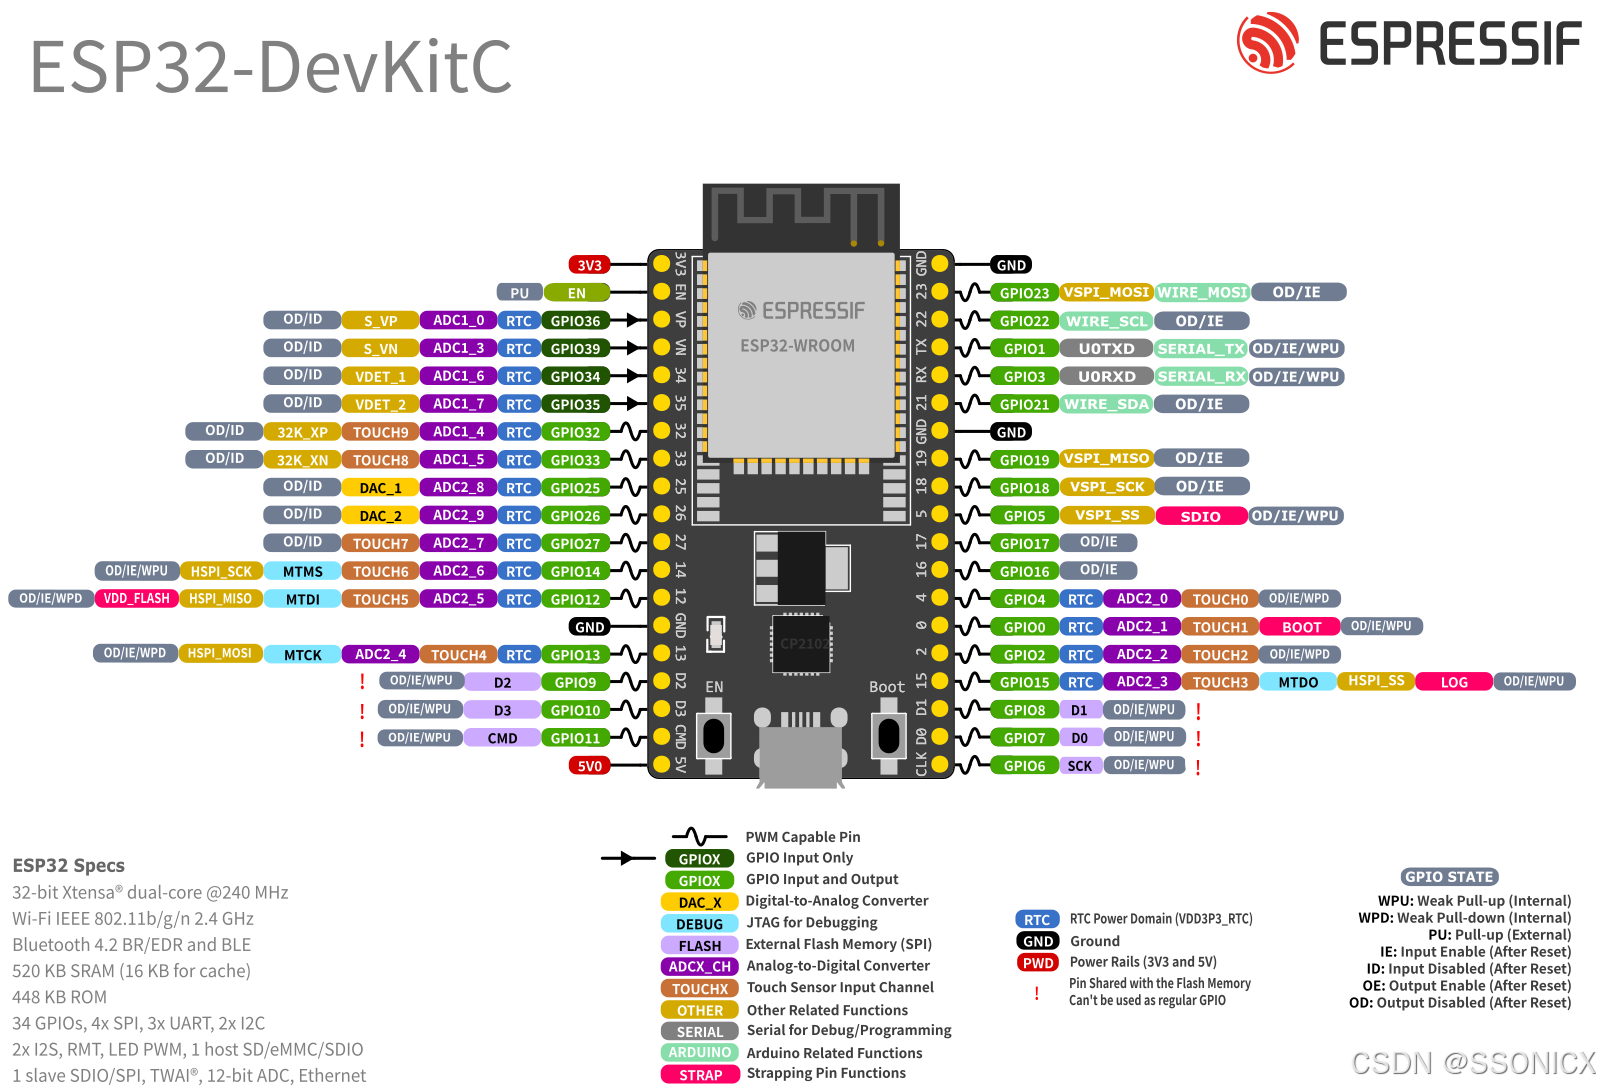
硬件:ESP32-Devkit-V4 MODEL:ESP32-32U
库:ESP-IDF v5.4.1
系统:windows中的虚拟机 ubuntu 22.04
1.注意事项
- 分辨率限制:8 位(256 级),输出电压范围 0-3.3V,每步约 12.9 mV。
- 输出阻抗:DAC 输出阻抗较高,驱动能力弱,建议连接运放缓冲。
- 噪声性能:ESP32 DAC 噪声相对较高,不适用于高精度应用。
- 电源影响:输出电压精度受 VDD3P3_RTC 电源质量影响。
- 并发限制:
使用 dac_output_voltage()时,余弦波生成器自动禁用。
启用余弦波生成器时,dac_output_voltage()无效。 - 引脚复用:
GPIO 25 和 26 在启用 DAC 时不能用于其他功能(如 ADC)。
这两个引脚没有内部上拉/下拉电阻。
2. 校准建议
为提高精度,可考虑:
- 测量实际输出电压,建立查找表。
- 外部添加 RC 滤波器减少高频噪声。
- 使用外部运放提高驱动能力。
DAC API 相对简单,适合音频提示、简单波形生成、电压基准等应用场景
头文件
c
#ifndef BSP_DAC_H_
#define BSP_DAC_H_

void dac_adc_monitor_init_task(void);

#endif
源文件
c
#include "bsp_dac.h"
#include "freertos/FreeRTOS.h"
#include "freertos/task.h"
#include "driver/dac_cosine.h"
#include "esp_adc/adc_oneshot.h"
#include "esp_check.h"

#if CONFIG_IDF_TARGET_ESP32
#define EXAMPLE_DAC_CHAN0_ADC_CHAN          ADC_CHANNEL_8   // GPIO25, same as DAC channel 0
#define EXAMPLE_DAC_CHAN1_ADC_CHAN          ADC_CHANNEL_9   // GPIO26, same as DAC channel 1
#define EXAMPLE_ADC_WIDTH                   ADC_WIDTH_BIT_12
#elif CONFIG_IDF_TARGET_ESP32S2
#define EXAMPLE_DAC_CHAN0_ADC_CHAN          ADC_CHANNEL_6   // GPIO17, same as DAC channel 0
#define EXAMPLE_DAC_CHAN1_ADC_CHAN          ADC_CHANNEL_7   // GPIO18, same as DAC channel 1
#define EXAMPLE_ADC_WIDTH                   ADC_WIDTH_BIT_13
#endif
#define EXAMPLE_ADC_ATTEN                   ADC_ATTEN_DB_12

static void adc_monitor_task(void *args)
{
    /* Set the ADC2 channels, these channels are connected to the DAC channels internally */
    adc_oneshot_unit_handle_t adc2_handle = (adc_oneshot_unit_handle_t)args;
    int chan0_val = 0;
    int chan1_val = 0;
    while (1) {
        /* Read the DAC output voltage */
        ESP_ERROR_CHECK(adc_oneshot_read(adc2_handle, EXAMPLE_DAC_CHAN0_ADC_CHAN, &chan0_val));
        ESP_ERROR_CHECK(adc_oneshot_read(adc2_handle, EXAMPLE_DAC_CHAN1_ADC_CHAN, &chan1_val));
        printf("DAC channel 0 value: %4d\tDAC channel 1 value: %4d\n", chan0_val, chan1_val);
        vTaskDelay(pdMS_TO_TICKS(100));
    }
}

void dac_adc_monitor_init_task(void)
{
    dac_cosine_handle_t chan0_handle;
    dac_cosine_handle_t chan1_handle;
    /* Normally two channels can only be configured to one frequency
     * But we can set force_set_freq bit to force update the frequency
     * The example here will produce cosine wave at 8 KHz on both channels */
    dac_cosine_config_t cos0_cfg = {
        .chan_id = DAC_CHAN_0,
        .freq_hz = 1000, // It will be covered by 8000 in the latter configuration
        .clk_src = DAC_COSINE_CLK_SRC_DEFAULT,
        .offset = 0,
        .phase = DAC_COSINE_PHASE_0,
        .atten = DAC_COSINE_ATTEN_DEFAULT,
        .flags.force_set_freq = false,
    };
    dac_cosine_config_t cos1_cfg = {
        .chan_id = DAC_CHAN_1,
        .freq_hz = 8000,
        .clk_src = DAC_COSINE_CLK_SRC_DEFAULT,
        .offset = 0,
        .phase = DAC_COSINE_PHASE_180,
        .atten = DAC_COSINE_ATTEN_DB_6,
        .flags.force_set_freq = true, // set true will allow to overwrite the frequency that set before
    };
    ESP_ERROR_CHECK(dac_cosine_new_channel(&cos0_cfg, &chan0_handle));
    ESP_ERROR_CHECK(dac_cosine_new_channel(&cos1_cfg, &chan1_handle));
    ESP_ERROR_CHECK(dac_cosine_start(chan0_handle));
    ESP_ERROR_CHECK(dac_cosine_start(chan1_handle));

    /* Set the ADC2 channels, these channels are connected to the DAC channels internally */
    adc_oneshot_unit_handle_t adc2_handle;
    adc_oneshot_unit_init_cfg_t adc_cfg = {
        .unit_id = ADC_UNIT_2,
        .ulp_mode = false,
    };
    ESP_ERROR_CHECK(adc_oneshot_new_unit(&adc_cfg, &adc2_handle));
    adc_oneshot_chan_cfg_t chan_cfg = {
        .atten = EXAMPLE_ADC_ATTEN,
        .bitwidth = ADC_BITWIDTH_DEFAULT,
    };
    ESP_ERROR_CHECK(adc_oneshot_config_channel(adc2_handle, EXAMPLE_DAC_CHAN0_ADC_CHAN, &chan_cfg));
    ESP_ERROR_CHECK(adc_oneshot_config_channel(adc2_handle, EXAMPLE_DAC_CHAN1_ADC_CHAN, &chan_cfg));
    xTaskCreate(adc_monitor_task, "adc_monitor_task", 4096, adc2_handle, 5, NULL);
}