一 切换到国内源
1.1 ubuntu 24.04 切换到国内源
1.1.1 确认系统版本
请先在终端执行 lsb_release -c 确认版本代号为 noble,以下配置才能生效。
ubuntu@ubuntu2404:/etc/apt/sources.list.d$ lsb_release -c
No LSB modules are available.
Codename:	noble
ubuntu@ubuntu2404:/etc/apt/sources.list.d$
1.1.2 实施
步骤 1:备份原有源列表
Ubuntu 24.04 的源配置文件位于 /etc/apt/sources.list.d/ubuntu.sources。执行以下命令进行备份:
sudo cp /etc/apt/sources.list.d/ubuntu.sources /etc/apt/sources.list.d/ubuntu.sources.bak步骤 2:替换为清华源
sudo tee /etc/apt/sources.list.d/ubuntu.sources > /dev/null <<EOF
Types: deb
URIs: https://mirrors.tuna.tsinghua.edu.cn/ubuntu/
Suites: noble noble-updates noble-backports
Components: main restricted universe multiverse
Signed-By: /usr/share/keyrings/ubuntu-archive-keyring.gpg

Types: deb
URIs: https://mirrors.tuna.tsinghua.edu.cn/ubuntu/
Suites: noble-security
Components: main restricted universe multiverse
Signed-By: /usr/share/keyrings/ubuntu-archive-keyring.gpg
EOF
步骤 3:保存并更新
sudo apt update二 配置远程桌面
以下是在ubuntu 24.04 版本配置
2.1 方式一 使用gnome-remote-desktop
Ubuntu 24.04 自带了 gnome-remote-desktop,它基于 xrdp 实现,但提供了更好的 GNOME 集成。
2.1.1 安装组件 (通常已预装,若未安装执行此命令):
sudo apt install gnome-remote-desktop2.1.2 配置 RDP 服务:
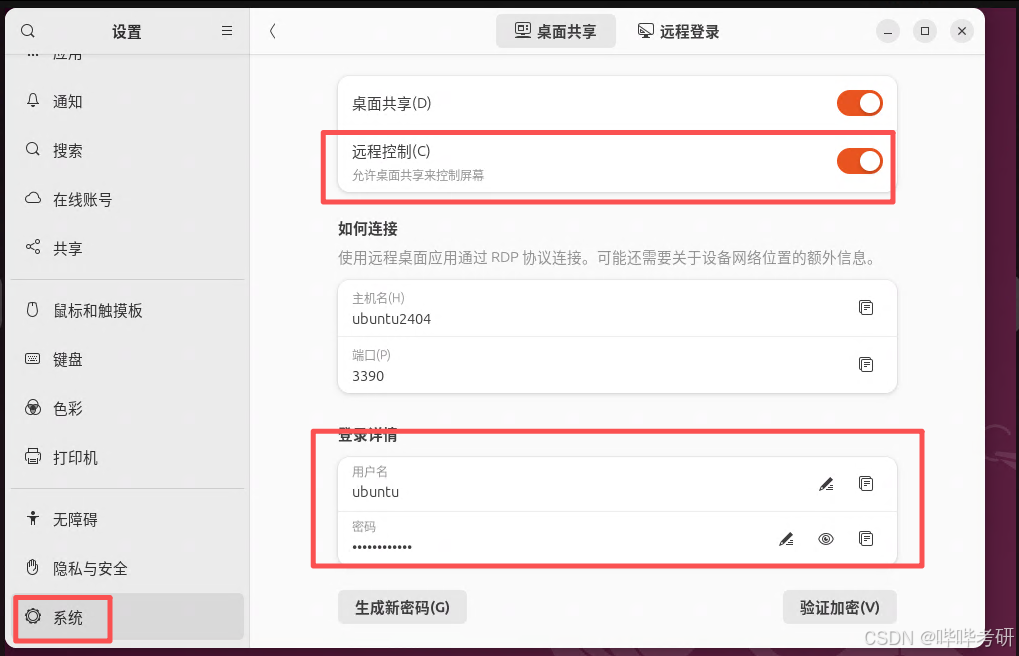
配置 RDP 服务:
进入 Settings (设置) -> System (系统) -> Remote Desktop (远程桌面)。
在右侧选择 "Remote Login" (远程登录) 或 "Desktop Sharing" (桌面共享)。
Remote Login:类似于 Windows 远程桌面,会创建一个新的会话(推荐用于服务器)。
Desktop Sharing:共享当前正在使用的桌面。
打开开关。
点击 "Authentication" (认证) 旁边的齿轮图标,设置一个 用户名 和 密码(这通常与你的系统密码一致,但如果提示密钥环问题,需单独设置)。
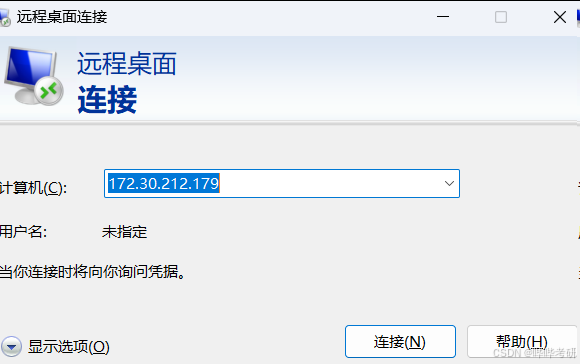
2.1.3 然后使用mstsc 测试验证
2.2 方式二 安装与配置 VNC (使用 TigerVNC)
由于 Ubuntu 24.04 的兼容性变化,推荐使用 TigerVNC 而不是 TightVNC。
已验证TigerVNC +GNOME/GNOME Flashback 黑屏,暂无解决方案;
2.2.1 安装tigerVNC 并验证
2.2.1.1 安装 TigerVNC:
sudo apt update
sudo apt install tigervnc-standalone-server tigervnc-common -y
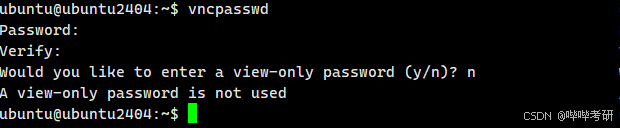
sudo apt install xterm -y2.2.1.2 设置 VNC 密码:
vncpasswd输入 8 位以内的密码。
询问是否设置"仅查看"密码时,输入 n。
2.2.1.3 验证VNC 可能正常使用
vncserver -localhost no -geometry 1024x768 -depth 24 :99这里为什么是99,而不是常见的1,因为ubuntu24 默认使用1-10,请不要使用这几个数字,最好从50开始测试;
验证命令
vncserver -localhost no -geometry 1024x768 -depth 24 :99
检查
vncserver -list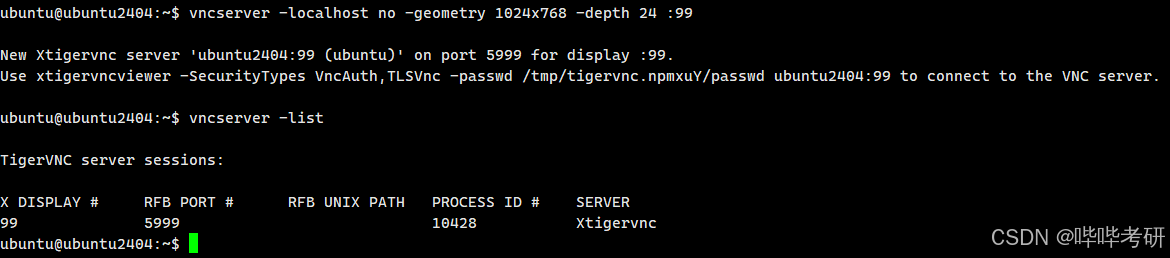
可以使用vncview 连接验证
2.2.1.4 vnc 常用调试命令
# 启动
ubuntu@ubuntu2404:~$ vncserver -localhost no -geometry 1920x1080 -depth 24 :98
#看已启动vnc
ubuntu@ubuntu2404:~$ vncserver -list

# 看日志
ubuntu@ubuntu2404:~$ tail -n 50 ~/.vnc/$(hostname):98.log


#kill
ubuntu@ubuntu2404:~$ vncserver -kill :98
Killing Xtigervnc process ID 11503... success!
ubuntu@ubuntu2404:~$ rm -f ~/.vnc/*:98.*
2.2.2 XFCE4 与xstarup 集成
2.2.2.1 安装xfce4
sudo apt install xfce4 xfce4-goodies dbus-x11 x11-xserver-utils -y安装过程中会有个弹窗,请选择gdm3
xfce4 和 xfce4-goodies 是轻量级桌面环境及其插件。
dbus-x11 和 x11-xserver-utils 是保证图形界面正常通信和运行的依赖。
2.2.2.2 配置 xstartup 文件 (xfce4 版本):
这个文件告诉 VNC 启动什么桌面环境。使用 nano 编辑配置文件:
nano ~/.vnc/xstartup将以下内容粘贴进去(这是适配 Ubuntu 24.04 GNOME 的关键配置):
ubuntu@ubuntu2404:~$ cat .vnc/xstartup
#!/bin/bash

# Debug log
exec >> /tmp/vnc-debug.log 2>&1
echo "[$(date)] xstartup started with DISPLAY"

# 启动 XFCE
echo "[$(date)] Starting XFCE..."

# 清除可能干扰的会话管理器变量
unset SESSION_MANAGER
unset DBUS_SESSION_BUS_ADDRESS

# 明确指定使用 X11 后端
export XDG_SESSION_TYPE=x11

# 启动 Xfce 桌面
exec startxfce4
ubuntu@ubuntu2404
保存并退出 (Ctrl+O, Enter, Ctrl+X)。
赋予执行权限:
chmod +x ~/.vnc/xstartup2.2.2.3 验证
2.2.3.1 初步验证
结论:能用,但是浏览器无法正常使用,暂未解决浏览器问题
重启系统,然后执行
ubuntu@ubuntu2404:~$ vncserver -localhost no -geometry 1920x1080 -depth 24 :98

vncserver -list
然后使用vncview 客户端连接
能显示窗口,但是浏览器不能使用
2.2.3.2 修复浏览器不能使用
卸载 Snap 版 Firefox,改用 APT 安装的原生版本
第一步:彻底移除 Snap 版 Firefox
# 卸载 Snap 应用
sudo snap remove firefox

# 移除过渡包(关键!)
sudo apt purge firefox -y
第二步:验证是否已清除
# 检查 snap 是否还有 firefox
snap list | grep firefox    # 应无输出

# 检查 apt 是否还有 firefox 包
dpkg -l firefox             # 应显示 "rc" 或无结果
第三步:安装真正的 APT 版 Firefox(来自 Mozilla PPA)
# 1. 添加 Mozilla 官方 PPA
sudo add-apt-repository ppa:mozillateam/ppa -y

# 2. 设置优先级(防止被 Ubuntu 默认源覆盖)
echo '
Package: *
Pin: release o=LP-PPA-mozillateam
Pin-Priority: 1001
' | sudo tee /etc/apt/preferences.d/mozilla-firefox
#3:验证 PPA 是否生效
apt policy firefox
若没生效,安装了还是snap 版本
# 4. 更新并安装
sudo apt update
sudo apt install firefox -y
第四步:验证安装成功
dpkg -l firefox | grep ^ii

ubuntu@ubuntu2404:~$ dpkg -l firefox | grep ^ii
ii  firefox        1:1snap1-0ubuntu5 amd64        Transitional package - firefox -> firefox snap
ubuntu@ubuntu2404:~$ which firefox
/usr/bin/firefox
2.2.4 创建 Systemd 服务 (开机自启):
创建服务文件:
sudo nano /etc/systemd/system/vncserver@.service粘贴以下内容(请将 <你的用户名> 替换为实际的用户名):
[Unit]
Description=Remote desktop service (VNC)
After=syslog.target network.target

[Service]
Type=forking
User=<你的用户名>
PAMName=login
ExecStart=/usr/bin/vncserver -localhost no :1
ExecStop=/usr/bin/vncserver -kill :1
Restart=on-failure

[Install]
WantedBy=multi-user.target
我的用户名是ubuntu
[Unit]
Description=Remote desktop service (VNC)
After=syslog.target network.target

[Service]
Type=forking
User=ubuntu
PAMName=login
ExecStart=/usr/bin/vncserver -localhost no :1
ExecStop=/usr/bin/vncserver -kill :1
Restart=on-failure

[Install]
WantedBy=multi-user.target

[Unit]
Description=Start TightVNC server at startup
After=syslog.target network.target

[Service]
Type=forking
User=ubuntu
PIDFile=/home/your-username/.vnc/%H:%i.pid
ExecStartPre=-/usr/bin/vncserver -kill :%i > /dev/null 2>&1
ExecStart=/usr/bin/vncserver -geometry 1920x1080 -depth 24 :%i
ExecStop=/usr/bin/vncserver -kill :%i

[Install]
WantedBy=multi-user.target
2.2.5 启用并启动服务:
sudo systemctl daemon-reload
sudo systemctl enable vncserver@1 --now