目录
[2.1 addFirst](#2.1 addFirst)
[2.2 display](#2.2 display)
[2.3 size](#2.3 size)
[2.4 contains](#2.4 contains)
[2.5 addLast](#2.5 addLast)
[2.6 addIndex](#2.6 addIndex)
[2.7 remove](#2.7 remove)
[2.8 removeAllKey](#2.8 removeAllKey)
[2.9 clear](#2.9 clear)
一、前言:
这节课来学习一个重点:LinkedList
要想了解这个,我们很有必要先自己模拟实现一遍其中的方法:
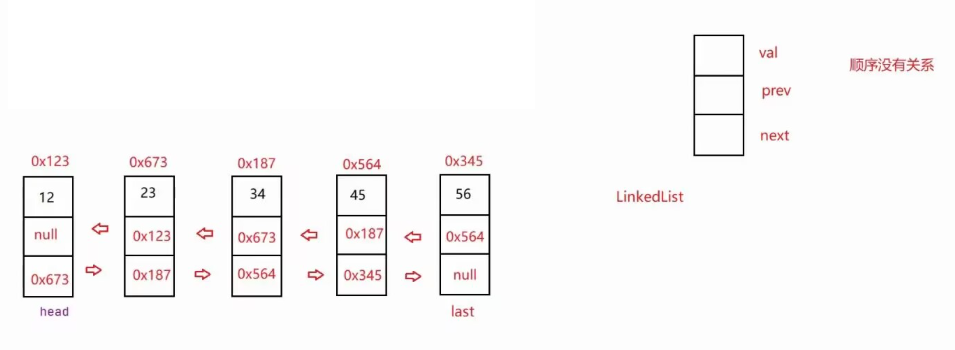
前面我们学习了单向链表,双向链表也就是每个节点多了一个存放上一个节点地址的域,如下图所示:
先来定义一个接口:
java
public interface ILinkedList {
    //头插法
    void addFirst(int data);

    //尾插法
    void addLast(int data);

    //任意位置插入,第一个数据节点为0号下标
    void addIndex(int index, int data);

    //查找是否包含关键字key是否在单链表当中
    boolean contains(int key);

    //删除第一次出现关键字为key的节点
    void remove(int key);

    //删除所有值为key的节点
    void removeAllKey(int key);

    //得到单链表的长度
    int size();

    void clear();

    void display();
}
然后创建一个类来具体实现方法:
java
public class MyLinkedList implements ILinkedList{
    @Override
    public void addFirst(int data) {

    }

    @Override
    public void addLast(int data) {

    }

    @Override
    public void addIndex(int index, int data) {

    }

    @Override
    public boolean contains(int key) {
        return false;
    }

    @Override
    public void remove(int key) {

    }

    @Override
    public void removeAllKey(int key) {

    }

    @Override
    public int size() {
        return 0;
    }

    @Override
    public void clear() {

    }

    @Override
    public void display() {

    }
}
二、具体方法:
要想实现首先得定义一个:双向链表节点的静态内部类
java
static class ListNode {
public int val;
public ListNode prev;
public ListNode next;
public ListNode(int val) {
this.val = val;
}
public ListNode head;
public ListNode last;
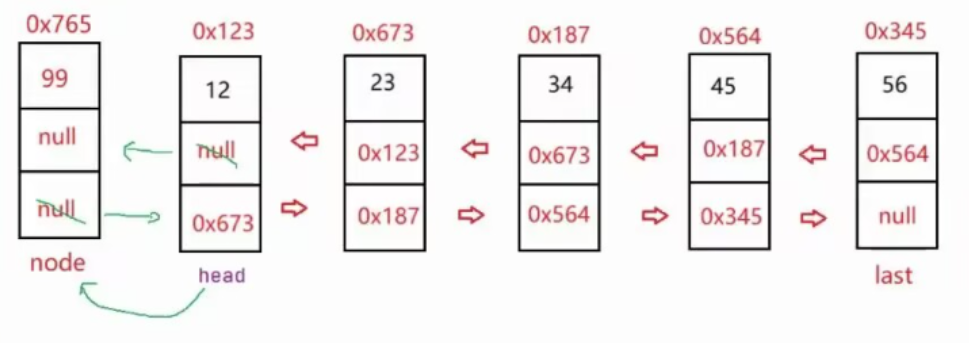
}2.1 addFirst
头插法的思路如图:
代码如下:
java
@Override
public void addFirst(int data) {
    ListNode node = new ListNode(data);
    if(head == null) {
        head = node;
        last = node;
    }else {
        node.next = head;
        head.prev = node;
        head = node;
    }
}
2.2 display
也就是展示双向链表元素,遍历即可:
java
@Override
public void display() {
    ListNode cur = head;
    while (cur != null) {
        System.out.print(cur.val + " ");
        cur = cur.next;
    }
    System.out.println();
}
2.3 size
求链表长度:
java
@Override
public int size() {
    int count = 0;
    ListNode cur = head;
    while (cur != null) {
        count++;
        cur = cur.next;
    }
    return count;
}
2.4 contains
java
@Override
public boolean contains(int key) {
ListNode cur = head;
while (cur != null) {
if(cur.val == key) {
return true; // 找到关键字,返回true
}
cur = cur.next;
}
return false; // 遍历完链表没找到,返回false
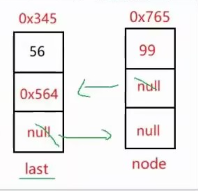
}2.5 addLast
在尾巴上插入一个元素:
java
@Override
public void addLast(int data) {
    ListNode node = new ListNode(data);
    if(head == null) {
        head = node;
        last = node;
    }else {
        last.next = node;
        node.prev = last;
        last = node;
    }
}
2.6 addIndex
那如果要在双向链表的任意位置插入元素呢?
画图理解思路:
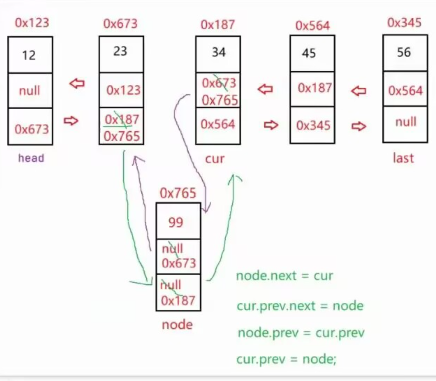
核心代码:
java
node.next = cur;
cur.prev.next = node;
node.prev = cur.prev;
cur.prev = node;
具体实现代码:
java
@Override
public void addIndex(int index, int data) {
    // 1. 检查index的合法性(代码中未完全展示,需自行补充范围判断)

    // 2. 特殊位置处理
    if (index == 0) {
        addFirst(data);
        return;
    }

    if (index == size()) {
        addLast(data);
        return;
    }

    // 3. 中间节点插入逻辑
    ListNode cur = searchIndex(index);
    ListNode node = new ListNode(data);

    node.next = cur;
    cur.prev.next = node;
    node.prev = cur.prev;
    cur.prev = node;
}

private ListNode searchIndex(int index) {
    ListNode cur = head;
    while (index != 0) {
        cur = cur.next;
        index--;
    }
    return cur;
}
2.7 remove
如何删除节点呢,来看看画好的思路图:
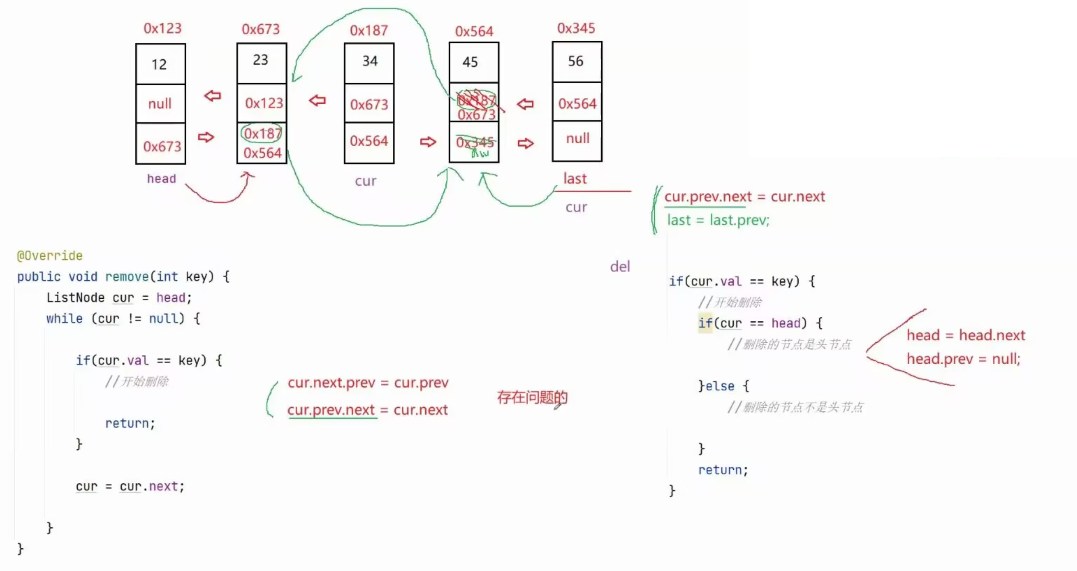
也就是需要先找到要删除的那个节点,然后进行删除。
代码实现如下:
java
@Override
public void remove(int key) {
    ListNode cur = head;
    while (cur != null) {

        if (cur.val == key) {
            // 开始删除
            if (cur == head) {
                // 删除的节点是头节点
                head = head.next;
                head.prev = null;
            } else {
                // 删除的节点不是头节点
                if (cur.next == null) {
                    // 删除尾巴节点
                    cur.prev.next = cur.next;
                    last = last.prev;
                } else {
                    // 删除中间节点
                    cur.next.prev = cur.prev;
                    cur.prev.next = cur.next;
                }
            }
            return;
        }
        cur = cur.next;
    }
}
代码也可以写成:
java
@Override
public void remove(int key) {
    ListNode cur = head;
    while (cur != null) {

        if (cur.val == key) {
            // 开始删除
            if (cur == head) {
                // 删除的节点是头节点
                head = head.next;
                head.prev = null;
            } else {
                cur.prev.next = cur.next;
                // 删除的节点不是头节点
                if (cur.next == null) {
                    // 删除尾巴节点
                    last = last.prev;
                } else {
                    // 删除中间节点
                    cur.next.prev = cur.prev;
                }
            }
            return;
        }
        cur = cur.next;
    }
}
2.8 removeAllKey
这个理解了2.7那就好做了,把2.7的代码中将 return关键字 删除即可!
代码:
java
@Override
public void remove(int key) {
    ListNode cur = head;
    while (cur != null) {

        if (cur.val == key) {
            // 开始删除
            if (cur == head) {
                // 删除的节点是头节点
                head = head.next;
                head.prev = null;
            } else {
                cur.prev.next = cur.next;
                // 删除的节点不是头节点
                if (cur.next == null) {
                    // 删除尾巴节点
                    last = last.prev;
                } else {
                    // 删除中间节点
                    cur.next.prev = cur.prev;
                }
            }
            //return;
        }
        cur = cur.next;
    }
}
2.9 clear
清空链表:
java
@Override
public void clear() {
    ListNode cur = head;
    while (cur != null) {
        ListNode curN = cur.next;
        cur.prev = null;
        cur.next = null;
        cur = curN;
    }
    head = null;
    last = null;
}
三、认识Java自带的LinkedList类
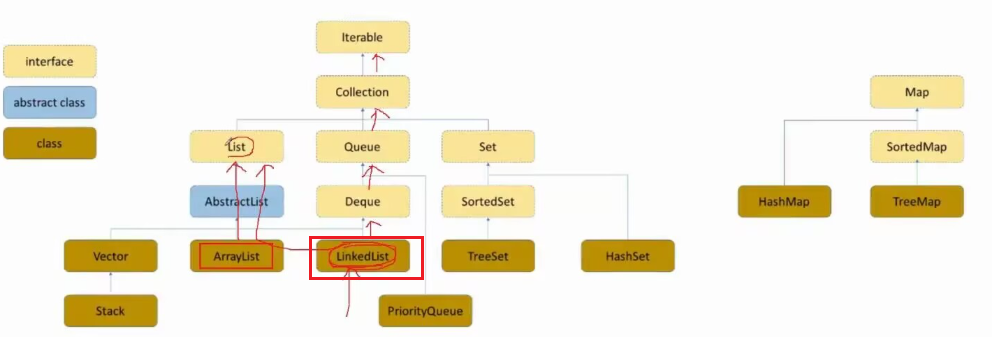
还是将这上面这幅图拿出来,LinkedList实现了List这个接口。所以可以如下图所示实现多态,父类引用指向子类对象:
LinkedList的底层是使用了双向链表的。
3.1 构造方法:

3.2 LinkedList其他常用方法介绍:

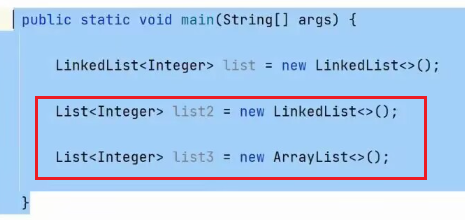
3.3 重要:LinkedList的遍历
for循环,foreach循环,Iterator迭代器,ListIterator反向迭代器:
java
public static void main(String[] args) {
    LinkedList<Integer> list = new LinkedList<>();
    list.add(10);
    list.add(9);
    list.add(99);
    for (int i = 0; i < list.size(); i++) {
        System.out.print(list.get(i) + " ");
    }
    System.out.println();
    System.out.println("==========");

    for (Integer x : list) {
        System.out.print(x + " ");
    }
    System.out.println();
    System.out.println("==========");

    Iterator<Integer> it = list.iterator();
    while (it.hasNext()) {
        System.out.print(it.next() + " ");
    }
    System.out.println();
    System.out.println("==========");

    ListIterator<Integer> listIterator2 = list.listIterator(list.size());
    while (listIterator2.hasPrevious()) {
        System.out.print(listIterator2.previous() + " ");
    }
    System.out.println();
    System.out.println("==========");
}
3.4 ArrayList与LinkedList的区别
这里我直接放一张图在这里:
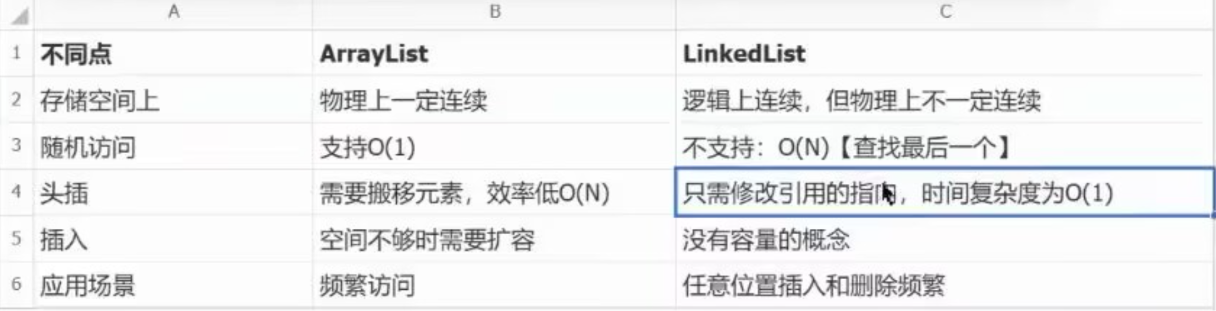
上图非常清晰了