基于Cobbler的系统自动化安装部署------Cobbler的安装部署实践![]() https://blog.csdn.net/xiaochenXIHUA/article/details/159239899
https://blog.csdn.net/xiaochenXIHUA/article/details/159239899
一、在Cobbler中导入红帽系镜像配置与客户端测试
注意:
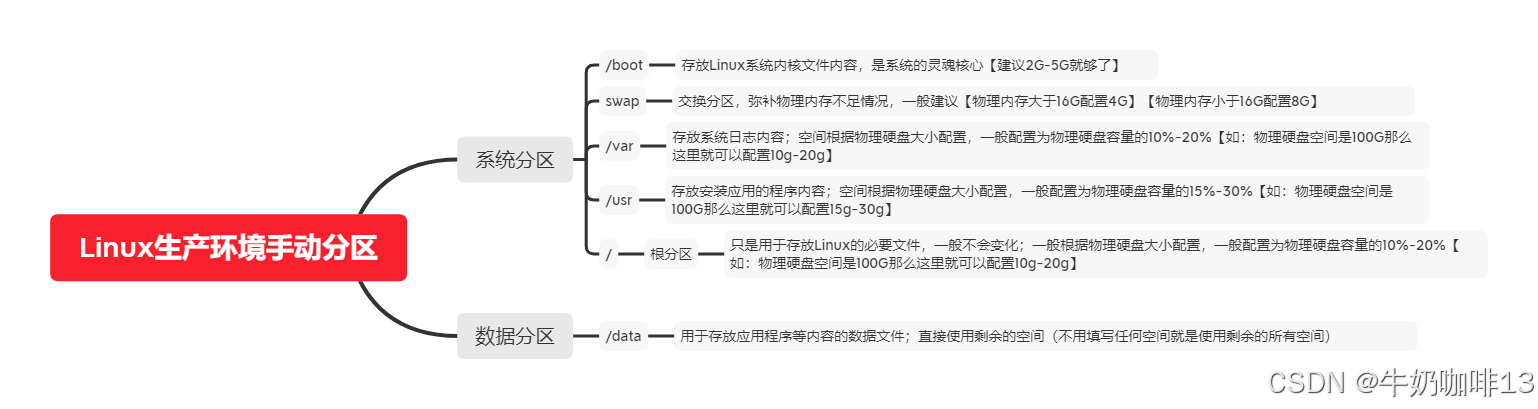
1、由于Cobbler的数据与系统镜像内容都存储在【/var】目录中,因此,在需要配置Cobbler的服务器上【/var】目录就需要分配更多的空间。
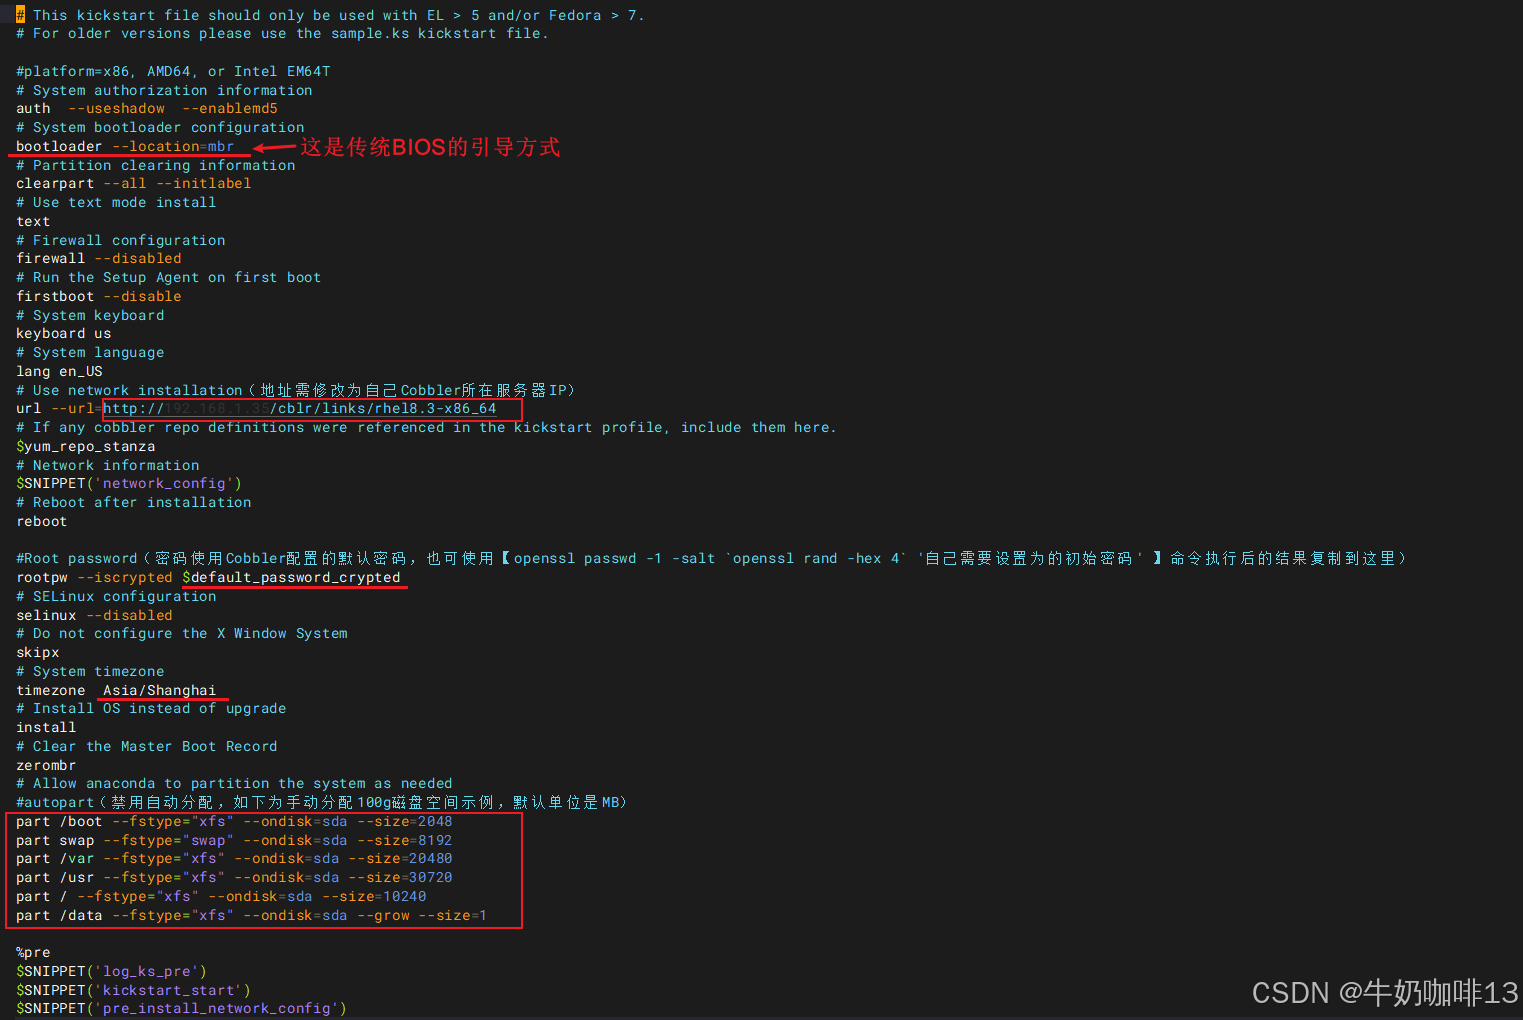
2、所有红帽系(如:AlmaLinux、RockyLinux等)的系统在Cobbler中的自动化安装部署都与如下的操作步骤一致,需要注意的是在红帽系9及其更高版本的安装部署中对应的全自动安装模板ks文件修改两个参数(第一个参数是auth,需要改为authselect,第二个是install参数;需要注释掉即为#install,因为rhel9新版本下ks模板文件中,这两个过期参数已经被取消了)若不修改会导致安装出问题。
1.1、将红帽系统镜像导入到Cobbler中
Cobbler要实现对系统的全自动化安装,还需要安装源;因此还需要导入系统安装介质到Cobbler中(即:先下载需要安装操作系统的iso安装介质并上传到cobbler服务器上;然后再将iso系统镜像文件进行挂载)【这个导入镜像的过程,其实是将iso文件的内容统一拷贝到/var/www/cobbler/distro_mirror目录下,形成一个安装镜像源】。
bash
#Cobbler中导入所需的系统镜像操作
#1-将系统镜像上传到指定目录中(如:/data/linuxos)
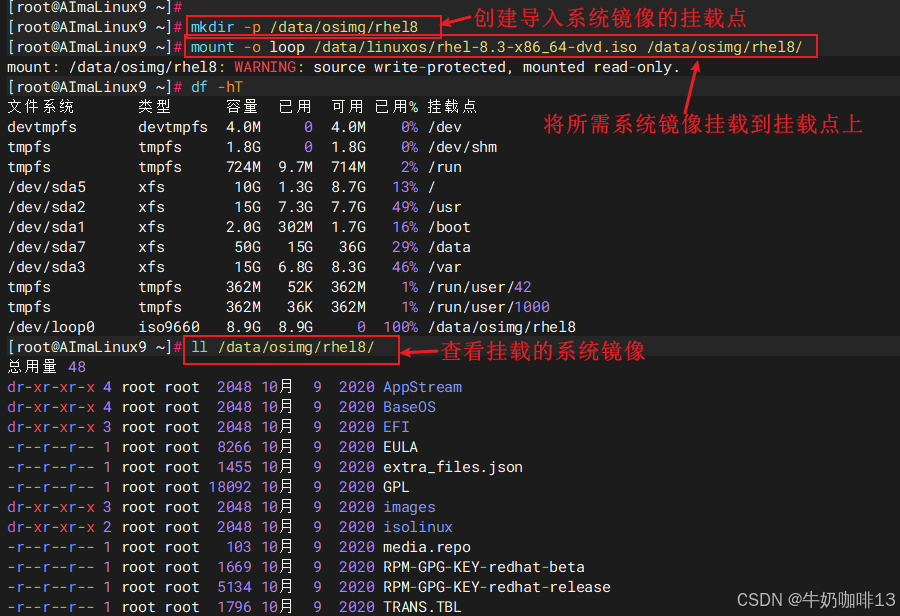
mkdir -p /data/linuxos
ls
#2-创建系统所挂载的路径并挂载上(如:将/data/linuxos/rhel-8.3-x86_64-dvd.iso系统挂载到/data/osimg/rhel8目录中)
mkdir -p /data/osimg/rhel8
mount -o loop /data/linuxos/rhel-8.3-x86_64-dvd.iso /data/osimg/rhel8/
ll /data/osimg/rhel8/
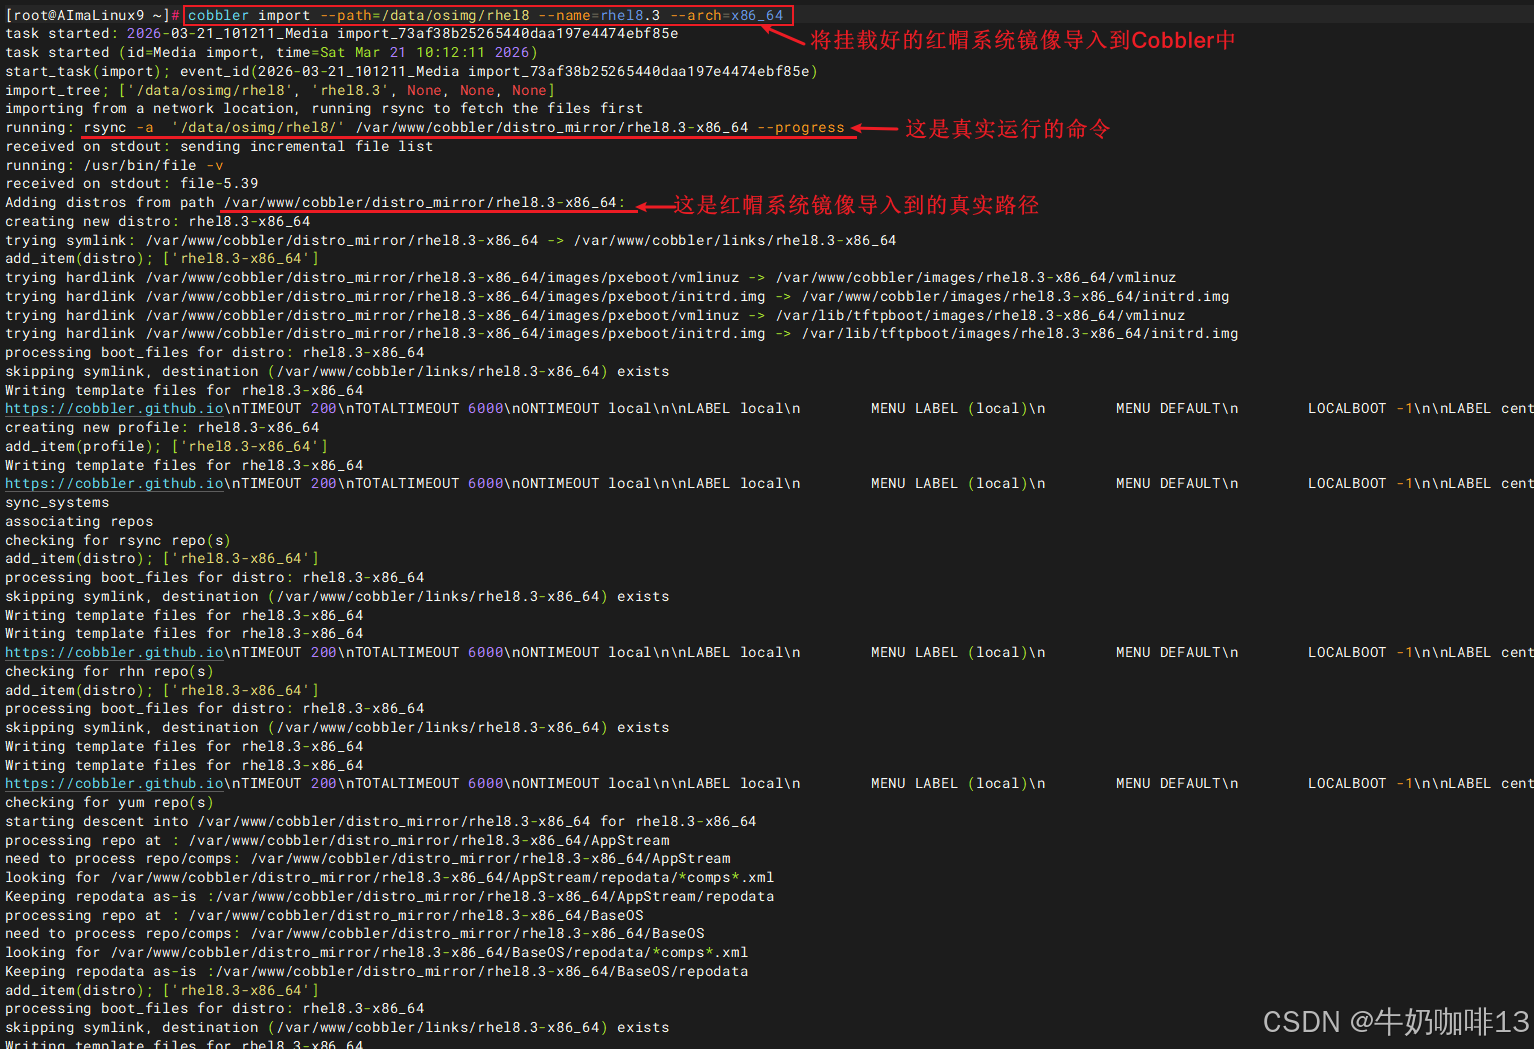
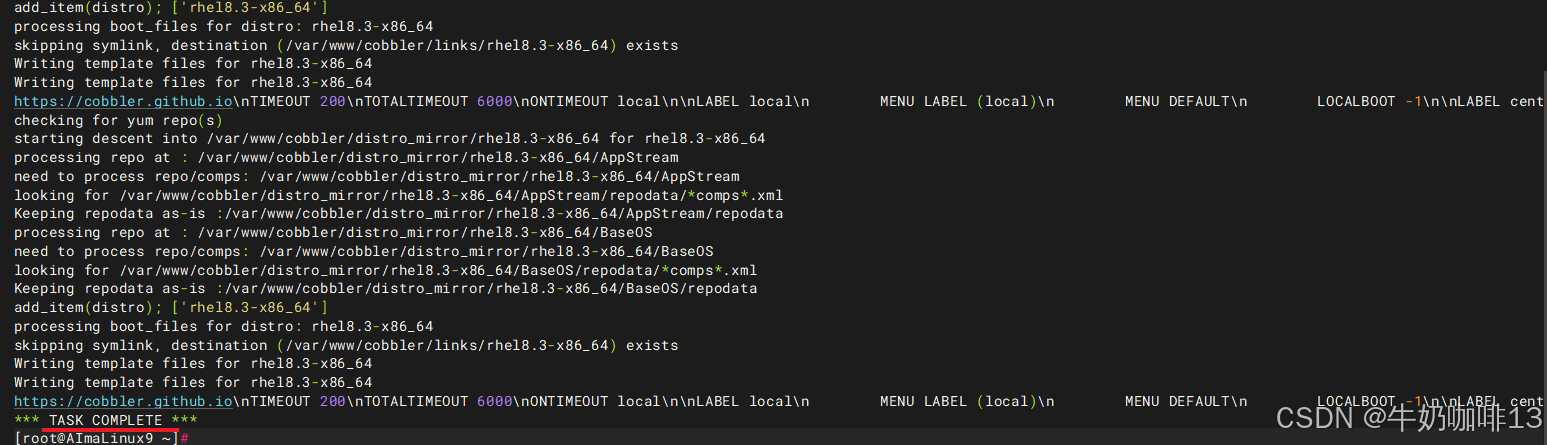
#3-将镜像导入到Cobbler中(注意:若是导入失败,则需要检查/var空间是否足够,是否有权限
#--path:指定镜像路径;
#--name:定义安装源名称,可任意指定, 安装源唯一标识通过name参数来定义;
#--arch:指定安装源平台信息,目前支持的选项有:i386、x86_64、arm、aarch64;
#最后显示【TASK COMPLETE】则表示导入完成
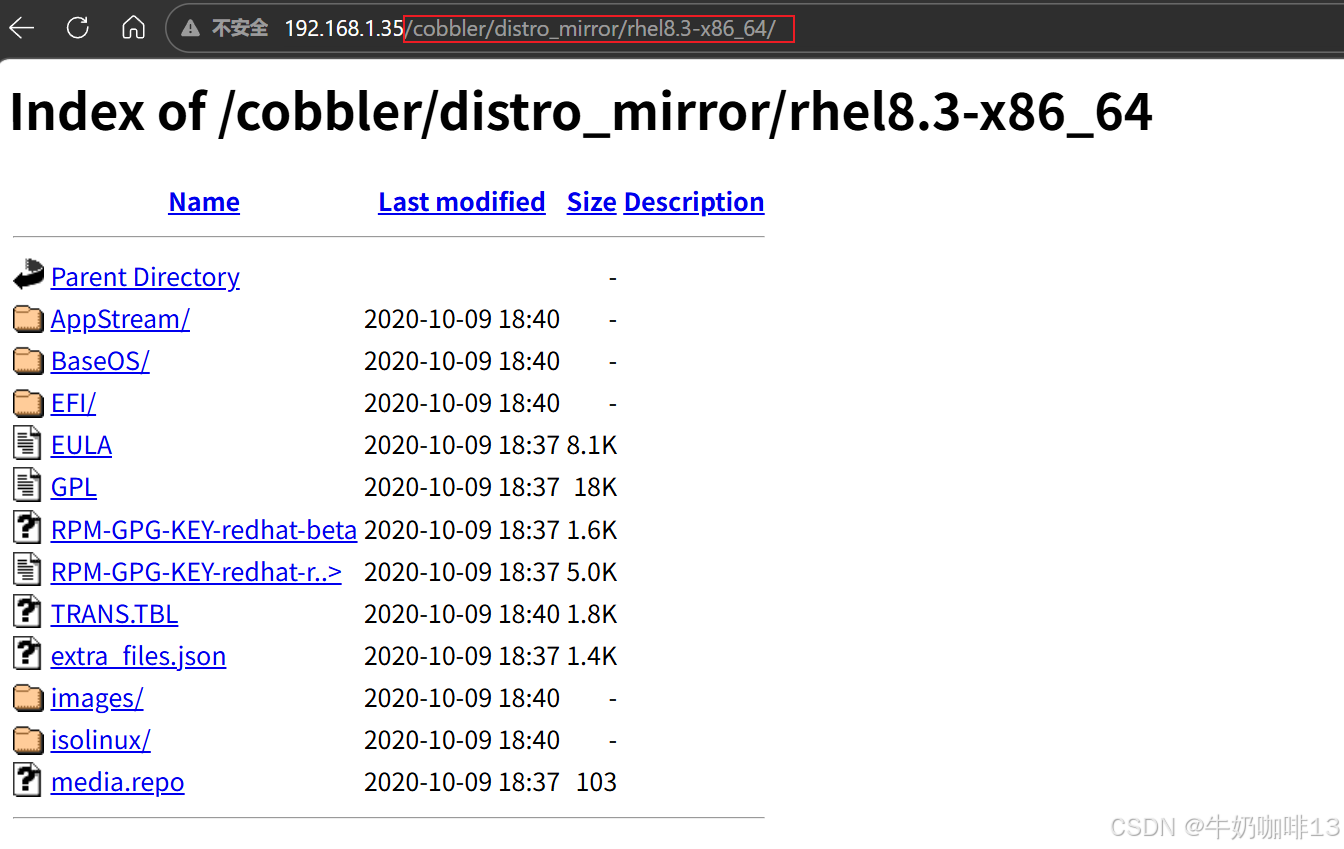
#且可在web访问【Cobbler所在服务器IP/cobbler/distro_mirror/rhel8.3-x86_64/】访问)
cobbler import --path=/data/osimg/rhel8 --name=rhel8.3 --arch=x86_64
#4-查看Cobbler中目前导入的镜像(显示结果中主要有三个内容需要关注:
#【distros】表示某个发行版的对象,不同的镜像导入后对应不同的distro(比如:rhel8.3-x86_64)。
#【profiles】是distro的配置文件,一个distro可对应一个或多个profile。默认导入时会为distro生成一个profile。每个profile背后关联一个ks文件,用于决定kickstart安装操作系统时的配置。
#【systems】是system对象不是必须要创建的,但它可以指导cobbler进行更定制化的操作(比如:我们有多个profile文件,需要为不同的机器安装不同配置的操作系统,没有system对象时,需要手动选择profile文件,而通过system对象可以使指定机器使用指定的profile配置))
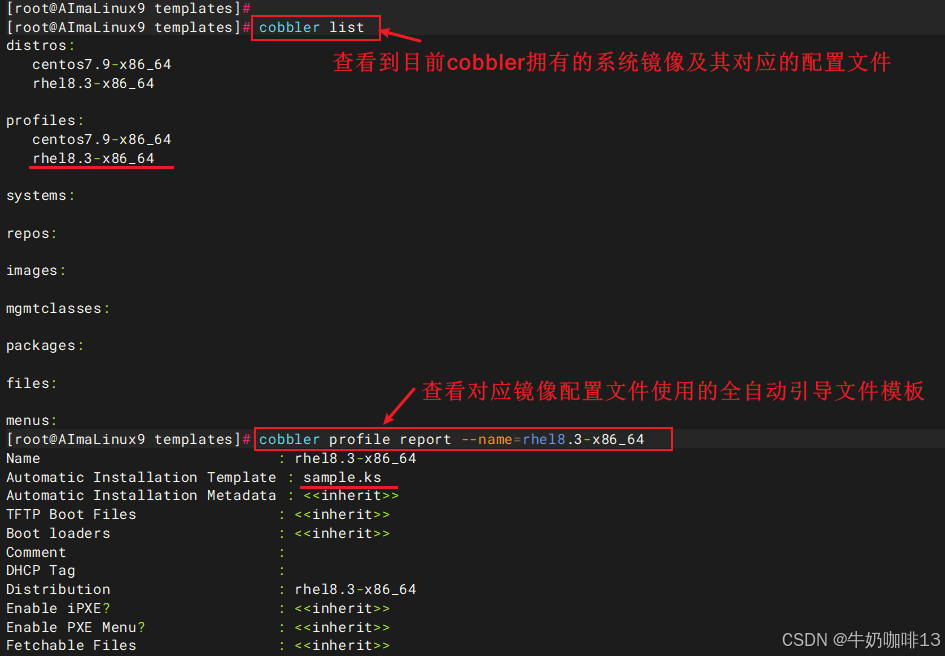
cobbler list
#5-查看指定的配置文件内容(如:查看名为【rhel8.3-x86_64】的配置文件内容;
#从输出可以看到【rhel8.3-x86_64】profile关联的ks文件是sample.ks,这个sample.ks默认路径位于【/var/lib/cobbler/templates】下。
#接下来我们要做的,就是基于原始的ks模版文件,进行修改。修改完成后,修改profile中的Kickstart文件路径,使其指向我们自己的ks模版文件。)
cobbler profile report --name=rhel8.3-x86_64
ll /var/lib/cobbler/templates
1.2、新增红帽镜像的全自动安装ks文件
bash
#新增红帽镜像的全自动安装配置ks文件(如:rhel8系统的全自动安装配置)
#1-进入镜像全自动安装配置目录创建该镜像对应的ks文件
cd /var/lib/cobbler/templates
vi rhel8.ks
#【rhel8.ks】文件的完整内容如下:
# This kickstart file should only be used with EL > 5 and/or Fedora > 7.
# For older versions please use the sample.ks kickstart file.
#platform=x86, AMD64, or Intel EM64T
# System authorization information(红帽系9及其以上版本中这里的auth,需要改为authselect)
auth --useshadow --enablemd5
# System bootloader configuration
bootloader --location=mbr
# Partition clearing information
clearpart --all --initlabel
# Use text mode install(也可设置为图形界面安装【graphical】)
text
# Firewall configuration
firewall --disabled
# Run the Setup Agent on first boot
firstboot --disable
# System keyboard
keyboard us
# System language
lang en_US
# Use network installation(地址需修改为自己Cobbler所在服务器IP)
url --url=http://192.168.1.35/cblr/links/rhel8.3-x86_64
# If any cobbler repo definitions were referenced in the kickstart profile, include them here.
$yum_repo_stanza
# Network information
$SNIPPET('network_config')
# Reboot after installation
reboot
#Root password(密码使用Cobbler配置的默认密码,也可使用【openssl passwd -1 -salt `openssl rand -hex 4` '自己需要设置为的初始密码' 】命令执行后的结果复制到这里)
rootpw --iscrypted $default_password_crypted
# SELinux configuration
selinux --disabled
# Do not configure the X Window System
skipx
# System timezone
timezone Asia/Shanghai
# Install OS instead of upgrade(红帽系9及其更高版本install参数,需要注释掉,即为#install)
install
# Clear the Master Boot Record
zerombr
# Allow anaconda to partition the system as needed
#autopart(禁用自动分配,如下为手动分配100g磁盘空间示例,默认单位是MB)
part /boot --fstype="xfs" --ondisk=sda --size=2048
part swap --fstype="swap" --ondisk=sda --size=8192
part /var --fstype="xfs" --ondisk=sda --size=20480
part /usr --fstype="xfs" --ondisk=sda --size=30720
part / --fstype="xfs" --ondisk=sda --size=10240
part /data --fstype="xfs" --ondisk=sda --grow --size=1
%pre
$SNIPPET('log_ks_pre')
$SNIPPET('kickstart_start')
$SNIPPET('pre_install_network_config')
# Enable installation monitoring
$SNIPPET('pre_anamon')
%end
%packages
#$SNIPPET('func_install_if_enabled')
@additional-devel
@development
@platform-devel
bash-completion
chrony
dos2unix
kexec-tools
lrzsz
sysstat
tree
vim
wget
git
net-tools
%end
%post --nochroot
$SNIPPET('log_ks_post_nochroot')
%end
%post
$SNIPPET('log_ks_post')
# Start yum configuration
$yum_config_stanza
# End yum configuration
$SNIPPET('post_install_kernel_options')
$SNIPPET('post_install_network_config')
$SNIPPET('func_register_if_enabled')
$SNIPPET('download_config_files')
$SNIPPET('koan_environment')
$SNIPPET('redhat_register')
$SNIPPET('cobbler_register')
# Enable post-install boot notification
$SNIPPET('post_anamon')
# Start final steps
$SNIPPET('kickstart_done')
# End final steps
%end
#2-修改导入镜像使用的自动安装ks文件为自定义的ks文件(如:rhel8.ks)
#2.1-查看Cobbler中目前导入的镜像
cobbler list
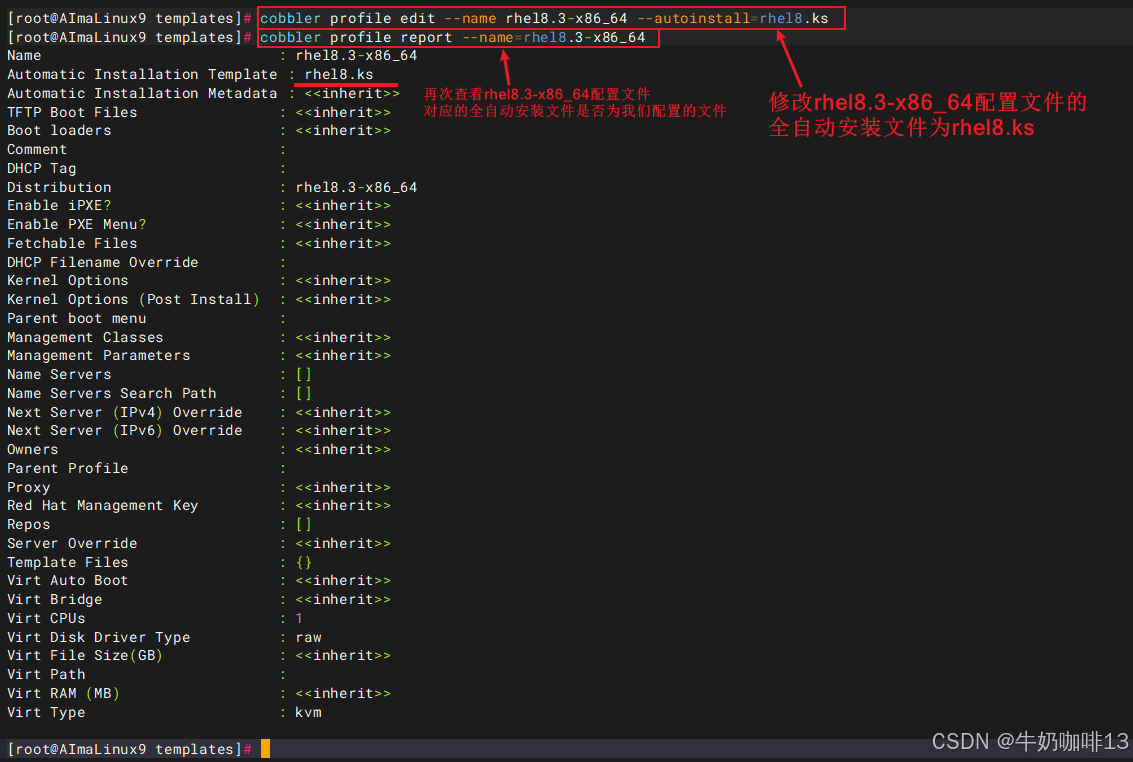
#2.2-修改Cobbler中导入镜像名称为【rhel8.3】的配置文件【rhel8.3-x86_64】的全自动安装配置ks文件为【自建的rhel8.ks】
cobbler profile edit --name rhel8.3-x86_64 --autoinstall=rhel8.ks
#查看指定的配置文件内容(如:查看名为【rhel8.3-x86_64】的配置文件内容)
cobbler profile report --name=rhel8.3-x86_64
1.3、让修改后的配置同步并生效及其生成可引导加载程序
bash
#生成可引导GRUB2的引导加载程序【在cobbler3版本之后,还需要手动执行如下命令生成GRUB2引导程序】
cd /var/lib/cobbler/loaders/
cobbler mkloaders
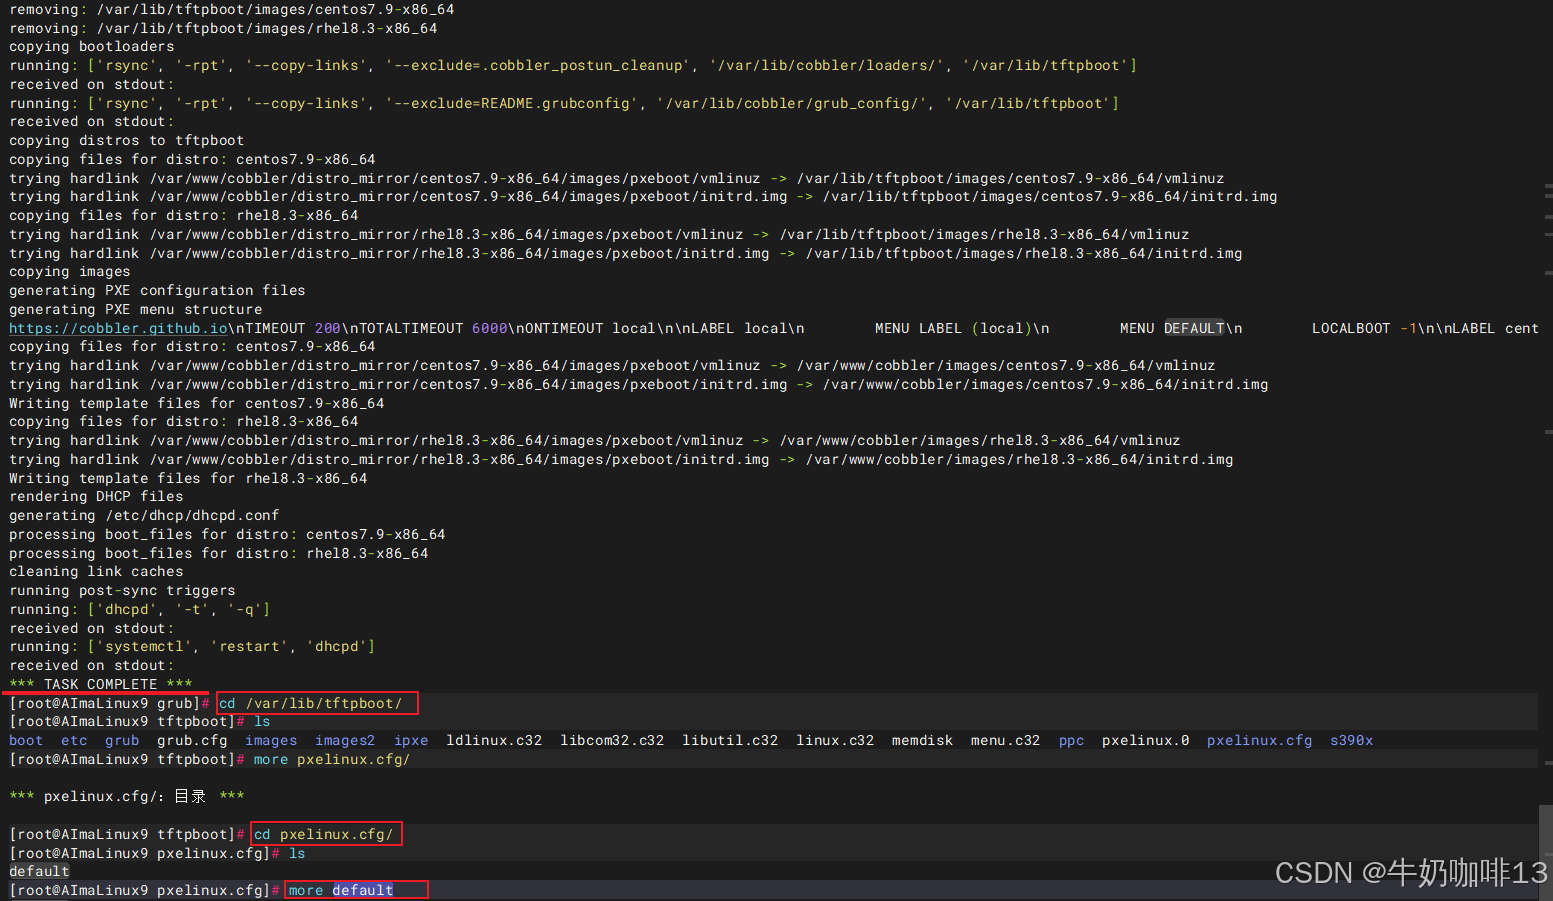
#让修改后的配置同步到Cobbler中并生效(客户端中引导的内容都是从【/var/lib/tftpboot】获取的;
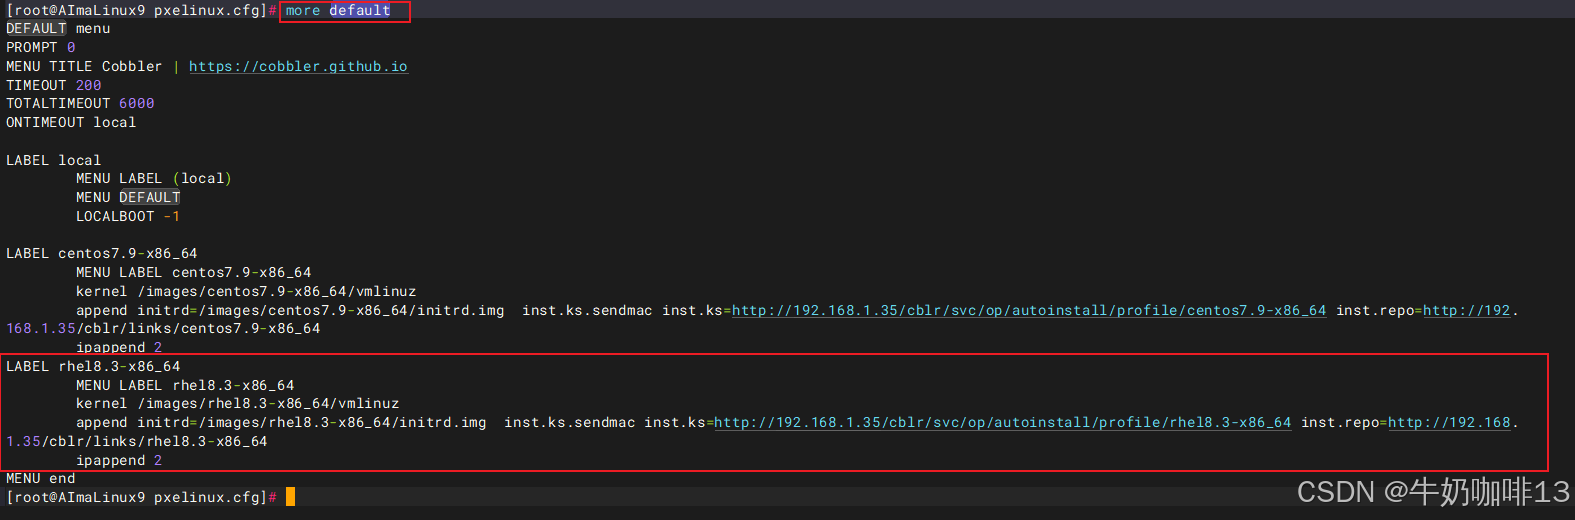
#客户端的初始系统界面内容配置是在【/var/lib/tftpboot/pxelinux.cfg/default】文件中自动生成的)
cobbler sync
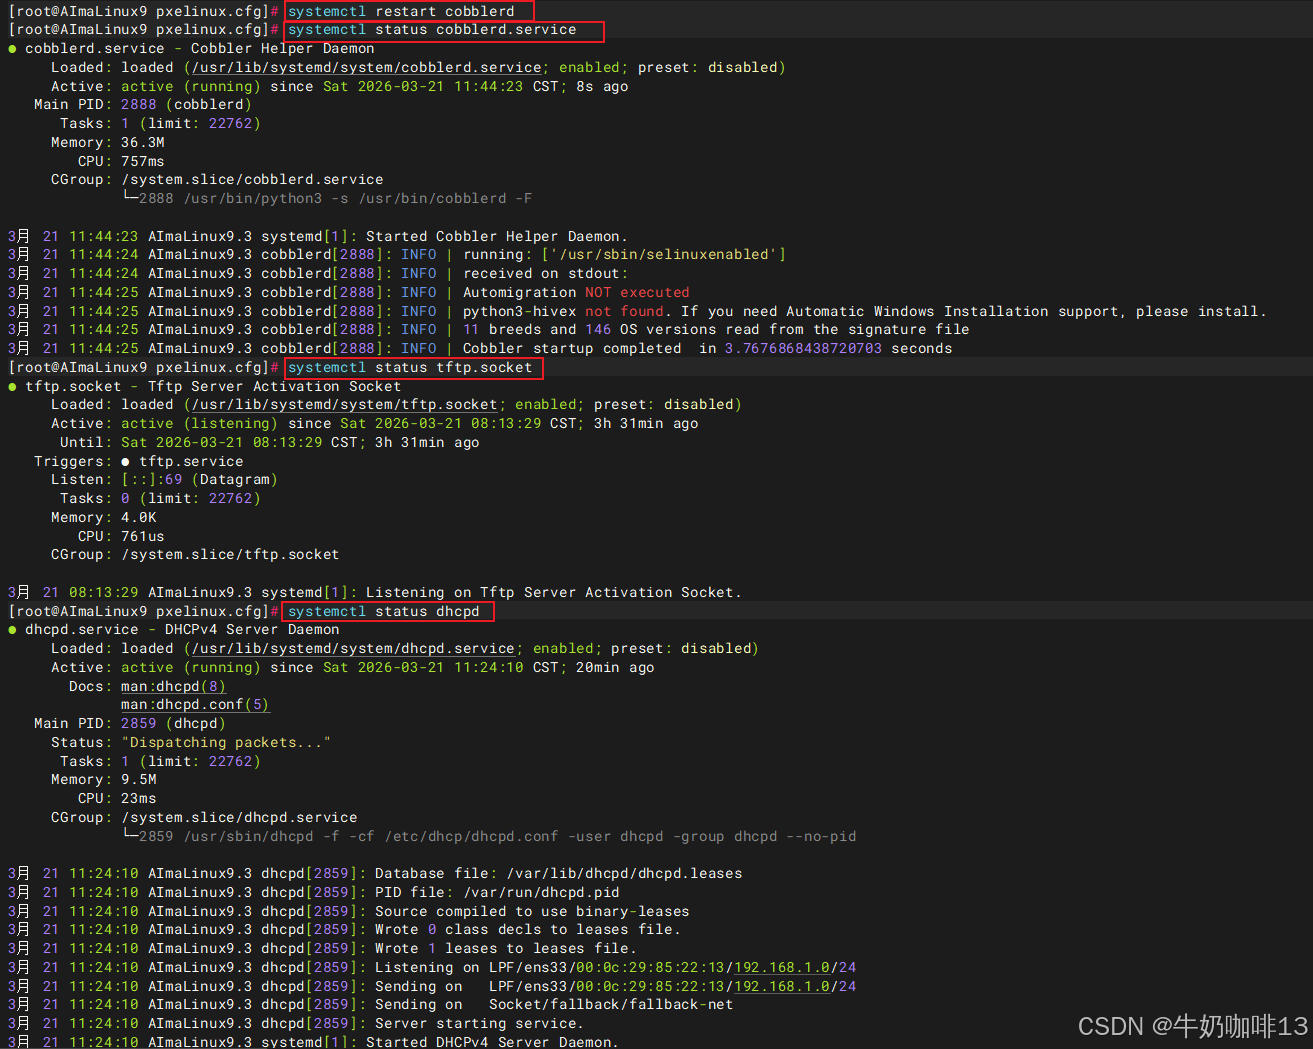
systemctl restart cobblerd
#查看cobblerd、tftp.sock、dhcpd服务是否都正常运行中
systemctl status cobblerd.service
systemctl status tftp.socket
systemctl status dhcpd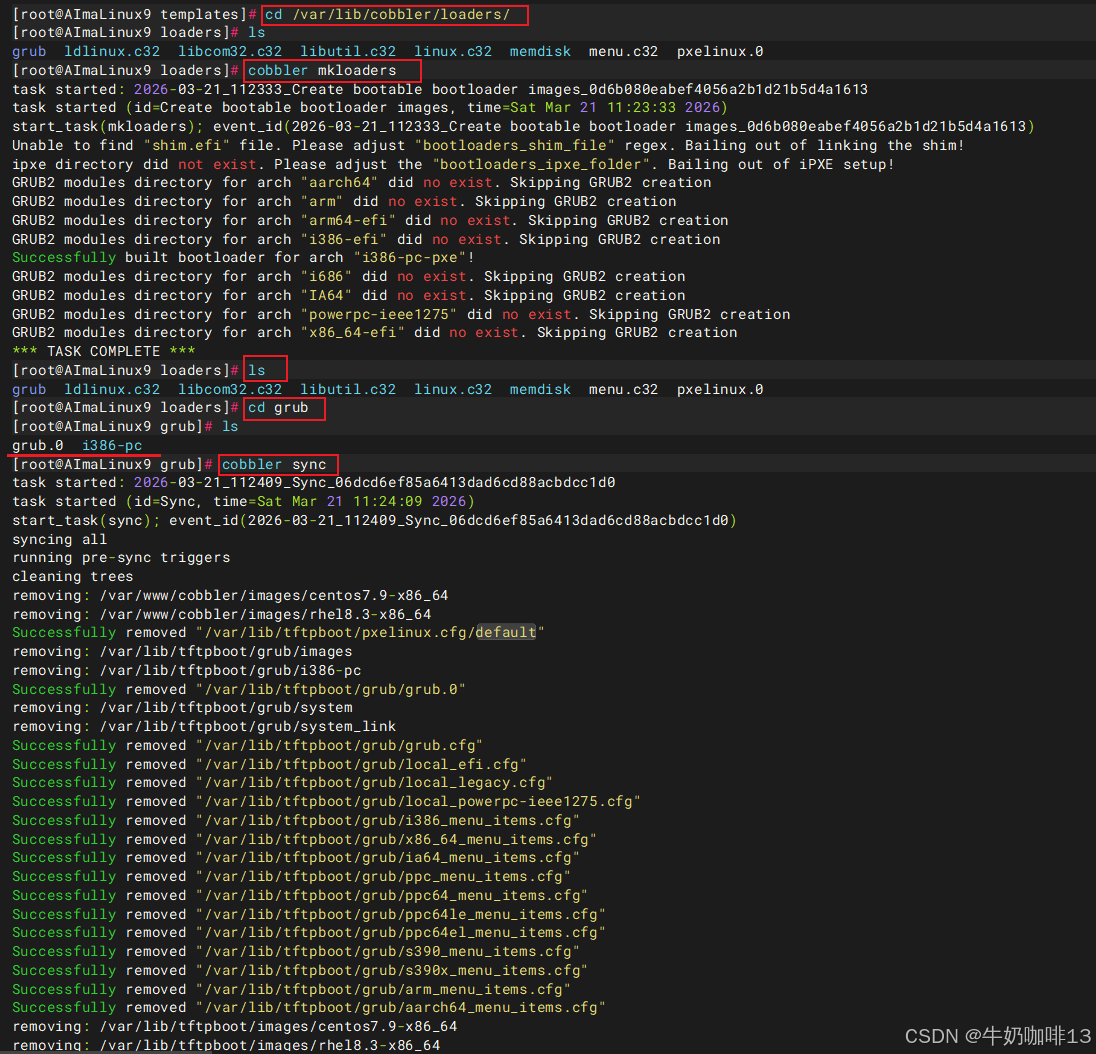
1.4、客户端测试红帽系统全自动安装
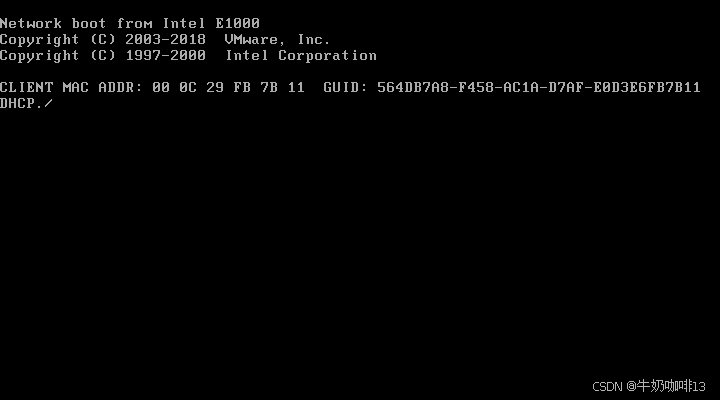
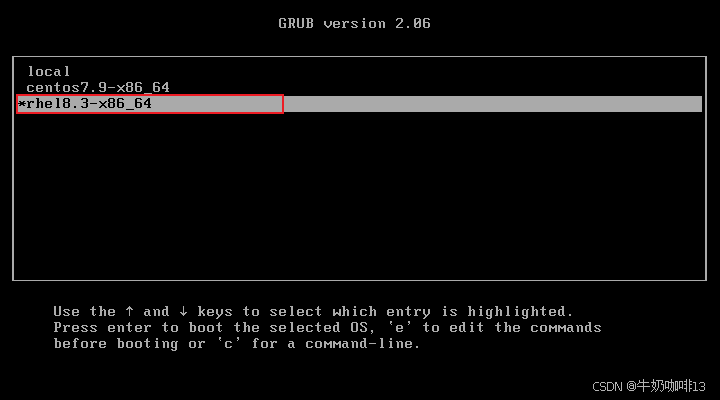
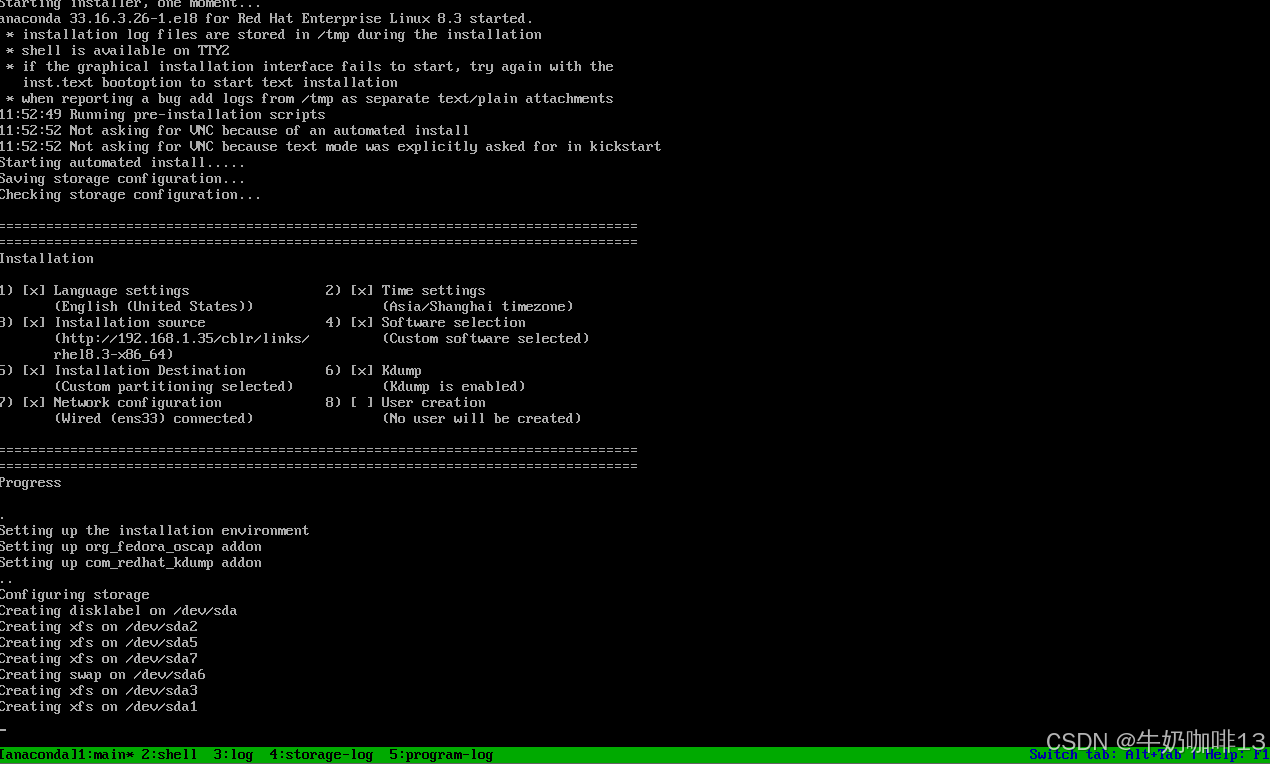
现在找一台全新的服务器或者新建一个虚拟机与我们这里搭建好的Cobbler服务器在同一个网段内(如:我这里是192.168.1网段);然后设置该设备从网络引导是否可以显示【rhel8.3-x86_64】并选择该镜像后,耐心等待全自动安装我们部署好的rhel8.3系统即可,如下图所示:

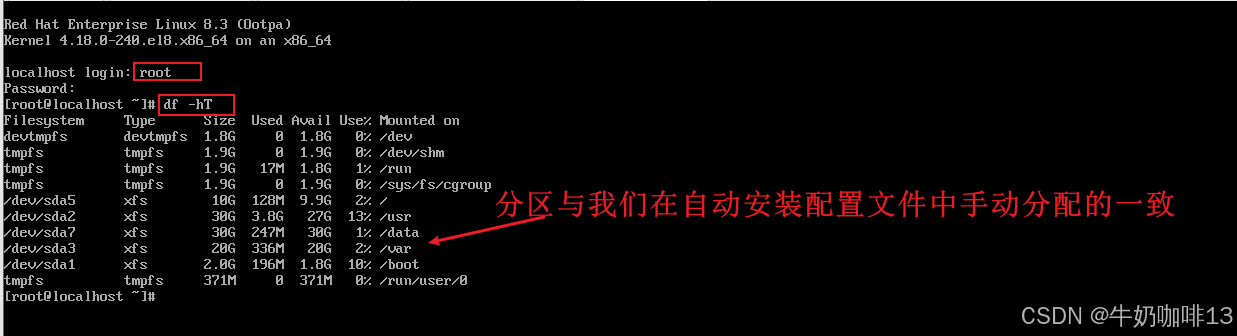
到这里,恭喜你,在客户端测试红帽系统全自动安装部署完成了!
二、在Cobbler中导入德班系镜像配置与客户端测试
在 Ubuntu18.04版本及其更低版本中,用的应答文件是 preseeds(预配置文件),它基于 debian-installer(aka di)来实现自动安装的。需要注意的是:如果你使用的是cobbler自动化安装,那一定要下载 ubuntu-18.04-server-amd64.iso,而不是 live-server(因为live版本缺少netboot文件),Ubuntu20.04以后已没有 server版本了。
2.1、将德班系统镜像导入到Cobbler中
bash
#Cobbler中导入所需的系统镜像操作
#1-将系统镜像上传到指定目录中(如:/data/linuxos)
mkdir -p /data/linuxos
ls
#2-创建系统所挂载的路径并挂载上(如:将ubuntu-18.04.6-server-amd64.iso系统挂载到/data/osimg/ubuntu18目录中)
mkdir -p /data/osimg/ubuntu18
mount -o loop /data/linuxos/ubuntu-18.04.6-server-amd64.iso /data/osimg/ubuntu18/
ll /data/osimg/ubuntu18/
#3-将镜像导入到Cobbler中(注意:若是导入失败,则需要检查/var空间是否足够,是否有权限
#--path:指定镜像路径;
#--name:定义安装源名称,可任意指定, 安装源唯一标识通过name参数来定义;
#--arch:指定安装源平台信息,目前支持的选项有:i386、x86_64、arm、aarch64;
#最后显示【TASK COMPLETE】则表示导入完成
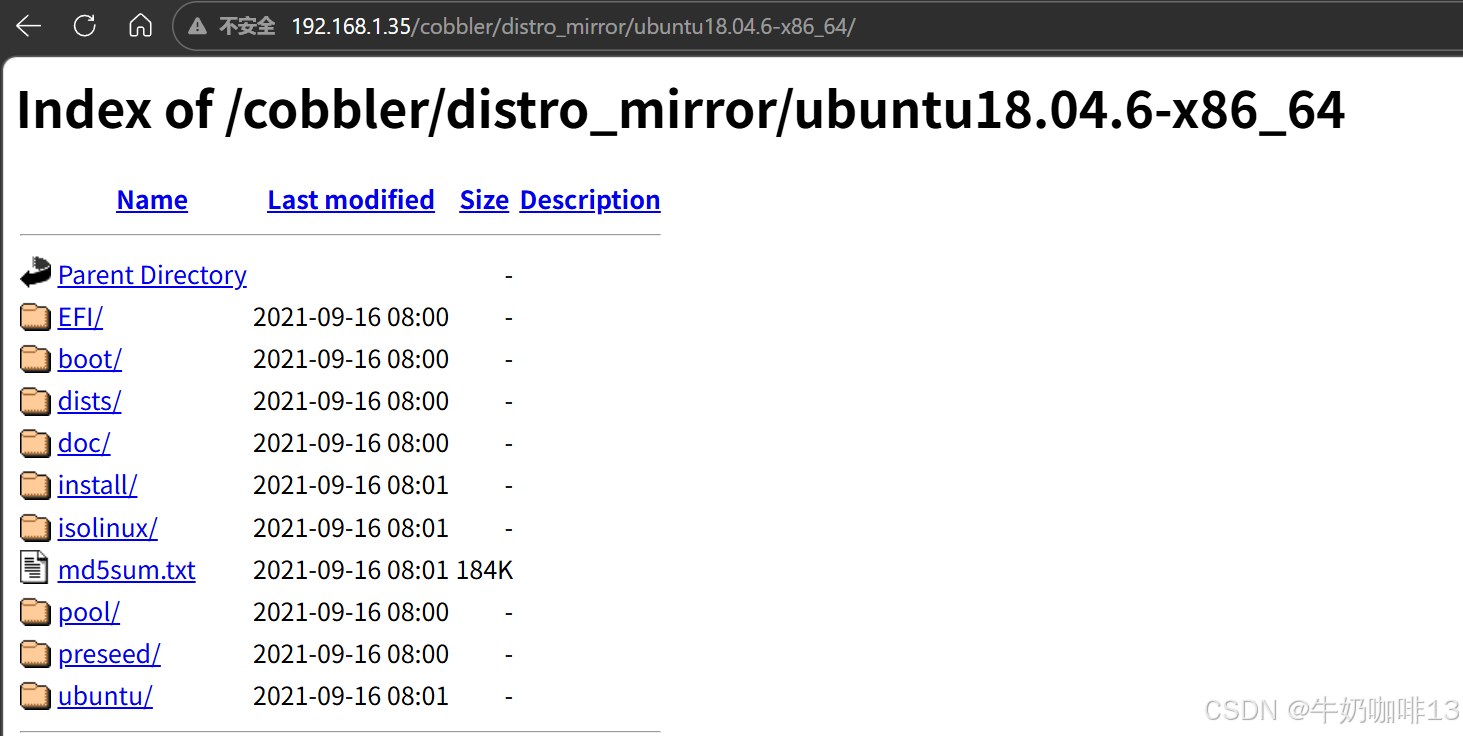
#且可在web访问【Cobbler所在服务器IP/cobbler/distro_mirror/ubuntu18.04.6-x86_64/】访问)
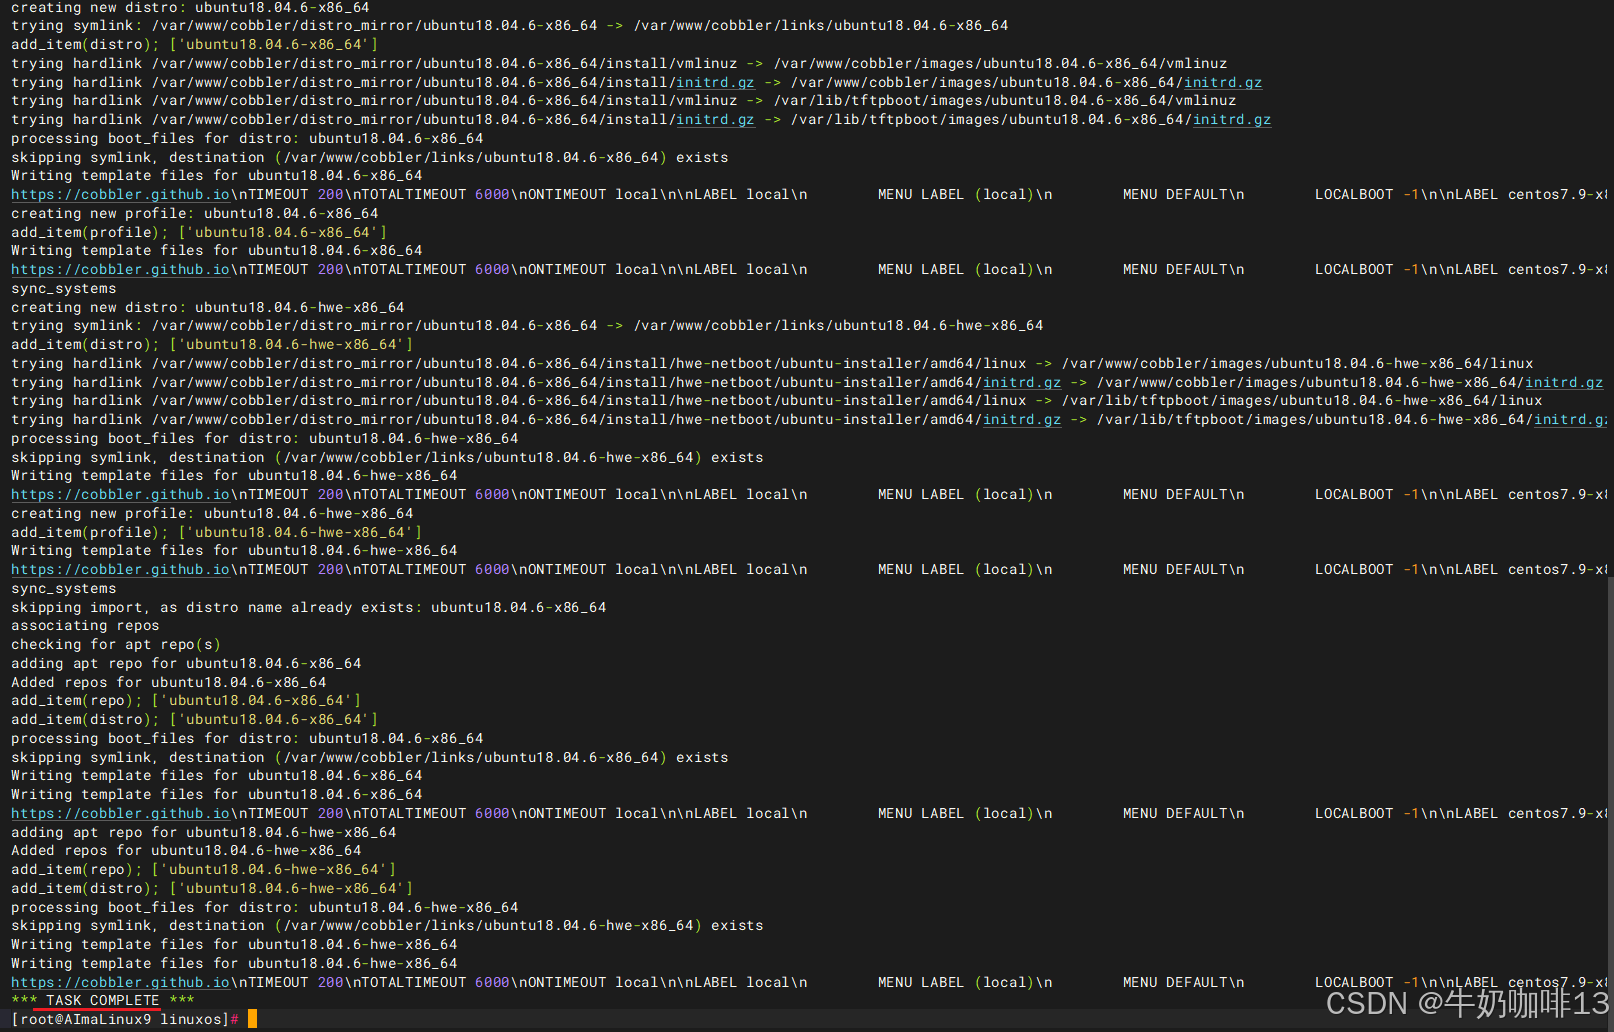
cobbler import --path=/data/osimg/ubuntu18/ --name=ubuntu18.04.6 --arch=x86_64
#4-查看Cobbler中目前导入的镜像(显示结果中主要有三个内容需要关注:
#【distros】表示某个发行版的对象,不同的镜像导入后对应不同的distro(比如:rhel8.3-x86_64)。
#【profiles】是distro的配置文件,一个distro可对应一个或多个profile。默认导入时会为distro生成一个profile。每个profile背后关联一个ks文件,用于决定kickstart安装操作系统时的配置。
#【systems】是system对象不是必须要创建的,但它可以指导cobbler进行更定制化的操作(比如:我们有多个profile文件,需要为不同的机器安装不同配置的操作系统,没有system对象时,需要手动选择profile文件,而通过system对象可以使指定机器使用指定的profile配置))
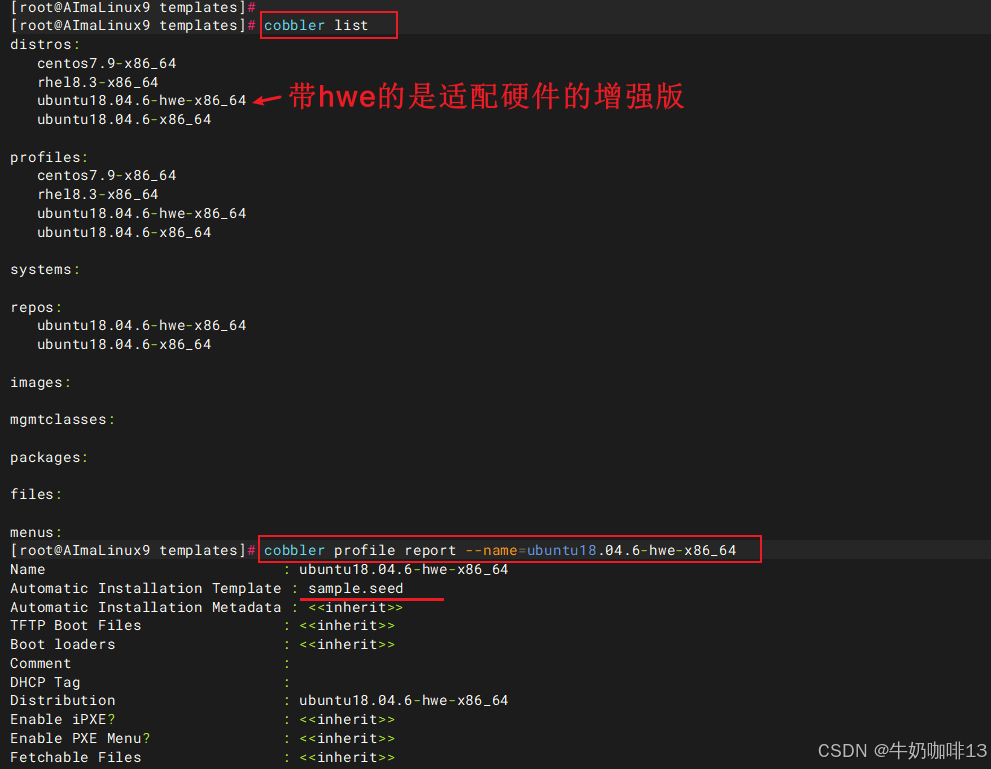
cobbler list
#5-查看指定的配置文件内容(如:查看名为【rhel8.3-x86_64】的配置文件内容;
#从输出可以看到【rhel8.3-x86_64】profile关联的ks文件是sample.ks,这个sample.ks默认路径位于【/var/lib/cobbler/templates】下。
#接下来我们要做的,就是基于原始的ks模版文件,进行修改。修改完成后,修改profile中的Kickstart文件路径,使其指向我们自己的ks模版文件。)
cobbler profile report --name=rhel8.3-x86_64
ll /var/lib/cobbler/templates
2.2、新增德班镜像的全自动安装seed文件
注意:ubuntu18-hwe-x86_64是硬件增强内核,建议使用这个引导安装系统。
bash
#新增德班镜像的全自动安装配置seed文件(如:ubuntu18系统的全自动安装配置)
#1-进入镜像全自动安装配置目录创建该镜像对应的seed文件
cd /var/lib/cobbler/templates
vi ubuntu18.seed
#【ubuntu18.seed】文件的完整内容如下:
# Mostly based on the Ubuntu installation guide
# https://help.ubuntu.com/18.04/installation-guide/
# Debian sample
# https://www.debian.org/releases/stable/example-preseed.txt
# Preseeding only locale sets language, country and locale.
d-i debian-installer/locale string en_US.UTF-8
# Keyboard selection.
# Disable automatic (interactive) keymap detection.
d-i console-setup/ask_detect boolean false
d-i keyboard-configuration/xkb-keymap select us
d-i keyboard-configuration/toggle select No toggling
d-i keyboard-configuration/layoutcode string us
d-i keyboard-configuration/variantcode string
# netcfg will choose an interface that has link if possible. This makes it
# skip displaying a list if there is more than one interface.
#set $myhostname = $getVar('hostname',$getVar('name','cobbler')).replace("_","-")
#d-i netcfg/choose_interface select auto
#d-i netcfg/choose_interface select ens33
#d-i netcfg/get_hostname string helmsman
#d-i netcfg/choose_interface select auto
#d-i netcfg/dhcp_failed note
#d-i netcfg/dhcp_options select Do not configure the network at this time
#d-i netcfg/get_hostname string keqi-server
#d-i netcfg/get_domain string keqi-server
d-i netcfg/enable boolea false
# If non-free firmware is needed for the network or other hardware, you can
# configure the installer to always try to load it, without prompting. Or
# change to false to disable asking.
# d-i hw-detect/load_firmware boolean true
# NTP/Time Setup #设置时区
d-i time/zone string Asia/Shanghai
d-i clock-setup/ntp-server string cn.pool.ntp.org
d-i clock-setup/utc boolean true
d-i clock-setup/ntp boolean true
# Setup the installation source #设置服务端地址【需要与自己导入的镜像地址匹配】。
d-i mirror/country string manual
d-i mirror/http/hostname string $http_server
d-i mirror/http/directory string /cobbler/distro_mirror/ubuntu18.04.6-x86_64
d-i mirror/http/proxy string
#set $os_v = $getVar('os_version','')
#if $breed == "ubuntu" and $os_v and $os_v.lower() != 'precise'
# Required at least for ubuntu 12.10+ , so test os_v is not precise. Olders versions are not supported anymore
d-i live-installer/net-image string http://$http_server/cobbler/links/$distro_name/install/filesystem.squashfs
#end if
# Suite to install.
# d-i mirror/suite string precise
# d-i mirror/udeb/suite string precise
# Components to use for loading installer components (optional).
#d-i mirror/udeb/components multiselect main, restricted
# Disk Partitioning # 磁盘分区问题,这里选择 LVM 自动分区。条件:必须只有一块硬盘作为系统盘,不能有其他硬盘。物理机安装正常。
# Use LVM, and wipe out anything that already exists
d-i partman-auto/disk string /dev/sda
d-i partman-auto/choose_recipe select atomic
d-i partman-auto/method string lvm
d-i partman-auto-lvm/guided_size string 100%
d-i partman-lvm/confirm boolean true
d-i partman-lvm/confirm_nooverwrite boolean true
d-i partman-lvm/device_remove_lvm boolean true
d-i partman-md/device_remove_md boolean true
d-i partman-partitioning/confirm_write_new_label boolean true
d-i partman/choose_partition select finish
d-i partman/confirm boolean true
d-i partman/confirm_nooverwrite boolean true
d-i partman/default_filesystem string xfs
d-i partman/mount_style select uuid
# You can choose one of the three predefined partitioning recipes:
# - atomic: all files in one partition
# - home: separate /home partition
# - multi: separate /home, /usr, /var, and /tmp partitions
d-i partman-auto/choose_recipe select atomic
# If you just want to change the default filesystem from ext3 to something
# else, you can do that without providing a full recipe.
# d-i partman/default_filesystem string ext4
# root account and password #设置 root 账户密码。在/etc/cobbler/settings 文件中定义,这里直接写也可以。
d-i passwd/root-login boolean true
d-i passwd/root-password-crypted password $default_password_crypted
# skip creation of a normal user account.
d-i passwd/make-user boolean false
# You can choose to install restricted and universe software, or to install
# software from the backports repository.
d-i apt-setup/restricted boolean true
d-i apt-setup/universe boolean true
d-i apt-setup/backports boolean true
# Uncomment this if you don't want to use a network mirror.
# d-i apt-setup/use_mirror boolean false
# Select which update services to use; define the mirrors to be used.
# Values shown below are the normal defaults.
d-i apt-setup/services-select multiselect security
d-i apt-setup/security_host string $http_server
d-i apt-setup/security_path string /cobbler/distro_mirror/ubuntu18.04.6-x86_64
$SNIPPET('preseed_apt_repo_config')
# Enable deb-src lines
# d-i apt-setup/local0/source boolean true
# URL to the public key of the local repository; you must provide a key or
# apt will complain about the unauthenticated repository and so the
# sources.list line will be left commented out
# d-i apt-setup/local0/key string http://local.server/key
# By default the installer requires that repositories be authenticated
# using a known gpg key. This setting can be used to disable that
# authentication. Warning: Insecure, not recommended.
# d-i debian-installer/allow_unauthenticated boolean true
# Package selection
# Default for minimal
tasksel tasksel/first multiselect standard
# Default for server
# tasksel tasksel/first multiselect standard, web-server
# Default for gnome-desktop
# tasksel tasksel/first multiselect standard, gnome-desktop
# Individual additional packages to install #需要安装的软件,这里只安装了 ssh 和 vim
# wget is REQUIRED otherwise quite a few things won't work
# later in the build (like late-command scripts)
d-i pkgsel/include string openssh-server vim
# Debian needs this for the installer to avoid any question for grub # GRUP引导的安装,如果前面分区没有弄好,这也是不行的。
# Please verify that it suit your needs as it may overwrite any usb stick
#if $breed == "debian"
d-i grub-installer/grub2_instead_of_grub_legacy boolean true
d-i grub-installer/bootdev string /dev/sda
#end if
# Use the following option to add additional boot parameters for the
# installed system (if supported by the bootloader installer).
# Note: options passed to the installer will be added automatically.
d-i debian-installer/add-kernel-opts string $kernel_options_post
# Avoid that last message about the install being complete.
d-i finish-install/reboot_in_progress note
## Figure out if we're kickstarting a system or a profile
#if $getVar('system_name','') != ''
#set $what = "system"
#else
#set $what = "profile"
#end if
# This first command is run as early as possible, just after preseeding is read.
# d-i preseed/early_command string [command]
d-i preseed/early_command string wget -O- \
http://$http_server/cblr/svc/op/script/$what/$name/?script=preseed_early_default | \
/bin/sh -s
# This command is run immediately before the partitioner starts. It may be
# useful to apply dynamic partitioner preseeding that depends on the state
# of the disks (which may not be visible when preseed/early_command runs).
# d-i partman/early_command \
# string debconf-set partman-auto/disk "\$(list-devices disk | head -n1)"
# This command is run just before the install finishes, but when there is
# still a usable /target directory. You can chroot to /target and use it
# directly, or use the apt-install and in-target commands to easily install
# packages and run commands in the target system.
# d-i preseed/late_command string [command]
#如下这些内容是可选的【表示在系统安装完成后进行国内源的替换、IP固定等操作】前提是在cobbler中提前将这些脚本内容添加到【/var/www/cobbler/distro_mirror/】目录下
d-i preseed/late_command string wget -O- \
http://$http_server/cblr/svc/op/script/$what/$name/?script=preseed_late_default | \
chroot /target /bin/sh -s
d-i preseed/late_command string mkdir -p /target/root/.ssh ; \
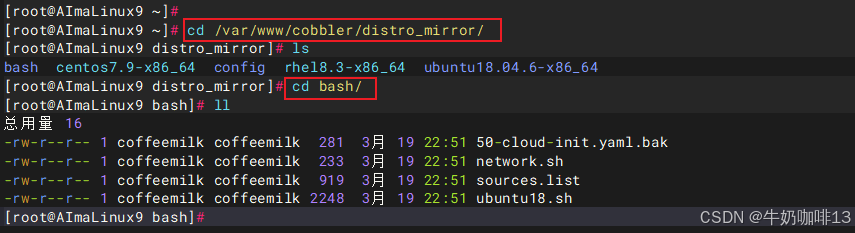
wget -O /target/etc/apt/sources.list http://$http_server/cobbler/distro_mirror/bash/sources.list ; \
wget -P /target/etc/netplan/ http://$http_server/cobbler/distro_mirror/bash/50-cloud-init.yaml.bak ; \
wget -P /target/root/ http://$http_server/cobbler/distro_mirror/bash/ubuntu18.sh ; \
wget -P /target/root/ http://$http_server/cobbler/distro_mirror/bash/network.sh ; \
cd /target ; \
chroot ./ bash /root/ubuntu18.sh ; \
echo ""
#2-修改导入镜像使用的自动安装ks文件为自定义的ks文件(如:ubuntu18.seed)
#2.1-查看Cobbler中目前导入的镜像
cobbler list
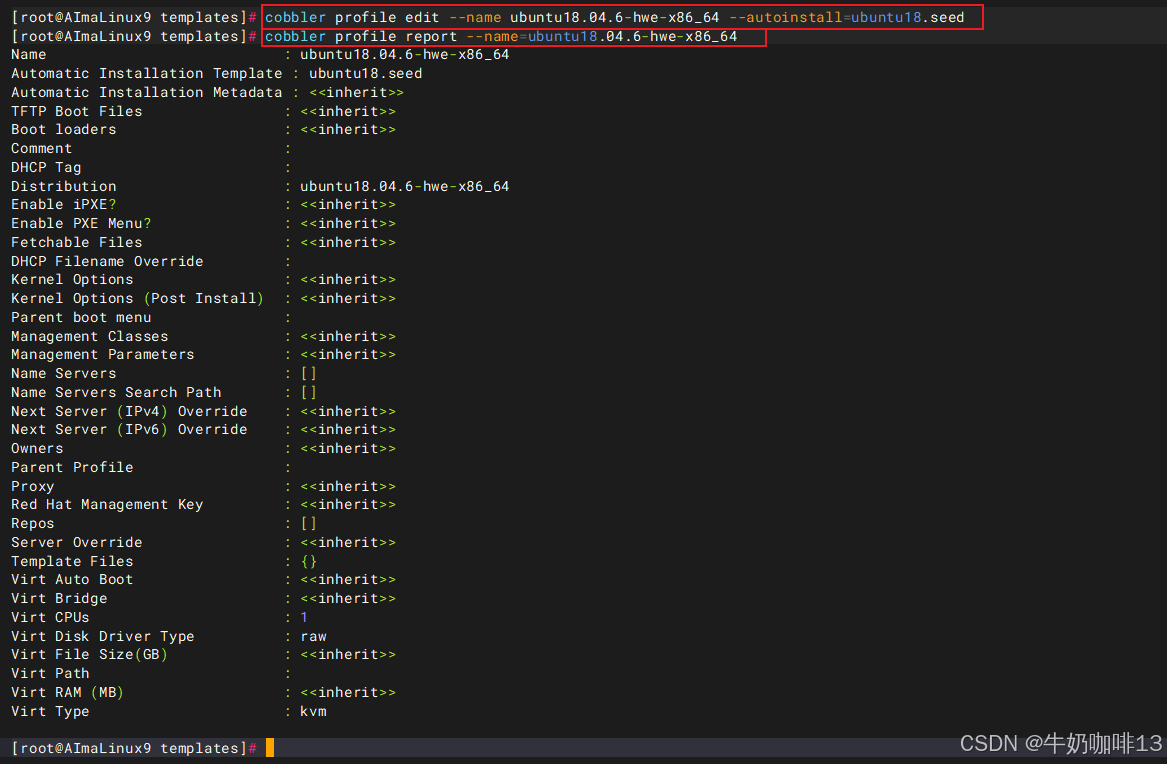
#2.2-修改Cobbler中导入镜像名称为【ubuntu18】的配置文件【ubuntu18.04.6-hwe-x86_64】的全自动安装配置seed文件为【自建的ubuntu18.seed】
cobbler profile edit --name ubuntu18.04.6-hwe-x86_64 --autoinstall=ubuntu18.seed
#查看指定的配置文件内容(如:查看名为【ubuntu18.04.6-hwe-x86_64】的配置文件内容)
cobbler profile report --name=ubuntu18.04.6-hwe-x86_64
2.3、让修改后的配置同步并生效及其生成可引导加载程序
bash
#生成可引导GRUB2的引导加载程序【在cobbler3版本之后,还需要手动执行如下命令生成GRUB2引导程序】
cd /var/lib/cobbler/loaders/
cobbler mkloaders
#让修改后的配置同步到Cobbler中并生效(客户端中引导的内容都是从【/var/lib/tftpboot】获取的;
#客户端的初始系统界面内容配置是在【/var/lib/tftpboot/pxelinux.cfg/default】文件中自动生成的)
cobbler sync
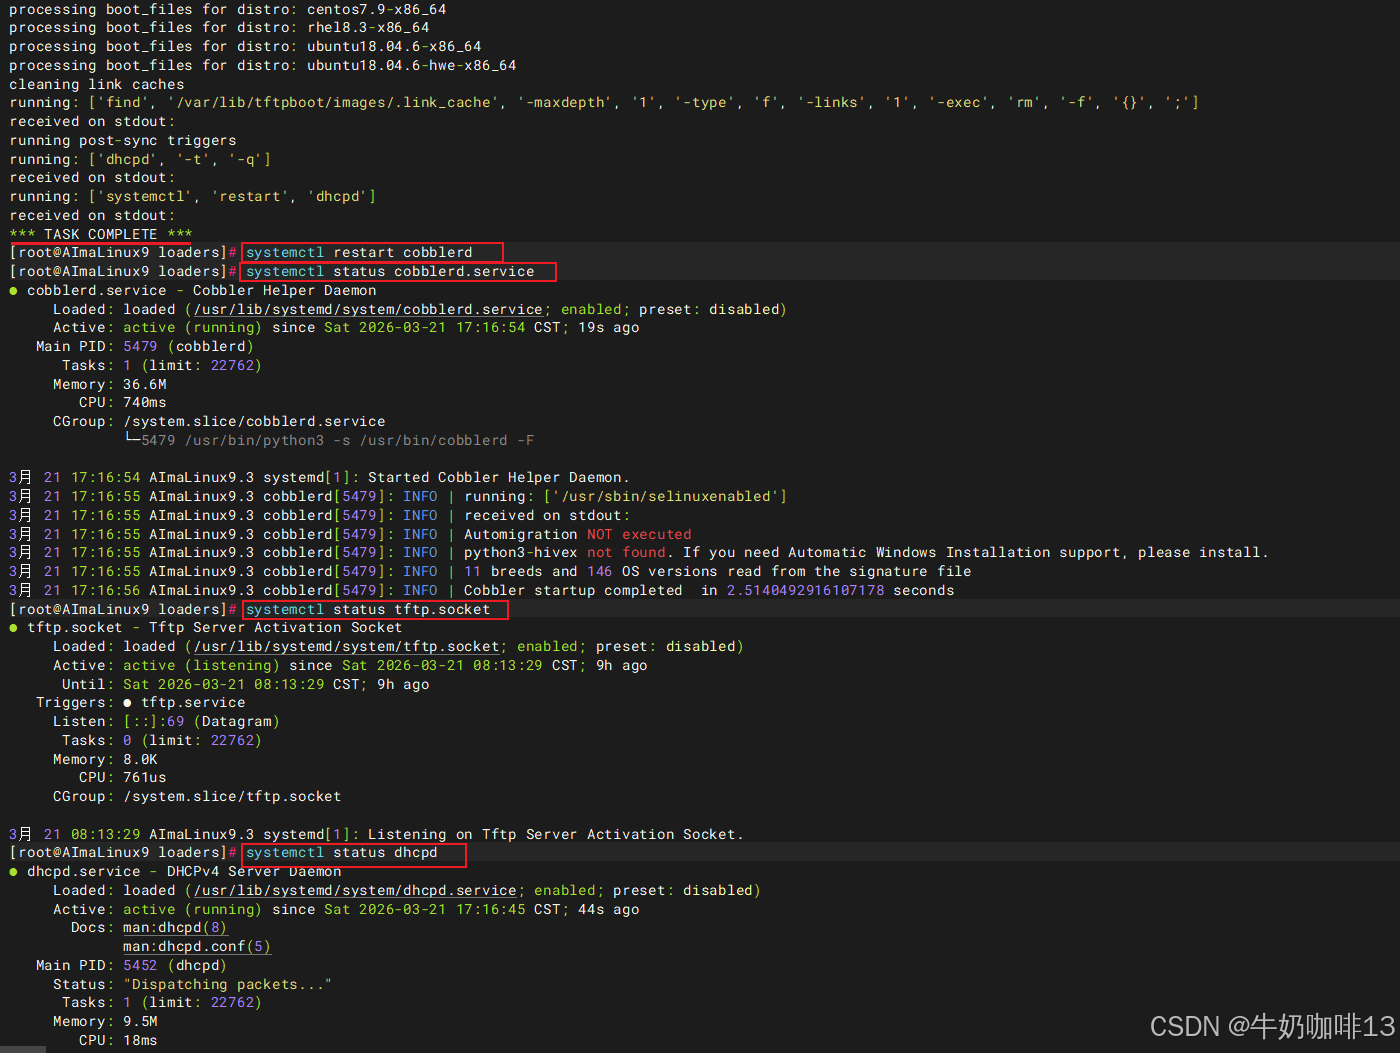
systemctl restart cobblerd
#查看cobblerd、tftp.sock、dhcpd服务是否都正常运行中
systemctl status cobblerd.service
systemctl status tftp.socket
systemctl status dhcpd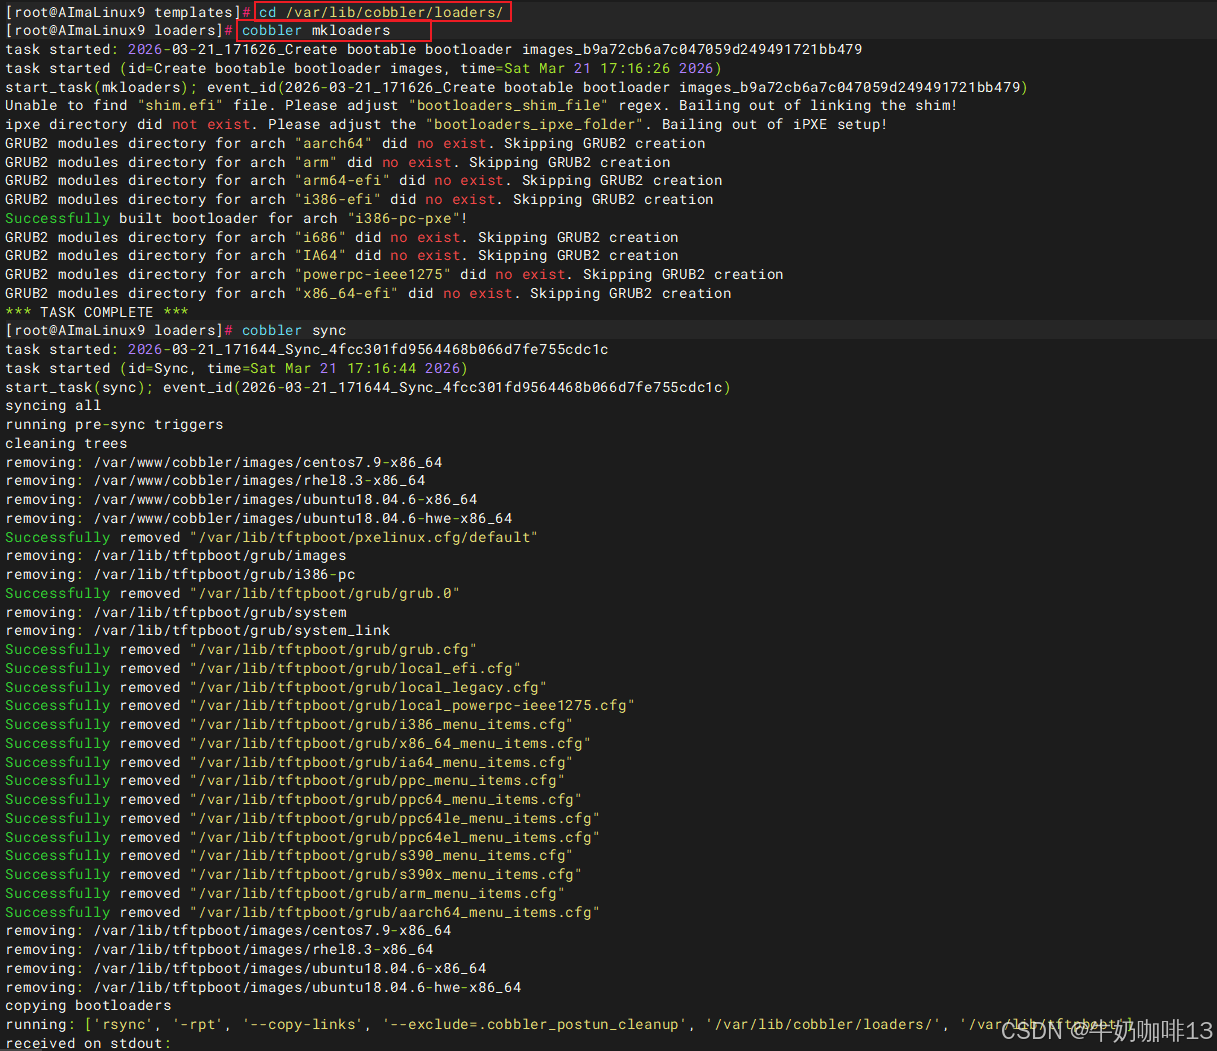
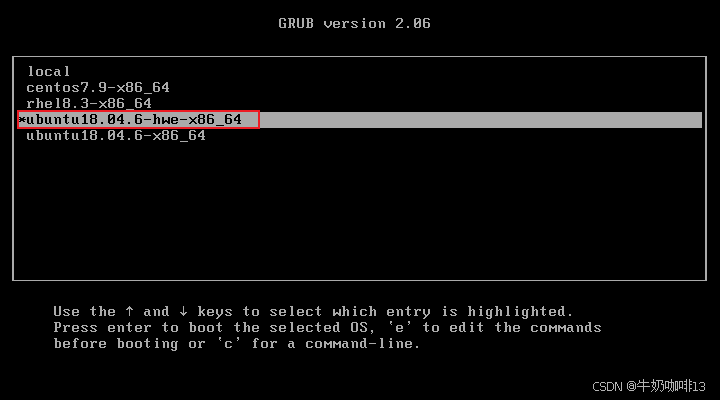
2.4、客户端测试德班系统全自动安装
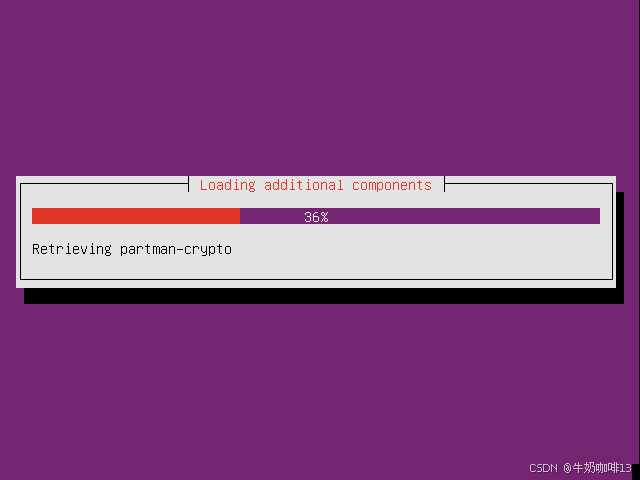
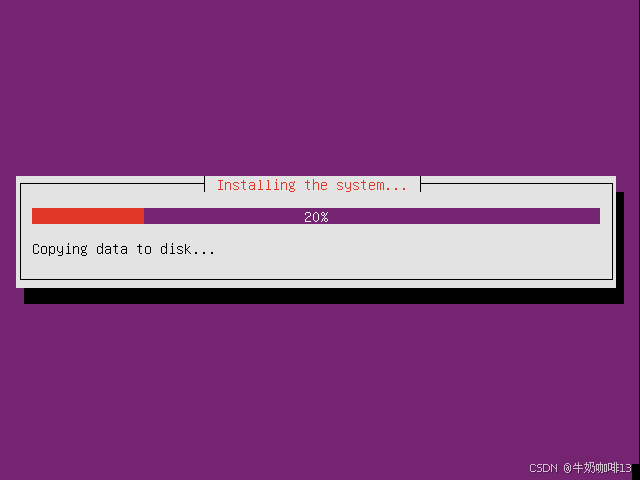
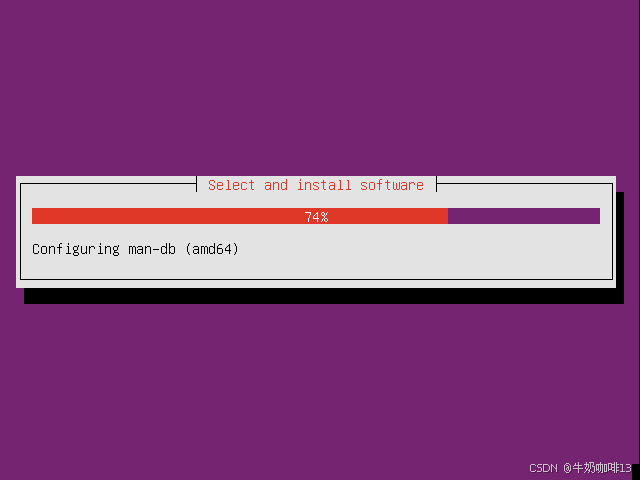
现在找一台全新的服务器或者新建一个虚拟机与我们这里搭建好的Cobbler服务器在同一个网段内(如:我这里是192.168.1网段);然后设置该设备从网络引导是否可以显示【ubuntu18.04.6-hwe-x86_64】并选择该镜像后,耐心等待全自动安装我们部署好的ubuntu18.04.6系统即可,如下图所示:

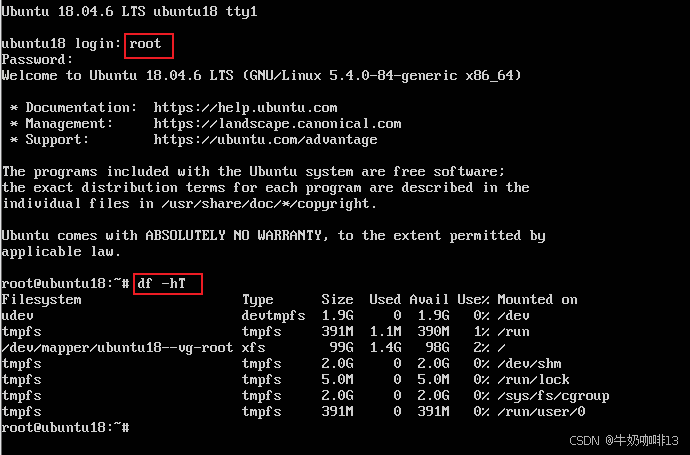
到这里,恭喜你,在客户端测试德班系统全自动安装部署完成了!
2.5、使用ubuntu18-x86_64镜像安装会弹窗无法挂载光盘介质
bash
cobbler profile report --name=ubuntu18.04.6-x86_64
cobbler profile edit --name ubuntu18.04.6-x86_64 --autoinstall=ubuntu18.seed
cobbler profile report --name=ubuntu18.04.6-x86_64
cobbler sync
systemctl restart cobblerd
systemctl status cobblerd.service
systemctl status tftp.socket
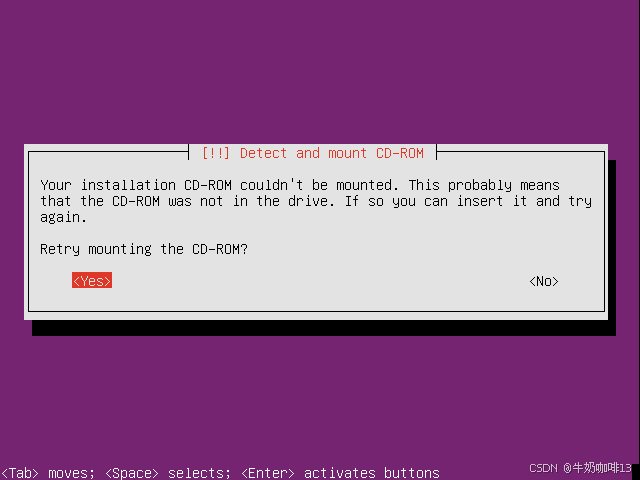
systemctl status dhcpd**注意:**如果使用【ubuntu18-x86_64】这个发行版,默认自动化安装会有问题,安装过程会提示无法挂载光盘介质。
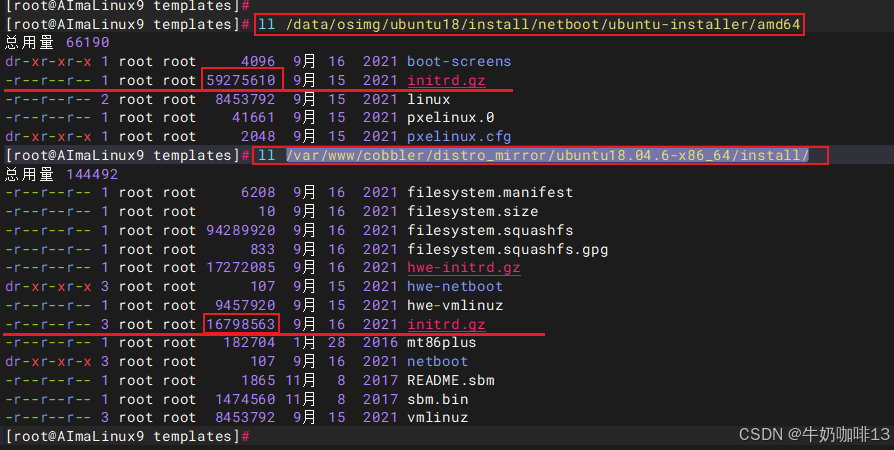
重点:Ubuntu18在cobbler导入后, ubuntu18-x86_64这个内核版本有个坑(即:cobbler默认加载的引导文件是iso安装介质中install目录下的initrd.gz文件,而此文件是基于光盘引导的,在网络安装的时候会提示光盘介质无法挂载的错误提示,因为cobbler是网络安装,因此,要替换这个文件,替换命令如下:
bash
cp /data/osimg/ubuntu18/install/netboot/ubuntu-installer/amd64/initrd.gz /var/www/cobbler/distro_mirror/ubuntu18.04.6-x86_64/install/其中,【/data/osimg/ubuntu18】是iso安装介质的挂载点。也就是把iso安装介质中网络引导目录下的initrd.gz文件拷贝覆盖到cobbler的本地镜像路径下。替换后, ubuntu18-x86_64这个内核也可以自动化安装系统了)。
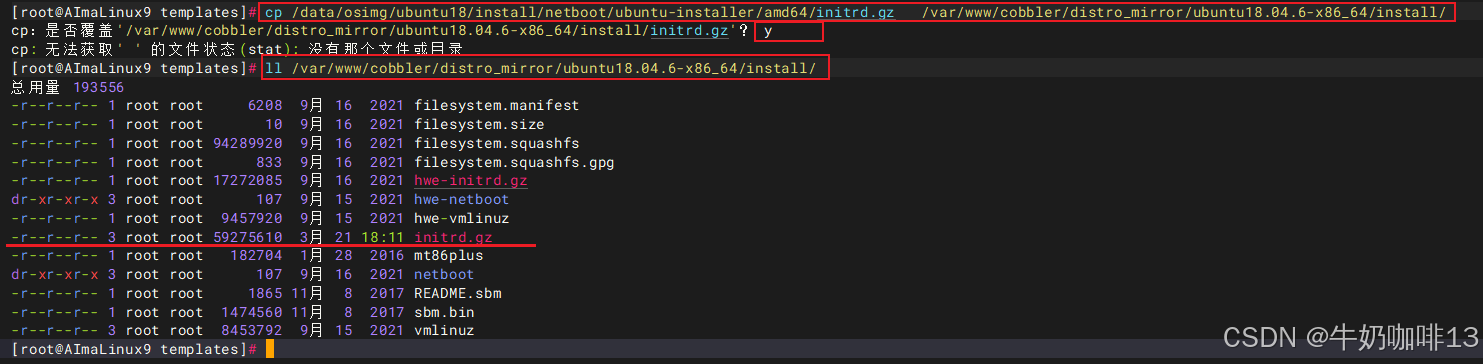
这样修改后就可以正常全自动安装系统了。