一、前言与环境
前言
大模型在企业场景中最典型的落地方式之一就是知识库问答。用户提一个问题,系统先从知识库里检索最相关的内容,再把检索结果和原始问题一起喂给大模型,让模型基于真实资料回答,而不是凭空编造。这就是 RAG(Retrieval-Augmented Generation)的核心思路。
但仅仅返回一段 AI 回答是不够的。用户往往会追问"这个结论从哪来的"、"依据是什么"。如果能在回答下方直接展示引用了哪些知识条目或文件,用户点击就能查看原文,信任度和实用性都会大幅提升。本文从向量入库、相似度检索、来源收集、SSE 流式推送到前端渲染,完整展示如何在 Spring Boot 项目中落地一套带来源引用的 RAG 智能问答。
系统环境
| 组件 | 版本 / 说明 |
|---|---|
| JDK | 17 |
| Spring Boot | 3.5.9 |
| Spring AI | 1.0+ |
| Vue | 3.5.13 |
| Element Plus | 2.x |
| Embedding 模型 | Qwen3-Embedding-0.6B(SiliconFlow) |
| LLM | 通过 OpenAI 兼容接口接入 |
如果你使用的 Embedding 模型或 LLM 提供商不同,只需调整 spring.ai.openai.base-url 和模型名称即可,其余代码完全通用。
二、方案设计
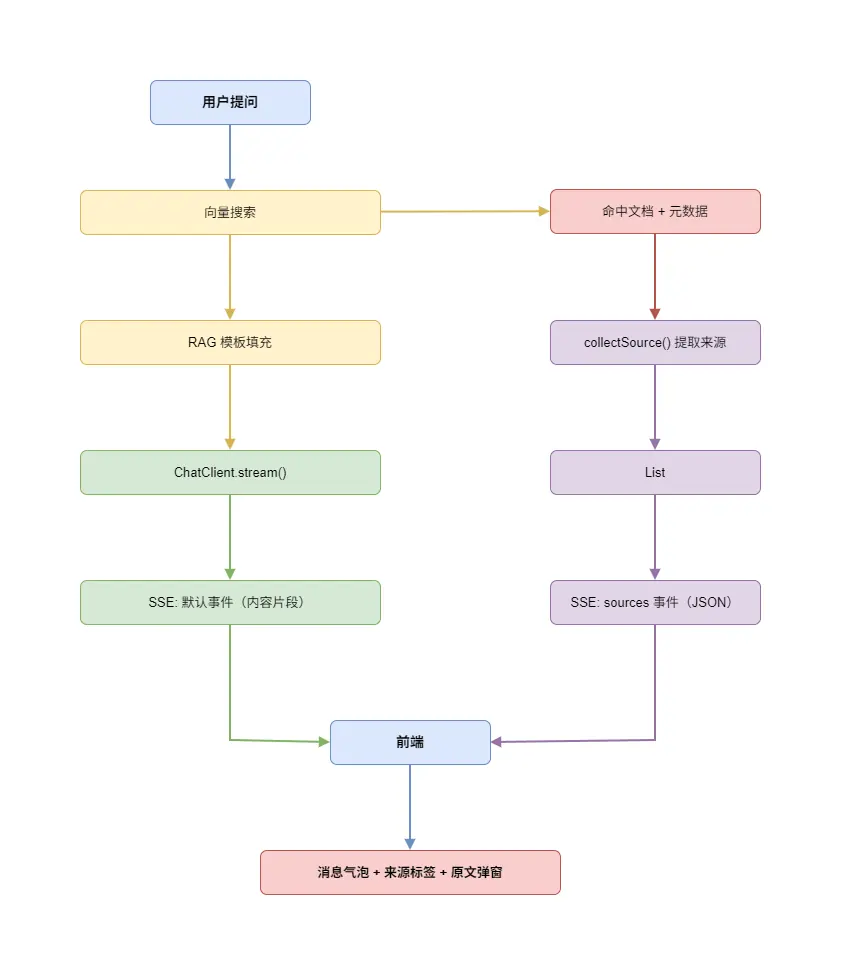
整体架构
整套方案围绕一条核心链路展开:知识入库 → 向量检索 → 来源收集 → 模板填充 → 流式回答 → 前端渲染来源。
- 知识入库 :文本知识和文件知识在保存到数据库的同时,写入向量库,并在 Document 的 metadata 中埋入
_sourceType、_sourceTitle、_sourceId三个保留字段,用于后续来源溯源。 - 向量检索 :用户发起提问时,先通过 Spring AI 的
VectorStore做相似度检索,拿到最相关的文档片段。 - 来源收集 :从检索结果的 metadata 中提取来源信息,去重后构造
ChatSourceDTO列表。 - 模板填充:将检索到的上下文和用户问题填入 RAG 模板,作为最终的 prompt 发给 LLM。
- SSE 推送 :LLM 的流式回答通过默认 SSE 事件推送,来源列表通过命名事件
sources单独推送。 - 前端渲染:消息气泡下方展示来源标签,点击可查看原文。
数据流程
三、后端实现
3.1 来源数据结构
先定义来源引用的 DTO,这是贯穿前后端的数据契约。
arduino
@Data
public class ChatSourceDTO {
/**
* 来源类型:knowledge-文本知识库 file-文件知识库
*/
private String sourceType;
/**
* 来源标题(知识标题 或 文件名)
*/
private String sourceTitle;
/**
* 来源记录ID
*/
private Long sourceId;
/**
* 来源内容(知识库原文)
*/
private String content;
}sourceType 区分来源是文本知识还是文件知识,前端可以据此展示不同的图标。content 字段携带原文内容,前端点击来源标签时直接弹窗展示,不需要二次请求。
3.2 流式结果封装
RAG 检索结果和 LLM 流式输出是两个异步过程。来源在检索阶段就已确定,而内容是流式生成的。用一个简单的 POJO 把两者打包返回。
less
@Data
@AllArgsConstructor
public class ChatStreamResult {
/**
* LLM 流式输出内容
*/
private Flux<String> contentStream;
/**
* RAG 检索命中的知识库来源
*/
private List<ChatSourceDTO> sources;
}3.3 知识入库:埋入来源元数据
RAG 来源追踪的基础在于入库时就把来源信息写入 Document 的 metadata。这是最关键的设计决策------检索时能溯源,全靠入库时把数据埋好。
文本知识入库:
less
@Override
@Transactional(rollbackFor = Exception.class)
public void saveNew(AiKnowledgeDTO dto) {
AiKnowledge entity = AiKnowledge.INSTANCE.toEntity(dto);
save(entity);
// 将知识库内容与元数据写入向量库
Map<String, Object> metadata = JacksonUtils.toMap(entity.getMetadataJson(), String.class, Object.class);
metadata.put("_sourceType", "knowledge");
metadata.put("_sourceTitle", entity.getTitle());
metadata.put("_sourceId", entity.getId());
vectorStore.add(Collections.singletonList(
new Document("knowledge_" + entity.getId(), entity.getContent(), metadata)
));
}文件知识入库:
less
@Override
@Transactional(rollbackFor = Exception.class)
public void saveNew(AiFileKnowledgeDTO dto) {
// ... 文件上传和解析逻辑 ...
String content = parseFileContent(fullPath, fileType);
AiFileKnowledge entity = new AiFileKnowledge();
entity.setFileName(originalFilename);
entity.setFileType(fileType);
// ... 设置其他字段 ...
save(entity);
Map<String, Object> metadata = JacksonUtils.toMap(entity.getMetadataJson(), String.class, Object.class);
metadata.put("_sourceType", "file");
metadata.put("_sourceTitle", entity.getFileName());
metadata.put("_sourceId", entity.getId());
vectorStore.add(Collections.singletonList(
new Document("file_" + entity.getId(), content, metadata)
));
}两种知识的入库逻辑结构一致,区别仅在于 _sourceType 的值和内容来源。Document ID 采用 类型_主键 的格式(如 knowledge_1、file_2),确保全局唯一,同时也便于按 ID 删除和重建向量。
三个保留字段统一以下划线开头(_sourceType、_sourceTitle、_sourceId),和用户自定义的 metadata 字段做区分,避免命名冲突。
3.4 核心检索与来源收集
这是整套方案最核心的部分。ChatServiceImpl 负责接收用户消息,执行向量检索,收集来源,填充 RAG 模板,最终返回流式结果。
ini
@Slf4j
@Service
@RequiredArgsConstructor
public class ChatServiceImpl implements ChatService {
private final DynamicChatClientFactory dynamicChatClientFactory;
private final AiModelConfigService aiModelConfigService;
private final AiRolePromptService aiRolePromptService;
private final VectorStore vectorStore;
@Override
public ChatStreamResult chatStream(String message, String conversationId) {
ChatClient chatClient = dynamicChatClientFactory.buildDefaultClient();
// 加载模型配置和角色提示词
AiModelConfig config = aiModelConfigService.getDefaultConfig();
AiRolePrompt rolePrompt = null;
boolean enableRag = true;
if (config != null && config.getRoleId() != null) {
rolePrompt = aiRolePromptService.getById(config.getRoleId());
if (rolePrompt != null && rolePrompt.getIsRagEnabled() != null) {
enableRag = rolePrompt.getIsRagEnabled() == 1;
}
}
var prompt = chatClient.prompt()
.advisors(a -> a.param(ChatMemory.CONVERSATION_ID, conversationId));
String finalUserInput = message;
List<ChatSourceDTO> sources = Collections.emptyList();
if (enableRag && rolePrompt != null) {
// 1. 构建检索请求
int topK = rolePrompt.getTopK() != null && rolePrompt.getTopK() > 0
? rolePrompt.getTopK() : 5;
Double threshold = rolePrompt.getSimilarityThreshold();
SearchRequest.Builder builder = SearchRequest.builder()
.query(message)
.topK(topK);
if (threshold != null) {
builder = builder.similarityThreshold(threshold);
}
if (StringUtils.isNotBlank(rolePrompt.getCustomFilter())) {
builder = builder.filterExpression(rolePrompt.getCustomFilter());
}
// 2. 执行向量检索
var docs = vectorStore.similaritySearch(builder.build());
// 3. 去重并收集上下文与来源
List<String> contextParts = new ArrayList<>();
Set<String> seenContents = new LinkedHashSet<>();
List<ChatSourceDTO> collectedSources = new ArrayList<>();
Set<String> seenSourceKeys = new HashSet<>();
for (Document doc : docs) {
String content = doc.getText();
if (content == null) {
content = doc.toString();
}
if (seenContents.add(content)) {
contextParts.add(content);
}
collectSource(doc, collectedSources, seenSourceKeys);
}
// 4. 用 RAG 模板组装最终 prompt
String context = String.join("\n\n---\n\n", contextParts);
String template = rolePrompt.getRagTemplate();
if (StringUtils.isNotBlank(template)) {
finalUserInput = template
.replace("{context}", context)
.replace("{query}", message);
}
sources = collectedSources;
}
// 5. 发起流式请求
Flux<String> contentStream = prompt.user(finalUserInput)
.stream()
.content();
return new ChatStreamResult(contentStream, sources);
}
}整条链路清晰地分为五步:构建检索请求、执行向量检索、收集去重、模板填充、流式请求。来源在第 3 步就已经全部确定,不依赖 LLM 的回答内容,这意味着来源可以在流式回答开始前就推送给前端。
来源提取的核心方法如下:
ini
/**
* 从检索到的文档中提取来源信息(去重)
*/
private void collectSource(Document doc, List<ChatSourceDTO> sources, Set<String> seenKeys) {
Map<String, Object> meta = doc.getMetadata();
String sourceType = (String) meta.get("_sourceType");
String sourceTitle = (String) meta.get("_sourceTitle");
Object sourceIdObj = meta.get("_sourceId");
if (sourceType == null || sourceTitle == null || sourceIdObj == null) {
return;
}
String uniqueKey = sourceType + "_" + sourceIdObj;
if (seenKeys.add(uniqueKey)) {
ChatSourceDTO source = new ChatSourceDTO();
source.setSourceType(sourceType);
source.setSourceTitle(sourceTitle);
source.setSourceId(Long.parseLong(String.valueOf(sourceIdObj)));
source.setContent(doc.getText());
sources.add(source);
}
}去重策略使用 sourceType + "_" + sourceId 作为唯一键。同一条知识即使被向量检索命中多次(比如相似度阈值较低时),也只会出现一次来源引用。
3.5 RAG 模板配置
RAG 模板存储在 AiRolePrompt 实体的 ragTemplate 字段中,支持两个占位符:
{context}:会被替换为检索到的文档内容(多段用---分隔){query}:会被替换为用户原始问题
一个典型的 RAG 模板:
请根据以下参考资料回答用户的问题。如果参考资料中没有相关信息,请如实告知用户。
参考资料:
{context}
用户问题:
{query}AiRolePrompt 实体中与 RAG 相关的配置字段:
| 字段 | 类型 | 说明 |
|---|---|---|
isRagEnabled |
Integer | 是否启用 RAG(1=启用) |
ragTemplate |
String | RAG 提示词模板 |
topK |
Integer | 检索返回的最大文档数 |
similarityThreshold |
Double | 相似度阈值(0~1) |
customFilter |
String | 元数据过滤表达式 |
这些参数全部可以通过后台管理界面动态配置,无需重启服务即可调整检索策略。
3.6 SSE 流式推送 Controller
Controller 层负责将 ChatStreamResult 转化为 SSE 事件流。关键设计是用不同的事件类型区分内容和来源。
less
@RestController
@RequestMapping("/chat")
@RequiredArgsConstructor
public class ChatBotController {
private final ChatService chatService;
@PreAuthorize("hasAuthority('ai:chats:stream')")
@GetMapping(value = "/stream", produces = MediaType.TEXT_EVENT_STREAM_VALUE)
public Flux<ServerSentEvent<String>> chatStream(String message, String conversationId) {
ChatStreamResult result = chatService.chatStream(message, conversationId);
String sourcesJson = JacksonUtils.toJson(result.getSources());
return result.getContentStream()
.map(content -> ServerSentEvent.<String>builder().data(content).build())
.concatWithValues(
ServerSentEvent.<String>builder().event("sources").data(sourcesJson).build(),
ServerSentEvent.<String>builder().event("close").data("").build()
);
}
}这种设计的好处是:内容片段使用默认(无名)事件,前端通过 onmessage 直接接收;来源和关闭信号使用命名事件,通过 addEventListener 分别监听。三种事件各司其职,互不干扰。
concatWithValues 保证了来源和关闭事件一定在所有内容片段之后发送。即使 LLM 流式输出中途出错,sources 事件也已经在 Flux 链路中排好队,不会丢失。
四、前端实现
4.1 类型定义
前端的类型定义与后端 DTO 一一对应。
typescript
export interface ChatSource {
  sourceType: 'knowledge' | 'file'
  sourceTitle: string
  sourceId: number
  content?: string
}

export interface ChatMessage {
  id: string
  role: 'user' | 'assistant'
  content: string
  timestamp: number
  status: 'sending' | 'streaming' | 'done' | 'error'
  sources?: ChatSource[]
}
ChatMessage 中的 sources 是可选字段,只有 AI 助手的回复才可能携带来源。status 字段跟踪消息的生命周期,从 sending(已发送请求)到 streaming(正在接收流式内容)再到 done(回答完成)。
4.2 SSE 连接与来源接收
核心的消息发送和 SSE 监听逻辑封装在 useCustomerService 组合式函数中。
typescript
const sendMessage = async (preset?: string) => {
    const messageToSend = (preset ?? inputMessage.value).trim()
    if (!messageToSend || isStreaming.value) return

    const session = customerServiceStore.ensureActiveSession()
    const assistantMessageId = customerServiceStore.createMessageId()

    // 创建用户消息和空的助手消息
    customerServiceStore.addMessage(session.id, userMessage)
    customerServiceStore.addMessage(session.id, assistantMessage)

    const eventSource = createChatStream({
        message: messageToSend,
        conversationId: session.id,
        token: userStore.token
    })

    // 接收内容片段,增量拼接到助手消息
    eventSource.onmessage = (event) => {
        if (!event.data) return

        const targetMessage = findMessage(session.id, assistantMessageId)
        if (!targetMessage) return

        customerServiceStore.updateMessage(session.id, assistantMessageId, {
            content: `${targetMessage.content}${event.data}`,
            status: 'streaming'
        })
    }

    // 接收知识库来源引用
    eventSource.addEventListener('sources', (event: MessageEvent) => {
        try {
            const sources = JSON.parse(event.data) as ChatSource[]
            if (sources?.length) {
                customerServiceStore.updateMessage(session.id, assistantMessageId, { sources })
            }
        } catch (e) {
            console.warn('Failed to parse sources:', e)
        }
    })

    // 流结束,标记消息完成并关闭连接
    eventSource.addEventListener('close', () => {
        customerServiceStore.updateMessage(session.id, assistantMessageId, {
            status: 'done'
        })
        resetStreamState()
    })
}
这里的关键在于 sources 事件的监听。当后端推送 event: sources 时,前端解析 JSON 数组并通过 updateMessage 将来源挂载到对应的助手消息上。由于 Pinia store 的响应式特性,消息气泡会立即渲染出来源标签。
onmessage 只处理默认事件(内容片段),addEventListener('sources', ...) 只处理来源事件,两者完全解耦。即使内容还在流式输出中,来源信息也能独立接收和展示。
4.3 来源标签渲染
消息气泡组件 MessageBubble.vue 在消息内容下方渲染来源标签。
xml
<template>
  <div class="message-bubble" :class="message.role">
    <div class="bubble-main" :class="message.role">
      <!-- 消息内容 -->
      <div class="bubble-content" :class="message.role" v-html="renderedContent"></div>

      <!-- 来源标签区域 -->
      <div v-if="message.role === 'assistant' && message.sources?.length" class="bubble-sources">
        <span class="sources-label">参考来源:</span>
        <div class="sources-list">
          <span
            v-for="(source, idx) in message.sources"
            :key="idx"
            class="source-tag"
            :class="{ clickable: !!source.content }"
            @click="source.content && showSourceDetail(source)"
          >
            <el-icon :size="12">
              <Document v-if="source.sourceType === 'file'" />
              <Notebook v-else />
            </el-icon>
            {{ source.sourceTitle }}
          </span>
        </div>
      </div>
    </div>

    <!-- 来源原文详情弹窗 -->
    <el-dialog
      v-model="detailVisible"
      :title="detailSource?.sourceTitle"
      width="600px"
      append-to-body
      destroy-on-close
    >
      <div class="source-detail-content" v-html="detailRendered"></div>
    </el-dialog>
  </div>
</template>
渲染逻辑遵循几个原则:
- 条件展示 :只有
assistant角色的消息且sources数组非空时才展示来源区域。 - 图标区分 :文件来源用
Document图标,文本知识用Notebook图标,一目了然。 - 可点击判断 :只有携带
content的来源才标记为可点击(clickableclass),避免点击后弹出空弹窗。 - 原文弹窗:点击来源标签后弹出 Dialog,内容通过 Markdown 渲染器处理后展示,支持代码高亮、表格等格式。
对应的脚本部分:
ini
const detailVisible = ref(false)
const detailSource = ref<ChatSource | null>(null)
const detailRendered = computed(() =>
  detailSource.value?.content ? renderMessageMarkdown(detailSource.value.content) : ''
)

const showSourceDetail = (source: ChatSource) => {
  detailSource.value = source
  detailVisible.value = true
}
4.4 来源标签样式
来源标签使用轻量的标签样式,悬停时高亮为主题色,视觉上与消息内容形成层次区分。
css
.bubble-sources {
  margin-top: 8px;
  padding: 8px 12px;
  border-radius: 8px;
  background: var(--el-fill-color-extra-light);
  border: 1px solid var(--el-border-color-extra-light);
  font-size: 12px;
  color: var(--el-text-color-secondary);
}

.source-tag {
  display: inline-flex;
  align-items: center;
  gap: 4px;
  padding: 2px 8px;
  border-radius: 4px;
  background: var(--el-fill-color-light);
  border: 1px solid var(--el-border-color-lighter);
  font-size: 12px;
  transition: all 0.2s;

  &.clickable {
    cursor: pointer;

    &:hover {
      color: var(--el-color-primary);
      border-color: var(--el-color-primary-light-5);
      background: var(--el-color-primary-light-9);
    }
  }
}
样式全部基于 Element Plus 的 CSS 变量,自动适配明暗主题,不需要额外处理暗色模式。
五、知识更新与向量重建
知识库是活的,内容会增删改。每次修改都需要同步更新向量库,否则检索结果就会过时。
更新知识时:先删除旧向量,再重新写入。
less
// 删除旧向量
vectorStore.delete(List.of("knowledge_" + id));
updateById(entity);

// 重新写入向量库
Map<String, Object> metadata = JacksonUtils.toMap(entity.getMetadataJson(), String.class, Object.class);
metadata.put("_sourceType", "knowledge");
metadata.put("_sourceTitle", entity.getTitle());
metadata.put("_sourceId", entity.getId());
vectorStore.add(List.of(new Document("knowledge_" + entity.getId(), entity.getContent(), metadata)));全量重建:当 Embedding 模型升级或向量库数据损坏时,可以触发全量重建。
less
@Override
@Transactional(rollbackFor = Exception.class)
public void rebuildAllVectors() {
    List<AiKnowledge> list = list();
    if (list == null || list.isEmpty()) return;

    // 删除所有旧向量
    List<String> ids = list.stream()
            .map(k -> "knowledge_" + k.getId())
            .collect(Collectors.toList());
    vectorStore.delete(ids);