Spring整合Web环境实现思路及SpringMVC发展背景介绍
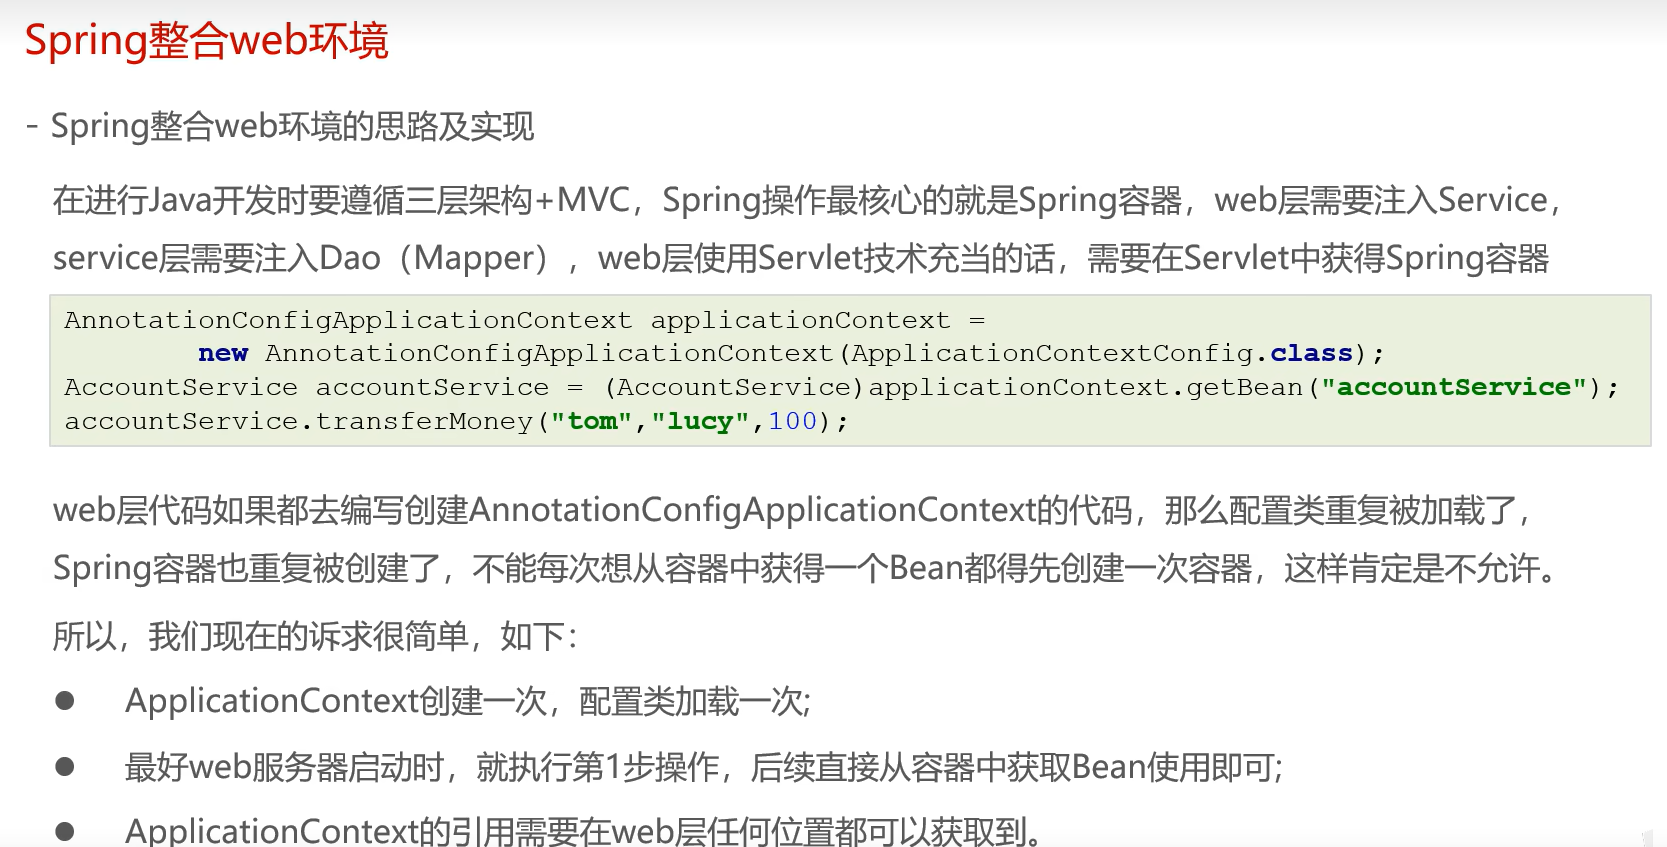
一、概述
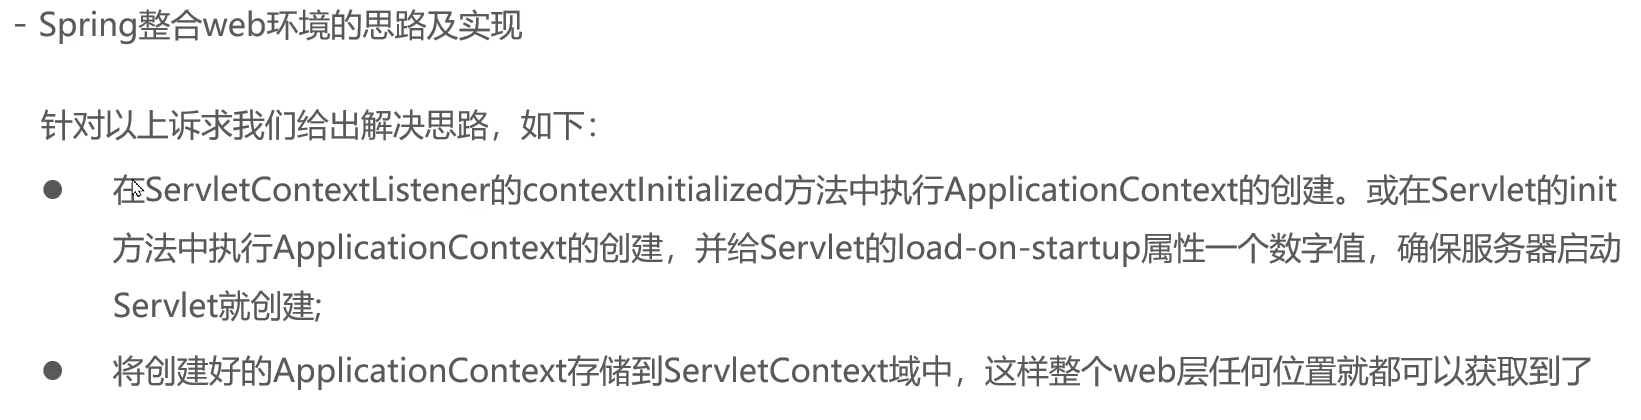
二、实现及其思路
2.1思路
2.2实现
想要使用最终版本,直接看2.3
1、定义监听器在里面加载加载Spring容器,且将Spring容器存储到ervletContext当中
java
package com.itheima.lisener;

import org.springframework.context.ApplicationContext;
import org.springframework.context.support.ClassPathXmlApplicationContext;

import javax.servlet.ServletContextEvent;
import javax.servlet.ServletContextListener;

public class ContexLoaderLisener implements ServletContextListener {
    @Override
    public void contextInitialized(ServletContextEvent sce) {
        //    加载Spring容器,
        ApplicationContext app = new ClassPathXmlApplicationContext("applicationContext.xml");
//        将容器存储到ServletContext当中,先get到ServletContext再set进去
        sce.getServletContext().setAttribute("applicationContext",app);


    }


}
2、在Servlet中通过获取request,再通过request获取servletContext,由servletContext获取到我们之前set的Spring容器,进而通过Spring容器获取Service
java
package com.itheima.web;


import com.itheima.service.AccountService;
import org.springframework.context.ApplicationContext;
import org.springframework.context.support.ClassPathXmlApplicationContext;
import org.springframework.web.context.support.WebApplicationContextUtils;

import javax.servlet.ServletContext;
import javax.servlet.ServletException;
import javax.servlet.annotation.WebServlet;
import javax.servlet.http.HttpServlet;
import javax.servlet.http.HttpServletRequest;
import javax.servlet.http.HttpServletResponse;
import java.io.IOException;

@WebServlet(urlPatterns = "/accountServlet2")
public class AccountServlet2 extends HttpServlet {

    protected void doGet(HttpServletRequest request, HttpServletResponse response) throws ServletException, IOException {

//        ApplicationContext applicationContext = new ClassPathXmlApplicationContext("applicationContext.xml");
        //        再是通过servlet来加载ServletContext
       ServletContext servletContext =  request.getServletContext();
       ApplicationContext app= (ApplicationContext) servletContext.getAttribute("applicationContext");
//       再获取AccountService

//      AccountService accountService =  (AccountService) applicationContext.getBean(AccountService.class);
        AccountService accountService =  (AccountService) app.getBean(AccountService.class);
        accountService.transferMoney("tom","lucy",500);

    }
}
3、在web.xml中配置监听器即可:
java
<?xml version="1.0" encoding="UTF-8"?>
<web-app xmlns="http://xmlns.jcp.org/xml/ns/javaee"
         xmlns:xsi="http://www.w3.org/2001/XMLSchema-instance"
         xsi:schemaLocation="http://xmlns.jcp.org/xml/ns/javaee http://xmlns.jcp.org/xml/ns/javaee/web-app_3_1.xsd"
         version="3.1">
<!--    配置lisener-->
     <listener>
        <listener-class>com.itheima.lisener.ContexLoaderLisener</listener-class>
    </listener>

</web-app>
但是以上的方法并不完美,存在高耦合的特点,如:** ApplicationContext app = new ClassPathXmlApplicationContext("applicationContext.xml");**、**** ApplicationContext app= (ApplicationContext) servletContext.getAttribute("applicationContext");**这些都是写死的,下面将通过一个工具类来实现,代码解耦合,当然只是初步实现而已,实现以后我们就可以在web.xml中配置我们想要的任何名字的配置文件了,下面是代码(已经有详细的注释了,我就不再过多解释了):
java
package com.itheima.web;

import org.springframework.context.ApplicationContext;

import javax.servlet.ServletContext;

public class WebApplicationContextUtils {
    static final String APPLICATION_CONTEXT = "applicationContext";
//    由于这是一个普通的Java的Bean所以需要借助ServletContext来获取Spring容器
    public static ApplicationContext getWebApplicationContext(ServletContext servletContext){
        ApplicationContext applicationContext = (ApplicationContext) servletContext.getAttribute(APPLICATION_CONTEXT);
        return applicationContext;
    }
}
java
package com.itheima.web;


import com.itheima.service.AccountService;
import org.springframework.context.ApplicationContext;
import javax.servlet.ServletContext;
import javax.servlet.ServletException;
import javax.servlet.annotation.WebServlet;
import javax.servlet.http.HttpServlet;
import javax.servlet.http.HttpServletRequest;
import javax.servlet.http.HttpServletResponse;
import java.io.IOException;

@WebServlet(urlPatterns = "/accountServlet2")
public class AccountServlet2 extends HttpServlet {

    protected void doGet(HttpServletRequest request, HttpServletResponse response) throws ServletException, IOException {

//        ApplicationContext applicationContext = new ClassPathXmlApplicationContext("applicationContext.xml");
        //        再是通过servlet来加载ServletContext
       ServletContext servletContext =  request.getServletContext();
       ApplicationContext app= WebApplicationContextUtils.getWebApplicationContext(servletContext);
//       再获取AccountService

//      AccountService accountService =  (AccountService) applicationContext.getBean(AccountService.class);
        AccountService accountService =  (AccountService) app.getBean(AccountService.class);
        accountService.transferMoney("tom","lucy",500);

    }


}
java
package com.itheima.lisener;

import org.springframework.context.ApplicationContext;
import org.springframework.context.support.ClassPathXmlApplicationContext;

import javax.servlet.ServletContext;
import javax.servlet.ServletContextEvent;
import javax.servlet.ServletContextListener;

public class ContextLoaderListener implements ServletContextListener {
    private String CONTEXT_CONFIG_LOCATION = "contextConfigLocation";
    @Override
    public void contextInitialized(ServletContextEvent sce) {
        System.out.println("contextInitialized...");
        ServletContext servletContext = sce.getServletContext();
//        获取配置文件的名称
        String contextConfigLocation = servletContext.getInitParameter(CONTEXT_CONFIG_LOCATION);
//        然后这里只简单处理,实际的框架并不是这样
        contextConfigLocation= contextConfigLocation.substring("classpath:".length());
        //    加载Spring容器,
        ApplicationContext app = new ClassPathXmlApplicationContext(contextConfigLocation);
//        将容器存储到ServletContext当中,先get到ServletContext再set进去
        servletContext.setAttribute("applicationContext",app);


    }


}
2.3想要直接运行,直接看这里
实际上ContexLoaderLisener和WebApplicationContextUtils都是Spring帮我们配置好的,我们只需要导入Spring-web的jar包,在web.xml中配置好就可以使用了,具体步骤如下:
1、导入依赖:
java
<dependency>
            <groupId>org.springframework</groupId>
            <artifactId>spring-web</artifactId>
            <version>5.3.7</version>
        </dependency>
2、在web.xml中配置好Spring的监听器:
java
<?xml version="1.0" encoding="UTF-8"?>
<web-app xmlns="http://xmlns.jcp.org/xml/ns/javaee"
         xmlns:xsi="http://www.w3.org/2001/XMLSchema-instance"
         xsi:schemaLocation="http://xmlns.jcp.org/xml/ns/javaee http://xmlns.jcp.org/xml/ns/javaee/web-app_3_1.xsd"
         version="3.1">

    <!--定义全局参数-->
    <context-param>
        <param-name>contextConfigLocation</param-name>
        <param-value>classpath:applicationContext.xml</param-value>
    </context-param>
    <listener>
        <listener-class>org.springframework.web.context.ContextLoaderListener</listener-class>
    </listener>
</web-app>
3、改一下Servlet导入的WebApplicationContextUtils的包:
java
package com.itheima.web;

import org.springframework.web.context.support.WebApplicationContextUtils;
import com.itheima.service.AccountService;
import org.springframework.context.ApplicationContext;
import javax.servlet.ServletContext;
import javax.servlet.ServletException;
import javax.servlet.annotation.WebServlet;
import javax.servlet.http.HttpServlet;
import javax.servlet.http.HttpServletRequest;
import javax.servlet.http.HttpServletResponse;
import java.io.IOException;

@WebServlet(urlPatterns = "/accountServlet2")
public class AccountServlet2 extends HttpServlet {

    protected void doGet(HttpServletRequest request, HttpServletResponse response) throws ServletException, IOException {

//        ApplicationContext applicationContext = new ClassPathXmlApplicationContext("applicationContext.xml");
        //        再是通过servlet来加载ServletContext
       ServletContext servletContext =  request.getServletContext();
       ApplicationContext app= WebApplicationContextUtils.getWebApplicationContext(servletContext);
//       再获取AccountService

//      AccountService accountService =  (AccountService) applicationContext.getBean(AccountService.class);
        AccountService accountService =  (AccountService) app.getBean(AccountService.class);
        accountService.transferMoney("tom","lucy",500);

    }

}
三、使用核心配置类的方式来进行配置
如果是使用核心配置类的话那么我们应当是要使用到注解的,下面我们通过源码的形式来进行分析:
java
<?xml version="1.0" encoding="UTF-8"?>
<web-app xmlns="http://xmlns.jcp.org/xml/ns/javaee"
         xmlns:xsi="http://www.w3.org/2001/XMLSchema-instance"
         xsi:schemaLocation="http://xmlns.jcp.org/xml/ns/javaee http://xmlns.jcp.org/xml/ns/javaee/web-app_3_1.xsd"
         version="3.1">

    <!--定义全局参数-->
    <context-param>
        <param-name>contextConfigLocation</param-name>
        <param-value>classpath:applicationContext.xml</param-value>
    </context-param>
<!--    配置lisener-->
<!--    <listener>-->
<!--        <listener-class>org.springframework.web.context.ContextLoaderListener</listener-class>-->
<!--    </listener>-->
    <listener>
        <listener-class>org.springframework.web.context.ContextLoaderListener</listener-class>
    </listener>

</web-app>
既然在ContextLoaderListener中加载配置文件,那么我们来看看ContextLoaderListener:
java
//
// Source code recreated from a .class file by IntelliJ IDEA
// (powered by FernFlower decompiler)
//

package org.springframework.web.context;

import javax.servlet.ServletContextEvent;
import javax.servlet.ServletContextListener;

public class ContextLoaderListener extends ContextLoader implements ServletContextListener {
    public ContextLoaderListener() {
    }

    public ContextLoaderListener(WebApplicationContext context) {
        super(context);
    }

    public void contextInitialized(ServletContextEvent event) {
        this.initWebApplicationContext(event.getServletContext());
    }

    public void contextDestroyed(ServletContextEvent event) {
        this.closeWebApplicationContext(event.getServletContext());
        ContextCleanupListener.cleanupAttributes(event.getServletContext());
    }
}
它本质是ServletContextListener,继承了ContextLoader,进入initWebApplicationContext方法:
java
public WebApplicationContext initWebApplicationContext(ServletContext servletContext) {
        if (servletContext.getAttribute(WebApplicationContext.ROOT_WEB_APPLICATION_CONTEXT_ATTRIBUTE) != null) {
            throw new IllegalStateException("Cannot initialize context because there is already a root application context present - check whether you have multiple ContextLoader* definitions in your web.xml!");
        } else {
            servletContext.log("Initializing Spring root WebApplicationContext");
            Log logger = LogFactory.getLog(ContextLoader.class);
            if (logger.isInfoEnabled()) {
                logger.info("Root WebApplicationContext: initialization started");
            }

            long startTime = System.currentTimeMillis();

            try {
                if (this.context == null) {
                    this.context = this.createWebApplicationContext(servletContext);
                }

                if (this.context instanceof ConfigurableWebApplicationContext) {
                    ConfigurableWebApplicationContext cwac = (ConfigurableWebApplicationContext)this.context;
                    if (!cwac.isActive()) {
                        if (cwac.getParent() == null) {
                            ApplicationContext parent = this.loadParentContext(servletContext);
                            cwac.setParent(parent);
                        }

                        this.configureAndRefreshWebApplicationContext(cwac, servletContext);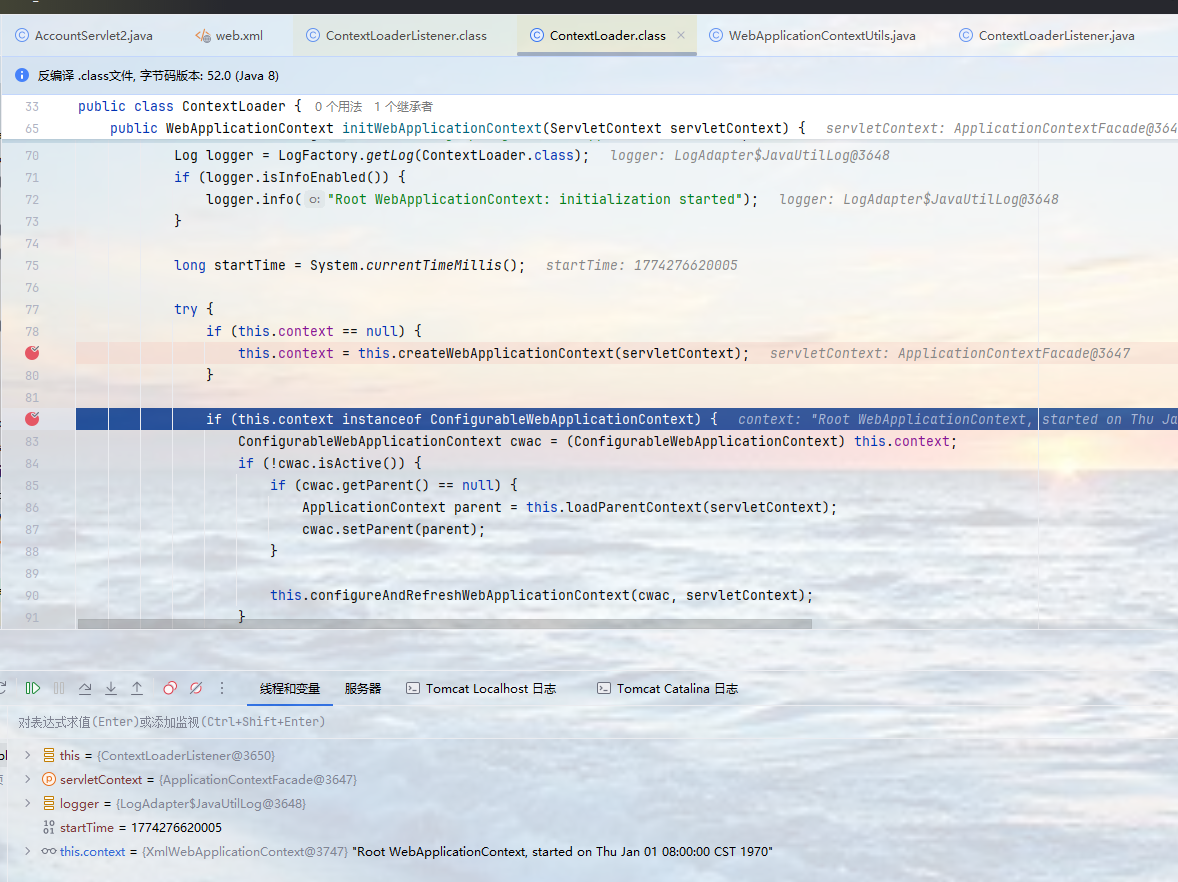
}看到有一个创建WebApplicationContext的代码:this.context = this.createWebApplicationContext(servletContext);,进入:
java
protected WebApplicationContext createWebApplicationContext(ServletContext sc) {
        Class<?> contextClass = this.determineContextClass(sc);
        if (!ConfigurableWebApplicationContext.class.isAssignableFrom(contextClass)) {
            throw new ApplicationContextException("Custom context class [" + contextClass.getName() + "] is not of type [" + ConfigurableWebApplicationContext.class.getName() + "]");
        } else {
            return (ConfigurableWebApplicationContext)BeanUtils.instantiateClass(contextClass);
        }
    }

    protected Class<?> determineContextClass(ServletContext servletContext) {
        String contextClassName = servletContext.getInitParameter("contextClass");
        if (contextClassName != null) {
            try {
                return ClassUtils.forName(contextClassName, ClassUtils.getDefaultClassLoader());
            } catch (ClassNotFoundException ex) {
                throw new ApplicationContextException("Failed to load custom context class [" + contextClassName + "]", ex);
            }
        } else {
            contextClassName = defaultStrategies.getProperty(WebApplicationContext.class.getName());

            try {
                return ClassUtils.forName(contextClassName, ContextLoader.class.getClassLoader());
            } catch (ClassNotFoundException ex) {
                throw new ApplicationContextException("Failed to load default context class [" + contextClassName + "]", ex);
            }
        }
    }
发现它可以依据传递过来的参数contextClass是否为空返回相应的字节码,我们这里没有指定参数所以是空的:
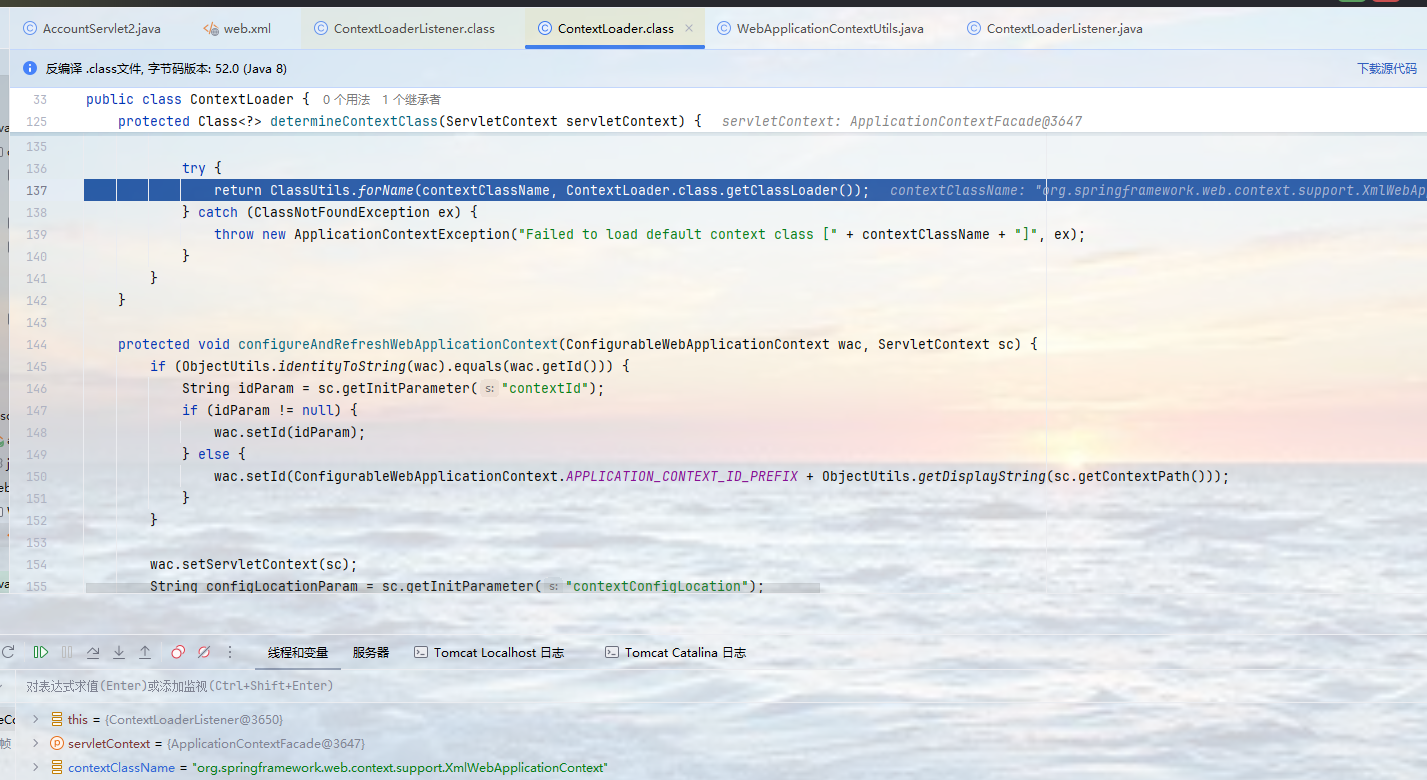
返回的是 XmlWebApplicationContext,然后完成xml形式的Spring容器创建:
那来看看XmlWebApplicationContext的继承体系:
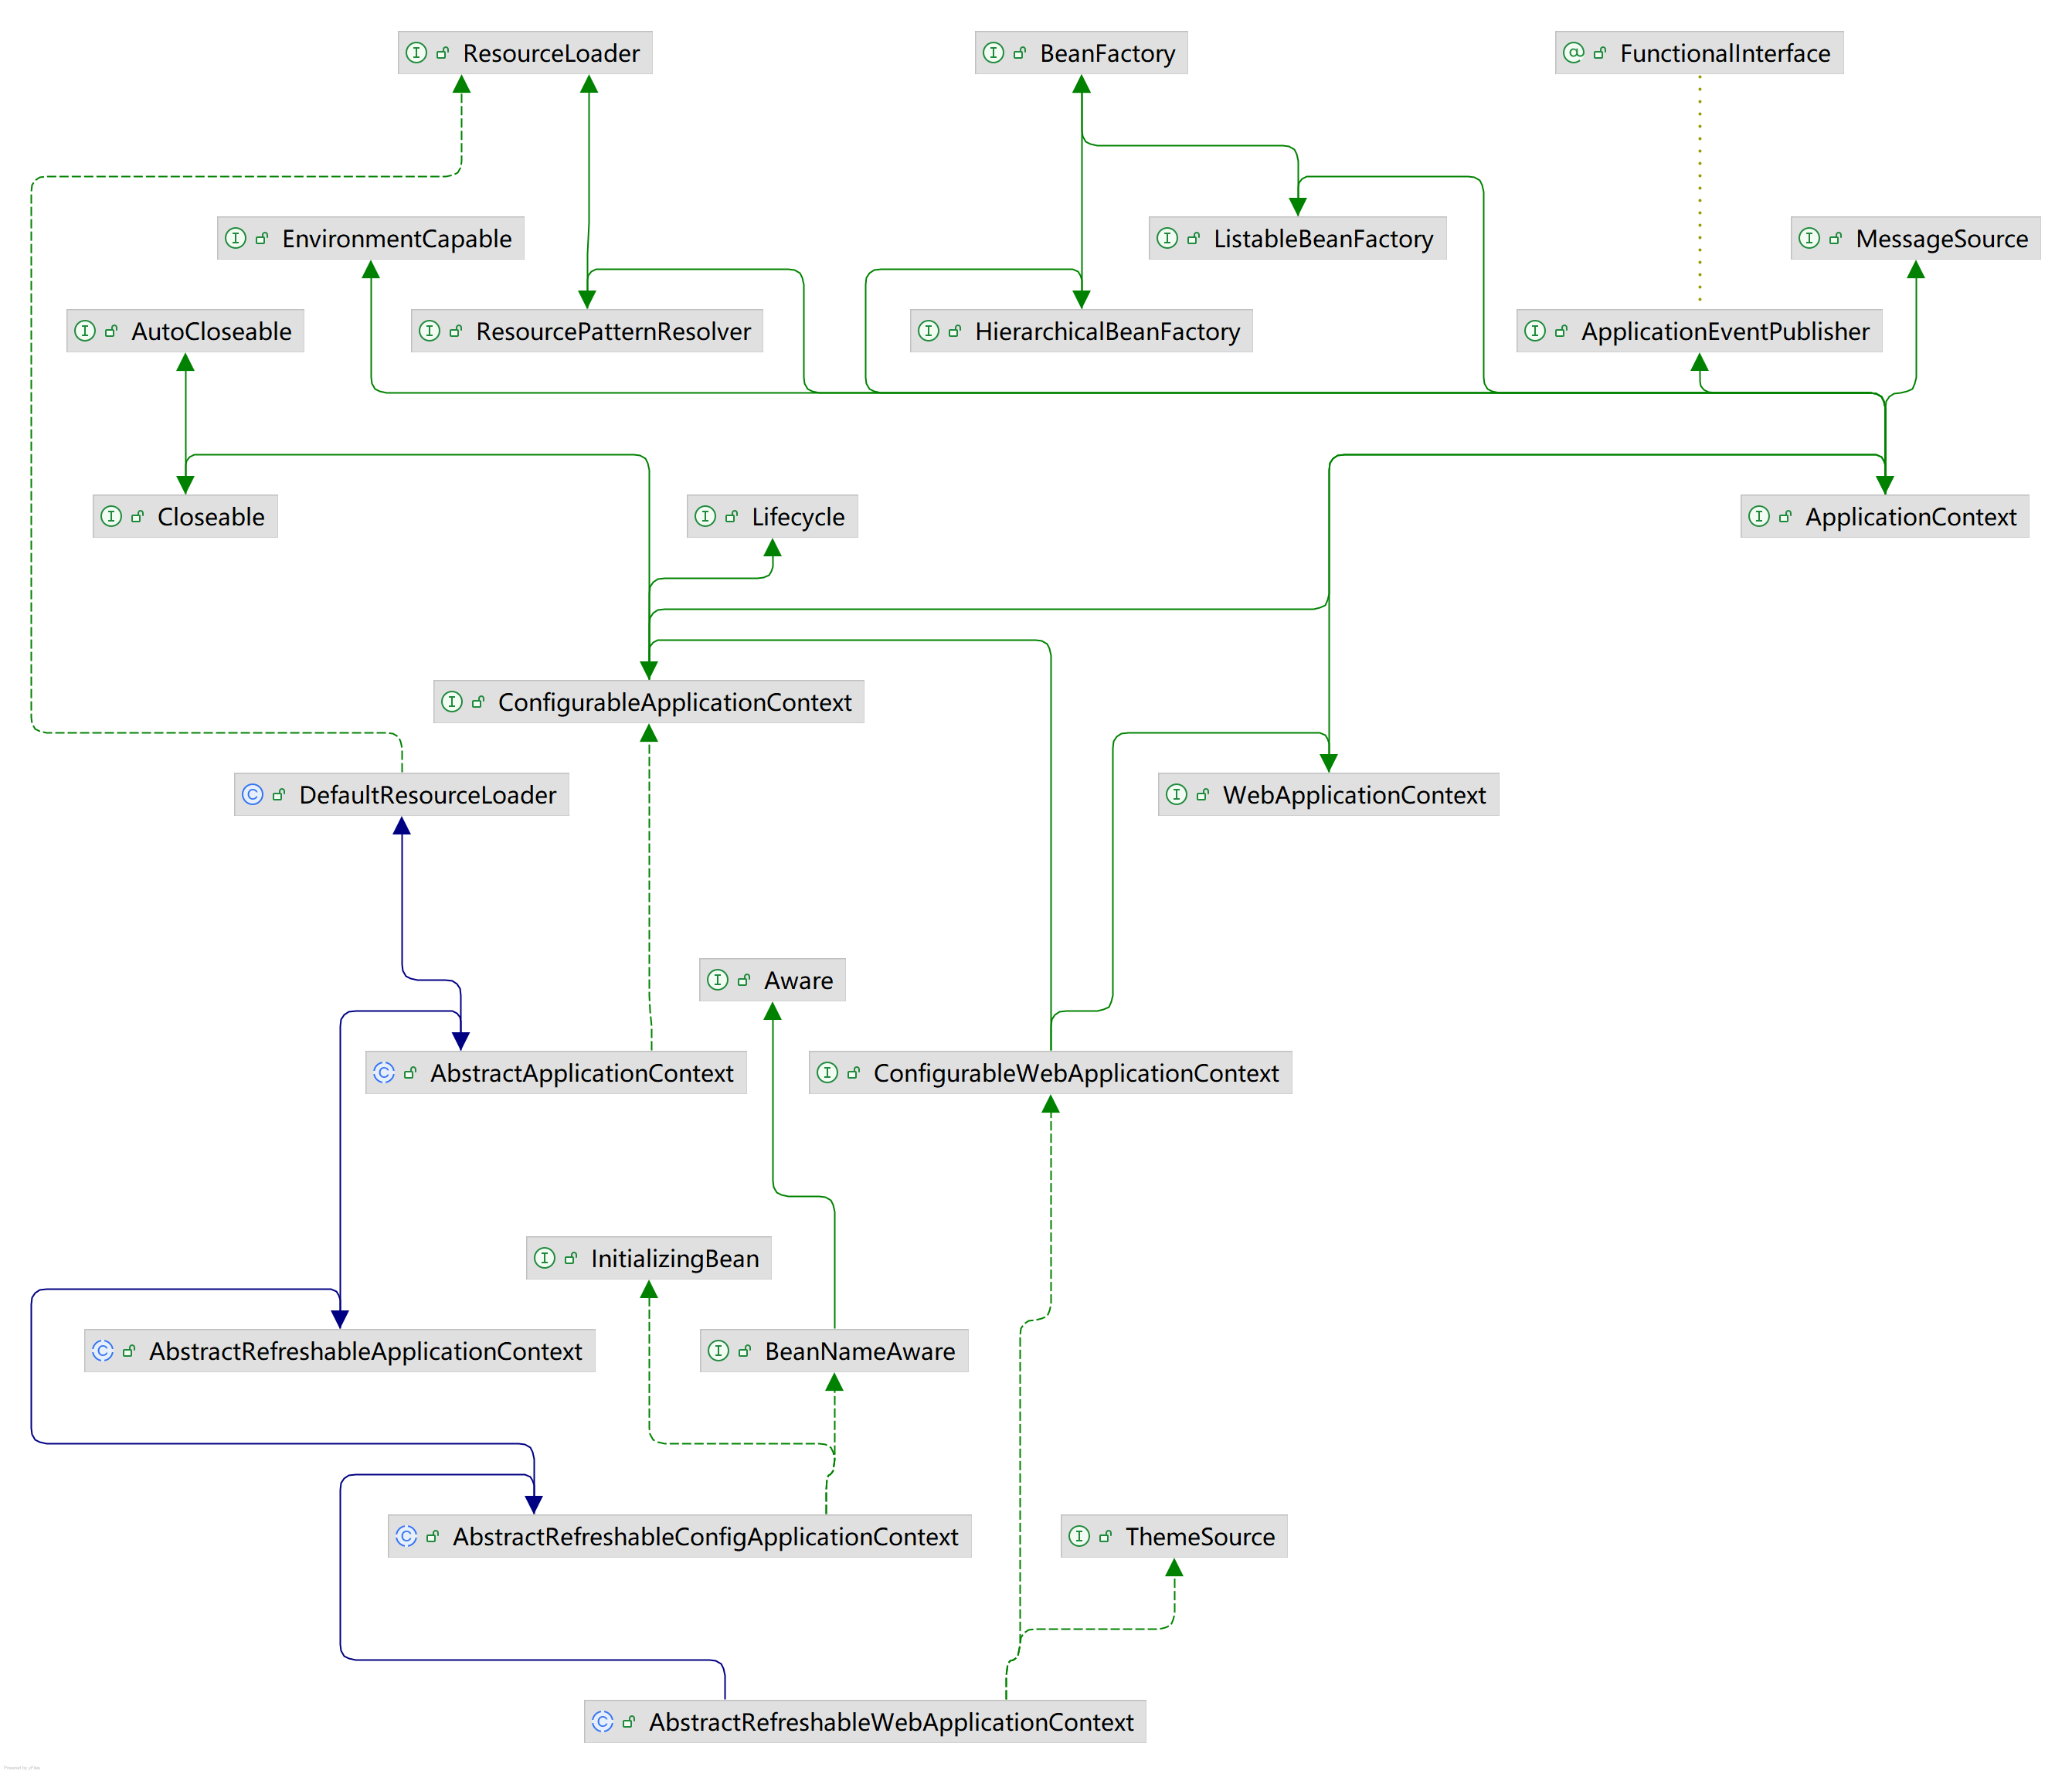
实现了一个WebApplicationContext,我们猜想会不会注解方式的类也会实现这个类呢,来看看WebApplicationContext的继承体系:
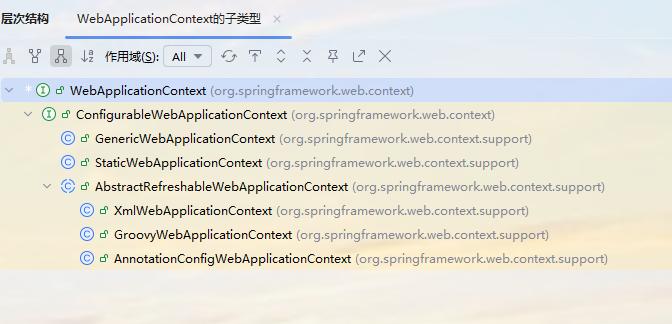
果然,同时我们发现AnnotationConfigWebApplicationContext有一个register注册方法,那么我们将核心配置类置于注册方法当中,然后监听器加载AnnotationConfigWebApplicationContext完成注册,那么核心配置类注册完成。
java
 @Nullable
    protected BeanNameGenerator getBeanNameGenerator() {
        return this.beanNameGenerator;
    }

    public void setScopeMetadataResolver(@Nullable ScopeMetadataResolver scopeMetadataResolver) {
        this.scopeMetadataResolver = scopeMetadataResolver;
    }

    @Nullable
    protected ScopeMetadataResolver getScopeMetadataResolver() {
        return this.scopeMetadataResolver;
    }

    public void register(Class<?>... componentClasses) {
        Assert.notEmpty(componentClasses, "At least one component class must be specified");
        Collections.addAll(this.componentClasses, componentClasses);
    }
这样是否可行呢?我们来试一下:
1、首先为了使用AnnotationConfigWebApplicationContext的register方法来注册核心配置类我们配置一个AnnotationConfigWebApplicationContext的子类MyAnnotationConfigWebApplicationContext:
java
package com.itheima.config;

import org.springframework.web.context.support.AnnotationConfigWebApplicationContext;

public class MyAnnotationConfigWebApplicationContext extends AnnotationConfigWebApplicationContext {
    public MyAnnotationConfigWebApplicationContext() {
        super();
        this.register(SpringConfig.class);
    }
}
2、在web.xml中的contextClass属性配置MyAnnotationConfigWebApplicationContext:
java
<?xml version="1.0" encoding="UTF-8"?>
<web-app xmlns="http://xmlns.jcp.org/xml/ns/javaee"
         xmlns:xsi="http://www.w3.org/2001/XMLSchema-instance"
         xsi:schemaLocation="http://xmlns.jcp.org/xml/ns/javaee http://xmlns.jcp.org/xml/ns/javaee/web-app_3_1.xsd"
         version="3.1">
    <context-param>
        <param-name>contextClass</param-name>
        <param-value>com.itheima.config.MyAnnotationConfigWebApplicationContext</param-value>
    </context-param>
    <listener>
        <listener-class>org.springframework.web.context.ContextLoaderListener</listener-class>
    </listener>
</web-app>
结果如下:
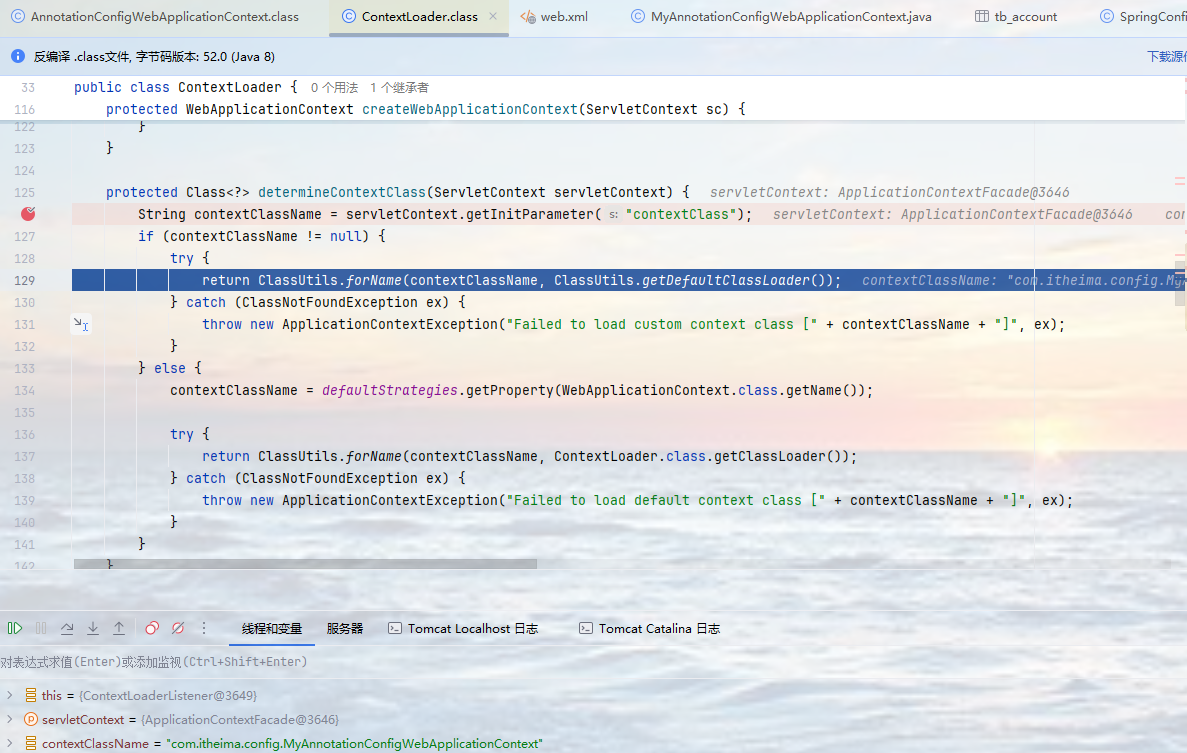
这时后的contextClass就是我们的MyAnnotationConfigWebApplicationContext了,本质就是一个AnnotationConfigWebApplicationContext。
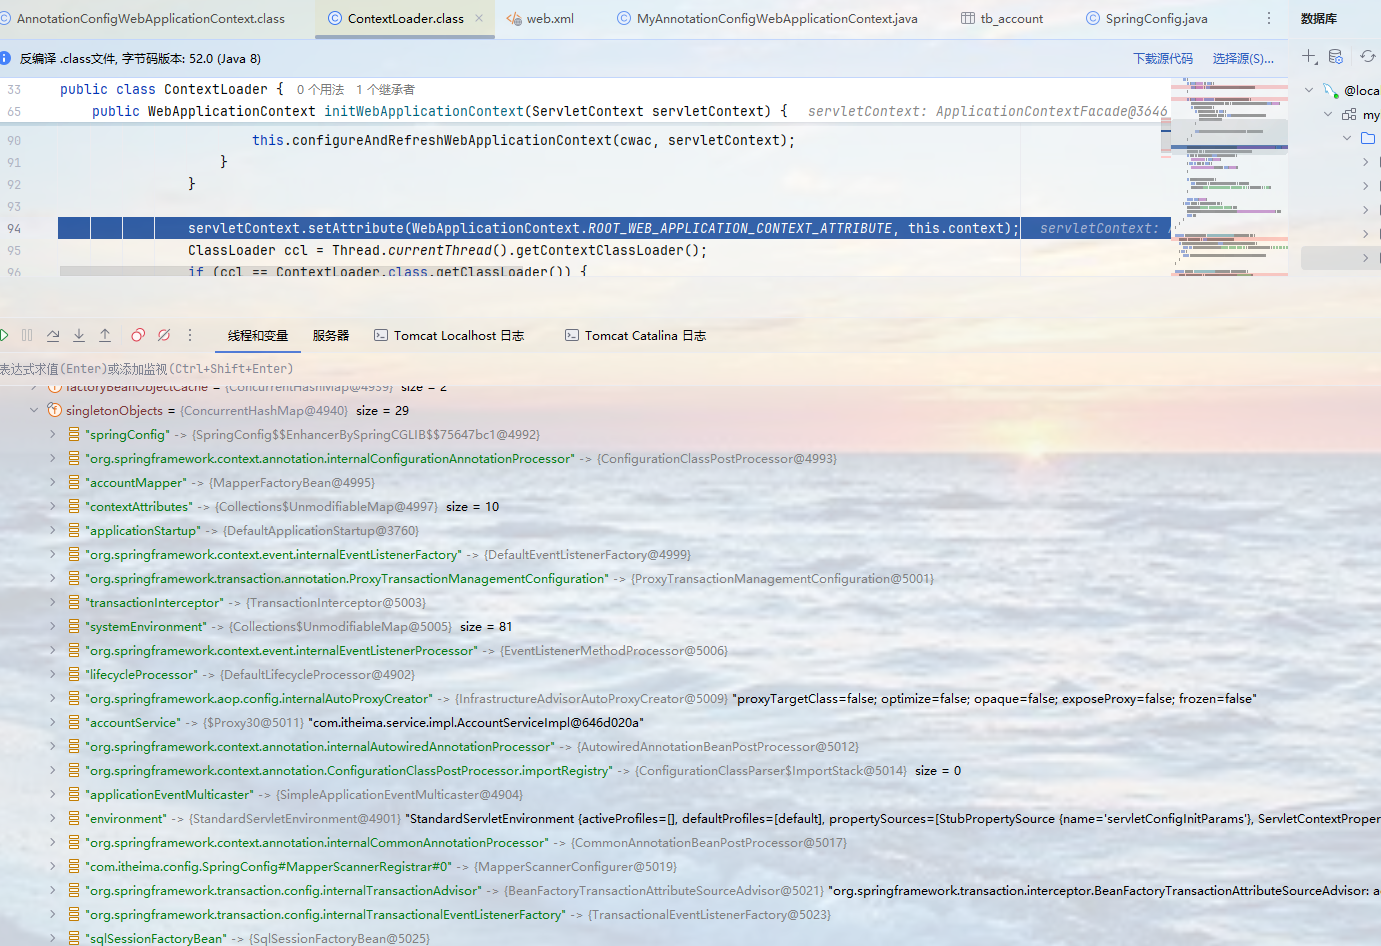
核心配置类确实是注册了,可见这种方式是可行的。
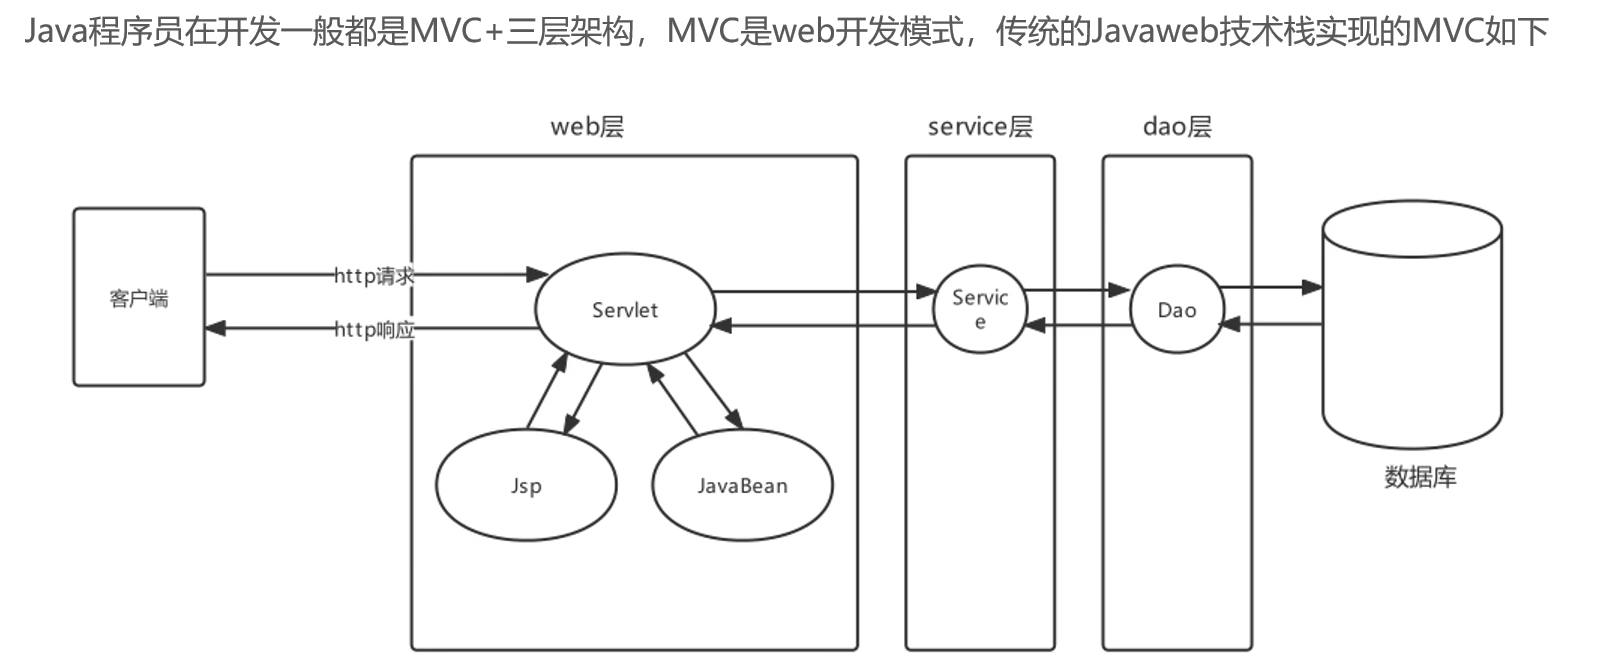
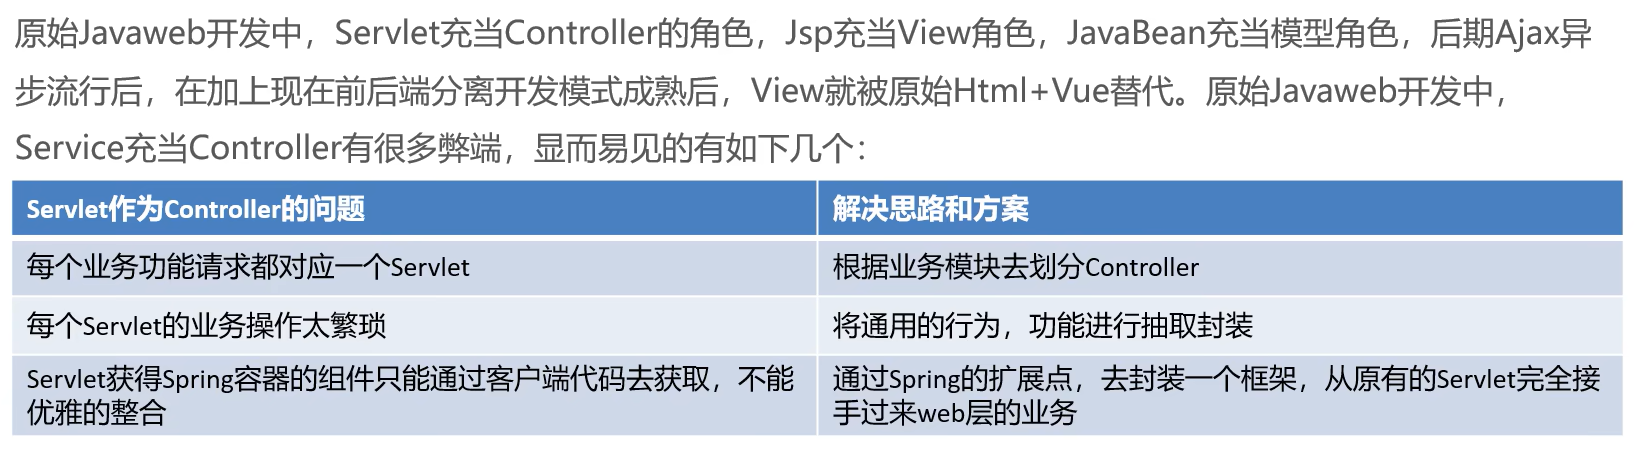
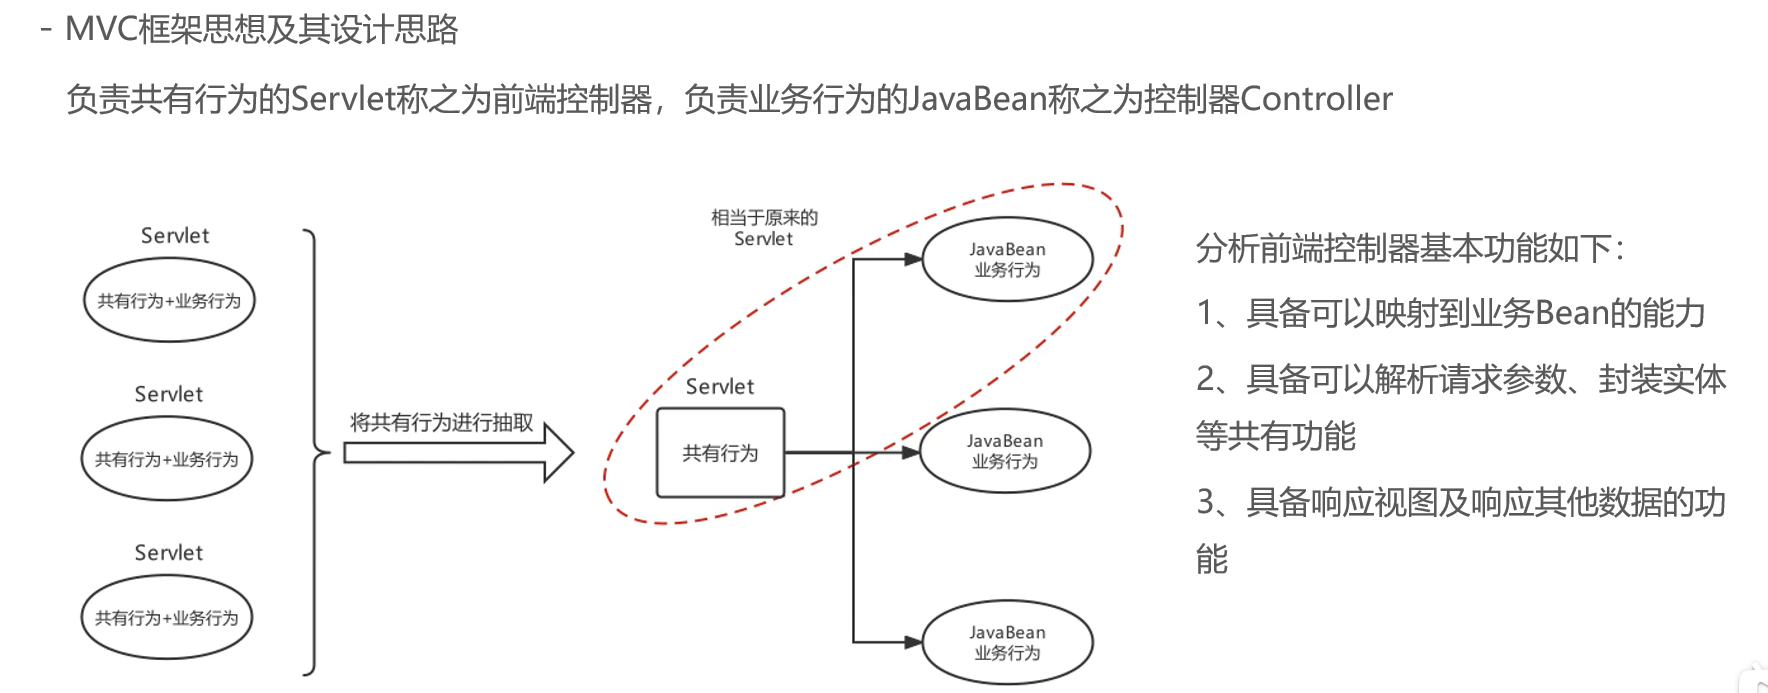
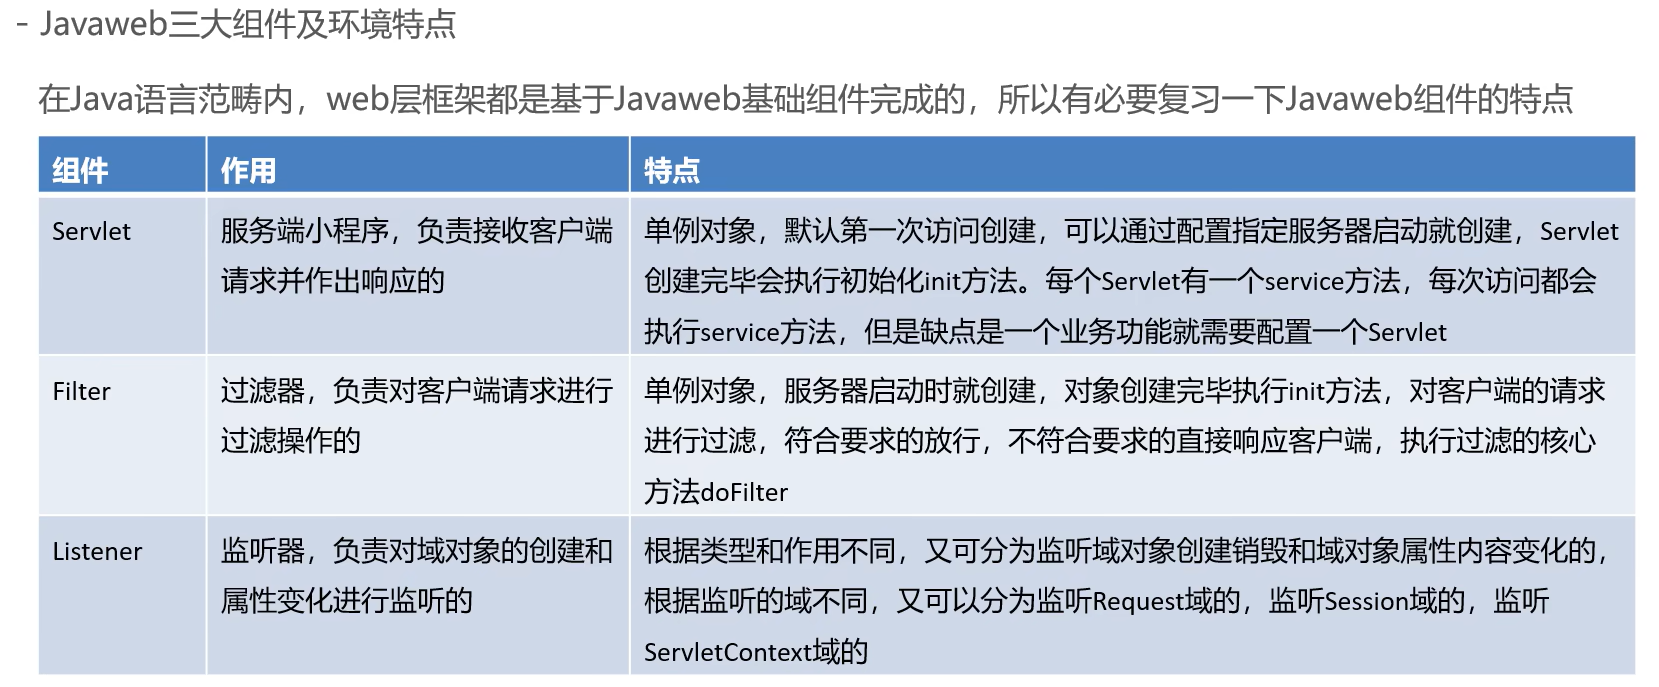
四、SpringMVC的发展背景