这期实现温湿度采集、光照强度监测、智能设备控制(加湿器、PWM 调光 LED、PWM 调速风扇)
确定引脚,根据原理图找出可以使用的引脚开关。根据手册信息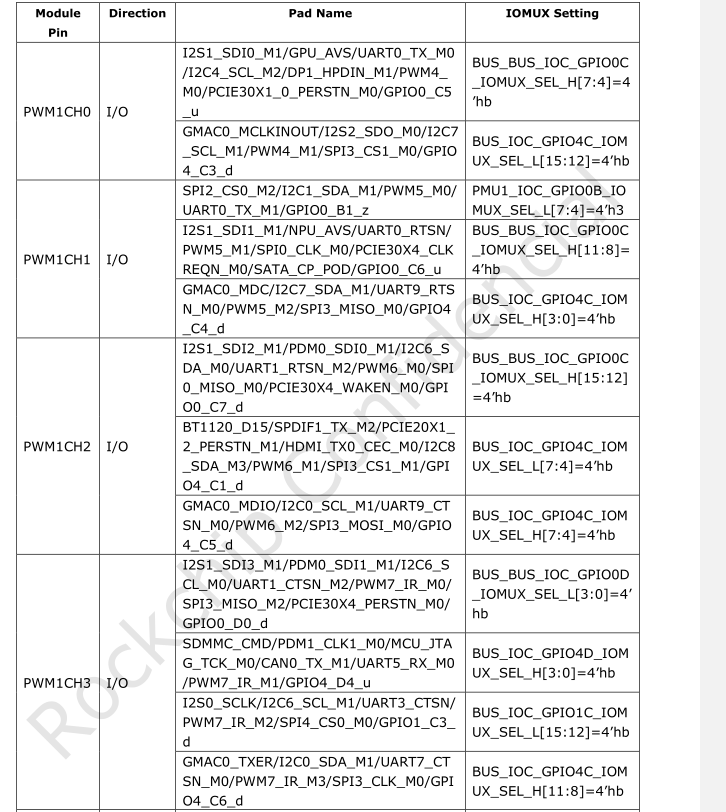
PWM口GPIO0_D0和GPIO0_C6,把设备树GPIO0_D0做5G的复位disable,再加入
&pwm5 {
pinctrl-0 = <&pwm5m1_pins>;
status = "okay";
};
&pwm7 {
pinctrl-0 = <&pwm7m1_pins>;
status = "okay";
};
因为pinctrl.dtsi都定义好了io口做PWM,是PWM几。所以只要打开 status = "okay";。系统就会自动的在/sys/class/pwm/下去生成pwmchip5,直接去写入设置PWM。
echo 0 > /sys/class/pwm/pwmchip2/export echo 50000 > /sys/class/pwm/pwmchip2/pwm0/period echo 10000 > /sys/class/pwm/pwmchip2/pwm0/duty_cycle echo normal > /sys/class/pwm/pwmchip2/pwm0/polarity echo 1 > /sys/class/pwm/pwmchip2/pwm0/enable
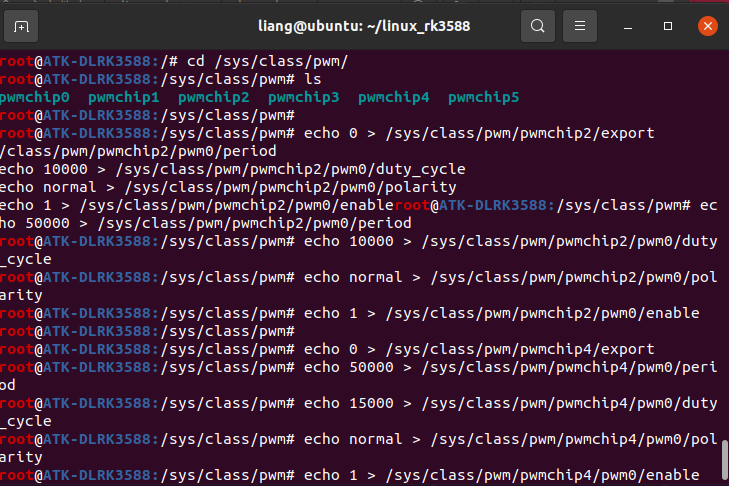
pwmchip2是PWM5,pwmchip5是PWM7。通过示波器正常显示PWM波形图
LED 亮度调节GPIO0_C6,PWM5
风扇调速 GPIO1_D0 PWM7
加湿器(开关)GPIO1_D3
DHT11 温湿度GPIO1_D2
光敏传感器SARADC_VIN4
需要GPIO,PWM,ADC驱动。所以设备树加入以下代码
	humidifier {
    compatible = "rzroomi,humidifier";
    gpios = <&gpio1 RK_PD3 GPIO_ACTIVE_HIGH>;
    status = "okay";
	};
	dht11 {
    compatible = "rzroomi,dht11";
    gpios = <&gpio1 RK_PD2 GPIO_ACTIVE_HIGH>;
    status = "okay";
	};


&pwm5 {
	pinctrl-0 = <&pwm5m1_pins>;
	status = "okay";
};
&pwm6 {
	pinctrl-0 = <&pwm6m1_pins>;
	status = "okay";
};
&pwm7 {
	pinctrl-0 = <&pwm7m1_pins>;
	status = "okay";
};
经过编译,编译是成功了,烧写到开发版,结果usb识别不了设备了。
把之前的代码烧录进去,加入PWM和GPIO正常,可能是ADC设备驱动的原因把。
在驱动代码使用platform + miscdevice + gpiod + devm + ioctl进行编写驱动,代码会更精简。与之前的驱动代码相比有以下优点
1使用miscdevice,替代了下面的代码
alloc_chrdev_region(...) cdev_init(...) cdev_add(...) class_create(...) device_create(...)
- 申请主设备号(固定 10)
- 自动分配次设备号
- 自动创建 /dev/xxx
- 自动绑定 fops
- 自动实现 open/close
2使用platform,替代了下面的代码
dev->nd = of_find_node_by_path(...); of_property_read_string(...); of_get_named_gpio_flags(...); gpio_request(...); gpio_direction_output(...);
- 找设备树节点
- 检查 compatible
- 解析 gpios 属性
- 申请 GPIO
- 初始化输出模式
- 默认输出低电平
3用了 ioctl 而不是 write,ioctl可传入更多的常数来控制设备
以下就是humidifier_gpio_driver.c
#include <linux/module.h>
#include <linux/platform_device.h>
#include <linux/miscdevice.h>
#include <linux/fs.h>
#include <linux/uaccess.h>
#include <linux/gpio/consumer.h>
#include <linux/of.h>

/*
_IOW = 写命令
'H' = 幻数(随便写)
0 = 命令号
int = 要传递的数据类型
用途:应用程序发这个命令,就能控制 GPIO 高低电平。
*/
#define IOCTL_HUMI_SET _IOW('H', 0, int)

static struct gpio_desc *humi_gpio;

//ioctl 函数(应用层控制硬件的入口)
//把应用层数据传入内核,并操作io
static long humi_ioctl(struct file *file, unsigned int cmd, unsigned long arg)
{
    int value;

    if (copy_from_user(&value, (int __user *)arg, sizeof(int)))
        return -EFAULT;

    gpiod_set_value(humi_gpio, !!value);
    return 0;
}
/*
unlocked_ioctl
compat_ioctl
*/
static const struct file_operations humi_fops = {
    .owner = THIS_MODULE,
    .unlocked_ioctl = humi_ioctl,
    .compat_ioctl = humi_ioctl,
};


static struct miscdevice humi_misc = {
    .minor = MISC_DYNAMIC_MINOR,            // 自动分配次设备号
    .name = "humidifier",                   // 设备名 /dev/humidifier
    .fops = &humi_fops,                     // 关联操作函数
};

//Platform 驱动的探测函数
static int humi_probe(struct platform_device *pdev)
{
    humi_gpio = devm_gpiod_get(&pdev->dev, NULL, GPIOD_OUT_LOW);
    if (IS_ERR(humi_gpio))
        return PTR_ERR(humi_gpio);

    misc_register(&humi_misc);
    dev_info(&pdev->dev, "HUMI probe ok\n");
    return 0;
}


//设备树匹配表
static const struct of_device_id humi_of_match[] = {
    { .compatible = "rzroomi,humidifier" },
    {},
};
//告诉内核:这个驱动支持的设备。
MODULE_DEVICE_TABLE(of, humi_of_match);

//把 probe 函数和匹配表绑定到 Platform 驱动。
static struct platform_driver humi_driver = {
    .probe = humi_probe,
    .driver = {
        .name = "humidifier",
        .of_match_table = humi_of_match,
    },
};

// 给 main.c 调用
int humi_probe_register(void)
{
    return platform_driver_register(&humi_driver);
}

void humi_probe_unregister(void)
{
    platform_driver_unregister(&humi_driver);
}
另外两个打开PWM的代码,自动创建设备了,似乎也不需要写驱动了。
以下就是main.c
#include <linux/module.h>

extern int led_probe_register(void);
extern void led_probe_unregister(void);

extern int fan_probe_register(void);
extern void fan_probe_unregister(void);

extern int humi_probe_register(void);
extern void humi_probe_unregister(void);

static int __init smart_driver_init(void)
{
    led_probe_register();
    fan_probe_register();
    humi_probe_register();
    return 0;
}

// 总出口(唯一)
static void __exit smart_driver_exit(void)
{
    humi_probe_unregister();
    fan_probe_unregister();
    led_probe_unregister();
}

module_init(smart_driver_init);
module_exit(smart_driver_exit);

MODULE_LICENSE("GPL");
这次的代码使用了四个.c文件,主程序是main.c。然后通过Makefile结合在一起进行编译生成ko文件。代码的思路是这样的:
insmod main.ko后,驱动代码里先会去匹配设备,比如先匹配humi_probe_register,Platform 驱动根据所给的name,compatible对应设备树内容,获取gpios然后就会执行humi_probe函数,在里面执行devm_gpiod_get申请gpio的使用权,然后设置默认默认输出低电平,然后执行misc_register(&humi_misc);作用就是创建字符设备,也就是上期代码里的cdevinit,class_create,device_create.当应用对其控制就可以执行命令iocrt('H', 1, int),设置gpio为高,就可以打开这个加湿器,比上一期的wirte更加灵活,因为可以修改参数。
三天的笔记到这了,如有错误请大佬指正