目录
[米尔T113-i 驱动开发](#米尔T113-i 驱动开发)
[1、Buildroot 编译 host-fakeroot 包时出现的错误](#1、Buildroot 编译 host-fakeroot 包时出现的错误)
[2、buildroot编译编译 host-m4-1.4.18 时遇到的错误](#2、buildroot编译编译 host-m4-1.4.18 时遇到的错误)
[3、编译 Device Tree Compiler (DTC) 1.4.7 时遇到的链接错误](#3、编译 Device Tree Compiler (DTC) 1.4.7 时遇到的链接错误)
[4、CMake 3.8.2 的代码缺少必要的头文件包含,导致 std::numeric_limits 未定义](#4、CMake 3.8.2 的代码缺少必要的头文件包含,导致 std::numeric_limits 未定义)
[5、fakeroot 在运行时需要 System V IPC 支持](#5、fakeroot 在运行时需要 System V IPC 支持)
[6、libglib2 依赖的 libpcre库未找到,导致 configure 失败](#6、libglib2 依赖的 libpcre库未找到,导致 configure 失败)
[九、开发板编译时遇到了无法验证的 SSL 证书](#九、开发板编译时遇到了无法验证的 SSL 证书)
十三、新T113-i开发板的4G模块(ML307R)不能上网
米尔T113-i 驱动开发
下面是开发米尔的T113-i核心板,以适配我们自己设计的底板。使用wsl来编译米尔官方提供的SDK,在编译官方提供的SDK时出现的问题和解决方法。其中最核心的就是怎么将米尔的T113-i核心板适配到我们自己设计的底板,并使底板中的GPIO、IIC、UART、USB正常驱动外设。在驱动中怎么适配我们的4G模块和USB接口也是一大难点。在这里我们展示了我们自己对驱动适配底层底板硬件的解决方法,希望这能够解决您在开发过程中所遇到的问题。
一、交叉编译脚本的执行
如果只./脚本的去执行,导致变量未加载到当前shell中,而是在新的一个shell中执行,执行玩这个脚本也就结束了这个新的shell,相当于没有设置。
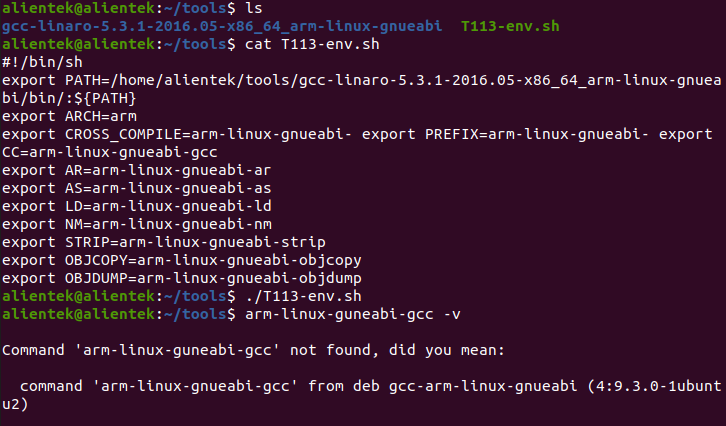
所以我们执行如下操作,就可以正常的添加
bash
source T113-env.sh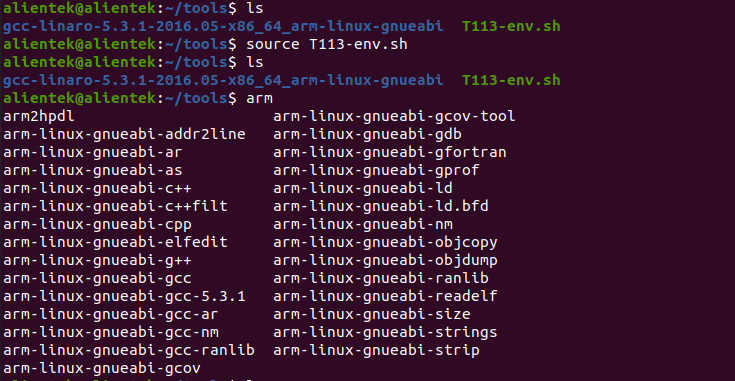
二、buildroot编译报错
在windows10上部署好wsl2,进行米尔官方提供的SDK编译,就算是官方提供的SDK也可能会出现如下的一些问题(注意:SDK必须放在家目录下进行编译,不然可能出现的报错还会更多)
1、Buildroot 编译 host-fakeroot 包时出现的错误
出错日志
bash
make[3]: *** [Makefile:642: libfakeroot.lo] Error 1
make[3]: *** Waiting for unfinished jobs....
libtool: link: /usr/bin/ar cru .libs/libcommunicate.a .libs/communicate.o
/usr/bin/ar: `u' modifier ignored since `D' is the default (see `U')
libtool: link: /usr/bin/ranlib .libs/libcommunicate.a
libtool: link: ( cd ".libs" && rm -f "libcommunicate.la" && ln -s "../libcommunicate.la" "libcommunicate.la" )
make[3]: Leaving directory '/home/itlsl/T113/out/t113_i/myir_image_yt113i/buildroot/buildroot/build/host-fakeroot-1.20.2'
make[2]: *** [Makefile:660: all-recursive] Error 1
make[2]: Leaving directory '/home/itlsl/T113/out/t113_i/myir_image_yt113i/buildroot/buildroot/build/host-fakeroot-1.20.2'
make[1]: *** [Makefile:434: all] Error 2
make[1]: Leaving directory '/home/itlsl/T113/out/t113_i/myir_image_yt113i/buildroot/buildroot/build/host-fakeroot-1.20.2'
make: *** [package/pkg-generic.mk:241: /home/itlsl/T113/out/t113_i/myir_image_yt113i/buildroot/buildroot/build/host-fakeroot-1.20.2/.stamp_built] Error 2
make: Leaving directory '/home/itlsl/T113/buildroot/buildroot-201902'
ERROR: build buildroot Failed
INFO: build_buildroot_rootfs failed
itlsl@PC-20230311LFHV:~/T113$如果出现了上面的报错打印信息,可以通过推荐打补丁问题的方式来解决,在你的SDK目录/T113/buildroot/buildroot-201902/package/fakeroot下新建如下文件0003-libfakeroot.c-define-_stat_ver-if-not-already-define.patch,文件内容如下:
bash
From ca68c7336dea4a07cf5b77c1fdc9e9aee4984ca5 Mon Sep 17 00:00:00 2001
From: Ilya Lipnitskiy <ilya.lipnitskiy@gmail.com>
Date: Thu, 11 Feb 2021 20:59:25 -0800
Subject: [PATCH 1/3] libfakeroot.c: define _STAT_VER if not already defined
Signed-off-by: Ilya Lipnitskiy <ilya.lipnitskiy@gmail.com>
---
libfakeroot.c | 10 ++++++++++
1 file changed, 10 insertions(+)
diff --git a/libfakeroot.c b/libfakeroot.c
index 3e80e38..14cdbc4 100644
--- a/libfakeroot.c
+++ b/libfakeroot.c
@@ -90,6 +90,16 @@
#define SEND_GET_XATTR64(a,b,c) send_get_xattr64(a,b)
#endif
+#ifndef _STAT_VER
+ #if defined (__aarch64__)
+ #define _STAT_VER 0
+ #elif defined (__x86_64__)
+ #define _STAT_VER 1
+ #else
+ #define _STAT_VER 3
+ #endif
+#endif
+
/*
These INT_* (which stands for internal) macros should always be used when
the fakeroot library owns the storage of the stat variable.清理之前编译缓存
bash
rm -rf 你的SDK目录/T113/out/t113_i/myir_image_yt113i/buildroot/buildroot/build/host-fakeroot-1.20.2/然后重新编译即可。
2、buildroot编译编译 host-m4-1.4.18 时遇到的错误
如果出现如下报错信息:
bash
In file included from /usr/include/signal.h:328,
                 from ./signal.h:52,
                 from c-stack.c:49:
c-stack.c:55:26: error: missing binary operator before token "("
   55 | #elif HAVE_LIBSIGSEGV && SIGSTKSZ < 16384
      |                          ^~~~~~~~
  CC       exitfail.o
  CC       execute.o
  CC       fatal-signal.o
  CC       fd-hook.o
  CC       fd-safer-flag.o
make[4]: *** [Makefile:1915: c-stack.o] Error 1
make[4]: *** Waiting for unfinished jobs....
  CC       dup-safer-flag.o
make[4]: Leaving directory '/home/itlsl/T113/out/t113_i/myir_image_yt113i/buildroot/buildroot/build/host-m4-1.4.18/lib'
make[3]: *** [Makefile:1674: all] Error 2
make[3]: Leaving directory '/home/itlsl/T113/out/t113_i/myir_image_yt113i/buildroot/buildroot/build/host-m4-1.4.18/lib'
make[2]: *** [Makefile:1572: all-recursive] Error 1
make[2]: Leaving directory '/home/itlsl/T113/out/t113_i/myir_image_yt113i/buildroot/buildroot/build/host-m4-1.4.18'
make[1]: *** [Makefile:1528: all] Error 2
make[1]: Leaving directory '/home/itlsl/T113/out/t113_i/myir_image_yt113i/buildroot/buildroot/build/host-m4-1.4.18'
make: *** [package/pkg-generic.mk:241: /home/itlsl/T113/out/t113_i/myir_image_yt113i/buildroot/buildroot/build/host-m4-1.4.18/.stamp_built] Error 2
make: Leaving directory '/home/itlsl/T113/buildroot/buildroot-201902'
ERROR: build buildroot Failed
INFO: build_buildroot_rootfs failed
itlsl@PC-20230311LFHV:~/T113$
修复patch,修改c-stack.c文件
bash
cd 你的SDK目录/T113/out/t113_i/myir_image_yt113i/buildroot/buildroot/build/host-m4-1.4.18/lib
vim c-stack.c
cpp
#将第 55 行附近的代码:
#elif HAVE_LIBSIGSEGV && SIGSTKSZ < 16384
#修改为:
#elif HAVE_LIBSIGSEGV && defined(SIGSTKSZ)
3、编译 Device Tree Compiler (DTC) 1.4.7 时遇到的链接错误
报错信息:
bash
/usr/bin/ld: dtc-parser.tab.o:(.bss+0x10): multiple definition of `yylloc'; dtc-lexer.lex.o:(.bss+0x0): first defined here
collect2: error: ld returned 1 exit status
make[1]: *** [Makefile:324: dtc] Error 1
make[1]: *** Waiting for unfinished jobs....
make[1]: Leaving directory '/home/itlsl/T113/out/t113_i/myir_image_yt113i/buildroot/buildroot/build/host-dtc-1.4.7'
make: *** [package/pkg-generic.mk:241: /home/itlsl/T113/out/t113_i/myir_image_yt113i/buildroot/buildroot/build/host-dtc-1.4.7/.stamp_built] Error 2
make: Leaving directory '/home/itlsl/T113/buildroot/buildroot-201902'
ERROR: build buildroot Failed
INFO: build_buildroot_rootfs failed
itlsl@PC-20230311LFHV:~/T113$
解决方法:
cpp
# 进入 DTC 源码文件dtc-lexer.l
cd 你的SDK目录/T113/out/t113_i/myir_image_yt113i/buildroot/buildroot/build/host-dtc-1.4.7/dtc-lexer.l
#将下面代码
YYLTYPE yylloc;
#加上extern
extern YYLTYPE yylloc;
然后重新编译即可
4、CMake 3.8.2 的代码缺少必要的头文件包含,导致 std::numeric_limits 未定义
报错信息:
bash
/home/itlsl/T113/out/t113_i/myir_image_yt113i/buildroot/buildroot/build/host-cmake-3.8.2/Source/cmServerProtocol.cxx: In member function 'std::size_t std::hash<LanguageData>::operator()(const LanguageData&) const':
/home/itlsl/T113/out/t113_i/myir_image_yt113i/buildroot/buildroot/build/host-cmake-3.8.2/Source/cmServerProtocol.cxx:620:43: error: 'numeric_limits' is not a member of 'std'
  620 |                          (i.second ? std::numeric_limits<size_t>::max() : 0));
      |                                           ^~~~~~~~~~~~~~
/home/itlsl/T113/out/t113_i/myir_image_yt113i/buildroot/buildroot/build/host-cmake-3.8.2/Source/cmServerProtocol.cxx:620:64: error: expected primary-expression before '>' token
  620 |                          (i.second ? std::numeric_limits<size_t>::max() : 0));
      |                                                                ^
/home/itlsl/T113/out/t113_i/myir_image_yt113i/buildroot/buildroot/build/host-cmake-3.8.2/Source/cmServerProtocol.cxx:620:67: error: '::max' has not been declared; did you mean 'std::max'?
  620 |                          (i.second ? std::numeric_limits<size_t>::max() : 0));
      |                                                                   ^~~
      |                                                                   std::max
In file included from /usr/include/c++/11/algorithm:62,
                 from /home/itlsl/T113/out/t113_i/myir_image_yt113i/buildroot/buildroot/build/host-cmake-3.8.2/Source/cmLinkItem.h:8,
                 from /home/itlsl/T113/out/t113_i/myir_image_yt113i/buildroot/buildroot/build/host-cmake-3.8.2/Source/cmGeneratorTarget.h:8,
                 from /home/itlsl/T113/out/t113_i/myir_image_yt113i/buildroot/buildroot/build/host-cmake-3.8.2/Source/cmServerProtocol.cxx:7:
/usr/include/c++/11/bits/stl_algo.h:3467:5: note: 'std::max' declared here
 3467 |     max(initializer_list<_Tp> __l, _Compare __comp)
      |     ^~~
/home/itlsl/T113/out/t113_i/myir_image_yt113i/buildroot/buildroot/build/host-cmake-3.8.2/Source/cmServerProtocol.cxx:626:39: error: 'numeric_limits' is not a member of 'std'
  626 |       result ^ (in.IsGenerated ? std::numeric_limits<size_t>::max() : 0);
      |                                       ^~~~~~~~~~~~~~
/home/itlsl/T113/out/t113_i/myir_image_yt113i/buildroot/buildroot/build/host-cmake-3.8.2/Source/cmServerProtocol.cxx:626:60: error: expected primary-expression before '>' token
  626 |       result ^ (in.IsGenerated ? std::numeric_limits<size_t>::max() : 0);
      |                                                            ^
/home/itlsl/T113/out/t113_i/myir_image_yt113i/buildroot/buildroot/build/host-cmake-3.8.2/Source/cmServerProtocol.cxx:626:63: error: '::max' has not been declared; did you mean 'std::max'?
  626 |       result ^ (in.IsGenerated ? std::numeric_limits<size_t>::max() : 0);
      |                                                               ^~~
      |                                                               std::max
In file included from /usr/include/c++/11/algorithm:62,
                 from /home/itlsl/T113/out/t113_i/myir_image_yt113i/buildroot/buildroot/build/host-cmake-3.8.2/Source/cmLinkItem.h:8,
                 from /home/itlsl/T113/out/t113_i/myir_image_yt113i/buildroot/buildroot/build/host-cmake-3.8.2/Source/cmGeneratorTarget.h:8,
                 from /home/itlsl/T113/out/t113_i/myir_image_yt113i/buildroot/buildroot/build/host-cmake-3.8.2/Source/cmServerProtocol.cxx:7:
/usr/include/c++/11/bits/stl_algo.h:3467:5: note: 'std::max' declared here
 3467 |     max(initializer_list<_Tp> __l, _Compare __comp)
      |     ^~~
[ 91%] Built target CMakeLibTests
[ 92%] Building CXX object Source/CMakeFiles/CTestLib.dir/CTest/cmCTestConfigureHandler.cxx.o
[ 92%] Building CXX object Source/CMakeFiles/CTestLib.dir/CTest/cmCTestCoverageCommand.cxx.o
[ 92%] Building CXX object Source/CMakeFiles/CTestLib.dir/CTest/cmCTestCoverageHandler.cxx.o
[ 92%] Building CXX object Source/CMakeFiles/CTestLib.dir/CTest/cmCTestCurl.cxx.o
解决方法:
cpp
# 进入到如下文件
cd 你的SDK目录/out/t113_i/myir_image_yt113i/buildroot/buildroot/build/host-cmake-3.8.2/Source/cmServerProtocol.cxx
# 添加limits头文件
#include <limits>5、fakeroot 在运行时需要 System V IPC 支持
报错信息
bash
/build/buildroot-fs/ext2/fakeroot
fakeroot, while creating message channels: Function not implemented
This may be due to a lack of SYSV IPC support.
fakeroot: error while starting the `faked' daemon.
kill: usage: kill [-s sigspec | -n signum | -sigspec] pid | jobspec ... or kill -l [sigspec]
make: *** [fs/ext2/ext2.mk:62: /home/itlsl/T113/out/t113_i/myir_image_yt113i/buildroot/buildroot/images/rootfs.ext2] Error 1
make: Leaving directory '/home/itlsl/T113/buildroot/buildroot-201902'
ERROR: build buildroot Failed
INFO: build_buildroot_rootfs failed
解决方法:
这个是以为wsl1不支持进程间通信,所以我们需要将wsl1升级为wsl2即可解决
6、libglib2 依赖的 libpcre库未找到,导致 configure 失败
报错信息:
bash
checking value of POLLIN... 1
checking value of POLLOUT... 4
checking value of POLLPRI... 2
checking value of POLLERR... 8
checking value of POLLHUP... 16
checking value of POLLNVAL... 32
checking for broken poll... no (cross compiling)
checking for PCRE... no
configure: error: Package requirements (libpcre >= 8.13) were not met:
Package 'libpcre', required by 'virtual:world', not found
Consider adjusting the PKG_CONFIG_PATH environment variable if you
installed software in a non-standard prefix.
Alternatively, you may set the environment variables PCRE_CFLAGS
and PCRE_LIBS to avoid the need to call pkg-config.
See the pkg-config man page for more details.
make: *** [package/pkg-generic.mk:231: /home/itlsl/T113/out/t113_i/myir_image_yt113i/buildroot/buildroot/build/libglib2-2.56.3/.stamp_configured] Error 1
make: Leaving directory '/home/itlsl/T113/buildroot/buildroot-201902'
ERROR: build buildroot Failed
INFO: build_buildroot_rootfs failed
itlsl@PC-20230311LFHV:~/T113$解决方法
bash
# 进入如下目录
cd 你的SDK目录/T113/out/t113_i/myir_image_yt113i/buildroot/buildroot
# 执行如下命令,清理 pcre 和 pcre2 的编译状态
make pcre-dirclean
make pcre2-dirclean
然后重新编译即可
7、which无法找到
报错信息:
bash
INFO: build rootfs ...
INFO: Prepare toolchain ...
INFO: build buildroot ...
make: Entering directory '/home/itlsl/T113/buildroot/buildroot-201902'
/bin/sh: line 1: which: command not found
/bin/sh: line 1: which: command not found
/bin/sh: line 1: which: command not found
/bin/sh: line 1: which: command not found
/bin/sh: line 1: which: command not found
/bin/sh: line 1: which: command not found
/bin/sh: line 1: which: command not found
/bin/sh: line 1: which: command not found
/bin/sh: line 1: which: command not found
/bin/sh: line 1: which: command not found
/bin/sh: line 1: which: command not found
/bin/sh: line 1: which: command not found
/bin/sh: line 1: which: command not found
/bin/sh: line 1: which: command not found
support/dependencies/check-host-tar.sh: line 5: which: command not found
support/dependencies/check-host-tar.sh: line 7: which: command not found
support/dependencies/check-host-gzip.sh: line 5: which: command not found
make: which: No such file or directory
/home/itlsl/T113/buildroot/buildroot-201902/support/dependencies/dependencies.sh: line 59: which: command not found
You must install 'which' on your build machine
make: *** [support/dependencies/dependencies.mk:27: dependencies] Error 1
make: Leaving directory '/home/itlsl/T113/buildroot/buildroot-201902'
ERROR: build buildroot Failed
INFO: build_buildroot_rootfs failed
itlsl@PC-20230311LFHV:~/T113$解决方法:
bash
sudo apt-get install --reinstall debianutils重装即可解决,然后重新编译
目前如果按照windows10上的wsl2部署,然后在家目录编译SDK,可能遇到的问题就是这些。如果还有其他问题,可以问问kimi AI解决。这是wsl2上的问题,如果是虚拟机Ubuntu上进行部署编译SDK应该报错要少。还有种可能是SDK中的库过于老旧,导致很多的版本不匹配出现的问题。所以目前报错最多的是buildroot的编译,bootloader和kernel的报错很少很简单
三、设备树内核配置修改
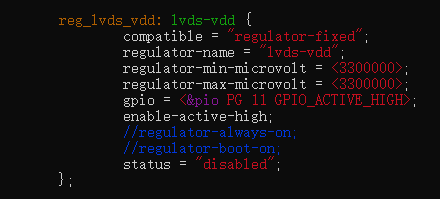
1、PG11设备树修改
搜索查找PG11的设备节点
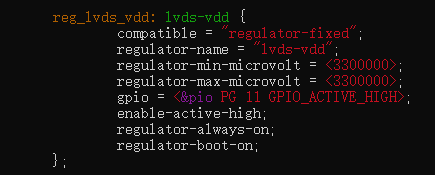
我们硬件平台没有lvds,所以把它设备树功能禁止即可,修改为如下:
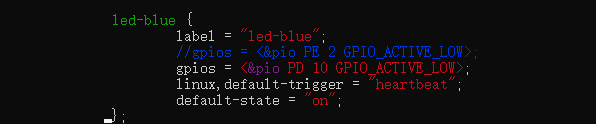
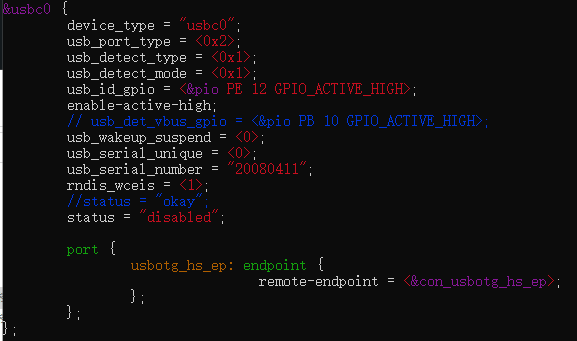
2、PE12设备树修改
搜索查找PE12的设备节点
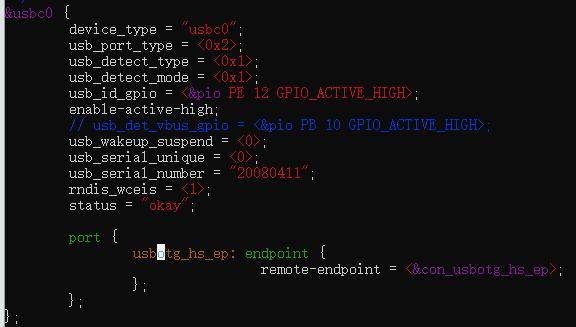
我们没有使用usb otg,所以将这个设备树节点禁止即可,修改为:
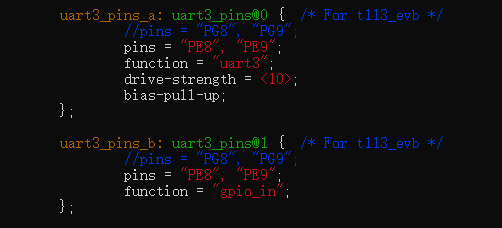
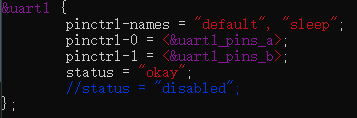
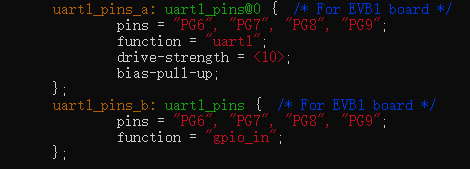
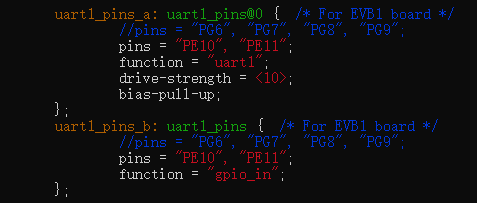
3、UART配置
UART3设备树修改
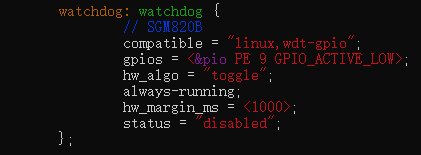
将watchdog设备节点禁止
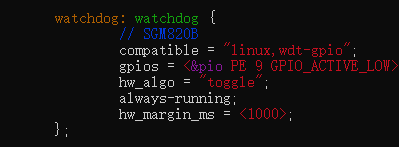
修改为如下:
将UART3设备节点打开
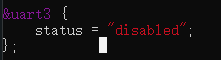
修改如下:
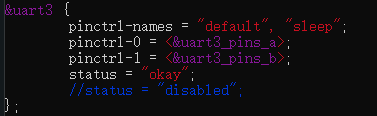
将UART3设备节点修改为自己硬件的串口3引脚
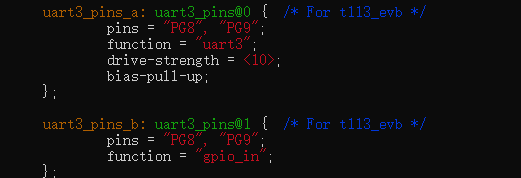
修改为如下:
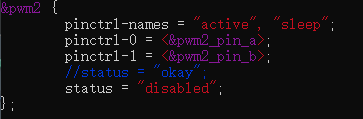
将pwm2节点禁止
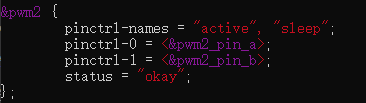
修改为如下:
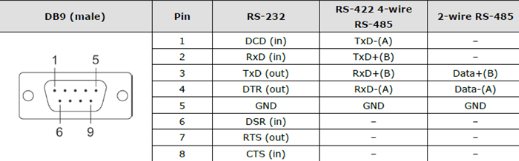
硬件使用的是rs232连接,不要使用usb to ttl去调,不然会乱码,rs232的接线如下:
然后使用stty工具去调试rs232端口、
bash
#设置波特率
stty -F /dev/ttyS3 ispeed 115200 ospeed 115200
#打开回显
stty -F /dev/ttyS3 echo
UART1设备树配置
这是触摸屏的设备节点,硬件平台没有,直接禁止该设备节点

修改后:
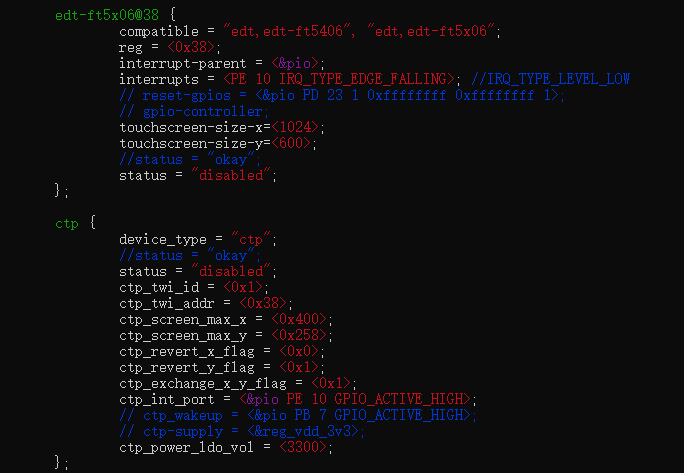
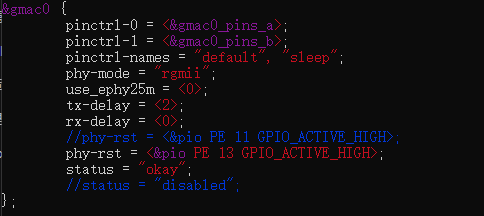
这是以太网的设备节点,不能直接禁止,将PE11换成硬件上的以太网口复位引脚PE13
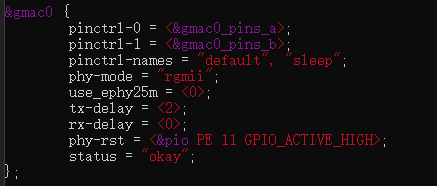
修改后:
添加UART1设备节点
修改后:
修改串口1设备节点对应的引脚
修改后:
因上面修改了以太的复位引脚为PE13,不让PE13为PWM功能,禁止该设备节点
修改后:

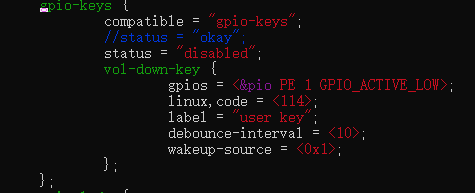
4、PE1设备树修改
将这个设备节点禁止

修改之后:
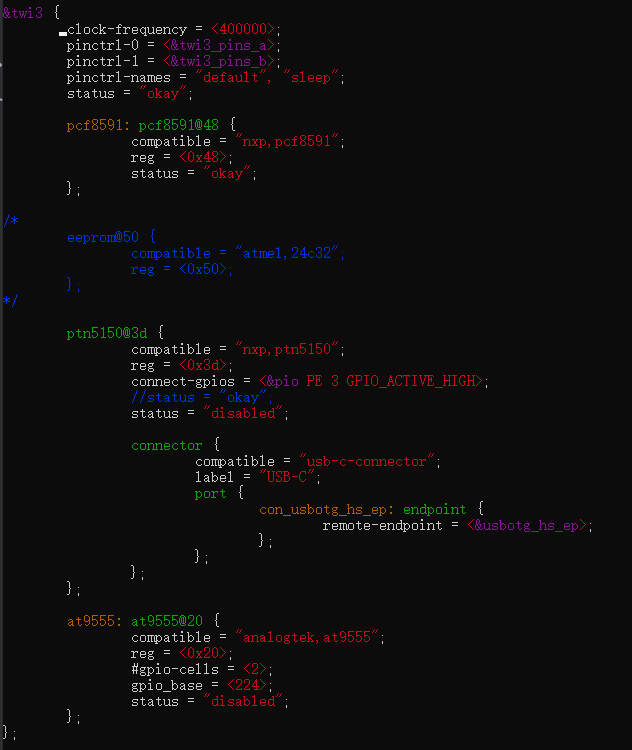
5、iic3设备树修改
其实可以不用修改设备树就能找到iic3总线上的设备地址
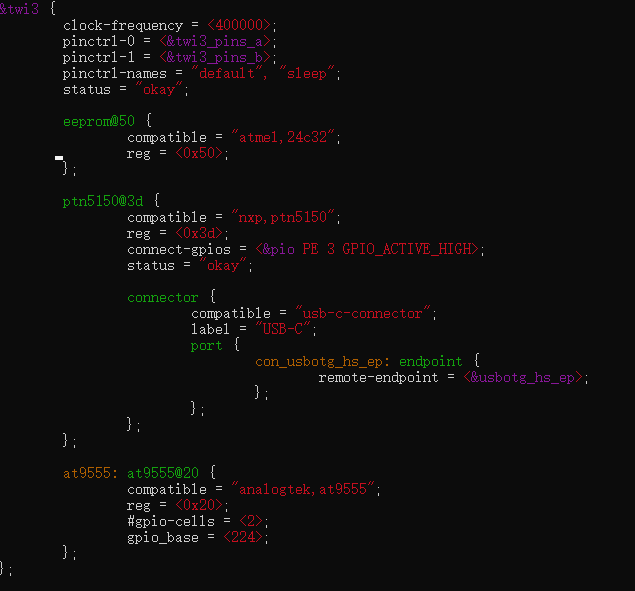
修改为:
bash
# 读 AIN0 (控制字 0x40)
i2ctransfer -y 3 w1@0x48 0x40 r2
# 读 AIN1 (控制字 0x41)
i2ctransfer -y 3 w1@0x48 0x41 r2
# 读 AIN2 (控制字 0x42)
i2ctransfer -y 3 w1@0x48 0x42 r2
# 读 AIN3 (控制字 0x43)
i2ctransfer -y 3 w1@0x48 0x43 r2
#返回值 第一个上当前当前总线的adc值
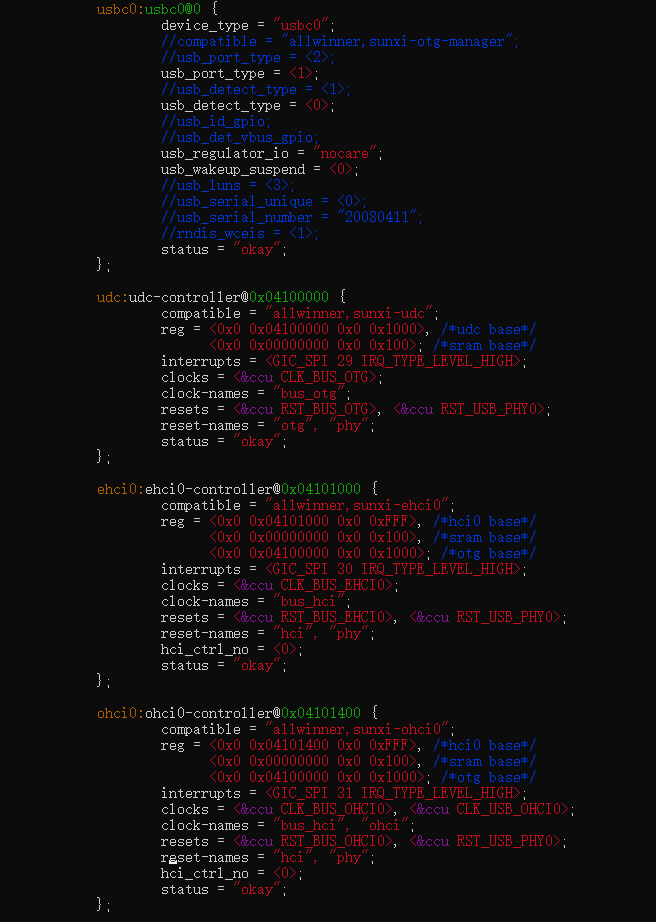
0xc3 0xc06、USB摄像头和4G模块设备树的修改
我们修改米尔的官方提供的设备树在这里就不行了,要修改它包含的头文件sun8iw20p1.dtsi,
将 你的SDK目录/T113/kernel/linux-5.4/arch/arm/boot/dts/sun8iw20p1.dtsi中的如下节点修改如下
、
然后官方的设备树修改如下:
然后使用下面的命令就可以拍照了
bash
# 查看摄像头支持的格式
v4l2-ctl --device=/dev/video0 --list-formats-ext
# 拍照设置(以 MJPEG 为例)
v4l2-ctl --device=/dev/video0 --set-fmt-video=width=640,height=480,pixelformat=MJPG
# 拍照
v4l2-ctl --device=/dev/video0 --stream-mmap --stream-to=photo.jpg --stream-count=1设备树更改好了的USB摄像头已经可以正常使用了,但是4G模块还是不能在/dev下正常的设备到设备。
还需要在你的SDK/T113/kernel/linux-5.4/drivers/usb/serial/option.c中的static const struct usb_device_id option_ids[] 数组中添加
cpp
{ USB_DEVICE(0x2ecc, 0x3012, 0xff, 0, 0) }, 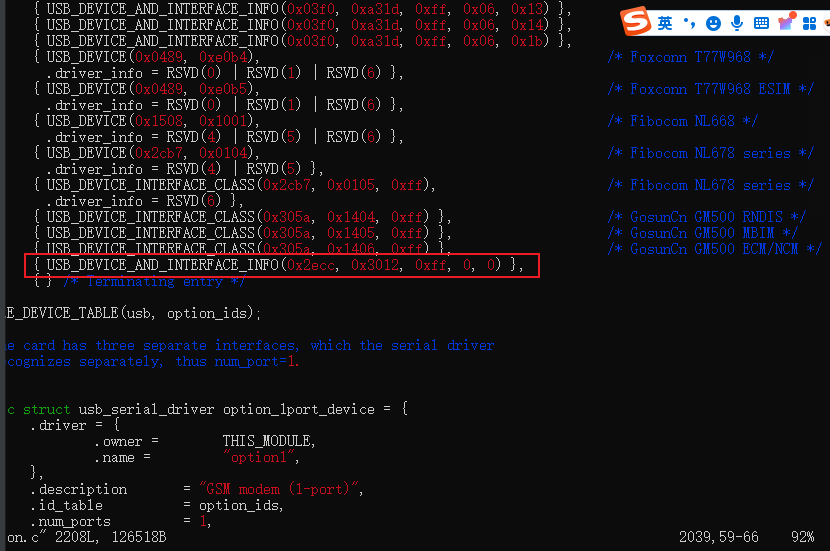
然后在配置列表中选择如下选项
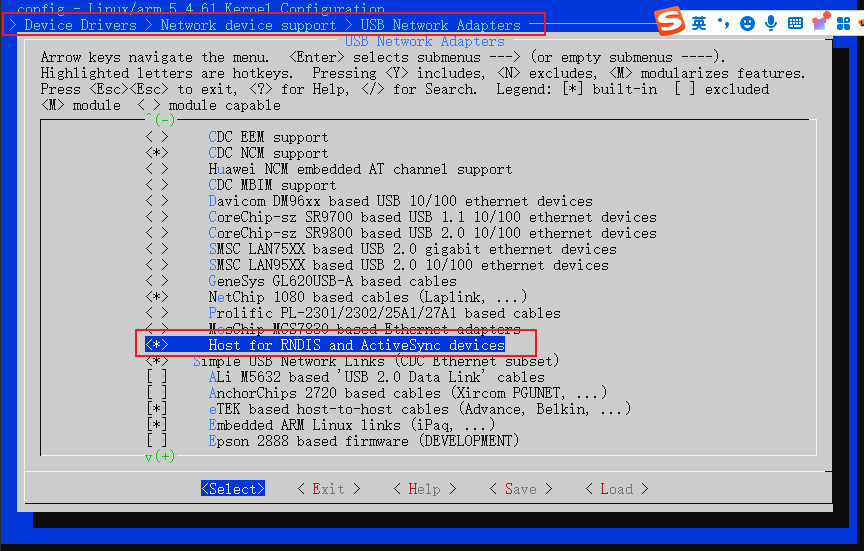
重新编译内核即可。
这样就可以与4G模块ML307R进行AT通信了
要上网,需参考ML307R的官方手册来操作即可上网。
四、更改自启动延时
打开如下文件:
bash
vi 你的SDK目录/T113/device/config/chips/t113_i/configs/myir_image_yt113i/buildroot/env.cfg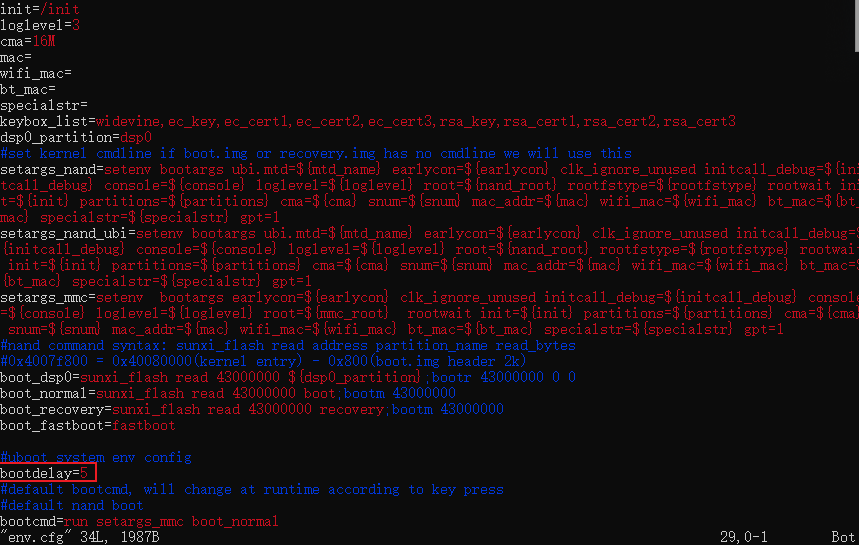
bootdelay就是自启动延时(s)
五、RS485通讯问题
硬件可以向电脑发送,但是电脑不能向硬件发送。
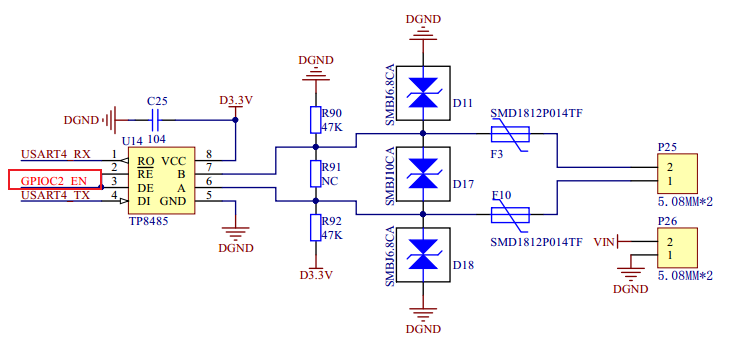
这个GPIOC2_EN引脚不是使能,而是控制RS485的信息的传送发现,这也在底层硬件中体现了RS485是一个半双工的通信协议,同一时间段只能有一个方向的发送。之后可以在驱动中配置。
六、网口ping外网不通问题
目前公司网络配置始终存在问题,这里使用usb转网口连接开发板和电脑,使用电脑给开发板分配可上网的IP。
修改linux开发板的配置文件 /etc/network/interfaces,修改为如下
bash
# interface file auto-generated by buildroot
auto lo
iface lo inet loopback
auto eth0
iface eth0 inet static
address 192.168.1.10
netmask 255.255.255.0这里使用的是windows10的电脑,如果是windows11其实配置也大差不差。
打开电脑设置
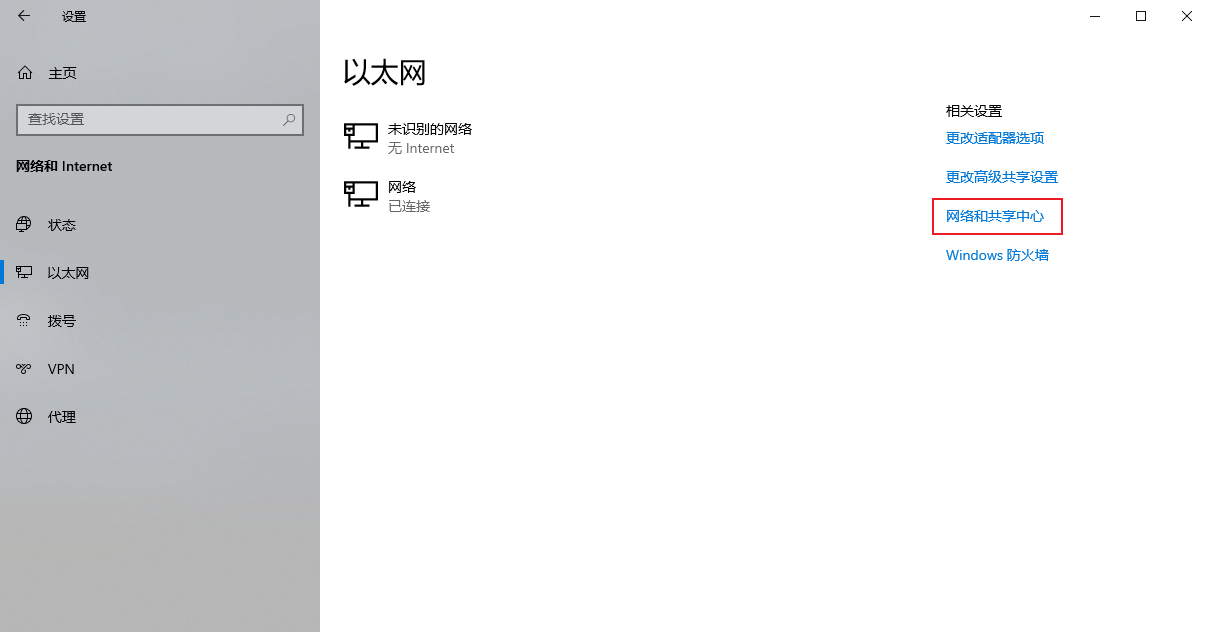
点击进入电脑以太网
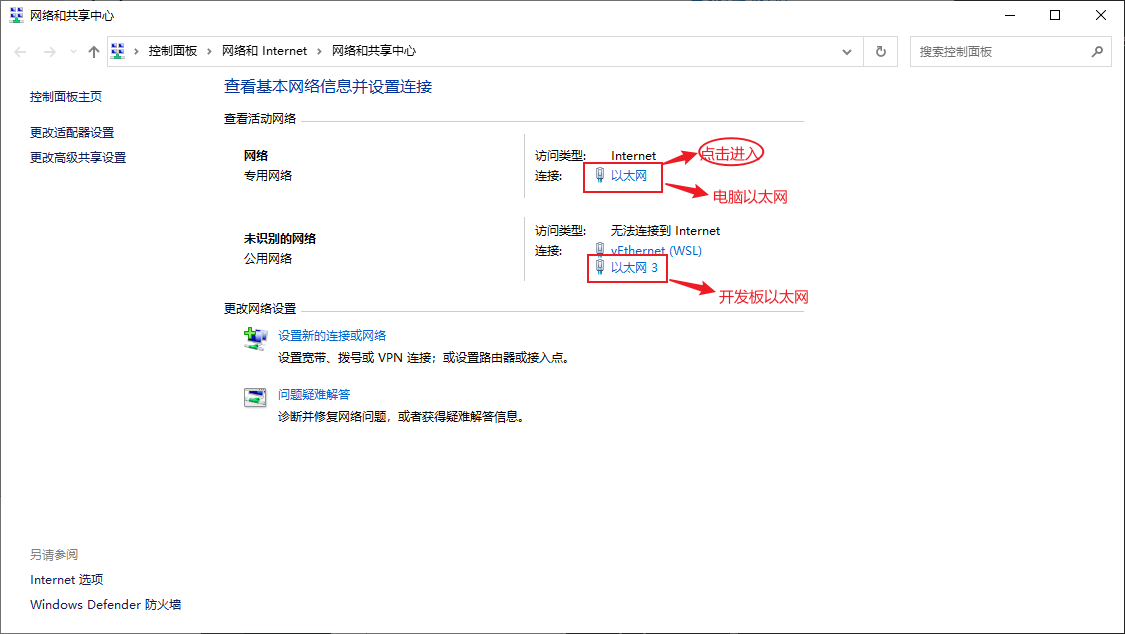
点击属性
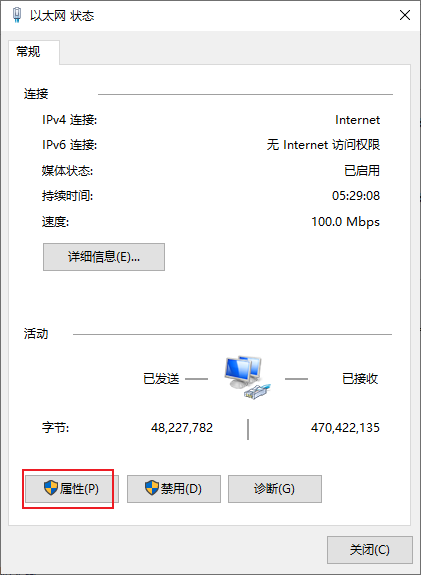
点击共享
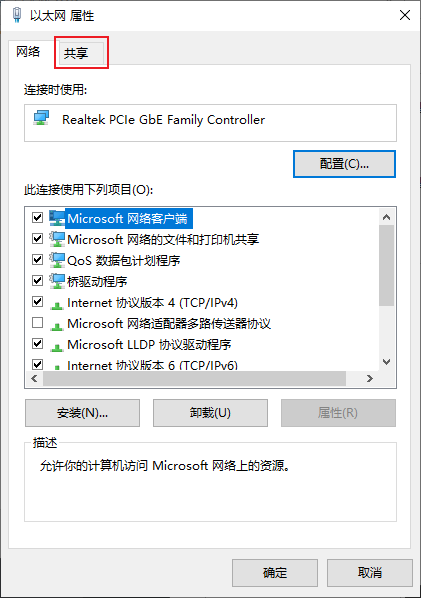
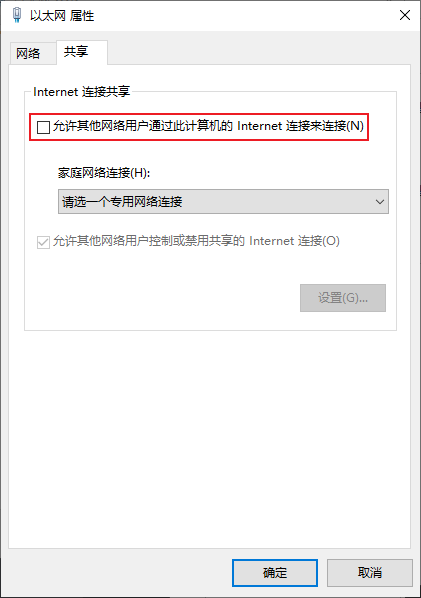
勾选上允许其他网络用户通过此计算机的......
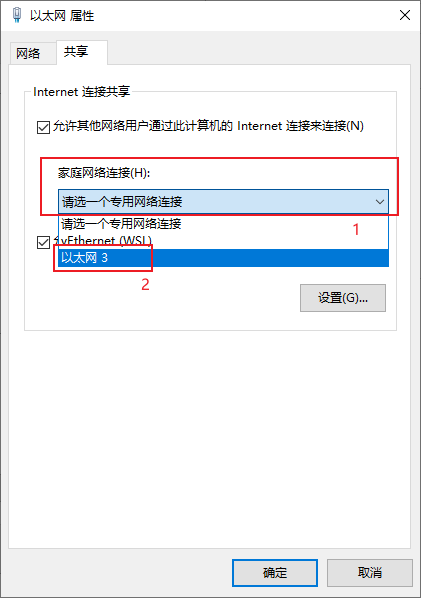
按下面继续勾选
OK,电脑上配置操作已经完成,可以进入开发板终端查看是否分配ip成功,如果没有成功,可以重启开发板。(这一步可以是没有分配成功,但是可以上外网即表明已经分配成功)
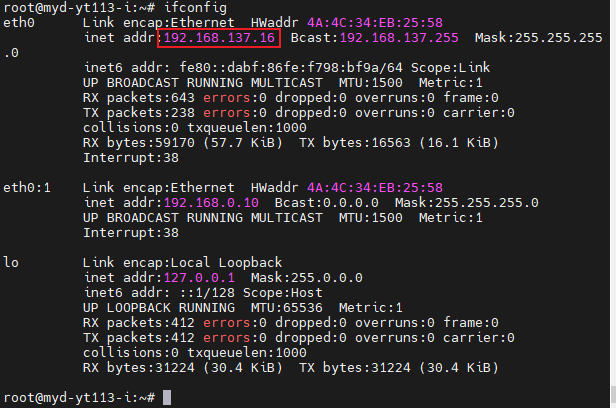
检查开发板是否可以上外网
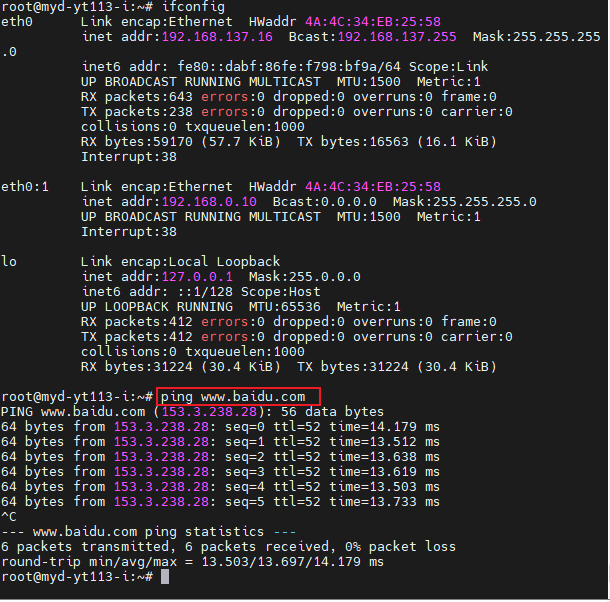
这样开发板就可以冲浪了。
七、T113-i平台go语言部署
目前buildroot不支持apt命令,所以go环境我们只能从官方下载文件来配置操作。
下载这个:https://go.dev/dl/ 中的高版本go都行。
解压到/usr/local/
bash
gunzip -c go1.23.4.linux-armv6l.tar.gz | tar -C /usr/local/ -x
#或使用
sudo tar -C /usr/local -xzf go1.25.0.linux-amd64.tar.gz编辑环境配置文件/etc/profile,在这个文件的末尾添加如下
bash
export GOROOT=/usr/local/go
export PATH=$PATH:$GOROOT/bin
export GOPATH=$HOME/go
执行如下命令:
bash
source /etc/profile验证go是否安装成功
Go
go version
OK,如上图所示,就说明已经go编译环境已经部署成功了。
八、开发板编译时请求超时
如果遇到如下编译时请求超时的问题
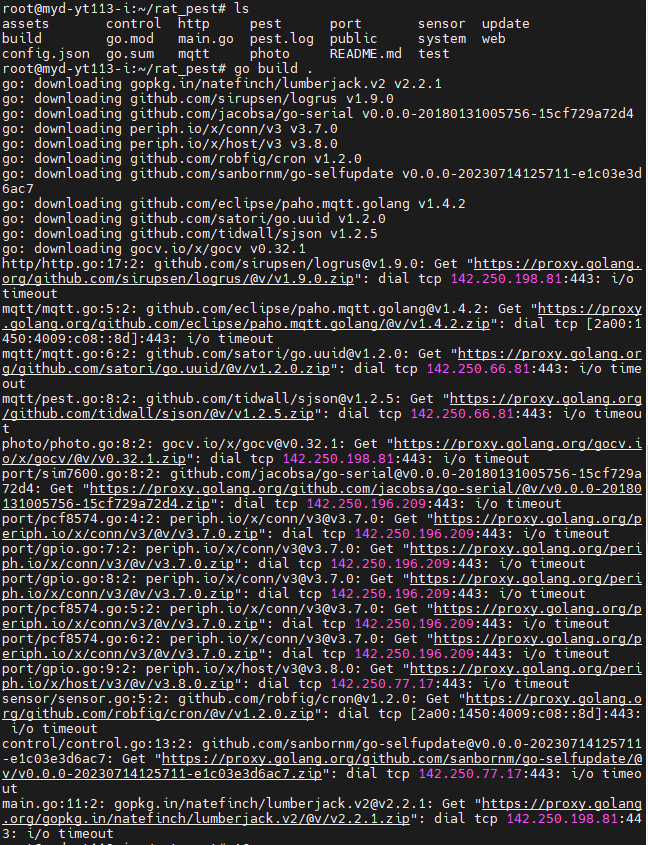
使用如下命令,换成国内的代理服务器
Go
go env -w GOPROXY=https://goproxy.cn,direct九、开发板编译时遇到了无法验证的 SSL 证书
当编译go语言源码时遇到了如下的缺少根证书时
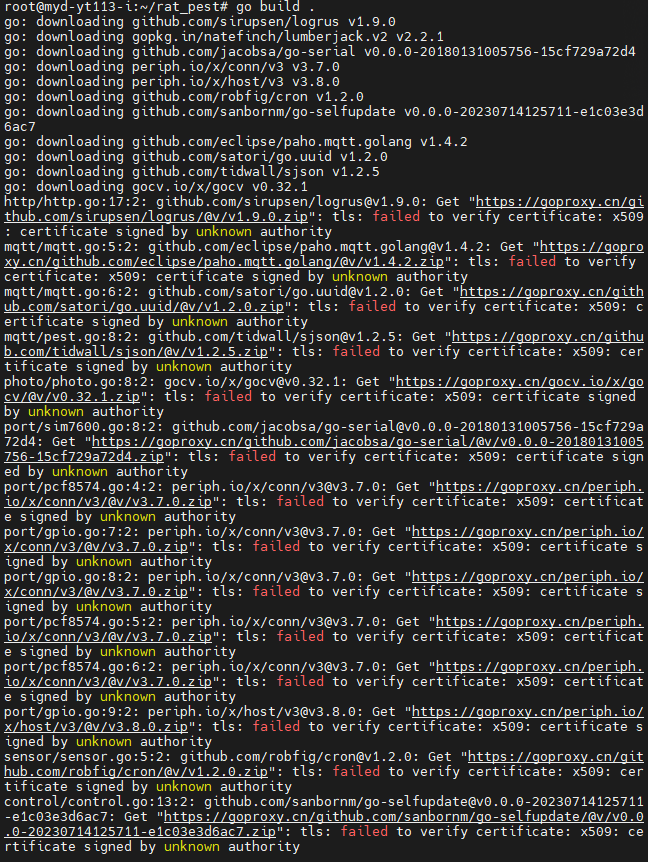
这时候我们的系统是buildroot的轻量级系统,解决方法最快就是把我们wsl上的证书考一分给T113-i,在我们的wsl中的/etc/ssl/certs中的ca-certificates.crt文件,将这个文件拷贝到我们的T113-i中的/etc/ssl/certs,就可以解决上面的问题。
十、编译go工程项目
这里我们在之前部署的wsl上进行go项目的编译,部署go编译环境之前我们要部署gcc交叉编译工具链,这里按照米尔官方提供的gcc交叉编译工具链的部署即可。脚本如下:
bash
#!/bin/sh
export PATH=你的交叉编译链目录/gcc-linaro-5.3.1-2016.05-x86_64_arm-linux-gnueabi/bin/:${PATH}
export ARCH=arm
export CROSS_COMPILE=arm-linux-gnueabi- export PREFIX=arm-linux-gnueabi- export CC=arm-linux-gnueabi-gcc
export AR=arm-linux-gnueabi-ar
export AS=arm-linux-gnueabi-as
export LD=arm-linux-gnueabi-ld
export NM=arm-linux-gnueabi-nm
export STRIP=arm-linux-gnueabi-strip
export OBJCOPY=arm-linux-gnueabi-objcopy
export OBJDUMP=arm-linux-gnueabi-objdump然后,这里不能./脚本名.sh去执行脚本,要使用source 脚本名.sh去执行才会生效。生效之后的结果如下:

wsl上的go语言工具部署和T113-i平台的go工具部署一样,这里wsl上的go环境变量需要改变为如下:
Go
#使用 go env查看,查看到的go环境变量如下:
AR='arm-linux-gnueabi-ar'
CC='arm-linux-gnueabi-gcc'
CGO_CFLAGS='-O2 -g'
CGO_CPPFLAGS=''
CGO_CXXFLAGS='-O2 -g'
CGO_ENABLED='1'
CGO_FFLAGS='-O2 -g'
CGO_LDFLAGS='-O2 -g'
CXX='g++'
GCCGO='gccgo'
GO111MODULE=''
GOARCH='arm'
GOARM='7'
GOAUTH='netrc'
GOBIN=''
GOCACHE='/home/itlsl/.cache/go-build'
GOCACHEPROG=''
GODEBUG=''
GOENV='/home/itlsl/.config/go/env'
GOEXE=''
GOEXPERIMENT=''
GOFIPS140='off'
GOFLAGS=''
GOGCCFLAGS='-fPIC -marm -pthread -Wl,--no-gc-sections -fmessage-length=0 -fdebug-prefix-map=/tmp/go-build2471426208=/tmp/go-build -gno-record-gcc-switches'
GOHOSTARCH='amd64'
GOHOSTOS='linux'
GOINSECURE=''
GOMOD='/mnt/d/go应用开发/go语言开发的linux应用(分析版)/rat_pest/rat_pest/go.mod'
GOMODCACHE='/home/itlsl/go/pkg/mod'
GONOPROXY=''
GONOSUMDB=''
GOOS='linux'
GOPATH='/home/itlsl/go'
GOPRIVATE=''
GOPROXY='https://goproxy.cn,direct'
GOROOT='/usr/local/go'
GOSUMDB='sum.golang.org'
GOTELEMETRY='local'
GOTELEMETRYDIR='/home/itlsl/.config/go/telemetry'
GOTMPDIR=''
GOTOOLCHAIN='auto'
GOTOOLDIR='/usr/local/go/pkg/tool/linux_amd64'
GOVCS=''
GOVERSION='go1.25.0'
GOWORK=''
PKG_CONFIG='pkg-config'go.mod的生成
Go
#会在项目中生成go.mod
go mod init flight.top/pest
go.sum和可执行文件pest的生成
# 重新下载依赖并生成 go.sum
go mod tidy
# 重新构建
go build .十一、4G模块有时不能上网的问题
有时会出现4G模块突然不能上外网了,这个时候一般是我们的开发板T113-i把我们的网口当做上网的端口了,这个时候我们要拔下网线,就可以ping通百度、上外网了。
十二、网口IP影响4G模块通讯的问题
有时网口的ip不能与4G模块的ip配置成同一个网段,这样会影响4G连网,具体是因为什么,这里没有找到关于T113-i怎么解决这个问题,唯一的办法是将网口IP修改为与4G模块的IP不在同一网段下就行。
如下:eth0为网口,eth1为4G
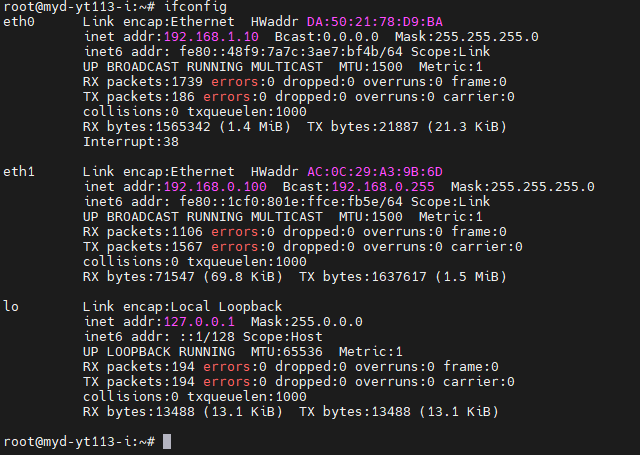
网口ip在如下文件中修改:/etc/network/interfaces
bash
# interface file auto-generated by buildroot
auto lo
iface lo inet loopback
auto eth0
iface eth0 inet static
address 192.168.1.10
netmask 255.255.255.0十三、新T113-i开发板的4G模块(ML307R)不能上网
对于新的T113-i开发板4G模块不能上网的问题,可以尝试如下几个AT命令(这里可以使用microcom工具去操作/dev/ttyUSB2,也可以用echo -e)
bash
 #拨号命令
AT+MDIALUP=1,1
 #配置为自动连网(模组应用层网络)
AT+MUECONFIG="autoconn",1
 #配置为自动拨号(上位机网卡拨号)
AT+MDIALUPCFG="auto",1
十四、cpolar实现内网透传(远程登录开发板)
对于已经部署好了的产品设备,如果出现了问题,出现了应用层程序卡死的状态或想查看设备运行输出信息。这里我们就需要远程登陆开发板了,但是设备部署在远端,没有与电脑在同一个局域网。这个时候我们就需要内网穿透或p2p这种方法来远程登陆设备了。
1、注册cpolar
官方网站地址:https://www.cpolar.com

点击免费注册,注册完之后,就可以登录至控制台了
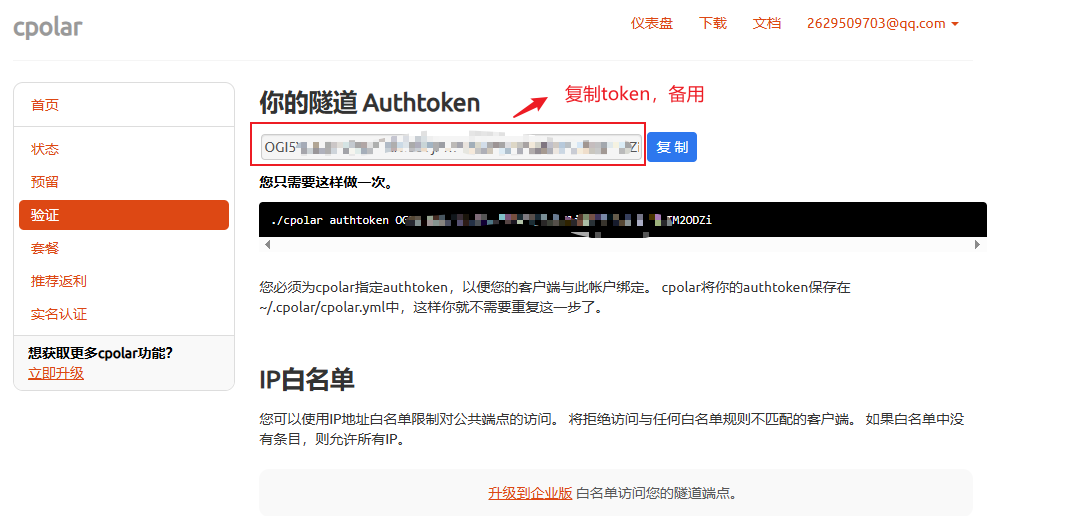
登录进入控制台,点击验证如下:
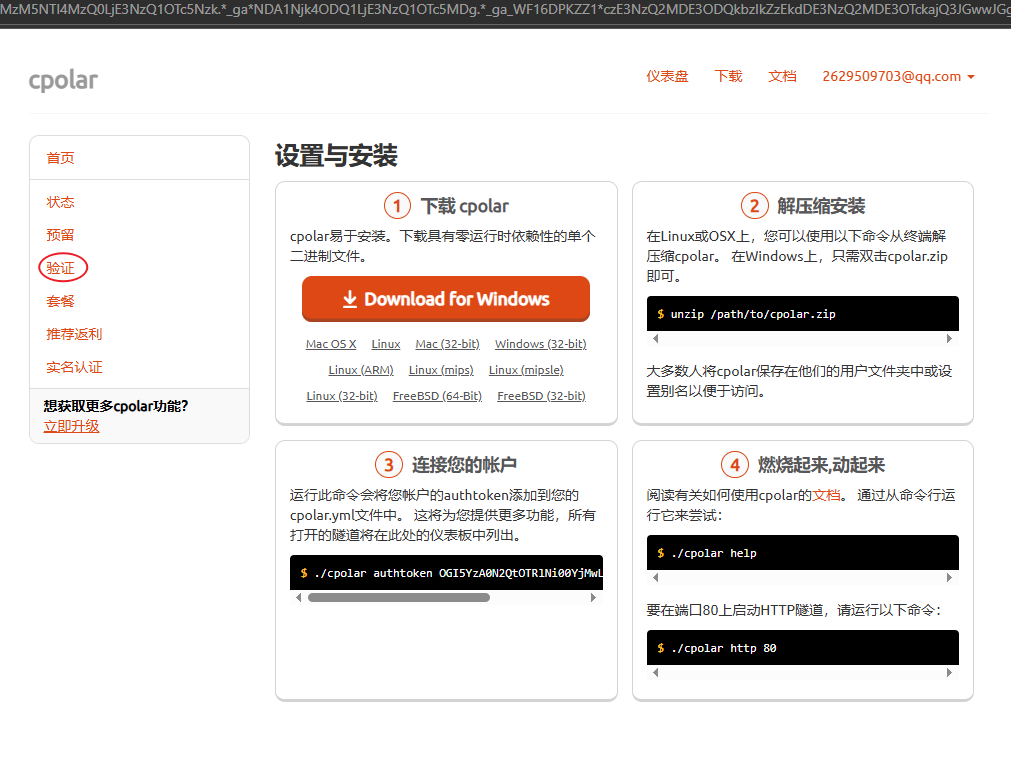
在验证中复制token备用:
2、T113-i中部署cpolar,并激活
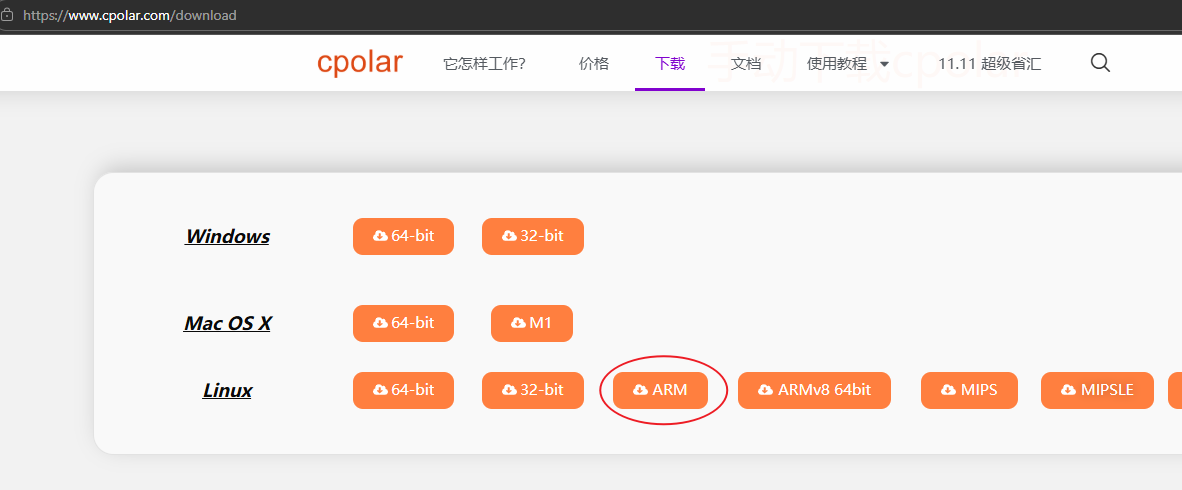
在官网中,下载arm架构32位的cpolar工具:https://www.cpolar.com/download
然后移入开发板,给它可执行的权限。
然后执行保存Token操作:
bash
./cpolar authtoken 你的那一串十六进制Token
开启ssh隧道:
bash
./cpolar tcp 22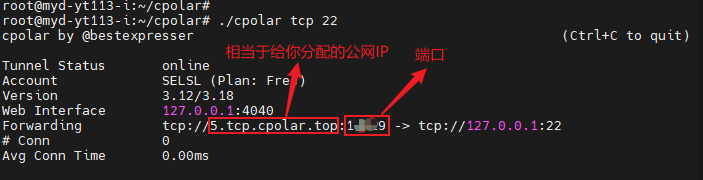
在Ubuntu中执行ssh远程登录:
bash
# ssh root@给你分配的地址 -p 随机端口
ssh root@5.tcp.cpolar.top -p 12345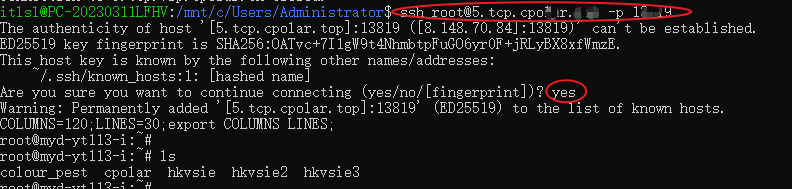
在开发板中可以后台模式运行开启ssh隧道:
bash
nohup ./cpolar tcp 22 &OK,目前米尔的T113-i驱动适配和部分go项目部署就介绍到这里,希望对您开发米尔的T113-i有帮助。