一、准备工作10.0.0.101
1.安装 docker docker compose
bash
#!/bin/bash

# =============================================================================
# Docker 和 Docker Compose 安装脚本 (APT + 二进制)
#
# 此脚本使用 APT 包管理器从阿里云镜像源安装 Docker CE、containerd 和相关插件,
# 并从二进制文件安装独立的 Docker Compose。
# 支持 Ubuntu/Debian 系统。
# 脚本执行 root 权限检查,设置阿里云镜像源,添加 Docker GPG 密钥,
# 安装 Docker 组件,安装 Docker Compose,将当前用户添加到 docker 组,
# 并包含全面的错误处理。
#
# 使用方法:
#   1. chmod +x install-docker-apt.sh
#   2. sudo ./install-docker-apt.sh
#
# =============================================================================

set -e  # 如果命令退出状态非零,则立即退出

# Colors for output / 输出颜色定义
RED='\033[0;31m'
GREEN='\033[0;32m'
YELLOW='\033[1;33m'
BLUE='\033[0;34m'
NC='\033[0m' # No Color / 无颜色

# Print colored output / 打印带颜色的输出
print_info() {
    echo -e "${BLUE}[信息]${NC} $1"
}

print_success() {
    echo -e "${GREEN}[成功]${NC} $1"
}

print_warning() {
    echo -e "${YELLOW}[警告]${NC} $1"
}

print_error() {
    echo -e "${RED}[错误]${NC} $1"
}

# Check if running as root / 检查是否以 root 权限运行
check_root_privileges() {
    print_info "检查 root 权限..."
    if [[ $EUID -eq 0 ]]; then
        print_success "以 root 身份运行"
    else
        print_error "此脚本必须以 root 或 sudo 运行"
        exit 1
    fi
}

# Check if running on Ubuntu/Debian / 检查是否运行在 Ubuntu/Debian 上
check_os() {
    print_info "检查操作系统..."
    if [[ -f /etc/debian_version ]] || grep -qi "ubuntu" /etc/os-release; then
        print_success "检测到 Debian/Ubuntu 系统"
    else
        print_error "此脚本仅支持 Ubuntu/Debian 系统。"
        exit 1
    fi
}

# Install necessary system tools / 安装必要的系统工具
install_prerequisites() {
    print_info "安装必要的系统工具 (ca-certificates, curl, gnupg, apt-transport-https)..."
    apt-get update
    apt-get install -y ca-certificates curl gnupg apt-transport-https
    print_success "系统工具安装完成"
}

# Add Docker's official GPG key / 添加 Docker 的官方 GPG 密钥
add_docker_gpg_key() {
    print_info "添加 Docker 的 GPG 公钥..."

    # Create directory for keys / 创建密钥目录
    install -m 0755 -d /etc/apt/keyrings

    # Download and install GPG key from Aliyun mirror / 从阿里云镜像下载并安装 GPG 密钥
    if ! curl -fsSL "https://mirrors.aliyun.com/docker-ce/linux/ubuntu/gpg" | gpg --dearmor -o /etc/apt/keyrings/docker.gpg; then
        print_error "下载或安装 Docker GPG 密钥失败"
        exit 1
    fi

    # Set correct permissions / 设置正确权限
    chmod a+r /etc/apt/keyrings/docker.gpg
    print_success "Docker GPG 密钥已添加"
}

# Add Docker repository / 添加 Docker 仓库
add_docker_repository() {
    print_info "添加 Docker 软件源..."

    # Determine architecture / 确定架构
    ARCH=$(dpkg --print-architecture)

    # Determine OS codename / 确定 OS 代号
    if [[ -f /etc/os-release ]]; then
        . /etc/os-release
        OS_CODENAME="$VERSION_CODENAME"
    else
        print_error "无法确定 OS 代号 (/etc/os-release 不存在)"
        exit 1
    fi

    # Write repository info / 写入仓库信息
    REPO_URL="deb [arch=${ARCH} signed-by=/etc/apt/keyrings/docker.gpg] https://mirrors.aliyun.com/docker-ce/linux/ubuntu ${OS_CODENAME} stable"
    if ! echo "$REPO_URL" | tee /etc/apt/sources.list.d/docker.list > /dev/null; then
        print_error "写入 Docker 仓库信息失败"
        exit 1
    fi

    print_success "Docker 仓库已添加"
}

# Update package index / 更新包索引
update_package_index() {
    print_info "更新 APT 包索引..."
    apt-get update
    print_success "APT 包索引已更新"
}

# Install Docker packages / 安装 Docker 包
install_docker_packages() {
    print_info "安装 Docker CE, containerd.io, 和相关插件..."

    # Install the packages / 安装包
    if ! apt-get install -y docker-ce docker-ce-cli containerd.io docker-buildx-plugin; then
        print_error "Docker 包安装失败"
        exit 1
    fi

    print_success "Docker CE, containerd.io, 和 docker-buildx-plugin 已安装"
}

# Install Docker Compose binary / 安装 Docker Compose 二进制文件
install_docker_compose() {
    print_info "正在安装 Docker Compose v5.1.1 (二进制文件)..."

    # Download Docker Compose binary / 下载 Docker Compose 二进制文件
    COMPOSE_URL="https://githubfast.com/docker/compose/releases/download/v5.1.1/docker-compose-linux-x86_64"
    COMPOSE_BIN="/usr/local/bin/docker-compose"

    if ! curl -L -o "$COMPOSE_BIN" "$COMPOSE_URL"; then
        print_error "下载 Docker Compose 失败"
        exit 1
    fi

    # Set executable permissions / 设置可执行权限
    chmod +x "$COMPOSE_BIN"

    print_success "Docker Compose (二进制文件) 安装成功"
}

# Start and enable Docker service / 启动并启用 Docker 服务
setup_docker_service() {
    print_info "启动并启用 Docker 服务..."

    # Enable and start Docker service / 启用并启动 Docker 服务
    systemctl enable docker
    systemctl start docker

    print_success "Docker 服务已启动并启用"
}

# Add current user to docker group / 将当前用户添加到 docker 组
add_user_to_docker_group() {
    print_info "将当前用户添加到 docker 组..."

    # Get the current user (before sudo) / 获取当前用户(sudo 之前)
    ORIGINAL_USER=$(logname 2>/dev/null || whoami | awk '{print $1}')

    # Create docker group if it doesn't exist / 如果不存在则创建 docker 组
    if ! getent group docker > /dev/null 2>&1; then
        print_info "创建 docker 组..."
        groupadd docker
    fi

    # Add user to docker group / 将用户添加到 docker 组
    usermod -aG docker "$ORIGINAL_USER"

    print_success "已将 $ORIGINAL_USER 添加到 docker 组"
    print_warning "您需要注销并重新登录才能使组更改生效。"
    print_info "或者,您可以运行: newgrp docker"
}

# Verify installations / 验证安装
verify_installations() {
    print_info "验证安装..."

    # Check Docker version / 检查 Docker 版本
    print_info "检查 Docker 版本..."
    if command -v docker >/dev/null 2>&1; then
        DOCKER_VERSION=$(docker --version 2>/dev/null || echo "未知")
        print_success "Docker 版本: $DOCKER_VERSION"
    else
        print_error "Docker 安装验证失败"
        exit 1
    fi

    # Check Docker Compose version (binary) / 检查 Docker Compose 版本(二进制文件)
    print_info "检查 Docker Compose (二进制文件) 版本..."
    if command -v docker-compose >/dev/null 2>&1; then
        COMPOSE_VERSION=$(docker-compose --version 2>/dev/null || echo "未知")
        print_success "Docker Compose (二进制文件) 版本: $COMPOSE_VERSION"
    else
        print_warning "Docker Compose (二进制文件) 安装验证失败或未安装 (这可能不是错误,取决于您的需求)"
        # Optionally, you could make this an error if docker-compose is strictly required
        # print_error "Docker Compose (二进制文件) 安装验证失败"
        # exit 1
    fi

    # Check Docker Compose plugin version / 检查 Docker Compose 插件版本
    print_info "检查 Docker Compose (插件) 版本..."
    if docker compose version >/dev/null 2>&1; then
        PLUGIN_COMPOSE_VERSION=$(docker compose version 2>/dev/null || echo "未知")
        print_success "Docker Compose (插件) 版本: $PLUGIN_COMPOSE_VERSION"
    else
        print_warning "Docker Compose (插件) 安装验证失败或未安装 (这可能不是错误,取决于您的需求)"
    fi

    # Test Docker daemon / 测试 Docker 守护进程
    print_info "测试 Docker 守护进程..."
    if timeout 10 docker info >/dev/null 2>&1; then
        print_success "Docker 守护进程运行正常"
    else
        print_error "Docker 守护进程测试失败"
        exit 1
    fi

    print_success "所有验证都通过了!"
}

# Main function / 主函数
main() {
    print_info "开始 Docker (APT) 和 Docker Compose (二进制) 安装..."
    print_info "日期: $(date)"

    check_root_privileges          # 检查 root 权限
    check_os                       # 检查操作系统
    install_prerequisites          # 安装必要工具
    add_docker_gpg_key             # 添加 GPG 密钥
    add_docker_repository          # 添加仓库
    update_package_index           # 更新包索引
    install_docker_packages        # 安装 Docker 包
    install_docker_compose         # 安装 Docker Compose 二进制文件
    setup_docker_service           # 设置并启动 Docker 服务
    add_user_to_docker_group       # 将用户添加到 docker 组
    verify_installations           # 验证安装结果

    print_info ""
    print_success "安装成功完成!"
    print_info ""
    print_info "下一步操作:"
    print_info "1. 注销并重新登录(或运行: newgrp docker)以便无需 sudo 即可使用 Docker"
    print_info "2. 测试 Docker: docker run hello-world"
    print_info "3. 测试 Docker Compose (插件): docker compose version"
    print_info "4. 测试 Docker Compose (二进制): docker-compose --version"
    print_info ""
    print_info "Docker 更多信息: https://docs.docker.com/"
    print_info "Docker Compose 更多信息: https://docs.docker.com/compose/"
}

# Run main function / 运行主函数
main "$@"
2.下载harbor
bash
wget https://github.com/goharbor/harbor/releases/download/v2.14.2/harbor-offline-installer-v2.14.2.tgz

#国内加速地址
wget https://githubfast.com/goharbor/harbor/releases/download/v2.14.2/harbor-offline-installer-v2.14.2.tgz
3.解压,修改文件,安装
bash
tar zxvf harbor-offline-installer-v2.14.2.tgz
cd harbor/
mv harbor.yml.tmpl harbor.yml
vim harbor.yml
# Configuration file of Harbor

# The IP address or hostname to access admin UI and registry service.
# DO NOT use localhost or 127.0.0.1, because Harbor needs to be accessed by external clients.
hostname: 10.0.0.101

# http related config
http:
  # port for http, default is 80. If https enabled, this port will redirect to https port
  port: 8088

# https related config
#https:
  # https port for harbor, default is 443
  # port: 443
  # The path of cert and key files for nginx
  #certificate: /your/certificate/path
  #private_key: /your/private/key/path
  # enable strong ssl ciphers (default: false)
  # strong_ssl_ciphers: false

# # Harbor will set ipv4 enabled only by default if this block is not configured
# # Otherwise, please uncomment this block to configure your own ip_family stacks
# ip_family:
#   # ipv6Enabled set to true if ipv6 is enabled in docker network, currently it affected the nginx related component
#   ipv6:
#     enabled: false
#   # ipv4Enabled set to true by default, currently it affected the nginx related component
#   ipv4:
#     enabled: true

# # Uncomment following will enable tls communication between all harbor components
# internal_tls:
#   # set enabled to true means internal tls is enabled
#   enabled: true
#   # put your cert and key files on dir
#   dir: /etc/harbor/tls/internal


# Uncomment external_url if you want to enable external proxy
# And when it enabled the hostname will no longer used
# external_url: https://reg.mydomain.com:8433

# The initial password of Harbor admin
# It only works in first time to install harbor
# Remember Change the admin password from UI after launching Harbor.
harbor_admin_password: Harbor12345

# Harbor DB configuration
database:
  # The password for the user('postgres' by default) of Harbor DB. Change this before any production use.
  password: root123
  # The maximum number of connections in the idle connection pool. If it <=0, no idle connections are retained.
  max_idle_conns: 100
  # The maximum number of open connections to the database. If it <= 0, then there is no limit on the number of open connections.
  # Note: the default number of connections is 1024 for postgres of harbor.
  max_open_conns: 900
  # The maximum amount of time a connection may be reused. Expired connections may be closed lazily before reuse. If it <= 0, connections are not closed due to a connection's age.
  # The value is a duration string. A duration string is a possibly signed sequence of decimal numbers, each with optional fraction and a unit suffix, such as "300ms", "-1.5h" or "2h45m". Valid time units are "ns", "us" (or "µs"), "ms", "s", "m", "h".
  conn_max_lifetime: 5m
  # The maximum amount of time a connection may be idle. Expired connections may be closed lazily before reuse. If it <= 0, connections are not closed due to a connection's idle time.
  # The value is a duration string. A duration string is a possibly signed sequence of decimal numbers, each with optional fraction and a unit suffix, such as "300ms", "-1.5h" or "2h45m". Valid time units are "ns", "us" (or "µs"), "ms", "s", "m", "h".
  conn_max_idle_time: 0

# The default data volume
data_volume: /data

# Harbor Storage settings by default is using /data dir on local filesystem
# Uncomment storage_service setting If you want to using external storage
storage_service:
   # ca_bundle is the path to the custom root ca certificate, which will be injected into the truststore
#   # of registry's containers.  This is usually needed when the user hosts a internal storage with self signed certificate.
#   ca_bundle:

   # storage backend, default is filesystem, options include filesystem, azure, gcs, s3, swift and oss
   # for more info about this configuration please refer https://distribution.github.io/distribution/about/configuration/
   # and https://distribution.github.io/distribution/storage-drivers/
s3:
    accesskey: "s3user_data"       # 替换为你的 Access Key
    secretkey: "S3User.Data"       # 替换为你的 Secret Key
    region: "us-east-1"                # 区域(MinIO 可随意填,如 "minio")
    regionendpoint: "http://10.0.0.102:9000" # MinIO 地址(AWS S3 可省略)
    bucket: "data"          # 存储桶名称(需提前创建)
    rootdirectory: "/registry"          # 桶内存储路径(可选)
    forcepathstyle: true                # MinIO 必须设为 true,AWS S3 可选
    secure: false                        # 是否使用 HTTPS(MinIO 无证书设为 false)
    v4auth: true                        # 启用 S3 V4 签名
    chunksize: 5242880                  # 分块上传大小(默认 5MB)
   filesystem:
     maxthreads: 100
   # set disable to true when you want to disable registry redirect
   redirect:
     disable: false

# Trivy configuration
#
# Trivy DB contains vulnerability information from NVD, Red Hat, and many other upstream vulnerability databases.
# It is downloaded by Trivy from the GitHub release page https://github.com/aquasecurity/trivy-db/releases and cached
# in the local file system. In addition, the database contains the update timestamp so Trivy can detect whether it
# should download a newer version from the Internet or use the cached one. Currently, the database is updated every
# 12 hours and published as a new release to GitHub.
trivy:
  # ignoreUnfixed The flag to display only fixed vulnerabilities
  ignore_unfixed: false
  # skipUpdate The flag to enable or disable Trivy DB downloads from GitHub
  #
  # You might want to enable this flag in test or CI/CD environments to avoid GitHub rate limiting issues.
  # If the flag is enabled you have to download the `trivy-offline.tar.gz` archive manually, extract `trivy.db` and
  # `metadata.json` files and mount them in the `/home/scanner/.cache/trivy/db` path.
  skip_update: false
  #
  # skipJavaDBUpdate If the flag is enabled you have to manually download the `trivy-java.db` file and mount it in the
  # `/home/scanner/.cache/trivy/java-db/trivy-java.db` path
  skip_java_db_update: false
  #
  # The offline_scan option prevents Trivy from sending API requests to identify dependencies.
  # Scanning JAR files and pom.xml may require Internet access for better detection, but this option tries to avoid it.
  # For example, the offline mode will not try to resolve transitive dependencies in pom.xml when the dependency doesn't
  # exist in the local repositories. It means a number of detected vulnerabilities might be fewer in offline mode.
  # It would work if all the dependencies are in local.
  # This option doesn't affect DB download. You need to specify "skip-update" as well as "offline-scan" in an air-gapped environment.
  offline_scan: false
  #
  # Comma-separated list of what security issues to detect. Possible values are `vuln`, `config` and `secret`. Defaults to `vuln`.
  security_check: vuln
  #
  # insecure The flag to skip verifying registry certificate
  insecure: false
  #
  # timeout The duration to wait for scan completion.
  # There is upper bound of 30 minutes defined in scan job. So if this `timeout` is larger than 30m0s, it will also timeout at 30m0s.
  timeout: 5m0s
  #
  # github_token The GitHub access token to download Trivy DB
  #
  # Anonymous downloads from GitHub are subject to the limit of 60 requests per hour. Normally such rate limit is enough
  # for production operations. If, for any reason, it's not enough, you could increase the rate limit to 5000
  # requests per hour by specifying the GitHub access token. For more details on GitHub rate limiting please consult
  # https://docs.github.com/rest/overview/resources-in-the-rest-api#rate-limiting
  #
  # You can create a GitHub token by following the instructions in
  # https://help.github.com/en/github/authenticating-to-github/creating-a-personal-access-token-for-the-command-line
  #
  # github_token: xxx

jobservice:
  # Maximum number of job workers in job service
  max_job_workers: 10
  # Maximum hours of task duration in job service, default 24
  max_job_duration_hours: 24
  # The jobLoggers backend name, only support "STD_OUTPUT", "FILE" and/or "DB"
  job_loggers:
    - STD_OUTPUT
    - FILE
    # - DB
  # The jobLogger sweeper duration (ignored if `jobLogger` is `stdout`)
  logger_sweeper_duration: 1 #days

notification:
  # Maximum retry count for webhook job
  webhook_job_max_retry: 3
  # HTTP client timeout for webhook job
  webhook_job_http_client_timeout: 3 #seconds

# Log configurations
log:
  # options are debug, info, warning, error, fatal
  level: info
  # configs for logs in local storage
  local:
    # Log files are rotated log_rotate_count times before being removed. If count is 0, old versions are removed rather than rotated.
    rotate_count: 50
    # Log files are rotated only if they grow bigger than log_rotate_size bytes. If size is followed by k, the size is assumed to be in kilobytes.
    # If the M is used, the size is in megabytes, and if G is used, the size is in gigabytes. So size 100, size 100k, size 100M and size 100G
    # are all valid.
    rotate_size: 200M
    # The directory on your host that store log
    location: /var/log/harbor

  # Uncomment following lines to enable external syslog endpoint.
  # external_endpoint:
  #   # protocol used to transmit log to external endpoint, options is tcp or udp
  #   protocol: tcp
  #   # The host of external endpoint
  #   host: localhost
  #   # Port of external endpoint
  #   port: 5140

#This attribute is for migrator to detect the version of the .cfg file, DO NOT MODIFY!
_version: 2.14.0

# Uncomment external_database if using external database.
external_database:
  harbor:
    host: 10.0.0.102
    port: 5432
    db_name: registry
    username: postgres
    password: 123456
    ssl_mode: disable
    max_idle_conns: 100
    max_open_conns: 900
    conn_max_lifetime: 5m
    conn_max_idle_time: 0
  notary_signer:
    host: 10.0.0.102
    port: 5432
    db_name: notary_signer
    username: postgres
    password: 123456
    ssl_mode: disable
  notary_server:
    host: 10.0.0.102
    port: 5432
    db_name: notary_server
    username: postgres
    password: 123456
    ssl_mode: disable

# Uncomment external_redis if using external Redis server
external_redis:
  # support redis, redis+sentinel
  # host for redis: <host_redis>:<port_redis>
  # host for redis+sentinel:
  #  <host_sentinel1>:<port_sentinel1>,<host_sentinel2>:<port_sentinel2>,<host_sentinel3>:<port_sentinel3>
  host: 10.0.0.102:6379
  password: redis.ms
  # Redis AUTH command was extended in Redis 6, it is possible to use it in the two-arguments AUTH <username> <password> form.
  # there's a known issue when using external redis username ref:https://github.com/goharbor/harbor/issues/18892
  # if you care about the image pull/push performance, please refer to this https://github.com/goharbor/harbor/wiki/Harbor-FAQs#external-redis-username-password-usage
  # username:
  # sentinel_master_set must be set to support redis+sentinel
  #sentinel_master_set:
  # tls configuration for redis connection
  # only server-authentication is supported
  # mtls for redis connection is not supported
  # tls connection will be disable by default
  # tlsOptions:
  #   enable: false
  #   # if it is a self-signed ca, please set the ca path specifically.
  #   rootCA:
  # db_index 0 is for core, it's unchangeable
  registry_db_index: 1
  jobservice_db_index: 2
  trivy_db_index: 5
  idle_timeout_seconds: 30
  # it's optional, the db for harbor business misc, by default is 0, uncomment it if you want to change it.
  # harbor_db_index: 6
  # it's optional, the db for harbor cache layer, by default is 0, uncomment it if you want to change it.
  # cache_layer_db_index: 7

# Uncomment uaa for trusting the certificate of uaa instance that is hosted via self-signed cert.
# uaa:
#   ca_file: /path/to/ca

# Global proxy
# Config http proxy for components, e.g. http://my.proxy.com:3128
# Components doesn't need to connect to each others via http proxy.
# Remove component from `components` array if want disable proxy
# for it. If you want use proxy for replication, MUST enable proxy
# for core and jobservice, and set `http_proxy` and `https_proxy`.
# Add domain to the `no_proxy` field, when you want disable proxy
# for some special registry.
proxy:
  http_proxy:
  https_proxy:
  no_proxy:
  components:
    - core
    - jobservice
    - trivy

metric:
  enabled: true
  port: 9090
  path: /metrics

# Trace related config
# only can enable one trace provider(jaeger or otel) at the same time,
# and when using jaeger as provider, can only enable it with agent mode or collector mode.
# if using jaeger collector mode, uncomment endpoint and uncomment username, password if needed
# if using jaeger agetn mode uncomment agent_host and agent_port
# trace:
#   enabled: true
#   # set sample_rate to 1 if you wanna sampling 100% of trace data; set 0.5 if you wanna sampling 50% of trace data, and so forth
#   sample_rate: 1
#   # # namespace used to differentiate different harbor services
#   # namespace:
#   # # attributes is a key value dict contains user defined attributes used to initialize trace provider
#   # attributes:
#   #   application: harbor
#   # # jaeger should be 1.26 or newer.
#   # jaeger:
#   #   endpoint: http://hostname:14268/api/traces
#   #   username:
#   #   password:
#   #   agent_host: hostname
#   #   # export trace data by jaeger.thrift in compact mode
#   #   agent_port: 6831
#   # otel:
#   #   endpoint: hostname:4318
#   #   url_path: /v1/traces
#   #   compression: false
#   #   insecure: true
#   #   # timeout is in seconds
#   #   timeout: 10

# Enable purge _upload directories
upload_purging:
  enabled: true
  # remove files in _upload directories which exist for a period of time, default is one week.
  age: 168h
  # the interval of the purge operations
  interval: 24h
  dryrun: false

# Cache layer configurations
# If this feature enabled, harbor will cache the resource
# `project/project_metadata/repository/artifact/manifest` in the redis
# which can especially help to improve the performance of high concurrent
# manifest pulling.
# NOTICE
# If you are deploying Harbor in HA mode, make sure that all the harbor
# instances have the same behaviour, all with caching enabled or disabled,
# otherwise it can lead to potential data inconsistency.
cache:
  # not enabled by default
  enabled: false
  # keep cache for one day by default
  expire_hours: 24

# Harbor core configurations
# Uncomment to enable the following harbor core related configuration items.
# core:
#   # The provider for updating project quota(usage), there are 2 options, redis or db,
#   # by default is implemented by db but you can switch the updation via redis which
#   # can improve the performance of high concurrent pushing to the same project,
#   # and reduce the database connections spike and occupies.
#   # By redis will bring up some delay for quota usage updation for display, so only
#   # suggest switch provider to redis if you were ran into the db connections spike around
#   # the scenario of high concurrent pushing to same project, no improvement for other scenes.
#   quota_update_provider: redis # Or db
4.核实db版本,导出数据库信息待用(可选)
bash
docker ps
CONTAINER ID   IMAGE                                 COMMAND                  CREATED          STATUS                    PORTS                                     NAMES
b67e0e06a8af   goharbor/harbor-jobservice:v2.14.2    "/harbor/entrypoint...."   42 minutes ago   Up 42 minutes (healthy)                                             harbor-jobservice
48a5148ed2f2   goharbor/nginx-photon:v2.14.2         "nginx -g 'daemon of..."   42 minutes ago   Up 42 minutes (healthy)   0.0.0.0:80->8080/tcp, [::]:80->8080/tcp   nginx
991a1e861042   goharbor/harbor-core:v2.14.2          "/harbor/entrypoint...."   42 minutes ago   Up 42 minutes (healthy)                                             harbor-core
1b6d1f13ce77   goharbor/harbor-registryctl:v2.14.2   "/home/harbor/start...."   42 minutes ago   Up 42 minutes (healthy)                                             registryctl
b52c5618a7e7   goharbor/redis-photon:v2.14.2         "redis-server /etc/r..."   42 minutes ago   Up 42 minutes (healthy)                                             redis
74b496cf89c2   goharbor/harbor-db:v2.14.2            "/docker-entrypoint...."   42 minutes ago   Up 42 minutes (healthy)                                             harbor-db
4ecb1055fa6f   goharbor/harbor-portal:v2.14.2        "nginx -g 'daemon of..."   42 minutes ago   Up 42 minutes (healthy)                                             harbor-portal
ee253455261f   goharbor/registry-photon:v2.14.2      "/home/harbor/entryp..."   42 minutes ago   Up 42 minutes (healthy)                                             registry
23c71f9644a6   goharbor/harbor-log:v2.14.2           "/bin/sh -c /usr/loc..."   42 minutes ago   Up 42 minutes (healthy)   127.0.0.1:1514->10514/tcp                 harbor-log

#将db数据库数据导出到宿主机上
docker exec harbor-db pg_dump -U postgres -d registry > ./harbor_registry_backup.sql
#核实默认db版本
docker exec  harbor-db postgres -V
postgres (PostgreSQL) 15.15
docker exec redis redis-server -v
Redis server v=7.2.11 sha=00000000:0 malloc=jemalloc-5.3.0 bits=64 build=7d2a79c22df711d4
docker exec trivy-adapter trivy --version
Version: 0.68.2
二、二进制离线部署外置 trivy
bash
root@zz:~# cat 1.sh
#!/bin/bash

###############################################################################
# 脚本名称: deploy_trivy_ha.sh
# 版本: v4.0 (Production Ready)
# 功能: 自动化部署 Trivy Server (二进制 + 离线数据库 + Systemd + 深度健康检查)
# 适用: CentOS/RHEL/Ubuntu/Debian (Linux amd64)
# 作者: AI Assistant
###############################################################################

set -e

# ==================== 1. 全局配置 ====================
RED='\033[0;31m'
GREEN='\033[0;32m'
YELLOW='\033[1;33m'
BLUE='\033[0;34m'
CYAN='\033[0;36m'
NC='\033[0m'

# 软件版本
TRIVY_VERSION="0.69.3"
ORAS_VERSION="1.3.1"

# 国内镜像源 (加速下载)
GITHUB_MIRROR="https://githubfast.com"
NJU_REGISTRY="ghcr.nju.edu.cn"

# 路径与环境
INSTALL_DIR="/usr/local/bin"
TRIVY_DATA_DIR="/opt/trivy-data/cache"
TRIVY_PORT="4975"
SERVICE_NAME="trivy-server"

# ==================== 2. 辅助函数 ====================
log_info() { echo -e "${BLUE}[INFO]${NC} $1"; }
log_success() { echo -e "${GREEN}[SUCCESS]${NC} $1"; }
log_warn() { echo -e "${YELLOW}[WARN]${NC} $1"; }
log_error() { echo -e "${RED}[ERROR]${NC} $1"; }
log_step() { echo -e "\n${CYAN}>>> $1${NC}"; }

check_root() {
    if [ "$EUID" -ne 0 ]; then
        log_error "请使用 root 用户或 sudo 运行此脚本。"
        exit 1
    fi
}

# ==================== 3. 主流程 ====================
check_root

echo -e "${GREEN}================================================================${NC}"
echo -e "${GREEN}  Trivy 高可用扫描节点部署脚本 (v4.0 - 生产环境优化版)${NC}"
echo -e "${GREEN}  目标版本: Trivy ${TRIVY_VERSION} | 端口: ${TRIVY_PORT}${NC}"
echo -e "${GREEN}================================================================${NC}"

# -----------------------------------------------------------------------------
# 步骤 1: 安装 ORAS (用于拉取数据库)
# -----------------------------------------------------------------------------
log_step "[1/6] 检查/安装 ORAS 工具..."
if [ ! -f "$INSTALL_DIR/oras" ]; then
    ORAS_TAR="oras_${ORAS_VERSION}_linux_amd64.tar.gz"
    ORAS_URL="${GITHUB_MIRROR}/oras-project/oras/releases/download/v${ORAS_VERSION}/${ORAS_TAR}"

    log_info "正在下载 ORAS..."
    wget -q --show-progress "${ORAS_URL}" -O "/tmp/${ORAS_TAR}" || { log_error "ORAS 下载失败"; exit 1; }

    tar -zxf "/tmp/${ORAS_TAR}" -C /tmp
    mv /tmp/oras "${INSTALL_DIR}/"
    chmod +x "${INSTALL_DIR}/oras"
    rm -f "/tmp/${ORAS_TAR}"
    log_success "ORAS 安装完成: $(oras version | head -n1)"
else
    log_warn "ORAS 已存在,跳过。"
fi

# -----------------------------------------------------------------------------
# 步骤 2: 安装 Trivy (智能版本检测)
# -----------------------------------------------------------------------------
log_step "[2/6] 检查/安装 Trivy ${TRIVY_VERSION}..."

NEED_INSTALL=false
if [ ! -f "$INSTALL_DIR/trivy" ]; then
    NEED_INSTALL=true
else
    # 【优化】使用正则提取版本号,兼容 "Version: x.y.z" 或 "trivy version x.y.z"
    CURRENT_VER=$(trivy --version 2>/dev/null | grep -oE '[0-9]+\.[0-9]+\.[0-9]+' | head -n 1)

    if [ -z "$CURRENT_VER" ]; then
        log_warn "无法识别当前版本,跳过安装以防破坏环境。"
    elif [ "$CURRENT_VER" != "$TRIVY_VERSION" ]; then
        log_warn "版本不匹配 (当前: $CURRENT_VER, 目标: $TRIVY_VERSION),跳过安装。"
        log_warn "如需升级,请手动删除 $INSTALL_DIR/trivy 后重试。"
    else
        log_success "版本一致 ($CURRENT_VER),跳过安装。"
    fi
fi

if [ "$NEED_INSTALL" = true ]; then
    TRIVY_TAR="trivy_${TRIVY_VERSION}_Linux-64bit.tar.gz"
    TRIVY_URL="${GITHUB_MIRROR}/aquasecurity/trivy/releases/download/v${TRIVY_VERSION}/${TRIVY_TAR}"

    log_info "正在下载 Trivy..."
    wget -q --show-progress "${TRIVY_URL}" -O "/tmp/${TRIVY_TAR}" || { log_error "Trivy 下载失败"; exit 1; }

    tar -zxf "/tmp/${TRIVY_TAR}" -C /tmp
    mv /tmp/trivy "${INSTALL_DIR}/"
    chmod +x "${INSTALL_DIR}/trivy"
    rm -f "/tmp/${TRIVY_TAR}"
    log_success "Trivy 安装完成: $(trivy --version | head -n1)"
fi

# -----------------------------------------------------------------------------
# 步骤 3: 初始化数据目录
# -----------------------------------------------------------------------------
log_step "[3/6] 初始化数据目录..."
mkdir -p "${TRIVY_DATA_DIR}/db" "${TRIVY_DATA_DIR}/java-db"

if ls "${TRIVY_DATA_DIR}/db/"*.db 1> /dev/null 2>&1; then
    log_warn "发现现有数据库,将直接使用 (不覆盖)。"
else
    log_info "未找到有效数据库,将在下一步拉取。"
fi

# -----------------------------------------------------------------------------
# 步骤 4: 拉取漏洞数据库 (离线导入模式)
# -----------------------------------------------------------------------------
log_step "[4/6] 拉取漏洞数据库 (国内源)..."
cd /tmp

# 4.1 主库 (trivy-db)
DB_META="${TRIVY_DATA_DIR}/db/metadata.json"
if [ ! -f "$DB_META" ]; then
    log_info "正在拉取 trivy-db (版本 2)..."
    if oras pull "${NJU_REGISTRY}/aquasecurity/trivy-db:2" -v --insecure > /dev/null 2>&1; then
        if [ -f "db.tar.gz" ]; then
            tar -zxf db.tar.gz -C "${TRIVY_DATA_DIR}/db/"
            rm -f db.tar.gz
            log_success "主漏洞库导入成功。"
        else
            log_error "拉取成功但未找到 db.tar.gz。"
            exit 1
        fi
    else
        log_error "拉取 trivy-db 失败,请检查网络。"
        exit 1
    fi
else
    log_warn "主库已存在,跳过。"
fi

# 4.2 Java 库 (trivy-java-db)
JAVA_META="${TRIVY_DATA_DIR}/java-db/metadata.json"
if [ ! -f "$JAVA_META" ]; then
    log_info "正在拉取 trivy-java-db (版本 1)..."
    if oras pull "${NJU_REGISTRY}/aquasecurity/trivy-java-db:1" -v --insecure > /dev/null 2>&1; then
        if [ -f "javadb.tar.gz" ]; then
            tar -zxf javadb.tar.gz -C "${TRIVY_DATA_DIR}/java-db/"
            rm -f javadb.tar.gz
            log_success "Java 漏洞库导入成功。"
        else
            log_warn "Java 库文件未找到,跳过。"
        fi
    else
        log_warn "Java 库拉取失败,跳过 (不影响基础扫描)。"
    fi
else
    log_warn "Java 库已存在,跳过。"
fi

rm -f /tmp/db.tar.gz /tmp/javadb.tar.gz 2>/dev/null
log_info "📊 数据目录大小: $(du -sh ${TRIVY_DATA_DIR} | cut -f1)"

# -----------------------------------------------------------------------------
# 步骤 5: 配置 Systemd 服务
# -----------------------------------------------------------------------------
log_step "[5/6] 配置 Systemd 服务..."

cat > /etc/systemd/system/${SERVICE_NAME}.service <<EOF
[Unit]
Description=Trivy Vulnerability Scanner Server
After=network.target

[Service]
Type=simple
User=root
Environment="TRIVY_CACHE_DIR=${TRIVY_DATA_DIR}"
Environment="TRIVY_SKIP_DB_UPDATE=true"
ExecStart=${INSTALL_DIR}/trivy server --listen 0.0.0.0:${TRIVY_PORT} --cache-dir ${TRIVY_DATA_DIR}
Restart=always
RestartSec=5
LimitNOFILE=65536
StandardOutput=journal
StandardError=journal

[Install]
WantedBy=multi-user.target
EOF

systemctl daemon-reload
systemctl enable ${SERVICE_NAME}
systemctl restart ${SERVICE_NAME}
log_success "服务已启动。"

# -----------------------------------------------------------------------------
# 步骤 6: 深度健康检查 (兼容 ok/ready/true)
# -----------------------------------------------------------------------------
log_step "[6/6] 进行服务健康检查..."

MAX_RETRIES=20  # 100秒
RETRY_COUNT=0
INTERVAL=5

sleep 2 # 等待进程完全初始化

if ! ss -tlnp | grep -q ":${TRIVY_PORT}"; then
    log_error "端口 ${TRIVY_PORT} 未监听!"
    journalctl -u ${SERVICE_NAME} -n 10 --no-pager
    exit 1
fi

echo -n "  等待服务就绪"
while [ $RETRY_COUNT -lt $MAX_RETRIES ]; do
    RESPONSE=$(curl -s -w "\n%{http_code}" http://127.0.0.1:${TRIVY_PORT}/healthz 2>/dev/null || echo -e "\n000")
    HTTP_CODE=$(echo "$RESPONSE" | tail -n 1)
    BODY=$(echo "$RESPONSE" | head -n -1)

    if [ "$HTTP_CODE" == "200" ]; then
        # 【核心修复】兼容 "ok", "ready", "true" 等多种返回
        if echo "$BODY" | grep -qiE "ok|ready|true"; then
            echo ""
            log_success "服务健康检查通过! (响应: $BODY)"
            break
        else
            # 如果是 200 但内容奇怪,也视为成功 (防止未来版本变更)
            log_warn "返回 200 但内容为 '$BODY',视为成功。"
            break
        fi
    fi

    echo -n "."
    RETRY_COUNT=$((RETRY_COUNT + 1))
    sleep $INTERVAL
done

if [ $RETRY_COUNT -eq $MAX_RETRIES ]; then
    echo ""
    log_error "健康检查超时!"
    echo "--- 调试信息 ---"
    curl -v http://127.0.0.1:${TRIVY_PORT}/healthz
    echo ""
    journalctl -u ${SERVICE_NAME} -n 15 --no-pager
    exit 1
fi

# ==================== 4. 部署总结与 HA 指南 ====================
echo -e "\n${GREEN}================================================================${NC}"
echo -e "${GREEN}  🎉 部署成功!Trivy Server 已就绪${NC}"
echo -e "${GREEN}================================================================${NC}"
echo -e "📦 版本: ${TRIVY_VERSION}"
echo -e "🔌 端口: ${TRIVY_PORT}"
echo -e "📂 数据: ${TRIVY_DATA_DIR}"
echo -e "🛠️  管理命令:"
echo -e "   systemctl status ${SERVICE_NAME}"
echo -e "   journalctl -u ${SERVICE_NAME} -f"
echo ""
echo -e "${CYAN}🚀 高可用 (HA) 后续配置指南:${NC}"
echo "1. 在另一台节点运行此脚本。"
echo "2. 配置 HAProxy (示例配置如下):"
echo -e "${YELLOW}------------------------------------------${NC}"
cat <<EOF
backend trivy_back
    balance roundrobin
    option httpchk GET /healthz
    http-check expect status 200
    server node1 <NODE1_IP>:${TRIVY_PORT} check
    server node2 <NODE2_IP>:${TRIVY_PORT} check
EOF
echo -e "${YELLOW}------------------------------------------${NC}"
echo "3. 在 Harbor 中设置扫描器地址为 HAProxy 的 VIP。"
echo -e "${GREEN}================================================================${NC}"
root@zz:~# cat 2.sh
#!/bin/bash

###############################################################################
# 脚本名称: deploy_harbor_scanner_trivy_fixed.sh
# 版本: v2.5 (修复版 - 移除错误的 go mod clean 命令)
# 功能: 源码安装 Harbor Scanner Trivy
# 端口: 8081
###############################################################################

set -e

# ==================== 1. 全局配置 ====================
RED='\033[0;31m'
GREEN='\033[0;32m'
YELLOW='\033[1;33m'
BLUE='\033[0;34m'
CYAN='\033[0;36m'
NC='\033[0m'

SCANNER_VERSION="0.35.1"
TRIVY_VERSION="0.69.3"
GITHUB_MIRROR="https://githubfast.com"
DOWNLOAD_URL="${GITHUB_MIRROR}/goharbor/harbor-scanner-trivy/archive/refs/tags/v${SCANNER_VERSION}.tar.gz"

INSTALL_DIR="/usr/local/bin"
SCANNER_DATA_DIR="/opt/harbor-scanner-trivy/data"
SERVICE_PORT="8081"
SERVICE_NAME="harbor-scanner-trivy"
SERVICE_USER="harbor-scanner"
SERVICE_GROUP="harbor-scanner"

# 强制指定 Go 的绝对路径
GO_BIN="/usr/local/go/bin/go"

# ==================== 2. 辅助函数 ====================
log_info() { echo -e "${BLUE}[INFO]${NC} $1"; }
log_success() { echo -e "${GREEN}[SUCCESS]${NC} $1"; }
log_warn() { echo -e "${YELLOW}[WARN]${NC} $1"; }
log_error() { echo -e "${RED}[ERROR]${NC} $1"; }
log_step() { echo -e "\n${CYAN}>>> $1${NC}"; }

check_root() {
    if [ "$EUID" -ne 0 ]; then
        log_error "请使用 root 用户或 sudo 运行此脚本。"
        exit 1
    fi
}

check_trivy() {
    log_info "检查 Trivy 安装状态..."
    if command -v trivy &> /dev/null; then
        TRIVY_VER=$(trivy --version 2>/dev/null | head -n 1 || echo "未知版本")
        log_success "Trivy 已安装: $TRIVY_VER"
        return 0
    else
        log_error "Trivy 未安装!请先安装 Trivy。"
        exit 1
    fi
}

# ==================== 自动安装 Go ====================
install_go() {
    GO_TARBALL="go1.22.0.linux-amd64.tar.gz"
    GO_DOWNLOAD_URL="https://mirrors.aliyun.com/golang/${GO_TARBALL}"

    log_info "正在从阿里云下载并安装 Go 1.22..."
    wget --no-check-certificate -q --show-progress "${GO_DOWNLOAD_URL}" -O "/tmp/${GO_TARBALL}"
    rm -rf /usr/local/go
    tar -C /usr/local -xzf "/tmp/${GO_TARBALL}"

    # 配置全局环境变量
    export PATH=$PATH:/usr/local/go/bin
    echo 'export PATH=$PATH:/usr/local/go/bin' > /etc/profile.d/go.sh
    chmod +x /etc/profile.d/go.sh

    rm -f "/tmp/${GO_TARBALL}"

    if [ -x "$GO_BIN" ]; then
        log_success "Go 安装成功: $($GO_BIN version)"
    else
        log_error "Go 安装失败!"
        exit 1
    fi
}

check_go() {
    log_info "检查 Go 环境..."
    if [ -x "$GO_BIN" ]; then
        GO_VER=$($GO_BIN version 2>/dev/null | grep -oE 'go[0-9]+\.[0-9]+\.[0-9]+' || echo "未知版本")
        log_success "Go 已就绪: ${GO_VER}"
        return 0
    else
        log_warn "Go 未安装!自动开始安装..."
        install_go
    fi
}

# ==================== 3. 主流程 ====================
check_root

echo -e "${GREEN}================================================================${NC}"
echo -e "${GREEN}  Harbor Scanner Trivy 修复版部署 (v${SCANNER_VERSION})${NC}"
echo -e "${GREEN}  服务端口: ${SERVICE_PORT}${NC}"
echo -e "${GREEN}================================================================${NC}"

check_trivy
check_go

# 导出 PATH
export PATH=$PATH:/usr/local/go/bin

# -----------------------------------------------------------------------------
# 步骤 1: 下载源码
# -----------------------------------------------------------------------------
log_step "[1/6] 下载源码..."
TARBALL_NAME="v${SCANNER_VERSION}.tar.gz"
SOURCE_DIR="/tmp/harbor-scanner-trivy-${SCANNER_VERSION}"
[ -d "$SOURCE_DIR" ] && rm -rf "$SOURCE_DIR"
cd /tmp
log_info "正在下载: ${DOWNLOAD_URL}"
wget -q --show-progress "${DOWNLOAD_URL}" -O "/tmp/${TARBALL_NAME}"
log_success "下载完成"

# -----------------------------------------------------------------------------
# 步骤 2: 解压源码
# -----------------------------------------------------------------------------
log_step "[2/6] 解压源码..."
tar -zxf "${TARBALL_NAME}" -C /tmp/
if [ ! -d "$SOURCE_DIR" ]; then
    log_error "解压失败!"
    exit 1
fi
log_success "解压完成: ${SOURCE_DIR}"

# -----------------------------------------------------------------------------
# 步骤 3: 编译 (关键修复:移除错误的 go mod clean 命令)
# -----------------------------------------------------------------------------
log_step "[3/6] 编译源码..."
cd "$SOURCE_DIR"

export GOPROXY="https://goproxy.cn,direct"
export GO111MODULE=on

VERSION_PACKAGE="github.com/goharbor/harbor-scanner-trivy/pkg/version"
GIT_COMMIT="none"
BUILD_TIME=$(date -u +'%Y-%m-%dT%H:%M:%SZ')

log_info "获取 Go 依赖..."
# 【修复】只使用 go mod download,不要使用 go mod clean(该命令不存在!)
$GO_BIN mod download 2>&1 | tail -3 || true

log_info "开始编译 (注入版本: ${SCANNER_VERSION})..."
BUILD_START=$(date +%s)

$GO_BIN build -o scanner-trivy \
    -ldflags "-s -w \
    -X ${VERSION_PACKAGE}.Version=${SCANNER_VERSION} \
    -X ${VERSION_PACKAGE}.Commit=${GIT_COMMIT} \
    -X ${VERSION_PACKAGE}.Date=${BUILD_TIME}" \
    ./cmd/scanner-trivy/main.go

BUILD_END=$(date +%s)
log_success "编译完成! (耗时: $((BUILD_END - BUILD_START))秒)"

# 安装二进制
mv scanner-trivy "${INSTALL_DIR}/${SERVICE_NAME}"
chmod +x "${INSTALL_DIR}/${SERVICE_NAME}"
log_success "二进制已安装: ${INSTALL_DIR}/${SERVICE_NAME}"

# 清理
rm -f "/tmp/${TARBALL_NAME}"
rm -rf "$SOURCE_DIR"

# -----------------------------------------------------------------------------
# 步骤 4: 初始化目录与用户
# -----------------------------------------------------------------------------
log_step "[4/6] 初始化目录与用户..."
if ! id -u "${SERVICE_USER}" &>/dev/null; then
    useradd -r -s /sbin/nologin -M "${SERVICE_USER}"
    log_success "创建系统用户: ${SERVICE_USER}"
fi

mkdir -p "${SCANNER_DATA_DIR}/cache/trivy/db"
mkdir -p "${SCANNER_DATA_DIR}/cache/trivy/java-db"
mkdir -p "${SCANNER_DATA_DIR}/reports"
mkdir -p "/home/${SERVICE_USER}/.cache/trivy"

chown -R "${SERVICE_USER}:${SERVICE_GROUP}" "${SCANNER_DATA_DIR}" /home/${SERVICE_USER}
chmod -R 750 "${SCANNER_DATA_DIR}" /home/${SERVICE_USER}
log_success "目录权限配置完成"

# -----------------------------------------------------------------------------
# 步骤 5: 配置 Systemd 服务
# -----------------------------------------------------------------------------
log_step "[5/6] 配置 Systemd 服务..."
cat > /etc/systemd/system/${SERVICE_NAME}.service <<EOF
[Unit]
Description=Harbor Scanner Trivy Adapter
After=network.target

[Service]
Type=simple
User=${SERVICE_USER}
Group=${SERVICE_GROUP}
WorkingDirectory=${SCANNER_DATA_DIR}
ExecStart=${INSTALL_DIR}/${SERVICE_NAME}
Restart=always
RestartSec=5
LimitNOFILE=65536
MemoryMax=2G

Environment="HOME=/home/${SERVICE_USER}"
Environment="SCANNER_TRIVY_CACHE_DIR=${SCANNER_DATA_DIR}/cache"
Environment="SCANNER_TRIVY_REPORTS_DIR=${SCANNER_DATA_DIR}/reports"
Environment="SCANNER_API_SERVER_ADDR=0.0.0.0:${SERVICE_PORT}"
Environment="SCANNER_LOG_LEVEL=info"
Environment="TRIVY_CACHE_DIR=${SCANNER_DATA_DIR}/cache"
Environment="TRIVY_SKIP_DB_UPDATE=true"
Environment="TRIVY_VERSION=${TRIVY_VERSION}"
Environment="PATH=/usr/local/sbin:/usr/local/bin:/usr/sbin:/usr/bin"

NoNewPrivileges=true
ProtectHome=true
PrivateTmp=true
ReadWritePaths=${SCANNER_DATA_DIR}
ReadWritePaths=/home/${SERVICE_USER}

StandardOutput=journal
StandardError=journal

[Install]
WantedBy=multi-user.target
EOF

systemctl daemon-reload
systemctl stop ${SERVICE_NAME} 2>/dev/null || true
systemctl enable ${SERVICE_NAME}
systemctl restart ${SERVICE_NAME}
sleep 3
log_success "服务已启动"

# -----------------------------------------------------------------------------
# 步骤 6: 健康检查
# -----------------------------------------------------------------------------
log_step "[6/6] 服务健康检查..."

# 检查端口
if ! ss -tlnp | grep -q ":${SERVICE_PORT}"; then
    log_error "端口 ${SERVICE_PORT} 未监听!"
    journalctl -u ${SERVICE_NAME} -n 15 --no-pager
    exit 1
fi
log_info "端口 ${SERVICE_PORT} 监听正常"

# 检查 API
log_info "测试 API 连通性..."
MAX_RETRIES=10
RETRY_COUNT=0
while [ $RETRY_COUNT -lt $MAX_RETRIES ]; do
    if curl -s http://127.0.0.1:${SERVICE_PORT}/api/v1/metadata 2>/dev/null | grep -q "scanner"; then
        log_success "API 连通性检查通过!"
        break
    fi
    RETRY_COUNT=$((RETRY_COUNT + 1))
    sleep 2
done

if [ $RETRY_COUNT -eq $MAX_RETRIES ]; then
    log_warn "API 检查超时,但服务可能仍在启动中"
fi

# 防火墙配置
if command -v firewall-cmd &> /dev/null && firewall-cmd --state &> /dev/null; then
    firewall-cmd --permanent --add-port=${SERVICE_PORT}/tcp &>/dev/null
    firewall-cmd --reload &>/dev/null
    log_success "firewalld: 端口 ${SERVICE_PORT} 已开放"
fi

# ==================== 部署总结 ====================
echo -e "\n${GREEN}================================================================${NC}"
echo -e "${GREEN}  Harbor Scanner Trivy 部署成功!${NC}"
echo -e "${GREEN}================================================================${NC}"
echo -e "📦 目标版本: ${SCANNER_VERSION}"
echo -e "🔌 服务端口: ${SERVICE_PORT}"
echo -e "📂 数据目录: ${SCANNER_DATA_DIR}"
echo ""
echo -e "${CYAN}常用命令:${NC}"
echo "   查看状态: systemctl status ${SERVICE_NAME}"
echo "   查看日志: journalctl -u ${SERVICE_NAME} -f"
echo "   测试 API: curl http://127.0.0.1:${SERVICE_PORT}/api/v1/metadata"
echo ""
echo -e "${CYAN}Harbor 配置:${NC}"
echo "   API URL: http://<本机IP>:${SERVICE_PORT}"
echo "   授权模式: Non-Secret"
echo -e "${GREEN}================================================================${NC}"
安装扫描器中间件
bash
vim deploy_harbor_scanner_trivy.sh
bash
#!/bin/bash

###############################################################################
# 脚本名称: deploy_harbor_scanner_trivy.sh
# 版本: v2.5
# 功能: 源码安装 Harbor Scanner Trivy
# 端口: 8081
###############################################################################

set -e

# ==================== 1. 全局配置 ====================
RED='\033[0;31m'
GREEN='\033[0;32m'
YELLOW='\033[1;33m'
BLUE='\033[0;34m'
CYAN='\033[0;36m'
NC='\033[0m'

SCANNER_VERSION="0.35.1"
TRIVY_VERSION="0.69.3"
GITHUB_MIRROR="https://githubfast.com"
DOWNLOAD_URL="${GITHUB_MIRROR}/goharbor/harbor-scanner-trivy/archive/refs/tags/v${SCANNER_VERSION}.tar.gz"

INSTALL_DIR="/usr/local/bin"
SCANNER_DATA_DIR="/opt/harbor-scanner-trivy/data"
SERVICE_PORT="8081"
SERVICE_NAME="harbor-scanner-trivy"
SERVICE_USER="harbor-scanner"
SERVICE_GROUP="harbor-scanner"

# 强制指定 Go 的绝对路径
GO_BIN="/usr/local/go/bin/go"

# ==================== 2. 辅助函数 ====================
log_info() { echo -e "${BLUE}[INFO]${NC} $1"; }
log_success() { echo -e "${GREEN}[SUCCESS]${NC} $1"; }
log_warn() { echo -e "${YELLOW}[WARN]${NC} $1"; }
log_error() { echo -e "${RED}[ERROR]${NC} $1"; }
log_step() { echo -e "\n${CYAN}>>> $1${NC}"; }

check_root() {
    if [ "$EUID" -ne 0 ]; then
        log_error "请使用 root 用户或 sudo 运行此脚本。"
        exit 1
    fi
}

check_trivy() {
    log_info "检查 Trivy 安装状态..."
    if command -v trivy &> /dev/null; then
        TRIVY_VER=$(trivy --version 2>/dev/null | head -n 1 || echo "未知版本")
        log_success "Trivy 已安装: $TRIVY_VER"
        return 0
    else
        log_error "Trivy 未安装!请先安装 Trivy。"
        exit 1
    fi
}

# ==================== 自动安装 Go ====================
install_go() {
    GO_TARBALL="go1.22.0.linux-amd64.tar.gz"
    GO_DOWNLOAD_URL="https://mirrors.aliyun.com/golang/${GO_TARBALL}"

    log_info "正在从阿里云下载并安装 Go 1.22..."
    wget --no-check-certificate -q --show-progress "${GO_DOWNLOAD_URL}" -O "/tmp/${GO_TARBALL}"
    rm -rf /usr/local/go
    tar -C /usr/local -xzf "/tmp/${GO_TARBALL}"

    # 配置全局环境变量
    export PATH=$PATH:/usr/local/go/bin
    echo 'export PATH=$PATH:/usr/local/go/bin' > /etc/profile.d/go.sh
    chmod +x /etc/profile.d/go.sh

    rm -f "/tmp/${GO_TARBALL}"

    if [ -x "$GO_BIN" ]; then
        log_success "Go 安装成功: $($GO_BIN version)"
    else
        log_error "Go 安装失败!"
        exit 1
    fi
}

check_go() {
    log_info "检查 Go 环境..."
    if [ -x "$GO_BIN" ]; then
        GO_VER=$($GO_BIN version 2>/dev/null | grep -oE 'go[0-9]+\.[0-9]+\.[0-9]+' || echo "未知版本")
        log_success "Go 已就绪: ${GO_VER}"
        return 0
    else
        log_warn "Go 未安装!自动开始安装..."
        install_go
    fi
}

# ==================== 3. 主流程 ====================
check_root

echo -e "${GREEN}================================================================${NC}"
echo -e "${GREEN}  Harbor Scanner Trivy 修复版部署 (v${SCANNER_VERSION})${NC}"
echo -e "${GREEN}  服务端口: ${SERVICE_PORT}${NC}"
echo -e "${GREEN}================================================================${NC}"

check_trivy
check_go

# 导出 PATH
export PATH=$PATH:/usr/local/go/bin

# -----------------------------------------------------------------------------
# 步骤 1: 下载源码
# -----------------------------------------------------------------------------
log_step "[1/6] 下载源码..."
TARBALL_NAME="v${SCANNER_VERSION}.tar.gz"
SOURCE_DIR="/tmp/harbor-scanner-trivy-${SCANNER_VERSION}"
[ -d "$SOURCE_DIR" ] && rm -rf "$SOURCE_DIR"
cd /tmp
log_info "正在下载: ${DOWNLOAD_URL}"
wget -q --show-progress "${DOWNLOAD_URL}" -O "/tmp/${TARBALL_NAME}"
log_success "下载完成"

# -----------------------------------------------------------------------------
# 步骤 2: 解压源码
# -----------------------------------------------------------------------------
log_step "[2/6] 解压源码..."
tar -zxf "${TARBALL_NAME}" -C /tmp/
if [ ! -d "$SOURCE_DIR" ]; then
    log_error "解压失败!"
    exit 1
fi
log_success "解压完成: ${SOURCE_DIR}"

# -----------------------------------------------------------------------------
# 步骤 3: 编译 (关键修复:移除错误的 go mod clean 命令)
# -----------------------------------------------------------------------------
log_step "[3/6] 编译源码..."
cd "$SOURCE_DIR"

export GOPROXY="https://goproxy.cn,direct"
export GO111MODULE=on

VERSION_PACKAGE="github.com/goharbor/harbor-scanner-trivy/pkg/version"
GIT_COMMIT="none"
BUILD_TIME=$(date -u +'%Y-%m-%dT%H:%M:%SZ')

log_info "获取 Go 依赖..."
# 【修复】只使用 go mod download,不要使用 go mod clean(该命令不存在!)
$GO_BIN mod download 2>&1 | tail -3 || true

log_info "开始编译 (注入版本: ${SCANNER_VERSION})..."
BUILD_START=$(date +%s)

$GO_BIN build -o scanner-trivy \
    -ldflags "-s -w \
    -X ${VERSION_PACKAGE}.Version=${SCANNER_VERSION} \
    -X ${VERSION_PACKAGE}.Commit=${GIT_COMMIT} \
    -X ${VERSION_PACKAGE}.Date=${BUILD_TIME}" \
    ./cmd/scanner-trivy/main.go

BUILD_END=$(date +%s)
log_success "编译完成! (耗时: $((BUILD_END - BUILD_START))秒)"

# 安装二进制
mv scanner-trivy "${INSTALL_DIR}/${SERVICE_NAME}"
chmod +x "${INSTALL_DIR}/${SERVICE_NAME}"
log_success "二进制已安装: ${INSTALL_DIR}/${SERVICE_NAME}"

# 清理
rm -f "/tmp/${TARBALL_NAME}"
rm -rf "$SOURCE_DIR"

# -----------------------------------------------------------------------------
# 步骤 4: 初始化目录与用户
# -----------------------------------------------------------------------------
log_step "[4/6] 初始化目录与用户..."
if ! id -u "${SERVICE_USER}" &>/dev/null; then
    useradd -r -s /sbin/nologin -M "${SERVICE_USER}"
    log_success "创建系统用户: ${SERVICE_USER}"
fi

mkdir -p "${SCANNER_DATA_DIR}/cache/trivy/db"
mkdir -p "${SCANNER_DATA_DIR}/cache/trivy/java-db"
mkdir -p "${SCANNER_DATA_DIR}/reports"
mkdir -p "/home/${SERVICE_USER}/.cache/trivy"

chown -R "${SERVICE_USER}:${SERVICE_GROUP}" "${SCANNER_DATA_DIR}" /home/${SERVICE_USER}
chmod -R 750 "${SCANNER_DATA_DIR}" /home/${SERVICE_USER}
log_success "目录权限配置完成"

# -----------------------------------------------------------------------------
# 步骤 5: 配置 Systemd 服务
# -----------------------------------------------------------------------------
log_step "[5/6] 配置 Systemd 服务..."
cat > /etc/systemd/system/${SERVICE_NAME}.service <<EOF
[Unit]
Description=Harbor Scanner Trivy Adapter
After=network.target

[Service]
Type=simple
User=${SERVICE_USER}
Group=${SERVICE_GROUP}
WorkingDirectory=${SCANNER_DATA_DIR}
ExecStart=${INSTALL_DIR}/${SERVICE_NAME}
Restart=always
RestartSec=5
LimitNOFILE=65536
MemoryMax=2G

Environment="HOME=/home/${SERVICE_USER}"
Environment="SCANNER_TRIVY_CACHE_DIR=${SCANNER_DATA_DIR}/cache"
Environment="SCANNER_TRIVY_REPORTS_DIR=${SCANNER_DATA_DIR}/reports"
Environment="SCANNER_API_SERVER_ADDR=0.0.0.0:${SERVICE_PORT}"
Environment="SCANNER_LOG_LEVEL=info"
Environment="TRIVY_CACHE_DIR=${SCANNER_DATA_DIR}/cache"
Environment="TRIVY_SKIP_DB_UPDATE=true"
Environment="TRIVY_VERSION=${TRIVY_VERSION}"
Environment="PATH=/usr/local/sbin:/usr/local/bin:/usr/sbin:/usr/bin"

NoNewPrivileges=true
ProtectHome=true
PrivateTmp=true
ReadWritePaths=${SCANNER_DATA_DIR}
ReadWritePaths=/home/${SERVICE_USER}

StandardOutput=journal
StandardError=journal

[Install]
WantedBy=multi-user.target
EOF

systemctl daemon-reload
systemctl stop ${SERVICE_NAME} 2>/dev/null || true
systemctl enable ${SERVICE_NAME}
systemctl restart ${SERVICE_NAME}
sleep 3
log_success "服务已启动"

# -----------------------------------------------------------------------------
# 步骤 6: 健康检查
# -----------------------------------------------------------------------------
log_step "[6/6] 服务健康检查..."

# 检查端口
if ! ss -tlnp | grep -q ":${SERVICE_PORT}"; then
    log_error "端口 ${SERVICE_PORT} 未监听!"
    journalctl -u ${SERVICE_NAME} -n 15 --no-pager
    exit 1
fi
log_info "端口 ${SERVICE_PORT} 监听正常"

# 检查 API
log_info "测试 API 连通性..."
MAX_RETRIES=10
RETRY_COUNT=0
while [ $RETRY_COUNT -lt $MAX_RETRIES ]; do
    if curl -s http://127.0.0.1:${SERVICE_PORT}/api/v1/metadata 2>/dev/null | grep -q "scanner"; then
        log_success "API 连通性检查通过!"
        break
    fi
    RETRY_COUNT=$((RETRY_COUNT + 1))
    sleep 2
done

if [ $RETRY_COUNT -eq $MAX_RETRIES ]; then
    log_warn "API 检查超时,但服务可能仍在启动中"
fi

# 防火墙配置
if command -v firewall-cmd &> /dev/null && firewall-cmd --state &> /dev/null; then
    firewall-cmd --permanent --add-port=${SERVICE_PORT}/tcp &>/dev/null
    firewall-cmd --reload &>/dev/null
    log_success "firewalld: 端口 ${SERVICE_PORT} 已开放"
fi

# ==================== 部署总结 ====================
echo -e "\n${GREEN}================================================================${NC}"
echo -e "${GREEN}  Harbor Scanner Trivy 部署成功!${NC}"
echo -e "${GREEN}================================================================${NC}"
echo -e "📦 目标版本: ${SCANNER_VERSION}"
echo -e "🔌 服务端口: ${SERVICE_PORT}"
echo -e "📂 数据目录: ${SCANNER_DATA_DIR}"
echo ""
echo -e "${CYAN}常用命令:${NC}"
echo "   查看状态: systemctl status ${SERVICE_NAME}"
echo "   查看日志: journalctl -u ${SERVICE_NAME} -f"
echo "   测试 API: curl http://127.0.0.1:${SERVICE_PORT}/api/v1/metadata"
echo ""
echo -e "${CYAN}Harbor 配置:${NC}"
echo "   API URL: http://<本机IP>:${SERVICE_PORT}"
echo "   授权模式: Non-Secret"
echo -e "${GREEN}================================================================${NC}"
设置自动更新镜像扫描数据库
bash
cat /usr/local/bin/trivy-update-db.sh
#!/bin/bash

# ==================== 配置区域 ====================
# 数据来源:复用您之前脚本中的南京大学镜像源
TRIVY_DB_REPO="ghcr.nju.edu.cn/aquasecurity/trivy-db:2"
TRIVY_JAVA_DB_REPO="ghcr.nju.edu.cn/aquasecurity/trivy-java-db:1"

# 路径配置:必须与您之前安装脚本中的 TRIVY_DATA_DIR 一致
# 您的脚本中定义为:/opt/trivy-data/cache
CACHE_DIR="/opt/trivy-data/cache"

# Trivy 二进制路径 (根据您的安装脚本通常在 /usr/local/bin)
TRIVY_BIN="/usr/local/bin/trivy"

# 日志文件路径
LOG_FILE="/var/log/trivy-db-update.log"

# ==================== 辅助函数 ====================
log() {
    echo "[$(date '+%Y-%m-%d %H:%M:%S')] $1" | tee -a "$LOG_FILE"
}

# ==================== 主流程 ====================

# 1. 前置检查
if [ ! -f "$TRIVY_BIN" ]; then
    log "ERROR: 未找到 Trivy 二进制文件 ($TRIVY_BIN),请检查安装路径。"
    exit 1
fi

if [ ! -d "$CACHE_DIR" ]; then
    log "WARN: 缓存目录不存在,正在创建:$CACHE_DIR"
    mkdir -p "$CACHE_DIR/db" "$CACHE_DIR/java-db"
fi

log "------------------------------------------"
log "开始更新 Trivy 漏洞数据库..."
log "使用源 (DB):   $TRIVY_DB_REPO"
log "使用源 (Java): $TRIVY_JAVA_DB_REPO"
log "缓存目录:      $CACHE_DIR"

# 2. 更新主漏洞库 (trivy-db)
log "正在下载主漏洞库..."
# 设置环境变量指定仓库,执行下载
if TRIVY_DB_REPOSITORY="$TRIVY_DB_REPO" "$TRIVY_BIN" image --cache-dir "$CACHE_DIR" --download-db-only; then
    log "SUCCESS: 主漏洞库更新完成。"
else
    log "ERROR: 主漏洞库下载失败!"
    # 不退出,尝试继续更新 Java 库
fi

# 3. 更新 Java 漏洞库 (trivy-java-db)
log "正在下载 Java 漏洞库..."
if TRIVY_JAVA_DB_REPOSITORY="$TRIVY_JAVA_DB_REPO" "$TRIVY_BIN" image --cache-dir "$CACHE_DIR" --download-java-db-only; then
    log "SUCCESS: Java 漏洞库更新完成。"
else
    log "WARN: Java 漏洞库下载失败 (可选,不影响基础扫描)。"
fi

# 4. 清理旧版本 (Trivy 通常会自动清理,但手动确认一下磁盘空间也是好的)
CURRENT_SIZE=$(du -sh "$CACHE_DIR" 2>/dev/null | cut -f1)
log "当前数据库目录大小:$CURRENT_SIZE"

log "更新任务结束。"
log "------------------------------------------"

exit 0
添加执行权限+设置每日自动更新
bash
chmod +x /usr/local/bin/trivy-update-db.sh

(crontab -l 2>/dev/null; echo "0 3 * * * /usr/local/bin/trivy-update-db.sh") | crontab -
三、通过pigsty部署pgsql,redis,minio 10.0.0.102节点
项目地址:https://pigsty.cc/
bash
curl -fsSL https://repo.pigsty.cc/get | bash;
bash
cd pigsty
vim pigsty.yml
---
#==============================================================#
# File      :   rich.yml
# Desc      :   Pigsty feature-rich 1-node online install config
# Ctime     :   2020-05-22
# Mtime     :   2025-12-12
# Docs      :   https://pigsty.io/docs/conf/rich
# License   :   Apache-2.0 @ https://pigsty.io/docs/about/license/
# Copyright :   2018-2026  Ruohang Feng / Vonng (rh@vonng.com)
#==============================================================#

# This is the enhanced version of default meta.yml, which has:
# - almost all available postgres extensions
# - build local software repo for entire env
# - 1 node minio used as central backup repo
# - cluster stub for 3-node pg-test / ferret / redis
# - stub for nginx, certs, and website self-hosting config
# - detailed comments for database / user / service
#
# Usage:
#   curl https://repo.pigsty.io/get | bash
#   ./configure -c rich
#   ./deploy.yml

all:

  #==============================================================#
  # Clusters, Nodes, and Modules
  #==============================================================#
  children:

    #----------------------------------------------#
    # PGSQL : https://pigsty.io/docs/pgsql
    #----------------------------------------------#
    # this is an example single-node postgres cluster with pgvector installed, with one biz database & two biz users
    pg-meta:
      hosts:
        10.0.0.101: { pg_seq: 1, pg_role: primary } # <---- primary instance with read-write capability
        #x.xx.xx.xx: { pg_seq: 2, pg_role: replica } # <---- read only replica for read-only online traffic
        #x.xx.xx.xy: { pg_seq: 3, pg_role: offline } # <---- offline instance of ETL & interactive queries
      vars:
        pg_cluster: pg-meta

        # install, load, create pg extensions: https://pigsty.io/docs/pgsql/ext/
        pg_extensions: [ postgis, timescaledb, pgvector, pg_wait_sampling ]
        pg_libs: 'timescaledb, pg_stat_statements, auto_explain, pg_wait_sampling'

        # define business users/roles : https://pigsty.io/docs/pgsql/config/user
        pg_users:
          - name: dbuser_meta               # REQUIRED, `name` is the only mandatory field of a user definition
            password: DBUser.Meta           # optional, the password. can be a scram-sha-256 hash string or plain text
            pgbouncer: true                 # optional, add this user to the pgbouncer user-list? false by default (production user should be true explicitly)
            comment: pigsty admin user      # optional, comment string for this user/role
            roles: [ dbrole_admin ]         # optional, belonged roles. default roles are: dbrole_{admin|readonly|readwrite|offline}
            #state: create                  # optional, create|absent, 'create' by default, use 'absent' to drop user
            #login: true                    # optional, can log in, true by default (new biz ROLE should be false)
            #superuser: false               # optional, is superuser? false by default
            #createdb: false                # optional, can create databases? false by default
            #createrole: false              # optional, can create role? false by default
            #inherit: true                  # optional, can this role use inherited privileges? true by default
            #replication: false             # optional, can this role do replication? false by default
            #bypassrls: false               # optional, can this role bypass row level security? false by default
            #connlimit: -1                  # optional, user connection limit, default -1 disable limit
            #expire_in: 3650                # optional, now + n days when this role is expired (OVERWRITE expire_at)
            #expire_at: '2030-12-31'        # optional, YYYY-MM-DD 'timestamp' when this role is expired (OVERWRITTEN by expire_in)
            #parameters: {}                 # optional, role level parameters with `ALTER ROLE SET`
            #pool_mode: transaction         # optional, pgbouncer pool mode at user level, transaction by default
            #pool_connlimit: -1             # optional, max database connections at user level, default -1 disable limit
            # Enhanced roles syntax (PG16+): roles can be string or object with options:
            #   - dbrole_readwrite                       # simple string: GRANT role
            #   - { name: role, admin: true }            # GRANT WITH ADMIN OPTION
            #   - { name: role, set: false }             # PG16: REVOKE SET OPTION
            #   - { name: role, inherit: false }         # PG16: REVOKE INHERIT OPTION
            #   - { name: role, state: absent }          # REVOKE membership
          - { name: dbuser_view ,password: DBUser.Viewer ,pgbouncer: true ,roles: [dbrole_readonly], comment: read-only viewer for meta database }
          #- {name: dbuser_bytebase ,password: DBUser.Bytebase ,pgbouncer: true ,roles: [dbrole_admin] ,comment: admin user for bytebase database   }
          #- {name: dbuser_remove ,state: absent }       # use state: absent to remove a user

        # define business databases : https://pigsty.io/docs/pgsql/config/db
        pg_databases:                       # define business databases on this cluster, array of database definition
          - name: meta                      # REQUIRED, `name` is the only mandatory field of a database definition
            #state: create                  # optional, create|absent|recreate, create by default
            baseline: cmdb.sql              # optional, database sql baseline path, (relative path among the ansible search path, e.g.: files/)
            schemas: [ pigsty ]             # optional, additional schemas to be created, array of schema names
            extensions:                     # optional, additional extensions to be installed: array of `{name[,schema]}`
              - vector                      # install pgvector for vector similarity search
              - postgis                     # install postgis for geospatial type & index
              - timescaledb                 # install timescaledb for time-series data
              - { name: pg_wait_sampling, schema: monitor } # install pg_wait_sampling on monitor schema
            comment: pigsty meta database   # optional, comment string for this database
            #pgbouncer: true                # optional, add this database to the pgbouncer database list? true by default
            #owner: postgres                # optional, database owner, current user if not specified
            #template: template1            # optional, which template to use, template1 by default
            #strategy: FILE_COPY            # optional, clone strategy: FILE_COPY or WAL_LOG (PG15+), default to PG's default
            #encoding: UTF8                 # optional, inherited from template / cluster if not defined (UTF8)
            #locale: C                      # optional, inherited from template / cluster if not defined (C)
            #lc_collate: C                  # optional, inherited from template / cluster if not defined (C)
            #lc_ctype: C                    # optional, inherited from template / cluster if not defined (C)
            #locale_provider: libc          # optional, locale provider: libc, icu, builtin (PG15+)
            #icu_locale: en-US              # optional, icu locale for icu locale provider (PG15+)
            #icu_rules: ''                  # optional, icu rules for icu locale provider (PG16+)
            #builtin_locale: C.UTF-8        # optional, builtin locale for builtin locale provider (PG17+)
            #tablespace: pg_default         # optional, default tablespace, pg_default by default
            #is_template: false             # optional, mark database as template, allowing clone by any user with CREATEDB privilege
            #allowconn: true                # optional, allow connection, true by default. false will disable connect at all
            #revokeconn: false              # optional, revoke public connection privilege. false by default. (leave connect with grant option to owner)
            #register_datasource: true      # optional, register this database to grafana datasources? true by default
            #connlimit: -1                  # optional, database connection limit, default -1 disable limit
            #pool_auth_user: dbuser_meta    # optional, all connection to this pgbouncer database will be authenticated by this user
            #pool_mode: transaction         # optional, pgbouncer pool mode at database level, default transaction
            #pool_size: 64                  # optional, pgbouncer pool size at database level, default 64
            #pool_reserve: 32               # optional, pgbouncer pool size reserve at database level, default 32
            #pool_size_min: 0               # optional, pgbouncer pool size min at database level, default 0
            #pool_connlimit: 100            # optional, max database connections at database level, default 100
          #- {name: bytebase ,owner: dbuser_bytebase ,revokeconn: true ,comment: bytebase primary database }

        pg_hba_rules:   # https://pigsty.io/docs/pgsql/config/hba
          - { user: all ,db: all ,addr: intra ,auth: pwd ,title: 'everyone intranet access with password' ,order: 800 }
        pg_crontab:     # https://pigsty.io/docs/pgsql/admin/crontab
          - '00 01 * * * /pg/bin/pg-backup full'

        # define (OPTIONAL) L2 VIP that bind to primary
        #pg_vip_enabled: true
        #pg_vip_address: 10.10.10.2/24
        #pg_vip_interface: eth1

    #----------------------------------------------#
    # PGSQL HA Cluster Example: 3-node pg-test
    #----------------------------------------------#
    #pg-test:
    #  hosts:
    #    10.10.10.11: { pg_seq: 1, pg_role: primary }   # primary instance, leader of cluster
    #    10.10.10.12: { pg_seq: 2, pg_role: replica }   # replica instance, follower of leader
    #    10.10.10.13: { pg_seq: 3, pg_role: replica, pg_offline_query: true } # replica with offline access
    #  vars:
    #    pg_cluster: pg-test           # define pgsql cluster name
    #    pg_users:  [{ name: test , password: test , pgbouncer: true , roles: [ dbrole_admin ] }]
    #    pg_databases: [{ name: test }]
    #    # define business service here: https://pigsty.io/docs/pgsql/service
    #    pg_services:                        # extra services in addition to pg_default_services, array of service definition
    #      # standby service will route {ip|name}:5435 to sync replica's pgbouncer (5435->6432 standby)
    #      - name: standby                   # required, service name, the actual svc name will be prefixed with `pg_cluster`, e.g: pg-meta-standby
    #        port: 5435                      # required, service exposed port (work as kubernetes service node port mode)
    #        ip: "*"                         # optional, service bind ip address, `*` for all ip by default
    #        selector: "[]"                  # required, service member selector, use JMESPath to filter inventory
    #        dest: default                   # optional, destination port, default|postgres|pgbouncer|<port_number>, 'default' by default
    #        check: /sync                    # optional, health check url path, / by default
    #        backup: "[? pg_role == `primary`]"  # backup server selector
    #        maxconn: 3000                   # optional, max allowed front-end connection
    #        balance: roundrobin             # optional, haproxy load balance algorithm (roundrobin by default, other: leastconn)
    #        options: 'inter 3s fastinter 1s downinter 5s rise 3 fall 3 on-marked-down shutdown-sessions slowstart 30s maxconn 3000 maxqueue 128 weight 100'
    #    pg_vip_enabled: true
    #    pg_vip_address: 10.10.10.3/24
    #    pg_vip_interface: eth1
    #    pg_crontab:  # make a full backup on monday 1am, and an incremental backup during weekdays
    #      - '00 01 * * 1 /pg/bin/pg-backup full'
    #      - '00 01 * * 2,3,4,5,6,7 /pg/bin/pg-backup'

    #----------------------------------------------#
    # INFRA : https://pigsty.io/docs/infra
    #----------------------------------------------#
    infra:
      hosts:
        10.0.0.101: { infra_seq: 1 }
      vars:
        repo_enabled: true    # build local repo, and install everything from it:  https://pigsty.io/docs/infra/admin/repo
        # and download all extensions into local repo
        repo_extra_packages: [ pg15-main ,pg15-time ,pg15-gis ,pg15-rag ,pg15-fts ,pg15-olap ,pg15-feat ,pg15-lang ,pg15-type ,pg15-util ,pg15-func ,pg15-admin ,pg15-stat ,pg15-sec ,pg15-fdw ,pg15-sim ,pg15-etl]

    #----------------------------------------------#
    # ETCD : https://pigsty.io/docs/etcd
    #----------------------------------------------#
    etcd:
      hosts:
        10.0.0.101: { etcd_seq: 1 }
      vars:
        etcd_cluster: etcd
        etcd_safeguard: false             # prevent purging running etcd instance?

    #----------------------------------------------#
    # MINIO : https://pigsty.io/docs/minio
    #----------------------------------------------#
    minio:
      hosts:
        10.0.0.101: { minio_seq: 1 }
      vars:
        minio_cluster: minio
        minio_users:                      # list of minio user to be created
          - { access_key: pgbackrest  ,secret_key: S3User.Backup ,policy: pgsql }
          - { access_key: s3user_meta ,secret_key: S3User.Meta   ,policy: meta  }
          - { access_key: s3user_data ,secret_key: S3User.Data   ,policy: data  }

    #----------------------------------------------#
    # DOCKER : https://pigsty.io/docs/docker
    # APP    : https://pigsty.io/docs/app
    #----------------------------------------------#
    # OPTIONAL, launch example pgadmin app with: ./app.yml & ./app.yml -e app=bytebase
    app:
      hosts: { 10.0.0.101: {} }
      vars:
        docker_enabled: true                # enabled docker with ./docker.yml
        #docker_registry_mirrors: ["https://docker.1panel.live","https://docker.1ms.run","https://docker.xuanyuan.me","https://registry-1.docker.io"]
        app: pgadmin                        # specify the default app name to be installed (in the apps)
        apps:                               # define all applications, appname: definition

          # Admin GUI for PostgreSQL, launch with: ./app.yml
          pgadmin:                          # pgadmin app definition (app/pgadmin -> /opt/pgadmin)
            conf:                           # override /opt/pgadmin/.env
              PGADMIN_DEFAULT_EMAIL: admin@pigsty.cc   # default user name
              PGADMIN_DEFAULT_PASSWORD: pigsty         # default password

          # Schema Migration GUI for PostgreSQL, launch with: ./app.yml -e app=bytebase
          bytebase:
            conf:
              BB_DOMAIN: http://ddl.pigsty  # replace it with your public domain name and postgres database url
              BB_PGURL: "postgresql://dbuser_bytebase:DBUser.Bytebase@10.0.0.101:5432/bytebase?sslmode=prefer"

    #----------------------------------------------#
    # REDIS : https://pigsty.io/docs/redis
    #----------------------------------------------#
    # OPTIONAL, launch redis clusters with: ./redis.yml
    redis-ms:
      hosts: { 10.0.0.101: { redis_node: 1 , redis_instances: { 6379: { }, 6380: { replica_of: '10.0.0.101 6379' } } } }
      vars: { redis_cluster: redis-ms ,redis_password: 'redis.ms' ,redis_max_memory: 64MB }


  #==============================================================#
  # Global Parameters
  #==============================================================#
  vars:

    #----------------------------------------------#
    # INFRA : https://pigsty.io/docs/infra
    #----------------------------------------------#
    version: v4.2.2                   # pigsty version string
    admin_ip: 10.0.0.101              # admin node ip address
    region: china                     # upstream mirror region: default|china|europe
    proxy_env:                        # global proxy env when downloading packages
      no_proxy: "localhost,127.0.0.1,10.0.0.0/8,192.168.0.0/16,*.pigsty,*.aliyun.com,mirrors.*,*.myqcloud.com,*.tsinghua.edu.cn"
      # http_proxy:  # set your proxy here: e.g http://user:pass@proxy.xxx.com
      # https_proxy: # set your proxy here: e.g http://user:pass@proxy.xxx.com
      # all_proxy:   # set your proxy here: e.g http://user:pass@proxy.xxx.com

    certbot_sign: false               # enable certbot to sign https certificate for infra portal
    certbot_email: your@email.com     # replace your email address to receive expiration notice
    infra_portal:                     # infra services exposed via portal
      home      : { domain: i.pigsty }     # default domain name
      pgadmin   : { domain: adm.pigsty ,endpoint: "${admin_ip}:8885" }
      bytebase  : { domain: ddl.pigsty ,endpoint: "${admin_ip}:8887" }
      minio     : { domain: m.pigsty ,endpoint: "${admin_ip}:9001" ,scheme: https ,websocket: true }

      #website:   # static local website example stub
      #  domain: repo.pigsty              # external domain name for static site
      #  certbot: repo.pigsty             # use certbot to sign https certificate for this static site
      #  path: /www/pigsty                # path to the static site directory

      #supabase:  # dynamic upstream service example stub
      #  domain: supa.pigsty          # external domain name for upstream service
      #  certbot: supa.pigsty         # use certbot to sign https certificate for this upstream server
      #  endpoint: "10.0.0.101:8000" # path to the static site directory
      #  websocket: true              # add websocket support
      #  certbot: supa.pigsty         # certbot cert name, apply with `make cert`

    #----------------------------------------------#
    # PASSWORD : https://pigsty.io/docs/setup/security/
    #----------------------------------------------#
    grafana_admin_password: pigsty
    grafana_view_password: DBUser.Viewer
    pg_admin_password: DBUser.DBA
    pg_monitor_password: DBUser.Monitor
    pg_replication_password: DBUser.Replicator
    patroni_password: Patroni.API
    haproxy_admin_password: pigsty
    minio_secret_key: S3User.MinIO
    etcd_root_password: Etcd.Root

    #----------------------------------------------#
    # NODE : https://pigsty.io/docs/node/param
    #----------------------------------------------#
    nodename_overwrite: false             # do not overwrite node hostname on single node mode
    node_tune: oltp                       # node tuning specs: oltp,olap,tiny,crit
    node_etc_hosts:                       # add static domains to all nodes /etc/hosts
      - '${admin_ip} i.pigsty sss.pigsty'
      - '${admin_ip} adm.pigsty ddl.pigsty repo.pigsty supa.pigsty'
    node_repo_modules: local              # use pre-made local repo rather than install from upstream
    node_repo_remove: true                # remove existing node repo for node managed by pigsty
    #node_packages: [openssh-server]      # packages to be installed current nodes with latest version
    #node_timezone: Asia/Shanghai         # overwrite node timezone (中国区建议)

    #----------------------------------------------#
    # PGSQL : https://pigsty.io/docs/pgsql/param
    #----------------------------------------------#
    pg_version: 15                      # default postgres version
    pg_conf: oltp.yml                   # pgsql tuning specs: {oltp,olap,tiny,crit}.yml
    pg_safeguard: false                 # prevent purging running postgres instance?
    pg_packages: [ pgsql-main, pgsql-common ]                 # pg kernel and common utils
    #pg_extensions: [ pg15-time ,pg15-gis ,pg15-rag ,pg15-fts ,pg15-olap ,pg15-feat ,pg15-lang ,pg15-type ,pg15-util ,pg15-func ,pg15-admin ,pg15-stat ,pg15-sec ,pg15-fdw ,pg15-sim ,pg15-etl]

    #----------------------------------------------#
    # BACKUP : https://pigsty.io/docs/pgsql/backup
    #----------------------------------------------#
    # if you want to use minio as backup repo instead of 'local' fs, uncomment this, and configure `pgbackrest_repo`
    # you can also use external object storage as backup repo
    pgbackrest_method: minio          # if you want to use minio as backup repo instead of 'local' fs, uncomment this
    pgbackrest_repo:                  # pgbackrest repo: https://pgbackrest.org/configuration.html#section-repository
      local:                          # default pgbackrest repo with local posix fs
        path: /pg/backup              # local backup directory, `/pg/backup` by default
        retention_full_type: count    # retention full backups by count
        retention_full: 2             # keep 2, at most 3 full backups when using local fs repo
      minio:                          # optional minio repo for pgbackrest
        type: s3                      # minio is s3-compatible, so s3 is used
        s3_endpoint: sss.pigsty       # minio endpoint domain name, `sss.pigsty` by default
        s3_region: us-east-1          # minio region, us-east-1 by default, useless for minio
        s3_bucket: pgsql              # minio bucket name, `pgsql` by default
        s3_key: pgbackrest            # minio user access key for pgbackrest [CHANGE ACCORDING to minio_users.pgbackrest]
        s3_key_secret: S3User.Backup  # minio user secret key for pgbackrest [CHANGE ACCORDING to minio_users.pgbackrest]
        s3_uri_style: path            # use path style uri for minio rather than host style
        path: /pgbackrest             # minio backup path, default is `/pgbackrest`
        storage_port: 9000            # minio port, 9000 by default
        storage_ca_file: /etc/pki/ca.crt  # minio ca file path, `/etc/pki/ca.crt` by default
        block: y                      # Enable block incremental backup
        bundle: y                     # bundle small files into a single file
        bundle_limit: 20MiB           # Limit for file bundles, 20MiB for object storage
        bundle_size: 128MiB           # Target size for file bundles, 128MiB for object storage
        cipher_type: aes-256-cbc      # enable AES encryption for remote backup repo
        cipher_pass: pgBackRest       # AES encryption password, default is 'pgBackRest'
        retention_full_type: time     # retention full backup by time on minio repo
        retention_full: 14            # keep full backup for the last 14 days
      s3:                             # you can use cloud object storage as backup repo
        type: s3                      # Add your object storage credentials here!
        s3_endpoint: oss-cn-beijing-internal.aliyuncs.com
        s3_region: oss-cn-beijing
        s3_bucket: <your_bucket_name>
        s3_key: <your_access_key>
        s3_key_secret: <your_secret_key>
        s3_uri_style: host
        path: /pgbackrest
        bundle: y                     # bundle small files into a single file
        bundle_limit: 20MiB           # Limit for file bundles, 20MiB for object storage
        bundle_size: 128MiB           # Target size for file bundles, 128MiB for object storage
        cipher_type: aes-256-cbc      # enable AES encryption for remote backup repo
        cipher_pass: pgBackRest       # AES encryption password, default is 'pgBackRest'
        retention_full_type: time     # retention full backup by time on minio repo
        retention_full: 14            # keep full backup for the last 14 days
...
部署
bash
./deploy.yml && ./redis.yml修改 pgsql密码
bash
su - postgres
psql
postgres=# \password
Enter new password:     #输入设置的密码 123456
Enter it again:      #确认密码(再次输入)
创建数据库:
postgres=# create database  registry;
CREATE DATABASE
postgres=# create database notary_signer;
CREATE DATABASE
postgres=# create database notary_servers;
CREATE DATABASE
创建用户:
postgres=# create user server with password '123456';
CREATE ROLE
postgres=# create user signer with password '123456';
CREATE ROLE
四:部署harbor+测试
bash
10.0.0.101节点
cd harbor
./install

网页访问 http://10.0.0.101:8088/harbor/interrogation-services/scanners
添加扫描器
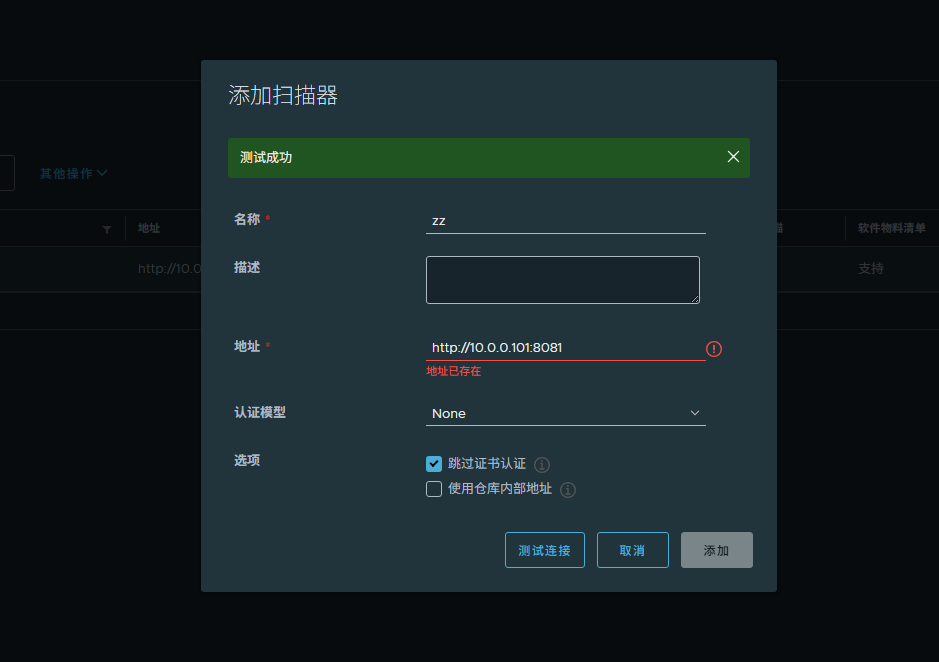
生产高可用待更新 10.0.0.101-109 。9个节点