目录
[1. 环境搭建](#1. 环境搭建)
[1.1 安装的依赖包](#1.1 安装的依赖包)
[1.2 安装命令](#1.2 安装命令)
[2. 配置别名路径](#2. 配置别名路径)
[2.1 为什么需要配置别名路径](#2.1 为什么需要配置别名路径)
[2.2 路径解析配置](#2.2 路径解析配置)
[2.3 联想路径配置](#2.3 联想路径配置)
[3. 数据Mock实现](#3. 数据Mock实现)
[3.1 常见的Mock方式](#3.1 常见的Mock方式)
[3.2 json-server实现Mock](#3.2 json-server实现Mock)
[4. 整体路由设计](#4. 整体路由设计)
[4.1 路由结构](#4.1 路由结构)
[4.2 路由配置实现](#4.2 路由配置实现)
[5. Ant Design Mobile 主题定制](#5. Ant Design Mobile 主题定制)
[5.1 定制方式](#5.1 定制方式)
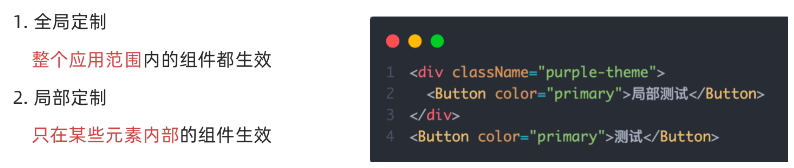
[1. 全局定制](#1. 全局定制)
[2. 局部定制](#2. 局部定制)
[5.2 记账本主题色配置](#5.2 记账本主题色配置)
[6. Redux管理账目列表](#6. Redux管理账目列表)
[6.1 创建账单 Store](#6.1 创建账单 Store)
[6.2 组合子模块,导出 Store 实例](#6.2 组合子模块,导出 Store 实例)
[6.3 在入口文件中引入](#6.3 在入口文件中引入)
[7. TabBar功能实现](#7. TabBar功能实现)
[7.1 静态布局实现](#7.1 静态布局实现)
[7.2 样式文件](#7.2 样式文件)
[8. 月度账单 - 统计区域](#8. 月度账单 - 统计区域)
[8.1 完整实现代码](#8.1 完整实现代码)
[8.2 核心功能点](#8.2 核心功能点)
[9. 月度账单 - 单日统计列表](#9. 月度账单 - 单日统计列表)
[9.1 DailyBill 组件](#9.1 DailyBill 组件)
[9.2 账单类型映射常量](#9.2 账单类型映射常量)
[10. 月度账单 - 单日账单列表展示](#10. 月度账单 - 单日账单列表展示)
[10.1 核心代码解析](#10.1 核心代码解析)
[11. 月度账单 - 切换展开收起](#11. 月度账单 - 切换展开收起)
[11.1 实现代码](#11.1 实现代码)
[12. Icon组件封装](#12. Icon组件封装)
[12.1 Icon 组件实现](#12.1 Icon 组件实现)
[13. 记账功能实现](#13. 记账功能实现)
[13.1 完整代码](#13.1 完整代码)
[14. 项目总结](#14. 项目总结)
[14.1 技术栈总结](#14.1 技术栈总结)
[14.2 核心功能实现](#14.2 核心功能实现)
[14.3 最佳实践](#14.3 最佳实践)
[14.4 扩展建议](#14.4 扩展建议)
本文详细介绍了使用React技术栈开发记账本应用的完整过程。
项目采用React+ReactRouter+ReduxToolkit+AntDesignMobile技术组合,包含环境搭建、路径别名配置、Mock数据实现、路由设计、主题定制等核心环节。
重点讲解了账单统计功能实现,包括月度账单统计、单日账单展示、TabBar导航等模块的开发细节。
通过ReduxToolkit管理账目状态,使用AntDesignMobile构建UI界面,实现了账单的增删改查功能。
文章还分享了组件封装、性能优化等最佳实践,为React移动端开发提供了完整的技术方案和实现思路。
项目概述
本文将带领大家使用 React + React Router + Redux Toolkit + Ant Design Mobile 从零搭建一个功能完整的记账本应用。通过这个项目,你将学到:
-
React Router 的嵌套路由配置
-
Redux Toolkit 的状态管理
-
移动端组件库的使用
-
路径别名配置
-
Mock 数据的使用
-
复杂组件的拆分与封装

1. 环境搭建
首先,我们需要使用 Create React App 创建项目,并安装必要的依赖包:
1.1 安装的依赖包
| 依赖包 | 用途 |
|---|---|
| @reduxjs/toolkit | Redux 状态管理工具库 |
| react-redux | React 与 Redux 的绑定库 |
| react-router-dom | React 路由库 |
| dayjs | 轻量级时间处理库 |
| classnames | 动态 class 类名处理 |
| antd-mobile | 移动端 UI 组件库 |
| axios | HTTP 请求库 |
1.2 安装命令
bash
# 使用 Create React App 创建项目
npm create-react-app react-account-book
# 进入项目目录
cd react-account-book
# 安装依赖
npm i @reduxjs/toolkit react-redux react-router-dom dayjs classnames antd-mobile axios
# 安装开发依赖
npm i -D json-server @craco/craco2. 配置别名路径
在实际开发中,我们经常会使用 @/ 来代替 src/ 目录,这样可以让导入路径更简洁、更易读。
2.1 为什么需要配置别名路径
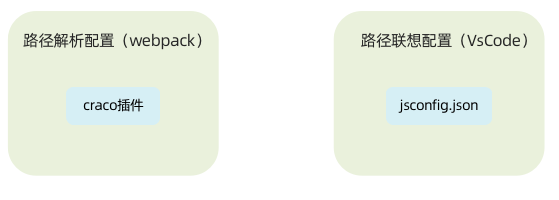
-
路径解析配置(webpack) :把
@/解析为src/ -
路径联想配置(VS Code) :VS Code 在输入
@/时,自动联想出对应的src/下的子级目录
2.2 路径解析配置
配置步骤:
-
安装 craco
-
项目根目录下创建配置文件
craco.config.js -
配置文件中添加路径解析配置
-
包文件中配置启动和打包命令
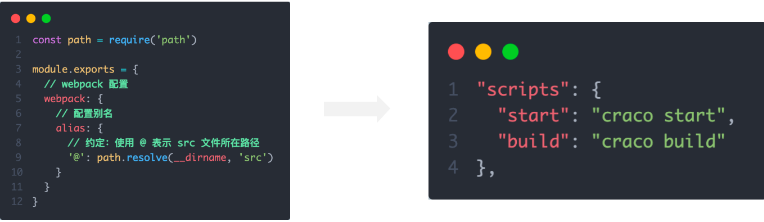
craco.config.js:
javascript
const path = require('path')
module.exports = {
webpack: {
alias: {
'@': path.resolve(__dirname, 'src')
}
}
}修改 package.json 中的脚本:
javascript
{
  "scripts": {
    "start": "craco start",
    "build": "craco build",
    "test": "craco test",
    "eject": "react-scripts eject"
  }
}
2.3 联想路径配置
在项目根目录下新建 jsconfig.json 文件:
javascript
{
  "compilerOptions": {
    "baseUrl": "./",
    "paths": {
      "@/*": [
        "src/*"
      ]
    }
  }
}
这样配置后,VS Code 就会自动识别 @/ 路径,并提供智能提示了。
3. 数据Mock实现
在前后端分离的开发模式下,前端可以在没有实际后端接口的支持下先进行接口数据的模拟,进行正常的业务功能开发。
3.1 常见的Mock方式
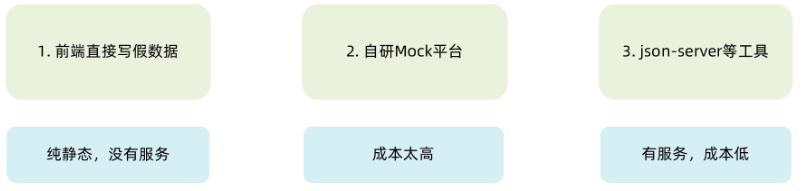
3.2 json-server实现Mock
json-server 是一个非常好用的 Mock 工具,它可以让你在几分钟内创建一个完整的 REST API。
实现步骤:
-
项目中安装 json-server
-
准备一个 json 文件
-
添加启动命令
-
访问接口进行测试

db.json 示例:
javascript
{
  "ka": [
    {
      "id": 1,
      "type": "pay",
      "money": 100,
      "date": "2023-03-25",
      "useFor": "food"
    },
    {
      "id": 2,
      "type": "income",
      "money": 500,
      "date": "2023-03-25",
      "useFor": "salary"
    }
  ]
}
package.json 添加启动命令:
javascript
{
  "scripts": {
    "serve": "json-server db.json --port 8888"
  }
}
启动 Mock 服务:
bash
npm run serve现在你可以通过 http://localhost:8888/ka 访问到你的 Mock 数据了。
4. 整体路由设计
好的路由设计是一个应用成功的基础。让我们来设计记账本的整体路由结构。
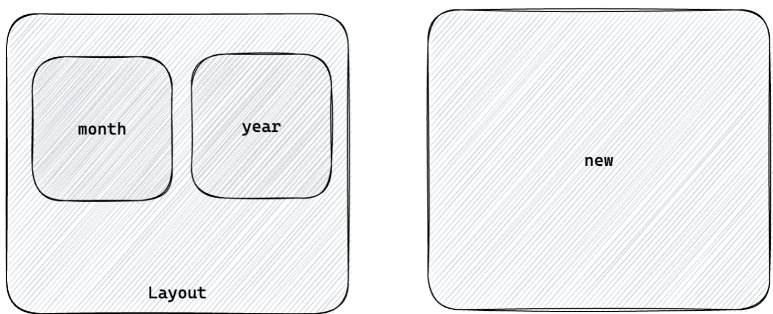
4.1 路由结构
bash
/ (根路径,重定向到 /month)
├── /layout (Layout 一级路由)
│   ├── /month (月度账单,默认二级路由)
│   └── /year (年度账单)
└── /new (记账页面,独立一级路由)
4.2 路由配置实现
javascript
// src/router/index.js
import { createBrowserRouter, Navigate } from 'react-router-dom'
import Layout from '@/pages/Layout'
import Month from '@/pages/Month'
import Year from '@/pages/Year'
import New from '@/pages/New'
const router = createBrowserRouter([
{
path: '/',
element: <Navigate to="/month" replace />
},
{
path: '/',
element: <Layout />,
children: [
{
index: true,
element: <Navigate to="/month" replace />
},
{
path: 'month',
element: <Month />
},
{
path: 'year',
element: <Year />
}
]
},
{
path: '/new',
element: <New />
}
])
export default router5. Ant Design Mobile 主题定制
Ant Design Mobile 提供了灵活的主题定制方案,可以让我们轻松地定制应用的外观。
5.1 定制方式
1. 全局定制
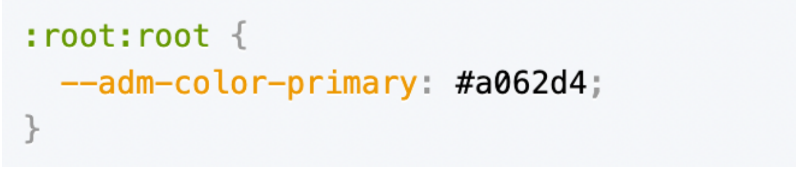
通过 CSS 变量可以全局修改主题色:
javascript
:root:root {
  --adm-color-primary: rgb(105, 174, 120);
}
2. 局部定制
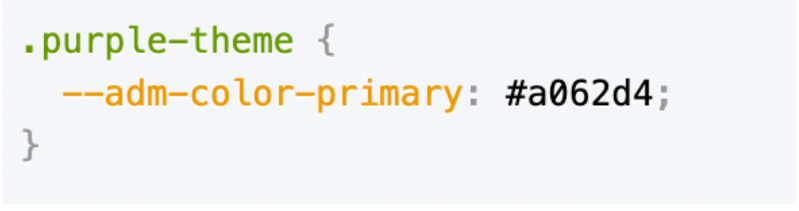
可以通过组件的 style 属性或 className 进行局部样式调整。
5.2 记账本主题色配置
在 src/index.css 中添加:
javascript
:root:root {
  --adm-color-primary: rgb(105, 174, 120);
}
这样整个应用的主色调就变成了清新的绿色。
6. Redux管理账目列表
使用 Redux Toolkit 来管理我们的账目数据,让状态管理变得简单高效。
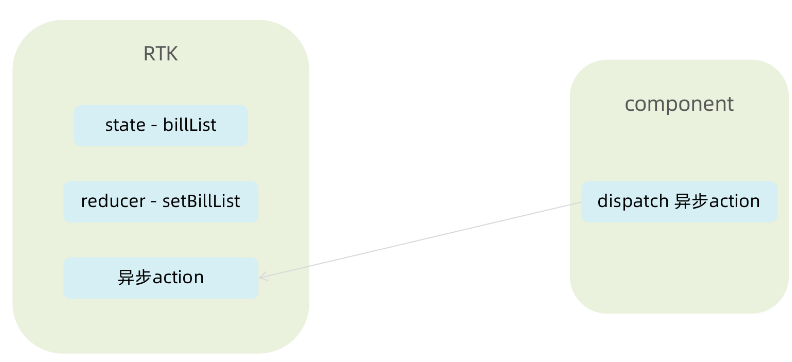
6.1 创建账单 Store
javascript
// src/store/modules/billStore.js
import { createSlice } from '@reduxjs/toolkit'
import axios from 'axios'
const billStore = createSlice({
name: 'bill',
initialState: {
billList: []
},
reducers: {
setBillList(state, action) {
state.billList = action.payload
},
addBill(state, action) {
state.billList.push(action.payload)
}
}
})
const { setBillList, addBill } = billStore.actions
const getBillList = () => {
return async (dispatch) => {
const res = await axios.get('http://localhost:8888/ka')
dispatch(setBillList(res.data))
}
}
const addBillList = (data) => {
return async (dispatch) => {
const res = await axios.post('http://localhost:8888/ka', data)
dispatch(addBill(res.data))
}
}
export { getBillList, addBillList }
const reducer = billStore.reducer
export default reducer6.2 组合子模块,导出 Store 实例
javascript
// src/store/index.js
import { configureStore } from '@reduxjs/toolkit'
import billReducer from './modules/billStore'
const store = configureStore({
reducer: {
bill: billReducer
}
})
export default store6.3 在入口文件中引入
javascript
// src/index.js
import React from 'react'
import ReactDOM from 'react-dom/client'
import { RouterProvider } from 'react-router-dom'
import { Provider } from 'react-redux'
import router from './router'
import store from './store'
import './index.css'
const root = ReactDOM.createRoot(document.getElementById('root'))
root.render(
<Provider store={store}>
<RouterProvider router={router} />
</Provider>
)7. TabBar功能实现
TabBar 是移动端应用最常见的导航组件之一,让我们来实现它。

7.1 静态布局实现
javascript
// src/pages/Layout/index.jsx
import { TabBar } from 'antd-mobile'
import { useEffect } from 'react'
import { Outlet, useNavigate, useLocation } from 'react-router-dom'
import { useDispatch } from 'react-redux'
import { getBillList } from '@/store/modules/billStore'
import './index.scss'
import {
BillOutline,
CalculatorOutline,
AddCircleOutline
} from 'antd-mobile-icons'
const tabs = [
{
key: '/month',
title: '月度账单',
icon: <BillOutline />,
},
{
key: '/new',
title: '记账',
icon: <AddCircleOutline />,
},
{
key: '/year',
title: '年度账单',
icon: <CalculatorOutline />,
},
]
const Layout = () => {
const dispatch = useDispatch()
const navigate = useNavigate()
const location = useLocation()
useEffect(() => {
dispatch(getBillList())
}, [dispatch])
const switchRoute = (path) => {
navigate(path)
}
return (
<div className="layout">
<div className="container">
<Outlet />
</div>
<div className="footer">
<TabBar
activeKey={location.pathname}
onChange={switchRoute}
>
{tabs.map(item => (
<TabBar.Item key={item.key} icon={item.icon} title={item.title} />
))}
</TabBar>
</div>
</div>
)
}
export default Layout7.2 样式文件
javascript
// src/pages/Layout/index.scss
.layout {
.container {
position: fixed;
top: 0;
bottom: 50px;
left: 0;
right: 0;
overflow-y: auto;
}
.footer {
position: fixed;
bottom: 0;
width: 100%;
}
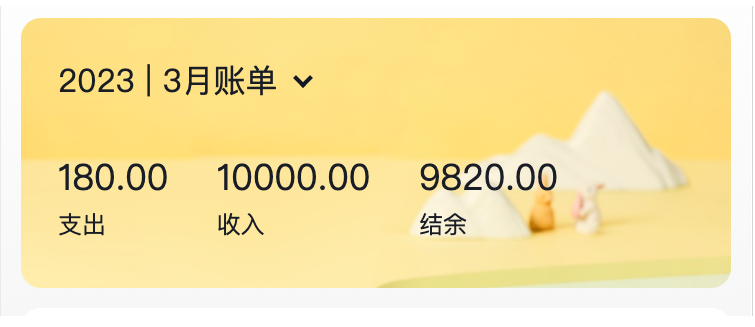
}8. 月度账单 - 统计区域
统计区域是月度账单页面的核心,展示了收入、支出和结余的汇总数据。
8.1 完整实现代码
javascript
// src/pages/Month/index.jsx
import { useSelector } from 'react-redux'
import { NavBar, DatePicker } from 'antd-mobile'
import './index.scss'
import _ from 'lodash'
import dayjs from 'dayjs'
import { useMemo, useState, useEffect } from 'react'
import classNames from 'classnames'
import DailyBill from './components/DailyBill'
const Month = () => {
const billList = useSelector(state => state.bill.billList)
const monthGroup = useMemo(() => {
return _.groupBy(billList, item => dayjs(item.date).format('YYYY-MM'))
}, [billList])
const [dateVisible, setDateVisible] = useState(false)
const [currentMonthList, setMonthList] = useState([])
const [currentMonth, setCurrentMonth] = useState(() => {
return dayjs().format('YYYY-MM')
})
const dateConfirm = (date) => {
setDateVisible(false)
const monthKey = dayjs(date).format('YYYY-MM')
setCurrentMonth(monthKey)
setMonthList(monthGroup[monthKey])
}
useEffect(() => {
const list = monthGroup[dayjs().format('YYYY-MM')]
if (list) {
setMonthList(list)
}
}, [monthGroup])
const overview = useMemo(() => {
if (!currentMonthList) return { income: 0, pay: 0, total: 0 }
const income = currentMonthList
.filter(item => item.type === 'income')
.reduce((a, c) => a + c.money, 0)
const pay = currentMonthList
.filter(item => item.type === 'pay')
.reduce((a, c) => a + c.money, 0)
return {
income,
pay,
total: income + pay
}
}, [currentMonthList])
const dayGroup = useMemo(() => {
const group = _.groupBy(currentMonthList, (item) =>
dayjs(item.date).format('YYYY-MM-DD')
)
return {
dayKeys: Object.keys(group),
group
}
}, [currentMonthList])
return (
<div className="monthlyBill">
<NavBar className="nav" backArrow={false}>
月度收支
</NavBar>
<div className="content">
<div className="header">
<div className="date" onClick={() => setDateVisible(true)}>
<span className="text">{currentMonth} 账单</span>
<span className={classNames('arrow', dateVisible && 'expand')}></span>
</div>
<div className='twoLineOverview'>
<div className="item">
<span className="money">{overview.pay.toFixed(2)}</span>
<span className="type">支出</span>
</div>
<div className="item">
<span className="money">{overview.income.toFixed(2)}</span>
<span className="type">收入</span>
</div>
<div className="item">
<span className="money">{overview.total.toFixed(2)}</span>
<span className="type">结余</span>
</div>
</div>
<DatePicker
className="kaDate"
title="记账日期"
precision="month"
visible={dateVisible}
max={new Date()}
onConfirm={dateConfirm}
/>
</div>
{dayGroup.dayKeys.map(dayKey => (
<DailyBill
key={dayKey}
date={dayKey}
billList={dayGroup.group[dayKey]}
/>
))}
</div>
</div>
)
}
export default Month8.2 核心功能点
-
按月分组账单 :使用
lodash.groupBy按月份对账单进行分组 -
时间选择器:使用 DatePicker 组件选择月份
-
统计计算 :使用
useMemo优化计算性能,避免不必要的重复计算 -
按日分组:为单日账单列表准备数据
9. 月度账单 - 单日统计列表
现在让我们来实现单日账单的统计列表。
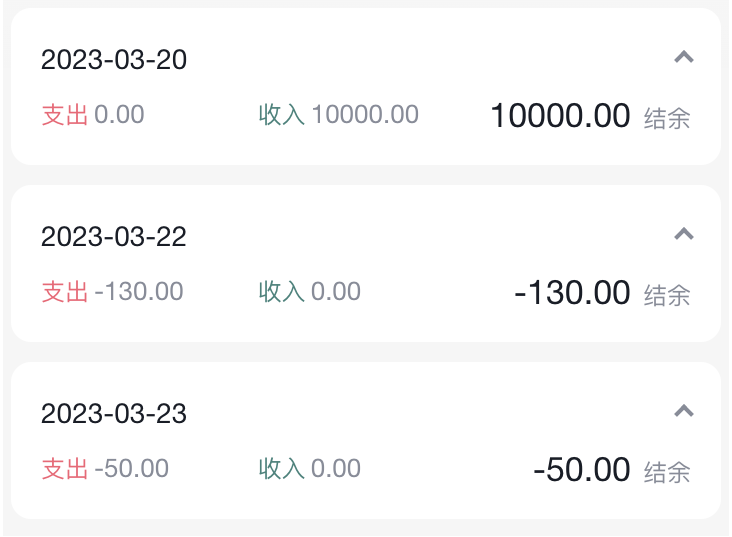
9.1 DailyBill 组件
javascript
// src/pages/Month/components/DailyBill.jsx
import classNames from 'classnames'
import { useMemo, useState } from 'react'
import dayjs from 'dayjs'
import './index.scss'
import Icon from '@/components/Icon'
import { billTypeToName } from '@/contants'
const DailyBill = ({ date, billList }) => {
const [visible, setVisible] = useState(true)
const dayResult = useMemo(() => {
const pay = billList
.filter(item => item.type === 'pay')
.reduce((a, c) => a + c.money, 0)
const income = billList
.filter(item => item.type === 'income')
.reduce((a, c) => a + c.money, 0)
return {
pay,
income,
total: pay + income
}
}, [billList])
return (
<div className={classNames('dailyBill')}>
<div className="header">
<div className="dateIcon" onClick={() => setVisible(!visible)}>
<span className="date">
{dayjs(date).format('MM月DD日')}
</span>
<span className={classNames('arrow', !visible && 'expand')}></span>
</div>
<div className="oneLineOverview">
<div className="pay">
<span className="type">支出</span>
<span className="money">{dayResult.pay.toFixed(2)}</span>
</div>
<div className="income">
<span className="type">收入</span>
<span className="money">{dayResult.income.toFixed(2)}</span>
</div>
<div className="balance">
<span className="money">{dayResult.total.toFixed(2)}</span>
<span className="type">结余</span>
</div>
</div>
</div>
<div className="billList" style={{ display: visible ? 'block' : 'none' }}>
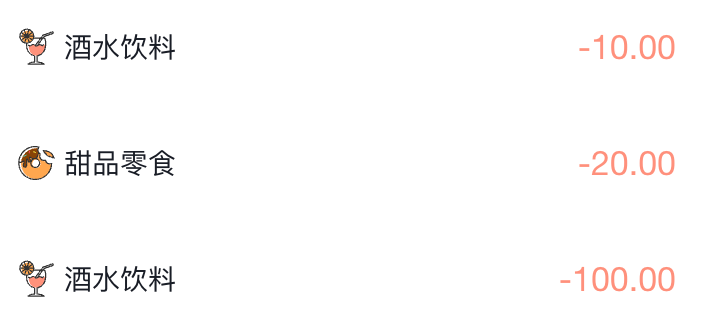
{billList.map(item => {
return (
<div className="bill" key={item.id}>
<Icon type={item.useFor} />
<div className="detail">
<div className="billType">{billTypeToName[item.useFor]}</div>
</div>
<div className={classNames('money', item.type)}>
{item.money.toFixed(2)}
</div>
</div>
)
})}
</div>
</div>
)
}
export default DailyBill9.2 账单类型映射常量
javascript
// src/contants/index.js
export const billListData = {
pay: [
{
type: 'foods',
name: '餐饮',
list: [
{ type: 'food', name: '餐费' },
{ type: 'drinks', name: '酒水饮料' },
{ type: 'dessert', name: '甜品零食' },
],
},
{
type: 'taxi',
name: '出行交通',
list: [
{ type: 'taxi', name: '打车租车' },
{ type: 'longdistance', name: '旅行票费' },
],
},
{
type: 'recreation',
name: '休闲娱乐',
list: [
{ type: 'bodybuilding', name: '运动健身' },
{ type: 'game', name: '休闲玩乐' },
{ type: 'audio', name: '媒体影音' },
{ type: 'travel', name: '旅游度假' },
],
},
{
type: 'daily',
name: '日常支出',
list: [
{ type: 'clothes', name: '衣服裤子' },
{ type: 'bag', name: '鞋帽包包' },
{ type: 'book', name: '知识学习' },
{ type: 'promote', name: '能力提升' },
{ type: 'home', name: '家装布置' },
],
},
{
type: 'other',
name: '其他支出',
list: [{ type: 'community', name: '社区缴费' }],
},
],
income: [
{
type: 'professional',
name: '工资薪金',
list: [
{ type: 'salary', name: '工资' },
{ type: 'overtimepay', name: '加班' },
{ type: 'bonus', name: '奖金' },
],
},
{
type: 'other',
name: '其他收入',
list: [
{ type: 'financial', name: '理财收入' },
{ type: 'cashgift', name: '礼金收入' },
],
},
],
}
export const billTypeToName = Object.keys(billListData).reduce((prev, key) => {
billListData[key].forEach(bill => {
bill.list.forEach(item => {
prev[item.type] = item.name
})
})
return prev
}, {})10. 月度账单 - 单日账单列表展示
让我们来完善单日账单列表的展示功能。
10.1 核心代码解析
javascript
<div className="billList" style={{ display: visible ? 'block' : 'none' }}>
{billList.map(item => {
return (
<div className="bill" key={item.id}>
<Icon type={item.useFor} />
<div className="detail">
<div className="billType">{billTypeToName[item.useFor]}</div>
</div>
<div className={classNames('money', item.type)}>
{item.money.toFixed(2)}
</div>
</div>
)
})}
</div>11. 月度账单 - 切换展开收起
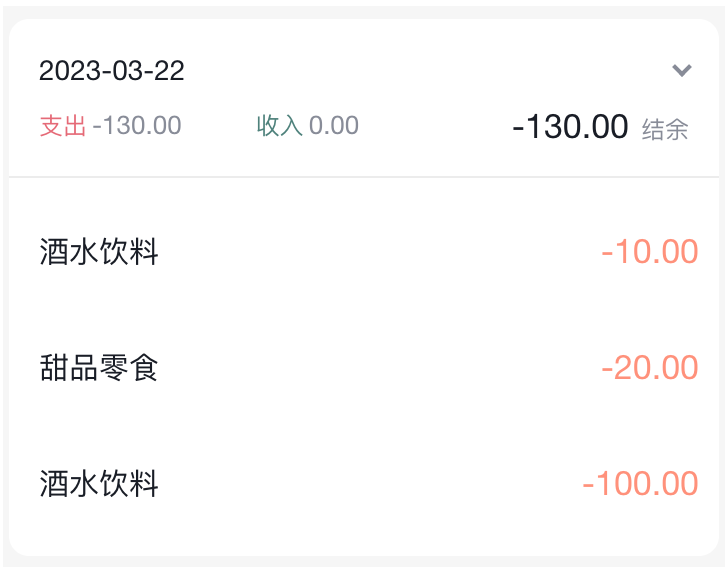
11.1 实现代码
javascript
const DailyBill = ({ date, billList }) => {
const [visible, setVisible] = useState(true)
return (
<div className={classNames('dailyBill')}>
<div className="header">
<div className="dateIcon" onClick={() => setVisible(!visible)}>
<span className="date">{date}</span>
<span className={classNames('arrow', !visible && 'expand')}></span>
</div>
</div>
<div className="billList" style={{ display: visible ? 'block' : 'none' }}>
{/* 账单列表 */}
</div>
</div>
)
}12. Icon组件封装
为了更好地复用,我们把 Icon 组件单独封装出来。
12.1 Icon 组件实现
javascript
// src/components/Icon/index.jsx
const BASE_URL = 'https://yjy-teach-oss.oss-cn-beijing.aliyuncs.com/reactbase/ka/'
const Icon = ({ type, className }) => {
return (
<img
src={`${BASE_URL + type}.svg`}
alt="icon"
style={{
width: 20,
height: 20,
}}
className={className}
/>
)
}
export default Icon13. 记账功能实现
最后,让我们来实现记账功能,这是整个应用的核心功能之一。
13.1 完整代码
javascript
// src/pages/New/index.jsx
import { Button, DatePicker, Input, NavBar } from 'antd-mobile'
import Icon from '@/components/Icon'
import './index.scss'
import classNames from 'classnames'
import { billListData } from '@/contants'
import { useNavigate } from 'react-router-dom'
import { useState } from 'react'
import { useDispatch } from 'react-redux'
import { addBillList } from '@/store/modules/billStore'
import dayjs from 'dayjs'
const New = () => {
const navigate = useNavigate()
const dispatch = useDispatch()
const [billType, setBillType] = useState('pay')
const [money, setMoney] = useState('')
const [useFor, setUseFor] = useState('')
const [dateVisible, setDateVisible] = useState(false)
const [selectedDate, setSelectedDate] = useState(() => dayjs().format('YYYY-MM-DD'))
const saveBill = () => {
if (!money || !useFor) {
alert('请填写完整信息')
return
}
const data = {
type: billType,
money: billType === 'pay' ? -parseFloat(money) : parseFloat(money),
date: selectedDate,
useFor: useFor
}
dispatch(addBillList(data))
navigate(-1)
}
const dateConfirm = (date) => {
setDateVisible(false)
setSelectedDate(dayjs(date).format('YYYY-MM-DD'))
}
return (
<div className="keepAccounts">
<NavBar className="nav" onBack={() => navigate(-1)}>
记一笔
</NavBar>
<div className="header">
<div className="kaType">
<Button
shape="rounded"
className={classNames(billType === 'pay' ? 'selected' : '')}
onClick={() => setBillType('pay')}
>
支出
</Button>
<Button
className={classNames(billType === 'income' ? 'selected' : '')}
shape="rounded"
onClick={() => setBillType('income')}
>
收入
</Button>
</div>
<div className="kaFormWrapper">
<div className="kaForm">
<div className="date" onClick={() => setDateVisible(true)}>
<Icon type="calendar" className="icon" />
<span className="text">{selectedDate}</span>
</div>
<div className="kaInput">
<Input
className="input"
placeholder="0.00"
type="number"
value={money}
onChange={val => setMoney(val)}
/>
<span className="iconYuan">¥</span>
</div>
</div>
</div>
</div>
<div className="kaTypeList">
{billListData[billType].map(item => {
return (
<div className="kaType" key={item.type}>
<div className="title">{item.name}</div>
<div className="list">
{item.list.map(item => {
return (
<div
className={classNames('item', useFor === item.type ? 'selected' : '')}
key={item.type}
onClick={() => setUseFor(item.type)}
>
<div className="icon">
<Icon type={item.type} />
</div>
<div className="text">{item.name}</div>
</div>
)
})}
</div>
</div>
)
})}
</div>
<div className="btns">
<Button className="btn save" onClick={saveBill}>
保 存
</Button>
</div>
<DatePicker
className="kaDate"
title="记账日期"
max={new Date()}
visible={dateVisible}
onConfirm={dateConfirm}
onClose={() => setDateVisible(false)}
/>
</div>
)
}
export default New14. 项目总结
通过这个记账本项目的实战开发,我们学习并掌握了以下知识:
14.1 技术栈总结
| 技术 | 用途 | 学习要点 |
|---|---|---|
| React | 视图层框架 | Hooks、组件设计 |
| React Router | 路由管理 | 嵌套路由、导航、传参 |
| Redux Toolkit | 状态管理 | createSlice、异步 action |
| Ant Design Mobile | UI组件库 | TabBar、DatePicker、Button等 |
| dayjs | 时间处理 | 格式化、解析 |
| lodash | 工具库 | groupBy |
| classnames | 类名处理 | 动态 class |
| json-server | Mock数据 | REST API 模拟 |
| craco | 配置工具 | 路径别名 |
14.2 核心功能实现
-
✅ 路由配置:嵌套路由、默认路由、重定向
-
✅ 状态管理:Redux Toolkit 的使用
-
✅ Mock数据:json-server 的配置和使用
-
✅ TabBar导航:底部导航栏实现
-
✅ 月度统计:按月份分组、统计计算
-
✅ 单日列表:按日分组、展开收起
-
✅ 记账功能:表单收集、数据提交
-
✅ 组件封装:Icon 组件、DailyBill 组件
14.3 最佳实践
-
组件拆分:将复杂页面拆分为多个小组件,提高可维护性
-
性能优化 :使用
useMemo避免不必要的重复计算 -
状态管理:合理使用 Redux 管理全局状态
-
目录结构:清晰的目录结构便于代码组织
-
路径别名 :使用
@/代替src/,提高代码可读性
14.4 扩展建议
-
数据持久化:使用 localStorage 或 IndexedDB 保存数据
-
图表统计:使用 ECharts 或 Chart.js 实现数据可视化
-
预算管理:添加预算设置和超支提醒功能
-
数据导出:支持将账单数据导出为 Excel 或 CSV
-
多账户:支持多个账户的账单管理
这个记账本项目涵盖了 React 开发的核心知识点,是一个非常好的实战练手项目。希望通过这个项目,你对 React 生态有了更深入的理解!
相关阅读: