导读
蓝牙开发在鸿蒙 PC 端一直是个被忽视的角落------大多数教程只讲手机端,PC 端的蓝牙 API 细节、权限配置、设备配对流程几乎没有完整的中文资料。
本文聚焦 HarmonyOS 6.0 PC 端,系统讲清楚三件事:
@ohos.bluetooth.ble和@ohos.bluetooth.connection两套 API 的分工与配合- 完整的蓝牙工作流:开关状态检测 → 设备扫描 → 配对连接 → GATT 数据收发
- 几个 PC 端特有的坑和对应处理方式
不依赖 ArkUI 组件,所有逻辑用纯 ArkTS 实现,可以独立封装成 Service 层在任何页面调用。
一、权限配置与环境准备
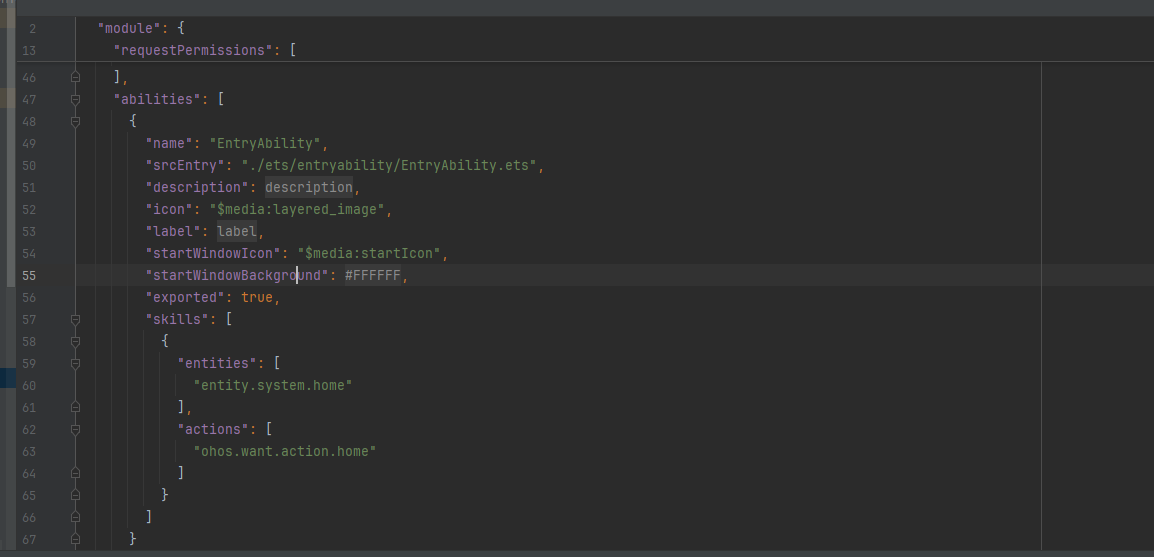
1.1 module.json5 权限声明
PC 端蓝牙需要声明的权限比手机端多,漏掉任何一个都会导致 API 调用静默失败:
{
  "module": {
    "name": "entry",
    "type": "entry",
    "description": "$string:module_desc",
    "mainElement": "EntryAbility",
    "deviceTypes": [
      "phone"
    ],
    "deliveryWithInstall": true,
    "installationFree": false,
    "pages": "$profile:main_pages",
    "requestPermissions": [
      {
        "name": "ohos.permission.ACCESS_BLUETOOTH",
        "reason": "$string:permission_bluetooth",
        "usedScene": {
          "abilities": ["EntryAbility"],
          "when": "inuse"
        }
      },
      {
        "name": "ohos.permission.MANAGE_BLUETOOTH",
        "reason": "$string:permission_bluetooth",
        "usedScene": {
          "abilities": ["EntryAbility"],
          "when": "inuse"
        }
      },
      {
        "name": "ohos.permission.LOCATION",
        "reason": "$string:permission_location",
        "usedScene": {
          "abilities": ["EntryAbility"],
          "when": "inuse"
        }
      },
      {
        "name": "ohos.permission.APPROXIMATELY_LOCATION",
        "reason": "$string:permission_location",
        "usedScene": {
          "abilities": ["EntryAbility"],
          "when": "inuse"
        }
      }
    ],
    "abilities": [
      {
        "name": "EntryAbility",
        "srcEntry": "./ets/entryability/EntryAbility.ets",
        "description": "$string:EntryAbility_desc",
        "icon": "$media:layered_image",
        "label": "$string:EntryAbility_label",
        "startWindowIcon": "$media:startIcon",
        "startWindowBackground": "$color:start_window_background",
        "exported": true,
        "skills": [
          {
            "entities": [
              "entity.system.home"
            ],
            "actions": [
              "ohos.want.action.home"
            ]
          }
        ]
      }
    ],
    "extensionAbilities": [
      {
        "name": "EntryBackupAbility",
        "srcEntry": "./ets/entrybackupability/EntryBackupAbility.ets",
        "type": "backup",
        "exported": false,
        "metadata": [
          {
            "name": "ohos.extension.backup",
            "resource": "$profile:backup_config"
          }
        ],
      }
    ]
  }
}
为什么需要位置权限?
BLE 扫描在底层依赖位置信息(通过蓝牙信号强度可以推算设备位置),即使你的应用完全不使用定位功能,只要用到 BLE 扫描,就必须申请位置权限,否则 startBLEScan 会返回错误码 201(权限被拒绝)。这是 Android 系的惯例,鸿蒙沿用了这个设计。
1.2 API 分工说明
HarmonyOS 蓝牙 API 分两个模块:
|----------------------------|-------------------------|
| 模块 | 职责 |
| @ohos.bluetooth.connection | 经典蓝牙:开关状态、设备配对、连接管理 |
| @ohos.bluetooth.ble | BLE低功耗蓝牙:扫描、GATT连接、数据读写 |
PC 端外设(键鼠、耳机等)通常用经典蓝牙,IoT 传感器类设备用 BLE。本文两套都会讲,并提供统一的封装层。
二、蓝牙状态管理
2.1 检测与监听蓝牙开关
// bluetooth/BluetoothManager.ets
import connection from '@ohos.bluetooth.connection';
import { BusinessError } from '@ohos.base';

export enum BtState {
  OFF       = 0,
  TURNING_ON  = 1,
  ON        = 2,
  TURNING_OFF = 3
}

export class BluetoothManager {

  // 获取当前蓝牙状态
  static getState(): BtState {
    try {
      const state = connection.getBluetoothState();
      return state as unknown as BtState;
    } catch (err) {
      const e = err as BusinessError;
      console.error(`[BT] getState failed: ${e.code} ${e.message}`);
      return BtState.OFF;
    }
  }

  // 监听蓝牙状态变化
  static onStateChange(callback: (state: BtState) => void): void {
    try {
      connection.on('stateChange', (state: connection.BluetoothState) => {
        callback(state as unknown as BtState);
      });
    } catch (err) {
      const e = err as BusinessError;
      console.error(`[BT] onStateChange failed: ${e.code} ${e.message}`);
    }
  }

  // 取消监听
  static offStateChange(): void {
    try {
      connection.off('stateChange');
    } catch (err) {
      const e = err as BusinessError;
      console.error(`[BT] offStateChange failed: ${e.code} ${e.message}`);
    }
  }

  // 开启蓝牙(需要 MANAGE_BLUETOOTH 权限)
  static enableBluetooth(): void {
    try {
      connection.enableBluetooth();
    } catch (err) {
      const e = err as BusinessError;
      console.error(`[BT] enableBluetooth failed: ${e.code} ${e.message}`);
    }
  }

  // 关闭蓝牙
  static disableBluetooth(): void {
    try {
      connection.disableBluetooth();
    } catch (err) {
      const e = err as BusinessError;
      console.error(`[BT] disableBluetooth failed: ${e.code} ${e.message}`);
    }
  }
}
代码要点:所有 API 调用都要 try/catch
蓝牙 API 在权限不足、蓝牙未开启等情况下会直接抛出 BusinessError,不是通过回调返回错误码,所以必须用 try/catch 包裹。BusinessError 包含 code(错误码)和 message(错误描述),打印出来能快速定位问题。
三、经典蓝牙:设备配对与连接
3.1 扫描已配对设备
PC 端连接蓝牙设备通常先查询已配对列表,不需要每次都重新扫描:
// bluetooth/ClassicBluetooth.ets
import connection from '@ohos.bluetooth.connection';
import { BusinessError } from '@ohos.base';

export interface BtDevice {
  deviceId: string;    // MAC 地址,如 "XX:XX:XX:XX:XX:XX"
  deviceName: string;
  deviceClass: number; // 设备类型(耳机、键盘等)
}

export class ClassicBluetooth {

  // 获取已配对设备列表
  static getPairedDevices(): BtDevice[] {
    try {
      const devices = connection.getPairedDevices();
      return devices.map((deviceId: string) => {
        const name = ClassicBluetooth.getDeviceName(deviceId);
        const cls  = ClassicBluetooth.getDeviceClass(deviceId);
        return { deviceId, deviceName: name, deviceClass: cls };
      });
    } catch (err) {
      const e = err as BusinessError;
      console.error(`[BT] getPairedDevices failed: ${e.code} ${e.message}`);
      return [];
    }
  }

  // 获取设备名称
  static getDeviceName(deviceId: string): string {
    try {
      return connection.getRemoteDeviceName(deviceId);
    } catch {
      return '未知设备';
    }
  }

  // 获取设备类型
  static getDeviceClass(deviceId: string): number {
    try {
      const cls = connection.getRemoteDeviceClass(deviceId);
      return cls.majorClass;
    } catch {
      return 0;
    }
  }

  // 设备类型转可读描述
  static getDeviceTypeDesc(majorClass: number): string {
    const map: Record<number, string> = {
      0x0100: '电脑',
      0x0200: '手机',
      0x0300: '网络设备',
      0x0400: '音频/视频',
      0x0500: '外设(键鼠)',
      0x0600: '图像设备',
      0x0700: '穿戴设备',
      0x0800: '玩具',
      0x0900: '健康设备',
    };
    return map[majorClass] ?? '其他设备';
  }

  // 发起配对请求
  static pairDevice(deviceId: string): Promise<boolean> {
    return new Promise((resolve) => {
      try {
        // 监听配对状态变化
        connection.on('bondStateChange', (state: connection.BondStateParam) => {
          if (state.deviceId !== deviceId) return;

          if (state.state === connection.BondState.BOND_STATE_BONDED) {
            connection.off('bondStateChange');
            resolve(true);
          } else if (state.state === connection.BondState.BOND_STATE_INVALID) {
            connection.off('bondStateChange');
            resolve(false);
          }
        });

        connection.pairDevice(deviceId);
      } catch (err) {
        const e = err as BusinessError;
        console.error(`[BT] pairDevice failed: ${e.code} ${e.message}`);
        resolve(false);
      }
    });
  }

  // 取消配对
  static unpairDevice(deviceId: string): boolean {
    try {
      connection.cancelPairedDevice(deviceId);
      return true;
    } catch (err) {
      const e = err as BusinessError;
      console.error(`[BT] unpairDevice failed: ${e.code} ${e.message}`);
      return false;
    }
  }

  // 监听设备连接状态变化
  static onConnectionStateChange(
    callback: (deviceId: string, state: number) => void
  ): void {
    try {
      connection.on('connectionStateChange',
        (result: connection.BluetoothConnectionState) => {
          callback(result.deviceId, result.state);
        }
      );
    } catch (err) {
      const e = err as BusinessError;
      console.error(`[BT] onConnectionStateChange failed: ${e.code} ${e.message}`);
    }
  }
}
pairDevice 为什么用 Promise 包装?
connection.pairDevice() 本身是同步触发配对请求,但配对结果是异步通过 bondStateChange 事件回调的(用户需要在弹窗里确认)。把监听和触发包装在同一个 Promise 里,调用方可以用 await 等待配对完成,代码逻辑更线性清晰。
四、BLE 低功耗蓝牙:扫描与 GATT 通信
4.1 BLE 设备扫描
// bluetooth/BleScanner.ets
import ble from '@ohos.bluetooth.ble';
import { BusinessError } from '@ohos.base';

export interface BleDevice {
  deviceId: string;
  deviceName: string;
  rssi: number;           // 信号强度,越大越近(负数,如 -60)
  serviceUuids: string[]; // 设备广播的服务 UUID
}

export class BleScanner {
  private static scanning: boolean = false;
  private static deviceMap: Map<string, BleDevice> = new Map();
  private static onDeviceFound: (devices: BleDevice[]) => void = () => {};

  // 开始扫描
  static startScan(
    filterUuids: string[],   // 传空数组表示扫描所有设备
    onFound: (devices: BleDevice[]) => void
  ): void {
    if (BleScanner.scanning) return;

    BleScanner.deviceMap.clear();
    BleScanner.onDeviceFound = onFound;

    try {
      // 注册扫描结果回调
      ble.on('BLEDeviceFind', (devices: Array<ble.ScanResult>) => {
        for (const result of devices) {
          const device: BleDevice = {
            deviceId:    result.deviceId,
            deviceName:  result.data ? BleScanner.parseDeviceName(result.data) : '未知设备',
            rssi:        result.rssi,
            serviceUuids: result.serviceUuids ?? []
          };
          // 用 Map 去重,同一设备只保留最新扫描结果
          BleScanner.deviceMap.set(result.deviceId, device);
        }
        // 按信号强度排序,越近的排在前面
        const sorted = Array.from(BleScanner.deviceMap.values())
          .sort((a, b) => b.rssi - a.rssi);
        BleScanner.onDeviceFound(sorted);
      });

      // 构建扫描过滤器
      const filters: ble.ScanFilter[] = filterUuids.length > 0
        ? filterUuids.map(uuid => ({ serviceUuid: uuid }))
        : [];

      const scanOptions: ble.ScanOptions = {
        interval: 0,       // 0 表示持续扫描
        dutyMode: ble.ScanDuty.SCAN_MODE_LOW_LATENCY,  // 低延迟模式,更快发现设备
        matchMode: ble.MatchMode.MATCH_MODE_AGGRESSIVE
      };

      ble.startBLEScan(filters, scanOptions);
      BleScanner.scanning = true;
      console.info('[BLE] 扫描已启动');

    } catch (err) {
      const e = err as BusinessError;
      console.error(`[BLE] startScan failed: ${e.code} ${e.message}`);
    }
  }

  // 停止扫描
  static stopScan(): void {
    if (!BleScanner.scanning) return;
    try {
      ble.stopBLEScan();
      ble.off('BLEDeviceFind');
      BleScanner.scanning = false;
      console.info('[BLE] 扫描已停止');
    } catch (err) {
      const e = err as BusinessError;
      console.error(`[BLE] stopScan failed: ${e.code} ${e.message}`);
    }
  }

  // 从广播数据中解析设备名称
  private static parseDeviceName(data: ArrayBuffer): string {
    try {
      const bytes = new Uint8Array(data);
      let i = 0;
      while (i < bytes.length) {
        const len  = bytes[i];
        const type = bytes[i + 1];
        // type 0x09 是完整设备名,0x08 是缩短设备名
        if ((type === 0x09 || type === 0x08) && len > 1) {
          const nameBytes = bytes.slice(i + 2, i + 1 + len);
          return new TextDecoder().decode(nameBytes);
        }
        i += len + 1;
      }
    } catch {
      // 解析失败不影响主流程
    }
    return '未知设备';
  }

  static isScanning(): boolean {
    return BleScanner.scanning;
  }
}
广播数据解析是什么原理?
BLE 设备在广播包里携带了设备名、服务 UUID 等信息,格式是「长度 + 类型 + 数据」的 TLV 结构。parseDeviceName 就是遍历这个字节数组,找到类型为 0x09(完整名称)的字段并解码成字符串。这是 BLE 协议的标准格式,所有 BLE 设备都遵循。
为什么用 Map 存扫描结果而不是数组?
BLE 扫描是持续进行的,同一个设备可能被多次发现(每次广播都会触发回调)。用 Map 以 deviceId 为 key 存储,自动实现去重,每次更新同一设备的最新信号强度,不会出现列表里同一个设备出现多次的情况。
4.2 GATT 连接与数据通信
GATT(Generic Attribute Profile)是 BLE 数据交换的核心协议。连接建立后,通过读/写 Characteristic 来收发数据:
// bluetooth/GattClient.ets
import ble from '@ohos.bluetooth.ble';
import { BusinessError } from '@ohos.base';
export interface GattService {
serviceUuid: string;
characteristics: GattCharacteristic[];
}
export interface GattCharacteristic {
uuid: string;
properties: number; // 读/写/通知 等属性位标志
}
// Characteristic 属性标志位
export const CHAR_PROPS = {
READ: 0x02,
WRITE: 0x08,
NOTIFY: 0x10,
};
export class GattClient {
private client: ble.GattClientDevice | null = null;
private deviceId: string = '';
// 连接设备
async connect(deviceId: string): Promise<boolean> {
return new Promise((resolve) => {
try {
this.deviceId = deviceId;
this.client = ble.createGattClientDevice(deviceId);
// 监听连接状态
this.client.on('BLEConnectionStateChange',
(state: ble.BLEConnectionChangeState) => {
if (state.state === ble.ProfileConnectionState.STATE_CONNECTED) {
console.info(`[GATT] 已连接:${deviceId}`);
resolve(true);
} else if (state.state === ble.ProfileConnectionState.STATE_DISCONNECTED) {
console.info(`[GATT] 已断开:${deviceId}`);
resolve(false);
}
}
);
this.client.connect();
} catch (err) {
const e = err as BusinessError;
console.error(`[GATT] connect failed: ${e.code} ${e.message}`);
resolve(false);
}
});
}
// 发现服务(连接成功后调用)
async discoverServices(): Promise<GattService[]> {
if (!this.client) return [];
try {
const services = await this.client.getServices();
return services.map((svc: ble.GattService) => ({
serviceUuid: svc.serviceUuid,
characteristics: (svc.characteristics ?? []).map(
(char: ble.BLECharacteristic) => ({
uuid: char.characteristicUuid,
properties: char.properties?.write ? CHAR_PROPS.WRITE :
char.properties?.read ? CHAR_PROPS.READ : 0
})
)
}));
} catch (err) {
const e = err as BusinessError;
console.error(`[GATT] getServices failed: ${e.code} ${e.message}`);
return [];
}
}
// 读取 Characteristic 数据
async readCharacteristic(
serviceUuid: string,
charUuid: string
): Promise<Uint8Array | null> {
if (!this.client) return null;
try {
const char: ble.BLECharacteristic = {
serviceUuid,
characteristicUuid: charUuid,
characteristicValue: new ArrayBuffer(0),
descriptors: []
};
const result = await this.client.readCharacteristicValue(char);
return new Uint8Array(result.characteristicValue);
} catch (err) {
const e = err as BusinessError;
console.error(`[GATT] readChar failed: ${e.code} ${e.message}`);
return null;
}
}
// 写入 Characteristic 数据
async writeCharacteristic(
serviceUuid: string,
charUuid: string,
data: Uint8Array
): Promise<boolean> {
if (!this.client) return false;
try {
const char: ble.BLECharacteristic = {
serviceUuid,
characteristicUuid: charUuid,
characteristicValue: data.buffer,
descriptors: []
};
await this.client.writeCharacteristicValue(char, ble.GattWriteType.WRITE);
return true;
} catch (err) {
const e = err as BusinessError;
console.error(`[GATT] writeChar failed: ${e.code} ${e.message}`);
return false;
}
}
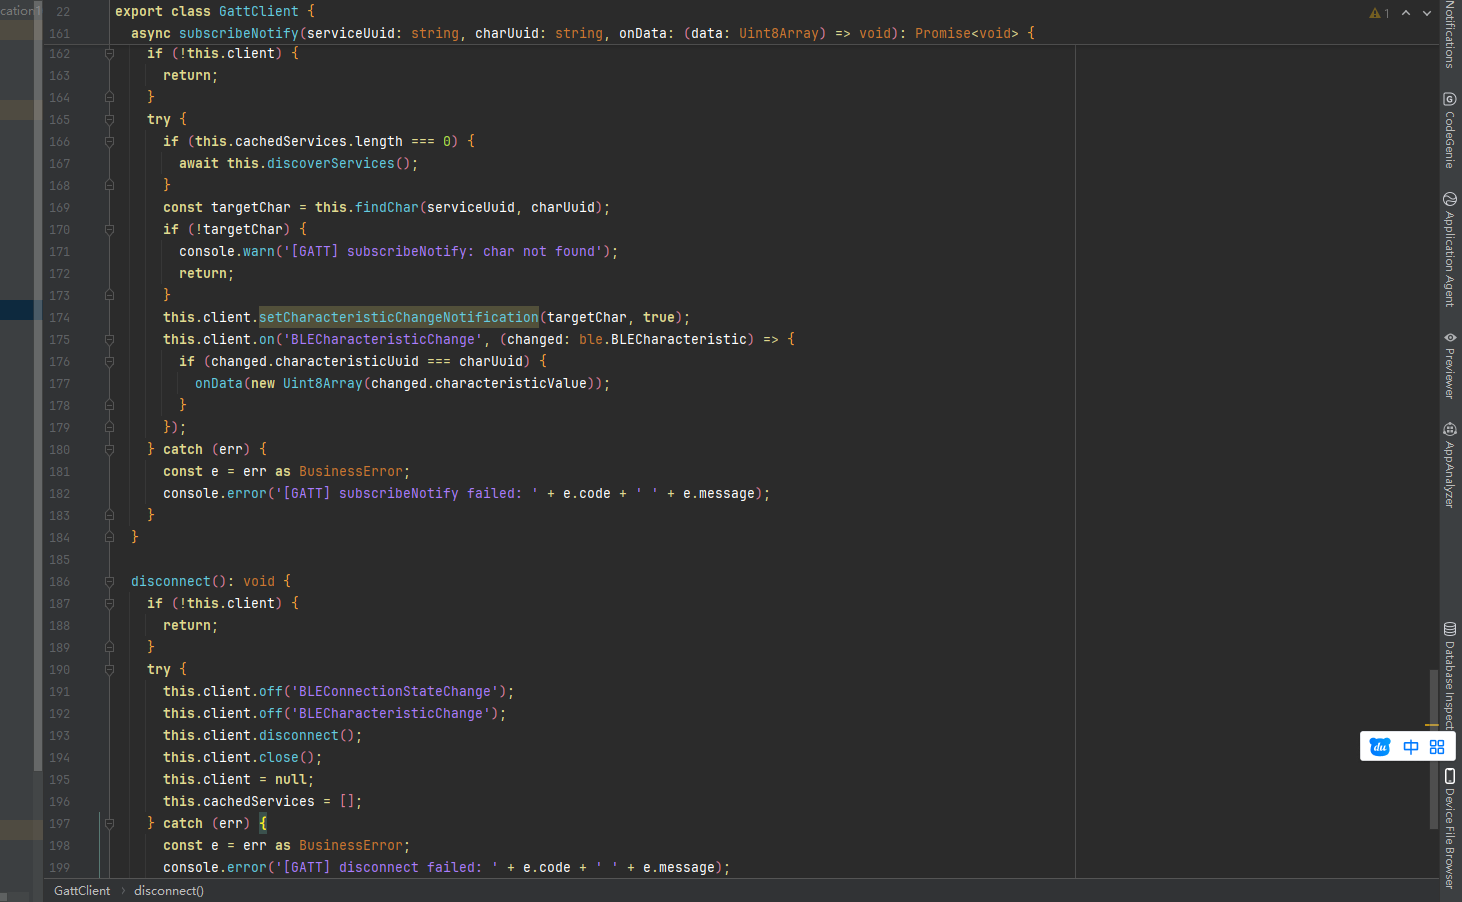
// 订阅 Characteristic 通知(设备主动推送数据)
subscribeNotify(
serviceUuid: string,
charUuid: string,
onData: (data: Uint8Array) => void
): void {
if (!this.client) return;
try {
// 开启通知
this.client.setCharacteristicChangeNotification(
{
serviceUuid,
characteristicUuid: charUuid,
characteristicValue: new ArrayBuffer(0),
descriptors: []
},
true
);
// 监听数据推送
this.client.on('BLECharacteristicChange',
(char: ble.BLECharacteristic) => {
if (char.characteristicUuid === charUuid) {
onData(new Uint8Array(char.characteristicValue));
}
}
);
} catch (err) {
const e = err as BusinessError;
console.error(`[GATT] subscribeNotify failed: ${e.code} ${e.message}`);
}
}
// 断开连接并释放资源
disconnect(): void {
if (!this.client) return;
try {
this.client.off('BLEConnectionStateChange');
this.client.off('BLECharacteristicChange');
this.client.disconnect();
this.client.close();
this.client = null;
} catch (err) {
const e = err as BusinessError;
console.error(`[GATT] disconnect failed: ${e.code} ${e.message}`);
}
}
isConnected(): boolean {
return this.client !== null;
}
}
读/写/通知三种操作有什么区别?
- 读(Read):主动向设备请求数据,适合查询当前状态(如电量)
- 写(Write):主动向设备发送指令或数据,适合控制设备(如调节亮度)
- 通知(Notify):订阅后设备会主动推送数据,适合持续监测场景(如心率、温度传感器)
三种操作是 GATT 协议的核心,BLE 设备的所有数据交互都通过这三种方式完成。
五、统一封装:BluetoothService
把以上三个模块整合成一个统一的 Service 入口,页面调用更方便:
// bluetooth/BluetoothService.ets
import { BluetoothManager, BtState } from './BluetoothManager';
import { ClassicBluetooth, BtDevice } from './ClassicBluetooth';
import { BleScanner, BleDevice } from './BleScanner';
import { GattClient } from './GattClient';
export { BtState, BtDevice, BleDevice };
export class BluetoothService {
private static gattClient: GattClient = new GattClient();
// ── 状态管理 ──────────────────────────────
static getState(): BtState {
return BluetoothManager.getState();
}
static isEnabled(): boolean {
return BluetoothManager.getState() === BtState.ON;
}
static onStateChange(cb: (state: BtState) => void): void {
BluetoothManager.onStateChange(cb);
}
static offStateChange(): void {
BluetoothManager.offStateChange();
}
// ── 经典蓝牙 ──────────────────────────────
static getPairedDevices(): BtDevice[] {
return ClassicBluetooth.getPairedDevices();
}
static async pairDevice(deviceId: string): Promise<boolean> {
return ClassicBluetooth.pairDevice(deviceId);
}
static unpairDevice(deviceId: string): boolean {
return ClassicBluetooth.unpairDevice(deviceId);
}
static onConnectionStateChange(
cb: (deviceId: string, state: number) => void
): void {
ClassicBluetooth.onConnectionStateChange(cb);
}
// ── BLE 扫描 ──────────────────────────────
static startBleScan(
filterUuids: string[],
onFound: (devices: BleDevice[]) => void
): void {
if (!BluetoothService.isEnabled()) {
console.warn('[BT] 蓝牙未开启,无法扫描');
return;
}
BleScanner.startScan(filterUuids, onFound);
}
static stopBleScan(): void {
BleScanner.stopScan();
}
// ── GATT 通信 ──────────────────────────────
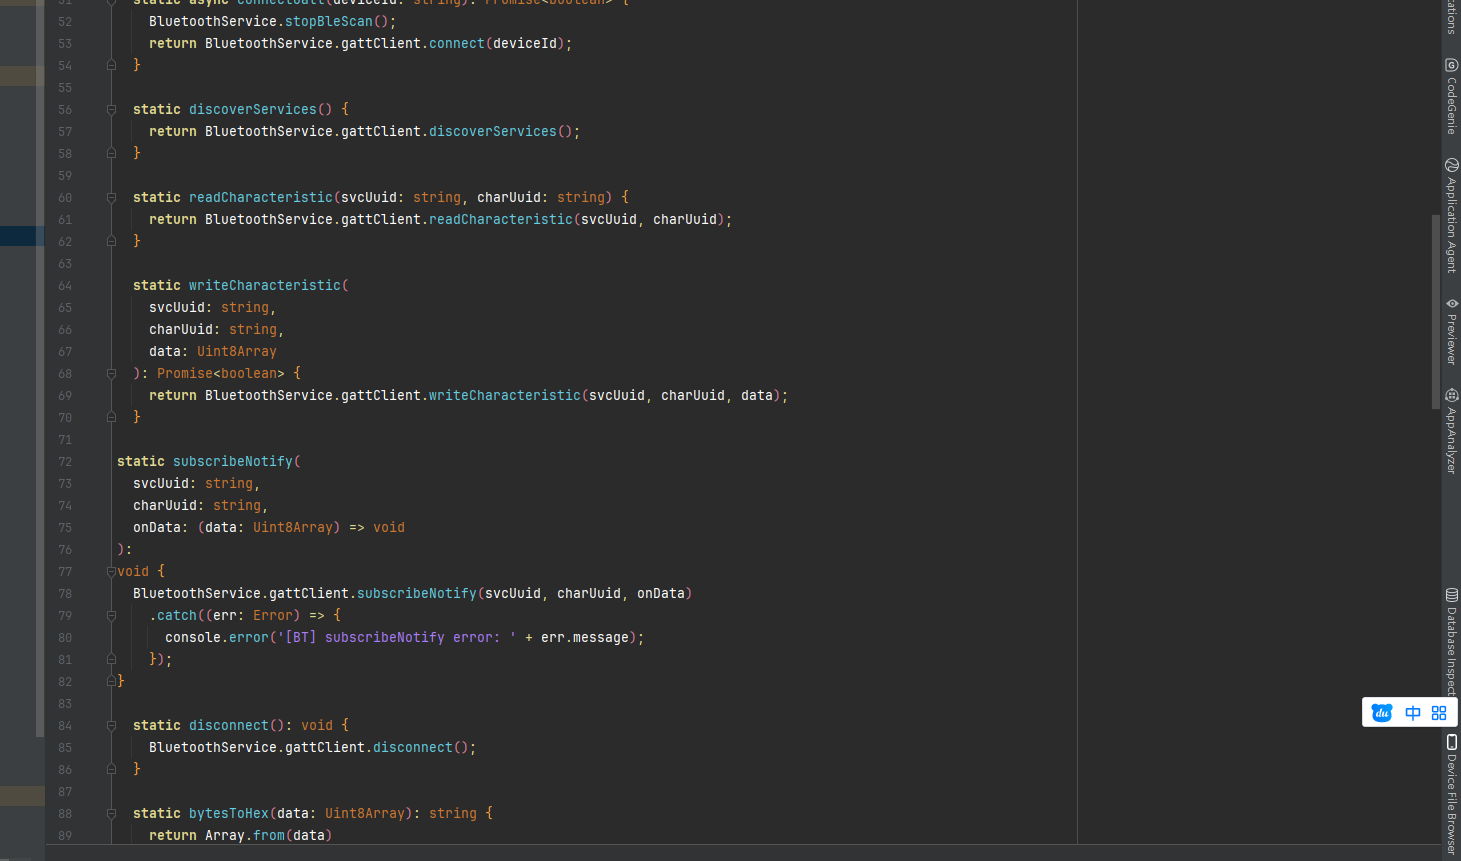
static async connectGatt(deviceId: string): Promise<boolean> {
BluetoothService.stopBleScan(); // 连接前停止扫描,节省资源
return BluetoothService.gattClient.connect(deviceId);
}
static async discoverServices() {
return BluetoothService.gattClient.discoverServices();
}
static async readCharacteristic(svcUuid: string, charUuid: string) {
return BluetoothService.gattClient.readCharacteristic(svcUuid, charUuid);
}
static async writeCharacteristic(
svcUuid: string,
charUuid: string,
data: Uint8Array
): Promise<boolean> {
return BluetoothService.gattClient.writeCharacteristic(svcUuid, charUuid, data);
}
static subscribeNotify(
svcUuid: string,
charUuid: string,
onData: (data: Uint8Array) => void
): void {
BluetoothService.gattClient.subscribeNotify(svcUuid, charUuid, onData);
}
static disconnect(): void {
BluetoothService.gattClient.disconnect();
}
// ── 工具方法 ──────────────────────────────
// Uint8Array 转十六进制字符串(调试用)
static bytesToHex(data: Uint8Array): string {
return Array.from(data)
.map(b => b.toString(16).padStart(2, '0').toUpperCase())
.join(' ');
}
// 字符串转 Uint8Array(发送文本指令用)
static stringToBytes(str: string): Uint8Array {
return new TextEncoder().encode(str);
}
// Uint8Array 转字符串(接收文本数据用)
static bytesToString(data: Uint8Array): string {
return new TextDecoder().decode(data);
}
}六、在页面中使用
封装好之后,页面里调用非常简洁:
// pages/BluetoothPage.ets
import { BluetoothService, BtState, BleDevice } from '../bluetooth/BluetoothService';

@Entry
@Component
struct BluetoothPage {
  @State btEnabled: boolean = false;
  @State bleDevices: BleDevice[] = [];
  @State scanning: boolean = false;
  @State connectedDeviceId: string = '';
  @State receivedData: string = '';

  aboutToAppear() {
    // 检查蓝牙状态
    this.btEnabled = BluetoothService.isEnabled();

    // 监听蓝牙开关变化
    BluetoothService.onStateChange((state: BtState) => {
      this.btEnabled = state === BtState.ON;
      if (!this.btEnabled && this.scanning) {
        this.scanning = false;
      }
    });
  }

  aboutToDisappear() {
    BluetoothService.offStateChange();
    BluetoothService.stopBleScan();
    BluetoothService.disconnect();
  }

  // 开始/停止 BLE 扫描
  toggleScan() {
    if (this.scanning) {
      BluetoothService.stopBleScan();
      this.scanning = false;
    } else {
      this.bleDevices = [];
      BluetoothService.startBleScan([], (devices: BleDevice[]) => {
        this.bleDevices = devices;
      });
      this.scanning = true;
    }
  }

  // 连接 BLE 设备并订阅通知
  async connectDevice(deviceId: string) {
    BluetoothService.stopBleScan();
    this.scanning = false;

    const connected = await BluetoothService.connectGatt(deviceId);
    if (!connected) {
      console.error('[PAGE] 连接失败');
      return;
    }

    this.connectedDeviceId = deviceId;

    // 发现服务
    const services = await BluetoothService.discoverServices();
    console.info(`[PAGE] 发现 ${services.length} 个服务`);

    // 假设目标设备的通知 Characteristic UUID(根据实际设备替换)
    const TARGET_SVC  = '0000180D-0000-1000-8000-00805F9B34FB'; // 心率服务
    const TARGET_CHAR = '00002A37-0000-1000-8000-00805F9B34FB'; // 心率测量

    // 订阅数据通知
    BluetoothService.subscribeNotify(TARGET_SVC, TARGET_CHAR, (data: Uint8Array) => {
      const hex = BluetoothService.bytesToHex(data);
      this.receivedData = hex;
      console.info(`[PAGE] 收到数据:${hex}`);
    });
  }

  build() {
    Column() {
      // 蓝牙状态指示
      Row() {
        Text('蓝牙状态:')
          .fontSize(16).fontColor('#1e293b')
        Text(this.btEnabled ? '已开启 ✅' : '已关闭 ❌')
          .fontSize(16)
          .fontColor(this.btEnabled ? '#22c55e' : '#ef4444')
      }
      .padding(20)

      // 扫描按钮
      Button(this.scanning ? '停止扫描' : '开始扫描 BLE 设备')
        .onClick(() => this.toggleScan())
        .backgroundColor(this.scanning ? '#ef4444' : '#3b82f6')
        .fontColor(Color.White)
        .borderRadius(24)
        .margin({ bottom: 16 })
        .enabled(this.btEnabled)

      // 设备列表
      List({ space: 8 }) {
        ForEach(this.bleDevices, (device: BleDevice) => {
          ListItem() {
            Row() {
              Column() {
                Text(device.deviceName)
                  .fontSize(15).fontWeight(FontWeight.Medium)
                Text(device.deviceId)
                  .fontSize(12).fontColor('#94a3b8')
                Text('信号:' + device.rssi + ' dBm')
                  .fontSize(12).fontColor('#64748b')
              }
              .layoutWeight(1)
              .alignItems(HorizontalAlign.Start)

              Button('连接')
                .fontSize(13)
                .height(32)
                .backgroundColor('#3b82f6')
                .fontColor(Color.White)
                .borderRadius(16)
                .onClick(() => this.connectDevice(device.deviceId))
            }
            .padding(14)
            .backgroundColor(Color.White)
            .borderRadius(12)
          }
        })
      }
      .padding({ left: 16, right: 16 })
      .layoutWeight(1)

      // 接收到的数据
      if (this.receivedData !== '') {
        Text('收到数据:' + this.receivedData)
          .fontSize(14).fontColor('#7c3aed')
          .padding(16)
          .backgroundColor('#ede9fe')
          .borderRadius(8)
          .margin(16)
      }
    }
    .height('100%')
    .backgroundColor('#f8fafc')
  }
}
七、代码讲解
7.1 事件监听必须配对 off
所有 on 注册的监听器,在页面或组件销毁时必须调用对应的 off 取消。如果不取消,即使页面已经销毁,回调函数依然持有对页面组件的引用,导致内存泄漏,还可能触发在已销毁组件上更新状态的报错。
本文所有监听器都在 aboutToDisappear 里统一清理,这是标准做法。
7.2 连接前停止扫描
connectGatt 里第一步就调用 stopBleScan(),原因是 BLE 扫描和 GATT 连接共用底层无线资源,同时进行会互相干扰,导致连接成功率下降、连接耗时增加。先停扫描再连接,是 BLE 开发的标准实践。
7.3 Uint8Array 与 ArrayBuffer 的转换
BLE 数据在 API 层面是 ArrayBuffer 类型,但直接操作 ArrayBuffer 不方便,通常转成 Uint8Array 后再处理:
// ArrayBuffer → Uint8Array(读取数据时)
const bytes = new Uint8Array(result.characteristicValue);

// Uint8Array → ArrayBuffer(写入数据时)
const buffer = bytes.buffer;

// 字符串 → Uint8Array(发文本指令)
const bytes = new TextEncoder().encode('Hello');

// Uint8Array → 字符串(收文本数据)
const str = new TextDecoder().decode(bytes);
BluetoothService 里封装了这几个工具方法,实际项目里直接调用即可。
7.4 GATT UUID 的标准格式
BLE 服务和 Characteristic 的 UUID 有两种格式:
- 标准 UUID :128位,格式如
0000180D-0000-1000-8000-00805F9B34FB(心率服务) - 短 UUID :16位,如
0x180D,是标准 UUID 的缩写形式
HarmonyOS 的 GATT API 接受两种格式,但建议统一用完整的 128位格式,避免兼容性问题。常见的标准服务 UUID 可以在 Bluetooth SIG 官网查询。
八、真实运行效果
文件清单:
entry/src/main/ets/
├── bluetooth/
│ ├── BluetoothManager.ets
│ ├── ClassicBluetooth.ets
│ ├── BleScanner.ets
│ ├── GattClient.ets
│ └── BluetoothService.ets
└── pages/
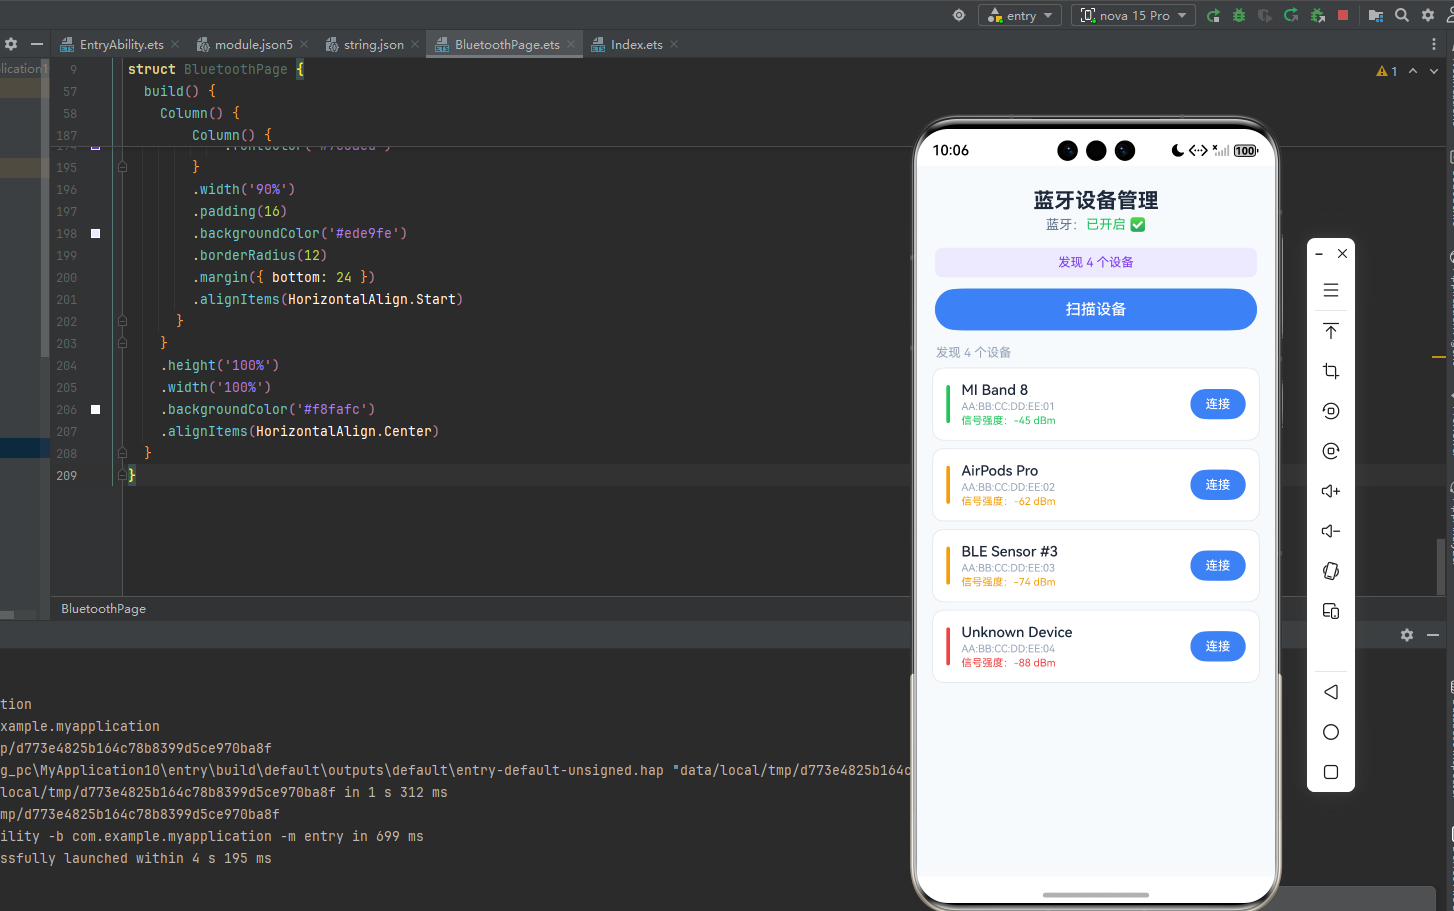
└── BluetoothPage.ets权限配置后的运行表现:
应用启动后页面顶部显示当前蓝牙开关状态。如果蓝牙未开启,扫描按钮呈灰色禁用状态,用户无法误触。
点击「开始扫描 BLE 设备」后,列表开始动态更新,附近的 BLE 设备逐个出现,按信号强度从强到弱排序,信号强度数值实时刷新(越靠近 0 信号越强,如 -45 dBm 比 -80 dBm 更近)。
点击某个设备的「连接」按钮,扫描立即停止,GATT 连接建立后自动发现服务列表,控制台打印服务数量。如果目标设备支持心率通知,订阅后数据会以十六进制字符串形式显示在页面底部。
关闭蓝牙开关,stateChange 事件立即触发,页面状态指示切换为「已关闭」,扫描按钮变灰。
PC 端与手机端的主要差异:
PC 端蓝牙适配器功率通常比手机低,扫描范围约 5~8 米,超出范围的设备信号强度会低于 -90 dBm,实际连接成功率很低,属于正常现象。PC 端不支持蓝牙 5.0 的长距离模式(LE Long Range),最大可靠通信距离约 10 米。
九、常见问题
Q:startBLEScan 报错码 201?
权限问题。检查 module.json5 里是否同时声明了 ACCESS_BLUETOOTH 和 LOCATION 两个权限,缺一不可。
Q:getServices 返回空数组?
连接成功后需要等待约 500ms~1s 让 GATT 服务发现完成,再调用 getServices。可以加一个 setTimeout 延迟调用,或者监听连接状态稳定后再操作。
Q:writeCharacteristic 报错「不支持的操作」?
目标 Characteristic 可能不具备 Write 属性。先调用 getServices 查看该 Characteristic 的 properties,只有 write 或 writeNoResponse 为 true 的 Characteristic 才能写入。
Q:订阅通知后收不到数据?
检查是否正确写入了 Client Characteristic Configuration Descriptor(CCCD)。部分设备需要显式向 CCCD(UUID: 00002902)写入 0x01 0x00 才能激活通知,setCharacteristicChangeNotification 在大多数设备上会自动处理,但少数设备需要手动操作。
总结
本文完整覆盖了 HarmonyOS 6.0 PC 端蓝牙开发的核心链路:
权限配置是一切的前提,INTERNET 和 LOCATION 缺一不可。connection 模块管经典蓝牙,ble 模块管 BLE,职责分明不要混用。事件监听一定要成对 on/off,在 aboutToDisappear 里统一清理。BLE 连接前先停止扫描,提升连接成功率。GATT 数据以 ArrayBuffer 传输,用 Uint8Array 桥接操作更方便。
这套封装可以直接带入实际项目,根据目标设备的 GATT Profile 替换对应的服务和 Characteristic UUID 即可。