文章目录
- [1 BusyBox简介](#1 BusyBox简介)
- [2 BusyBox源码获取](#2 BusyBox源码获取)
- [3 BusyBox构建根文件系统](#3 BusyBox构建根文件系统)
-
- [3.1 源码解压](#3.1 源码解压)
- [3.2 修改Makefile](#3.2 修改Makefile)
- [3.3 busybox中文字符支持](#3.3 busybox中文字符支持)
- [3.4 配置busybox](#3.4 配置busybox)
-
- [3.4.1 配置动态编译](#3.4.1 配置动态编译)
- [3.4.2 配置vi编辑器](#3.4.2 配置vi编辑器)
- [3.4.3 配置使能unicode编码](#3.4.3 配置使能unicode编码)
- [3.4.4 配置禁止精简指令开关](#3.4.4 配置禁止精简指令开关)
- [3.4.5 配置使能medv配置](#3.4.5 配置使能medv配置)
- [3.5 保存配置](#3.5 保存配置)
- [4 BusyBox编译及初步完善](#4 BusyBox编译及初步完善)
-
- [4.1 编译](#4.1 编译)
- [4.2 向根文件系统添加lib库](#4.2 向根文件系统添加lib库)
- [4.3 向RootFS的`usr/lib`目录添加库文件](#4.3 向RootFS的
usr/lib目录添加库文件) - [4.4 创建其他文件夹](#4.4 创建其他文件夹)
- [5 根文件系统网络加载](#5 根文件系统网络加载)
-
- [5.1 准备加载文件](#5.1 准备加载文件)
- [5.2 根文件系统运行](#5.2 根文件系统运行)
- [5.3 uboot设置根文件系统网络加载](#5.3 uboot设置根文件系统网络加载)
- [5.4 初步测试结果](#5.4 初步测试结果)
- [6 完善根文件系统](#6 完善根文件系统)
-
- [6.1 创建`/etc/init.d/rcS`文件](#6.1 创建
/etc/init.d/rcS文件) -
- [6.1.1 运行后测试结果](#6.1.1 运行后测试结果)
- [6.2 完善根文件系统](#6.2 完善根文件系统)
-
- [6.2.1 创建`/etc/fstab`文件](#6.2.1 创建
/etc/fstab文件) - [6.2.2 使能内核`uevet helper`](#6.2.2 使能内核
uevet helper) -
- [6.2.2.1 编译并加载](#6.2.2.1 编译并加载)
- [6.2.3 创建`/etc/inittab`文件](#6.2.3 创建
/etc/inittab文件) - [6.2.4 运行后测试结果](#6.2.4 运行后测试结果)
- [6.2.1 创建`/etc/fstab`文件](#6.2.1 创建
- [6.3 根文件系统测试](#6.3 根文件系统测试)
-
- [6.3.1 简单程序测试](#6.3.1 简单程序测试)
- [6.3.2 中文字符测试](#6.3.2 中文字符测试)
- [6.3.3 开机自启动测试](#6.3.3 开机自启动测试)
- [6.3.4 外网连接测试](#6.3.4 外网连接测试)
- [6.1 创建`/etc/init.d/rcS`文件](#6.1 创建
- [7 烧写根文件系统到EMMC中](#7 烧写根文件系统到EMMC中)
-
- [7.1 rootfs.ext4文件制作](#7.1 rootfs.ext4文件制作)
- [7.2 根文件系统烧录](#7.2 根文件系统烧录)
-
- [7.2.1 文件准备](#7.2.1 文件准备)
- [7.2.2 使用USB烧写rootfs.ext4](#7.2.2 使用USB烧写rootfs.ext4)
- [7.3 根文件系统运行](#7.3 根文件系统运行)
- [7.4 uboot设置根文件系统从EMMC启动](#7.4 uboot设置根文件系统从EMMC启动)
说明说明:
1 BusyBox简介
BusyBox是一个集成了大量的Linux命令和工具的软件,像ls、mv、ifconfig等命令BusyBox都会提供。BusyBox就是一个大的工具箱,这个工具箱里面集成了Linux的许多工具和命令。一般下载BusyBox的源码,然后配置BusyBox,选择想要的功能,最后编译即可。
2 BusyBox源码获取
BusyBox可以在其官网下载到,官网地址为:跳转官网。如图所示:

在官网左侧的"Get Busy Box"栏有一行"Download Source",点击"Download Source"即可打开Busy Box的下载页,如图所示:
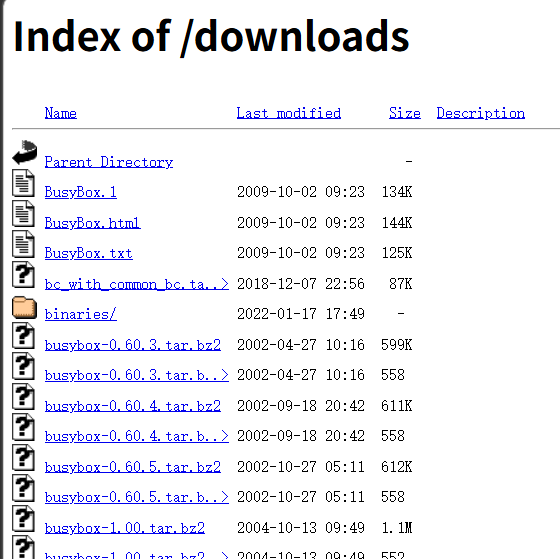
找到busybox-1.32.0.tar.bz2并下载。下载完成后拷贝到Ubuntu系统中。
3 BusyBox构建根文件系统
一般在Linux驱动开发的时候都是通过nfs挂载根文件系统的,当根文件制作好了才会将根文件系统烧写到EMMC中。本文档主要目的是构建根文件系统,如何搭建nfs服务器不做说明。
进入到nfs服务器目录中,创建RootFS文件夹来存放制作的根文件系统。
3.1 源码解压
bash
tar -vxjf busybox-1.32.0.tar.bz23.2 修改Makefile
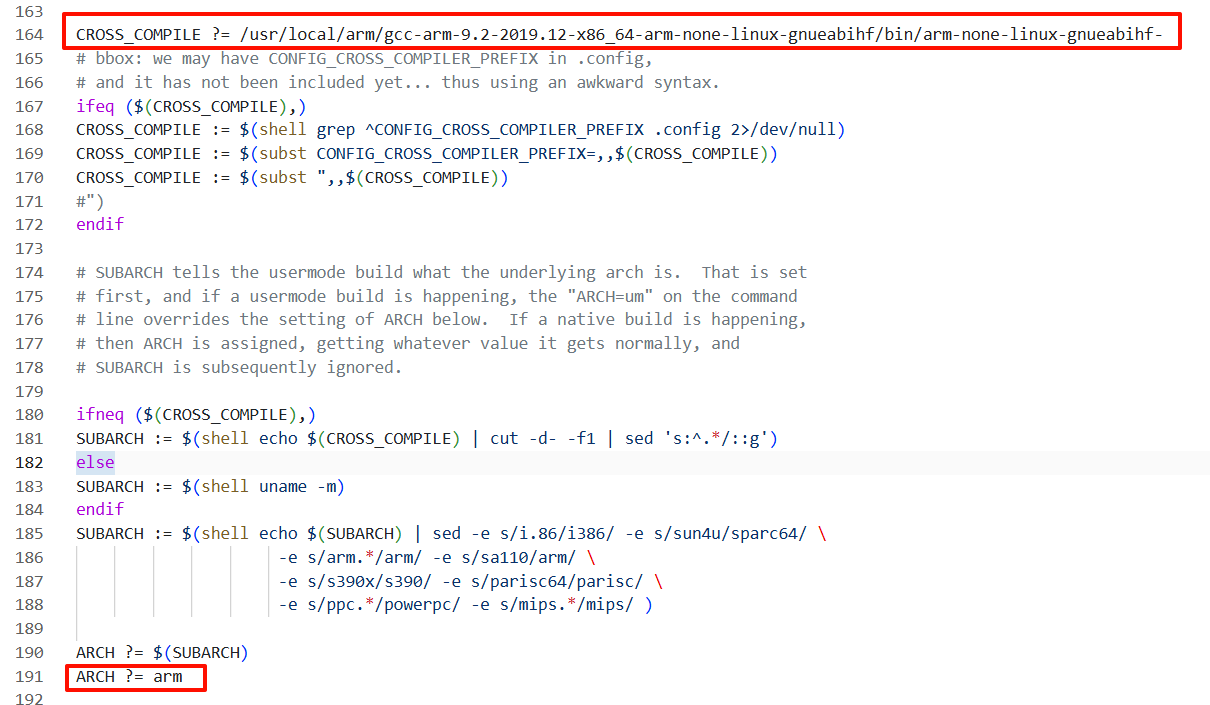
修改顶层Makefile,添加内容如下:
makefile
ARCH ?= arm
CROSS_COMPILE ?= /usr/local/arm/gcc-arm-9.2-2019.12-x86_64-arm-none-linux-gnueabihf/bin/arm-none-linux-gnueabihf-
修改后内容如下:
3.3 busybox中文字符支持
修改busybox源码,取消busybox对中文显示的限制。
打开busybox-1.32.0/libbb/printable_string.c,修改printable_string2函数,修改后内容如下:
c
const char* FAST_FUNC printable_string2(uni_stat_t *stats, const char *str)
{
	char *dst;
	const char *s;

	s = str;
	while (1) {
		unsigned char c = *s;
		if (c == '\0') {
			/* 99+% of inputs do not need conversion */
			if (stats) {
				stats->byte_count = (s - str);
				stats->unicode_count = (s - str);
				stats->unicode_width = (s - str);
			}
			return str;
		}
		if (c < ' ')
			break;
		/* if (c >= 0x7f)
			break; */
		s++;
	}

#if ENABLE_UNICODE_SUPPORT
	dst = unicode_conv_to_printable(stats, str);
#else
	{
		char *d = dst = xstrdup(str);
		while (1) {
			unsigned char c = *d;
			if (c == '\0')
				break;
			/*if (c < ' ' || c >= 0x7f)*/
			if (c < ' ')
				*d = '?';
			d++;
		}
		if (stats) {
			stats->byte_count = (d - dst);
			stats->unicode_count = (d - dst);
			stats->unicode_width = (d - dst);
		}
	}
#endif
	return auto_string(dst);
}打开busybox-1.32.0/libbb/unicode.c,修改unicode_conv_to_printable2函数,修改后内容如下:
c
static char* FAST_FUNC unicode_conv_to_printable2(uni_stat_t *stats, const char *src, unsigned width, int flags)
{
	char *dst;
	unsigned dst_len;
	unsigned uni_count;
	unsigned uni_width;

	if (unicode_status != UNICODE_ON) {
		char *d;
		if (flags & UNI_FLAG_PAD) {
			d = dst = xmalloc(width + 1);
			while ((int)--width >= 0) {
				unsigned char c = *src;
				if (c == '\0') {
					do
						*d++ = ' ';
					while ((int)--width >= 0);
					break;
				}
				/* *d++ = (c >= ' ' && c < 0x7f) ? c : '?'; */
				*d++ = (c >= ' ') ? c : '?';
				src++;
			}
			*d = '\0';
		} else {
			d = dst = xstrndup(src, width);
			while (*d) {
				unsigned char c = *d;
				/* if (c < ' ' || c >= 0x7f) */
				if (c < ' ')
					*d = '?';
				d++;
			}
		}
		if (stats) {
			stats->byte_count = (d - dst);
			stats->unicode_count = (d - dst);
			stats->unicode_width = (d - dst);
		}
		return dst;
	}

	dst = NULL;
	uni_count = uni_width = 0;
	dst_len = 0;
	while (1) {
		int w;
		wchar_t wc;

#if ENABLE_UNICODE_USING_LOCALE
		{
			mbstate_t mbst = { 0 };
			ssize_t rc = mbsrtowcs(&wc, &src, 1, &mbst);
			/* If invalid sequence is seen: -1 is returned,
			 * src points to the invalid sequence, errno = EILSEQ.
			 * Else number of wchars (excluding terminating L'\0')
			 * written to dest is returned.
			 * If len (here: 1) non-L'\0' wchars stored at dest,
			 * src points to the next char to be converted.
			 * If string is completely converted: src = NULL.
			 */
			if (rc == 0) /* end-of-string */
				break;
			if (rc < 0) { /* error */
				src++;
				goto subst;
			}
			if (!iswprint(wc))
				goto subst;
		}
#else
		src = mbstowc_internal(&wc, src);
		/* src is advanced to next mb char
		 * wc == ERROR_WCHAR: invalid sequence is seen
		 * else: wc is set
		 */
		if (wc == ERROR_WCHAR) /* error */
			goto subst;
		if (wc == 0) /* end-of-string */
			break;
#endif
		if (CONFIG_LAST_SUPPORTED_WCHAR && wc > CONFIG_LAST_SUPPORTED_WCHAR)
			goto subst;
		w = wcwidth(wc);
		if ((ENABLE_UNICODE_COMBINING_WCHARS && w < 0) /* non-printable wchar */
		 || (!ENABLE_UNICODE_COMBINING_WCHARS && w <= 0)
		 || (!ENABLE_UNICODE_WIDE_WCHARS && w > 1)
		) {
 subst:
			wc = CONFIG_SUBST_WCHAR;
			w = 1;
		}
		width -= w;
		/* Note: if width == 0, we still may add more chars,
		 * they may be zero-width or combining ones */
		if ((int)width < 0) {
			/* can't add this wc, string would become longer than width */
			width += w;
			break;
		}

		uni_count++;
		uni_width += w;
		dst = xrealloc(dst, dst_len + MB_CUR_MAX);
#if ENABLE_UNICODE_USING_LOCALE
		{
			mbstate_t mbst = { 0 };
			dst_len += wcrtomb(&dst[dst_len], wc, &mbst);
		}
#else
		dst_len += wcrtomb_internal(&dst[dst_len], wc);
#endif
	}

	/* Pad to remaining width */
	if (flags & UNI_FLAG_PAD) {
		dst = xrealloc(dst, dst_len + width + 1);
		uni_count += width;
		uni_width += width;
		while ((int)--width >= 0) {
			dst[dst_len++] = ' ';
		}
	}
	if (!dst) /* for example, if input was "" */
		dst = xzalloc(1);
	dst[dst_len] = '\0';
	if (stats) {
		stats->byte_count = dst_len;
		stats->unicode_count = uni_count;
		stats->unicode_width = uni_width;
	}

	return dst;
}
busybox中文字符支持跟代码修改有关的就改好了,最后还需要配置busybox来使能unicode码。
3.4 配置busybox
bash
cd /home/alientek/linux/nfs/RootFS
make defconfig
make menuconfig
3.4.1 配置动态编译
tex
Location:
	-> Settings
		-> Build static binary (no shared libs)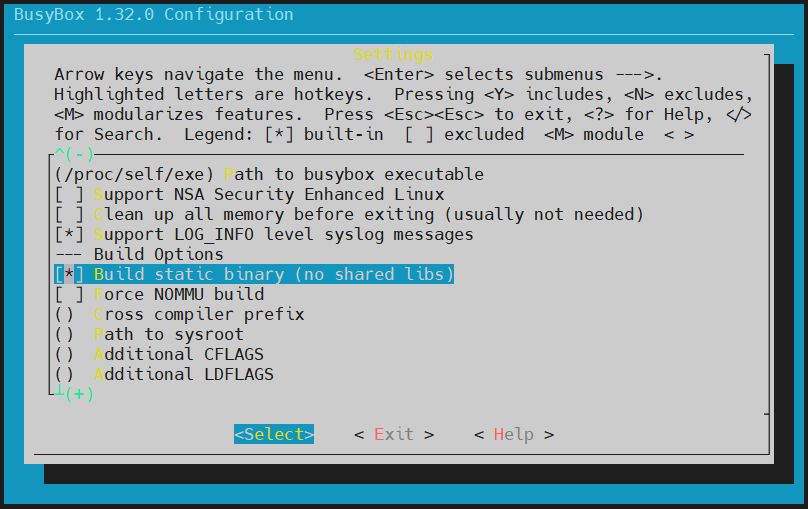
3.4.2 配置vi编辑器
tex
Location:
	-> Settings
		-> vi-style line editing commands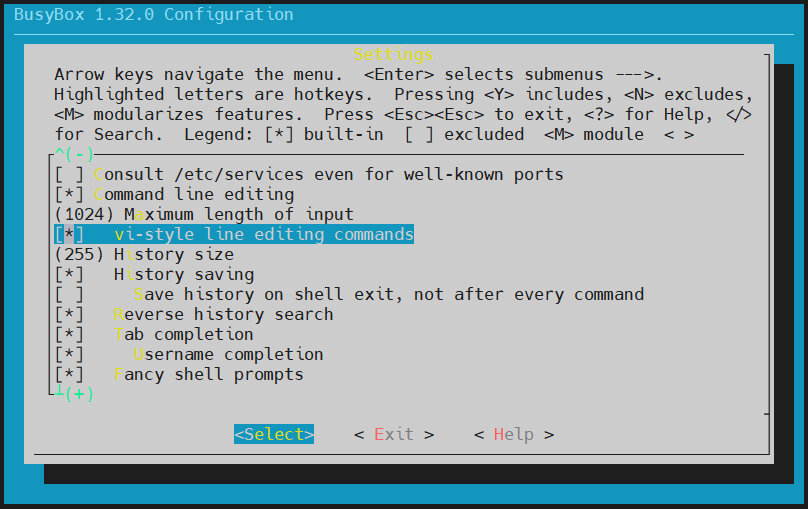
3.4.3 配置使能unicode编码
tex
Location:
	-> Settings
		-> Support Unicode
			-> Check $LC_ALL, $LC_CTYPE and $LANG environment variables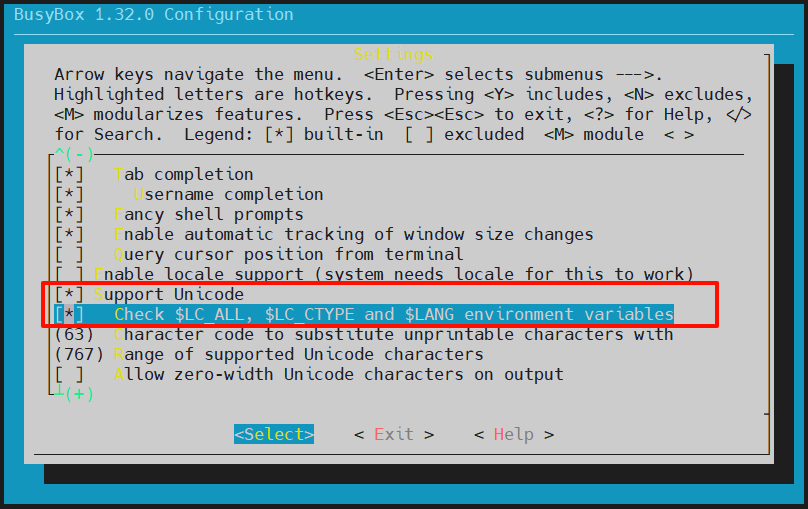
3.4.4 配置禁止精简指令开关
tex
Location:
	-> Linux Module Utilities
		-> Simplified modutils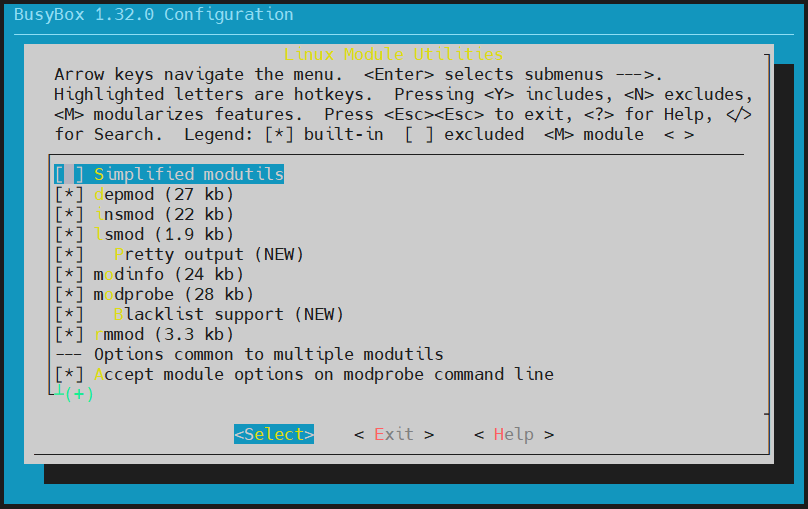
3.4.5 配置使能medv配置
tex
Location:
	-> Linux System Utilities
		-> mdev (17 kb)
3.5 保存配置
bash
cd busybox-1.32.0
cp .config ./configs/stm32mp157_da_defconfig		# 使用 make stm32mp157_da_defconfig 可加载此配置文件
4 BusyBox编译及初步完善
4.1 编译
bash
cd busybox-1.32.0
make
make install CONFIG_PREFIX=/home/alientek/linux/nfs/RootFS # 执行编译结果存放目录执行成功后,可进入/home/alientek/linux/nfs/RootFS查看。
4.2 向根文件系统添加lib库
bash
cd /home/alientek/linux/nfs/RootFS
mkdir lib
cd /usr/local/arm/gcc-arm-9.2-2019.12-x86_64-arm-none-linux-gnueabihf/arm-none-linux-gnueabihf/libc/lib
cp *so* /home/alientek/linux/nfs/RootFS/lib/ -d
# 其中 ld-linux-armhf.so.3 是一个软连接,在根文件系统中会出现问题
rm /home/alientek/linux/nfs/RootFS/lib/ld-linux-armhf.so.3
cp ld-linux-armhf.so.3 /home/alientek/linux/nfs/RootFS/lib/
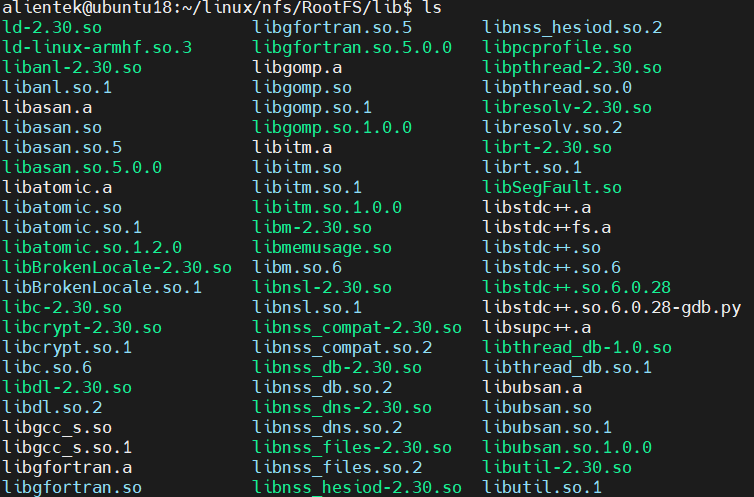
cd /usr/local/arm/gcc-arm-9.2-2019.12-x86_64-arm-none-linux-gnueabihf/arm-none-linux-gnueabihf/lib
cp *so* *.a /home/alientek/linux/nfs/RootFS/lib/ -d此时/home/alientek/linux/nfs/RootFS/lib/文件如下图所示:
4.3 向RootFS的usr/lib目录添加库文件
bash
cd /home/alientek/linux/nfs/RootFS/usr
mdkir lib
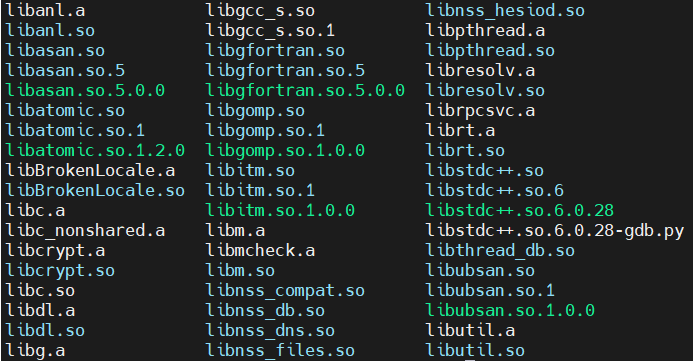
cd /usr/local/arm/gcc-arm-9.2-2019.12-x86_64-arm-none-linux-gnueabihf/arm-none-linux-gnueabihf/libc/usr/lib
cp *so* *.a /home/alientek/linux/nfs/RootFS/usr/lib/ -d此时/home/alientek/linux/nfs/RootFS/usr/lib/文件如下图所示:
4.4 创建其他文件夹
bash
cd /home/alientek/linux/nfs/RootFS
mkdir dev proc mnt sys tmp etc root
5 根文件系统网络加载
测试根文件系统时不是直接烧写到EMMC里面,在开发板上通过nfs挂载Ubuntu下的根文件系统目录即可,等根文件确定后再进行。
5.1 准备加载文件
通过USB_OTG将Linux内核移植阶段的da_image烧录至开发板。
5.2 根文件系统运行
打开MobaXterm软件,设置好与开发板连接的串口,波特率选择115200。
设置开发板拨码开关为010,也就是从EMMC启动,然后复位开发板!
在串口中观察启动过程。
5.3 uboot设置根文件系统网络加载
关于bootargs参数设置,可以在Linux内核源码目录中Documentation/filesystems/nfs/nfsroot.txt查看详细配置。
bash
setenv bootargs 'console=ttySTM0,115200 root=/dev/nfs nfsroot=192.168.10.101:/home/alientek/linux/nfs/RootFS,proto=tcp rw ip=192.168.10.102:192.168.10.101:192.168.10.1:255.255.255.0::eth0:off'
saveenv
boot
5.4 初步测试结果
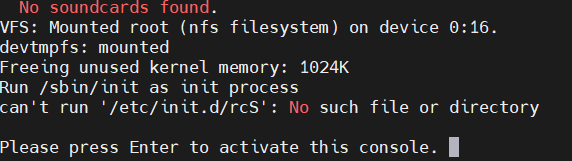
6 完善根文件系统
根据初步测试结果,根文件系统缺失文件,逐步测试添加文件。
6.1 创建/etc/init.d/rcS文件
rcS是个shell脚本,Linux内核启动以后需要启动一些服务,而rcS就是规定启动哪些文件的脚本文件。根据如下命令创建并写入内容到rcS文件中。
bash
cd /home/alientek/linux/nfs/RootFS
cd etc
mkdir init.d
cd init.d

touch rcS

# 打开rcS文件后,填充如下内容,并保存

chmod 777 rcS
rcS文件填充内容如下:
shell
#!/bin/sh

PATH=/sbin:/bin:/usr/sbin:/usr/bin:$PATH
LD_LIBRARY_PATH=$LD_LIBRARY_PATH:/lib:/usr/lib
export PATH LD_LIBRARY_PATH

mount -a
mkdir /dev/pts
mount -t devpts devpts /dev/pts

echo /sbin/mdev > /proc/sys/kernel/hotplug
mdev -s
6.1.1 运行后测试结果
打开MobaXterm软件,设置好与开发板连接的串口,波特率选择115200。
设置开发板拨码开关为010,也就是从EMMC启动,然后复位开发板!
在串口中观察启动过程。
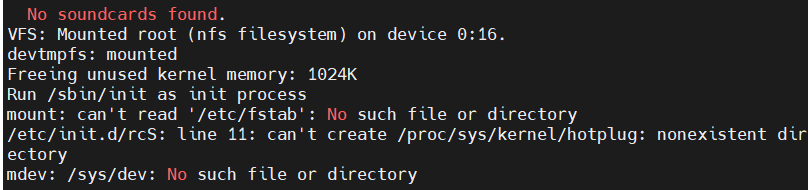
6.2 完善根文件系统
6.2.1 创建/etc/fstab文件
在rootfs中创建/etc/fstab文件,fstab在Linux开机以后自动配置哪些需要自动挂载的分区。
bash
cd /home/alientek/linux/nfs/RootFS
cd etc

touch fstabfatsb文件内容如下:
tex
#<file system> <mount point> <type> <options> <dump> <pass>
proc /proc proc defaults 0 0
tmpfs /tmp tmpfs defaults 0 0
sysfs /sys sysfs defaults 0 0
6.2.2 使能内核uevet helper
bash
cd linux-5.4.31/
make menuconfig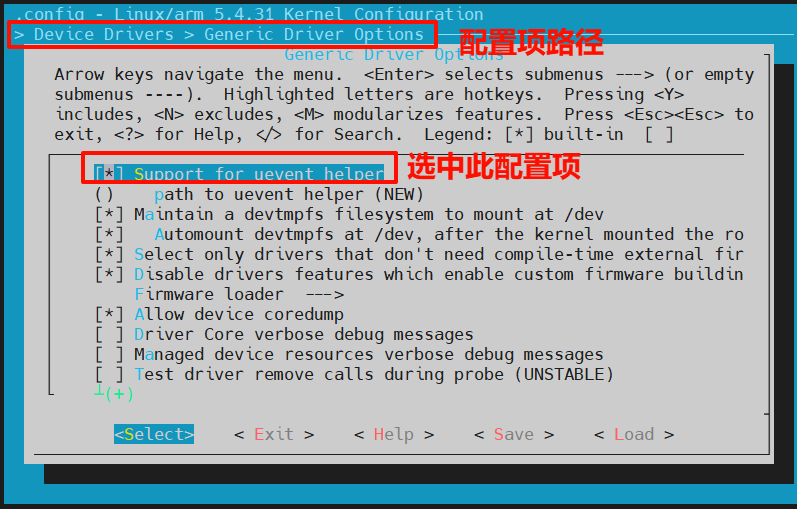
执行如下命令备份完整配置:
bash
cp .config ./arch/arm/configs/stm32mp1_da_defconfig6.2.2.1 编译并加载
6.2.3 创建/etc/inittab文件
bash
cd /home/alientek/linux/nfs/RootFS
cd etc

touch inittabinittab文件内容如下:
tex
#etc/inittab
::sysinit:/etc/init.d/rcS
console::askfirst:-/bin/sh
::restart:/sbin/init
::ctrlaltdel:/sbin/reboot
::shutdown:/bin/umount -a -r
::shutdown:/sbin/swapoff -a
6.2.4 运行后测试结果
打开MobaXterm软件,设置好与开发板连接的串口,波特率选择115200。
设置开发板拨码开关为010,也就是从EMMC启动,然后复位开发板!
在串口中观察启动过程。
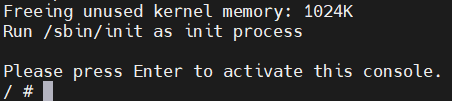
6.3 根文件系统测试
6.3.1 简单程序测试
Ubuntu:
bash
cd /home/alientek/linux/nfs/RootFS
mkdir drivers

touch hello.c	# hello.c 填充如下内容

arm-none-linux-gnueabihf-gcc hello.c -o hello
hello.c文件内容:
c
#include <stdio.h>

int main(void)
{
    while(1)
    {
        printf("hello world!\r\n");
        sleep(2);
    }
    return 0;
}
开发板:
bash
cd /drivers
./hello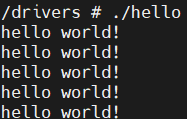
6.3.2 中文字符测试
Ubuntu:
bash
mkdir 中文测试开发板:

6.3.3 开机自启动测试
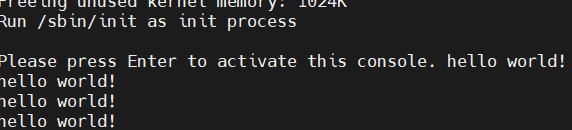
修改/etc/init.d/rcS文件内容如下:
tex
#!/bin/sh

PATH=/sbin:/bin:/usr/sbin:/usr/bin:$PATH
LD_LIBRARY_PATH=$LD_LIBRARY_PATH:/lib:/usr/lib
export PATH LD_LIBRARY_PATH

mount -a
mkdir /dev/pts
mount -t devpts devpts /dev/pts

echo /sbin/mdev > /proc/sys/kernel/hotplug
mdev -s

cd /drivers
./hello &
cd /
重新复位开发板:
6.3.4 外网连接测试
确保开发板连接在局域网,局域网可上外网。
创建/etc/resolv.conf文件,并填充如下内容,其中nameserver 192.168.10.1为局域网的网关地址:
tex
nameserver 114.114.114.114
nameserver 192.168.10.1
7 烧写根文件系统到EMMC中
7.1 rootfs.ext4文件制作
bash
# 第一步(仅初次使用):在家目录中选择合适位置,创建 rootfs 文件夹,并进入
mkdir rootfs
cd rootfs

# 第二步(仅初次使用):将生成的 uImage 和 stm32mp157d-da.dtb 文件拷贝到 rootfs 文件夹目录中

# 第三步(仅初次使用):新建 ext4 格式磁盘
# of为名称,bs为块大小,count为块数量,所以 rootfs.ext4 文件大小为1024MB,如果空间不够则调整 count
dd if=/dev/zero of=rootfs.ext4 bs=1M count=1024
# -L rootfs 为卷名,使用 mkfs.ext4 将 rootfs.ext4 文件格式化为 ext4 格式,且指定卷名为 rootfs
mkfs.ext4 -L rootfs rootfs.ext4


# 第四步:将系统镜像拷贝到 ext4 磁盘中
sudo mkdir /mnt/rootfs		# (仅初次使用)
sudo mount rootfs.ext4 /mnt/rootfs/
sudo cp /home/alientek/linux/nfs/RootFS/* /mnt/rootfs/ -drf	# 其中 /home/alientek/linux/nfs/RootFS/ 为根文件系统路径

# 第五步:卸载 /mnt/rootfs
sudo umount /mnt/rootfs
7.2 根文件系统烧录
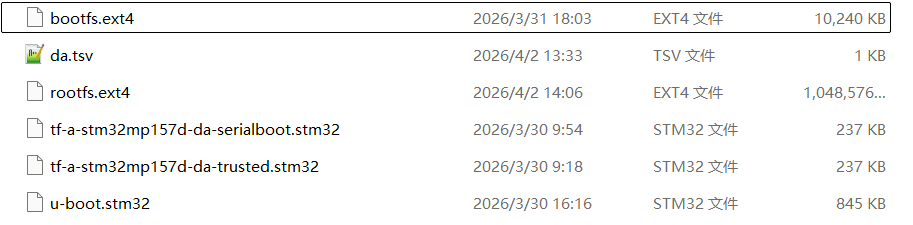
7.2.1 文件准备
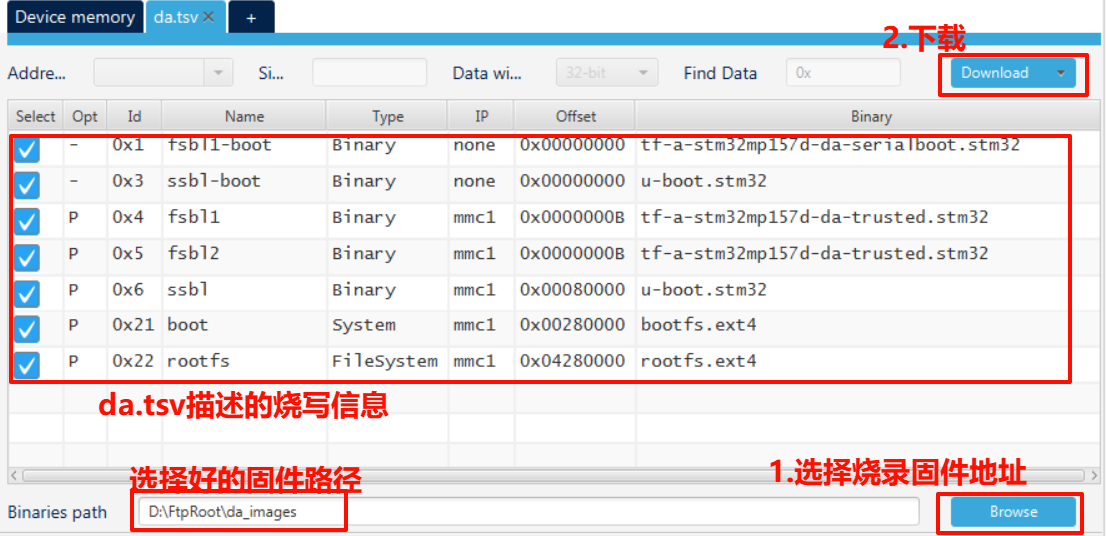
将制作好的的rootfs.ext4、bootfs.ext4、tf-a-stm32mp157d-da-trusted.stm32和tf-a-stm32mp157d-da-serialboot.stm32、u-boot.stm32文件(其中bootfs.ext4、u-boot.stm32、tf-a-stm32mp157d-da-trusted.stm32和tf-a-stm32mp157d-da-serialboot.stm32使用已经编译好的),统一放入文件夹中,例如:da-images文件夹。在da-images文件夹中添加da.tsv文件;文件内容如下所示:
tex
#Opt	Id	Name	Type	Device	Offset	Binary
-	0x01	fsbl1-boot	Binary	none	0x0	tf-a-stm32mp157d-da-serialboot.stm32
-	0x03	ssbl-boot	Binary	none	0x0	u-boot.stm32
P	0x04	fsbl1	Binary	mmc1	boot1	tf-a-stm32mp157d-da-trusted.stm32
P	0x05	fsbl2	Binary	mmc1	boot2	tf-a-stm32mp157d-da-trusted.stm32
P	0x06	ssbl	Binary	mmc1	0x00080000	u-boot.stm32
P	0x21	boot	System	mmc1	0x00280000	bootfs.ext4
P	0x22	rootfs	FileSystem	mmc1	0x04280000	rootfs.ext4
文件内容格式要严格遵循下图:

tsv语法要求只能用TAB键,不能用空格!以#开头为注释。
最终da-images文件夹中的内容如下:
7.2.2 使用USB烧写rootfs.ext4
通过USBType-C线将开发板的USB_OTG和USB_TTL连接到电脑上。
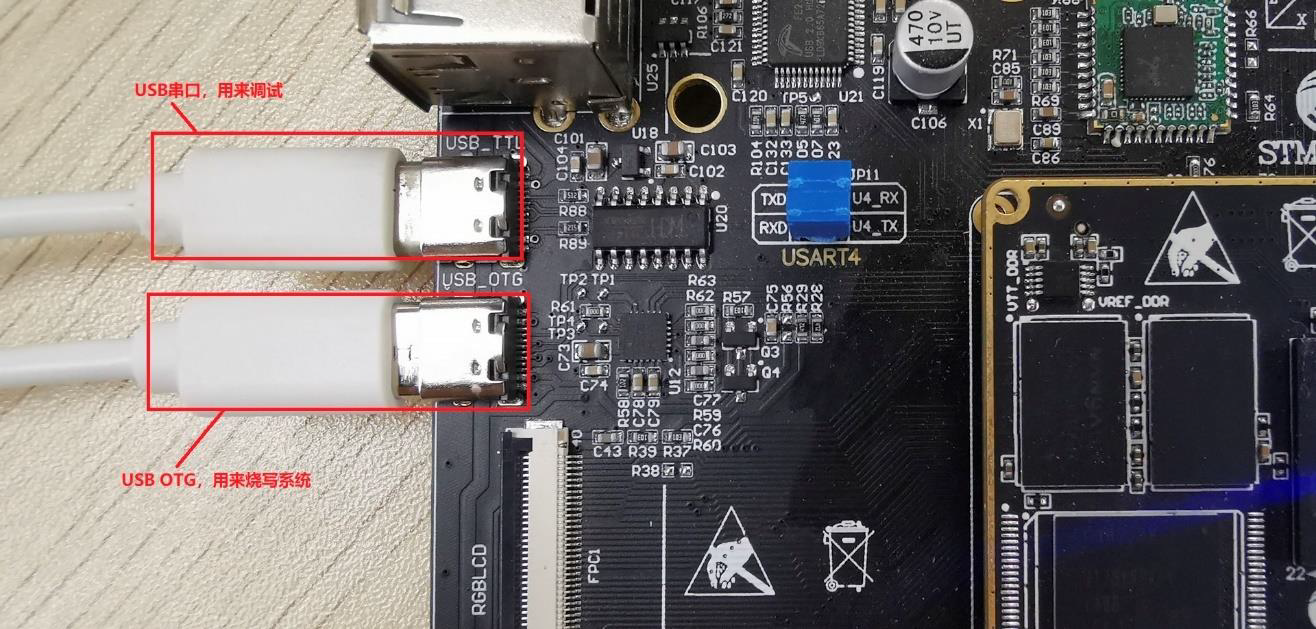
设置开发板拨码开关,设置为000,也就是从USB启动,然后复位开发板。
打开STM32CubeProgrammer,选择USB连接方式,Port选择USB1。
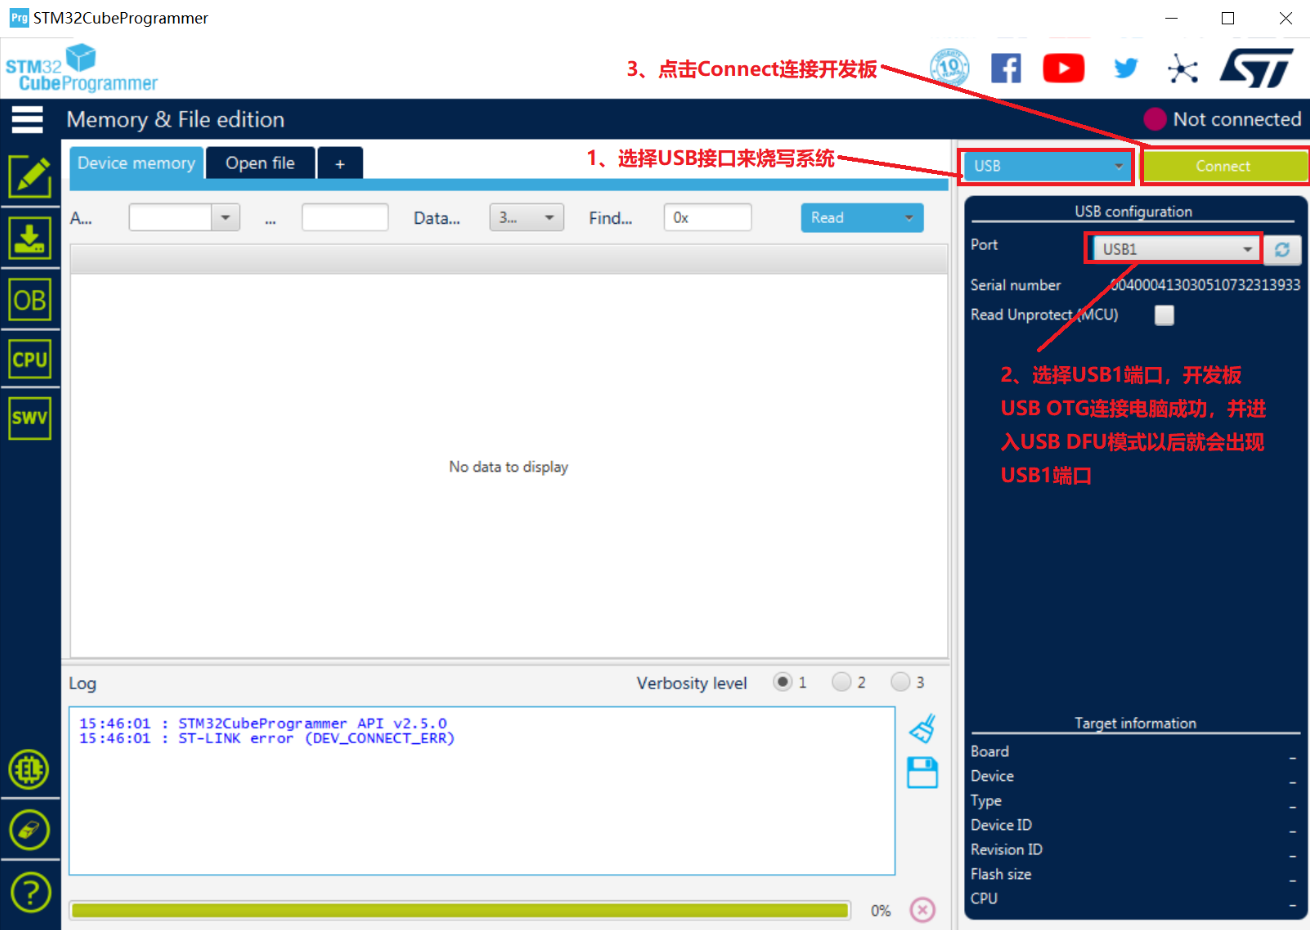
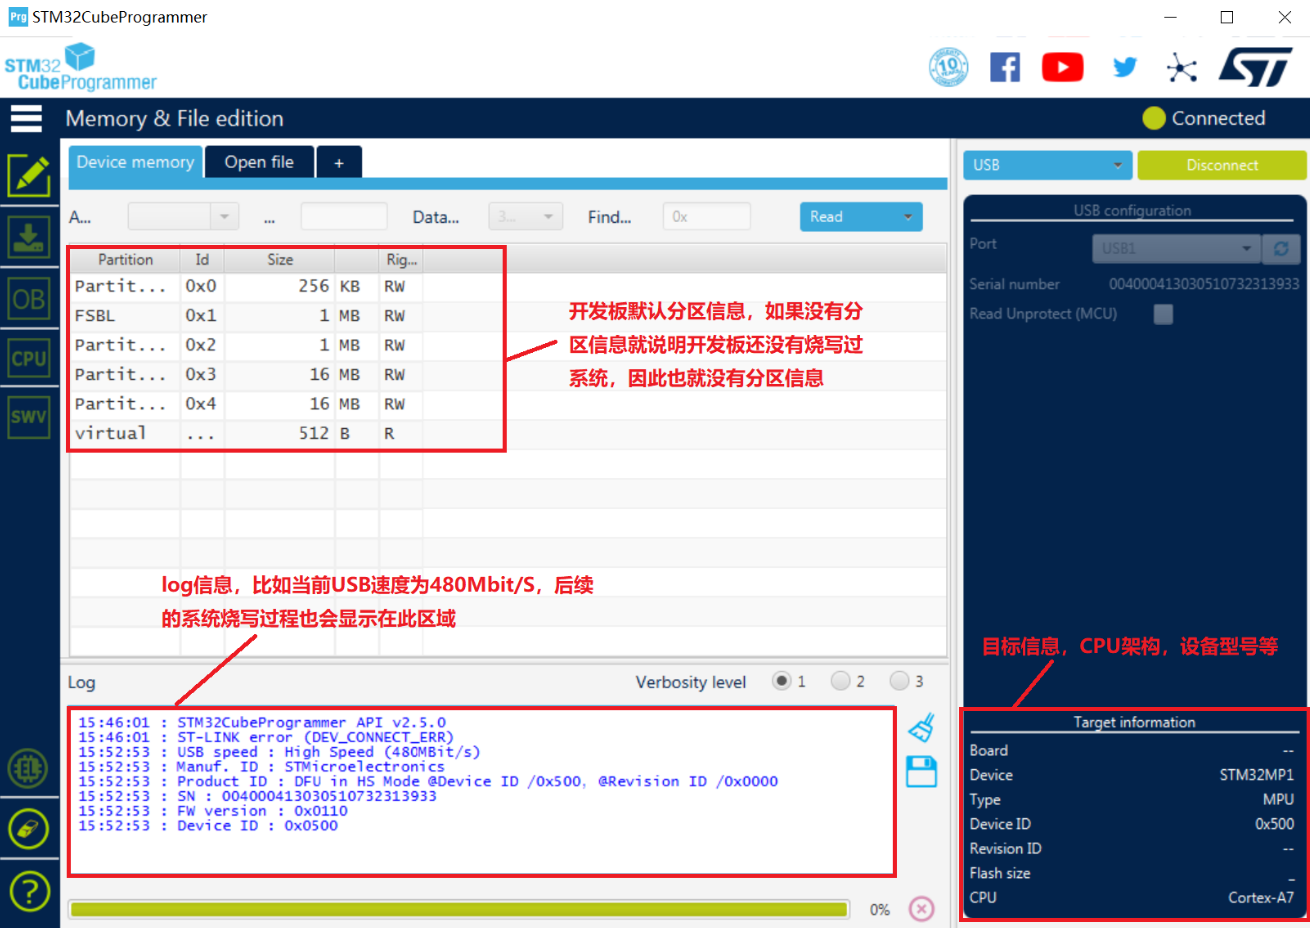
USB设置好以后点击右上角的"Connect"来连接开发板,连接成功以后左下角的log区域就会输出一些信息,右侧中间的数据区域也会显示开发板默认的分区情况,右下角会显示目标板信息,如图所示:
STM32CubeProgrammer要使用FlashLayout文件来烧写系统,也就是da-images文件夹下的da.tsv。点击界面上的"Open File",打开da.tsv,如下图所示:
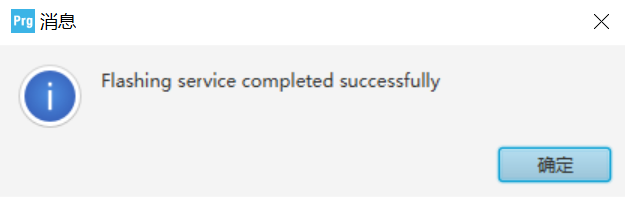
根文件系统较大,烧写时间相对于之前的烧写时间略长,烧写完成后会有如下提示:
7.3 根文件系统运行
打开MobaXterm软件,设置好与开发板连接的串口,波特率选择115200。
设置开发板拨码开关为010,也就是从EMMC启动,然后复位开发板!
在串口中观察启动过程。
7.4 uboot设置根文件系统从EMMC启动
bash
setenv bootargs 'console=ttySTM0,115200 root=/dev/mmcblk1p3 rootwait rw'
saveenv
boot