一、使用 Web API
1. 安装requests
Requests 包让 Python 程序能够轻松地向网站请求信息并检查返回的响应。要安装 Requests,可使用 pip:
pip install requests2. 处理API响应
下面来编写一个程序,自动执行 API 调用并处理结果:
python
import requests
# 赋值一个调用API的URL
url = 'https://api.github.com/search/repositories'
url += '?q=language:python+sort:stars+stars:>10000'
# 指定 headers 显式地要求使用这个版本的 API 并返回 JSON 格式的结果
headers = {'Accept': 'application/vnd.github.v3+json'}
# 调用 API
r = requests.get(url, headers=headers)
# 打印 status_code,以核实调用是否成功
print(f'Status code: {r.status_code}')
# 使用 json() 方法将这些信息转换为一个 Python 字典
response_dicts = r.json()
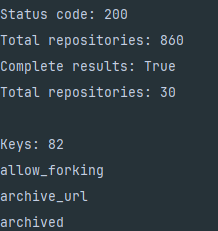
print(response_dicts.keys())输出结果为:

3. 处理响应字典
将 API 调用返回的信息存储到字典里后,就可处理其中的数据了。生成一些概述这些信息的输出是一种不错的方式,可帮助我们确认收到了期望的信息,进而开始研究感兴趣的信息:
python
import requests
# 赋值一个调用API的URL
url = 'https://api.github.com/search/repositories'
url += '?q=language:python+sort:stars+stars:>10000'
# 指定 headers 显式地要求使用这个版本的 API 并返回 JSON 格式的结果
headers = {'Accept': 'application/vnd.github.v3+json'}
# 调用 API
r = requests.get(url, headers=headers)
# 打印 status_code,以核实调用是否成功
print(f'Status code: {r.status_code}')
# 使用 json() 方法将这些信息转换为一个 Python 字典
response_dicts = r.json()
# 打印与 'total_count' 相关联的值,它指出API 调用返回了多少个 Python 仓库
print(f"Total repositories: {response_dicts['total_count']}")
# 查看了与'incomplete_results' 相关联的值,以便知道 GitHub 是否有足够的时间处理完这个查询
print(f"Complete results: {not response_dicts['incomplete_results']}")
repo_dicts = response_dicts['items']
print(f"Total repositories: {len(repo_dicts)}")
# 先提取 repo_dicts中的第一个字典,并将其赋给 repo_dict
repo_dict = repo_dicts[0]
# 打印这个字典包含的键数,看看其中有多少项信息
print(f"\nKeys: {len(repo_dict)}")
# 打印这个字典的所有键,看看其中包含哪些信息
for key in sorted(repo_dict.keys()):
    print(key)
结果如下:
4. 概述最受欢迎的仓库
python
import requests
# 赋值一个调用API的URL
url = 'https://api.github.com/search/repositories'
url += '?q=language:python+sort:stars+stars:>10000'
# 指定 headers 显式地要求使用这个版本的 API 并返回 JSON 格式的结果
headers = {'Accept': 'application/vnd.github.v3+json'}
# 调用 API
r = requests.get(url, headers=headers)
# 打印 status_code,以核实调用是否成功
print(f'Status code: {r.status_code}')
# 使用 json() 方法将这些信息转换为一个 Python 字典
response_dicts = r.json()
# 打印与 'total_count' 相关联的值,它指出API 调用返回了多少个 Python 仓库
print(f"Total repositories: {response_dicts['total_count']}")
# 查看了与'incomplete_results' 相关联的值,以便知道 GitHub 是否有足够的时间处理完这个查询
print(f"Complete results: {not response_dicts['incomplete_results']}")
repo_dicts = response_dicts['items']
print(f"Total repositories: {len(repo_dicts)}")
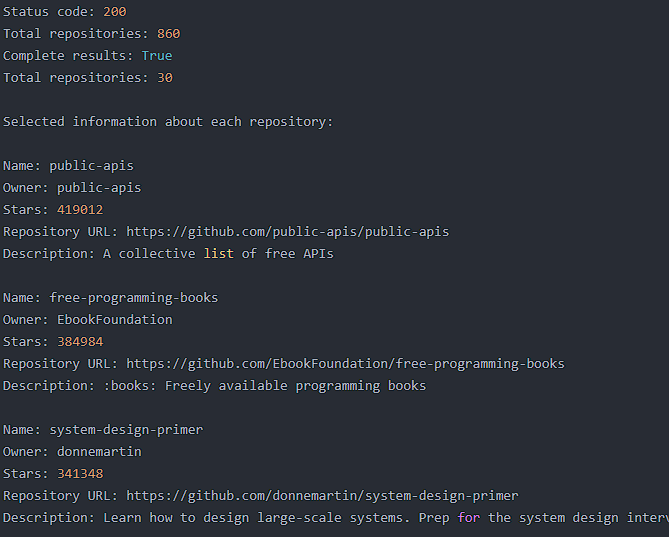
print("\nSelected information about each repository:")
for repo in repo_dicts:
print(f"\nName: {repo['name']}")
print(f"Owner: {repo['owner']['login']}")
print(f"Stars: {repo['stargazers_count']}")
print(f"Repository URL: {repo['html_url']}")
print(f"Description: {repo['description']}")结果如下:
二、使用 Plotly 可视化仓库
我们将创建一个交互式条形图
python
import requests
import plotly.express as px
# 赋值一个调用API的URL
url = 'https://api.github.com/search/repositories'
url += '?q=language:python+sort:stars+stars:>10000'
# 指定 headers 显式地要求使用这个版本的 API 并返回 JSON 格式的结果
headers = {'Accept': 'application/vnd.github.v3+json'}
# 调用 API
r = requests.get(url, headers=headers)
# 打印 status_code,以核实调用是否成功
print(f'Status code: {r.status_code}')
# 使用 json() 方法将这些信息转换为一个 Python 字典
response_dicts = r.json()
# 查看了与'incomplete_results' 相关联的值,以便知道 GitHub 是否有足够的时间处理完这个查询
print(f"Complete results: {not response_dicts['incomplete_results']}")
repo_dicts = response_dicts['items']
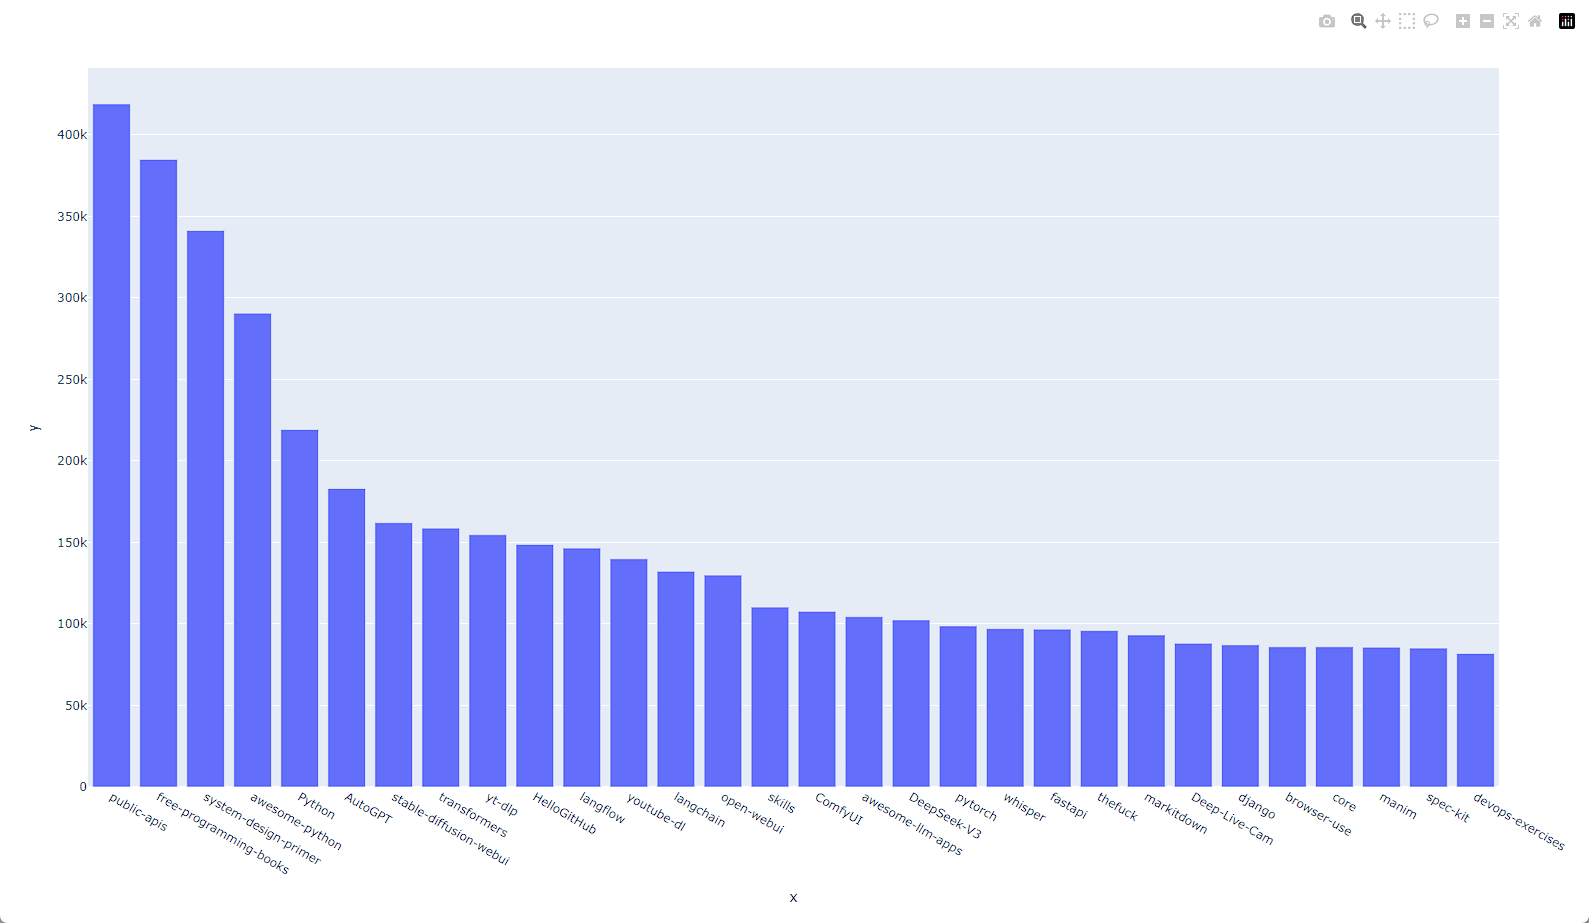
# 处理有关仓库的信息
repo_names, stars = [], []
for repo in repo_dicts:
repo_names.append(repo['name'])
stars.append(repo['stargazers_count'])
fig = px.bar(x=repo_names, y=stars)
fig.show()结果如下:
1. 设置图形的样式
python
import requests
import plotly.express as px
# 赋值一个调用API的URL
url = 'https://api.github.com/search/repositories'
url += '?q=language:python+sort:stars+stars:>10000'
# 指定 headers 显式地要求使用这个版本的 API 并返回 JSON 格式的结果
headers = {'Accept': 'application/vnd.github.v3+json'}
# 调用 API
r = requests.get(url, headers=headers)
# 打印 status_code,以核实调用是否成功
print(f'Status code: {r.status_code}')
# 使用 json() 方法将这些信息转换为一个 Python 字典
response_dicts = r.json()
# 查看了与'incomplete_results' 相关联的值,以便知道 GitHub 是否有足够的时间处理完这个查询
print(f"Complete results: {not response_dicts['incomplete_results']}")
repo_dicts = response_dicts['items']
# 处理有关仓库的信息
repo_names, stars = [], []
for repo in repo_dicts:
repo_names.append(repo['name'])
stars.append(repo['stargazers_count'])
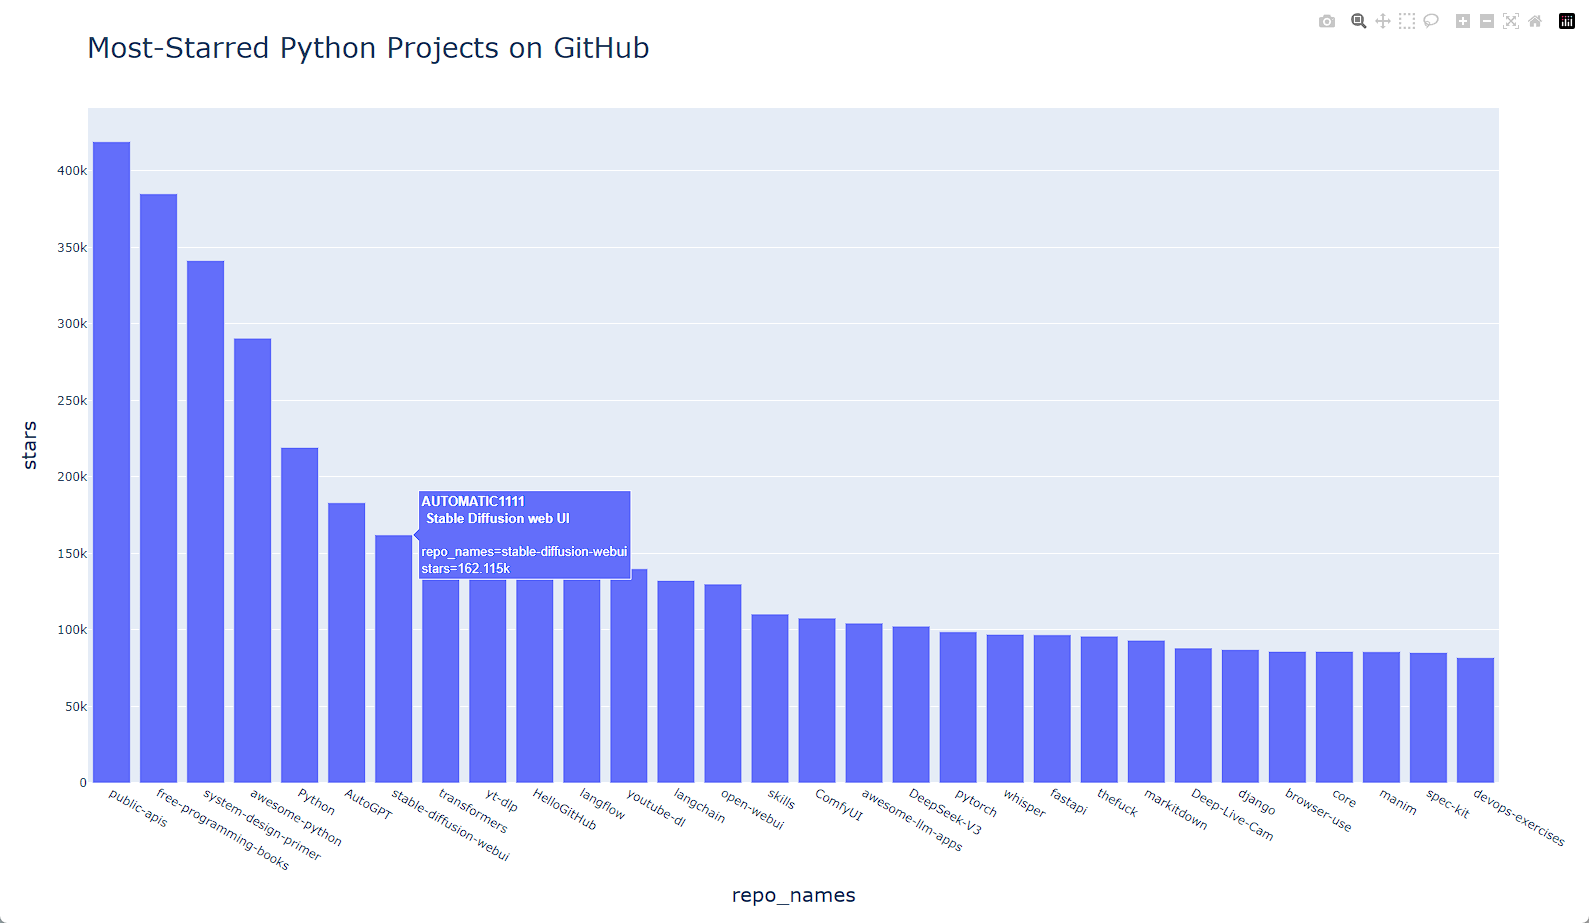
title = 'Most-Starred Python Projects on GitHub'
labels = {'x': 'repo_names', 'y': 'stars'}
fig = px.bar(x=repo_names, y=stars, title=title, labels=labels)
fig.update_layout(title_font_size=28, xaxis_title_font_size=20, yaxis_title_font_size=20)
fig.show()结果:

2. 添加定制工具提示
在 Plotly 中,将鼠标指向条形将显示它表示的信息。这通常称为工具提示(tooltip)。
python
import requests
import plotly.express as px
# 赋值一个调用API的URL
url = 'https://api.github.com/search/repositories'
url += '?q=language:python+sort:stars+stars:>10000'
# 指定 headers 显式地要求使用这个版本的 API 并返回 JSON 格式的结果
headers = {'Accept': 'application/vnd.github.v3+json'}
# 调用 API
r = requests.get(url, headers=headers)
# 打印 status_code,以核实调用是否成功
print(f'Status code: {r.status_code}')
# 使用 json() 方法将这些信息转换为一个 Python 字典
response_dicts = r.json()
# 查看了与'incomplete_results' 相关联的值,以便知道 GitHub 是否有足够的时间处理完这个查询
print(f"Complete results: {not response_dicts['incomplete_results']}")
repo_dicts = response_dicts['items']
# 处理有关仓库的信息
repo_names, stars, hover_texts = [], [], []
for repo in repo_dicts:
    repo_names.append(repo['name'])
    stars.append(repo['stargazers_count'])
    # 创建悬停文本
    owner = repo['owner']['login']
    description = repo['description']
    hover_text = f"{owner} <br /> {description}"
    hover_texts.append(hover_text)

title = 'Most-Starred Python Projects on GitHub'
labels = {'x': 'repo_names', 'y': 'stars'}
fig = px.bar(x=repo_names, y=stars, title=title, labels=labels, hover_name=hover_texts)
fig.update_layout(title_font_size=28, xaxis_title_font_size=20, yaxis_title_font_size=20)
fig.show()
结果如下:
3. 添加可单击的链接
python
import requests
import plotly.express as px
# 赋值一个调用API的URL
url = 'https://api.github.com/search/repositories'
url += '?q=language:python+sort:stars+stars:>10000'
# 指定 headers 显式地要求使用这个版本的 API 并返回 JSON 格式的结果
headers = {'Accept': 'application/vnd.github.v3+json'}
# 调用 API
r = requests.get(url, headers=headers)
# 打印 status_code,以核实调用是否成功
print(f'Status code: {r.status_code}')
# 使用 json() 方法将这些信息转换为一个 Python 字典
response_dicts = r.json()
# 查看了与'incomplete_results' 相关联的值,以便知道 GitHub 是否有足够的时间处理完这个查询
print(f"Complete results: {not response_dicts['incomplete_results']}")
repo_dicts = response_dicts['items']
# 处理有关仓库的信息
repo_links, stars, hover_texts = [], [], []
for repo in repo_dicts:
    repo_name = repo['name']
    repo_url = repo['html_url']
    repo_link = f'<a href="{repo_url}">{repo_name}</a>'
    repo_links.append(repo_link)
    stars.append(repo['stargazers_count'])
    # 创建悬停文本
    owner = repo['owner']['login']
    description = repo['description']
    hover_text = f"{owner} <br /> {description}"
    hover_texts.append(hover_text)

title = 'Most-Starred Python Projects on GitHub'
labels = {'x': 'repo_names', 'y': 'stars'}
fig = px.bar(x=repo_links, y=stars, title=title, labels=labels, hover_name=hover_texts)
fig.update_layout(title_font_size=28, xaxis_title_font_size=20, yaxis_title_font_size=20)
fig.show()
上面代码,点击横坐标即可跳转到对应页面。
4. 定制标记颜色
创建图形后,可使用以 update_ 打头的方法来定制其各个方面。前面使用了 update_layout() 方法,而 update_traces() 则可用来定制图形呈现的数据。
python
fig.update_traces(marker_color='SteelBlue', marker_opacity=0.6)三、Hacker News API
为了探索如何使用其他网站的 API 调用,我们来看看 Hacker News 网站。在这个网站上,用户分享编程和技术方面的文章,并就这些文章展开积极的讨论。Hacker News 的 API 让你能够访问有关该网站上所有文章和评论的信息,并且不要求通过注册获得密钥。