1.轮播图
考点
语法:
css:position会让元素悬浮;border-radius是;active相关效果
js:
setInterval(函数,时间)----过XXms触发(不关闭就一直开着使用)
数组.push(元素)
元素.appendChild(子元素)
逻辑:
添加左右->添加渲染点 点高亮css
->函数startTimer let timer全局变量 在函数里定义为计时器 计时器内容:删,增active 实现轮播效果
->使用函数->鼠标进入(关计时)与离开函数(用函数开计时)
->左右按钮监听点击事件(关计时+删加active)
->圆点被点击 用圆点数组遍历( 传入dot和index形参 dot绑定点击事件)
html
<!DOCTYPE html>
<html lang="en">
<head>
<meta charset="UTF-8">
<meta name="viewport" content="width=device-width, initial-scale=1.0">
<title>Document</title>
<style>
*{
margin: 0px;
padding: 0px;
}
.container{
margin: 0 auto;
position: relative;
width: 1000px;
height: 800px;
background-color: yellow;
}
img{
width: 100%;
height: 90%;
display: none;
}
.name{
background-color: rgb(19, 19, 19);
width: 100%;
height: 10%;
color: rgb(230, 226, 226);
font-size: 20px;
position: absolute;
left: 0px;
top: 90%;
display: none;
}
.active{
display: block;
}
.left{
position: absolute;
font-size: 50px;
left: 0;
top: 50%;
color:white;
cursor: pointer;
}
.right{
position: absolute;
font-size: 50px;
right: 0;
top: 50%;
color: white;
cursor: pointer;
}
.dots{
position: absolute;
left: 20%;
top: 95%;
z-index: 10;
}
.dots span{
width: 30px;
height: 30px;
border-radius: 50%;
background-color: grey;
margin: 0 5px;
cursor: pointer;
display: inline-block;
}
span.active{
background-color: white;
}
</style>
</head>
<body>
<div class="container">
<img src="./yushi_20.JPG" alt="" class="active">
<div class="name active">fall'out</div>
<img src="./yushi_10.JPG" alt="">
<div class="name">小u</div>
<img src="./yushi_3.png" alt="">
<div class="name">Yushi</div>
<div class="left"><</div>
<div class="right">></div>
<div class="dots">
</div>
</div>
<script>
const container=document.querySelector('.container')
const imgArr=document.querySelectorAll('img')
const nameArr=document.querySelectorAll('.name')
const left=document.querySelector('.left')
const right=document.querySelector('.right')
const dotsContainer=document.querySelector('.dots')
for(let i=0;i<imgArr.length;i++){
const spanEle=document.createElement('span')
dotsContainer.appendChild(spanEle)
}
const dots = document.querySelectorAll('.dots span')
dots[0].classList.add('active')
//轮播->active删+增 定时器
let currentIndex=0
let timer
function startTimer(){
timer=setInterval(()=>{
//记录索引号
//active删+增
const activeArr=document.querySelectorAll('.active')
activeArr.forEach((item)=>item.classList.remove('active'))
if(currentIndex===imgArr.length-1){
currentIndex=0
}
else currentIndex+=1
imgArr[currentIndex].classList.add('active')
nameArr[currentIndex].classList.add('active')
dots[currentIndex].classList.add('active')
},1000)
}
startTimer()
//因为圆点和左右和鼠标会影响轮播的定时器 所以定时器得单独一个函数
//奇怪:只执行了一次 第二次鼠标进入就不生效了---因为重复使用定时器 总有新的定时器开启
//所以需要一个timer来作为定时器固有的名字 这样每次删的都是同一个定时器 保证最多只有一个定时器
//鼠标进入
container.addEventListener('mouseenter',()=>{
clearInterval(timer)
})
//鼠标退出
container.addEventListener('mouseleave',()=>{
//继续循环
startTimer()
})
//左右按钮
//上一页
left.addEventListener('click',()=>{
clearInterval(timer)
document.querySelectorAll('.active').forEach(item=>{
item.classList.remove('active')
})
if(currentIndex!=0){
currentIndex-=1
}
else{
currentIndex=imgArr.length-1
}
// 显示当前图片
imgArr[currentIndex].classList.add('active')
nameArr[currentIndex].classList.add('active')
dots[currentIndex].classList.add('active')
startTimer()
})
right.addEventListener('click',()=>{
clearInterval(timer)
document.querySelectorAll('.active').forEach(item=>{
item.classList.remove('active')
})
if(currentIndex!=imgArr.length-1){
currentIndex+=1
}
else{
currentIndex=0
}
// 显示当前图片
imgArr[currentIndex].classList.add('active')
nameArr[currentIndex].classList.add('active')
dots[currentIndex].classList.add('active')
startTimer()
})
//圆点被点击
dots.forEach((dot,index)=>{
dot.addEventListener('click',()=>{
clearInterval(timer)
document.querySelectorAll('.active').forEach(item=>{
item.classList.remove('active')
})
currentIndex=index
imgArr[currentIndex].classList.add('active')
nameArr[currentIndex].classList.add('active')
dots[currentIndex].classList.add('active')
startTimer()
})
})
</script>
</body>
</html>2.二级导航
考点:
语法:
css:父子关系
A>B --A下的直属B
A+空格+B--A下所有B(后代)
border:1px solid color
html
<!DOCTYPE html>
<html lang="en">
<head>
    <meta charset="UTF-8">
    <meta name="viewport" content="width=device-width, initial-scale=1.0">
    <title>Document</title>
    <style>
        *{
            margin: 0;
            padding: 0;
        }
        ul{
            list-style: none;
        }
        .navigator{
            width: 80%;
            display: flex;
            background-color: dodgerblue;
            justify-content: space-evenly;
        }
        .nav-item{
            position: relative;
            border: 1px solid beige;
            border-bottom: none;
            border-top: none;
            padding: 1%;
        }
        /* 二级菜单的位置要相对.nav-item
            使用position的同时元素是悬浮在上面 */
        /* ul参考.nav-item的位置 */
        .nav-item>ul{
            display: none;
            position: absolute;
            top: 100%;
            left: 0;
            background-color: dodgerblue;

        }

        .nav-item>ul>li{
            height: 30px;
            border: 1px solid beige;
            position: relative; /* 三级导航参考二级菜单的位置*/
            line-height: 30px;
        }
        .nav-item:hover>ul{
            display: block;
            width: 100%;
            background-color: dodgerblue;
            text-align: center;
        }
        .nav-item:hover li{
            height:30px;
            border: 1px solid beige;
        }


        /* 三级菜单 */
        .nav-item>ul>li>ul{
            position: absolute;
            top: 0%;
            left: 100%;
            width: 100%;
            background-color: dodgerblue;
            border: 1px solid beige;
            display: flex;
        }

        .nav-item ul li:hover >ul {
            display: flex;
        }
        .nav-item>ul>li>ul>li{
            height: 30px;
            border: 1px solid beige;
            line-height: 30px;
            text-align: center;
        }

    </style>
</head>
<body>
    <div class="navigator">
        <div class="nav-item">首页</div>
        <div class="nav-item">学校介绍
            <ul>
                <li>1学习2
                    <ul>
                        <li>三级</li>
                        <li>sanji</li>
                    </ul>
                </li>
                <li>2学校</li>
            </ul>
        </div>
        <div class="nav-item">学生发展
            <ul>
                <li>1学习2</li>
                <li>2学校</li>
            </ul>
        </div>
    </div>
</body>

</html>
3.瀑布流
考点:
语法:
页面加载:
window.οnlοad=函数页面加载就触发
offsetWidth offsetHeight元素总尺寸
clientWidth--盒子宽度(不含边框)
数组.push(元素)
记得js里对于宽高等用 ->数字+'px'
Math.floor()向下取整
Math.random()*某个数 Math.random<=1
`XX${XX}`
监听页面滚动 window.οnscrοll=函数
逻辑:
页面加载时展示数据->页面加载完成后触发瀑布流函数,且页面尺寸变化window.οnresize=waterFall
->瀑布流函数(负责元素布局:容器宽,元素宽,hrr放每列高(一开始6个高),每次都更新高度)
-》新建函数--负责添加新元素(新建的数量,元素内容,元素放到新数组)--一定要返回这个新数组
-》页面滚动的时候触发函数--(document.documentElement.clientHeight是网页高度)如果页面高度大于内容,就开一个倒计时:把之前的新数组每个填到container里面 再用waterfall()控制位置
html
<!DOCTYPE html>
<html lang="en">
<head>
    <meta charset="UTF-8">
    <meta name="viewport" content="width=device-width, initial-scale=1.0">
    <title>Document</title>
    <style>
        *{
            margin: 0;
            padding: 0;
        }
        .container{
            margin: 0 auto;
            display: flex;
            flex-direction: row;
            flex-wrap: wrap;
        }
        .container img{
            width: 200px;
        }
    </style>
</head>
<body>
    <div class="container">
        <div class="item">
            <img src="./yushi_1.jpeg" alt="">
        </div>
        <div class="item">
            <img src="./yushi_2.png" alt="">
        </div>
        <div class="item">
            <img src="./yushi_3.png" alt="">
        </div>
        <div class="item">
            <img src="./yushi_4.png" alt="">
        </div>
        <div class="item">
            <img src="./yushi_5.png" alt="">
        </div>
        <div class="item">
            <img src="./yushi_6.png" alt="">
        </div>
        <div class="item">
            <img src="./yushi_7.png" alt="">
        </div>
        <div class="item">
            <img src="./yushi_8.JPG" alt="">
        </div>
        <div class="item">
            <img src="./yushi_9.JPG" alt="">
        </div>
        <div class="item">
            <img src="./yushi_10.JPG" alt="">
        </div>
        <div class="item">
            <img src="./yushi_11.JPG" alt="">
        </div>
        <div class="item">
            <img src="./yushi_12.JPG" alt="">
        </div>
        <div class="item">
            <img src="./yushi_13.JPG" alt="">
        </div>
        <div class="item">
            <img src="./yushi_14.JPG" alt="">
        </div>
        <div class="item">
            <img src="./yushi_15.JPG" alt="">
        </div>
        <div class="item">
            <img src="./yushi_16.JPG" alt="">
        </div>
        <div class="item">
            <img src="./yushi_17.JPG" alt="">
        </div>
        <div class="item">
            <img src="./yushi_18.JPG" alt="">
        </div>
        <div class="item">
            <img src="./yushi_19.JPG" alt="">
        </div>
        <div class="item">
            <img src="./yushi_20.JPG" alt="">
        </div>
        <div class="item">
            <img src="./yushi_21.JPG" alt="">
        </div>
        <div class="item">
            <img src="./yushi_22.JPG" alt="">
        </div>
        <div class="item">
            <img src="./yushi_23.JPG" alt="">
        </div>
        <div class="item">
            <img src="./yushi_24.JPG" alt="">
        </div>
    </div>
</body>
<script>
    //页面加载的时候运行瀑布流函数
    window.load=function(){
        waterFall()
        //window.onresize窗口尺寸变化时执行函数
        window.onresize=waterFall
    }
    //瀑布流函数(一开始的布局)
    function waterFall(){
        const item=document.querySelectorAll('.item')
        const container=document.querySelector('.container')
        //获取各元素的宽 算出container的宽
        let width=item[i].offsetWidth
        let clientWidth=document.documentElement.clientWidth
        let columnCount=6
        container.style.width=width*columnCount+'px'

        //把所有item的高放进hrr
        let hrr=[]
        for(let i=0;i<item.length;i++){
            if(i<columnCount){
                item[i].style.left=width*i+'px'
                item[i].style.top='0px'
                hrr.push(item[i].offsetHeight)
            }
            else{
                //方便后面在最短的那列后面添加新的元素
                //最短那一列 高:Math.min(...hrr) +索引号
                let min=Math.min(...hrr)
                let index=hrr.indexOf(min)
                //由此影响元素位置
                item[i].style.top=min+'px'
                item[i].style.left=index*width+'px'
                //最短那个高要加上现在的元素
                hrr[index]+=item[i].offsetHeight
            }
        }
    }
    //默认加载完毕
    let isLoading=false
    //添加新元素
    function getNewItems(){
        const newItems=[]
        const loadCount=Math.floor(Math.random()*11)+20

        for(let i=0;i<loadCount;i++){
            const itemDiv=document.createElement('div')
            itemDiv.className='item'
            const num=(i%24)+1

            let suffix='JPG'
            if(num>1&&num<=9)suffix='PNG'
            else if(num==1)suffix='JPEG'

            const img=document.createElement('img')
            img.src=`yushi_${num}.${suffix}`
            itemDiv.appendChild(img)
            newItems.push(itemDiv)
        }
        return newItems
    }


    window.onscroll=function(){
        let container=document.querySelector('.container')
        let containerHeight=container.offsetHeight
        let containerTop=container.offsetTop

        let clientHeight=document.documentElement.clientHeight
        if(containerHeight+containerTop-clientHeight<=0&&!isLoading){
            isLoading=true
            setTimeout(function(){
                let newItems=getNewItems()
                let container=document.querySelector('.container')
                newItems.forEach(item=>{container.appendChild(item)})
                waterFall()
                isLoading=false
            },1000)
        }
    }
</script>
</html>
4.随机点名
考点:
拼接字符串
逻辑:
函数(添加数据),
滚动函数(active删增)
开始/结束按钮绑定事件 start.addEventListener('click',()=>{})
dom获取元素
设置全局变量
html
<!DOCTYPE html>
<html lang="en">
<head>
    <meta charset="UTF-8">
    <meta name="viewport" content="width=device-width, initial-scale=1.0">
    <title>Document</title>
    <style>
        .container{
            width: 50%;
            height: 30%;
            margin: 0 auto;
        }
        .item{
            width: 100%;
            font-size: 20px;
            display: none;
        }
        .active{
            display: block;
        }
        button{
            width: 100px;
            height: 70px;
        }
    </style>
</head>
<body>
    <div class="container">
        <div class="showArea">
            <!-- 添加50个
            <div class="item">
                <span></span>
                <span></span>
            </div> -->
        </div>
        <div class="control">
            <button class="start">开始</button>
            <button class="end">结束</button>
        </div>
    </div>
    <script>
        const showArea=document.querySelector('.showArea')
        let data=[]
        //添加 渲染数据
        const add=function(){
            for(let i=0;i<50;i++){
                const item=document.createElement('div')
                item.className='item'
                for(let j=0;j<2;j++){
                    const spanELe=document.createElement('span')
                    if(j===0){
                        if(i<10) spanELe.textContent=`2521070${i}`
                        else spanELe.textContent=`252107${i}`
                    }
                    else spanELe.textContent=`学生${i}`
                    item.appendChild(spanELe)

                }
                showArea.appendChild(item)
                data.push(item)
            }
            return showArea
        }
        const array=add()
        //点击事件
        const start=document.querySelector('.start')
        const end=document.querySelector('.end')
        let currentIndex=0
        let timer=null
        data[0].classList.add('active')

        function roll(){
            const active=document.querySelector('.active')
            active.classList.remove('active')
            currentIndex++
            if(currentIndex>=data.length){
                currentIndex=0
            }
            data[currentIndex].classList.add('active')
        }


        start.addEventListener('click',()=>{
            clearInterval(timer)
            timer=setInterval(roll,15)
        })

        end.addEventListener('click',()=>{
            clearInterval(timer)
        })
    </script>
</body>
</html>
5.时钟
考点:
逻辑:获取当下时间+补0函数+每隔1s就更新----一开始就调用函数,后来每隔1s调用一次
语法:
new Date()---从年到每一秒的数据 ---属性:getHours()/getDate()/getDay()
拼接字符串const dateStr=`{year}年{month}月{day}日{week}`
把字符串放到某个元素的内容 XX.textContent=String
setInterval(函数,时间
html
<!DOCTYPE html>
<html lang="en">
<head>
    <meta charset="UTF-8">
    <meta name="viewport" content="width=device-width, initial-scale=1.0">
    <title>Document</title>
</head>
<body>
    <div class="clock">
        <div id="time">00:00:00</div>
        <div class="date" id="date">2026年1月1日</div>
    </div>
    <script>
        function addZero(n){
            return n<10?`0${n}`:n
        }
        function updateClock(){
            const now=new Date()
            const hour=addZero(now.getHours())
            const min=addZero(now.getMinutes())
            const sec=addZero(now.getSeconds())

            const timeStr=`${hour}:${min}:${sec}`
            const weekArr=['星期日', '星期一', '星期二', '星期三', '星期四', '星期五', '星期六']
            const year=now.getFullYear()
            const month=addZero(now.getMonth()+1)
            const day=addZero(now.getDate())
            const week=weekArr[now.getDay()]

            const dateStr=`${year}年${month}月${day}日`

            //渲染
            document.getElementById('time').textContent=timeStr
            document.getElementById('date').textContent=dateStr

        }
        updateClock()
        setInterval(updateClock,1000)
    </script>
</body>
</html>
)
6.弹幕练习
考点:
逻辑:发送函数(检查是否有内容,最后清空input.value)+弹幕移动函数(位置变化)+按钮绑定点击事件实现函数使用
语法:
判断内容input.value.trim()
字符串转数字(XXpx->XX)parseInt(字符串)
弹幕属性:位置 大小 颜色 不换行
判断元素位置是否依旧超过某个容器:
if(rightNum-textWidth-sumWidth>0){
clearInterval(timer)
text.remove()
}
7.放大镜
逻辑:
鼠标mousemove->了解鼠标位置->黄色框框位置->放大图的背景图片位置
语法:
XX.getBoundingClientRect()----获取XX元素所有的位置信息
注意鼠标左移相当于放大图的背景向右移
background-image: url(./yushi_1.jpeg);
background-repeat: no-repeat;
background-size: cover;
border:1px solid black;
display: inline-block;
html
<!DOCTYPE html>
<html lang="en">
<head>
    <meta charset="UTF-8">
    <meta name="viewport" content="width=device-width, initial-scale=1.0">
    <title>Document</title>
    <style>
        .con{
            width: 100%;
            height: 1000px;
        }
        .small{
            width: 400px;
            height: 400px;
            background-image: url(./yushi_1.jpeg);
            background-repeat: no-repeat;
            background-size: cover;
            border:1px solid black;
            display: inline-block;
            position: relative;
        }
        .black{
            width: 100px;
            height: 100px;
            border: 1px solid yellow;
            position: absolute;
            pointer-events: none;
        }
        .big{
            width: 400px;
            height: 400px;
            background-image: url(./yushi_1.jpeg);
            background-repeat: no-repeat;
            background-size: 960px,960px;
            border:1px solid black;
            display: inline-block;
            background-position: 0,0;
        }
    </style>
</head>
<body>
    <div class="con">
        <div class="small">
            <div class="black"></div>
        </div>
        <div class="big">
        </div>
    </div>
    <script>
        const small=document.querySelector('.small')
        const big=document.querySelector('.big')
        const black=document.querySelector('.black')
        //鼠标进入small 每次都获取位置
        small.addEventListener('mousemove',(e)=>{
            //获取small元素的所有位置信息
            const rect=small.getBoundingClientRect()
            //e.clientX--相对浏览器的水平位置--从浏览器最左边 → 鼠标位置
            //rect.left--元素相对浏览器的水平位置--small 盒子左边距离浏览器最左边的距离
            //相减得鼠标相对盒子里的位置
            const x=e.clientX-rect.left
            const y=e.clientY-rect.top

            black.style.left=x-(parseInt(black.offsetWidth)/2)+'px'
            black.style.top=y-(parseInt(black.offsetHeight)/2)+'px'


            //如果鼠标在盒中
            if(x>=0&&x<=rect.width&&y>=0&&y<=rect.height){
                //backgroundPositionX/Y指的是图片怎么移动
                //鼠标向左,放大图的图相当于向右(画框固定 画移动)
                big.style.backgroundPositionX=-x*2.4+'px'
                big.style.backgroundPositionY=-y*2.4+'px'
            }

        })

    </script>
</body>
</html>
8.tab栏
考点:
active删与增
html
<!DOCTYPE html>
<html lang="en">
<head>
    <meta charset="UTF-8">
    <meta name="viewport" content="width=device-width, initial-scale=1.0">
    <title>Document</title>
    <style>
        *{
            margin: 0;
            padding: 0;
        }
        .navigator{
            display: flex;
            font-size: 25px;
            color: grey;
            gap: 100px;
        }
        .name{
            cursor: pointer;
        }
        .content{
            font-size: 20px;
            position: relative;
        }
        .text{
            width: 100px;
            height: 100px;
            display: none;
            position: absolute;
            left: 0;
            top: 100%;
        }
        .active{
            display: block;
        }
        .navigator .active{
            color: green;
        }
    </style>
</head>
<body>
    <div class="container">
        <div class="navigator">
            <div class="name active">英雄联盟</div>
            <div class="name">DOTA</div>
            <div class="name">风暴英雄</div>
        </div>
        <div class="content">
            <div class="text active">123</div>
            <div class="text">456</div>
            <div class="text">789</div>
        </div>
    </div>
    <script>
        const textSum=document.querySelectorAll('.text')
        const nameSum=document.querySelectorAll('.name')

        for(let i=0;i<nameSum.length;i++){
            nameSum[i].addEventListener('click',()=>{
                const active=document.querySelectorAll('.active')
                active.forEach((item)=>{
                    item.classList.remove('active')
                })
                textSum[i].classList.add('active')
                nameSum[i].classList.add('active')
            })
        }
    </script>
</body>
</html>
9.页面回到顶部
考点
窗口绑定滚动事件(滚动就触发函数--按钮存不存在)+点击按钮后window.screenY逐渐减小
html
<!DOCTYPE html>
<html lang="en">
<head>
    <meta charset="UTF-8">
    <meta name="viewport" content="width=device-width, initial-scale=1.0">
    <title>Document</title>
    <style>
        .exp{
            height: 200px;
        }
    </style>
</head>
<body>
    <div>
        <div class="exp">1</div>
        <div class="exp">2</div>
        <div class="exp">3</div>
        <div class="exp">4</div>
        <div class="exp">5</div>
        <div class="exp">6</div>
        <div class="exp">7</div>
        <div class="exp">8</div>
        <div class="exp">8</div>
        <div class="exp">8</div>
        <div class="exp">8</div>
        <div class="exp">8</div>
        <div class="exp">8</div>
        <div class="exp">8</div>
        <div class="exp">8</div>
        <div class="exp exp_bottom" >9</div>
    </div>
    <button id="backTop">回到顶部</button>
</body>
<script>
    const backTop=document.querySelector('#backTop')
    window.addEventListener('scroll',function(){
        const n=document.documentElement.scrollTop
        backTop.style.opacity=window.scrollY===0?0:1
    })
    function smoothScrollTop(){
        let currentY=window.screenY
        if(currentY>0){
            let step=Math.floor(currentY/10)
            step=Math.max(step,5)
            window.scrollTo(0,currentY-step)
            setTimeout(smoothScrollTop,15)
        }

    }
    backTop.addEventListener('click',smoothScrollTop)
</script>
</html>
10.动态表格
渲染函数+重置+添加
html
<!DOCTYPE html>
<html lang="en">
<head>
    <meta charset="UTF-8">
    <meta name="viewport" content="width=device-width, initial-scale=1.0">
    <title>Document</title>
    <style>
         body{
            font-size: 18px;
        }
        .add-btn{
            margin: 0 auto;
            background-color: green;
            width: 200px;
            display: flex;
            /* align-items: center; */
            justify-content: center;
            font-size: 20px;
        }
        table {
            width: 100%;
            border-collapse: collapse;
            text-align: center;
            margin: 50 auto 20px;
        }
        th,td{
            border: 1px solid #ccc;
            padding: 10px;
        }
        th{
            background-color: lightgreen;
            color: white;
        }
        tr.odd{
            color: black;
            background-color: white;
        }
        tr.even{
            color: white;
            background-color: black;
        }
        .modal-container{
            position: fixed;
            top: 0;
            left: 0;
            width: 100vw;
            height: 100vh;
            background-color: rgba(0,0,0,0.5);
            display: none;
            justify-content: center;
            align-self: center;
            z-index: 999;
        }
        .form-box{
            background-color: white;
            padding: 20px;
            border-radius: 8px;
            width: 400px;
            height: 300px;
            display: flex;
            flex-wrap: wrap;
            gap: 10px;
        }
        .form-box input,.form-box select {
            width: 120px;
            height: 32px;
            padding: 0 8px;
            box-sizing: border-box;
            border: 1px solid #ccc;
            border-radius: 4px;
        }
        /* 4. 表单按钮样式 */
        .form-box button {
            width: 100%;
            padding: 8px;
            border: none;
            border-radius: 4px;
            color: white;
            cursor: pointer;
            margin-top: 10px;
        }
        .submit-btn {
            width: 240;
            height: 32px;
            background-color: green;
        }
        .cancel-btn {
            width: 240;
            height: 32px;
            background-color: #6c757d;
        }
    </style>
</head>
<body>
    <div>
        <button class="add-btn">添加</button>
    </div>
    <div class="modal-container" id="add-modal">
        <div action="" class="form-box" autocomplete="off">
            学号:
            <input type="text" class="stu-id" name="id" >
            姓名:
            <input type="text" class="uname" name="uname">
            性别:
            <select type="text" class="gender" name="gender">
                <option value="女">女</option>
                <option value="男">男</option>
            </select>
            二级学院:
            <input type="text" class="stu-college">
            班级:
            <input type="text" class="stu-class">
            专业:<input type="text" id="stu-major">
            辅导员:<input type="text" id="stu-counselor">
            <button class="submit-btn" type="button">提交</button>
            <button class="cancel-btn" type="button">取消</button>
        </div>
    </div>
    <table class="container">
        <thead>
            <tr>
                <th>序号</th>
                <th>学号</th>
                <th>姓名</th>
                <th>性别</th>
                <th>二级学院</th>
                <th>班级</th>
                <th>专业</th>
                <th>辅导员</th>
                <th>操作</th>
            </tr>
        </thead>
        <tbody class="student-tbody">
            <!-- <td></td>
            <td></td>
            <td></td>
            <td></td>
            <td></td>
            <td></td>
            <td></td>
            <td></td> -->
        </tbody>
    </table>
</body>
<script>
    //1.学生数据创造+渲染(结构)函数定义,使用
    //创建一个空数组 放对象
    const studentList=[]
    for(let i=1;i<=50;i++){
        //数组.push(要加的内容)
        studentList.push({
            id:i,
            name:`学生${i}`,
            gender:i%2===1?'女':'男',
            college:`${i}学院`,
            className:`${i}班`,
            major:'计算机',
            counselor:'张老师'
        })
    }
    //渲染函数
    function render(){
        //tbody是整个studentList放的地方
        const tbody=document.querySelector('tbody')
        tbody.innerHTML=''
        //传入数组里每一个元素
        //数组.forEach((当前元素, 索引) => { 循环逻辑 })
        studentList.forEach((student,index)=>{
            //创建tr(表单中的行)
            const tr=document.createElement('tr')
            tr.className=(index+1)%2==1?'odd':'even'
            //能一次性把整行的 HTML 结构赋值给 <tr> 元素
            tr.innerHTML=`
                <td>${index+1}</td>
                <td>${student.id}</td>
                <td>${student.name}</td>
                <td>${student.gender}</td>
                <td>${student.college}</td>
                <td>${student.className}</td>
                <td>${student.major}</td>
                <td>${student.counselor}</td>
                //这个index为后续删除做准备
                <td><button class="delete-btn" data-index="${index}">删除</button></td>
            `
            //将tr加到tbody里面
            tbody.appendChild(tr)
        })
    }
    //运用渲染函数
    render()


    //2.删除+渲染
    //.student-tbody 是「静态元素」,利用「事件冒泡」机制处理子元素事件
    //为什么是给.student-tbody绑定:因为按的是这一行的按钮,删的是这一行的元素
    //绑定到父元素上能避免 "动态元素需要重复绑定事件" 的问题
    document.querySelector('.student-tbody').addEventListener('click',function(e){
        if(e.target.className==='delete-btn'){
            const isConfirm=confirm('确定要删除这一行吗?')
            if(isConfirm){
                //delIndex 拿到的就是按钮上 data-index 的值(比如 0/1/2 等)。
                const delIndex=e.target.dataset.index
                //(从哪里开始删,删多少个)
                studentList.splice(delIndex,1)
                render()
            }
        }
    })


    //3.添加+框内内容清理
    //modal 是弹窗容器 formBox是添加内容的整体 formInput是内容
    const modal=document.getElementById('add-modal')
    const formBox=document.querySelector('.form-box')
    const formInput=document.querySelectorAll('input,select')
    function resetForm(){formInput.forEach(input=>{
        //判断类型 如果是INPUT就清空内容;SELECT就
        if(input.tagName==='INPUT'){
            input.value=''
        }
        //selectedIndex是select里option的索引号
        //重置后都变回 "女";
        else if(input.tagName==='SELECT'){
            input.selectedIndex=0
        }
    })}

    //添加按钮绑定事件
    document.querySelector('.add-btn').addEventListener('click',function(e){
        modal.style.display='flex'
    })
    //删除按钮绑定事件
    document.querySelector('.cancel-btn').addEventListener('click',function(){
        //不展示内容
        modal.style.display='none'
        //清空内容+重新渲染
        resetForm()
    })


    document.querySelector('.sumbit-btn').addEventListener('click',function(){
        const id=document.querySelector('.stu-id').value.trim()
        const name=document.querySelector('.uname').value.trim()
        const gender=document.querySelector('.gender').value.trim()
        const college=document.querySelector('.stu-college').value.trim()
        const className=document.querySelector('.stu-class').value.trim()
        const major=document.querySelector('#stu-major').value.trim()
        const counselor=document.querySelector('#stu-counselor').value.trim()

        if(!id||!name || !college || !className || !major || !counselor){
                alert('请填写所有必填信息')
                return
        }

        studentList.push({
            id:id,
            name:name,
            gender: gender,
            college: college,
            className: className,
            major: major,
            counselor: counselor
        })

        modal.style.display='none'
        //重置输入框
        resetForm()
        //渲染
        render()
    })

</script>
</html>
7.正则表达式
- 手机号验证
^13-9\d{9}$
- 邮箱验证
^\w+(-+.\w+)*@\w+(-.\w+)*\.\w+(-.\w+)*$
- 身份证号(简单版)
^\d{15}\|\^\\d{17}\[\\dXx\]
- 中文
\\u4e00-\\u9fa5
- 提取所有数字
\d+
JS获取数据
2. fetch(原生,不用装包)
js
fetch('https://api.xxx.com/data')
  .then(res => res.json())
  .then(data => {
    console.log(data)
  })
async/await 写法:
js
async function getData() {
  const res = await fetch('https://api.xxx.com/data')
  const data = await res.json()
  console.log(data)
}
3. axios(项目 99% 用这个)
安装
bash
运行
npm install axiosGET 获取数据
js
import axios from 'axios'

axios.get('https://api.xxx.com/data')
  .then(res => {
    console.log(res.data)
  })
async/await(最常用)
js
async function getData() {
  const res = await axios.get('https://api.xxx.com/data')
  console.log(res.data)
}
POST 提交数据
js
axios.post('https://api.xxx.com/login', {
  username: 'zs',
  password: '123'
}).then(res => {
  console.log(res.data)
})
二、Vue 里一般怎么写?(实战写法)
在 Vue 组件里获取数据,写在 created 或 onMounted:
js
export default {
  data() {
    return {
      list: []
    }
  },
  async created() {
    const res = await axios.get('https://api.xxx.com/list')
    this.list = res.data
  }
}
JS里使用方法
在 JavaScript 里怎么用
1. 测试是否匹配(验证)
js
const reg = /^1[3-9]\d{9}$/;
console.log(reg.test('13812345678')); // true/false
2. 查找匹配
js
const str = 'abc123def456';
const nums = str.match(/\d+/g); // ['123','456']
3. 替换
js
const str = 'hello 123 world';
const res = str.replace(/\d/g, '*'); // 'hello *** world'
4. 切分字符串
js
const str = 'a,b;c d';
const arr = str.split(/[,; ]/); // ['a','b','c','d']
二.Vue考点
一、文件 1:src/App.vue(根组件,核心考点全覆盖)
1. 模板部分 <template>
vue
<template>
  <div>
    <h1>{{ msg }}</h1>
    <p>计算属性:{{ fullName }}</p>
    <button @click="add">+1</button>
    <button @click="toggle">切换显示</button>

    <!-- v-if vs v-show 高频考点 -->
    <div v-if="isShow">v-if 会销毁/重建DOM</div>
    <div v-show="isShow">v-show 仅切换display:none</div>

    <!-- v-for 必须加key 高频考点 -->
    <ul>
      <li v-for="item in list" :key="item.id">{{ item.name }}</li>
    </ul>

    <!-- 父子组件通信:父传子用props -->
    <Child :msg="parentMsg" @get-child="handleChild" />

    <!-- keep-alive 缓存组件 高频考点 -->
    <keep-alive>
      <router-view />
    </keep-alive>
  </div>
</template>
表格
| 语法 | 作用 | 考试考点 |
|---|---|---|
{``{ msg }} |
插值语法,把响应式数据渲染到页面 | Vue 模板语法基础 |
@click="add" |
v-on:click 简写,绑定点击事件 |
事件绑定,@ 是语法糖 |
v-if="isShow" |
条件渲染,条件为 false 时销毁 DOM | 与v-show的区别:v-if开销大,适合不频繁切换 |
v-show="isShow" |
条件渲染,条件为 false 时仅隐藏 DOM | 与v-if的区别:v-show开销小,适合频繁切换 |
v-for="item in list" |
列表渲染,遍历数组渲染列表 | 必须加:key,用于 Diff 算法复用 DOM,提升性能 |
:key="item.id" |
v-bind:key 简写,绑定唯一标识 |
禁止用index作为 key,避免列表顺序错乱 |
:msg="parentMsg" |
v-bind:msg 简写,父组件向子组件传值 |
父→子通信核心语法 |
@get-child="handleChild" |
监听子组件触发的get-child事件 |
子→父通信核心语法 |
<keep-alive> |
缓存包裹的组件,避免重复创建销毁 | 配合router-view缓存页面,触发activated/deactivated钩子 |
<router-view /> |
路由出口,渲染匹配到的路由组件 | Vue Router 核心,单页应用的页面容器 |
子传父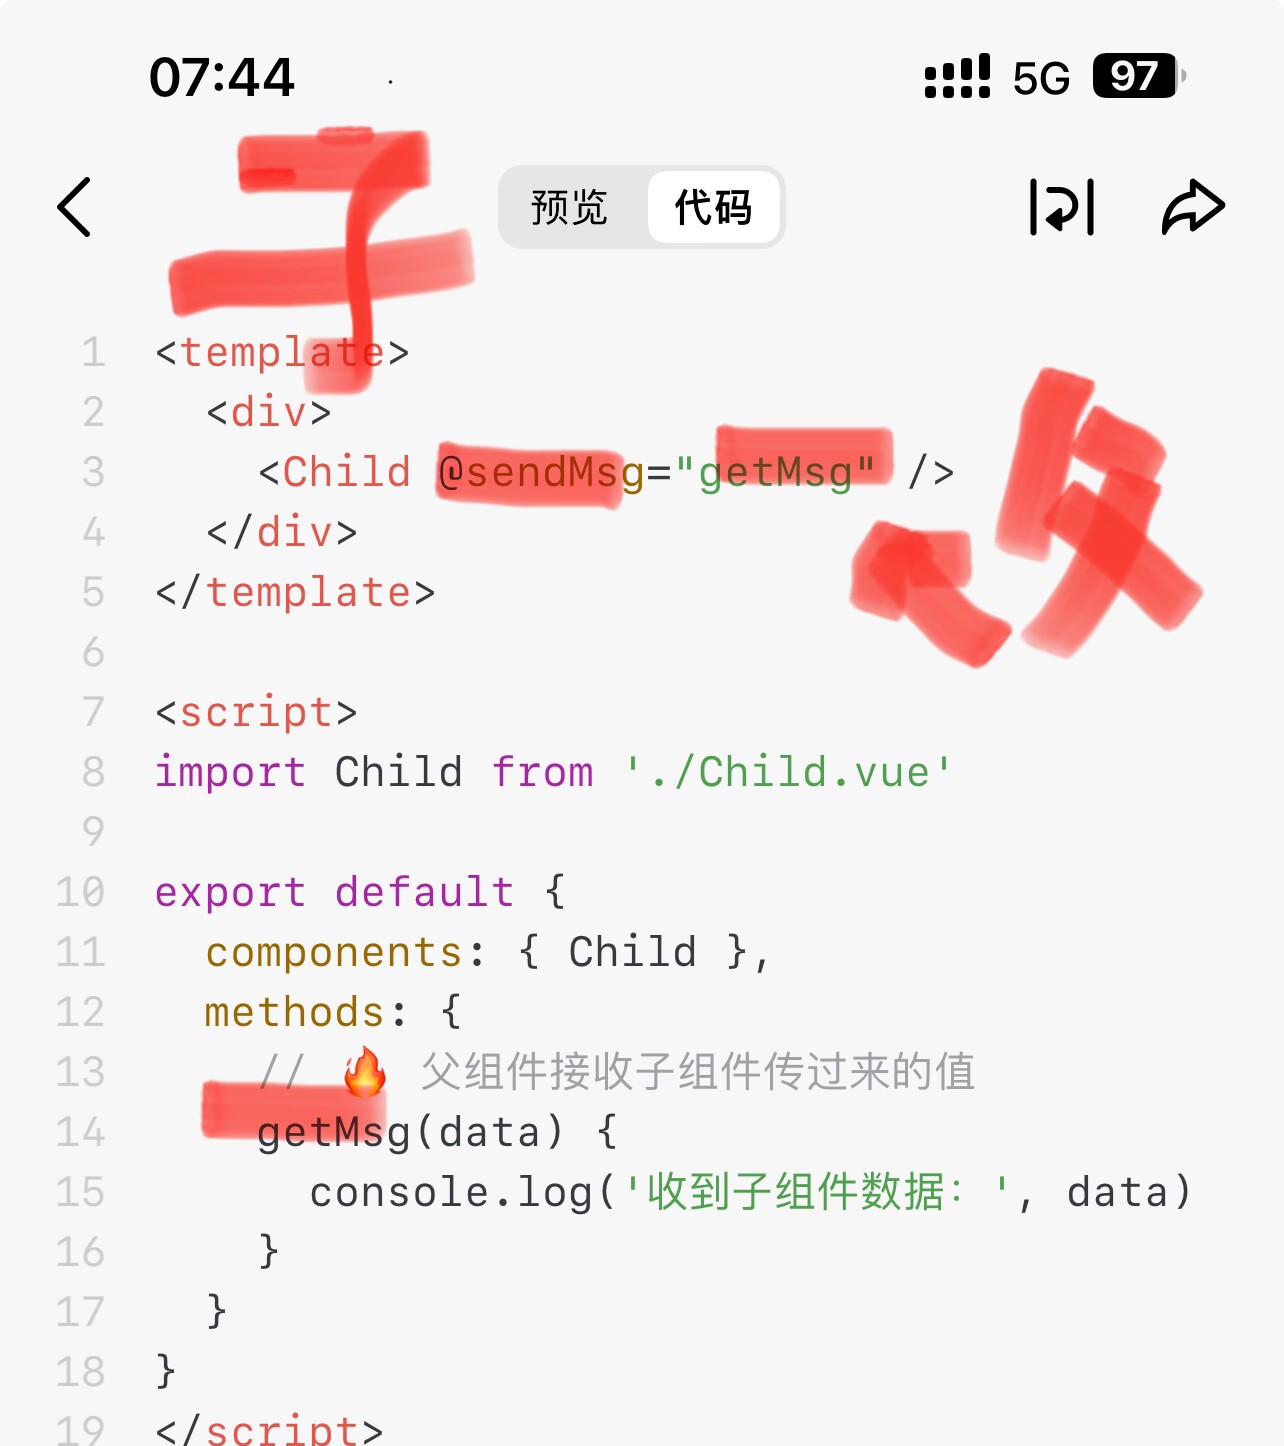
2. 脚本部分 <script setup>
vue
<script setup>
import { ref, computed, watch, onMounted, nextTick } from 'vue'
import Child from './components/Child.vue'

// 1. 响应式数据 高频考点
const msg = ref('Vue考试必背')
const count = ref(0)
const isShow = ref(true)
const parentMsg = ref('我是父组件')
const list = ref([{id:1,name:'张三'},{id:2,name:'李四'}])

// 2. 计算属性 computed 高频考点
const fullName = computed(()=>{
  return msg.value + '🔥'
})

// 3. 侦听器 watch 高频考点
watch(count,(newVal, oldVal)=>{
  console.log('count变了', newVal, oldVal)
})

// 4. 生命周期钩子 onMounted 高频考点
onMounted(()=>{
  console.log('组件挂载完成,适合发网络请求')
})

// 5. 方法定义
const add = ()=>{ count.value++ }
const toggle = ()=>{ isShow.value = !isShow.value }

// 6. 子传父事件处理
const handleChild = (val)=>{
  console.log('子组件传过来的数据:', val)
}

// 7. nextTick 高频考点
const testNextTick = async ()=>{
  await nextTick()
  console.log('DOM已完成更新,可获取最新DOM')
}
</script>
表格
| 语法 | 作用 | 考试考点 |
|---|---|---|
ref() |
创建基本类型的响应式数据,访问 / 修改需用.value |
Vue3 响应式基础,ref用于基本类型,reactive用于对象 |
computed() |
计算属性,有缓存,依赖数据变化时才重新计算 | 与methods的区别:computed有缓存,methods每次渲染都执行 |
watch() |
侦听器,监听响应式数据的变化,触发回调 | 适合异步 / 开销大的操作,可监听单个 / 多个数据 |
onMounted() |
生命周期钩子,组件挂载到 DOM 后执行 | 发送网络请求、初始化 DOM 操作的最佳位置 |
nextTick() |
等待 DOM 更新完成后执行回调 | 解决数据更新后 DOM 未同步的问题,获取最新 DOM |
defineProps() |
子组件接收父组件传的 props(在 Child.vue 中) | 父→子通信核心,props是只读的,不可直接修改 |
defineEmits() |
子组件定义可触发的事件(在 Child.vue 中) | 子→父通信核心,通过emit()触发事件传值 |
3. 样式部分 <style scoped>
vue
<style scoped>
/* scoped 表示样式仅作用于当前组件,不会污染全局 */
</style>
表格
| 语法 | 作用 | 考试考点 |
|---|---|---|
scoped |
样式隔离,仅当前组件生效 | Vue 组件样式封装,避免全局样式冲突 |
二、文件 2:src/components/Child.vue(子组件,父子通信考点)
vue
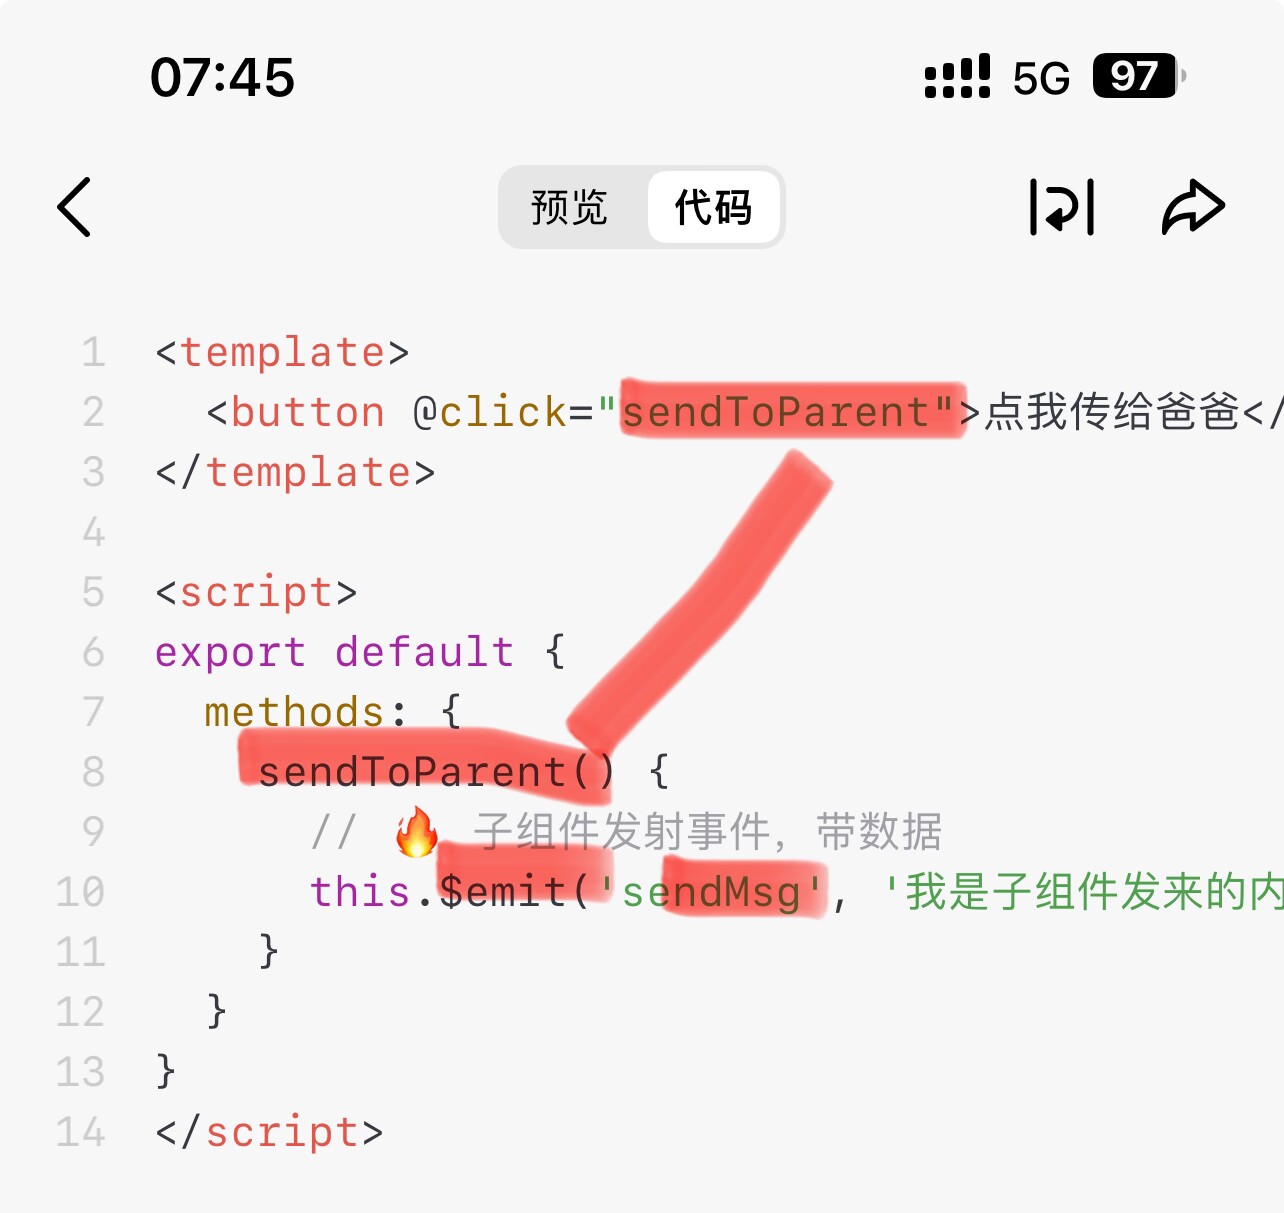
<template>
  <div>
    <p>子组件接收父组件数据:{{ msg }}</p>
    <button @click="sendToParent">点我传值给父组件</button>
  </div>
</template>

<script setup>
// 1. 父传子:defineProps 接收props
const props = defineProps({
  msg: String // 声明接收的props类型
})

// 2. 子传父:defineEmits 定义事件
const emit = defineEmits(['get-child'])

// 3. 触发事件,向父组件传值
const sendToParent = ()=>{
  emit('get-child', '我是子组件的数据')
}
</script>
表格
| 语法 | 作用 | 考试考点 |
|---|---|---|
defineProps() |
声明子组件可接收的父组件传值 | 父→子通信唯一合法方式,props只读 |
defineEmits() |
声明子组件可触发的事件 | 子→父通信唯一合法方式,通过emit()传值 |
emit('事件名', 数据) |
触发自定义事件,向父组件传值 | 子组件主动向父组件通信的核心语法 |
三、文件 3:src/router/index.js(路由,高频考点)
js
import { createRouter, createWebHistory } from 'vue-router'

// 1. 路由懒加载 高频考点
const routes = [
  {
    path: '/', // 路由路径
    name: 'home', // 路由名称(可选)
    component: () => import('../views/Home.vue') // 懒加载组件
  },
  {
    path: '/about',
    name: 'about',
    component: () => import('../views/About.vue')
  }
]

// 2. 创建路由实例
const router = createRouter({
  // history模式 高频考点:无#,需要后端配置
  history: createWebHistory(import.meta.env.BASE_URL),
  routes // 路由规则
})

// 3. 全局前置路由守卫 高频考点(登录拦截)
router.beforeEach((to, from, next) => {
  console.log('路由跳转前触发', to.path, from.path)
  next() // 必须调用next()才能继续跳转
})

export default router
表格
| 语法 | 作用 | 考试考点 |
|---|---|---|
createWebHistory() |
开启history路由模式,URL 无# |
与hash模式的区别:hash兼容性好,history需后端配置 |
() => import() |
路由懒加载,按需加载组件 | 优化首屏加载速度,减少初始包体积 |
router.beforeEach() |
全局前置路由守卫 | 做登录权限拦截,所有路由跳转前都会触发 |
next() |
路由守卫的放行方法 | 必须调用,否则路由会被拦截 |
四、文件 4:src/stores/counter.js(Pinia,状态管理考点)
js
import { defineStore } from 'pinia'

// 定义Store,第一个参数是唯一id
export const useCounterStore = defineStore('counter', {
  // 1. state:存储全局状态
  state: () => ({
    num: 0
  }),
  // 2. getters:计算属性,类似computed,有缓存
  getters: {
    doubleNum: (state) => state.num * 2
  },
  // 3. actions:修改state的方法,支持异步
  actions: {
    addNum() {
      this.num++ // 直接修改state,无需mutation
    }
  }
})
表格
| 语法 | 作用 | 考试考点 |
|---|---|---|
defineStore() |
定义 Pinia 的 Store | Pinia 核心 API,替代 Vuex |
state |
存储全局响应式状态 | 全局共享数据的容器 |
getters |
计算属性,基于 state 派生,有缓存 | 类似组件的computed |
actions |
修改 state 的方法,支持异步操作 | 替代 Vuex 的mutation+action,直接修改 state |
五、文件 5:src/main.js(项目入口,全局配置)
js
import { createApp } from 'vue'
import App from './App.vue'
import router from './router'
import { createPinia } from 'pinia'

// 1. 创建Vue应用实例
const app = createApp(App)

// 2. 注册Pinia和路由插件
app.use(createPinia())
app.use(router)

// 3. 挂载到DOM
app.mount('#app')
表格
| 语法 | 作用 | 考试考点 |
|---|---|---|
createApp(App) |
创建 Vue 应用实例 | Vue3 应用入口,替代 Vue2 的new Vue() |
app.use() |
注册全局插件(Pinia、Router 等) | 全局配置的核心方法 |
app.mount('#app') |
把 Vue 应用挂载到index.html的#app元素 |
应用启动的最后一步 |
六、文件 6:src/views/Home.vue / About.vue(页面组件)
以Home.vue为例,About.vue结构完全一致:
vue
<template>
  <div class="home">
    <h1>首页</h1>
    <p>这是路由匹配到的页面组件</p>
    <button @click="goToAbout">跳转到About页</button>
  </div>
</template>

<script setup>
import { useRouter } from 'vue-router'
const router = useRouter()

// 编程式导航 高频考点
const goToAbout = () => {
  router.push('/about')
}
</script>

<style scoped>
.home {
  padding: 20px;
}
</style>
表格
| 语法 | 作用 | 考试考点 |
|---|---|---|
useRouter() |
获取路由实例 | 编程式导航的核心 API |
router.push() |
编程式导航,跳转到指定路由 | 替代<router-link>,适合 JS 逻辑中跳转 |
🚀 完整网页打开步骤(照着做 100% 成功)
步骤 1:确保所有文件都正确创建
你需要在项目中创建这些文件,结构如下:
plaintext
vue-project/
├── src/
│   ├── components/
│   │   └── Child.vue  ✅ 已粘贴
│   ├── stores/
│   │   └── counter.js ✅ 已粘贴
│   ├── views/
│   │   ├── Home.vue   ✅ 已创建
│   │   └── About.vue  ✅ 已创建
│   ├── router/
│   │   └── index.js   ✅ 已粘贴
│   ├── App.vue        ✅ 已粘贴
│   └── main.js        ✅ 已粘贴
└── ...
步骤 2:启动开发服务器
-
打开 VS Code 终端(或 CMD),确保在
vue-project目录下 -
执行启动命令: bash
运行
npm run dev -
等待终端输出: plaintext
VITE v8.0.3  ready in XXXX ms
→ Local: http://localhost:5173/
步骤 3:打开网页
- 直接点击终端里的
http://localhost:5173/,或复制到浏览器地址栏 - 回车即可打开你的 Vue 项目网页,效果如下:
- 显示根组件的内容(
You did it!、按钮、列表等) - 点击
+1按钮,数字会增加 - 点击
切换显示,v-if/v-show的元素会隐藏 / 显示 - 点击子组件的按钮,控制台会打印子组件传的值
- 点击首页的
跳转到About页,会路由跳转到 About 页面
- 显示根组件的内容(
步骤 4:停止 / 重启服务器
- 停止:在终端按
Ctrl + C - 重启:重新执行
npm run dev
🎯 明天考试必背核心结论(直接默写)
- 响应式原理 :Vue3 用
Proxy,Vue2 用Object.defineProperty - v-if vs v-show :
v-if销毁 DOM,v-show仅隐藏;v-if适合不频繁切换,v-show适合频繁切换 - computed vs watch vs methods :
computed有缓存,watch监听变化,methods每次渲染都执行 - 父子通信 :父→子用
props,子→父用$emit(Vue3 用defineEmits) - 路由模式 :
hash有#,兼容性好;history无#,需后端配置 - Pinia 核心 :
state存数据,actions改数据,无mutation - nextTick 作用:DOM 更新后执行回调,获取最新 DOM
- key 的作用 :Diff 算法复用 DOM,提升性能,禁止用
index作为 key - 生命周期 :
onMounted发请求,beforeUnmount做清理 - 路由懒加载 :
() => import(),优化首屏加载速度
新建vue项目
打开终端(cmd / PowerShell / VS Code 终端)
bash
运行
node -v
npm -v只要有版本号就行,没有就去装:https://nodejs.org/ 装 LTS 版
2. 创建 Vue 项目(官方推荐方式)
① 进入你想放项目的文件夹
bash
运行
cd 你的文件夹路径② 执行创建命令
bash
运行
npm create vue@latest③ 一路按回车(默认即可)
必选:Router、Pinia(学 Vue 路由和状态管理必备)
会问你这些,直接回车默认:
- Project name: 项目名(不改直接回车)
- TypeScript: No
- JSX: No
- Vue Router: Yes(建议要)
- Pinia: Yes(建议要)
- ESLint: Yes
- Prettier: Yes
3. 进入项目 & 安装依赖
已生成代码
bash
运行
cd 你的项目名
npm install
4. 启动项目
bash
运行
npm run dev出现类似这样就是成功了:
plaintext
Local: http://localhost:5173/浏览器打开这个地址就能看到 Vue 页面。