介绍:
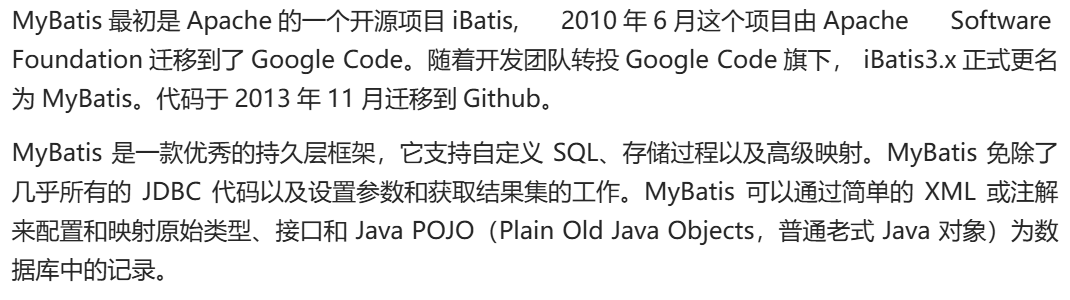
mybatis就是对jdbc技术的封装
大体步骤:
举例:
导入依赖:
<!--导入mybatis依赖-->
<dependencies>
    <dependency>
        <groupId>org.mybatis</groupId>
        <artifactId>mybatis</artifactId>
        <version>3.5.11</version>
    </dependency>
    <dependency>
        <groupId>mysql</groupId>
        <artifactId>mysql-connector-java</artifactId>
        <version>8.0.25</version>
    </dependency>
    <dependency>
        <groupId>org.junit.jupiter</groupId>
        <artifactId>junit-jupiter-engine</artifactId>
        <version>5.3.1</version>

    </dependency>


</dependencies>
实体类和mapper接口:
package com.atguigu.pojo;

public class Employee {

    private Integer empId;

    private String empName;

    private Double empSalary;

    //getter | setter
}

package com.atguigu.mapper;

import com.atguigu.pojo.Employee;

/**
 * ClassName:Employ
 * Package:com.atguigu.mapper
 * Description:
 *
 * @Author 妄汐霜
 * @Create 2026/3/24 16:21
 * @Version 1.0
 */
public interface EmployeeMapper {
    Employee queryById(Integer id);

    int deleteById(Integer id);
}
mapper接口的xml文件:在这个文件里写sql语句
<?xml version="1.0" encoding="UTF-8" ?>
<!DOCTYPE mapper
        PUBLIC "-//mybatis.org//DTD Mapper 3.0//EN"
        "https://mybatis.org/dtd/mybatis-3-mapper.dtd">
<!-- namespace等于mapper接口类的全限定名,这样实现对应 -->
<mapper namespace="com.atguigu.mapper.EmployeeMapper">
        <!--xml方式写sql语句 没有Java代码
        mybatis规定在特定的标签下写sql语句
        mapper文件会有约束-->


    <!-- 查询使用 select标签
            id = 方法名
            resultType = 返回值类型
            标签内编写SQL语句

            注意:mapper接口中不能重载


     -->
    <select id="queryById" resultType="com.atguigu.pojo.Employee">
        <!-- #{empId}代表动态传入的参数,并且进行赋值!后面详细讲解 -->
        select emp_id empId,emp_name empName, emp_salary empSalary from
        t_emp where emp_id = #{empId}
    </select>

    <delete id="deleteById" >
        delete from t_emp where emp_id = #{id}
    </delete>
</mapper>
mybatis的配置文件:
<?xml version="1.0" encoding="UTF-8" ?>
<!DOCTYPE configuration
        PUBLIC "-//mybatis.org//DTD Config 3.0//EN"
        "http://mybatis.org/dtd/mybatis-3-config.dtd">
<configuration>

    <!-- environments表示配置Mybatis的开发环境,可以配置多个环境,在众多具体环境中,
    使用default属性指定实际运行时使用的环境。default属性的取值是environment标签的id属性的值。 -->
    <environments default="development">
        <!-- environment表示配置Mybatis的一个具体的环境 -->
        <environment id="development">
            <!-- Mybatis的内置的事务管理器 -->
            <transactionManager type="JDBC"/>
            <!-- 配置数据源 -->
            <dataSource type="POOLED">
                <!-- 建立数据库连接的具体信息 -->
                <property name="driver" value="com.mysql.cj.jdbc.Driver"/>
                <property name="url" value="jdbc:mysql://localhost:3306/mybatis-example"/>
                <property name="username" value="root"/>
                <property name="password" value="abc123"/>
            </dataSource>
        </environment>
    </environments>

    <mappers>
        <!-- Mapper注册:指定Mybatis映射文件的具体位置 -->
        <!-- mapper标签:配置一个具体的Mapper映射文件 -->
        <!-- resource属性:指定Mapper映射文件的实际存储位置,这里需要使用一个以类路径根目录为基准的相对路径 -->
        <!--    对Maven工程的目录结构来说,resources目录下的内容会直接放入类路径,所以这里我们可以以resources目录为基准 -->
        <mapper resource="mappers/EmployeeMapper.xml"/>
    </mappers>

</configuration>
使用:
public class MybatisTest {
     @Test
     public void test_01() throws IOException {
         //1.读取外部配置文件
         InputStream ips = Resources.getResourceAsStream("mybatis-config.xml");

         //2.创建sqlSessionFactory
         SqlSessionFactory sqlSessionFactory = new SqlSessionFactoryBuilder().build(ips);

         //3.根据sqlSessionFactory创建sqlSession(每次业务创建一个,用完就释放)
         SqlSession sqlSession = sqlSessionFactory.openSession();

         //4.获取接口的代理对象(代理技术)调用代理对象的方法,就会查找mapper接口的方法
         EmployeeMapper mapper = sqlSession.getMapper(EmployeeMapper.class);
         Employee employee = mapper.queryById(1);
         System.out.println(employee);
         //5.提交事务和释放资源
         sqlSession.close();
     }
}
基本使用:
mybatis日志输出设置:
2.1.1 mybatis日志输出配置
mybatis配置文件设计标签和顶层结构如下:
- configuration(配置)
-
-
- environment(环境变量)
-
-
-
-
- transactionManager(事务管理器)
- dataSource(数据源)
-
-
我们可以在mybatis的配置文件使用settings标签设置,输出运过程SQL日志!
通过查看日志,我们可以判定#{} 和 ${}的输出效果!
settings设置项:
|logImpl|指定 MyBatis 所用日志的具体实现,未指定时将自动查找。|SLF4J | LOG4J(3.5.9 起废弃) | LOG4J2 | JDK_LOGGING | COMMONS_LOGGING | STDOUT_LOGGING | NO_LOGGING|未设置|
|-|-|-|-|
日志配置:
<settings>
  <!-- SLF4J 选择slf4j输出! -->
  <setting name="logImpl" value="SLF4J"/>
</settings>
向sql语句传参的两种方式:
#{key}和${key}
mapper的配置文件
<?xml version="1.0" encoding="UTF-8" ?>
<!DOCTYPE mapper
PUBLIC "-//mybatis.org//DTD Mapper 3.0//EN"
"https://mybatis.org/dtd/mybatis-3-mapper.dtd">
<!-- namespace等于mapper接口类的全限定名,这样实现对应 -->
<mapper namespace="com.atguigu.pojo.mapper.EmployeeMapper">
<!--
#{key} :占位符 + 赋值 emp_id = ? 再把?赋值
${key} : 字符串拼接 "emp_id = " + id
推荐使用#{key}防止注入攻击的问题
总结:如果是动态值,就使用#{key}
如果是动态的列名,容器名,关键字就使用${key}
-->
<select id="queryById" resultType="com.atguigu.pojo.Employee">
select emp_id empId,emp_name empName,emp_salary empSalary
from t_emp where emp_id = #{id}
</select>
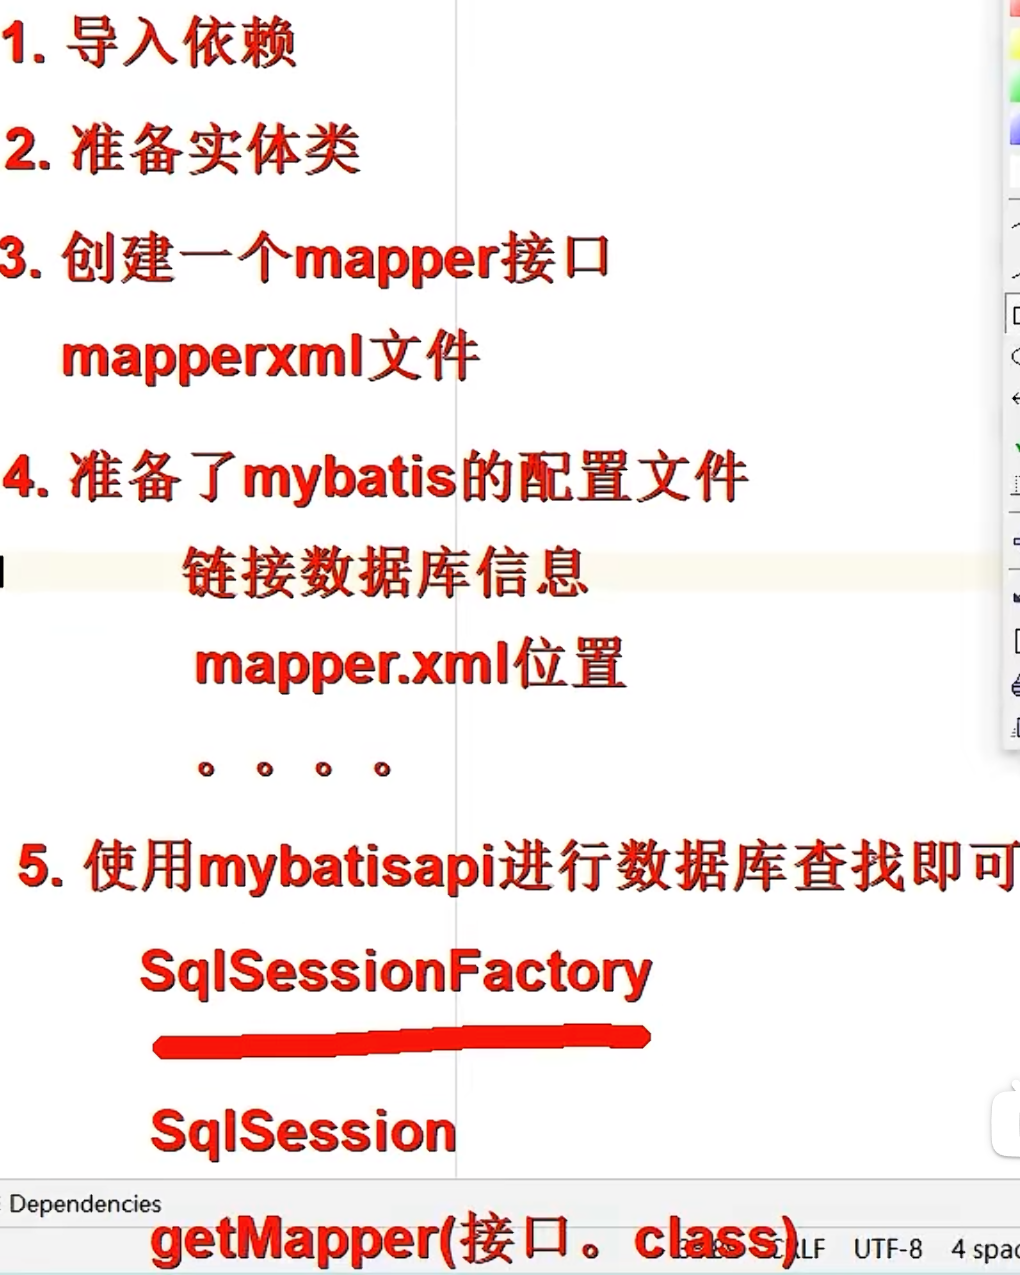
</mapper>数据输入:
传入一个简单类型数据:
接口:
//根据工资查询员工信息
List<Employee> queryBySalary(Double salary);


//插入员工数据
int insertEmp(Employee employee);
mapper配置文件:
<!--场景1:传入的单个简单类型 key值随便写 一般情况下就用参数名-->
<delete id="deleteById">
delete from t_emp where emp_id = #{key}
</delete>
<select id="queryBySalary" resultType="com.atguigu.pojo.Employee">
select emp_id empId,emp_name empName,emp_salary empSalary
from t_emp where emp_salary = #{salary}
</select>
<!--场景2:如果传入的是一个实体对象,那么key值 = 属性值就可以-->
<insert id="insertEmp">
insert into t_emp (emp_name,emp_salary) values(#{empName},#{empSalary});
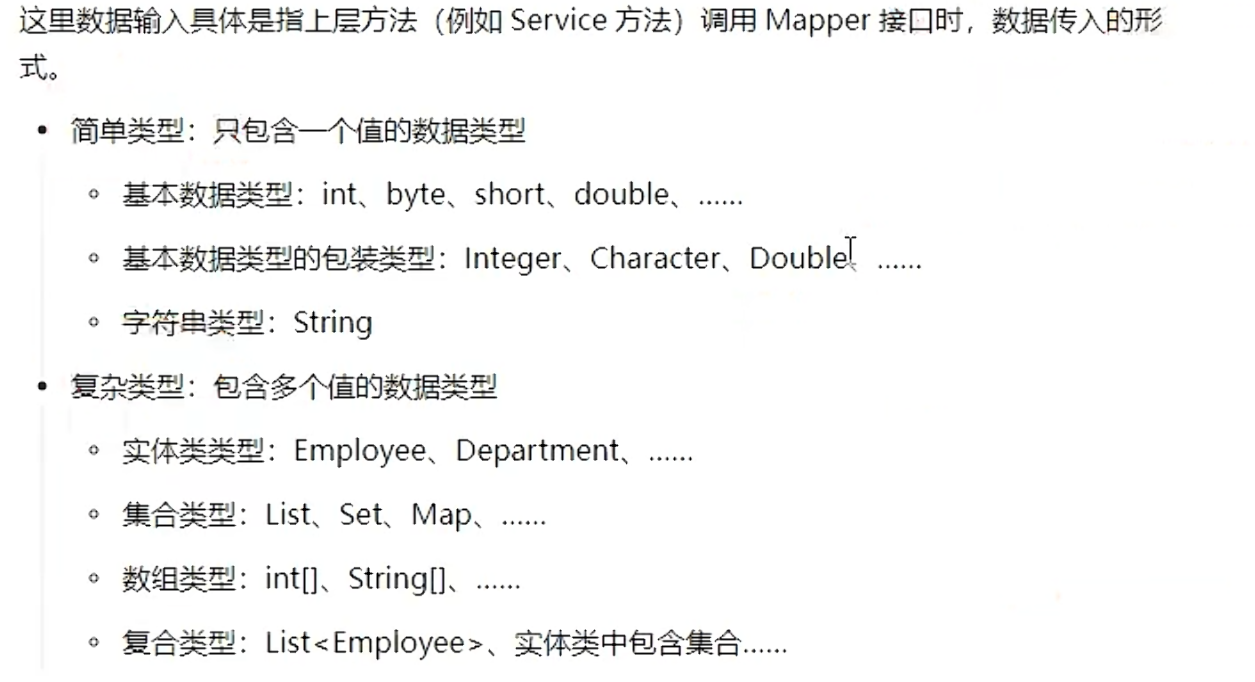
</insert>传入多个简单类型的数据:
接口:
//根据员工姓名和员工工资查询员工信息
List<Employee> queryByNameAndSalary(@Param("a") String name,@Param("b") Double salary);
mapper的xml配置文件:
<!--场景3:传入多个简单类型数据 要怎么取key值
    方案1:注解指定 @Param注解指定  可以指定多个简单参数的key key值 = @Param注解("value")括号里的value值
    方案2:mybatis默认机制
-->
<select id="queryByNameAndSalary" resultType="com.atguigu.pojo.Employee">
    select emp_id empId,emp_name empName,emp_salary empSalary
    from t_emp where emp_name = #{a} and emp_salary = #{b}
</select>
mapper接口中不允许方法重载!!!!
传入map类型数据数据:
mapper接口:
//插入员工数据,传入的是一个map(name = 员工的名字,salary = 员工的薪水)
int insertEmpMap(Map data);
mapper的xml配置文件:
<!--场景4:传入map 如何指定key的值
          key = map的key即可
-->
<insert id="insertEmpMap">
    insert into t_emp (emp_name , emp_salary) values(#{name},#{salary})
</insert>
数据输出:
单个简单类型:
mapper接口:
public interface EmployeeMapper {
        //如果是dml语句(插入 修改  删除)
        int deleteById(Integer id);

        //指定输出类型 查询语句
        //根据员工的id查询员工的姓名
    String queryNameById(Integer id);

    //根据员工的id查询员工的工资
    Double querySalaryById(Integer id);

}
mapper的xml文件:
<mapper namespace="com.atguigu.mapper.EmployeeMapper">

    <delete id="deleteById">
        delete from t_emp where emp_id = #{id}
    </delete>


    <select id="queryNameById" resultType="java.lang.String">
        select emp_name from t_emp where emp_id = #{id}
    </select>


</mapper>
定义别名:
在 MyBatis 的 XML 映射文件中,resultType、parameterType 等属性需要写类的全限定名 (比如 com.atguigu.pojo.Employee),代码冗长且不易维护。
别名 就是给这些全限定名起一个简短的别名,在 XML 中直接用别名代替全类名,简化开发、提升可读性。
如果自己要定义别名:
给自己声明的类定义别名:
    给类单独定义别名:
         <typeAliases>
            <typeAlias type="com.atguigu.pojo.Employee" alias="自己定义的别名"/>
         </typeAliases>
    批量设置别名:
    <typeAliases>
         批量将包下的类取别名,别名就是类的首字母大小写
         <package name= "com.atguigu.pojo">
    </typeAliases>

    如果不想使用批量的别名,可以使用注解给包取别名
    @Alias("自己定义的别名")
    这个注解作用在想定义别名的类上
用 @Alias 注解给类定义别名
适用场景:配合批量包扫描,对个别类自定义别名,避免默认别名冲突或不符合需求。
步骤:
-
在实体类上添加
@Alias注解:java运行import org.apache.ibatis.type.Alias;
@Alias("emp") // 自定义别名
public class Employee {
// 类属性与方法
} -
依然使用
<package>批量扫描包:xml
单个实体类型:
接口:
//返回单个自定义实体类型
Employee queryById(Integer id);
配置类:
<!--返回单个自定义的实体类型-->
<!--默认要求:如果返回单个实体类型的话,要求列名和属性名要一致
    这样才可以进行实体类的属性映射

    但是可以进行设置  直接设置成支持驼峰式自动映射
    在mybatis配置文件中,使用setting标签设置
-->
<select id="queryById" resultType="com.atguigu.pojo.Employee">
    select emp_id empId,emp_name empName,emp_salary empSalary
    from t_emp where emp_id = ${id}
</select>
在mybatis配置文件中开启驼峰式自动映射:
<settings>
<!--开启驼峰式自动映射-->
<setting name="mapUnderScoreToCamelCase" value="true"/>
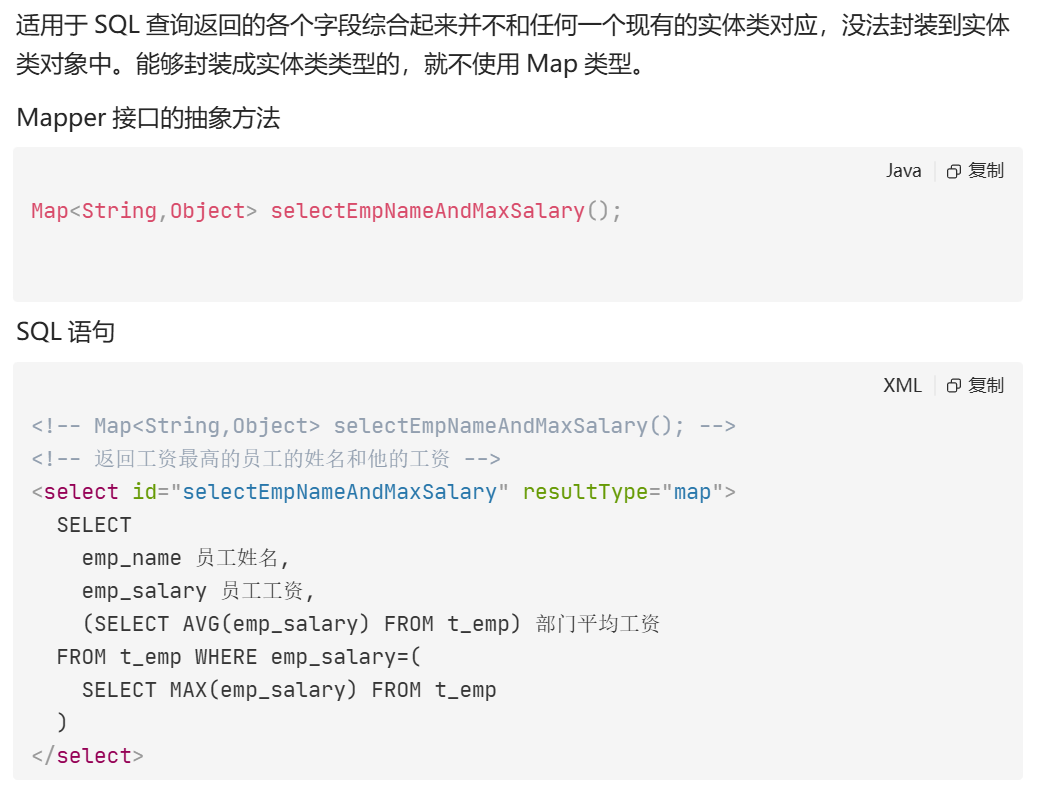
</settings>返回map类型:
当没有实体类可以接值的时候,我们就可以使用map接值
key -> 查询的列
value -> 查询的值
返回list类型:
接口:
//查询工资高于传入平均值的员工姓名
List<String> queryNamesBySalary(Double salary);

//查询全部员工信息
List<Employee> queryAll();
xml文件:
<!--返回的是list类型

    返回值是list,resultType不需要指定集合类型,只需要指定泛型即可
-->
<select id="queryNameBySalary" resultType="string">
    select emp_name from t_emp where emp_salary > #{salary}
</select>

<select id="queryAll" resultType="employee">
    select * from t_emp
</select>
自增长类型的主键回显和自动提交事务:
什么是主键回显?
在插入数据时,数据库会自动生成自增主键 (比如 MySQL 的 AUTO_INCREMENT),但插入完成后,Java 对象里的主键属性还是空的。主键回显就是让 MyBatis 把数据库生成的主键值,自动回填到传入的 Java 对象的对应属性中,方便后续业务使用(比如关联插入、日志记录)。
- useGeneratedKeys="true":告诉 MyBatis:「我要获取数据库自动生成的主键值」,仅支持自增主键的数据库(MySQL、SQL Server 等)。
- keyColumn="emp_id":指定数据库表中主键列的列名 (这里是
t_emp表的emp_id字段)。 - keyProperty="empId":指定 Java 实体类(
Employee)中接收主键值的属性名 (这里是empId字段)。
执行后,MyBatis 会把数据库生成的 emp_id 值,自动赋值给传入的 employee 对象的 empId 属性
接口:
//员工插入
int insertEmp(Employee employee);
xml文件:
<!--
    主键回显,获取插入数据的主键
    1.自增长主键回显
    useGeneratedKeys = "true" 我们想要数据库自动增强的主键值
    keyColumn="emp_id" 主键列的值
    keyProperty="empId" 接收主键列值的属性(就是把keyColumn的值赋值给keyProperty的值)
-->
<insert id="insertEmp" useGeneratedKeys="true" keyColumn="emp_id" keyProperty="empId">
    insert into t_emp (emp_name,emp_salary)
    value(#{empName},#{empSalary})
</insert>
测试类:
public class MybatisTest {

    @Test
    public void test_01() throws IOException {
        //读取外部配置文件
        InputStream ips = Resources.getResourceAsStream("mybatis-config.xml");

        //创建sqlSessionFactory
        SqlSessionFactory build = new SqlSessionFactoryBuilder().build(ips);

        //获取sqlSession对象
        //openSession自动开启事务,不会自动提交
        //需要sqlSession.commit()才会提交
        SqlSession sqlSession = build.openSession();

        //获取代理对象
        EmployeeMapper mapper = sqlSession.getMapper(EmployeeMapper.class);

        Employee employee = new Employee();
        employee.setEmpSalary(888.0);
        employee.setEmpName("辛铁柱");

        System.out.println(employee.getEmpId());
        int rows = mapper.insertEmp(employee);
        System.out.println(rows);
        System.out.println("---------");
        System.out.println(employee.getEmpId());

        //释放资源和提交事务
        sqlSession.commit();//当是DML语句的时候,必须提交事务
        sqlSession.close();


    }
}
非自增长类型主键维护:
什么是「非自增类型主键」?
和之前 MySQL 的 AUTO_INCREMENT 自增数字主键不同,非自增主键是指:
- 主键不是由数据库自动生成的数字
- 主键类型可以是
String(如 UUID、业务编码)、自定义数字(如雪花算法 ID)等 - 主键需要手动赋值 或通过数据库函数 / 序列生成,再插入数据库
实体类:
public class Teacher {
    private  String tId;
    private String tName;


    public String gettId() {
        return tId;
    }

    public void settId(String tId) {
        this.tId = tId;
    }

    public String gettName() {
        return tName;
    }

    public void settName(String tName) {
        this.tName = tName;
    }
}
接口:
public interface TeacherMapper {
    int insertTeacher(Teacher teacher);
}
mapper的xml文件:
<?xml version="1.0" encoding="UTF-8" ?>
<!DOCTYPE mapper
        PUBLIC "-//mybatis.org//DTD Mapper 3.0//EN"
        "https://mybatis.org/dtd/mybatis-3-mapper.dtd">
<!-- namespace等于mapper接口类的全限定名,这样实现对应 -->
<mapper namespace="com.atguigu.mapper.TeacherMapper">
    <!--
        把非自增长的主键,同样交给mybatis帮助我们维护
    -->
    <insert id="insertTeacher">
        <!--插入之前,先执行一段sql语句,生成一个主键值-->
        <!--使用selectKey标签  order是插入语句之前还是之后执行   resultType是返回值类型  keyProperty 是查询结果给哪个属性赋值-->
        <selectKey order="BEFORE" resultType="string" keyProperty="tId">
            SELECT REPLACE(UUID(),'-','');    <!--有了这句话就不用自己维护非自增长类型主键了-->
        </selectKey>
        INSERT INTO teacher(t_id,t_name)
        value(
        #{tId},#{tName})
    </insert>


</mapper>
mybatis的配置文件:
<?xml version="1.0" encoding="UTF-8" ?>
<!DOCTYPE configuration
        PUBLIC "-//mybatis.org//DTD Config 3.0//EN"
        "http://mybatis.org/dtd/mybatis-3-config.dtd">
<configuration>
    <settings>
        <setting name="logImpl" value="STDOUT_LOGGING"/>
        <!--开启驼峰式自动映射-->
        <setting name="mapUnderscoreToCamelCase" value="true"/>
    </settings>
    <!-- environments表示配置Mybatis的开发环境,可以配置多个环境,在众多具体环境中,使用default属性指定实际运行时使用的环境。default属性的取值是environment标签的id属性的值。 -->
    <environments default="development">
        <!-- environment表示配置Mybatis的一个具体的环境 -->
        <environment id="development">
            <!-- Mybatis的内置的事务管理器 -->
            <transactionManager type="JDBC"/>
            <!-- 配置数据源 -->
            <dataSource type="POOLED">
                <!-- 建立数据库连接的具体信息 -->
                <property name="driver" value="com.mysql.cj.jdbc.Driver"/>
                <property name="url" value="jdbc:mysql://localhost:3306/mybatis-example"/>
                <property name="username" value="root"/>
                <property name="password" value="abc123"/>
            </dataSource>
        </environment>
    </environments>

    <mappers>
        <!-- Mapper注册:指定Mybatis映射文件的具体位置 -->
        <!-- mapper标签:配置一个具体的Mapper映射文件 -->
        <!-- resource属性:指定Mapper映射文件的实际存储位置,这里需要使用一个以类路径根目录为基准的相对路径 -->
        <!--    对Maven工程的目录结构来说,resources目录下的内容会直接放入类路径,所以这里我们可以以resources目录为基准 -->
        <mapper resource="mappers/EmployeeMapper.xml"/>
        <mapper resource="mappers/TeacherMapper.xml"/>
    </mappers>


</configuration>
测试类:
@Test
    public void test_02() throws IOException {
        //读取外部配置文件
        InputStream ips = Resources.getResourceAsStream("mybatis-config.xml");

        //创建sqlSessionFactory
        SqlSessionFactory build = new SqlSessionFactoryBuilder().build(ips);

        //获取sqlSession对象
        //openSession自动开启事务,不会自动提交
        //需要sqlSession.commit()才会提交
        SqlSession sqlSession = build.openSession();

        //获取代理对象
        TeacherMapper mapper = sqlSession.getMapper(TeacherMapper.class);

        Teacher teacher = new Teacher();
        teacher.settName("哈哈哈");

        //自己维护非自增长型主键
//        String id = UUID.randomUUID().toString().replace("-", "");
//        teacher.settId(id);

        int i = mapper.insertTeacher(teacher);
        System.out.println("i = "+ i);


        //释放资源和提交事务
//        sqlSession.commit();//当是DML语句的时候,必须提交事务
        sqlSession.close();
}在实际项目中,非自增主键 = 自己掌控 ID 的生成规则,核心是「先给实体类的主键属性赋值,再执行插入」。
根据项目场景不同,有 3 种最常用的落地方式,我按「项目里最常用 → 次常用」的顺序给你讲:
方案 1:Java 代码手动生成 ID
适用场景 :分布式系统、需要全局唯一 ID、不想依赖数据库函数、追求性能和灵活性。常见 ID 生成方式:UUID、雪花算法(Snowflake)、百度 uid-generator 等。
步骤 1:实体类
public class Teacher {
    private String tId;  // 非自增主键,String 类型
    private String tName;

    // getter/setter 省略
}
步骤 2:在业务层(Service)生成 ID 并赋值
@Service
public class TeacherService {

    @Autowired
    private TeacherMapper teacherMapper;

    // 插入老师
    public int addTeacher(Teacher teacher) {
        // 1. 生成全局唯一 ID(这里用 UUID 举例,也可以换成雪花算法)
        String uniqueId = java.util.UUID.randomUUID().toString();
        // 2. 把 ID 赋值给实体类的主键属性
        teacher.settId(uniqueId);
        // 3. 调用 Mapper 插入数据库
        return teacherMapper.insertTeacher(teacher);
    }
}
步骤 3:Mapper 接口 + XML(普通插入即可)
接口:
public interface TeacherMapper {
    int insertTeacher(Teacher teacher);
}XML:
<insert id="insertTeacher" parameterType="com.xxx.pojo.Teacher">
    insert into t_teacher (t_id, t_name)
    values (#{tId}, #{tName})
</insert>
执行流程
- 前端 / 调用方传入
tName→ 封装成Teacher对象 - Service 层生成 UUID → 赋值给
tId - MyBatis 把
tId和tName一起插入数据库 - 插入后,
teacher对象的tId就是刚生成的唯一 ID,可直接用于后续业务(比如关联其他表)
方案 2:数据库函数生成 ID(适合 Oracle / 老项目)
适用场景 :不想在 Java 层处理 ID,依赖数据库内置函数 / 序列生成(比如 Oracle 序列、MySQL UUID ())。核心标签 :<selectKey> ------ 在插入前 / 后执行一条 SQL 生成 ID,并回填给实体类。
示例 1:MySQL 用 UUID() 生成 ID
XML 配置:
<insert id="insertTeacher" parameterType="com.xxx.pojo.Teacher">
    <!-- 插入前先执行查询,生成 UUID 并赋值给 tId -->
    <selectKey
        keyProperty="tId"    <!-- 实体类主键属性 -->
        keyColumn="t_id"     <!-- 数据库主键列名 -->
        resultType="string"  <!-- ID 类型 -->
        order="BEFORE">      <!-- 执行时机:插入前生成 -->
        select uuid()
    </selectKey>

    <!-- 执行插入,此时 tId 已经被赋值 -->
    insert into t_teacher (t_id, t_name)
    values (#{tId}, #{tName})
</insert>
示例 2:Oracle 用序列生成 ID
<insert id="insertTeacher" parameterType="com.xxx.pojo.Teacher">
    <selectKey
        keyProperty="tId"
        keyColumn="t_id"
        resultType="string"
        order="BEFORE">
        -- 调用 Oracle 序列生成下一个 ID
        select SEQ_TEACHER.nextval from dual
    </selectKey>

    insert into t_teacher (t_id, t_name)
    values (#{tId}, #{tName})
</insert>
执行流程
- MyBatis 先执行
<selectKey>里的 SQL → 生成 ID - 把 ID 赋值给
teacher.tId - 再执行
insert语句 → 把tId和tName插入数据库 - 插入后,
teacher.tId就是数据库生成的 ID,可直接使用
自定义映射关系和resultMap:
<!--
列名和属性名不一致的时候:
方案1:给每个变量取别名
方案2:开启驼峰式映射:mybatis文件中:<setting name="mapUnderscoreToCamelCase" value="true"/>
方案3:resultMap自定义映射 可以映射多层结构(resultType和resultMap二选一)
      resultType按照规则自动映射   按照是否开启驼峰式映射,自己映射属性和列名。
      但是只能映射一层结构,比如说:
      orderId  只能映射 order_id
      orderName 只能映射 order_name
     如果order_item里面还有一个item_id,那么就无法映射出item_id这个属性


-->
<select id="queryById" resultType="teacher" >
    <!--方案1:
    select t_id tId,t_name tName from teacher where t_id = #{tId}
    -->
    <!--方案2:
    select t_id tId,t_name tName from teacher where t_id = #{tId}
    -->
</select>

<!--方案3-->
<!--说明:resultMap标签,自己定义映射规则
        id标识 -> select里resultMap = "这里的标识"
        type  -> 具体的返回值类型 全限定符和别名  | 集合的话只写泛型就可以
-->
<resultMap id="tMap" type="teacher">
    <id column="t_id" property="tId"/>  <!--id是主键的映射关系-->
    <result column="t_name" property="tName"/> <!--result普通列的映射关系-->
</resultMap>
<select id="queryById" resultMap="tMap">
    select * from teacher where t_id = #{tId}
    select t_id tId,t_name tName from teacher where t_id = #{tId}
</select>
Mybatis多表映射:

对一映射:
一对一映射是 MyBatis 中最基础的关联关系,核心场景是:一个对象 A 包含一个另一个对象 B(属性关联) 。比如:一个用户(User)对应一个身份证(IdCard) 、一个老师(Teacher)对应一个详细信息(TeacherDetail)。
接口:
public interface OrderMapper {
    //根据id查询订单信息和对应的客户
    Order queryOrderById(Integer id);
}
实体类:
public class Customer {
    private Integer customerid;
    private String customerName;

    public Integer getCustomerId() {
        return customerid;
    }

    public void setCustomerId(Integer customerid) {
        this.customerid = customerid;
    }

    public String getCustomerName() {
        return customerName;
    }

    public void setCustomerName(String customerName) {
        this.customerName = customerName;
    }

}

public class Order {
    private Integer orderid;
    private String orderName;
    private Integer customerId;

    //对一的关系
    private  Customer customer;


    public Integer getOrderId() {
        return orderid;
    }

    public void setOrderId(Integer orderid) {
        this.orderid = orderid;
    }

    public String getOrderName() {
        return orderName;
    }

    public void setOrderName(String orderName) {
        this.orderName = orderName;
    }

    public Integer getCustomerId() {
        return customerId;
    }

    public void setCustomerId(Integer customerId) {
        this.customerId = customerId;
    }
}
mapper的xml文件:
<mapper namespace="com.atguigu.mapper.OrderMapper">
    <resultMap id="orderMap" type="order">
        <!--第一层属性 order对象-->
        <!--order的主键 id标签-->
         <id column="order_id" property="orderId"/>
        <!--普通列-->
        <result column="order_name" property="orderName"/>
        <result column="customer_id" property="customerId"/>

        <!--给对象属性赋值
            property 对象属性名
            javaType 对象类型
        -->
        <association property="customer" javaType="customer">
            <!--customer的主键-->
            <id column="customer_id" property="customerId"/>
            <!--普通列-->
            <result column="customer_name" property="customerName"/>

        </association>

    </resultMap>
    <!--根据id查询订单和订单关联的客户信息-->
    <select id="queryOrderById" resultMap="orderMap">
            SELECT * FROM t_order tor JOIN t_customer tur
        ON  tor.customer_id = tur.customer_id
        WHERE tor.order_id = #{id}
    </select>


</mapper>
mybatis的配置文件:
<?xml version="1.0" encoding="UTF-8" ?>
<!DOCTYPE configuration
        PUBLIC "-//mybatis.org//DTD Config 3.0//EN"
        "http://mybatis.org/dtd/mybatis-3-config.dtd">
<configuration>
    <settings>
        <setting name="logImpl" value="STDOUT_LOGGING"/>
        <!--开启驼峰式自动映射-->
        <setting name="mapUnderscoreToCamelCase" value="true"/>
    </settings>

    <typeAliases>

            <!-- 给实体类起别名 -->
            <package name="com.atguigu.pojo"/>

    </typeAliases>
    <!-- environments表示配置Mybatis的开发环境,可以配置多个环境,在众多具体环境中,使用default属性指定实际运行时使用的环境。default属性的取值是environment标签的id属性的值。 -->
    <environments default="development">
        <!-- environment表示配置Mybatis的一个具体的环境 -->
        <environment id="development">
            <!-- Mybatis的内置的事务管理器 -->
            <transactionManager type="JDBC"/>
            <!-- 配置数据源 -->
            <dataSource type="POOLED">
                <!-- 建立数据库连接的具体信息 -->
                <property name="driver" value="com.mysql.cj.jdbc.Driver"/>
                <property name="url" value="jdbc:mysql://localhost:3306/mybatis-example"/>
                <property name="username" value="root"/>
                <property name="password" value="abc123"/>
            </dataSource>
        </environment>
    </environments>

    <mappers>
        <!-- Mapper注册:指定Mybatis映射文件的具体位置 -->
        <!-- mapper标签:配置一个具体的Mapper映射文件 -->
        <!-- resource属性:指定Mapper映射文件的实际存储位置,这里需要使用一个以类路径根目录为基准的相对路径 -->
        <!--    对Maven工程的目录结构来说,resources目录下的内容会直接放入类路径,所以这里我们可以以resources目录为基准 -->
        <mapper resource="mappers/OrderMapper.xml"/>

    </mappers>


</configuration>
测试类:
@Test
public void test_01() throws IOException {
    //1.读取外部配置
    InputStream resourceAsStream = Resources.getResourceAsStream("mybatis-config.xml");
    //2.获取sqlSessionFactory对象
    SqlSessionFactory sqlSessionFactory = new SqlSessionFactoryBuilder().build(resourceAsStream);
    //3.open sqlSessionFactory 以获取sqlSession对象
    SqlSession sqlSession = sqlSessionFactory.openSession(true);
    //4.创建mapper代理对象并调用方法
    OrderMapper mapper = sqlSession.getMapper(OrderMapper.class);
    Order order = mapper.queryOrderById(1);
    System.out.println(order);
    System.out.println(order.getCustomerId());
    sqlSession.close();
}假设业务场景:查询老师信息时,同时把老师的详细信息(如地址、邮箱)一起查出来。
1. 数据库表设计
- t_teacher(老师表):主键
t_id - t_teacher_detail(老师详情表):主键
id,外键t_id关联老师表
2. 实体类设计
Teacher(主对象)
public class Teacher {
    private Integer tId;       // 主键
    private String tName;     // 姓名

    // 核心:一对一关联,一个老师对应一个详情
    private TeacherDetail detail;

    // getter/setter
}
TeacherDetail(关联对象)
public class TeacherDetail {
    private Integer id;       // 主键
    private String address;   // 地址
    private String email;    // 邮箱
    private Integer tId;      // 关联老师的外键

    // getter/setter
}
方式 1:嵌套结果映射(推荐 ✅)
原理 :用 一条 JOIN SQL 把主表和关联表的数据查出来,再通过 resultMap 把字段拆分到两个实体中。
1. 定义 ResultMap(核心)
<resultMap id="TeacherDetailMap" type="Teacher">
    <!-- 映射主表字段到 Teacher -->
    <id column="t_id" property="tId"/>
    <result column="t_name" property="tName"/>

    <!-- 核心:一对一关联标签 association -->
    <!-- property="detail" 对应 Teacher 里的 detail 属性 -->
    <!-- javaType="TeacherDetail" 指定关联对象的类型 -->
    <association property="detail" javaType="TeacherDetail">
        <!-- column:查询出的列名;property:TeacherDetail 的属性名 -->
        <id column="id" property="id"/>
        <result column="address" property="address"/>
        <result column="email" property="email"/>
        <result column="t_id" property="tId"/>
    </association>
</resultMap>
2. 编写查询 SQL
<select id="queryTeacherWithDetail" resultMap="TeacherDetailMap">
    -- 连表查询,把所有字段都查出来
    select t.t_id, t.t_name, d.id, d.address, d.email, d.t_id
    from t_teacher t
    left join t_teacher_detail d on t.t_id = d.t_id
    where t.t_id = #{tId}
</select>
3. 接口
Teacher queryTeacherWithDetail(Integer tId);一对多的查询:
整体上来说和一对一查询差不多,只是标签用的不一样
一对多查询是 MyBatis 最核心的关联查询场景,核心定义:一个主实体(一)对应多个子实体(多),比如:✅ 1 个部门 → 多个员工✅ 1 个用户 → 多个订单✅ 1 个班级 → 多个学生
MyBatis 实现一对多唯一核心标签 :<collection>(对应一对一用 <association>),且提供两种实现方式:
- 嵌套结果映射(推荐):连表查询,1 条 SQL,性能最优
- 嵌套查询(子查询):多条 SQL,存在 N+1 性能问题(不推荐)
一、前置准备
我们用 部门 (Dept) ↔ 员工 (Emp) 经典案例演示:
1. 数据库表
-- 部门表(一)
CREATE TABLE dept (
  dept_id INT PRIMARY KEY AUTO_INCREMENT,
  dept_name VARCHAR(20) NOT NULL
);
-- 员工表(多)
CREATE TABLE emp (
  emp_id INT PRIMARY KEY AUTO_INCREMENT,
  emp_name VARCHAR(20) NOT NULL,
  dept_id INT, -- 外键关联部门
  FOREIGN KEY (dept_id) REFERENCES dept(dept_id)
);
2. 实体类
关键 :「一」的实体中,必须包含「多」的集合属性
// 部门实体(一)
@Data
public class Dept {
    private Integer deptId;
    private String deptName;
    // 核心:一对多,存储多个员工
    private List<Emp> empList;
}

// 员工实体(多)
@Data
public class Emp {
    private Integer empId;
    private String empName;
    private Integer deptId;
}
二、方式一:嵌套结果映射(✅ 推荐,最优解)
核心原理
- 1 条连表 SQL 一次性查询出「部门 + 员工」所有数据
- MyBatis 通过
<collection>自动合并重复的主表数据,将子数据封装为集合 - 无 N+1 问题,性能远超子查询
代码实现
1. Mapper 接口
public interface DeptMapper {
    // 根据部门ID,查询部门+旗下所有员工
    Dept selectDeptWithEmpByDeptId(Integer deptId);
}
2. Mapper XML 核心配置
<?xml version="1.0" encoding="UTF-8"?>
<!DOCTYPE mapper PUBLIC "-//mybatis.org//DTD Mapper 3.0//EN"
"http://mybatis.org/dtd/mybatis-3-mapper.dtd">
<mapper namespace="com.mapper.DeptMapper">

    <!-- 核心:一对多结果映射 -->
    <resultMap id="DeptWithEmpResultMap" type="com.entity.Dept">
        <!-- 1. 映射部门(主表)字段 -->
        <id column="dept_id" property="deptId"/> <!-- 必须写主键!用于去重 -->
        <result column="dept_name" property="deptName"/>

        <!-- 2. 核心:一对多映射 → collection 标签 -->
        <!-- property:实体中集合属性名  ofType:集合泛型类型 -->
        <collection property="empList" ofType="com.entity.Emp">
            <!-- 映射员工(子表)字段 -->
            <id column="emp_id" property="empId"/>
            <result column="emp_name" property="empName"/>
            <result column="dept_id" property="deptId"/>
        </collection>
    </resultMap>

    <!-- 3. 连表查询 SQL -->
    <select id="selectDeptWithEmpByDeptId" resultMap="DeptWithEmpResultMap">
        SELECT d.dept_id, d.dept_name, e.emp_id, e.emp_name
        FROM dept d
        LEFT JOIN emp e ON d.dept_id = e.dept_id
        WHERE d.dept_id = #{deptId}
    </select>

</mapper>
关键必记
**必须写 :主表的主键映射,MyBatis 靠它 合并重复的部门数据**(连表查询会返回多条重复部门)<collection>两个必填属性:
-
property:实体中集合属性名 (对应Dept里的empList)ofType:集合的泛型类型 (对应Emp)
- 用
LEFT JOIN:即使部门没有员工,也能查询出部门信息
多表映射优化:
可以去mybatis配置文件里,把自动映射打开

只要把这个的值设置成FULL就会自动映射,不用手写resultMap标签的映射关系了,只是result标签里的不用写,如果是主键(id的标签)的话还是要写的
动态sql语句:
什么是 MyBatis 动态 SQL?
1. 核心定义
动态 SQL = 根据传入的参数条件,自动拼接不同的 SQL 语句
- 不用手动写繁琐的字符串拼接
- 不用处理
WHERE 1=1这种 hack 写法 - 自动避免 SQL 语法错误、SQL 注入
2. 解决的原生痛点
比如查询员工:前端可能传姓名、部门 ID、性别 ,3 个条件都是可选的。原生 JDBC 拼接 SQL 会非常麻烦,还容易多写 AND/WHERE 导致报错。MyBatis 用
3. 本次核心标签(90% 场景用这两个)
<if>:单条件判断,满足就拼 SQL,不满足就不拼<where>:智能处理 WHERE 子句 ,自动去掉多余的AND/OR,无条件时不生成 WHERE
二、核心标签 1:<if> 单条件判断
1. 作用
满足 test 条件 → 拼接标签内的 SQL 片段;不满足 → 直接忽略
2. 语法
<!-- test:必填,写判断条件(OGNL表达式) -->
<if test="参数判断条件">
    要拼接的SQL片段
</if>
3. 常用判断规则
|----------|-----------------------------|-----------------|
| 参数类型 | 判断非空写法 | 说明 |
| 字符串 | name != null and name != '' | 既不能为 null,也不能为空 |
| 数字 | deptId != null | 数字只需判断非 null |
| 布尔 | status == true | 布尔值直接判断 |
4. 单独使用 <if> 的坑
<!-- 错误示例:单独用if,会出现语法错误 -->
<select id="selectEmp" resultType="com.entity.Emp">
    SELECT * FROM emp
    WHERE
    <if test="empName != null and empName != ''">
        emp_name LIKE CONCAT('%',#{empName},'%')
    </if>
    <if test="deptId != null">
        AND dept_id = #{deptId}
    </if>
</select>报错场景:
- 所有条件都不传 → SQL 变成
SELECT * FROM emp WHERE(语法错误) - 只传部门 ID → SQL 变成
SELECT * FROM emp WHERE AND dept_id = ?(多了 AND)
这就是 **
三、核心标签 2:<where> 智能 WHERE 处理器
1. 作用
自动修复 WHERE 子句的所有语法问题,它有 3 个神仙特性:
- 内部有条件满足 → 自动生成
WHERE关键字 - 自动剔除开头多余的 AND**/** OR(比如第一个条件就带 AND,直接删掉)
- 内部无任何条件 → 直接忽略
WHERE,不生成任何关键字
2. 语法
<where>
    <!-- 里面包裹所有 <if> 条件 -->
    <if test="条件1">SQL片段1</if>
    <if test="条件2">SQL片段2</if>
</where>四、最佳实践:<where> + <if> 组合实战
我们用员工表做完整演示(最贴近实际开发)
1. 实体类 Emp
@Data
public class Emp {
    private Integer empId;    // 员工ID
    private String empName;  // 员工姓名
    private Integer deptId;  // 部门ID
    private String gender;   // 性别
}
2. Mapper 接口
public interface EmpMapper {
    // 动态条件查询员工:姓名(模糊)、部门ID、性别 都是可选条件
    List<Emp> selectEmpByCondition(Emp emp);
}
3. Mapper XML 核心配置(
<?xml version="1.0" encoding="UTF-8"?>
<!DOCTYPE mapper PUBLIC "-//mybatis.org//DTD Mapper 3.0//EN"
"http://mybatis.org/dtd/mybatis-3-mapper.dtd">
<mapper namespace="com.mapper.EmpMapper">

    <!-- 动态SQL查询:where + if 组合 -->
    <select id="selectEmpByCondition" parameterType="com.entity.Emp" resultType="com.entity.Emp">
        SELECT emp_id, emp_name, dept_id, gender
        FROM emp
        <!-- 核心:where标签包裹所有if条件 -->
        <where>
            <!-- 条件1:姓名非空 → 模糊查询 -->
            <if test="empName != null and empName != ''">
                AND emp_name LIKE CONCAT('%', #{empName}, '%')
            </if>
            <!-- 条件2:部门ID非空 → 精确查询 -->
            <if test="deptId != null">
                AND dept_id = #{deptId}
            </if>
            <!-- 条件3:性别非空 → 精确查询 -->
            <if test="gender != null and gender != ''">
                AND gender = #{gender}
            </if>
        </where>
    </select>

</mapper>
4. 自动拼接效果(MyBatis 智能处理)
|----------------|-----------------------------------------------------------|
| 传入参数 | 最终生成的 SQL |
| 无参数 | SELECT * FROM emp (无 WHERE) |
| 仅传姓名 | SELECT * FROM emp WHERE emp_name LIKE ? |
| 姓名 + 部门 ID | SELECT * FROM emp WHERE emp_name LIKE ? AND dept_id = ? |
| 仅传部门 ID(带 AND) | SELECT * FROM emp WHERE dept_id = ? (自动删 AND) |
五、高频避坑指南(必记)
内的 SQL 片段,开头必须写 AND/ OR交给<where>自动处理,不要自己删- 字符串必须判断 **!= null and != ''**只判断 null 会导致空字符串传入,拼接错误条件
- 数字 / 包装类(Integer/Long)只需判断 != null基本类型(int)有默认值 0,慎用
只会剔除【开头】的 AND/ OR中间的多余 AND 不会处理,写条件时要规范- 模糊查询推荐用 CONCAT避免手写
%导致的 SQL 注入风险
六、总结
- 动态 SQL :MyBatis 根据参数自动拼接 SQL,解决可选条件查询痛点
:单条件判断,满足就拼 SQL :智能修复 WHERE 语法,自动删多余 AND/OR、无条件不生成 WHERE - 黄金组合 :
<where>包裹所有<if>,90% 的业务查询都用这个写法 - 核心优势:代码简洁、无语法错误、防 SQL 注入
为什么sql语句的开头要写and或者or?
先看「不加 AND」的错误场景
假设你这么写(错误写法):
<where>
    <if test="empName != null">
        emp_name LIKE #{empName}  <!-- 没加AND -->
    </if>
    <if test="deptId != null">
        dept_id = #{deptId}       <!-- 没加AND -->
    </if>
</where>如果两个条件都传,拼接的 SQL 是:
SELECT * FROM emp WHERE emp_name LIKE ? dept_id = ?❌ 直接报错 !因为两个条件之间没有连接符,SQL 语法不认识。
2. 再看「加了 AND」的正确逻辑
我们给每个条件前面都加 AND (正确写法):
xml
<where>
    <if test="empName != null">
        AND emp_name LIKE #{empName}  <!-- 开头加AND -->
    </if>
    <if test="deptId != null">
        AND dept_id = #{deptId}       <!-- 开头加AND -->
    </if>
</where>
场景 1:两个条件都传
拼接结果:
SELECT * FROM emp WHERE emp_name LIKE ? AND dept_id = ?第二个 AND 保留,连接两个条件)
场景 2:只传第二个条件
拼接结果:
SELECT * FROM emp WHERE dept_id = ?**
场景 3:都不传
拼接结果:
SELECT * FROM emp无 WHERE,无语法错误
set关键字:
<set> 标签是干嘛的?
核心作用
用于 MyBatis 动态更新 SQL ,智能处理 UPDATE 语句的 SET 子句:
- 自动生成
SET关键字 - 自动删除末尾多余的逗号(最核心功能)
- 没有要更新的字段时,直接忽略
SET,避免语法报错
先看:不用 <set> 的致命坑(必懂)
假设我们要动态更新员工(只传要改的字段,不传的不更新):
<!-- 错误写法:没有 set 标签 -->
<update id="updateEmp">
    UPDATE emp
    SET
    <if test="empName != null and empName != ''">
        emp_name = #{empName},  <!-- 末尾加了逗号 -->
    </if>
    <if test="gender != null and gender != ''">
        gender = #{gender},    <!-- 末尾加了逗号 -->
    </if>
    WHERE emp_id = #{empId}
</update>
报错场景:
只传姓名,最终 SQL 变成:
UPDATE emp SET emp_name = ?, WHERE emp_id = ?SET 最后多了一个逗号,SQL 直接报错。
这就是 <set> 标签要解决的问题!
二、<set> + <if> 正确用法(黄金组合)
核心规则(和 <where> 对应记忆)
|-----------|------------|-----------------------|------------|
| 标签 | 适用 SQL | 拼接规则 | 自动处理功能 |
| <where> | SELECT | 每个 <if> 开头加 AND | 删除开头多余 AND |
| <set> | UPDATE | 每个 <if> 末尾加 逗号 | 删除末尾多余 逗号 |
实战完整代码
1. Mapper 接口
// 动态更新员工:只更新传入的非空字段
int updateEmp(Emp emp);
2. Mapper XML(✨ 重点:set + if 写法)
<update id="updateEmp" parameterType="com.entity.Emp">
    UPDATE emp
    <!-- 核心:set 标签包裹所有动态更新字段 -->
    <set>
        <!-- 条件1:姓名非空 → 更新,末尾加逗号 -->
        <if test="empName != null and empName != ''">
            emp_name = #{empName},
        </if>
        <!-- 条件2:性别非空 → 更新,末尾加逗号 -->
        <if test="gender != null and gender != ''">
            gender = #{gender},
        </if>
        <!-- 条件3:部门ID非空 → 更新,末尾加逗号 -->
        <if test="deptId != null">
            dept_id = #{deptId},
        </if>
    </set>
    <!-- 必须加 WHERE 条件!否则更新全表 -->
    WHERE emp_id = #{empId}
</update>自动拼接效果(<set> 智能处理)
|----------|------------------------------------------------------------|
| 传入参数 | 最终生成的 SQL |
| 只传姓名 | UPDATE emp SET emp_name = ? WHERE emp_id = ? |
| 姓名 + 性别 | UPDATE emp SET emp_name = ?, gender = ? WHERE emp_id = ? |
| 无任何更新字段 | UPDATE emp WHERE emp_id = ? (无语法错,不更新数据) |
三、3 个必记避坑点
- **
**内的字段,末尾必须加 逗号交给 <set>自动删除最后一个多余逗号 - UPDATE 必须加 WHERE 主键条件不加会更新全表数据,生产环境直接事故
- 只更新非空字段 这是动态更新的意义:避免把没传的字段覆盖为
null
四、一句话总结(和 where 联动记忆)
- 查询用
:包裹 <if>,自动删开头多余 AND - 更新用
:包裹 <if>,自动删末尾多余 逗号 - 两个标签都是 MyBatis 的语法保姆,彻底告别动态 SQL 拼接错误
trim标签:
核心结论(先记死)
<trim> 是 万能动态 SQL 标签 👉 <where> 和 <set> 都是 <trim> 的简化专用版 !👉 <trim> 可以完全替代 <where> 和 <set>,还能实现更复杂的自定义拼接
一、<trim> 4 个核心属性(必背)
<trim> 就是自定义拼接规则,靠 4 个属性控制:
表格
|-------------------|---------------------------------------------|
| 属性 | 含义(大白话) |
| prefix | 给整个包裹内容 ,添加前缀 (比如加 WHERE 、SET ) |
| prefixOverrides | 去掉内容开头 多余的字符(比如去掉 AND 、OR ) |
| suffix | 给整个包裹内容 ,添加后缀(极少用) |
| suffixOverrides | 去掉内容结尾 多余的字符(比如去掉 , 逗号) |
二、实战 1:<trim> 完全替代 <where>
原生 <where> 写法
<where>
    <if test="empName != null">
        AND emp_name = #{empName}
    </if>
</where>
等价 <trim> 写法
<!-- 前缀加 WHERE,去掉开头多余的 AND/OR -->
<trim prefix="WHERE" prefixOverrides="AND |OR ">
    <if test="empName != null">
        AND emp_name = #{empName}
    </if>
</trim>
<where> 本质就是:
<trim prefix="WHERE" prefixOverrides="AND |OR ">三、实战 2:<trim> 完全替代 <set>
原生 <set> 写法
<set>
    <if test="empName != null">
        emp_name = #{empName},
    </if>
</set>
等价 <trim> 写法
<!-- 前缀加 SET,去掉结尾多余的 逗号 -->
<trim prefix="SET" suffixOverrides=",">
    <if test="empName != null">
        emp_name = #{empName},
    </if>
</trim>
<set> 本质就是:
<trim prefix="SET" suffixOverrides=",">四、<trim> 真正强大:自定义万能拼接
<where>/<set> 只能固定加前缀、固定去字符<trim> 可以任意自定义,比如:
- 同时去掉开头 + 结尾多余字符
- 自定义前缀 + 后缀
- 适配更复杂的 SQL 场景
示例:自定义复杂拼接
<trim
    prefix="("
    suffix=")"
    prefixOverrides=","
    suffixOverrides=","
>
    <if test="empName != null">, #{empName}</if>
    <if test="gender != null">, #{gender}</if>
</trim>
👉 自动拼接成 (张三, 男),自动去掉首尾逗号
choose/when/otherwise:
choose/when/otherwise 标签 一看就懂
一句话先定性:✅ <if> 完全相反:
<if>:多个条件可以同时生效<choose>:多个条件只能选一个生效
一、完整语法结构
xml
<choose>
    <!-- 相当于 else if -->
    <when test="条件A">SQL片段A</when>
    <when test="条件B">SQL片段B</when>
    <!-- 相当于 else 兜底,可选 -->
    <otherwise>默认SQL片段</otherwise>
</choose>
执行规则:
- 从上往下判断
- 找到第一个成立的 when,执行后直接结束
- 全都不成立,走
otherwise
二、实战场景(最常用业务)
需求:查询员工
- 如果传了姓名 → 优先按姓名精确查询
- 没姓名,但传了部门 ID → 按部门查询
- 两个都没传 → 查询所有员工
Mapper XML 完整写法
<select id="findEmp" resultType="com.entity.Emp">
    SELECT * FROM emp
    <where>
        <choose>
            <when test="empName != null and empName != ''">
                emp_name = #{empName}
            </when>
            <when test="deptId != null">
                dept_id = #{deptId}
            </when>
            <otherwise>
                1=1
            </otherwise>
        </choose>
    </where>
</select>
三种执行效果
- 传姓名 + 部门 ID:只执行姓名那一行(第一个满足条件优先)
- 不传姓名,只传部门 ID:执行部门 ID 那一行
- 全都不传:走
otherwise 1=1,查询全部
三、和普通 <if> 核心区别(必考)
<if>组合多个条件同时满足 → 全部拼接生效适合:同时多个筛选条件(姓名 + 部门 + 性别一起查)<choose>组合多个条件同时满足 → 只取第一个适合:优先级互斥选择(优先 A,没有再 B)
foreach标签:
一、5 个核心属性(必背,超简单)
xml
<foreach
    collection="集合参数名"   <!-- 遍历谁,必填 -->
    item="单个元素别名"       <!-- 循环里每一项叫什么 -->
    open="("                 <!-- 循环整体开头拼接符号 -->
    close=")"                <!-- 循环整体结尾拼接符号 -->
    separator=",">           <!-- 每个元素之间用什么分隔 -->
    #{item}
</foreach>
二、最重要:collection 填什么?(新手 90% 踩坑)
- 直接传 List 集合 →
collection="list" - 直接传 数组 Array →
collection="array" - 封装到实体类里 → 写属性名(如 userIds)
场景 1:最常用!IN 多条件查询(高频必会)
需求:根据多个员工 ID 批量查询 select * from emp where emp_id in (1,3,5)
1. Mapper 接口
java
运行
List<Emp> selectEmpByIds(List<Integer> idList);2. XML 写法
xml
<select id="selectEmpByIds" resultType="Emp">
    SELECT * FROM emp
    <where>
        emp_id IN
        <foreach collection="list" item="id" open="(" close=")" separator=",">
            #{id}
        </foreach>
    </where>
</select>自动拼接效果:emp_id IN (1,2,3) 完美格式无语法错误
场景 2:批量删除
需求:删除多个 ID 的员工
int deleteEmpByIds(List<Integer> idList);

<delete id="deleteEmpByIds">
    DELETE FROM emp
    WHERE emp_id IN
    <foreach collection="list" item="id" open="(" close=")" separator=",">
        #{id}
    </foreach>
</delete>
场景 3:批量插入(工作常用)
一次性插入多条员工数据
int batchInsertEmp(List<Emp> empList);

<insert id="batchInsertEmp">
    INSERT INTO emp(emp_name, dept_id)
    VALUES
    <foreach collection="list" item="emp" separator=",">
        (#{emp.empName}, #{emp.deptId})
    </foreach>
</insert>
自动拼接多条 values 用逗号分隔
sql片段:
SQL 片段 = 把重复写烂的 SQL 代码抽出来封装,以后直接拿来复用,少写代码、少改错!
一、两个核心标签(就记这俩)
<sql id="名字">:定义重复代码块(封装)<include refid="名字"/>:引用封装好的片段(调用)
二、最常用场景 1:抽取查询字段(90% 新手最先用)
原来写法(冗余麻烦):多个查询方法,每次都重复写一堆字段:
<select id="a">select emp_id,emp_name,gender,dept_id from emp</select>
<select id="b">select emp_id,emp_name,gender,dept_id from emp where ...</select>
用 SQL 片段优化
-
先封装公共字段
emp_id, emp_name, gender, dept_id -
直接引用复用
三、最常用场景 2:抽取动态条件(配合你学的 if/where)
如果多个接口,查询条件一模一样,直接抽条件片段:
<!-- 封装通用动态查询条件 -->
<sql id="empQueryCondition">
    <if test="empName != null and empName != ''">
        and emp_name like concat('%',#{empName},'%')
    </if>
    <if test="deptId != null">
        and dept_id = #{deptId}
    </if>
</sql>
多处直接引用:
<select id="list1">
    select * from emp
    <where>
        <include refid="empQueryCondition"/>
    </where>
</select>

<select id="list2">
    select * from emp where status=1
    <where>
        <include refid="empQueryCondition"/>
    </where>
</select>
四、超重要避坑(新手必错)
- SQL 片段里不要写 where****关键字 只写纯条件,外面自己套
<where>标签 - 片段末尾不要乱加逗号和正常 SQL 写法一致就行
- 跨 Mapper 文件引用:refid 写全路径
refid="com.mapper.EmpMapper.empCommonColumn"
mapper按包批量扫描:
以前笨办法:一个个配置 Mapper,接口多了累死
<!-- 笨办法:一个个写,麻烦死 -->
<mappers>
  <mapper resource="EmpMapper.xml"/>
  <mapper resource="DeptMapper.xml"/>
  <mapper resource="OrderMapper.xml"/>
</mappers>批量扫描:一行配置,扫整个包
<mappers>
  <package name="com.mapper"/>
</mappers>
二、分两种场景(99% 开发用第二种)
场景 1:纯 MyBatis(原生,mybatis-config.xml)
直接在核心配置文件里加一行:
<configuration>
  <!-- 其他配置... -->
  <mappers>
    <!-- 核心:批量扫描 → 写你的Mapper接口所在包名 -->
    <package name="com.mapper"/>
  </mappers>
</configuration>效果:com.mapper 包下所有 Mapper 接口,自动全部生效
场景 2:SpringBoot 整合 MyBatis(工作必用)
最简单:启动类加一个注解,搞定一切
import org.mybatis.spring.annotation.MapperScan;
import org.springframework.boot.SpringApplication;
import org.springframework.boot.autoconfigure.SpringBootApplication;

// 启动类
@SpringBootApplication
// 👇 这一行就是批量扫描Mapper包
@MapperScan("com.mapper")
public class Application {
    public static void main(String[] args) {
        SpringApplication.run(Application.class, args);
    }
}
三、必须遵守的规则(不然后报错)
你的 Mapper 接口 和 XML 文件 必须对应:
- Mapper 接口放在:
java/com/mapper - Mapper XML 放在:
resources/com/mapper
目录结构长这样:
src/main
├─ java
│  └─ com
│     └─ mapper
│        ├─ EmpMapper.java   (接口)
│        └─ DeptMapper.java
└─ resources
   └─ com
      └─ mapper
         ├─ EmpMapper.xml    (XML)
         └─ DeptMapper.xml
四、极简总结(记这 2 句就够)
- 纯 MyBatis :配置文件写
<package name="包名"/> - SpringBoot :启动类加
@MapperScan("包名")(最常用)
作用:自动扫描包下所有 Mapper 接口,不用手动一个个注册!
分页插件的使用:
一、第一步:导入 Maven 依赖(纯 MyBatis 专用)
不要用 spring-boot-starter,用原生核心依赖:
<!-- MyBatis 核心 -->
<dependency>
    <groupId>org.mybatis</groupId>
    <artifactId>mybatis</artifactId>
    <version>3.5.13</version>
</dependency>

<!-- PageHelper 原生版依赖 -->
<dependency>
    <groupId>com.github.pagehelper</groupId>
    <artifactId>pagehelper</artifactId>
    <version>5.3.3</version>
</dependency>
二、第二步:核心关键!在 mybatis-config.xml 注册插件
打开全局核心配置文件 mybatis-config.xml,在 <configuration> 里面添加 plugins 标签,手动注册分页插件:
<?xml version="1.0" encoding="UTF-8"?>
<!DOCTYPE configuration
        PUBLIC "-//mybatis.org//DTD Config 3.0//EN"
        "http://mybatis.org/dtd/mybatis-3-config.dtd">
<configuration>

    <!-- 1. 全局设置省略 -->

    <!-- ========== 重点:注册 PageHelper 分页插件 ========== -->
    <plugins>
        <plugin interceptor="com.github.pagehelper.PageInterceptor">
            <!-- 指定数据库方言 mysql/oracle -->
            <property name="helperDialect" value="mysql"/>
            <!-- 开启分页合理化(超推荐) -->
            <property name="reasonable" value="true"/>
            <!-- 自动识别参数 -->
            <property name="supportMethodsArguments" value="true"/>
        </plugin>
    </plugins>

    <!-- 2. 映射器 Mapper扫描省略 -->

</configuration>
配置解释
interceptor:固定写 PageHelper 的拦截器全类名helperDialect=mysql:告诉插件当前数据库类型,自动拼接limitreasonable=true:页码小于 1 自动切第一页,大于总页数自动切最后一页
三、第三步:Mapper 和 XML 完全不变
和普通查询一模一样,不用写 limit:
1. Mapper 接口
public interface EmpMapper {
    List<Emp> selectAllEmp();
}
2. Mapper XML
<select id="selectAllEmp" resultType="Emp">
    select emp_id,emp_name,dept_id from emp
</select>
四、第四步:Java 代码调用(和 Spring 用法完全一样)
获取 SqlSession 之后,按固定模板写:
PageHelper.startPage(页码,每页条数)- 立即执行 Mapper 查询
- 封装为
PageInfo
完整测试代码
public class TestPage {
    public static void main(String[] args) {
        // 1. 获取SqlSession(纯MyBatis常规写法)
        SqlSession session = MyBatisUtil.getSqlSession();
        EmpMapper mapper = session.getMapper(EmpMapper.class);

        // 2. 开启分页:第1页,每页5条
        PageHelper.startPage(1,5);

        // 3. 立刻执行查询(中间不能写任何代码!)
        List<Emp> empList = mapper.selectAllEmp();

        // 4. 封装分页信息
        PageInfo<Emp> pageInfo = new PageInfo<>(empList);

        // 5. 打印分页结果
        System.out.println("当前页:"+pageInfo.getPageNum());
        System.out.println("总条数:"+pageInfo.getTotal());
        System.out.println("总页数:"+pageInfo.getPages());
        System.out.println("当前页数据:"+pageInfo.getList());

        session.close();
    }
}