HarmonyOS 6实战:HarmonyOS轻量化交互的两种方案改造与实践(下)
当年我入行干开发,做这个功能把我卡住很久
上篇我们讲了服务卡片和实况窗,解决了"桌面级"的快捷访问问题。但还有一个场景:用户在地图里选好了路线,想看看详情,得点个按钮弹出一个页面,操作路径又长了。
能不能仿照常见的地图应用,用手一拖就能拉起来看,不用了再推回去?
这就是下篇要讲的内容:可拖拽滑动面板 。之前我们在其他文章中展示过类似于手风琴的卡片折起与展开,如下图。而本次我们要做的是从下往上拉起的交互动作:
用户在地图上操作时,底部有一个面板,拖上去看详情,拖下来还地图视野。整个交互通过滑动监听,不需要多余的点击。
一、这个面板长什么样
先说说我们要做什么。
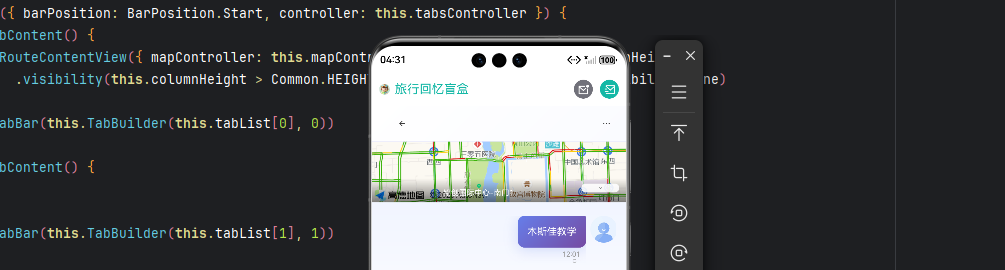
在地图页面底部,有一个可以上下拖拽的面板。它有三个吸附点位:
-
低档(150vp) :只显示一个拖拽条和助手,几乎不占地图视野,我们之前的样式也是这样的。

-
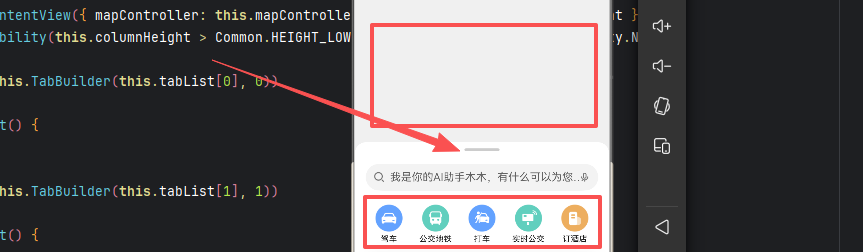
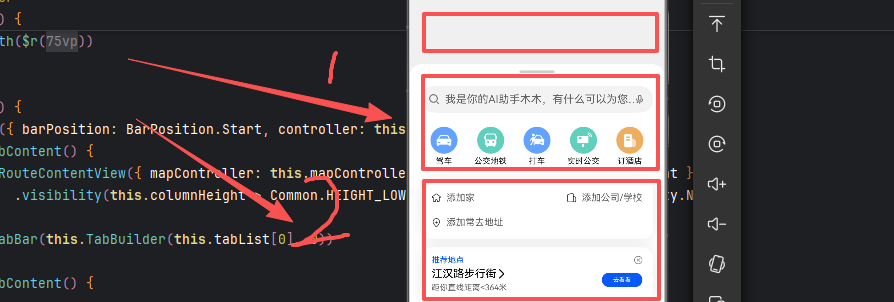
中档(269vp):显示搜索框和快捷功能入口,这里我们仿照一些其他地图进行设计,加入一些出行方式、和配套功能。
- 高档(动态计算) :接近全屏,显示完整的路线详情,这里的1组件就是上篇我们单独抽离出来服务卡片的内容部分。
用户拖拽面板时,手指松开后,面板会自动吸附到最近的档位,不会停在半中间。这个体验很像iOS的底部抽屉效果。
同时,面板还要适配不同屏幕尺寸------手机竖屏和折叠屏展开后,宽度不同,面板的样式也要跟着变。
| 档位 | 高度值 | 说明 |
|---|---|---|
| 低档 | 150vp | 最小高度,仅显示拖拽指示条 |
| 中档 | 269vp | 默认高度,显示搜索框和功能入口 |
| 高档 | 动态计算 | 最大高度,接近全屏展示 |
用户拖拽 → 实时更新高度 → 松手 → 吸附到最近档位
         ↓
    限制范围 [150, maxHeight]
二、核心实现原理
先看核心的状态变量:
typescript
// features/map/src/main/ets/view/MapView.ets
@Component
export struct MapView {
  // 当前断点(响应式布局)
  @StorageLink('currentBreakpoint') @Watch('getHeight') currentBreakpoint: string = 'md';

  // 面板高度相关状态
  @State columnMaxHeight: number = 0;      // 最大高度(动态计算)
  @State columnHeight: number = 269;       // 当前吸附高度
  @State tempColumnHeight: number = 269;   // 拖拽过程中的临时高度

  // 手势配置
  private panOptionHeight: PanGestureOptions = new PanGestureOptions({
    direction: PanDirection.Up | PanDirection.Down  // 仅响应上下拖拽
  });
}
为什么用两个高度变量?
columnHeight记录吸附后的稳定高度,用于吸附计算和判断当前档位;tempColumnHeight是拖拽中的临时高度,用于实时显示。分开处理可以避免拖拽过程中的抖动------如果只用一个变量,拖拽时频繁更新会导致UI闪烁。
为什么要用@Watch?
@Watch('getHeight')监听currentBreakpoint的变化。当屏幕旋转或折叠屏展开/合拢时,断点会变化,面板的最大高度需要重新计算。这个装饰器让getHeight方法自动被调用。
状态变量说明:
| 变量 | 用途 | 特点 |
|---|---|---|
columnMaxHeight |
最大高度 | 根据设备屏幕动态计算 |
columnHeight |
吸附后的稳定高度 | 取值:150、269、columnMaxHeight |
tempColumnHeight |
拖拽中的临时高度 | 实时跟随手指变化 |
最大高度不能写死,要根据设备屏幕动态算:
typescript
// 小屏最大高度 = 屏幕高度 - 状态栏高度 - 边距
private smMaxHeight: number = DeviceScreen.getDeviceHeight() - 8 -
  (this.getUIContext().px2vp(AppStorage.get('topRectHeight') as number));

// 根据断点获取最大高度
getHeight() {
  this.columnMaxHeight = new BreakpointType(
    this.smMaxHeight,      // 小屏:接近全屏
    Common.HEIGHT_MD       // 中屏:固定699vp
  ).getValue(this.currentBreakpoint);

  AppStorage.setOrCreate('columnMaxHeight', this.columnMaxHeight);

  // 断点切换时同步高度
  if (this.tempColumnHeight === this.smMaxHeight &&
      this.currentBreakpoint === BreakpointConstants.BREAKPOINT_MD) {
    this.tempColumnHeight = Common.HEIGHT_MD;
  }
  if (this.tempColumnHeight === Common.HEIGHT_MD &&
      this.currentBreakpoint === BreakpointConstants.BREAKPOINT_SM) {
    this.tempColumnHeight = this.smMaxHeight;
  }
}高度常量定义:
typescript
export class CommonConstants {
  static readonly HEIGHT_LOW: number = 150;     // 低档高度
  static readonly HEIGHT_MIDDLE: number = 269;  // 中档高度
  static readonly HEIGHT_MD: number = 699;      // 中屏最大高度
}
为什么要区分小屏和中屏?
手机竖屏时,面板高档应该接近全屏,让用户有更大的空间看详情。折叠屏展开后屏幕变宽,如果面板也全屏会显得太宽,所以固定699vp,留出边距更美观。
拖拽手势实现
拖拽指示条
面板顶部有一个拖拽指示条,用户在这里上下滑动来控制面板高度。手势绑定在这个指示条上。
typescript
Column() {
  // 拖拽指示条区域
  Row() {
    Divider()
      .strokeWidth(4)
      .color('#33000000')
      .width('48vp')
      .lineCap(LineCapStyle.Round)  // 圆角
      .padding({ bottom: '16vp' })
  }
  .height('26vp')
  .width('100%')
  .justifyContent(FlexAlign.Center)
  .gesture(
    // 绑定拖拽手势
    PanGesture(this.panOptionHeight)
      .onActionUpdate((event?: GestureEvent) => { /* 拖拽中 */ })
      .onActionEnd(() => { /* 拖拽结束 */ })
  )

  // 面板内容区域
  TabView({ mapController: this.mapController, columnHeight: this.columnHeight })
}
为什么手势绑在指示条上而不是整个面板?
如果绑在整个面板上,用户想滑动面板里的内容(比如滚动列表)时,会误触发面板高度变化。绑在指示条上,只有明确拖拽指示条才会改变高度,内容区域可以正常滚动。
拖拽过程处理
拖拽中的核心逻辑:手指向上滑,面板变高;向下滑,面板变矮。
typescript
PanGesture(this.panOptionHeight)
  .onActionUpdate((event?: GestureEvent) => {
    if (event) {
      // 计算新高度 = 当前吸附高度 - 拖拽偏移量
      // 注意:offsetY向下为正,向上为负
      let height = this.columnHeight - event.offsetY;
      this.tempColumnHeight = height;

      // 限制最小高度
      if (this.tempColumnHeight < 150) {
        this.tempColumnHeight = 150;
      }

      // 限制最大高度
      if (this.tempColumnHeight > this.columnMaxHeight) {
        this.tempColumnHeight = this.columnMaxHeight;
      }
    }
})关键点:
event.offsetY:手指在Y轴的偏移量(向下为正,向上为负)columnHeight - event.offsetY:向上拖拽时event.offsetY为负,高度增加- 实时更新
tempColumnHeight,面板跟随手指移动 - 用
Math.min和Math.max限制范围,防止面板超出边界
吸附逻辑
手指松开后,面板要自动吸附到最近的档位。吸附算法的核心是算分界点------高档和中档的分界点,就是它们中间的位置。
typescript
.onActionEnd(() => {
  // 计算吸附分界点
  // 高档分界点 = (最大高度 - 中档高度) / 2 + 中档高度
  let highThreshold = (this.columnMaxHeight - 269) / 2 + 269;

  // 低档分界点 = (中档高度 - 低档高度) / 2 + 低档高度
  let lowThreshold = (269 - 150) / 2 + 150;

  // 判断吸附到哪一档
  if (this.tempColumnHeight > highThreshold) {
    // 吸附到高档
    this.columnHeight = this.columnMaxHeight;
    this.isShowBack = false;
  } else if (this.tempColumnHeight < lowThreshold) {
    // 吸附到低档
    this.columnHeight = 150;
    this.isShowBack = true;
  } else {
    // 吸附到中档
    this.columnHeight = 269;
    this.isShowBack = true;
  }

  // 同步临时高度
  this.tempColumnHeight = this.columnHeight;
})
吸附时加个动画,过渡更平滑:
typescript
import { Curves } from '@kit.ArkUI';

.onActionEnd(() => {
  let targetHeight = this.HEIGHT_MIDDLE;
  // 计算目标高度...

  animateTo({
    duration: 300,
    curve: Curves.EaseOut
  }, () => {
    this.columnHeight = targetHeight;
    this.tempColumnHeight = targetHeight;
  });
})
快速滑动时直接切换到相邻档位,手感更像原生:
typescript
private lastVelocity: number = 0;

.onActionUpdate((event?: GestureEvent) => {
  if (event) {
    this.lastVelocity = event.velocityY;
    // ... 其他处理
  }
})

.onActionEnd(() => {
  // 快速滑动时直接切换到相邻档位
  if (Math.abs(this.lastVelocity) > 1000) {
    if (this.lastVelocity < 0) {
      // 快速向上滑 → 展开到高档
      this.columnHeight = this.HEIGHT_HIGH;
    } else {
      // 快速向下滑 → 收起到低档
      this.columnHeight = this.HEIGHT_LOW;
    }
  } else {
    // 慢速拖拽 → 使用吸附逻辑
    // ...
  }
})
吸附算法图解 :
我们无关的内容隐藏,大家根据高度看我话的框就可以。
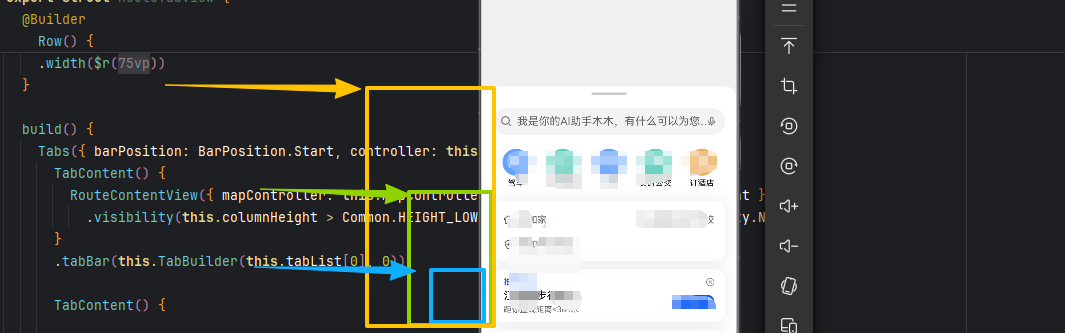
举个例子:假设最大高度是600,中档是269,低档是150。
- highThreshold = (600-269)/2 + 269 = 434.5。拖拽高度大于434.5时,吸附到高档。
- lowThreshold = (269-150)/2 + 150 = 209.5。拖拽高度小于209.5时,吸附到低档。
- 介于209.5和434.5之间,吸附到中档。
面板的样式要随着档位变化动态调整:
typescript
Column() {
  // ... 内容
}
// 扩展安全区域(高档时扩展底部)
.expandSafeArea(
  (this.tempColumnHeight === this.columnMaxHeight ? [SafeAreaType.KEYBOARD] : []),
  (this.tempColumnHeight === this.columnMaxHeight ? [SafeAreaEdge.BOTTOM] : [])
)
.backgroundColor(Color.White)
.visibility(this.isShow ? Visibility.Visible : Visibility.None)
// 响应式圆角
.borderRadius({
  topLeft: $r('app.float.border_radius'),
  topRight: $r('app.float.border_radius'),
  bottomLeft: new BreakpointType(0, $r('app.float.border_radius'))
    .getValue(this.currentBreakpoint),
  bottomRight: new BreakpointType(0, $r('app.float.border_radius'))
    .getValue(this.currentBreakpoint)
})
// 响应式宽度
.width(new BreakpointType('100%', $r('app.float.width_md'))
  .getValue(this.currentBreakpoint))
// 动态高度
.height(this.tempColumnHeight)
.margin({
  bottom: new BreakpointType(0, $r('app.float.column_margin_bottom'))
    .getValue(this.currentBreakpoint),
  left: new BreakpointType(0, this.tempLeft)
    .getValue(this.currentBreakpoint)
})关键样式说明:
expandSafeArea:高档时扩展到底部安全区,让内容完全展开borderRadius:小屏时底部圆角为0,中屏时有圆角width:小屏时占满宽度,中屏时固定宽度居中
三、响应式布局适配
不同屏幕尺寸下,面板的宽度、边距、圆角都不一样。我们通过断点系统来区分。
typescript
export class BreakpointConstants {
  static readonly BREAKPOINT_SM: string = 'sm';  // 小屏 (< 600vp)
  static readonly BREAKPOINT_MD: string = 'md';  // 中屏 (>= 600vp)
  static readonly BREAKPOINT_RANGES: number[] = [320, 600, 840];
}
typescript
export class BreakpointType<T> {
  sm: T;  // 小屏值
  md: T;  // 中屏值

  constructor(sm: T, md: T) {
    this.sm = sm;
    this.md = md;
  }

  getValue(currentBreakpoint: string): T {
    if (currentBreakpoint === BreakpointConstants.BREAKPOINT_MD) {
      return this.md;
    } else {
      return this.sm;
    }
  }
}
用起来很简单:
typescript
.width(new BreakpointType('100%', 360).getValue(this.currentBreakpoint))
.margin({
  left: new BreakpointType(0, 24).getValue(this.currentBreakpoint)
})| 属性 | 小屏 (sm) | 中屏 (md) |
|---|---|---|
| 宽度 | 100% | 固定宽度 |
| 底部圆角 | 0 | 24vp |
| 底部边距 | 0 | 有边距 |
| 最大高度 | 接近全屏 | 699vp |
小屏占满宽度,中屏留白边,这样面板在任何设备上看起来都舒服。
四、内容区域滚动控制
面板内容区域是一个Scroll列表。但低档时用户只想看地图,不想滑面板里的内容。所以要根据面板高度动态控制Scroll是否可滚动。
typescript
// features/home/src/main/ets/view/HomeFullView.ets
@Component
export struct HomeFullView {
  @Link columnHeight: number;
  @Link mapController: map.MapComponentController;

  build() {
    Scroll() {
      Column() {
        SearchBar({ /* ... */ })
        GridView({ /* ... */ })
        ColumnView({ /* ... */ })
        ListView()
        // ... 其他内容
      }
    }
    .scrollBar(BarState.Off)
    // 关键:低档时禁止滚动,中高档时允许滚动
    .scrollable(
      this.columnHeight === Common.HEIGHT_LOW
        ? ScrollDirection.None
        : ScrollDirection.Vertical
    )
  }
}滚动控制逻辑:
- 低档 (150vp):禁止滚动,防止误触
- 中档/高档:允许垂直滚动
这个设计很关键。如果低档时内容也能滚动,用户拖拽面板时手指稍微一滑,内容就开始滚了,体验会很糟糕。
为了方便理解,这里给出一个简化版的可拖拽面板,去掉了响应式布局等复杂逻辑,只保留核心功能:
typescript
@Entry
@Component
struct DraggablePanel {
  // 高度常量
  private readonly HEIGHT_LOW: number = 150;
  private readonly HEIGHT_MIDDLE: number = 269;
  private readonly HEIGHT_HIGH: number = 600;

  // 状态变量
  @State columnHeight: number = this.HEIGHT_MIDDLE;
  @State tempColumnHeight: number = this.HEIGHT_MIDDLE;

  // 手势配置
  private panOption: PanGestureOptions = new PanGestureOptions({
    direction: PanDirection.Up | PanDirection.Down
  });

  build() {
    Stack({ alignContent: Alignment.BottomStart }) {
      // 背景层(如地图)
      Column()
        .width('100%')
        .height('100%')
        .backgroundColor('#E8E8E8')

      // 可拖拽面板
      Column() {
        // 拖拽指示条
        Row() {
          Divider()
            .strokeWidth(4)
            .color('#33000000')
            .width(48)
            .lineCap(LineCapStyle.Round)
        }
        .width('100%')
        .height(26)
        .justifyContent(FlexAlign.Center)
        .gesture(
          PanGesture(this.panOption)
            .onActionUpdate((event?: GestureEvent) => {
              if (event) {
                // 计算新高度
                let height = this.columnHeight - event.offsetY;
                // 限制范围
                this.tempColumnHeight = Math.max(
                  this.HEIGHT_LOW,
                  Math.min(height, this.HEIGHT_HIGH)
                );
              }
            })
            .onActionEnd(() => {
              // 吸附逻辑
              let highThreshold = (this.HEIGHT_HIGH - this.HEIGHT_MIDDLE) / 2 + this.HEIGHT_MIDDLE;
              let lowThreshold = (this.HEIGHT_MIDDLE - this.HEIGHT_LOW) / 2 + this.HEIGHT_LOW;

              if (this.tempColumnHeight > highThreshold) {
                this.columnHeight = this.HEIGHT_HIGH;
              } else if (this.tempColumnHeight < lowThreshold) {
                this.columnHeight = this.HEIGHT_LOW;
              } else {
                this.columnHeight = this.HEIGHT_MIDDLE;
              }
              this.tempColumnHeight = this.columnHeight;
            })
        )

        // 面板内容
        Column() {
          Text('面板内容')
            .fontSize(16)
          // 更多内容...
        }
        .width('100%')
        .layoutWeight(1)
      }
      .width('100%')
      .height(this.tempColumnHeight)
      .backgroundColor(Color.White)
      .borderRadius({ topLeft: 24, topRight: 24 })
    }
    .width('100%')
    .height('100%')
  }
}
高档时背景加个半透明遮罩,点击遮罩自动收起面板:
typescript
@State showMask: boolean = false;

build() {
  Stack() {
    // 遮罩层(高档时显示)
    if (this.showMask) {
      Column()
        .width('100%')
        .height('100%')
        .backgroundColor('rgba(0,0,0,0.5)')
        .onClick(() => {
          this.columnHeight = this.HEIGHT_LOW;
        })
    }

    // 可拖拽面板
    Column() { /* ... */ }
  }
}

// 在 onActionEnd 中更新遮罩状态
.onActionEnd(() => {
  // ...
  this.showMask = (this.columnHeight === this.HEIGHT_HIGH);
})
关键技术点总结
| 要点 | 实现方式 |
|---|---|
| 手势识别 | PanGesture + PanGestureOptions |
| 实时响应 | onActionUpdate 更新临时高度 |
| 吸附效果 | onActionEnd 计算分界点并吸附 |
| 高度限制 | Math.max/min 限制范围 |
| 响应式 | BreakpointType 适配不同设备 |
| 滚动控制 | scrollable() 根据高度动态控制 |
下面是我在开发中提炼需要注意的点,仅供参考;
offsetY的方向
event.offsetY向下为正,向上为负。新高度计算公式是columnHeight - offsetY,这个减号很容易写错。我一开始写成了加号,结果向上拖拽面板反而变矮了。
分界点算错
吸附分界点如果算错了,面板会吸到错误的档位。一开始我直接用(max+min)/2,没考虑三档的情况。后来才改成两两之间取中点。
低档时内容还能滚动
面板内容区域是一个Scroll,低档时如果不禁用滚动,用户拖拽面板时手指稍微一滑,内容就开始滚了。解决方案是用scrollable动态控制。
typescript
// 方式1:移除手势绑定
.gesture(isDraggable ? PanGesture(...) : null)

// 方式2:使用空手势配置
private disabledPanOption: PanGestureOptions = new PanGestureOptions({
  direction: PanDirection.All,
  distance: 99999  // 设置极大距离阈值
});折叠屏展开时,最大高度变了,但面板高度还是原来的值。解决方案是用@Watch监听断点变化,在回调里重新计算并同步高度。
拖拽时面板抖动
如果只用一个高度变量,拖拽时频繁更新会导致UI闪烁。用两个变量分开管理就解决了。
columnHeight:记录吸附后的稳定高度,用于吸附计算tempColumnHeight:拖拽过程中的临时高度,用于实时显示\- 分离两者可以避免拖拽过程中的抖动
也可以搭配速度监听进行优化
typescript
.onActionUpdate((event?: GestureEvent) => {
  if (event) {
    console.log('速度:', event.velocityY);
    console.log('加速度:', event.velocityX);
  }
})这就是轻量化交互的价值------让用户用手指就能自然地控制界面,不需要学习,不需要思考。