提示:文章写完后,目录可以自动生成,如何生成可参考右边的帮助文档
文章目录
本篇灵感
也是好久没有编代码了,今天也是重新找下手感;
具体的代码在网络安全编程------开发一个TCP代理Python实现已经说过,这里不再赘述;
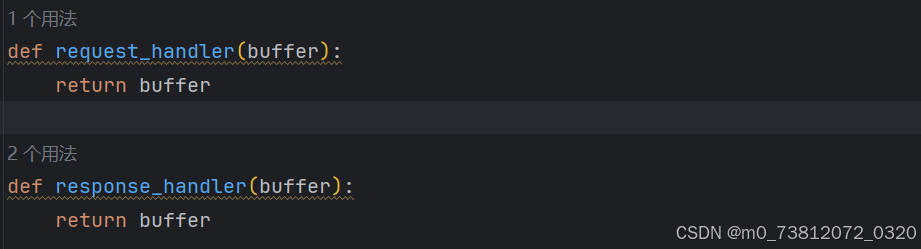
今天在回顾代码的时候,发现有两个模块并没有用到(如果想在代理转发数据包之前,修改一下 回复 / 请求 的数据包,可以在这里进行修改)
代码展示
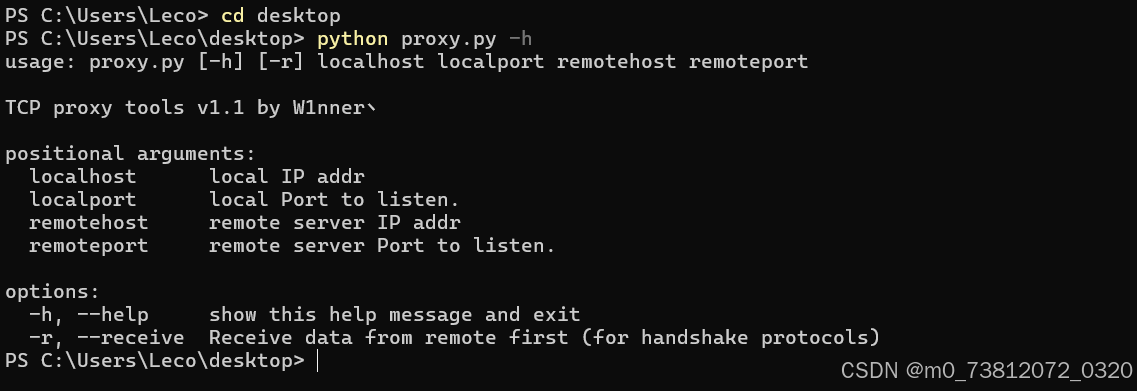
这里我稍微优化了一下代码,用argparse 模块来代替之前的sys.argv[1:] 功能(--help 帮助文档):
完整代码如下:
python
import socket
import threading
import argparse
import sys

# 修正:使用 ''.join 而不是 '.'.join,否则会多出很多不必要的点
Hex_filter = ''.join(chr(i) if 32 <= i <= 126 else '.' for i in range(256))

def hexdump(src, step=16, show=True):
    if isinstance(src, bytes):
        src = src.decode(errors='replace') # 加上 errors='replace' 防止乱码报错

    result = []
    for i in range(0, len(src), step):
        word = str(src[i:i+step])
        printable = word.translate(Hex_filter)

        # 修正:十六进制格式化是 02x(2位补0),而不是 0x2
        hexa = ' '.join([f'{ord(c):02x}' for c in word]) # 修正:这里用空格连接比较好看

        hexwidth = step * 3
        # 修正:十六进制格式化是 04x,不是 0x4
        result.append(f'{i:04x} {hexa:<{hexwidth}} {printable}')

        if show:
            for line in result:
                print(line)
        else:
            return result

def receive_from(connections):
    buffer = b''
    connections.settimeout(5)
    try:
        while True:
            data = connections.recv(4096)
            if not data:
                break
            buffer += data
    except Exception as e:
        pass
    return buffer

def request_handler(buffer):
    return buffer

def response_handler(buffer):
    return buffer

def proxy_handler(client_socket, remote_host, remote_port, receive_first):
    remote_socket = socket.socket(socket.AF_INET, socket.SOCK_STREAM)
    # 修正:connect 需要传入元组,所以是双层括号
    remote_socket.connect((remote_host, remote_port))

    if receive_first:
        # 修正:这里传入的是 remote_socket,而不是 receive_first 布尔值
        remote_buffer = receive_from(remote_socket)
        if len(remote_buffer):
            hexdump(remote_buffer)
            remote_buffer = response_handler(remote_buffer)
            print(f'[<==] Sending {len(remote_buffer)} bytes data to local')
            # 修正:直接发送 bytes 即可,不需要 decode
            client_socket.send(remote_buffer)

    while True:
        # 从本地读 -> 发往远程
        local_buffer = receive_from(client_socket)
        if len(local_buffer):
            print(f"[==>] Received {len(local_buffer)} bytes data from local")
            hexdump(local_buffer)
            local_buffer = request_handler(local_buffer)
            remote_socket.send(local_buffer)
            print(f"[*] Successful send data to Remote.")

        # 从远程读 -> 发往本地
        # 修正:这里你之前漏掉了重新读取远程数据的代码!
        remote_buffer = receive_from(remote_socket)
        if len(remote_buffer):
            print(f"[<==] Received {len(remote_buffer)} bytes data from remote")
            hexdump(remote_buffer)
            remote_buffer = response_handler(remote_buffer)
            client_socket.send(remote_buffer)
            print(f"[*] Successful send data to Local")
            # 修正:删除了这里无条件的 break

        # 如果双方都没有数据了,断开连接
        if not len(remote_buffer) and not len(local_buffer):
            client_socket.close()
            remote_socket.close()
            print(f"[*] No data send to anywhere, Connection closing.")
            break

def server_loop(local_host, local_port, remote_host, remote_port, receive_first):
    server = socket.socket(socket.AF_INET, socket.SOCK_STREAM)
    try:
        # 修正:bind 需要元组格式
        server.bind((local_host, local_port))
    except Exception as e:
        print(f"[!!] Failed to listen to {local_host}:{local_port}. Error is {e}")
        sys.exit()

    print(f"[**] Successful listen to {local_host}:{local_port}.")
    server.listen(5)

    while True:
        client_socket, addr = server.accept()
        print(f"[*] Received incoming connection from {addr[0]}:{addr[1]}")

        # 修正:target=proxy_handler 不能带括号,否则会在主线程立刻执行报错
        proxy_thread = threading.Thread(
            target=proxy_handler,
            args=(client_socket, remote_host, remote_port, receive_first)
        )
        proxy_thread.start()

def main():
    parser = argparse.ArgumentParser(description='TCP proxy tools v1.1 by W1nner丶')
    parser.add_argument("localhost", help='local IP addr')
    parser.add_argument("localport", type=int, help='local Port to listen.')
    parser.add_argument("remotehost", help='remote server IP addr')
    parser.add_argument("remoteport", type=int, help='remote server Port to listen.')
    parser.add_argument("-r", "--receive", action="store_true",
                        help="Receive data from remote first (for handshake protocols)")
    args = parser.parse_args()

    server_loop(args.localhost, args.localport, args.remotehost, args.remoteport, args.receive)

# 修正:顶格写,不能放在 main 函数里面!
if __name__ == "__main__":
    main()

# 错误
# 多余的括号:target=proxy_handler(),加了括号意味着"立即执行并把返回值当做目标",正确写法是不带括号 target=proxy_handler。
#
# 连接元组错误:remote_socket.connect(remote_host,remote_port),连接必须传入一个元组,应该是双层括号 .connect((remote_host, remote_port))。
#
# 格式化写反了:在 hexdump 中,十六进制补零的写法是 02x 和 04x,你写成了 0x2 会报错。
#
# 循环里忘记接收数据:在 while True 循环里"从远程读"的部分,你直接用了 if len(remote_buffer):,却忘记写 remote_buffer = receive_from(remote_socket)去重新接收数据了!
#
# 异常的 break:在发往本地数据后,你加了一个没有任何条件的 break,这会导致只通信一次代理就直接强行关闭了。
这里我们首先看一下效果: -h 帮助文档
效果演示
这里我们在本地用PHPstudy + proxy代码来进行演示:
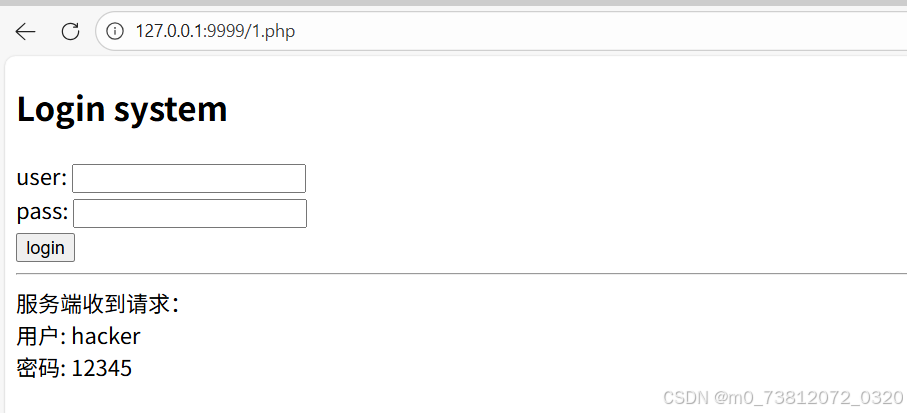
(1)首先在 D:\phpstudy_pro\WWW 目录下创建一个前端网页(用于POST提交数据)
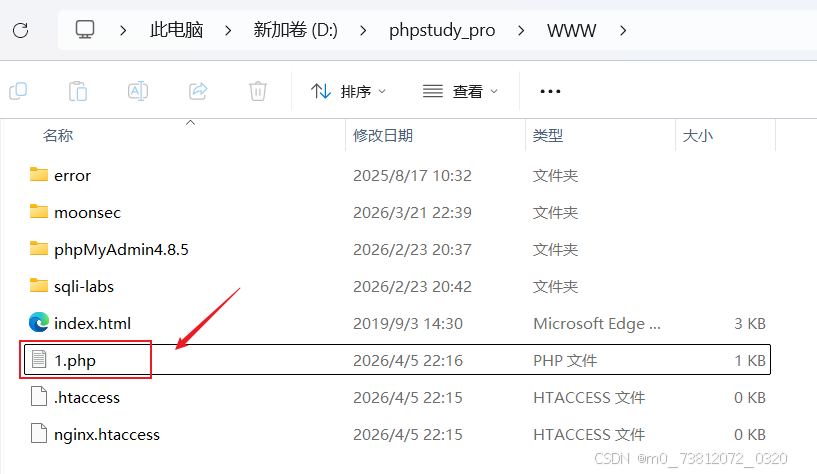
代码如下:
php
<!DOCTYPE html>
<html>
<head><title>BHP TCP proxy tools</title></head>
<body>
    <h2>Login system</h2>
    <form method="POST" action="">
        user: <input type="text" name="username"><br>
        pass: <input type="password" name="password"><br>
        <input type="submit" value="login">
    </form>

    <?php
    if ($_SERVER['REQUEST_METHOD'] == 'POST') {
        echo "<hr>服务端收到请求:<br>";
        echo "用户: " . $_POST['username'] . "<br>";
        echo "密码: " . $_POST['password'];
    }
    ?>
</body>
</html>
(2)随后输入网址 http://127.0.0.1:8082/1.php 查看一下效果:
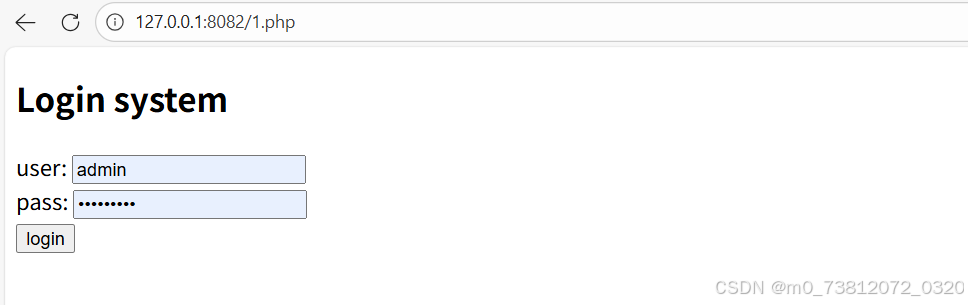
正常代理拦截数据(嗅探明文密码)
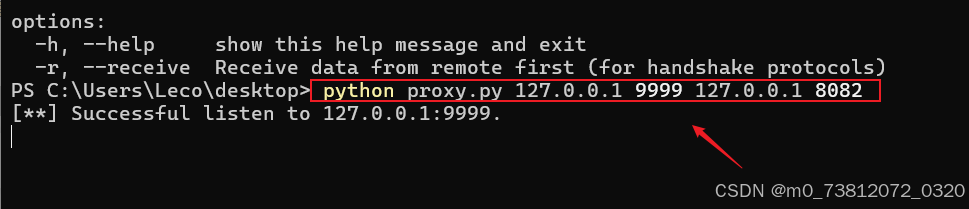
(1)这里我们输入命令,正常代理一下网页:
bash
python proxy.py 127.0.0.1 9999 127.0.0.1 8082效果如下:
(2)打开你的 Edge 浏览器,访问你在 WWW 目录下的 1.php,但是要走 9999 代理端口:http://127.0.0.1:9999/1.php
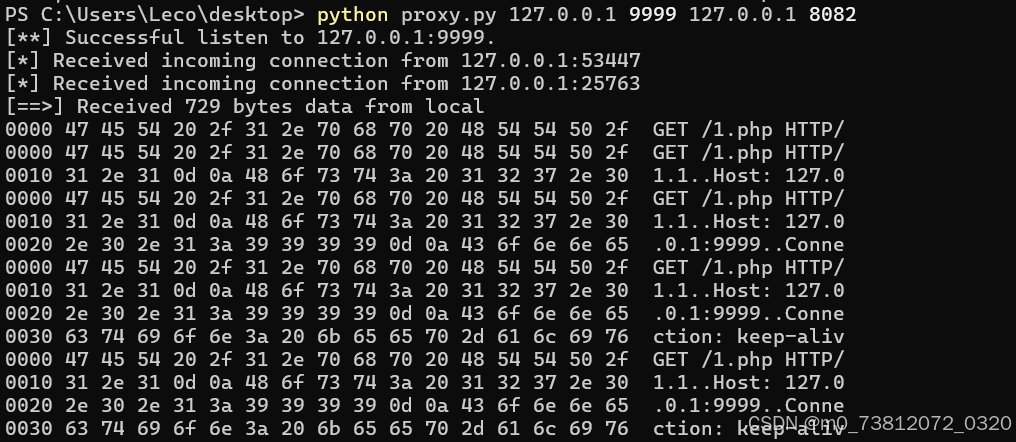
输入网址后,命令行成功返回了结果;
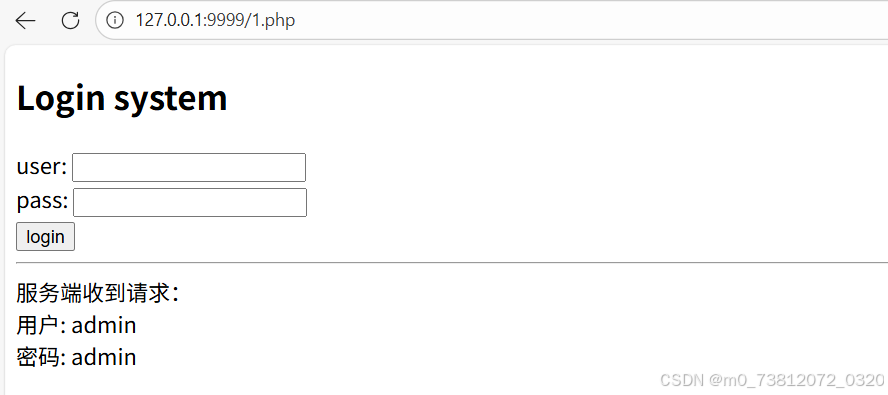
(3)然后提交一下数据:admin / admin
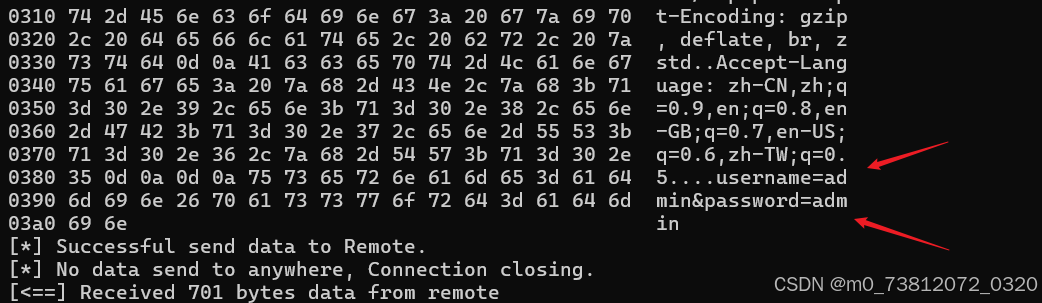
成功获取到了user=admin&pass=admin 的明文数据
页面也返回了效果:
已经成功让流量经过了 Python 代理,屏幕上的十六进制数据(Hexdump)就是最好的证明。
篡改请求体
假设你想恶作剧:无论用户在浏览器里输入什么账号,发给服务器的都强行变成 hacker
(1)打开你的 proxy.py,找到里面的 request_handler 函数,修改成这样:

bash
def request_handler(buffer):
    # 检查发送给服务器的数据中是否包含用户输入的 'admin'
    if b"admin" in buffer:
        # 将字节流中的 admin 替换成 hacker
        buffer = buffer.replace(b"admin", b"hacker")
        print("[***] 警告:已将登录账号从 admin 篡改为 hacker!")
    return buffer
修改后重新运行脚本。在网页里输入 admin 登录,页面打印出来的接收结果将变成 hacker因为流量在半路被你写的代码"劫持并修改"了。
这里我输入的是 admin / 123456

而页面数据同样也被篡改:
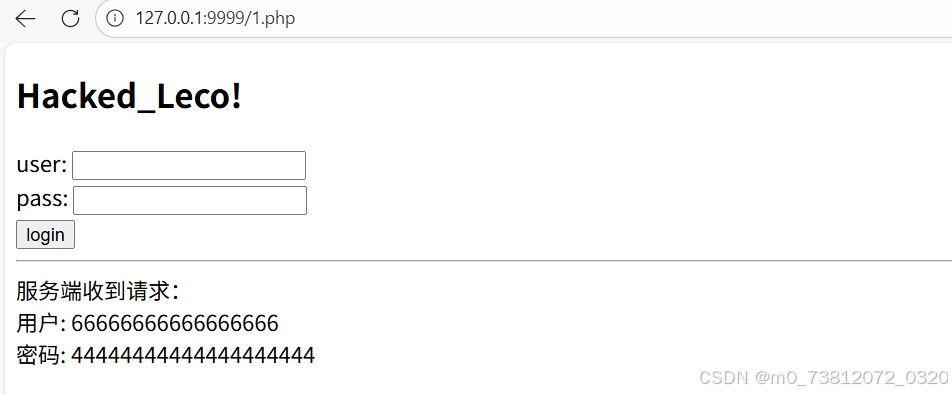
篡改响应体(网页挂马/篡改)
不仅能改发出去的数据,还能改收回来的数据。你想把网页的标题 Login system 偷偷换掉吗?
(1)修改代码中的 response_handler:
bash
def response_handler(buffer):
    # 'Login system' 长度是 12
    # 'Hacked_Leco!' 长度也是 12
    if b"Login system" in buffer:
        buffer = buffer.replace(b"Login system", b"Hacked_Leco!")
        print("[***] 警告:已等长篡改服务器返回的网页内容!")
    return buffer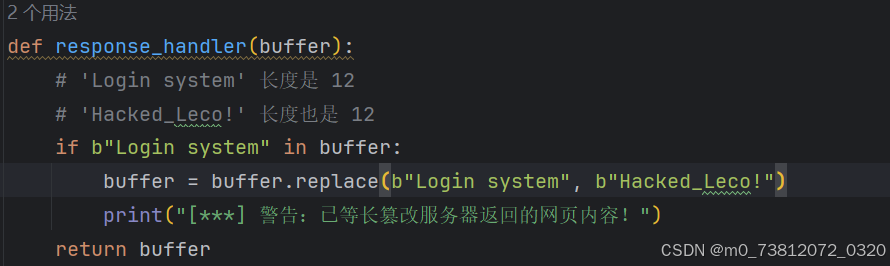
步骤同上,先监听然后提交表单:

提交数据如下:
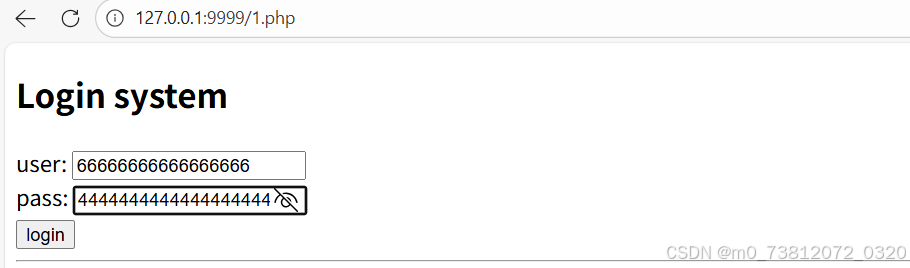
随后进行拦截修改:
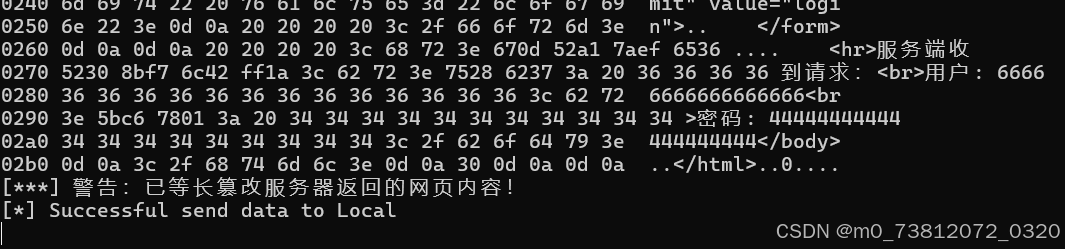
而网页标题也确实发生了改变:
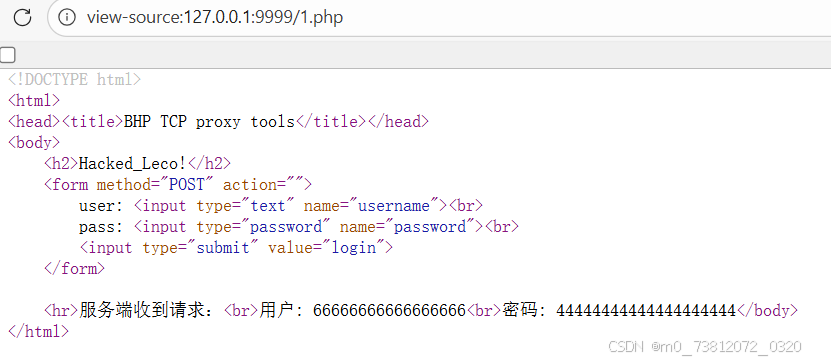
但是网页源码并没有变化:
总结
这两个 handler 函数就是网络安全中"中间人攻击 (MITM)"的核心原理缩影。
所以代码还是挺有趣的;
期待下次再见;