HarmonyOS 6实战:HarmonyOS轻量化交互的两种姿势(上篇)
我们之前做了个AI旅行助手,迭代了AI侧的"帮我规划路线"、"推荐个餐厅"、"查一下天气",已经实现了基本的AI+地图类应用。
但实际用起来,有个小交互一直让我不太舒服:这个AI助手藏在App里,得打开应用才能用。
你想啊,我早上出门前想查一下今天的路线,得先找到App图标,点开,等启动页,等加载,再等AI反应过来。这一套流程下来,十几秒过去了。
能不能更快一点?用户一解锁手机,就能看到今天的路线推荐,点一下就能用?

这是桌面级的轻量化交互。
还有另一个场景:用户在地图里选好了路线,想看看详情,得点个按钮弹出一个页面,操作路径又长了。能不能让面板直接在地图上 ,用手一拖就能拉起来看详情,不用了再推回去?
这是应用内的轻量化交互。
这两件事,一个在桌面,一个在应用内,但核心思路相同:把信息和服务推到用户眼前,而不是让用户去找。
于是有了这次改造。这篇文章分上下两篇,上篇讲服务卡片和实况窗 (系统级轻量化交互),下篇讲可拖拽滑动面板(应用内手势交互)。今天是上篇。
一、服务卡片:AI助手实现常驻系统页
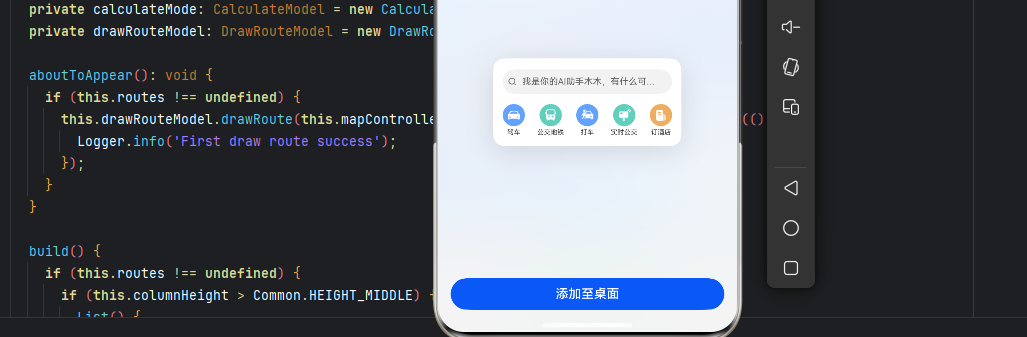
服务卡片就是长按桌面上的App图标,弹出来的那个小窗口。可以是1×2、2×2、2×4等不同尺寸。
它有几个特点:
- 不用打开App就能看到信息
- 点一下就能跳转到应用内具体页面
- 可以定时更新,比如每天早上8点刷新今天的路线推荐
我们的AI助手,正好适合做成卡片------每天早上推几个常用功能,用户看一眼,有兴趣就点进去直接跳转到对应的功能页。
我们使用ide的AI工具可以实时生成卡片,基本 结构大概是下面这样的。
├── ets/
│   ├── form/
│   │   ├── pages/
│   │   │   └── FormCard.ets        # 卡片UI页面
│   │   ├── viewmodel/
│   │   │   └── FormViewData.ets    # 卡片数据
│   │   └── constants/
│   │       └── FormConstants.ets   # 常量
│   └── formability/
│       └── FormAbility.ets         # 卡片能力扩展
└── resources/base/profile/
    └── form_config.json            # 卡片配置
服务卡片改造实战
卡片需要一个能力扩展类,继承FormExtensionAbility。它管卡片的生命周期:什么时候创建、什么时候更新、什么时候销毁。
typescript
// products/phone/src/main/ets/formability/FormAbility.ets
import { formBindingData, FormExtensionAbility, formInfo } from '@kit.FormKit';
import { Want } from '@kit.AbilityKit';

export default class FormAbility extends FormExtensionAbility {

  // 添加卡片时调用 - 返回卡片数据
  onAddForm(want: Want) {
    let formData = '';
    return formBindingData.createFormBindingData(formData);
  }

  // 临时卡片转正常卡片时调用
  onCastToNormalForm(formId: string) {
    // 临时卡片成功转换为正常卡片时的通知
  }

  // 更新卡片时调用
  onUpdateForm(formId: string) {
    // 通知卡片提供方更新指定卡片
  }

  // 卡片可见性变化时调用
  onChangeFormVisibility(newStatus: Record<string, number>) {
    // 接收系统的卡片事件
  }

  // 卡片自定义事件触发时调用
  onFormEvent(formId: string, message: string) {
    // 指定的消息事件被触发
  }

  // 移除卡片时调用
  onRemoveForm(formId: string) {
    // 通知卡片提供方指定卡片已被销毁
  }

  // 获取卡片状态
  onAcquireFormState(want: Want) {
    return formInfo.FormState.READY;
  }
}每个回调方法的用途:
| 回调方法 | 触发时机 | 主要用途 |
|---|---|---|
onAddForm |
用户添加卡片 | 初始化卡片数据 |
onUpdateForm |
定时/主动更新 | 刷新卡片内容 |
onRemoveForm |
用户删除卡片 | 清理资源 |
onFormEvent |
卡片内事件触发 | 处理用户点击 |
onAcquireFormState |
查询卡片状态 | 返回就绪状态 |
卡片UI用的是ArkTS,和普通页面写法差不多,但有几个特殊的地方。
关键组件是FormLink ,它不是普通的Button或Text,而是卡片专用的跳转组件。点击它,可以跳转到App内部指定的页面。这个设计很贴心------卡片里不能直接用router.pushUrl,系统专门给了FormLink来干这件事。
typescript
// products/phone/src/main/ets/form/pages/FormCard.ets
import { FormLink } from '@kit.FormKit';
import { FormViewData } from '../viewmodel/FormViewData';
import { FunctionType } from '@ohos/commons/Index';

@Entry
@Component
struct FormCard {
  readonly ACTION_TYPE: string = 'router';
  readonly ABILITY_NAME: string = 'EntryAbility';
  readonly MESSAGE: string = 'add detail';

  build() {
    Column() {
      FormLink({
        action: this.ACTION_TYPE,
        abilityName: this.ABILITY_NAME,
        params: {
          message: this.MESSAGE
        }
      }) {
        Column() {
          Row() {
            Image($r('app.media.ic_public_input_search'))
              .width('15vp')
              .margin({ left: '10vp', right: '10vp' })

            Text($r('app.string.textInput_holder'))
              .fontColor('#99000000')
              .width('80%')
              .maxLines(1)
              .textOverflow({ overflow: TextOverflow.Ellipsis })
          }
          .borderRadius('22vp')
          .width('100%')
          .height('44vp')
          .backgroundColor('#0d000000')
          .margin({ top: '20vp' })

          Row() {
            ForEach(FormViewData.FUNCTIONS, (item: FunctionType) => {
              Column() {
                Image(item.icon)
                  .width('40vp')
                  .height('40vp')

                Text(item.desc)
                  .fontSize('12vp')
                  .padding({ top: '4vp' })
              }
            }, (item: FunctionType) => item.id.toString())
          }
          .justifyContent(FlexAlign.SpaceBetween)
          .height('60%')
          .width('100%')
        }
        .width('90%')
      }
    }
    .width('100%')
  }
}FormLink的配置说明:
| 属性 | 说明 | 示例 |
|---|---|---|
action |
动作类型,'router'表示路由跳转 |
'router' |
abilityName |
跳转的目标Ability名称 | 'EntryAbility' |
params |
传递的参数对象 | { message: 'xxx' } |
卡片里显示的内容,比如"今日推荐路线",可以从AI服务拉取。我们建了一个简单的数据模型来管理。
typescript
// products/phone/src/main/ets/form/viewmodel/FormViewData.ets
import { FunctionType } from '@ohos/commons/Index';

export class FormViewData {
  static readonly FUNCTIONS: Array<FunctionType> = [
    {
      id: 1,
      icon: $r('app.media.icon_drive'),
      desc: $r('app.string.drive_form')
    },
    {
      id: 2,
      icon: $r('app.media.icon_Metro'),
      desc: $r('app.string.metro_form')
    },
    {
      id: 3,
      icon: $r('app.media.icon_taxi'),
      desc: $r('app.string.taxi_form')
    },
    {
      id: 4,
      icon: $r('app.media.icon_bus'),
      desc: $r('app.string.bus_form')
    },
    {
      id: 5,
      icon: $r('app.media.icon_hotel'),
      desc: $r('app.string.hotel_form')
    }
  ];
}FunctionType接口定义:
typescript
// 通常在 commons/Index.ets 中定义
export interface FunctionType {
  id: number;
  icon: Resource;
  desc: Resource;
}卡片需要两个配置:一个form_config.json描述卡片属性,一个在module.json5里注册。
form_config.json:
json
// products/phone/src/main/resources/base/profile/form_config.json
{
  "forms": [
    {
      "name": "form",
      "displayName": "$string:form_display_name",
      "description": "$string:form_desc",
      "src": "./ets/form/pages/FormCard.ets",
      "uiSyntax": "arkts",
      "window": {
        "designWidth": 720,
        "autoDesignWidth": true
      },
      "colorMode": "auto",
      "isDynamic": false,
      "isDefault": true,
      "updateEnabled": false,
      "scheduledUpdateTime": "10:30",
      "updateDuration": 1,
      "defaultDimension": "2*4",
      "supportDimensions": ["2*4"]
    }
  ]
}配置项说明:
| 配置项 | 说明 | 我们的设置 |
|---|---|---|
name |
卡片标识 | form |
src |
卡片UI页面路径 | ./ets/form/pages/FormCard.ets |
uiSyntax |
UI语法 | arkts |
defaultDimension |
默认尺寸 | 2*4 |
supportDimensions |
支持的尺寸列表 | ["2*4"] |
updateEnabled |
是否启用定时更新 | false |
scheduledUpdateTime |
定时更新时间 | 10:30 |
updateDuration |
更新间隔(小时) | 1 |
module.json5:
json5
// products/phone/src/main/module.json5
{
  "module": {
    "extensionAbilities": [
      {
        "name": "FormAbility",
        "srcEntry": "./ets/formability/FormAbility.ets",
        "label": "$string:FormAbility_label",
        "description": "$string:FormAbility_desc",
        "type": "form",
        "metadata": [
          {
            "name": "ohos.extension.form",
            "resource": "$profile:form_config"
          }
        ]
      }
    ]
  }
}
配完之后,长按桌面上的App图标,就能看到"添加卡片"的选项了。
踩坑记录
坑1:路径问题
form_config.json里的src路径要从ets开始写,比如./ets/form/pages/FormCard.ets。我一开始写成了pages/FormCard.ets,结果编译不过,报错找不到文件。排查了半天才搞清楚是路径不对。
坑2:卡片里不能用router.pushUrl
普通页面里跳转用router.pushUrl,但在卡片里不行。卡片组件需要用FormLink包裹,系统会自动处理跳转。这个花了我半天才搞明白,看了好几遍官方文档才找到答案。
坑3:更新时机要合理
updateDuration设得太短会频繁刷新,影响性能和电量;设得太长内容可能过时。我们根据业务场景,设了1小时更新一次。
二、实况窗:更新位置与进程服务(mock版)
服务卡片解决了"桌面级"的快捷访问问题。但还有一个场景:用户通过AI叫了车,想随时知道司机到哪了。总不能一直开着App盯着看吧?
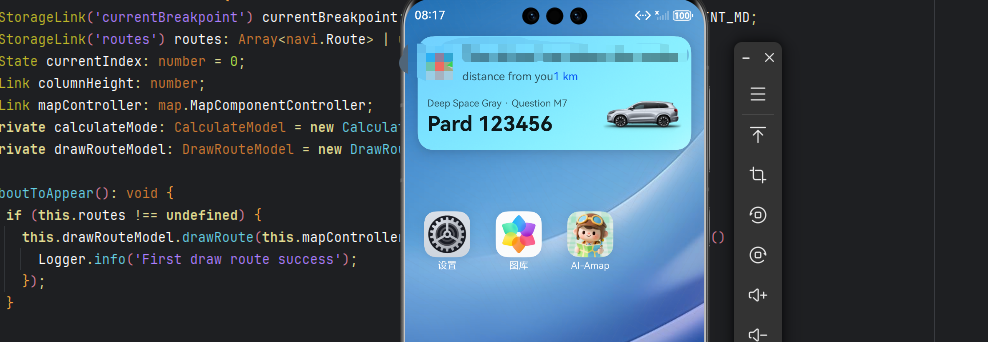
这就是实况窗的用武之地。它可以在状态栏、锁屏、通知栏等位置展示实时信息。比如叫车后,锁屏上就能看到"司机还有1公里",不用反复打开App刷。
我们改造AI助手的时候,顺便加了这个功能。用户通过AI叫了车,AI生成打车订单后,自动启动实况窗,实时更新司机位置。但是因为我们还没有实际接入打车功能,所以这里是mock数据。
├── viewmodel/
│   └── LiveViewController.ets    # 实况窗控制器
└── constants/
    └── LiveConstants.ets         # 实况窗常量
比服务卡片简单很多,核心就是一个控制器类。
typescript
// features/live/src/main/ets/viewmodel/LiveViewController.ets
import { liveViewManager } from '@kit.LiveViewKit';
import { wantAgent } from '@kit.AbilityKit';
import { BusinessError } from '@kit.BasicServicesKit';
import { Logger } from '@ohos/commons/Index';
import { LiveConstants } from '../constants/LiveConstants';

export class LiveViewController {
  private static defaultView = LiveViewController.buildDefaultView();

  /**
   * 启动实况窗
   */
  public async startLiveView(): Promise<liveViewManager.LiveViewResult> {
    // 1. 检查实况窗是否可用
    if (!await LiveViewController.isLiveViewEnabled()) {
      throw new Error('Live view is disabled.');
    }

    // 2. 启动实况窗
    try {
      return await liveViewManager.startLiveView(await LiveViewController.defaultView);
    } catch (error) {
      throw new Error('Live view is disabled.');
    }
  }

  /**
   * 构建默认实况窗数据
   */
  private static async buildDefaultView(): Promise<liveViewManager.LiveView> {
    return {
      id: 0,
      event: 'PICK_UP',
      liveViewData: {
        primary: {
          title: 'The driver has taken the order',
          content: [
            { text: 'distance from you' },
            { text: '1 km', textColor: '#FF0A59F7' }
          ],
          keepTime: 15,
          clickAction: await LiveViewController.buildWantAgent(),
          layoutData: {
            layoutType: 4,
            underlineColor: '#00ffffff',
            title: 'Deep Space Gray · Question M7',
            content: 'Pard 123456',
            descPic: 'taxi.png'
          }
        },
        capsule: {
          type: 1,
          status: 1,
          icon: 'navigate.png',
          backgroundColor: '#FF0A59F7',
          title: '1 km'
        }
      }
    };
  }

  /**
   * 检查实况窗是否启用
   */
  private static async isLiveViewEnabled(): Promise<boolean> {
    try {
      return await liveViewManager.isLiveViewEnabled();
    } catch (error) {
      return false;
    }
  }

  /**
   * 构建点击跳转的WantAgent
   */
  private static async buildWantAgent(): Promise<Want | undefined> {
    const wantAgentInfo: wantAgent.WantAgentInfo = {
      wants: [
        {
          bundleName: LiveConstants.BUNDLE_NAME,
          abilityName: LiveConstants.ABILITY_NAME,
        } as Want
      ],
      actionType: wantAgent.OperationType.START_ABILITIES,
      requestCode: 0,
      actionFlags: [wantAgent.WantAgentFlags.UPDATE_PRESENT_FLAG]
    };

    try {
      const agent = await wantAgent.getWantAgent(wantAgentInfo);
      return agent;
    } catch (error) {
      return undefined;
    }
  }

  /**
   * 停止实况窗
   */
  public async stopLiveView() {
    if (!LiveViewController.isLiveViewEnabled()) {
      throw new Error('Live view is disabled.');
    }
    liveViewManager.stopLiveView(await LiveViewController.defaultView);
  }
}

export default new LiveViewController();
下面是一些常量配置,实际我们需要从后台接口拿,但是没有服务我们根据官网教程实现了一个简化版本的。
typescript
// features/live/src/main/ets/constants/LiveConstants.ets
export class LiveConstants {
  static readonly CAPSULE_COLOR: string = '#FF0A59F7';
  static readonly CAPSULE_ICON: string = 'navigate.png';
  static readonly LIVE_VIEW_TITLE: string = '司机已接单';
  static readonly LIVE_VIEW_CONTENT: string = '距离你 ';
  static readonly LIVE_VIEW_DISTANCE: string = '1公里';
  static readonly LIVE_VIEW_DISTANCE_COLOR: string = '#FF0A59F7';
  static readonly TAXI_BRAND_INFO: string = '深空灰·问界M7';
  static readonly TAXI_LICENCE_INFO: string = '牌123456';
  static readonly TAXI_ICON: string = 'taxi.png';
  static readonly UNDERLINE_COLOR: string = '#00ffffff';
  static readonly TIME: number = 15;
  static readonly BUNDLE_NAME: string = 'com.example.multitravelnavigation';
  static readonly ABILITY_NAME: string = 'EntryAbility';
}
生命周期管理
实况窗不能一直开着,得在合适的时机启动和停止。我们在EntryAbility里加了控制:
typescript
// products/phone/src/main/ets/entryability/EntryAbility.ets
import { LiveViewController } from '@ohos/live/Index';

export default class EntryAbility extends UIAbility {

  // 窗口销毁时 - 停止实况窗
  onWindowStageDestroy(): void {
    LiveViewController.stopLiveView();
  }

  // 进入后台时 - 启动实况窗
  onBackground(): void {
    LiveViewController.startLiveView();
  }
}
实况窗的数据结构稍微有点复杂,但拆开看就清楚了:
LiveView 是顶层对象,包含id(唯一标识)、event(事件类型)、liveViewData(具体数据)。
typescript
interface LiveView {
  id: number;              // 实况窗ID,启动时传0
  event: string;           // 事件类型,如 'PICK_UP'
  liveViewData: LiveViewData;
}
liveViewData 分两部分:primary是主要内容区(展开状态),capsule是状态栏胶囊(收起状态)。
typescript
interface LiveViewData {
  primary: PrimaryData;
  capsule: CapsuleData;
}
primary 里包含title(标题)、content(文字内容数组,支持不同颜色)、keepTime(保持秒数)、clickAction(点击跳转)、layoutData(布局细节)。
typescript
interface PrimaryData {
  title: string;
  content: ContentItem[];
  keepTime: number;
  clickAction: Want;
  layoutData: LayoutData;
}

interface ContentItem {
  text: string;
  textColor?: string;
}

interface LayoutData {
  layoutType: number;
  underlineColor: string;
  title: string;
  content: string;
  descPic: string;
}capsule是状态栏胶囊的配置:
typescript
interface CapsuleData {
  type: number;
  status: number;
  icon: string;
  backgroundColor: string;
  title: string;
}
踩坑记录
坑1:忘记检查isLiveViewEnabled
有些设备或系统版本不支持实况窗,直接调用startLiveView会崩溃。一定要先调用isLiveViewEnabled检查。这个坑我在调试的时候遇到过,真机运行正常,但在某个旧版本模拟器上直接崩了。
坑2:keepTime设置要合理
keepTime设置太短,用户还没看清就消失了;太长又占着位置,影响其他通知。官方示例用的是15秒,我们沿用这个值,效果还不错。
坑3:点击跳转的WantAgent需要正确处理
wantAgent.getWantAgent是异步操作,要确保在实况窗启动前完成。我们的代码里用了await,保证了顺序。
坑4:应用退出后实况窗还在
实况窗是系统级的,应用退出后它可能还留在状态栏。我们在onWindowStageDestroy里调用了stopLiveView,确保退出时清理。
坑5:胶囊内容长度限制
状态栏胶囊空间有限,title别写太长。官方示例用的是"1 km",我们沿用这个风格,保持在10个字以内。
总结
这一篇我们做了两件事:服务卡片 和实况窗。
| 能力 | 位置 | 触发方式 | 核心API | 适用场景 |
|---|---|---|---|---|
| 服务卡片 | 桌面 | 用户主动添加 | FormExtensionAbility + FormLink |
快捷入口、信息展示 |
| 实况窗 | 状态栏/锁屏 | 应用主动启动 | LiveViewManager |
实时状态追踪 |
这两个能力不冲突,可以同时用。卡片负责"快捷入口",让用户快速打开AI助手;实况窗负责"实时状态",让用户不用进App就能追踪打车进度。
代码量不算大,但涉及的知识点不少。服务卡片需要理解FormExtensionAbility的生命周期和FormLink的跳转机制;实况窗需要搞懂LiveView的数据结构和WantAgent的配置。
这就是轻量化交互的价值------把信息和服务推到用户眼前,而不是让用户去找。
下篇预告:我们将继续探讨"应用内"的轻量化交互------可拖拽滑动面板。用手一拖就能拉起详情面板,不用了再推回去,让信息"藏"在应用内,需要时随时取用。