目录
[(3) 请求多个fixtrue](#(3) 请求多个fixtrue)
[(4)yield fixture 清理步骤](#(4)yield fixture 清理步骤)
[<1> scope="function" : # function每个测试函数都会调用一次fixture](# function每个测试函数都会调用一次fixture)
[<2> scope="class": # 在同一个测试类中共享这个fixture](# 在同一个测试类中共享这个fixture)
[<3>⽰例: scope="moudle" 、 scope="session" 实现全局的前后置应⽤:](#<3>⽰例: scope="moudle" 、 scope="session" 实现全局的前后置应⽤:)
[<4> autouse=True 时, fixture 会在所有测试函数执⾏之前⾃动调⽤](#<4> autouse=True 时, fixture 会在所有测试函数执⾏之前⾃动调⽤)
[<5> 通过 params 实现参数化](#<5> 通过 params 实现参数化)
[安装 && 使用:](#安装 && 使用:)
[五、JSON Schema](#五、JSON Schema)
一个框架:pytest
5个模块:requests、YAML、JSON Schema、logging、allure
一、接口自动化测试流程
• 需求分析:当前这个项目上有哪些接口,接口的请求方法、参数、响应,我们都要明确。
• 挑选自动化接口:在众多的接口上,挑选当前来实现自动化的接口(时间紧张保证重要接口、尽可能多的去覆盖、接口复杂程度是否经常变化)。
• 设计自动化测试用例:接口通过性测试、接口安全、参数组合、异常验证。
• 搭建自动化测试环境:确定语言和开发工具。
• 设计自动化框架
• 编写代码
• 执行用例
• 生成测试报告
二、requests模块
安装:
python
pip install requests==2.31.0requests 库是⼀个非常流行的HTTP客户端库,用于发送HTTP请求。 requests.get ⽅法⽤于 发送⼀个HTTP get 请求到指定的URL requests.get 方法返回⼀个 Response 对象,这个对象包含了服务器返回的所有信息。

|----------------------|------------------------------------|
| 方法 | 描述 |
| r.status_code | 响应状态码 |
| r.content | 字节方式的响应体,会自动解码gzip和deflate压缩 |
| r.headers | 以字典对象存储服务器响应头,若键不存在则返回None |
| r.json() | Requests中内置的JSON解析⽅法,将响应体解析为JSON格式 |
| r.url | 获取实际请求的URL |
| r.encoding | 编码格式,根据响应头部的字符编码确定 |
| r.cookies | 获取服务器设置的cookies |
| r.raw | 返回原始响应体,不进⾏任何处理 |
| r.text | 字符串⽅式的响应体,会⾃动根据响应头部的字符编码进⾏解码 |
| r.raise_for_status() | 失败请求(非200响应)抛出异常 |
python
url = "http://xxxxxxxx"
# 定义查询参数
params = {
 "blogId":9773
}
# 定义请求头信息
header = {

"user_token_header":"eyJhbGciOiJIUzI1NiJ9.eyJpZCI6MSwidXNlck5hbWUiOiJ6aGFuZ3Nhb
iIsImV4cCI6MTczNTU1ODk2Mn0.72oh-gQ-5E6_aIcLsjotWL4ZHmgy0jF1794JDE-uUkg",
 "x-requested-with":"XMLHttpRequest"
}

# 定义要发送的数据
#data = {}

# 定义cookie信息
#cookie = {}


r = requests.post(url=url, params=params, headers=header)
print(r.json())
三、自动化框架pytest
有了 requests 库,可以实现对接口发起 http 请求,然而自动化测试中,我们需要编写⼤量的测试⽤例,这些⽤例的组织、执行和管理也需要使⽤其他更强大的框架⸺⸺ pytest 框架。 requests 库专注于HTTP请求的发送,而 pytest 框架则提供了测试的组织、执行和管理功能。
1、安装
python
pip install pytest==8.3.22、用例运行规则
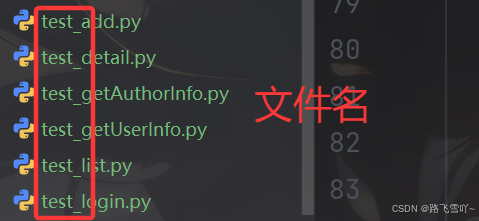
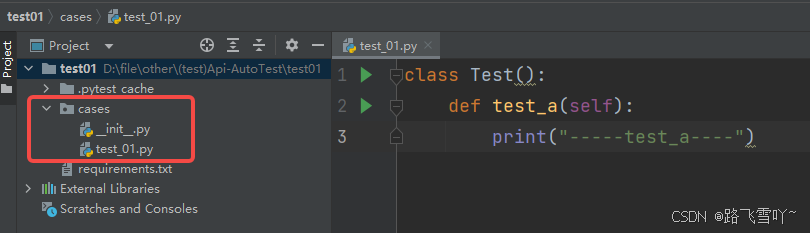
1. 文件名必须以 test_ 开头或者 _test 结尾
2. 测试类必须以 Test 开头,并且不能有 init 方法。
3. 测试方法必须以 test 开头

注意:Python类中不可以添加init方法。
3、pytest命令参数
|---------------------------|----------------------|
| 命令 | 描述 |
| pytest | 在当前⽬录及其⼦⽬录中搜索并运⾏ 测试。 |
| pytest -v | 增加输出的详细程度 |
| pytest -s | 显⽰测试中的 print 语句 |
| pytest test_module.py | 运⾏指定的测试模块 |
| pytest test_dir/ | 运⾏指定⽬录下的所有测试 |
| pytest -k <keyword> | 只运⾏测试名包含指定关键字的测 试 |
| pytest -m <marker> | 只运⾏标记为指定标记的测试 |
| pytest -q | 减少输出的详细程度 |
| pytest --html=report.html | ⽣成 HTML 格式的测试报告 |
| pytest --cov | 测量测试覆盖率 |
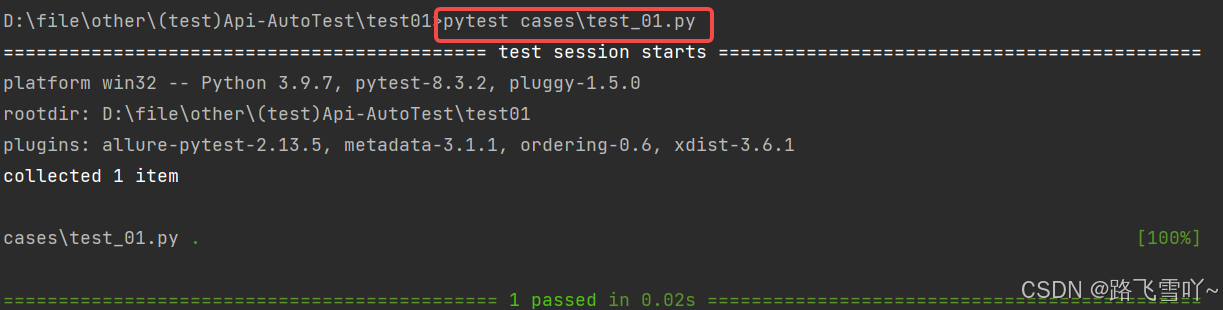
#指定测试⽤例: pytest 包名/⽂件名::类名::⽅法名
pytest cases/test_01.py::Test::test_a
4、pytest配置文件
当我们既要详细输出,又要指定⽂件时,命令会⼜臭⼜⻓,⽽且每次运⾏都需要⼿动输⼊命 令,如何解决? 将需要的相关配置参数统⼀放到 pytest 配置⽂件中。
在当前项⽬下创建 pytest.ini ⽂件,该⽂件为 pytest 的配置⽂件,以下为常⻅的配置选项:
|------------------|-------------------------|
| 参数 | 解释 |
| addopts | 指定在命令⾏中默认包含的选项 |
| testpaths | 指定搜索测试的⽬录 |
| python_files | 指定发现测试模块时使⽤的⽂件匹配模式 |
| python_classes | 指定发现测试类时使⽤的类名前缀或模式 |
| python_functions | 指定发现测试函数和⽅法时使⽤的函数名前缀或模式 |
| norecursedirs | 指定在搜索测试时应该避免递归进⼊的⽬录模式 |
| markers | 定义测试标记,⽤于标记测试⽤例 |
⽰例:详细输出 cases 包下⽂件名以 test_ 开头且⽅法名以 Test 开头的所有⽤例:
python
#pytest.ini
[pytest]
addopts = -vs        #默认选项
testpaths = ./cases  #搜索目录
python_files = test_*.py  #执行的文件
python_classes = Test*    #要执行的类名
配置好 pytest.ini ⽂件后,命令⾏执⾏ pytest 命令即可,⽆需再额外指定其他参数。
5、pytest前后置
使⽤pytest框架,测试类中不可以添加init()⽅法,如何进⾏数据的初始化?
pytest 框架提供三种⽅法做前后置的操作:
• setup_method 和 teardown_method :这两个⽅法⽤于类中的每个测试⽅法的前置和后置操
作。
• setup_class 和 teardown_class :这两个⽅法⽤于整个测试类的前置和后置操作。
• fixture :这是 pytest 推荐的⽅式来实现测试⽤例的前置和后置操作。 fixture 提供了更
灵活的控制和更强⼤的功能。(该内容后续在 fixture 章节中详细讲解)
python
# setup_method 和 teardown_method 用于类中的每个测试方法
# 每个测试方法之前都会调用setup_method
# 之后都会调用teardown_method
class Test:
    # def __init__(self):
    #     print("login")
    # 前置操作
    def setup_method(self):
        print("setup_method()")

    def test01(self):
        print("test01")

    def test02(self):
        print("test02")

    # 后置操作
    def teardown_method(self):
        print("teardown_method()")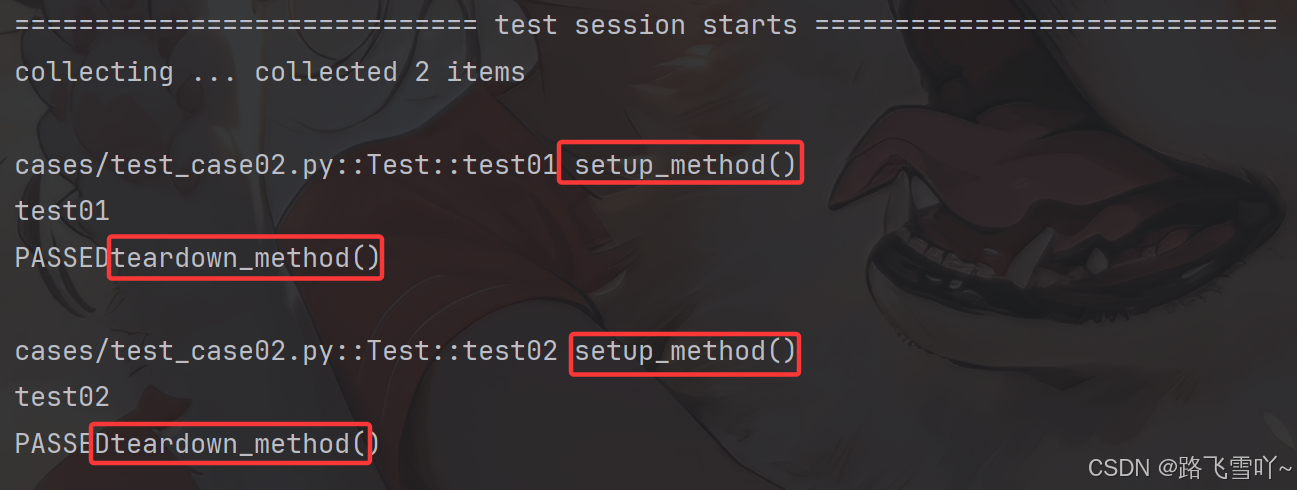
python
# setup_class 和 teardown_class 用于整个测试类的前置和后置
# 所有测试方法之前会调用setup_class
# 之后会调用teardown_class
class Test:
    # 前置操作
    def setup_class(self):
        print("setup_class()")

    def test01(self):
        print("test01")

    def test02(self):
        print("test02")

    # 后置操作
    def teardown_class(self):
        print("teardown_class()")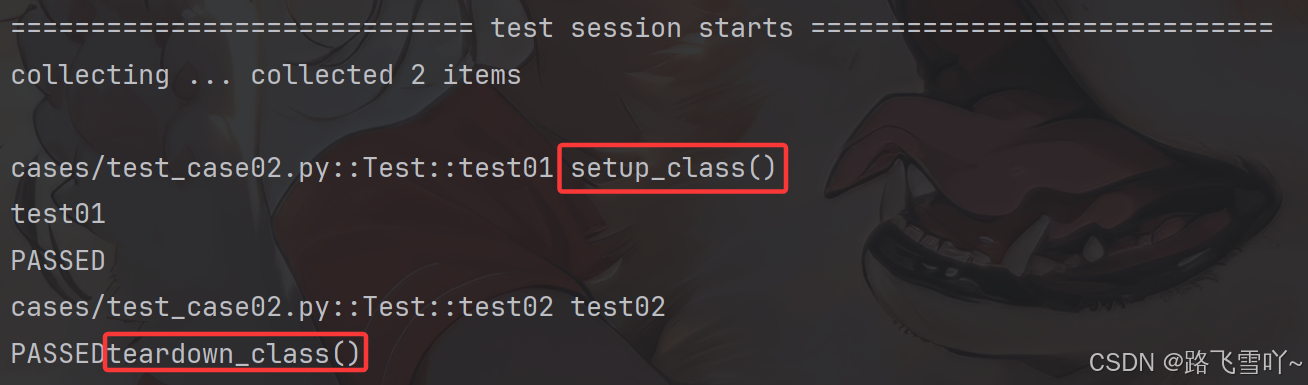
6、断言
(1)基本语法
python
assert 条件, 错误信息

• 条件 :必须是⼀个布尔表达式。
• 错误信息 :当条件为假时显⽰的错误信息,可选。
python
#断⾔整数
a = 1
b = 2
assert a == b
#断⾔字符串
str = "hello"
assert "hello" == str
python
⽰例2:数据结构断⾔

def test():
 # 断⾔列表
 expect_list = [1, 'apple', 3.14]
 actual_list = [1, 'apple', 3.14]

 assert expect_list == actual_list

 # 断⾔元组
 expect_tuple = (1, 'apple', 3.14)
 actual_tuple = (1, 'apple', 3.14)

 assert expect_tuple == actual_tuple

 # 断⾔字典
 expect_dict = {'name': 'Alice', 'age': 25}
 actual_dict = {'name': 'Alice', 'age': 25}

 assert expect_dict == actual_dict

# 断⾔集合
 expect_set = {1, 2, 3, 'apple'}
 actual_set = {1, 2, 3, 'apple'}

 assert expect_set == actual_set
python
⽰例3:函数断⾔

def divide(a, b):
 assert b != 0, "除数不能为0"
 return a / b

# 正常情况
print(divide(10, 2)) # 输出 5.0

# 触发断⾔
print(divide(10, 0)) # 抛出 AssertionError: 除数不能为0
python
⽰例4:接⼝返回值断⾔

#断⾔接⼝返回值完整字段和值
def test1():
 url = "http://jsonplaceholder.typicode.com/posts/1"
 r = requests.get(url=url)

 expect_data = {
 "userId": 1,
 "id": 1,
 "title": "sunt aut facere repellat provident occaecati excepturi optio
reprehenderit",
 "body": "quia et suscipit\nsuscipit recusandae consequuntur expedita et
cum\nreprehenderit molestiae ut ut quas totam\nnostrum rerum est autem sunt
rem eveniet architecto"
 }

 print(r.json())

 assert r.json() == expect_data

 assert r.json()['userId'] == 1


#断⾔接⼝返回值重要字段
def test2():
 url = "http://jsonplaceholder.typicode.com/comments?postId=1"
 r = requests.get(url=url)
 print(r.json())

 assert r.json()[1]['id'] == 1

#断⾔接⼝html返回值
def test3():
 url = "http://jsonplaceholder.typicode.com/"
 r = requests.get(url=url)
 assert "Use your own data" in r.text
7、参数化
pytest中内置的 pytest.mark.parametrize 装饰器允许对测试函数的参数进⾏参数化。
python
import pytest

@pytest.mark.parametrize("test_input,expected", [("3+5", 8), ("2+4", 6),
("6*9", 42)])
def test_eval(test_input, expected):
 assert eval(test_input) == expected
这⾥, @parametrize 装饰器定义了三个不同的 (test_input,expected) 元组,以便 test_eval 函数将依次使⽤它们运⾏三次。 也可以在类或模块上使⽤ parametrize 标记,这将使⽤参数集调⽤多个函数。
python
# 参数为统一的类型
@pytest.mark.parametrize("data",(1,2,3))
def ftest(data):
    print(data)

# 参数不是统一的类型
@pytest.mark.parametrize("data",(100,2.12,'a',"hello"))
def gtest(data):
    print(data)

# 对多组参数实现参数化
@pytest.mark.parametrize("test_input,expected", [("3+5", 8), ("2+4", 6),("6*9", 42)])
def htest_eval(test_input, expected):
 assert eval(test_input) == expected

# 在类上实现参数化
@pytest.mark.parametrize("n,expected", [(1, 2), (3, 4)])
class iTestClass:
    def test_simple_case(self, n, expected):
        assert n + 1 == expected

    def test_weird_simple_case(self, n, expected):
        assert (n * 1) + 1 == expected

# pytestmark 全局赋值
pytestmark = pytest.mark.parametrize("data",(1,2))
class Test_A:
    def test_a01(self,data):   #1,2
        print(data)
    def test_a02(self,data):   #1,2
        print(data)

class Test_B:
    def test_b01(self,data):   #1,2
        print(data)
    def test_b02(self,data):   #1,2
        print(data)
python
# 自定义参数化数据源
def data_provider():
    return ["a","b","c"]

@pytest.mark.parametrize("data", data_provider())
def htest_data(data):
    print(data)
8、fixture
pytest 中的fixture 是⼀种强⼤的机制,⽤于提供测试函数所需的资源或上下⽂。它可以⽤于 设置测试环境、准备数据等。
(1)使用和不使用的区别:
python
# 未标记fixture方法调用 --- 函数名来调用
def fixture_01():
    print("第一个fixture方法")

def test_01():
    fixture_01() # 需要在方法体中调用
    print("第一个测试用例")


# 使用
@pytest.fixture
def fixture_01():
    print("第一个fixture方法")

def test_01(fixture_01): # 不需要在方法体中调用
    print("第一个测试用例")

def test_02(fixture_01): # 不需要在方法体中调用
    print("第一个测试用例")

def test_03(fixture_01): # 不需要在方法体中调用
    print("第一个测试用例")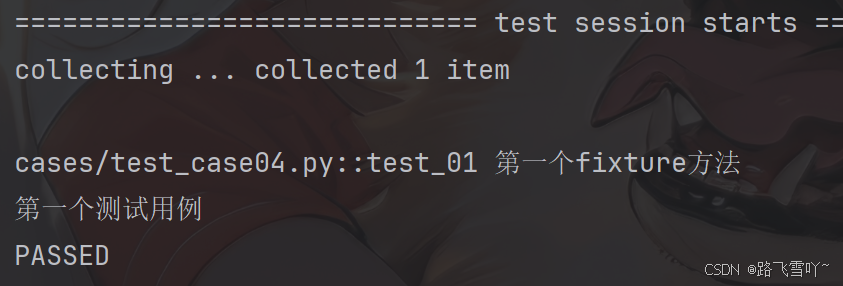
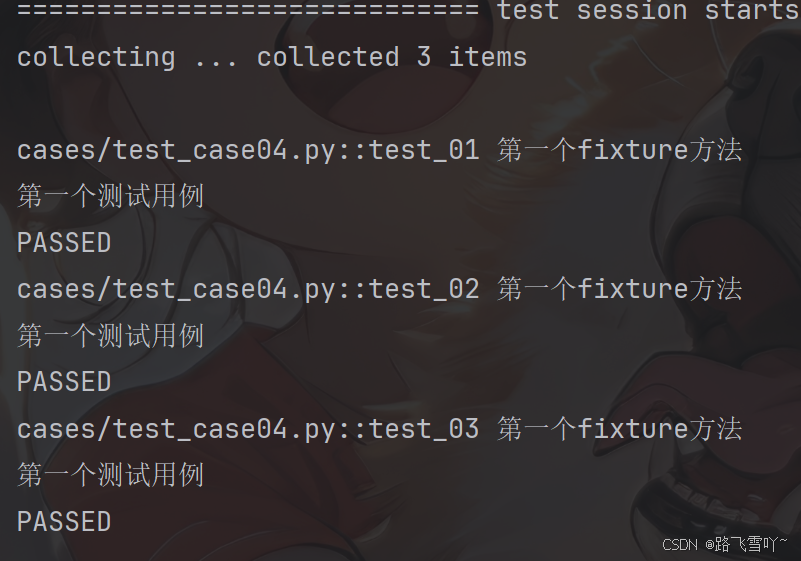
未标记 fixture ⽅法的调⽤与 fixture 标记的⽅法调⽤完全不⼀样,前者需要在⽅法体中调⽤, ⽽后者可以将函数名作为参数进⾏调⽤。
测试脚本中存在的很多重复的代码、公共的数据对象时,使⽤ fixture 最为合适。
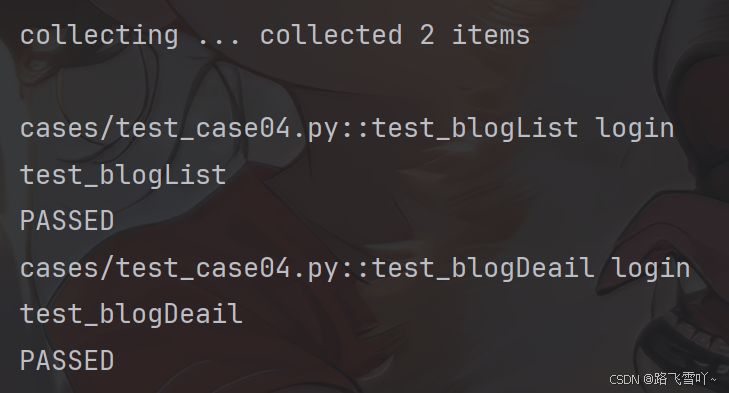
python
@pytest.fixture
def login():
    print("login")

def test_blogList(login):
    print("test_blogList")

def test_blogDeail(login):
    print("test_blogDeail")
通过使⽤ @pytest.fixture 装饰器来告诉 pytest ⼀个特定函数是⼀个 fixture,通过运⾏结果可 ⻅,在执⾏列表⻚和详情⻚之前都会先执⾏ login ⽅法。
(2)fixture嵌套
python
# # fixture 嵌套
@pytest.fixture
def first_entry():
    return "a"

@pytest.fixture
def order(first_entry):
    return [first_entry]

def test_string(order):
    # ["a"]
    order.append("b")

    assert order == ["a", "b"]
(3) 请求多个fixtrue
python
# 请求多个fixture
class Fruit:
    def __init__(self, name):
        self.name = name
    def __eq__(self, other):
        return self.name == other.name

@pytest.fixture
def my_fruit():
    return Fruit("apple")

@pytest.fixture
def fruit_basket(my_fruit):
    return [Fruit("banana"), my_fruit]   # ["banana","apple"]

def test_my_fruit_in_basket(my_fruit, fruit_basket):
    assert my_fruit in fruit_basket  # ["apple" in "banana","apple"]
(4)yield fixture 清理步骤
当我们运⾏测试时,我们希望确保它们能够⾃我清理,以便它们不会⼲扰其他测试(同时也避免留下 大量测试数据来膨胀系统)。pytest中的 fixture 提供了⼀个⾮常有⽤拆卸系统,它允许我们为每 个 fixture 定义具体的清理步骤。
• return 被替换为 yield 。
• 该 fixture 的任何拆卸代码放置在 yield 之后。
⼀旦 pytest 确定了 fixture 的线性顺序,它将运⾏每个 fixture 直到它返回或 yield ,然后 继续执⾏列表中的下⼀个 fixture 做同样的事情。 测试完成后, pytest 将逆向遍历 fixture 列表,对于每个 yield 的 fixture ,运⾏ yield 语句之后的代码。
python
@pytest.fixture
def operator():
    print("前置操作:数据的初始化")

    yield # 什么都不返回

    print("后置操作:数据的清理")

def test_01(operator):
    print("test_01")
python
#创建⽂件句柄与关闭⽂件

@pytest.fixture
def file_read():
    print("打开⽂件句柄")
    fo = open("test.txt", "r", encoding="utf-8")

    yield fo

    print("关闭打开的⽂件")
    fo.close()

@pytest.fixture
def file_write():
    print("打开⽂件句柄")
    fo = open("test.txt","w",encoding="utf-8")

    return fo
    # yield fo
    #
    # print("关闭⽂件句柄")
    # fo.close()

def test_file(file_write, file_read):
    # 写⼊数据
    w = file_write
    w.write("小路飞,天天开心!!!")
    w.close() # 写⼊后关闭⽂件句柄,以便读取
    # 读取数据
    r = file_read
    str = r.read()
    print("⽂件内容:", str)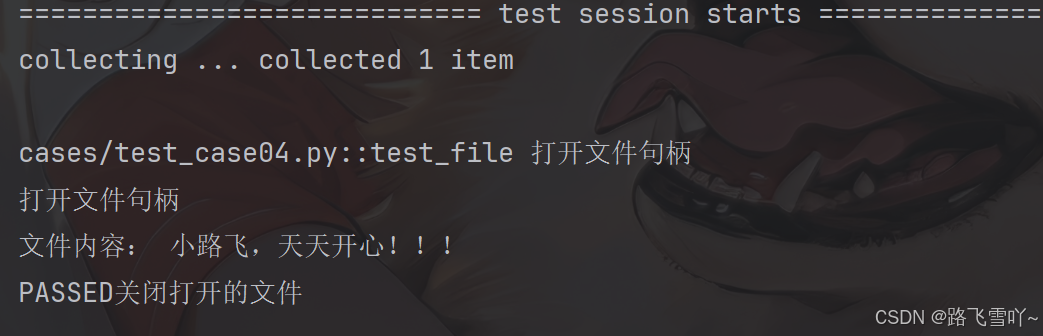
(5)带参数的fixture
python
pytest.fixture(scope='', params='', autouse='', ids='', name='')• scope 参数⽤于控制fixture的作⽤范围,决定了fixture的⽣命周期。可选值有:
|---------------|------------------------------|
| function (默认) | 每个测试函数都会调⽤⼀次fixture |
| class | 在同⼀个测试类中共享这个fixture |
| module | 在同⼀个测试模块中共享这个fixture。(⼀个⽂件⾥) |
| session | 整个测试会话中共享这个fixture |
• autouse 参数默认为 False 。如果设置为 True ,则每个测试函数都会⾃动调⽤该fixture, ⽆需显式传⼊;
• params 参数⽤于参数化fixture,⽀持列表传⼊。每个参数值都会使fixture执⾏⼀次,类似于 for循环;
• ids 参数与 params 配合使⽤,为每个参数化实例指定可读的标识符(给参数取名字);
• name 参数⽤于为fixture显式设置⼀个名称。如果使⽤了 name ,则在测试函数中需要使⽤这个 名称来引⽤ fixture (给fixture取名字);
<1> scope="function" : # function每个测试函数都会调用一次fixture
python
@pytest.fixture(scope="function") # function每个测试函数都会调用一次fixture
def fixture_01():
    print("初始化")
    yield
    print("清理")

class TestCase01():
    def test_01(self, fixture_01):
        print("第⼀个测试⽤例")

    def test_02(self, fixture_01):
        print("第⼆个测试⽤例")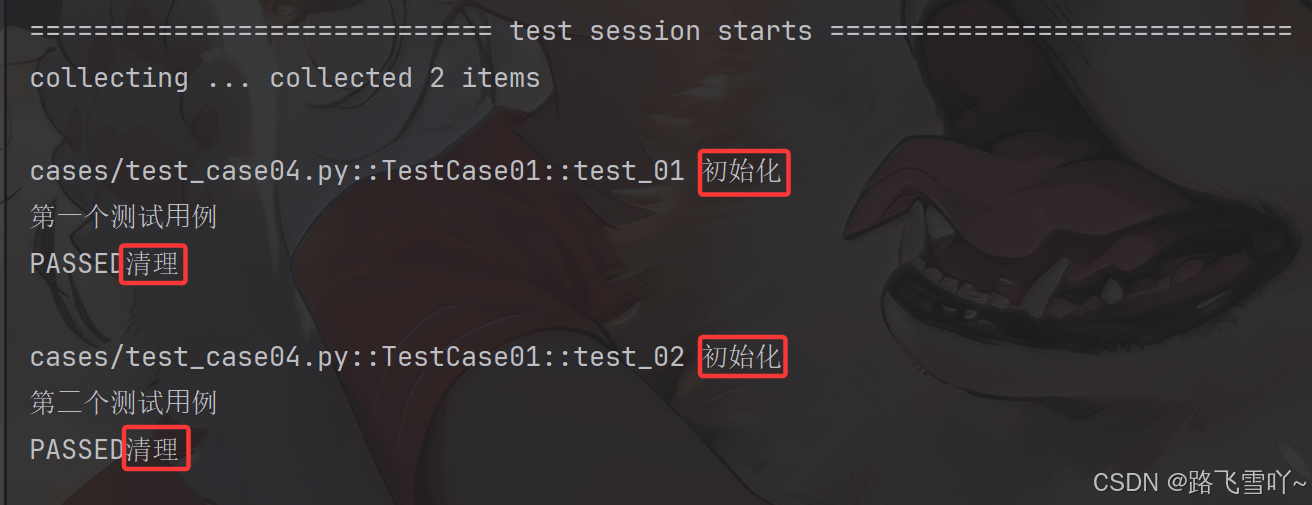
<2> scope="class": # 在同一个测试类中共享这个fixture
python
@pytest.fixture(scope="class") # 在同一个测试类中共享这个fixture
def fixture_01():
    print("初始化")
    yield
    print("清理")

class TestCase01():
    def test_01(self, fixture_01):
        print("第⼀个测试⽤例")

    def test_02(self, fixture_01):
        print("第⼆个测试⽤例")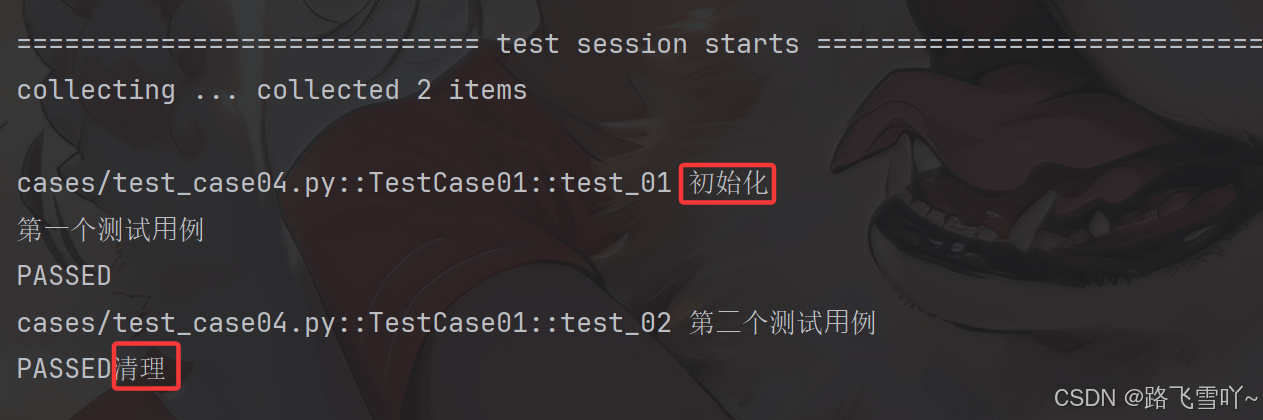
结论:
• scope 默认为 function ,这⾥的 function 可以省略不写,当 scope="function" 时, 每个测试函数都会调⽤⼀次 fixture 。 scope="class" 时,在同⼀个测试类中, fixture 只会在类中的第⼀个测试函数开始前执⾏⼀次,并在类中的最后⼀个测试函数结束后执⾏清理。
当 scope="moudle" 、 scope="session" 时可⽤于实现全局的前后置应⽤,这⾥需要多个 ⽂件的配合:
conftest.py 和 @pytest.fixture 结合使⽤实现全局的前后置应⽤ @pytest.fixture 与 conftest.py ⽂件结合使⽤,可以实现在多个测试模块( .py )⽂件中共 享前后置操作,这种结合的⽅式使得可以在整个测试项⽬中定义和维护通⽤的前后置逻辑,使测试代码 更加模块化和可维护。
规则:
• conftest.py 是⼀个单独存放的夹具配置⽂件,名称是固定的不能修改;
• 你可以在项⽬中的不同⽬录下创建多个 conftest.py ⽂件,每个 conftest.py ⽂件都会对其 所在⽬录及其⼦⽬录下的测试模块⽣效;
• 在不同模块的测试中需要⽤到 conftest.py 的前后置功能时,不需要做任何的import导⼊操作;
• 作⽤:可以在不同的 .py ⽂件中使⽤同⼀个 fixture 函数;
<3>⽰例: scope="moudle" 、 scope="session" 实现全局的前后置应⽤:
python
conftest.py

import pytest

# module针对整个文件
@pytest.fixture(scope="module") # 在同一个测试模块中共享这个fixture
# @pytest.fixture(scope="session")
def fixture_01():
    print("初始化")
    yield
    print("清理")
python
test_case05.py

class TestCase01:
    def test_01(self, fixture_01):
        print("第⼀个测试⽤例")

    def test_02(self, fixture_01):
        print("第⼆个测试⽤例")

class TestCase02:
    def test_01(self, fixture_01):
        print("第⼀个测试⽤例")

    def test_02(self, fixture_01):
        print("第⼆个测试⽤例")
python
test_case06


class TestCase03:
    def test_01(self, fixture_01):
        print("第⼀个测试⽤例")

    def test_02(self, fixture_01):
        print("第⼆个测试⽤例")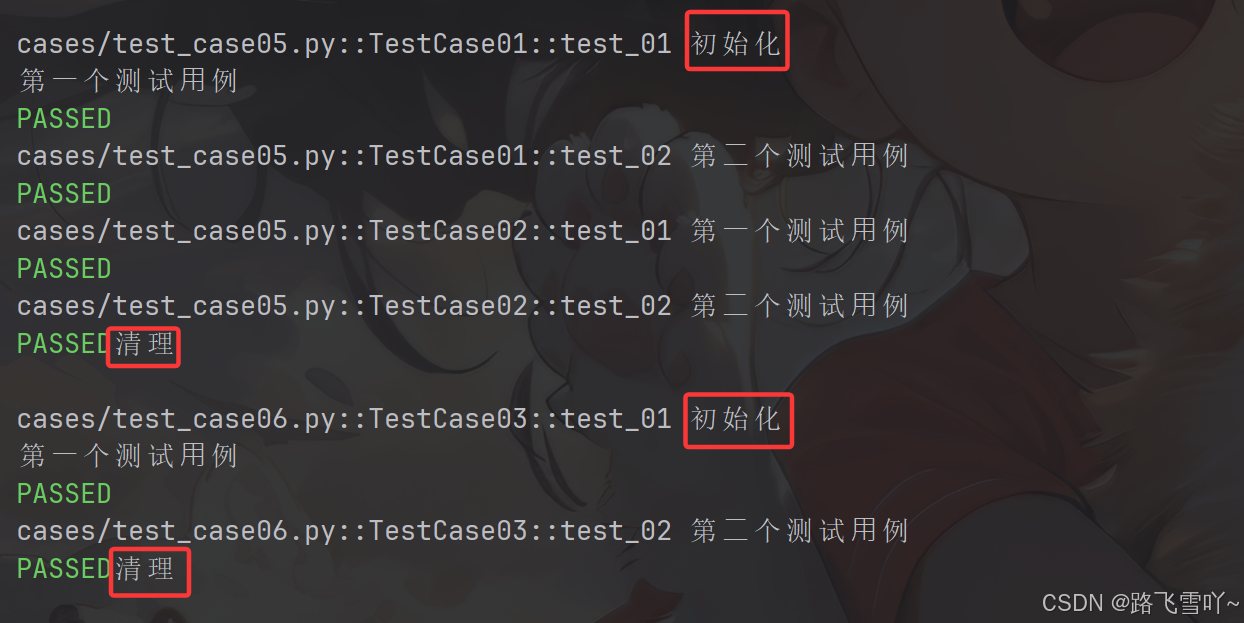
python
import pytest

@pytest.fixture(scope="session") #整个测试会话中共享这个fixture
def fixture_01():
    print("初始化")
    yield
    print("清理")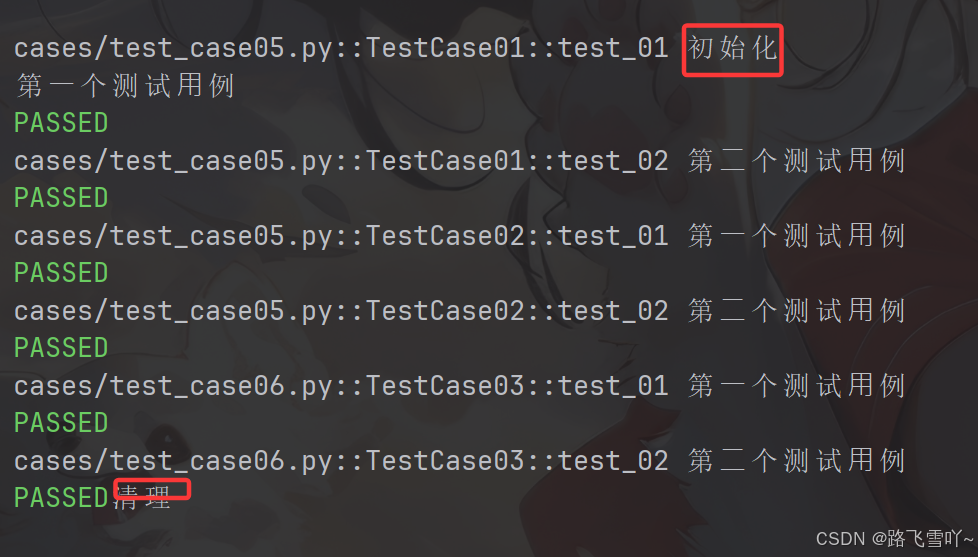
<4> autouse=True 时, fixture 会在所有测试函数执⾏之前⾃动调⽤
autouse 默认为 False ,即当前的 fixture 需要⼿动显⽰调⽤,在该案例之前我们默认使⽤的 都是 autouse=False 当 autouse=True 时, fixture 会在所有测试函数执⾏之前⾃动调⽤,⽆论这些测试函数是否显 式地引⽤了该 fixture:
python
import pytest

@pytest.fixture(scope="module",autouse=True)
def fixture_01():
    print("初始化")
    yield
    print("清理")
python
class TestCase01:
    # def test_01(self, fixture_01): # 不用显示去调用fixture_01
    def test_01(self):

        print("第⼀个测试⽤例")

    def test_02(self):
        print("第⼆个测试⽤例")

class TestCase02:
    def test_01(self):
        print("第⼀个测试⽤例")

    def test_02(self):
        print("第⼆个测试⽤例")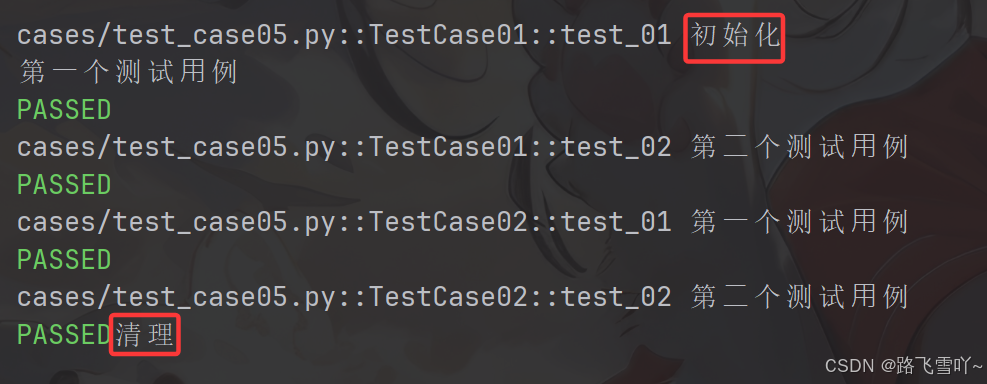
<5> 通过 params 实现参数化
python
import pytest


@pytest.fixture(params=[1, 2, 3])
def data_provider(request):
    return request.param

def test_data(data_provider):
    print(data_provider)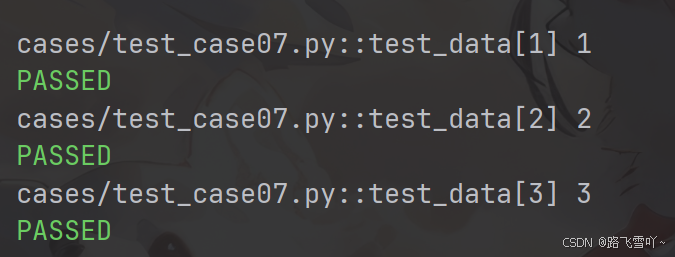
前⾯我们已经学过pytest中通过 @pytest.mark.parametrize 实现参数化,通过 fixture 也 可以实现参数化,那么到底哪⼀种更好呢?
parametrize 更适合简单场景,⽽ fixture 更适合需要动态数据和资源管理的复 杂场景。
四、YAML
YAML是⼀种数据序列化语⾔,⽤于以⼈类可读的形式存储信息。它最初代表"Yet Another Markup Language",但后来更改为" YAML Ain't Markup Language"(YAML不是⼀种标记语⾔),以区 别于真正的标记语⾔。 它类似于XML和JSON⽂件,但使⽤更简洁的语法。
特点:
• YAML 是⼀种⾮常简单的基于⽂本的⼈类可读的语⾔,⽤于在⼈和计算机之间交换数据。
• YAML 是不是⼀种编程语⾔。它主要⽤于存储配置信息。
• YAML 的缩进就像Python的缩进⼀样优雅。
• YAML 还减少了 JSON 和 XML ⽂件中的⼤部分"噪⾳"格式,例如引号、⽅括号和⼤括号。
注意:• YAML 是区分⼤⼩写。
• YAML 不允许使⽤制表符 Tab 键,(你之所按下 Tab YAML 仍能使⽤,是因为编辑器被配置为按下 Tab 键会导致插⼊适当数量的空格)。
• YAML 是遵循严格缩进的。
YAML ⽂件的后缀名是 .yaml 或 .yml ,本着能少写不多写的原则,我们常⽤的是 .yml 。 yaml 中⽀持不同数据类型,但在写法上稍有区别。
以上语法若短时间内⽆法掌握,我们也有很多⼯具可供使⽤,如json转yaml
|---------|--------------------------------------------------------------------------------------------------------|---------------------------------------------------------------------------------------------------------------------------------------|
| | YAML | JSON |
| 简单标量值 | python key: value | python { "key": "value" } |
| 整数和浮点数 | python int_key: 123 float_key: 123.456 | python { "int_key": 123, "float_key": 123.456 } |
| 布尔值 | python bool_key: true | python { "bool_key": true } |
| 字符串 | python string_key: "This is a string" | python { "string_key": "This is a string" } |
| 列表 | python list_key: - item1 - item2 - item3 | python { "list_key": ["item1", "item2", "item3"] } |
| 映射(字 典) | python map_key: sub_key1: sub_value1 sub_key2: sub_value2 | python { "map_key": { "sub_key1": "sub_value1", "sub_key2": "sub_value2" } } |
| 嵌套结构 | python nested_key: list_key: - item1 - item2 map_key: sub_key1: sub_value1 sub_key2: sub_value2 | python { "nested_key": { "list_key": ["item1", "item2"], "map_key": { "sub_key1": "sub_value1", "sub_key2": "sub_value2" } } } |
安装 && 使用:
安装:
pythonpip install PyYAML==6.0.1
创建两个yaml文件:
firstyaml.ymlsecondyaml.yml
python
import yaml
#往yaml文件中写入数据
def write_yaml(filename, data):
    #打开文件
    with open(file=filename, mode="a+",encoding="utf-8") as f:
        yaml.safe_dump(data=data, stream=f)

#读取yaml文件中的数据
def read_yaml(filename):
    with open(file=filename, mode="r", encoding="utf-8") as f:
        # 读取yaml文件数据
        data = yaml.safe_load(stream=f)
        return data

# 清空yaml文件中的数据
def clear_yaml(filename):
    #打开文件
    with open(file=filename, mode="w", encoding="utf-8") as f:
        f.truncate()

# 测试往yaml文件中写入数据
def test_write():
    data = {
        "name" : "zhangsan",
        "age" : 18,
    }
    write_yaml("firstyaml.yml", data)

#测试读取yaml文件中的数据
# def test_read():
#     data = read_yaml("secondyaml.yml")
#     print(json.dumps(data))
#     # print(data)

# #测试清空yaml文件中的数据
# def test_clear():
#     clear_yaml("firstyaml.yml")
五、JSON Schema
JSON Schema⼀个⽤来定义和校验JSON的web规范,简⽽⾔之,JSON Schema是⽤来校验json是否 符合预期。
(1)安装
python
pip install jsonschema==4.23.0(2)介绍
|------------------------------------------------------------------|------------------------------------------------------------------------------------------------------------------------------------------------------------------|
| JSON | JSON Schema |
| python { "code": "SUCCESS", "errMsg": "", "data": false } | python { "type": "object", "required": [], "properties": { "code": { "type": "string" }, "errMsg": { "type": "string" }, "data": { "type": "string" } } } |
json转JSON Schema太⿇烦?使⽤现有⼯具⾃动转换:https://tooltt.com/json2schema/
注意:⼯具不是万能的,结果可能存在错误,要对⾃动⽣成的结果进⾏⼆次检查
python
# 校验博客列表⻚返回的json数据

import requests
from jsonschema.validators import validate

def test_json():
schema ={
            "type": "object",
            "required": ["code", "errMsg", "data"],
            "additionalProperties": False,
            "properties": {
                "code": {
                    "type": "string"
                },
                "errMsg": {
                    "type": "string"
                },
                "data": {
                    "type": "array",
                    #要求返回的博客数据最少要有一个
                    "mimItems":1,
                    "items": {
                        "type": "object",
                        "required": ["id", "title", "content", "userId", "deleteFlag", "createTime", "updateTime","loginUser"],
                        "additionalProperties": False,
                        "properties": {
                            "id": {
                                "type": "number"
                            },
                            "title": {
                                "type": "string"
                            },
                            "content": {
                                "type": "string"
                            },
                            "userId": {
                                "type": "number"
                            },
                            "deleteFlag": {
                                "type": "number"
                            },
                            "createTime": {
                                "type": "string"
                            },
                            "updateTime": {
                                "type": "string"
                            },
                            "loginUser": {
                                "type": "boolean"
                            }
                        }
                    }
                }
            }
        }


    url = "http://8.137.19.140:9090/blog/getList"

    header = {
    "user_token_header":"eyJhbGciOiJIUzI1NiJ9.eyJpZCI6MSwidXNlck5hbWUiOiJ6aGFuZ3Nhb
    iIsImV4cCI6MTc0MDczOTIzOH0.lYiI6-fPBqIyTVItvUQRyD7OKruSXR6I5tNOEmorWw8"
     }

     r = requests.get(url=url,headers=header)

     validate(r.json(),schema)
(3)数据类型
type 关键字指定了数据类型。 可以验证JSON数据中每个属性的数据类型是否符合预期。常⽤的数据类型包括:
|---------|----------------------|
| type | 解释 |
| string | 字符串类型,⽤于⽂本数据 |
| number | 数字类型,⽤于表⽰浮点数 |
| integer | 整数类型,⽤于表⽰整数 |
| boolean | 布尔类型,值为 true 或 false |
| object | 对象类型,⽤于嵌套的 JSON 对象 |
| array | 数组类型,⽤于列表或集合 |
| null | 空值类型 |
python
{
 "type": "object",
 "properties": {
 "name": { "type": "string" },
 "age": { "type": "integer" }
 }
}
properties 是⼀个验证关键字。当你定义 properties 时,你创建了⼀个对象,其 中每个属性代表正在验证的 JSON 数据中的⼀个键。
(4)最大最小值
• minimum 和 maximum :指定数值的最⼩值和最⼤值。
• exclusiveMinimum 和exclusiveMaximum :指定数值必须严格⼤于或⼩于某个值(不包 含等于)。
(5)字符串特殊校验
• pattern :使⽤正则表达式来验证字符串是否符合特定的模式。
(6)数组约束
• minItems 和 maxItems :指定数组的最⼩和最⼤⻓度。
• uniqueItems :确保数组中的元素是唯⼀的。
• items :定义数组中每个元素的类型和约束。
(7)对象约束
• minProperties 和 maxProperties :指定对象的最⼩和最⼤属性数量。
• additionalProperties :控制是否允许对象中存在未在properties中定义的额外属性,默 认为True
(8)必须属性
通过 required 关键字,JSON Schema 可以指定哪些属性是必需的。如果 JSON 实例中缺少这些必 需属性,验证将失败。
(9)依赖关系
dependentRequired 可以定义属性之间的依赖关系。例如,如果某个属性存在,则必须存在另⼀ 个属性。
六、logging日志模块
logging 是 Python 标准库中的⼀个模块,它提供了灵活的⽇志记录功能。通过 logging ,开发 者可以⽅便地将⽇志信息输出到控制台、⽂件、⽹络等多种⽬标,同时⽀持不同级别的⽇志记录,以 满⾜不同场景下的需求。
(1)全局logging
python
import logging
logging.basicConfig(level=logging.INFO)
logging.debug('This is a debug message')
logging.info('This is an info message')
logging.warning('This is a warning message')
logging.error('This is an error message')
logging.critical('This is a critical message')
(2)⾃定义logger并输出到控制台
python
# 导⼊ logging 模块
import logging
logging.basicConfig(level=logging.INFO)
# 获取⼀个⽇志记录器对象,名称为当前模块的名称
logger = logging.getLogger(__name__)
# 设置⽇志记录器的级别为 DEBUG
# 这意味着所有级别为 DEBUG 及以上的⽇志都会被记录
logger.setLevel(logging.DEBUG)
if __name__ == "__main__":
 logger.debug('This is a debug message')
 logger.info('This is an info message')
 logger.warning('This is a warning message')
 logger.error('This is an error message')
 logger.critical('This is a critical message')
(3)⾃定义logger并输出到⽇志⽂件
python
# 导⼊ logging 模块
import logging
# 获取⼀个⽇志记录器对象,名称为当前模块的名称
logger = logging.getLogger(__name__)
# 设置⽇志记录器的级别为 DEBUG
# 这意味着所有级别为 DEBUG 及以上的⽇志都会被记录
logger.setLevel(logging.DEBUG)
# 创建⼀个 FileHandler 对象,指定⽇志⽂件的名称为 "test.log"
# 这个处理器会将⽇志信息写⼊到指定的⽂件中
handler = logging.FileHandler(filename="test.log")
# 将这个处理器添加到⽇志记录器中
# 这样,⽇志记录器就会使⽤这个处理器来处理⽇志信息
logger.addHandler(handler)
if __name__ == "__main__":
 logger.debug('This is a debug message')
 logger.info('This is an info message')
 logger.warning('This is a warning message')
 logger.error('This is an error message')
 logger.critical('This is a critical message')
• 获取⽇志记录器: logging.getLogger(name) 获取⼀个⽇志记录器对象, name 是当 前模块的名称。使⽤模块名称作为⽇志记录器的名称有助于在⼤型项⽬中区分不同模块的⽇志.
• 设置⽇志级别: logger.setLevel(logging.DEBUG) 将⽇志记录器的级别设置为 DEBUG ,这意味着所有 DEBUG 及以上级别的⽇志都会被记录.
日志级别金字塔:DEBUG < INFO < WARNING < ERROR < CRITICAL
高于设定级别的日志才会被处理
• 创建⽂件处理器: logging.FileHandler(filename="test.log") 创建⼀个⽂件处理 器,将⽇志信息写⼊到名为test.log 的⽂件中.
• 添加处理器: logger.addHandler(handler) 将⽂件处理器添加到⽇志记录器中,这样⽇志 记录器就会使⽤这个处理器来处理⽇志信息.
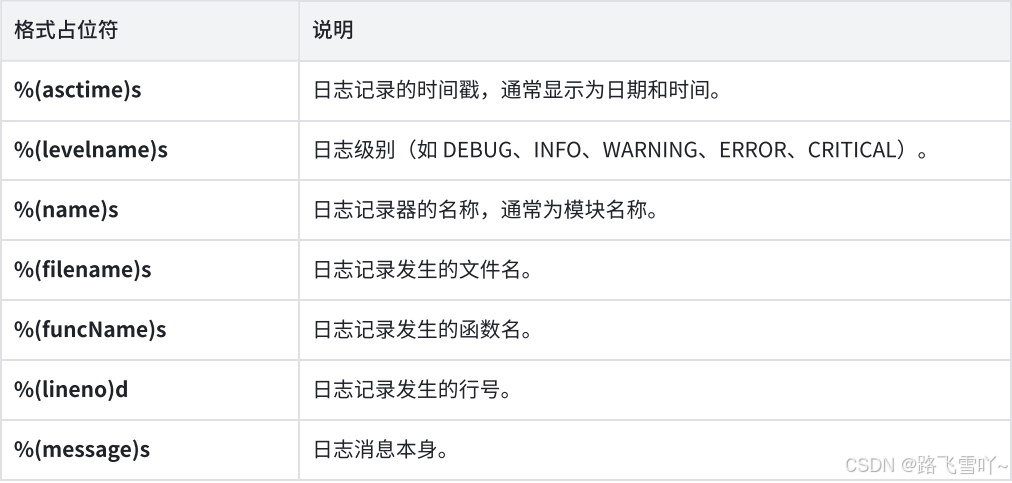
(4)设置⽇志格式
python
# 导⼊ logging 模块
import logging
# 获取⼀个⽇志记录器对象,名称为当前模块的名称
logger = logging.getLogger(__name__)
# 设置⽇志记录器的级别为 DEBUG
# 这意味着所有级别为 DEBUG 及以上的⽇志都会被记录
logger.setLevel(logging.DEBUG)
# 创建⼀个 FileHandler 对象,指定⽇志⽂件的名称为 "test.log"
# 这个处理器会将⽇志信息写⼊到指定的⽂件中
handler = logging.FileHandler(filename="test.log")
# 创建⼀个⽇志格式器对象
formatter = logging.Formatter(
 "%(asctime)s %(levelname)s [%(name)s] [%(filename)s (%(funcName)s:%
(lineno)d)] - %(message)s"
)
# 将格式器设置到处理器上
handler.setFormatter(formatter)
# 将这个处理器添加到⽇志记录器中
# 这样,⽇志记录器就会使⽤这个处理器来处理⽇志信息
logger.addHandler(handler)
if __name__ == "__main__":
 logger.debug('This is a debug message')
 logger.info('This is an info message')
 logger.warning('This is a warning message')
 logger.error('This is an error message')
 logger.critical('This is a critical message')
logging.Formatter 是⽤于定义⽇志输出格式的类。在构造函数中,传递了⼀个格式字符串,⽤ 于指定⽇志信息的格式。格式字符串中使⽤了⼀些特殊的占位符(以% 开头),这些占位符会被替换 为相应的⽇志信息内容。
七、allure测试报告
Allure Report 由⼀个框架适配器和 allure 命令⾏⼯具组成,是⼀个流⾏的开源⼯具,⽤于可视化 测试运⾏的结果。它可以以很少甚⾄零配置的⽅式添加到您的测试⼯作流中。它⽣成的报告可以在任 何地⽅打开,并且任何⼈都可以阅读,⽆需深厚的技术知识.
(1)安装
python
pip install allure-pytest==2.13.5(2)使用
step1:运⾏⾃动化,并指定测试报告放置路径
python
pytest --alluredir=results_dir(保存测试报告的路径)

⽰例:pytest --alluredir=allure-results
当前项⽬下⾃动⽣成 allre-results ⽂件夹,存放报告相关⽂件。
⽣成测试报告可以在控制台通过命令将结果保存在 allre-results ⽂件夹中,也可以在 pytest.ini⽂件中配置测试报告放置路径:
python[pytest] ;指定在命令⾏中默认包含的选项 addopts = -vs --alluredir allure-results --clean-alluredir
step2:查看测试报告
1)⽅法⼀:启动⼀个本地服务器来在浏览器中展⽰测试报告
终端执⾏命令: allure serve options ,⾃动在浏览器打开测试 报告
• --host :指定服务器监听的主机地址,默认为 localhost。
• --port :指定服务器监听的端⼝号,默认为 0(⾃动选择空闲端⼝)
• --clean-alluredir :清除上⼀次⽣成的测试报告
python
#不指定端⼝号和主机地址
allure serve .\allure-results\
#指定端⼝号
allure serve --port 8787 .\allure-results\
#清除上⼀次⽣成的测试报告
allure serve .\allure-results\ --clean-alluredir
2)⽅法⼆:从测试结果⽣成测试报告
python
终端执⾏命令:allure generate [options] <allure-results> -o <reports>