QT部署YOLO11实时检测
实验视频
qt_yolo11测试视频配合博客
这篇文章主要讲述的是在QT中编辑检测界面以及输出实时目标检测的画框界面,是基于YOLOV11进行开发的,在完成这篇文章之前请首先参考这篇文章正点原子瑞芯微RK3568部署YOLOV11模型,因为这篇文章主要是在之前那篇文章的基础上进行试验的。绝大多数文件都是基于官方代码移植的。
步骤1:我的思路是TakePhoto 按钮拍摄图片然后检测将图片存储到当前路径下,而VideoFlow主要就是实时监测目标然后在Frame中实时显示,stop按钮就是退出当前所有功能。代码主要集中也是两块mainwindow.cpp、mainwindow.h。也就实现按键拍照,和调用摄像头驱动读取视频流的功能。
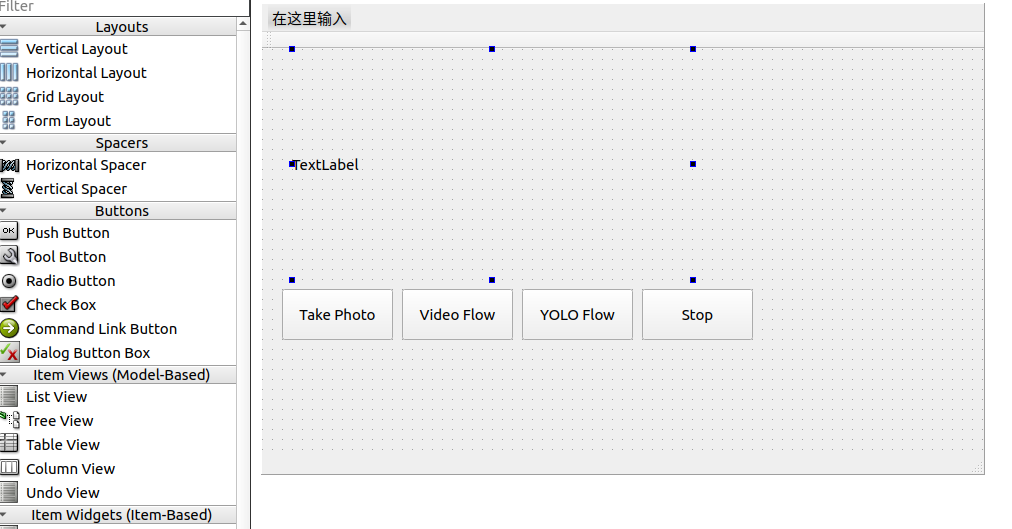
mainwindow.h
cpp
#ifndef MAINWINDOW_H
#define MAINWINDOW_H

#include <QMainWindow>

class QPushButton;
class QLabel;
class QVBoxLayout;
class QCamera;
class QVideoWidget;
class QCameraImageCapture;   // take photo class
class MainWindow : public QMainWindow
{
    Q_OBJECT

public:
    MainWindow(QWidget *parent = nullptr);
    ~MainWindow();

private slots:
    void onTakePhotoClicked();   // 预留,暂不实现
    void onVideoFlowClicked();   // 启动摄像头实时显示
    void onStopClicked();        // 停止摄像头并清理

private:
    void setupUI();
    void startCamera();          // 开始摄像头预览
    void stopCamera();           // 停止摄像头预览

    QWidget *centralWidget;
    QLabel *frameLabel;          // 占位标签(无视频时显示)
    QVideoWidget *videoWidget;   // 实际视频显示控件
    QPushButton *takePhotoButton;
    QPushButton *videoFlowButton;
    QPushButton *stopButton;
    QVBoxLayout *mainLayout;

    QCamera *camera;
    QCameraImageCapture *imageCapture;   // 新增:用于拍照
};

#endif // MAINWINDOW_H
mainwindow.cpp
c
#include "mainwindow.h"
#include <QPushButton>
#include <QLabel>
#include <QVBoxLayout>
#include <QHBoxLayout>
#include <QCamera>
#include <QCameraInfo>
#include <QVideoWidget>
#include <QCameraImageCapture>    //
#include <QDebug>
#include <QDateTime>              // 用于生成文件名
#include <QFile>                  // 文件操作
#include <QEventLoop>             // 用于同步等待
#include <QFileInfo>
MainWindow::MainWindow(QWidget *parent)
    : QMainWindow(parent)
    , videoWidget(nullptr)
    , camera(nullptr)
    , imageCapture(nullptr)
{
    setupUI();
}

MainWindow::~MainWindow()
{
    stopCamera();   // 析构时确保释放摄像头
}

void MainWindow::setupUI()
{
    centralWidget = new QWidget(this);
    setCentralWidget(centralWidget);

    // 显示区域:初始是一个 QLabel,用于提示
    frameLabel = new QLabel("点击 VideoFlow 启动摄像头", this);
    frameLabel->setAlignment(Qt::AlignCenter);
    frameLabel->setStyleSheet("border: 1px solid gray; background-color: black; color: white;");
    frameLabel->setFixedSize(640, 480);

    // 三个按钮
    takePhotoButton = new QPushButton("TakePhoto", this);
    videoFlowButton = new QPushButton("VideoFlow", this);
    stopButton = new QPushButton("Stop", this);

    QHBoxLayout *buttonLayout = new QHBoxLayout;
    buttonLayout->addWidget(takePhotoButton);
    buttonLayout->addWidget(videoFlowButton);
    buttonLayout->addWidget(stopButton);

    mainLayout = new QVBoxLayout(centralWidget);
    mainLayout->addWidget(frameLabel);
    mainLayout->addLayout(buttonLayout);

    // 连接信号槽
    connect(takePhotoButton, &QPushButton::clicked, this, &MainWindow::onTakePhotoClicked);
    connect(videoFlowButton, &QPushButton::clicked, this, &MainWindow::onVideoFlowClicked);
    connect(stopButton, &QPushButton::clicked, this, &MainWindow::onStopClicked);
}

void MainWindow::startCamera()
{
    if (camera) {
        qDebug() << "Camera already started";
        return;
    }

    // 获取可用摄像头
    const QList<QCameraInfo> cameras = QCameraInfo::availableCameras();
    if (cameras.isEmpty()) {
        qDebug() << "No camera found!";
        frameLabel->setText("未找到摄像头");
        return;
    }

    // 使用第一个摄像头
    camera = new QCamera(cameras.first(), this);

    // 创建视频显示控件
    videoWidget = new QVideoWidget(this);
    videoWidget->setFixedSize(640, 480);

    // 用 videoWidget 替换布局中的 frameLabel
    mainLayout->replaceWidget(frameLabel, videoWidget);
    frameLabel->hide();   // 隐藏占位标签,但保留以便后面恢复

    // 设置摄像头取景器为 videoWidget
    camera->setViewfinder(videoWidget);

    // 可选:设置分辨率(根据摄像头支持情况)
    QCameraViewfinderSettings settings;
    settings.setResolution(640, 480);
    if (camera->supportedViewfinderSettings().contains(settings)) {
        camera->setViewfinderSettings(settings);
    }

    // *** 关键:创建 QCameraImageCapture 对象 ***
    imageCapture = new QCameraImageCapture(camera, this);
    imageCapture->setCaptureDestination(QCameraImageCapture::CaptureToFile);

    // 启动摄像头
    camera->start();
    qDebug() << "Camera started";
}

void MainWindow::stopCamera()
{
    if (camera) {
        camera->stop();
        delete imageCapture;   // 删除拍照对象
        imageCapture = nullptr;
        delete camera;
        camera = nullptr;
    }

    if (videoWidget) {
        mainLayout->removeWidget(videoWidget);
        delete videoWidget;
        videoWidget = nullptr;
    }

    // 恢复显示 frameLabel
    frameLabel->show();
    frameLabel->setText("摄像头已停止");
    qDebug() << "Camera stopped";
}

void MainWindow::onTakePhotoClicked()
{
    if (!camera || camera->state() != QCamera::ActiveState || !imageCapture) {
        qDebug() << "Camera not active, cannot take photo";
        return;
    }

    QEventLoop loop;
    QImage capturedImage;

    connect(imageCapture, &QCameraImageCapture::imageCaptured, &loop,
        [&](int id, const QImage &preview) {
            Q_UNUSED(id);
            capturedImage = preview;
            loop.quit();
        });

    imageCapture->capture();
    loop.exec();

    // 生成带时间戳的文件名
    QString fileName = QString("photo_%1.jpg")
                       .arg(QDateTime::currentDateTime().toString("yyyyMMdd_hhmmss_zzz"));
    // 获取当前工作目录的绝对路径
    QString absolutePath = QFileInfo(fileName).absoluteFilePath();
    if (capturedImage.save(fileName)) {
        qDebug() << "Photo saved:" << absolutePath;
    } else {
        qDebug() << "Failed to save photo!";
    }
}

void MainWindow::onVideoFlowClicked()
{
    startCamera();   // 启动实时显示
}

void MainWindow::onStopClicked()
{
    stopCamera();    // 停止摄像头并清理显示
}
测试拉取图片拍照效果如下。
c
alientek@alientek-virtual-machine:~/qt_project/qt_yolo11$ adb pull /userdata/aidemo/rknn_yolo11_demo/photo_19700317_120709_094.jpg
/userdata/aidemo/rknn_yolo11_demo/phot...pped. 0.6 MB/s (51265 bytes in 0.081s)
你可以看到我还有一个yolo11文件这是我将/home/alientek/software/rknn_model_zoo/examples/yolo11
移植拷贝过来的。
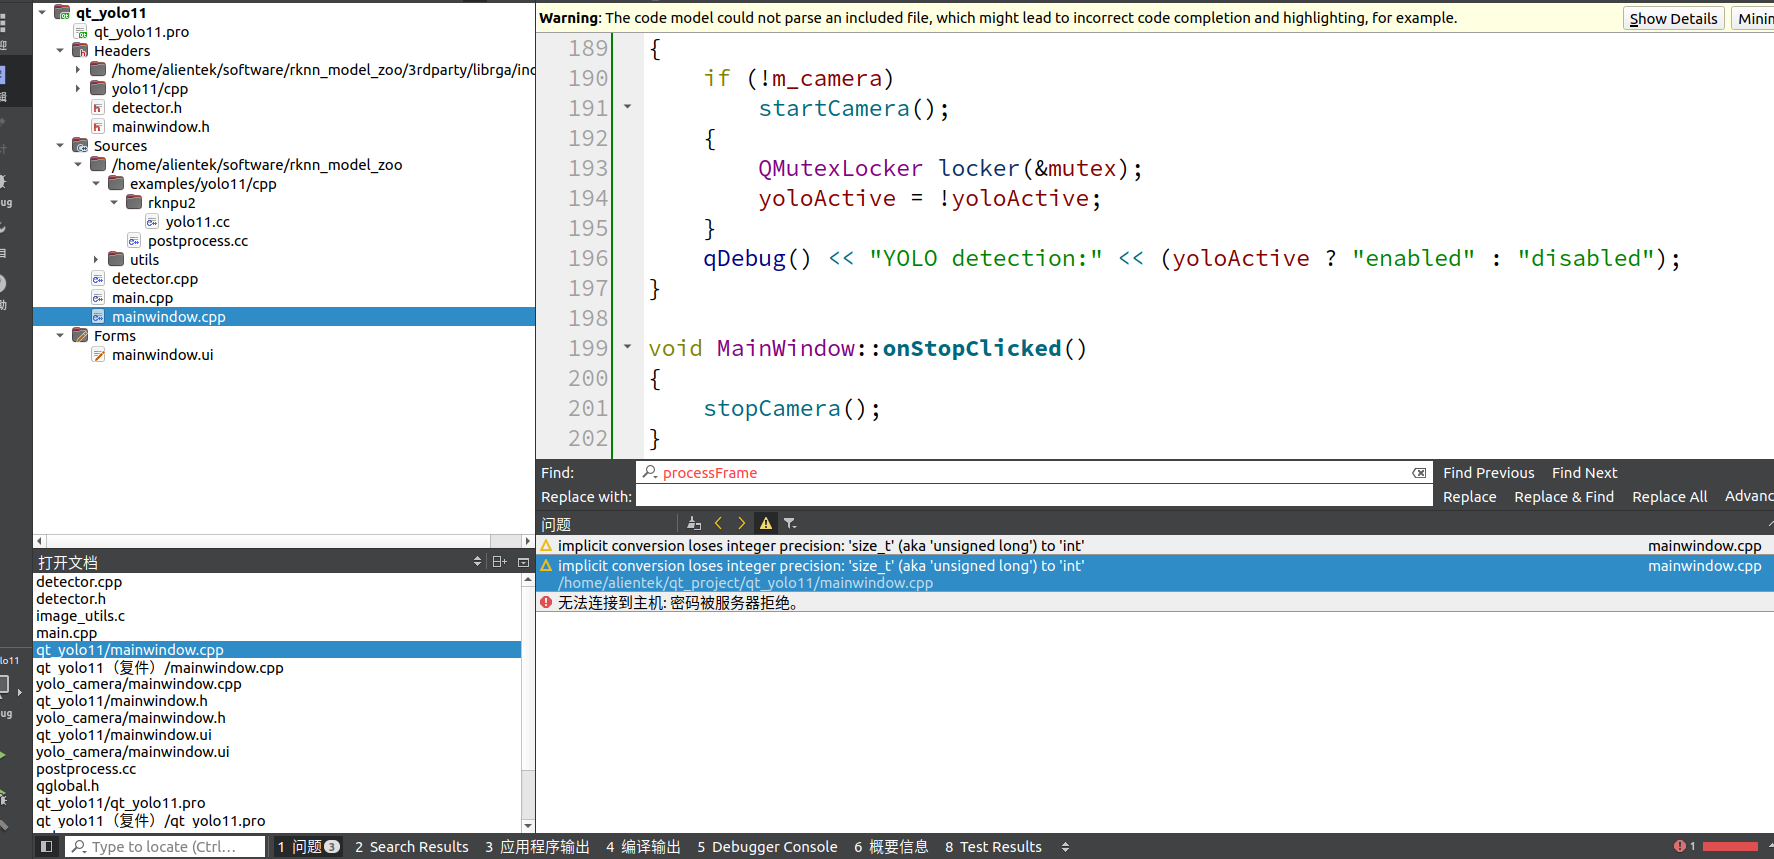
步骤二:一个按钮YOLOFlowButton,当按下VideoFlowButton后再按下此按键开启yolo检测,构建一个新类YOLO类全部放到detector.cpp中。首先构思计划的是,类似于官方的main.cc应用程序,直接调用模型,将调用的一系列接口全部放到detector.cpp中,然后用图像处理的库推送图片进行检测即可。
官方的yolo11的CPP中,首先观察到main.cc中调用的头文件比较多,那么需要将头文件以及.c文件导入到qt的pro中。
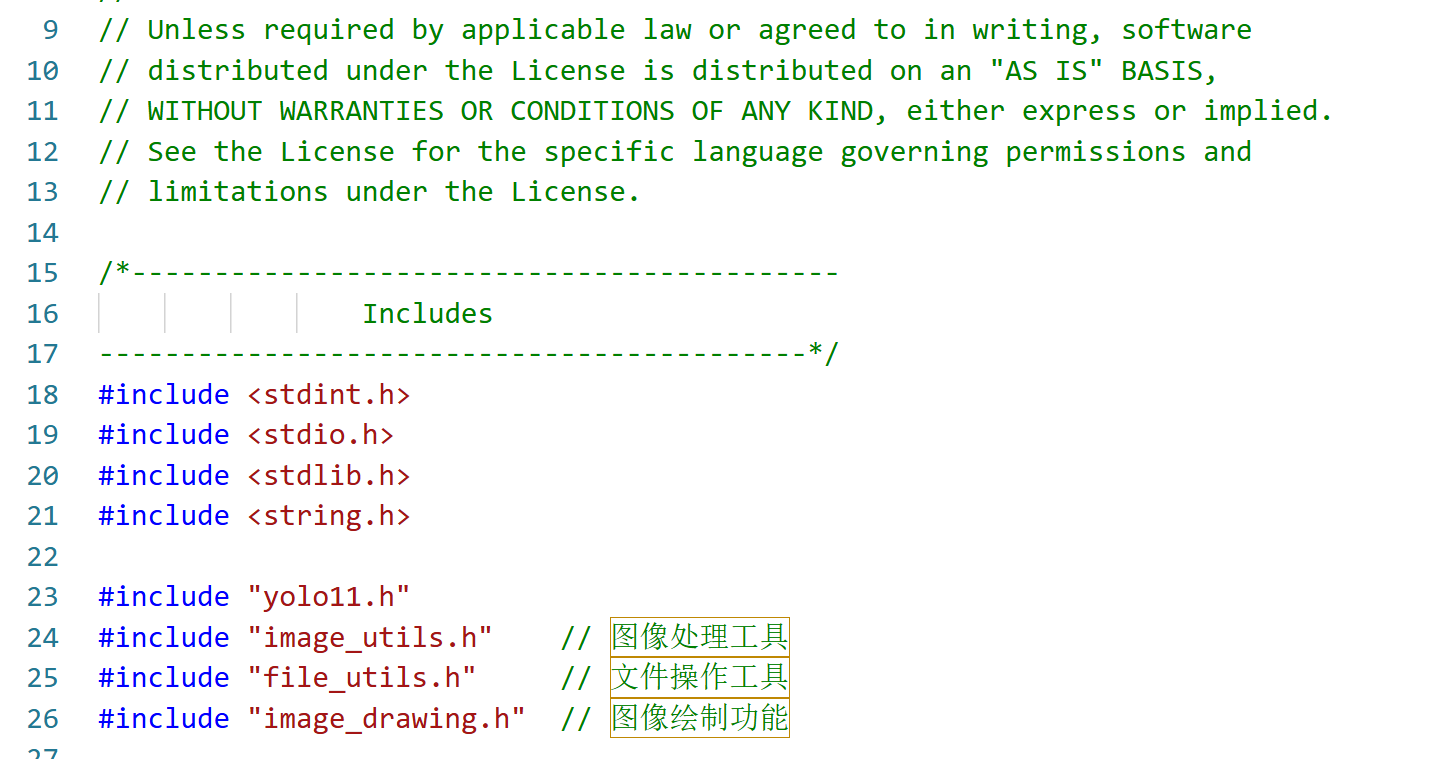
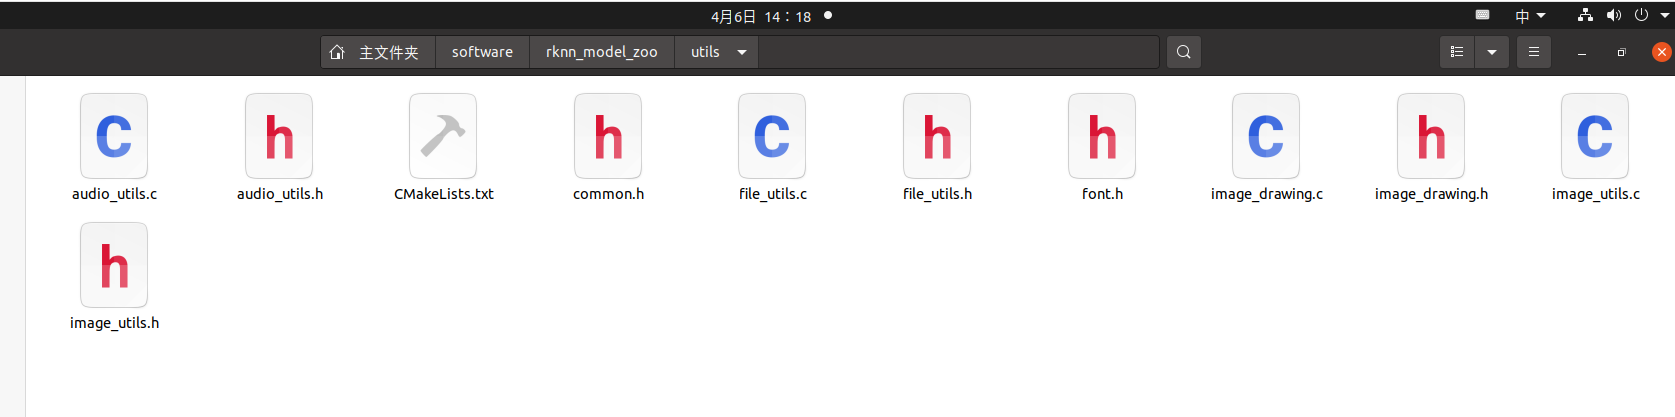
还得查找这些头文件存放的地址。地址如下在rknn_model_zoo -> utils 。
后续写完代码后运行出现这个问题,主要是因为
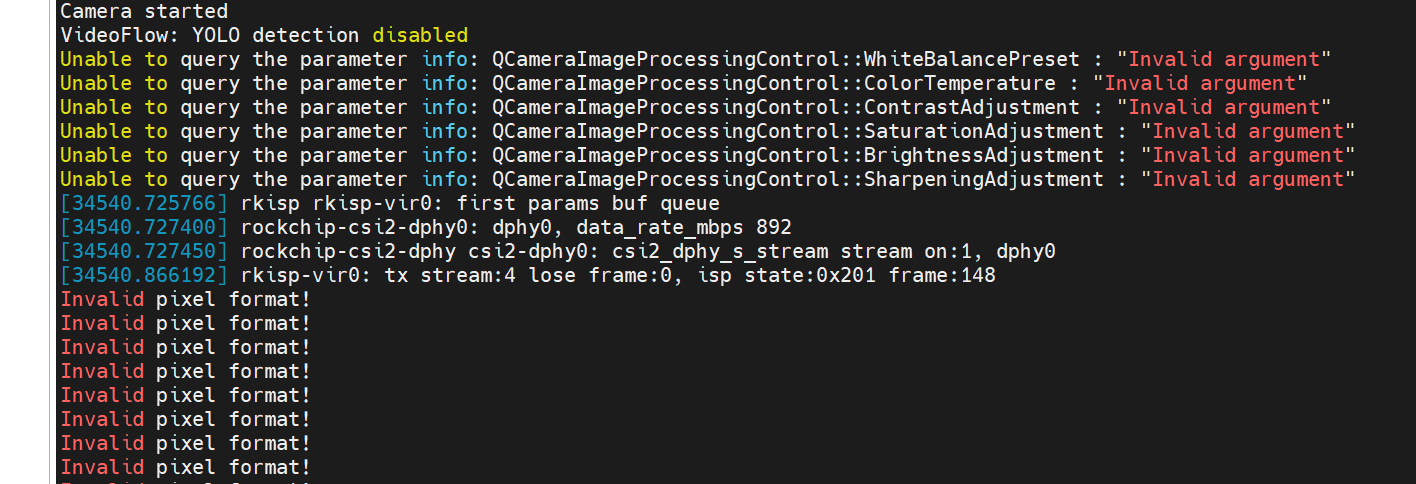
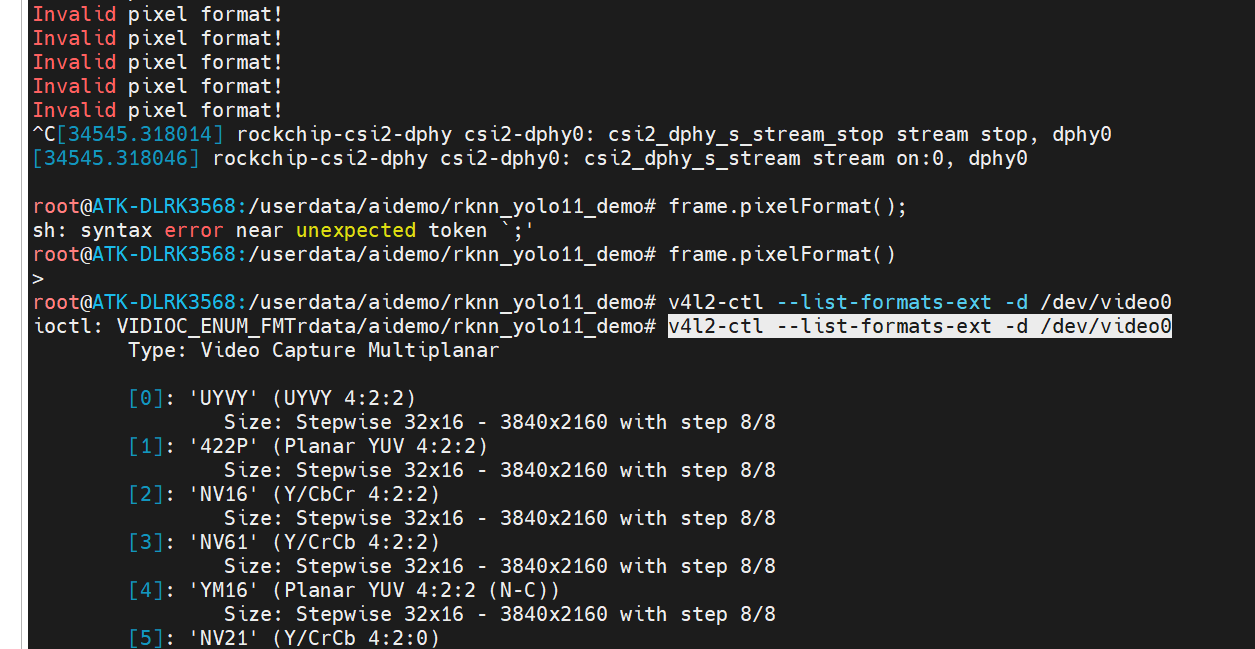
QVideoFrame::imageFormatFromPixelFormat() 无法识别摄像头实际输出的格式。日志中显示使用了 mplane plugin,这是 V4L2 的 VIDIOC_G_FMT 获取的格式,常见的有 V4L2_PIX_FMT_NV12、V4L2_PIX_FMT_YUYV 或 V4L2_PIX_FMT_MJPEG。Qt 的 QVideoFrame::PixelFormat 枚举可能不包含这些,导致返回 Invalid。
修改 processFrame 函数,手动处理摄像头常见的格式。由于 RK3568 平台通常使用 V4L2 驱动,帧数据多为 NV12 或 YUYV。我们将添加对这些格式的支持。
你的摄像头支持 NV12、YU12、UYVY 等多种格式。Qt 无法直接将这些格式转为 QImage,所以你需要手动实现转换。最简单高效的方法是使用 libyuv 库。
后来我想那是不是opencv库也可以实现这个工作呢?正点原子的RK3568的opencv为4.5.5版本,SDK中的也是这个版本,我只要pro文件中导入这个库,头文件地址即可。
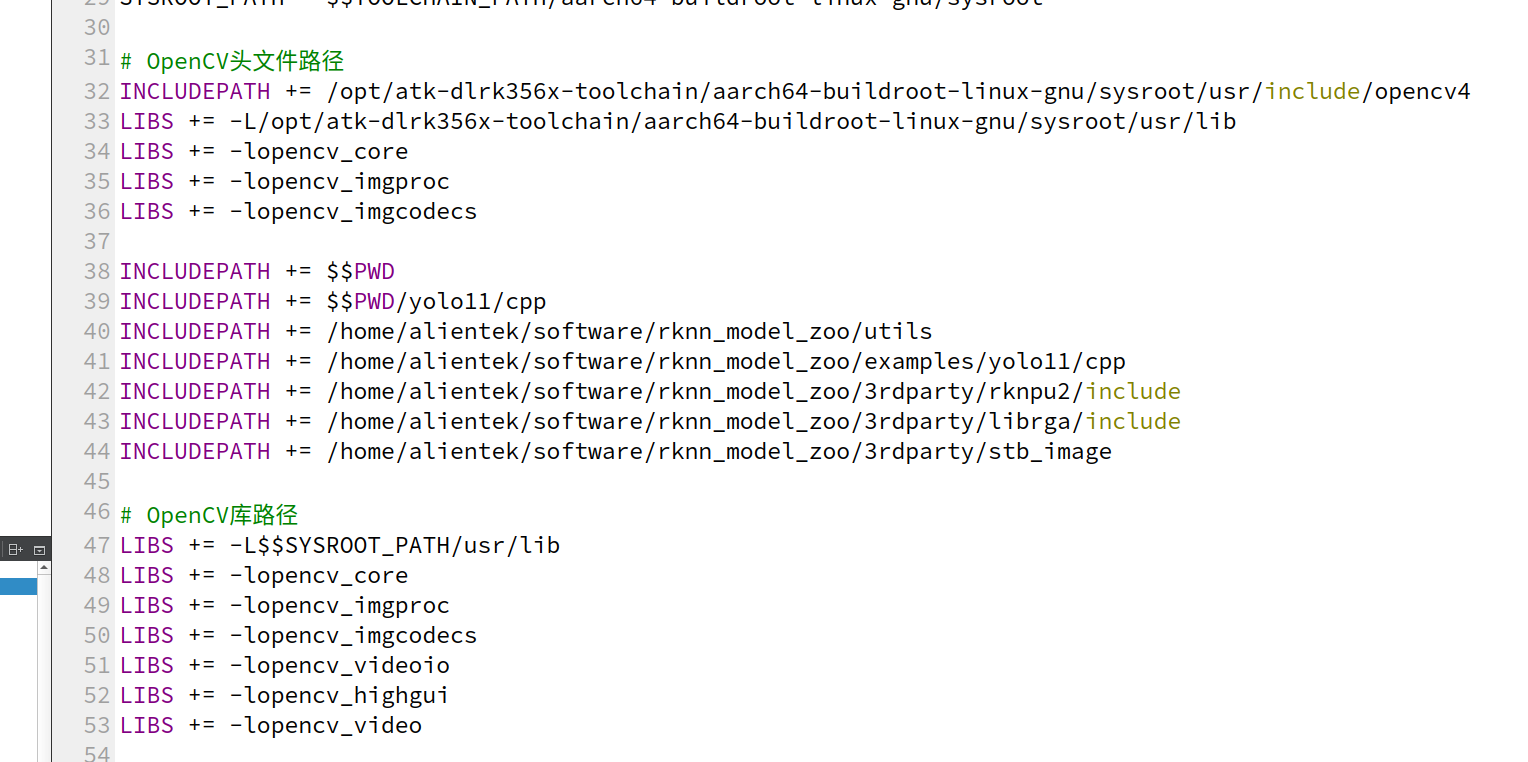
路径地址,一定要查找是不是这个文件地址正点原子的应该都是这个地址。
从文件路径中可以看出我使用了官方的yolo11文件等。
文件有多处地方是需要注意使用自己的库文件地址以及rknn模型地址的指定。这是编译完成后的样子。
qt_yolo11.pro文件参考
c
#-------------------------------------------------
#
# Project created by QtCreator 2026-04-06T16:20:49
#
#-------------------------------------------------

QT       += core gui multimedia multimediawidgets widgets

greaterThan(QT_MAJOR_VERSION, 4): QT += widgets

TARGET = qt_yolo11
TEMPLATE = app

# The following define makes your compiler emit warnings if you use
# any feature of Qt which has been marked as deprecated (the exact warnings
# depend on your compiler). Please consult the documentation of the
# deprecated API in order to know how to port your code away from it.
DEFINES += QT_DEPRECATED_WARNINGS
DEFINES += RKNPU2
# You can also make your code fail to compile if you use deprecated APIs.
# In order to do so, uncomment the following line.
# You can also select to disable deprecated APIs only up to a certain version of Qt.
#DEFINES += QT_DISABLE_DEPRECATED_BEFORE=0x060000    # disables all the APIs deprecated before Qt 6.0.0

CONFIG += c++11

# 定义OpenCV路径
TOOLCHAIN_PATH = /opt/atk-dlrk356x-toolchain
SYSROOT_PATH = $$TOOLCHAIN_PATH/aarch64-buildroot-linux-gnu/sysroot

# OpenCV头文件路径
INCLUDEPATH += /opt/atk-dlrk356x-toolchain/aarch64-buildroot-linux-gnu/sysroot/usr/include/opencv4
LIBS += -L/opt/atk-dlrk356x-toolchain/aarch64-buildroot-linux-gnu/sysroot/usr/lib
LIBS += -lopencv_core
LIBS += -lopencv_imgproc
LIBS += -lopencv_imgcodecs

INCLUDEPATH += $$PWD
INCLUDEPATH += $$PWD/yolo11/cpp
INCLUDEPATH += /home/alientek/software/rknn_model_zoo/utils
INCLUDEPATH += /home/alientek/software/rknn_model_zoo/examples/yolo11/cpp
INCLUDEPATH += /home/alientek/software/rknn_model_zoo/3rdparty/rknpu2/include
INCLUDEPATH += /home/alientek/software/rknn_model_zoo/3rdparty/librga/include
INCLUDEPATH += /home/alientek/software/rknn_model_zoo/3rdparty/stb_image

# OpenCV库路径
LIBS += -L$$SYSROOT_PATH/usr/lib
LIBS += -lopencv_core
LIBS += -lopencv_imgproc
LIBS += -lopencv_imgcodecs
LIBS += -lopencv_videoio
LIBS += -lopencv_highgui
LIBS += -lopencv_video

SOURCES += \
    /home/alientek/software/rknn_model_zoo/examples/yolo11/cpp/postprocess.cc \
    /home/alientek/software/rknn_model_zoo/examples/yolo11/cpp/rknpu2/yolo11.cc \
        main.cpp \
        mainwindow.cpp \
    detector.cpp \
    /home/alientek/software/rknn_model_zoo/utils/file_utils.c \
    /home/alientek/software/rknn_model_zoo/utils/image_utils.c \
    /home/alientek/software/rknn_model_zoo/utils/image_drawing.c

HEADERS += mainwindow.h \
    detector.h \
    yolo11/cpp/postprocess.h \
    yolo11/cpp/yolo11.h \
    rknn_api.h \
    common.h \
    /home/alientek/software/rknn_model_zoo/3rdparty/librga/include/im2d.h
    /home/alientek/software/rknn_model_zoo/3rdparty/stb_image/stb_image.h
FORMS += \
    mainwindow.ui

LIBS += -L/home/alientek/software/rknn_model_zoo/3rdparty/rknpu2/runtime/Linux/aarch64
LIBS += -lrknnrt
LIBS += -lpthread -ldl -lm
LIBS += -L/usr/lib/aarch64-linux-gnu -lturbojpeg
LIBS += -L/home/alientek/software/rknn_model_zoo/install/rk356x_linux_aarch64/rknn_yolo11_demo/lib -lrga
# Default rules for deployment.
qnx: target.path = /tmp/$${TARGET}/bin
else: unix:!android: target.path = /opt/$${TARGET}/bin
!isEmpty(target.path): INSTALLS += target
上传之后打开文件。
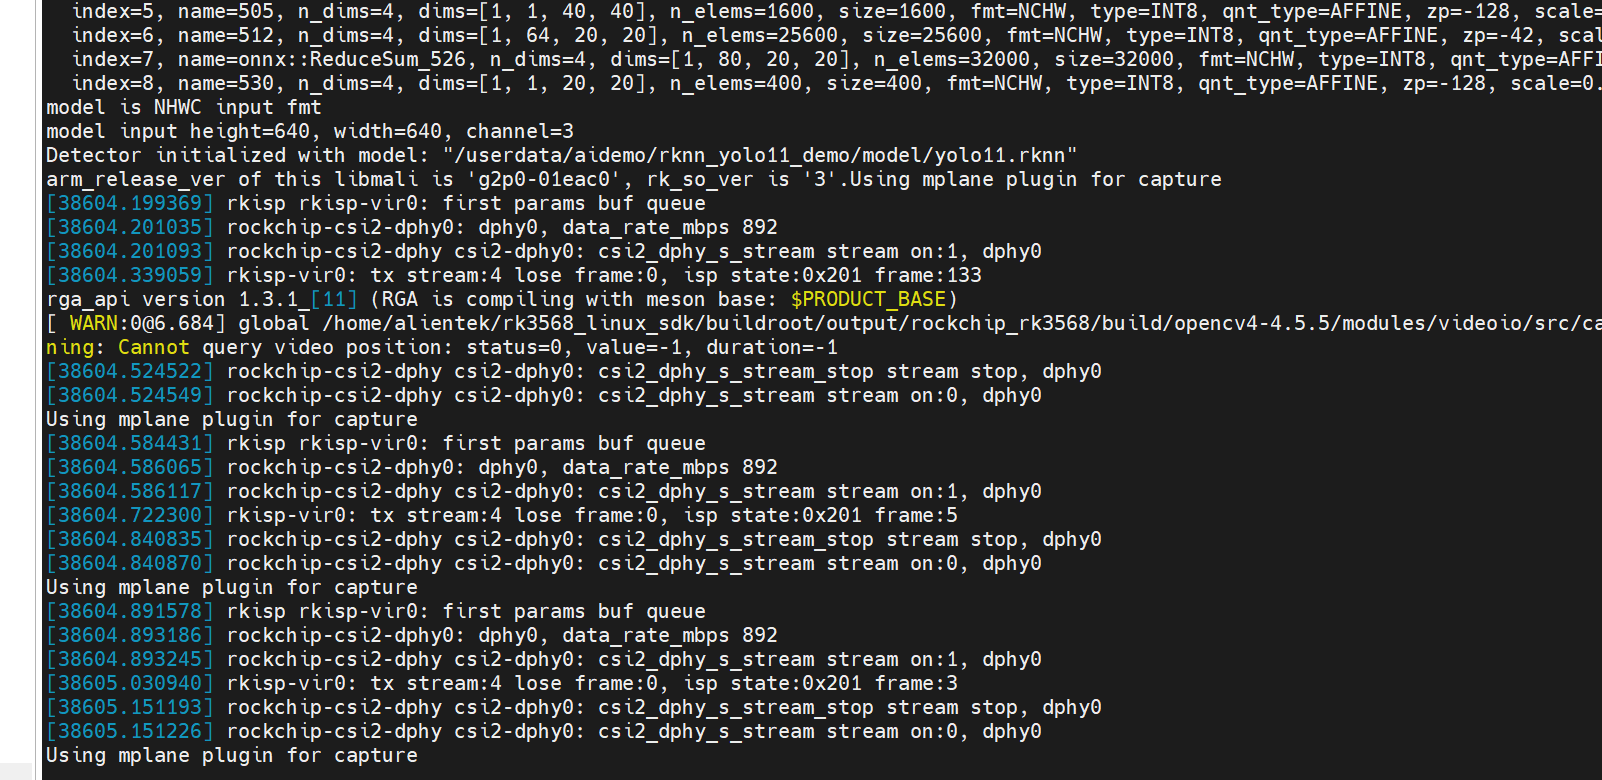
c
root@ATK-DLRK3568:/userdata/aidemo/rknn_yolo11_demo# ./qt_yolo11
c
alientek@alientek-virtual-machine:~/qt_project/build-qt_yolo11-rk3568-Debug$ adb push qt_yolo11 /userdata/aidemo/rknn_yolo11_demo
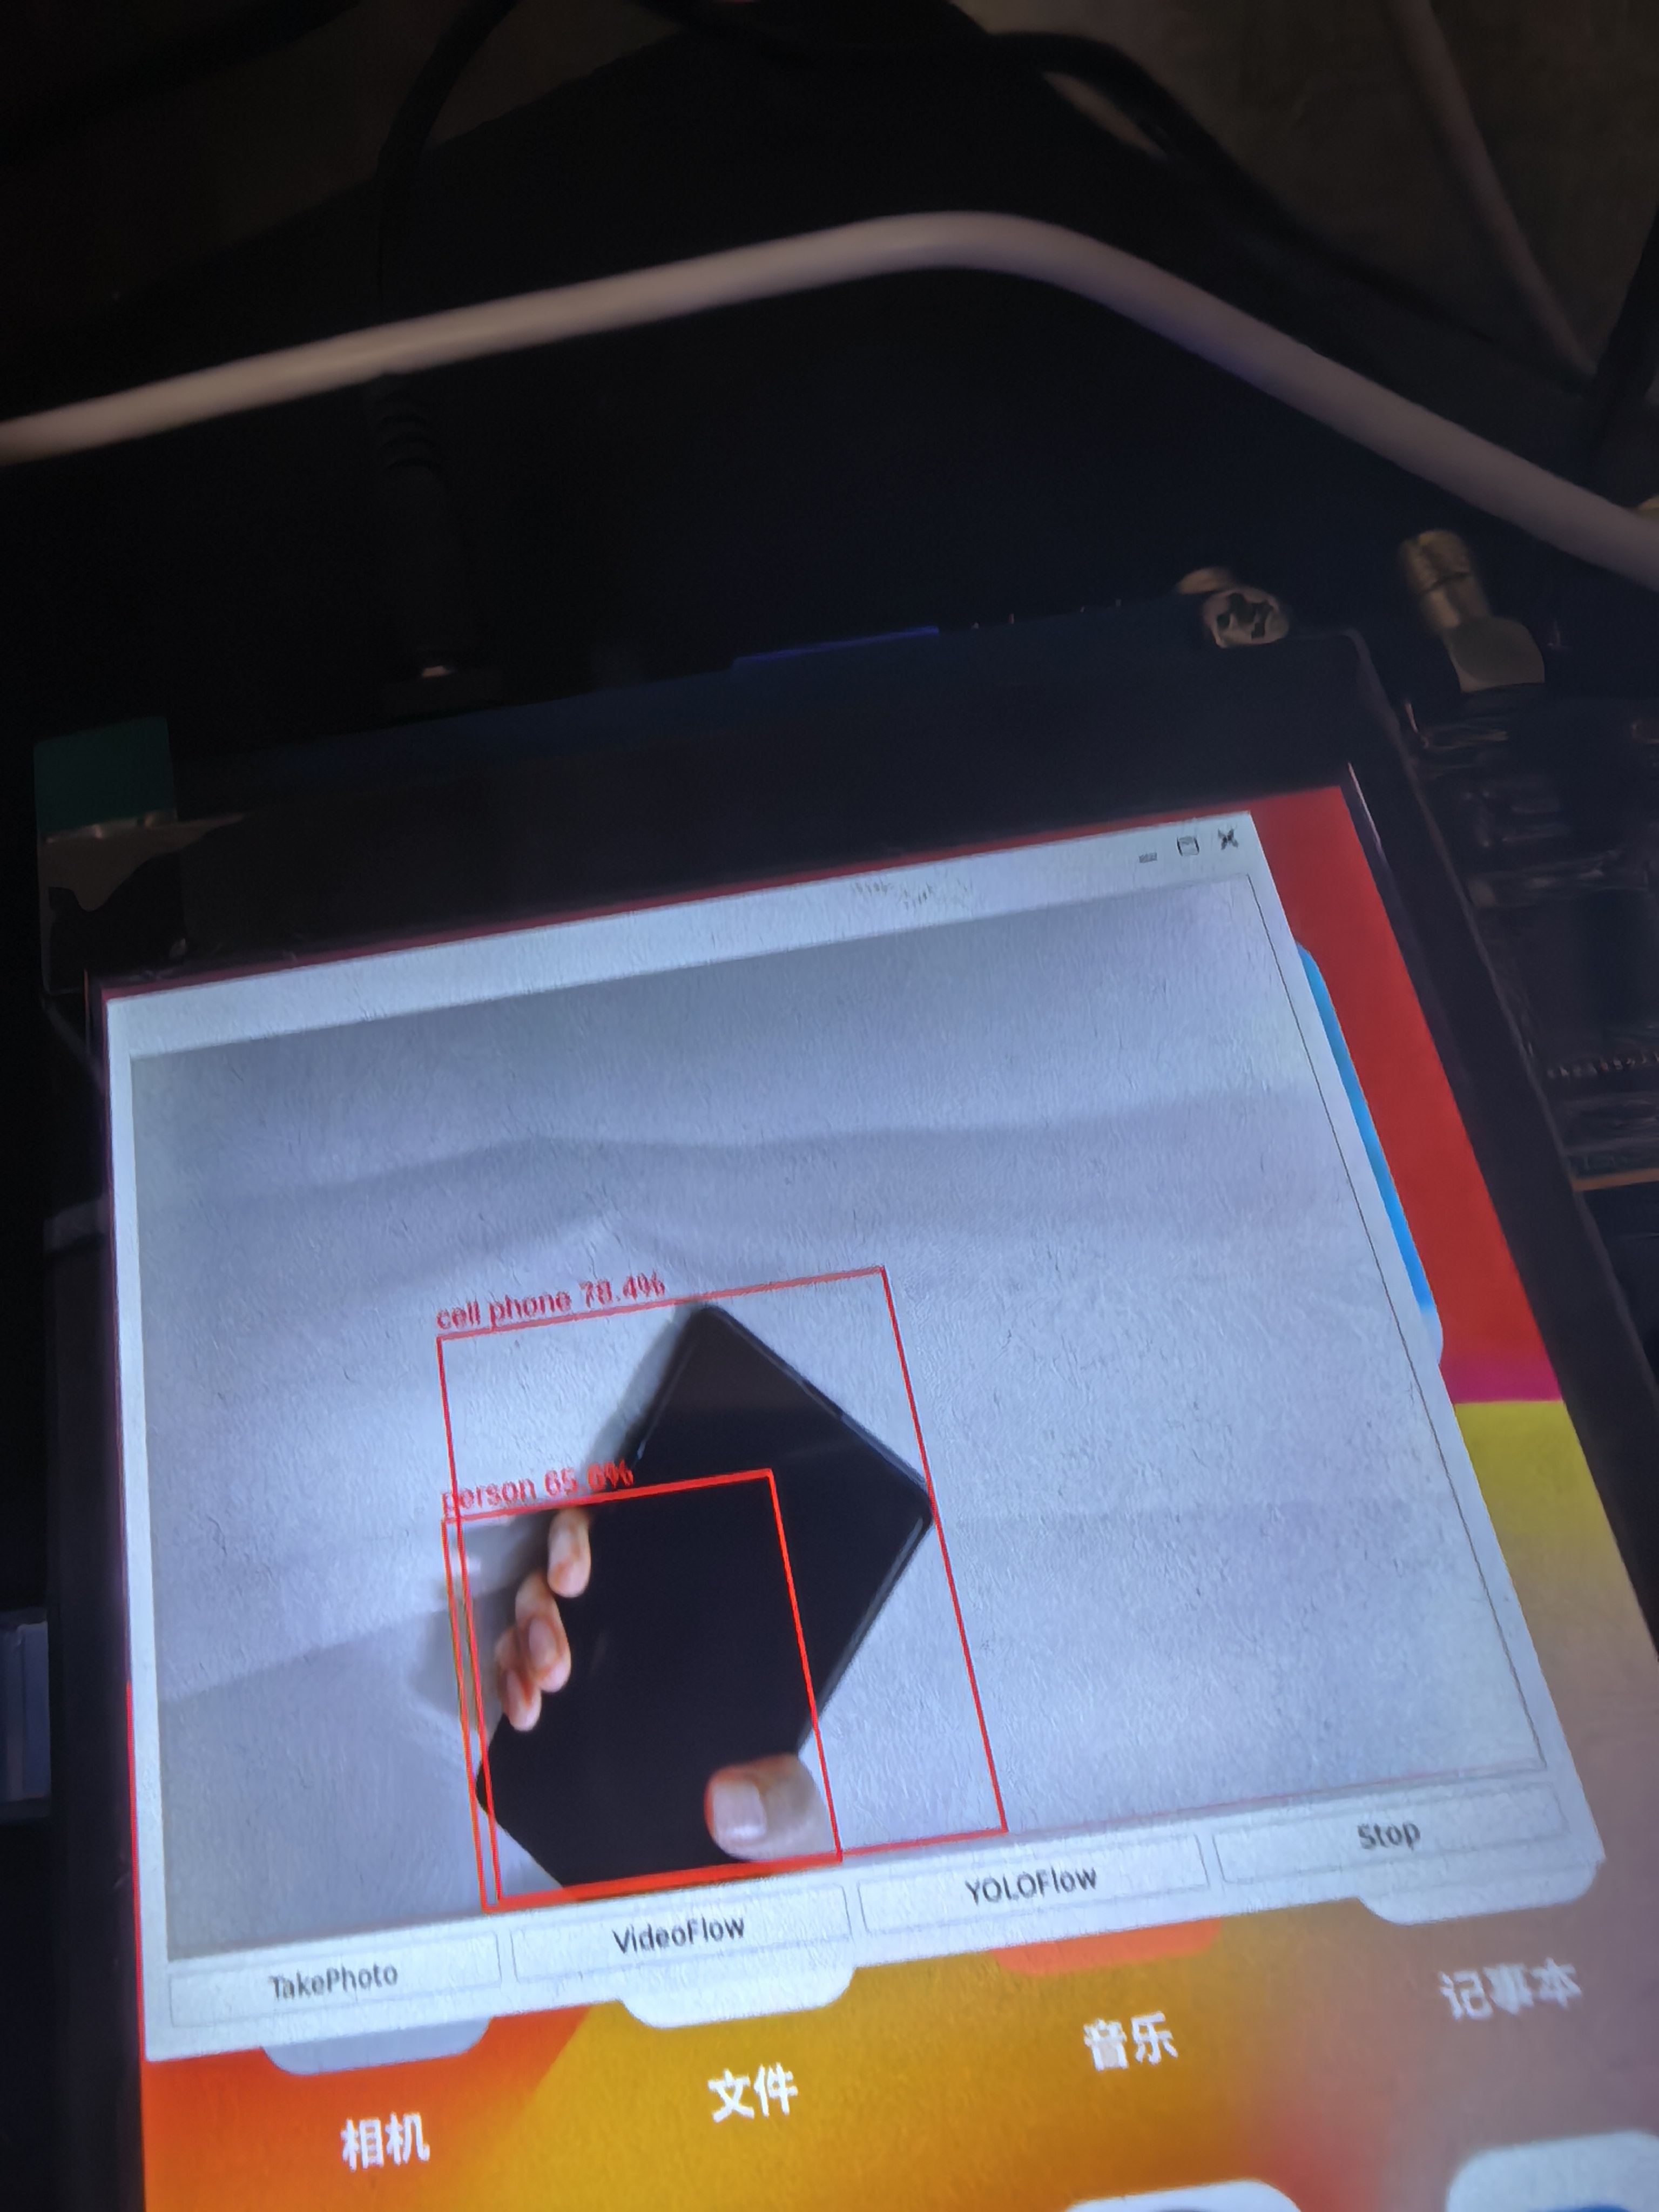
qt_yolo11: 1 file pushed, 0 skipped. 900.8 MB/s (244600 bytes in 0.000s)实验结果:
代码程序:网盘分享qt_yolov11 链接
https://pan.baidu.com/s/11ClnOe37rOUHA5pUxI2H_g?pwd=3qtc 提取码: 3qtc