DevOps自动化运维实践_ansible-playbook的使用![]() https://blog.csdn.net/xiaochenXIHUA/article/details/159888140
https://blog.csdn.net/xiaochenXIHUA/article/details/159888140
一、playbook中的变量与所在主机命令使用
1.1、register、set_fact、debug模块
【register】与【set_fact】功能都是一样的,用于注册变量(即:可将前一个内容的输出作为一个变量,从而将其传递给后面使用)。【debug】是用于调试输出信息(其中debug: 'msg={``{变量1}} {``{变量2}} {``{变量3}} ...'的输出方式十分灵活),方便查看内容是否符合要求。
bash
#register、debug模块示例1
vi debug1.yml

#【debug1.yml】文件的完整内容
- hosts: 192.168.1.30
  remote_user: root
  gather_facts: false
  vars:
    ansible_ssh_port: 22222
    ansible_ssh_pass: admin123456
  tasks:
    - name: get hostname info
      shell: hostname
      register: host_result
    - debug: var=host_result
    - debug: var=host_result.stdout
    - debug: 'msg="执行【{{host_result.cmd}}】命令;获取到的主机名称是:{{host_result.stdout}};执行的时间是:{{host_result.start}}"'


#执行命令
ansible-playbook debug1.yml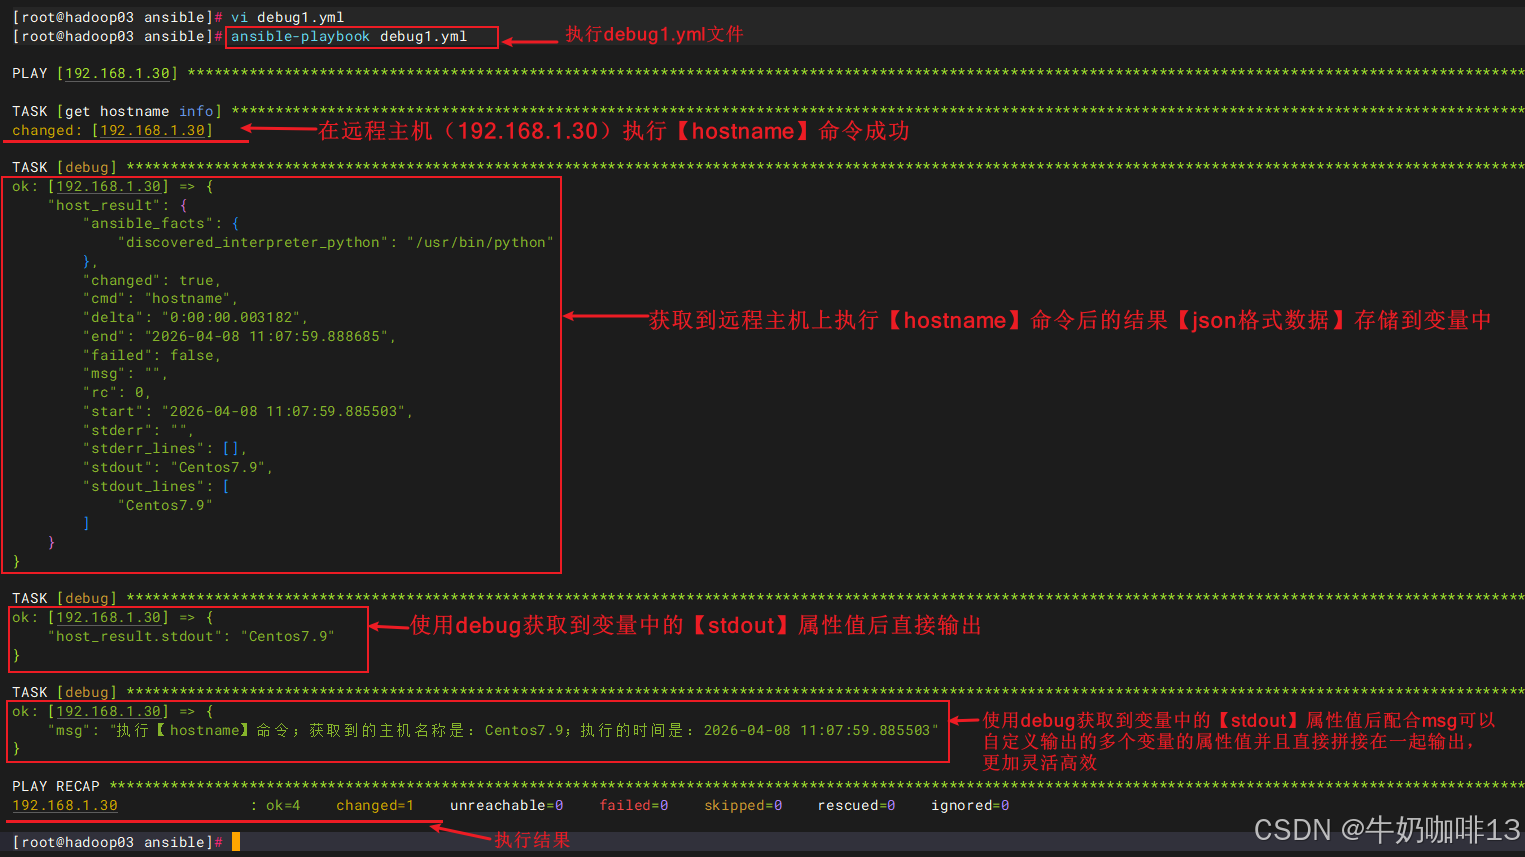
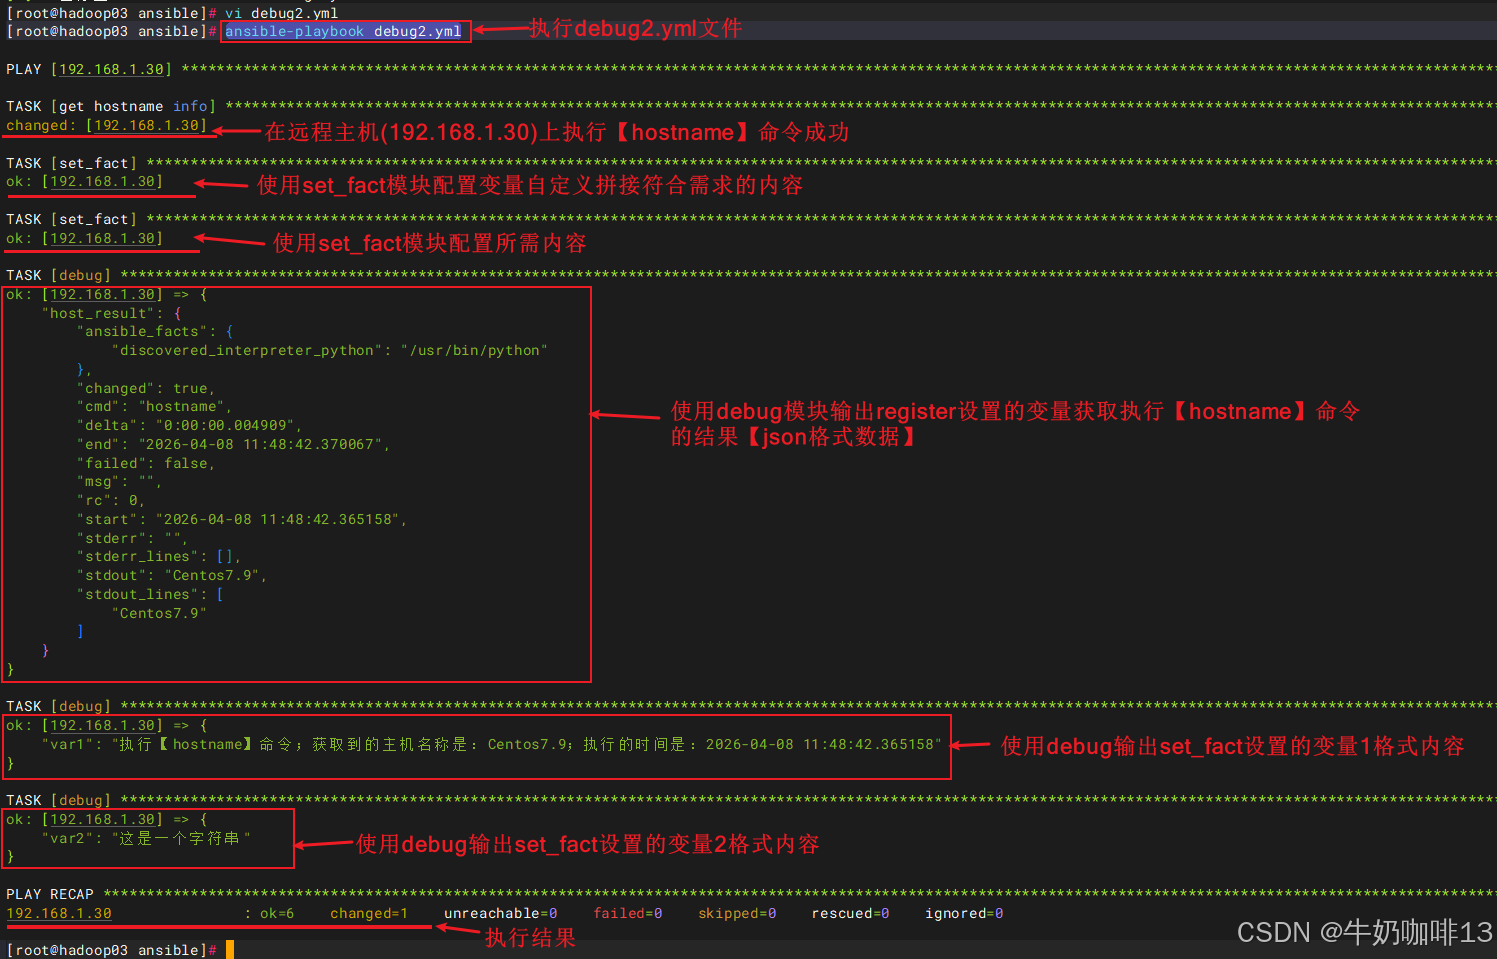
bash
#register、set_fact、debug模块的示例2
vi debug2.yml

#【debug2.yml】文件的完整内容
- hosts: 192.168.1.30
  remote_user: root
  gather_facts: false
  vars:
    ansible_ssh_port: 22222
    ansible_ssh_pass: admin123456
  tasks:
    - name: get hostname info
      shell: hostname
      register: host_result
    - set_fact: var1="执行【{{host_result.cmd}}】命令;获取到的主机名称是:{{host_result.stdout}};执行的时间是:{{host_result.start}}"
    - set_fact: var2="这是一个字符串"
    - debug: var=host_result
    - debug: var=var1
    - debug: var=var2


#执行命令
ansible-playbook debug2.yml
1.2、delegate_to、connection、和local_action模块
【delegate_to】、【connection】、【local_action】这三个模块是实现在ansible所在主机上执行命令。
bash
#delegate_to、connection、和local_action模块示例
vi local1.yml

#【local1.yml】文件的完整内容:
- hosts: 192.168.1.30
  remote_user: root
  gather_facts: true
  vars:
    ansible_ssh_port: 22222
    ansible_ssh_pass: admin123456
  tasks:
    - name: delegate_to
      shell: echo "delegate_to___{{inventory_hostname}} $(hostname)">>/tmp/local.log
      delegate_to: localhost
    - name: connection
      shell: echo "connection___{{inventory_hostname}} $(hostname)">>/tmp/local.log
      connection: local
    - name: local_action
      local_action: shell echo "local_action___{{inventory_hostname}} $(hostname)">>/tmp/local.log


#命令执行
ansible-playbook local1.yml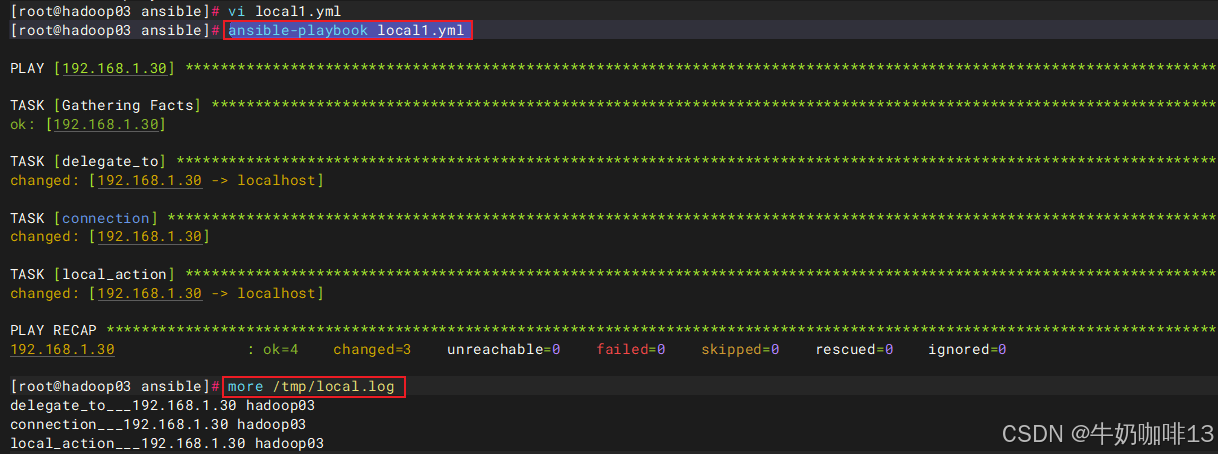
二、playbook的常用示例
2.1、自动配置SSH密钥
bash
#自动配置ssh密钥示例
vi sshkey_autoconfig.yml

#【sshkey_autoconfig.yml】文件的完整内容:
- hosts: 192.168.1.30
  gather_facts: no
  remote_user: root
  vars:
    #需要给远程主机设置的ssh公钥的用户
    sshkey_user: root
    ansible_ssh_port: 22222
    ansible_ssh_pass: admin123456
    #本地Ansible控制机密钥路径(可自定义)
    local_ssh_key: ~{{sshkey_user}}/.ssh/id_ed25519
    #模板文件路径
    ansible_template_dir: /etc/ansible/roles/templates

  tasks:
    #1-关闭主机密钥检查
    - name: close ssh yes/no check
      lineinfile: path=/etc/ssh/ssh_config regexp='(.*)StrictHostKeyChecking(.*)' line="StrictHostKeyChecking no"

    #2-删除远程主机上旧的.ssh
    - name: delete /root/.ssh【用户可自定义,这里的是root】
      file: path=~{{sshkey_user}}/.ssh state=absent

    #3-在远程主机上创建.ssh目录
    - name: create .ssh directory
      file: path=~{{sshkey_user}}/.ssh mode=0700 state=directory owner={{sshkey_user}} group={{sshkey_user}}

    #4-在ansible所在的本机上生成密钥(若已存在则跳过)
    - name: generating local public/private
      local_action: shell ssh-keygen -t ed25519 -N "" -f {{local_ssh_key}} -q
      args:
        creates: "{{local_ssh_key}}"

    #5-读取ansible所在本机上的公钥
    - name: view id_ed25519.pub
      local_action: shell cat {{local_ssh_key}}.pub
      register: sshpubinfo
    - set_fact: sshpub={{sshpubinfo.stdout}}

    #6-在ansible所在本机上创建模板目录
    - name: create template dir
      local_action: file path={{ansible_template_dir}} state=directory mode=0755

    #7-将公钥内容写入到模板文件中
    - name: add ssh record
      local_action: shell echo {{sshpub}} > {{ansible_template_dir}}/authorized_keys.j2

    #8-将生成的公钥模板文件分发到远程主机
    - name: copy authorized_keys.j2 to all
      template: src={{ansible_template_dir}}/authorized_keys.j2 dest=~{{sshkey_user}}/.ssh/authorized_keys mode=0600

    #9-重启远程主机的ssh服务,让配置生效
    #- name: restart sshd service
    #  service: name=sshd state=restarted enabled=yes
    #  async: 5
    #  poll: 0
    #  ignore_errors: yes


#执行命令
ansible-playbook sshkey_autoconfig.yml
注意:
《1》若直接执行【ansible-playbook sshkey_autoconfig.yml】命令报错,则需要将【sshkey_autoconfig.yml】文件中的【1-关闭主机密钥检查】下的两行内容都注释,然后执行【ansible-playbook sshkey_autoconfig.yml --ssh-common-args='-o StrictHostKeyChecking=no'】命令即可。
《2》若不想在【sshkey_autoconfig.yml】文件中指定用户的明文密码(需将该文件中的【ansible_ssh_pass】这一行内容删除),然后在执行【ansible-playbook sshkey_autoconfig.yml -k】命令后输入用户的密码后即可。
《3》若要批量给多台主机指定用户都添加上SSH免密登录配置,则先在【/etc/ansible/hosts】文件中将这些主机的IP都添加到指定的组中,若每台主机的账号密码不一致,则需要指定具体的IP、端口、用户、密码【ansible_host=192.168.1.30 ansible_port=22222 ansible_user=root ansible_ssh_pass=admin123456】 ;然后修改【sshkey_autoconfig.yml】文件中【hosts】后的值为主机组名(如:web_servers)示例如下:
bash
#【/etc/ansible/hosts】文件中添加多台主机信息示例
# 自定义主机组名(可以随便改,比如 web_servers、db_servers)
[my_servers]
#【server1】是"主机别名(随便写,方便区分)" 【ansible_host】是"目标机器真实 IP" 【ansible_port】是目标主机的SSH 端口(默认是22) 【ansible_user】是目标主机的用户 【ansible_ssh_pass】是目标主机用户的SSH登录密码
server1 ansible_host=192.168.1.30 ansible_port=22222 ansible_user=root ansible_ssh_pass=your_password1
server2 ansible_host=192.168.1.35 ansible_port=22 ansible_user=ubuntu ansible_ssh_pass=your_password2
server3 ansible_host=192.168.1.36 ansible_port=22022 ansible_user=admin ansible_ssh_pass=your_password3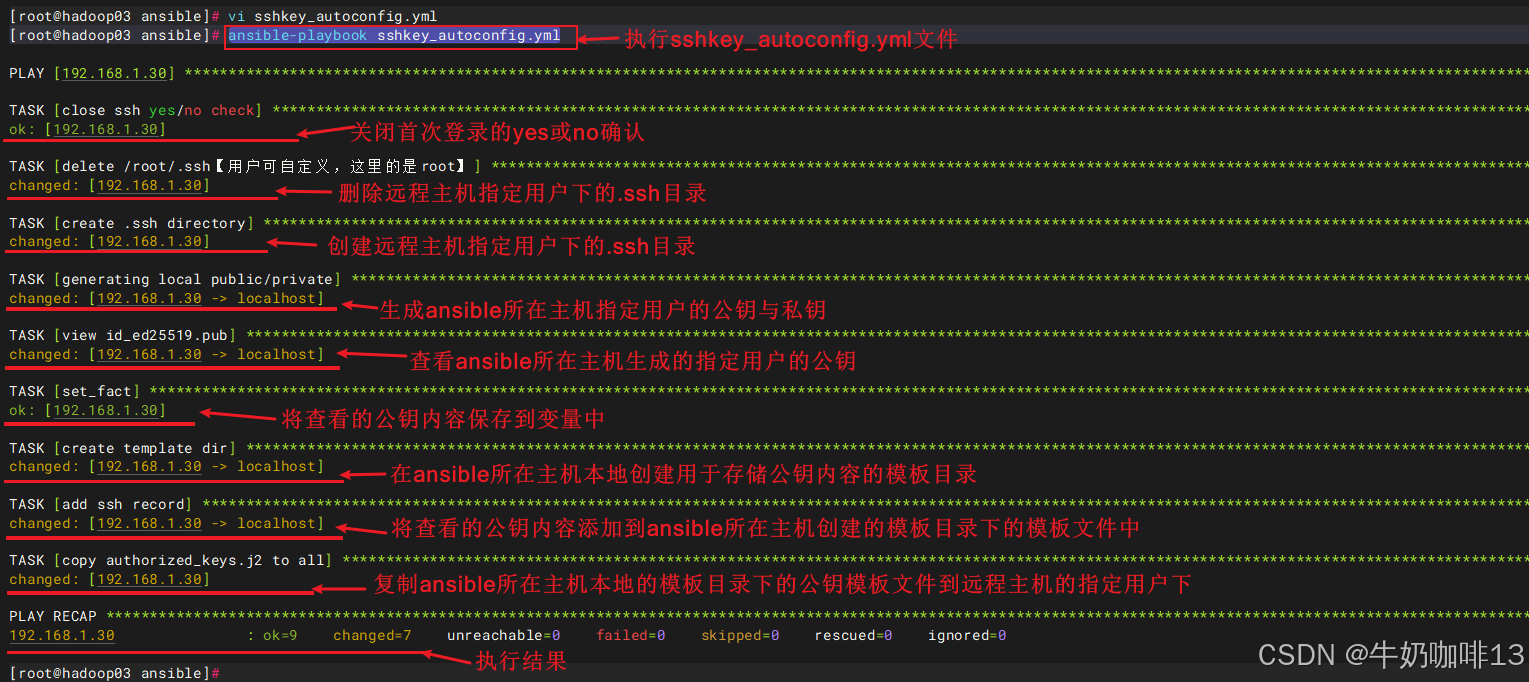
2.2、自动修改主机名
bash
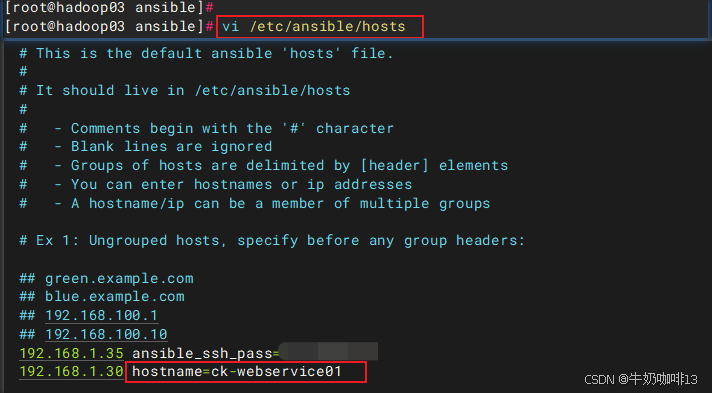
#自动修改主机名示例
#1-修改主机名对应的hostname(如:192.168.1.30 hostname=ck-webservice01)
vi /etc/ansible/hosts
#2-创建自动修改主机名的文件
vi hostname.yml
#3-【hostname.yml】文件的完整内容:
- hosts: 192.168.1.30
remote_user: root
gather_facts: false
vars:
ansible_ssh_port: 22222
ansible_ssh_pass: admin123456
tasks:
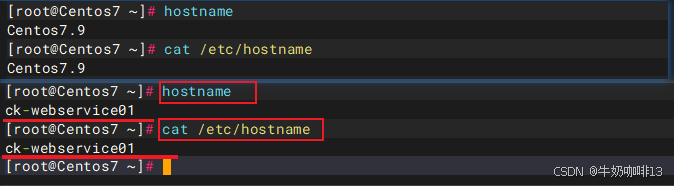
- name: change hostname
shell: "echo {{hostname}} > /etc/hostname"
- name: the hostname is active
shell: hostname {{hostname}}
#命令执行
ansible-playbook hostname.yml 注意:Linux 主机名严格规则(必须遵守):
- 只能用:小写字母 a-z + 数字 0-9 + 短横线
- - 禁止:下划线
_、大写字母、空格、特殊符号 - 不能以短横线
-开头 / 结尾

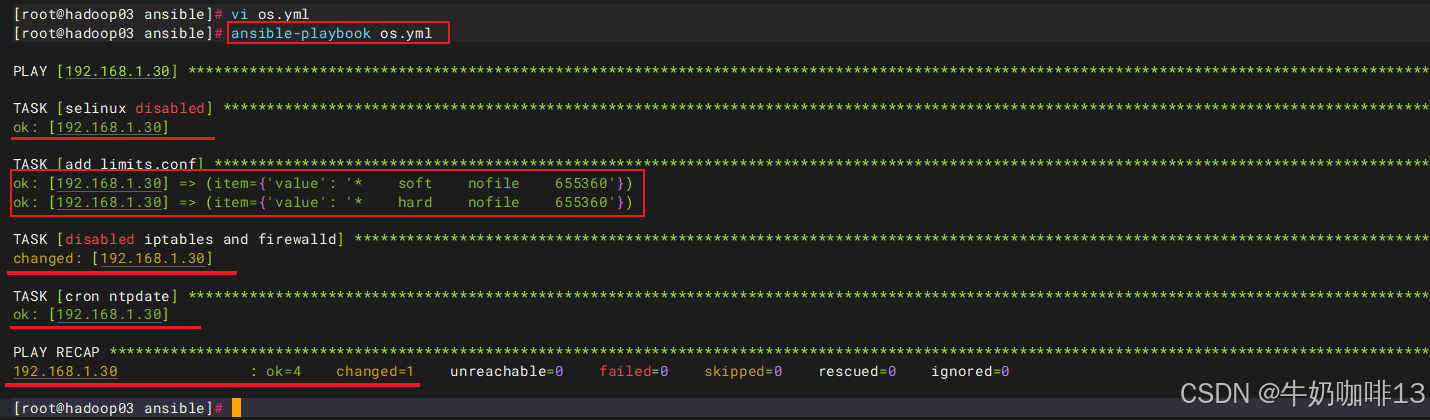
2.3、自动优化系统配置
bash
#自动优化系统配置
#1-完善ansible的hosts文件中的配置(如:192.168.1.30 hostname=ck-webservice01 ansible_port=22222 ansible_user=root ansible_ssh_pass=admin123456)
vi /etc/ansible/hosts

#2-新增自动优化系统配置文件
vi os.yml

#3-【os.yml】文件的完整内容:
- hosts: 192.168.1.30
  remote_user: root
  gather_facts: false
  tasks:
    - name: selinux disabled
      lineinfile: dest=/etc/selinux/config regexp='SELINUX=(.*)' line='SELINUX=disabled'

    - name: add limits.conf
      lineinfile: dest=/etc/security/limits.conf line="{item.value}" state=present
      with_items:
      - {value: "*    soft    nofile    655360"}
      - {value: "*    hard    nofile    655360"}

    - name: disabled iptables and firewalld
      shell: systemctl stop firewalld&&systemctl disable firewalld&&iptables -F

    - name: cron ntpdate
      cron: name=ntpdate minute=*/5 user=root job="source /etc/profile;/usr/sbin/ntpdate -u ntp.aliyun.com && /sbin/hwclock -w"


#命令执行
ansible-playbook os.yml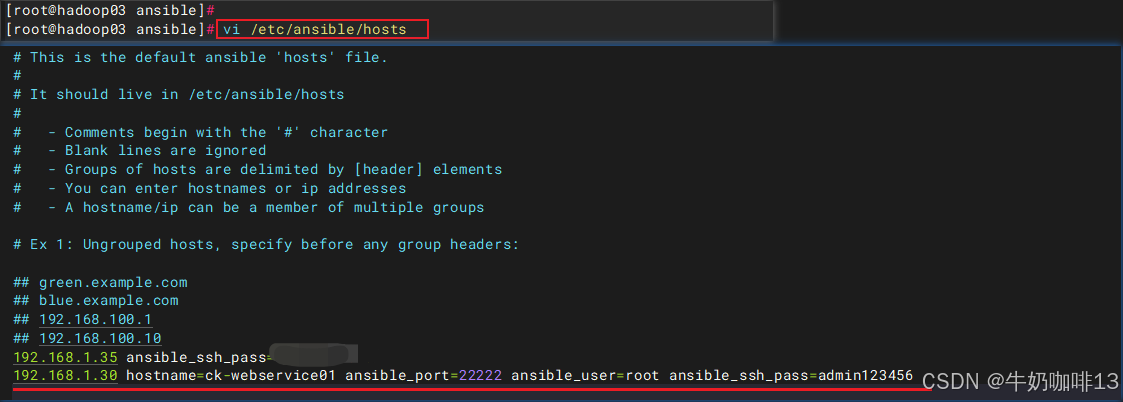
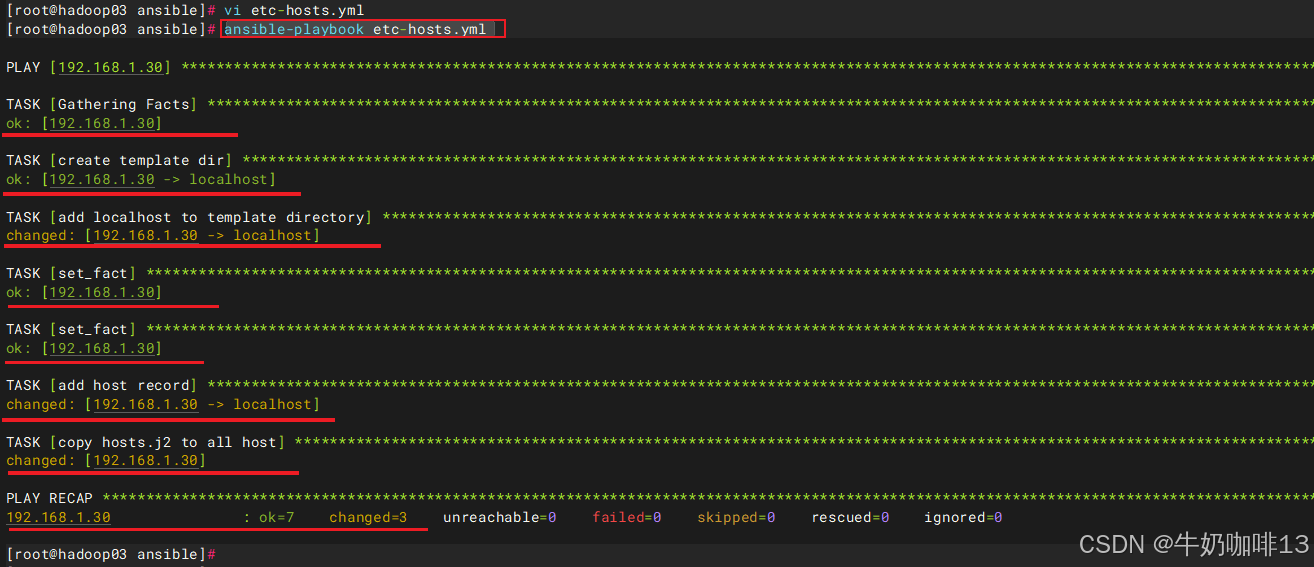
2.4、自动配置主机的hosts文件
bash
#自动配置主机的hosts文件示例
#编辑ansible的【/etc/ansible/hosts】文件中的远程主机信息(如:192.168.1.30 hostname=ck-webservice01 ansible_port=22222 ansible_user=root)
vi /etc/ansible/hosts

#新增自动配置主机hosts文件
vi etc-hosts.yml

#【etc-hosts.yml】文件的完整内容
- hosts: 192.168.1.30
  remote_user: root
  gather_facts: true
  vars:
    #模板文件路径
    ansible_template_dir: /etc/ansible/roles/templates

  tasks:
    - name: create template dir
      local_action: file path={{ansible_template_dir}} state=directory mode=0755

    - name: add localhost to template directory
      local_action: shell echo "127.0.0.1   localhost" > {{ansible_template_dir}}/hosts.j2
      run_once: true

    - set_fact: ipaddr={{inventory_hostname}}
    - set_fact: hostname={{hostname}}

    - name: add host record
      local_action: shell echo {{ipaddr}}   {{hostname}} >> {{ansible_template_dir}}/hosts.j2

    - name: copy hosts.j2 to all host
      template: src={{ansible_template_dir}}/hosts.j2 dest=/etc/hosts


#命令执行
ansible-playbook etc-hosts.yml 

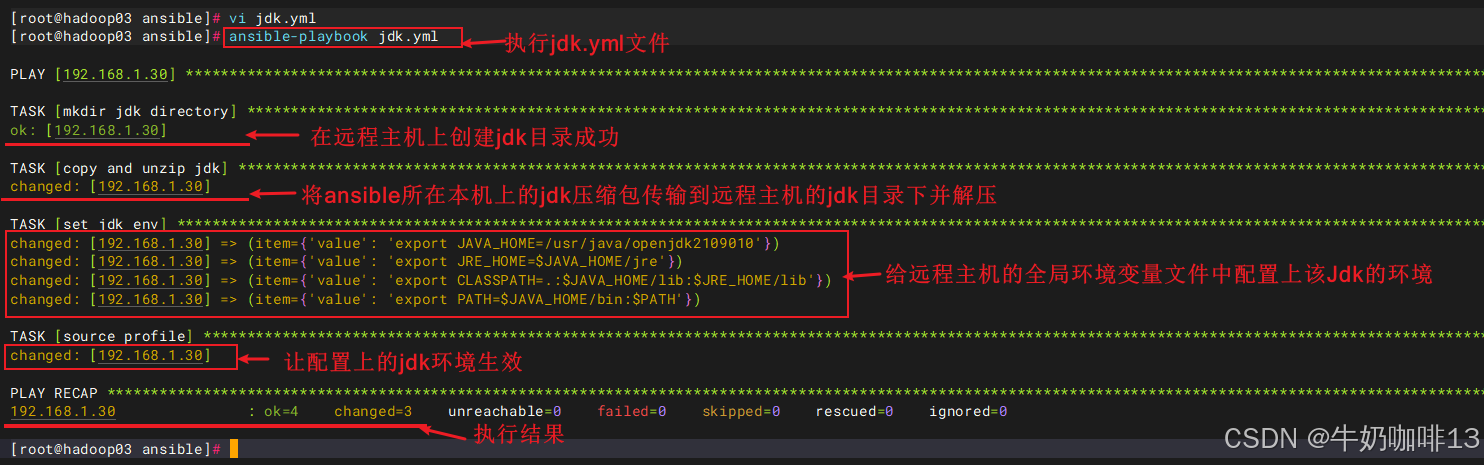
2.5、自动安装JDK并设置环境变量
Linux中手动安装JDK1.8保姆级教程![]() https://blog.csdn.net/xiaochenXIHUA/article/details/142693188手动安装配置openjdk21的保姆级教程
https://blog.csdn.net/xiaochenXIHUA/article/details/142693188手动安装配置openjdk21的保姆级教程![]() https://blog.csdn.net/xiaochenXIHUA/article/details/154943994Linux的压缩与解压缩
https://blog.csdn.net/xiaochenXIHUA/article/details/154943994Linux的压缩与解压缩![]() https://blog.csdn.net/xiaochenXIHUA/article/details/149109326
https://blog.csdn.net/xiaochenXIHUA/article/details/149109326
bash
#自动安装JDK示例
vi jdk.yml

#【jdk.yml】文件的完整内容:
- hosts: 192.168.1.30
  remote_user: root
  gather_facts: false
  vars:
    #注意:这个jdk压缩包是从官网下载下来后进行整合压缩后的可用包
    jdkfile: /data/openjdk2109010.tar.gz
    etcprofile: /etc/profile

  tasks:
    - name: mkdir jdk directory
      file: path=/usr/java state=directory mode=0755

    - name: copy and unzip jdk
      unarchive: src={{jdkfile}} dest=/usr/java

    - name: set jdk env
      lineinfile: dest={{etcprofile}} line="{{item.value}}" state=present
      with_items:
      - {value: "export JAVA_HOME=/usr/java/openjdk2109010"}
      - {value: "export JRE_HOME=$JAVA_HOME/jre"}
      - {value: "export CLASSPATH=.:$JAVA_HOME/lib:$JRE_HOME/lib"}
      - {value: "export PATH=$JAVA_HOME/bin:$PATH"}

    - name: source profile
      shell: source {{etcprofile}}


#命令执行
ansible-playbook jdk.yml
注意:
《1》在对整合后的jdk目录进行压缩的时候,一定要进入该jdk目录所在路径中执行压缩操作(如【tar -zcvf openjdk2109010.tar.gz openjdk2109010】)否则解压后会带有额外的路径导致配置的环境变量不对。
《2》在正式操作前可以对需要传送的jdk压缩包浏览看看路径是否正确(查看命令是【tar -ztvf openjdk2109010.tar.gz 】)。