python
from flask import Flask

app = Flask(__name__)

def hello():
    return "Hello, World!"

# 注册路由
app.add_url_rule('/', 'hello', hello)

# 等价于:
# @app.route('/')
# def hello():
#     return "Hello, World!"

#  带变量的路由
def user_profile(username):
    return f"用户: {username}"

app.add_url_rule('/user/<username>', 'user_profile', user_profile)

# 带类型转换器
def post_detail(post_id):
    return f"文章ID: {post_id}"

app.add_url_rule('/post/<int:post_id>', 'post_detail', post_detail)


#  指定  请求方式的
def user_list():
    if request.method == 'GET':
        return "获取用户列表"
    elif request.method == 'POST':
        return "创建新用户"

app.add_url_rule('/users', 'user_list', user_list, methods=['GET', 'POST'])

# 等价于:
# @app.route('/users', methods=['GET', 'POST'])
# def user_list():
#     ...
python
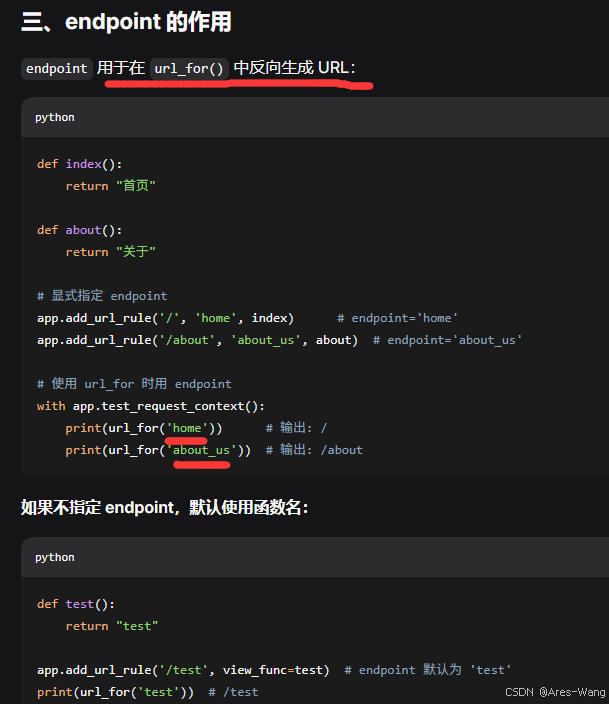
app.test_request_context() 返回一个请求上下文对象(RequestContext),它模拟一个 HTTP 请求环境,让你可以在没有实际请求的情况下使用 Flask 的请求相关功能。
from flask import Flask, url_for, request, session

app = Flask(__name__)

# 调用 test_request_context() 返回一个上下文对象
ctx = app.test_request_context()
print(type(ctx))
# <class 'flask.ctx.RequestContext'>


#  在没有请求时使用 url_for()
# ❌ 这样会报错(没有应用上下文)
# url_for('index')  # RuntimeError: Working outside of application context

# ✅ 使用 test_request_context
with app.test_request_context():
    url = url_for('index')  # 正常工作
    print(url)  # /


# 模拟请求数据(路径、参数、方法等)

# 模拟 GET 请求,带查询参数
with app.test_request_context('/search?q=flask&page=2'):
    print(request.method)   # GET
    print(request.path)     # /search
    print(request.args)     # ImmutableMultiDict([('q', 'flask'), ('page', '2')])
    print(request.args.get('q'))  # flask

# 模拟 POST 请求,带表单数据
with app.test_request_context('/login', method='POST', data={'username': 'admin', 'password': '123'}):
    print(request.method)   # POST
    print(request.form)     # ImmutableMultiDict([('username', 'admin'), ('password', '123')])
    print(request.form['username'])  # admin

# 模拟 JSON 数据
with app.test_request_context('/api', json={'name': '张三', 'age': 20}):
    print(request.json)  # {'name': '张三', 'age': 20}

# 模拟携带请求头
with app.test_request_context('/', headers={
    'User-Agent': 'Mozilla/5.0',
    'X-Custom-Header': 'test'
}):
    print(request.headers.get('User-Agent'))  # Mozilla/5.0
    print(request.headers.get('X-Custom-Header'))  # test

#  操作session
with app.test_request_context():
    session['user_id'] = 123
    session['username'] = 'admin'
    print(session.get('user_id'))  # 123


# 手动调用视图函数
@app.route('/user/<int:user_id>')
def user_profile(user_id):
    return f"User {user_id}"

# 测试视图函数
with app.test_request_context('/user/42'):
    # 手动调用视图函数
    response = user_profile(42)
    print(response)  # User 42

# 测试需要请求数据的视图函数
@app.route('/login', methods=['POST'])
def login():
    username = request.form.get('username')
    password = request.form.get('password')
    if username == 'admin' and password == 'secret':
        session['user'] = username
        return '登录成功'
    return '登录失败', 401

# 测试登录功能
with app.test_request_context('/login', method='POST', data={
    'username': 'admin',
    'password': 'secret'
}):
    response = login()
    print(response)  # 登录成功
    print(session.get('user'))  # admin
批量注册路由
》》使用列表批量注册路由
python
def index(): return "首页"
def about(): return "关于"
def contact(): return "联系我们"

routes = [
    ('/', 'index', index),
    ('/about', 'about', about),
    ('/contact', 'contact', contact),
]

for rule, endpoint, view_func in routes:
    app.add_url_rule(rule, endpoint, view_func)
》》》使用字典批量注册路由
python
routes_config = {
    '/': {'endpoint': 'home', 'view_func': index, 'methods': ['GET']},
    '/admin': {'endpoint': 'admin', 'view_func': admin, 'methods': ['GET', 'POST']},
}

for rule, config in routes_config.items():
    app.add_url_rule(rule, **config)


#  在蓝图中使用
from flask import Blueprint

admin = Blueprint('admin', __name__)

def dashboard():
    return "管理后台"

# 在蓝图上使用 add_url_rule
admin.add_url_rule('/dashboard', 'dashboard', dashboard)
# 注册蓝图
app.register_blueprint(admin, url_prefix='/admin')

#  根据条件注册路由
def register_debug_routes(app):
    """仅在调试模式下注册的路由"""
    if app.debug:
        def debug_info():
            return "调试信息"
        app.add_url_rule('/debug', 'debug_info', debug_info)

register_debug_routes(app)


#  动态添加路由(运行时)
def dynamic_page(name):
    return f"动态页面: {name}"

# 运行时动态添加路由
page_name = "test"
app.add_url_rule(f'/{page_name}', page_name, dynamic_page)

# 甚至可以循环添加
pages = ['about', 'service', 'product']
for page in pages:
    def view_func(page=page):  # 注意捕获变量
        return f"这是{page}页面"
    app.add_url_rule(f'/{page}', page, view_func)
类视图
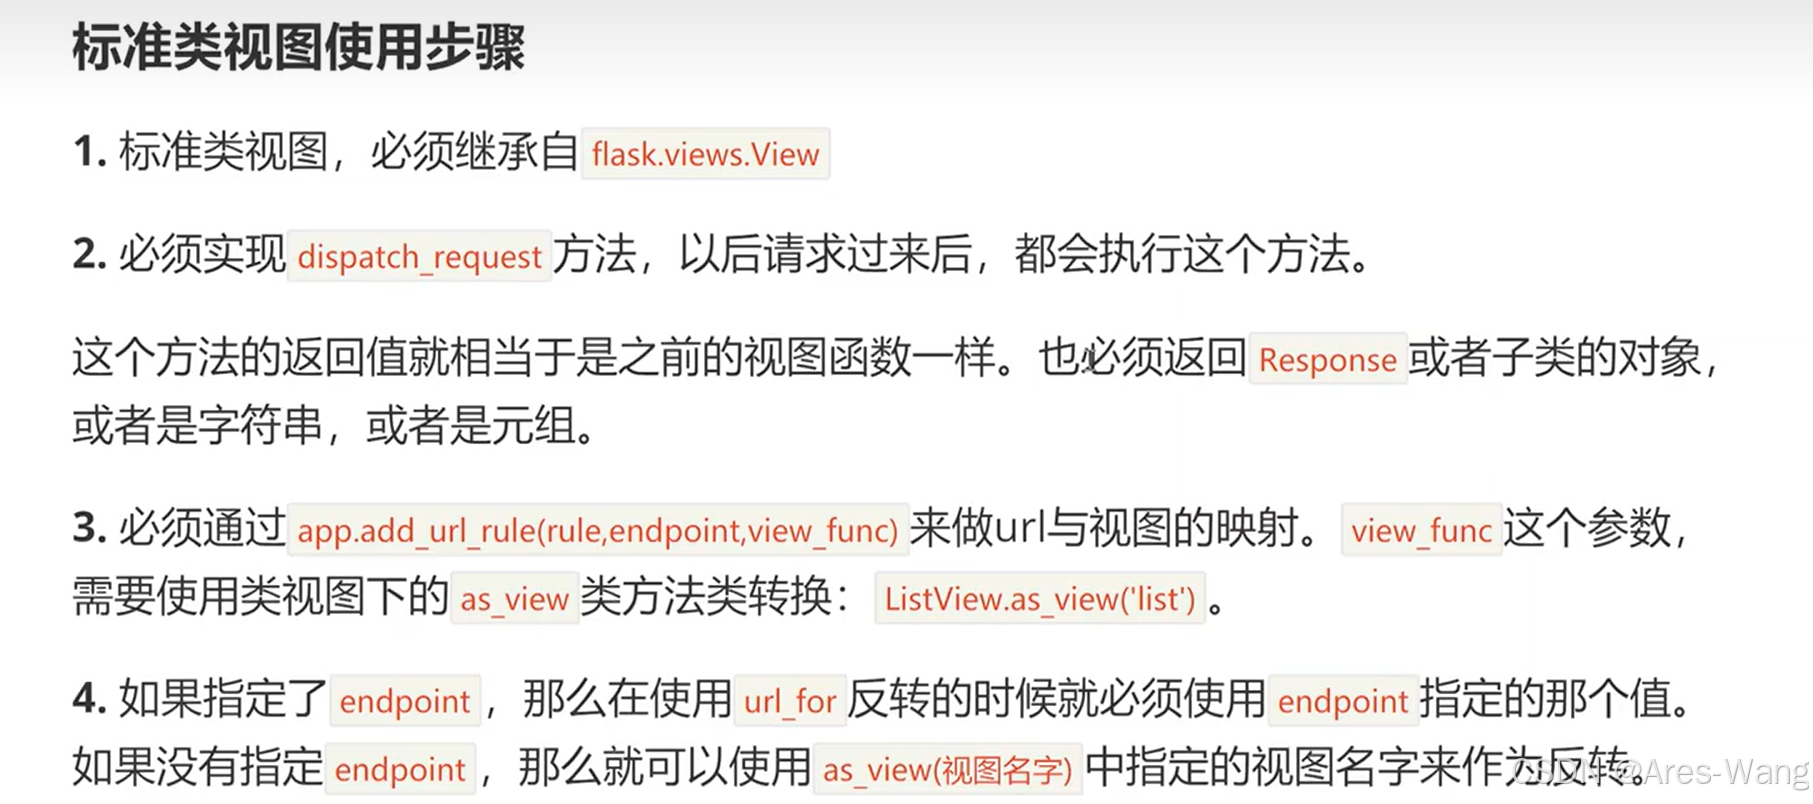
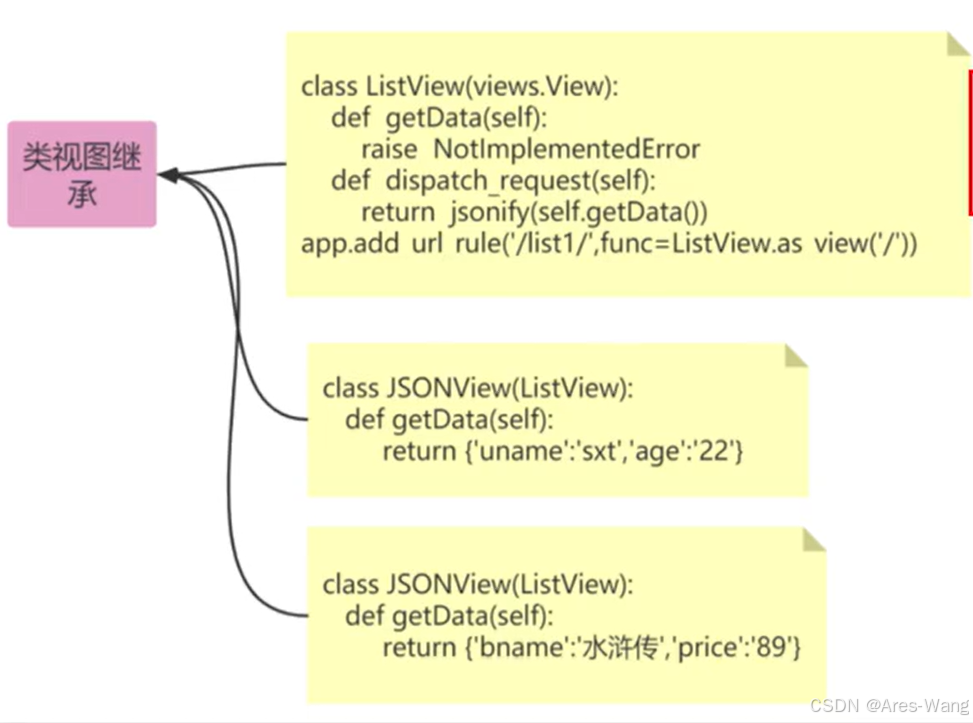
标准视图(继承 View)
python
from flask import Flask, request
from flask.views import View

app = Flask(__name__)

class IndexView(View):
    def dispatch_request(self):
        return "欢迎来到首页!"

class UserView(View):
    def dispatch_request(self, user_id):
        # 可以接收 URL 参数
        return f"用户 {user_id} 的页面"

# 注册路由
app.add_url_rule('/', view_func=IndexView.as_view('index'))
app.add_url_rule('/user/<int:user_id>', view_func=UserView.as_view('user'))
方法视图(继承 MethodView)⭐ 推荐
》将每个 HTTP 方法映射到同名方法,代码更清晰。
python
from flask.views import MethodView

class UserAPI(MethodView):
    def get(self, user_id=None):
        """处理 GET 请求"""
        if user_id:
            return f"获取用户 {user_id} 的信息"
        return "获取所有用户列表"

    def post(self):
        """处理 POST 请求 - 创建用户"""
        return "创建新用户"

    def put(self, user_id):
        """处理 PUT 请求 - 更新用户"""
        return f"更新用户 {user_id}"

    def delete(self, user_id):
        """处理 DELETE 请求 - 删除用户"""
        return f"删除用户 {user_id}"

# 注册多个路由到同一个类视图
user_view = UserAPI.as_view('user_api')
app.add_url_rule('/users/', view_func=user_view, methods=['GET', 'POST'])
app.add_url_rule('/users/<int:user_id>', view_func=user_view, methods=['GET', 'PUT', 'DELETE'])
python
# 它内部大致做了这些工作:
def as_view(name):
    # 1. 创建一个闭包函数
    def view(**kwargs):
        # 2. 实例化 UserView 类
        instance = UserView()
        # 3. 调用 dispatch_request 方法
        return instance.dispatch_request(**kwargs)

    # 4. 给这个函数起个名字(用于 endpoint)
    view.__name__ = name

    return view  # 返回一个真正的函数


# ✅ 正确:通过 as_view 转换
app.add_url_rule('/users', view_func=UserView.as_view('user_list'))

# 相当于手动写了一个函数视图:
def user_list():
    return UserView().dispatch_request()
app.add_url_rule('/users', view_func=user_list)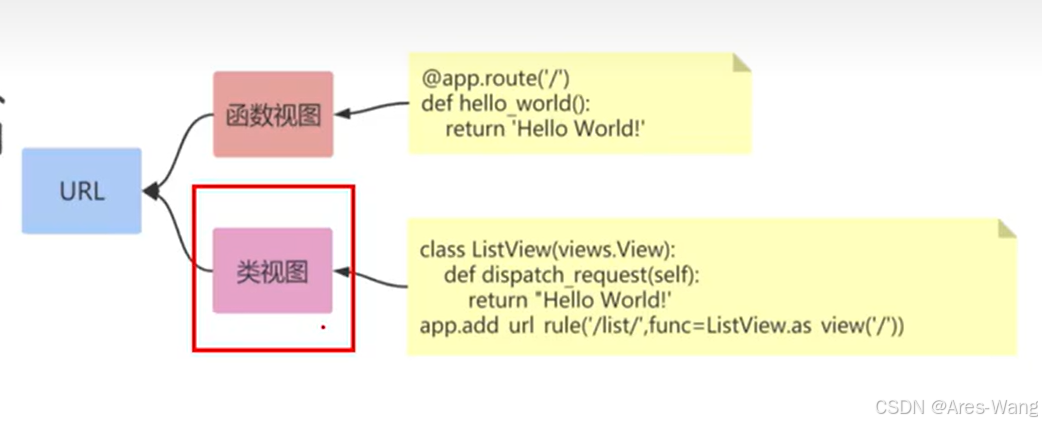
支持多个 HTTP 方法
python
from flask.views import View
class LoginView(View):
    methods = ['GET', 'POST']  # 指定支持的方法

    def dispatch_request(self):
        if request.method == 'GET':
            return "显示登录表单"
        elif request.method == 'POST':
            username = request.form.get('username')
            return f"用户 {username} 登录成功"

app.add_url_rule('/login', view_func=LoginView.as_view('login'))
python
from flask import request, jsonify, render_template

class ArticleView(MethodView):
    def __init__(self):
        # 初始化共享资源
        self.model = Article  # 假设有数据库模型

    def get(self, article_id=None):
        """获取文章"""
        if article_id:
            article = self.model.query.get(article_id)
            if not article:
                return jsonify({"error": "文章不存在"}), 404
            return jsonify(article.to_dict())
        else:
            articles = self.model.query.all()
            return jsonify([a.to_dict() for a in articles])

    def post(self):
        """创建文章"""
        data = request.get_json()
        title = data.get('title')
        content = data.get('content')

        if not title or not content:
            return jsonify({"error": "标题和内容不能为空"}), 400

        article = self.model(title=title, content=content)
        # 保存到数据库
        # db.session.add(article)
        # db.session.commit()

        return jsonify(article.to_dict()), 201

    def put(self, article_id):
        """更新文章"""
        article = self.model.query.get(article_id)
        if not article:
            return jsonify({"error": "文章不存在"}), 404

        data = request.get_json()
        article.title = data.get('title', article.title)
        article.content = data.get('content', article.content)
        # db.session.commit()

        return jsonify(article.to_dict())

    def delete(self, article_id):
        """删除文章"""
        article = self.model.query.get(article_id)
        if not article:
            return jsonify({"error": "文章不存在"}), 404

        # db.session.delete(article)
        # db.session.commit()
        return jsonify({"message": "删除成功"}), 200

# 注册路由
article_view = ArticleView.as_view('article')
app.add_url_rule('/articles/', view_func=article_view, methods=['GET', 'POST'])
app.add_url_rule('/articles/<int:article_id>', view_func=article_view,
                 methods=['GET', 'PUT', 'DELETE'])
》》》装饰器配置
python
# 为整个类视图添加装饰器
from flask import session, abort

def login_required(func):
    """登录验证装饰器"""
    def wrapper(*args, **kwargs):
        if not session.get('user_id'):
            abort(401)
        return func(*args, **kwargs)
    return wrapper

class DashboardView(View):
    decorators = [login_required]  # 所有请求都会经过这个装饰器

    def dispatch_request(self):
        return "管理员面板"

app.add_url_rule('/admin', view_func=DashboardView.as_view('admin'))
python
# MethodView 的装饰器
class ProfileView(MethodView):
    decorators = [login_required]

    def get(self):
        return "用户资料页面"

    def post(self):
        return "更新用户资料"