本文基于大牛直播 SDK(SmartMediaKit)鸿蒙 NEXT RTMP、RTSP播放器,结合真实 ArkTS 工程代码,完整介绍视频帧 RGBA 数据的回调机制、线程模型、帧率控制策略,以及如何在此基础上接入 AI 视觉算法------涵盖帧差运动检测、HarmonyOS Vision Kit 目标识别和 TensorFlow Lite 推理三种典型场景。
背景
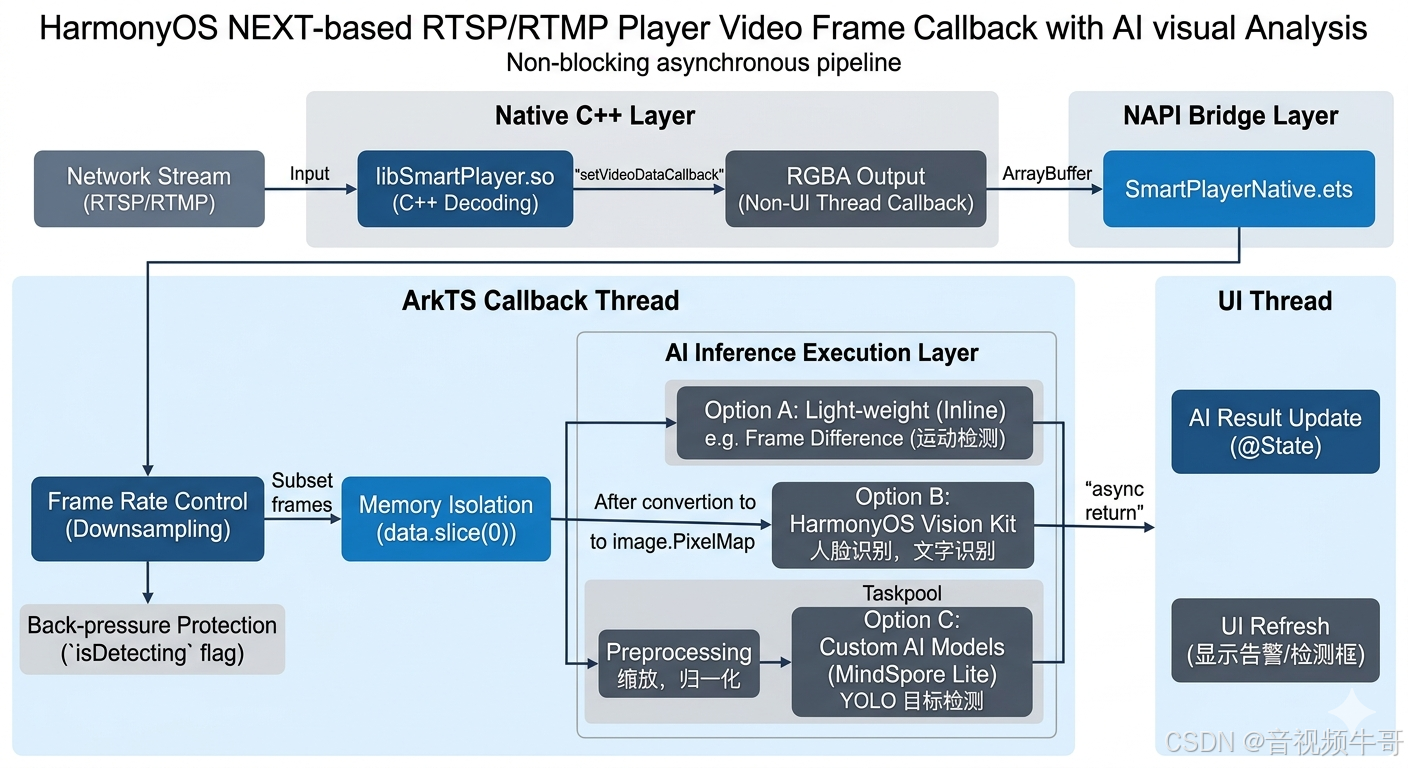
RTSP/RTMP 实时流在监控、工业巡检、智慧零售等场景中,往往不只是"给人看",还需要"让机器看"------在播放的同时把视频帧交给 AI 算法做实时分析。大牛直播 SDK 的鸿蒙 NEXT 版本通过 setVideoDataCallback 接口,将每一帧解码后的 RGBA 原始像素数据直接回调到 ArkTS 层,为接入各类视觉算法提供了标准化的数据入口。
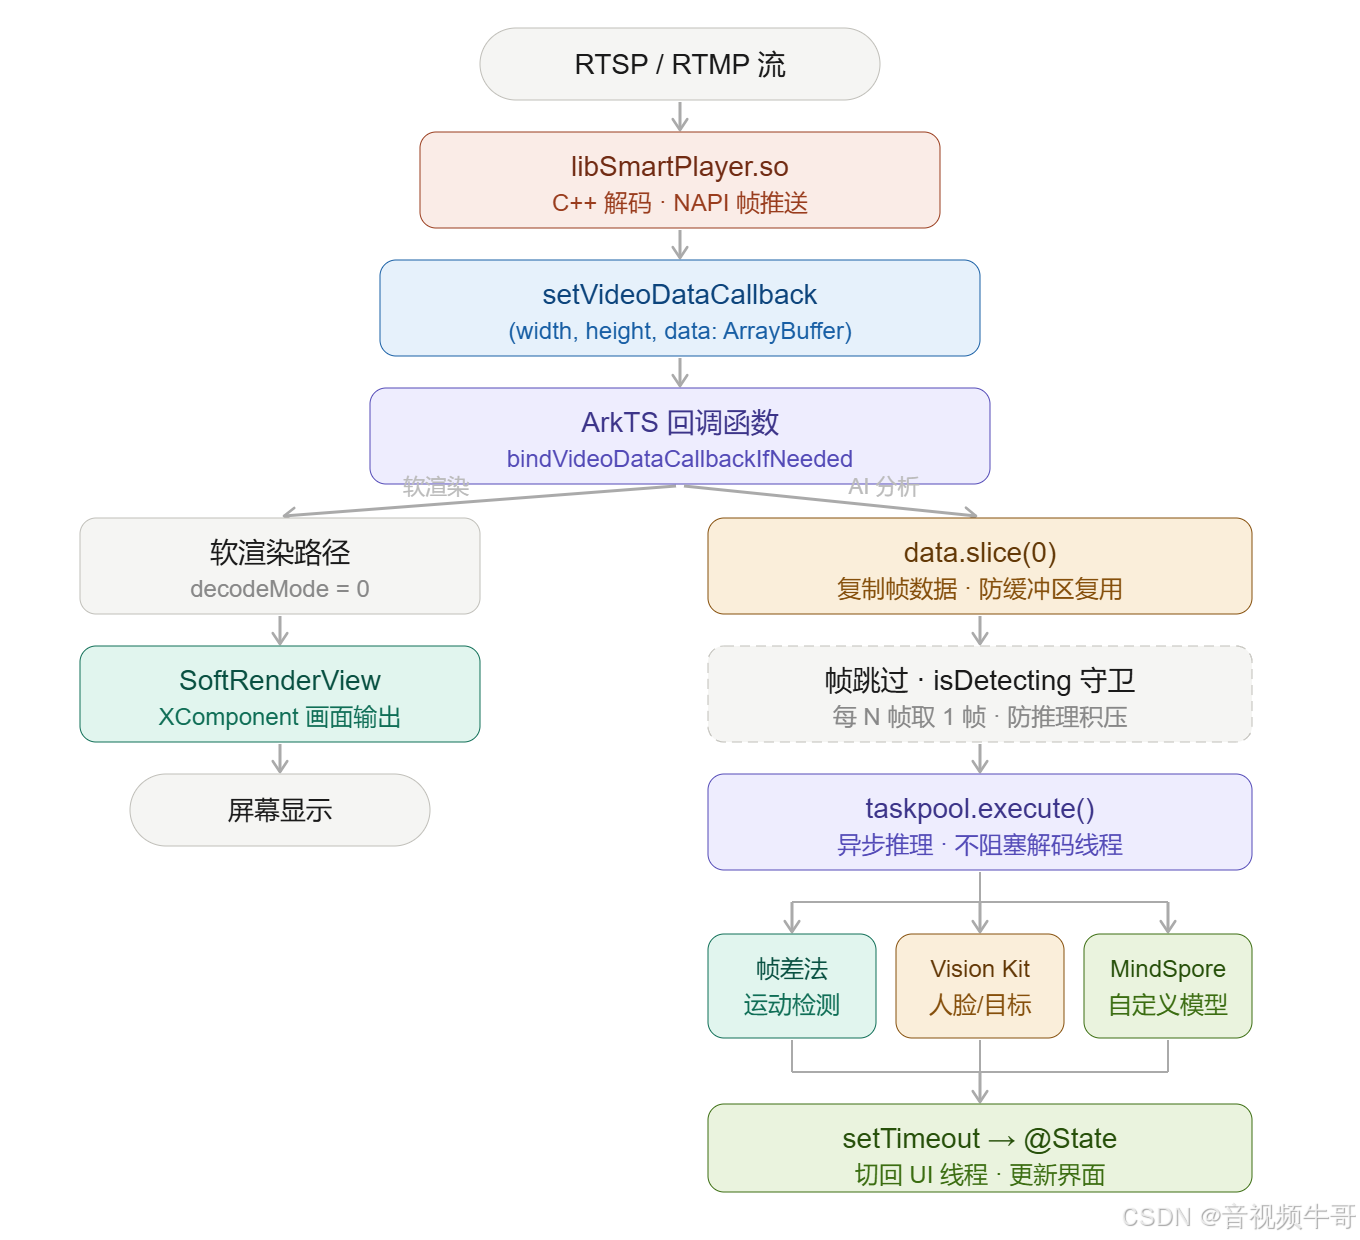
整个数据流向如下:
libSmartPlayer.so(C++ 解码)
    ↓  每帧 RGBA ArrayBuffer
setVideoDataCallback 回调
    ↓
ArkTS 回调函数(bindVideoDataCallbackIfNeeded)
    ├── 软渲染 → SoftRenderView(屏幕显示)
    ├── 回调预览 → callbackPreviewCtrl
    └── 扩展点 → AI 视觉分析(本文重点)
一、视频帧回调接口
1.1 Native 层
// SmartPlayerNative.ets
// 注释明确标注:视频数据回调(RGBA)
export function SmartPlayerSetVideoDataCallback(
  h: number,
  cb: ((width: number, height: number, data: ArrayBuffer) => void) | null
): void {
  _SetVideoDataCb(h, cb);
}
1.2 Wrapper 层
// SmartPlayerWrapper.ets
setVideoDataCallback(
  callback: ((width: number, height: number, data: ArrayBuffer) => void) | null
): void {
  if (!this.isOpened()) return;
  NT.SmartPlayerSetVideoDataCallback(this.handle, callback);
}
1.3 数据格式
每次回调携带三个参数:
| 参数 | 类型 | 说明 |
|---|---|---|
width |
number | 帧宽度(像素) |
height |
number | 帧高度(像素) |
data |
ArrayBuffer | RGBA 像素数据,长度 = width × height × 4 字节 |
内存布局为逐行扫描,每像素 4 字节,顺序为 R、G、B、A(Alpha 固定为 255)。以 1920×1080 分辨率为例,每帧数据约 8.3 MB。
注意:如果接入后发现颜色异常(偏蓝或通道顺序不对),需确认底层实际输出的字节序是 RGBA 还是 BGRA,软渲染层曾遇到过此类问题。建议先取一个像素与实际画面对比,确认后再进行像素操作。
二、注册与注销
2.1 在播放启动时注册
回调必须在 player.isOpened() 为 true 之后注册,实际项目中统一放在 bindPlayerCallbacks() 里:
TypeScript
private bindPlayerCallbacks(): void {
  this.bindEventCallback();         // 播放状态事件
  this.bindVideoDataCallbackIfNeeded(); // 视频帧回调(含 AI 扩展点)
  this.bindSEIDataCallback();       // SEI 元数据回调
}
bindVideoDataCallbackIfNeeded() 通过两个开关决定是否真正绑定:
TypeScript
private bindVideoDataCallbackIfNeeded(): void {
  if (!this.player.isOpened()) return;

  const needSoftRenderMain = ENABLE_SOFT_RENDER && this.decodeMode === 0;
  // enableVideoFrameCallback:UI 上的"视频回调"开关,默认关闭
  const needFrameHook = this.enableVideoFrameCallback || this.showCallbackPreview;
  const shouldBind = needSoftRenderMain || needFrameHook;

  if (!shouldBind) {
    this.clearVideoCallbacksAndPreview(); // 清除旧回调
    return;
  }

  let frameCount = 0;
  this.player.setVideoDataCallback((width: number, height: number, data: ArrayBuffer) => {
    frameCount++;

    // 软渲染路径(模拟器调试用)
    if (needSoftRenderMain) {
      this.softRendererCtrl.onFrame(width, height, data);
    }

    // 每 30 帧打一次日志
    if (frameCount % 30 === 0) {
      this.setLastEvent(`VF ${width}x${height}, bytes=${data.byteLength}, frame=${frameCount}`);
    }

    // ===== AI 扩展点 =====
    // 在这里接入视觉算法,见第四节
  });
}
2.2 在停止时注销
页面隐藏或播放停止时,必须主动注销回调,否则 C++ 层还会持续推送帧数据,造成资源泄漏:
TypeScript
private clearVideoCallbacksAndPreview(): void {
  this.player.setVideoDataCallback(null); // 传 null = 注销
  this.softRendererCtrl.stop();
  this.callbackPreviewCtrl.stop();
  this.player.setSEIDataCallback(null);
}

onPageHide(): void {
  this.clearVideoCallbacksAndPreview();
}

aboutToDisappear(): void {
  this.player.setVideoDataCallback(null);
  this.softRendererCtrl.stop();
}
三、回调的线程模型与帧率控制
3.1 回调在哪个线程触发
setVideoDataCallback 的回调由 C++ 解码线程通过 NAPI 调用,不在 ArkTS 的 UI 主线程。这意味着:
- 禁止 在回调里直接修改
@State变量------会触发跨线程 UI 更新异常。 - 需要更新 UI 时,应使用
taskpool或回调内部用闭包捕获的计数器来限频,通过异步机制切回主线程。 - 回调本身的耗时要严格控制,不能阻塞解码线程(否则会造成播放卡顿)。
TypeScript
// 错误示例:直接在回调里改 @State
this.player.setVideoDataCallback((w, h, data) => {
  this.detectionResult = '检测到人脸'; // ❌ 跨线程操作 @State
});

// 正确示例:用 setTimeout 切回主线程
this.player.setVideoDataCallback((w, h, data) => {
  const result = runDetection(data, w, h);        // 在当前线程跑算法
  setTimeout(() => {                              // 切回主线程更新 UI
    this.detectionResult = result;
  }, 0);
});
3.2 帧率控制:不要每帧都跑算法
实时流通常以 25~30fps 回调,AI 推理一般耗时 20~200ms,远超单帧时间。必须做帧跳过,只取部分帧送入算法:
TypeScript
let frameCount = 0;
const AI_INTERVAL = 5; // 每 5 帧取 1 帧,约 5~6fps 送算法

this.player.setVideoDataCallback((width: number, height: number, data: ArrayBuffer) => {
  frameCount++;

  // 软渲染:每帧都要,保证画面流畅
  if (needSoftRenderMain) {
    this.softRendererCtrl.onFrame(width, height, data);
  }

  // AI 分析:降频,避免推理积压
  if (frameCount % AI_INTERVAL !== 0) return;

  // 复制一份数据,防止 ArrayBuffer 被下一帧覆盖
  const frameCopy = data.slice(0);
  this.dispatchToAI(frameCopy, width, height);
});
data.slice(0) 是关键操作。Native 层的 ArrayBuffer 可能是复用缓冲区,回调返回后内存就会被下一帧覆盖。如果把原始 data 传给异步任务,等任务执行时数据已变。必须先 slice(0) 复制一份再异步处理。
HarmonyOS NEXT纯血鸿蒙RTSP|RTMP播放器
四、AI 视觉算法接入实战
4.1 场景一:帧差法运动检测
最轻量的方案,不依赖任何第三方库,纯 JS 在回调线程里完成,适合实时性要求极高的告警触发场景。
原理:对比相邻两帧的亮度差,差值超过阈值的像素占比超过一定比例时,判定为"有运动"。
以下是示例代码:
TypeScript
// 灰度化工具函数(RGBA → 灰度)
function toGrayscale(data: ArrayBuffer, width: number, height: number): Uint8Array {
  const src = new Uint8Array(data);
  const gray = new Uint8Array(width * height);
  for (let i = 0; i < width * height; i++) {
    const r = src[i * 4];
    const g = src[i * 4 + 1];
    const b = src[i * 4 + 2];
    // BT.601 亮度公式
    gray[i] = Math.round(0.299 * r + 0.587 * g + 0.114 * b);
  }
  return gray;
}

// 状态变量(闭包持有,不放 @State)
let prevGray: Uint8Array | null = null;
const DIFF_THRESHOLD = 30;    // 像素灰度差阈值
const MOTION_RATIO = 0.02;    // 超过 2% 像素有变化则判定运动

let frameCount = 0;
this.player.setVideoDataCallback((width: number, height: number, data: ArrayBuffer) => {
  frameCount++;
  if (frameCount % 3 !== 0) return; // 每 3 帧取一帧

  const gray = toGrayscale(data, width, height);

  if (prevGray !== null && prevGray.length === gray.length) {
    let diffCount = 0;
    for (let i = 0; i < gray.length; i++) {
      if (Math.abs(gray[i] - prevGray[i]) > DIFF_THRESHOLD) {
        diffCount++;
      }
    }
    const motionRatio = diffCount / gray.length;

    if (motionRatio > MOTION_RATIO) {
      setTimeout(() => {
        this.statusText = `运动告警 (变化率: ${(motionRatio * 100).toFixed(1)}%)`;
      }, 0);
    }
  }

  prevGray = gray;
});
这套方案在 1920×1080 分辨率下每帧灰度化约耗时 5~15ms(取决于设备性能),适合每 3~5 帧运行一次。
4.2 场景二:接入 HarmonyOS Vision Kit
HarmonyOS NEXT 系统内置了 Vision Kit,提供人脸检测、文字识别、条码扫描等能力。Vision Kit 的输入是 image.PixelMap,因此需要先将 RGBA ArrayBuffer 转换为 PixelMap。
以下是示例代码:
TypeScript
import { image } from '@kit.ImageKit';
import { faceDetector } from '@kit.VisionKit';
import { taskpool } from '@kit.ArkTS';

// 将 RGBA ArrayBuffer 转为 PixelMap
async function createPixelMap(data: ArrayBuffer, width: number, height: number): Promise<image.PixelMap> {
  const opts: image.InitializationOptions = {
    size: { width, height },
    pixelFormat: image.PixelMapFormat.RGBA_8888,
    editable: false
  };
  return image.createPixelMap(new Uint8Array(data), opts);
}

// AI 分析任务(在 taskpool 线程执行)
@Concurrent
async function detectFaces(
  pixelMap: image.PixelMap
): Promise<faceDetector.FaceDetectResult[]> {
  const config: faceDetector.Config = {
    performanceMode: faceDetector.PerformanceMode.PERFORMANCE
  };
  return faceDetector.detect(pixelMap, config);
}

// 在回调里接入
let isDetecting = false; // 防止推理任务积压

this.player.setVideoDataCallback((width: number, height: number, data: ArrayBuffer) => {
  frameCount++;
  if (frameCount % 5 !== 0) return; // 降频到约 5fps 送算法
  if (isDetecting) return;          // 上一帧还没处理完,跳过

  isDetecting = true;
  const frameCopy = data.slice(0);  // 必须复制,防止缓冲区被复用

  createPixelMap(frameCopy, width, height).then((pixelMap) => {
    return taskpool.execute(detectFaces, pixelMap);
  }).then((results: faceDetector.FaceDetectResult[]) => {
    setTimeout(() => {
      this.faceCount = results.length;
      this.statusText = results.length > 0
        ? `检测到 ${results.length} 张人脸`
        : '未检测到人脸';
    }, 0);
  }).catch((e: Error) => {
    console.error(`[AI] 人脸检测失败: ${e.message}`);
  }).finally(() => {
    isDetecting = false;
  });
});
isDetecting 标志位是防止推理积压的关键------如果一次推理还没结束,下一帧就放弃,而不是排队等待。推理队列一旦积压,内存会快速膨胀,最终触发 OOM。
4.3 场景三:接入 TensorFlow Lite / ONNX Runtime
对于需要自定义模型(目标检测、异常行为识别等)的场景,可以通过 TensorFlow Lite 或鸿蒙原生的 MindSpore Lite 接入本地推理。数据流转如下:
TypeScript
import { mindSporeLite } from '@kit.MindSporeLiteKit';

// 初始化模型(在 aboutToAppear 完成,避免每帧重建)
private model: mindSporeLite.Model | null = null;

async initModel(): Promise<void> {
  const ctx = this.getUIContext().getHostContext() as common.UIAbilityContext;
  const modelPath = ctx.filesDir + '/yolo_detect.ms'; // 预置模型文件
  const context = new mindSporeLite.Context();
  context.target = ['cpu'];

  this.model = await mindSporeLite.loadModelFromFile(modelPath, context);
}

// 预处理:RGBA → float32 归一化(模型输入格式)
function preprocess(
  data: ArrayBuffer,
  width: number,
  height: number,
  targetW: number,
  targetH: number
): Float32Array {
  const src = new Uint8Array(data);
  const dst = new Float32Array(targetW * targetH * 3); // RGB only, no alpha

  // 简化版双线性缩放 + 归一化到 [0,1]
  const scaleX = width / targetW;
  const scaleY = height / targetH;

  for (let y = 0; y < targetH; y++) {
    for (let x = 0; x < targetW; x++) {
      const srcX = Math.floor(x * scaleX);
      const srcY = Math.floor(y * scaleY);
      const srcIdx = (srcY * width + srcX) * 4;
      const dstIdx = (y * targetW + x) * 3;
      dst[dstIdx]     = src[srcIdx]     / 255.0; // R
      dst[dstIdx + 1] = src[srcIdx + 1] / 255.0; // G
      dst[dstIdx + 2] = src[srcIdx + 2] / 255.0; // B
    }
  }
  return dst;
}

// 在帧回调中执行推理
this.player.setVideoDataCallback((width: number, height: number, data: ArrayBuffer) => {
  frameCount++;
  if (frameCount % 10 !== 0) return; // 降频到约 3fps
  if (!this.model || isDetecting) return;

  isDetecting = true;
  const frameCopy = data.slice(0);

  taskpool.execute((): string => {
    const input = preprocess(frameCopy, width, height, 640, 640);
    const inputTensor = new mindSporeLite.MSTensor(
      'input',
      new Int32Array([1, 640, 640, 3]),
      mindSporeLite.DataType.FLOAT32
    );
    inputTensor.setData(input.buffer);

    // 执行推理
    const outputs = this.model!.predict([inputTensor]);
    // 解析 outputs 得到检测框、类别、置信度...
    return JSON.stringify(parseDetections(outputs));
  }).then((resultJson: string) => {
    const detections = JSON.parse(resultJson);
    setTimeout(() => {
      this.detectionBoxes = detections;
    }, 0);
  }).finally(() => {
    isDetecting = false;
  });
});
纯血鸿蒙(HarmonyOS )RTSP直播播放器时延测试
五、完整接入流程
5.1 开启帧回调开关
帧回调默认关闭(避免不必要的性能开销)。需要 AI 分析时,在播放启动前置为 true:
TypeScript
// 在 doPlay() 之前
this.enableVideoFrameCallback = true;

// 然后正常启动播放
this.doPlay();
代码层面的条件判断:
TypeScript
const needFrameHook = this.enableVideoFrameCallback || this.showCallbackPreview;
const shouldBind = needSoftRenderMain || needFrameHook;
只有 enableVideoFrameCallback = true 时,shouldBind 才为 true,帧数据才会从 C++ 层推送过来。
5.2 硬解码 Surface 直通模式的限制
当解码模式为 videoDecoderMode = 2(硬解码 Surface 直通)时,视频帧直接写入 OHNativeWindow,不会触发 setVideoDataCallback。需要帧回调的场景必须使用软解码(mode=0)或普通硬解码(mode=1)。
TypeScript
// 启用帧回调时,禁止 Surface 直通模式
if (this.enableVideoFrameCallback && this.decodeMode === 2) {
  this.decodeMode = 1; // 自动降级到普通硬解码
  this.setLastEvent('已切换到硬解码模式以启用帧回调');
}
5.3 完整的生命周期管理
TypeScript
// aboutToAppear: 初始化 AI 模型
aboutToAppear(): void {
  this.initModel();  // 预加载,避免首帧延迟
}

// doPlay: 启动前确认回调开关
private doPlay(): void {
  if (!this.player.isOpened()) {
    this.player.open();
  }
  this.bindPlayerCallbacks();  // 内部调用 bindVideoDataCallbackIfNeeded
  this.player.applyPlaybackConfig(this.buildCommonConfig());
  this.player.startPlayback();
}

// onPageHide: 停止推送,释放线程资源
onPageHide(): void {
  this.clearVideoCallbacksAndPreview(); // setVideoDataCallback(null)
}

// aboutToDisappear: 销毁模型
aboutToDisappear(): void {
  this.player.setVideoDataCallback(null);
  this.model?.dispose();
  this.model = null;
}
六、性能调优建议
帧跳过比例 :根据算法耗时动态调整 AI_INTERVAL。推理耗时 50ms 时,以 25fps 流为例,每 2 帧跑一次就已经是满负荷;建议从每 5 帧开始,通过日志观察丢帧率后再调整。
taskpool 线程数 :taskpool.execute() 会自动管理线程池,不要手动创建多个并发推理任务。isDetecting 标志位保证任意时刻只有一个推理任务在跑。
分辨率降采样 :AI 模型通常只需要 320×320 或 640×640 的输入,而实际流可能是 1920×1080。在 preprocess() 里做缩放,可以将数据量压缩到原来的 1/9,显著降低传输和计算开销。
ROI 裁剪:如果只关心画面的特定区域(如门口、收银台),可以只截取感兴趣区域(Region of Interest)送给模型,进一步降低计算量。
TypeScript
// 只取中心 640×640 区域
function cropCenter(
  data: ArrayBuffer,
  srcW: number,
  srcH: number,
  cropW: number,
  cropH: number
): ArrayBuffer {
  const src = new Uint8Array(data);
  const dst = new Uint8Array(cropW * cropH * 4);
  const offsetX = Math.floor((srcW - cropW) / 2);
  const offsetY = Math.floor((srcH - cropH) / 2);
  for (let y = 0; y < cropH; y++) {
    const srcRow = ((offsetY + y) * srcW + offsetX) * 4;
    const dstRow = y * cropW * 4;
    dst.set(src.subarray(srcRow, srcRow + cropW * 4), dstRow);
  }
  return dst.buffer;
}
七、常见问题
Q:回调里直接操作像素感觉很慢,有加速方案吗?
纯 ArkTS 的 Uint8Array 循环在处理 1080p 帧时确实较慢。可以把计算密集的预处理(灰度化、缩放、归一化)封装进 @Concurrent 函数通过 taskpool 并行,或者考虑把预处理逻辑下沉到 C++ 侧,以 NAPI 接口暴露给 ArkTS,一次调用完成数据格式转换。
Q:帧数据回调频率很高,会不会影响播放流畅度?
回调本身是同步调用,如果回调函数执行时间过长会阻塞 C++ 解码线程,导致播放卡顿掉帧。原则是:回调函数里只做数据复制和帧跳过判断 (微秒级),实际算法全部通过 taskpool 异步化。示例里 data.slice(0) 复制 + 帧计数判断不超过 1ms,对解码线程几乎没有影响。
Q:Vision Kit 的 detect() 是否线程安全?
Vision Kit 的接口设计为异步,可在非 UI 线程调用,但建议通过 taskpool 进行隔离,避免多帧任务同时进入导致资源争用。isDetecting 标志位是最简单可靠的互斥方案。
Q:关闭 AI 分析时如何恢复硬解码 Surface 直通模式?
将 enableVideoFrameCallback 设回 false,然后重新启动播放(doStop() + doPlay()),在 buildCommonConfig() 里会读取最新的 decodeMode,走 Surface 直通路径,不再触发帧回调。
小结
大牛直播 SDK 鸿蒙 NEXT 版本RTSP、RTMP播放器的视频帧回调设计,把 AI 视觉分析的接入点做到了最小侵入:setVideoDataCallback 一行注册,RGBA 数据直达 ArkTS,剩下的算法选型完全由业务层决定。核心工程难点集中在三处:回调线程安全(禁止直接改 @State)、帧数据复制(data.slice(0) 防止缓冲区复用踩踏)、推理反压控制(isDetecting 标志位杜绝积压)。把这三个要点处理好,无论接入帧差运动检测、Vision Kit 还是自定义 TFLite 模型,架构都是一致的。
📎 CSDN官方博客:音视频牛哥-CSDN博客