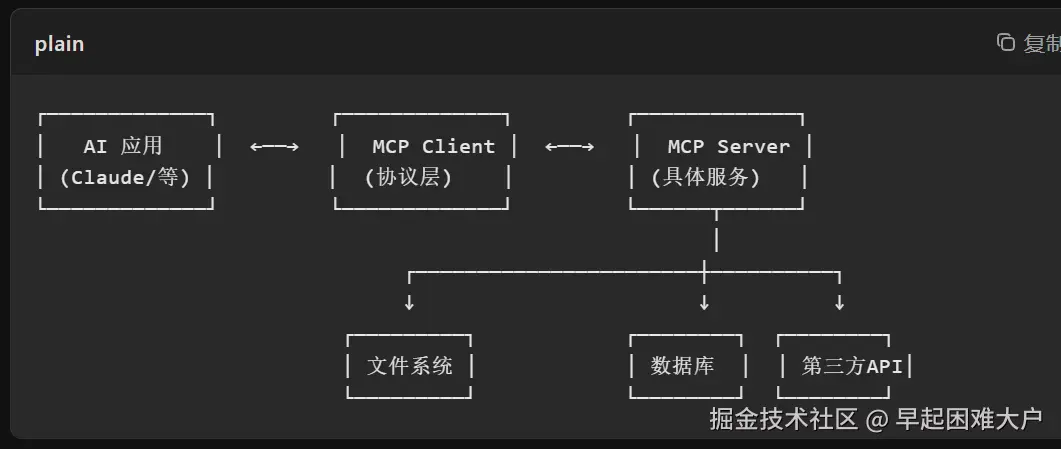
MCP Server 是 Model Context Protocol(模型上下文协议) 的服务器端实现。MCP 是由 Anthropic 推出的开放协议,旨在标准化 AI 模型与外部数据源、工具之间的连接方式。你可以把它理解为 AI 应用的"USB-C 接口" ------ 统一、即插即用。
| 功能 | 说明 |
|---|---|
| 数据连接 | 让 AI 安全地访问本地文件、数据库、API 等外部资源 |
| 工具提供 | 为 AI 提供可调用的功能(如搜索、计算、代码执行) |
| 上下文管理 | 管理 AI 会话中的上下文信息,保持连贯性 |
 mcp server开发兼容多种语言,实际上ts的生态最好
技术栈选择
| 语言 | SDK | 适用场景 |
|---|---|---|
| TypeScript | @modelcontextprotocol/sdk |
最成熟,生态最好 |
| Python | mcp |
数据/ML 场景友好 |
| Java / C# | 社区 SDK | 企业级应用 |
| 概念 | 说明 |
|---|---|
| Tool(工具) | AI 可调用的功能,如搜索、计算、API 请求 |
| Resource(资源) | AI 可读取的数据,如文件内容、数据库记录 |
| Prompt(提示模板) | 预定义的提示词模板 |
| Transport(传输层) | 通信方式:stdio(本地)或 SSE(远程) |
如何开发一个 mcp server
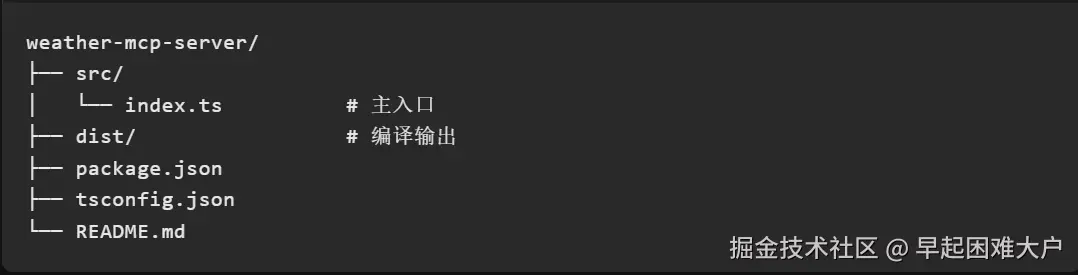
ts项目架构:
 1.配置package.json
js
{
  "name": "weather-mcp-server",
  "version": "1.0.0",
  "description": "天气查询 MCP Server",
  "type": "module",
  "bin": {
    "weather-mcp-server": "./dist/index.js"
  },
  "scripts": {
    "build": "tsc",
    "dev": "tsx src/index.ts",
    "start": "node dist/index.js",
    "prepare": "npm run build"
  },
  "keywords": [
    "mcp",
    "weather",
    "model-context-protocol"
  ],
  "license": "MIT",
  "dependencies": {
    "@modelcontextprotocol/sdk": "^1.0.0",
    "zod": "^3.22.0"
  },
  "devDependencies": {
    "@types/node": "^20.19.39",
    "tsx": "^4.0.0",
    "typescript": "^5.0.0"
  }
}
2.配置tsconfig.json
js
{
  "compilerOptions": {
    "target": "ES2022",
    "module": "Node16",
    "moduleResolution": "Node16",
    "outDir": "./dist",
    "rootDir": "./src",
    "strict": true,
    "esModuleInterop": true,
    "skipLibCheck": true,
    "forceConsistentCasingInFileNames": true,
    "types": ["node"]
  },
  "include": ["src/**/*"]
}
3.核心代码index.ts
js
#!/usr/bin/env node
import { Server } from "@modelcontextprotocol/sdk/server/index.js";
import { StdioServerTransport } from "@modelcontextprotocol/sdk/server/stdio.js";
import {
CallToolRequestSchema,
ListToolsRequestSchema,
} from "@modelcontextprotocol/sdk/types.js";
import { z } from "zod";
// ============ 类型定义 ============
interface WeatherData {
current: {
temperature_2m: number;
weathercode: number;
windspeed_10m: number;
};
daily: {
time: string[];
temperature_2m_max: number[];
temperature_2m_min: number[];
weathercode: number[];
};
}
// 天气代码映射(WMO Weather interpretation codes)
const weatherCodes: Record<number, string> = {
0: "晴朗",
1: "主要晴朗", 2: "多云", 3: "阴天",
45: "雾", 48: "沉积雾",
51: "毛毛雨", 53: "中度毛毛雨", 55: "密集毛毛雨",
61: "小雨", 63: "中雨", 65: "大雨",
71: "小雪", 73: "中雪", 75: "大雪",
80: "阵雨", 81: "中度阵雨", 82: "暴雨",
95: "雷雨", 96: "雷雨伴冰雹", 99: "强雷雨伴冰雹",
};
// ============ 工具函数 ============
async function getCoordinates(city: string): Promise<{ lat: number; lon: number; name: string } | null> {
try {
const response = await fetch(
`https://geocoding-api.open-meteo.com/v1/search?name=${encodeURIComponent(city)}&count=1&language=zh&format=json`
);
const data = await response.json() as { results?: Array<{ latitude: number; longitude: number; name: string }> };
if (!data.results || data.results.length === 0) return null;
const result = data.results[0];
return {
lat: result.latitude,
lon: result.longitude,
name: result.name,
};
} catch (error) {
return null;
}
}
async function getWeather(lat: number, lon: number): Promise<WeatherData> {
const response = await fetch(
`https://api.open-meteo.com/v1/forecast?latitude=${lat}&longitude=${lon}¤t=temperature_2m,weathercode,windspeed_10m&daily=temperature_2m_max,temperature_2m_min,weathercode&timezone=auto&forecast_days=3`
);
return await response.json() as WeatherData;
}
function formatWeather(data: WeatherData, cityName: string): string {
const current = data.current;
const currentWeather = weatherCodes[current.weathercode] || "未知天气";
let result = `🌍 ${cityName}\n`;
result += `🌡️ 当前温度: ${current.temperature_2m}°C\n`;
result += `☁️ 天气状况: ${currentWeather}\n`;
result += `💨 风速: ${current.windspeed_10m} km/h\n\n`;
result += `📅 未来3天预报:\n`;
for (let i = 0; i < 3; i++) {
const date = new Date(data.daily.time[i]);
const dayStr = i === 0 ? "今天" : i === 1 ? "明天" : "后天";
const maxTemp = data.daily.temperature_2m_max[i];
const minTemp = data.daily.temperature_2m_min[i];
const weather = weatherCodes[data.daily.weathercode[i]] || "未知";
result += `${dayStr} (${date.getMonth() + 1}/${date.getDate()}): ${weather}, ${minTemp}°C ~ ${maxTemp}°C\n`;
}
return result;
}
// ============ MCP Server 核心 ============
const server = new Server(
{
name: "weather-mcp-server",
version: "1.0.0",
},
{
capabilities: {
tools: {},
},
}
);
// 声明可用工具
server.setRequestHandler(ListToolsRequestSchema, async () => {
return {
tools: [
{
name: "get_current_weather",
description: "获取指定城市的当前天气和未来3天预报",
inputSchema: {
type: "object",
properties: {
city: {
type: "string",
description: "城市名称,例如:北京、上海、New York",
},
},
required: ["city"],
},
},
{
name: "compare_weather",
description: "比较两个城市的天气",
inputSchema: {
type: "object",
properties: {
city1: {
type: "string",
description: "第一个城市",
},
city2: {
type: "string",
description: "第二个城市",
},
},
required: ["city1", "city2"],
},
},
],
};
});
// 处理工具调用
server.setRequestHandler(CallToolRequestSchema, async (request) => {
const { name, arguments: args } = request.params;
// Tool 1: 获取单个城市天气
if (name === "get_current_weather") {
const schema = z.object({ city: z.string() });
const { city } = schema.parse(args);
const coords = await getCoordinates(city);
if (!coords) {
return {
content: [{ type: "text", text: `❌ 未找到城市: ${city}` }],
isError: true,
};
}
const weather = await getWeather(coords.lat, coords.lon);
const formatted = formatWeather(weather, coords.name);
return {
content: [{ type: "text", text: formatted }],
};
}
// Tool 2: 比较两个城市天气
if (name === "compare_weather") {
const schema = z.object({ city1: z.string(), city2: z.string() });
const { city1, city2 } = schema.parse(args);
const [coords1, coords2] = await Promise.all([
getCoordinates(city1),
getCoordinates(city2),
]);
if (!coords1 || !coords2) {
return {
content: [{ type: "text", text: `❌ 城市未找到: ${!coords1 ? city1 : city2}` }],
isError: true,
};
}
const [weather1, weather2] = await Promise.all([
getWeather(coords1.lat, coords1.lon),
getWeather(coords2.lat, coords2.lon),
]);
let result = `🆚 天气对比: ${coords1.name} vs ${coords2.name}\n\n`;
result += `【${coords1.name}】\n`;
result += `当前: ${weather1.current.temperature_2m}°C, ${weatherCodes[weather1.current.weathercode] || "未知"}\n`;
result += `今日: ${weather1.daily.temperature_2m_min[0]}°C ~ ${weather1.daily.temperature_2m_max[0]}°C\n\n`;
result += `【${coords2.name}】\n`;
result += `当前: ${weather2.current.temperature_2m}°C, ${weatherCodes[weather2.current.weathercode] || "未知"}\n`;
result += `今日: ${weather2.daily.temperature_2m_min[0]}°C ~ ${weather2.daily.temperature_2m_max[0]}°C`;
return {
content: [{ type: "text", text: result }],
};
}
throw new Error(`未知工具: ${name}`);
});
// ============ 启动服务 ============
async function main() {
const transport = new StdioServerTransport();
await server.connect(transport);
console.error("Weather MCP Server running on stdio");
}
main().catch((error) => {
console.error("Fatal error:", error);
process.exit(1);
});天气使用的是Open-Meteo 天气平台,这是一个完全免费、无需 API Key 的天气服务,非常适合开发测试使用。
如何使用这个mcp server
mcp server需要提供给AI大模型调用,可以借助一些已经集成了AI大模型的客户端来调用mcp server,我使用的是Cursor编辑器。
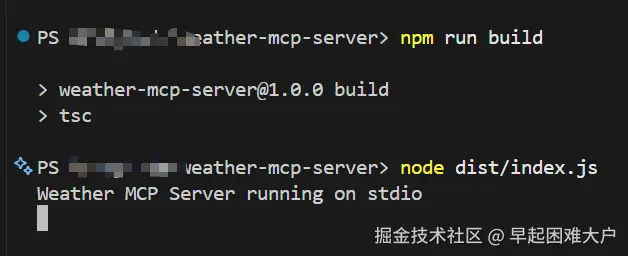
第一步:装完包后启动本地开发的mcp server项目
bash
npm i
bash
npm run build检查是否成功启动
node
node dist/index.js出现 Weather MCP Server running on stdio 说明成功启动了server
第二步,在Crosor进行配置
设置 => Tools & MCPs => New MCP Server,去配置mcp.json文件
json
{
  "mcpServers": {
    "weather-mcp-server": {
      "name": "weather-mcp-server",
      "transport": "stdio",
      "command": "node",
      "args": [
        "你自己的项目路径\weather-mcp-server\\dist\\index.js"
      ],
      "env": {}
    }
  }
}
配置成功后,可以看到设置里面会多一个mcp server
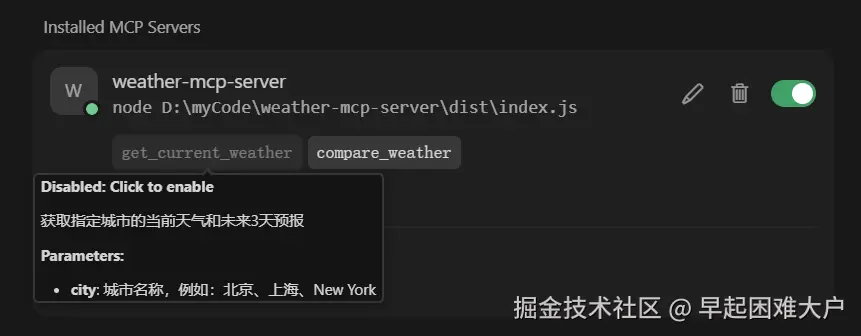 可以看到这个MCP Server提供了2个工具方法,2 tools enabled,分别是get_current_weather 和compare_weather,可以通过点击该方法设置disabled,再次点击放开,到这里已经全部配置好了,接下来就可以在chat对话框和cursor对话使用这个server了
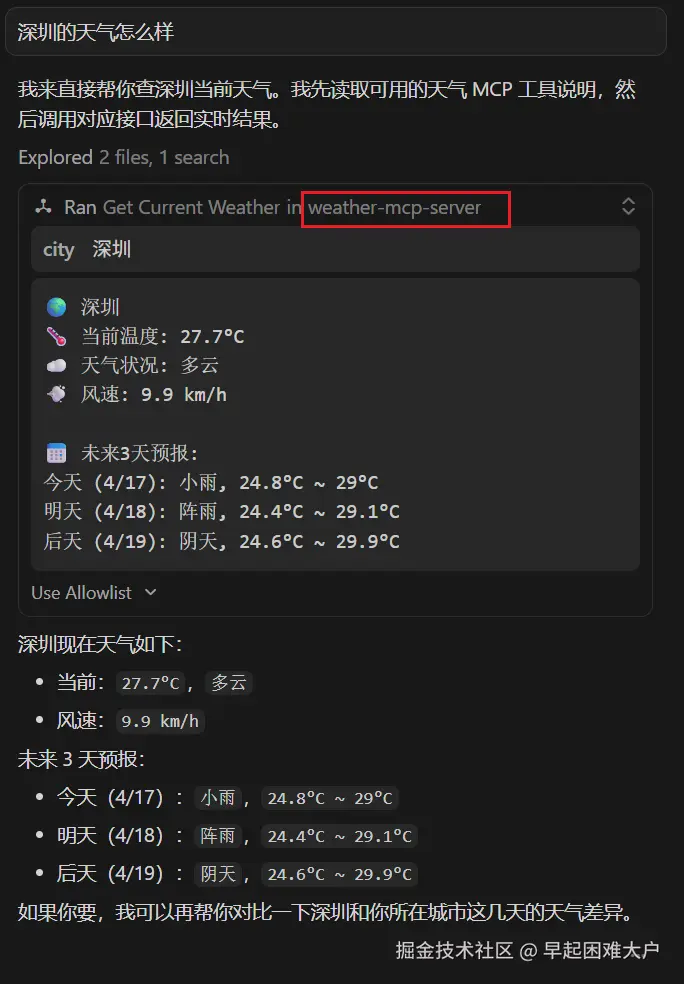 可以看到Cursor利用AI调用了这个服务