1.Tensor(张量)
标量、向量、矩阵、张量
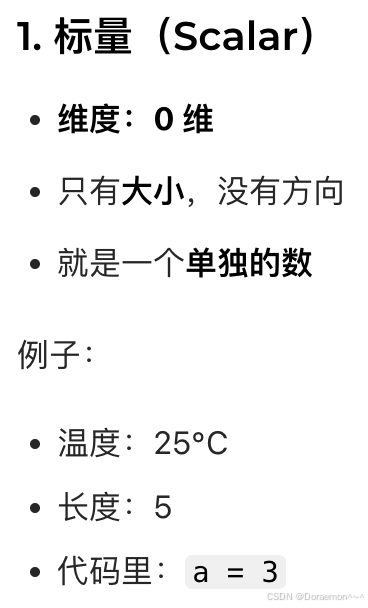
- 标量:一个数(0 维)
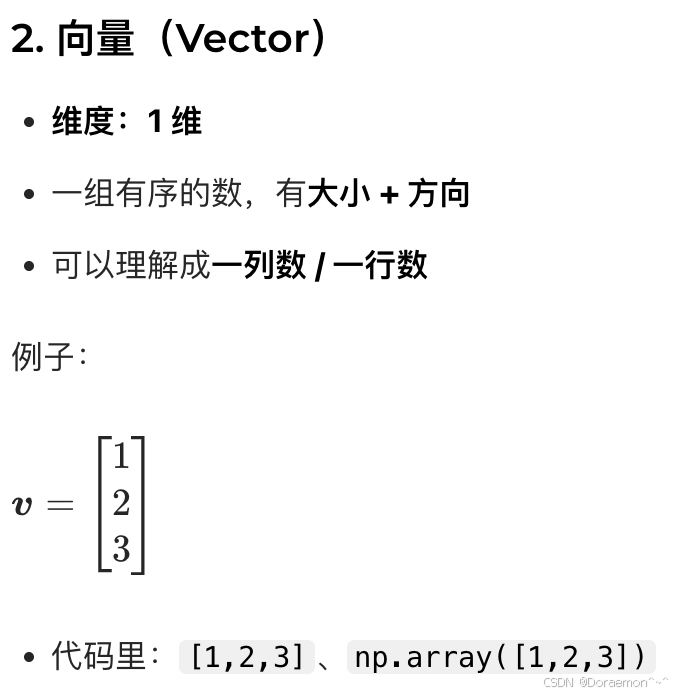
- 向量:一串数(1 维)
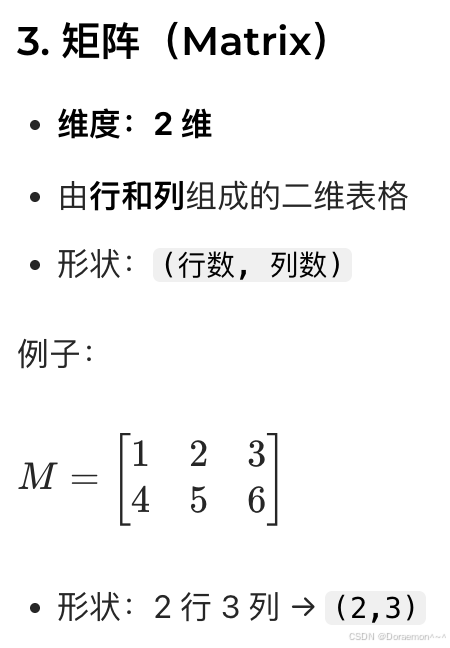
- 矩阵:一张二维表(2 维)
- 张量:所有维度数组的总称(0/1/2/3/4... 维)

1.1.Tensor初始化
1.1.1.从数据初始化
从python列表初始化tensor
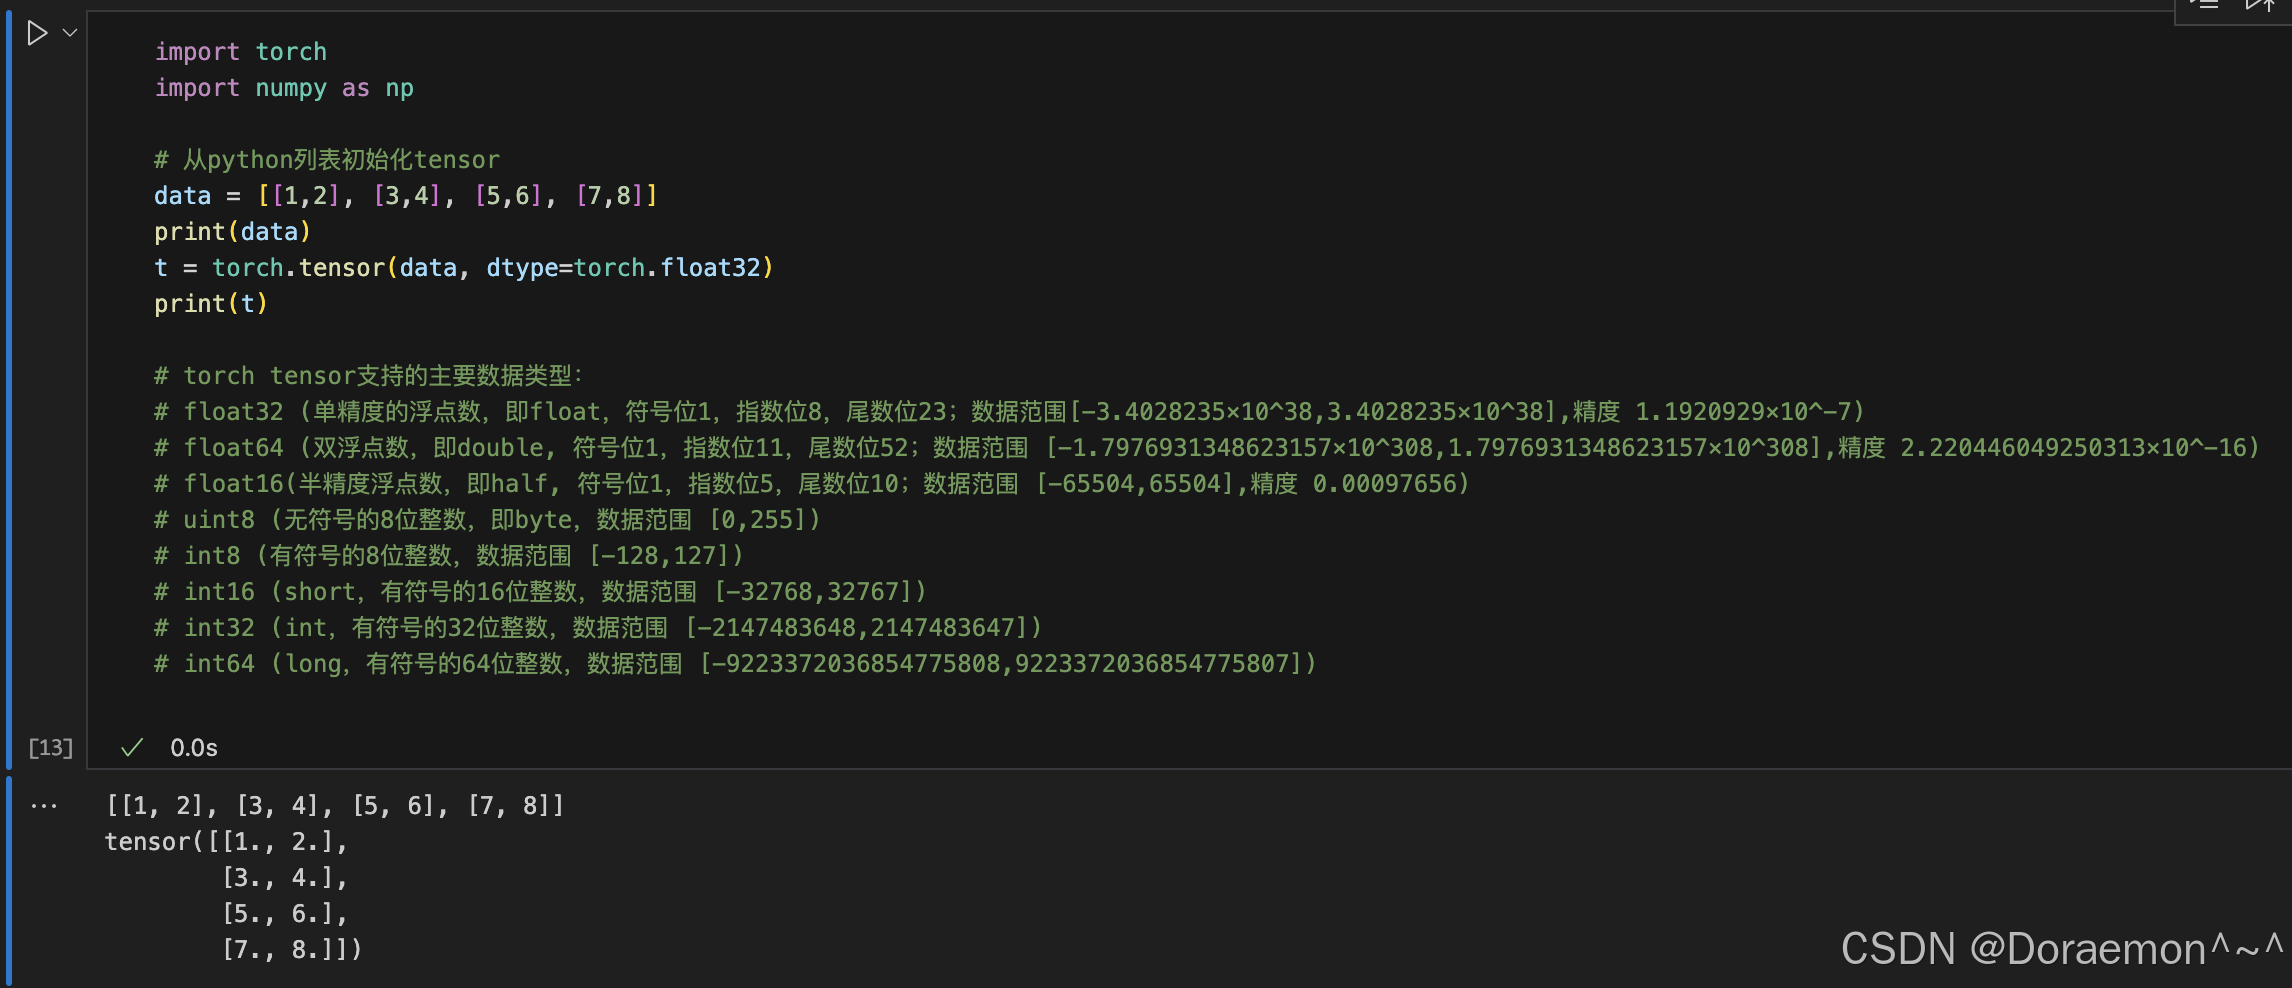
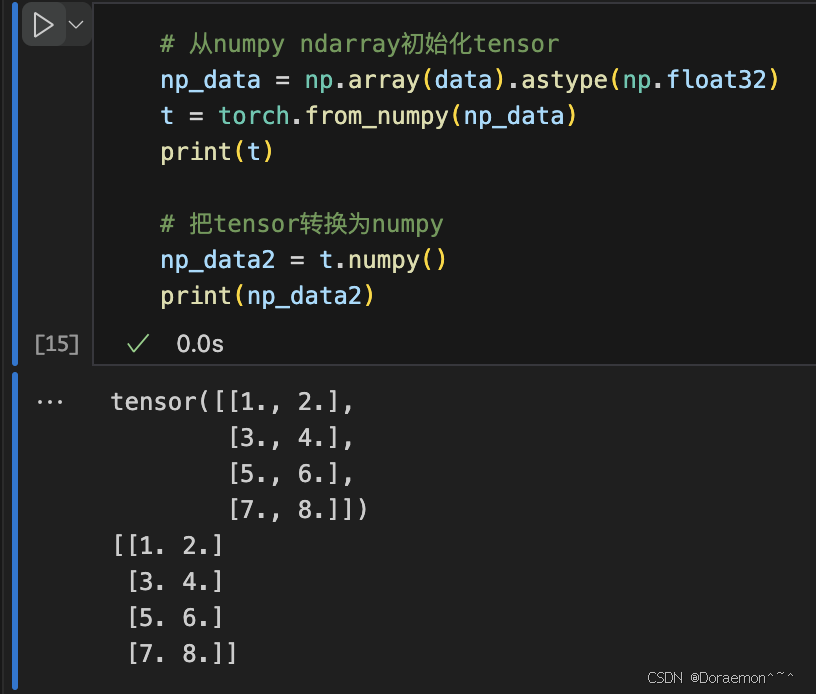
从numpy ndarray初始化tensor
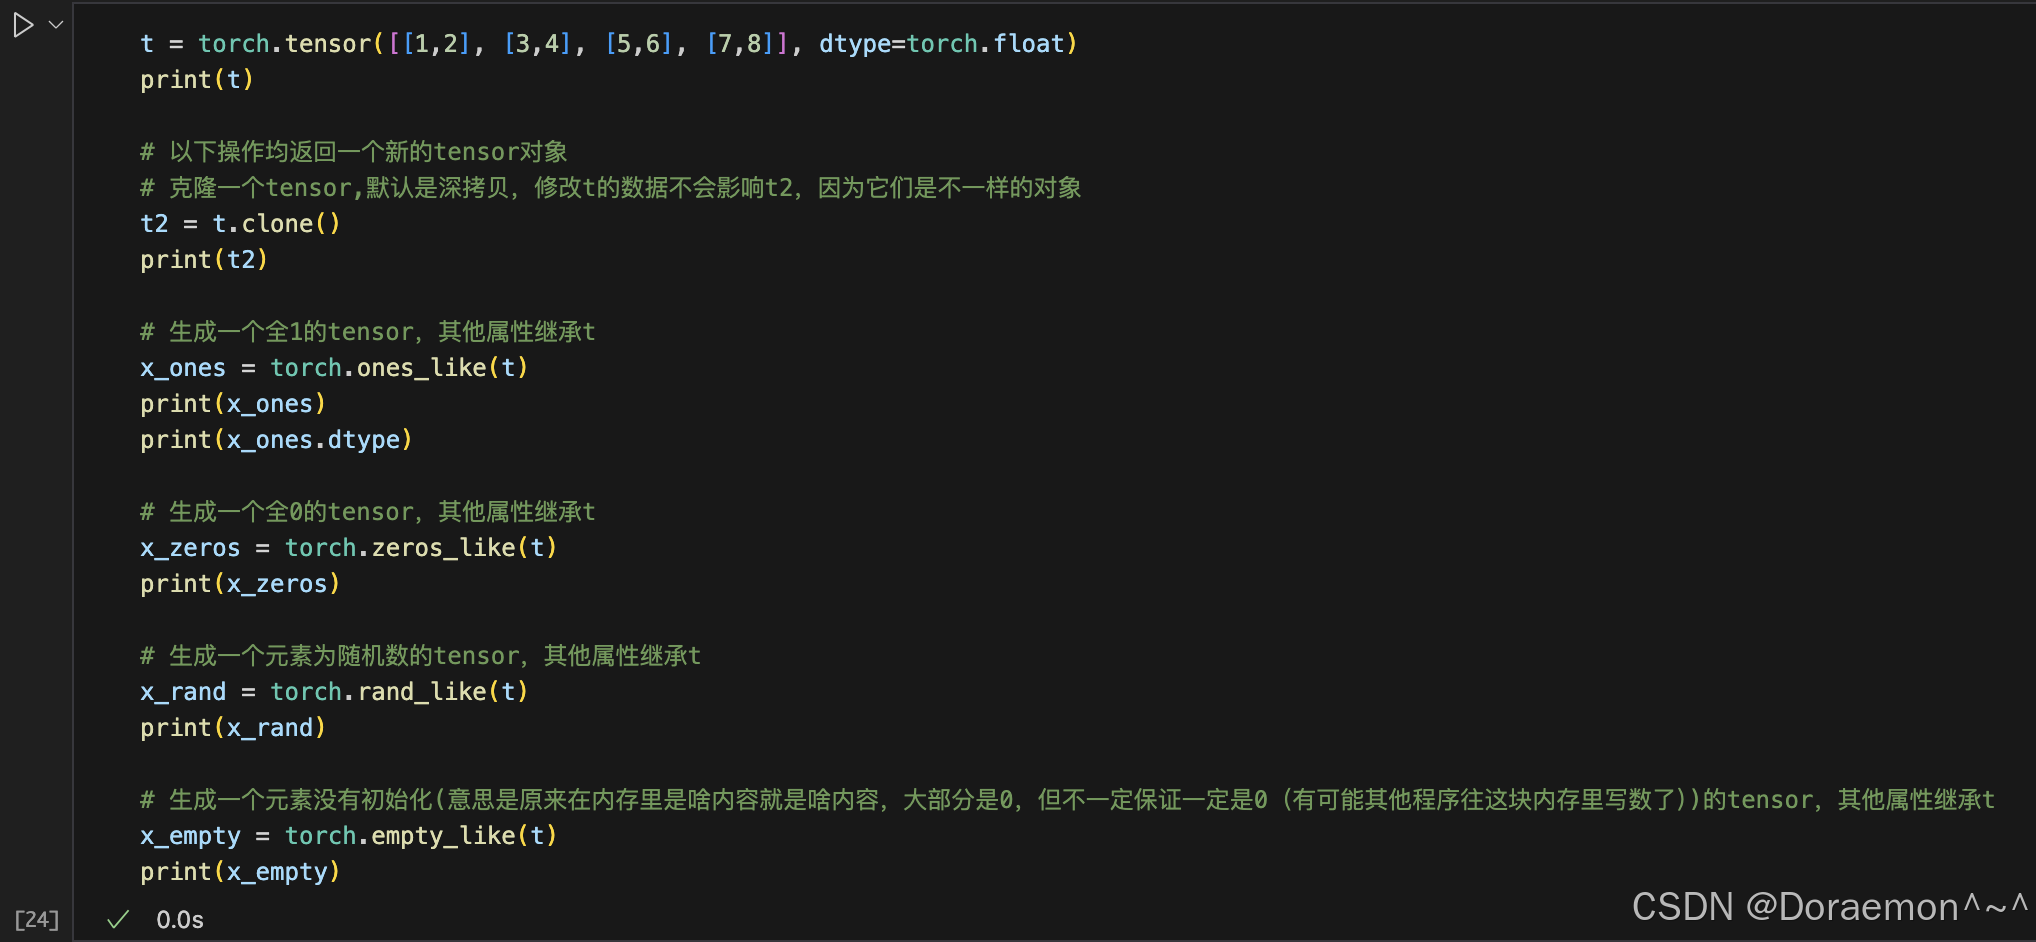
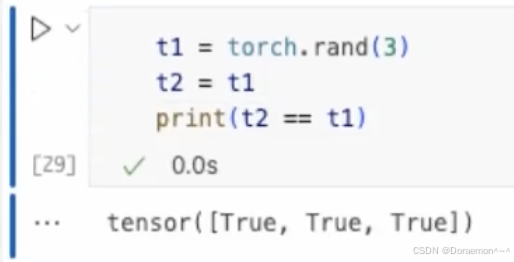
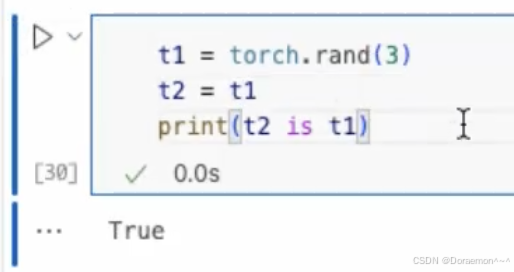
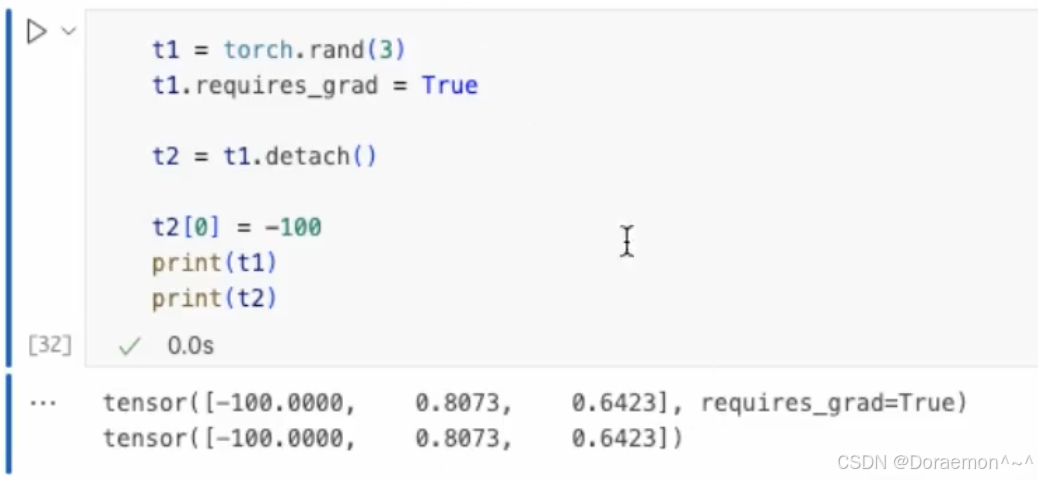
1.1.2.从其他tensor对象初始化
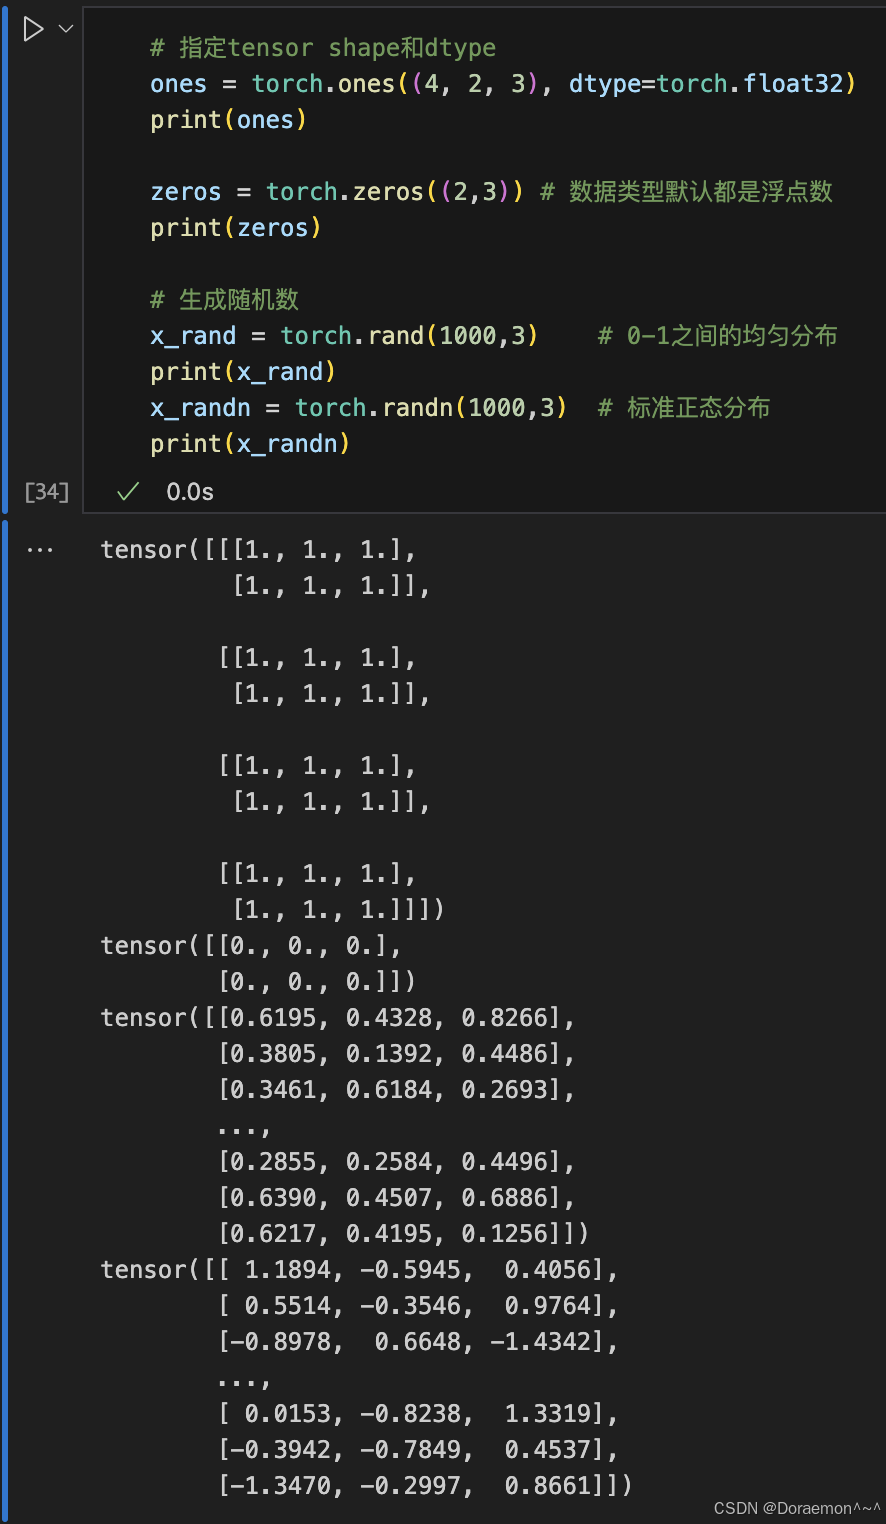
1.1.3.从常数或者随机初始化
1.2.Tensor的属性
1.2.1.张量的形状

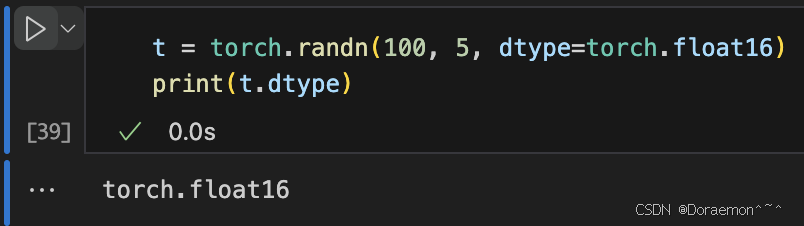
1.2.2.张量的数据类型
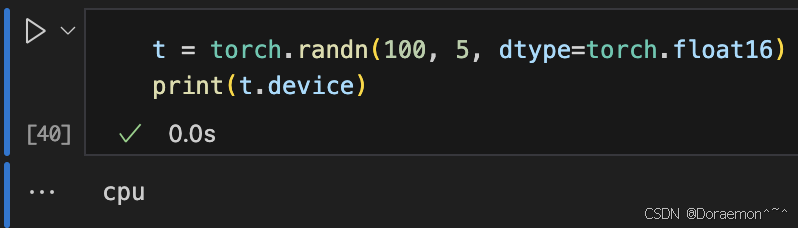
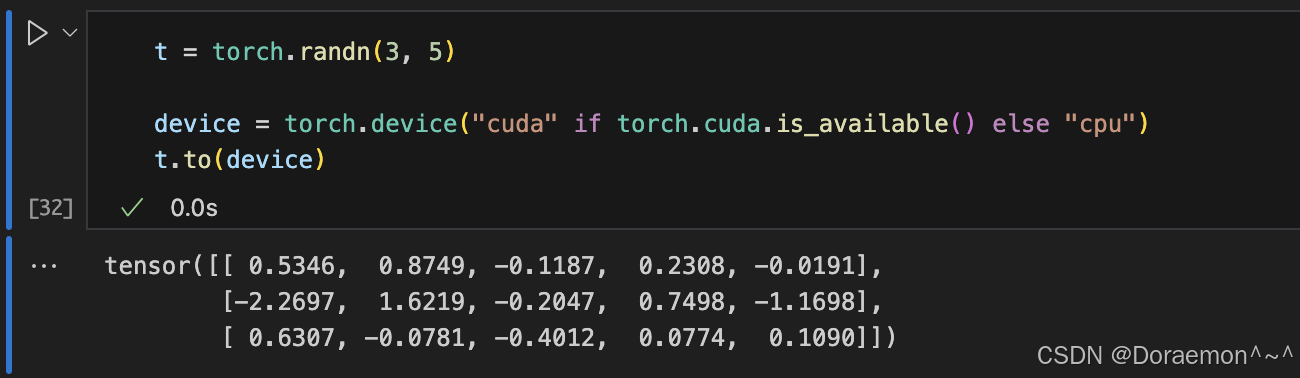
1.2.3.张量所在的设备
设备只有cpu:
设备有gpu:

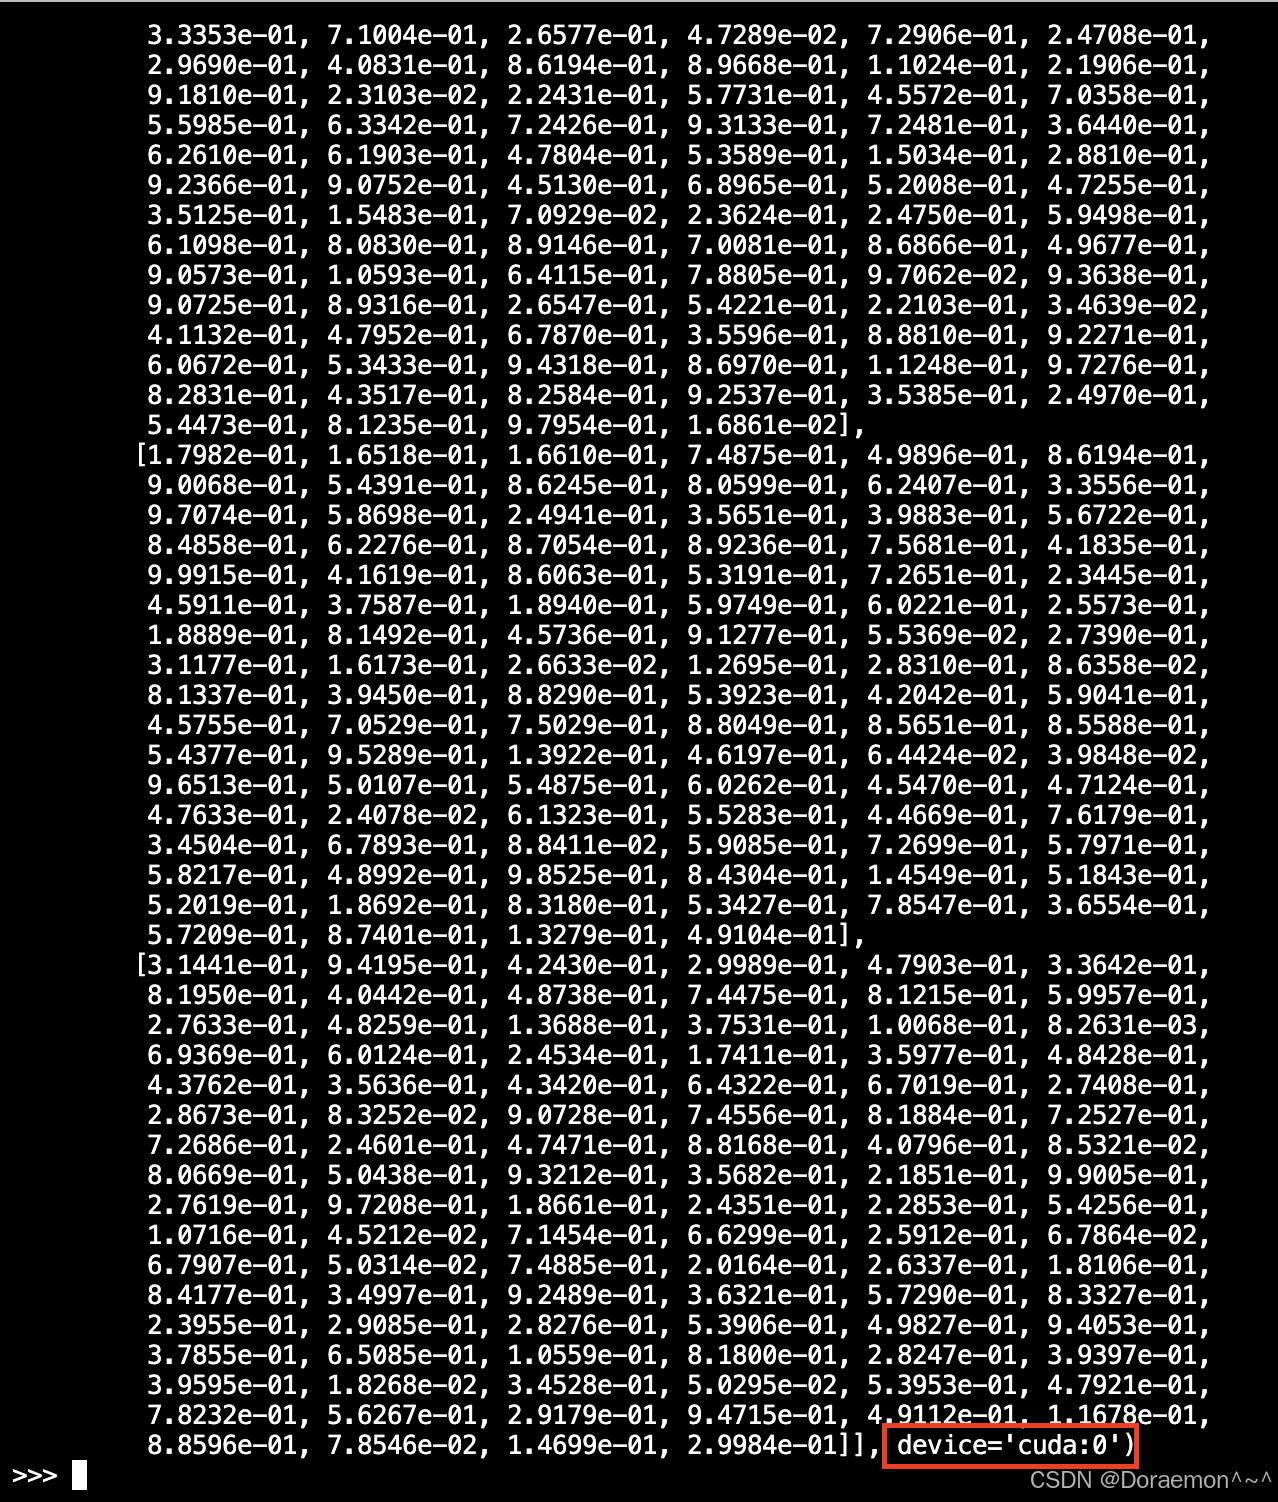
device='cuda:0'------0表示第一块gpu显卡
- 只有一块 NVIDIA 显卡时,它的编号就是 0
- 所以
device='cuda:0'就是指定用这唯一的 GPU
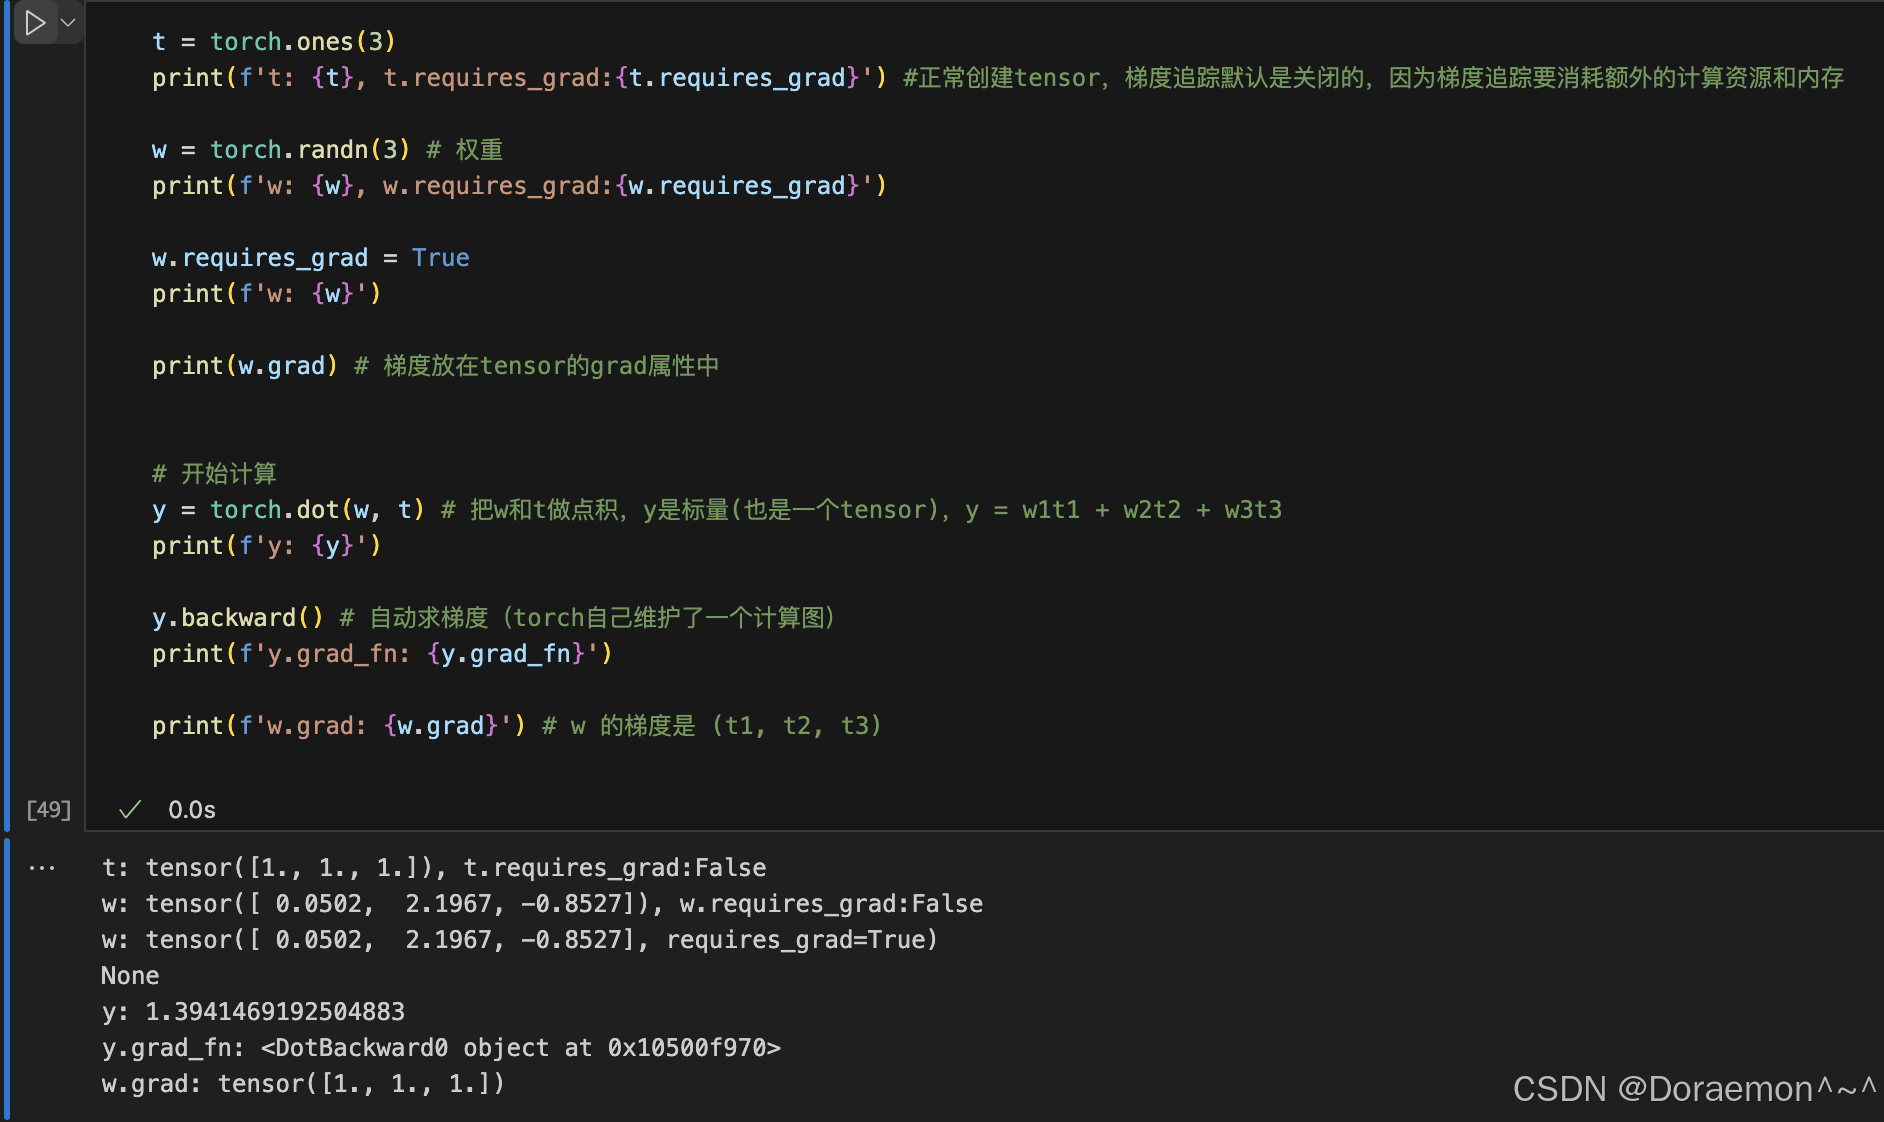
1.2.4.梯度计算相关
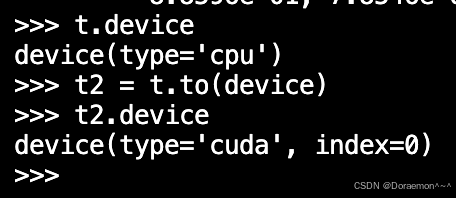
1.3.将Tensor移动到设备中
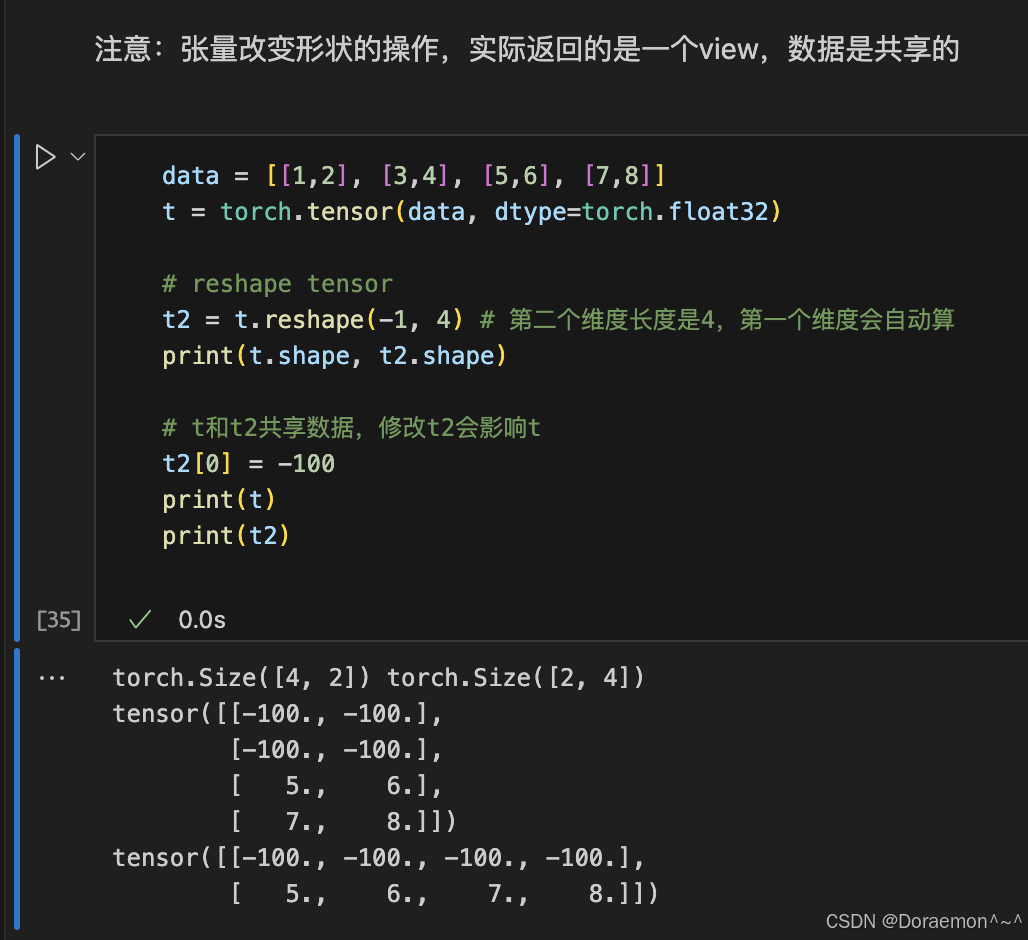
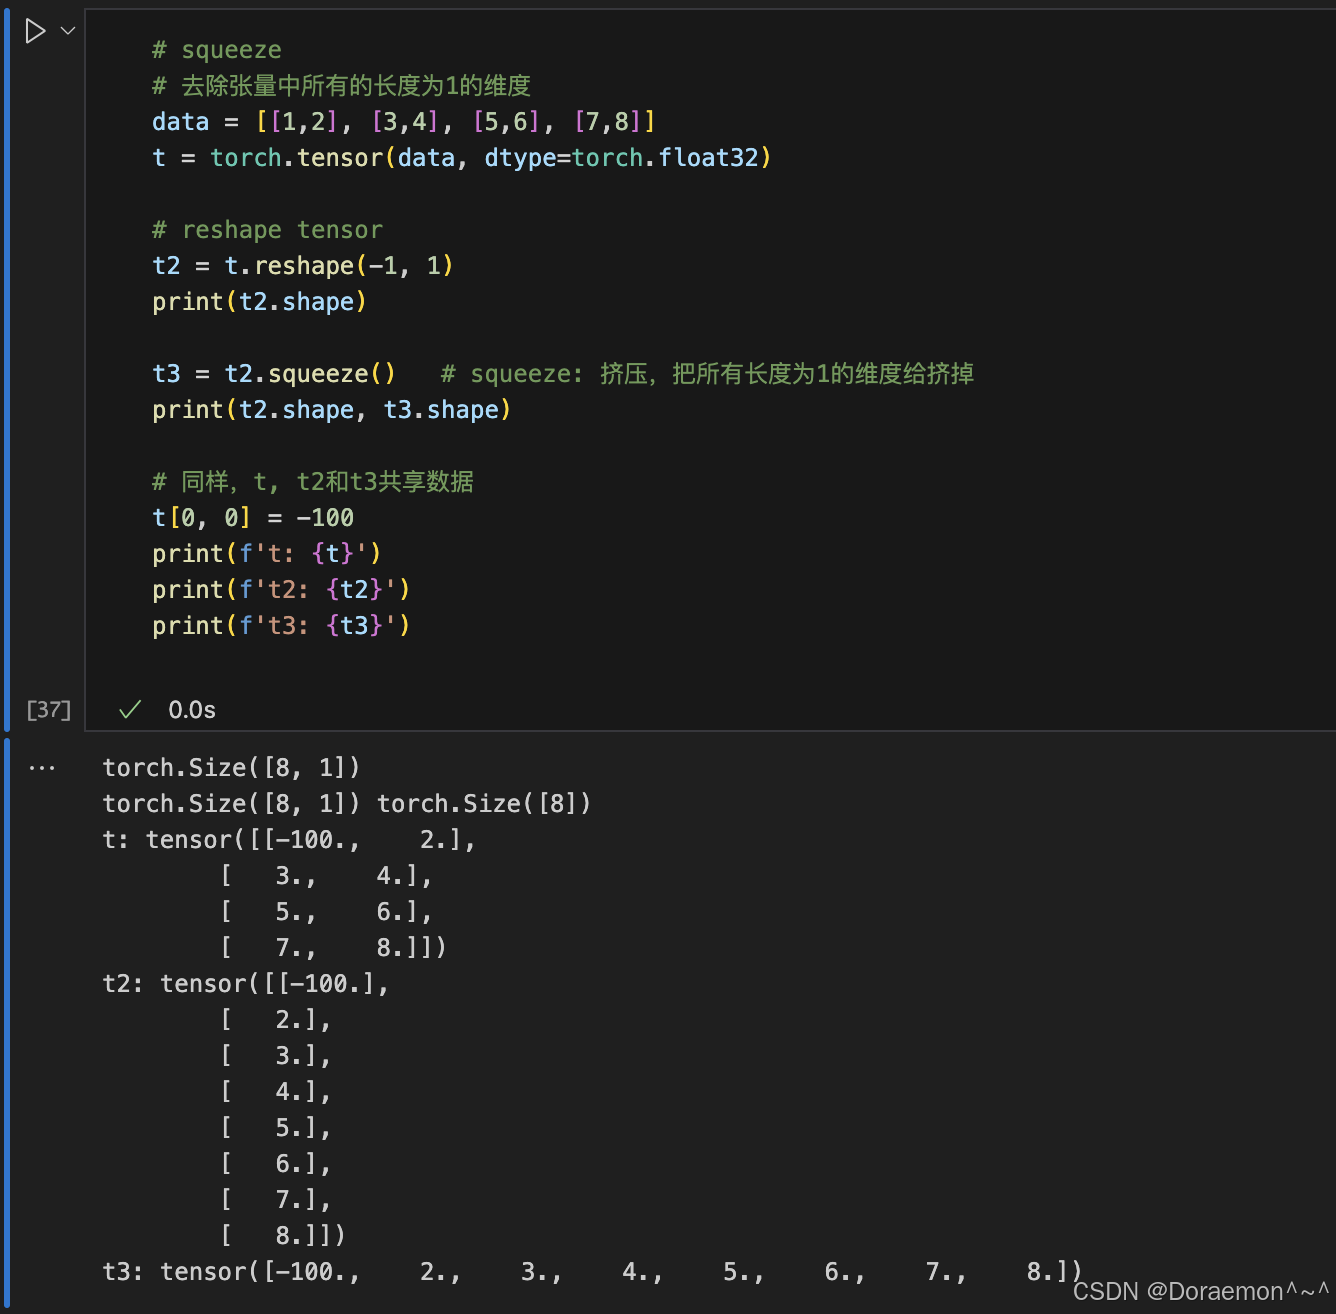
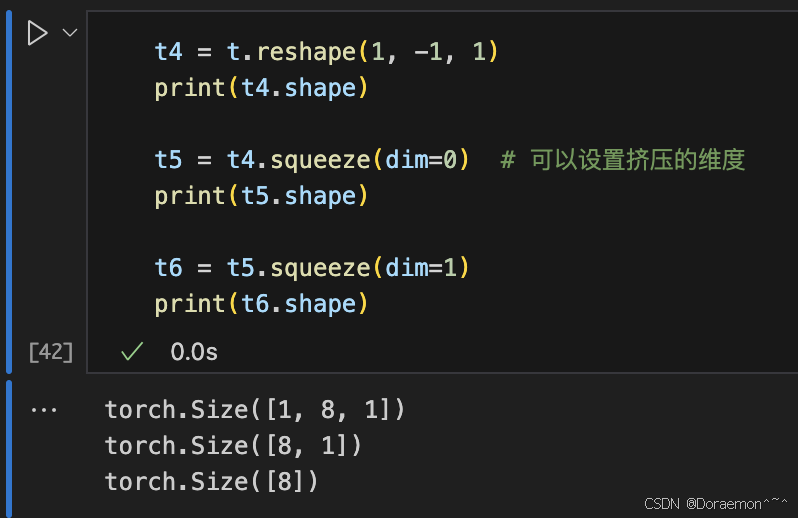
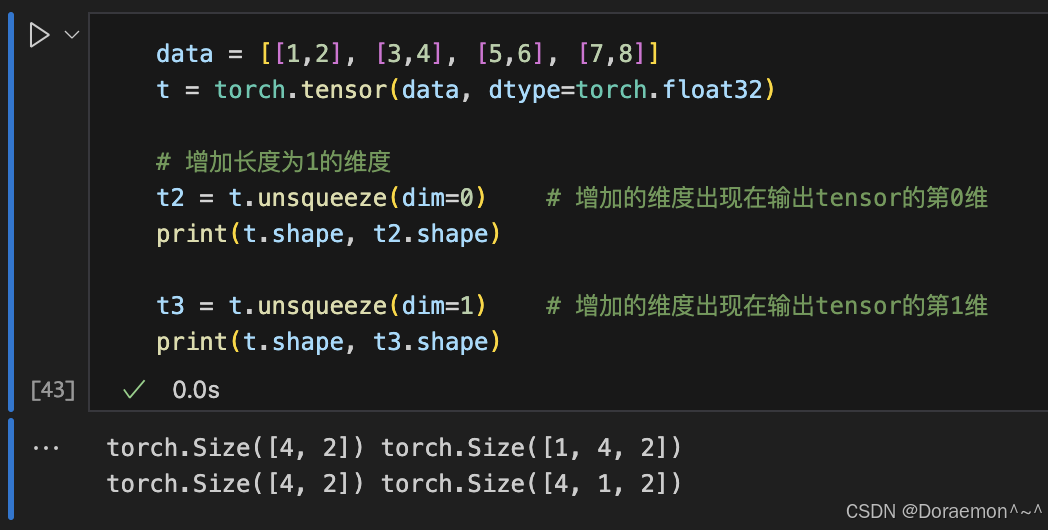
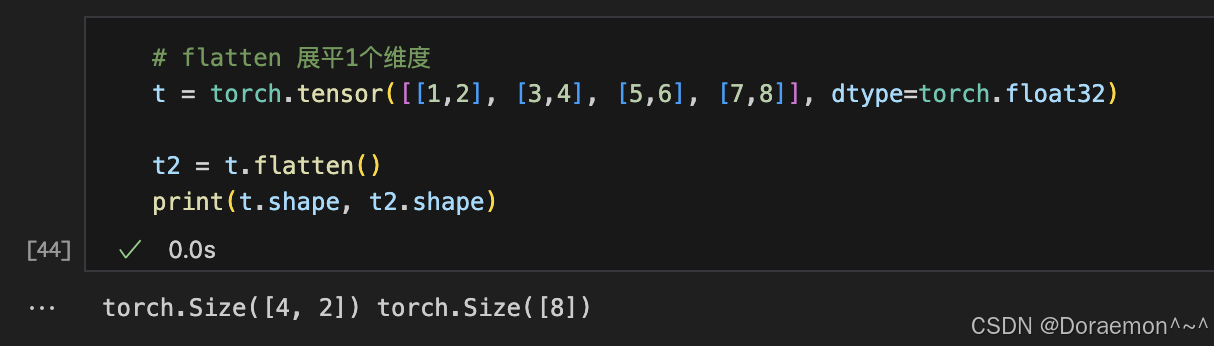
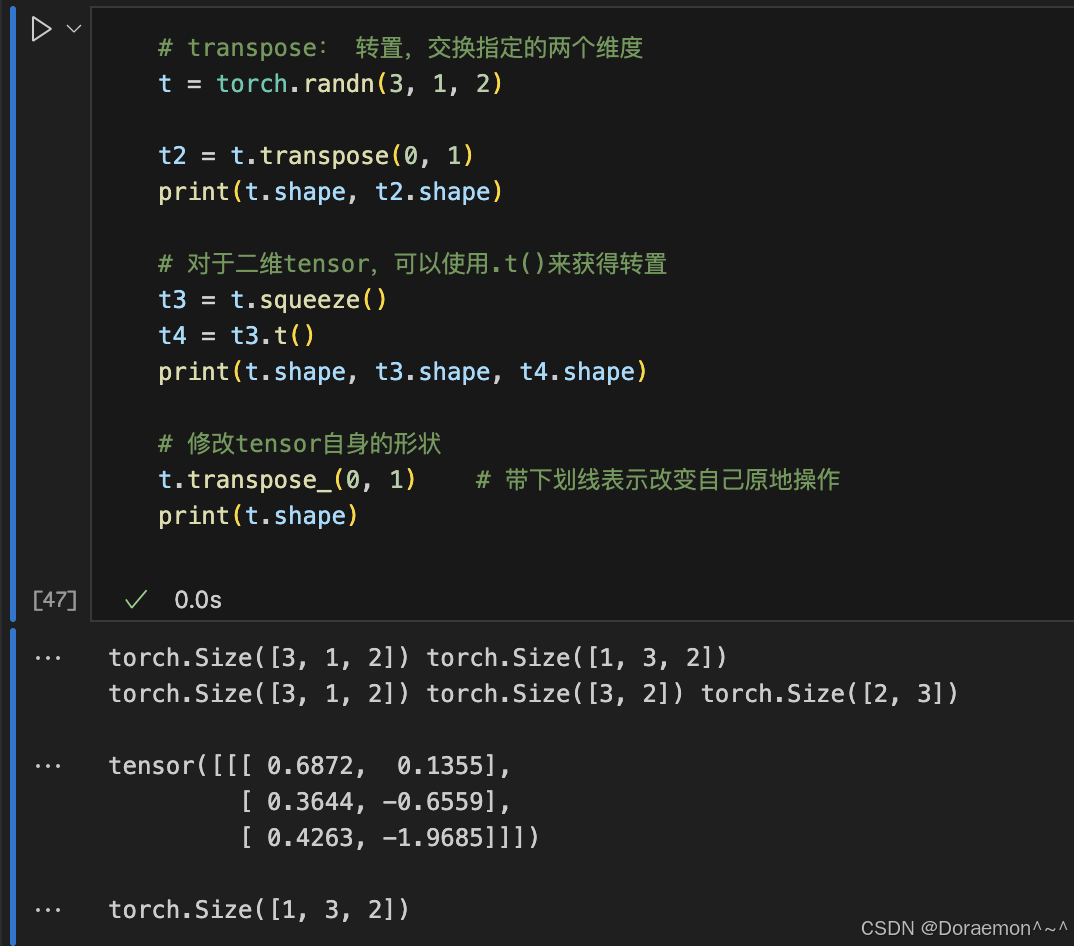
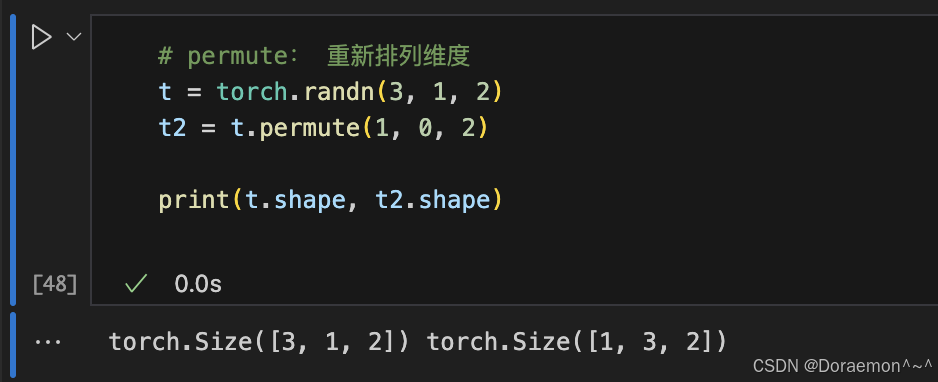
1.4.张量的形状操作
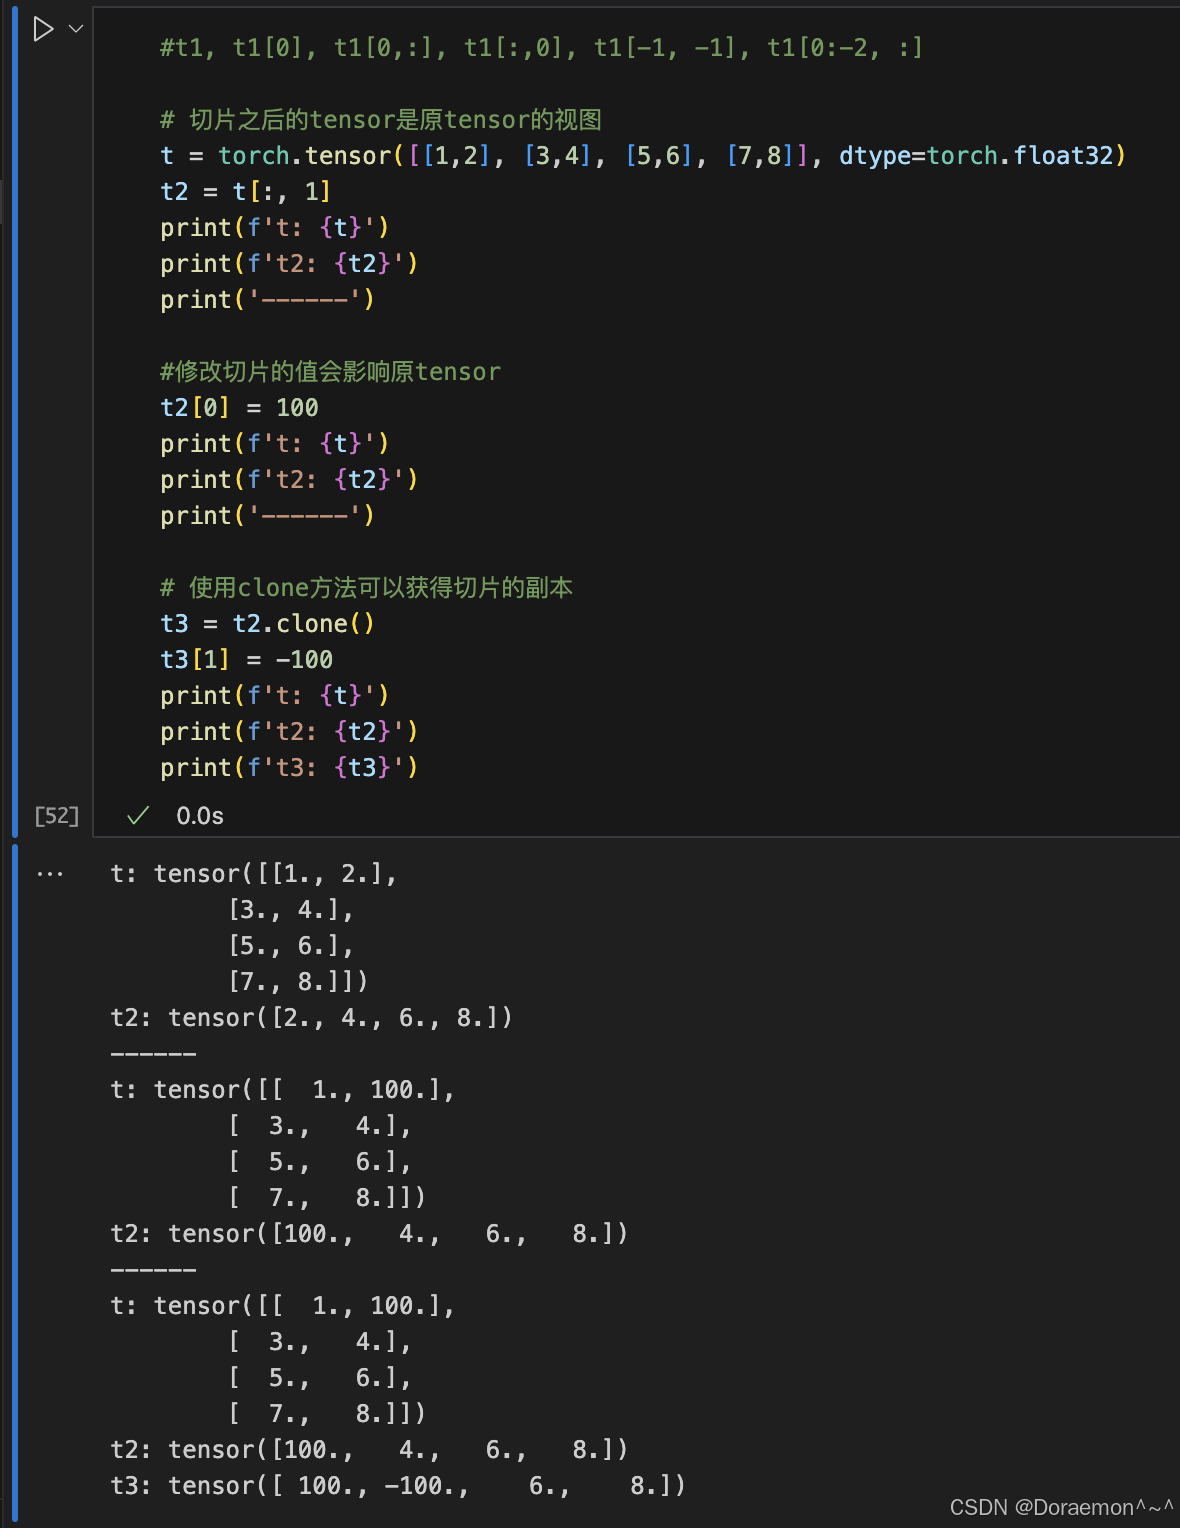
1.5.张量的索引和切片
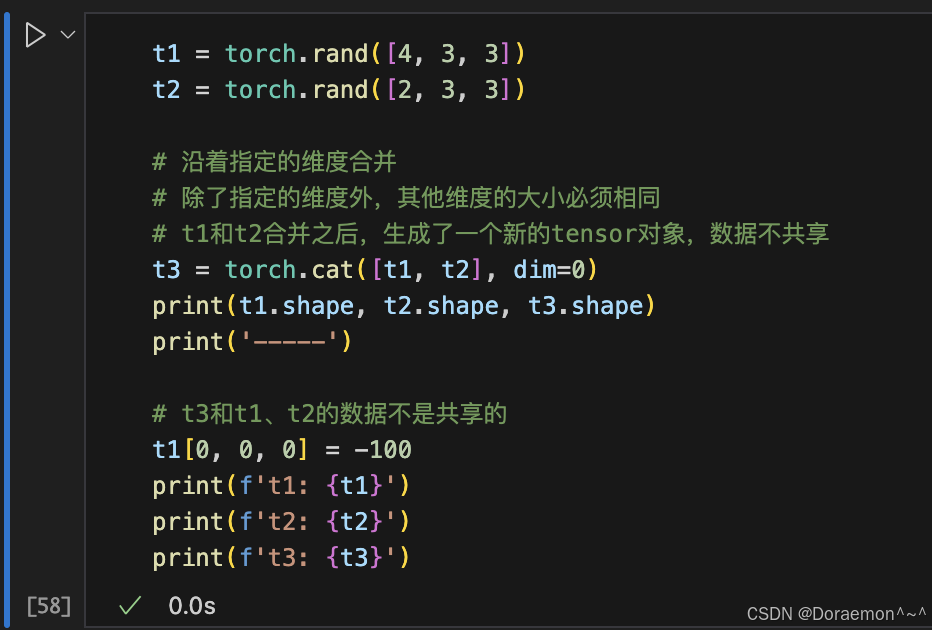
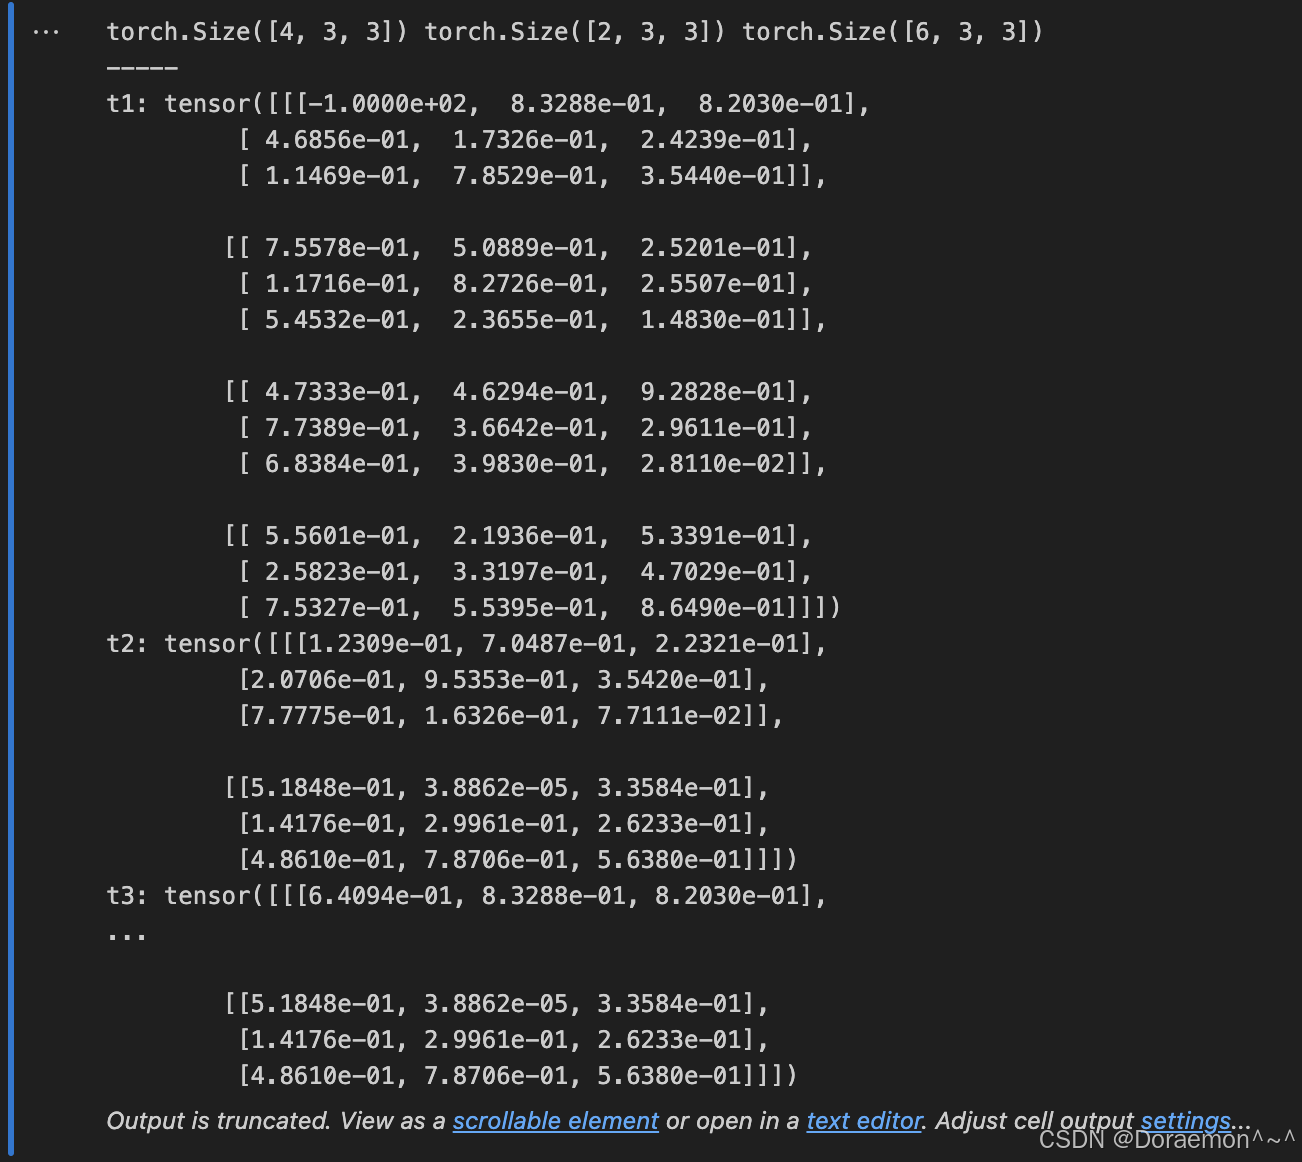
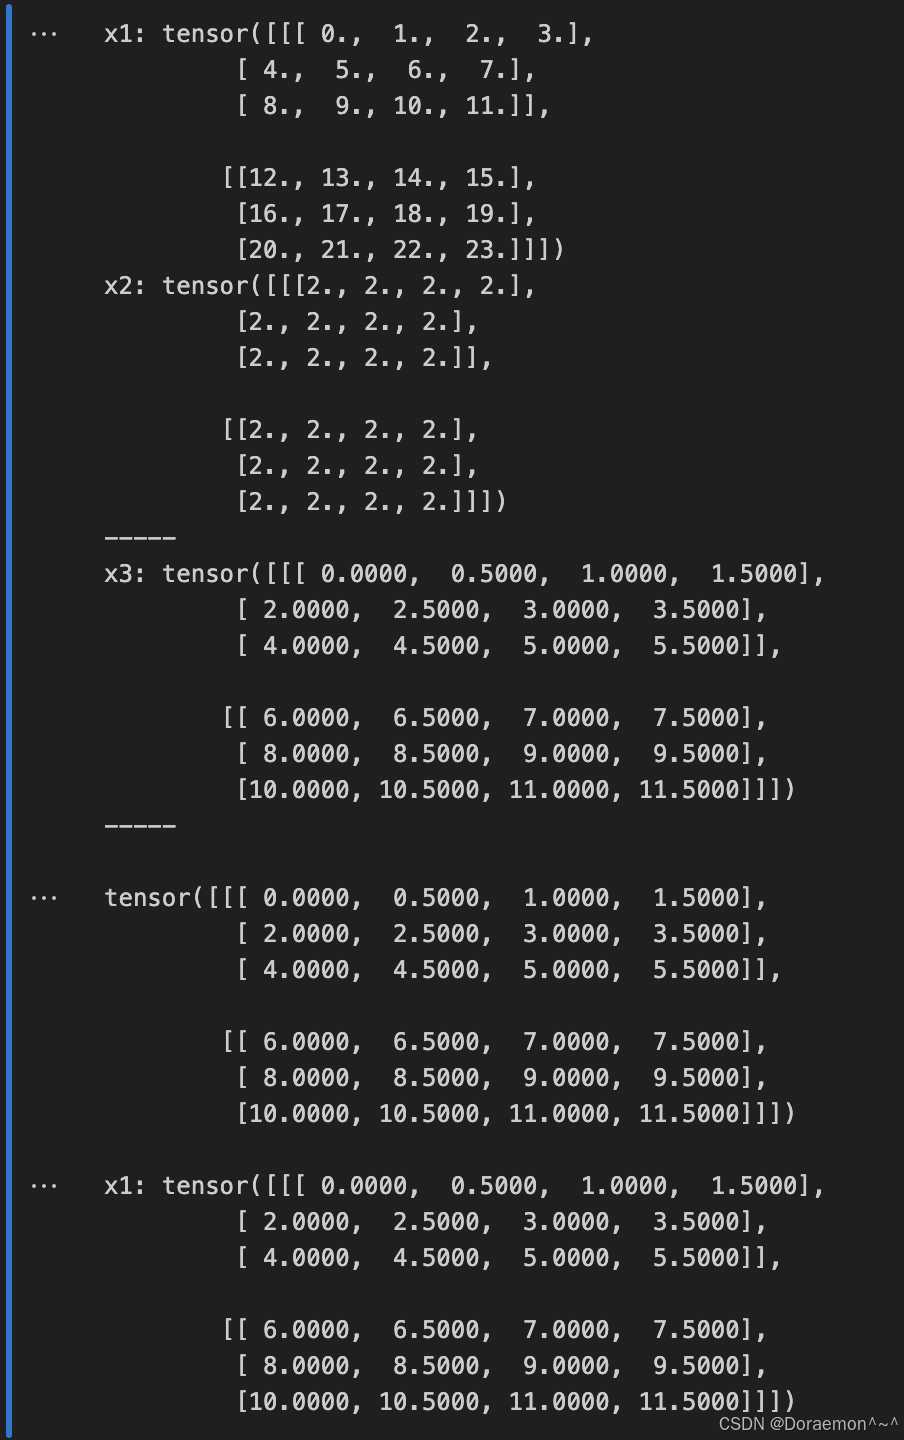
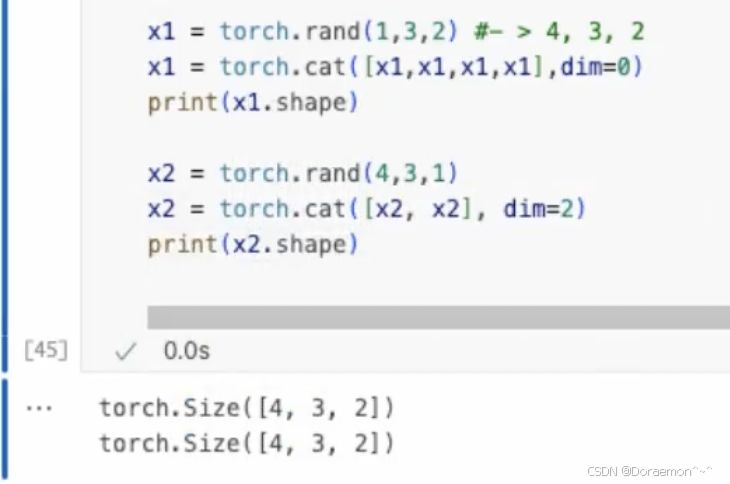
1.6.张量的合并
1.7.张量的运算
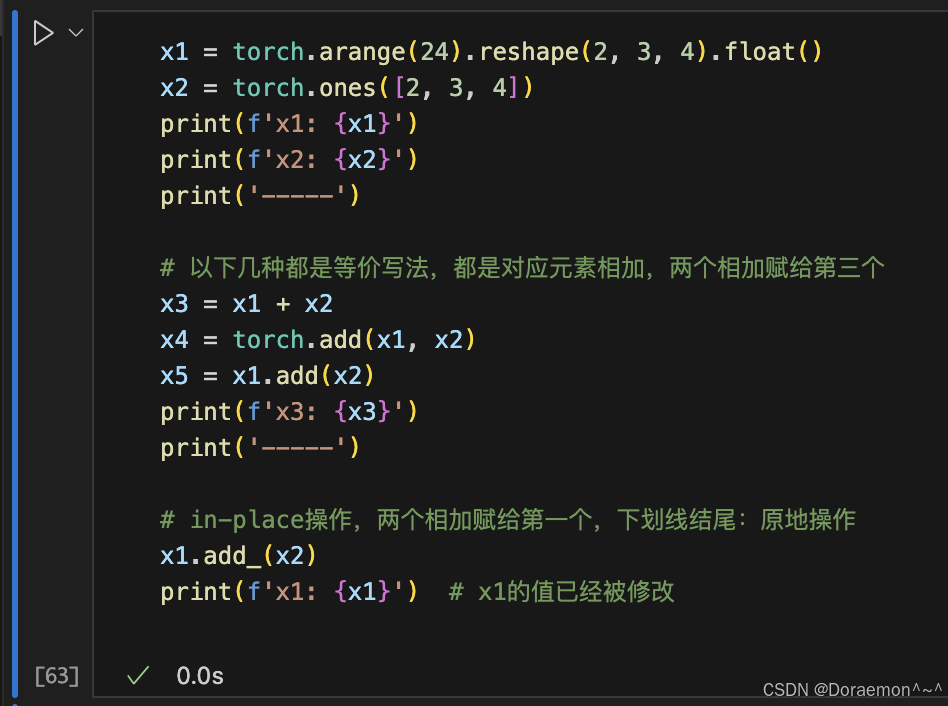
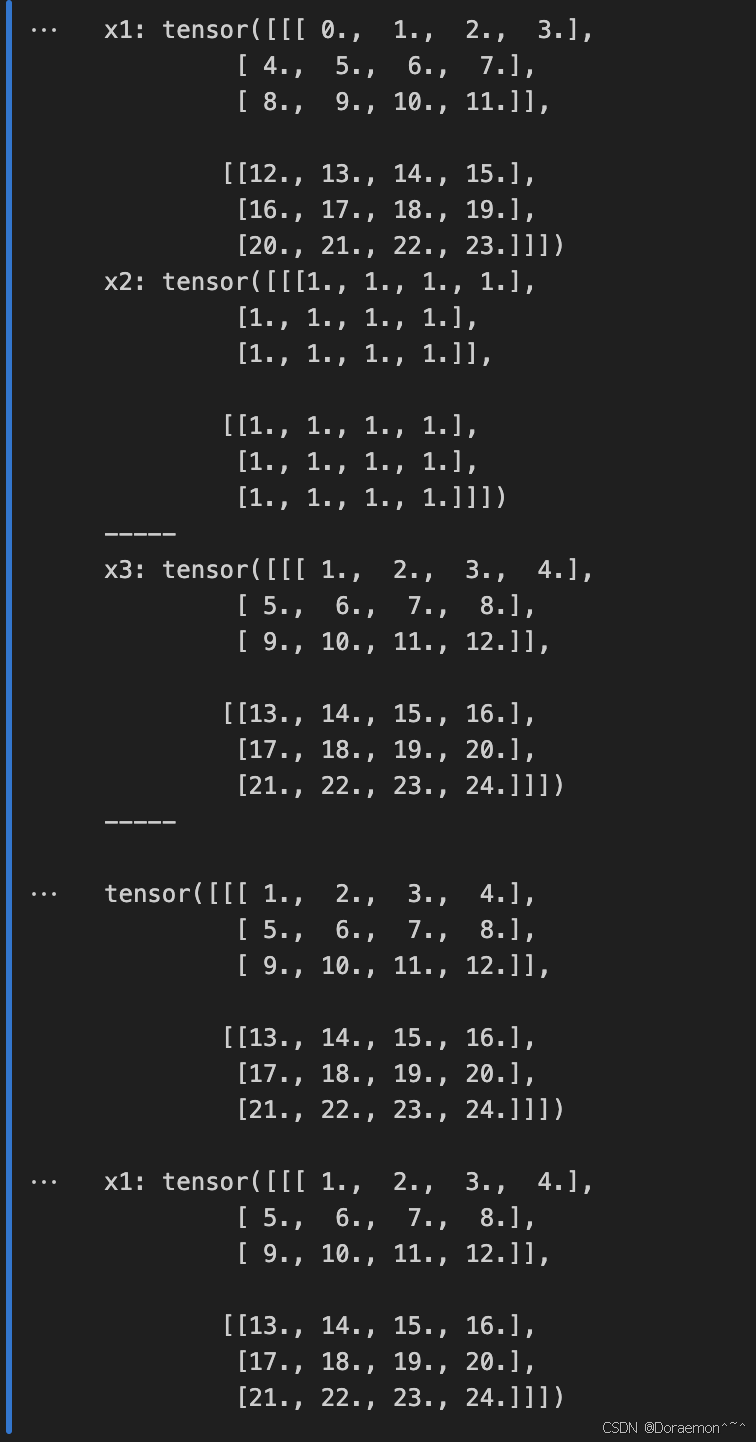
1.7.1.按元素运算
加法:
减法:

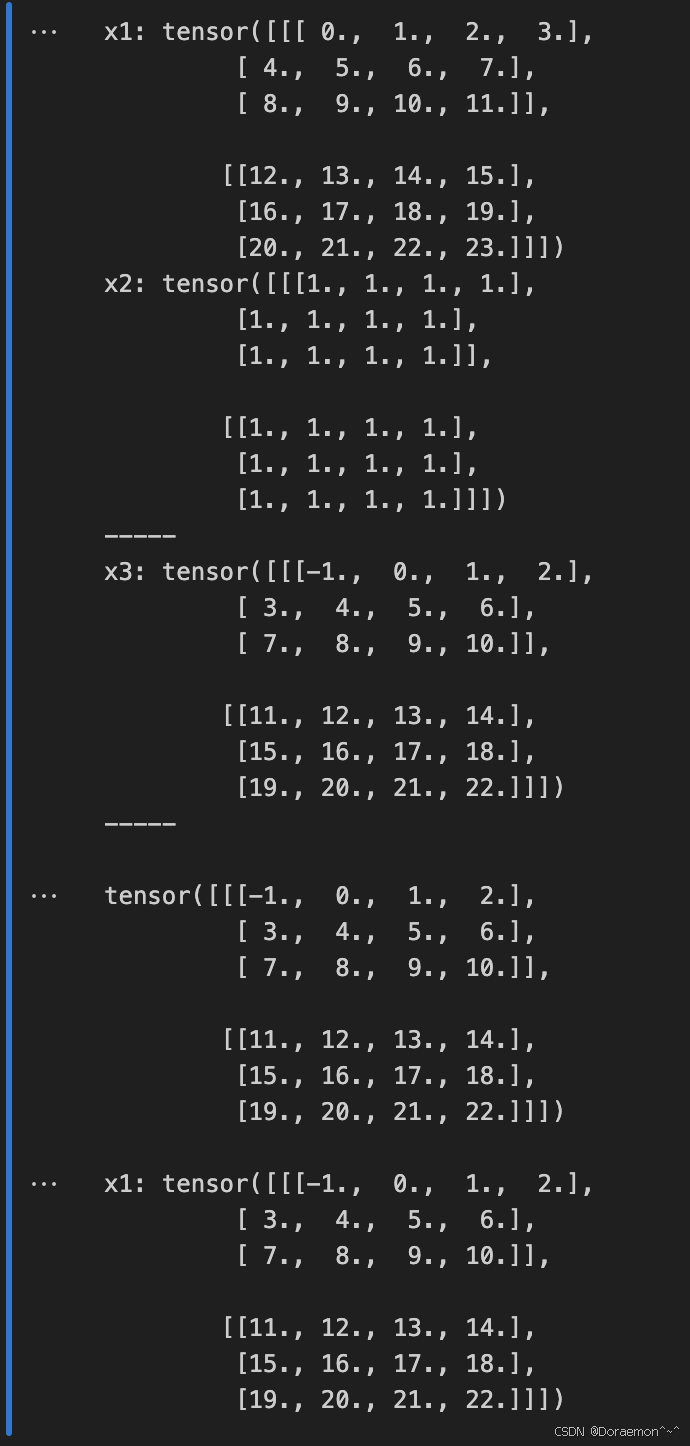
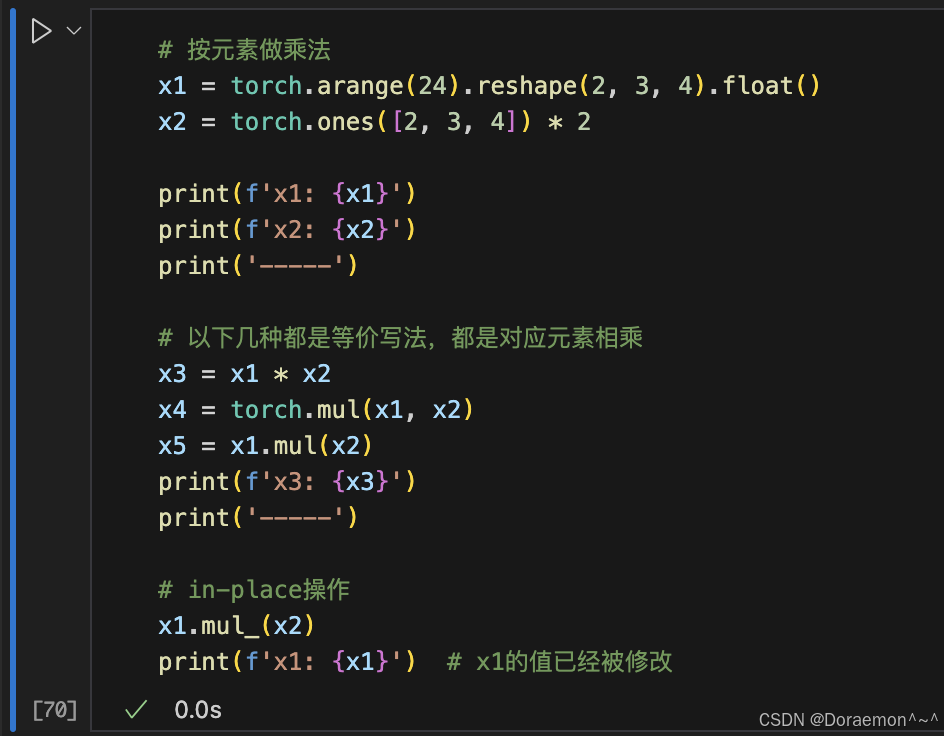
乘法:
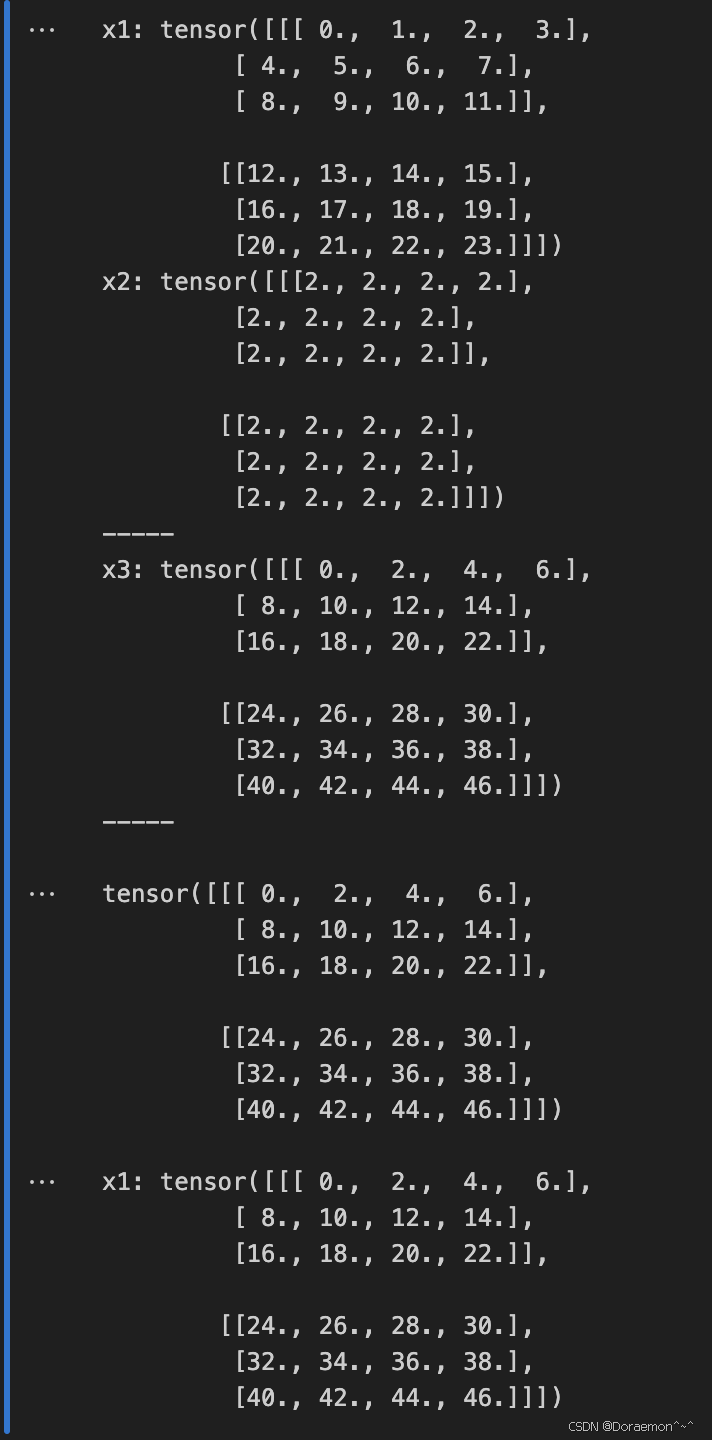
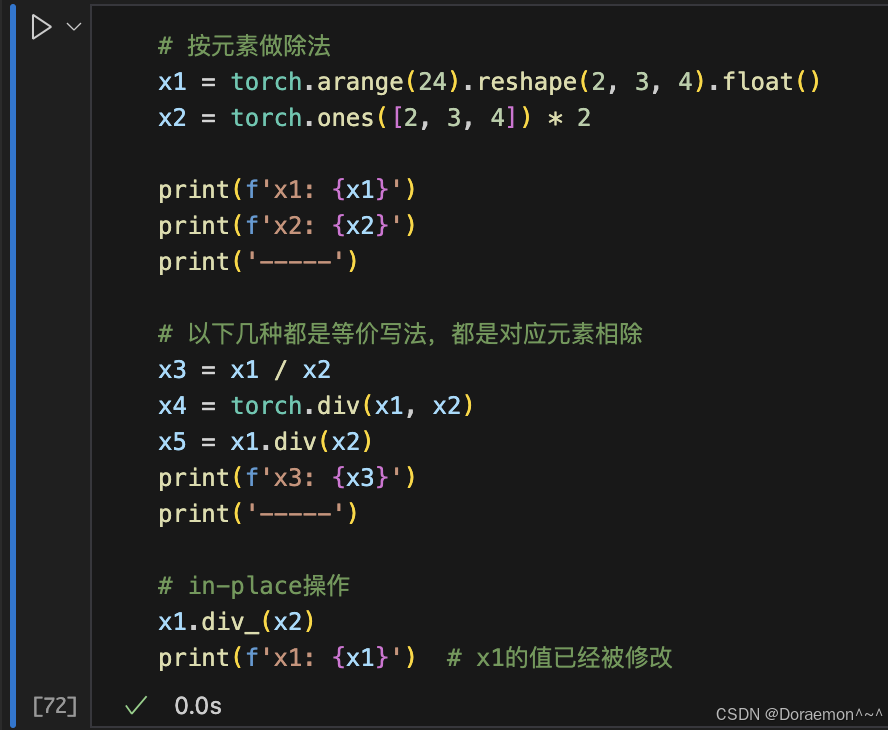
除法:
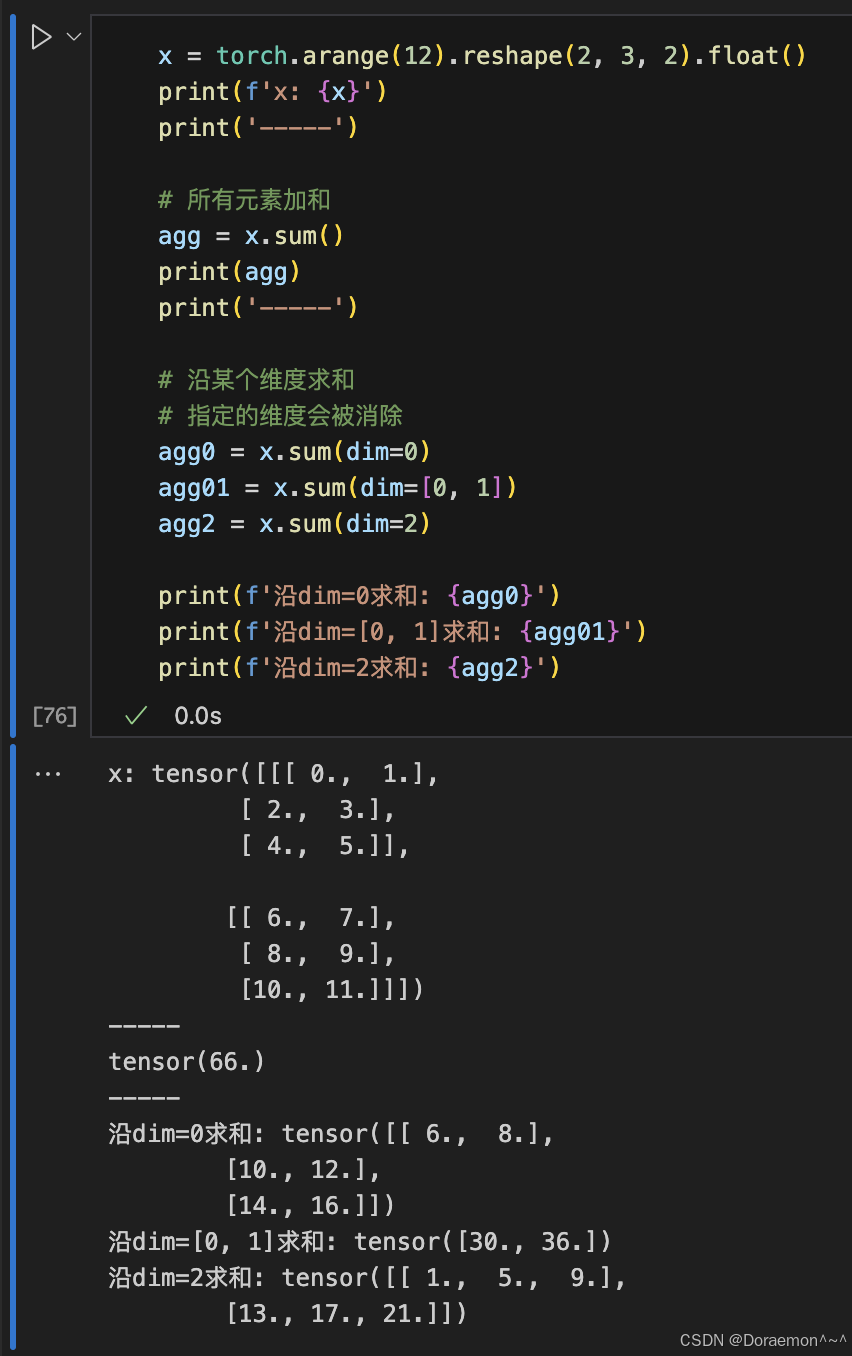
1.7.2.汇总运算
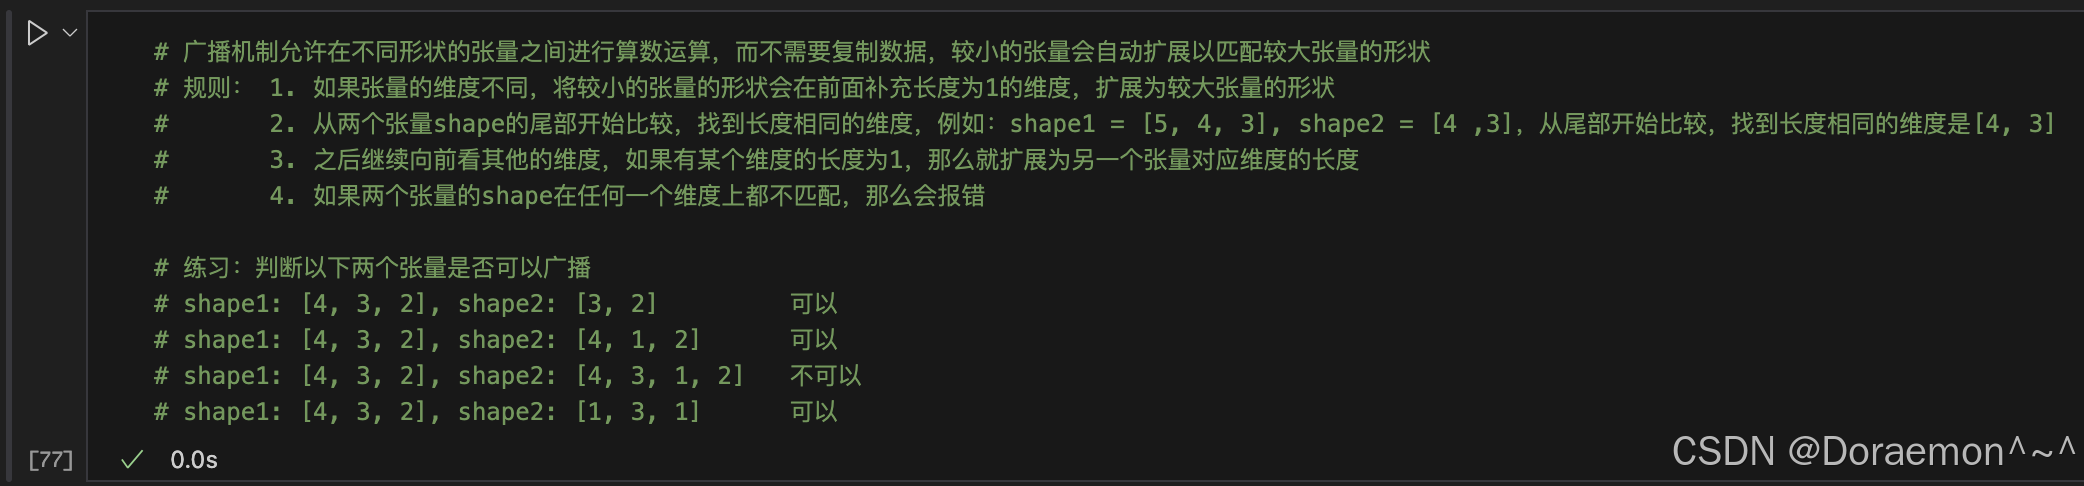
1.7.3.广播机制
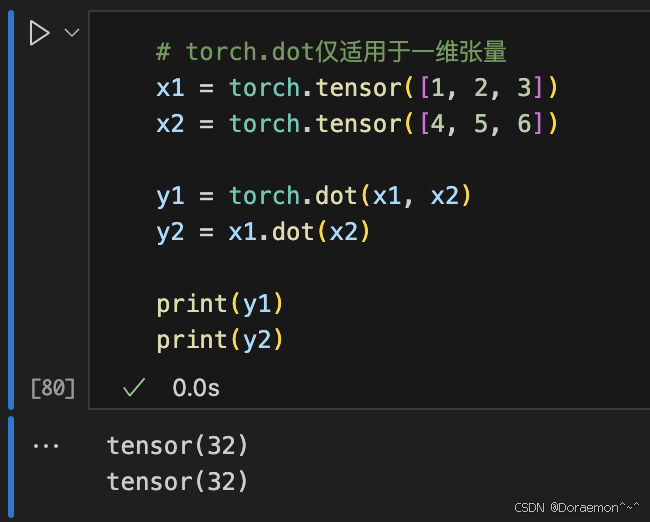
1.7.4.点积运算
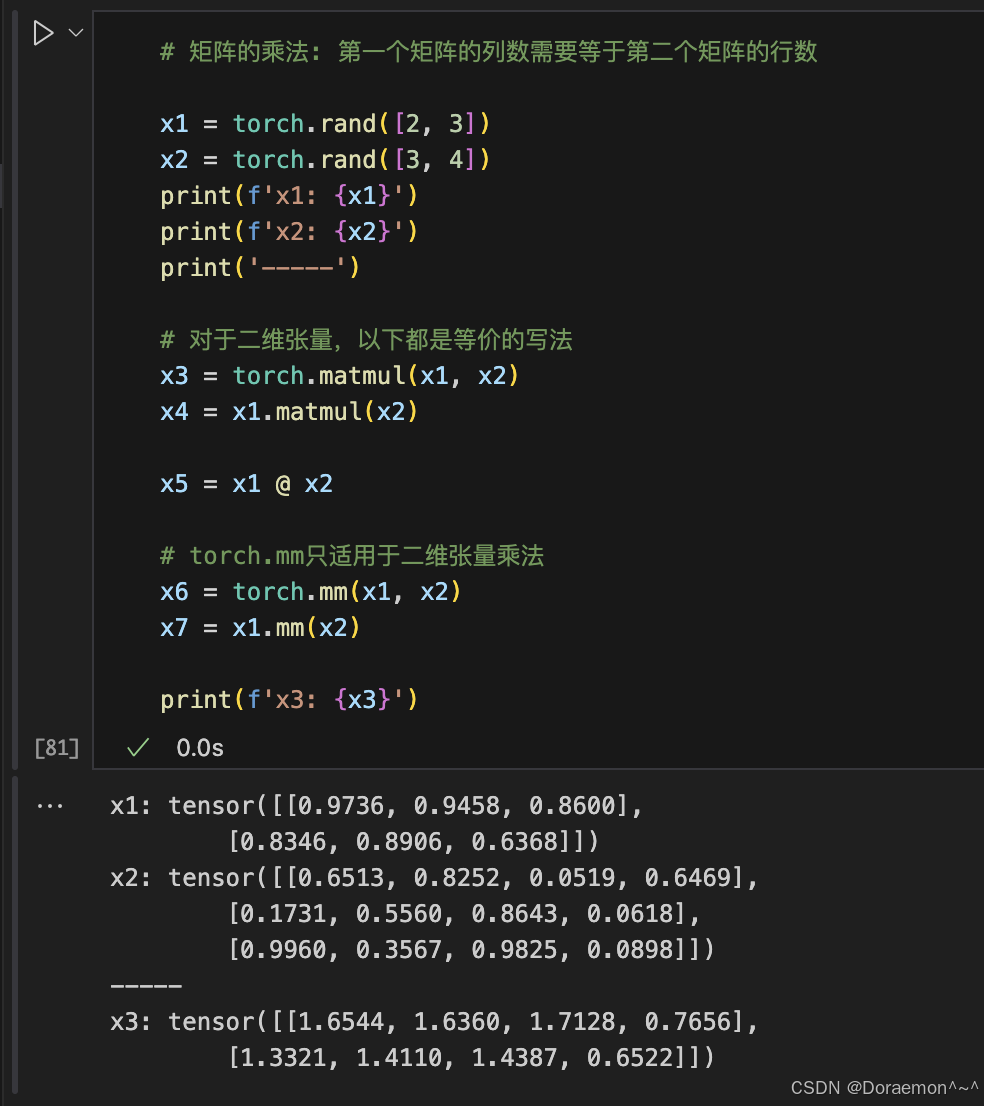
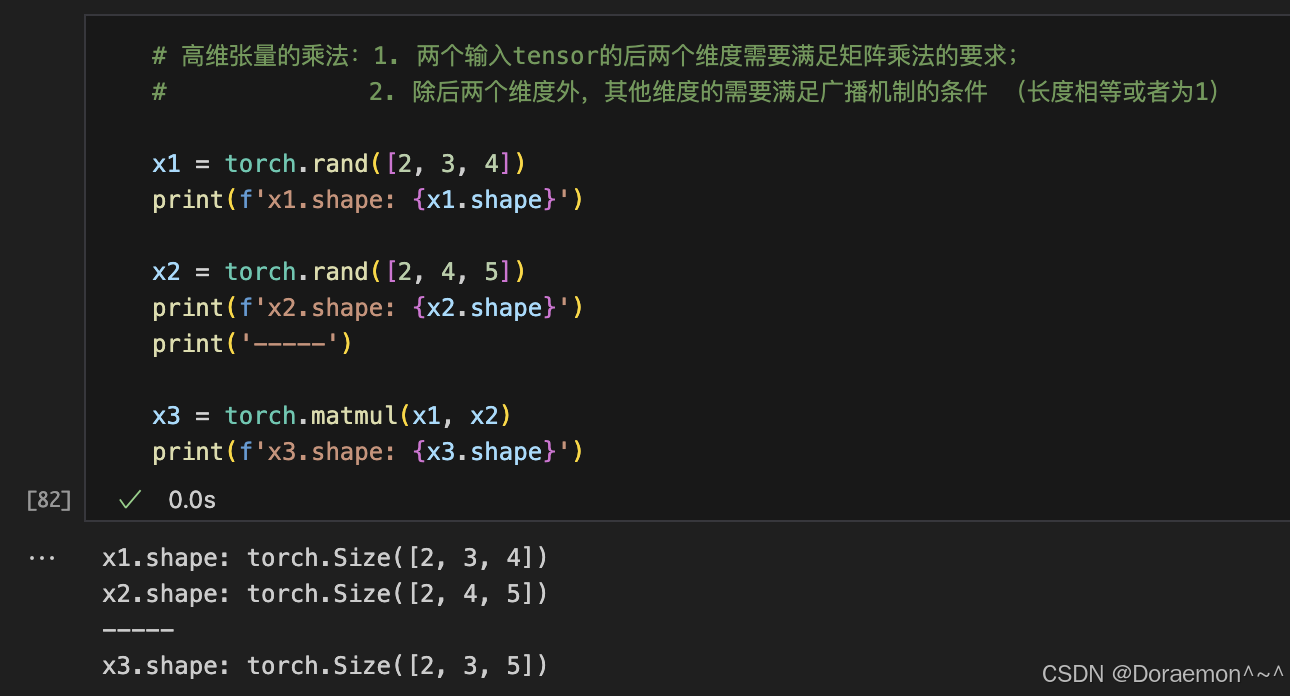
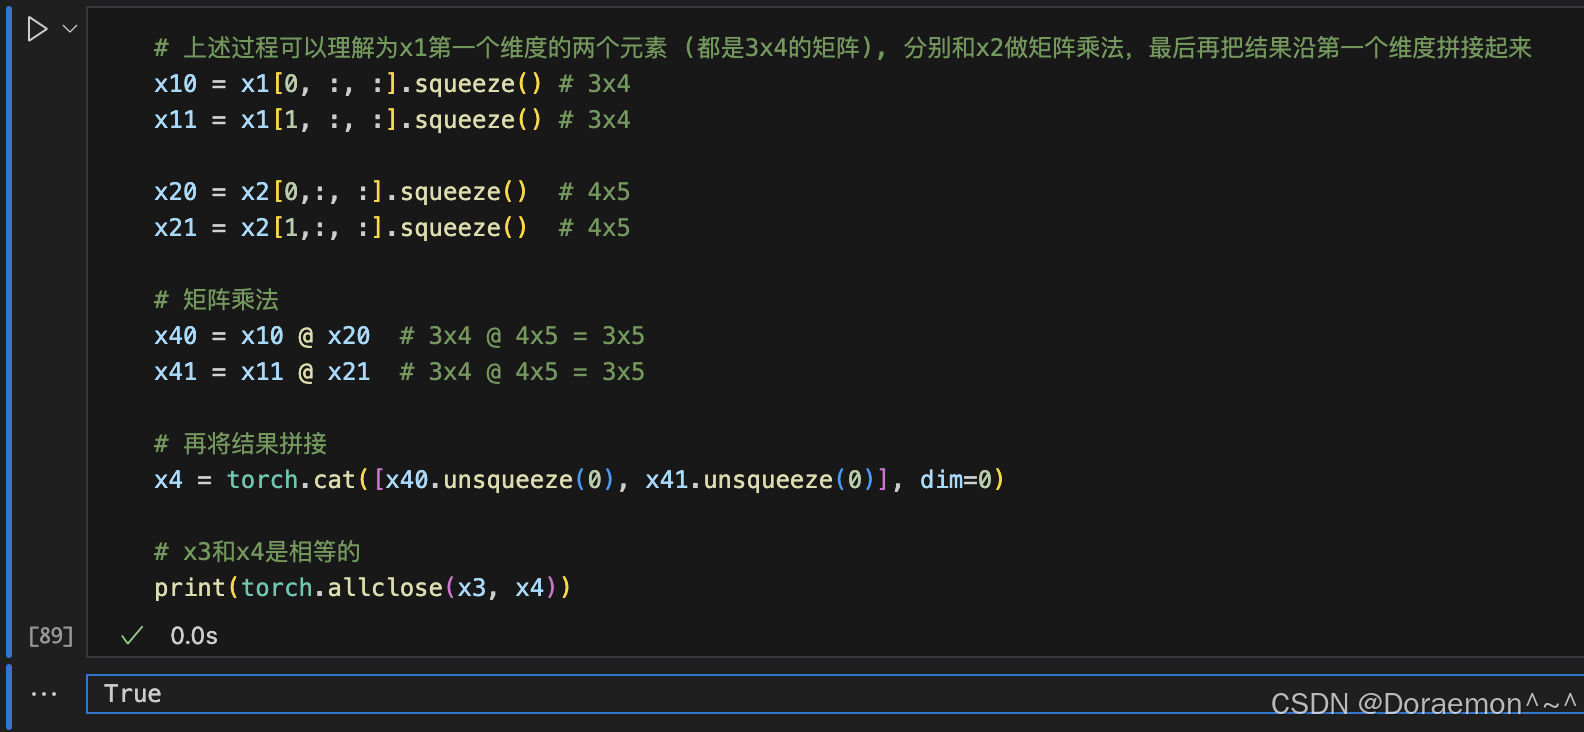
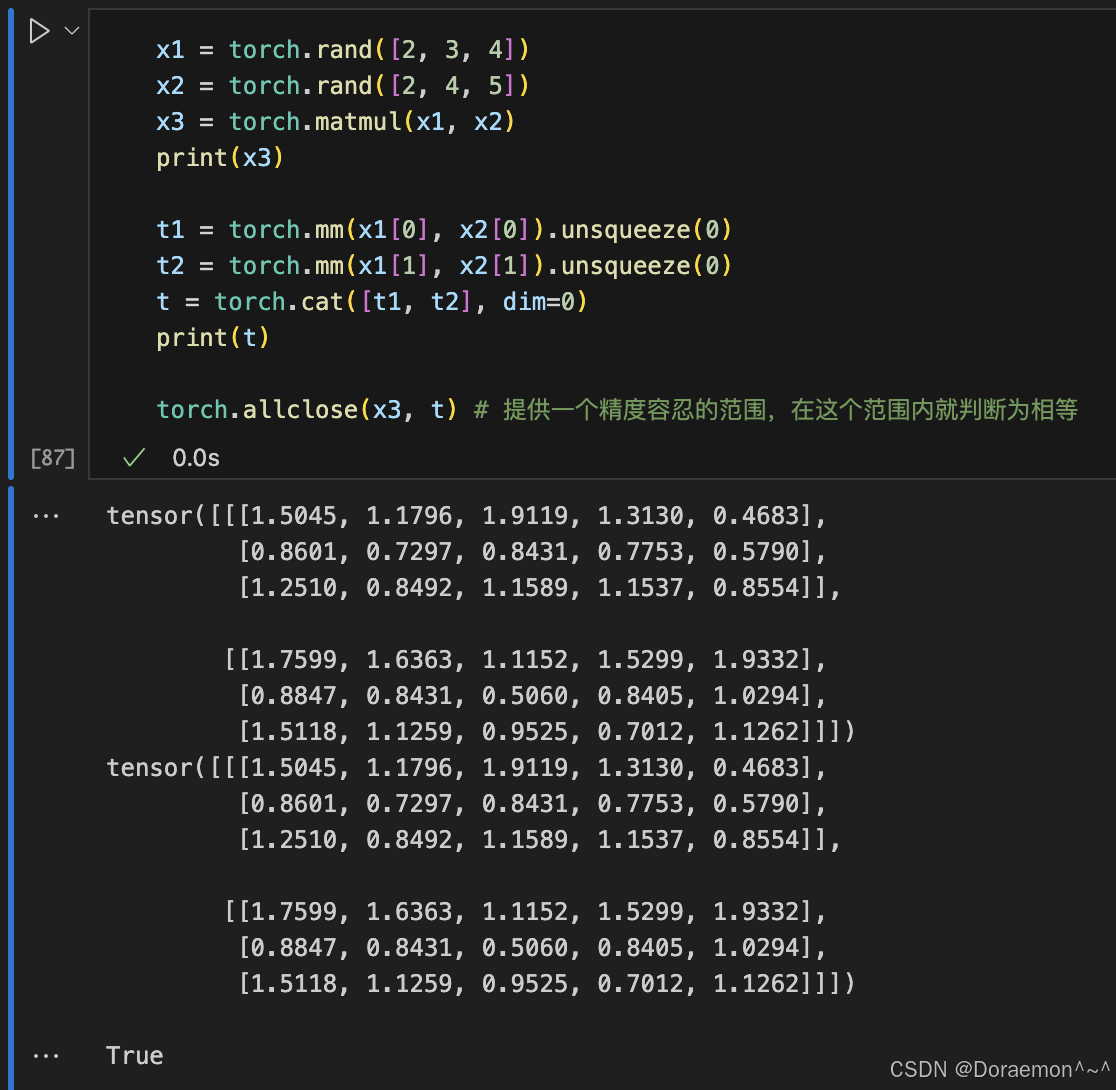
1.7.5.张量乘法
2.计算图和自动微分
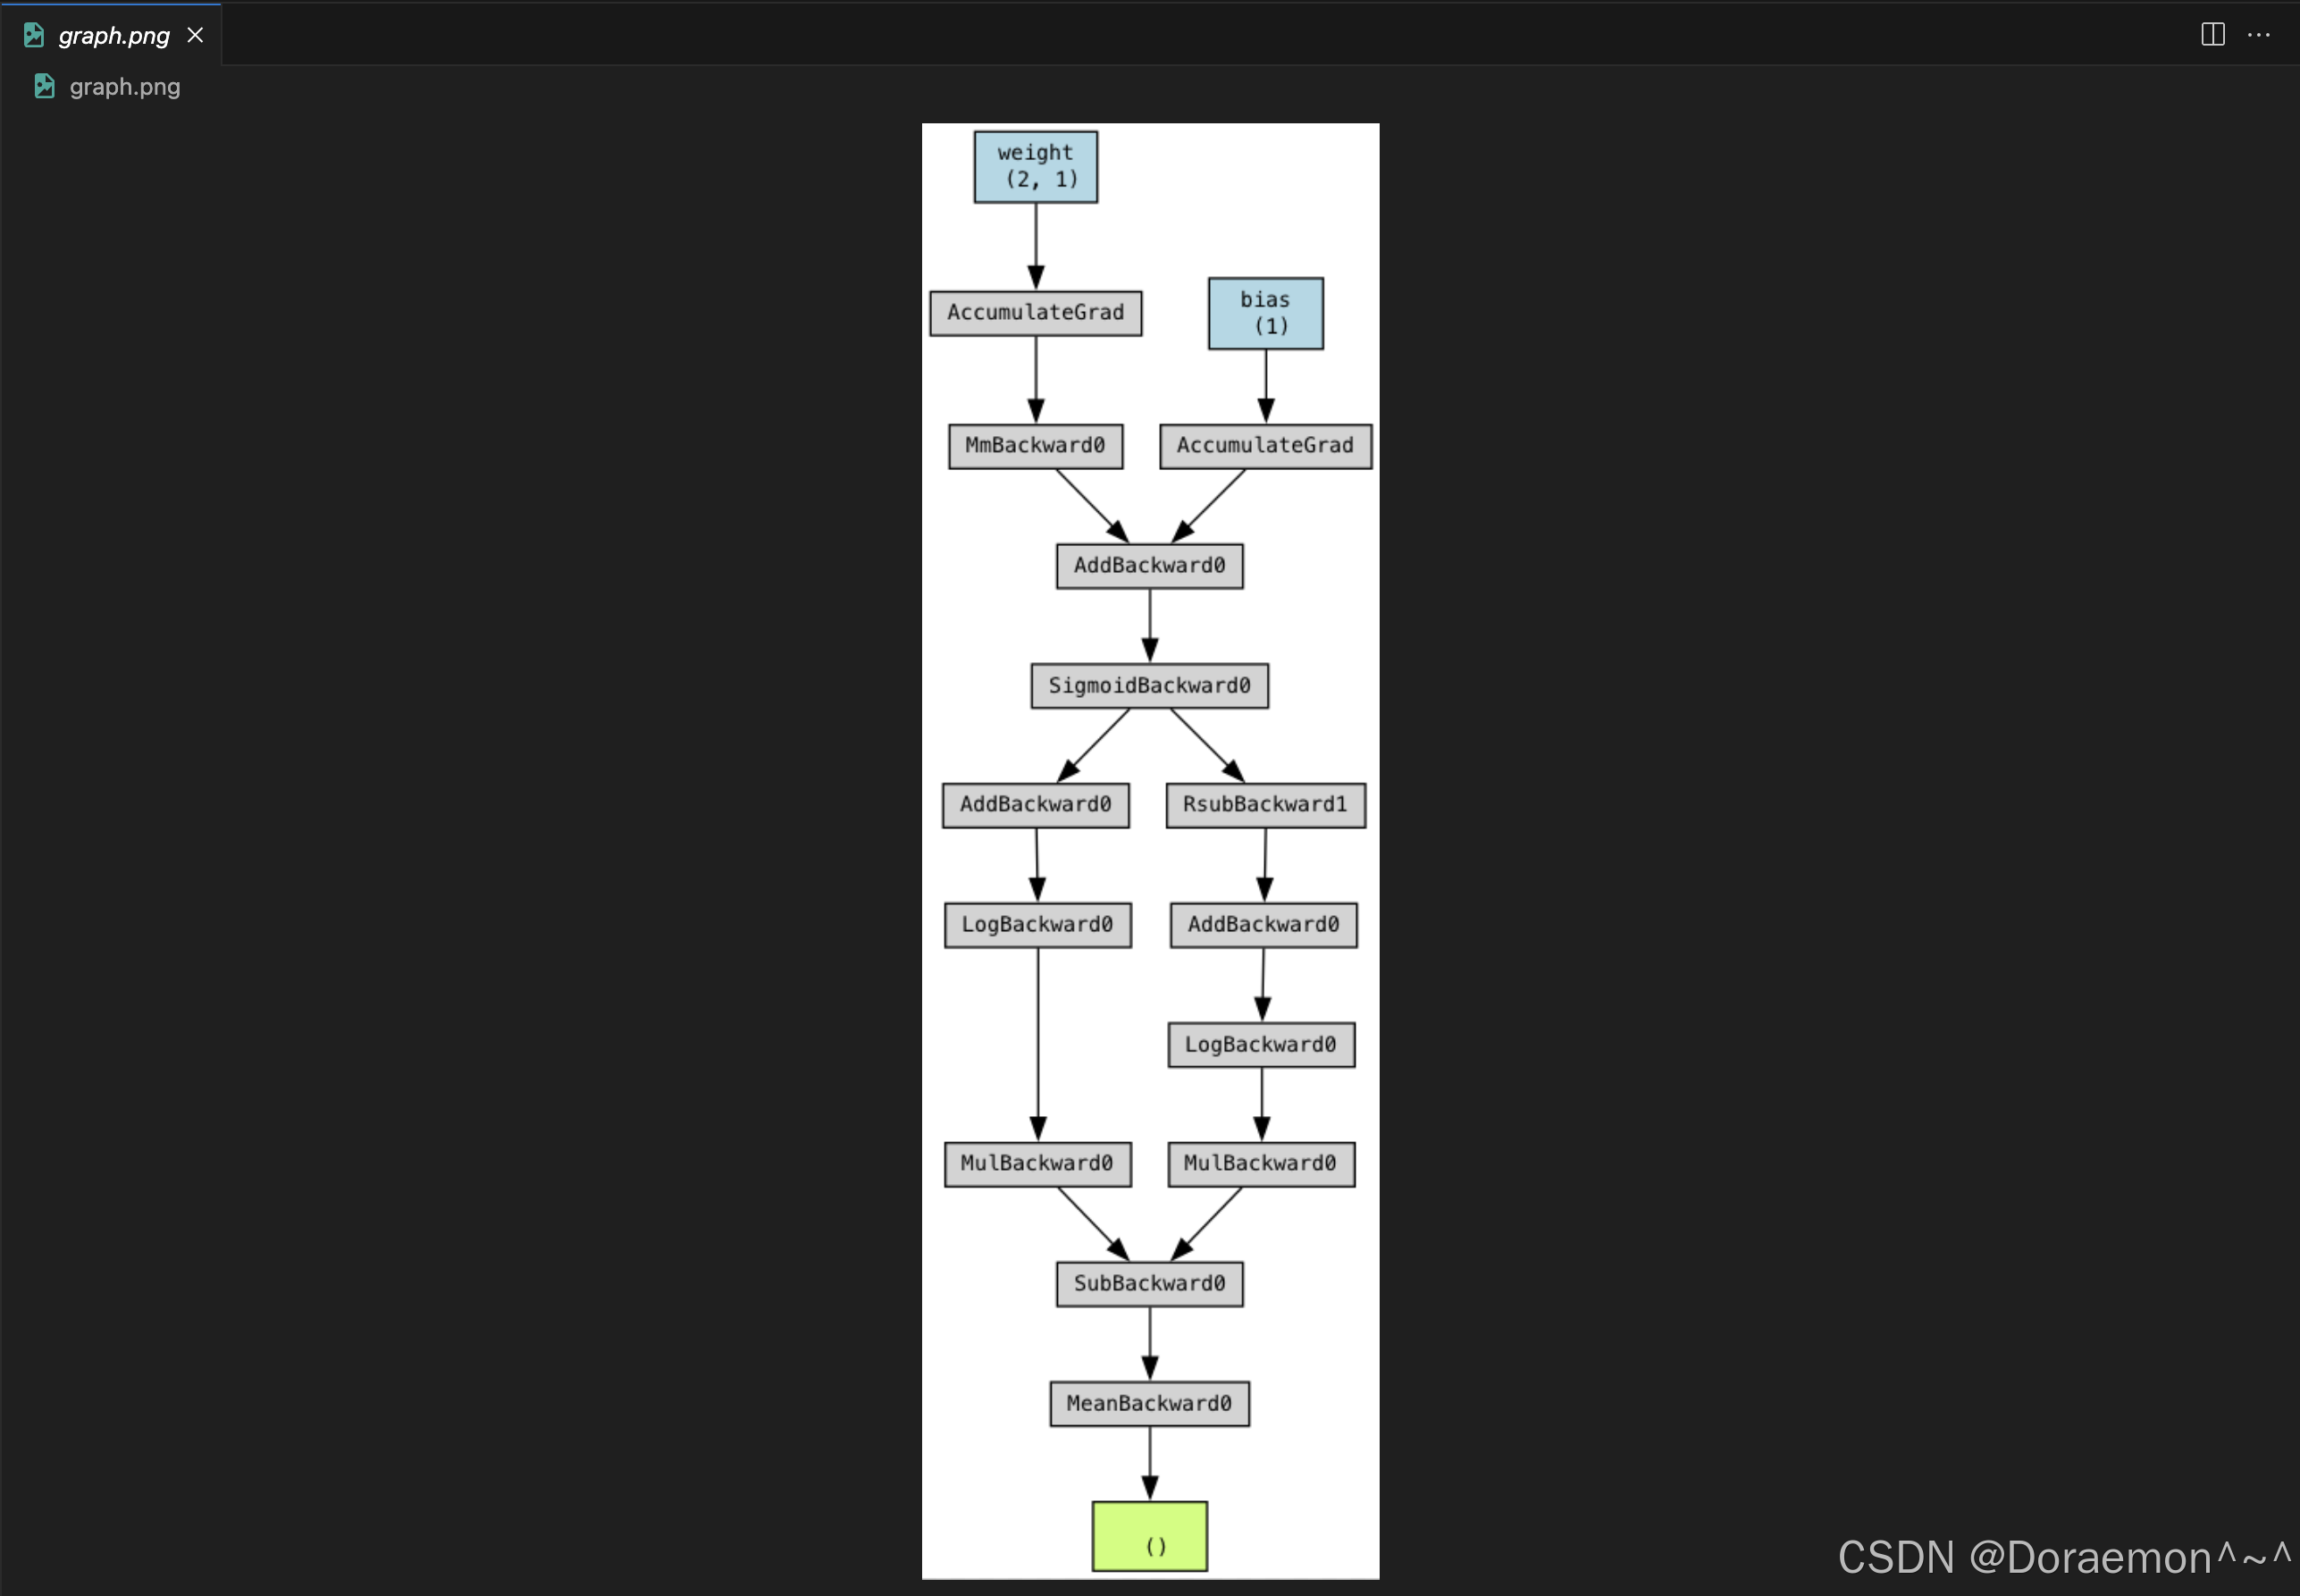
PyTorch有自动微分的功能。需要计算梯度的tensor对象需要将requires_grad设置为True。
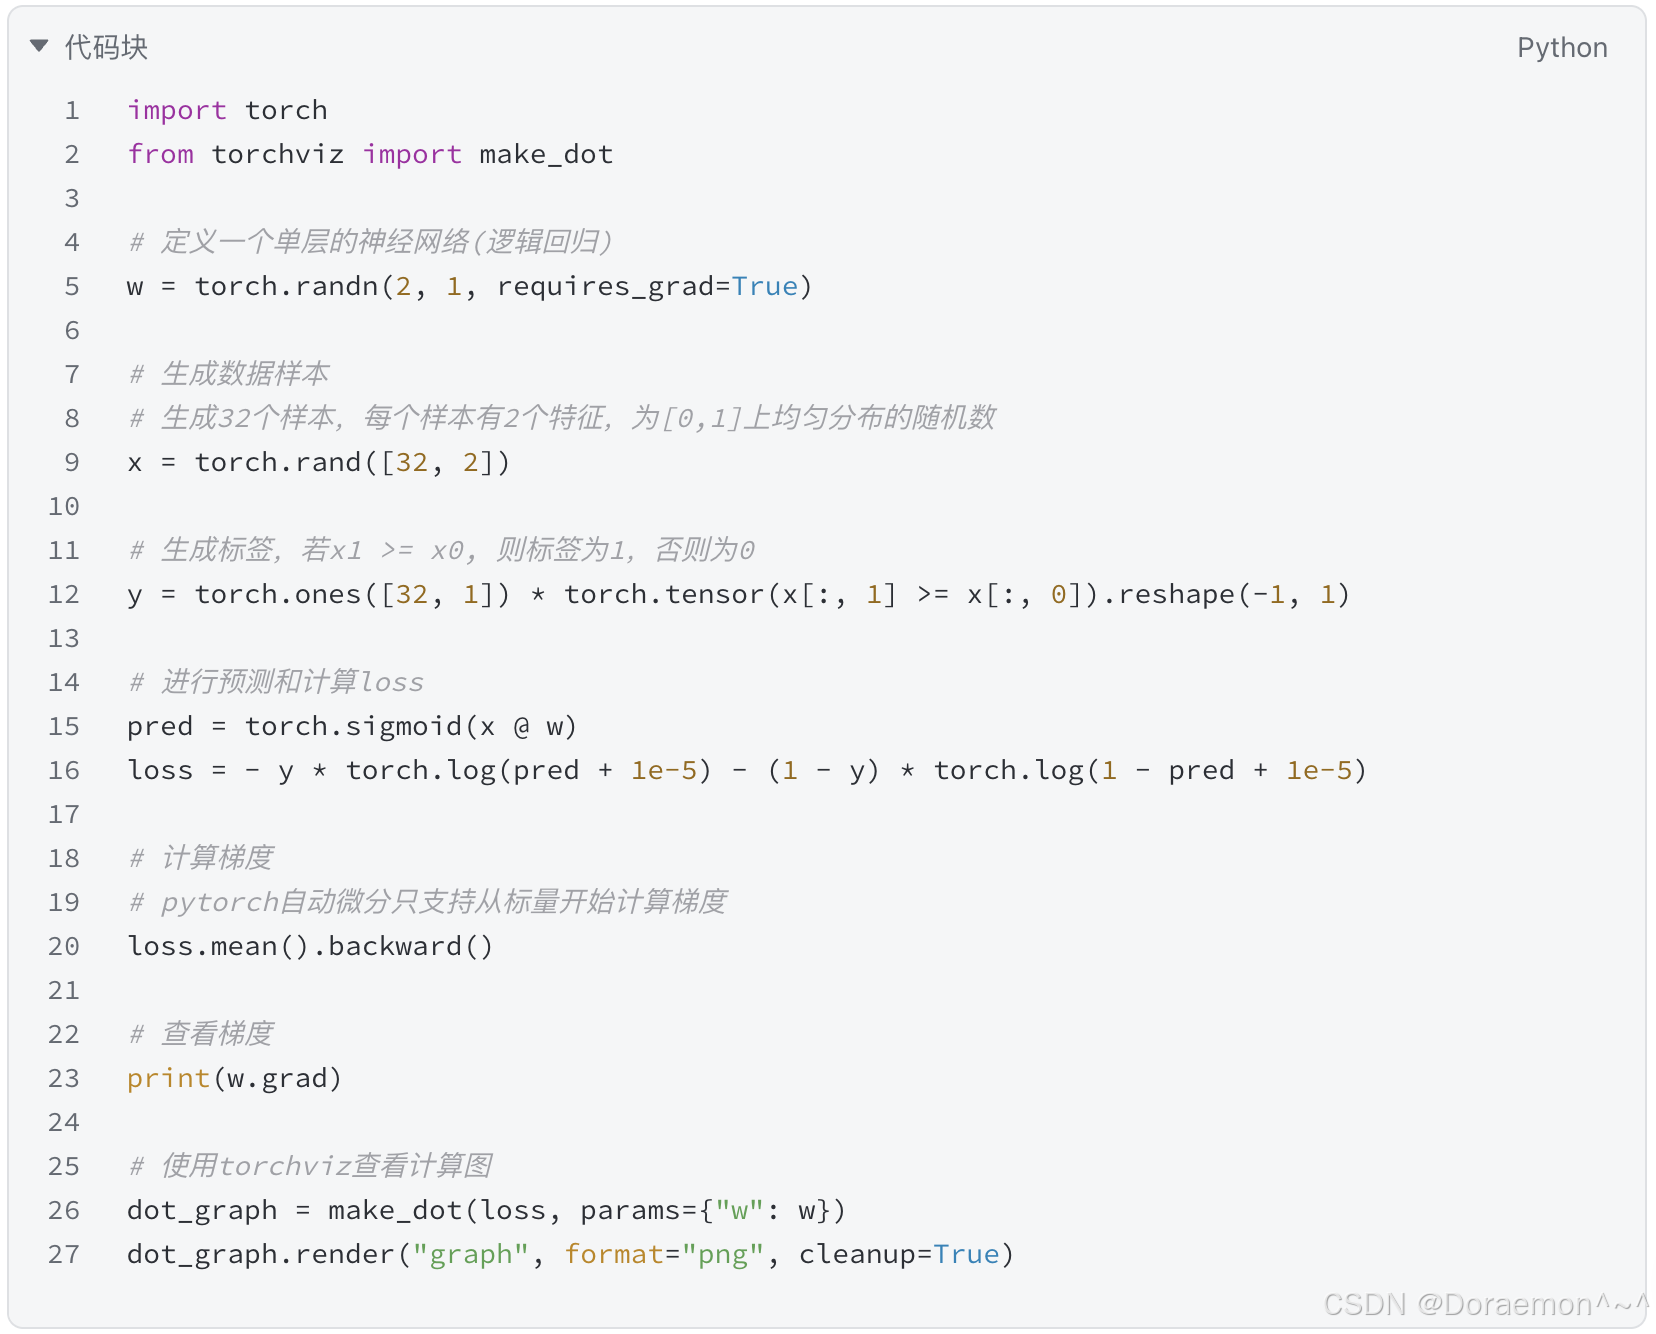
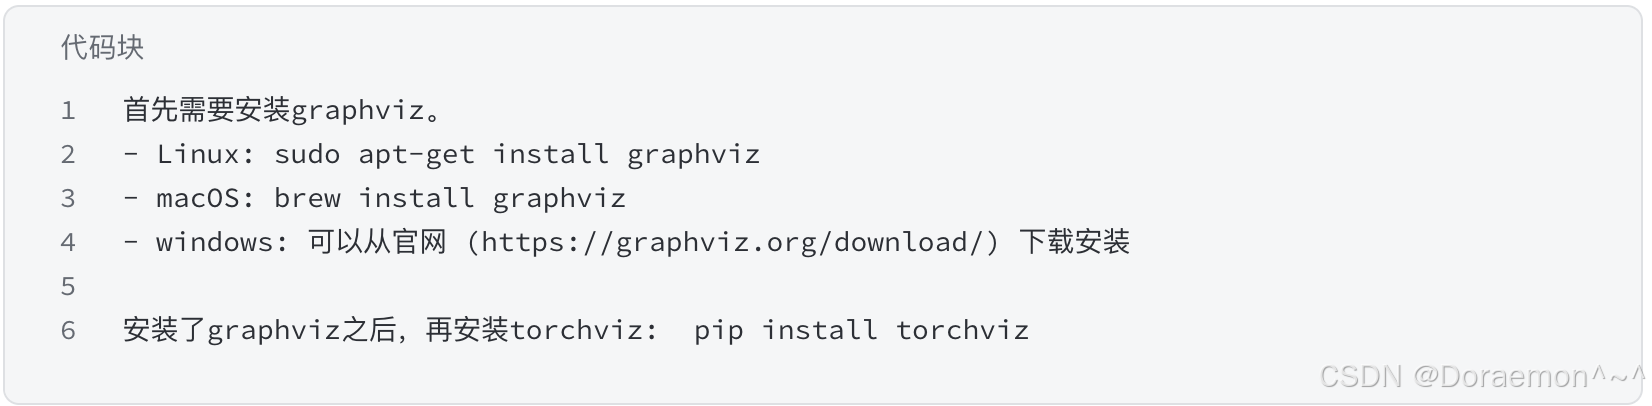
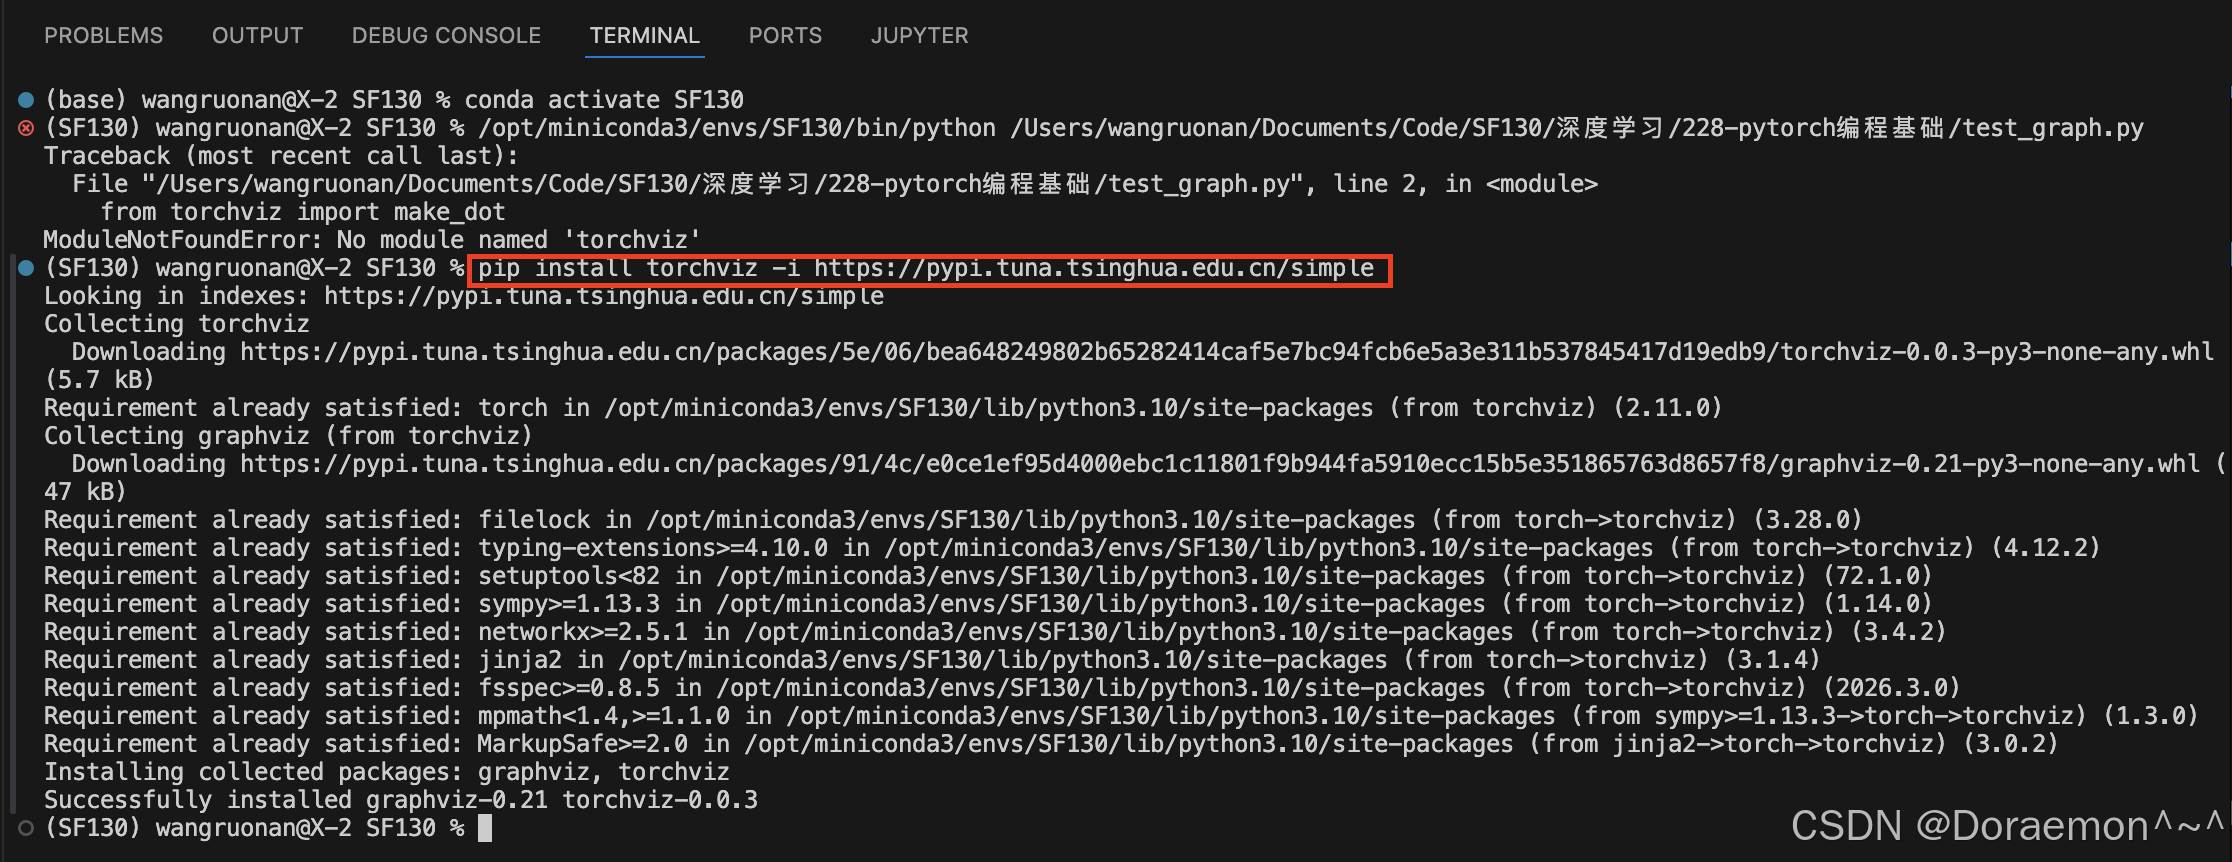
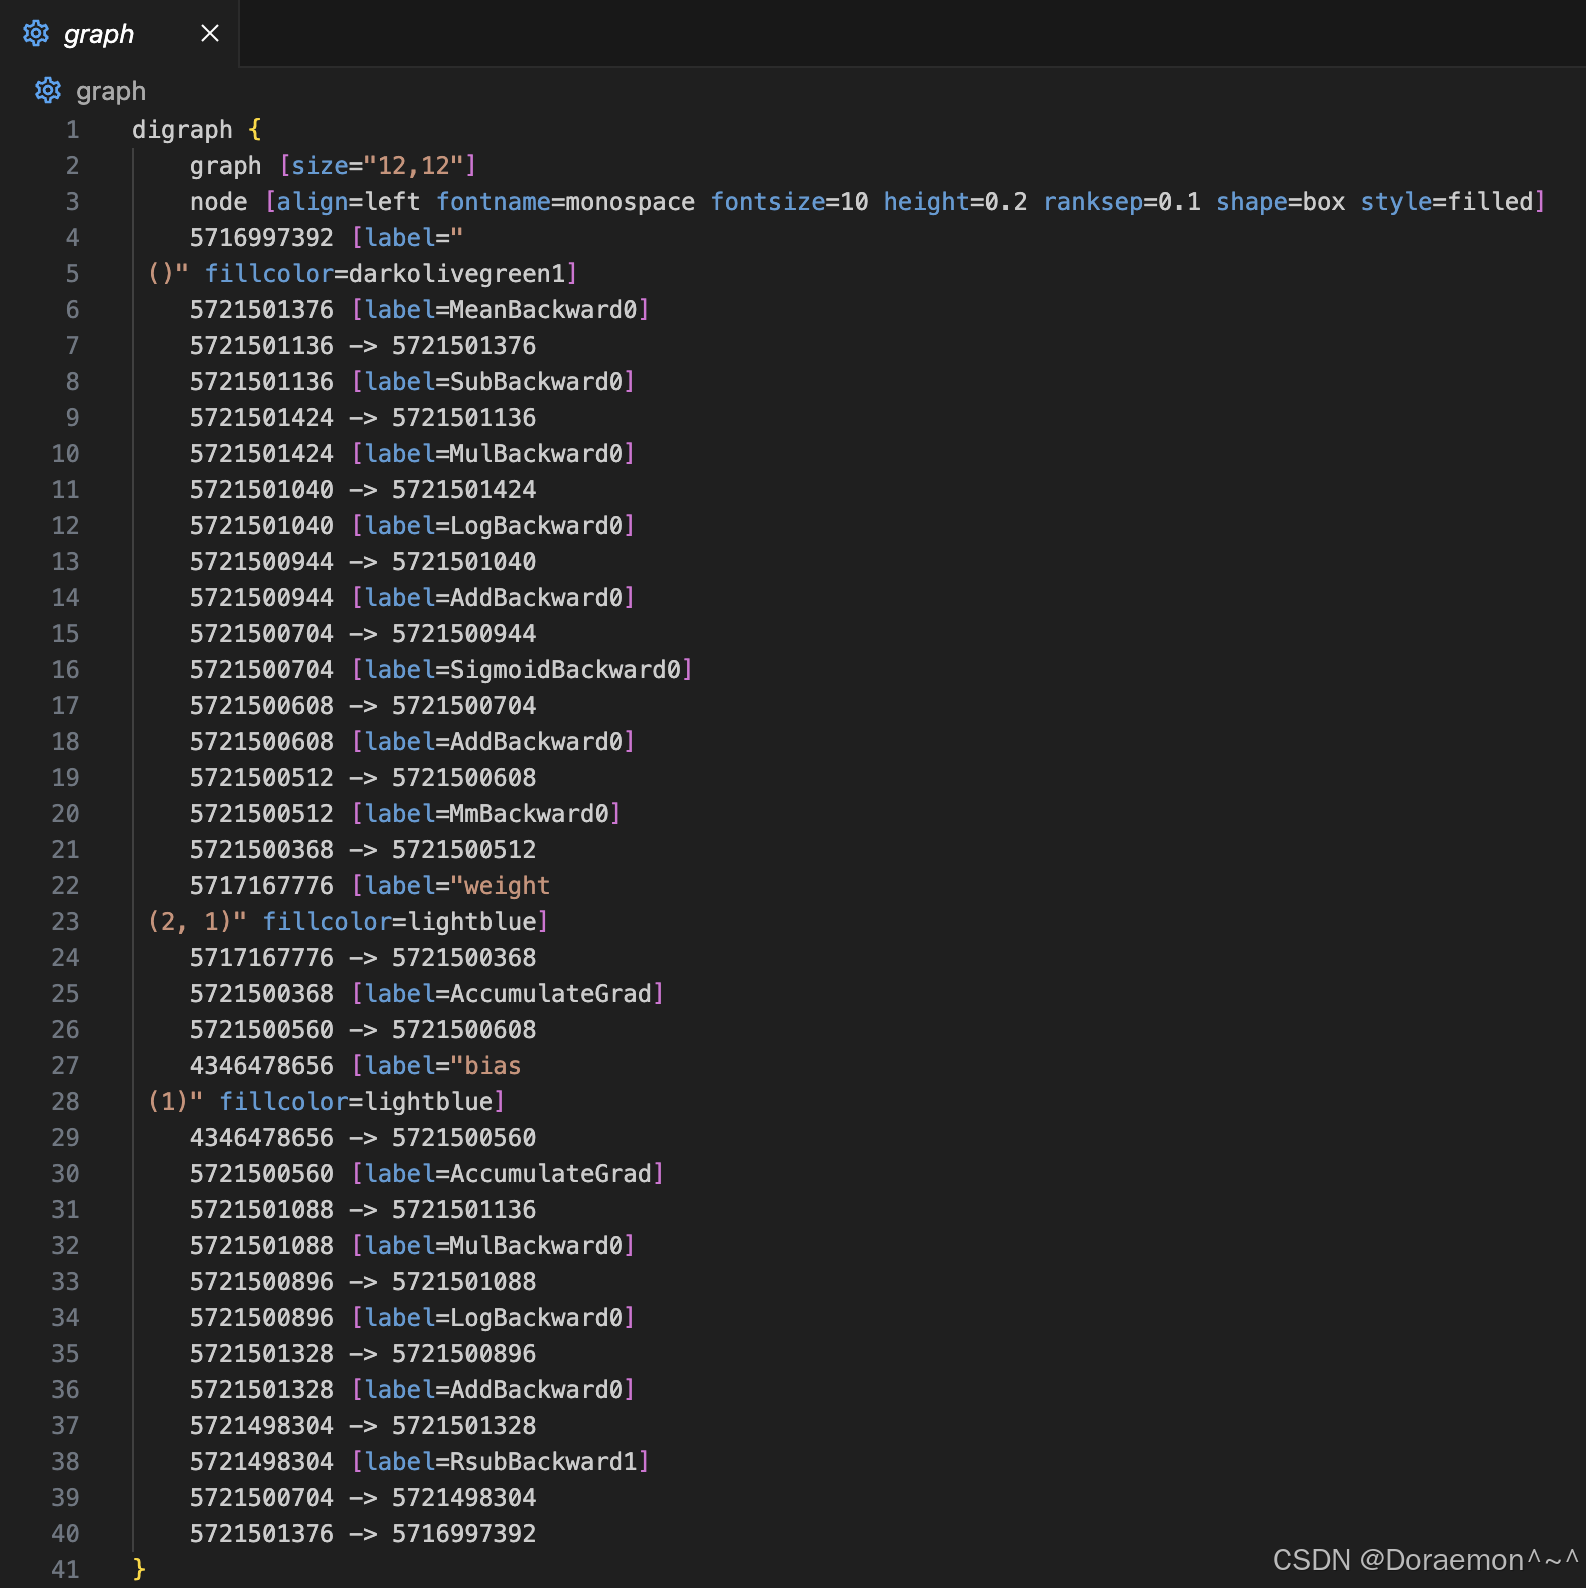
PyTorch会自动生成一个计算图,计算图中的每个节点记录了对应的微分函数。计算图可以通过 torchviz这个三方包进行可视化。torchviz的安装过程如下:
上边代码生成的计算图如下:
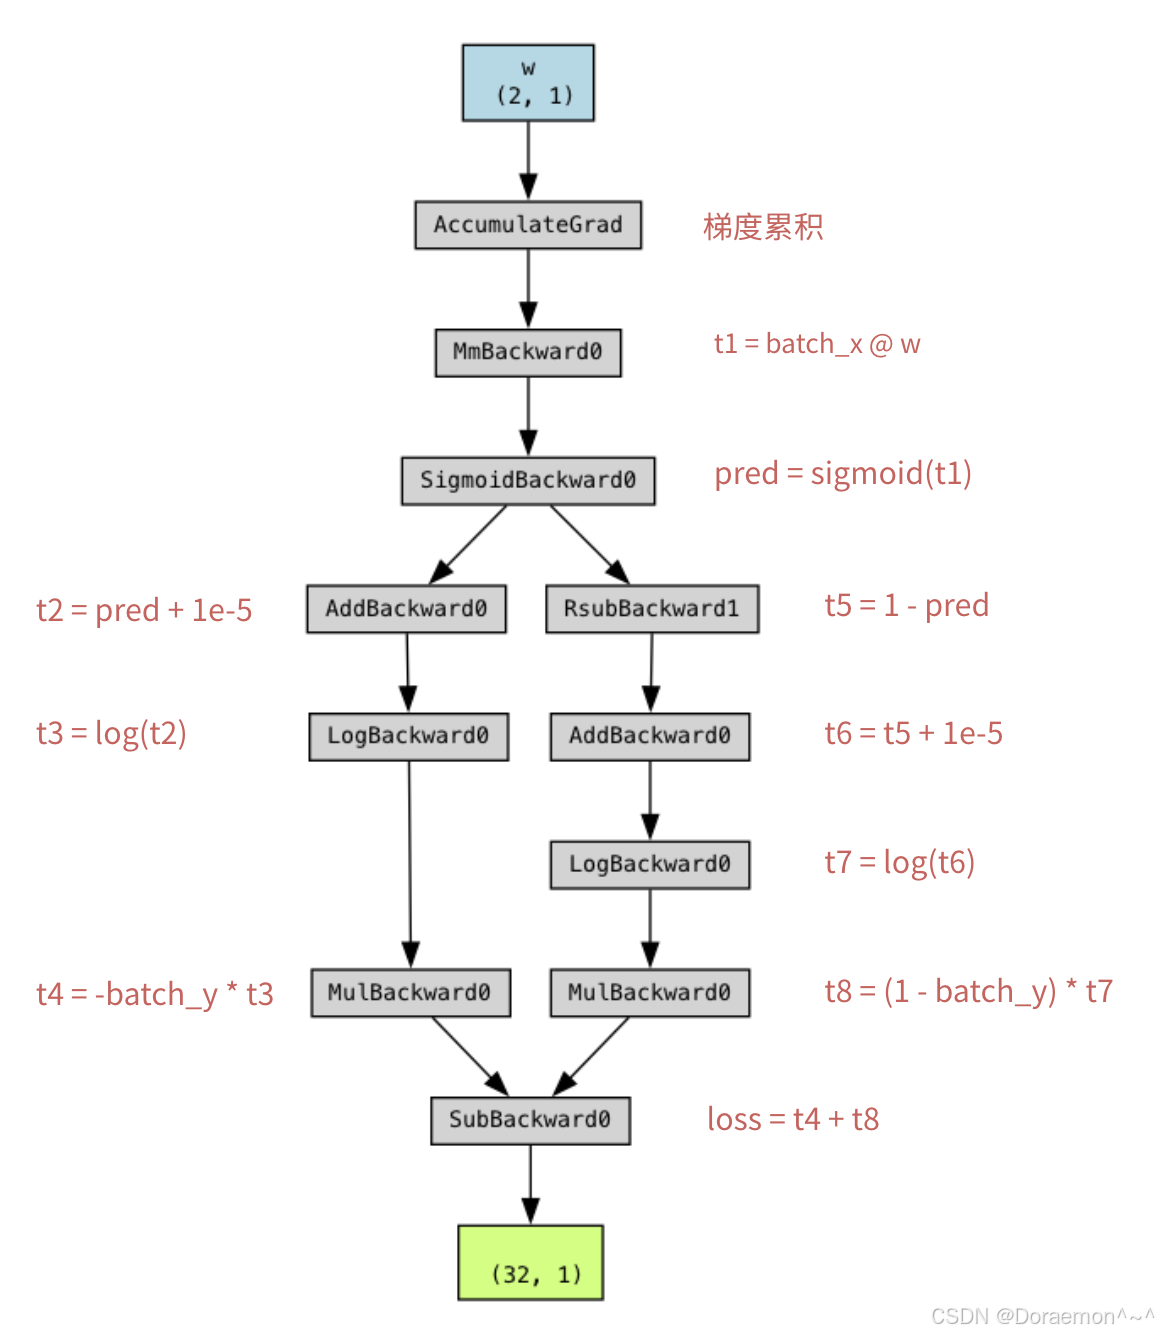
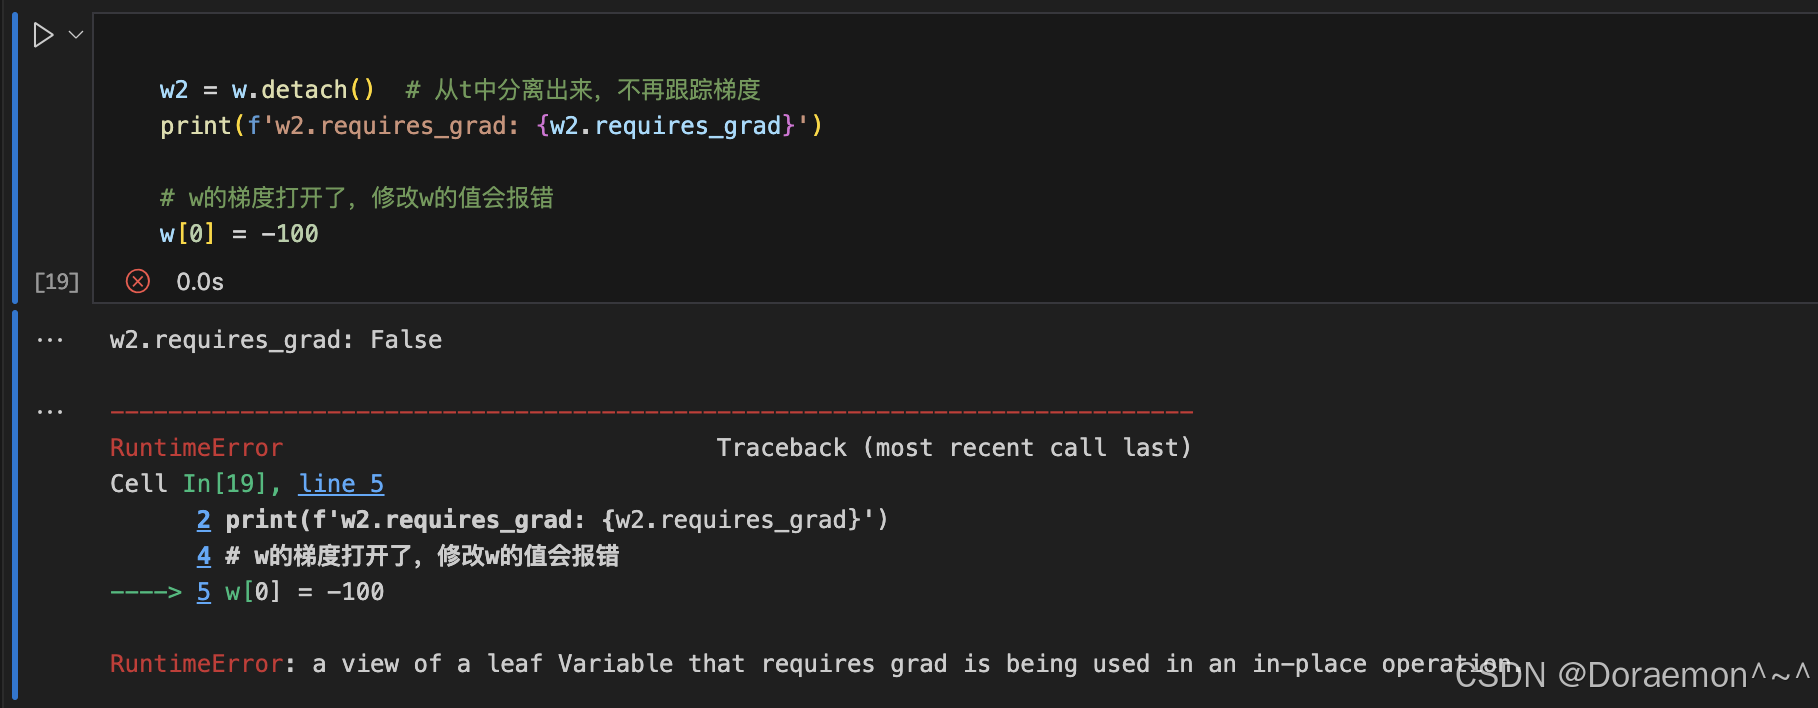
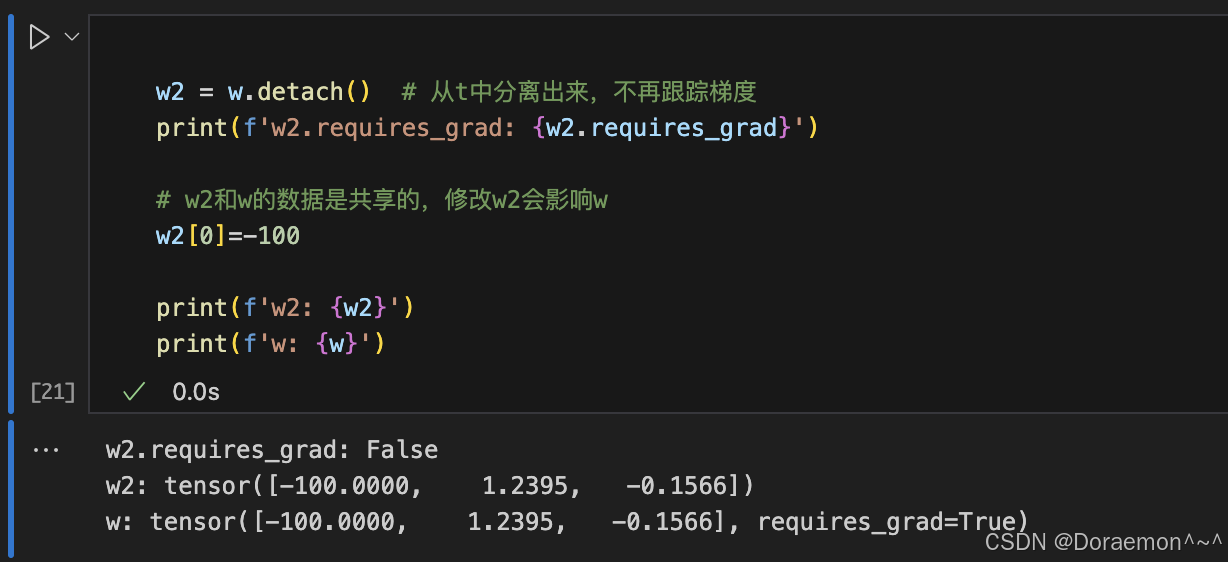
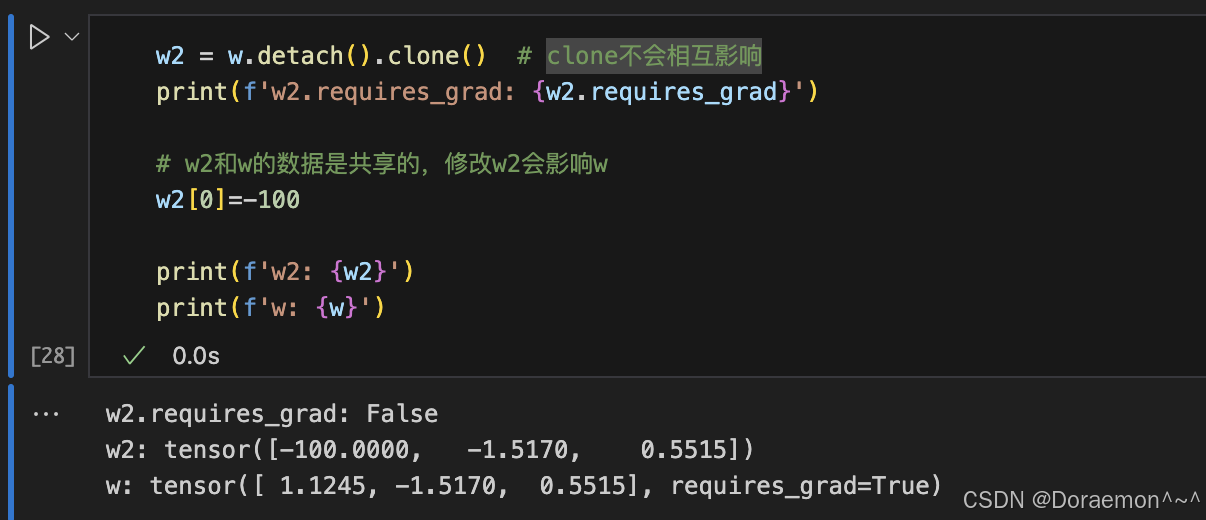
基于计算图,pytorch可以自动计算梯度。计算图中自变量的梯度保存在.grad属性中,中间变量默认不保存梯度。
实操:
python
# 安装 Python 用的 graphviz 库(接口)
pip install graphviz -i https://pypi.tuna.tsinghua.edu.cn/simple

# 安装 Mac 系统底层的画图工具(dot)
conda install -c conda-forge graphviz -y
python
import torch
from torchviz import make_dot

# 测试自动微分和计算图的代码

# 设置随机种子
torch.manual_seed(0)

# 参数w和b,打开了梯度追踪,独立同分布
# weight
w = torch.randn(2, 1, requires_grad=True) # randn 正态分布
# bias
b = torch.rand(1, requires_grad=True) # rand 均匀分布

# 生成数据样本
x = torch.rand(100, 2)
y = (x[:, 1] > x[:, 0]).int().reshape(-1, 1)

x_batch1 = x[:50]
y_batch1 = y[:50]
x_batch2 = x[50:]
y_batch2 = y[50:]

# 先处理batch1
# 前向传播
z = torch.matmul(x_batch1, w) + b
# print(z.requires_grad) # True
preds = torch.sigmoid(z)
# print(preds.requires_grad) # True

# 计算loss|交叉墒损失
loss = -y_batch1 * torch.log(preds+1e-10) - (1-y_batch1) * torch.log(1-preds+1e-10)

# 反向传播计算梯度
loss.mean().backward()

# 反向传播之后,梯度存在打开梯度追踪tensor的grad属性中
print(f"w.grad: {w.grad}")
# print(f"w: {w} \nw.data: {w.data} \nw.grad: {w.grad}")
# print(f"b: {b} \nb.data: {b.data} \nb.grad: {b.grad}")
# print(f"z: {z} \nz.data: {z.data} \nz.grad: {z.grad}") # z.grad 会算到,但不会保存下来,只会保存叶子结点(自变量)的梯度,为了节省内存

# 清空梯度,否则梯度会累加
w.grad.zero_()
b.grad.zero_()
print(f"w.grad: {w.grad}")

# 处理batch2
# 前向传播
z = torch.matmul(x_batch2, w) + b
preds = torch.sigmoid(z)

# 计算loss
loss = -y_batch2 * torch.log(preds+1e-10) - (1-y_batch2) * torch.log(1-preds +1e-10)

# 反向传播计算梯度
loss.mean().backward()

# 查看梯度
print(f"w.grad: {w.grad}")

# 计算图可视化
dot_graph = make_dot(loss.mean(), params={"weight": w, "bias": b}) # 生成结构化的数据
# print(dot_graph)
dot_graph.render("graph", format="png") # 将结构化的数据渲染成图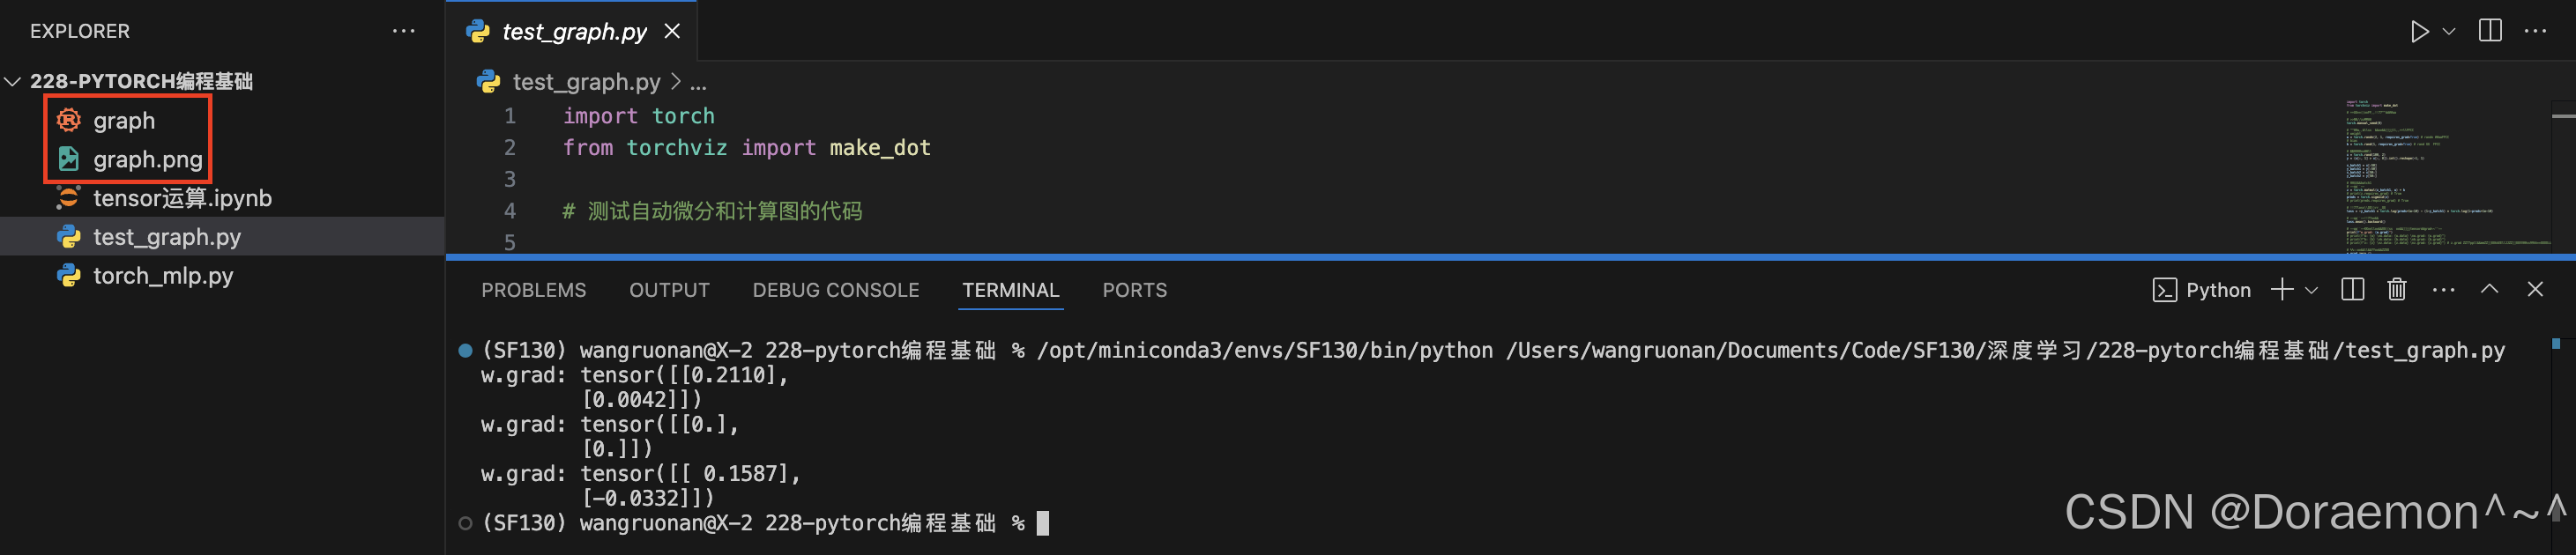
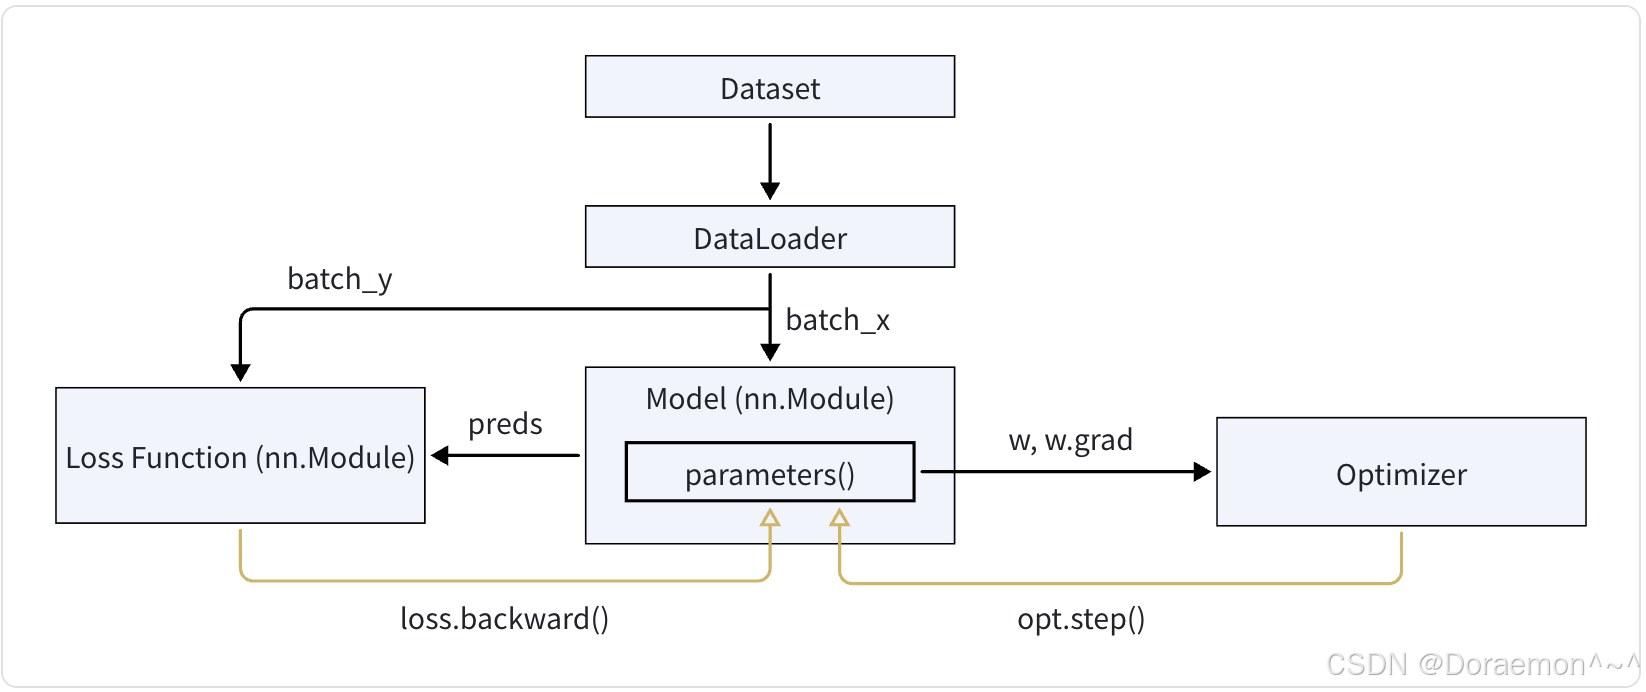
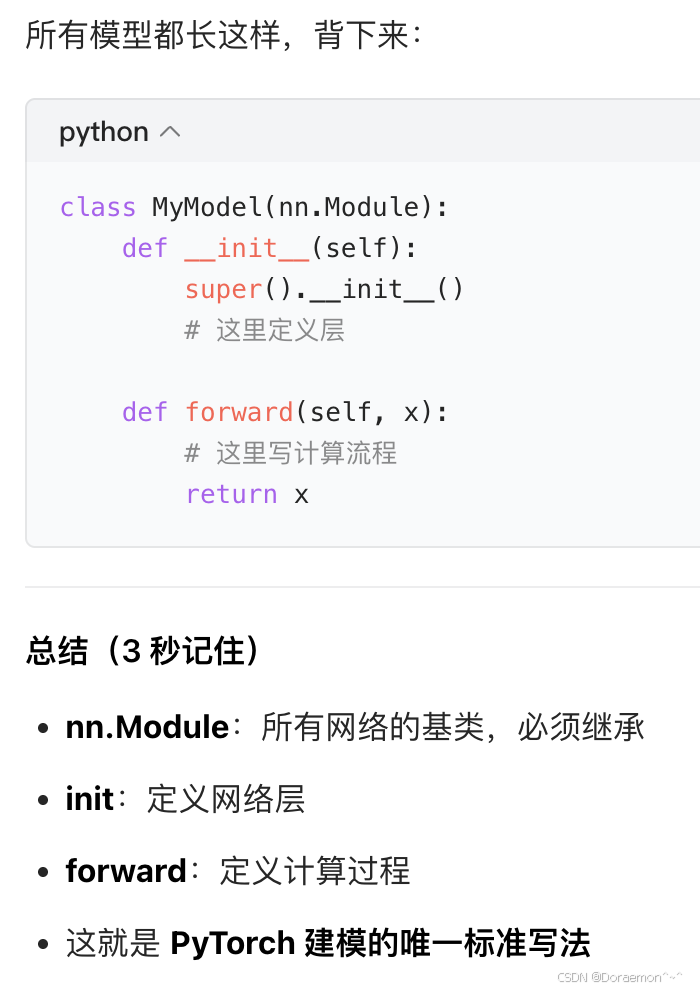
3.PyTorch训练过程
4.神经网络的搭建
4.1.神经网络的基类:torch.nn.Module()
torch.nn.Module() 是所有类型神经网络的基类。这里所说的"神经网络",可以是单层的网络结构, 或者是多层构成的"块",以及完整的一个神经网络模型。
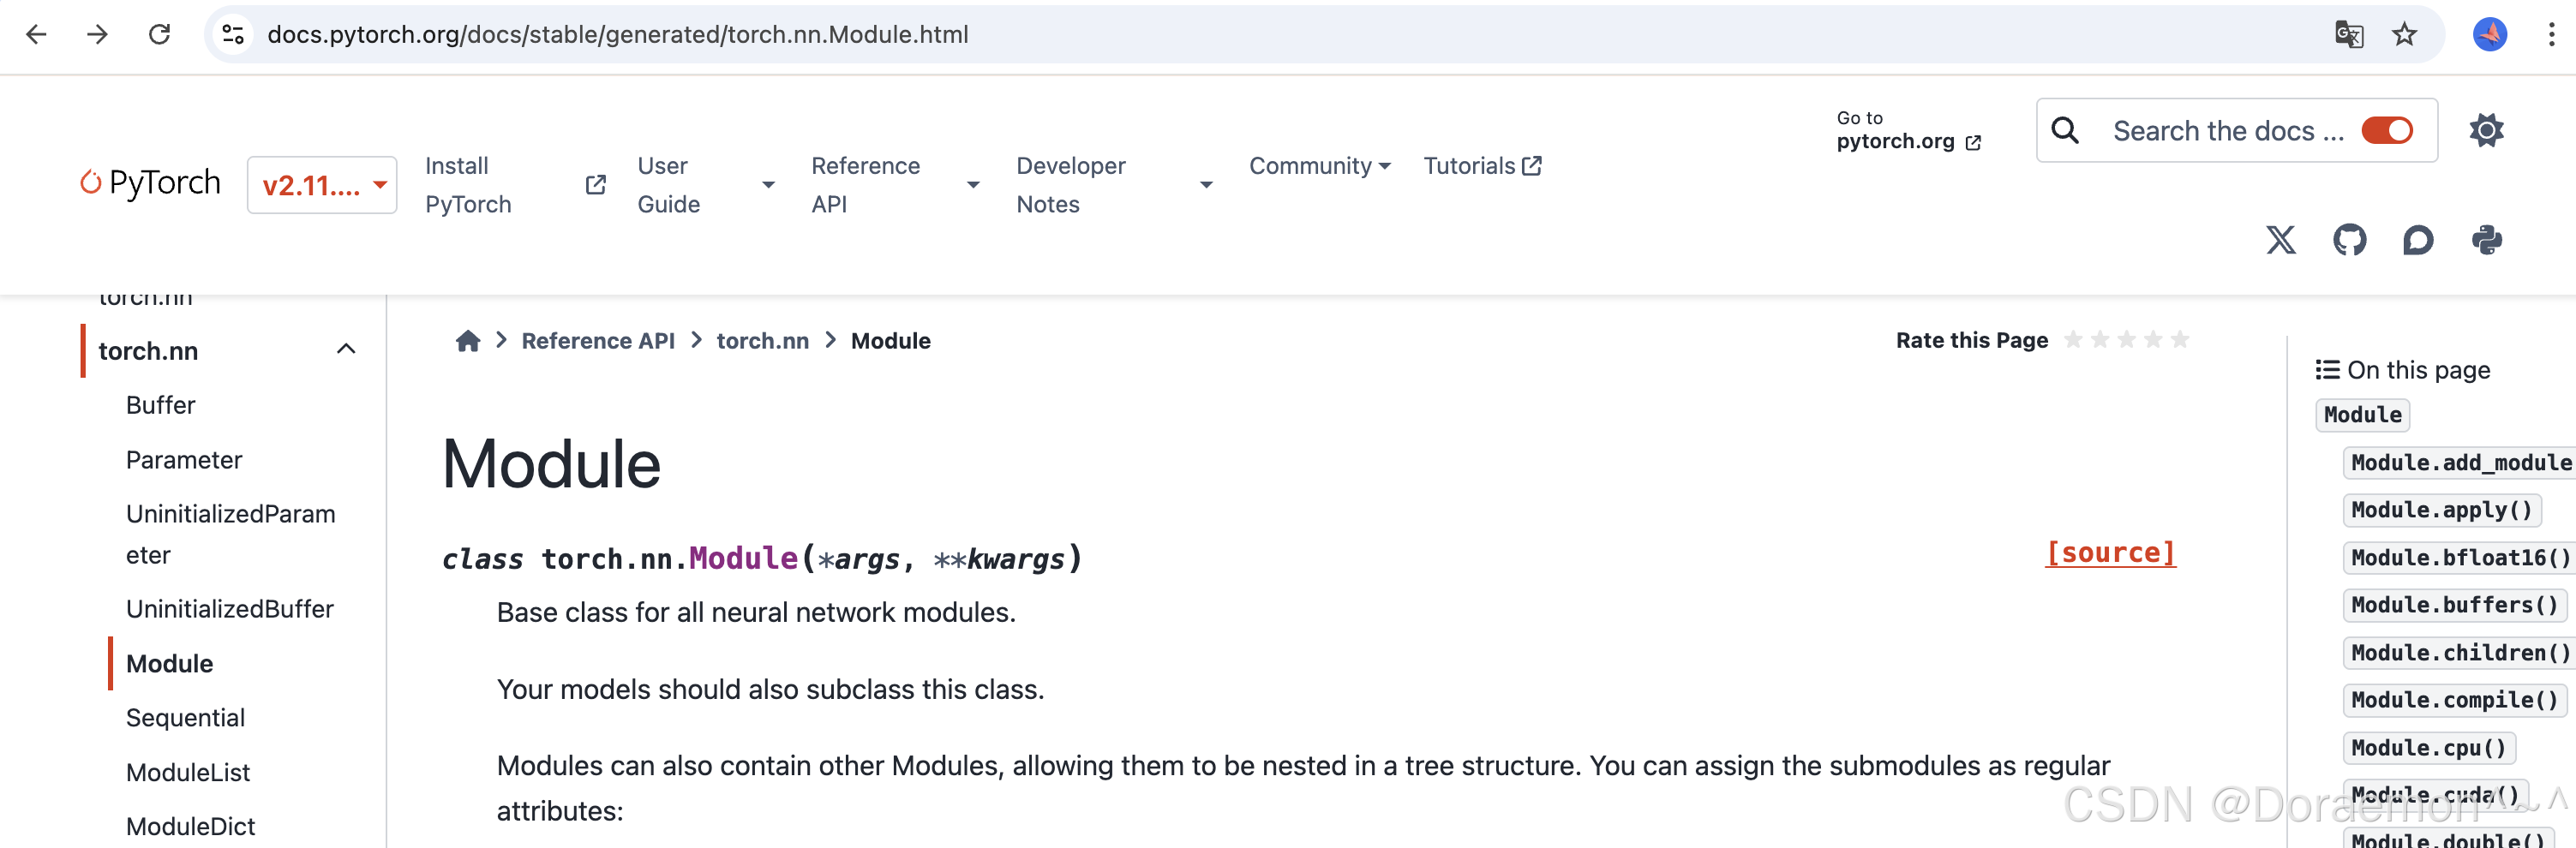

class torch.nn.Module(*args, **kwargs)
所有神经网络模块的基类。
你的模型也应当继承这个类。
模块内部还可以包含其他模块,使得它们可以嵌套成树形结构。你可以像普通属性一样赋值这些子模块:
pythonimport torch.nn as nn import torch.nn.functional as F # 定义自己的模型,必须继承 nn.Module class Model(nn.Module): # 第一步:构造函数 ------ 搭网络的"层" def __init__(self) -> None: super().__init__() # 必须写!调用父类初始化 # 定义网络层(卷积层) self.conv1 = nn.Conv2d(1, 20, 5) self.conv2 = nn.Conv2d(20, 20, 5) # 第二步:前向传播 ------ 定义数据怎么走 def forward(self, x): # 卷积 + 激活 x = F.relu(self.conv1(x)) return F.relu(self.conv2(x))以这种方式赋值的子模块会被自动注册,并且在你调用
.to()等方法时,它们的参数也会被一并转换(例如转到 GPU)。注意
正如上面的示例所示,在对子类进行属性赋值之前,必须先调用父类的
__init__()方法。变量
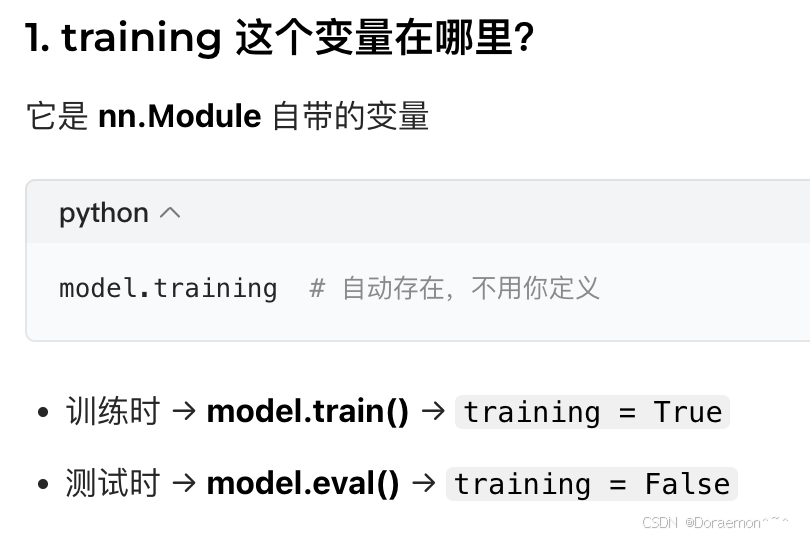
training (bool) -- 一个布尔值,表示当前模块处于训练模式还是评估模式。
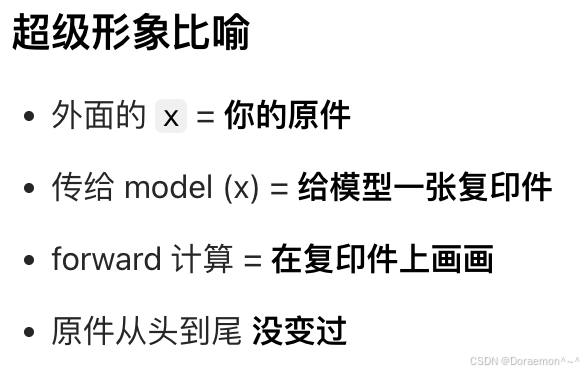
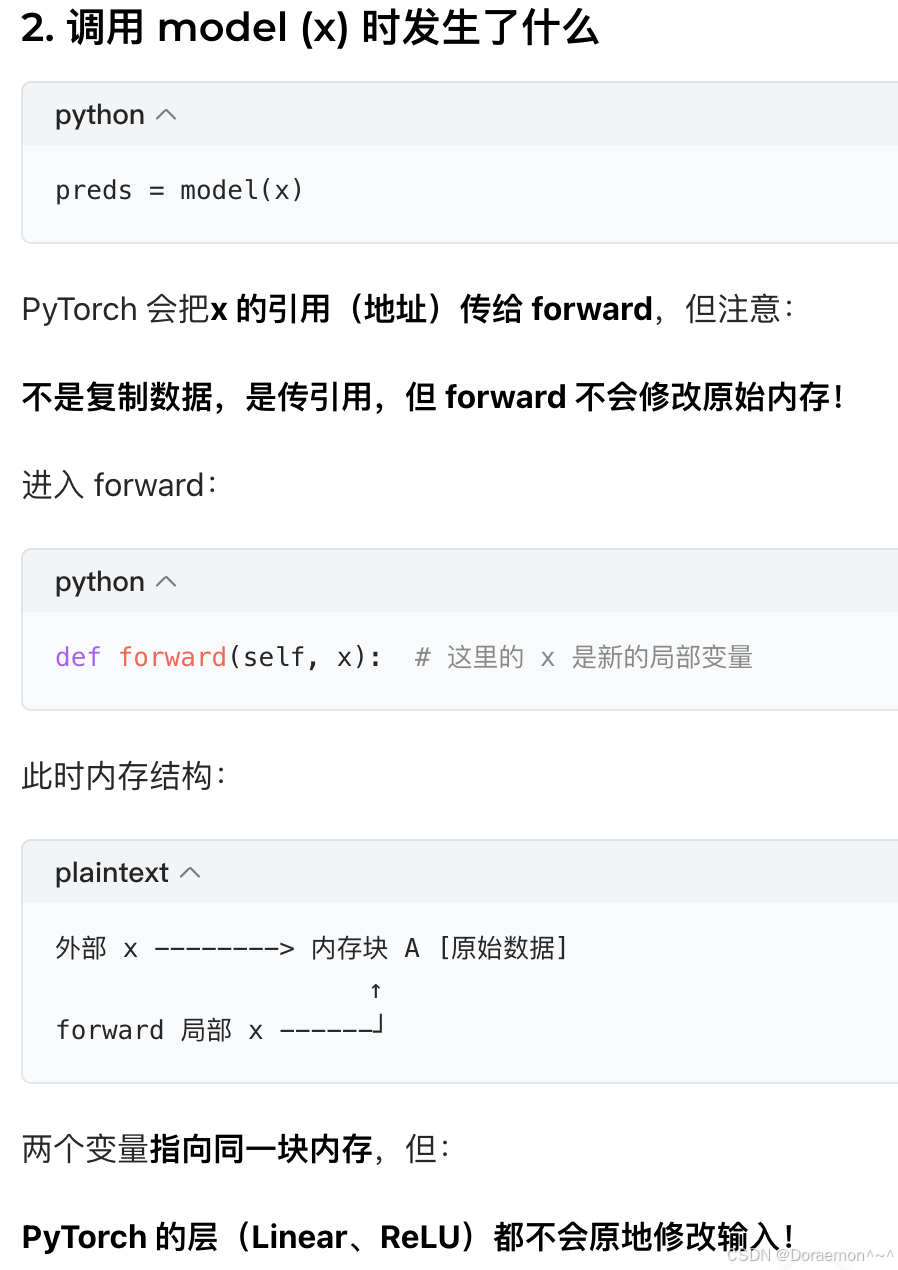
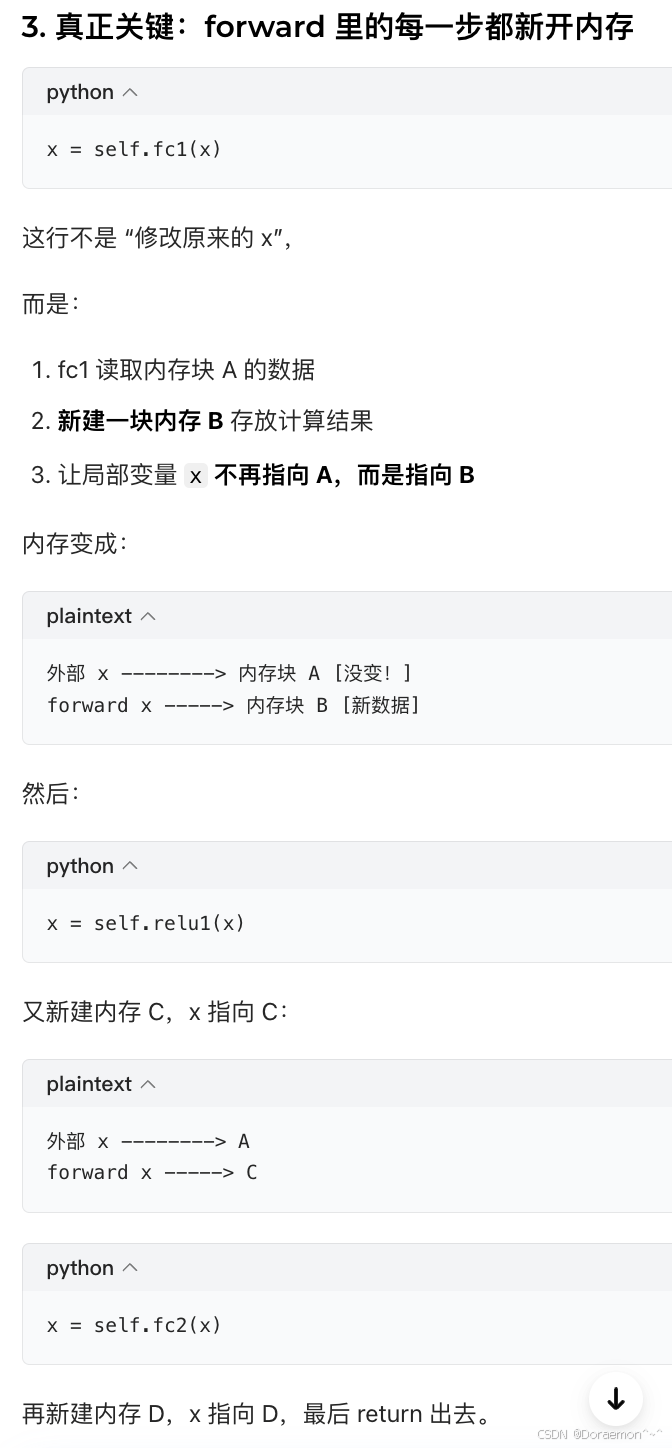
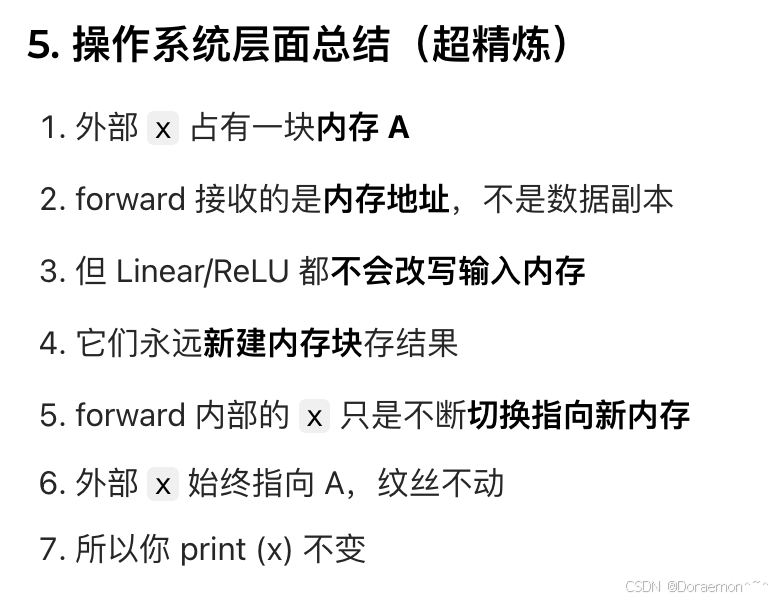
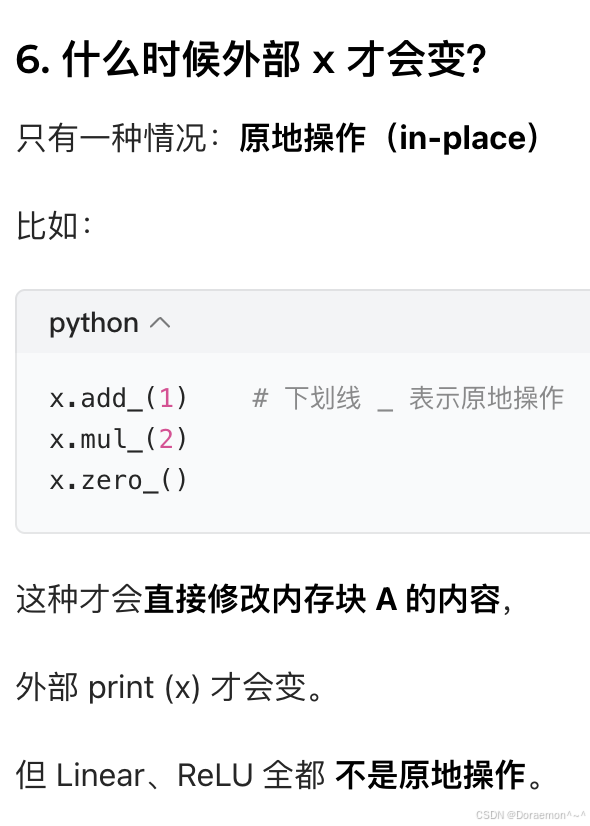
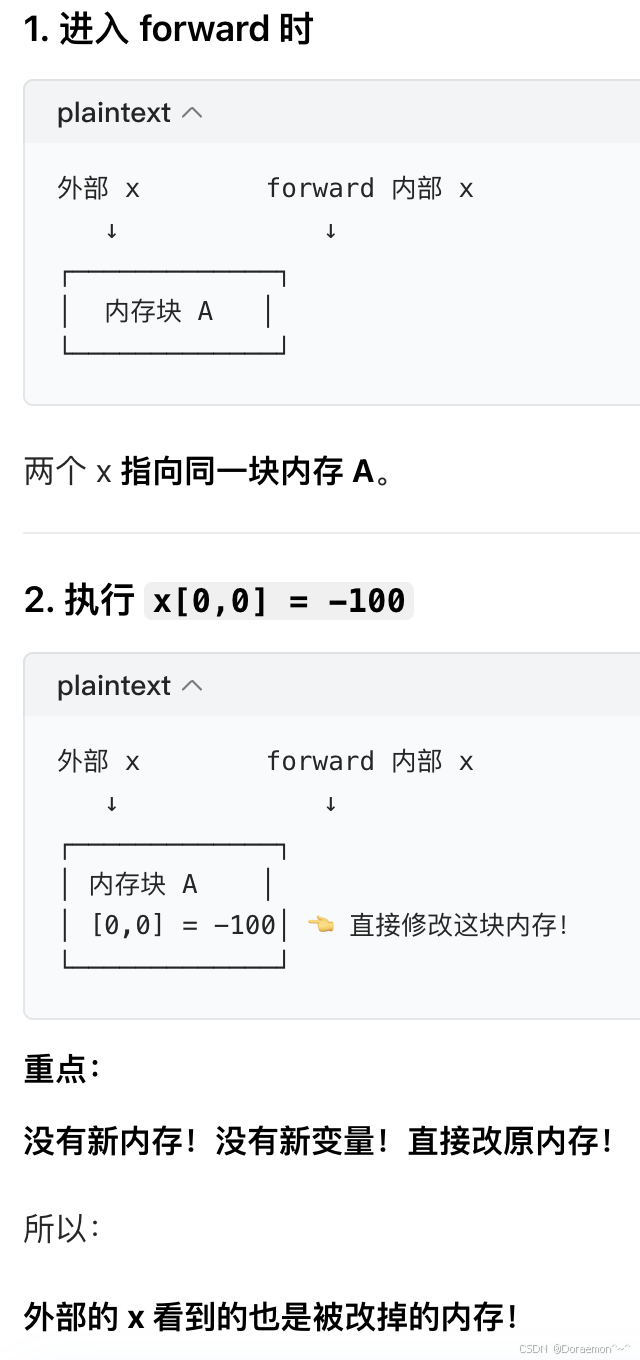
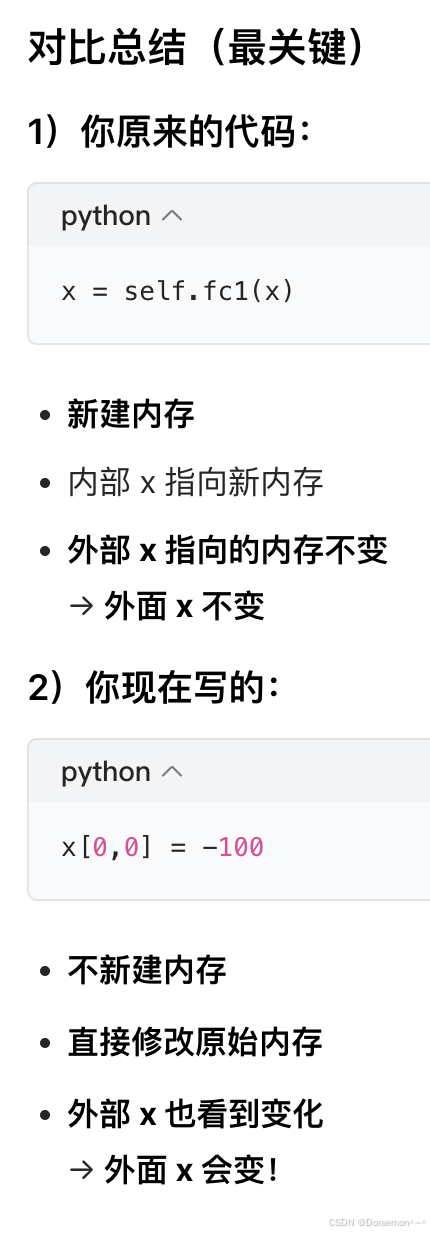
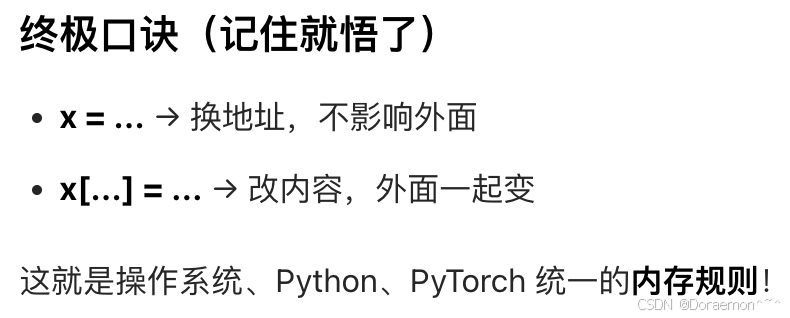
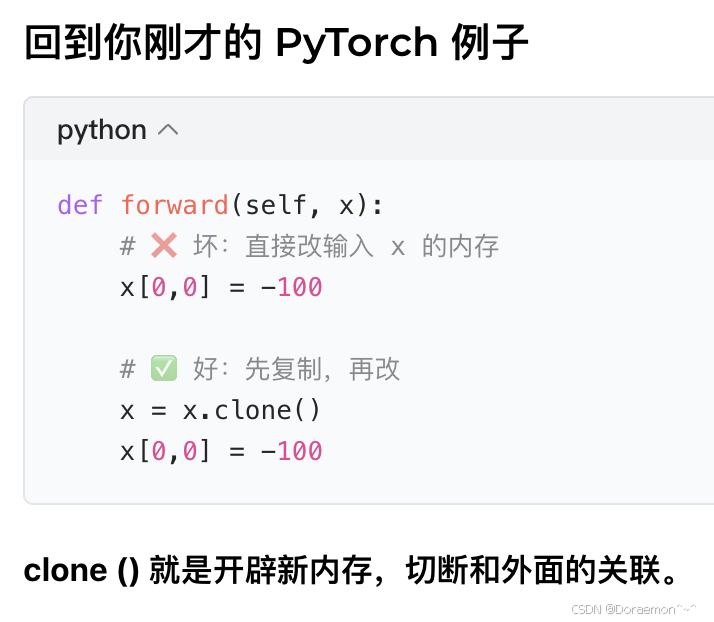
pythonimport torch import torch.nn as nn class SimpleModel(nn.Module): def __init__(self): super().__init__() self.fc1 = nn.Linear(3, 5) self.relu1 = nn.ReLU() self.fc2 = nn.Linear(5, 1) def forward(self, x): # 这里的x是【副本】,不是外面那个x # x 是一个tensor,不要在函数里该输入tensor(或者array、list、dict)的元素内容 print("here is forward.") x = self.fc1(x) # 改的是内部x,这种是做对象的赋值,不是改元素内容 x = self.relu1(x) x = self.fc2(x) return x # 计算结果返回给了 preds if __name__ == '__main__': model = SimpleModel() x = torch.randn(2, 3) # 创建了一个【原始输入x】 print(x) # 打印原始x preds = model(x) # 会自动调用forward,把x传给模型 → forward执行了! print(x) # 又打印了【最开始那个原始x】 print(preds) # 这才是 forward 计算后的结果forward 内部根本没有修改外面那个张量原本的内存,只新建了内存、改了局部变量。
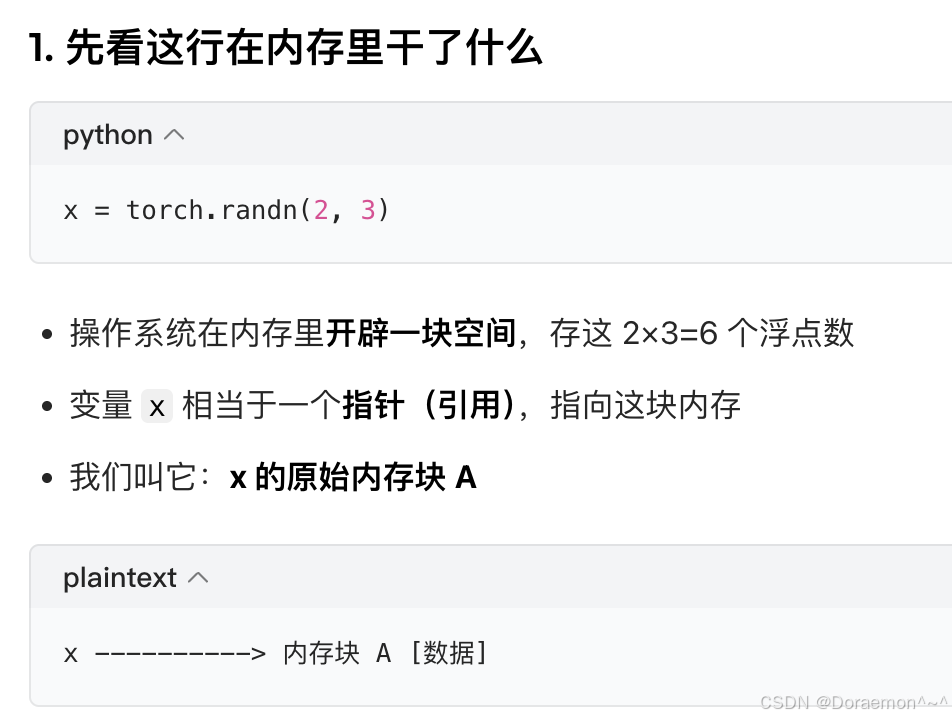
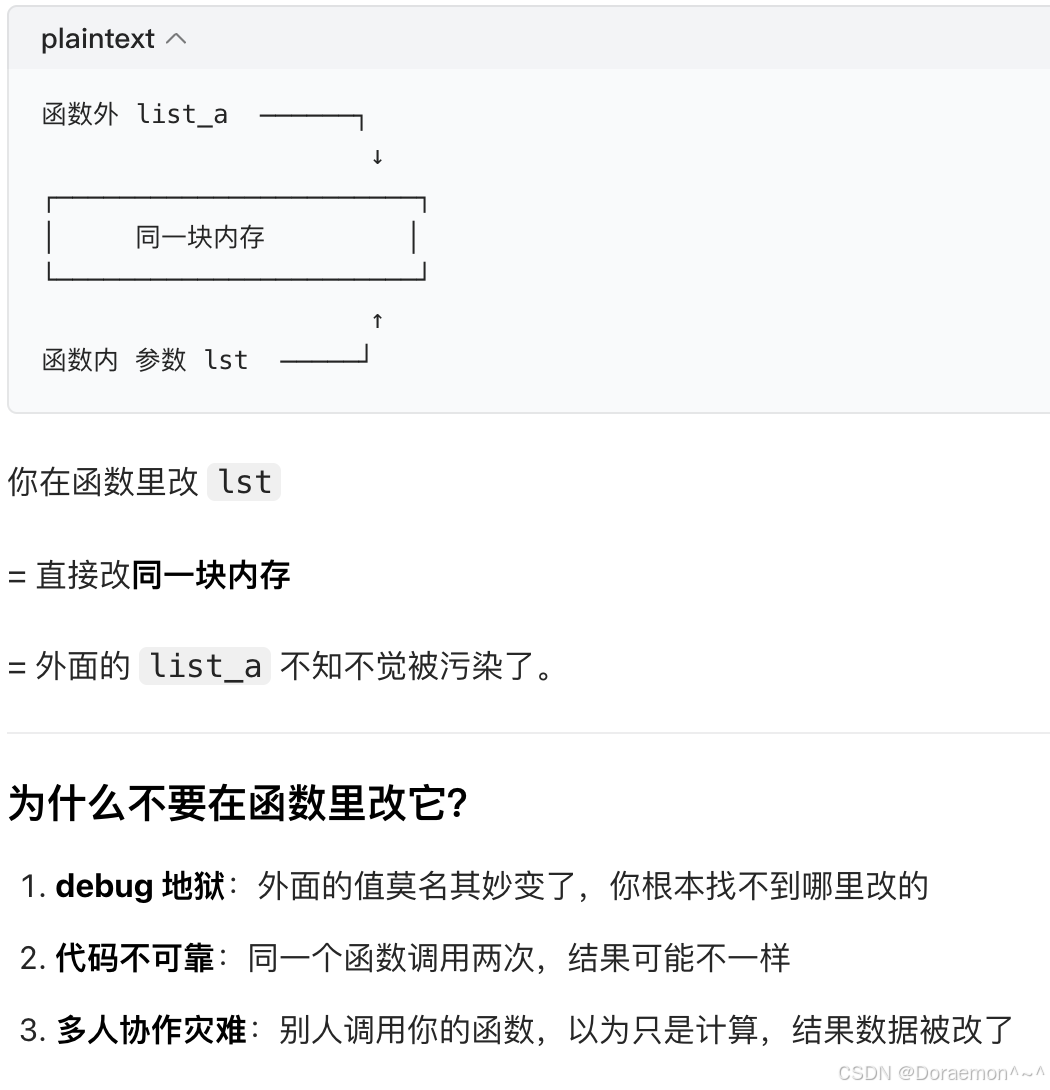
💡工程规范级别的正确认知/编程顶级好习惯:函数的input如果是一个复杂类型,不要在函数里改变它的内容。
复杂类型(list、dict、tensor、numpy array)传参时,传的是「内存地址引用」,在函数里改它,外面的变量会一起变,这叫隐形副作用(side effect)。
- x00:Python 列表写法,PyTorch 也兼容
- x0,0:PyTorch / NumPy 简洁写法(推荐)
- 功能 100% 相同,都原地改数据,都影响外部变量
- 简单类型(int、str、float)传的是值,随便改。
- 复杂类型(list、dict、array、tensor)传的是地址,千万别直接改。


4.1.1.主要的属性
a、training(bool):
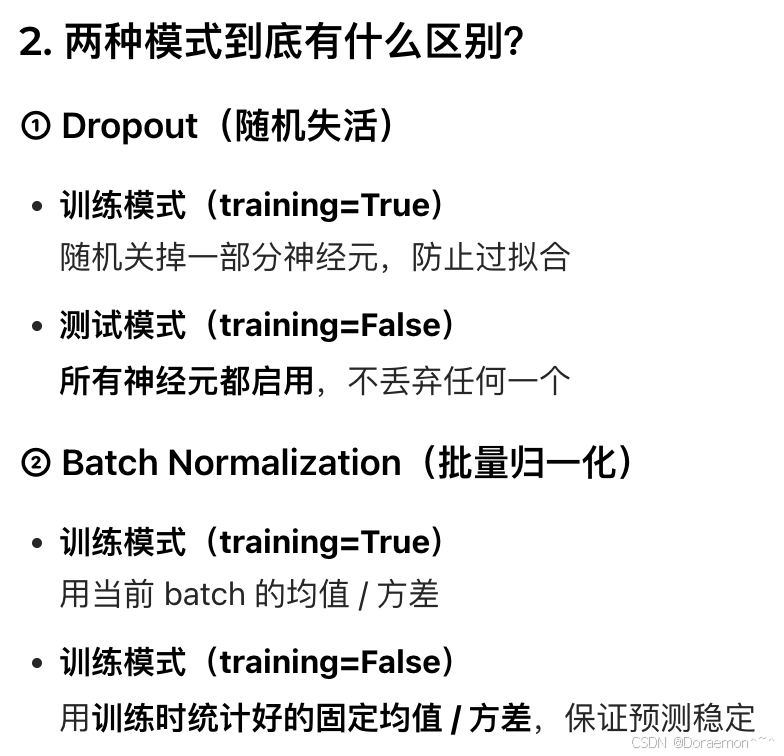
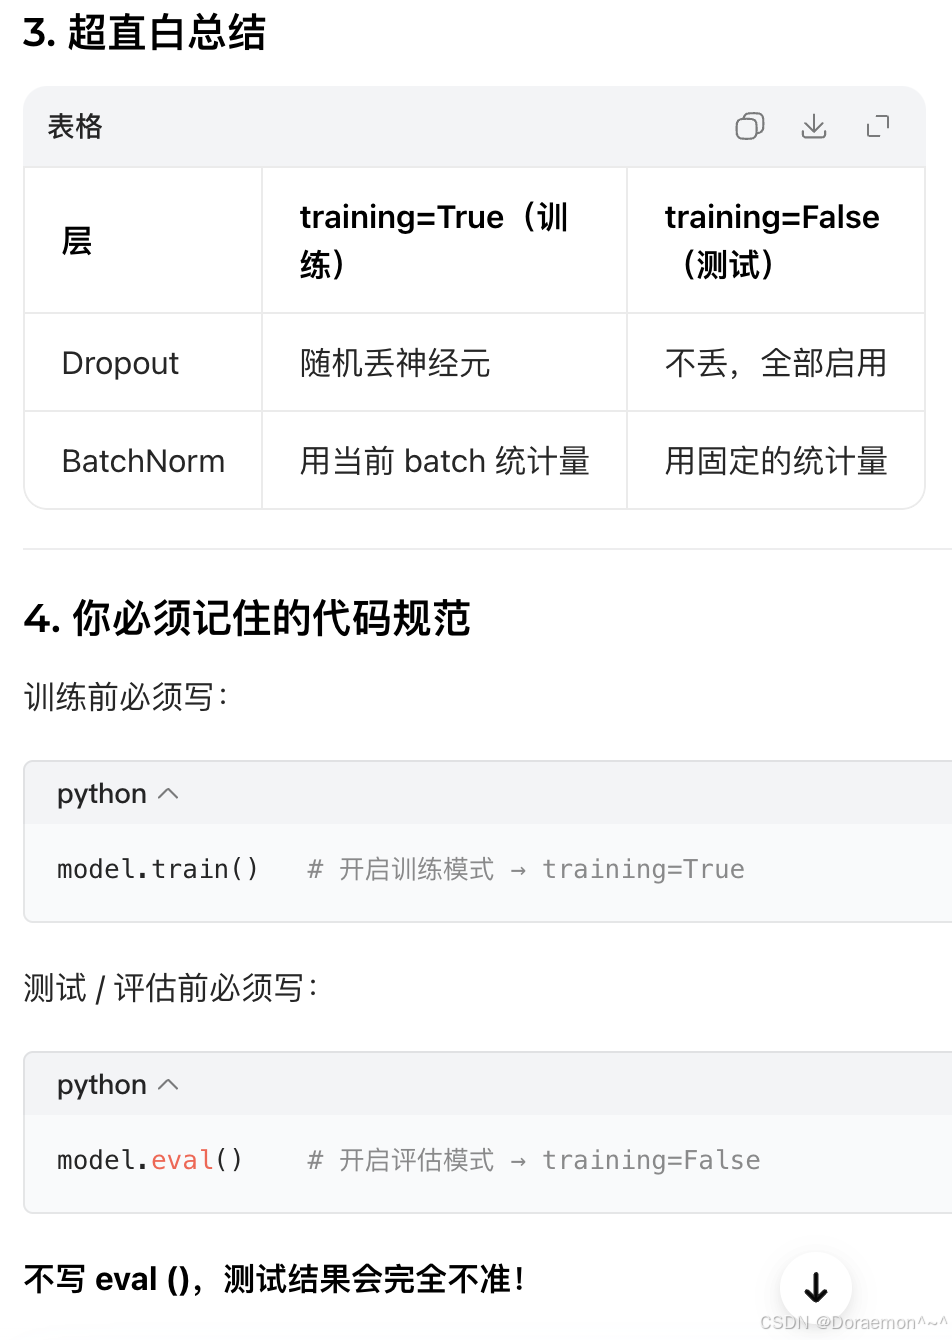
模型处于训练 或评测 模式。对于有的神经网络结构(比如Dropout、BatchNorm这两层),在训练 和**推理(测试/评估)**阶段的行为不同,需要加以区分。
训练 train:training=True → 更新参数
**推理 inference:**training=False → 模型跑前向,只输出结果(部署上线、实际使用)
**测试 / 评估 test/eval:**training=False → 推理 + 打分(算指标,看模型准不准)
training = True / False 决定了网络是 "训练模式" 还是 "测试模式"。

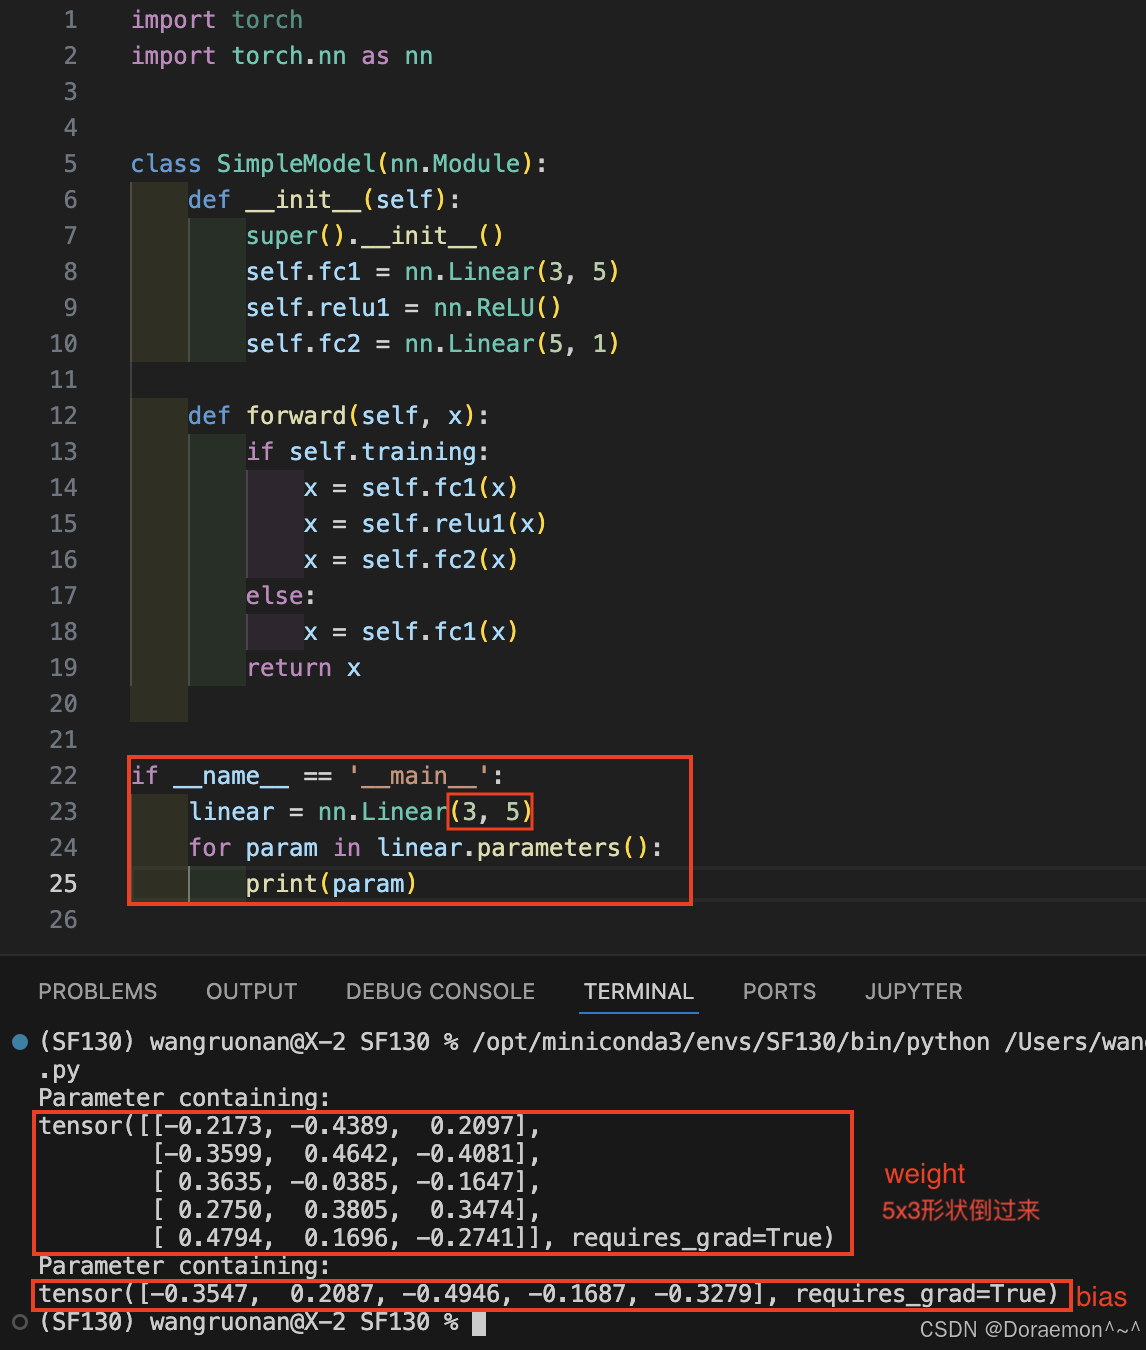
b、parameters():
模型参数的迭代器(一个模型所有的参数都会被放到parameters()这个迭代器里)。
python
for param in model.parameters():
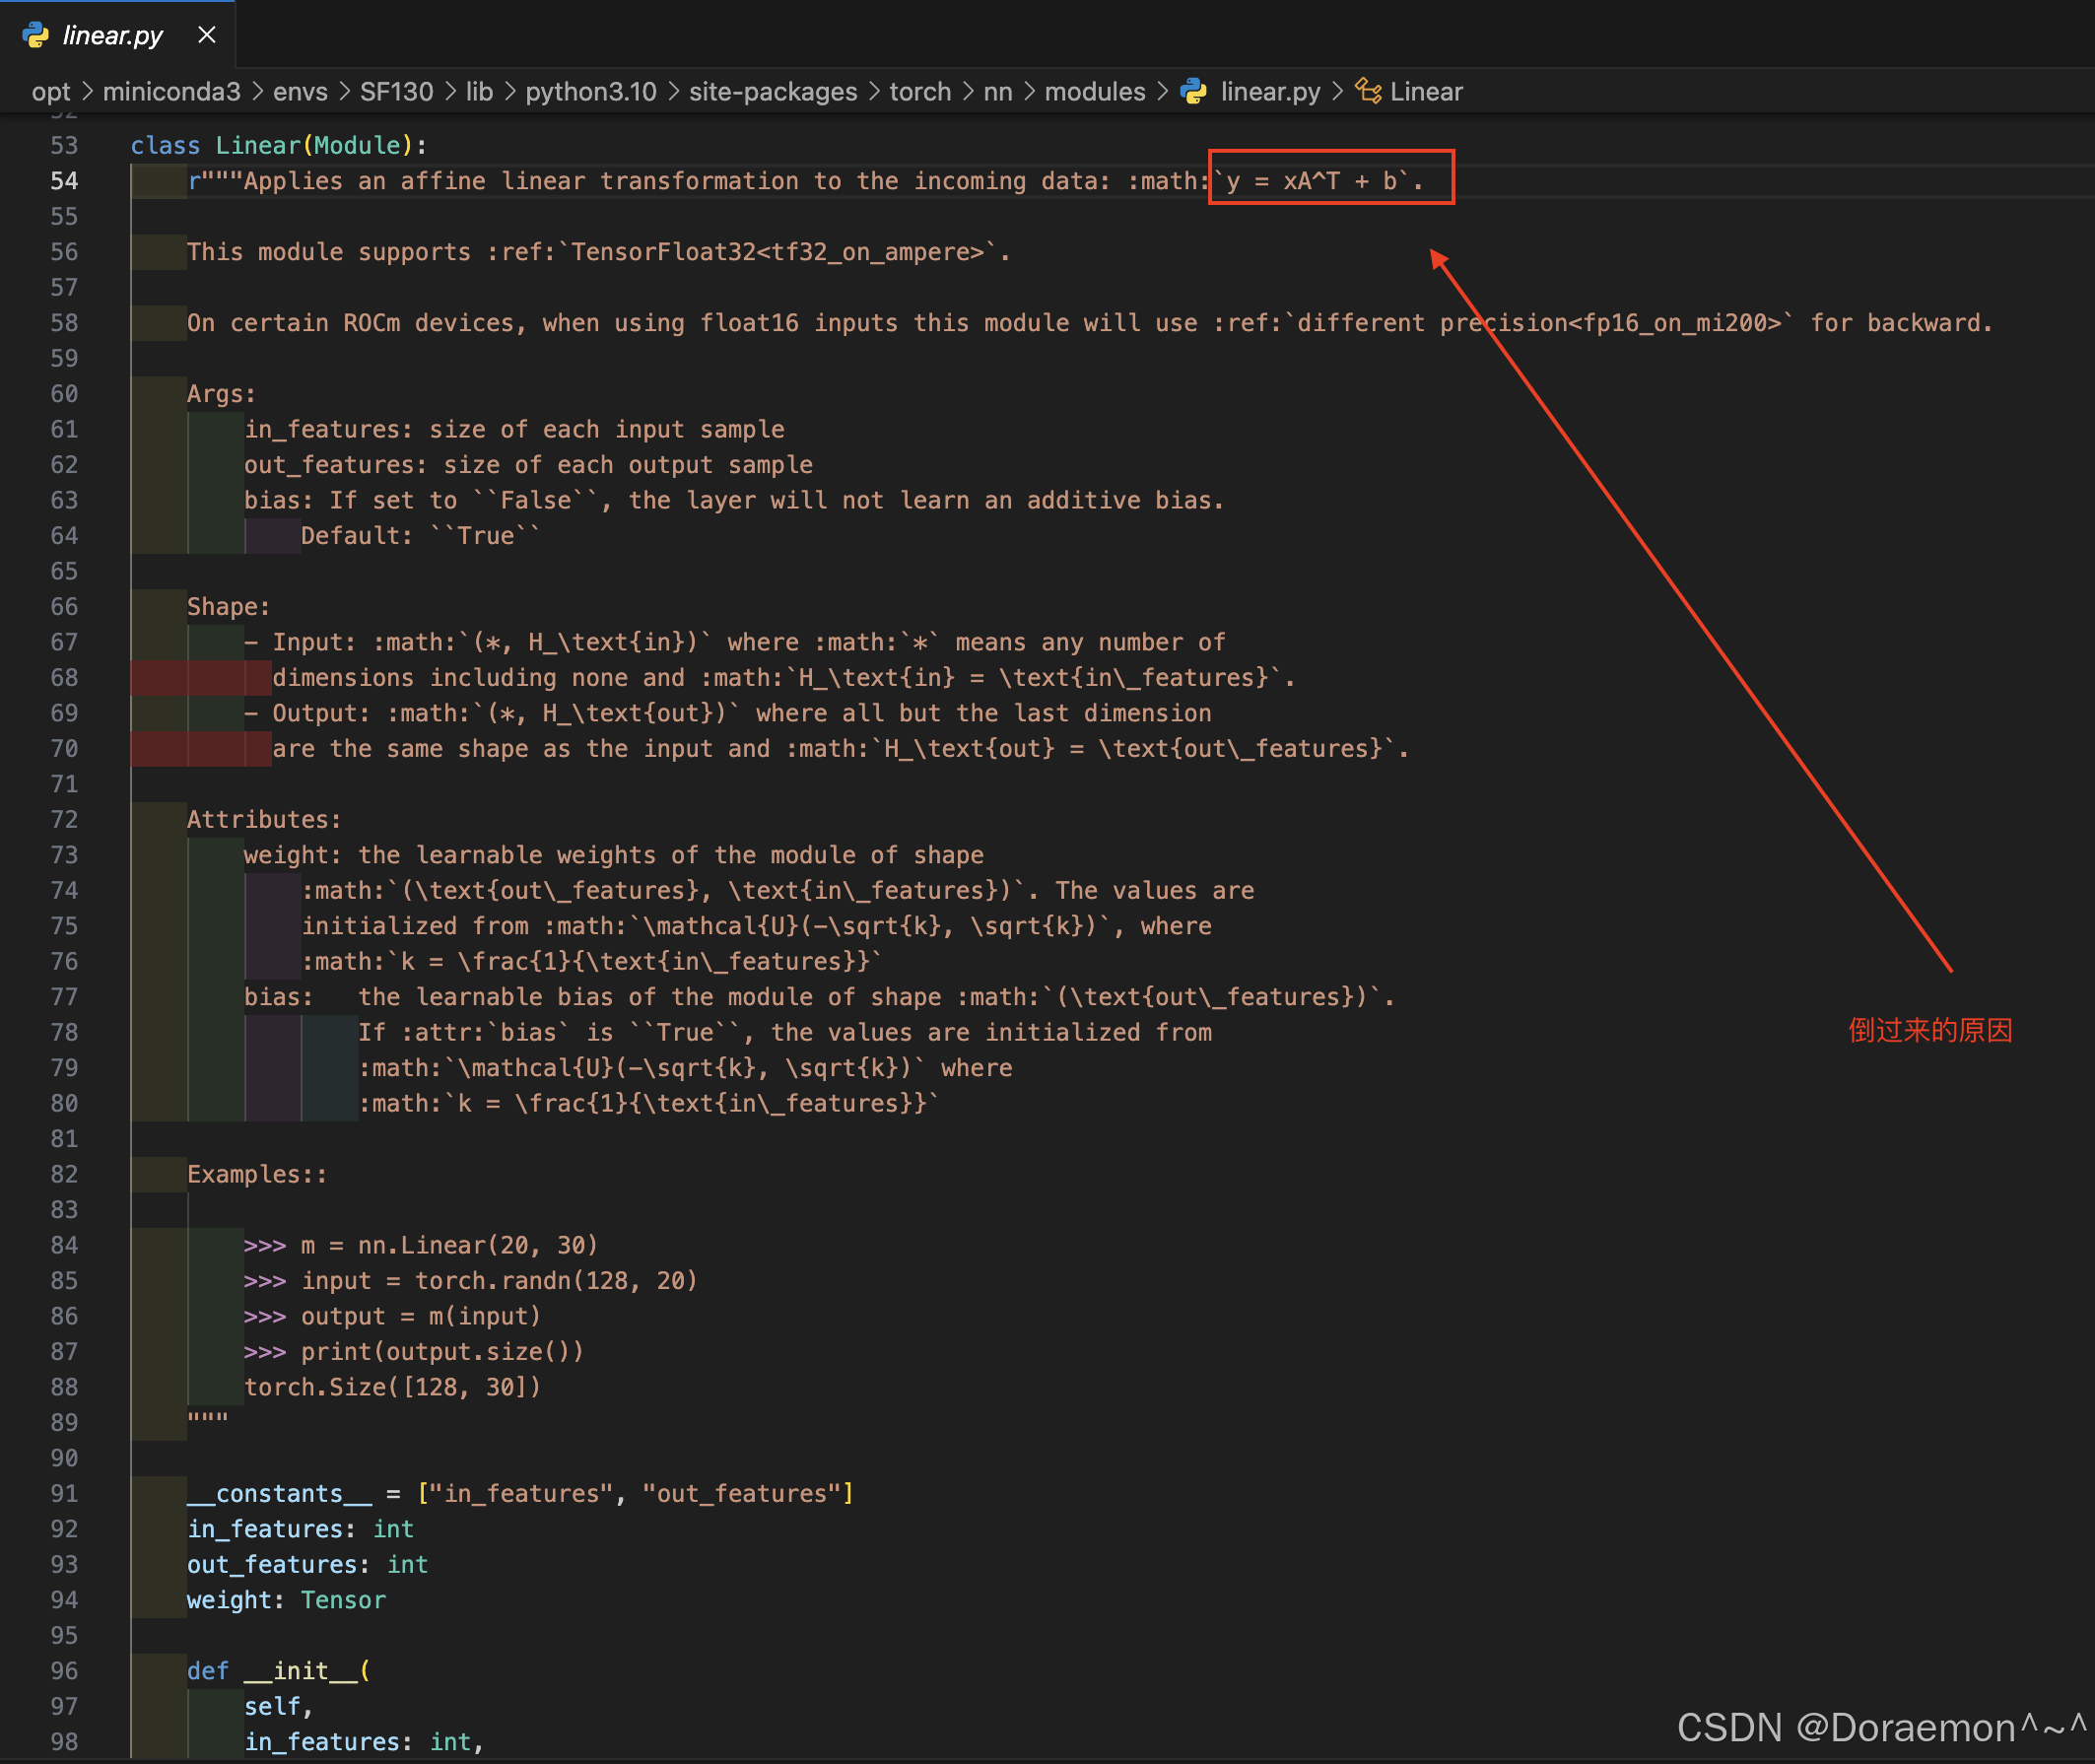
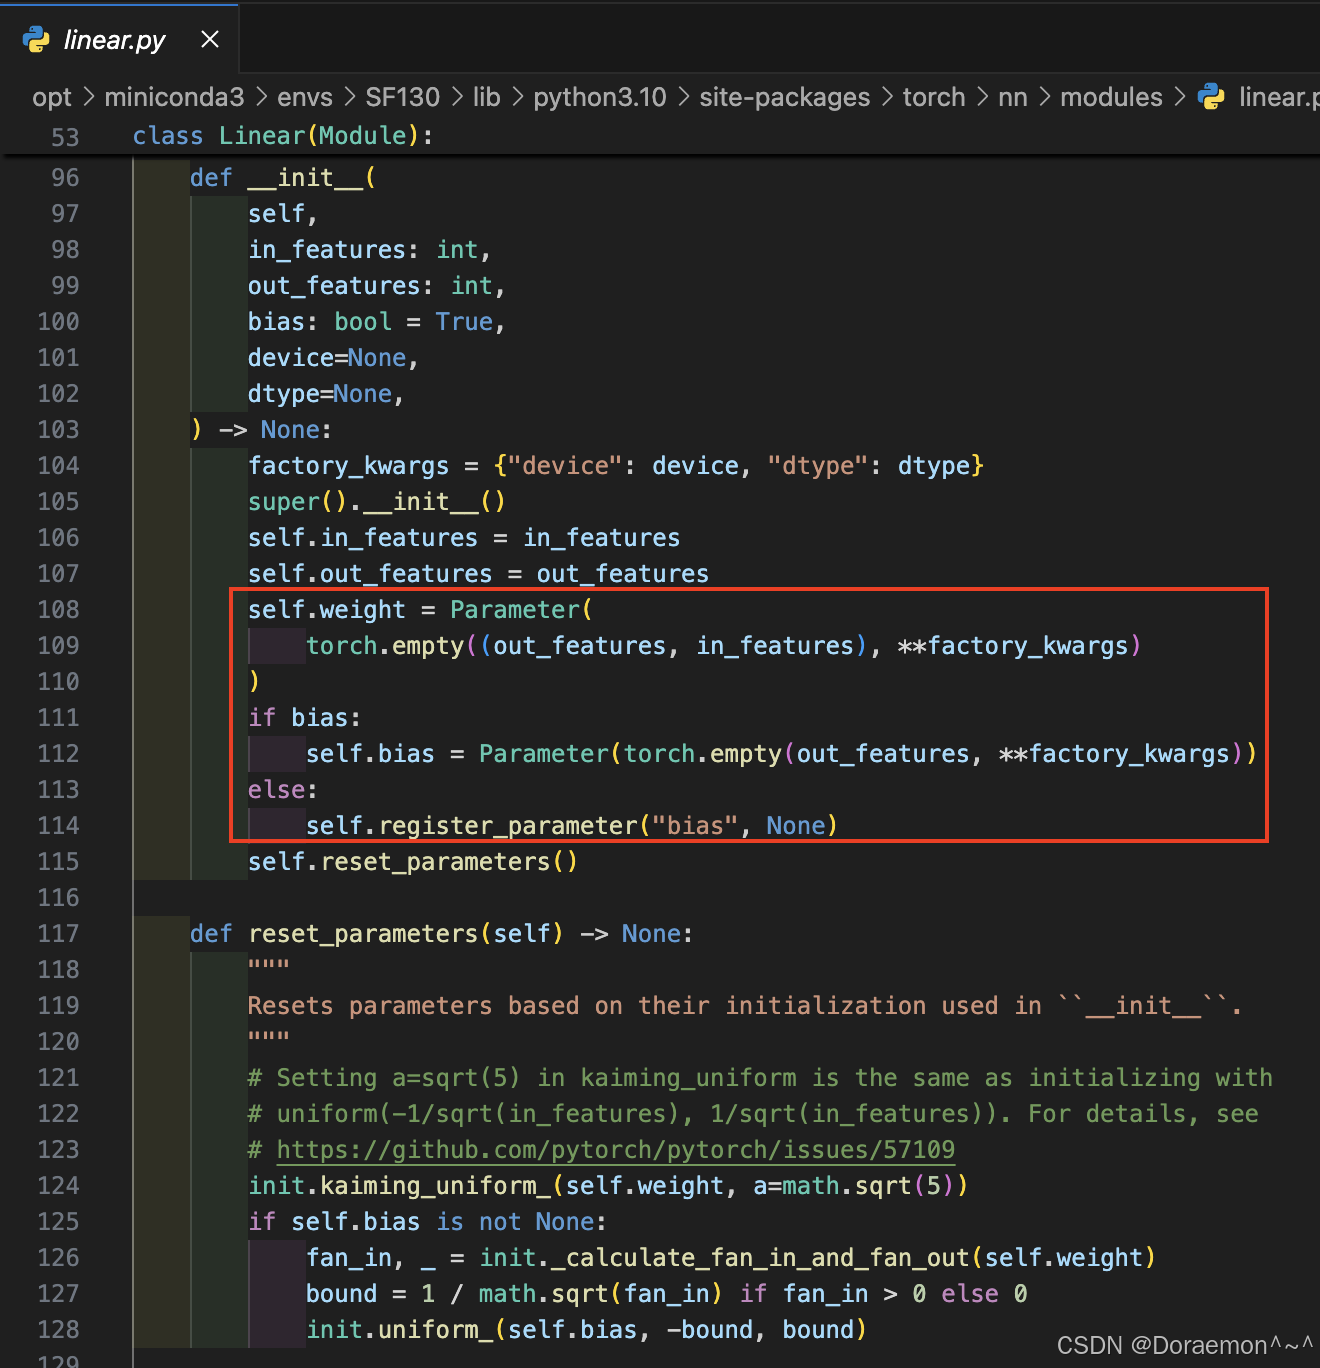
print(param)所有类型为Parameter (Tensor的子类,required_grad自动打开) 的成员变量都会被自动加入到 parameters()中。
源码:
c、named_parameters():
带名称的模型参数迭代器,参数的名称取决于Parameter类型的变量名。
python
for name, param in model.named_parameters():
    if "weight" in name:
        print(name, param.size())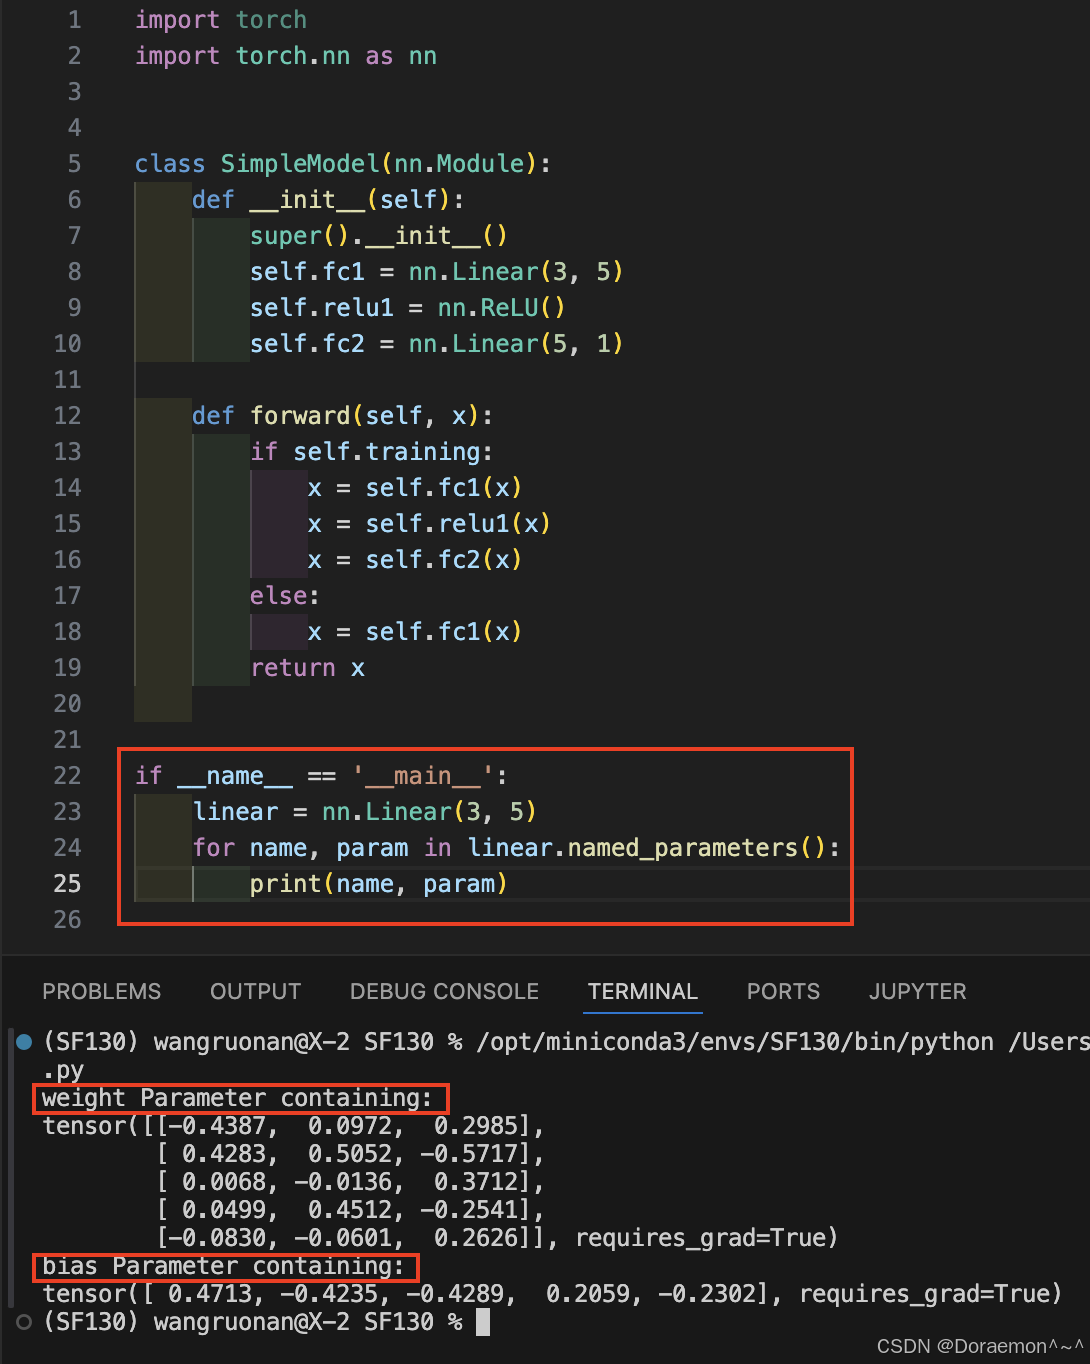
4.1.2.子类必须要实现的方法
a、init():
初始化函数,必须要先调用基类的初始化函数。
b、forward():
网络的正向传播逻辑 (由于自动微分功能,反向传播是自动进行的,无需关注)。
登录github授权使用自动预测生成代码功能。

4.1.3.其他常用的方法
a、train() :
将模型设置为训练模型。
b、eval() :
将模型设置为评估模式。
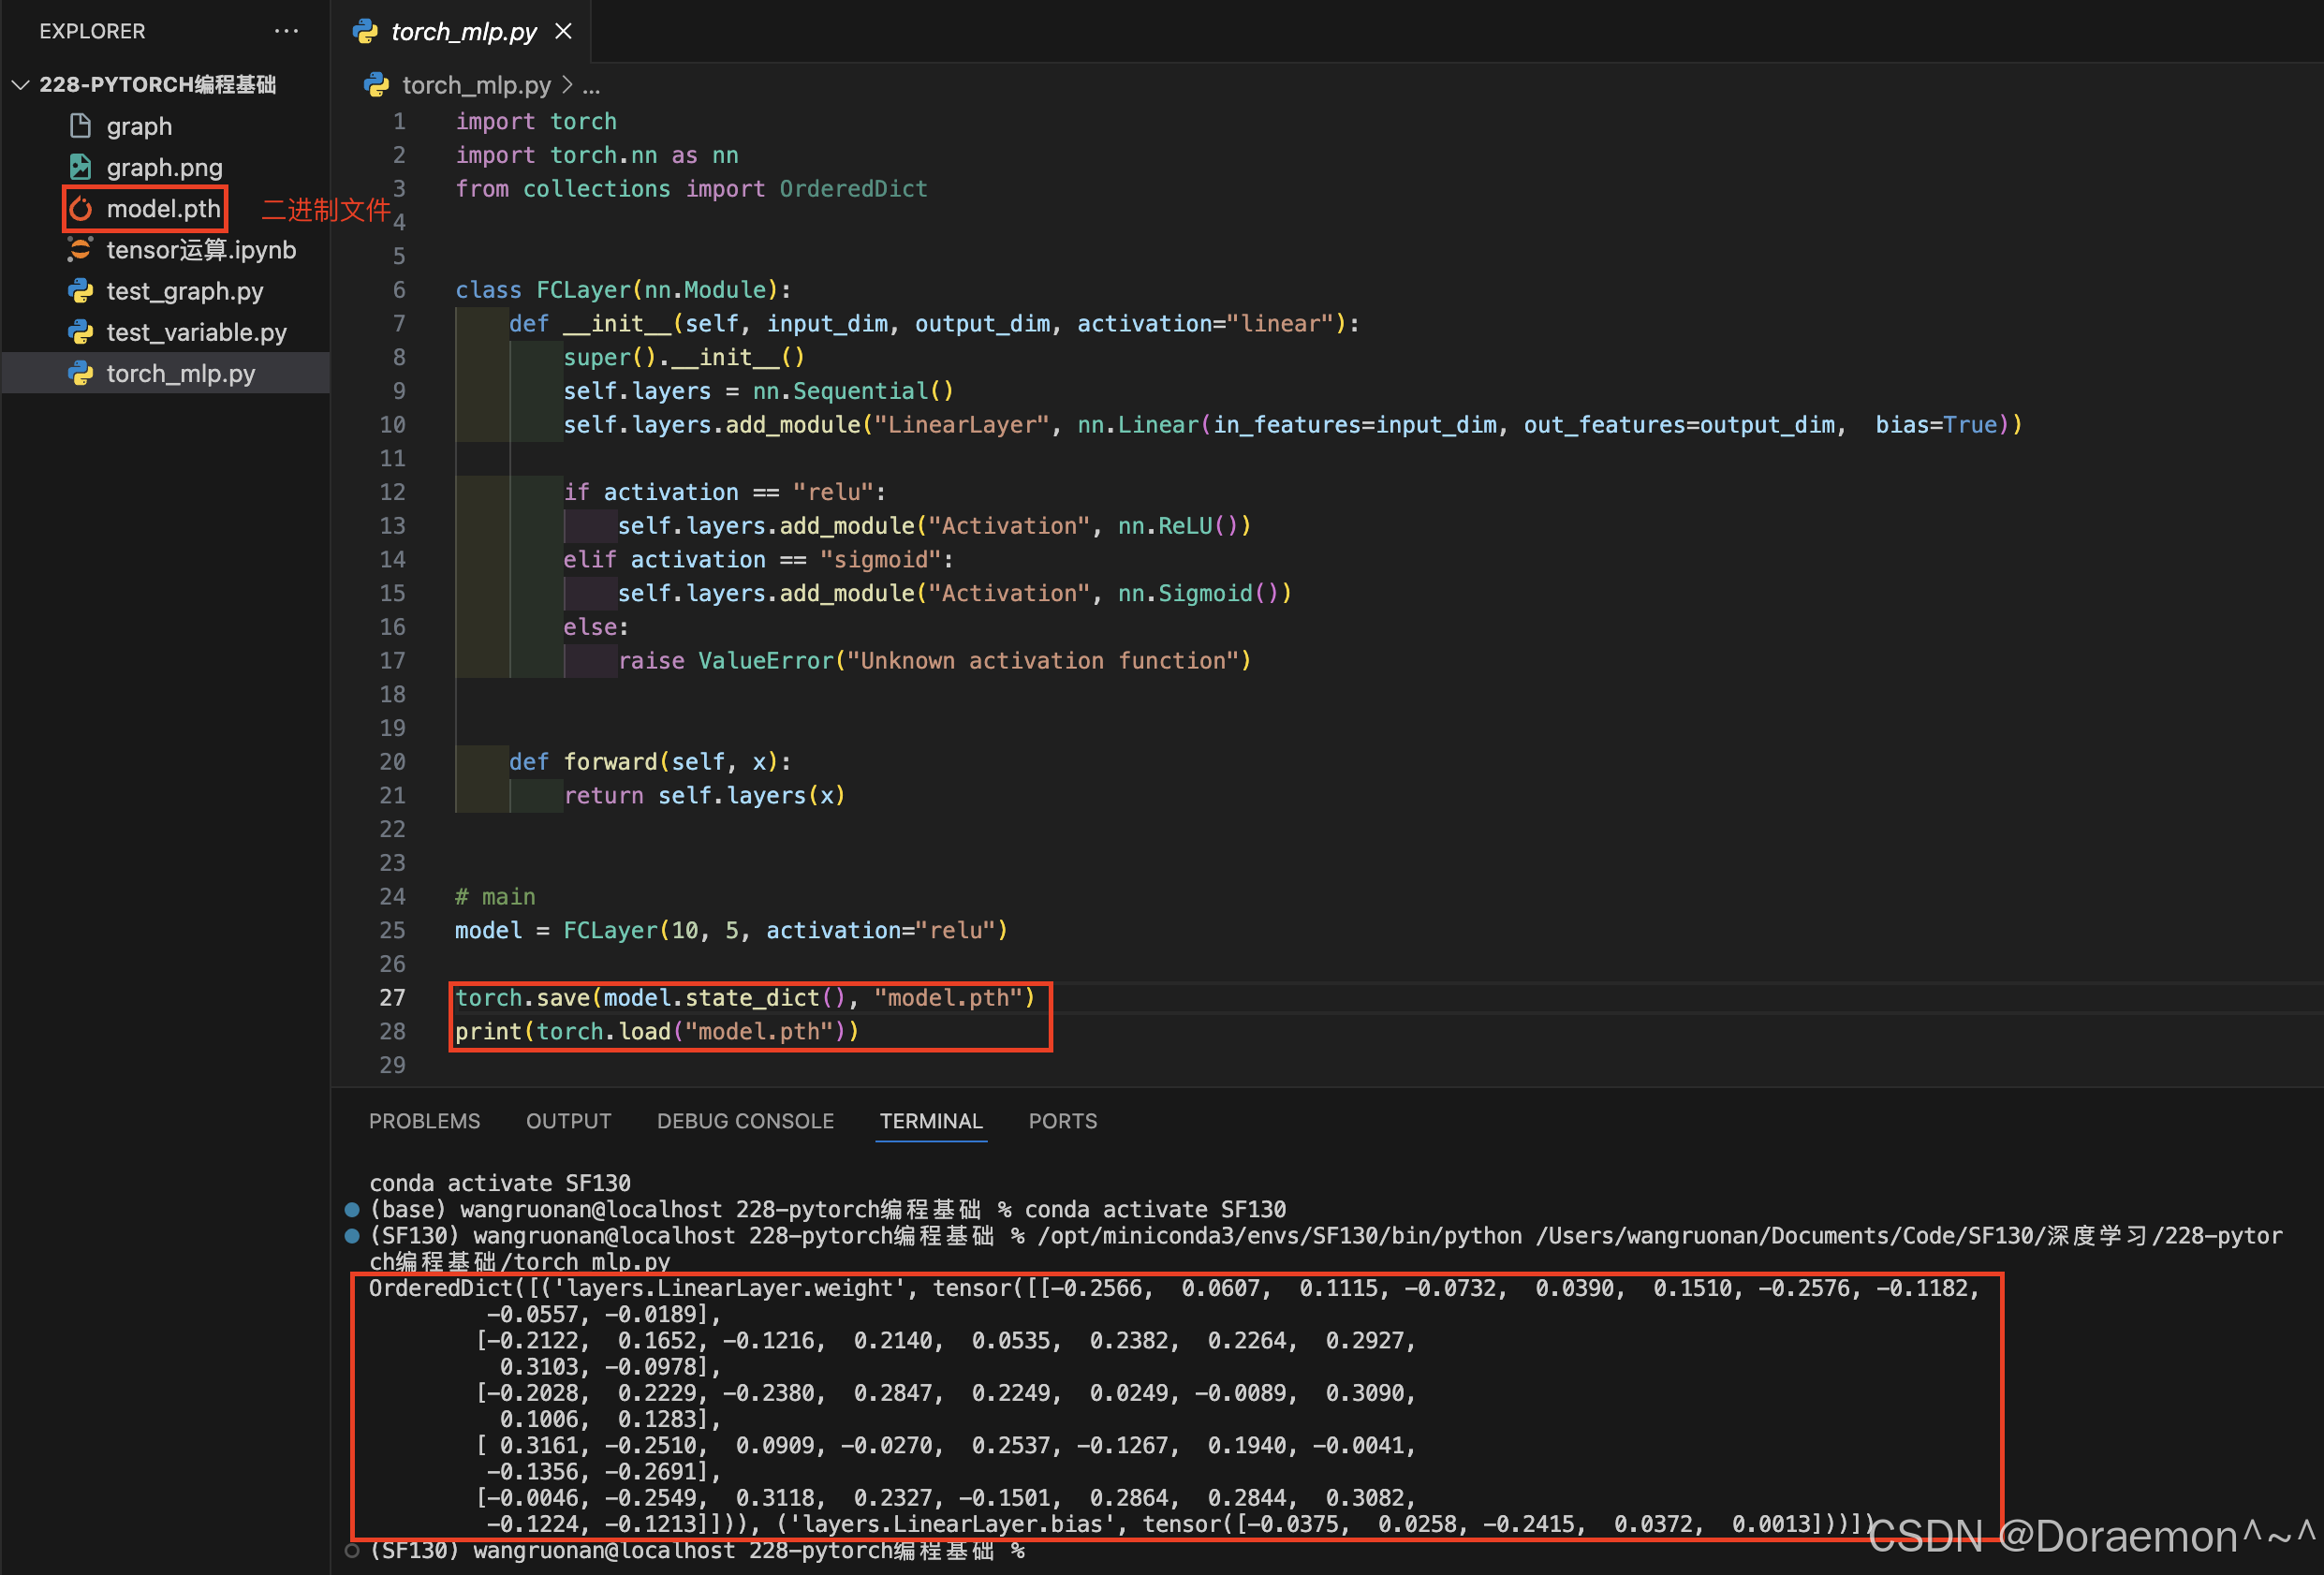
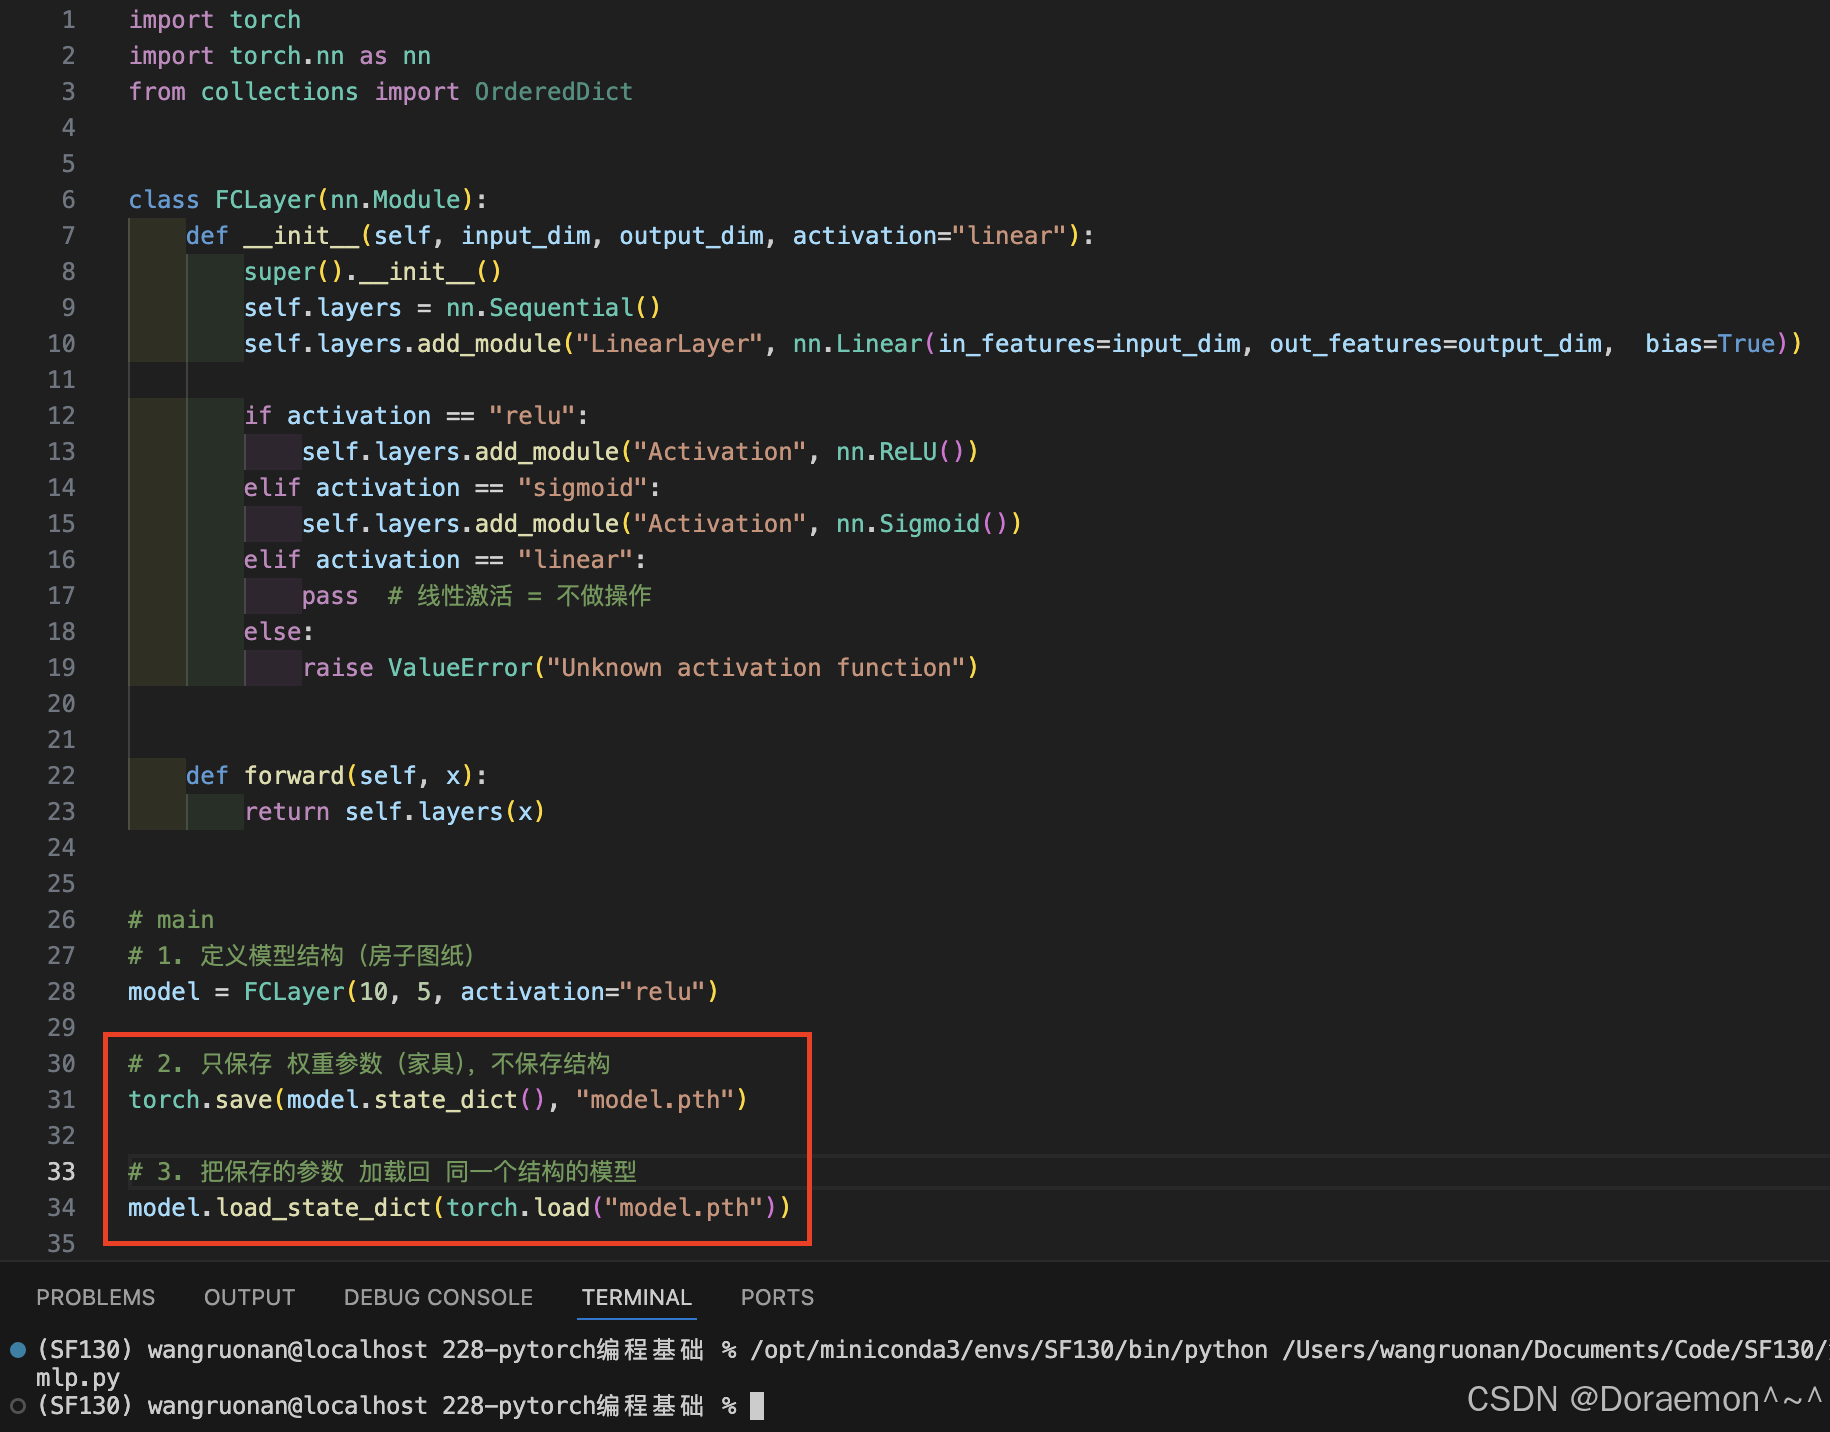
c、state_dict() :
返回模型的参数词典。
d、load_state_dict():
加载模型参数。
state_dict()= 纯参数 K-V 字典- 不包含任何网络拓扑结构
- 加载必须依赖相同结构的模型类代码
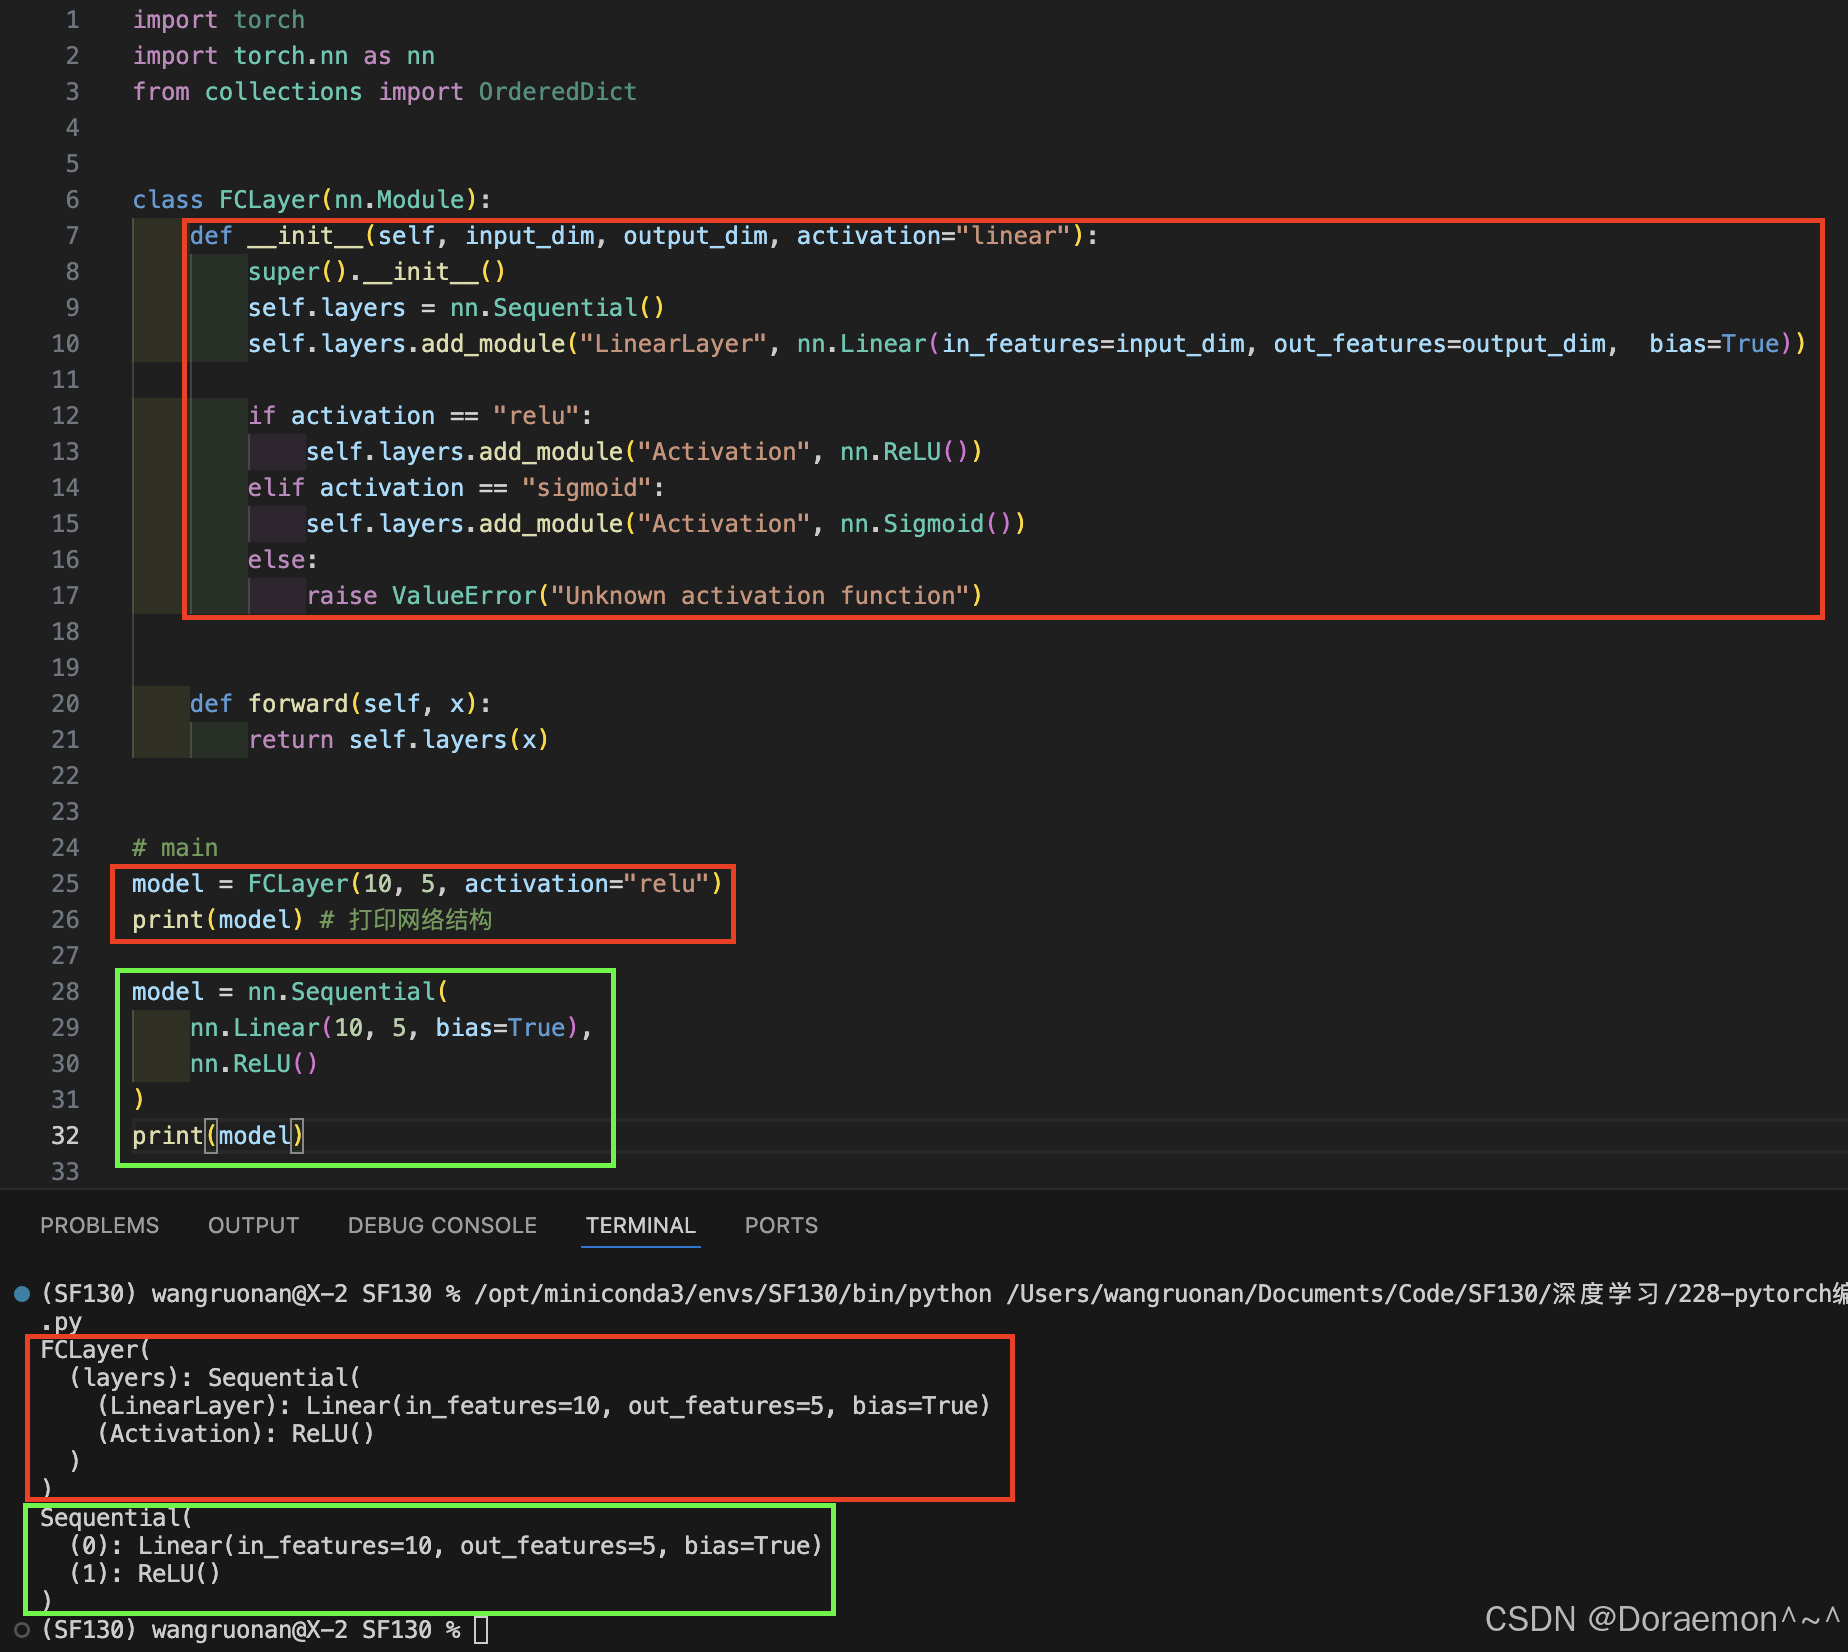
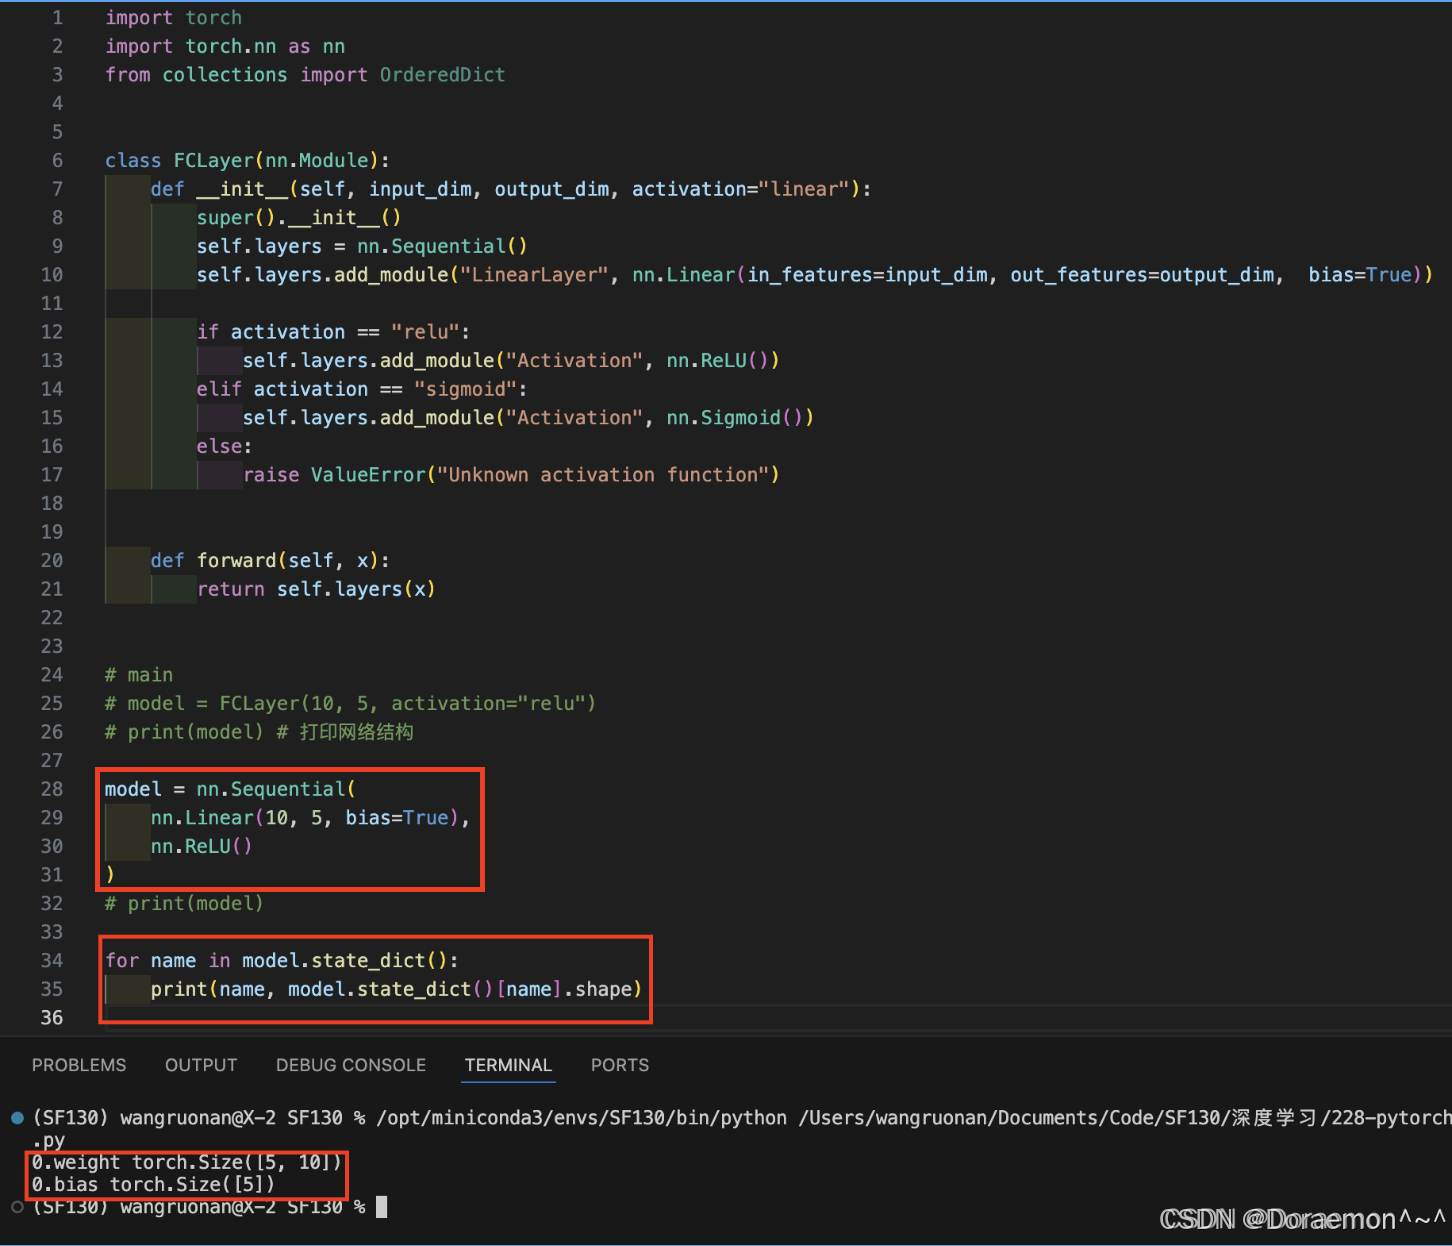
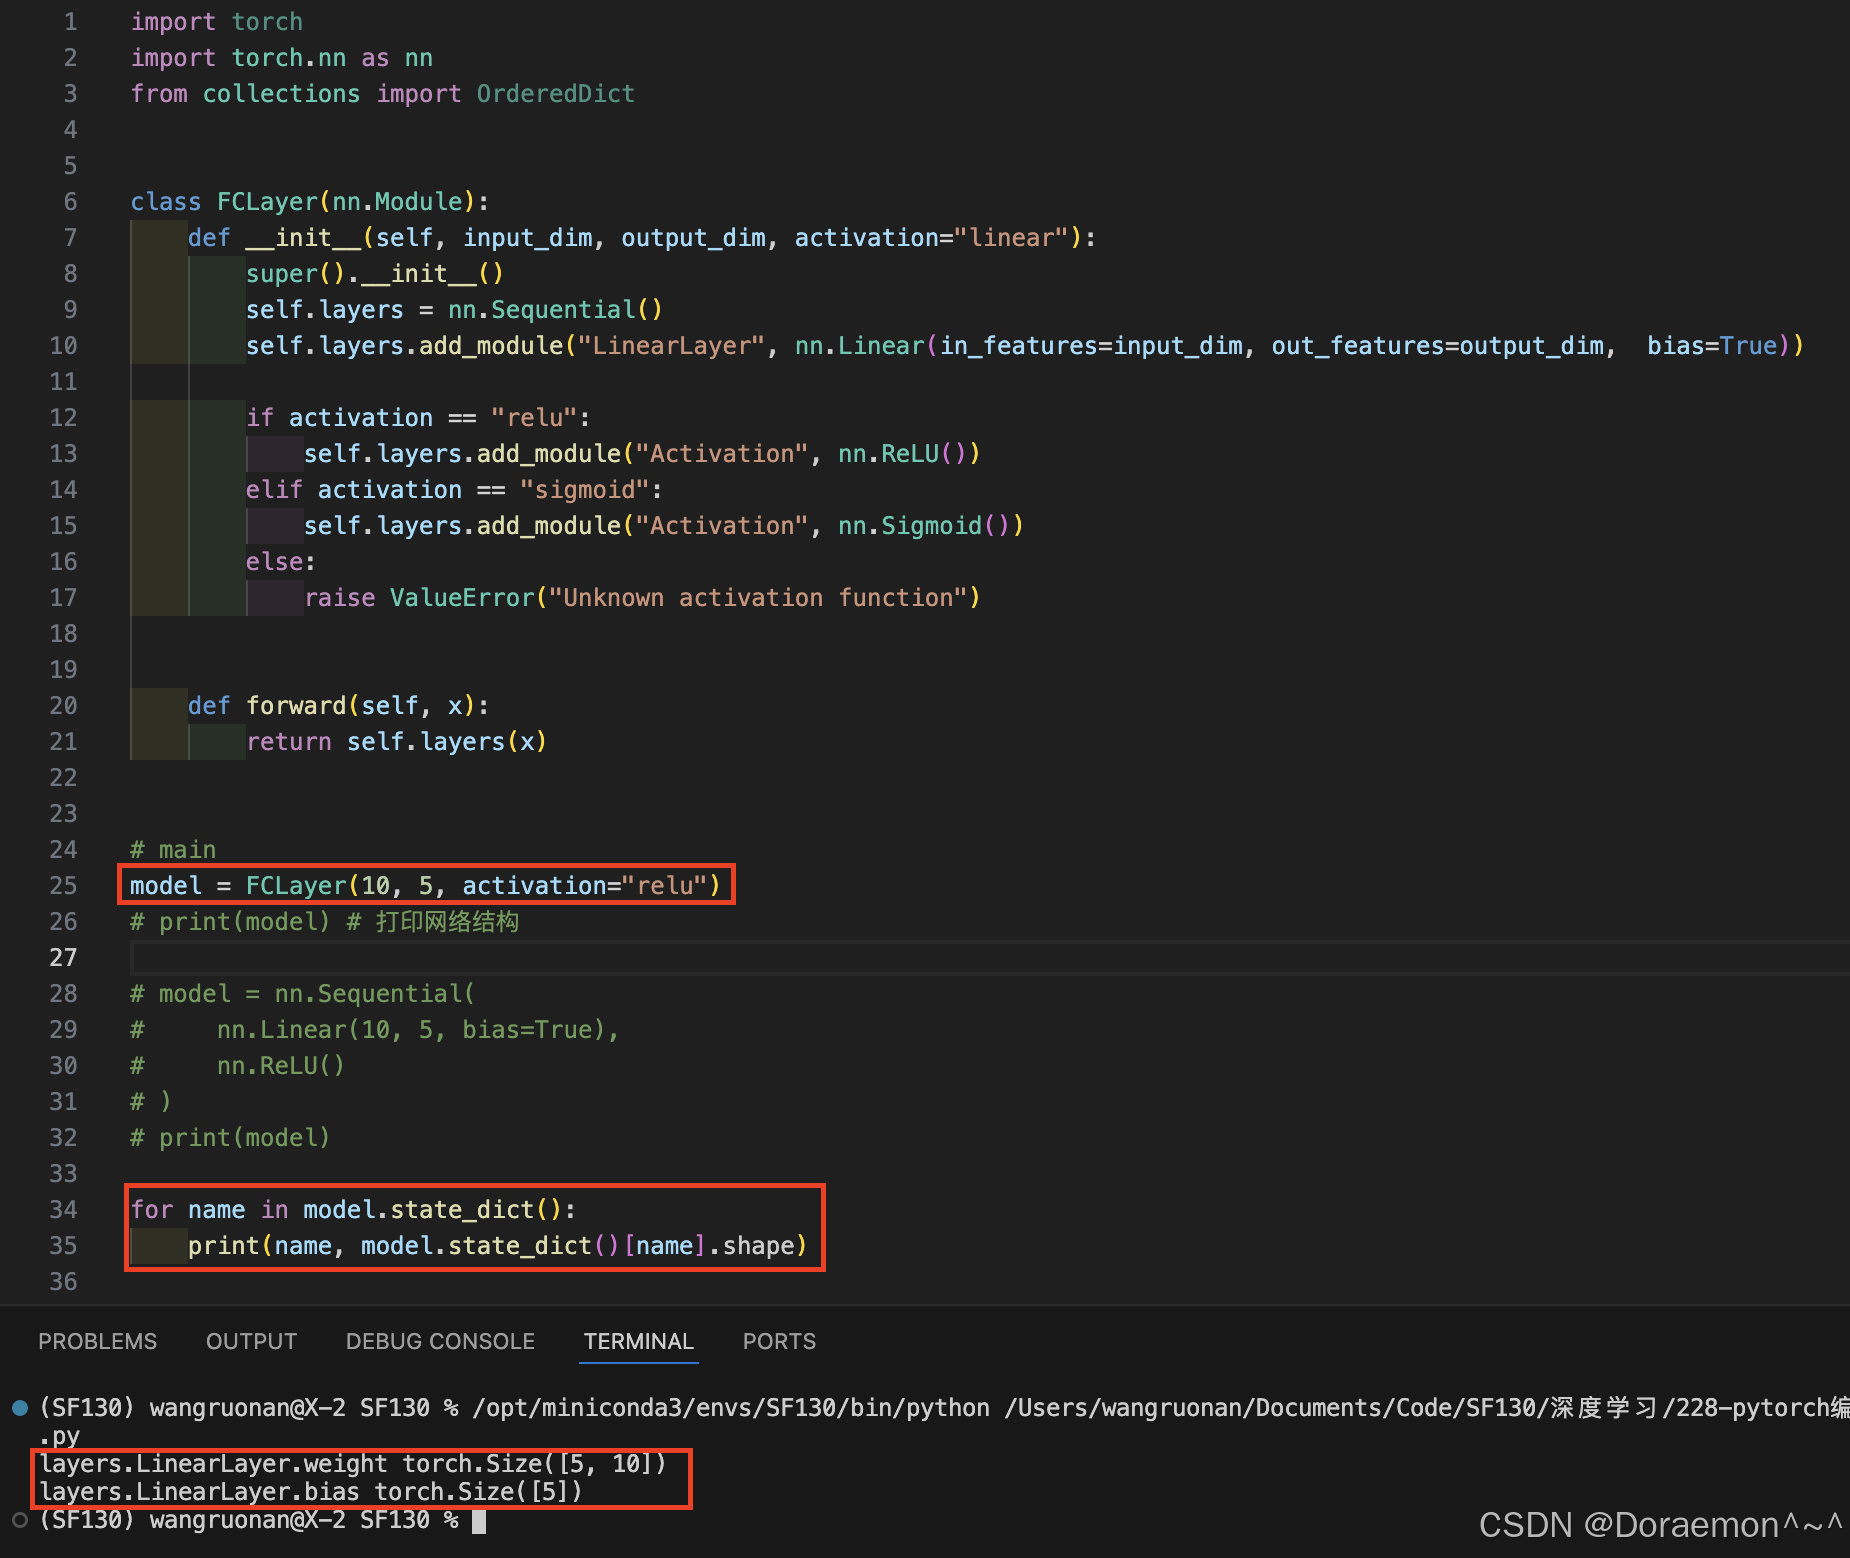
python# 导入PyTorch核心库 import torch # 导入PyTorch神经网络模块 import torch.nn as nn # 导入有序字典(保证参数顺序不变) from collections import OrderedDict # 定义一个全连接层类,继承自nn.Module(所有PyTorch模型的基类) class FCLayer(nn.Module): # 初始化函数:输入维度、输出维度、激活函数类型 def __init__(self, input_dim, output_dim, activation="linear"): # 调用父类nn.Module的初始化方法 super().__init__() # 创建一个有序的层容器,用于按顺序存放网络层 self.layers = nn.Sequential() # 向容器中添加一个线性层(全连接层) # 层名:LinearLayer,输入维度input_dim,输出维度output_dim,开启偏置项 self.layers.add_module( "LinearLayer", nn.Linear(in_features=input_dim, out_features=output_dim, bias=True) ) # 根据传入的激活函数名称,添加对应的激活层 if activation == "relu": # 添加ReLU激活函数 self.layers.add_module("Activation", nn.ReLU()) elif activation == "sigmoid": # 添加Sigmoid激活函数 self.layers.add_module("Activation", nn.Sigmoid()) elif activation == "linear": # 线性激活=不做任何操作,直接跳过 pass else: # 传入不支持的激活函数时,抛出异常 raise ValueError("Unknown activation function") # 前向传播函数:定义数据在网络中的流动路径 def forward(self, x): # 将输入x传入层容器,依次经过线性层+激活层,返回输出结果 return self.layers(x) # ==================== 主程序入口 ==================== if __name__ == "__main__": # 1. 创建第一个模型实例:输入10维,输出5维,激活函数用ReLU model = FCLayer(10, 5, activation="relu") # 2. 创建空的有序字典,用于存储模型最优参数 best_model_state_dict = OrderedDict() # 3. 遍历model的所有参数(权重、偏置) for name in model.state_dict(): # 对每个参数进行深拷贝,存入有序字典 # .clone() 保证新参数独立,不与原模型共享内存 best_model_state_dict[name] = model.state_dict()[name].clone() # 4. 创建第二个模型,结构必须和第一个完全一致 model2 = FCLayer(10, 5, activation="relu") # 5. 将拷贝好的参数加载到第二个模型中 # 注意:只加载参数,网络结构由FCLayer类提供 model2.load_state_dict(best_model_state_dict)
state_dict()只存参数 K-V 对,不存网络结构- 模型结构来自
class FCLayer,不是来自保存的文件.clone()深拷贝 = 两个模型参数完全独立,互不影响load_state_dict必须保证模型结构一模一样才能正常加载
e、to() :
将模型导入到对应的设备。
python
device = "cuda" if torch.cuda.is_available() else "cpu"
model.to(device)
4.2.一些内置的网络结构
4.2.1.nn.Linear():

4.2.2.非线性层:
a、nn.Sigmoid:

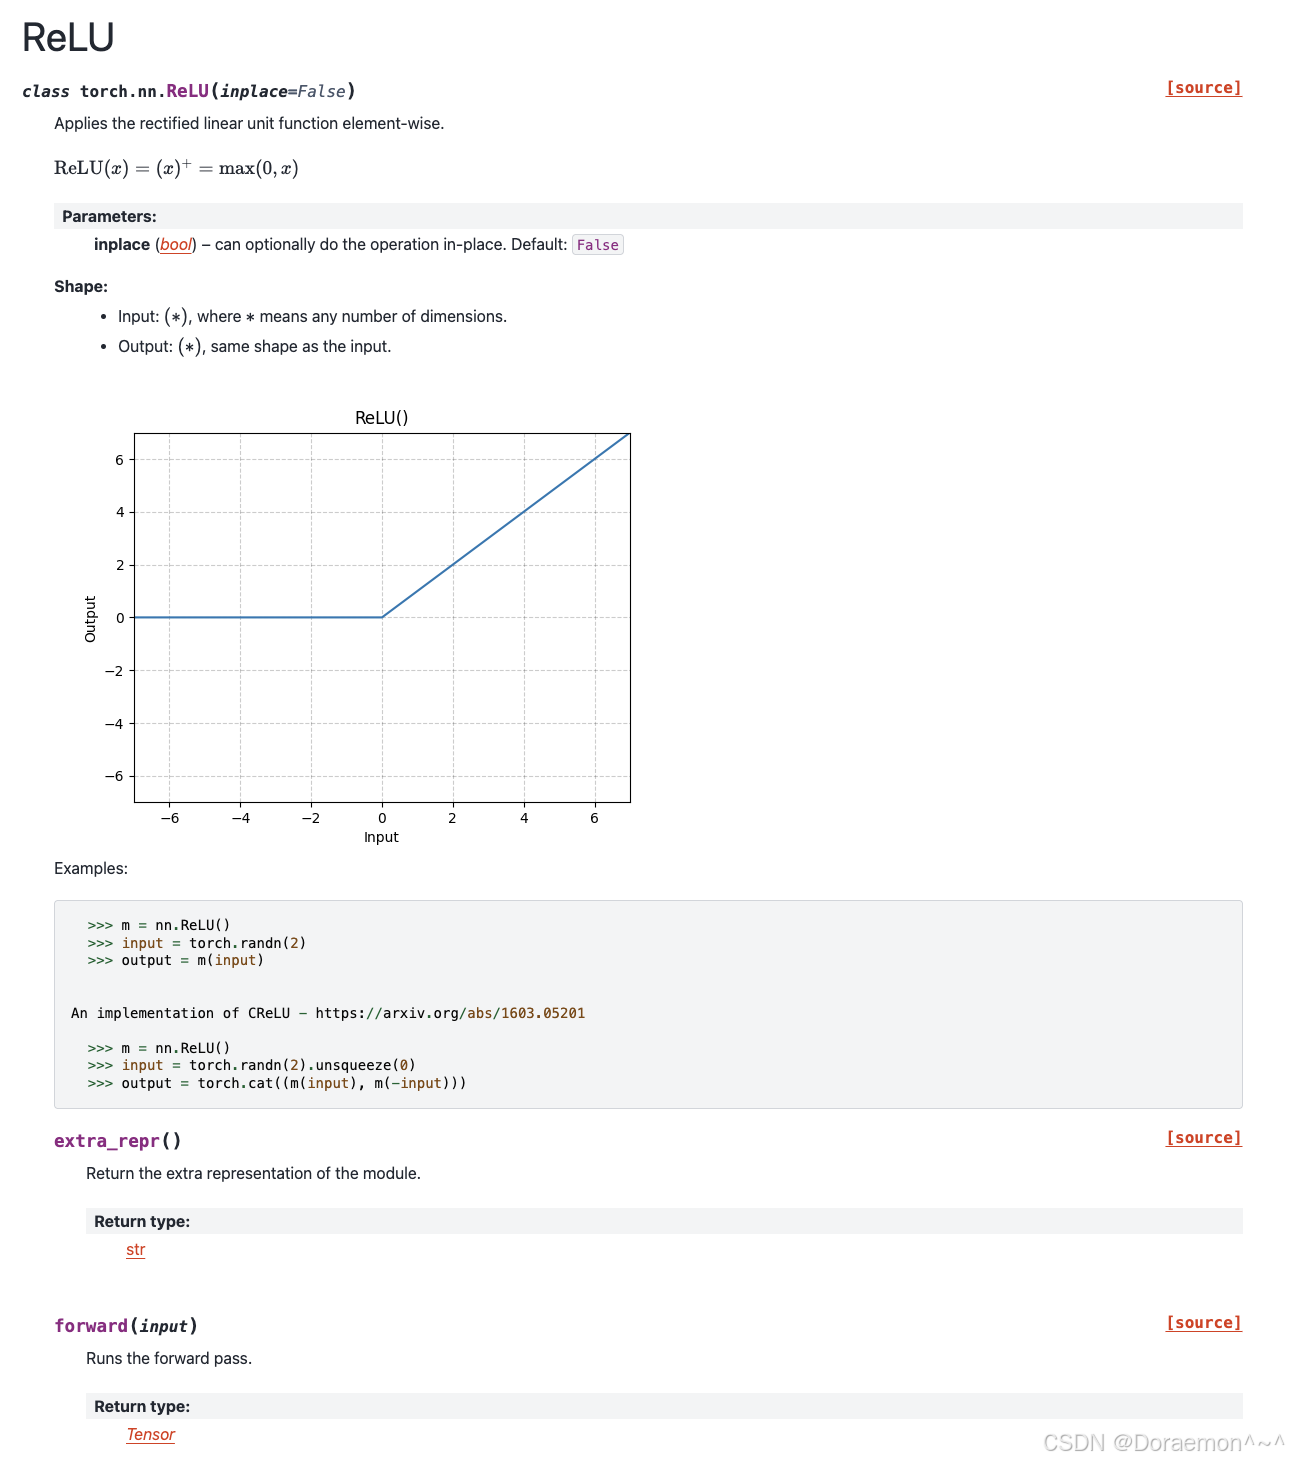
b、nn.ReLU:
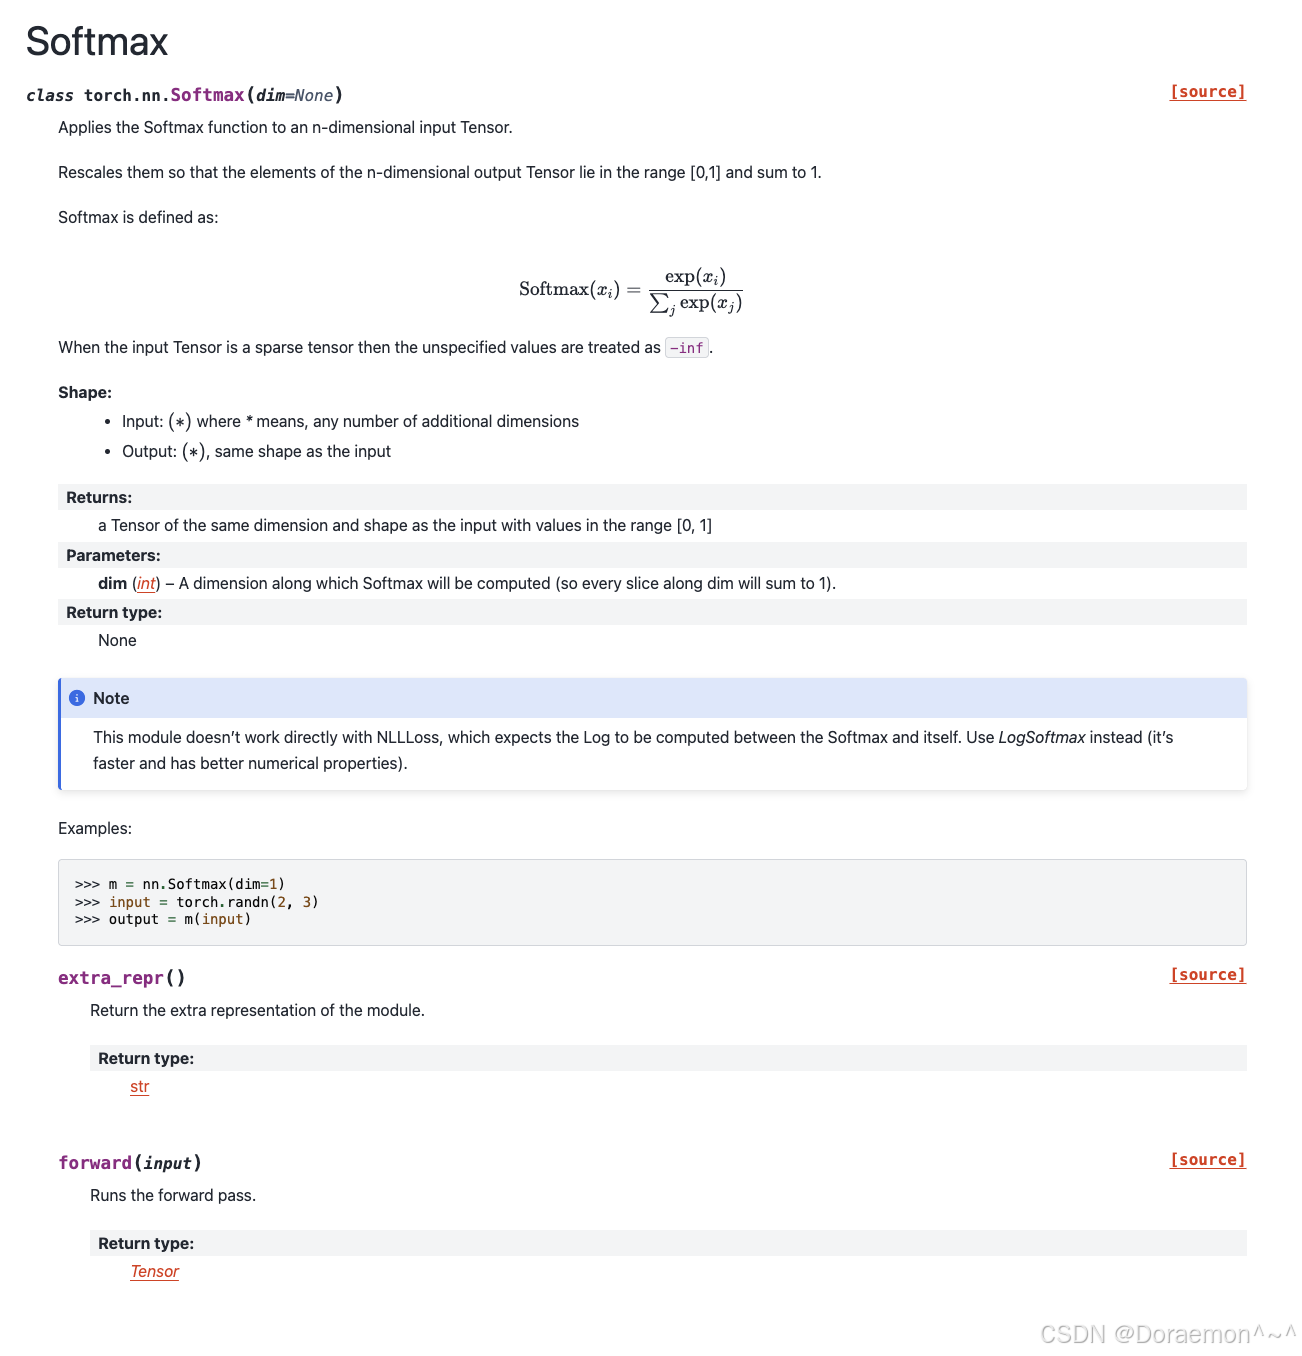
c、nn.Softmax:
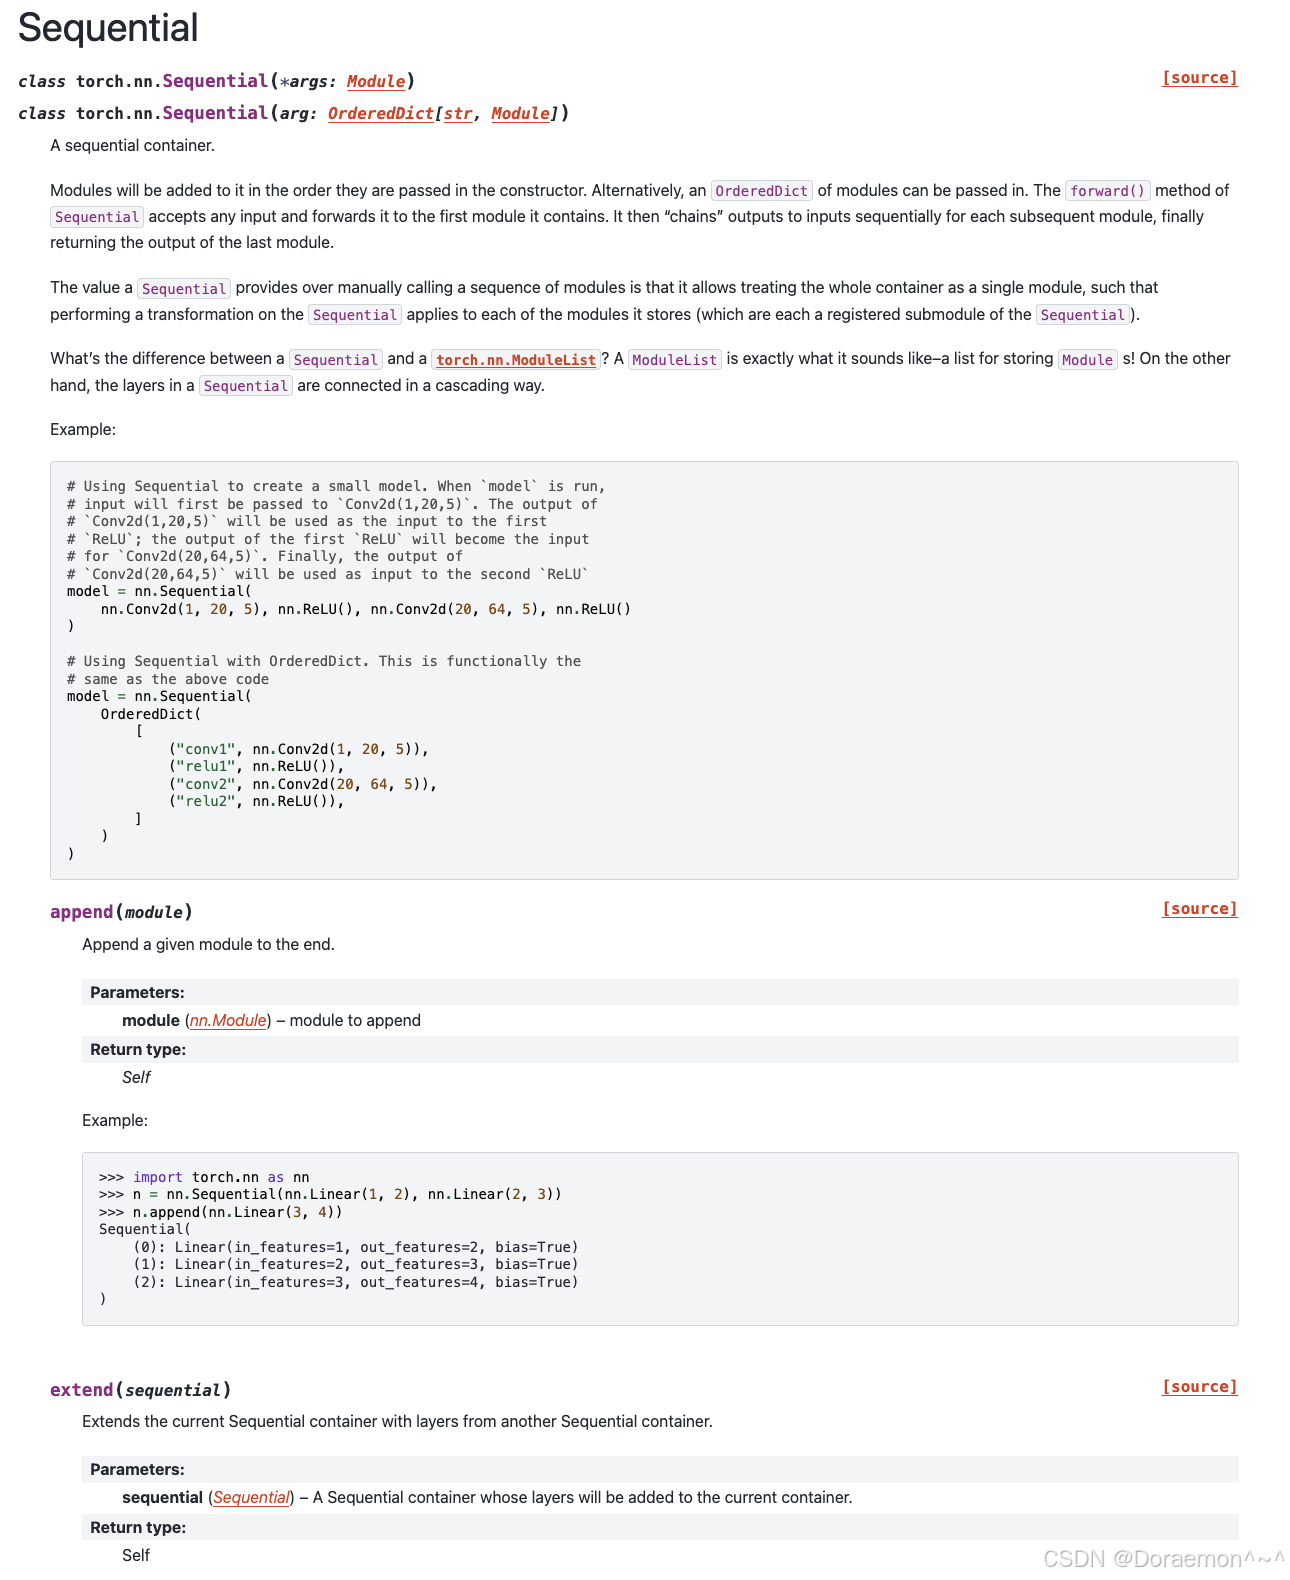
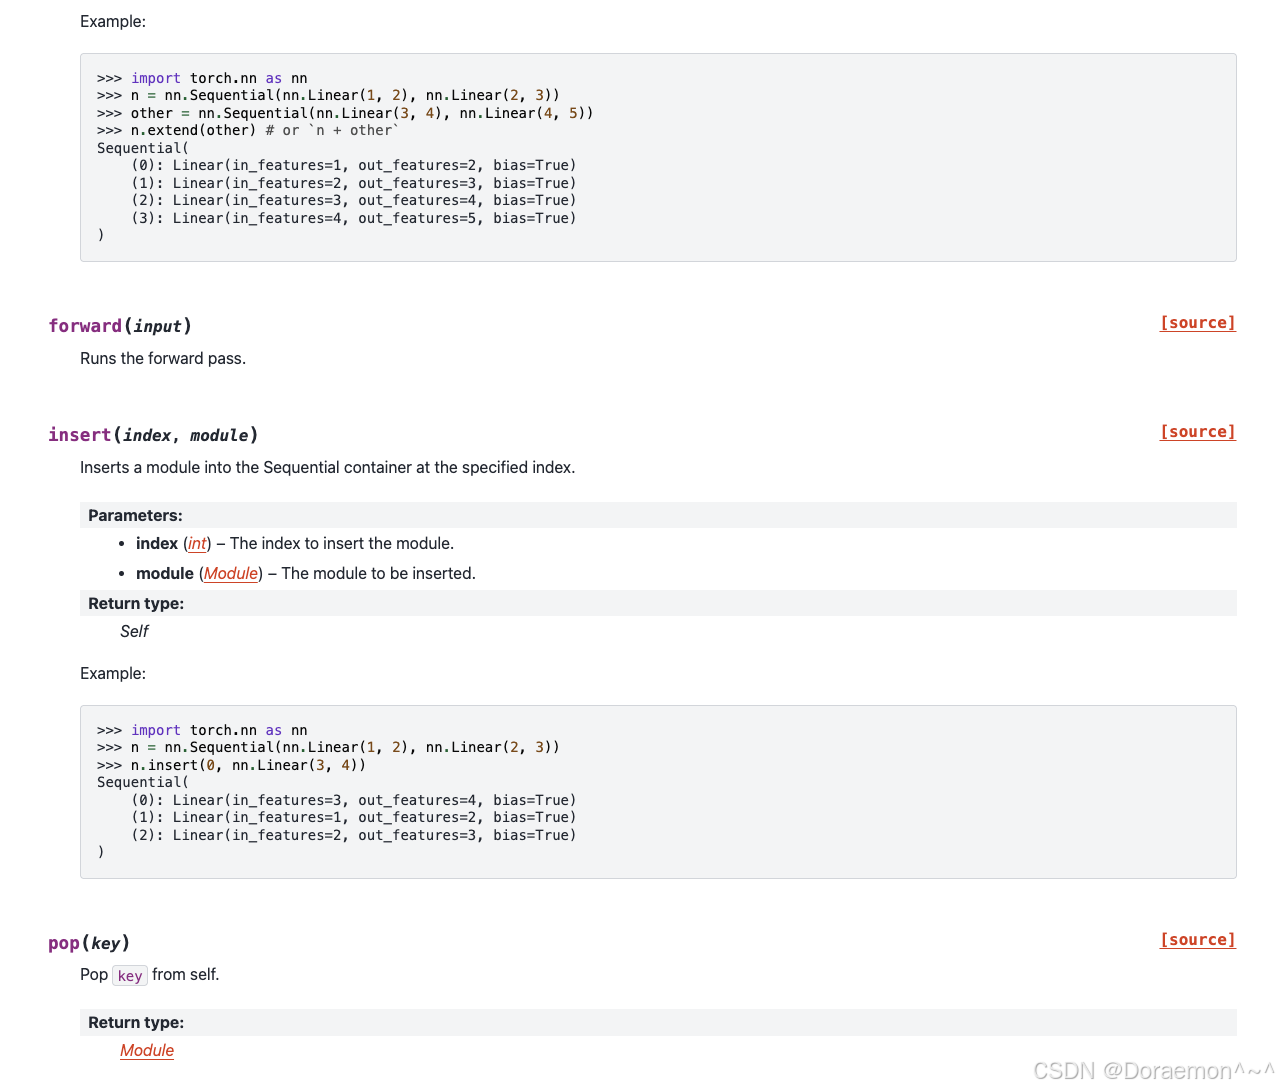
4.2.3.nn.Sequential():
4.3.损失函数
多种损失函数在PyTorch中也被封装为nn.Module()的子类。
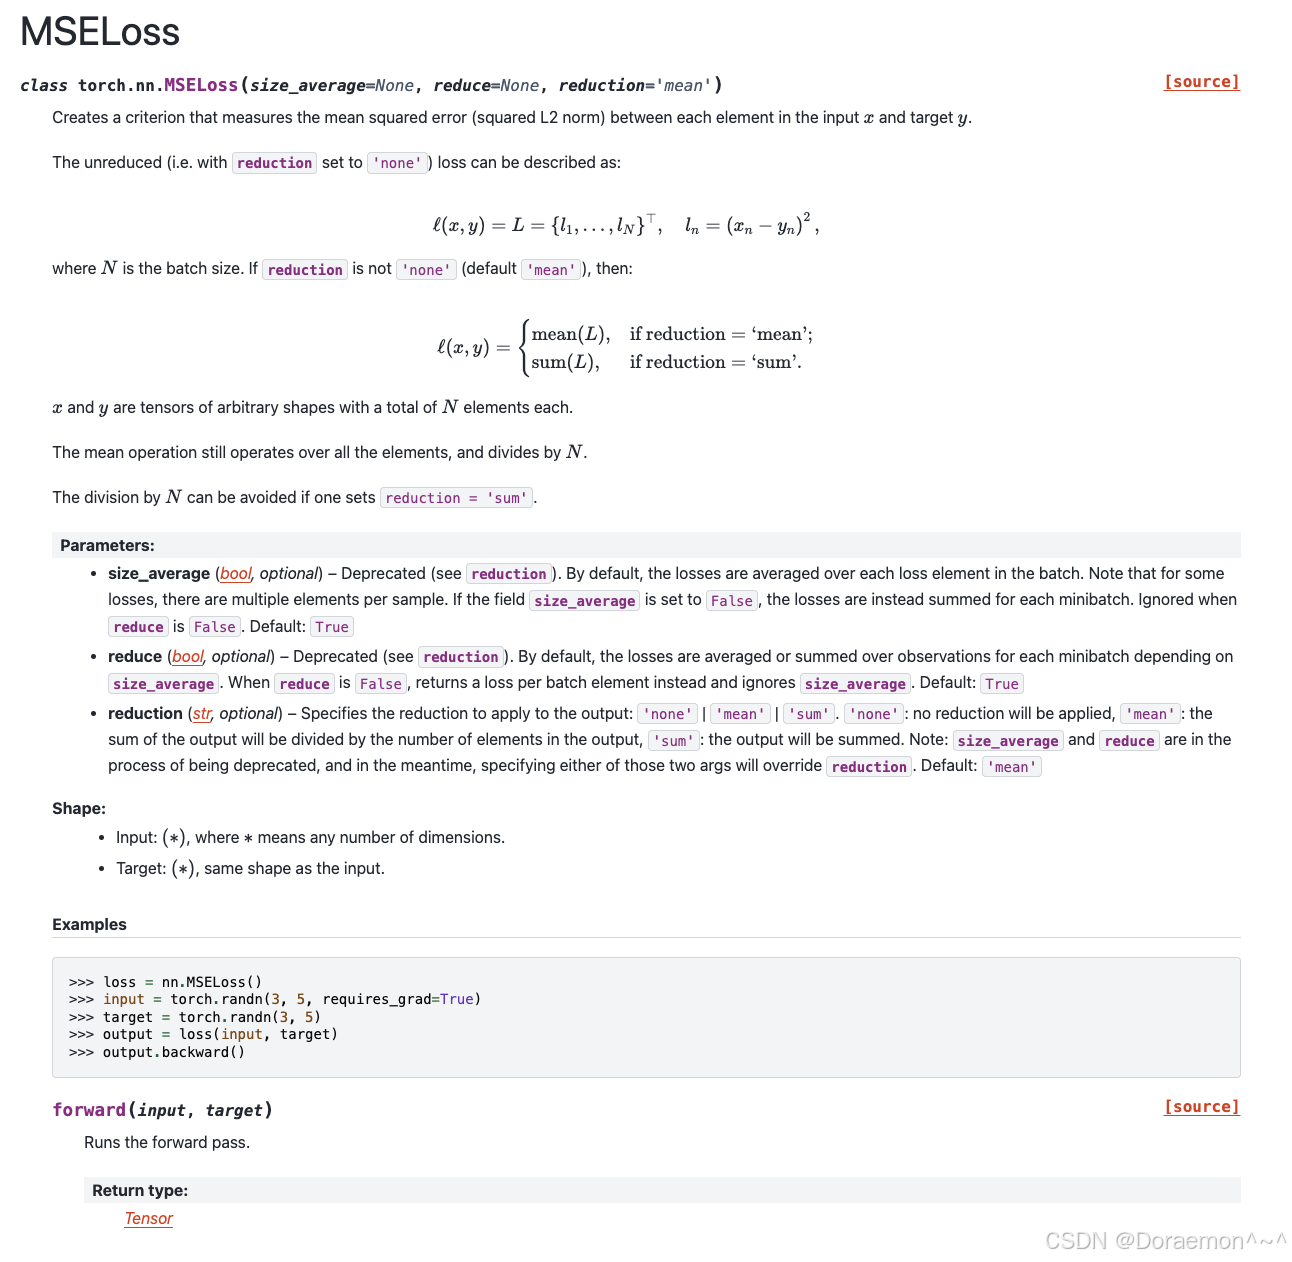
4.3.1.nn.MSELoss :
4.3.2.nn.BCELoss :
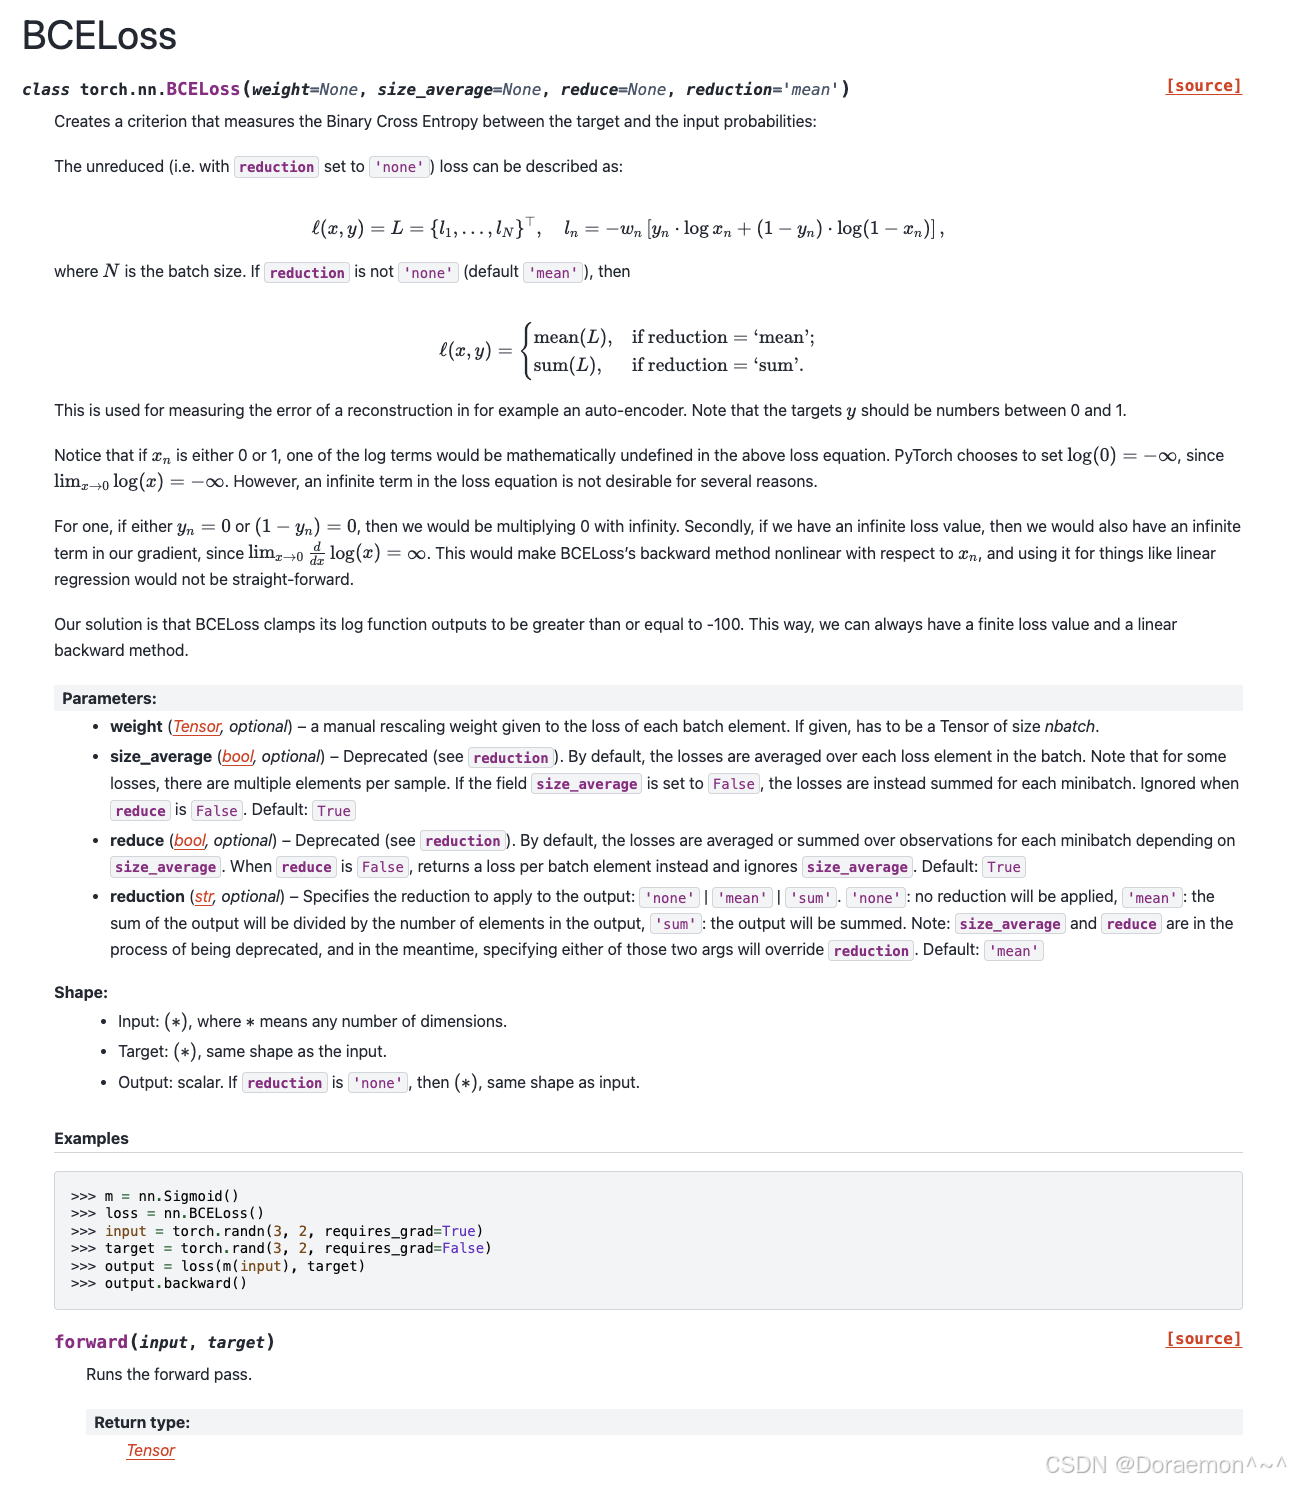
https://docs.pytorch.org/docs/stable/generated/torch.nn.BCELoss.html#torch.nn.BCELoss![]() https://docs.pytorch.org/docs/stable/generated/torch.nn.BCELoss.html#torch.nn.BCELoss二元交叉熵损失,用于二类分类问题。计算损失时preds需要经过 sigmoid 函数转换为概率。
https://docs.pytorch.org/docs/stable/generated/torch.nn.BCELoss.html#torch.nn.BCELoss二元交叉熵损失,用于二类分类问题。计算损失时preds需要经过 sigmoid 函数转换为概率。
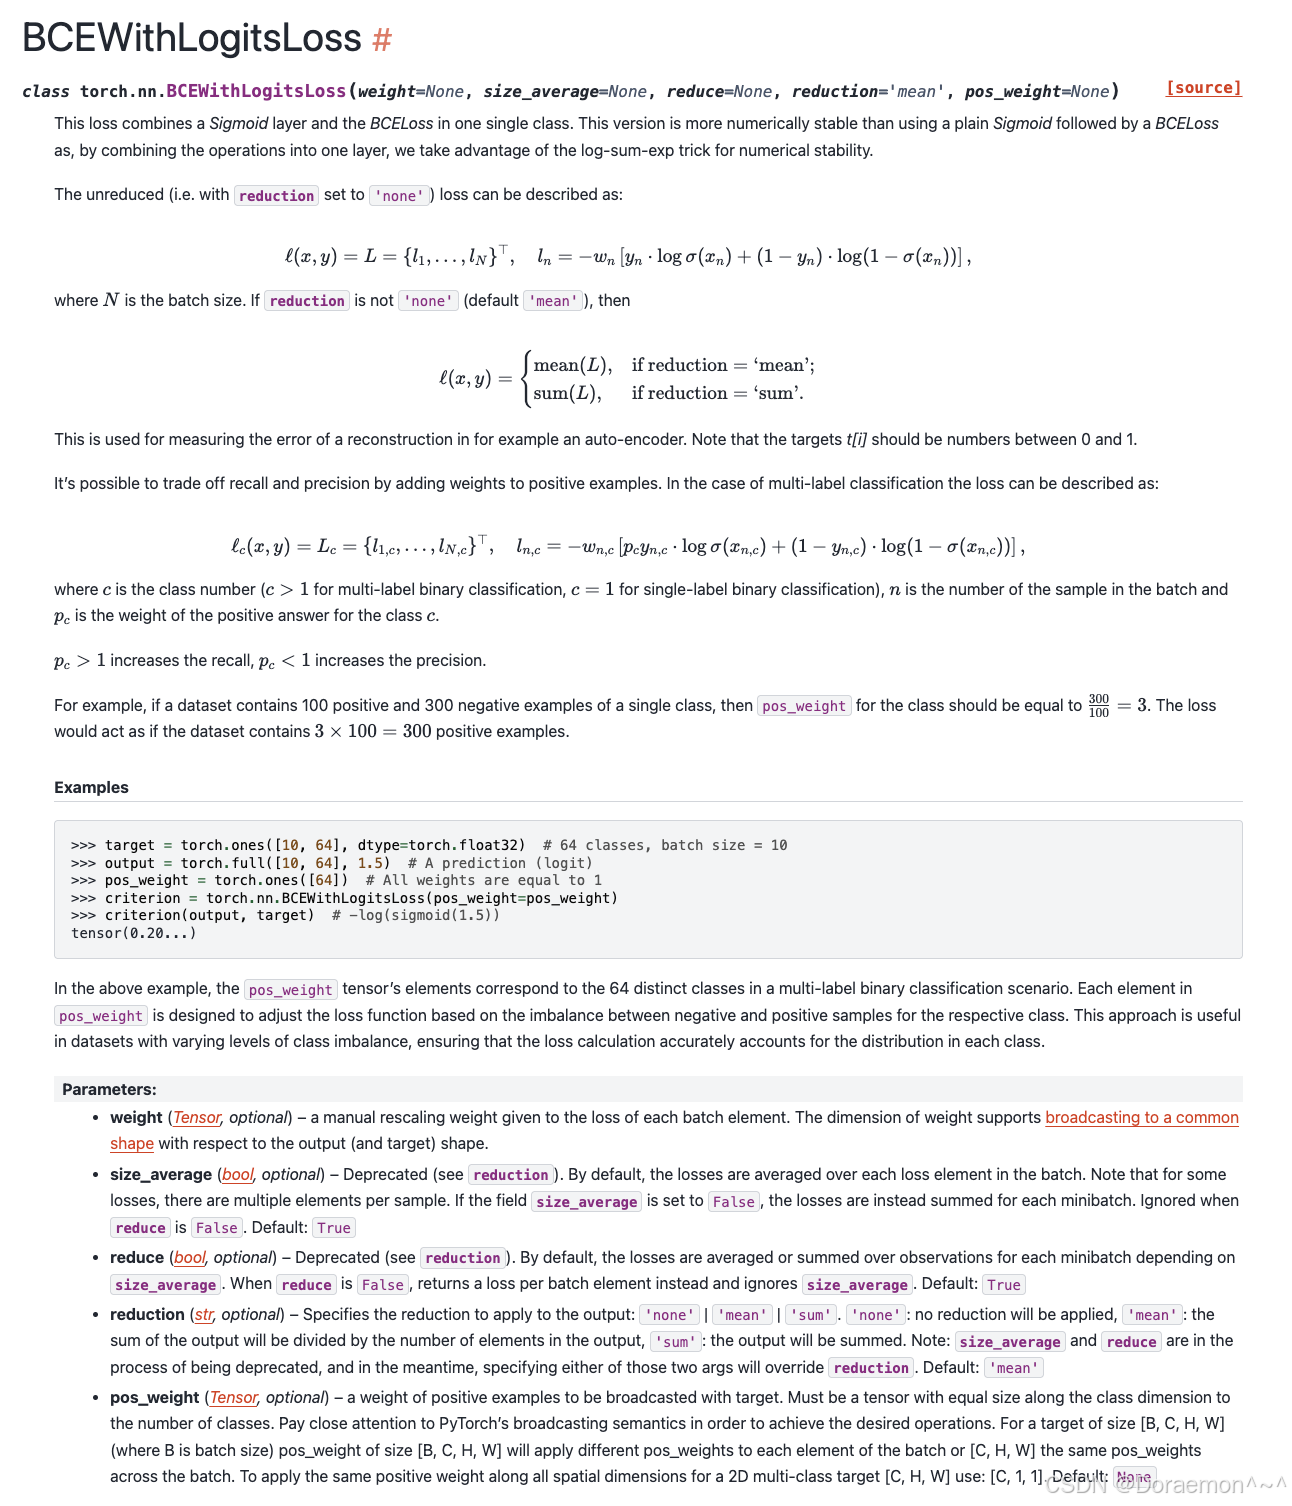
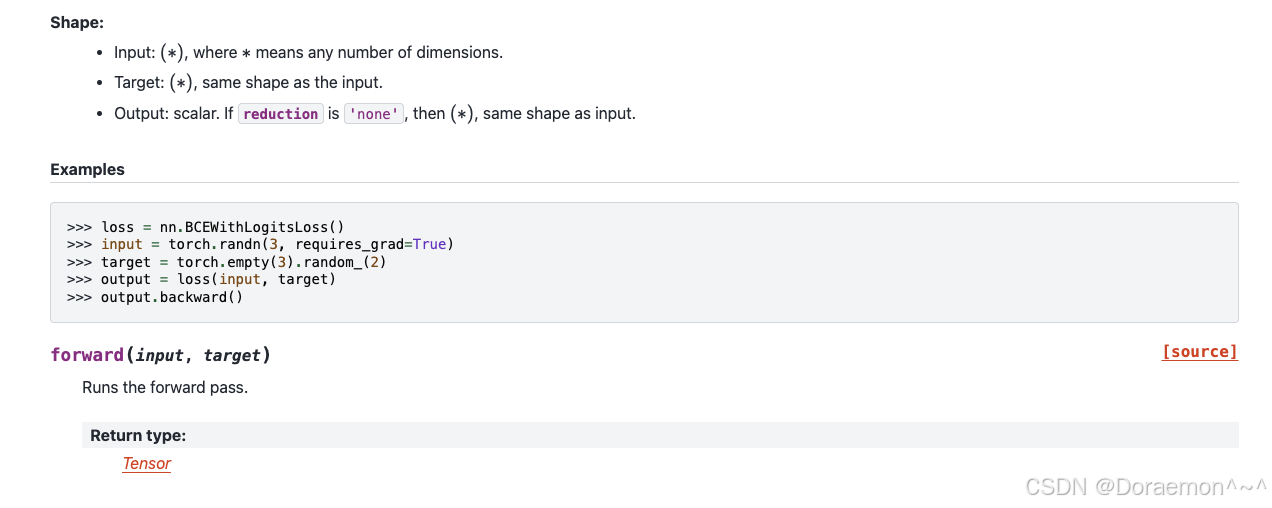
4.3.3.nn.BCEWithLogitsLoss:
https://docs.pytorch.org/docs/stable/generated/torch.nn.BCEWithLogitsLoss.html#torch.nn.BCEWithLogitsLoss![]() https://docs.pytorch.org/docs/stable/generated/torch.nn.BCEWithLogitsLoss.html#torch.nn.BCEWithLogitsLoss二元交叉熵损失,用于二类分类问题。计算损失时输入的是logits (不经过 sigmoid )。
https://docs.pytorch.org/docs/stable/generated/torch.nn.BCEWithLogitsLoss.html#torch.nn.BCEWithLogitsLoss二元交叉熵损失,用于二类分类问题。计算损失时输入的是logits (不经过 sigmoid )。
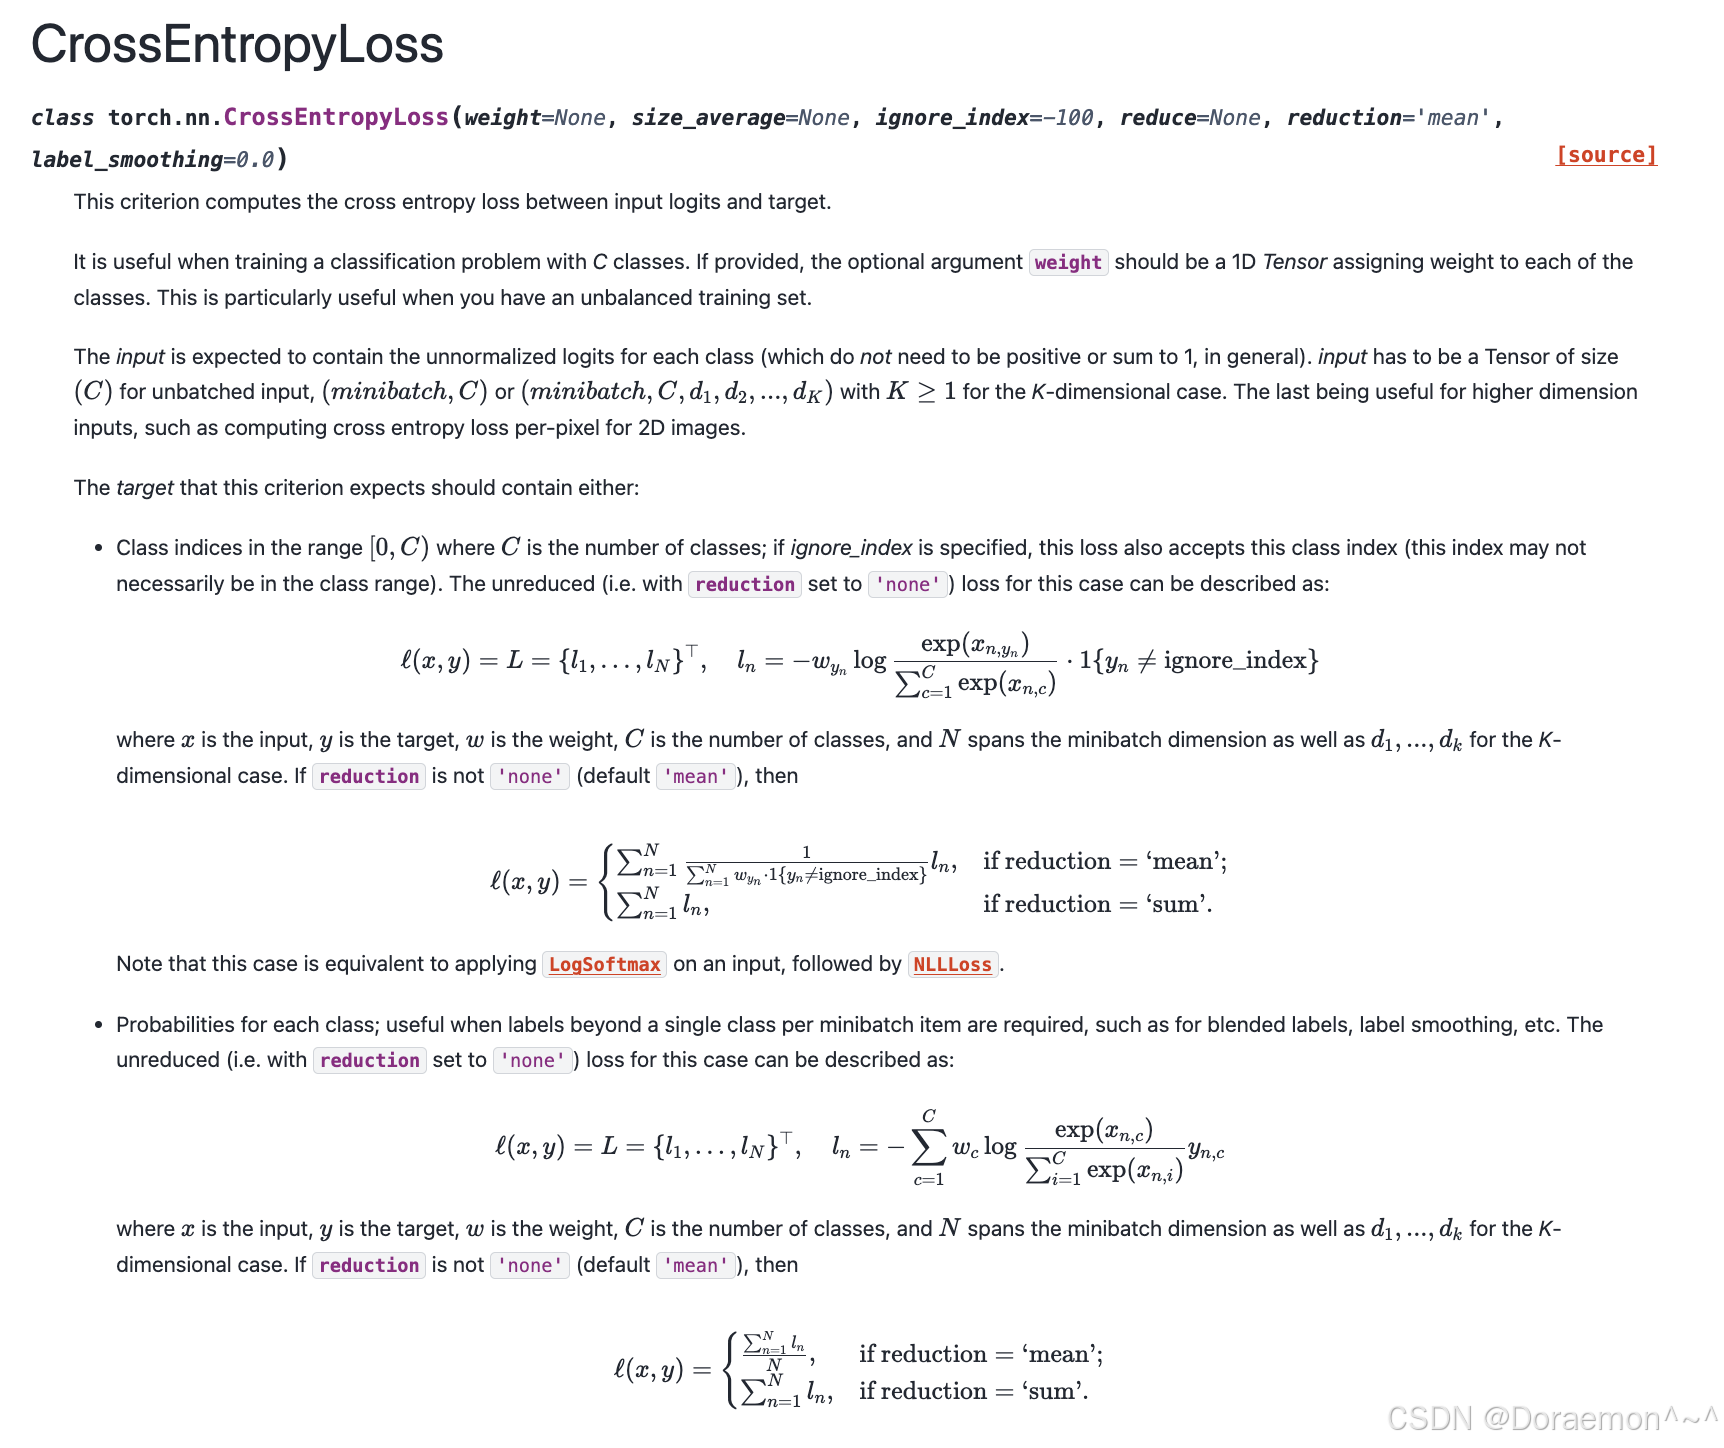
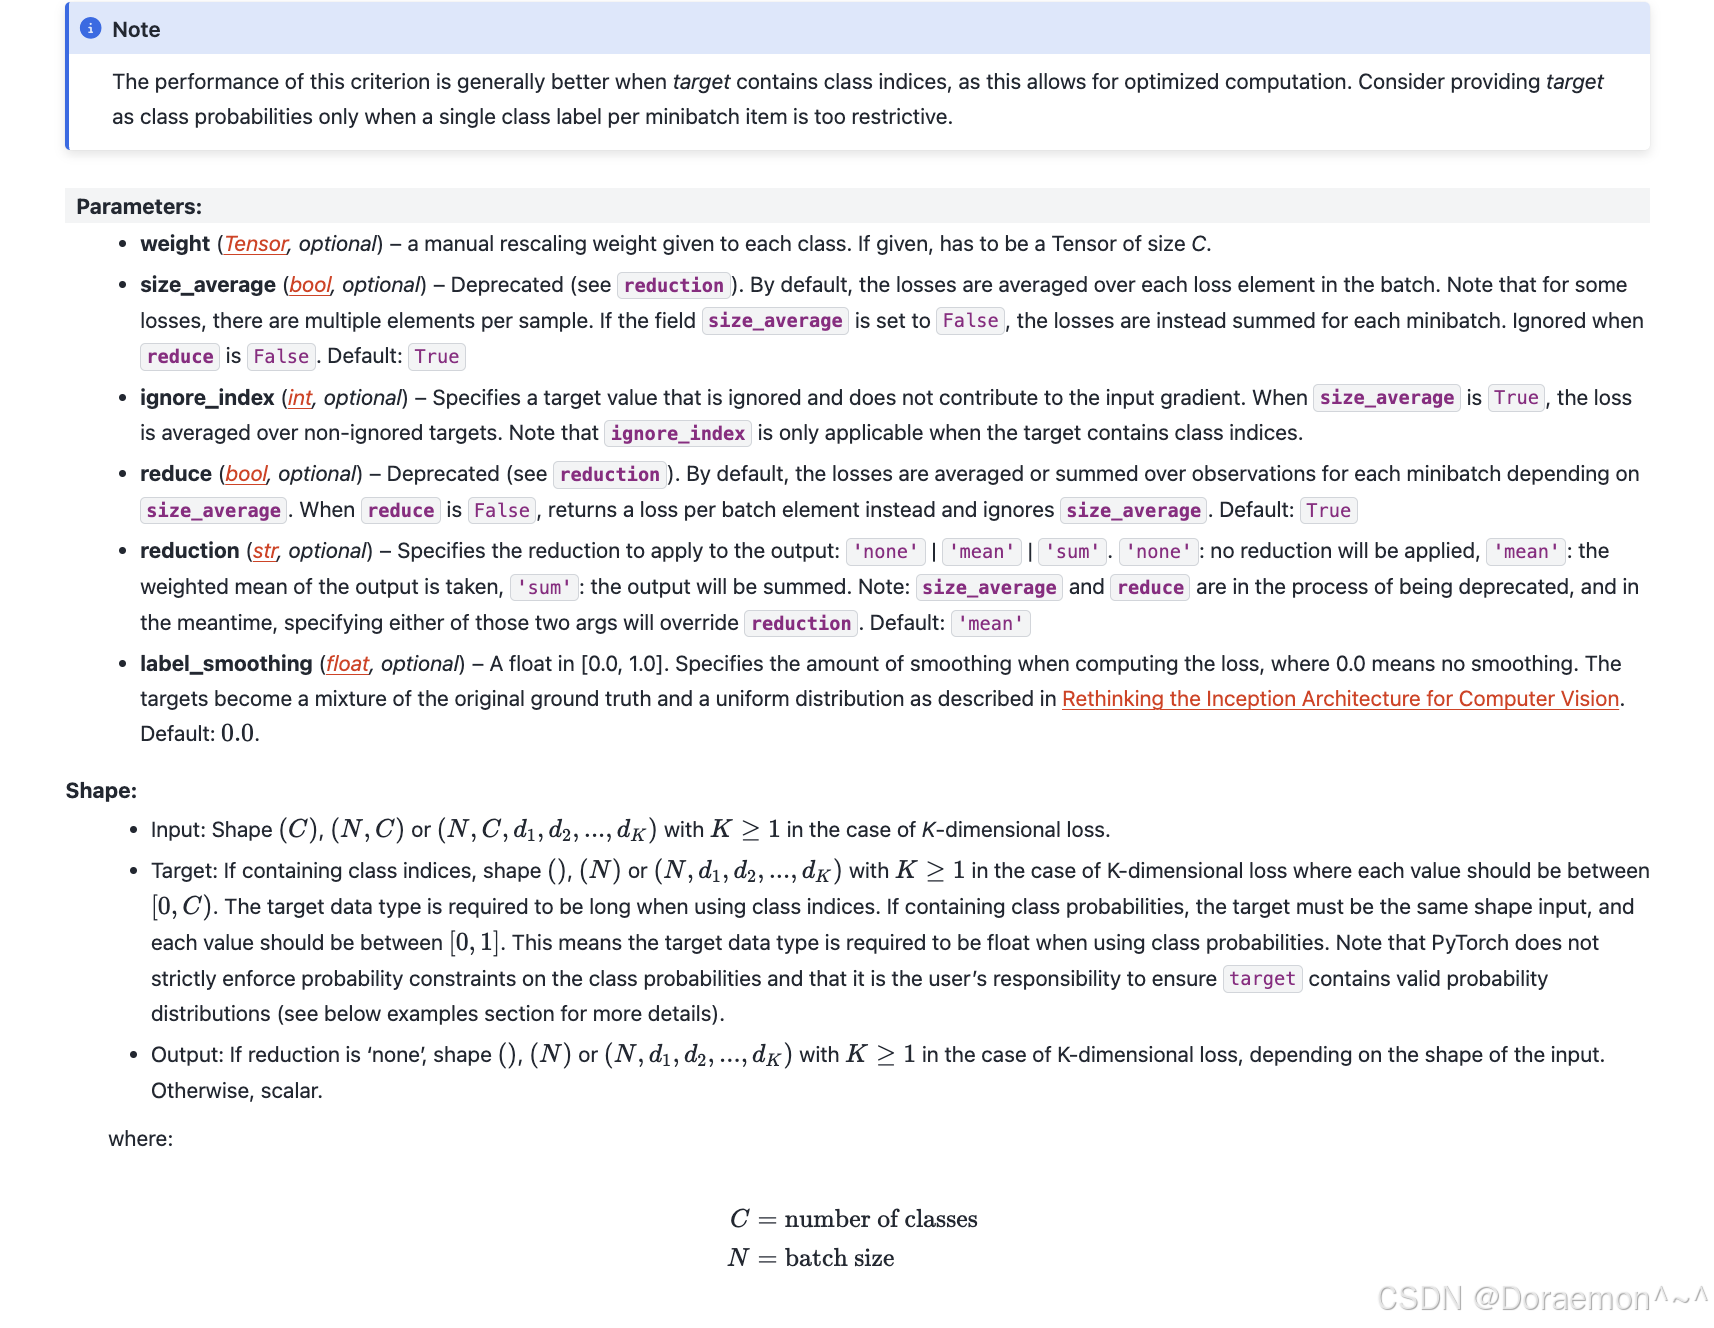
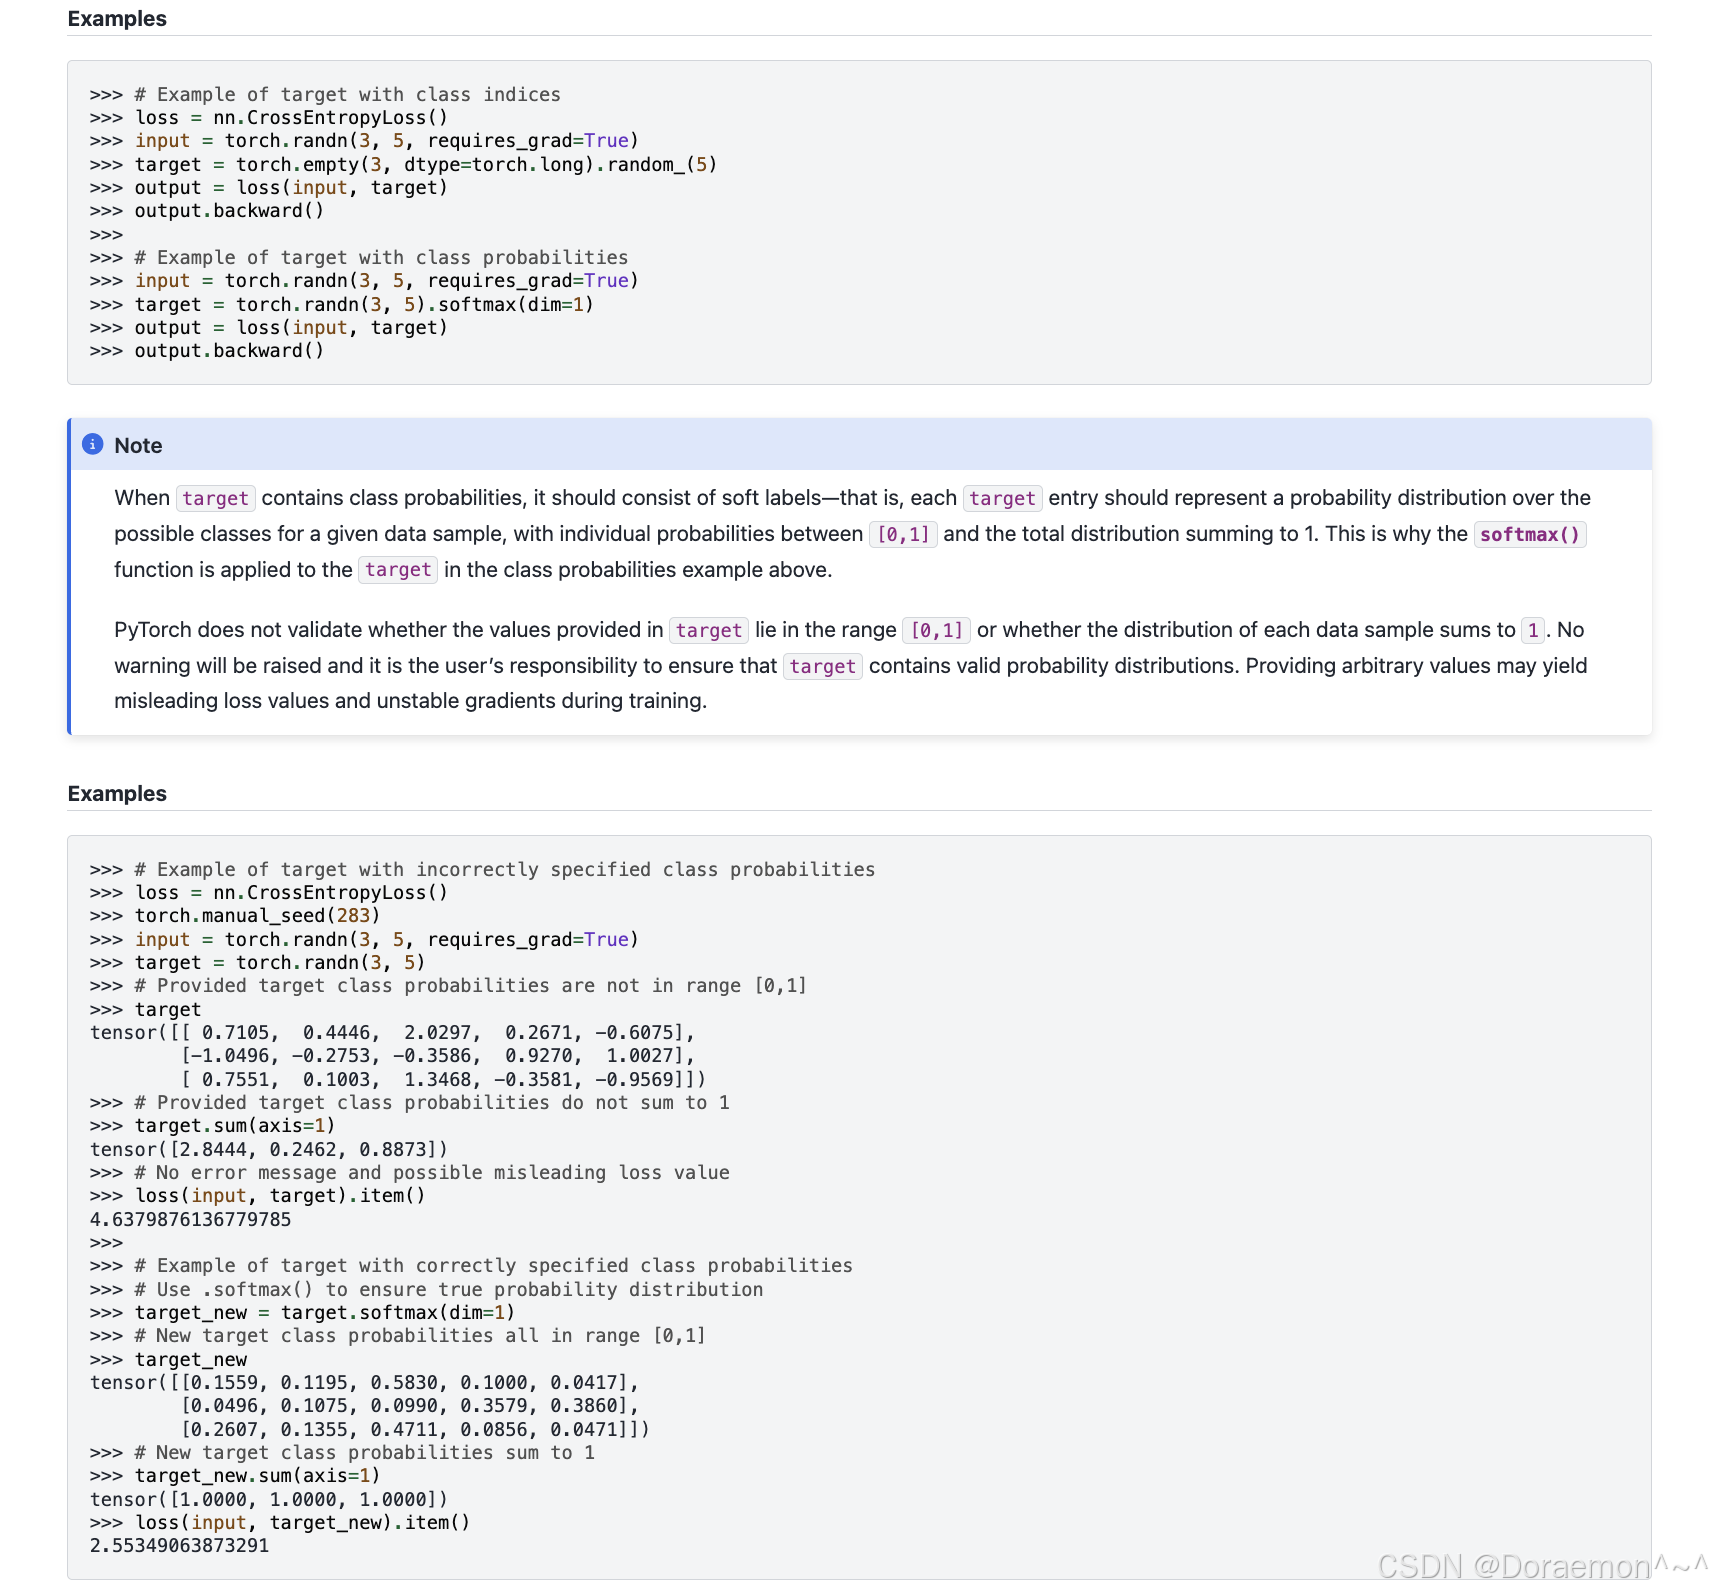
4.3.4.nn.CrossEntropyLoss :
https://docs.pytorch.org/docs/stable/generated/torch.nn.CrossEntropyLoss.html#torch.nn.CrossEntropyLoss![]() https://docs.pytorch.org/docs/stable/generated/torch.nn.CrossEntropyLoss.html#torch.nn.CrossEntropyLoss交叉熵损失,用于分类问题。计算损失时输入的是logits (不经过 softmax )。
https://docs.pytorch.org/docs/stable/generated/torch.nn.CrossEntropyLoss.html#torch.nn.CrossEntropyLoss交叉熵损失,用于分类问题。计算损失时输入的是logits (不经过 softmax )。