MySQL的MGR高可用

MySQL的MGR高可用架构

1. 什么是 MySQL MGR?

MySQL Group Replication (简称 MGR) 是 MySQL 官方于 2016 年 12 月(MySQL 5.7.17 版本)推出的一个全新的高可用与高扩展解决方案。

简单来说,MGR 是 MySQL 自带的一个插件 ,它将多台 MySQL 服务器组成一个"复制组"。组内的服务器通过Paxos 协议进行通信和协调,自动处理数据同步、故障检测和故障恢复。

核心定义: MGR 是一个基于原生复制及 Paxos 协议的组复制技术,它保证了数据的强一致性,并提供了内置的自动化脑裂保护机制。


2. 为什么要用 MGR?(解决了什么痛点)

在 MGR 出现之前,MySQL 的高可用主要依赖传统的**主从复制(异步/半同步)**配合 MHA 或 Keepalived 等第三方工具。这种传统架构存在以下核心痛点,而 MGR 正是为了解决这些问题而生:

2.1 传统主从复制的痛点 vs MGR 的优势

痛点 传统主从复制表现 MGR 解决方案
数据一致性 异步复制导致主从数据不一致,半同步性能损耗大且仍有丢数据风险。 强一致性:基于 Paxos 协议,事务提交需多数派确认,保证 RPO=0。
故障切换 需要依赖第三方工具(如 MHA)检测并切换,耗时较长(分钟级)。 自动故障切换:原生支持,秒级自动选主,RTO 通常在 10-30 秒内。
脑裂风险 网络分区时,可能出现两个主库同时写入,导致数据冲突。 自动防脑裂:基于多数派投票机制,非多数派节点自动只读或不可用。
运维复杂度 需搭建额外的高可用组件,配置繁琐。 原生集成:无需额外组件,通过参数配置即可实现集群管理。

3. MGR 的核心工作原理

MGR 的工作流程与传统复制完全不同,它引入了组通信系统 (GCS)Paxos 协议的变种。

3.1 复制流程

  1. 事务执行:客户端在某个节点(Member)上执行事务。
  2. 原子广播:事务在本地执行后,不会立即提交。该节点会将事务的写集(Write Set,即修改的数据行)原子广播给组内其他所有成员。
  3. 全局排序与冲突检测:所有成员接收到写集后,根据全局顺序进行排序,并检测是否存在冲突(例如是否修改了同一行数据)。
  4. 共识达成
    • 如果无冲突且获得组内**多数派(>N/2)**的确认,事务在所有节点上提交。
    • 如果有冲突,根据"先提交者胜出"原则,后提交的事务会被回滚。
  5. 应用事务:事务提交后,各节点异步应用事务到存储引擎。

3.2 关键技术点

  • Paxos 协议:保证了分布式系统下数据的一致性。只要不是大多数节点同时坏掉,系统就能正常工作。
  • GTID (全局事务标识):MGR 强制开启 GTID,用于追踪事务在集群中的执行情况。
  • 行格式日志 :MGR 强制要求 binlog_format=ROW,因为需要精确知道哪些行被修改了,以便进行冲突检测。

4. MGR 的两种工作模式

MGR 提供了两种运行模式,以适应不同的业务场景。

4.1 单主模式

这是生产环境最推荐的模式。

  • 机制 :组内自动选举出一个主节点(Primary),负责处理所有的读写操作。其余节点为从节点(Secondary),处于只读状态(super_read_only=ON)。
  • 故障转移:当主节点宕机或离开组时,剩余节点会自动触发选举协议,选出新的主节点。
  • 优点
    • 避免了多节点同时写入带来的冲突回滚风险。
    • 兼容性好,应用层无需感知复杂的冲突处理。
    • 一致性检查相对宽松,性能更稳定。

4.2 多主模式

  • 机制:组内所有节点都可以同时进行读写操作。
  • 冲突处理:如果不同节点同时修改同一行数据,MGR 会进行冲突检测。遵循"先到先得"原则,先提交的事务生效,后提交的事务会被回滚。
  • 缺点
    • 冲突风险高:在高并发写入场景下,事务回滚率极高,严重影响性能。
    • 稳定性差:任意节点的抖动都可能影响整个集群的可用性。
  • 适用场景:极少使用,仅适用于地理分布极广且写入完全不冲突的特殊场景(如不同地区的节点写入不同地区的数据)。

5. MGR 的优缺点总结

在决定是否采用 MGR 之前,必须清楚其局限性。

优点

  1. 高可用性:自动故障检测与恢复,无需人工干预。
  2. 强一致性:数据不丢不乱,适合金融、支付等核心业务。
  3. 弹性扩展:节点加入和移除是动态的,新节点会自动同步数据。
  4. 原生支持:MySQL 官方插件,兼容 MySQL 生态工具。

缺点与限制

  1. 必须有主键 :所有表必须使用 InnoDB 引擎,且必须定义主键(用于冲突检测)。
  2. 网络要求高:节点间通信频繁,对网络延迟敏感(建议局域网内,延迟 < 50ms)。
  3. 不支持大事务:大事务会阻塞复制流,建议单事务不超过 100MB-150MB。
  4. 不支持外键:不支持跨节点的外键约束检测。
  5. 节点数量限制:官方建议不超过 9 个节点(通常 3 或 5 个即可)。

6. 适用场景建议

场景 推荐程度 说明
金融/支付/订单系统 对数据一致性要求极高,不能容忍数据丢失。
电商核心业务 读多写少,且需要高可用保障。
SaaS 平台 需要多租户隔离和高可用。
海量日志/归档数据 写入量极大,MGR 性能开销过大,建议使用异步复制。
跨公网部署 网络延迟会导致严重的性能下降和流控。

7. 小结

MySQL MGR 是目前 MySQL 生态中最成熟的原生高可用解决方案。它用"强一致性"和"自动化运维"取代了传统主从复制的"最终一致性"和"手动/半自动切换"。

最佳实践建议:

在生产环境中,优先选择单主模式,部署 3 个或 5 个节点(奇数节点以利于投票),并确保所有表都有主键,网络环境稳定低延迟。

8. 实战:搭建三集群高可用

1、环境准备

主机名 IP 地址 备注
mgr1 192.168.194.11 节点 1
mgr2 192.168.194.12 节点 2 (当前操作机器)
mgr3 192.168.194.13 节点 3

先准备三台虚拟机,本次使用的系统是RedHat10.1版本,类似的对应CentOS Stream 10/其他红帽系列的系统

修改IP

powershell 复制代码
nmcli c m ens160 ipv4.method manual ipv4.addr 192.168.194.11/24 ipv4.gateway 192.168.194.2 ipv4.dns 223.5.5.5 connection.autoconnect yes

nmcli c m ens160 ipv4.method manual ipv4.addr 192.168.194.12/24 ipv4.gateway 192.168.194.2 ipv4.dns 223.5.5.5 connection.autoconnect yes

nmcli c m ens160 ipv4.method manual ipv4.addr 192.168.194.13/24 ipv4.gateway 192.168.194.2 ipv4.dns 223.5.5.5 connection.autoconnect yes

接着在每一个机器上输入开启设置网卡的命令

powershell 复制代码
nmcli c up ens160

注意ens160是自己的网卡名称,需要根据自己系统的网卡设备名称来进行设置

使用命令nmcli c show 查看

然后设置主机名

bash 复制代码
hostnamectl set-hostname mgr1 && bash

hostnamectl set-hostname mgr2 && bash

hostnamectl set-hostname mgr3 && bash

将主机名写入/etc/hosts,每个主机都要操作

powershell 复制代码
[root@mgr1 ~]# cat >> /etc/hosts << EOF
192.168.194.11 mgr1
192.168.194.12 mgr2
192.168.194.13 mgr3
EOF

2、设置免密登录

powershell 复制代码
[root@mgr1 ~]# ssh-keygen
Generating public/private ed25519 key pair.
Enter file in which to save the key (/root/.ssh/id_ed25519):
Enter passphrase for "/root/.ssh/id_ed25519" (empty for no passphrase):
Enter same passphrase again:
Your identification has been saved in /root/.ssh/id_ed25519
Your public key has been saved in /root/.ssh/id_ed25519.pub
The key fingerprint is:
SHA256:YVdckNPBtETeiqmBPHFECV30KN+FNh66Y0BU+GpfmZA root@mgr2
The key's randomart image is:
+--[ED25519 256]--+
|        .++B*O*. |
|         o+.+=o+ |
|        + =..oO o|
|       o B oEB = |
|        S o.=.+o |
|         .o+ .+  |
|         ...+.   |
|           ...   |
|                 |
+----[SHA256]-----+
[root@mgr1 ~]# ssh-copy-id mgr2
/usr/bin/ssh-copy-id: INFO: Source of key(s) to be installed: "/root/.ssh/id_ed25519.pub"
The authenticity of host 'mgr2 (192.168.194.12)' can't be established.
ED25519 key fingerprint is SHA256:cOcQwno9t4p5xBrZ5NwA0FVKmSFGPea8xF6/Xlgl8CQ.
This host key is known by the following other names/addresses:
    ~/.ssh/known_hosts:1: mgr1
Are you sure you want to continue connecting (yes/no/[fingerprint])? yes
/usr/bin/ssh-copy-id: INFO: attempting to log in with the new key(s), to filter out any that are already installed
/usr/bin/ssh-copy-id: INFO: 1 key(s) remain to be installed -- if you are prompted now it is to install the new keys
root@mgr2's password:

Number of key(s) added: 1

Now try logging into the machine, with: "ssh 'mgr2'"
and check to make sure that only the key(s) you wanted were added.

[root@mgr1 ~]# ssh-copy-id mgr3
/usr/bin/ssh-copy-id: INFO: Source of key(s) to be installed: "/root/.ssh/id_ed25519.pub"
The authenticity of host 'mgr3 (192.168.194.13)' can't be established.
ED25519 key fingerprint is SHA256:cOcQwno9t4p5xBrZ5NwA0FVKmSFGPea8xF6/Xlgl8CQ.
This host key is known by the following other names/addresses:
    ~/.ssh/known_hosts:1: mgr1
    ~/.ssh/known_hosts:4: mgr2
Are you sure you want to continue connecting (yes/no/[fingerprint])? yes
/usr/bin/ssh-copy-id: INFO: attempting to log in with the new key(s), to filter out any that are already installed
/usr/bin/ssh-copy-id: INFO: 1 key(s) remain to be installed -- if you are prompted now it is to install the new keys
root@mgr3's password:

Number of key(s) added: 1

Now try logging into the machine, with: "ssh 'mgr3'"
and check to make sure that only the key(s) you wanted were added.


# 或者在shell脚本中使用命令
ssh-keygen -t rsa -N '' -f /root/.ssh/id_rsa -q
# 然后拷贝即可
ssh-copy-id mgr2

3、安装MySQL(每个节点都安装)

添加MySQL官方仓库

powershell 复制代码
dnf install -y https://dev.mysql.com/get/mysql84-community-release-el10-2.noarch.rpm

注意改为自己的版本,这里可以借助大模型帮你改,跟大模型说你的系统版本,然后让大模型帮你换

执行安装命令

powershell 复制代码
yum install mysql-community-server -y

4、MySQL相关配置

先在第一个节点,mgr1中执行如下命令

powershell 复制代码
# 启动MySQL
[root@mgr1 ~]# systemctl start mysqld

# 使用grep命令查看日志中的临时密码
[root@mgr1 ~]# grep -i password /var/log/mysqld.log
2026-04-18T09:38:59.968877Z 6 [Note] [MY-010454] [Server] A temporary password is generated for root@localhost: :mOw3AlgS#Kf

接着使用awk命令和一个变量来接受MySQL密码,这样就需要直接手动输入密码了

powershell 复制代码
[root@mgr1 ~]# tmp_passwd=`awk '/temporary password/ {print $NF}' /var/log/mysqld.log` && echo ${tmp_passwd}
:mOw3AlgS#Kf
[root@mgr1 ~]# mysql -uroot -p${tmp_passwd}
mysql: [Warning] Using a password on the command line interface can be insecure.
Welcome to the MySQL monitor.  Commands end with ; or \g.
Your MySQL connection id is 8
Server version: 8.4.8

Copyright (c) 2000, 2026, Oracle and/or its affiliates.

Oracle is a registered trademark of Oracle Corporation and/or its
affiliates. Other names may be trademarks of their respective
owners.

Type 'help;' or '\h' for help. Type '\c' to clear the current input statement.

mysql>
# 更改密码
mysql>alter user 'root'@'localhost' identified by 'MySQL@123';

接着按照以上操作对mgr2和mgr3节点进行操作

配置MySQL配置文件

powershell 复制代码
# 先备份
[root@mgr1 ~]# cp /etc/my.cnf{,.bak}

# 接着查询uuid
[root@mgr2 ~]# mysql -uroot -p'MySQL@123' -e "select uuid()"
mysql: [Warning] Using a password on the command line interface can be insecure.
+--------------------------------------+
| uuid()                               |
+--------------------------------------+
| 53880f11-3be3-11f1-881e-000c29d52c59 |
+--------------------------------------+
[root@mgr2 ~]#

[root@mgr1 ~]# vim /etc/my.cnf

[root@mgr1 ~]# cat /etc/my.cnf
[mysqld]
#
# Remove leading # and set to the amount of RAM for the most important data
# cache in MySQL. Start at 70% of total RAM for dedicated server, else 10%.
# innodb_buffer_pool_size = 128M
#
# Remove the leading "# " to disable binary logging
# Binary logging captures changes between backups and is enabled by
# default. It's default setting is log_bin=binlog
# disable_log_bin
#
# Remove leading # to set options mainly useful for reporting servers.
# The server defaults are faster for transactions and fast SELECTs.
# Adjust sizes as needed, experiment to find the optimal values.
# join_buffer_size = 128M
# sort_buffer_size = 2M
# read_rnd_buffer_size = 2M

datadir=/var/lib/mysql
socket=/var/lib/mysql/mysql.sock

log-error=/var/log/mysqld.log
pid-file=/var/run/mysqld/mysqld.pid

disabled_storage_engines="MyISAM,BLACKHOLE,FEDERATED,ARCHIVE,MEMORY"
server_id=11
gtid_mode=ON
enforce_gtid_consistency=ON

binlog_checksum=NONE
log_slave_updates=ON
binlog_format=ROW
default_storage_engine=InnoDB

plugin_load_add='group_replication.so'
group_replication_group_name="53880f11-3be3-11f1-881e-000c29d52c59"
group_replication_start_on_boot=off
group_replication_local_address="mgr1:33061"
group_replication_group_seeds="mgr1:33061,mgr2:33061,mgr3:33061"
group_replication_bootstrap_group=off
group_replication_recovery_get_public_key=ON


[root@mgr1 ~]# scp /etc/my.cnf /etc/my.cnf.
/etc/my.cnf.bak   /etc/my.cnf.d/
[root@mgr1 ~]# scp /etc/my.cnf /etc/my.cnf.bak mgr2:/etc/
root@mgr2's password:
my.cnf                                                                                                                                               100% 1413     2.1MB/s   00:00
my.cnf.bak                                                                                                                                           100%  921     1.0MB/s   00:00
[root@mgr1 ~]# scp /etc/my.cnf /etc/my.cnf.bak mgr3:/etc/
The authenticity of host 'mgr3 (192.168.194.13)' can't be established.
ED25519 key fingerprint is SHA256:cOcQwno9t4p5xBrZ5NwA0FVKmSFGPea8xF6/Xlgl8CQ.
This host key is known by the following other names/addresses:
    ~/.ssh/known_hosts:1: mgr2
Are you sure you want to continue connecting (yes/no/[fingerprint])? yes
Warning: Permanently added 'mgr3' (ED25519) to the list of known hosts.
root@mgr3's password:
my.cnf                                                                                                                                               100% 1413     2.5MB/s   00:00
my.cnf.bak                                                                                                                                           100%  921     3.1MB/s   00:00
[root@mgr1 ~]#

gtid,全局事务标识,MySQL每次执行DDL,DML语句以及begin;commit;提交事务的时候才会产生。

另外两个节点,只修改两个地方

mgr2

powershell 复制代码
server_id=12
group_replication_local_address="mgr2:33061"

# 完整文件如下
[root@mgr2 ~]#  cat /etc/my.cnf
[mysqld]
#
# Remove leading # and set to the amount of RAM for the most important data
# cache in MySQL. Start at 70% of total RAM for dedicated server, else 10%.
# innodb_buffer_pool_size = 128M
#
# Remove the leading "# " to disable binary logging
# Binary logging captures changes between backups and is enabled by
# default. It's default setting is log_bin=binlog
# disable_log_bin
#
# Remove leading # to set options mainly useful for reporting servers.
# The server defaults are faster for transactions and fast SELECTs.
# Adjust sizes as needed, experiment to find the optimal values.
# join_buffer_size = 128M
# sort_buffer_size = 2M
# read_rnd_buffer_size = 2M

datadir=/var/lib/mysql
socket=/var/lib/mysql/mysql.sock

log-error=/var/log/mysqld.log
pid-file=/var/run/mysqld/mysqld.pid

disabled_storage_engines="MyISAM,BLACKHOLE,FEDERATED,ARCHIVE,MEMORY"
server_id=12
gtid_mode=ON
enforce_gtid_consistency=ON

binlog_checksum=NONE
log_slave_updates=ON
binlog_format=ROW
default_storage_engine=InnoDB

plugin_load_add='group_replication.so'
group_replication_group_name="53880f11-3be3-11f1-881e-000c29d52c59"
group_replication_start_on_boot=off
group_replication_local_address="mgr2:33061"
group_replication_group_seeds="mgr1:33061,mgr2:33061,mgr3:33061"
group_replication_bootstrap_group=off
group_replication_recovery_get_public_key=ON

mgr3

powershell 复制代码
server_id=13
group_replication_local_address="mgr3:33061"

# 完整文件如下
[root@mgr3 ~]# cat /etc/my.cnf
[mysqld]
#
# Remove leading # and set to the amount of RAM for the most important data
# cache in MySQL. Start at 70% of total RAM for dedicated server, else 10%.
# innodb_buffer_pool_size = 128M
#
# Remove the leading "# " to disable binary logging
# Binary logging captures changes between backups and is enabled by
# default. It's default setting is log_bin=binlog
# disable_log_bin
#
# Remove leading # to set options mainly useful for reporting servers.
# The server defaults are faster for transactions and fast SELECTs.
# Adjust sizes as needed, experiment to find the optimal values.
# join_buffer_size = 128M
# sort_buffer_size = 2M
# read_rnd_buffer_size = 2M

datadir=/var/lib/mysql
socket=/var/lib/mysql/mysql.sock

log-error=/var/log/mysqld.log
pid-file=/var/run/mysqld/mysqld.pid

disabled_storage_engines="MyISAM,BLACKHOLE,FEDERATED,ARCHIVE,MEMORY"
server_id=13
gtid_mode=ON
enforce_gtid_consistency=ON

binlog_checksum=NONE
log_slave_updates=ON
binlog_format=ROW
default_storage_engine=InnoDB

plugin_load_add='group_replication.so'
group_replication_group_name="53880f11-3be3-11f1-881e-000c29d52c59"
group_replication_start_on_boot=off
group_replication_local_address="mgr3:33061"
group_replication_group_seeds="mgr1:33061,mgr2:33061,mgr3:33061"
group_replication_bootstrap_group=off
group_replication_recovery_get_public_key=ON

重启MySQL,每个节点都需要操作

powershell 复制代码
systemctl restart mysqld

5、配置用户

三个节点都要执行

powershell 复制代码
mysql> SET SQL_LOG_BIN=0;
mysql> CREATE USER 'repl'@'%' IDENTIFIED BY 'Back@123';
mysql> GRANT REPLICATION SLAVE ON *.* TO 'repl'@'%';
mysql> GRANT CONNECTION_ADMIN ON *.* TO 'repl'@'%';
mysql> GRANT BACKUP_ADMIN ON *.* TO 'repl'@'%';
mysql> GRANT GROUP_REPLICATION_STREAM ON *.* TO 'repl'@'%';
mysql> FLUSH PRIVILEGES;
mysql> SET SQL_LOG_BIN=1;

# 2. 配置 MGR 服务通道,通道名字 group_replication_recovery 是固定的,不能修改
mysql> CHANGE REPLICATION SOURCE TO SOURCE_USER='repl',SOURCE_PASSWORD='Back@123' FOR CHANNEL 'group_replication_recovery';

6、安装插件

powershell 复制代码
mysql> show plugins;
+----------------------------------+----------+--------------------+----------------------+---------+
| Name                             | Status   | Type               | Library              | License |
+----------------------------------+----------+--------------------+----------------------+---------+
| binlog                           | ACTIVE   | STORAGE ENGINE     | NULL                 | GPL     |
| sha256_password                  | ACTIVE   | AUTHENTICATION     | NULL                 | GPL     |
| caching_sha2_password            | ACTIVE   | AUTHENTICATION     | NULL                 | GPL     |
| sha2_cache_cleaner               | ACTIVE   | AUDIT              | NULL                 | GPL     |
| daemon_keyring_proxy_plugin      | ACTIVE   | DAEMON             | NULL                 | GPL     |
| CSV                              | ACTIVE   | STORAGE ENGINE     | NULL                 | GPL     |
| MEMORY                           | ACTIVE   | STORAGE ENGINE     | NULL                 | GPL     |
| InnoDB                           | ACTIVE   | STORAGE ENGINE     | NULL                 | GPL     |
| INNODB_TRX                       | ACTIVE   | INFORMATION SCHEMA | NULL                 | GPL     |
| INNODB_CMP                       | ACTIVE   | INFORMATION SCHEMA | NULL                 | GPL     |
| INNODB_CMP_RESET                 | ACTIVE   | INFORMATION SCHEMA | NULL                 | GPL     |
| INNODB_CMPMEM                    | ACTIVE   | INFORMATION SCHEMA | NULL                 | GPL     |
| INNODB_CMPMEM_RESET              | ACTIVE   | INFORMATION SCHEMA | NULL                 | GPL     |
| INNODB_CMP_PER_INDEX             | ACTIVE   | INFORMATION SCHEMA | NULL                 | GPL     |
| INNODB_CMP_PER_INDEX_RESET       | ACTIVE   | INFORMATION SCHEMA | NULL                 | GPL     |
| INNODB_BUFFER_PAGE               | ACTIVE   | INFORMATION SCHEMA | NULL                 | GPL     |
| INNODB_BUFFER_PAGE_LRU           | ACTIVE   | INFORMATION SCHEMA | NULL                 | GPL     |
| INNODB_BUFFER_POOL_STATS         | ACTIVE   | INFORMATION SCHEMA | NULL                 | GPL     |
| INNODB_TEMP_TABLE_INFO           | ACTIVE   | INFORMATION SCHEMA | NULL                 | GPL     |
| INNODB_METRICS                   | ACTIVE   | INFORMATION SCHEMA | NULL                 | GPL     |
| INNODB_FT_DEFAULT_STOPWORD       | ACTIVE   | INFORMATION SCHEMA | NULL                 | GPL     |
| INNODB_FT_DELETED                | ACTIVE   | INFORMATION SCHEMA | NULL                 | GPL     |
| INNODB_FT_BEING_DELETED          | ACTIVE   | INFORMATION SCHEMA | NULL                 | GPL     |
| INNODB_FT_CONFIG                 | ACTIVE   | INFORMATION SCHEMA | NULL                 | GPL     |
| INNODB_FT_INDEX_CACHE            | ACTIVE   | INFORMATION SCHEMA | NULL                 | GPL     |
| INNODB_FT_INDEX_TABLE            | ACTIVE   | INFORMATION SCHEMA | NULL                 | GPL     |
| INNODB_TABLES                    | ACTIVE   | INFORMATION SCHEMA | NULL                 | GPL     |
| INNODB_TABLESTATS                | ACTIVE   | INFORMATION SCHEMA | NULL                 | GPL     |
| INNODB_INDEXES                   | ACTIVE   | INFORMATION SCHEMA | NULL                 | GPL     |
| INNODB_TABLESPACES               | ACTIVE   | INFORMATION SCHEMA | NULL                 | GPL     |
| INNODB_COLUMNS                   | ACTIVE   | INFORMATION SCHEMA | NULL                 | GPL     |
| INNODB_VIRTUAL                   | ACTIVE   | INFORMATION SCHEMA | NULL                 | GPL     |
| INNODB_CACHED_INDEXES            | ACTIVE   | INFORMATION SCHEMA | NULL                 | GPL     |
| INNODB_SESSION_TEMP_TABLESPACES  | ACTIVE   | INFORMATION SCHEMA | NULL                 | GPL     |
| MyISAM                           | ACTIVE   | STORAGE ENGINE     | NULL                 | GPL     |
| MRG_MYISAM                       | ACTIVE   | STORAGE ENGINE     | NULL                 | GPL     |
| PERFORMANCE_SCHEMA               | ACTIVE   | STORAGE ENGINE     | NULL                 | GPL     |
| TempTable                        | ACTIVE   | STORAGE ENGINE     | NULL                 | GPL     |
| ARCHIVE                          | ACTIVE   | STORAGE ENGINE     | NULL                 | GPL     |
| BLACKHOLE                        | ACTIVE   | STORAGE ENGINE     | NULL                 | GPL     |
| FEDERATED                        | DISABLED | STORAGE ENGINE     | NULL                 | GPL     |
| ndbcluster                       | DISABLED | STORAGE ENGINE     | NULL                 | GPL     |
| ndbinfo                          | DISABLED | STORAGE ENGINE     | NULL                 | GPL     |
| ndb_transid_mysql_connection_map | DISABLED | INFORMATION SCHEMA | NULL                 | GPL     |
| ngram                            | ACTIVE   | FTPARSER           | NULL                 | GPL     |
| mysqlx_cache_cleaner             | ACTIVE   | AUDIT              | NULL                 | GPL     |
| mysqlx                           | ACTIVE   | DAEMON             | NULL                 | GPL     |
| mysql_native_password            | DISABLED | AUTHENTICATION     | NULL                 | GPL     |
| group_replication                | ACTIVE   | GROUP REPLICATION  | group_replication.so | GPL     |
+----------------------------------+----------+--------------------+----------------------+---------+
49 rows in set (0.00 sec)

# 查看最后一行的group_replication.so插件有没有,如果没有就安装,这里已经有了不需要安装了

# 如果没有,则安装
mysql> INSTALL PLUGIN group_replication SONAME 'group_replication.so';
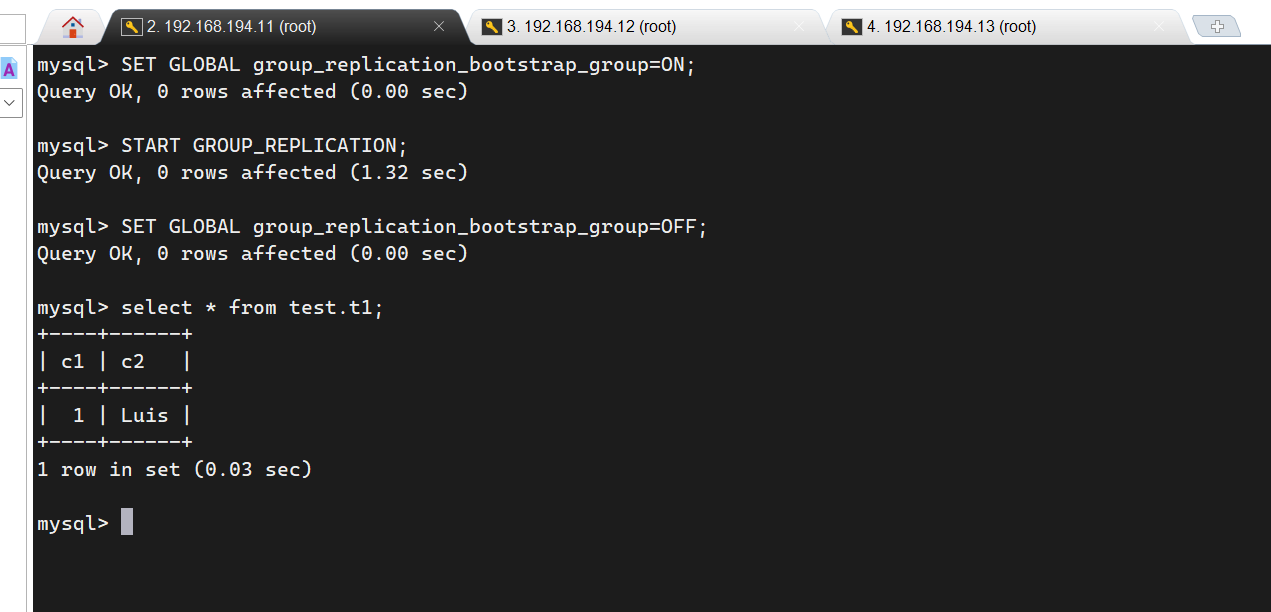
7、启动节点

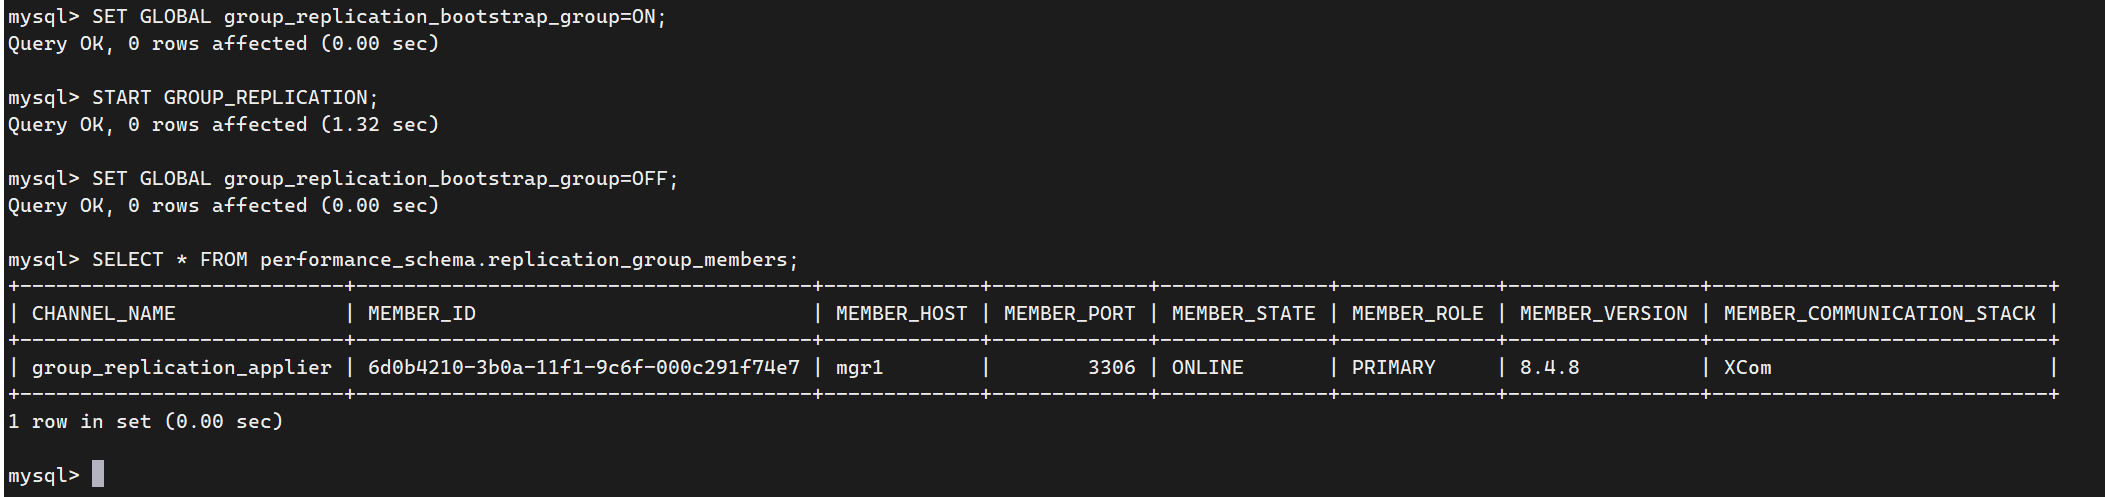
首次启动组的过程称为引导(bootstrapping)。可以使用 group_replication_bootstrap_group 系统变量来引导一个组。引导操作只能由启动该组的单个服务器执行,且只能执行一次。这就是为什么group_replication_bootstrap_group 选项的值没有存储在实例的选项文件中的原因。如果将其保存在选项文件中,则服务器在重启时会自动引导第二个同名组。这将导致出现两个同名但不同的组。同样的逻辑也适用于在将此选项设置为 ON 的情况停止和重新启动插件。因此,为了安全地引导组,请连接到 mgr1 节点并执行以下语句:

做这个之前一定一定要关闭这几个配置

powershell 复制代码
systemctl stop firewalld
systemctl disable firewalld
setenforce 0
sed -i 's/^SELINUX=enforcing/SELINUX=disabled/' /etc/selinux/config

只启动第一个节点mgr1

powershell 复制代码
mysql> SET GLOBAL group_replication_bootstrap_group=ON;
mysql> START GROUP_REPLICATION;
mysql> SET GLOBAL group_replication_bootstrap_group=OFF;

查看节点状态

powershell 复制代码
mysql> SELECT * FROM performance_schema.replication_group_members;
+---------------------------+--------------------------------------+-------------+-------------+---------------+-------------+----------------+----------------------------+
| CHANNEL_NAME              | MEMBER_ID                            | MEMBER_HOST | MEMBER_PORT | MEMBER_STATE  | MEMBER_ROLE | MEMBER_VERSION | MEMBER_COMMUNICATION_STACK |
+---------------------------+--------------------------------------+-------------+-------------+---------------+-------------+----------------+----------------------------+
| group_replication_applier | ce9be252-2b71-11e6-b8f4-00212844f856 |   s1        |       3306  | ONLINE        |             |                | XCom                       |
+---------------------------+--------------------------------------+-------------+-------------+---------------+-------------+----------------+----------------------------+
1 row in set (0.0108 sec)

测试,在mgr1节点中加入测试数据

powershell 复制代码
mysql> CREATE DATABASE test;
mysql> USE test;
mysql> CREATE TABLE t1 (c1 INT PRIMARY KEY, c2 TEXT NOT NULL);
mysql> INSERT INTO t1 VALUES (1, 'Luis');

mysql> SELECT * FROM t1;
+----+------+
| c1 | c2   |
+----+------+
|  1 | Luis |
+----+------+

mysql> SHOW BINLOG EVENTS;
+---------------+-----+----------------+-----------+-------------+--------------------------------------------------------------------+
| Log_name      | Pos | Event_type     | Server_id | End_log_pos | Info                                                               |
+---------------+-----+----------------+-----------+-------------+--------------------------------------------------------------------+
| binlog.000001 |   4 | Format_desc    |         1 |         123 | Server ver: 8.4.8-log, Binlog ver: 4                              |
| binlog.000001 | 123 | Previous_gtids |         1 |         150 |                                                                    |
| binlog.000001 | 150 | Gtid           |         1 |         211 | SET @@SESSION.GTID_NEXT= 'aaaaaaaa-aaaa-aaaa-aaaa-aaaaaaaaaaaa:1'  |
| binlog.000001 | 211 | Query          |         1 |         270 | BEGIN                                                              |
| binlog.000001 | 270 | View_change    |         1 |         369 | view_id=14724817264259180:1                                        |
| binlog.000001 | 369 | Query          |         1 |         434 | COMMIT                                                             |
| binlog.000001 | 434 | Gtid           |         1 |         495 | SET @@SESSION.GTID_NEXT= 'aaaaaaaa-aaaa-aaaa-aaaa-aaaaaaaaaaaa:2'  |
| binlog.000001 | 495 | Query          |         1 |         585 | CREATE DATABASE test                                               |
| binlog.000001 | 585 | Gtid           |         1 |         646 | SET @@SESSION.GTID_NEXT= 'aaaaaaaa-aaaa-aaaa-aaaa-aaaaaaaaaaaa:3'  |
| binlog.000001 | 646 | Query          |         1 |         770 | use `test`; CREATE TABLE t1 (c1 INT PRIMARY KEY, c2 TEXT NOT NULL) |
| binlog.000001 | 770 | Gtid           |         1 |         831 | SET @@SESSION.GTID_NEXT= 'aaaaaaaa-aaaa-aaaa-aaaa-aaaaaaaaaaaa:4'  |
| binlog.000001 | 831 | Query          |         1 |         899 | BEGIN                                                              |
| binlog.000001 | 899 | Table_map      |         1 |         942 | table_id: 108 (test.t1)                                            |
| binlog.000001 | 942 | Write_rows     |         1 |         984 | table_id: 108 flags: STMT_END_F                                    |
| binlog.000001 | 984 | Xid            |         1 |        1011 | COMMIT /* xid=38 */                                                |
+---------------+-----+----------------+-----------+-------------+--------------------------------------------------------------------+

8、启动其他两个节点

进入mgr2和mgr3的MySQL中,执行以下命令即可

powershell 复制代码
START GROUP_REPLICATION;

接着在其他两个节点的任意节点中查看数据库是否从mgr1中同步过来

powershell 复制代码
show databases;

# 如果发现了新创建的数据库就说明数据已经同步过来了

接着在mgr2/mgr2进行写数据测试

powershell 复制代码
use test;
insert into t1 values(2,'Tom');

9、切换主节点

官网操作的位置(MySQL版本为8.4.4):https://dev.mysql.com/doc/refman/8.4/en/group-replication-change-primary.html

powershell 复制代码
SELECT group_replication_set_as_primary(member_uuid);

现在就可以看到,主节点切换成功了,mgr3成为了主节点

10、切换模式

在命令行模式下,可以调用 group_replication_switch_to_single_primary_mode() 和group_replication_switch_to_multi_primary_mode() 来切换单主/多主模式。

多主模式

切换为多主模式,到mgr1节点去执行

powershell 复制代码
SELECT group_replication_switch_to_multi_primary_mode();
powershell 复制代码
# 查看节点的状态
SELECT * FROM performance_schema.replication_group_members;

插入测试数据,三个节点分别执行一句,会发现,现在每个节点都可以进行写数据操作了。

powershell 复制代码
insert into test.t1 values(3,'Jerry');
insert into test.t1 values(4,'Peter');
insert into test.t1 values(5,'Jack');
单主模式

参考官方文档:https://dev.mysql.com/doc/refman/8.4/en/group-replication-changing-group-mode.html

powershell 复制代码
# 随机某个节点为主节点的单主模式
SELECT group_replication_switch_to_single_primary_mode();

# 指定某个节点uuid来设置单主模式
SELECT group_replication_switch_to_single_primary_mode(member_uuid);

测试

powershell 复制代码
# 随机找一个节点进行测试,会发现,主节点是随机选取的
SELECT group_replication_switch_to_single_primary_mode();
powershell 复制代码
SELECT group_replication_switch_to_single_primary_mode(member_uuid);

11、停止组复制

powershell 复制代码
# 找到主节点,在主节点上进行操作,主节点为mgr1
stop group_replication;

然后去mgr2/mg3查看节点的状态

然后挨个将所有主机都停掉

接着重新启动所有节点开始组复制,以下命令三台中任意一台执行均可

powershell 复制代码
mysql> SET GLOBAL group_replication_bootstrap_group=ON;
mysql> START GROUP_REPLICATION;
mysql> SET GLOBAL group_replication_bootstrap_group=OFF;

然后其他节点只需要使用以下命令就可以让三个节点重新开始组复制了。

powershell 复制代码
START GROUP_REPLICATION;

tch_to_single_primary_mode();

复制代码
[外链图片转存中...(img-2WQeXu4P-1776679898415)]

```powershell
SELECT group_replication_switch_to_single_primary_mode(member_uuid);

外链图片转存中...(img-OHxvbS4d-1776679898415)

11、停止组复制

powershell 复制代码
# 找到主节点,在主节点上进行操作,主节点为mgr1
stop group_replication;

外链图片转存中...(img-1U6xCuxY-1776679898415)

然后去mgr2/mg3查看节点的状态

外链图片转存中...(img-kQ8QpuS0-1776679898415)

然后挨个将所有主机都停掉

接着重新启动所有节点开始组复制,以下命令三台中任意一台执行均可

powershell 复制代码
mysql> SET GLOBAL group_replication_bootstrap_group=ON;
mysql> START GROUP_REPLICATION;
mysql> SET GLOBAL group_replication_bootstrap_group=OFF;

外链图片转存中...(img-8zvK0qBX-1776679898415)

然后其他节点只需要使用以下命令就可以让三个节点重新开始组复制了。

powershell 复制代码
START GROUP_REPLICATION;
相关推荐
当战神遇到编程2 小时前
MySQL核心篇:增删改查(CRUD)
数据库·mysql
2201_761040592 小时前
MySQL中如何利用REPLACE函数替换文本_MySQL字符串替换技巧
jvm·数据库·python
qq_330037992 小时前
将数据库中的 UTC 时间准确转换为英国夏令时(BST)的 PHP 实现方法
jvm·数据库·python
2401_887724502 小时前
mysql如何通过调整临时表空间配置优化查询_优化innodb_temp_data_file_path
jvm·数据库·python
qq_654366982 小时前
如何配置Oracle环境变量_ORACLE_HOME与PATH路径映射
jvm·数据库·python
猿小喵2 小时前
记录一次长时间未提交事务造成的慢SQL
数据库·sql·mysql
pele2 小时前
bootstrap怎么实现带有验证状态的表单
jvm·数据库·python
上海合宙LuatOS2 小时前
LuatOS扩展库API——【 lbsLoc2】免费版单基站定位
数据库·物联网·oracle·junit·lua·luatos
蜡台2 小时前
Centos 安装Mysql
linux·mysql·centos·yum·mysql8