第3章(2)------使用Gradio JavaScript Client
-
- [3.2 使用Gradio JavaScript Client](#3.2 使用Gradio JavaScript Client)
-
- [3.2.1 JS运行方式:Node.js、CDN及PLAYCODE](#3.2.1 JS运行方式:Node.js、CDN及PLAYCODE)
- [3.2.2 连接到Gradio应用](#3.2.2 连接到Gradio应用)
-
- [1. 通过URL或Space ID连接](#1. 通过URL或Space ID连接)
- [2. duplicate()和hf_token](#2. duplicate()和hf_token)
- [3.2.3 查看可用API:函数view_api()和页脚链接](#3.2.3 查看可用API:函数view_api()和页脚链接)
- [3.2.4 使用API:直接调用predict()](#3.2.4 使用API:直接调用predict())
- [3.2.5 使用API:异步调用job与events](#3.2.5 使用API:异步调用job与events)
3.2 使用Gradio JavaScript Client
JavaScript Client非常易于将任意Gradio应用程序用作API,由于Python Client部分已经讲述了大部分Gradio应用的代码原理,因此本节不再重复解释,而是将对应Python命令替换为JavaScript方式,以减少篇幅。
3.2.1 JS运行方式:Node.js、CDN及PLAYCODE
Gradio的JavaScript Client包被命名为@gradio/client,它有三种安装运行方式:Node、CDN和在线环境PLAYCODE,本小节分别讲述。
脚本:Node.js 。除了@gradio/client库,@gradio还包括其他库,比如audio、image、video、chatbot及gallery等。安装@gradio/client库需要用到包管理器npm,而npm包含在Node.js中,要求其版本>=18.0.0。安装及试运行步骤如下:
(1)首先,安装Node.js。下面命令可以直接在终端运行也可以保存为bash脚本后,通过bash命令运行:
bash
# installs nvm (Node Version Manager)
$ curl -o- https://raw.githubusercontent.com/nvm-sh/nvm/v0.39.7/install.sh | bash
# download and install Node.js (you may need to restart the terminal)
$ nvm install 20

# verifies the right Node.js version is in the environment
$ node -v # should print `v20.15.1`
# verifies the right NPM version is in the environment
$ npm -v # should print `10.7.0`
(2)然后,使用npm或其他包管理器安装@gradio/client。将@gradio/client添加到项目依赖项中,以便将其导入JavaScript或TypeScript文件,命令如下:
bash
$ npm i @gradio/client
added 64 packages in 10s
10 packages are looking for funding
    run `npm fund` for details
(3)最后,测试简单的脚本以验证安装。比如在控制台输出日志,如代码3-13所示:
代码3-13
python
import { Client } from "@gradio/client";
const app = await Client.connect("user/space-name");
const result = await app.predict("/predict");
console.log(result )
保存为hello.js,使用命令node运行:node hello.js。实际运行时需替换连接的SpaceID。另外,安装过程中需注意:
- 使用Ubuntu 24.04系统的apt-get命令并不能安装正确版本的Node.js或npm,因为其内置的Node.js版本只有12.XX,并且不包含npm。
- 除了脚本方式,还可以通过Ubuntu software软件中心安装。
关于npm使用@gradio/client的更多方法请参阅:🖇️链接3-1。
网页:jsDelivr CDN。在Web项目中,可以使用jsDelivr CDN将@gradio/client加载到HTML文件,完整示例如代码3-14所示:
代码3-14
html
<!DOCTYPE html>
<html lang="en">
  <head>
    <meta charset="UTF-8">
    <meta name="viewport" content="width=device-width, initial-scale=1.0">
    <link rel="stylesheet" href="src/style.css">
    <script type="module" src="https://cdn.jsdelivr.net/npm/@gradio/client/dist/index.min.js"></script>
  </head>
  <body>
    <h1 id="header"></h1>
    <script type="module" src="src/script.js"></script>
  </body>
</html>
首先,一定要将包含@gradio/client的<script>添加到<head>内,这将安装新版@gradio/client。将<script>放到<head>中尽管有一定局限性,但非常适合实验或原型制作,在生产环境中应该硬编码版本。然后,将JavaScript脚本放在<body>的<script>的src属性。script.js内容如代码3-15所示:
代码3-15
python
import { Client } from "@gradio/client";
(async () => {
const app = await Client.connect("abidlabs/whisper");
const app_info = await app.view_api();
console.log(app_info);
})();代码中,客户端连接Gradio应用,然后通过view_api()查看可用API。在运行带有关键字await的示例程序时,可能会报以下错误:Top-level await is currently not supported with the "cjs" output format.。这是因为默认情况下,顶层的await不会被所有JavaScript运行时环境或编译工具所支持。这时只需要用async()方法将await关键字包裹即可,或在本地运行。详细用法可参考jsDelivr官网:🖇️链接3-2。
在线运行平台:PLAYCODE 。为了演示jsDelivr CDN方式使用@gradio/client,同时也便于使用Spaces中的Gradio应用,引入在线运行平台PLAYCODE(🖇️链接3-3)。PLAYCODE界面简洁,支持JavaScript、TypeScript、Html、Css、React、Vue、Svelte等多种语言及和其相关的运行库,并且可以在线安装所需包,非常便于在线开发小程序。步骤如下:
(1)打开官网后单击"Start coding",在Popular templates选择JavaScript。
(2)在文件index.html中输入代码3-14,并在script.js输入代码3-15。
(3)在左侧导航栏"PACKAGES"中安装@gradio/client。运行后界面如图3-7所示:
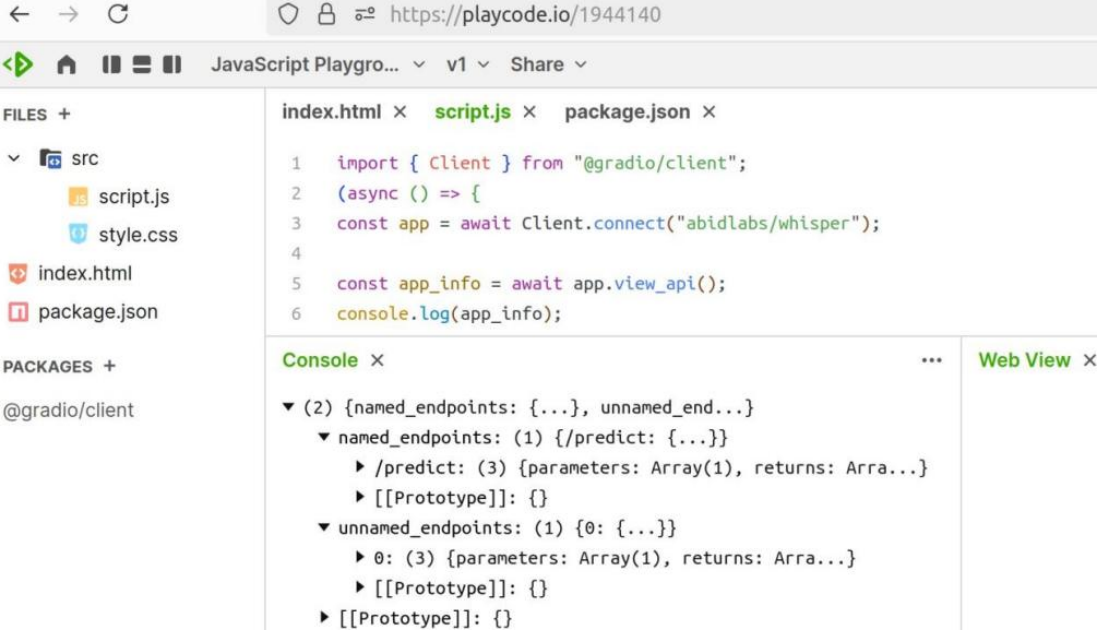
图3-7
PLAYCODE主要演示了jsDelivr CDN的使用方式,但其代码也适用于Node.js。另外,国内读者也可以尝试线上环境Lightly🖇️链接3-4。
3.2.2 连接到Gradio应用
JavaScript连接Gradio有两种方式:URL和Space ID,连接时可能会用到辅助方法duplicate()以及验证身份的hf_token,下面分别讲述。
1. 通过URL或Space ID连接
首先,实例化客户端时,可以通过Space ID或URL两种方式连接到Spaces或其他网络正在运行的Gradio应用。若Gradio应用需要用户名和密码认证,请将认证信息以元组形式传入Client类的auth参数。如代码3-16所示:
代码3-16
python
import { Client } from "@gradio/client";
# 通过URL连接
const app = Client.connect("https://huggingface.co/spaces/gradio/calculator")
# 通过Space ID连接
const app = Client.connect("gradio/calculator")
# 通过auth参数认证用户名和密码
const app = Client.connect(space_name, {auth: [username, password]})
2. duplicate()和hf_token
结合hf_token,duplicate()可无限制访问私有Space时,如代码3-17所示:
代码3-17
js
import { Client } from "@gradio/client";
const response = await fetch(
	"https://audio-samples.github.io/samples/mp3/blizzard_unconditional/sample-0.mp3"
);
const audio_file = await response.blob();

const app = await Client.duplicate("abidlabs/whisper",
   {hf_token: "hf_...", hardware: "a10g-small"});
const transcription = await app.predict("/predict", [audio_file]);
console.log(transcription.data);
3.2.3 查看可用API:函数view_api()和页脚链接
当连接到Gradio应用后,可以调用客户端的view_api()方法查看可用api。在本地运行abidlabs/whisper后,使用URL的形式连接,如代码3-18所示:
代码3-18
js
import { Client } from "@gradio/client";
const app = await Client.connect("http://127.0.0.1:7860");
const app_info = await app.view_api(all_endpoints=True);
console.log(app_info);
将代码保存为后缀名.js的文件后,使用命令node xxx.js运行,输出如下所示:
bash
$ node gradio_client_viewapi.js
{
	"named_endpoints": {
		"/predict": {
			"parameters": [{"label": "text", "component": "Textbox", "type": "string"}],
			"returns": [{"label": "output", "component": "Textbox", "type": "string"}]
		}
	},
	"unnamed_endpoints": {}
}
当Gradio应用程序具有未命名的API端点时,可以设置all_endpoints来显示这些端点。由于版本原因,运行的结果会有一些出入,但差别不大,主要理解用法。
另外,也可以单击Gradio应用界面底部页脚的"通过API使用"链接,查看类似的API信息及示例用法,如图3-8所示:
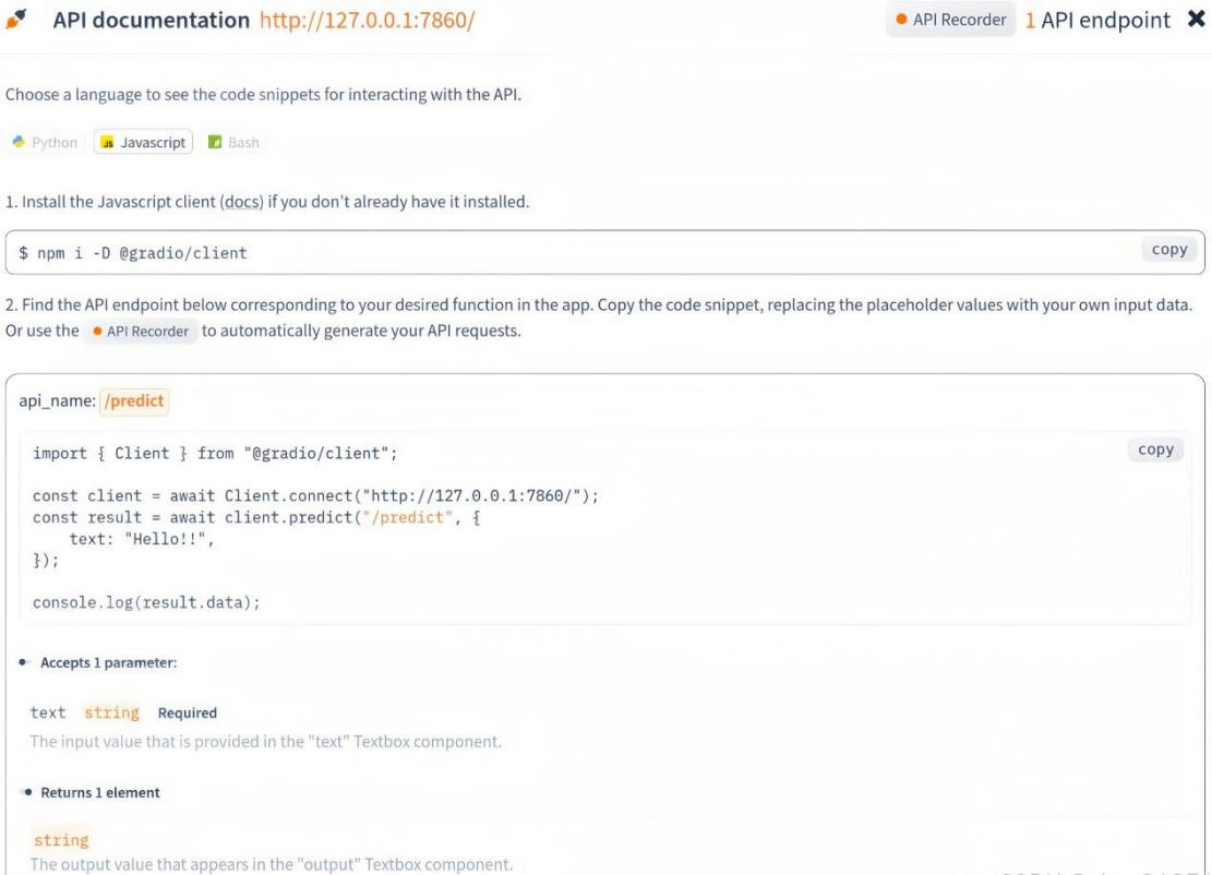
图3-8
3.2.4 使用API:直接调用predict()
JavaScript Client同样有两种使用API的方式:直接调用predict()和异步调用job。直接调用predict()的用法如下所述:
- 单个或多个参数:单个或多个参数的操作方式一样,将所有参数放在数组中传递。
- 多媒体格式:对于图像或音视频,可以根据需要传入Buffer、Blob或File。比如在Node.js中,可以使用Buffer或Blob;在CDN中,可使用Blob或File。
以Node.js脚本为例,传入单参数,如代码3-19所示:
代码3-19
js
import { Client } from "@gradio/client";
const response = await fetch(
	"https://audio-samples.github.io/samples/mp3/blizzard_unconditional/sample-0.mp3"
);
const audio_file = await response.blob();
const app = await Client.connect("abidlabs/whisper");
const result = await app.predict("/predict", [audio_file]);
# console.log(JSON.stringify(result, null, 2));  # 缩进2空格

> (5) {type: "data", time: Tue Jul 23 2024...}
type:"data"
time:Tue Jul 23 2024 10:55:37 GMT+0800 (中国标准时间)
data:(1) [My thought I have nobody by a beauty...]
0:My thought I have nobody by a beauty and will as you poured. Mr. Rochester is sir, but that so don't find simpus, and devoted abode, to at might in a
[[Prototype]]:[]
endpoint:"/predict"
fn_index:0
[[Prototype]]:{}
注意:对于预测结果,可以通过JSON.stringify()进行Json字符化处理。
3.2.5 使用API:异步调用job与events
predict()是一个阻塞操作,由其创建的Job在后台运行,使用可迭代接口获取返回的结果。这对可迭代端点或生成器端点特别有用,会随时间返回一系列的离散响应值。
Job常规方法。首先利用Client提交接口和参数创建job,然后循环等待迭代端点返回结果,等结果全部返回后再在控制台输出。等待过程中,可随时使用cancel()方法,取消已排队但尚未启动的作业。示例如代码3-20所示:
代码3-20
js
import { Client } from "@gradio/client";
import time
function log_result(payload) {
	const {data: [translation]} = payload;
	console.log(`The translated result is: ${translation}`);}

const app = await Client.connect("abidlabs/en2fr");
const job = app.submit("/predict", ["Hello"]);
start_time = time.time()
for await (const message of job) {
    log_result(message);}

setTimeout(() => {job.cancel();}, 3000);
函数log_result()期望接收的payload参数是一个包含data属性的对象,且data是一个至少包含一个元素的数组。函数会提取数组中的第一个元素作为翻译结果,并在控制台输出格式化的结果信息。通过超时函数setTimeout()在3秒后取消作业。
events分离数据与状态信息。在连接Gradio应用时,默认返回数据。但在实例化客户端时,可通过设置接口connect()的事件参数events,将status和data作为数组传递给events,告诉客户端获取正在运行作业的状态和数据,示例如代码3-21所示:
代码3-21
js
import { Client } from "@gradio/client";
function log_status(status) {
	console.log(
		`The current status for this job is: ${JSON.stringify(status, null, 2)}.`);}
const app = await Client.connect("abidlabs/en2fr", {
	events: ["status", "data"]});

const job = app.submit("/predict", ["Hello"]);
for await (const message of job) {
	if (message.type === "status") {
		log_status(message);}
	else
	  console.log(`return data is:${JSON.stringify(message, null, 2)}`);}
根据作业返回消息中的数据类型,打印出不同结果。Colab运行结果如图3-9:
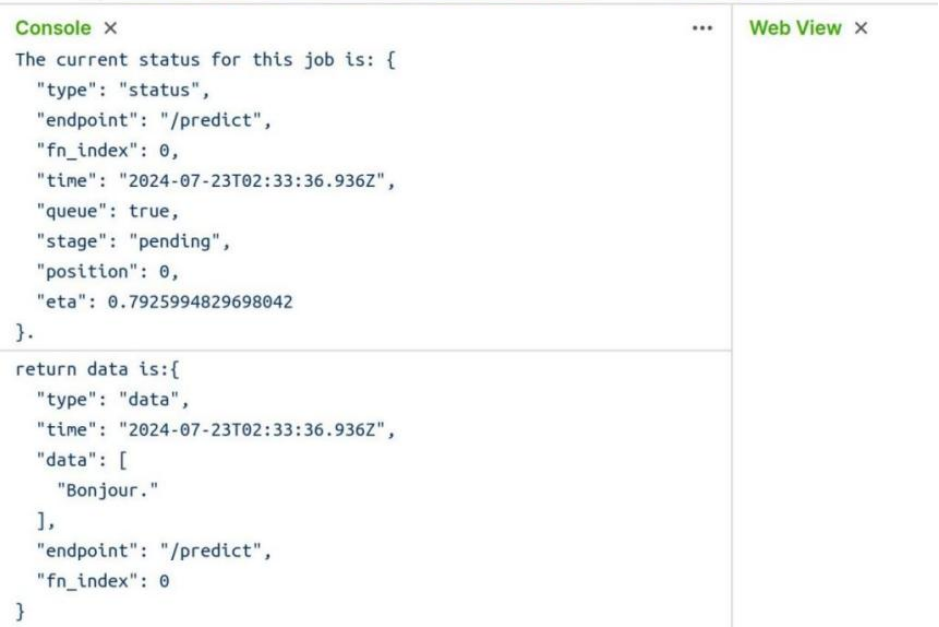
图3-9
返回的状态包括以下属性:type(数据类型),fn_index(标识迭代时的数据索引),stage(作业状态,如"pending" | "generating" | "complete" | "error"),其他返回的数据的属性类似,不再重复。