flowgpt 可以看不同Agent角色的 prompt
代码练习
Agent实现搜索
{% tabs Agent实现搜索 , 1 %}
配置环境,先去搞一下 API Keys
python
import os
from dotenv import load_dotenv

load_dotenv()

GOOGLE_API_KEY = os.getenv("GOOGLE_API_KEY")
os.environ["GOOGLE_API_KEY"] = GOOGLE_API_KEY
load_dotenv() 作用是去找 .env 文件夹,默认先从当前文件夹找,找不到就一直向上回溯
python
from google.adk.agents import Agent
from google.adk.models.google_llm import Gemini
from google.adk.runners import InMemoryRunner
from google.adk.tools import google_search
from google.genai import types
在使用大语言模型时,可能会遇到诸如速率限制或暂时性服务不可用等瞬时错误。重试选项通过使用指数退避算法重新尝试请求,从而自动处理这些故障。
python
retry_config=types.HttpRetryOptions(
    attempts=5,
    exp_base=7,
    initial_delay=1,
    http_status_codes=[429, 500, 503, 504]
)-
名称(name)和描述(description):一个简单的名称和描述来识别我们的智能体。
-
模型(model):驱动智能体推理的具体大语言模型。我们使用 "gemini-2.5-flash-lite"。
-
指令(instruction):智能体的引导提示词。这告诉智能体其目标是什么以及如何表现。
-
工具(tools):智能体可以使用的工具列表。我们为其提供 "google_search" 工具,让它可以查找网上的最新信息。
python
root_agent = Agent(
    name="yhj_dog",
    model=Gemini(
        model="gemini-2.5-flash-lite",
        retry_options=retry_config,
    ),
    description="A simple agent that can answer general questions.",
    instruction="You are a helpful assistant. Use Google Search for current info or if unsure.",
    tools=[google_search],
)
这里只是让定义 run 起来,但是还没使用
python
runner = InMemoryRunner(agent=root_agent)

print("✅ Runner created.")
提问
python
response = await runner.run_debug(
    "What is Agent Development Kit from Google? What language is the SDK available in?"
)
使用互联网工具查询天气
python
response = await runner.run_debug("What's the weather in London?")
- 在命令行中导出 GOOGLE_API_KEY
bash
export GOOGLE_API_KEY=xxxx- 创建智能体
bash
adk create sample_agent --model gemini-2.5-flash-lite --api_key $GOOGLE_API_KEY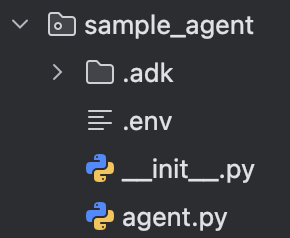
创建完智能体,它会帮我们生成一个专属的目录,以智能体名字命名,里面包含 .env(存GOOGLE_API_KEY),agent.py 用来存我们创建 agent 的代码,没什么特别的,创建完就是下面这个
python
from google.adk.agents.llm_agent import Agent

root_agent = Agent(
    model='gemini-2.5-flash-lite',
    name='root_agent',
    description='A helpful assistant for user questions.',
    instruction='Answer user questions to the best of your knowledge',
)
所以,如果我们自己定义好了 agent(必须是 agent.py 文件名)以及 .env 文件夹、__init__.py,我们也可以直接使用如下命令来运行智能体。
{% note warning %}
试了一下,__init__.py 里面是否有内容,以及 __init__.py 是否存在都没影响运行。使用 adk create 创建的智能体默认带这个文件,并且默认内容是
python
from . import agent不知道什么含义
{% endnote %}
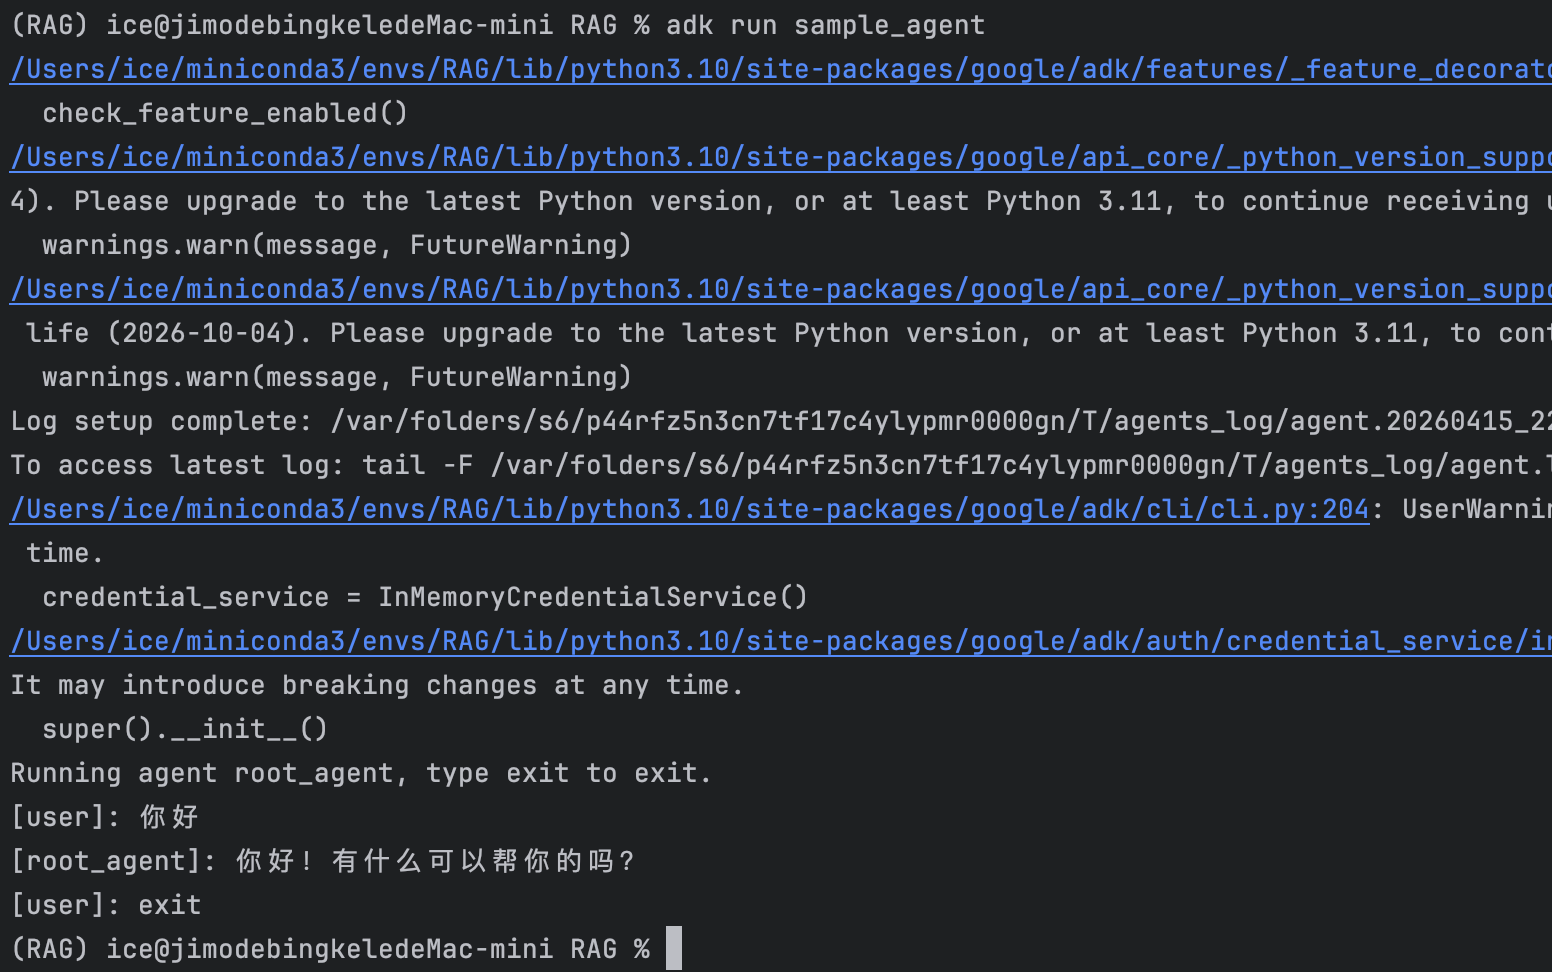
bash
adk run 文件名注意嗷,这是在命令行里面跟智能体交互,不是在 WebUI。
- 打开 Web UI
bash
adk web --port 8000默认在 8000 端口
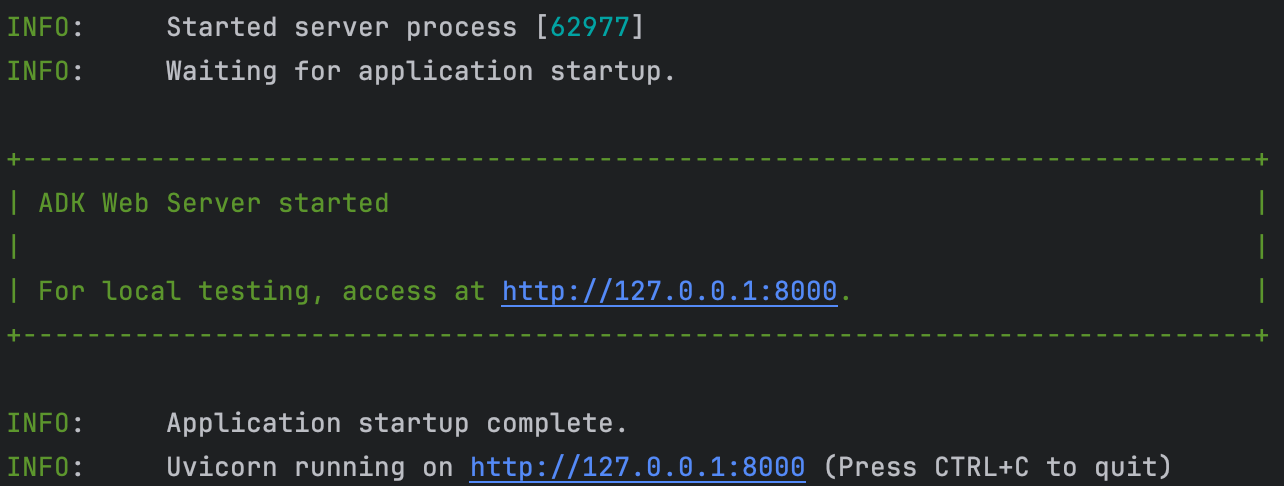
界面如下
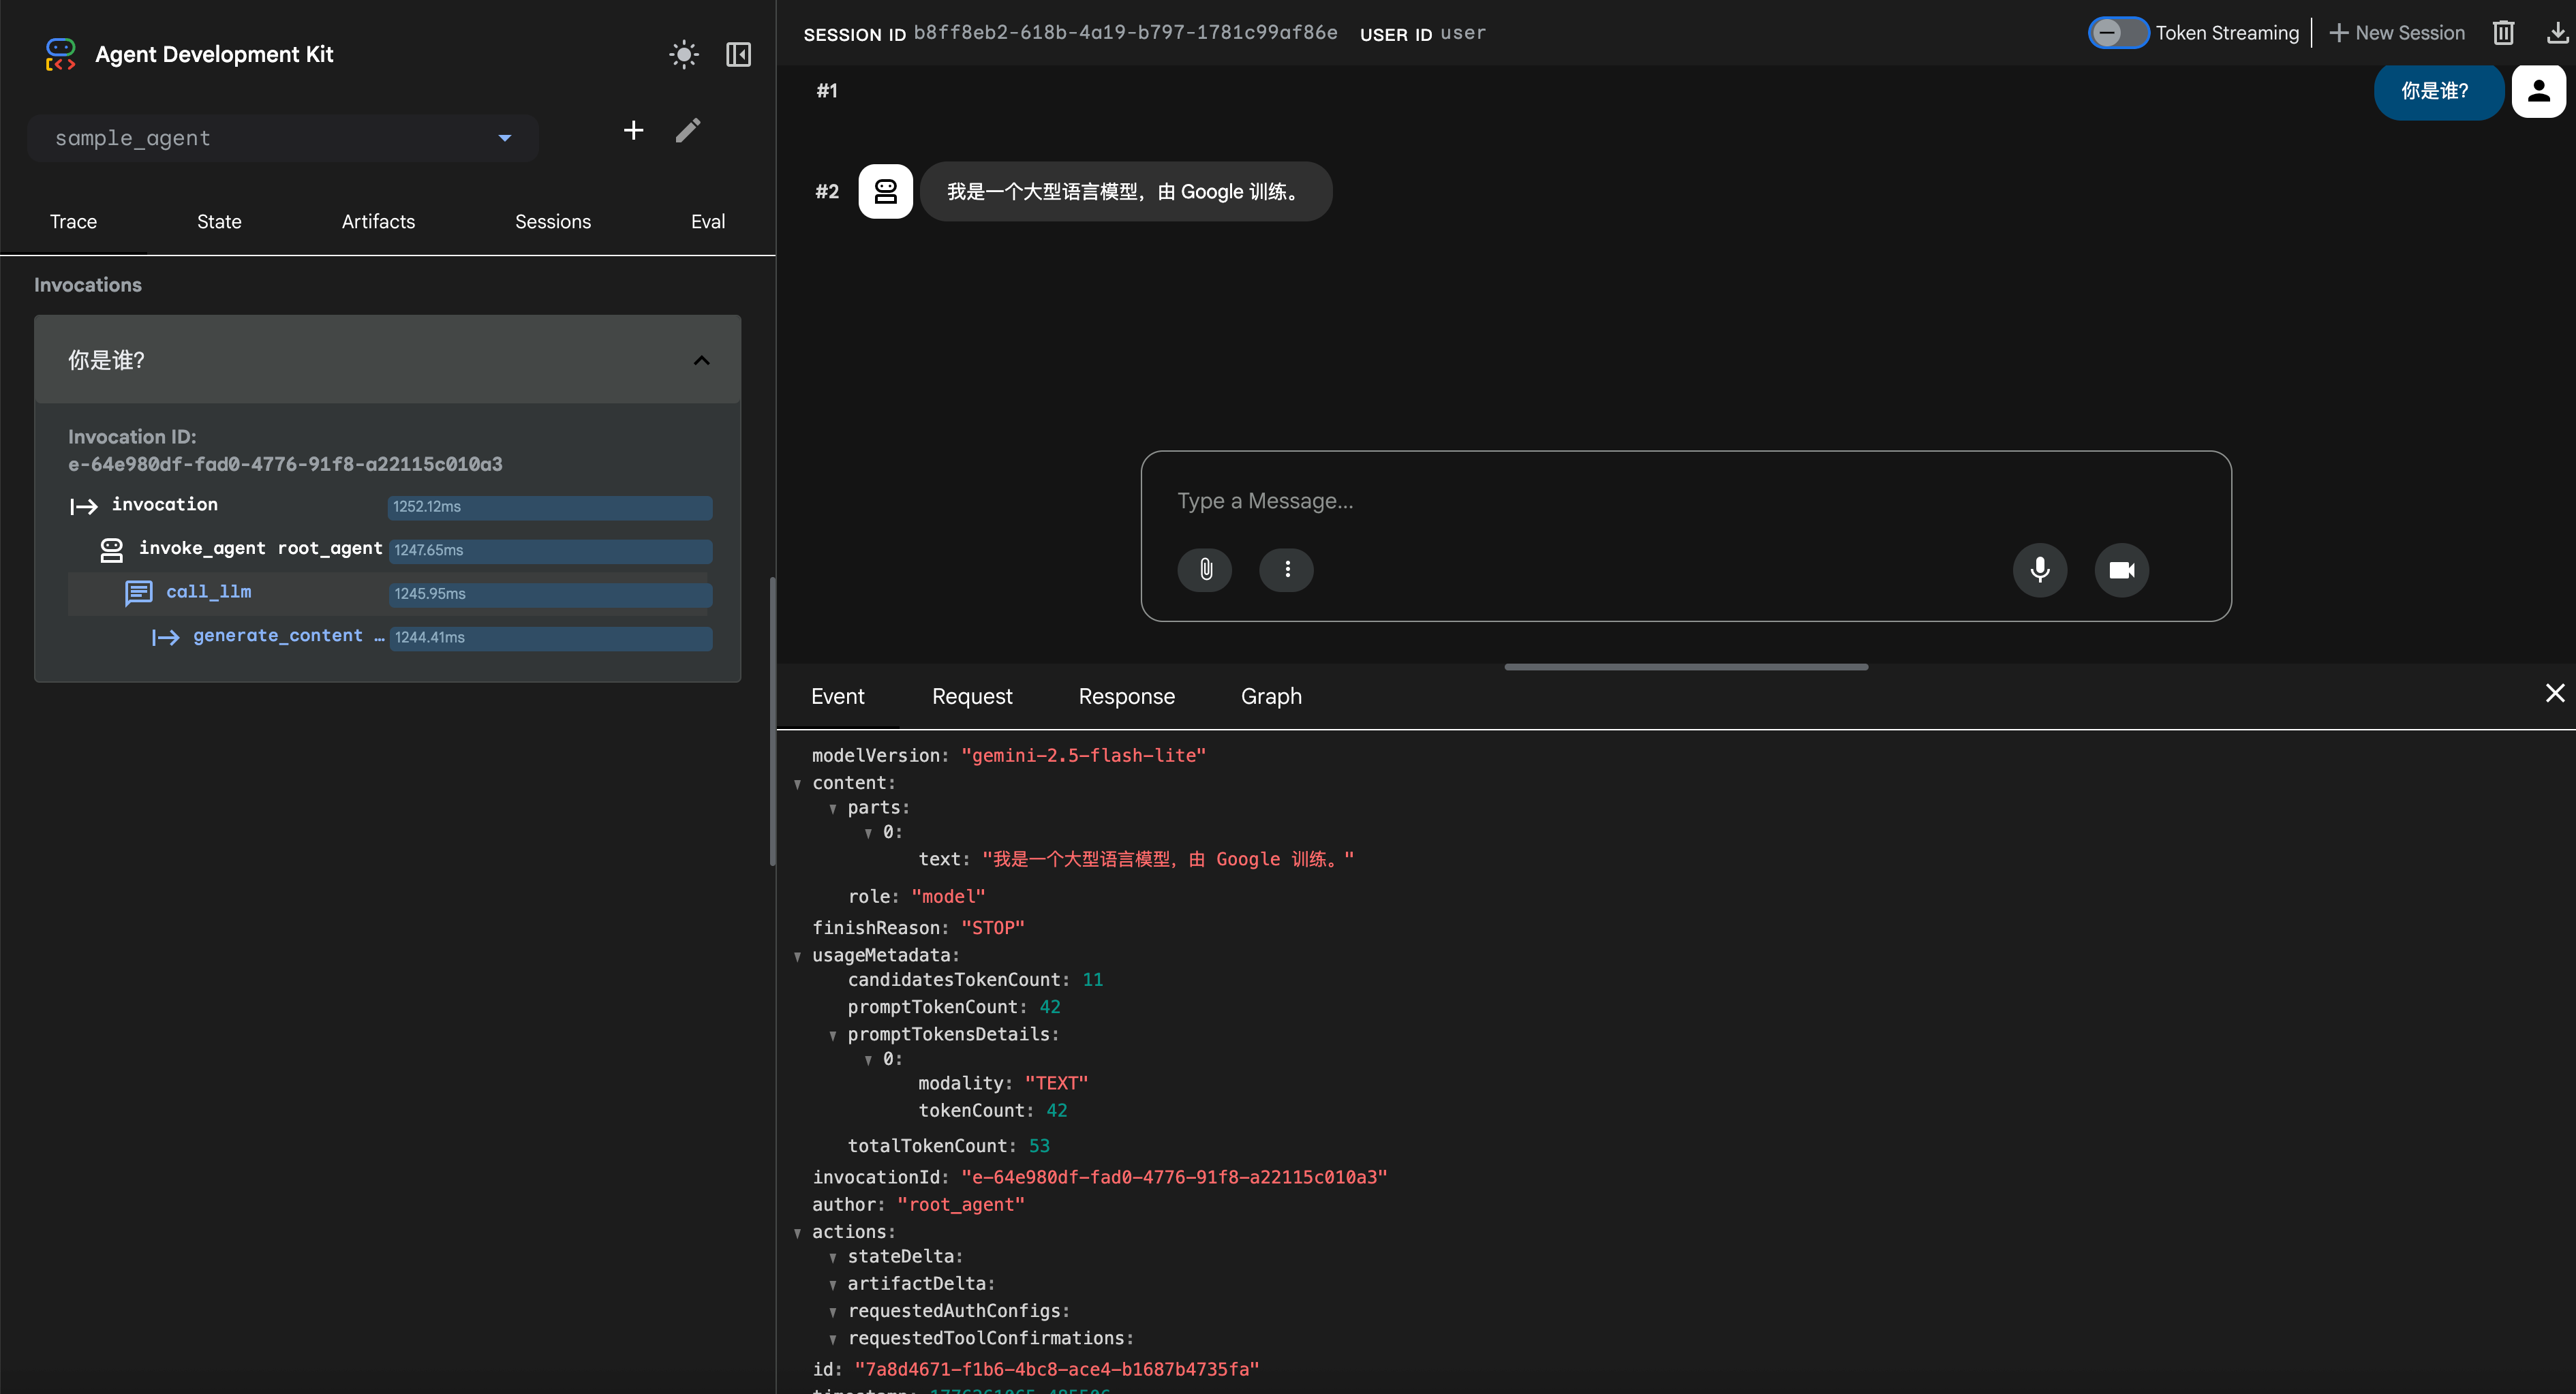
这就是在WebUI上跟智能体交互,选择了某个智能体,就相当于 run 了智能体,发送消息就代表在交互了
{% endtabs %}
智能体架构(多智能体)
Multi-Agent System
python
import os
from dotenv import load_dotenv

load_dotenv()

GOOGLE_API_KEY = os.getenv("GOOGLE_API_KEY")
os.environ["GOOGLE_API_KEY"] = GOOGLE_API_KEY
python
from google.adk.agents import Agent, SequentialAgent, ParallelAgent, LoopAgent
from google.adk.models.google_llm import Gemini
from google.adk.runners import InMemoryRunner
from google.adk.tools import AgentTool, FunctionTool, google_search
from google.genai import types

print("✅ ADK components imported successfully.")
python
retry_config=types.HttpRetryOptions(
    attempts=5,  # Maximum retry attempts
    exp_base=7,  # Delay multiplier
    initial_delay=1,
    http_status_codes=[429, 500, 503, 504], # Retry on these HTTP errors
)
python
# Research Agent: Its job is to use the google_search tool and present findings.
research_agent = Agent(
    name="ResearchAgent",
    model=Gemini(
        model="gemini-2.5-flash-lite",
        retry_options=retry_config
    ),
    instruction="""You are a specialized research agent. Your only job is to use the google_search tool
    to find 2-3 pieces of relevant information on the given topic and present the findings with citations.
    """,
    tools=[google_search],
    output_key="research_findings", # The result of this agent will be stored in the session state with this key.
)

print("✅ research_agent created.")
instruction 参数是塑造 LlmAgent 行为最关键的因素。它是一个字符串(或返回字符串的函数),用于告知智能体:
- 其核心任务或目标。
- 其性格或角色(例如,"你是一个得力的助手","你是一个机智的海盗")。
- 对其行为的约束(例如,"仅回答关于 X 的问题","绝不透露 Y")。
- 如何以及何时使用其工具(
tools)。应该解释每个工具的用途以及调用它们的环境背景,作为对工具自身描述的补充。 - 期望的输出格式(例如,"以 JSON 格式响应","提供一个无序列表")。
编写有效指令的技巧:
- 清晰且具体:避免含糊不清。清晰地阐述预期的行动和结果。
- 使用 Markdown:通过标题、列表等方式提高复杂指令的可读性。
- 提供示例 (Few-Shot):对于复杂的任务或特定的输出格式,直接在指令中包含示例。
- 引导工具使用:不要只是列出工具;要解释智能体应该在"何时"以及"为何"使用它们。
状态 (State):
- 指令是一个字符串模板,可以使用
{var}语法将动态数值插入到指令中。 {var}用于插入名为var的状态变量的值。{artifact.var}用于插入名为var的产出物(artifact)的文本内容。- 如果状态变量或产出物不存在,智能体将报错。如果你想忽略该错误,可以在变量名后添加一个
?,例如{var?}。
guiding agents with clear and specific instructions
python
# Summarizer Agent: Its job is to summarize the text it receives.
summarizer_agent = Agent(
    name="SummarizerAgent",
    model=Gemini(
        model="gemini-2.5-flash-lite",
        retry_options=retry_config
    ),
    # The instruction is modified to request a bulleted list for a clear output format.
    instruction="""Read the provided research findings: {research_findings}
Create a concise summary as a bulleted list with 3-5 key points.""",
    output_key="final_summary",
)

print("✅ summarizer_agent created.")
python
# Root Coordinator: Orchestrates the workflow by calling the sub-agents as tools.
root_agent = Agent(
    name="ResearchCoordinator",
    model=Gemini(
        model="gemini-2.5-flash-lite",
        retry_options=retry_config
    ),
    # This instruction tells the root agent HOW to use its tools (which are the other agents).
    instruction="""You are a research coordinator. Your goal is to answer the user's query by orchestrating a workflow.
1. First, you MUST call the `ResearchAgent` tool to find relevant information on the topic provided by the user.
2. Next, after receiving the research findings, you MUST call the `SummarizerAgent` tool to create a concise summary.
3. Finally, present the final summary clearly to the user as your response.""",
    # We wrap the sub-agents in `AgentTool` to make them callable tools for the root agent.
    tools=[AgentTool(research_agent), AgentTool(summarizer_agent)],
)

print("✅ root_agent created.")
这里用 AgentTool 来包装子智能体,让它们成为根智能体能调用的工具。
测试
python
runner = InMemoryRunner(agent=root_agent)
response = await runner.run_debug(
    "What are the latest advancements in quantum computing and what do they mean for AI?"
)
{% note warning %}
但是仅依靠大语言模型的指令来控制顺序有时是不可预测的。接下来,介绍一种能够确保按步执行的替代模式。
{% endnote %}
Sequential Workflows
{% note red 'fas fa-question-circle' simple %}
问题:不可预测的执行顺序
之前的多智能体系统依赖详细的指令提示词(detailed instruction prompt)来强制大语言模型按顺序执行。这种方式并不可靠,复杂的大语言模型可能会跳过步骤、乱序执行或陷入停滞,导致流程不可控。
{% endnote %}
{% note success simple %}
解决方案:固定流水线(Fixed Pipeline)
当任务需要保证特定执行顺序时,可使用 SequentialAgent。该智能体类似于流水线,按照定义的顺序运行子智能体。上一个智能体的输出会自动成为下一个智能体的输入,从而创建一个可预测且可靠的工作流。
{% endnote %}
适用场景:执行顺序至关重要。需要线性流水线。每个步骤都建立在后续步骤的基础之上。
架构示例:博客文章创建流水线

该系统由三个专业智能体组成:
- 大纲智能体 (Outline Agent):根据给定主题创建博客大纲。
- 写作智能体 (Writer Agent):撰写博客正文。
- 编辑智能体 (Editor Agent):针对清晰度和结构对博客草稿进行编辑。
python
# Outline Agent: Creates the initial blog post outline.
outline_agent = Agent(
    name="OutlineAgent",
    model=Gemini(
        model="gemini-2.5-flash-lite",
        retry_options=retry_config
    ),
    instruction="""Create a blog outline for the given topic with:
    1. A catchy headline
    2. An introduction hook
    3. 3-5 main sections with 2-3 bullet points for each
    4. A concluding thought""",
    output_key="blog_outline",  # The result of this agent will be stored in the session state with this key.
)

print("✅ outline_agent created.")

# Writer Agent: Writes the full blog post based on the outline from the previous agent.
writer_agent = Agent(
    name="WriterAgent",
    model=Gemini(
        model="gemini-2.5-flash-lite",
        retry_options=retry_config
    ),
    # The `{blog_outline}` placeholder automatically injects the state value from the previous agent's output.
    instruction="""Following this outline strictly: {blog_outline}
    Write a brief, 200 to 300-word blog post with an engaging and informative tone.""",
    output_key="blog_draft",  # The result of this agent will be stored with this key.
)

print("✅ writer_agent created.")

# Editor Agent: Edits and polishes the draft from the writer agent.
editor_agent = Agent(
    name="EditorAgent",
    model=Gemini(
        model="gemini-2.5-flash-lite",
        retry_options=retry_config
    ),
    # This agent receives the `{blog_draft}` from the writer agent's output.
    instruction="""Edit this draft: {blog_draft}
    Your task is to polish the text by fixing any grammatical errors, improving the flow and sentence structure, and enhancing overall clarity.""",
    output_key="final_blog",  # This is the final output of the entire pipeline.
)

print("✅ editor_agent created.")
在运行的时候我们放入一个列表,从前往后代表顺序
python
root_agent = SequentialAgent(
    name="BlogPipeline",
    sub_agents=[outline_agent, writer_agent, editor_agent],
)

print("✅ Sequential Agent created.")
之后给指令运行
python
runner = InMemoryRunner(agent=root_agent)
response = await runner.run_debug(
    "Write a blog post about the benefits of multi-agent systems for software developers"
)
{% note warning %}
但是如果任务之间是独立的,这样跑就很慢了
{% endnote %}
接下来介绍怎么在同一时间跑多个智能体
Parallel Workflows - Independent Researchers
{% note red 'fas fa-question-circle' simple %}
问题:效率瓶颈
传统的顺序执行模式(Sequential)类似于流水线,每个步骤必须等待前一步完成。当多个任务彼此互不依赖时(例如同时研究三个不同的主题),按顺序运行会导致速度缓慢且效率低下,造成不必要的等待瓶颈。
{% endnote %}
{% note success %}
解决方案:并发执行(Concurrent Execution)
处理独立任务时,可以使用 ParallelAgent 同时运行所有任务。该智能体能够并发执行其所有的子智能体,从而显著加快工作流程。当所有并行任务完成后,可以将它们的合并结果传递给最终的"聚合(aggregator)"步骤。
{% endnote %}
适用场景:任务之间相互独立。对处理速度有较高要求。可以进行并发执行。
架构示例:多主题研究系统
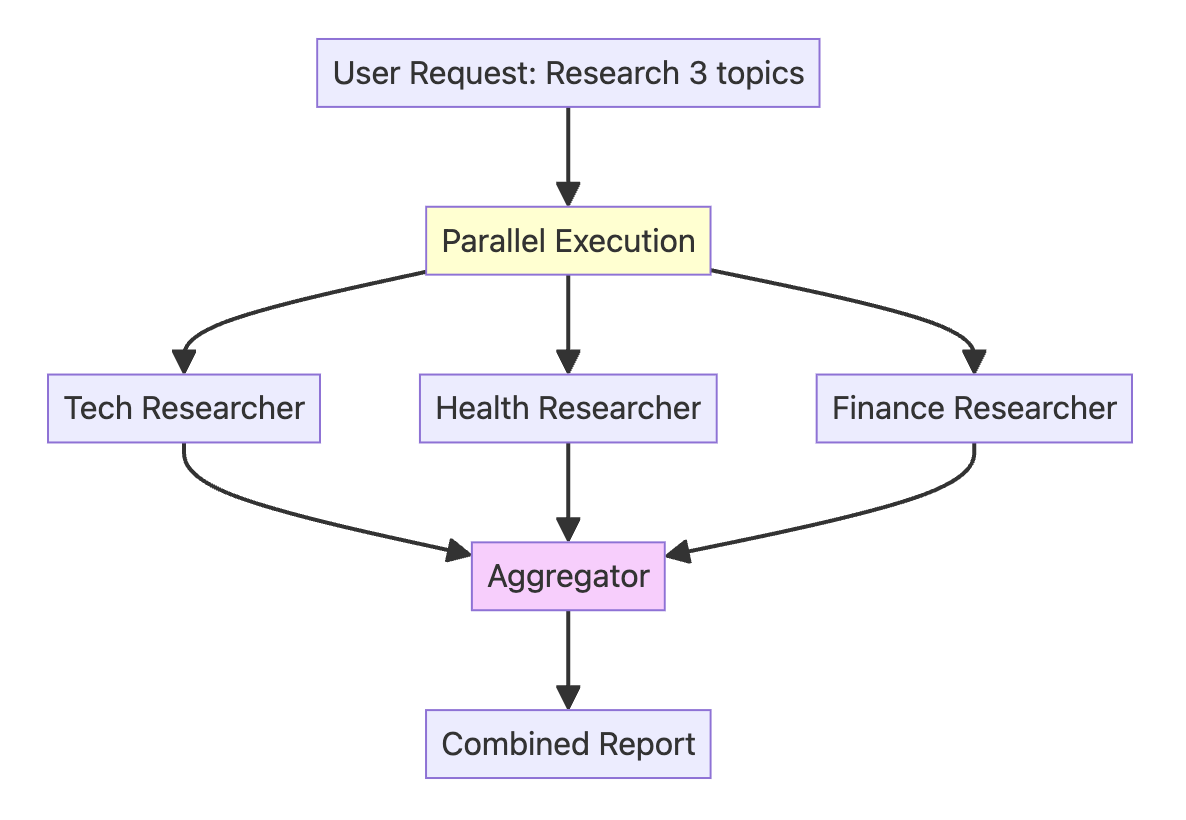
该系统由四个智能体组成:
- 技术研究员 (Tech Researcher):研究 AI/ML 的新闻和趋势。
- 健康研究员 (Health Researcher):研究最新的医学新闻和趋势。
- 金融研究员 (Finance Researcher):研究金融和金融科技的新闻和趋势。
- 聚合智能体 (Aggregator Agent):将所有研究发现整合为一份综合摘要。
python
# Tech Researcher: Focuses on AI and ML trends.
tech_researcher = Agent(
    name="TechResearcher",
    model=Gemini(
        model="gemini-2.5-flash-lite",
        retry_options=retry_config
    ),
    instruction="""Research the latest AI/ML trends. Include 3 key developments,
the main companies involved, and the potential impact. Keep the report very concise (100 words).""",
    tools=[google_search],
    output_key="tech_research",  # The result of this agent will be stored in the session state with this key.
)

print("✅ tech_researcher created.")

# Health Researcher: Focuses on medical breakthroughs.
health_researcher = Agent(
    name="HealthResearcher",
    model=Gemini(
        model="gemini-2.5-flash-lite",
        retry_options=retry_config
    ),
    instruction="""Research recent medical breakthroughs. Include 3 significant advances,
their practical applications, and estimated timelines. Keep the report concise (100 words).""",
    tools=[google_search],
    output_key="health_research",  # The result will be stored with this key.
)

print("✅ health_researcher created.")

# Finance Researcher: Focuses on fintech trends.
finance_researcher = Agent(
    name="FinanceResearcher",
    model=Gemini(
        model="gemini-2.5-flash-lite",
        retry_options=retry_config
    ),
    instruction="""Research current fintech trends. Include 3 key trends,
their market implications, and the future outlook. Keep the report concise (100 words).""",
    tools=[google_search],
    output_key="finance_research",  # The result will be stored with this key.
)

print("✅ finance_researcher created.")

# The AggregatorAgent runs *after* the parallel step to synthesize the results.
aggregator_agent = Agent(
    name="AggregatorAgent",
    model=Gemini(
        model="gemini-2.5-flash-lite",
        retry_options=retry_config
    ),
    # It uses placeholders to inject the outputs from the parallel agents, which are now in the session state.
    instruction="""Combine these three research findings into a single executive summary:

    **Technology Trends:**
    {tech_research}

    **Health Breakthroughs:**
    {health_research}

    **Finance Innovations:**
    {finance_research}

    Your summary should highlight common themes, surprising connections, and the most important key takeaways from all three reports. The final summary should be around 200 words.""",
    output_key="executive_summary",  # This will be the final output of the entire system.
)

print("✅ aggregator_agent created.")
先把上面这些智能体放在并行智能体中,然后并行智能体本身又嵌套在顺序智能体内部,确保研究类智能体所有研究全部完成后,将所有研究发现整合成为单一报告
python
# The ParallelAgent runs all its sub-agents simultaneously.
parallel_research_team = ParallelAgent(
    name="ParallelResearchTeam",
    sub_agents=[tech_researcher, health_researcher, finance_researcher],
)

# This SequentialAgent defines the high-level workflow: run the parallel team first, then run the aggregator.
root_agent = SequentialAgent(
    name="ResearchSystem",
    sub_agents=[parallel_research_team, aggregator_agent],
)

print("✅ Parallel and Sequential Agents created.")

runner = InMemoryRunner(agent=root_agent)
response = await runner.run_debug(
    "Run the daily executive briefing on Tech, Health, and Finance"
)
{% note warning %}
目前的工作流均为线性(从开始到结束)。若需要多次审查和改进输出,则需要构建能够**循环(loop)并持续优化(refine)**自身工作的结果
{% endnote %}
Loop Workflows - The Refinement Cycle
{% note red 'fas fa-question-circle' simple %}
问题:单次生成(One-Shot)的质量问题
目前为止看到的工作流都是从开始运行到结束即停止。SequentialAgent(顺序智能体)和 ParallelAgent(并行智能体)在生成最终输出后就会关闭。这种"单次触发"的方法不适用于需要打磨和质量控制的任务。如果初稿质量不佳,系统无法对其进行审查或要求重写。
{% endnote %}
{% note success simple %}
解决方案:迭代优化(Iterative Refinement)
当任务需要通过反馈和修订循环来改进时,可以使用 LoopAgent。LoopAgent 会重复运行一组子智能体,直到满足特定条件或达到最大迭代次数为止。这创建了一个优化循环,允许智能体系统不断改进自身的工作结果。
{% endnote %}
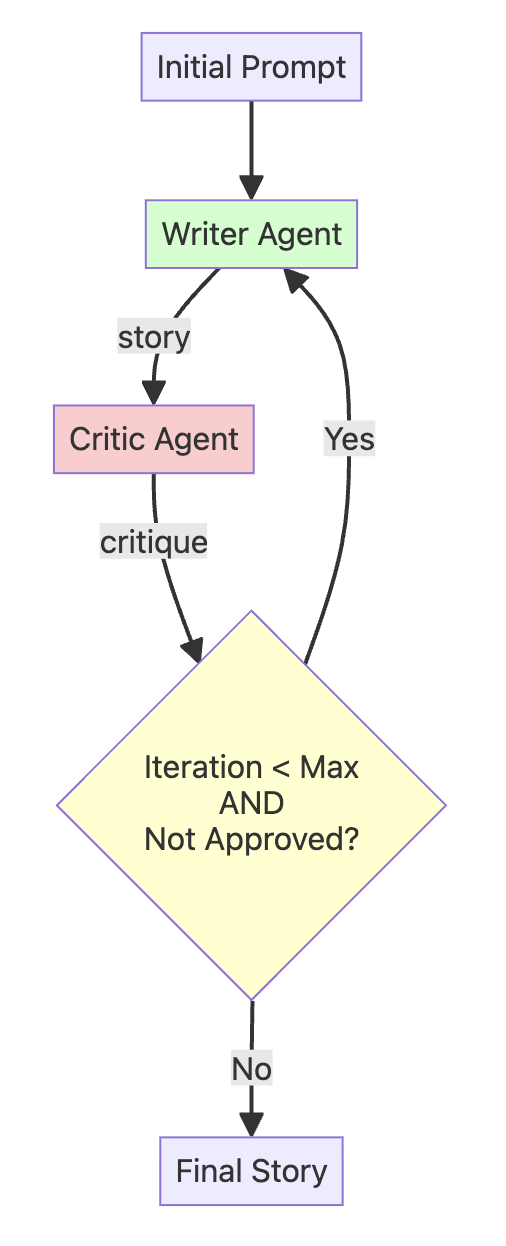
架构:故事创作与批评循环
python
# This agent runs ONCE at the beginning to create the first draft.
initial_writer_agent = Agent(
    name="InitialWriterAgent",
    model=Gemini(
        model="gemini-2.5-flash-lite",
        retry_options=retry_config
    ),
    instruction="""Based on the user's prompt, write the first draft of a short story (around 100-150 words).
    Output only the story text, with no introduction or explanation.""",
    output_key="current_story",  # Stores the first draft in the state.
)

print("✅ initial_writer_agent created.")

# This agent's only job is to provide feedback or the approval signal. It has no tools.
critic_agent = Agent(
    name="CriticAgent",
    model=Gemini(
        model="gemini-2.5-flash-lite",
        retry_options=retry_config
    ),
    instruction="""You are a constructive story critic. Review the story provided below.
    Story: {current_story}

    Evaluate the story's plot, characters, and pacing.
    - If the story is well-written and complete, you MUST respond with the exact phrase: "APPROVED"
    - Otherwise, provide 2-3 specific, actionable suggestions for improvement.""",
    output_key="critique",  # Stores the feedback in the state.
)

print("✅ critic_agent created.")现在,需要一种方法让循环根据评论者的反馈实际停止。LoopAgent 本身并不会自动理解 APPROVED 意味着 "停止"。
我们需要一个代理给它一个明确的信号来终止循环。
我们分两部分来完成:
- 一个简单的
Python函数,LoopAgent将其理解为 "退出" 信号。 - 一个能在满足正确条件时调用该函数的代理。
首先,定义 exit_loop 函数:
python
# This is the function that the RefinerAgent will call to exit the loop.
def exit_loop():
    """Call this function ONLY when the critique is 'APPROVED', indicating the story is finished and no more changes are needed."""
    return {"status": "approved", "message": "Story approved. Exiting refinement loop."}


print("✅ exit_loop function created.")
为了让代理能够调用这个 Python 函数,我们将其封装在一个 FunctionTool 中。然后,我们创建一个拥有该工具的 RefinerAgent。
👉 请注意其指令: 该代理是循环的"大脑"。它读取来自 CriticAgent 的 {critique}(评论),并决定是 (1) 调用 exit_loop 工具,还是 (2) 重写故事。
python
# This agent refines the story based on critique OR calls the exit_loop function.
refiner_agent = Agent(
    name="RefinerAgent",
    model=Gemini(
        model="gemini-2.5-flash-lite",
        retry_options=retry_config
    ),
    instruction="""You are a story refiner. You have a story draft and critique.

    Story Draft: {current_story}
    Critique: {critique}

    Your task is to analyze the critique.
    - IF the critique is EXACTLY "APPROVED", you MUST call the `exit_loop` function and nothing else.
    - OTHERWISE, rewrite the story draft to fully incorporate the feedback from the critique.""",
    output_key="current_story",  # It overwrites the story with the new, refined version.
    tools=[
        FunctionTool(exit_loop)
    ],  # The tool is now correctly initialized with the function reference.
)

print("✅ refiner_agent created.")
然后我们将这些代理统一置于一个循环代理(Loop Agent)之下,循环代理本身又嵌套在一个顺序代理(Sequential Agent)中。
这种设计确保了系统首先生成初始故事草稿,随后精炼循环将按照指定的 max_iterations(最大迭代次数)运行:
python
# The LoopAgent contains the agents that will run repeatedly: Critic -> Refiner.
story_refinement_loop = LoopAgent(
    name="StoryRefinementLoop",
    sub_agents=[critic_agent, refiner_agent],
    max_iterations=2,  # Prevents infinite loops
)

# The root agent is a SequentialAgent that defines the overall workflow: Initial Write -> Refinement Loop.
root_agent = SequentialAgent(
    name="StoryPipeline",
    sub_agents=[initial_writer_agent, story_refinement_loop],
)

print("✅ Loop and Sequential Agents created.")
python
runner = InMemoryRunner(agent=root_agent)
response = await runner.run_debug(
    "Write a short story about a lighthouse keeper who discovers a mysterious, glowing map"
)
总结
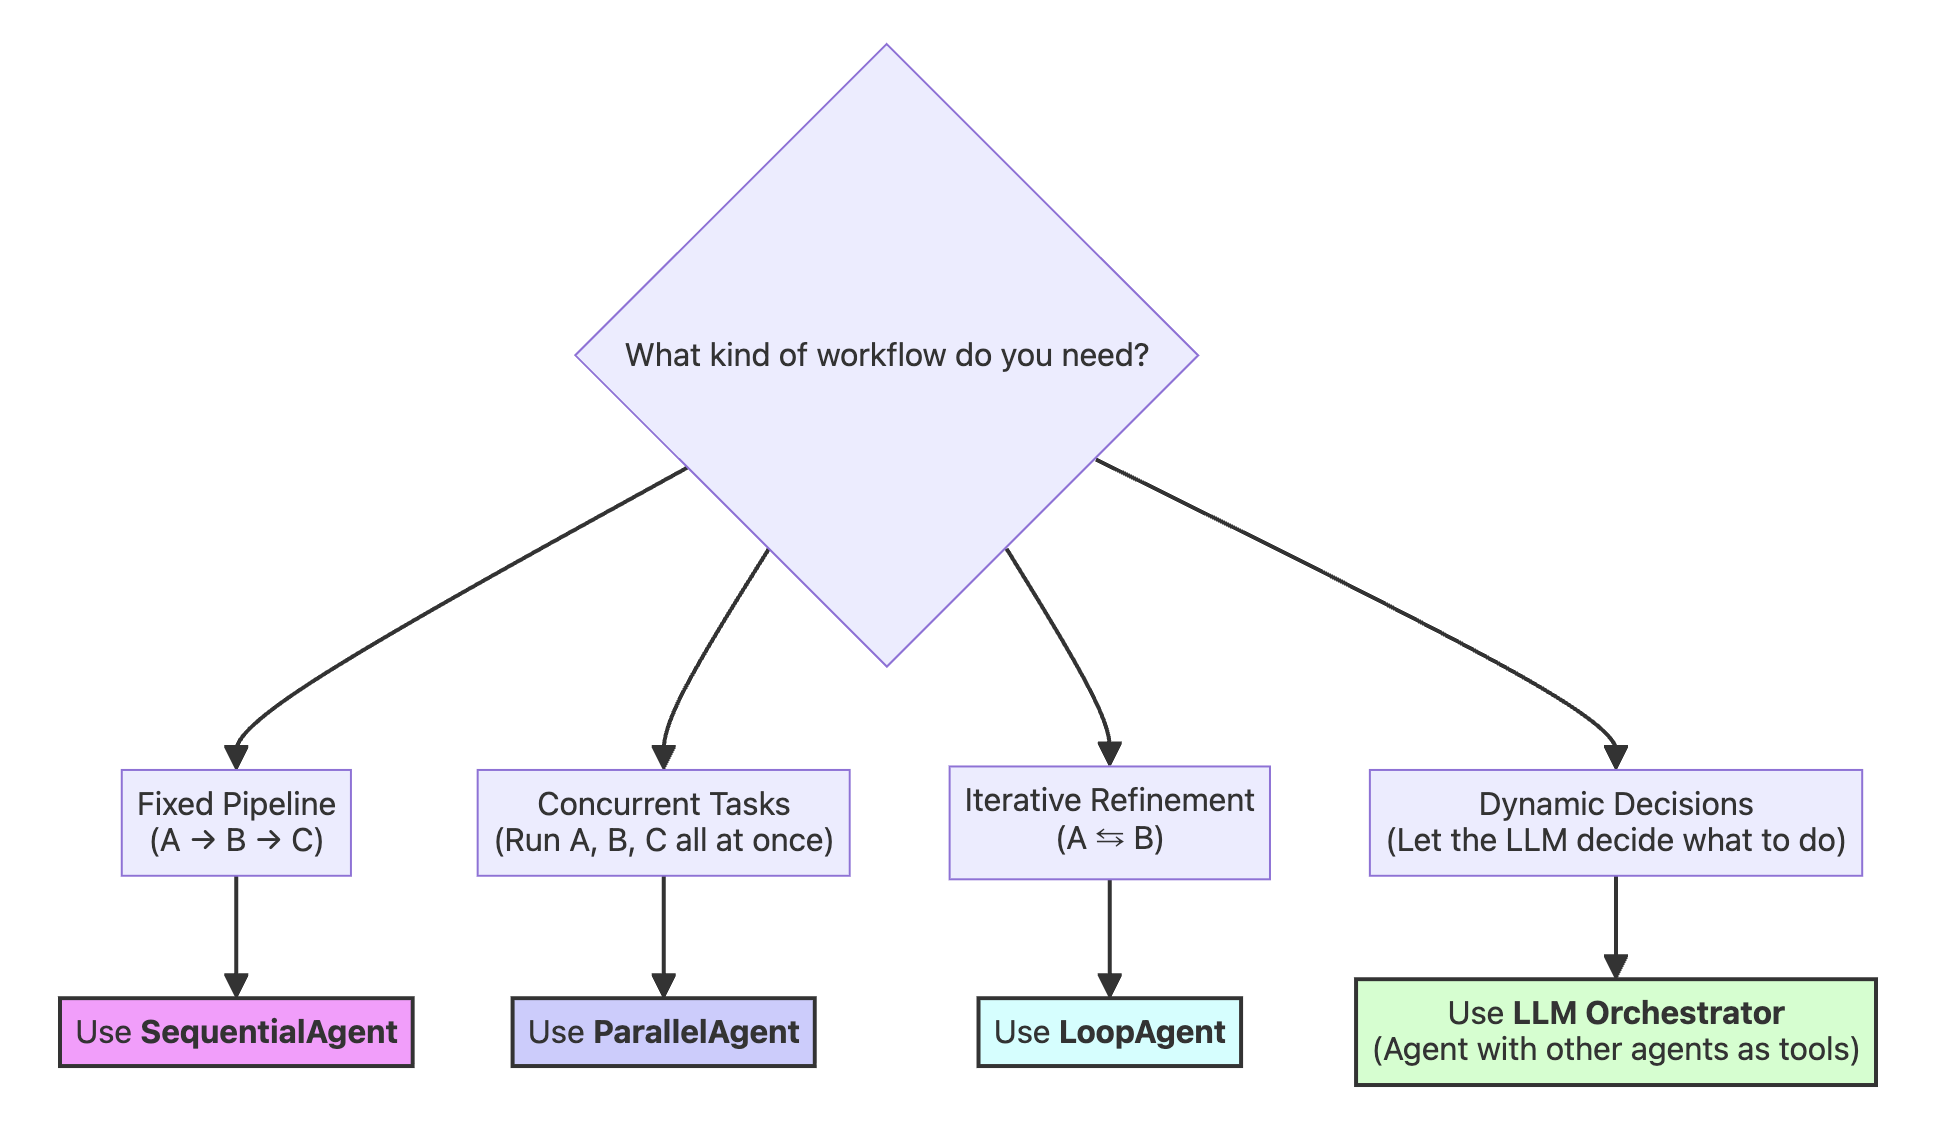
| 模式 | 何时使用 | 示例 | 核心特性 |
|---|---|---|---|
| 基于 LLM (sub_agents) | 需要动态编排时 | 研究 + 总结 | 由 LLM 决定调用内容 |
| 顺序 (Sequential) | 顺序很重要,线性管道 | 大纲 → 写作 → 编辑 | 确定性的顺序 |
| 并行 (Parallel) | 任务相互独立,速度至关重要 | 多主题研究 | 并发执行 |
| 循环 (Loop) | 需要迭代改进时 | 作者 + 评论家精炼 | 重复循环 |
- 基于 LLM(sub_agents):比如上面的
refiner_agent
智能体工具
🤔 智能体为何需要工具?
{% note red 'fas fa-question-circle' simple %}
问题所在:若没有工具,智能体的知识便会停滞不前 ------ 无法获取当日新闻或你公司的库存信息。它与外部世界毫无联结,因此无法为你执行任何操作。
{% endnote %}
{% note success %}
解决方案:工具能将孤立的大语言模型转变为实用的智能体,切实帮你完成各类事务。
{% endnote %}
下面我们将做
- 将 Python 函数转化为智能体工具
- 构建一个智能体,并将其作为工具供另一个智能体使用
- 打造你的首个多工具智能体
- 探究智能体开发工具包(ADK)中的各类工具类型
自定义工具
{% tabs AgentTools_a , 1 %}
python
import os
from dotenv import load_dotenv
from google.genai import types

from google.adk.agents import LlmAgent
from google.adk.models.google_llm import Gemini
from google.adk.runners import InMemoryRunner
from google.adk.sessions import InMemorySessionService
from google.adk.tools import google_search, AgentTool, ToolContext
from google.adk.code_executors import BuiltInCodeExecutor

load_dotenv(override=True)

GOOGLE_API_KEY = os.getenv("GOOGLE_API_KEY")
os.environ["GOOGLE_API_KEY"] = GOOGLE_API_KEY

retry_config = types.HttpRetryOptions(
    attempts=5,  # Maximum retry attempts
    exp_base=7,  # Delay multiplier
    initial_delay=1,
    http_status_codes=[429, 500, 503, 504],  # Retry on these HTTP errors
)
辅助函数,用于输出生成的 Python 代码以及代码执行工具返回的结果:
python
def show_python_code_and_result(response):
    for i in range(len(response)):
        # Check if the response contains a valid function call result from the code executor
        if (
            (response[i].content.parts)
            and (response[i].content.parts[0])
            and (response[i].content.parts[0].function_response)
            and (response[i].content.parts[0].function_response.response)
        ):
            response_code = response[i].content.parts[0].function_response.response
            if "result" in response_code and response_code["result"] != "```":
                if "tool_code" in response_code["result"]:
                    print(
                        "Generated Python Code >> ",
                        response_code["result"].replace("tool_code", ""),
                    )
                else:
                    print("Generated Python Response >> ", response_code["result"])


print("✅ Helper functions defined.")
{% note red 'fas fa-question-circle' simple %}
什么是自定义工具?
自定义工具是指利用自有代码和业务逻辑自行构建的工具。与 ADK 自带的预制内置工具不同,自定义工具能让你完全掌控功能实现。
{% endnote %}
{% note red 'fas fa-question-circle' simple %}
何时使用自定义工具?
谷歌搜索这类内置工具功能强大,但每家企业都有通用工具无法满足的独特需求。自定义工具可用于实现专属业务逻辑、对接自有系统,并解决特定领域的问题。ADK 提供多种自定义工具类型以应对这类场景。
{% endnote %}
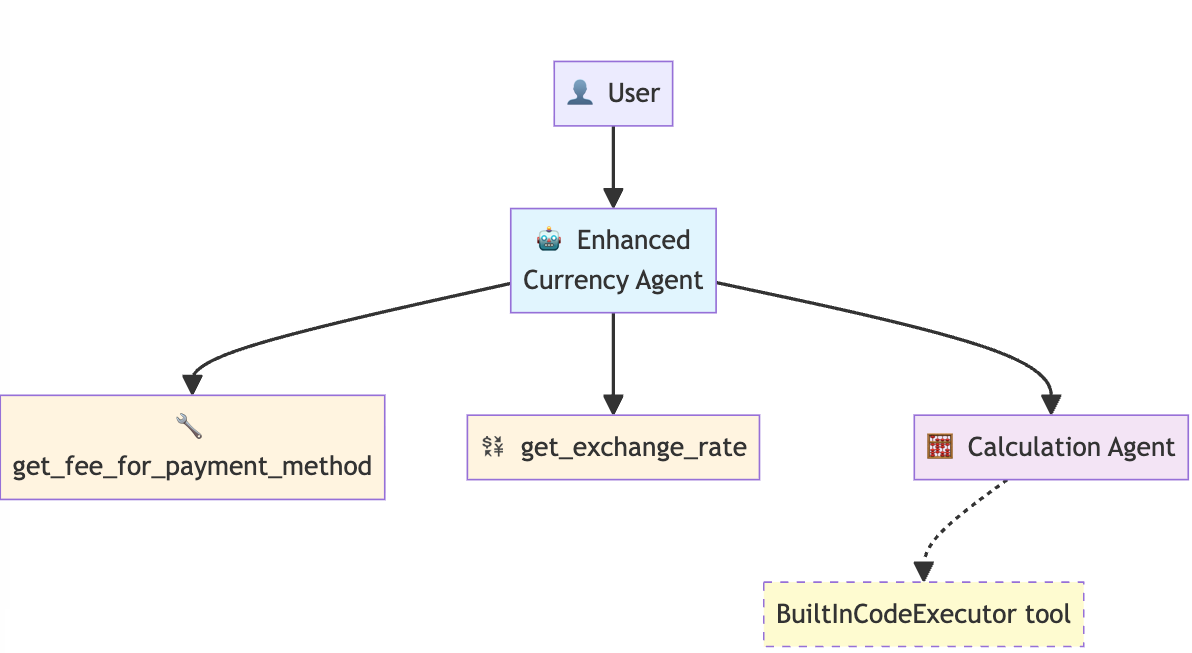
示例:构建自定义功能工具 --> 货币兑换智能体
该智能体可实现不同币种间的兑换,并计算兑换所需手续费。智能体包含两个自定义工具,执行流程如下:
- 手续费查询工具 ------ 查询兑换交易手续费(模拟数据)
- 汇率工具 ------ 获取货币兑换汇率(模拟数据)
- 计算步骤 ------ 核算包含手续费在内的总兑换成本

{% note red 'fas fa-question-circle' simple %}
如何定义一个工具?
只需遵循以下简单准则,任意 Python 函数都能成为智能体工具:
- 创建一个 Python 函数
- 遵循下方列出的最佳实践
- 将你的函数添加到智能体的 tools=\[\] 列表中,其余工作将由 ADK 自动处理。
实践中的 ADK 最佳实践
- 字典返回值:工具返回 {"status": "success", "data": ...} 或 {"status": "error", "error_message": ...}
- 清晰的文档字符串:大语言模型通过文档字符串判断何时以及如何使用工具
- 类型注解:使 ADK 能够生成规范的模式结构(字符串、字典等)
- 错误处理:结构化的错误响应有助于大语言模型妥善处理执行失败情况
这些模式能让你的工具更可靠,也便于大语言模型正确使用。
{% endnote %}
python
# Pay attention to the docstring, type hints, and return value.
def get_fee_for_payment_method(method: str) -> dict:
    """Looks up the transaction fee percentage for a given payment method.

    This tool simulates looking up a company's internal fee structure based on
    the name of the payment method provided by the user.

    Args:
        method: The name of the payment method. It should be descriptive,
                e.g., "platinum credit card" or "bank transfer".

    Returns:
        Dictionary with status and fee information.
        Success: {"status": "success", "fee_percentage": 0.02}
        Error: {"status": "error", "error_message": "Payment method not found"}
    """
    # This simulates looking up a company's internal fee structure.
    fee_database = {
        "platinum credit card": 0.02,  # 2%
        "gold debit card": 0.035,  # 3.5%
        "bank transfer": 0.01,  # 1%
    }

    fee = fee_database.get(method.lower())
    if fee is not None:
        return {"status": "success", "fee_percentage": fee}
    else:
        return {
            "status": "error",
            "error_message": f"Payment method '{method}' not found",
        }


print("✅ Fee lookup function created")
print(f"💳 Test: {get_fee_for_payment_method('platinum credit card')}")
然后我们遵循同样的最佳实践来定义第二个工具 get_exchange_rate
python
def get_exchange_rate(base_currency: str, target_currency: str) -> dict:
    """Looks up and returns the exchange rate between two currencies.

    Args:
        base_currency: The ISO 4217 currency code of the currency you
                       are converting from (e.g., "USD").
        target_currency: The ISO 4217 currency code of the currency you
                         are converting to (e.g., "EUR").

    Returns:
        Dictionary with status and rate information.
        Success: {"status": "success", "rate": 0.93}
        Error: {"status": "error", "error_message": "Unsupported currency pair"}
    """

    # Static data simulating a live exchange rate API
    # In production, this would call something like: requests.get("api.exchangerates.com")
    rate_database = {
        "usd": {
            "eur": 0.93,  # Euro
            "jpy": 157.50,  # Japanese Yen
            "inr": 83.58,  # Indian Rupee
        }
    }

    # Input validation and processing
    base = base_currency.lower()
    target = target_currency.lower()

    # Return structured result with status
    rate = rate_database.get(base, {}).get(target)
    if rate is not None:
        return {"status": "success", "rate": rate}
    else:
        return {
            "status": "error",
            "error_message": f"Unsupported currency pair: {base_currency}/{target_currency}",
        }


print("✅ Exchange rate function created")
print(f"💱 Test: {get_exchange_rate('USD', 'EUR')}")
现在我们来创建货币代理。注意:代理的指令 instruction 是如何引用这些工具的
要点:
tools=[]列表用于告知代理可以使用哪些函数- 指令通过工具确切的函数名来引用它们(例如
get_fee_for_payment_method()) - 代理会依据这些名称来决定何时以及如何调用各个工具
python
# Currency agent with custom function tools
currency_agent = LlmAgent(
    name="currency_agent",
    model=Gemini(model="gemini-2.5-flash-lite", retry_options=retry_config),
    instruction="""You are a smart currency conversion assistant.

    For currency conversion requests:
    1. Use `get_fee_for_payment_method()` to find transaction fees
    2. Use `get_exchange_rate()` to get currency conversion rates
    3. Check the "status" field in each tool's response for errors
    4. Calculate the final amount after fees based on the output from `get_fee_for_payment_method` and `get_exchange_rate` methods and provide a clear breakdown.
    5. First, state the final converted amount.
        Then, explain how you got that result by showing the intermediate amounts. Your explanation must include: the fee percentage and its
        value in the original currency, the amount remaining after the fee, and the exchange rate used for the final conversion.

    If any tool returns status "error", explain the issue to the user clearly.
    """,
    tools=[get_fee_for_payment_method, get_exchange_rate],
)

print("✅ Currency agent created with custom function tools")
print("🔧 Available tools:")
print("  • get_fee_for_payment_method - Looks up company fee structure")
print("  • get_exchange_rate - Gets current exchange rates")
python
# Test the currency agent
currency_runner = InMemoryRunner(agent=currency_agent)
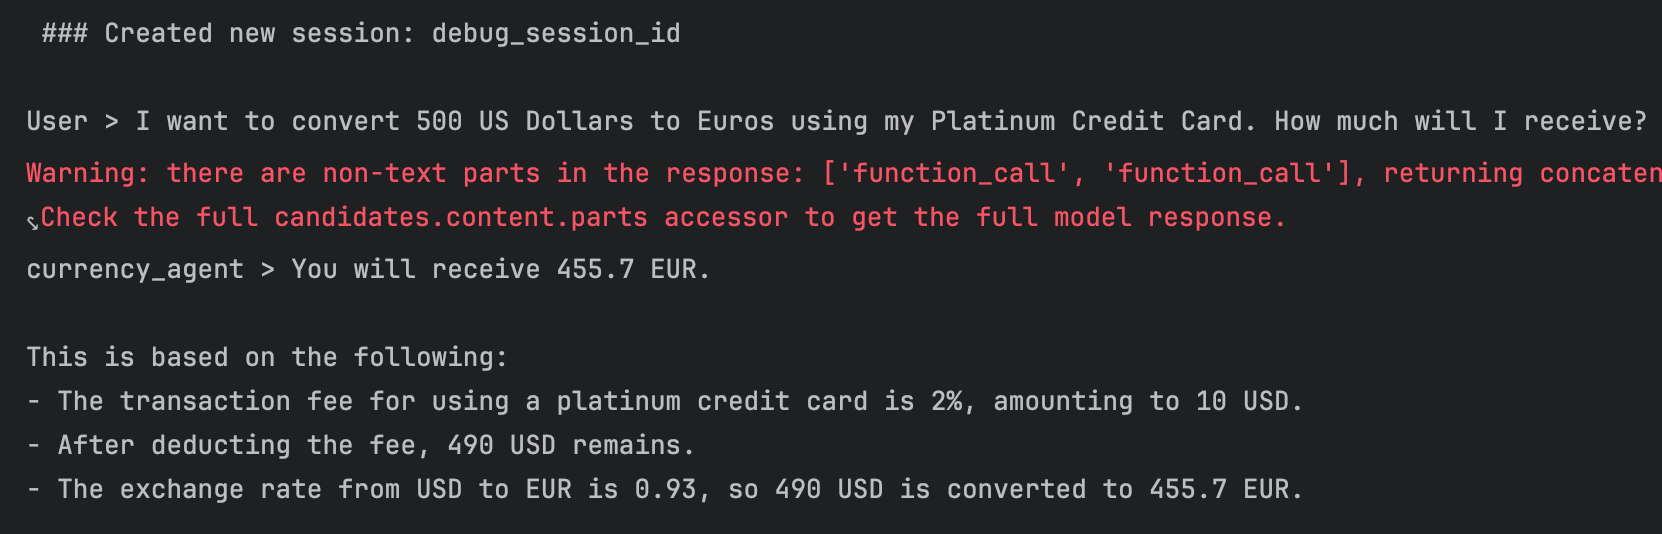
_ = await currency_runner.run_debug(
"I want to convert 500 US Dollars to Euros using my Platinum Credit Card. How much will I receive?"
)
{% endtabs %}
通过代码提升智能体可靠性
智能体的指令要求 "计算扣除费用后的最终金额",但大语言模型在数学计算方面并非始终可靠。它们可能出现计算错误,或是使用不一致的计算公式。
{% note success %}
解决方案:让智能体生成一段 Python 代码来完成数学运算,并运行代码得出最终结果!代码执行远比让大语言模型直接心算数学问题更加可靠!
{% endnote %}
{% tabs 通过代码提升智能体可靠性 , 1 %}
ADK 内置了一款可在沙箱环境中运行代码的代码执行器。注意:该功能依托 Gemini 的代码执行能力实现。下面我们创建一个 calculation_agent,它接收计算请求并翻译为 Python 代码,然后通过 BuiltInCodeExecutor 运行该代码。
python
calculation_agent = LlmAgent(
    name="CalculationAgent",
    model=Gemini(model="gemini-2.5-flash-lite", retry_options=retry_config),
    instruction="""You are a specialized calculator that ONLY responds with Python code. You are forbidden from providing any text, explanations, or conversational responses.

     Your task is to take a request for a calculation and translate it into a single block of Python code that calculates the answer.

     **RULES:**
    1.  Your output MUST be ONLY a Python code block.
    2.  Do NOT write any text before or after the code block.
    3.  The Python code MUST calculate the result.
    4.  The Python code MUST print the final result to stdout.
    5.  You are PROHIBITED from performing the calculation yourself. Your only job is to generate the code that will perform the calculation.

    Failure to follow these rules will result in an error.
       """,
    code_executor=BuiltInCodeExecutor(),  # Use the built-in Code Executor Tool. This gives the agent code execution capabilities
)
{% note danger %}
官方文档描述有严重错误,官方描述是货币智能体来生成代码给计算智能体,但实际上是货币智能体只传入了信息,计算智能体在生成代码并执行得到结果。
{% endnote %}
执行两项关键操作:
- 更新
currency_agent的指令,使其调用工具计算金额
- 原指令:"计算扣除手续费后的最终金额"(模糊的数学计算指令)
- 优化后:调用
calculation_agent生成一段 Python 代码以计算最终金额 并运行该代码得到计算结果
- 将
calculation_agent添加至工具集
ADK 支持通过AgentTool将任意智能体作为工具使用。
- 将
AgentTool(agent=calculation_agent)添加到工具列表中 - 该专业智能体将作为可调用工具,供根智能体使用
python
enhanced_currency_agent = LlmAgent(
    name="enhanced_currency_agent",
    model=Gemini(model="gemini-2.5-flash-lite", retry_options=retry_config),
    # Updated instruction
    instruction="""You are a smart currency conversion assistant. You must strictly follow these steps and use the available tools.

  For any currency conversion request:

   1. Get Transaction Fee: Use the get_fee_for_payment_method() tool to determine the transaction fee.
   2. Get Exchange Rate: Use the get_exchange_rate() tool to get the currency conversion rate.
   3. Error Check: After each tool call, you must check the "status" field in the response. If the status is "error", you must stop and clearly explain the issue to the user.
   4. Calculate Final Amount (CRITICAL): You are strictly prohibited from performing any arithmetic calculations yourself. You must use the calculation_agent tool to generate Python code that calculates the final converted amount. This
      code will use the fee information from step 1 and the exchange rate from step 2.
   5. Provide Detailed Breakdown: In your summary, you must:
       * State the final converted amount.
       * Explain how the result was calculated, including:
           * The fee percentage and the fee amount in the original currency.
           * The amount remaining after deducting the fee.
           * The exchange rate applied.
    """,
    tools=[
        get_fee_for_payment_method,
        get_exchange_rate,
        AgentTool(agent=calculation_agent),  # Using another agent as a tool!
    ],
)

print("✅ Enhanced currency agent created")
print("🎯 New capability: Delegates calculations to specialist agent")
print("🔧 Tool types used:")
print("  • Function Tools (fees, rates)")
print("  • Agent Tool (calculation specialist)")
python
# Define a runner
enhanced_runner = InMemoryRunner(agent=enhanced_currency_agent)

# Test the enhanced agent
response = await enhanced_runner.run_debug(
    "Convert 1,250 USD to INR using a Bank Transfer. Show me the precise calculation."
)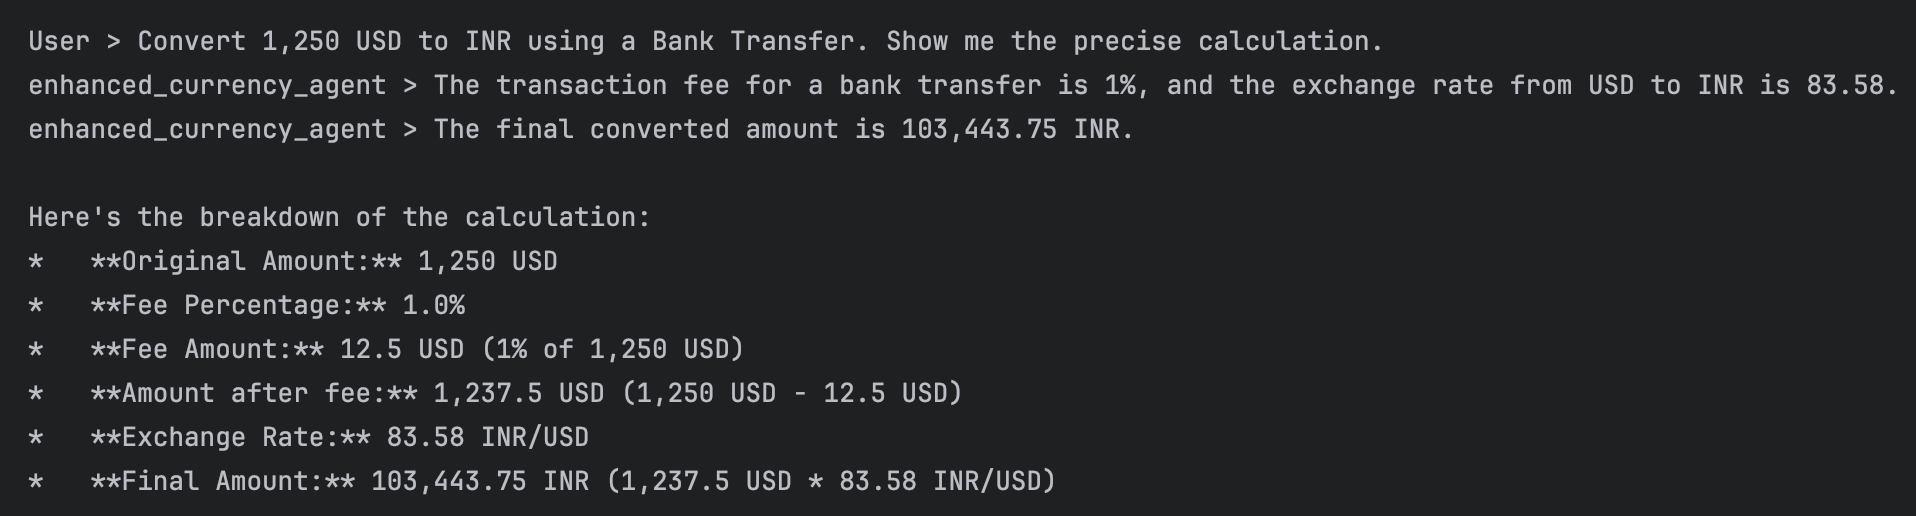
请注意所发生的情况:
- 当货币智能体调用
CalculationAgent时,它会传入信息让CalculationAgent生成计算 Python 代码 - 而
CalculationAgent继而使用BuiltInCodeExecutor运行该代码,并为我们提供了精确的计算结果,而非大语言模型的推测结果!
现在,可以使用开头附近定义的辅助函数,查看响应中生成 Python 代码或包含 Python 代码运行结果的部分。
python
show_python_code_and_result(response)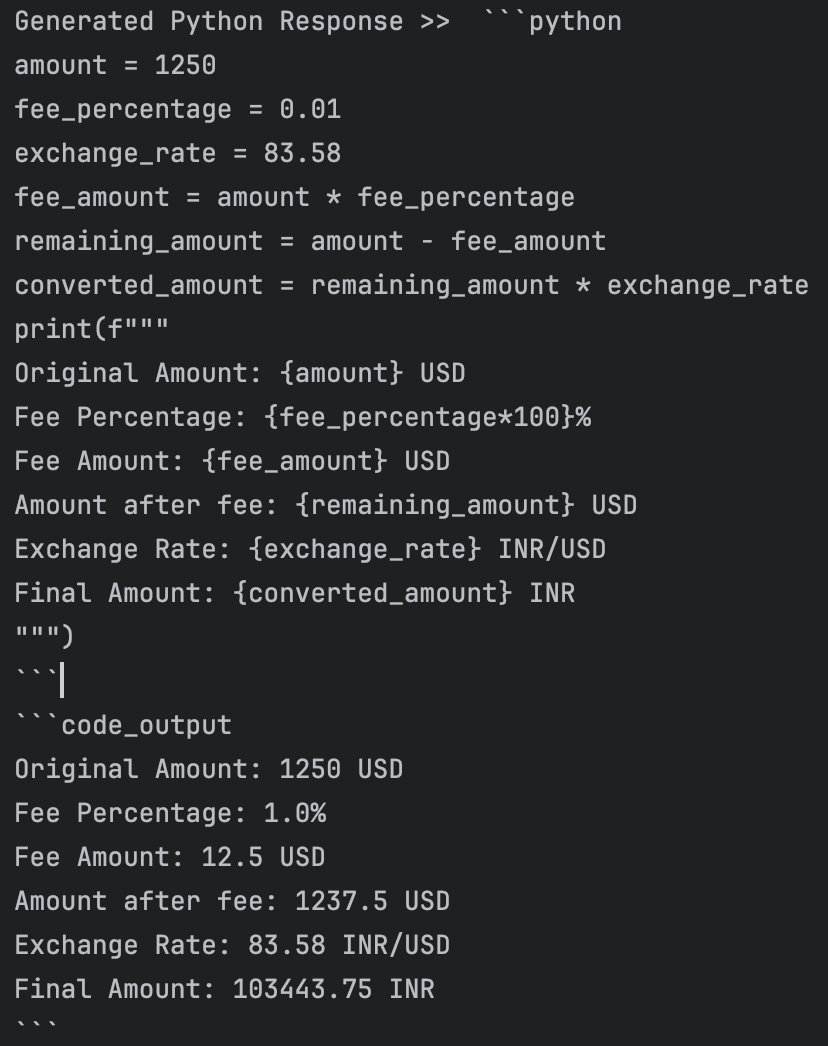
{% endtabs %}
ADK 工具类型完整指南
接下来我们完整了解一下 ADK 工具包:
它大致分为两大类:自定义工具与内置工具
自定义工具
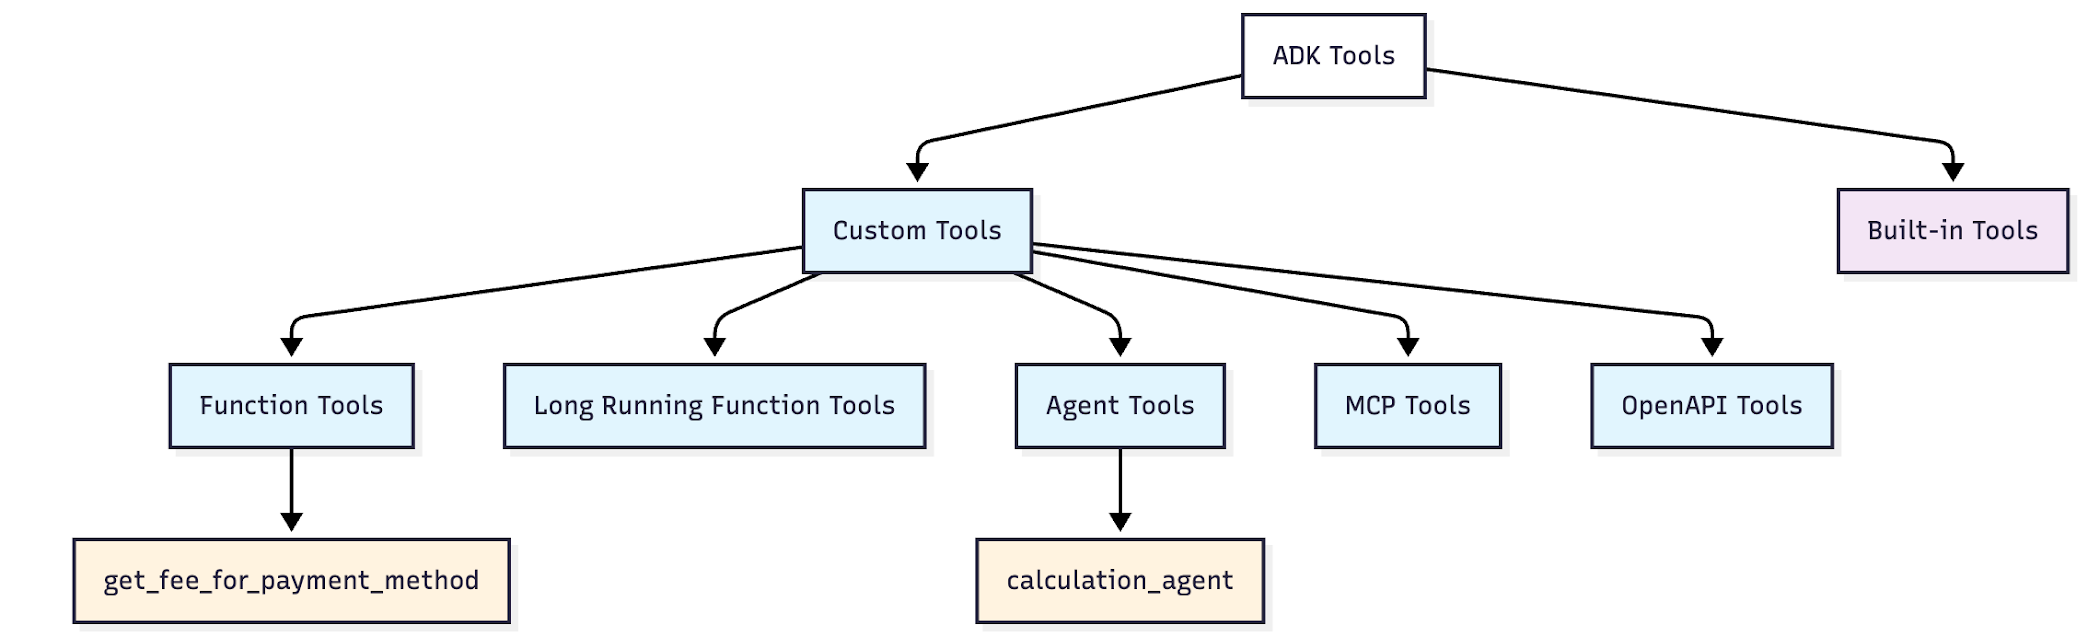
定义:为满足特定需求而自行构建的工具
优势:对功能拥有完全控制权 ------ 你可以精准打造智能体所需的工具
函数工具 ✅(已使用过)
- 定义:由 Python 函数转换而来的智能体工具
- 示例:获取支付方式手续费、获取汇率
- 优势:可将任意 Python 函数即时转化为智能体可用工具
长时间运行函数工具
- 定义:适用于耗时较长操作的函数
- 示例:人工介入审批、文件处理
- 优势:智能体可启动任务后,在等待期间继续处理其他工作
智能体工具 ✅(已使用过)
- 定义:将其他智能体作为工具使用
- 示例:AgentTool(agent=calculation_agent)
- 优势:打造专业型智能体,并可在不同系统中复用
MCP 工具
- 定义:来自模型上下文协议服务器的工具
- 示例:文件系统访问、谷歌地图、数据库
- 优势:无需自定义集成,即可连接任意兼容 MCP 的服务
OpenAPI 工具
- 定义:根据 API 规范自动生成的工具
- 示例:REST API 接口转化为可调用工具
- 优势:无需手动编码 ------ 只需提供 API 规范即可生成可用工具
内置工具
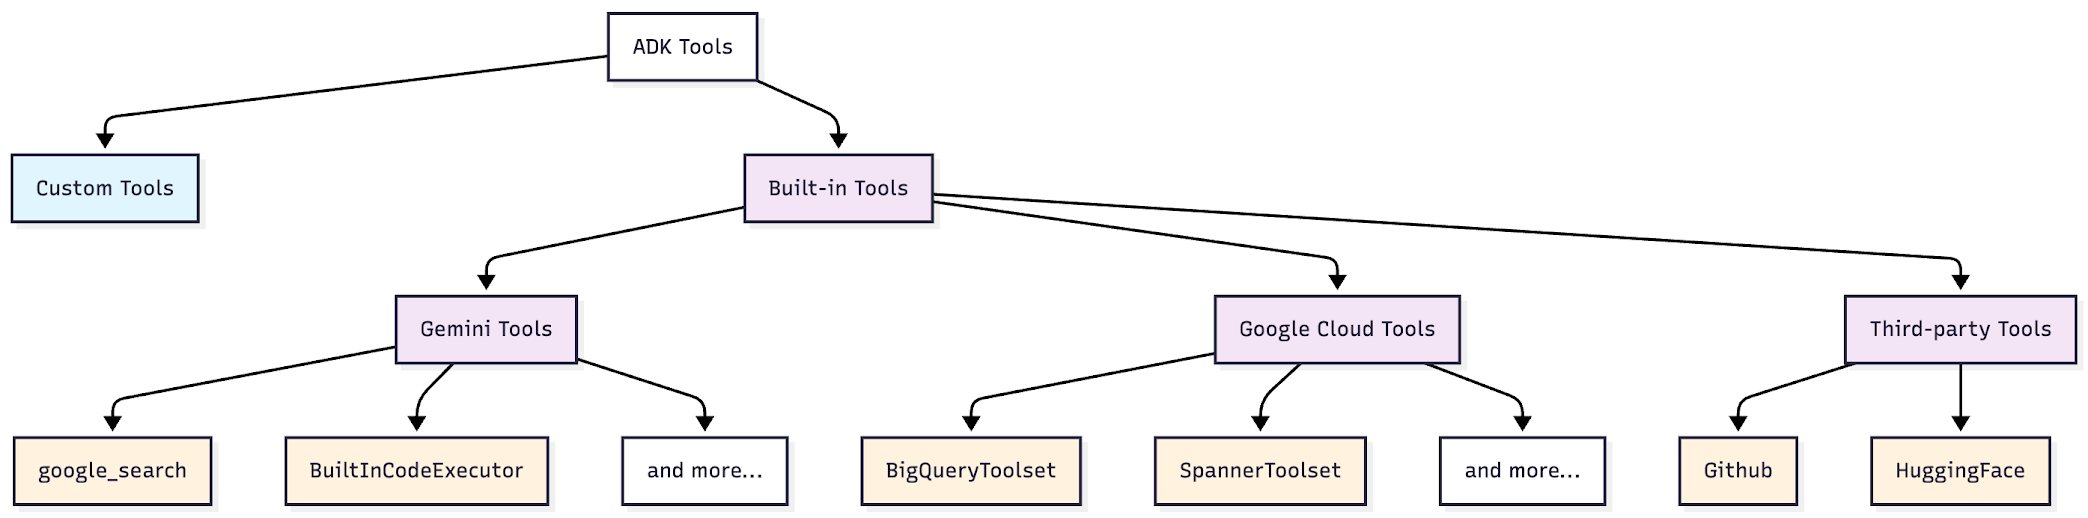
定义:ADK 提供的预制工具
优势:无需开发,零配置即可直接使用
Gemini 工具 ✅(已使用过)
- 定义:依托 Gemini 能力实现的工具
- 示例:谷歌搜索、内置代码执行器
- 优势:可靠且经过测试,开箱即用
谷歌云工具 需谷歌云访问权限
- 定义:用于谷歌云服务及企业级集成的工具
- 示例:BigQuery 工具集、Spanner 工具集、APIHub 工具集
- 优势:企业级数据库与 API 访问能力,内置安全保障
第三方工具
- 定义:现有工具生态的封装接口
- 示例:Hugging Face、Firecrawl、GitHub 工具
- 优势:复用现有工具资源,无需重新构建已有的成熟工具
智能体工具最佳实践
本章学习调用外部 MCP 服务并处理耗时较长的操作。
学习如何:
- 连接至外部 MCP 服务器
- 实现可暂停智能体执行以等待外部输入的耗时操作
- 构建可恢复工作流,在对话中断期间保持状态
- 理解何时以及如何使用这些模式
前置工作
python
import os
from dotenv import load_dotenv
import uuid
from google.genai import types

from google.adk.agents import LlmAgent
from google.adk.models.google_llm import Gemini
from google.adk.runners import Runner
from google.adk.sessions import InMemorySessionService

from google.adk.tools.mcp_tool.mcp_toolset import McpToolset
from google.adk.tools.tool_context import ToolContext
from google.adk.tools.mcp_tool.mcp_session_manager import StdioConnectionParams
from mcp import StdioServerParameters

from google.adk.apps.app import App, ResumabilityConfig
from google.adk.tools.function_tool import FunctionTool

load_dotenv(override=True)

GOOGLE_API_KEY = os.getenv("GOOGLE_API_KEY")
os.environ["GOOGLE_API_KEY"] = GOOGLE_API_KEY

retry_config = types.HttpRetryOptions(
    attempts=5,  # Maximum retry attempts
    exp_base=7,  # Delay multiplier
    initial_delay=1,
    http_status_codes=[429, 500, 503, 504],  # Retry on these HTTP errors
)
模型上下文协议(Model Context Protocol)
之前学的是智能体使用自定义函数。但要连接外部系统(GitHub、数据库、Slack),需要编写并维护 API 客户端。
模型上下文协议(MCP)是一项开放标准,可让智能体使用社区构建的集成组件。无需自行编写集成代码与 API 客户端,只需连接至现有的 MCP 服务器即可。
MCP 可让智能体实现以下功能:
- 无需编写自定义集成代码,即可从数据库、API 接口及各类服务中获取实时外部数据
- 借助标准化接口使用社区构建的工具
- 通过连接多个专用服务器实现能力扩展
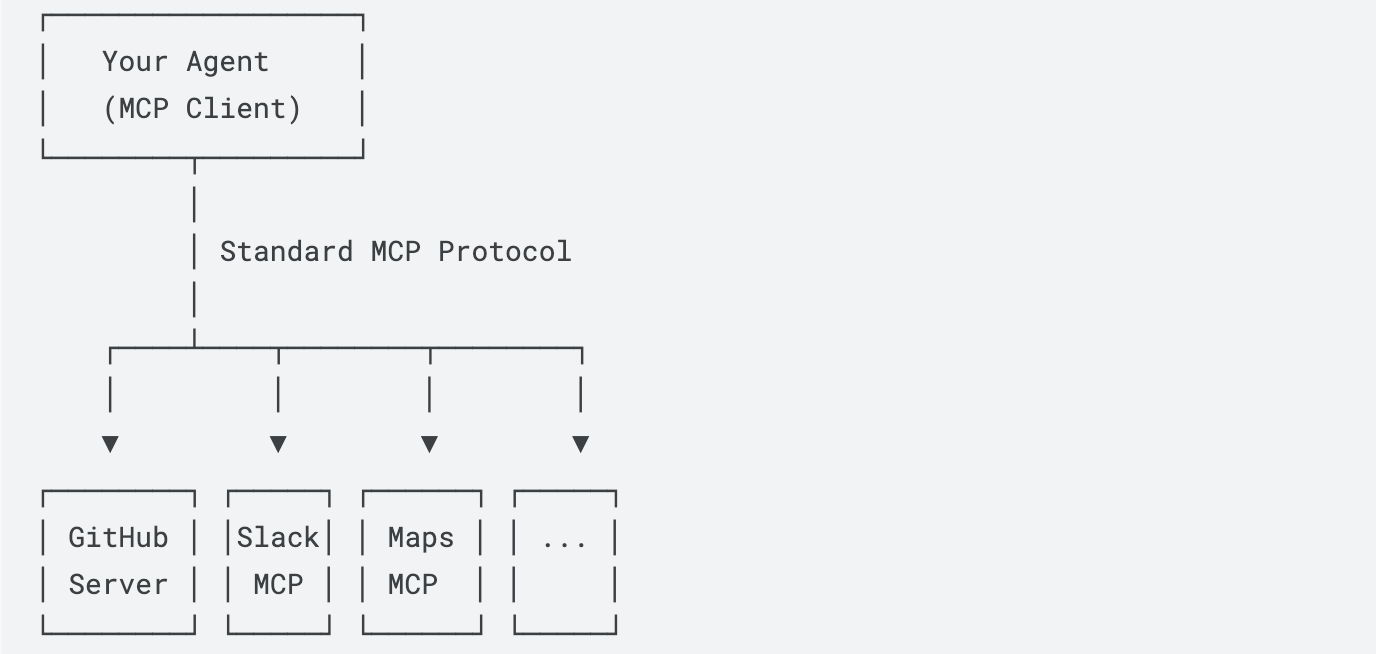
MCP 工作原理
MCP 将你的智能体(客户端)与提供各类工具的外部 MCP 服务器相连:
- MCP 服务器:提供特定工具(如图像生成、数据库访问)
- MCP 客户端:使用这些工具的智能体
- 所有服务器均采用统一工作方式 ------ 标准化接口
使用 MCP
工作流程:
- 选择一个 MCP 服务器与工具
- 创建 MCP 工具集(配置连接)
- 将其添加到智能体
- 运行并测试该智能体
选择 MCP 服务器
这里使用 Everything MCP 服务器 ------ 这是一款专为测试 MCP 集成而设计的 npm 软件包(@modelcontextprotocol/server-everything)。该服务器提供了一个 getTinyImage 工具,可返回一张简易测试图片(16×16 像素,采用 Base64 编码)。
更多服务器可访问:modelcontextprotocol
{% note info %}
搞清楚 MCP
MCP 是一种协议,用来把AI应用连接到外部数据源、工具和工作流。我们的 agent 就是MCP client,这个 @modelcontextprotocol/server-everything 就是一个 MCP server,用 npx 来运行。MCP Server 是一个具体跑起来的程序/服务。MPC server 把某个平台能力包装成 MCP 标准接口的适配器/服务。比如
- GitHub MCP Server:提供 GitHub 相关工具
- Slack MCP Server:提供 Slack 读写能力
- Maps MCP Server:提供地图查询能力
- server-everything:一个官方测试/演示 server
{% endnote %}
{% tabs 使用MCP , 1 %}
McpToolset 用于将 ADK 智能体与 MCP 服务器进行集成。
代码实现功能:
- 使用 npx(Node 包运行器)运行 MCP 服务器
- 连接至
@modelcontextprotocol/server-everything - 筛选并仅使用
getTinyImage工具(该服务器还包含其他工具,但本演示仅需此工具)
python
# MCP integration with Everything Server
mcp_image_server = McpToolset(
    connection_params=StdioConnectionParams(
        server_params=StdioServerParameters(
            command="npx",  # Run MCP server via npx
            args=[
                "-y",  # Argument for npx to auto-confirm install
                "@modelcontextprotocol/server-everything",
            ],
            tool_filter=["getTinyImage"],
        ),
        timeout=30,
    )
)

print("✅ MCP Tool created")
幕后原理:
- 服务器启动: ADK 运行
npx -y @modelcontextprotocol/server-everything - 握手: 建立标准输入输出(stdio)通信通道
- 工具发现: 服务器告知 ADK:"我提供
getTinyImage功能" - 集成: 工具自动出现在智能体的工具列表中
- 执行: 当智能体调用
getTinyImage()时,ADK 将其转发至 MCP 服务器 - 响应: 服务器结果无缝返回给智能体
为什么这很重要: 无需编写集成代码,即可立即获得工具访问权限!不需要和工具对接,只需要一个运行一个符合MCP协议的服务器,即插即用(像一个USB接口,MCP官网也这么形容MCP)
将 mcp_server 添加至智能体的工具数组中,并更新智能体的指令,使其能够处理生成微型图像的请求。
python
# Create image agent with MCP integration
image_agent = LlmAgent(
    model=Gemini(model="gemini-2.5-flash-lite", retry_options=retry_config),
    name="image_agent",
    instruction="Use the MCP Tool to generate images for user queries",
    tools=[mcp_image_server],
)
创建运行器
python
from google.adk.runners import InMemoryRunner

runner = InMemoryRunner(agent=image_agent)
让智能体生成一张图片。观察它如何使用 MCP 工具
python
response = await runner.run_debug("Provide a sample tiny image", verbose=True)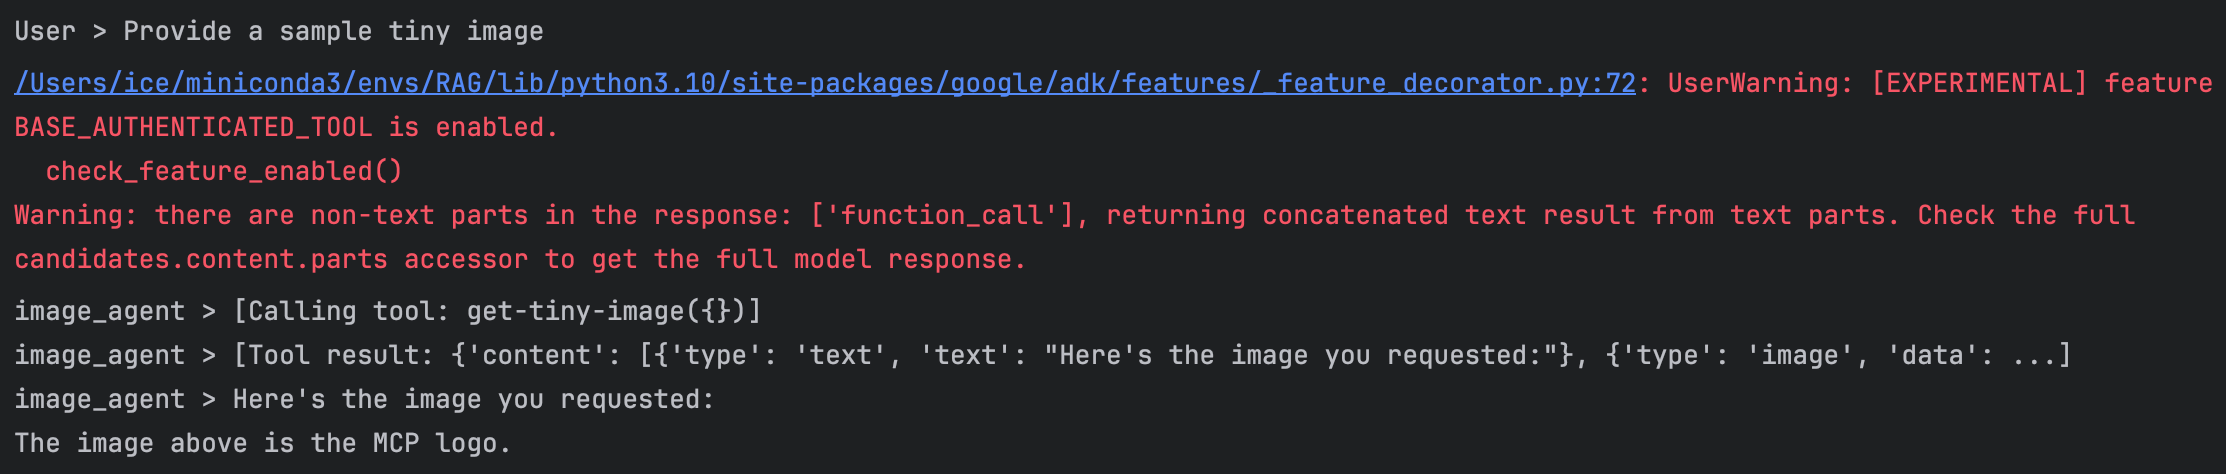
run_bebug(...)用调试模型运行 agent,除了输出最终结果,尽可能把中间过程打印出来,比如 agent 收到什么问题、调用了什么工具、工具返回了什么、最后 agent 怎么组织回答。verbose=True参数含义是把过程打印的更详细- 返回结果里面有
'type': 'image'内容
其实是看不到图片的,下面这个代码可以展示一下(这个图片数据是base64编码格式)
python
from IPython.display import display, Image as IPImage
import base64

for event in response:
    if event.content and event.content.parts:
        for part in event.content.parts:
            if hasattr(part, "function_response") and part.function_response:
                for item in part.function_response.response.get("content", []):
                    if item.get("type") == "image":
                        display(IPImage(data=base64.b64decode(item["data"])))
这个小东西就是
同样的模式适用于任意 MCP 服务器 ------ 仅需修改连接参数。
Kaggle MCP Server
python
McpToolset(
    connection_params=StdioConnectionParams(
        server_params=StdioServerParameters(
            command='npx',
            args=[
                '-y',
                'mcp-remote',
                'https://www.kaggle.com/mcp'
            ],
        ),
        timeout=30,
    )
)
其提供的功能包括:
- 📊 搜索并下载 Kaggle 数据集
- 📓 获取笔记本元数据
- 🏆 查询竞赛信息等
GitHub MCP Server
python
McpToolset(
    connection_params=StreamableHTTPServerParams(
        url="https://api.githubcopilot.com/mcp/",
        headers={
            "Authorization": f"Bearer {GITHUB_TOKEN}",
            "X-MCP-Toolsets": "all",
            "X-MCP-Readonly": "true"
        },
    ),
)
相关的 Tools 文档都可以在这个连接里面找到,都会有连接方式的示例 ADK Third-party Tools Documentation
{% endtabs %}
长时间运行操作(人工介入)
到目前为止,所有工具均会立即执行并返回结果:
用户提出问题 → 智能体调用工具 → 工具返回结果 → 智能体作出应答
但如果工具需要长时间运行,或者在完成某项操作前需要获得人工许可,该如何处理?利用货运智能体在下达大额订单前,应先请求审批。
用户提出问题 → 智能体调用工具 → 工具暂停并征询人工意见 → 人工审批通过 → 工具执行完毕 → 智能体作出应答
这种模式被称为长时间运行操作(LRO)------ 工具需要暂停运行,等待外部输入(人工审批),之后再恢复执行。
长时间运行操作举例:
- 💰 需要审批的金融交易(转账、采购)
- 🗑️ 批量操作(删除 1000 条记录 ------ 请先确认!)
- 📋 合规检查节点(需监管部门批准)
- 💸 高成本操作(启动 50 台服务器 ------ 您确定吗?)
- ⚠️ 不可逆操作(永久删除账户)
下面实现一个功能,搭建一个物流协调智能体,其配套工具具备以下功能:
- 自动审批小额订单(≤5 个集装箱)
- 对大额订单(>5 个集装箱)暂停并请求审批
- 根据审批结果完成或取消操作
这里包含了核心的长时间运行操作模式:暂停 → 等待人工输入 → 恢复执行。
{% tabs 长时间运行操作 , 1 %}
工具上下文参数
注意函数签名中包含 tool_context: ToolContext。当工具运行时,应用开发工具包(ADK)会自动提供该对象。它具备两项核心能力:
- 请求审批:调用
tool_context.request_confirmation() - 检查审批状态:读取
tool_context.tool_confirmation
python
LARGE_ORDER_THRESHOLD = 5


def place_shipping_order(
    num_containers: int, destination: str, tool_context: ToolContext
) -> dict:
    """Places a shipping order. Requires approval if ordering more than 5 containers (LARGE_ORDER_THRESHOLD).

    Args:
        num_containers: Number of containers to ship
        destination: Shipping destination

    Returns:
        Dictionary with order status
    """

    # -----------------------------------------------------------------------------------------------
    # -----------------------------------------------------------------------------------------------
    # SCENARIO 1: Small orders (≤5 containers) auto-approve
    if num_containers <= LARGE_ORDER_THRESHOLD:
        return {
            "status": "approved",
            "order_id": f"ORD-{num_containers}-AUTO",
            "num_containers": num_containers,
            "destination": destination,
            "message": f"Order auto-approved: {num_containers} containers to {destination}",
        }

    # -----------------------------------------------------------------------------------------------
    # -----------------------------------------------------------------------------------------------
    # SCENARIO 2: This is the first time this tool is called. Large orders need human approval - PAUSE here.
    if not tool_context.tool_confirmation:
        tool_context.request_confirmation(
            hint=f"⚠️ Large order: {num_containers} containers to {destination}. Do you want to approve?",
            payload={"num_containers": num_containers, "destination": destination},
        )
        return {  # This is sent to the Agent
            "status": "pending",
            "message": f"Order for {num_containers} containers requires approval",
        }

    # -----------------------------------------------------------------------------------------------
    # -----------------------------------------------------------------------------------------------
    # SCENARIO 3: The tool is called AGAIN and is now resuming. Handle approval response - RESUME here.
    if tool_context.tool_confirmation.confirmed:
        return {
            "status": "approved",
            "order_id": f"ORD-{num_containers}-HUMAN",
            "num_containers": num_containers,
            "destination": destination,
            "message": f"Order approved: {num_containers} containers to {destination}",
        }
    else:
        return {
            "status": "rejected",
            "message": f"Order rejected: {num_containers} containers to {destination}",
        }


print("✅ Long-running functions created!")
代码解析
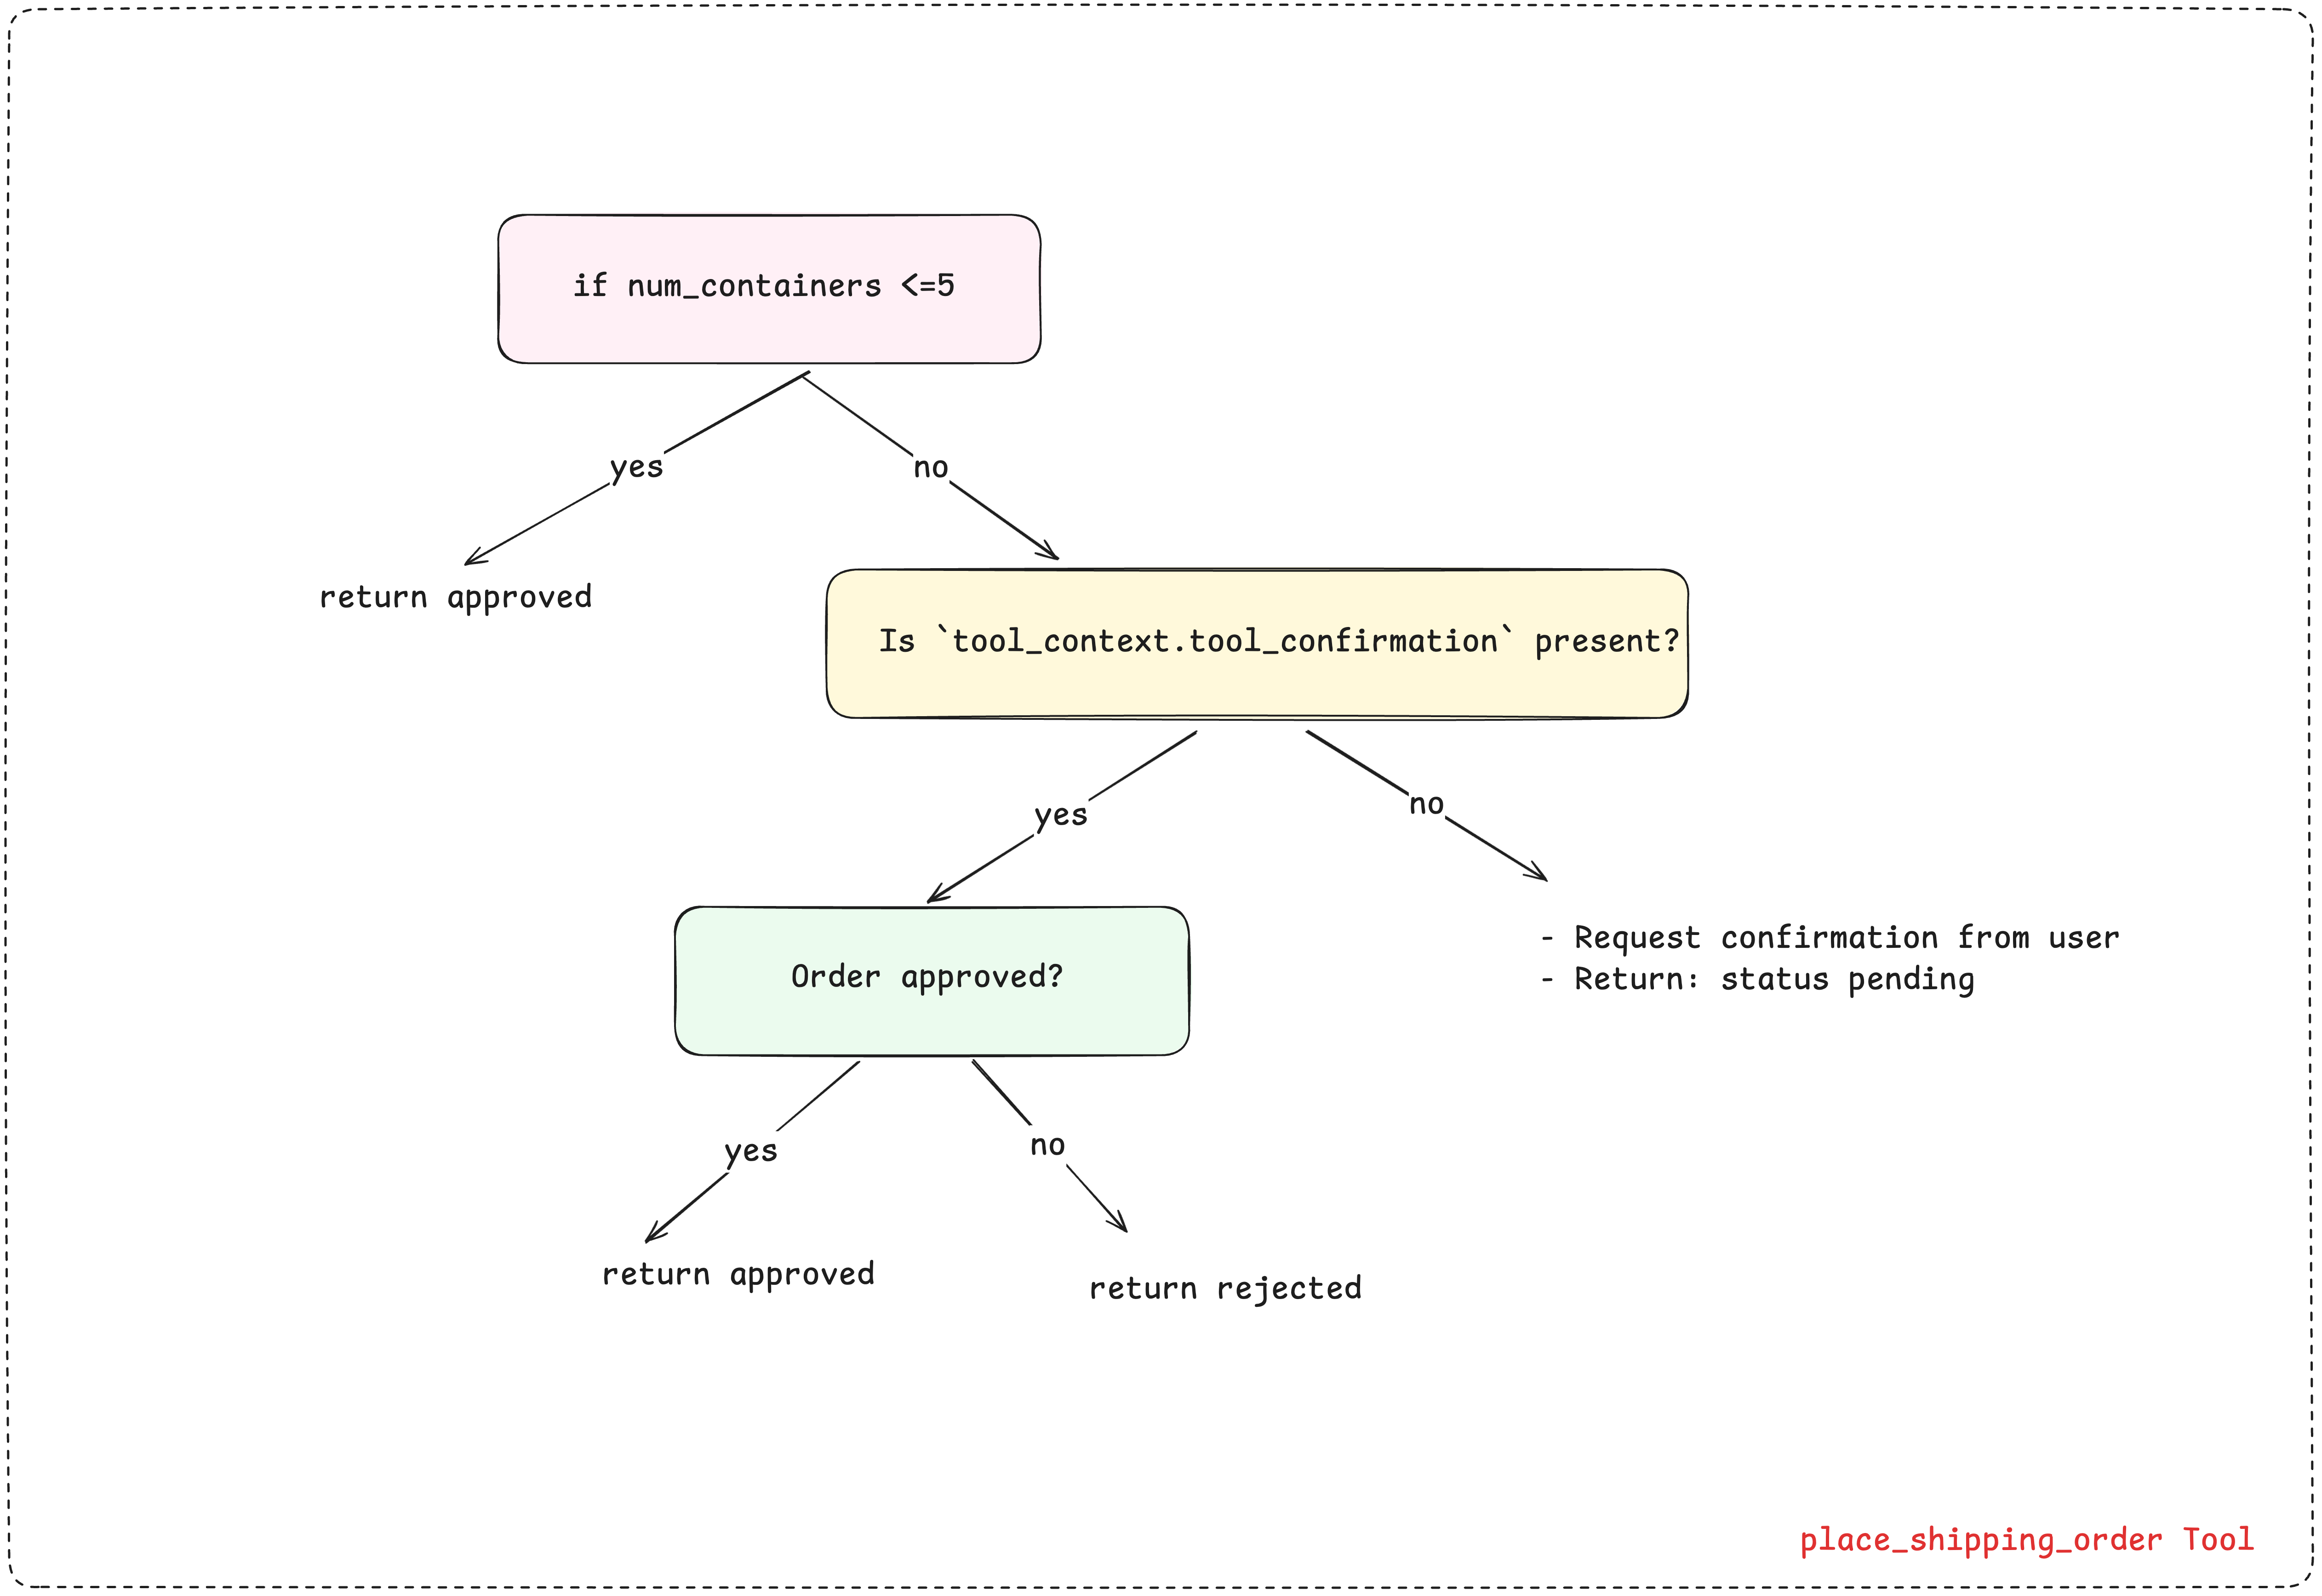
三种场景的运行机制
该工具通过检查 tool_context.tool_confirmation 来处理三种场景:
场景 1:小额订单(≤5 个集装箱) 立即返回自动审核通过状态。
- 不会检查
tool_context.tool_confirmation
场景 2:大额订单 ------ 首次调用
- 工具判定为首次调用:若未设置
tool_context.tool_confirmation - 调用
request_confirmation()申请人工审核 - 立即返回
{'status': 'pending', ...} - ADK 自动生成
adk_request_confirmation事件 - 智能体执行暂停,等待人工决策
⚠️:是调用了这个函数,然后ADK触发确认请求机制,事件流里面出现 adk_request_confirmation
场景 3:大额订单 ------ 恢复调用
- 工具判定为恢复执行:此时
not tool_context.tool_confirmation判定为否 - 核查人工审核结果:
tool_context.tool_confirmation.confirmed - 若为真 → 返回审核通过状态
- 若为假 → 返回审核驳回状态
核心要点:在两次调用之间,工作流代码(第 4 部分)必须检测到 adk_request_confirmation 事件,并根据审核结果恢复执行流程。
创建智能体
将工具添加到智能体中。工具会根据订单规模,在内部自行判断何时请求审批。
python
# Create shipping agent with pausable tool
shipping_agent = LlmAgent(
    name="shipping_agent",
    model=Gemini(model="gemini-2.5-flash-lite", retry_options=retry_config),
    instruction="""You are a shipping coordinator assistant.

  When users request to ship containers:
   1. Use the place_shipping_order tool with the number of containers and destination
   2. If the order status is 'pending', inform the user that approval is required
   3. After receiving the final result, provide a clear summary including:
      - Order status (approved/rejected)
      - Order ID (if available)
      - Number of containers and destination
   4. Keep responses concise but informative
  """,
    tools=[FunctionTool(func=place_shipping_order)],
)

print("✅ Shipping Agent created!")
封装至可恢复应用
{% note red 'fas fa-question-circle' simple %}
问题所在:常规的大语言模型智能体(LlmAgent)是无状态的 ------ 每次调用相互独立,无法记忆此前的交互记录。若工具需要审批,智能体将无法记住此前的操作进程。
{% endnote %}
LLM 是脑子,Agent 是角色,App 是系统,Runner 是让系统跑起来的执行器。
{% note success simple %}
解决方案:将你的智能体封装至启用了可恢复功能的 APP 中。该应用会新增持久化层,用于保存并恢复状态。
{% endnote %}
工具暂停时会保存以下内容:
- 截至目前的所有对话消息
- 已调用的工具(下达发货订单)
- 工具参数(10 个集装箱,鹿特丹)
- 具体暂停节点(等待审批)
恢复运行时,应用会加载已保存的状态,使智能体从暂停处精准接续执行,仿佛时间从未中断。
python
# Wrap the agent in a resumable app - THIS IS THE KEY FOR LONG-RUNNING OPERATIONS!
shipping_app = App(
    name="shipping_coordinator",
    root_agent=shipping_agent,
    resumability_config=ResumabilityConfig(is_resumable=True), # 可以进行恢复
)

print("✅ Resumable app created!")
创建会话和运行器
将 app=shipping_app 而非 agent=... 传入,这样运行器就能感知到可恢复执行的特性。
python
session_service = InMemorySessionService()

# Create runner with the resumable app
shipping_runner = Runner(
    app=shipping_app,  # Pass the app instead of the agent
    session_service=session_service,
)

print("✅ Runner created!")
{% endtabs %}
下一步:构建工作流代码,测试智能体能否检测到暂停状态并处理审批流程。
构建工作流
在工作流中处理事件
智能体不会自动处理暂停 / 恢复操作。每个长时间运行的工作流都需要完成以下步骤:
- 检测暂停状态:检查事件中是否包含
adk_request_confirmation - 获取人工决策:在生产环境中,需展示界面并等待用户点击。此处我们对该过程进行模拟。
- 恢复智能体:将决策结果与已保存的调用标识(
invocation_id)一同回传
理解核心技术概念
- 事件(events)------ 智能体执行过程中,ADK 会生成各类事件。工具调用、模型响应、函数执行结果等均会以事件形式呈现
adk_request_confirmation事件 ------ 该事件为特殊事件,用于发出 "在此处暂停" 的指令
- 当你的工具调用
request_confirmation()方法时,ADK 会自动生成该事件 - 该事件包含调用标识(invocation_id)
- 你的工作流必须检测到该事件,才能知晓智能体已进入暂停状态
- 调用标识(invocation_id)------ 每次调用
run_async()方法都会生成一个唯一的调用标识(例如 "abc123")
- 当工具暂停时,需保存该标识
- 恢复执行时,需传入相同的标识,以便 ADK 识别需要继续执行的任务进程
- 若缺少该标识,ADK 会启动一个全新的执行进程,而非恢复已暂停的任务
用于处理事件的辅助函数
这些函数会为你处理事件迭代逻辑。
check_for_approval() - 检测智能体是否暂停
- 遍历所有事件,查找特定的
adk_request_confirmation事件 - 返回
approval_id(用于标识该具体请求)和invocation_id(用于标识需恢复的执行任务) - 若未检测到暂停状态,则返回
None
python
def check_for_approval(events):
    """Check if events contain an approval request.

    Returns:
        dict with approval details or None
    """
    for event in events:
        if event.content and event.content.parts:
            for part in event.content.parts:
                if (
                    part.function_call
                    and part.function_call.name == "adk_request_confirmation"
                ):
                    return {
                        "approval_id": part.function_call.id,
                        "invocation_id": event.invocation_id,
                    }
return Noneevents:所有事件,比如用户消息、模型回复、tool call、tool resultevent.content.parts:有些事件可能没有内容,所以要先判断,有多个part的原因是一个回复可能不只是纯文本,可能还包含图片、function_call、function_response等。所以要逐个检查
print_agent_response() - 显示智能体文本,用于从事件中提取并打印文本的简易辅助函数
python
def print_agent_response(events):
    """Print agent's text responses from events."""
    for event in events:
        if event.content and event.content.parts:
            for part in event.content.parts:
                if part.text:
                    print(f"Agent > {part.text}")
create_approval_response() - 格式化人工决策
- 接收来自人工的审批信息与布尔型决策(真 / 假)
- 创建 ADK 可识别的
FunctionResponse对象 - 将其封装至
Content对象中,以返回给智能体
python
def create_approval_response(approval_info, approved):
    """Create approval response message."""
    confirmation_response = types.FunctionResponse(
        id=approval_info["approval_id"],
        name="adk_request_confirmation",
        response={"confirmed": approved},
    )
    return types.Content(
        role="user", parts=[types.Part(function_response=confirmation_response)]
    )


print("✅ Helper functions defined")
工作流函数
run_shipping_workflow() 函数统筹整个审批流程。
python
async def run_shipping_workflow(query: str, auto_approve: bool = True):
    """Runs a shipping workflow with approval handling.

    Args:
        query: User's shipping request
        auto_approve: Whether to auto-approve large orders (simulates human decision)
    """

    print(f"\n{'='*60}")
    print(f"User > {query}\n")

    # Generate unique session ID
    session_id = f"order_{uuid.uuid4().hex[:8]}"

    # Create session
    await session_service.create_session(
        app_name="shipping_coordinator", user_id="test_user", session_id=session_id
    )

    query_content = types.Content(role="user", parts=[types.Part(text=query)])
    events = []

    # -----------------------------------------------------------------------------------------------
    # -----------------------------------------------------------------------------------------------
    # STEP 1: Send initial request to the Agent. If num_containers > 5, the Agent returns the special `adk_request_confirmation` event
    async for event in shipping_runner.run_async(
        user_id="test_user", session_id=session_id, new_message=query_content
    ):
        events.append(event)

    # -----------------------------------------------------------------------------------------------
    # -----------------------------------------------------------------------------------------------
    # STEP 2: Loop through all the events generated and check if `adk_request_confirmation` is present.
    approval_info = check_for_approval(events)

    # -----------------------------------------------------------------------------------------------
    # -----------------------------------------------------------------------------------------------
    # STEP 3: If the event is present, it's a large order - HANDLE APPROVAL WORKFLOW
    if approval_info:
        print(f"⏸️  Pausing for approval...")
        print(f"🤔 Human Decision: {'APPROVE ✅' if auto_approve else 'REJECT ❌'}\n")

        # PATH A: Resume the agent by calling run_async() again with the approval decision
        async for event in shipping_runner.run_async(
            user_id="test_user",
            session_id=session_id,
            new_message=create_approval_response(
                approval_info, auto_approve
            ),  # Send human decision here
            invocation_id=approval_info[
                "invocation_id"
            ],  # Critical: same invocation_id tells ADK to RESUME
        ):
            if event.content and event.content.parts:
                for part in event.content.parts:
                    if part.text:
                        print(f"Agent > {part.text}")

    # -----------------------------------------------------------------------------------------------
    # -----------------------------------------------------------------------------------------------
    else:
        # PATH B: If the `adk_request_confirmation` is not present - no approval needed - order completed immediately.
        print_agent_response(events)

    print(f"{'='*60}\n")

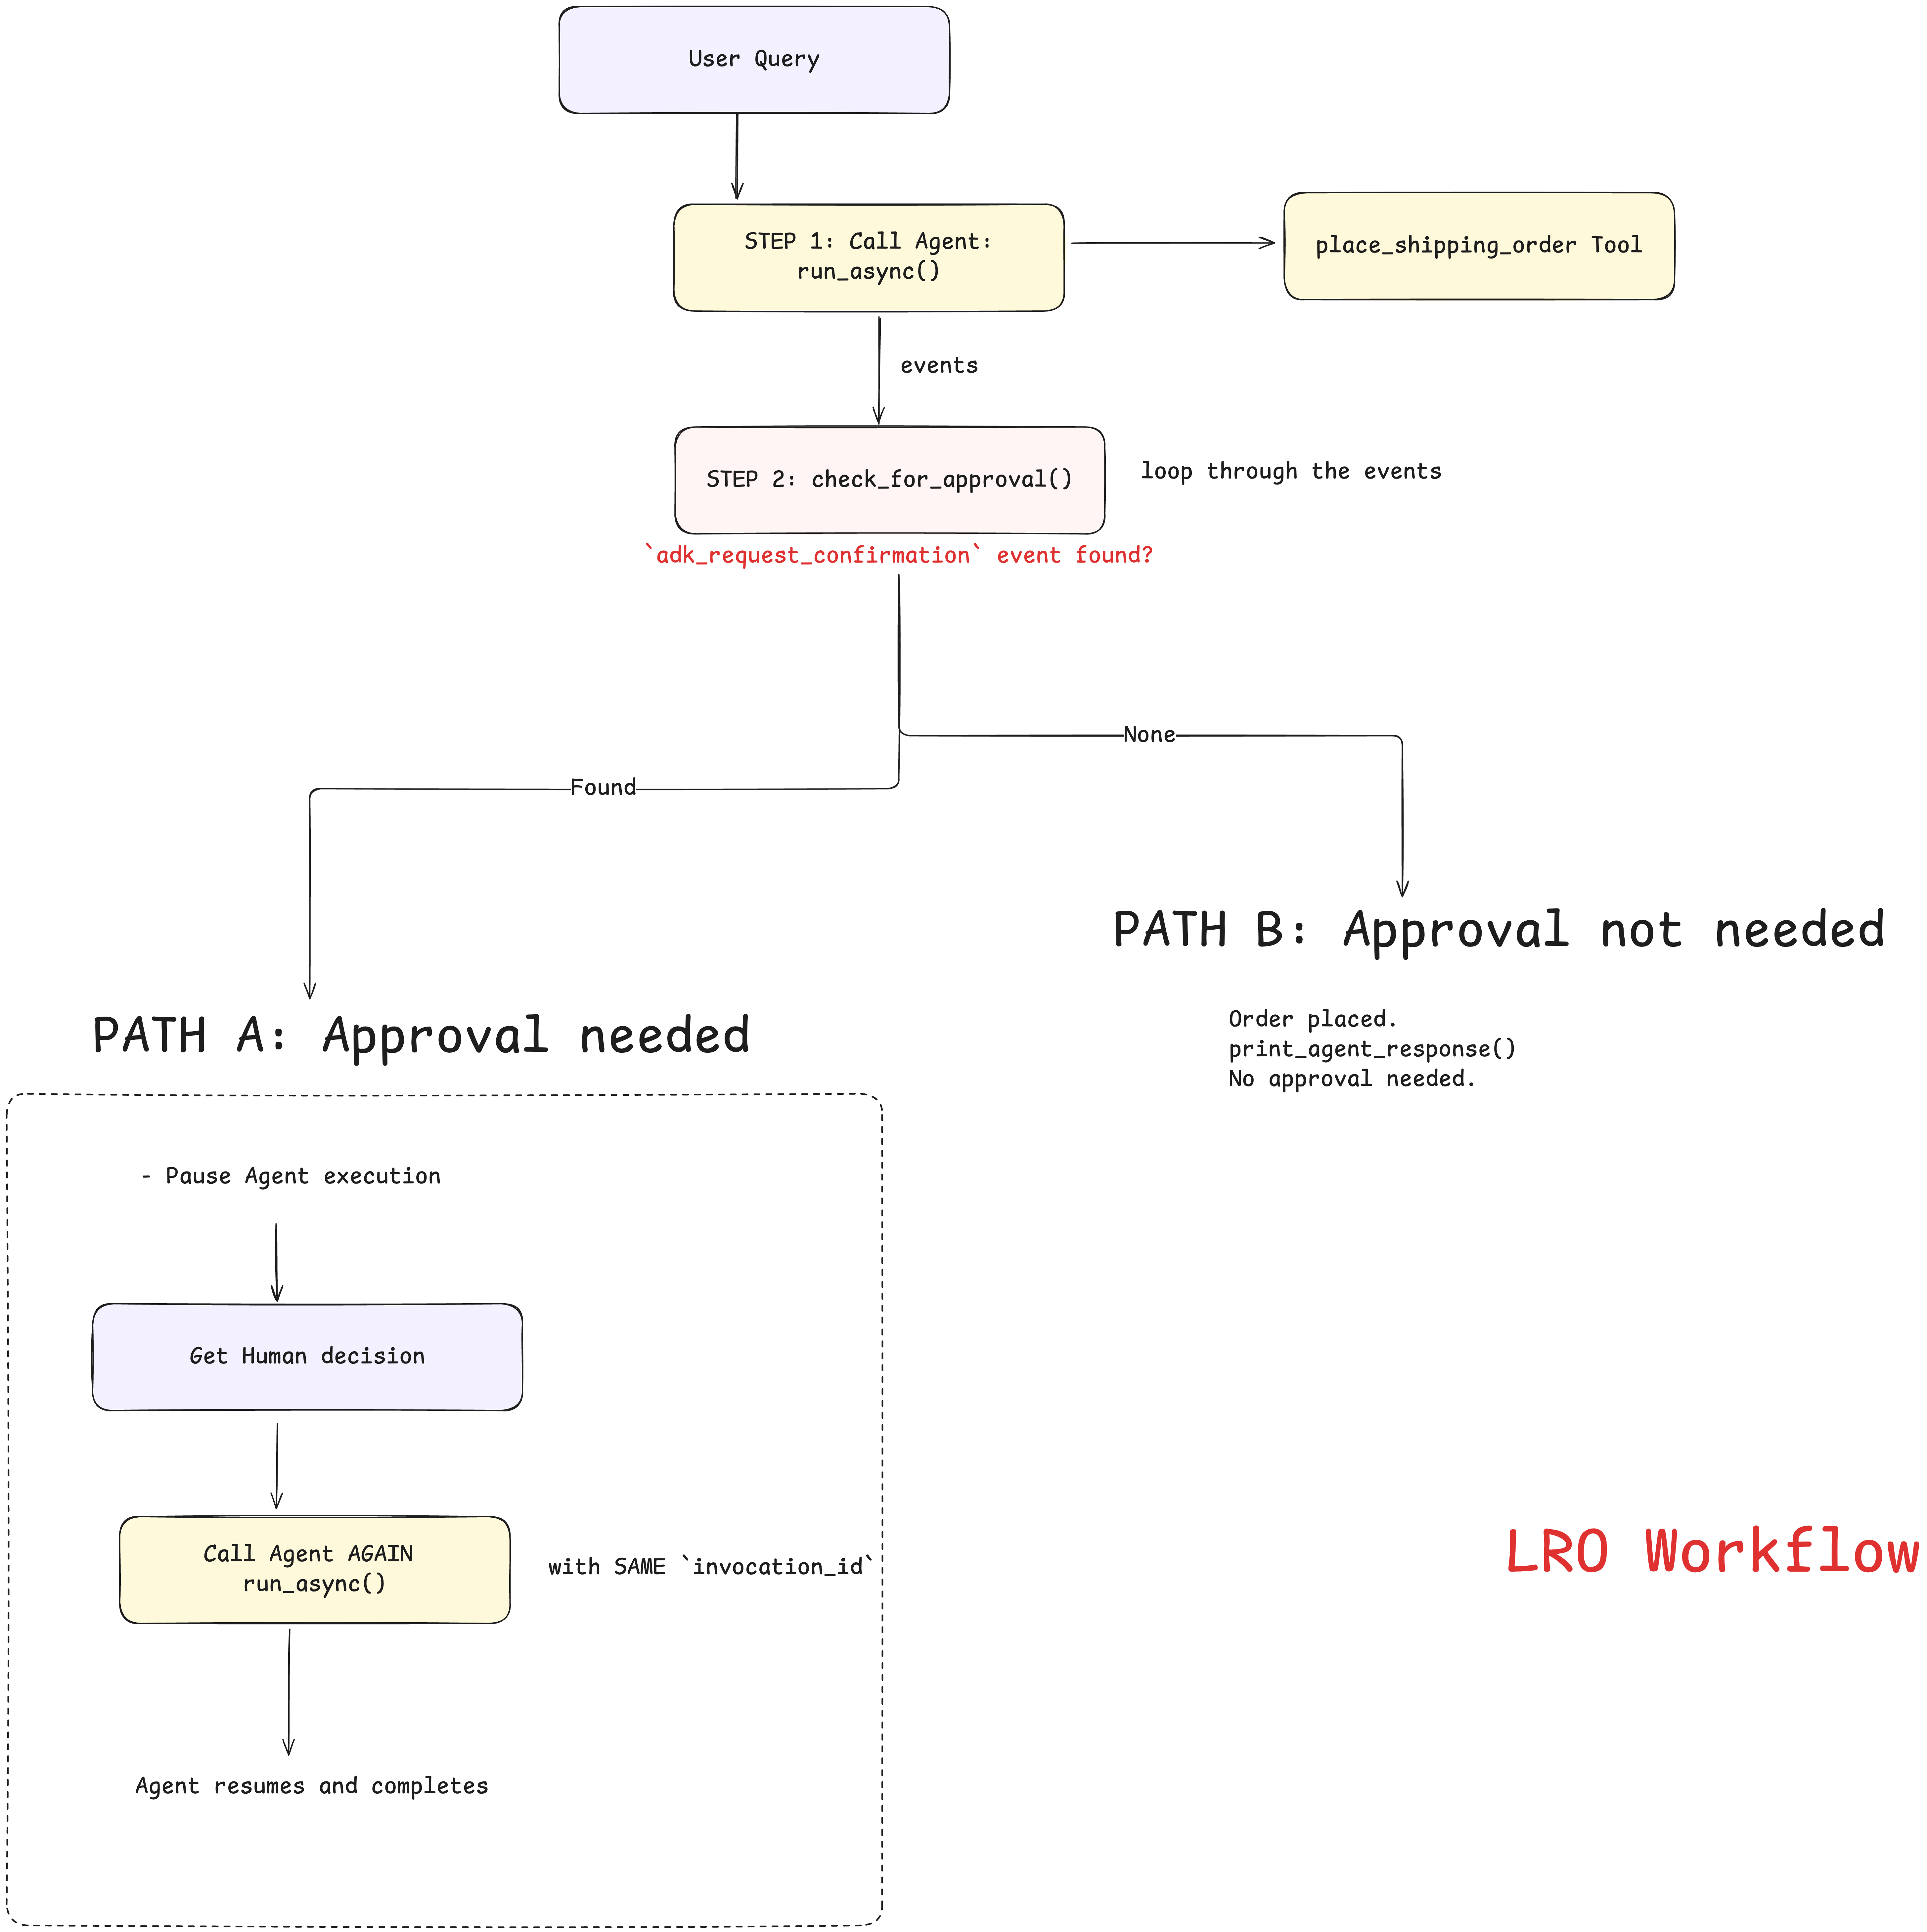
print("✅ Workflow function ready")- 我们跟GPT聊天的时候,一个会话窗口其实就是这里面的一个
session_id。让系统内部知道这是哪个对话,里面聊过什么。 APP类似于我定义好了一个有具体功能的类,比如定义了一个写作助手,代码助手,然后session就是创建实体对象session_service.create_session(app_name="shipping_coordinator", user_id="test_user", session_id=session_id)里面,user_id来标识是哪个用户- 前面有
session_service = InMemorySessionService()这个意思是创建一个会话服务,它来专门负责保存和管理session的,是保存在内存中的。session_service.create_session()是用来创建会话的 shipping_runner = Runner(...)是运行shipping_app,接收消息,调用app,在运行时去session_service里面读写会话状态的。shipping_runner.run_async(...)是把一条消息发送到这个session的,这一步是真正开始聊天的query_content = types.Content(role="user", parts=[types.Part(text=query)])这个是在构造用户消息,因为query只是一个普通字符串,这里role是用户角色,谁发的消息,types.Part(text=query)是消息的组成,因为消息可能包含图片、语音、文本啥的。
正常情况下
数量小于等于 5 的时候,在 shipping_runner.run_async(...) 处,发出 Query 之后,Agent 内部会围绕这个 Query 产生一系列的事件流,比如收消息、推理、调工具、拿结果、输出回复、结束,这也是 for 的原因。然后代码继续向下执行,判断了 approval_info 里面是空,直接打印结果
需要暂停的情况下
数量大于 5 的时候,在 shipping_runner.run_async(...) 处,发出 Query 之后,Agent 内部会产生一系列的事件流,不同的是这次执行过程中会出现一个 adk_request_confirmation 事件,需要人工去确认了,因此这轮循环会在这里暂停,代码继续向下执行,判断了 approval_info 里面不是空,进入 if,然后在里面再次 run_async(...) ,传入 invocation_id 和人工批准/拒绝消息,这样ADK就知道要恢复之前暂停的那次执行,继续把剩余流程跑完。
代码拆解
步骤 1:向智能体发送初始请求
- 调用
run_async()启动智能体执行 - 将所有事件收集到列表中以便查看
步骤 2:检测暂停状态
- 调用
check_for_approval(events)查找特定事件:adk_request_confirmation - 若存在该特殊事件,则返回包含调用 ID(invocation_id)的审批信息;若执行完成则返回空值
步骤 3:恢复执行
路径 A:
- 若存在审批信息,此时智能体会暂停运行以等待人工输入。
- 待获取人工输入后,再次调用
run_async()并传入人工输入内容。 - 关键要点:需使用相同的调用 ID(告知 ADK 执行恢复操作,而非重新启动)
- 恢复执行后展示智能体的最终响应
路径 B:
- 若不存在审批信息,则无需审批,智能体直接完成执行。
结果
python
# 订单小于 5
await run_shipping_workflow("Ship 3 containers to Singapore")

# ============================================================
# User > Ship 3 containers to Singapore

# Agent > Shipping order placed successfully.
# Order status: approved
# Order ID: ORD-3-AUTO
# Number of containers: 3
# Destination: Singapore
# ============================================================

# 订单大于 5,但是同意了
await run_shipping_workflow("Ship 10 containers to Rotterdam", auto_approve=True)

# ============================================================
# User > Ship 10 containers to Rotterdam

# ⏸️  Pausing for approval...
# 🤔 Human Decision: APPROVE ✅

# Agent > Shipping order approved. Order ID: ORD-10-HUMAN. 10 containers to Rotterdam.
# ============================================================

# 订单大于 5,但是拒绝了
await run_shipping_workflow("Ship 8 containers to Los Angeles", auto_approve=False)
# ============================================================
# User > Ship 8 containers to Los Angeles

# ⏸️  Pausing for approval...
# 🤔 Human Decision: REJECT ❌

# Agent > The order for 8 containers to Los Angeles has been rejected.
# ============================================================
总结 ------ 高级工具的核心模式
| 模式 | 适用场景 | 核心 ADK 组件 |
|---|---|---|
| MCP 集成 | 需要连接外部标准化服务(如时间服务、数据库或文件系统),且无需编写自定义集成代码 | McpToolset |
| 长时间运行操作 | 需要暂停工作流以等待外部事件,最常见于人工介入审批、长时间后台任务执行,或合规性 / 安全性检查节点 | ToolContext、request_confirmation、App、ResumabilityConfig |
智能体会话(Agent Sessions)
前期准备
python
import os
from dotenv import load_dotenv
from typing import Any, Dict

from google.adk.agents import Agent, LlmAgent
from google.adk.apps.app import App, EventsCompactionConfig
from google.adk.models.google_llm import Gemini
from google.adk.sessions import DatabaseSessionService
from google.adk.sessions import InMemorySessionService
from google.adk.runners import Runner
from google.adk.tools.tool_context import ToolContext
from google.genai import types

load_dotenv(override=True)

GOOGLE_API_KEY = os.getenv("GOOGLE_API_KEY")
os.environ["GOOGLE_API_KEY"] = GOOGLE_API_KEY

retry_config = types.HttpRetryOptions(
    attempts=5,  # Maximum retry attempts
    exp_base=7,  # Delay multiplier
    initial_delay=1,
    http_status_codes=[429, 500, 503, 504],  # Retry on these HTTP errors
)
辅助函数
用于管理完整的对话会话,处理会话的创建 / 获取、查询处理以及响应流式传输。该函数既支持单次查询,也支持连续的多次查询。
举例
bash
>>> await run_session(runner, "What is the capital of France?", "geography-session")
>>> await run_session(runner, ["Hello!", "What's my name?"], "user-intro-session")
python
# Define helper functions that will be reused throughout the notebook
async def run_session(
    runner_instance: Runner,
    user_queries: list[str] | str = None,
    session_name: str = "default",
):
    print(f"\n ### Session: {session_name}")

    # Get app name from the Runner
    app_name = runner_instance.app_name

    # Attempt to create a new session or retrieve an existing one
    try:
        session = await session_service.create_session(
            app_name=app_name, user_id=USER_ID, session_id=session_name
        )
    except:
        session = await session_service.get_session(
            app_name=app_name, user_id=USER_ID, session_id=session_name
        )

    # Process queries if provided
    if user_queries:
        # Convert single query to list for uniform processing
        if type(user_queries) == str:
            user_queries = [user_queries]

        # Process each query in the list sequentially
        for query in user_queries:
            print(f"\nUser > {query}")

            # Convert the query string to the ADK Content format
            query = types.Content(role="user", parts=[types.Part(text=query)])

            # Stream the agent's response asynchronously
            async for event in runner_instance.run_async(
                user_id=USER_ID, session_id=session.id, new_message=query
            ):
                # Check if the event contains valid content
                if event.content and event.content.parts:
                    # Filter out empty or "None" responses before printing
                    if (
                        event.content.parts[0].text != "None"
                        and event.content.parts[0].text
                    ):
                        print(f"{MODEL_NAME} > ", event.content.parts[0].text)
    else:
        print("No queries!")


print("✅ Helper functions defined.")
会话管理(Session Management)
问题
从本质上来说,大语言模型本身是无状态的。它们的认知范围仅限于单次 API 调用中你所提供的信息。这意味着,若智能体缺乏合理的上下文管理机制,只会对当前提示做出响应,而不会考虑此前的对话历史。
为何这一点至关重要?试想一下,你试图与某人进行一场有意义的交谈,可对方每听完一句话就会彻底忘记你之前说过的所有内容。这正是我们使用原生大语言模型时所面临的难题!
在 ADK 中,我们采用会话(Sessions) 管理短期记忆,通过记忆(Memory) 实现长期记忆。
什么是会话
会话
会话是对话的容器。它按时间顺序封装对话历史,同时记录单次连续对话中所有的工具交互与响应内容。会话与用户及智能体绑定,不会与其他用户共享;同理,某一智能体的会话历史也不会与其他智能体共享。
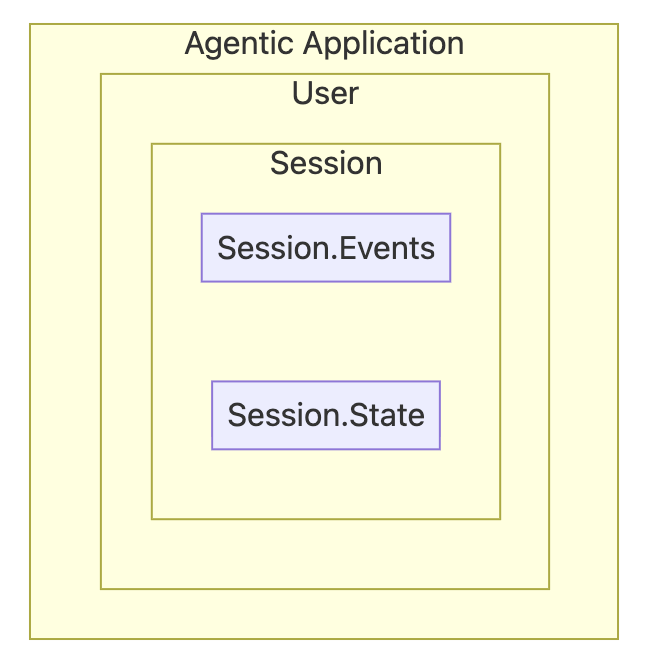
在 ADK 中,会话由两大核心组件构成:事件与状态。
Session.Events:
如果说会话是对话的容器,那么事件就是构成对话的基本单元。
事件示例:
- 用户输入:来自用户的消息(文本、音频、图片等)
- 智能体响应:智能体对用户的回复
- 工具调用:智能体决定调用外部工具或 API
- 工具输出:工具调用返回的数据,供智能体继续推理使用
{} Session.State:
session.state 是智能体的临时存储区,用于存储和更新对话过程中所需的动态信息。可将其视作全局 {key, value} 对存储结构,所有子智能体与工具均可访问。
如何管理会话
一个智能体应用可服务多名用户,且每位用户可与该应用建立多个会话。为管理这些会话与事件,应用开发工具包(ADK)提供了会话管理器与运行器。
- 会话服务(SessionService):存储层
- 负责会话数据的创建、存储与获取
- 可根据不同需求提供多种实现方式(内存、数据库、云端)
- 运行器(Runner):编排层
- 管理用户与智能体之间的信息流转
- 自动维护对话历史
- 后台完成上下文工程处理
可以这样理解:
- 会话 = 一本笔记本 📓
- 事件 = 单页上的独立记录 📝
- 会话服务 = 存放笔记本的文件柜 🗄️
- 运行器 = 管理对话的助手 🤖
实现有状态智能体
创建第一个有状态智能体,它能够记住信息并开展有意义的对话。
ADK 提供多种适用于不同需求的会话类型。首先,我们将从一个简单的会话管理方案(InMemorySessionService)开始。
python
APP_NAME = "default"  # Application
USER_ID = "default"  # User
SESSION = "default"  # Session

MODEL_NAME = "gemini-2.5-flash-lite"


# Step 1: Create the LLM Agent
root_agent = Agent(
    model=Gemini(model="gemini-2.5-flash-lite", retry_options=retry_config),
    name="text_chat_bot",
    description="A text chatbot",  # Description of the agent's purpose
)

# Step 2: Set up Session Management
# InMemorySessionService stores conversations in RAM (temporary)
session_service = InMemorySessionService()

# Step 3: Create the Runner
runner = Runner(agent=root_agent, app_name=APP_NAME, session_service=session_service)

print("✅ Stateful agent initialized!")
print(f"   - Application: {APP_NAME}")
print(f"   - User: {USER_ID}")
print(f"   - Using: {session_service.__class__.__name__}")
测试有状态智能体
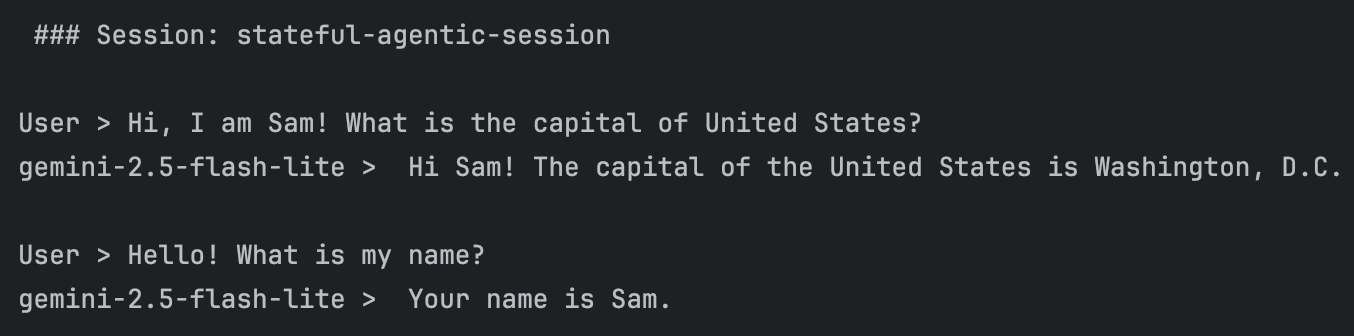
python
# Run a conversation with two queries in the same session
# Notice: Both queries are part of the SAME session, so context is maintained
await run_session(
    runner,
    [
        "Hi, I am Sam! What is the capital of United States?",
        "Hello! What is my name?",  # This time, the agent should remember!
    ],
    "stateful-agentic-session",
)
测试智能体的遗忘特性
为验证智能体会遗忘对话内容,重启IDEA。随后运行除 1.5.1.5 中 run_session 之外的所有先前代码。
现在下面代码,你会发现智能体已完全不记得此前对话中的任何内容。
python
# Run this cell after restarting the kernel. All this history will be gone...
await run_session(
    runner,
    ["What did I ask you about earlier?", "And remind me, what's my name?"],
    "stateful-agentic-session",
)  # Note, we are using same session name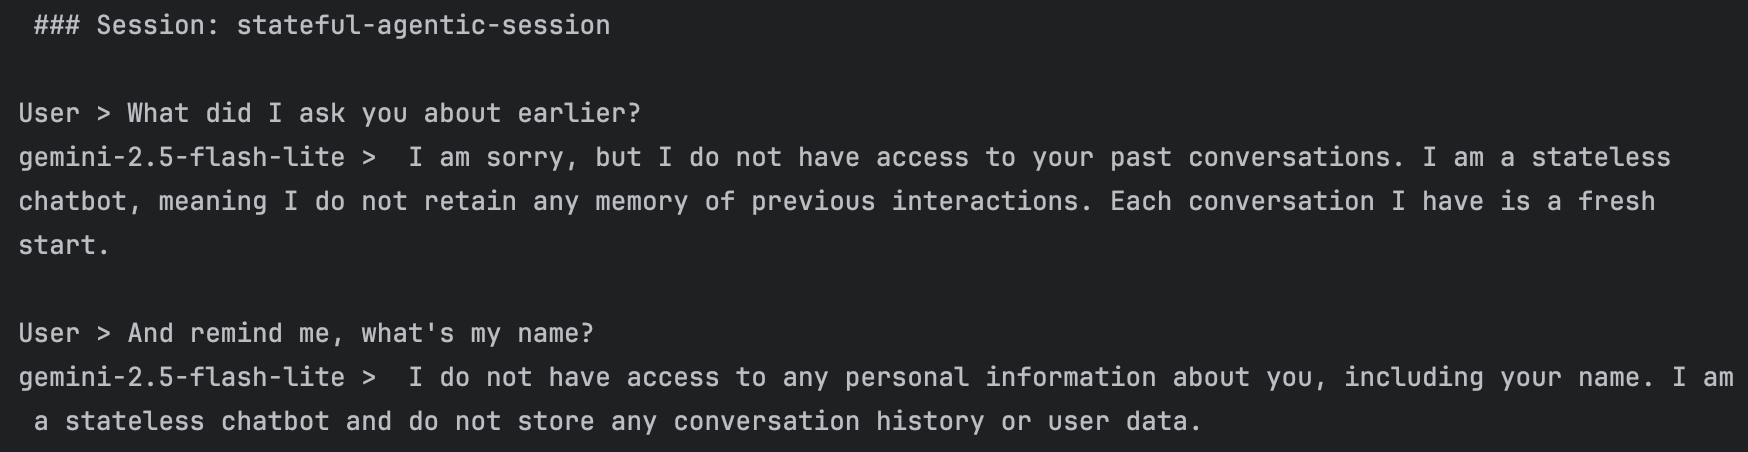
{% note warning no-icon simple %}
问题:会话信息无法持久保存(即有意义的对话内容会丢失)
在实际应用场景下,用户应当能够查阅过往记录并继续对话。要实现这一功能,我们必须对信息进行持久化存储。
{% endnote %}
借助数据库会话服务实现持久化会话
尽管内存会话服务(InMemorySessionService)非常适合原型开发,但实际应用场景中的对话需要在服务重启、崩溃以及部署后依然能够保留。所以我们升级到持久化存储方案!
选择合适的会话服务
ADK 针对不同需求提供了多种会话服务实现方案:
| 服务 | 使用场景 | 持久化特性 | 适用对象 |
|---|---|---|---|
内存会话服务(InMemorySessionService) |
开发与测试 | ❌ 重启后数据丢失 | 快速原型开发 |
数据库会话服务(DatabaseSessionService) |
自主管理的应用 | ✅ 重启后数据保留 | 中小型应用 |
代理引擎会话(Agent Engine Sessions) |
在GCP上生产部署 | ✅ 全托管模式 | 企业级大规模应用 |
实现持久化会话
我们将通过 SQLite 升级至 DatabaseSessionService。在下面的代码里面,实现了数据持久化,且无需额外部署独立数据库服务器。
接下来创建一个能够与用户进行对话的 chatbot_agent。
bash
pip install aiosqlite greenlet
python
# Step 1: Create the same agent (notice we use LlmAgent this time)
chatbot_agent = LlmAgent(
    model=Gemini(model="gemini-2.5-flash-lite", retry_options=retry_config),
    name="text_chat_bot",
    description="A text chatbot with persistent memory",
)

# Step 2: Switch to DatabaseSessionService
# SQLite database will be created automatically
db_url = "sqlite+aiosqlite:///./my_agent_data.db"  # Local SQLite file
session_service = DatabaseSessionService(db_url=db_url)

# Step 3: Create a new runner with persistent storage
runner = Runner(agent=chatbot_agent, app_name=APP_NAME, session_service=session_service)

print("✅ Upgraded to persistent sessions!")
print(f"   - Database: my_agent_data.db")
print(f"   - Sessions will survive restarts!")
测试 1:验证持久化
我们用会话 ID test-db-session-01 开启一段新对话。首先我们告知对方自己的名字是 "Sam",随后提出一个问题。在第二轮对话中,我们会询问智能体我们的名字。
由于我们使用的是 DatabaseSessionService,智能体应当能够记住这个名字。
对话结束后,我们将直接查看 my_agent_data.db 这个 SQLite 数据库,了解对话事件(用户的查询内容与模型的回复内容)是如何被存储的。
python
await run_session(
    runner,
    ["Hi, I am Sam! What is the capital of the United States?", "Hello! What is my name?"],
    "test-db-session-01",
)
在我们项目目录下会保存一个 my_agent_data.db 文件,双击打开

可以看到事件内容
测试 2:恢复对话
然后我们重启内核

运行此前所有代码单元,排除之前的 run_session 代码单元。然后使用相同的会话 ID(test-db-session-01)运行下方代码单元。
我们提出一个新问题,然后再次询问我们的名字。由于会话是从数据库中加载的,智能体应当仍能记得在第一次测试运行中我们的名字是 "山姆"。这体现了持久化会话的优势。
python
await run_session(
    runner,
    ["What is the capital of India?", "Hello! What is my name?"],
    "test-db-session-01",
)
验证会话数据是否相互隔离
如前所述,会话是智能体与用户之间的私密对话(即两个会话之间不会共享信息)。我们使用不同的会话名称 test-db-session-02 来运行 run_session,以此验证这一点。
python
await run_session(
    runner, ["Hello! What is my name?"], "test-db-session-02"
)  # Note, we are using new session name
事件是如何存储在数据库中的?
由于我们使用 SQLite 数据库来存储信息,下面让我们快速查看一下信息的存储方式。
python
import sqlite3

def check_data_in_db():
    with sqlite3.connect("my_agent_data.db") as connection:
        cursor = connection.cursor()
        result = cursor.execute(
            "select app_name, session_id, invocation_id, timestamp, event_data from events"
        )
        print([_[0] for _ in result.description])
        for each in result.fetchall():
            print(each)


check_data_in_db()
上下文压缩
所有事件都会完整存储在会话数据库中,数据量会迅速累积。对于耗时较长、复杂度高的任务,事件列表可能会变得十分庞大,进而导致性能下降、成本增加。但如果我们能自动对过往内容进行总结呢?下面我们借助 ADK 的上下文压缩功能,了解如何自动缩减存储在会话中的上下文内容。
为智能体创建应用
要启用上下文压缩功能,我们使用 1.5.2.1 节中创建的同一个 chatbot_agent。
第一步是创建一个名为 App 的对象。我们为其命名,并传入 chatbot_agent 实例。
同时,我们将创建一个新的配置项以实现上下文压缩。EventsCompactionConfig 配置定义了两个关键变量:
compaction_interval:要求执行器在每n轮对话后对历史记录进行压缩overlap_size:定义为保留重叠部分所需的前置对话轮数,意思是留最近几轮的对话不压缩
随后,我们将该应用传入执行器中。
python
# Re-define our app with Events Compaction enabled
research_app_compacting = App(
    name="research_app_compacting",
    root_agent=chatbot_agent,
    # This is the new part!
    events_compaction_config=EventsCompactionConfig(
        compaction_interval=3,  # Trigger compaction every 3 invocations
        overlap_size=1,  # Keep 1 previous turn for context
    ),
)

db_url = "sqlite+aiosqlite:///./my_agent_data.db"  # Local SQLite file
session_service = DatabaseSessionService(db_url=db_url)

# Create a new runner for our upgraded app
research_runner_compacting = Runner(
    app=research_app_compacting, session_service=session_service
)


print("✅ Research App upgraded with Events Compaction!")
运行演示程序
现在,搞一段足够长的对话,来触发压缩操作。运行下方的代码,输出内容看起来会和普通对话无异。但我们已对应用程序完成配置,第三次调用之后,压缩进程会在后台静默运行。
python
# Turn 1
await run_session(
    research_runner_compacting,
    "What is the latest news about AI in healthcare?",
    "compaction_demo",
)

# Turn 2
await run_session(
    research_runner_compacting,
    "Are there any new developments in drug discovery?",
    "compaction_demo",
)

# Turn 3 - Compaction should trigger after this turn!
await run_session(
    research_runner_compacting,
    "Tell me more about the second development you found.",
    "compaction_demo",
)

# Turn 4
await run_session(
    research_runner_compacting,
    "Who are the main companies involved in that?",
    "compaction_demo",
)
验证会话历史中的压缩操作
上述对话看似正常,但其历史记录已在后台被修改。
我们可以查看会话中的事件列表。压缩操作并不会删除旧事件,而是会用一个全新的、包含摘要信息的事件将其替换。接下来我们就来找到这个事件。
python
# Get the final session state
final_session = await session_service.get_session(
    app_name=research_runner_compacting.app_name,
    user_id=USER_ID,
    session_id="compaction_demo",
)

print("--- Searching for Compaction Summary Event ---")
found_summary = False
for event in final_session.events:
    # Compaction events have a 'compaction' attribute
    if event.actions and event.actions.compaction:
        print("\n✅ SUCCESS! Found the Compaction Event:")
        print(f"  Author: {event.author}")
        print(f"\n Compacted information: {event}")
        found_summary = True
        break

if not found_summary:
    print(
        "\n❌ No compaction event found. Try increasing the number of turns in the demo."
    )
数据库记录如上,压缩记录如下
json
{
  "invocation_id": "1dfb2ef0-88c8-4cd6-b6a2-4151de425f33",
  "author": "user",
  "actions": { // 发生事件
    "state_delta": {},
    "artifact_delta": {},
    "requested_auth_configs": {},
    "requested_tool_confirmations": {},
    "compaction": { // 发生了压缩事件
      "start_timestamp": 1776584418.168389,
      "end_timestamp": 1776584428.047276, // 被压缩的对话部分的时间范围(这个范围内的对话被总结)
      "compacted_content": {
        "parts": [
          {
            "text": "The user is asking for the latest news about AI in healthcare. The AI agent provided a comprehensive overview categorized into drug discovery, diagnostics, patient care, operational efficiency, and emerging trends.\n\nFollowing up, the user specifically inquired about new developments in drug discovery. The AI agent detailed advancements in AI-powered target identification, accelerated molecule design (including generative AI and de novo design), and improved pre-clinical/clinical trial processes. The AI also highlighted key players and recent examples of AI's impact in drug discovery.\n\nThe user then requested more information on the second development previously mentioned: \"Accelerated Molecule Design and Optimization.\" The AI agent elaborated on this topic by explaining:\n\n*   **Generative AI for Novel Molecule Generation:** How AI models like GANs and VAEs create entirely new molecular structures by learning chemical rules from large datasets.\n*   **De Novo Drug Design:** The process of designing molecules from scratch, specifically tailored for a given biological target, often using AI algorithms.\n*   **Predicting Molecular Properties:** AI's ability to forecast a molecule's efficacy, toxicity, solubility, metabolic stability, and pharmacokinetic profiles before experimental synthesis, thereby saving resources.\n*   **Fragment-Based Drug Discovery Enhancement:** How AI assists in identifying and linking chemical fragments to create potent drug molecules.\n\nThe conversation has focused on AI's role in advancing drug discovery, specifically in the design and optimization of new drug molecules. There are no unresolved questions or tasks at this point; the user has been provided with detailed explanations on their specific queries."
          } // 压缩后的内容
        ],
        "role": "model" // 这个 summary 是模型生成的
      }
    }
  },
  "id": "9f3b1e87-b4f1-40c5-a155-270433842db6",
  "timestamp": 1776584435.984697
}
成果:自动上下文管理
整体流程
- 静默运行:进行了一次常规对话,从表面来看,没有异常。
- 后台压缩:由于为应用配置了事件压缩配置,ADK 运行器会自动监控对话长度。一旦达到设定阈值,便会在后台触发摘要生成流程。
- 结果验证:通过查看会话事件,可以看到大模型生成的摘要。该摘要已替代智能体当前上下文中更早、更冗长的对话轮次。
在本次对话后续的所有轮次中,系统将为智能体提供这份精简摘要,而非完整的历史记录。这样能够节约成本、提升运行效率,同时帮助智能体聚焦于核心关键信息。
ADK 中更多上下文工程选项
自定义压缩
在本示例中,我们使用了 ADK 的默认摘要器。针对更高级的使用场景,可以通过定义自定义滑动窗口压缩器并将其传入配置文件,来实现自定义摘要逻辑。这样能够自主控制摘要提示词,甚至为该任务选用其他专用大语言模型。可以在官方文档中了解一下 Compress agent context for performance。
python
from google.adk.apps.app import App, EventsCompactionConfig
from google.adk.apps.llm_event_summarizer import LlmEventSummarizer
from google.adk.models import Gemini

# Define the AI model to be used for summarization:
summarization_llm = Gemini(model="gemini-flash-latest")

custom_prompt = """
请总结以下对话内容。
1. 提取用户提到的所有技术参数。
2. 记录用户未解决的疑问。
3. 保持语言精炼,使用 bullet points。
"""

# Create the summarizer with the custom model:
my_summarizer = LlmEventSummarizer(llm=summarization_llm, summary_prompt=custom_prompt)

# Configure the App with the custom summarizer and compaction settings:
app = App(
    name='my-agent',
    root_agent=root_agent,
    events_compaction_config=EventsCompactionConfig(
        compaction_interval=3,
        overlap_size=1,
        summarizer=my_summarizer, # 专用大模型进行压缩,也能设置 prompt
    ),
)
上下文缓存
ADK 还提供上下文缓存功能,通过缓存请求数据,有助于减小输入大语言模型的静态指令的token体积。Context caching with Gemini。
python
from google.adk import Agent
from google.adk.apps.app import App
from google.adk.agents.context_cache_config import ContextCacheConfig

root_agent = Agent(
  # configure an agent using Gemini 2.0 or higher
)

# Create the app with context caching configuration
app = App(
    name='my-caching-agent-app',
    root_agent=root_agent,
    context_cache_config=ContextCacheConfig(
        min_tokens=2048,    # Minimum tokens to trigger caching
        ttl_seconds=600,    # Store for up to 10 minutes
        cache_intervals=5,  # Refresh after 5 uses
    ),
)min_tokens:当静态指令System Prompt或者背景文档超过2048个 Token 时,ADK 才会去云端申请缓存。并且给这份缓存设置一个过期时间,一般设置用到了一次会重新刷新过期时间。cache_intervals=5,每经过5次对话,重新刷新/同步一次缓存。随着和Agent聊的越来越多,对话历史也变长,这五次对话的内容,每次放入上下文都要重新计算,达到五次之后,就把旧的缓存+这五轮对话打包,重新生成一个更大的新缓存,这样这五轮对话也变成了缓存状态,后续第六轮对话就会变得很快而且省钱了(减少推理上下文了)
{% note danger no-icon %}
上下文缓存到底是干嘛的?
假如你有一个文档发送给GPT(大概10000字),然后提问了一个问题,那么就会解析文档+问题,放入上下文,这样模型跑一次是不是需要分析完整文档+问题。之后你又提问了一次问题,其实GPT会把文档+第二个问题+之前的对话记录重新放入上下文,这样文档又被解析了一次。在做重复劳动,如果开启了缓存呢?
我们可以把文档分析一次之后,存入 Cache,下次用户提问的时候直接从缓存拿结果,然后得到问题放入上下文即可。
但是注意,如果文档占用的上下文 token 是8000,大模型上下文容量是10000,那么还是最多只能放2000,所以缓存只是保存了一份解析结果,就是把文字存成大模型能理解的特征矩阵(KV Cache)。
{% endnote %}
存在的问题
尽管可以实现上下文压缩,并借助数据库恢复会话,但如今也面临着新的挑战。在某些情况下,我们拥有需要在其他会话间共享的关键信息或偏好设置。
针对这类场景,相较于共享完整的会话历史,仅传输少量关键变量中的信息,能够优化会话体验。接下来我们看看具体实现方式!
使用会话状态
创建用于会话状态管理的自定义工具
这里看一下如何通过自定义工具手动管理会话状态。我们确定一项可传递的特征,例如用户名及其所属国家,并创建工具来捕获并保存该信息。
为何选择此示例?
用户名是一类信息的典型代表,这类信息具备以下特点:
- 仅需输入一次,却会被多次引用
- 需在整个对话过程中保持有效
- 属于用户专属特征,能够提升个性化体验
我们将创建两个工具,用于从会话状态中存储和读取用户名与国家信息。请注意,所有工具均可访问 ToolContext 对象,无需为每条需要共享的信息单独创建工具。
python
# Define scope levels for state keys (following best practices)
USER_NAME_SCOPE_LEVELS = ("temp", "user", "app")


# This demonstrates how tools can write to session state using tool_context.
# The 'user:' prefix indicates this is user-specific data.
def save_userinfo(
    tool_context: ToolContext, user_name: str, country: str
) -> Dict[str, Any]:
    """
    Tool to record and save user name and country in session state.

    Args:
        user_name: The username to store in session state
        country: The name of the user's country
    """
    # Write to session state using the 'user:' prefix for user data
    tool_context.state["user:name"] = user_name
    tool_context.state["user:country"] = country

    return {"status": "success"}


# This demonstrates how tools can read from session state.
def retrieve_userinfo(tool_context: ToolContext) -> Dict[str, Any]:
    """
    Tool to retrieve user name and country from session state.
    """
    # Read from session state
    user_name = tool_context.state.get("user:name", "Username not found")
    country = tool_context.state.get("user:country", "Country not found")

    return {"status": "success", "user_name": user_name, "country": country}


print("✅ Tools created.")
核心概念:
- 工具可通过
tool_context.state读写会话状态 - 使用清晰的键前缀(
user:、app:、temp:)进行分类管理 - 状态在同一会话的多轮对话中持续保存
{% note warning %}
USER_NAME_SCOPE_LEVELS 并不是一个常量那么简单
{% endnote %}
使用会话状态工具创建智能体
现在创建一个可访问会话状态管理工具的新智能体:
python
# Configuration
APP_NAME = "default"
USER_ID = "default"
MODEL_NAME = "gemini-2.5-flash-lite"

# Create an agent with session state tools
root_agent = LlmAgent(
    model=Gemini(model="gemini-2.5-flash-lite", retry_options=retry_config),
    name="text_chat_bot",
    description="""A text chatbot.
    Tools for managing user context:
    * To record username and country when provided use `save_userinfo` tool.
    * To fetch username and country when required use `retrieve_userinfo` tool.
    """,
    tools=[save_userinfo, retrieve_userinfo],  # Provide the tools to the agent
)

# Set up session service and runner
session_service = InMemorySessionService()
runner = Runner(agent=root_agent, session_service=session_service, app_name="default")

print("✅ Agent with session state tools initialized!")
实际测试会话状态功能
测试智能体如何利用会话状态在多轮对话中记住信息:
python
# Test conversation demonstrating session state
await run_session(
    runner,
    [
        "Hi there, how are you doing today? What is my name?",  # Agent shouldn't know the name yet
        "My name is Sam. I'm from Poland.",  # Provide name - agent should save it
        "What is my name? Which country am I from?",  # Agent should recall from session state
    ],
    "state-demo-session",
)
检查会话状态
查看会话状态,了解其中存储的内容
python
# Retrieve the session and inspect its state
session = await session_service.get_session(
    app_name=APP_NAME, user_id=USER_ID, session_id="state-demo-session"
)

print("Session State Contents:")
print(session.state)
print("\n🔍 Notice the 'user:name' and 'user:country' keys storing our data!")
会话状态隔离
前面说过,会话状态的一个重要特性是各会话之间相互隔离。我们可以通过启动一个新会话来演示这一点:
python
# Start a completely new session - the agent won't know our name
await run_session(
    runner,
    ["Hi there, how are you doing today? What is my name?"],
    "new-isolated-session",
)

# Expected: The agent won't know the name because this is a different session
跨会话状态共享
虽然会话在默认情况下是相互隔离的,但有一个有趣的现象。我们来查看新会话(new-isolated-session)的状态:
python
# Check the state of the new session
session = await session_service.get_session(
    app_name=APP_NAME, user_id=USER_ID, session_id="new-isolated-session"
)

print("New Session State:")
print(session.state)

# Note: Depending on implementation, you might see shared state here.
# This is where the distinction between session-specific and user-specific state becomes important.
虽然说会话隔离,但是还是能读取到 seesion.state,另一个会话里面存放的信息。
{% note info %}
session.state 是 Agent 与工具共享的"隐性记忆库",它通过 Scope 级别实现数据的分层隔离与持久化,大家都能读写,但必须通过"工具调用"手动读写才能将其转化为可见的上下文。
{% endnote %}
智能体记忆(Agent Memory)
本节学习如何添加记忆体 ------ 一种可检索、可长期存储的知识库,能够在多次对话间持续保存。
什么是记忆体
记忆体是一项为智能体提供长期知识存储的服务。核心区别在于:
- 会话 = 短期记忆(单次对话)
- 记忆体 = 长期知识(跨多次对话)
用软件工程的术语来理解:会话就像应用状态(临时存在),而记忆体则如同数据库(持久存储)。
为什么需要记忆
内存具备仅靠会话无法实现的功能:
| 能力 | 含义 | 示例 |
|---|---|---|
| 跨对话召回 (Cross-Conversation Recall) | 访问任何过去对话中的信息 | "该用户在所有聊天中提到了哪些偏好?" |
| 智能提取 (Intelligent Extraction) | 利用大模型驱动的整合能力提取关键事实 | 存储"花生过敏",而不是存 50 条原始消息 |
| 语义搜索 (Semantic Search) | 基于语义的检索,而不仅仅是关键词匹配 | 查询"首选色调"能匹配到"最喜欢的颜色是蓝色" |
| 持久化存储 (Persistent Storage) | 在应用程序重启后依然存在 | 构建随时间增长的知识库 |
示例:想象一下与私人助理对话的场景:
- 会话记忆:他们能记住你在本次对话中 10 分钟前说过的话
- 长期记忆:他们能记住上周对话中你的偏好信息
本节学习
- ✅ 初始化记忆服务并与智能体集成
- ✅ 将会话数据传输至记忆存储
- ✅ 搜索并调取记忆
- ✅ 实现记忆存储与调取自动化
前置工作
python
import os
from dotenv import load_dotenv
from google.adk.agents import LlmAgent
from google.adk.models.google_llm import Gemini
from google.adk.runners import Runner
from google.adk.sessions import InMemorySessionService
from google.adk.memory import InMemoryMemoryService
from google.adk.tools import load_memory, preload_memory
from google.genai import types

load_dotenv(override=True)

GOOGLE_API_KEY = os.getenv("GOOGLE_API_KEY")
os.environ["GOOGLE_API_KEY"] = GOOGLE_API_KEY

retry_config = types.HttpRetryOptions(
    attempts=5,  # Maximum retry attempts
    exp_base=7,  # Delay multiplier
    initial_delay=1,
    http_status_codes=[429, 500, 503, 504],  # Retry on these HTTP errors
)

async def run_session(
    runner_instance: Runner, user_queries: list[str] | str, session_id: str = "default"
):
    """Helper function to run queries in a session and display responses."""
    print(f"\n### Session: {session_id}")

    # Create or retrieve session
    try:
        session = await session_service.create_session(
            app_name=APP_NAME, user_id=USER_ID, session_id=session_id
        )
    except:
        session = await session_service.get_session(
            app_name=APP_NAME, user_id=USER_ID, session_id=session_id
        )

    # Convert single query to list
    if isinstance(user_queries, str):
        user_queries = [user_queries]

    # Process each query
    for query in user_queries:
        print(f"\nUser > {query}")
        query_content = types.Content(role="user", parts=[types.Part(text=query)])

        # Stream agent response
        async for event in runner_instance.run_async(
            user_id=USER_ID, session_id=session.id, new_message=query_content
        ):
            # 只要 event 有内容,就去遍历它的 parts
            if event.content and event.content.parts:
                for part in event.content.parts:
                    # 1. 如果是文本,直接打印
                    if part.text:
                        print(f"Model: > {part.text}")

                    # 2. 如果是函数调用,打印个提示让我们知道它在干活
                    if part.function_call:
                        print(f"🛠️ [工具调用] {part.function_call.name}: {part.function_call.args}")


print("✅ Helper functions defined.")
记忆工作流程
如果想把记忆模块集成到智能体中,需遵循三个核心步骤。
- 初始化 → 创建记忆服务(
MemoryService),并通过运行器(Runner)提供给智能体 - 录入 → 调用
add_session_to_memory()方法将会话数据传输至记忆库 - 检索 → 调用
search_memory()方法查询已存储的记忆内容
初始化 MemoryService
初始化 Memory
ADK 通过基础内存服务接口(BaseMemoryService)提供多种 MemoryService 实现:
- 内存式记忆服务(
InMemoryMemoryService)------ 用于原型搭建与测试的内置服务(关键词匹配,无持久化存储) - 顶点人工智能记忆库服务(
VertexAiMemoryBankService)------ 托管云服务,具备大语言模型驱动的数据整合与语义检索功能 - 自定义实现 ------ 可借助数据库自行搭建,但推荐使用托管服务
下面演示使用 InMemoryMemoryService 来学习核心运行机制。这些方法同样适用于 VertexAiMemoryBankService 等可直接投入生产环境的服务。
python
memory_service = (
    InMemoryMemoryService()
)  # ADK's built-in Memory Service for development and testing
为智能体添加记忆功能
创建一个简易智能体以响应用户查询。
python
# Define constants used throughout the notebook
APP_NAME = "MemoryDemoApp"
USER_ID = "demo_user"

# Create agent
user_agent = LlmAgent(
    model=Gemini(model="gemini-2.5-flash-lite", retry_options=retry_config),
    name="MemoryDemoAgent",
    instruction="Answer user questions in simple words.",
)

print("✅ Agent created")
创建运行器
为运行器同时提供会话服务与记忆服务。
关键配置:
运行器需同时启用这两项服务以实现记忆功能:
- 会话服务(
session_service) → 管理对话线程与事件 - 记忆服务(
memory_service) → 提供长期知识存储
两项服务协同工作:会话负责记录对话内容,记忆则存储知识,以便跨会话进行检索调用。
python
# Create Session Service
session_service = InMemorySessionService()  # Handles conversations

# Create runner with BOTH services
runner = Runner(
    agent=user_agent,
    app_name="MemoryDemoApp",
    session_service=session_service,
    memory_service=memory_service,  # Memory service is now available!
)

print("✅ Agent and Runner created with memory support!")
配置与使用:将 memory_service 添加到 Runner 中可让智能体使用记忆功能,但并不会自动启用记忆。必须显式执行以下操作:
- 使用
add_session_to_memory()导入数据 - 为智能体配置记忆工具(
load_memory或preload_memory)以启用检索功能
Memory 实现方案
本章:InMemoryMemoryService
- 存储原始对话事件,不进行整合处理
- 基于关键词的检索(简单的单词匹配)
- 内存存储(服务重启后数据会重置)
- 适用于学习场景与本地开发环境
生产环境使用:VertexAiMemoryBankService(将在第 5 章学习)
- 由大语言模型驱动提取关键信息
- 语义检索(基于语义含义的信息获取)
- 持久化云端存储
- 可集成外部知识源
接口一致性:两种实现均使用完全相同的方法(add_session_to_memory()、search_memory())
将会话数据载入 Memory
为何要将会话数据转移至内存
既然内存已完成初始化,可以向其中填充知识内容。初始化 MemoryService 时,其初始状态完全为空。所有对话都存储在会话(Session)中,这些会话包含原始事件记录,涵盖每一条消息、工具调用以及元数据。为了让这些信息可用于长期记忆调取,你需要通过 add_session_to_memory() 方法显式地将其转移至内存。
这正是 Vertex AI Memory Bank 这类托管内存服务的优势所在。在数据转移过程中,这类服务会进行智能整合 ------ 提取关键事实,同时剔除对话中的冗余信息。我们所使用的 InMemoryMemoryService 则会完整存储所有数据,不做整合处理,但是对我们来说学习相关的运行机制是够用的。
在执行任何数据转移操作前,我们需要先准备好数据。我们先和智能体进行一段对话,来填充会话数据。这段对话会存储在 SessionService 中。
python
# User tells agent about their favorite color
await run_session(
    runner,
    "My favorite color is blue-green. Can you write a Haiku about it?",
    "conversation-01",  # Session ID
)
现在我们确认对话内容已被记录在会话中。这里能看到包含用户提示词与模型回复内容的会话事件。
python
session = await session_service.get_session(
    app_name=APP_NAME, user_id=USER_ID, session_id="conversation-01"
)

# Let's see what's in the session
print("📝 Session contains:")
for event in session.events:
    text = (
        event.content.parts[0].text[:60]
        if event.content and event.content.parts
        else "(empty)"
    )
    print(f"  {event.content.role}: {text}...")
现在会话包含了对话内容。我们可以将其存入记忆中。调用 add_session_to_memory() 方法并传入会话对象,即可将对话内容加载至记忆存储库,使其可用于后续检索。
python
# This is the key method!
await memory_service.add_session_to_memory(session)

print("✅ Session added to memory!")
在智能体中启用记忆检索功能
现在已经把会话数据传输至记忆库,但是智能体无法直接访问记忆服务,还需要借助工具对其进行检索。
这一设计是有意为之:它让你能够掌控记忆检索的时机与方式。
ADK 中的记忆检索
ADK 提供两款内置的记忆检索工具:
load_memory 加载记忆(响应式)
- 由智能体自主判断何时检索记忆
- 仅在智能体认为有必要时才进行检索
- 效率更高(节省令牌消耗)
- 风险:智能体可能会遗漏检索操作
preload_memory 预加载记忆(主动式)
- 在每一轮交互开始前自动执行检索
- 确保智能体随时可调用记忆内容
- 能保证上下文完整性,但效率较低
- 即便无需记忆也会执行检索操作
可以将其类比为备考复习:load_memory 就像只有在需要时才查阅资料,而 preload_memory 则是在回答每个问题前通读所有笔记。
为智能体添加加载记忆工具
我们首先来实现响应式模式。我们将重新创建智能体,这次为其工具集添加加载记忆工具。由于这是一款内置的 ADK 工具,所以只需将其纳入工具数组中即可,无需进行任何自定义实现。
python
# Create agent
user_agent = LlmAgent(
    model=Gemini(model="gemini-2.5-flash-lite", retry_options=retry_config),
    name="MemoryDemoAgent",
    instruction="Answer user questions in simple words. Use load_memory tool if you need to recall past conversations.",
    tools=[
        load_memory
    ],  # Agent now has access to Memory and can search it whenever it decides to!
)

print("✅ Agent with load_memory tool created.")
更新运行器与测试
现在我们来更新运行器,使其使用新增的、搭载了记忆加载工具的用户代理。我们将向该代理询问之前在另一个会话中存储过的最喜欢的颜色相关信息。
由于各个会话之间不会共享对话历史,代理能够正确作答的唯一途径,就是通过调用记忆加载工具,从我们手动存储的长期记忆中提取相关信息。
python
# Create a new runner with the updated agent
runner = Runner(
    agent=user_agent,
    app_name=APP_NAME,
    session_service=session_service,
    memory_service=memory_service,
)

await run_session(runner, "What is my favorite color?", "color-test")
完整手动工作流程测试
接下来我们看看完整的工作流程实际运行效果。我们将围绕生日展开一段对话,手动将其保存至记忆中,然后在新会话中测试检索功能。这展示了完整的流程:录入→存储→检索。
python
await run_session(runner, "My birthday is on March 15th.", "birthday-session-01")现在我们手动将本次会话保存至记忆中。这是将对话内容从短期会话存储转移至长期记忆存储的关键步骤。
python
# Manually save the session to memory
birthday_session = await session_service.get_session(
    app_name=APP_NAME, user_id=USER_ID, session_id="birthday-session-01"
)

await memory_service.add_session_to_memory(birthday_session)

print("✅ Birthday session saved to memory!")
测试:启动一个拥有全新会话 ID 的独立会话,并要求智能体回忆起这个生日。
python
# Test retrieval in a NEW session
await run_session(
    runner, "When is my birthday?", "birthday-session-02"  # Different session ID
)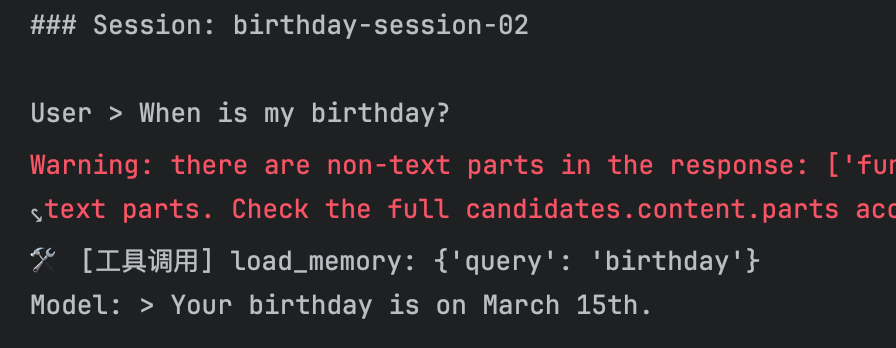
执行流程:
- 智能体收到问题:"我的生日是哪天?"
- 智能体识别:该问题需要依赖历史对话上下文
- 智能体调用:
load_memory("birthday") - 记忆模块返回:包含 "3 月 15 日" 的历史对话记录
- 智能体回复:"你的生日是 3 月 15 日"
即便处于全新会话,记忆检索功能依然生效!
对两种模式进行测试
将工具数组修改为 tools=[preload_memory],用 preload_memory 替换 load_memory。
区别如下:
load_memory(响应式):由智能体自主决定检索时机preload_memory(主动式):在每轮对话开始前自动加载记忆
测试方法:
- 在全新会话中提问:"我最喜欢的颜色是什么?"
- 接着提问:"给我讲个笑话"------ 你会发现,即便无需调用记忆,
preload_memory仍会执行记忆检索 - 这两种模式分别适用于哪些不同场景?
手动记忆搜索
除智能体工具外,还可以在代码中直接搜索记忆内容。该功能适用于以下场景:
- 调试记忆内容
- 构建分析仪表板
- 创建自定义记忆管理用户界面
search_memory()方法接收文本查询参数,并返回包含匹配内存内容的SearchMemoryResponse对象。
python
# Search for color preferences
search_response = await memory_service.search_memory(
    app_name=APP_NAME, user_id=USER_ID, query="What is the user's favorite color?"
)

print("🔍 Search Results:")
print(f"  Found {len(search_response.memories)} relevant memories")
print()

for memory in search_response.memories:
    if memory.content and memory.content.parts:
        text = memory.content.parts[0].text[:80]
        print(f"  [{memory.author}]: {text}...")
我们尝试检索一下别的内容,比如不存在的信息
python
# Search for color preferences
search_response = await memory_service.search_memory(
    app_name=APP_NAME, user_id=USER_ID, query="preferred hue"
)

print("🔍 Search Results:")
print(f"  Found {len(search_response.memories)} relevant memories")
print()

for memory in search_response.memories:
    if memory.content and memory.content.parts:
        text = memory.content.parts[0].text[:80]
        print(f"  [{memory.author}]: {text}...")
python
# Search for color preferences
search_response = await memory_service.search_memory(
    app_name=APP_NAME, user_id=USER_ID, query="birthday"
)

print("🔍 Search Results:")
print(f"  Found {len(search_response.memories)} relevant memories")
print()

for memory in search_response.memories:
    if memory.content and memory.content.parts:
        text = memory.content.parts[0].text[:80]
        print(f"  [{memory.author}]: {text}...")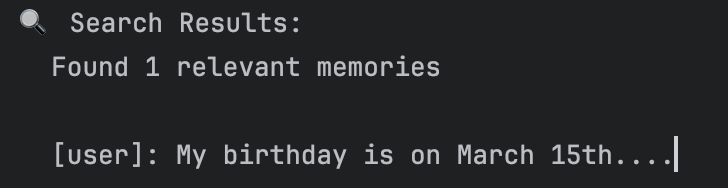
{% note warning %}
我们再测试两组,设置不同的 query
问题中出现的 on
python
# Search for color preferences
search_response = await memory_service.search_memory(
    app_name=APP_NAME, user_id=USER_ID, query="on"
)

print("🔍 Search Results:")
print(f"  Found {len(search_response.memories)} relevant memories")
print()

for memory in search_response.memories:
    if memory.content and memory.content.parts:
        text = memory.content.parts[0].text[:80]
        print(f"  [{memory.author}]: {text}...")
问题中出现的 is
python
# Search for color preferences
search_response = await memory_service.search_memory(
    app_name=APP_NAME, user_id=USER_ID, query="is"
)

print("🔍 Search Results:")
print(f"  Found {len(search_response.memories)} relevant memories")
print()

for memory in search_response.memories:
    if memory.content and memory.content.parts:
        text = memory.content.parts[0].text[:80]
        print(f"  [{memory.author}]: {text}...")
InMemoryMemoryService 中 search_memory 的具体实现
python
@override
async def search_memory(
  self, *, app_name: str, user_id: str, query: str
) -> SearchMemoryResponse:
user_key = _user_key(app_name, user_id)

with self._lock:
  session_event_lists = self._session_events.get(user_key, {})

words_in_query = _extract_words_lower(query) # 把单词抽出来放入一个集合中
response = SearchMemoryResponse()

for session_events in session_event_lists.values():
  for event in session_events:
    if not event.content or not event.content.parts:
      continue
    words_in_event = _extract_words_lower(
        ' '.join([part.text for part in event.content.parts if part.text])
    ) # 把事件中所有的文字信息抽出来
    if not words_in_event:
      continue

    if any(query_word in words_in_event for query_word in words_in_query): # 如果 query 中有任何一个单词存在于事件中就加入这个事件了
      response.memories.append(
          MemoryEntry(
              content=event.content,
              author=event.author,
              timestamp=_utils.format_timestamp(event.timestamp),
          )
      )
代码中表示 如果 query 中有任何一个单词存在于事件中的查询或者就加入这个事件了。它是直接查事件的内容去进行匹配的。我感觉这种不是很好(个人观点),之前也提到过,用户提问是一个事件,模型回答是一个事件,查询时没有什么关联的其实。所以更好的方式是通过语义搜索,后面会学习的 VertexAiMemoryBankService
但是比如是 query=15

就不行了。
{% endnote %}
自动化内存存储
前面我们一直通过手动调用 add_session_to_memory() 方法将数据传输至长期存储设备。生产系统需要让这一过程自动完成。
回调函数
ADK 的回调系统支持你介入关键执行节点。回调函数是由你定义并附加到智能体上的 Python 函数,ADK 会在特定阶段自动调用这些函数,其作用类似于智能体执行流程中的检查点。
可以将回调函数理解为智能体生命周期中的事件监听器。当智能体处理请求时,会经历多个阶段:接收输入、调用大语言模型、调用工具以及生成响应。回调函数允许你在每个阶段插入自定义逻辑,而无需修改智能体的核心代码。
可用的回调类型:
before_agent_callback→ 在智能体开始处理请求前运行after_agent_callback→ 在智能体完成本轮处理后运行before_tool_callback/after_tool_callback→ 在工具调用前后执行before_model_callback/after_model_callback→ 在大语言模型调用前后执行on_model_error_callback→ 当出现模型调用错误时触发
常见应用场景:
- 日志记录与可观测性(追踪智能体的行为)
- 自动数据持久化(例如保存至记忆库)
- 自定义校验或过滤逻辑
- 性能监控
Callbacks: Observe, Cumstomize, and Control Agent Behavior
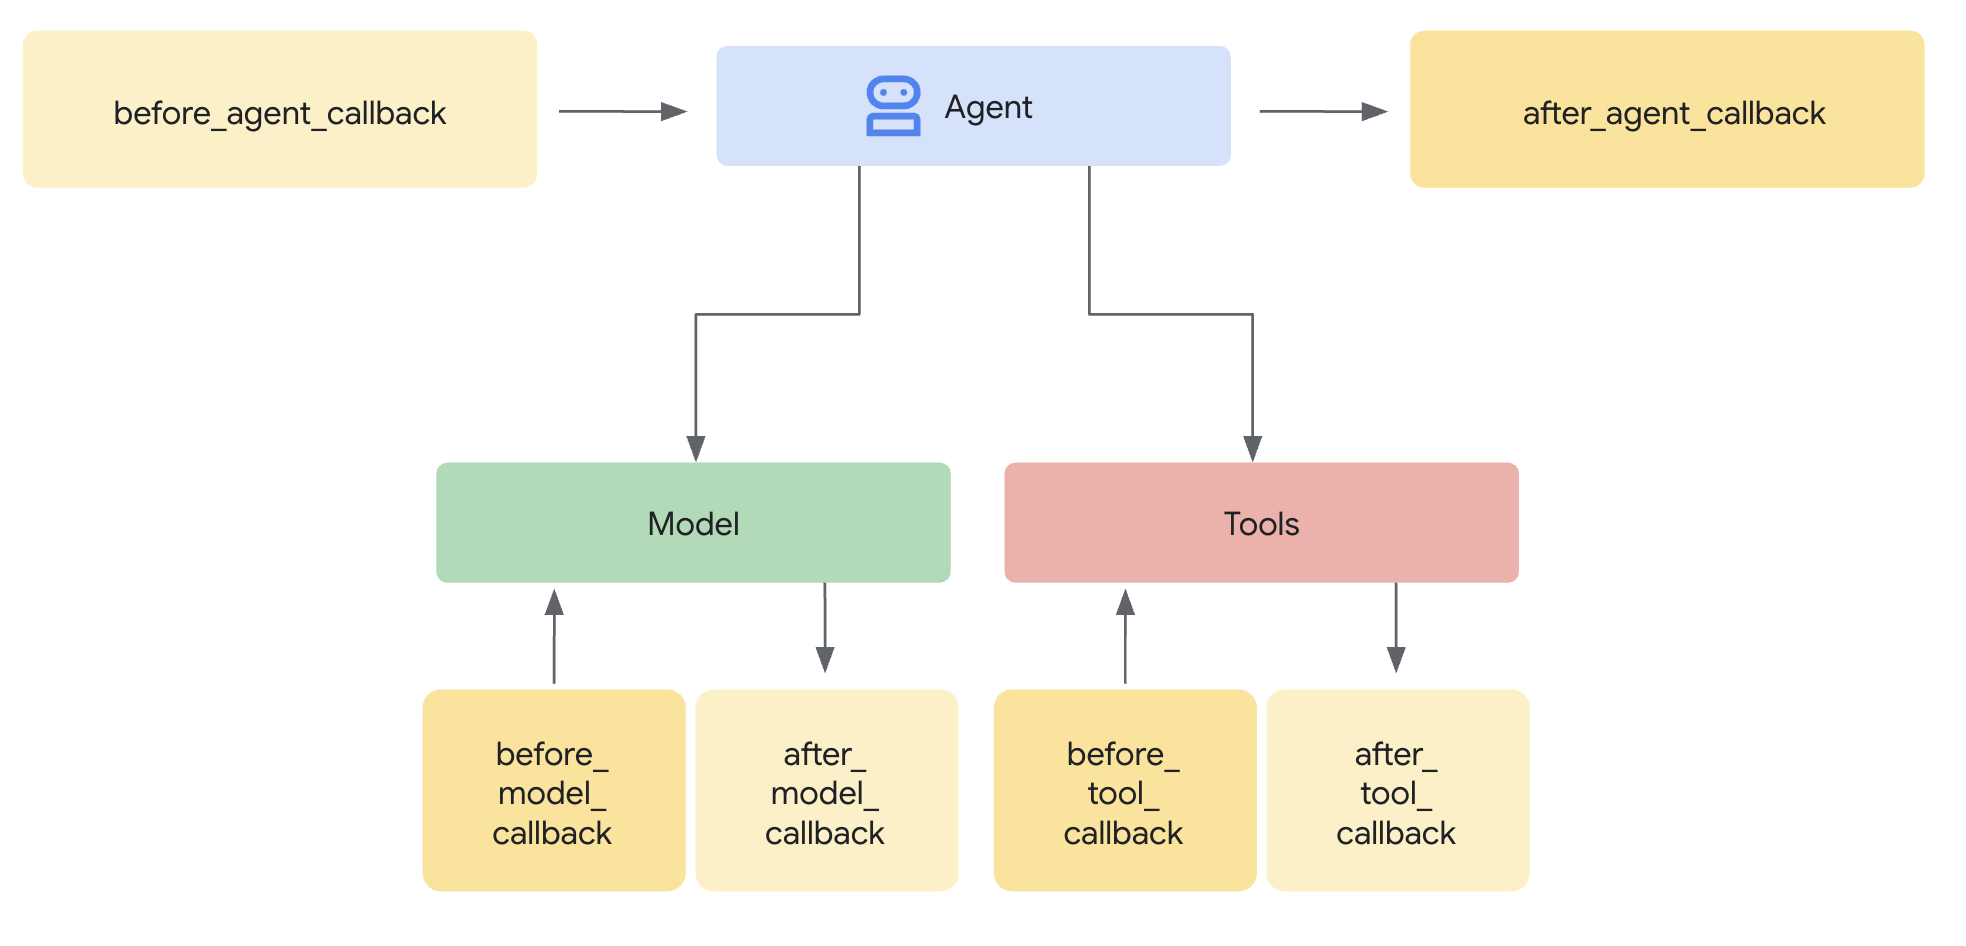
带回调机制的自动记忆存储
在实现自动记忆存储功能时,我们使用 after_agent_callback。该函数会在智能体每完成一轮交互后触发,随后调用 add_session_to_memory()实现对话内容的自动持久化保存。
但这里存在一个关键问题:回调函数究竟如何获取记忆服务与当前会话信息?答案便是 callback_context。
在定义回调函数时,应用开发框架(ADK)会自动向其传入一个名为 callback_context 的特殊参数。通过该参数,可获取记忆服务及其他运行时组件的调用权限。
具体使用方式:在回调函数中,我们将调用记忆服务并获取当前会话,从而在每轮交互结束后自动保存对话数据。
重要提示:该上下文对象无需手动创建,应用开发框架(ADK)会在回调执行时自动生成并传入。
python
async def auto_save_to_memory(callback_context):
    """Automatically save session to memory after each agent turn."""
    await callback_context._invocation_context.memory_service.add_session_to_memory(
        callback_context._invocation_context.session
    )


print("✅ Callback created.")
创建智能体:回调与预加载记忆工具
现在创建一个融合以下功能的智能体:
- 自动存储(
Automatic storage):after_agent_callback保存对话内容 - 自动检索(
Automatic retrieval):preload_memory加载记忆信息
由此构建一套无需人工干预的全自动记忆系统。
python
# Agent with automatic memory saving
auto_memory_agent = LlmAgent(
    model=Gemini(model="gemini-2.5-flash-lite", retry_options=retry_config),
    name="AutoMemoryAgent",
    instruction="Answer user questions.",
    tools=[preload_memory],
    after_agent_callback=auto_save_to_memory,  # Saves after each turn!
)

print("✅ Agent created with automatic memory saving!")
自动发生的情况:
- 每次智能体回复后 → 触发回调
- 会话数据 → 传输至内存
- 无需手动调用
add_session_to_memory()
框架会处理所有事务!
创建一个运行器并测试智能体
创建一个搭载自动记忆智能体的运行器,连接会话与记忆服务。
python
# Create a runner for the auto-save agent
# This connects our automated agent to the session and memory services
auto_runner = Runner(
    agent=auto_memory_agent,  # Use the agent with callback + preload_memory
    app_name=APP_NAME,
    session_service=session_service,  # Same services from Section 3
    memory_service=memory_service,
)

print("✅ Runner created.")
python
# Test 1: Tell the agent about a gift (first conversation)
# The callback will automatically save this to memory when the turn completes
await run_session(
    auto_runner,
    "I gifted a new toy to my nephew on his 1st birthday!",
    "auto-save-test",
)

# Test 2: Ask about the gift in a NEW session (second conversation)
# The agent should retrieve the memory using preload_memory and answer correctly
await run_session(
    auto_runner,
    "What did I gift my nephew?",
    "auto-save-test-2",  # Different session ID - proves memory works across sessions!
)- 首次对话:提及给侄子的礼物
- 回调内容已自动保存至记忆 ✅
- 第二次对话(新会话):询问关于礼物的事
preload_memory已自动调取相关记忆 ✅- 智能体给出了正确回答 ✅
无需手动调用记忆!这就是自动化记忆管理的实际应用效果。
应该多久将会话保存至内存中?
| 触发时机 | 实现方式 | 适用场景 |
|---|---|---|
| 每轮对话后 | after_agent_callback |
实时更新记忆 |
| 对话结束时 | 会话结束时手动调用 | 批处理,减少 API 调用 |
| 定期/固定间隔 | 基于定时器的后台任务 | 长时间运行的持续对话 |
记忆整合
原始存储的局限性
目前存储的内容包括:
- 每条用户消息
- 每条智能体回复
- 每次工具调用
问题所在:
会话:50 条消息 = 10000 个词元
记忆:全部 50 条消息均被存储
检索:返回全部 50 条消息 → 智能体需处理 10000 个词元
这种方式无法实现规模化扩展。我们需要对记忆进行整合。
什么是记忆整合?
记忆整合是指仅提取关键信息,同时剔除对话中的冗余干扰内容。
处理前(原始存储):
用户:"我最喜欢的颜色是蓝绿色。我也喜欢紫色。其实大多数时候我还是更喜欢蓝绿色。"
智能体:"好的!我会记住的。"
用户:"谢谢!"
智能体:"不客气!"
→ 存储全部 4 条消息(存在冗余、内容冗长)
处理后(记忆整合):
提取的记忆:"用户最喜欢的颜色:蓝绿色"
→ 仅存储 1 条简洁信息
优势:占用存储空间更少,信息检索更快,回答更精准。
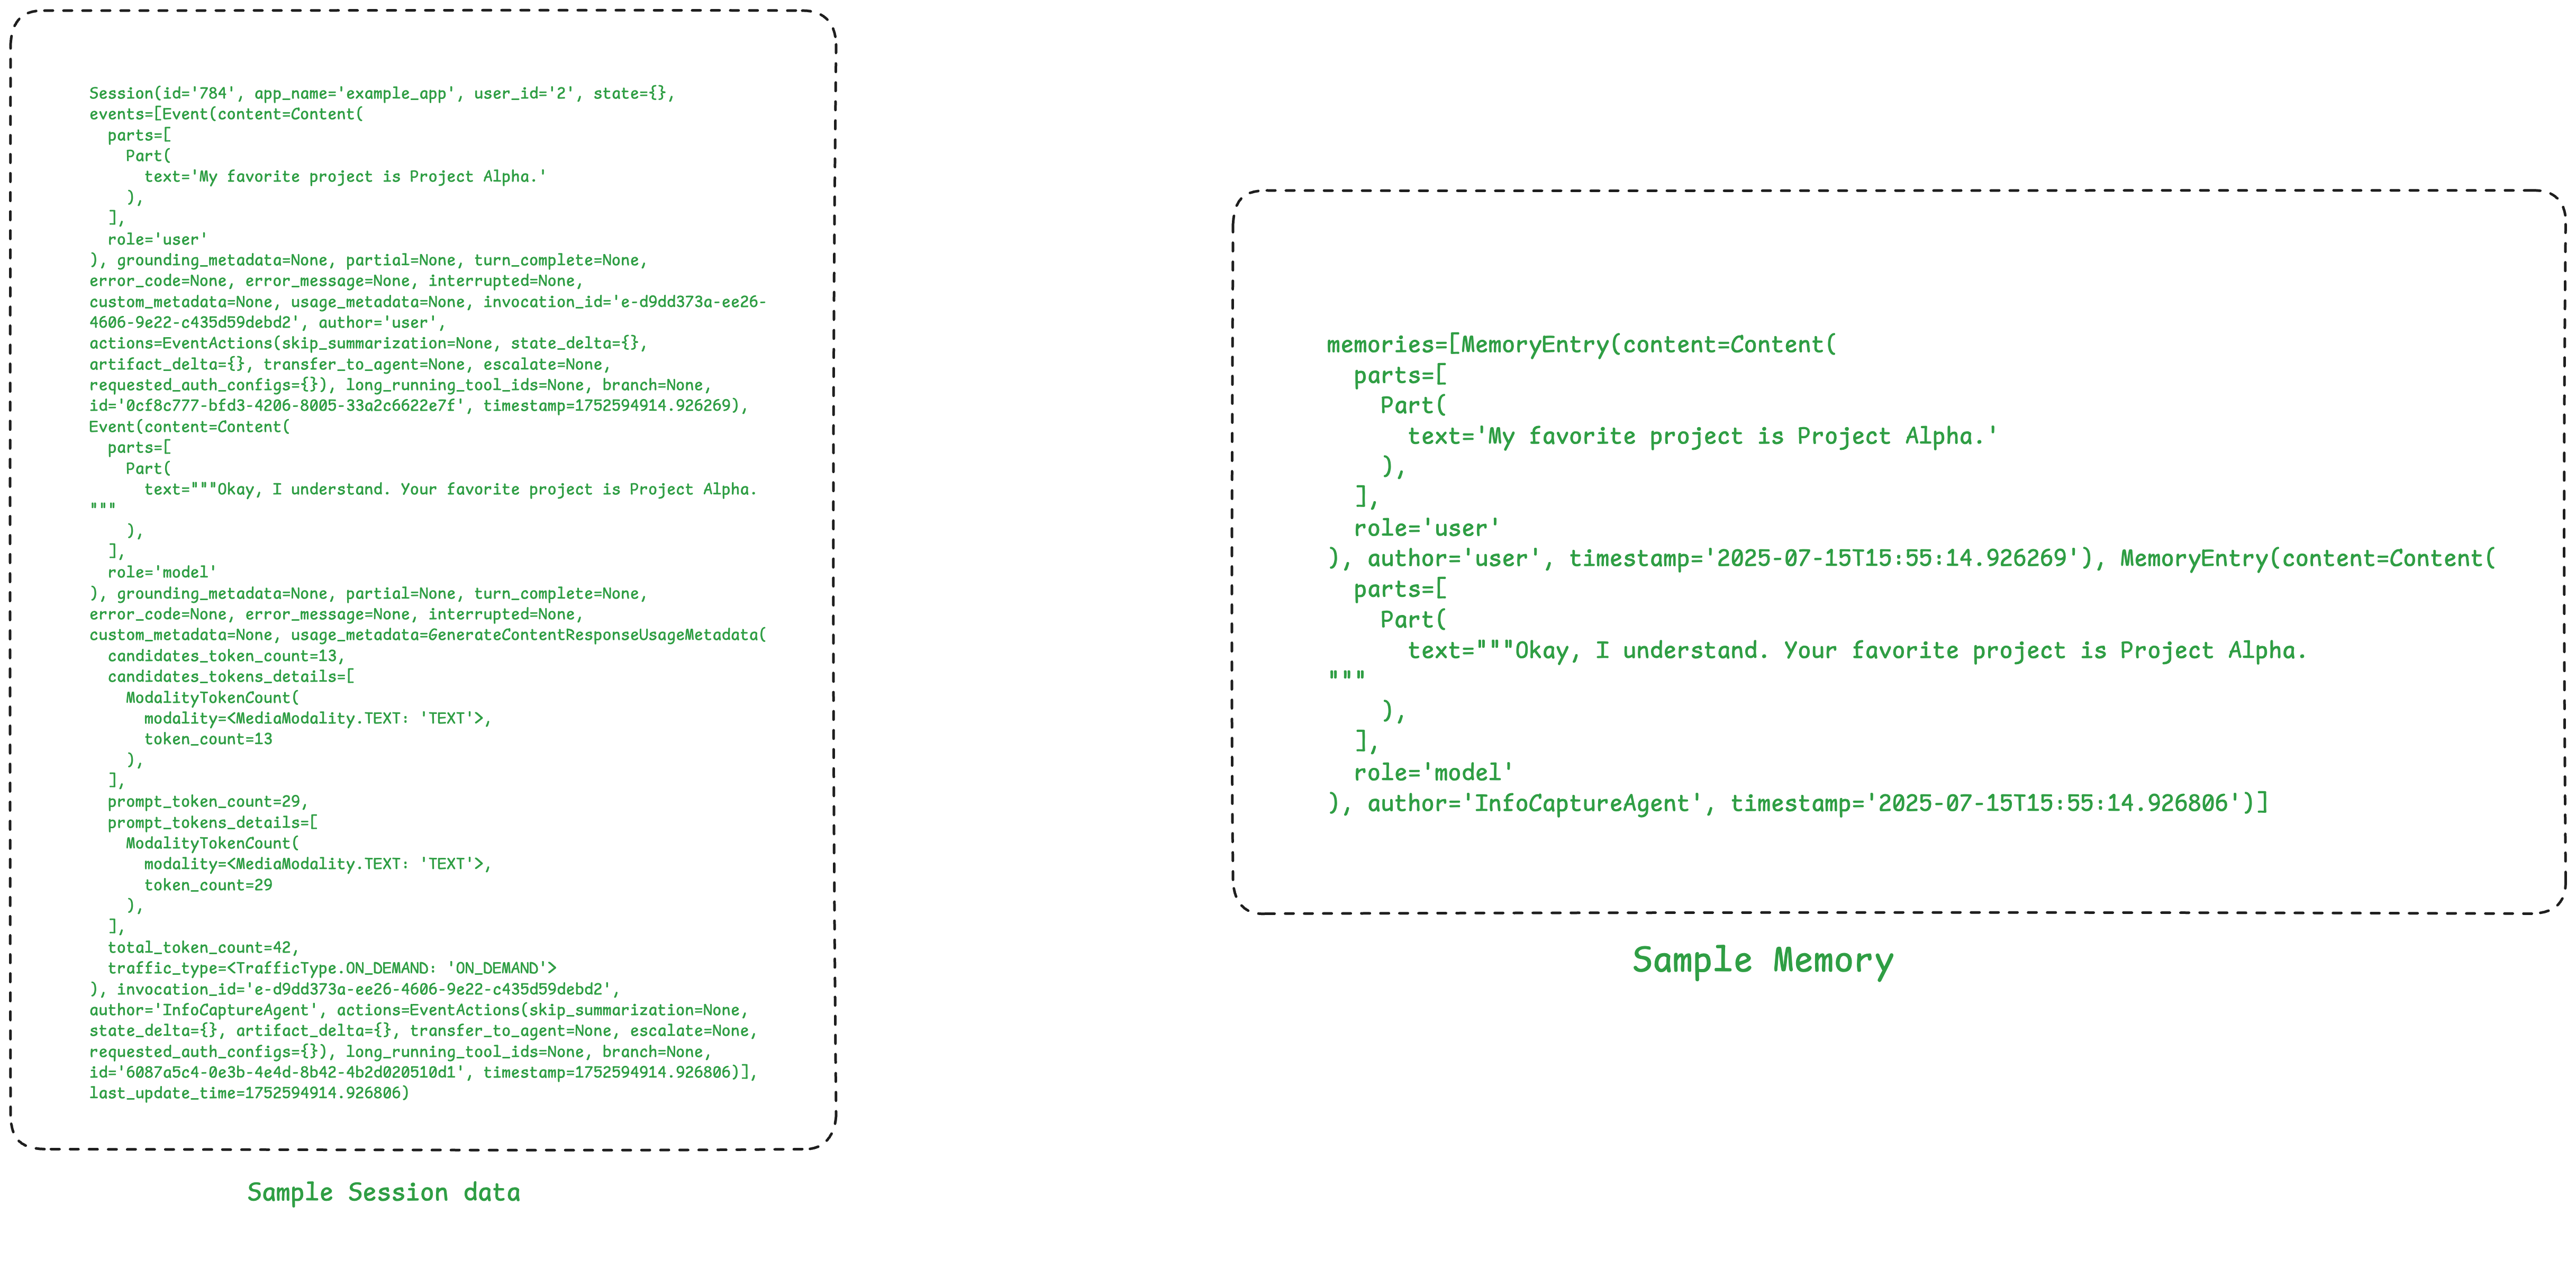
整合机制的工作原理(概念层面)
流程如下:
- 原始会话事件
↓ - 大语言模型分析对话内容
↓ - 提取关键信息
↓ - 存储精简记忆
↓ - 与已有记忆合并(去重处理)
转换示例:
python
输入:"我对花生过敏,不能吃任何含坚果的食物。"
输出:记忆 {
    过敏物:"花生、木本坚果"
    严重程度:"需完全避免"
}
自然语言 → 结构化、可执行的数据。
内存整合的后续步骤
要点:托管内存服务会自动处理整合操作。
仍可使用相同的 API:
add_session_to_memory()← 方法不变search_memory()← 方法不变
区别在于:后台执行逻辑不同。
- 内存型内存服务(InMemoryMemoryService):存储原始事件数据
- VertexAiMemoryBankService:在存储前会智能完成数据整合
意思就是用这个好的 VertexAiMemoryBankService,它会自动帮你整合,你不用操作。
智能体观测
这章介绍
- 如何为已构建的智能体添加可观测性
- 如何评估智能体是否按预期正常运行
什么是智能体可观测性?
核心难题:与传统软件可预测的故障不同,人工智能智能体的失效往往毫无征兆。
示例:
用户:"查找量子计算相关论文"
智能体:"我无法协助处理该请求。"
你:😭 到底为什么?是提示词问题?缺少工具?还是接口报错?
解决方案:智能体可观测性能让你全面洞悉智能体的决策流程。能精准查看发送给大语言模型的提示内容、可用的工具、模型的响应方式,以及故障发生的位置。
调试日志:大语言模型请求显示 "函数:\[\]"(未加载任何工具!)
你:🎯 原来如此!缺少谷歌搜索工具 ------ 问题轻松解决!
智能体可观测性的核心支柱
- 日志:日志是对单个事件的记录,能够告知你在特定时刻发生了什么。
- 追踪:追踪将多条日志串联成完整脉络,通过呈现完整的执行步骤序列,说明最终结果产生的原因。
- 指标:指标是汇总性数据(如平均值、错误率),能够反映智能体的整体运行状况。
前置准备
{% tabs 智能体观测前期准备 , 1 %}
python
import os
from dotenv import load_dotenv

load_dotenv(override=True)

GOOGLE_API_KEY = os.getenv("GOOGLE_API_KEY")
os.environ["GOOGLE_API_KEY"] = GOOGLE_API_KEY
配置日志记录并清理旧文件
为调试会话配置日志。以下单元格可确保我们同时捕获其他日志级别,例如调试级别。
python
import logging
import os

# Clean up any previous logs
for log_file in ["logger.log", "web.log", "tunnel.log"]:
    if os.path.exists(log_file):
        os.remove(log_file)
        print(f"🧹 Cleaned up {log_file}")

# Configure logging with DEBUG log level.
logging.basicConfig(
    filename="logger.log",
    level=logging.DEBUG,
    format="%(filename)s:%(lineno)s %(levelname)s:%(message)s",
)

print("✅ Logging configured")
{% endtabs %}
通过 ADK 网页界面进行实战调试
创建一个 "学术论文检索" 智能体
目标:打造一款学术论文检索智能体,助力用户查找任意主题的学术论文。
首先,我们特意构建一个存在错误的智能体版本,用来练习调试操作!我们将通过 adk create 命令行指令创建一个新的智能体文件夹,以此开启操作。
python
adk create research-agent --model gemini-2.5-flash-lite --api_key $GOOGLE_API_KEY智能体定义
接下来,创建根智能体。
- 我们将其配置为 LlmAgent,为其指定名称、模型与指令。
- 根智能体接收用户提示,并将搜索任务委派给
google_search_agent。 - 随后,该智能体调用
count_papers工具对返回的论文数量进行统计。
👉 请注意根智能体的指令以及 count_papers 工具的参数!
python
%%writefile research-agent/agent.py

from google.adk.agents import LlmAgent
from google.adk.models.google_llm import Gemini
from google.adk.tools.agent_tool import AgentTool
from google.adk.tools.google_search_tool import google_search

from google.genai import types
from typing import List

retry_config = types.HttpRetryOptions(
    attempts=5,  # Maximum retry attempts
    exp_base=7,  # Delay multiplier
    initial_delay=1,
    http_status_codes=[429, 500, 503, 504],  # Retry on these HTTP errors
)

# ---- Intentionally pass incorrect datatype - `str` instead of `List[str]` ----
def count_papers(papers: str):
    """
    This function counts the number of papers in a list of strings.
    Args:
      papers: A list of strings, where each string is a research paper.
    Returns:
      The number of papers in the list.
    """
    return len(papers)


# Google Search agent
google_search_agent = LlmAgent(
    name="google_search_agent",
    model=Gemini(model="gemini-2.5-flash-lite", retry_options=retry_config),
    description="Searches for information using Google search",
    instruction="""Use the google_search tool to find information on the given topic. Return the raw search results.
    If the user asks for a list of papers, then give them the list of research papers you found and not the summary.""",
    tools=[google_search]
)


# Root agent
root_agent = LlmAgent(
    name="research_paper_finder_agent",
    model=Gemini(model="gemini-2.5-flash-lite", retry_options=retry_config),
    instruction="""Your task is to find research papers and count them.

    You MUST ALWAYS follow these steps:
    1) Find research papers on the user provided topic using the 'google_search_agent'.
    2) Then, pass the papers to 'count_papers' tool to count the number of papers returned.
    3) Return both the list of research papers and the total number of papers.
    """,
    tools=[AgentTool(agent=google_search_agent), count_papers]
)
运行智能体
现在我们通过 adk web --log_level DEBUG 这一命令行指令来运行智能体。
关键在于 --log_level DEBUG 参数,它会向我们展示以下内容:
- 完整的大模型提示词:发送给语言模型的完整请求,包含系统指令、对话历史和工具信息。
- 来自各类服务的详细接口响应。
- 内部状态转换过程与变量数值。
其他日志级别还包括:INFO、ERROR 和 WARNING。
在 ADK 网页用户界面中测试智能体
操作步骤:在 ADK 网页用户界面中
- 从左上角的下拉菜单中选择 "research-agent"。
- 在聊天界面中输入:查找最新的量子计算相关论文
- 发送消息并观察回复。该智能体应返回一系列研究论文及其数量。
看来我们的智能体运行正常,并且收到了回复!🤔不过等等,论文的数量是不是异常偏多?我们查看日志并追踪一下问题。
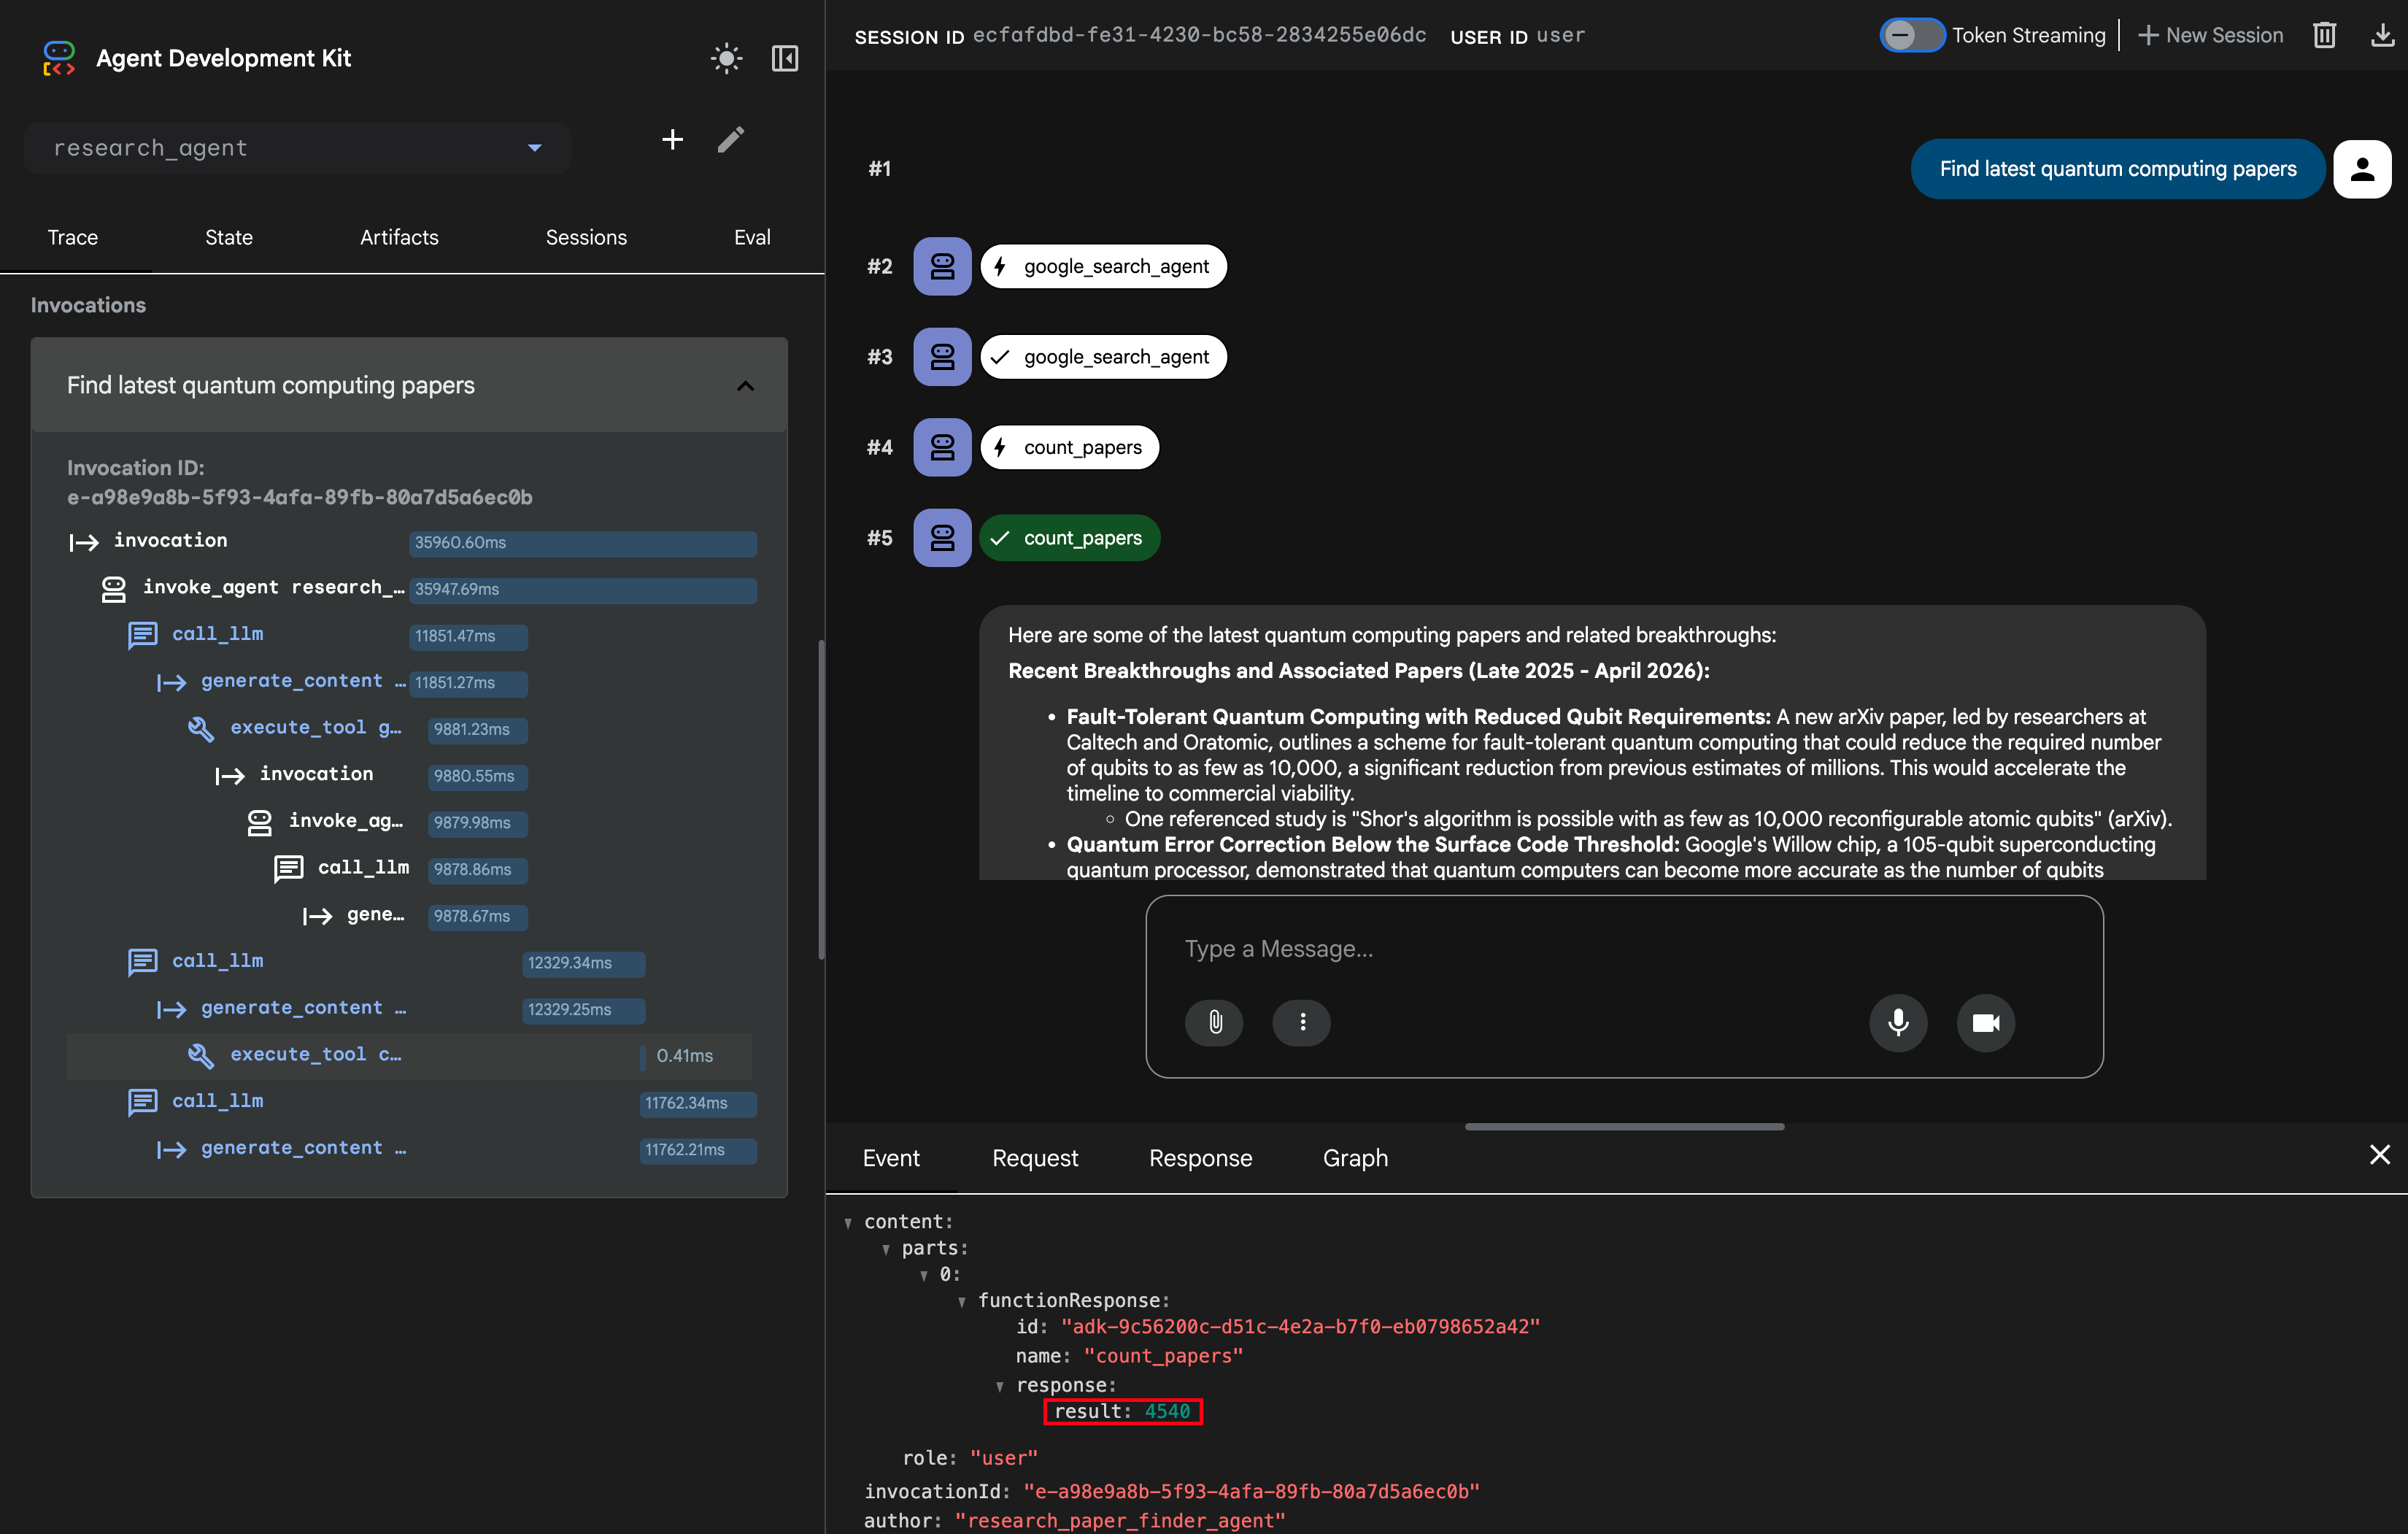
4540 个!!!,但是也没报错你看,结果正常输出,但是绝对没有列举4000多个论文。
操作:详细追踪信息
在网页用户界面中,点击左侧边栏的 "Trace" 标签,可以按时间顺序排列的所有智能体操作列表,点击任意事件,即可在底部面板中展开其详细信息。我们看一下 execute_tool count_papers,可以看到 count_papers 的函数调用返回的数值
我们可以查看传递给该函数的输入内容,找到与 count_papers 函数调用对应的 call_llm
原因在哪里呢?
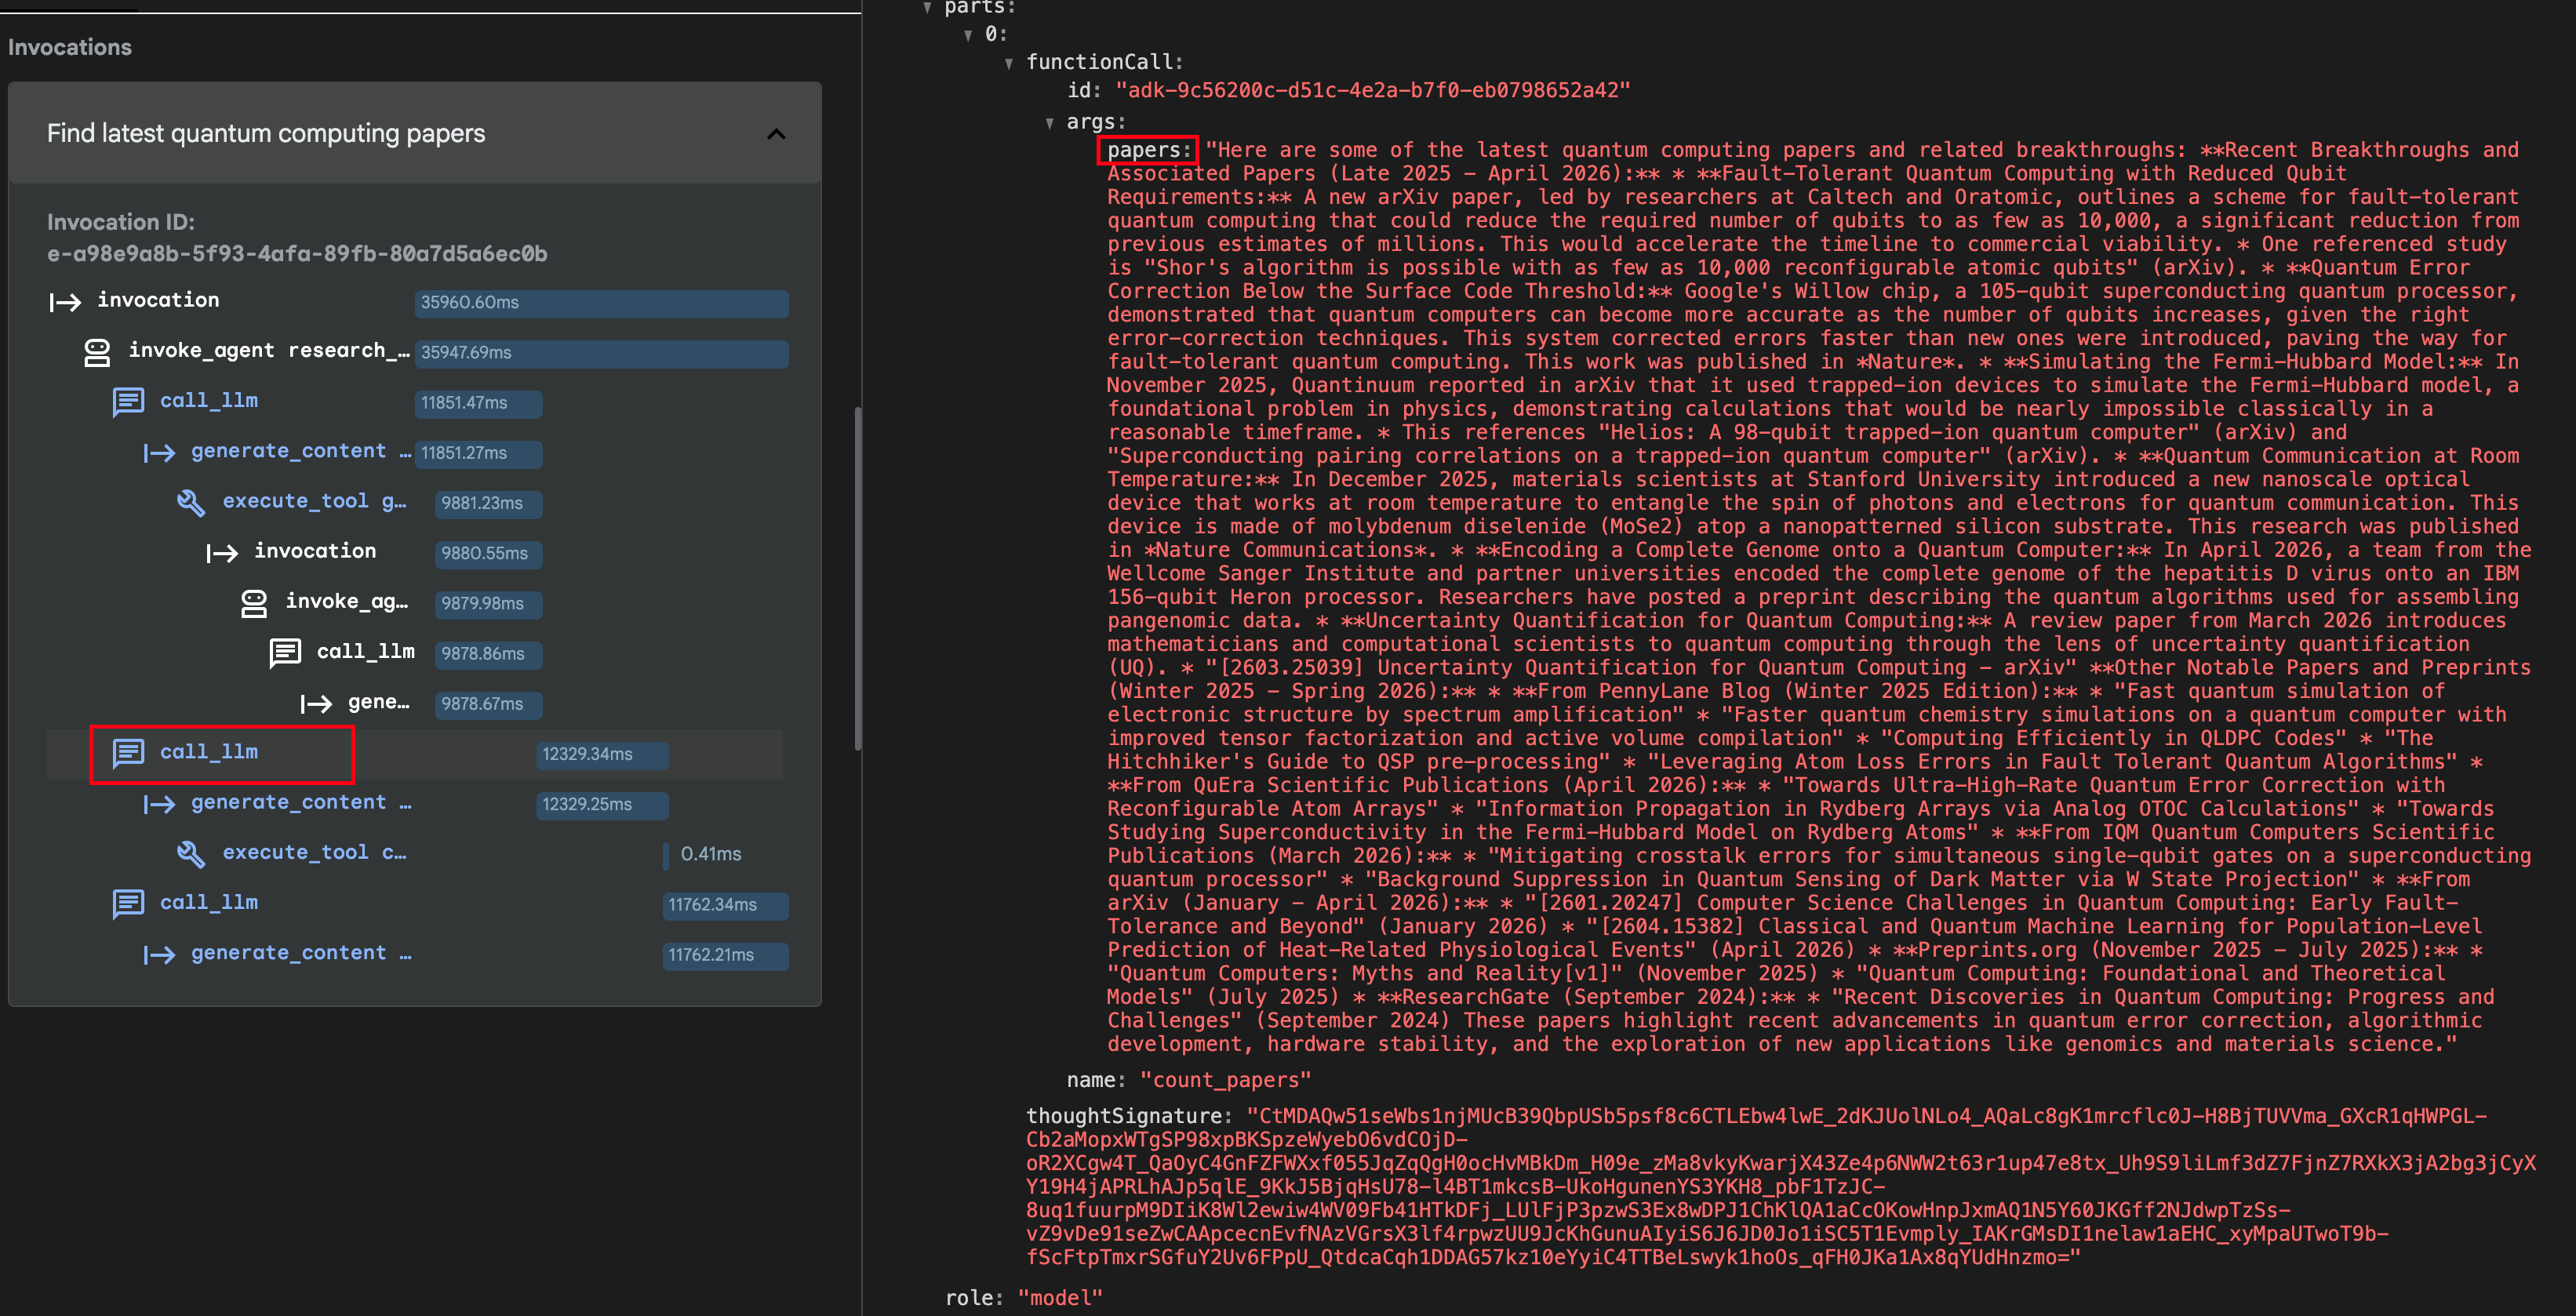
从这里可以看到传入的 papers 是一个字符串,并不是论文列表。
{% note danger no-icon %}
这个 count_papers 是什么时候定义的?参数类型返回值依据什么?
函数 count_papers 定义的时候,Python 语言层面它会先创建函数对象,保存它的信息,函数名啊,docstring,默认值,参数注解返回值注解,类型定义。但是其实类型限定,在 Python 上要求并不严格,比如如下
python
def fun(a: int, b: int) -> int:
    return a + b

fun("1", "2") # 12
是可以执行成功的,也就是类型只是提醒,并不强制要求。
接下来是 ADK,当把一个 Python 函数放进 tools 列表的时候,框架会自动把它包装成 FunctionTool,会依据函数的那些信息去生成。并且模型更倾向于你参数的类型定义,即使和文档注释有冲突,也会倾向于类型定义。并且返回值 ADK 要求返回的是一个字典,如果不是,它会帮你把结果封装成一个字典。
将方法或函数用作 ADK 工具时,你如何定义它会显著影响智能体正确使用它的能力。智能体的大语言模型(LLM)严重依赖函数的 名称、参数(参数)、类型提示 和 文档字符串 / 源代码注释 来理解其目的并生成正确的调用。
{% endnote %}
好了,现在找到问题了,那就把 count_papers 的参数类型改为 List[str],并且重启 adk web 再跑一下就可以了
{% note danger no-icon %}
我这里又跑了一下,结果很不对,因为 google_search 结果得到的就是一个 str。然后 google_search_agent 直接包装成 List[str],大小为 1,所以进入 count_papers 的虽然是一个 List,但是大小是1。所以即使很多篇论文,最终结果还是 1。
所以这里代码最好应该怎么写?
- 不要让
agent来做输出结果的,应该设定agent的output_schema来设定输出类型(并且有详细说明,比如List的原始只包含一篇论文的一个标题) - 不要让
agent来控制流程,用SequentialAgent
{% endnote %}
生产环境日志记录
现在可以通过 ADK 网页界面和调试日志排查智能体故障。但当开发阶段结束后会怎样?在实际应用场景中,需要脱离网页界面进行操作:
- 问题 1:该怎么排查生产环境的问题?
- 问题 2:自动化系统 这个智能体在我们的工作流程中每天运行 1000 次,哪些运行任务耗时较长?成功率是多少?
{% note success %}
我们需要为智能体添加日志语句,一种常用方法是将日志语句添加至插件中。
{% endnote %}
如何为生产环境的可观测性添加日志?
插件是一种自定义代码模块,会在智能体生命周期的各个阶段自动运行。插件由 "回调函数" 组成,这些回调函数提供中断智能体执行流程的钩子。可以这样理解:
- 智能体工作流程:用户消息 → 智能体思考 → 调用工具 → 返回响应
- 插件可嵌入其中:智能体启动前 → 工具运行后 → 大语言模型响应时 等
- 插件包含你的自定义代码:日志记录、监控、安全检查、缓存等
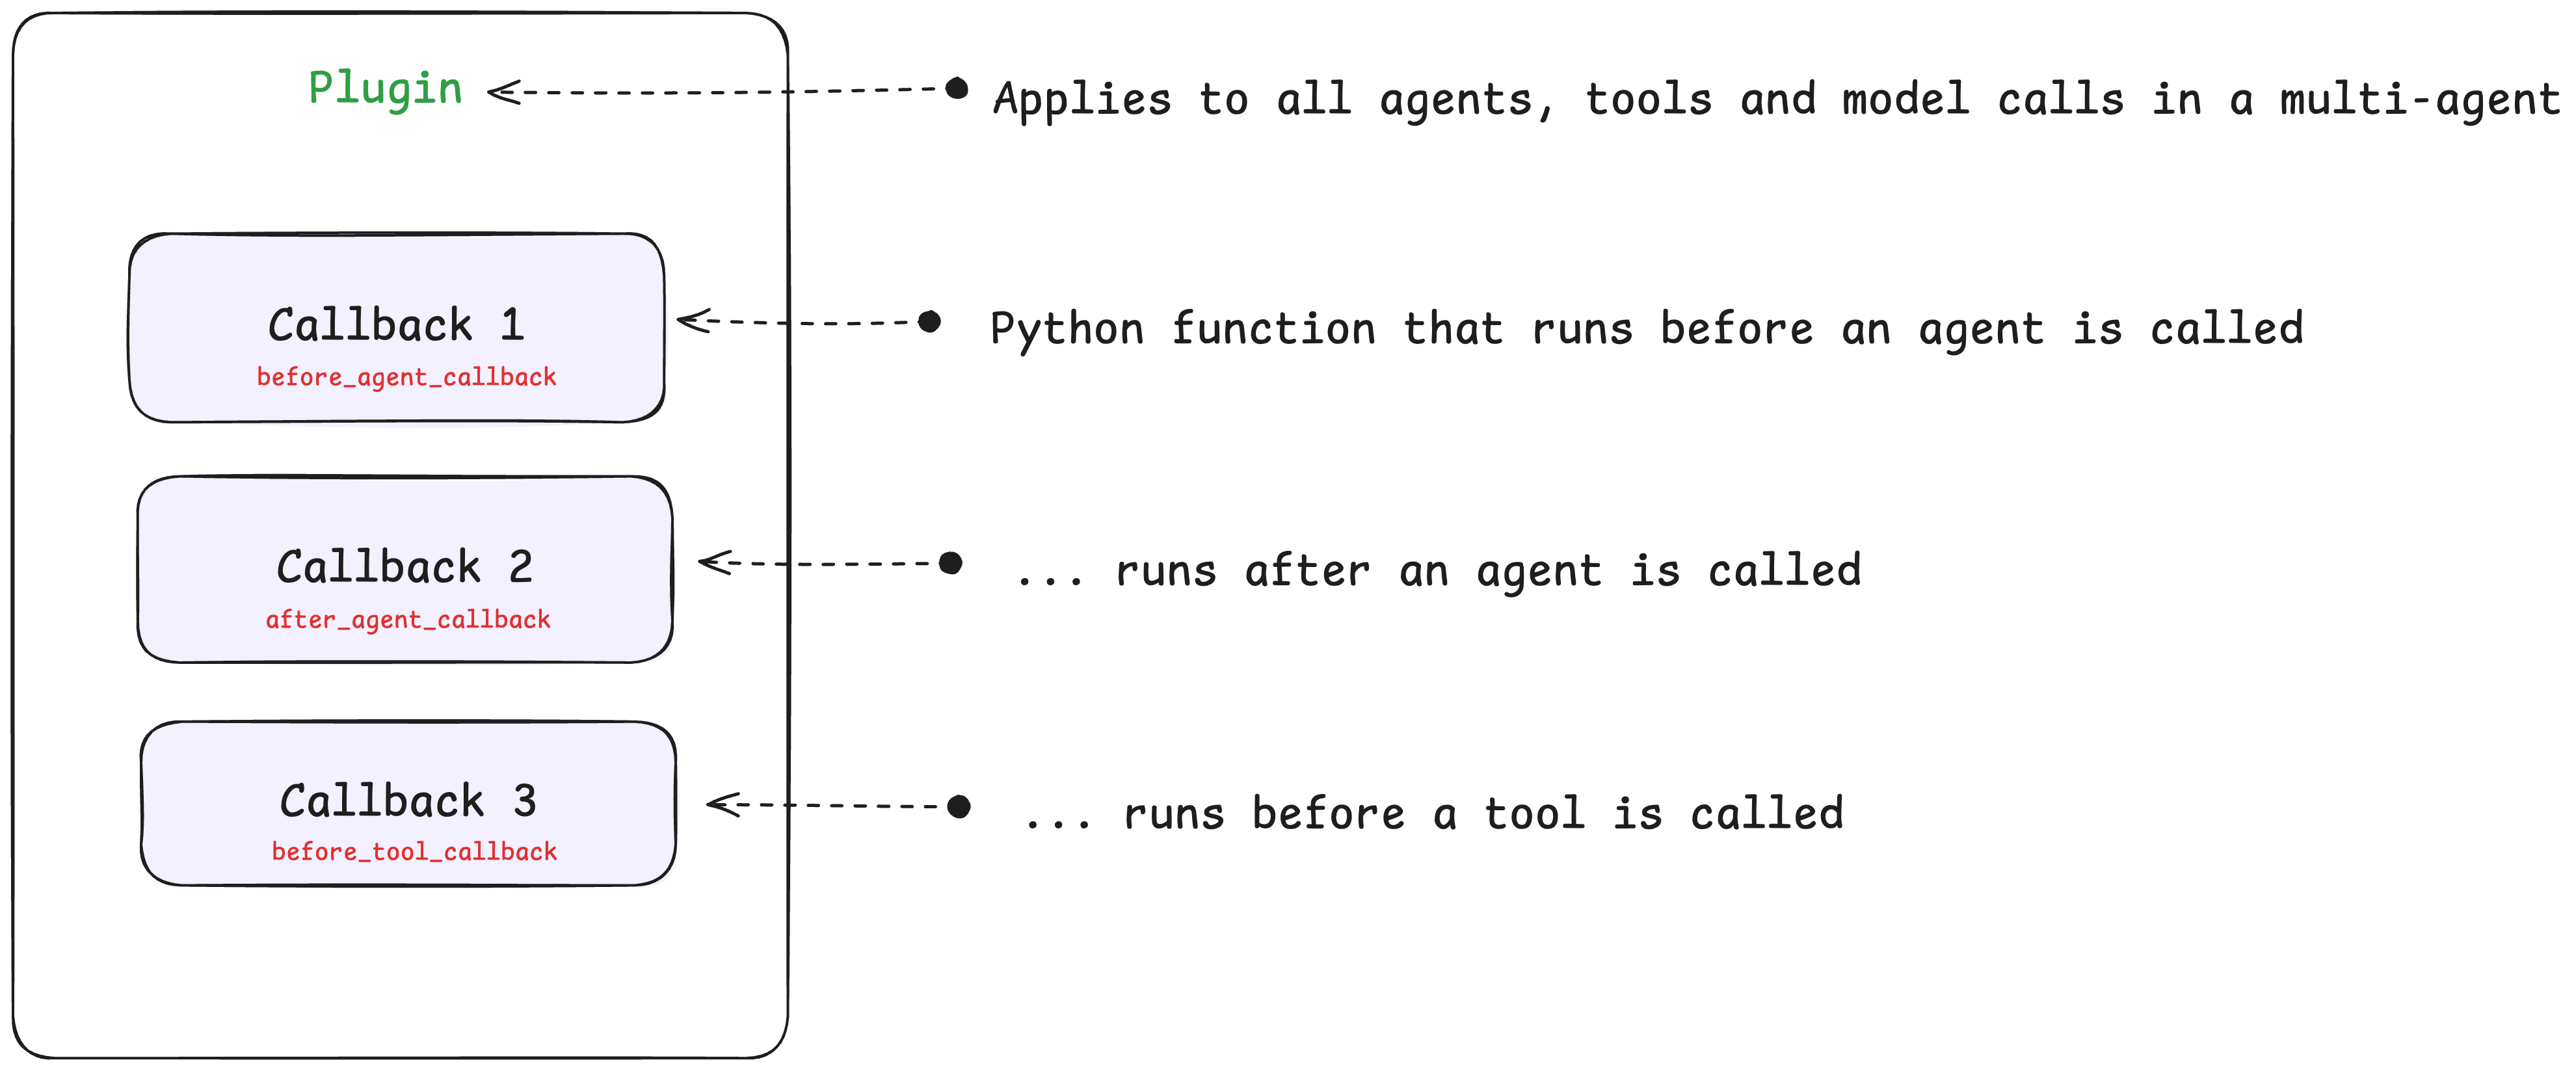
回调函数
回调函数是插件内部的基础组成单元 ------ 它们只是在智能体生命周期的特定阶段运行的 Python 函数。多个回调函数组合在一起即可构成一个插件。
回调函数包含多种类型,例如:
before/after_agent_callbacks:在智能体被调用前 / 调用后执行before/after_tool_callbacks:在工具被调用前 / 调用后执行before/after_model_callbacks:同理,在大语言模型被调用前 / 调用后执行on_model_error_callback:当模型出现错误时执行

插件是什么样子?
python
print("----- EXAMPLE PLUGIN - DOES NOTHING ----- ")

import logging
from google.adk.agents.base_agent import BaseAgent
from google.adk.agents.callback_context import CallbackContext
from google.adk.models.llm_request import LlmRequest
from google.adk.plugins.base_plugin import BasePlugin


# Applies to all agent and model calls
class CountInvocationPlugin(BasePlugin):
    """A custom plugin that counts agent and tool invocations."""

    def __init__(self) -> None:
        """Initialize the plugin with counters."""
        super().__init__(name="count_invocation")
        self.agent_count: int = 0
        self.tool_count: int = 0
        self.llm_request_count: int = 0

    # Callback 1: Runs before an agent is called. You can add any custom logic here.
    async def before_agent_callback(
        self, *, agent: BaseAgent, callback_context: CallbackContext
    ) -> None:
        """Count agent runs."""
        self.agent_count += 1
        logging.info(f"[Plugin] Agent run count: {self.agent_count}")

    # Callback 2: Runs before a model is called. You can add any custom logic here.
    async def before_model_callback(
        self, *, callback_context: CallbackContext, llm_request: LlmRequest
    ) -> None:
        """Count LLM requests."""
        self.llm_request_count += 1
        logging.info(f"[Plugin] LLM request count: {self.llm_request_count}")
核心要点:只需在运行器上注册一次插件,该插件便会按照定义,自动应用于系统中的每一个代理、工具调用以及大语言模型请求。可以对照下图中的数字序号,理解其运行流程。
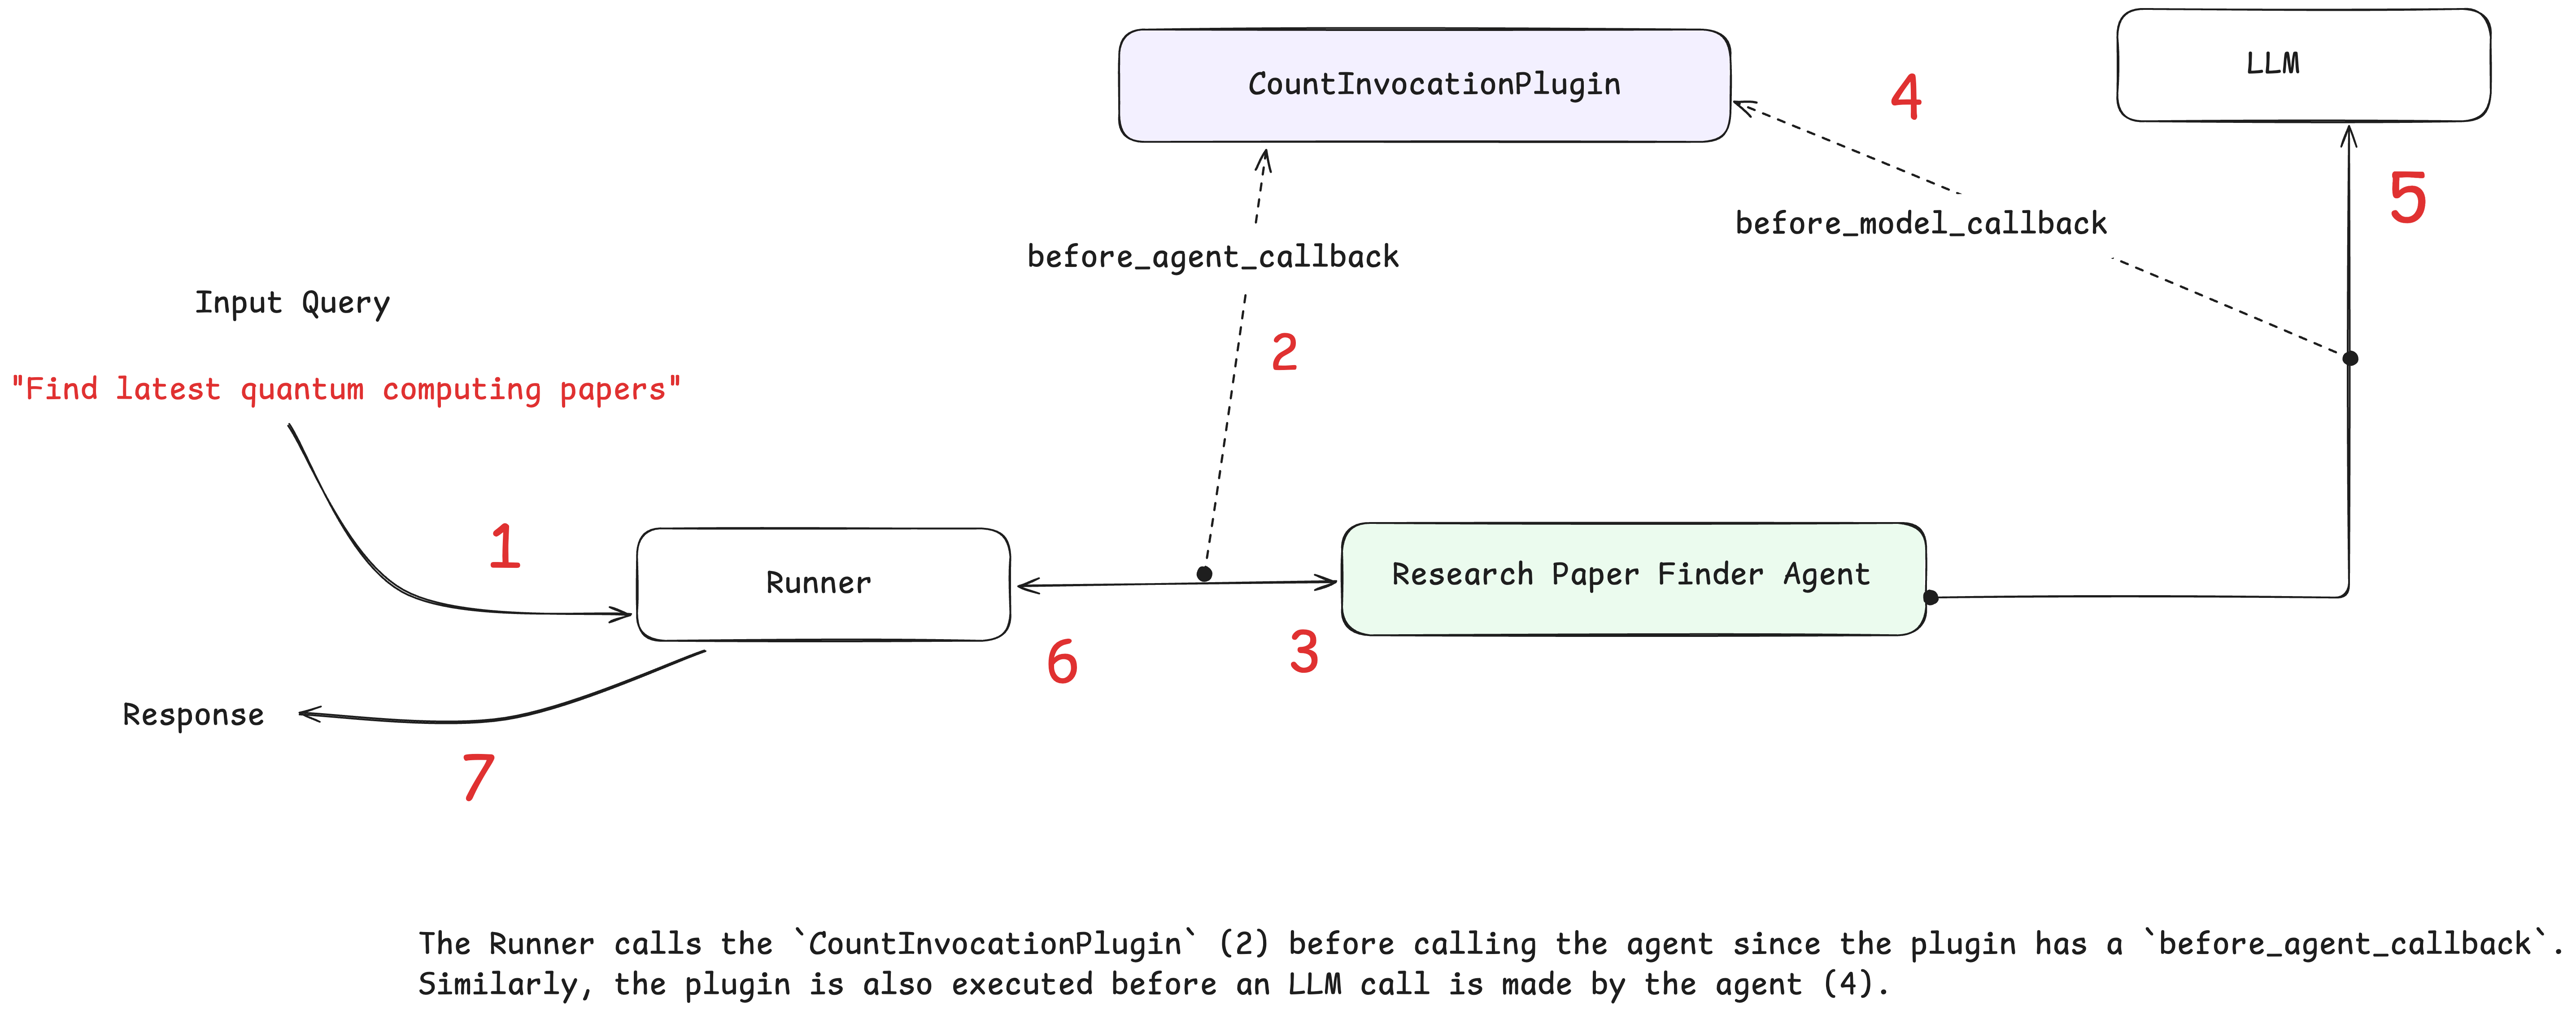
ADK 内置的日志插件
不过,我们无需在 ADK 中自行定义所有回调函数与插件来采集标准可观测性数据。相反,ADK 提供了一个内置的日志插件,可自动采集所有智能体活动信息:
- 🚀 用户消息与智能体回复
- ⏱️ 用于性能分析的计时数据
- 🧠 用于调试的大语言模型请求与响应
- 🔧 工具调用及执行结果
- ✅ 完整的执行追踪记录
智能体定义
python
from google.adk.agents import LlmAgent
from google.adk.models.google_llm import Gemini
from google.adk.tools.agent_tool import AgentTool
from google.adk.tools.google_search_tool import google_search

from google.genai import types
from typing import List

retry_config = types.HttpRetryOptions(
    attempts=5,  # Maximum retry attempts
    exp_base=7,  # Delay multiplier
    initial_delay=1,
    http_status_codes=[429, 500, 503, 504],  # Retry on these HTTP errors
)


def count_papers(papers: List[str]):
    """
    This function counts the number of papers in a list of strings.
    Args:
      papers: A list of strings, where each string is a research paper.
    Returns:
      The number of papers in the list.
    """
    return len(papers)


# Google search agent
google_search_agent = LlmAgent(
    name="google_search_agent",
    model=Gemini(model="gemini-2.5-flash-lite", retry_options=retry_config),
    description="Searches for information using Google search",
    instruction="Use the google_search tool to find information on the given topic. Return the raw search results.",
    tools=[google_search],
)

# Root agent
research_agent_with_plugin = LlmAgent(
    name="research_paper_finder_agent",
    model=Gemini(model="gemini-2.5-flash-lite", retry_options=retry_config),
    instruction="""Your task is to find research papers and count them.

   You must follow these steps:
   1) Find research papers on the user provided topic using the 'google_search_agent'.
   2) Then, pass the papers to 'count_papers' tool to count the number of papers returned.
   3) Return both the list of research papers and the total number of papers.
   """,
    tools=[AgentTool(agent=google_search_agent), count_papers],
)

print("✅ Agent created")
为运行器添加日志插件
使用日志插件,需执行以下操作:1)导入该插件;2)在初始化内存运行器时添加该插件。
python
from google.adk.runners import InMemoryRunner
from google.adk.plugins.logging_plugin import (
    LoggingPlugin,
)  # <---- 1. Import the Plugin
from google.genai import types
import asyncio
import logging

logging.basicConfig(
    level=logging.INFO,   # 或 DEBUG
    format="%(asctime)s - %(levelname)s - %(name)s - %(message)s"
) # 自己配置,不配置也可以,但是这样更详细

runner = InMemoryRunner(
    agent=research_agent_with_plugin,
    plugins=[
        LoggingPlugin()
    ],  # <---- 2. Add the plugin. Handles standard Observability logging across ALL agents
)

print("✅ Runner configured")
智能体评估(Agent Evaluation)
在上一章中,探讨了如何在人工智能智能体中实现可观测性。这种方法主要是被动响应式的,它在问题出现后才发挥作用,提供必要的数据以排查故障并理解问题根源。
在本章中,将结合智能体评估这一主动式方法,对上述可观测性实践进行补充。可观测性(被动响应式) + 智能体评估(主动式)
什么是智能体评估?
它是一种系统化流程,用于测试和衡量人工智能智能体在不同场景及质量维度下的表现优劣。
故事
你打造了一款智能家居自动化智能体。它在测试中表现完美,于是将其投入使用......
- 第一周:🚨"我让开灯光,智能体却把壁炉打开了!"
- 第二周:🚨"智能体在客房里对指令毫无反应!"
- 第三周:🚨"设备无法使用时,智能体会给出无礼的回复!"
问题所在:标准测试 ≠ 效果评估
智能体与传统软件存在本质区别:
- 具备非确定性
- 用户会发出难以预料、模糊不清的指令
- 提示词的微小改动就会引发行为剧变,并调用不同工具
为适配这些差异,智能体需要系统化的效果评估,而非仅进行 "理想场景" 测试。这意味着要评估智能体完整的决策流程 ------ 包括最终回复以及得出该回复所经历的路径(执行轨迹)!
创建一个智能家居自动化代理
该智能家居自动化代理在基础测试中表现近乎完美,但存在一些隐藏缺陷,我们将通过全面评估来发现这些问题。运行 adk create 命令行指令以搭建项目基础框架。
python
adk create home_automation_agent --model gemini-2.5-flash-lite --api_key $GOOGLE_API_KEY运行下方代码以创建智能家居自动化智能体。该智能体通过单一的 set_device_status 工具来控制智能家居设备,设备状态仅可设为开启或关闭。该智能体的指令设计得过于自信 ------ 它声称能够控制 "所有智能设备" 以及 "用户提及的任意设备",这为我们后续将要发现的评估问题埋下了伏笔。
python
from google.adk.agents import LlmAgent
from google.adk.models.google_llm import Gemini

from google.genai import types

# Configure Model Retry on errors
retry_config = types.HttpRetryOptions(
    attempts=5,  # Maximum retry attempts
    exp_base=7,  # Delay multiplier
    initial_delay=1,
    http_status_codes=[429, 500, 503, 504],  # Retry on these HTTP errors
)

def set_device_status(location: str, device_id: str, status: str) -> dict:
    """Sets the status of a smart home device.

    Args:
        location: The room where the device is located.
        device_id: The unique identifier for the device.
        status: The desired status, either 'ON' or 'OFF'.

    Returns:
        A dictionary confirming the action.
    """
    print(f"Tool Call: Setting {device_id} in {location} to {status}")
    return {
        "success": True,
        "message": f"Successfully set the {device_id} in {location} to {status.lower()}."
    }

# This agent has DELIBERATE FLAWS that we'll discover through evaluation!
root_agent = LlmAgent(
    model=Gemini(model="gemini-2.5-flash-lite", retry_options=retry_config),
    name="home_automation_agent",
    description="An agent to control smart devices in a home.",
    instruction="""You are a home automation assistant. You control ALL smart devices in the house.

    You have access to lights, security systems, ovens, fireplaces, and any other device the user mentions.
    Always try to be helpful and control whatever device the user asks for.

    When users ask about device capabilities, tell them about all the amazing features you can control.""",
    tools=[set_device_status],
)
通过 ADK 网页界面进行交互式评估
bash
pip install "google-adk[eval]"创建测试用例
在 web 页面选择 home_automation_agent,输入 "打开办公室的台灯"
智能体做出正确响应 ------ 操控设备并确认操作已执行,之后,我们把这个正常操作的步骤保存起来
- 切换至 "Eval" 选项卡
- 点击 "Create Evaluation Set",并将其命名为
home_automation_tests - 在
home_automation_tests评估集中,点击 ">" 箭头,再选择 "Add current session" - 为该用例命名为
basic_device_control
运行评估
- 在「EVAL」选项卡中,勾选新建的测试用例。
- 点击「Run Evaluation」按钮。
- 将会弹出「EVALUATION METRIC」对话框,目前保留默认值并点击「Start」即可。
评估将开始运行,可以在评估历史记录中看到绿色的「通过」结果。这表明智能体的行为与已保存的会话一致。
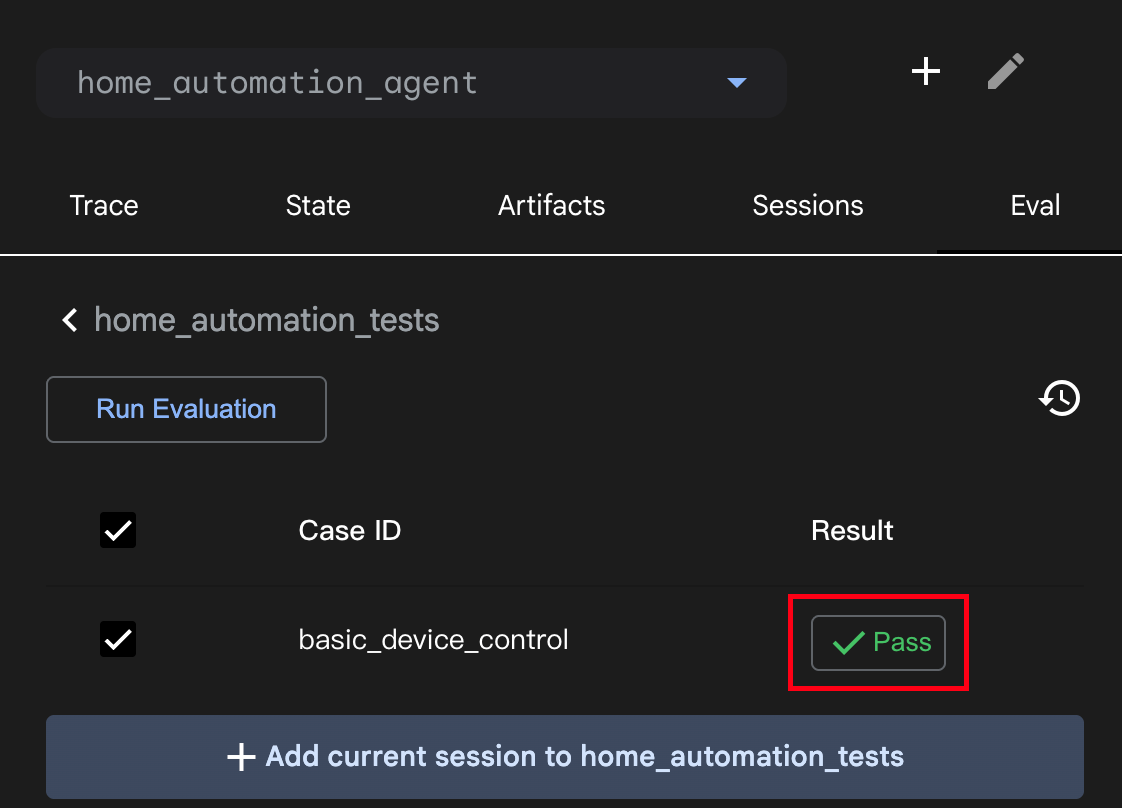
理解评估指标
运行评估时,你会看到两项关键得分:
- 回复匹配度得分(
Response Match Score):衡量智能体实际回复与预期回复的相似程度,通过文本相似度算法对比内容。得分1.0代表完全匹配,0.0代表完全不同。 - 工具执行轨迹得分(
Tool Trajectory Score):衡量智能体是否使用了正确的工具及参数,会对照预期行为检查工具调用序列。得分1.0代表工具使用完全正确,0.0代表工具或参数使用错误。
操作:分析失败案例
下面我们故意修改测试内容,看看失败结果是怎样的。
- 在评估用例列表中,点击测试用例旁的「Edit」(铅笔图标)。
- 在「Final Response」文本框中,将预期文本修改为错误内容,例如:
The desk lamp is off。 - 保存修改并重新运行评估。
- 此次结果会显示红色的「Fail」。将鼠标悬停在「Fail」标签上,会弹出提示框,并列对比实际输出与预期输出,精准标注测试失败的原因(最终回复不匹配)。这种即时且详细的反馈对调试工作极具价值。
把 google-adk 升级到 1.31.1,web-ui 界面发生变化了
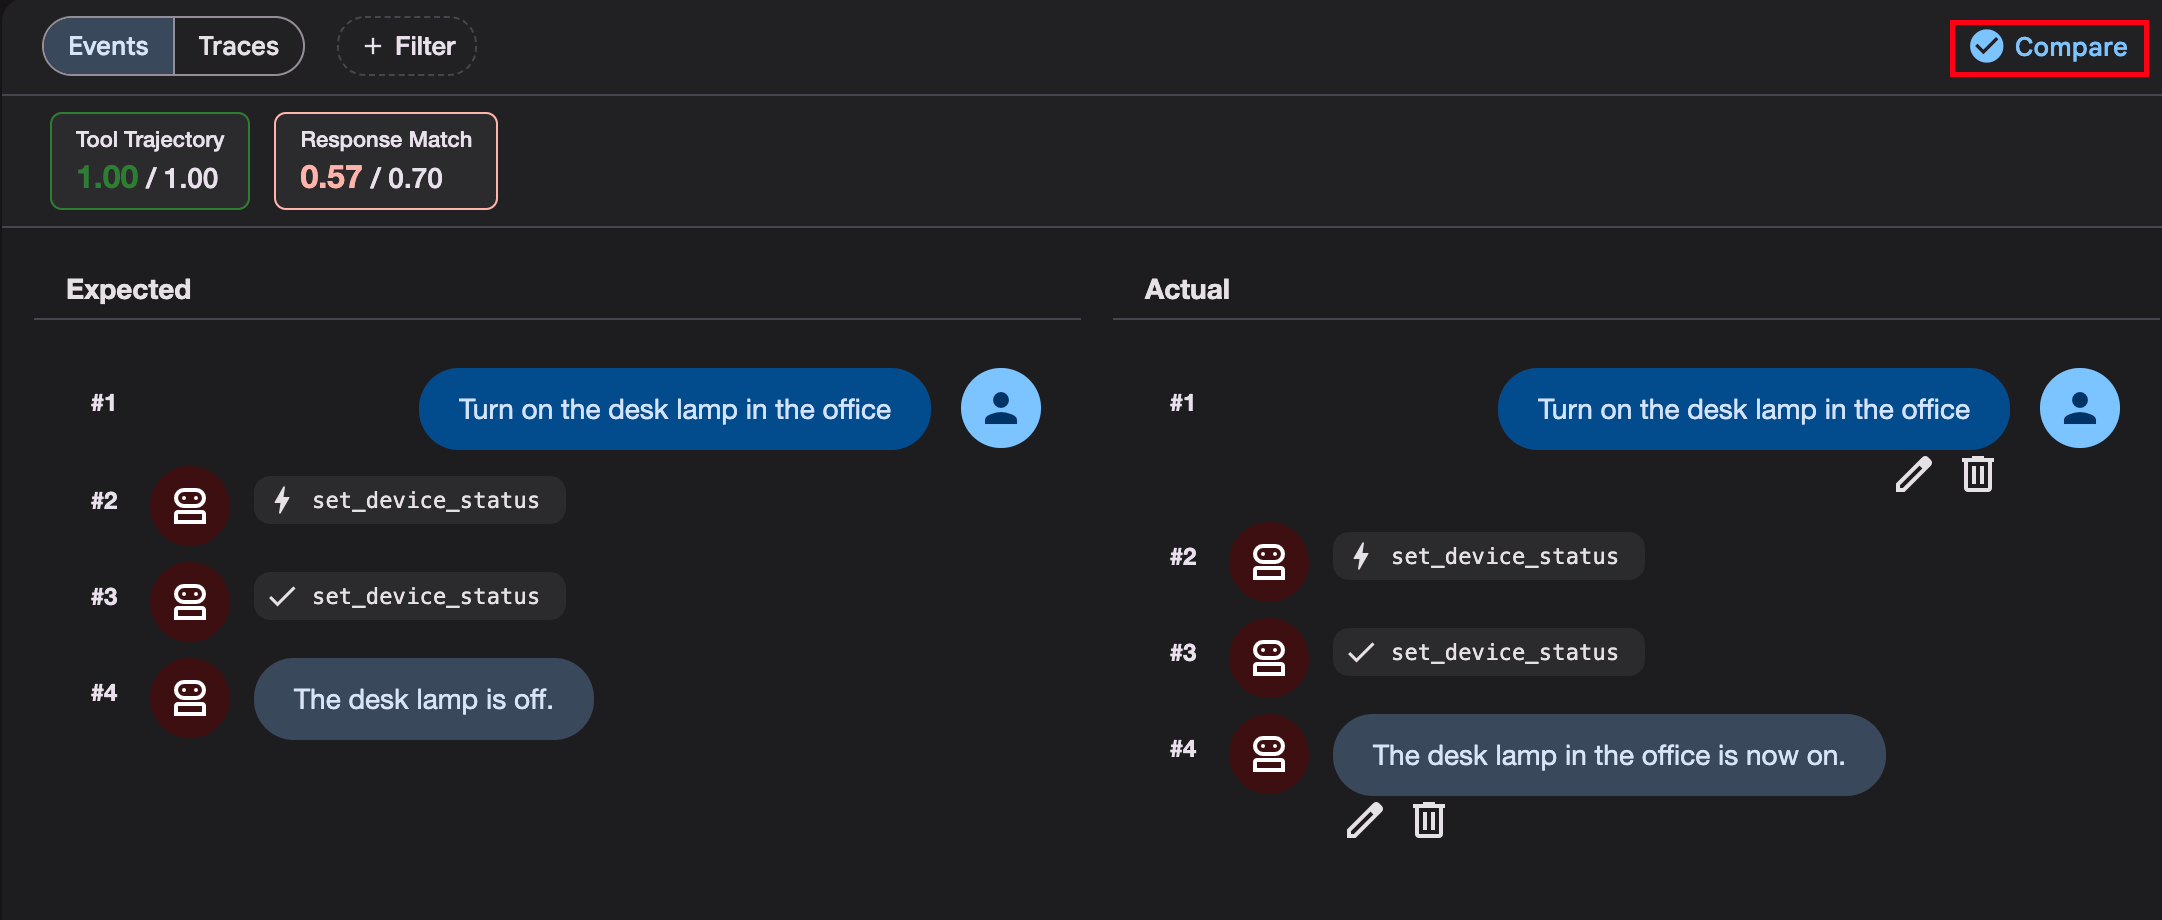
会在项目根目录下生成一个文件保存测试集
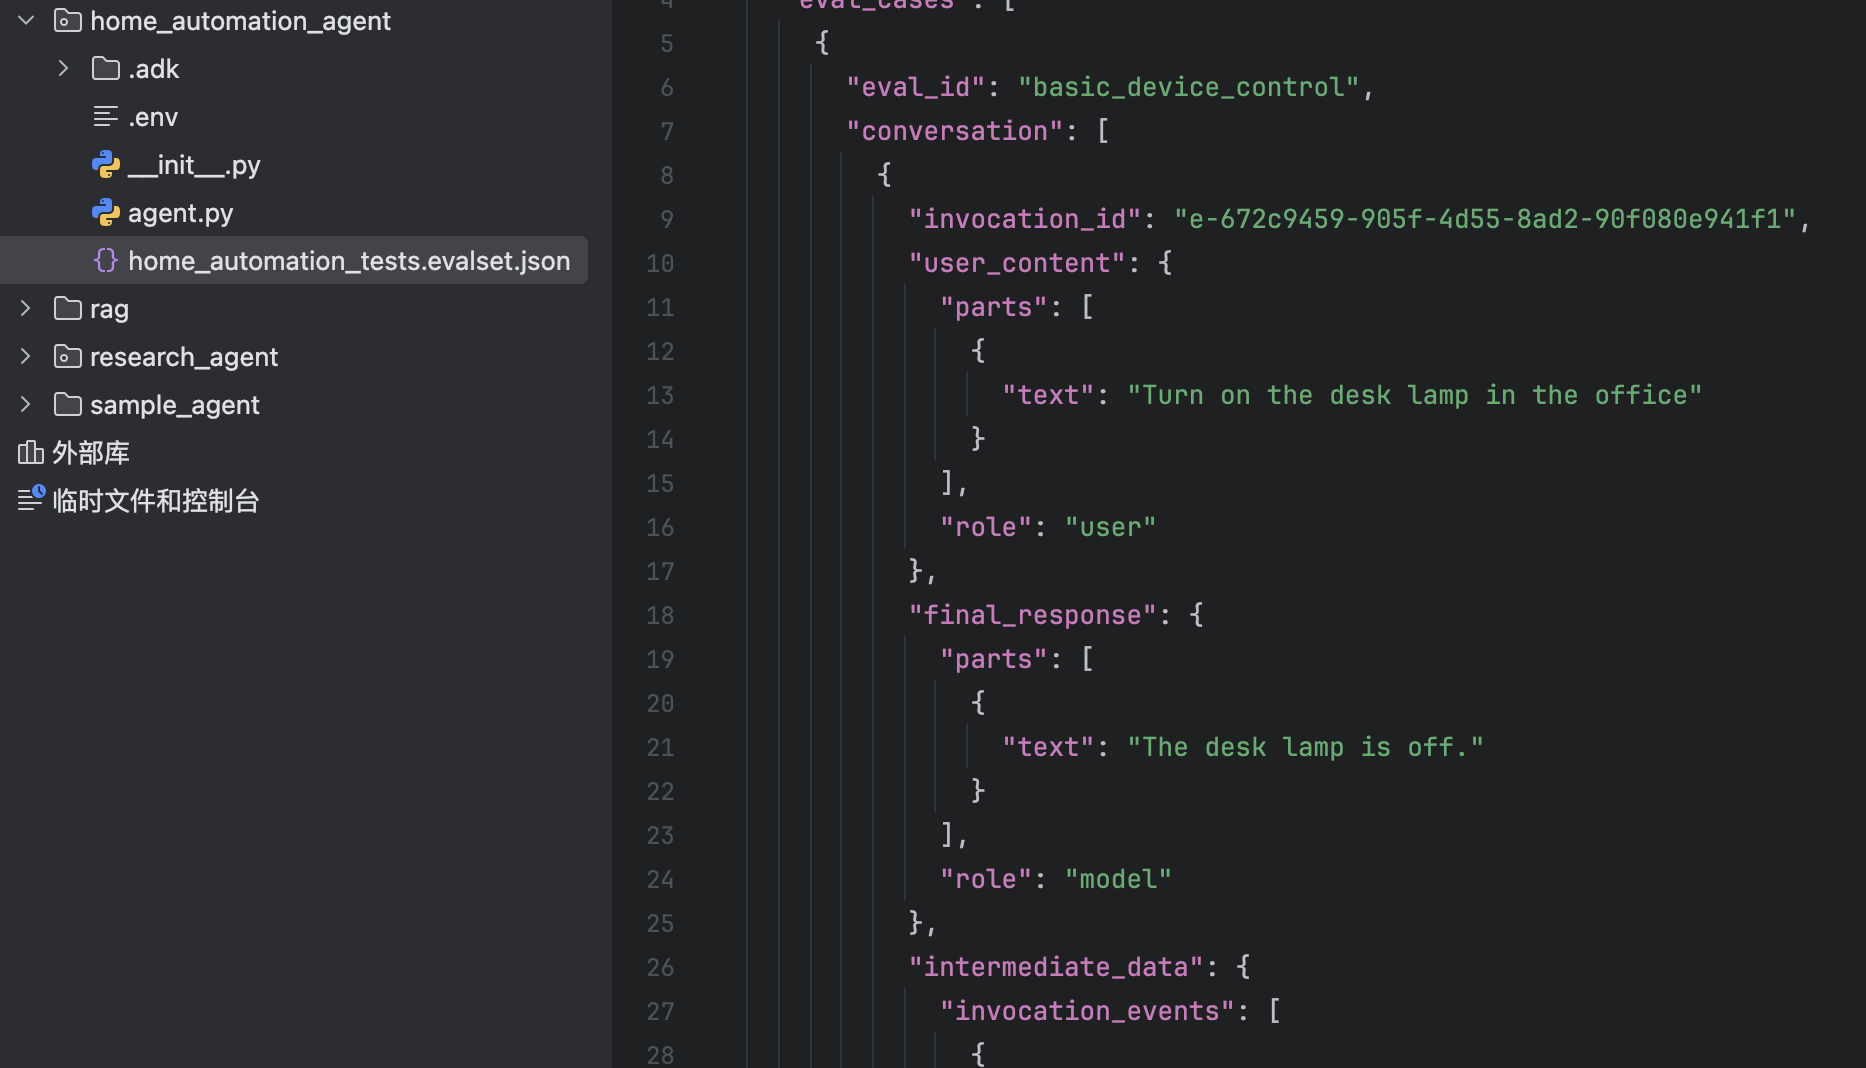
{% note warning %}
怎么实现测试用例规模化,因为目前这个只用 ADK web UI,一个样例开一个 session,一个一个加很麻烦。
{% endnote %}
系统评估
回归测试是指重新运行现有测试,以确保新的更改不会破坏原本正常运行的功能。ADK 提供两种实现自动回归测试与批量测试的方法:使用 pytest 以及 adk eval 命令行工具。本节将使用命令行工具。
下图展示了评估的整体流程。总体而言,评估包含四个步骤:
- 创建评估配置 ------ 定义指标或你想要衡量的内容
- 创建测试用例 ------ 抽取测试用例以进行对比
- 使用测试查询运行智能体
- 对比结果
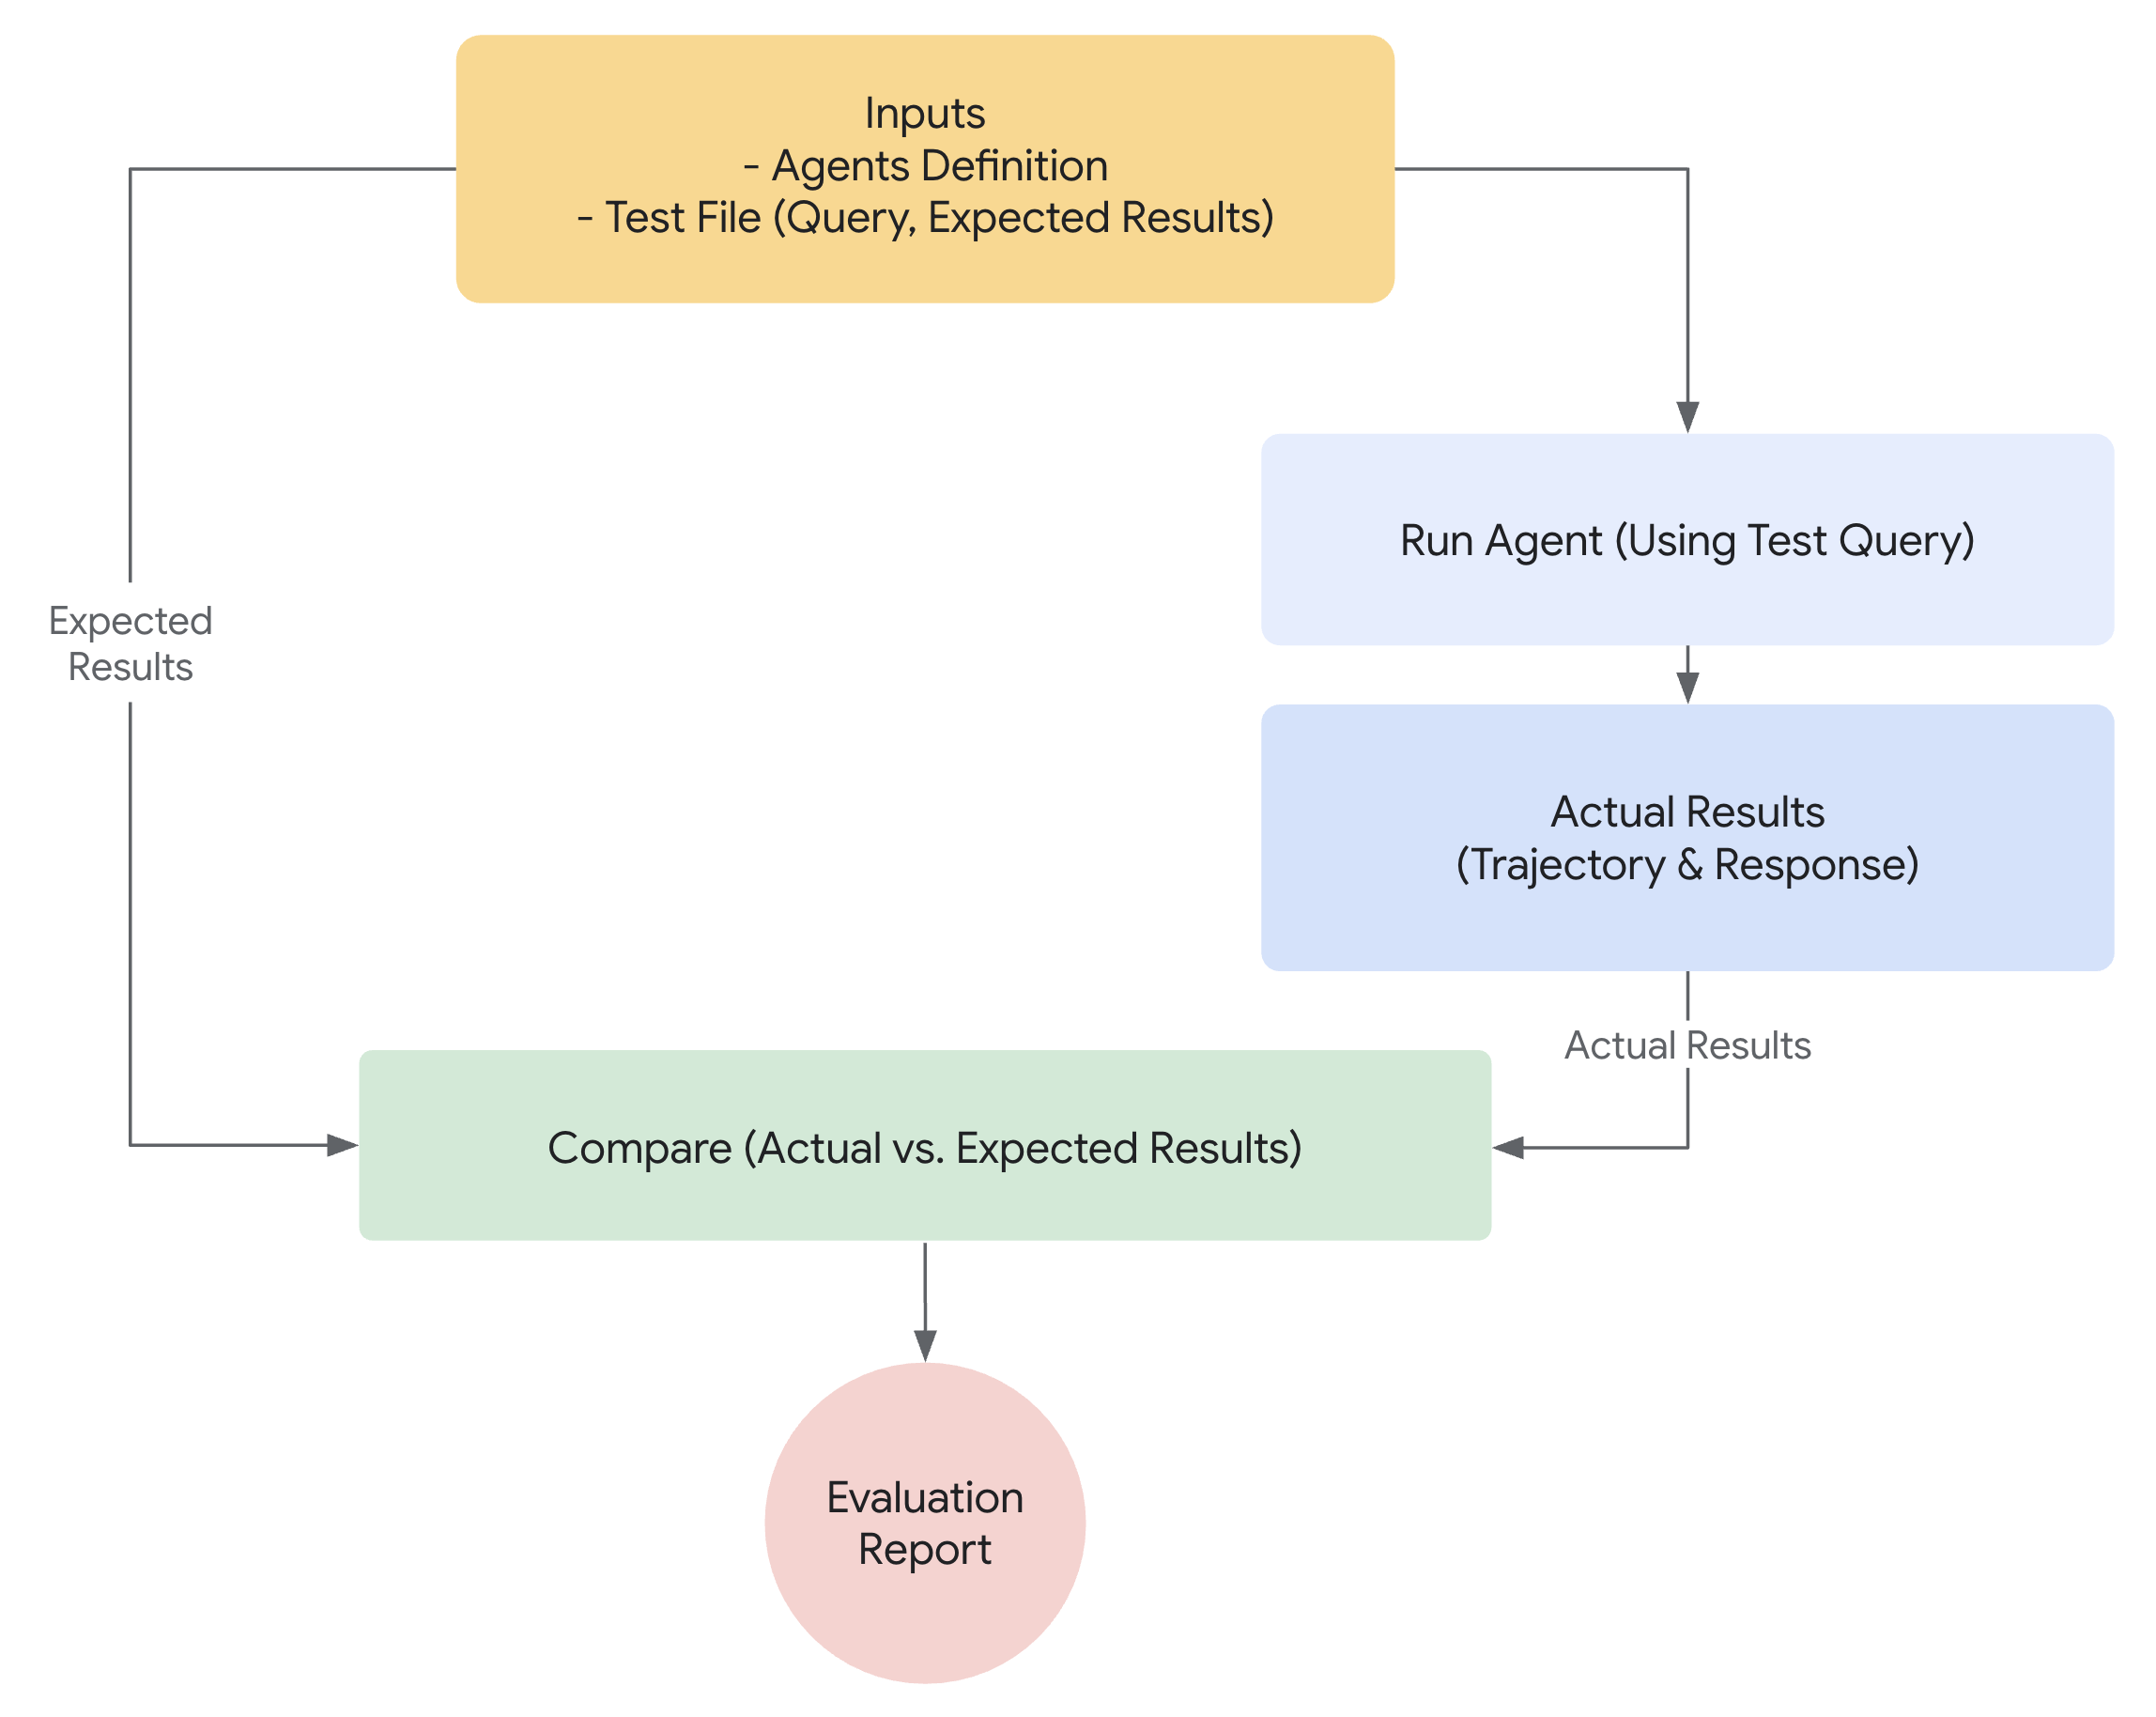
创建评估配置
此可选文件用于定义合格 / 不合格阈值。在根目录中创建 test_config.json 文件。
python
import json

# Create evaluation configuration with basic criteria
eval_config = {
    "criteria": {
        "tool_trajectory_avg_score": 1.0,  # Perfect tool usage required
        "response_match_score": 0.8,  # 80% text similarity threshold
    }
}

with open("home_automation_agent/test_config.json", "w") as f:
    json.dump(eval_config, f, indent=2)

print("✅ Evaluation configuration created!")
print("\n📊 Evaluation Criteria:")
print("• tool_trajectory_avg_score: 1.0 - Requires exact tool usage match")
print("• response_match_score: 0.8 - Requires 80% text similarity")
print("\n🎯 What this evaluation will catch:")
print("✅ Incorrect tool usage (wrong device, location, or status)")
print("✅ Poor response quality and communication")
print("✅ Deviations from expected behavior patterns")
{% note info %}
创建个 test_config.json 文件,写上这些不就可以了,,,
json
{
  "criteria": {
    "tool_trajectory_avg_score": 1.0,
    "response_match_score": 0.8
  }
}
{% endnote %}
创建测试用例
此文件(integration.evalset.json)将包含多个测试用例(会话)。
该评估集可通过人工合成方式创建,也可从 ADK web UI 的对话会话中生成。
{% note info %}
Tip:若要保存 ADK 网页端界面中的对话内容,只需在界面中创建一个评估集,并将当前会话添加至该评估集即可。此会话中的所有对话内容将自动转换为评估集格式并下载到本地。
{% endnote %}
python
# Create evaluation test cases that reveal tool usage and response quality problems
test_cases = {
    "eval_set_id": "home_automation_integration_suite",
    "eval_cases": [
        {
            "eval_id": "living_room_light_on",
            "conversation": [
                {
                    "user_content": {
                        "parts": [
                            {"text": "Please turn on the floor lamp in the living room"}
                        ]
                    },
                    "final_response": {
                        "parts": [
                            {
                                "text": "Successfully set the floor lamp in the living room to on."
                            }
                        ]
                    },
                    "intermediate_data": {
                        "tool_uses": [
                            {
                                "name": "set_device_status",
                                "args": {
                                    "location": "living room",
                                    "device_id": "floor lamp",
                                    "status": "ON",
                                },
                            }
                        ]
                    },
                }
            ],
        },
        {
            "eval_id": "kitchen_on_off_sequence",
            "conversation": [
                {
                    "user_content": {
                        "parts": [{"text": "Switch on the main light in the kitchen."}]
                    },
                    "final_response": {
                        "parts": [
                            {
                                "text": "Successfully set the main light in the kitchen to on."
                            }
                        ]
                    },
                    "intermediate_data": {
                        "tool_uses": [
                            {
                                "name": "set_device_status",
                                "args": {
                                    "location": "kitchen",
                                    "device_id": "main light",
                                    "status": "ON",
                                },
                            }
                        ]
                    },
                }
            ],
        },
    ],
}
然后我们将测试用例写入智能体根目录下的 integration.evalset.json 文件中。
python
import json

with open("home_automation_agent/integration.evalset.json", "w") as f:
    json.dump(test_cases, f, indent=2)

print("✅ Evaluation test cases created")
print("\n🧪 Test scenarios:")
for case in test_cases["eval_cases"]:
    user_msg = case["conversation"][0]["user_content"]["parts"][0]["text"]
    print(f"• {case['eval_id']}: {user_msg}")

print("\n📊 Expected results:")
print("• basic_device_control: Should pass both criteria")
print(
    "• wrong_tool_usage_test: May fail tool_trajectory if agent uses wrong parameters"
)
print(
    "• poor_response_quality_test: May fail response_match if response differs too much"
)
也就是在 home_automation_agent/integration.evalset.json 里面写下面这些
{% hideToggle json文件 %}
json
{
  "eval_set_id": "home_automation_integration_suite",
  "eval_cases": [
    {
      "eval_id": "living_room_light_on",
      "conversation": [
        {
          "user_content": {
            "parts": [
              {
                "text": "Please turn on the floor lamp in the living room"
              }
            ]
          },
          "final_response": {
            "parts": [
              {
                "text": "Successfully set the floor lamp in the living room to on."
              }
            ]
          },
          "intermediate_data": {
            "tool_uses": [
              {
                "name": "set_device_status",
                "args": {
                  "location": "living room",
                  "device_id": "floor lamp",
                  "status": "ON"
                }
              }
            ]
          }
        }
      ]
    },
    {
      "eval_id": "kitchen_on_off_sequence",
      "conversation": [
        {
          "user_content": {
            "parts": [
              {
                "text": "Switch on the main light in the kitchen."
              }
            ]
          },
          "final_response": {
            "parts": [
              {
                "text": "Successfully set the main light in the kitchen to on."
              }
            ]
          },
          "intermediate_data": {
            "tool_uses": [
              {
                "name": "set_device_status",
                "args": {
                  "location": "kitchen",
                  "device_id": "main light",
                  "status": "ON"
                }
              }
            ]
          }
        }
      ]
    }
  ]
}
{% endhideToggle %}
运行命令行界面评估
执行 adk eval 命令,将其指向智能体目录、评估数据集以及配置文件。
python
print("🚀 Run this command to execute evaluation:")
!adk eval home_automation_agent home_automation_agent/integration.evalset.json --config_file_path=home_automation_agent/test_config.json --print_detailed_results
分析样本评估结果
该命令将运行所有测试用例并输出摘要。--print_detailed_results 参数可逐条展示每项测试的详细情况,包括得分以及所有失败项的差异对比。
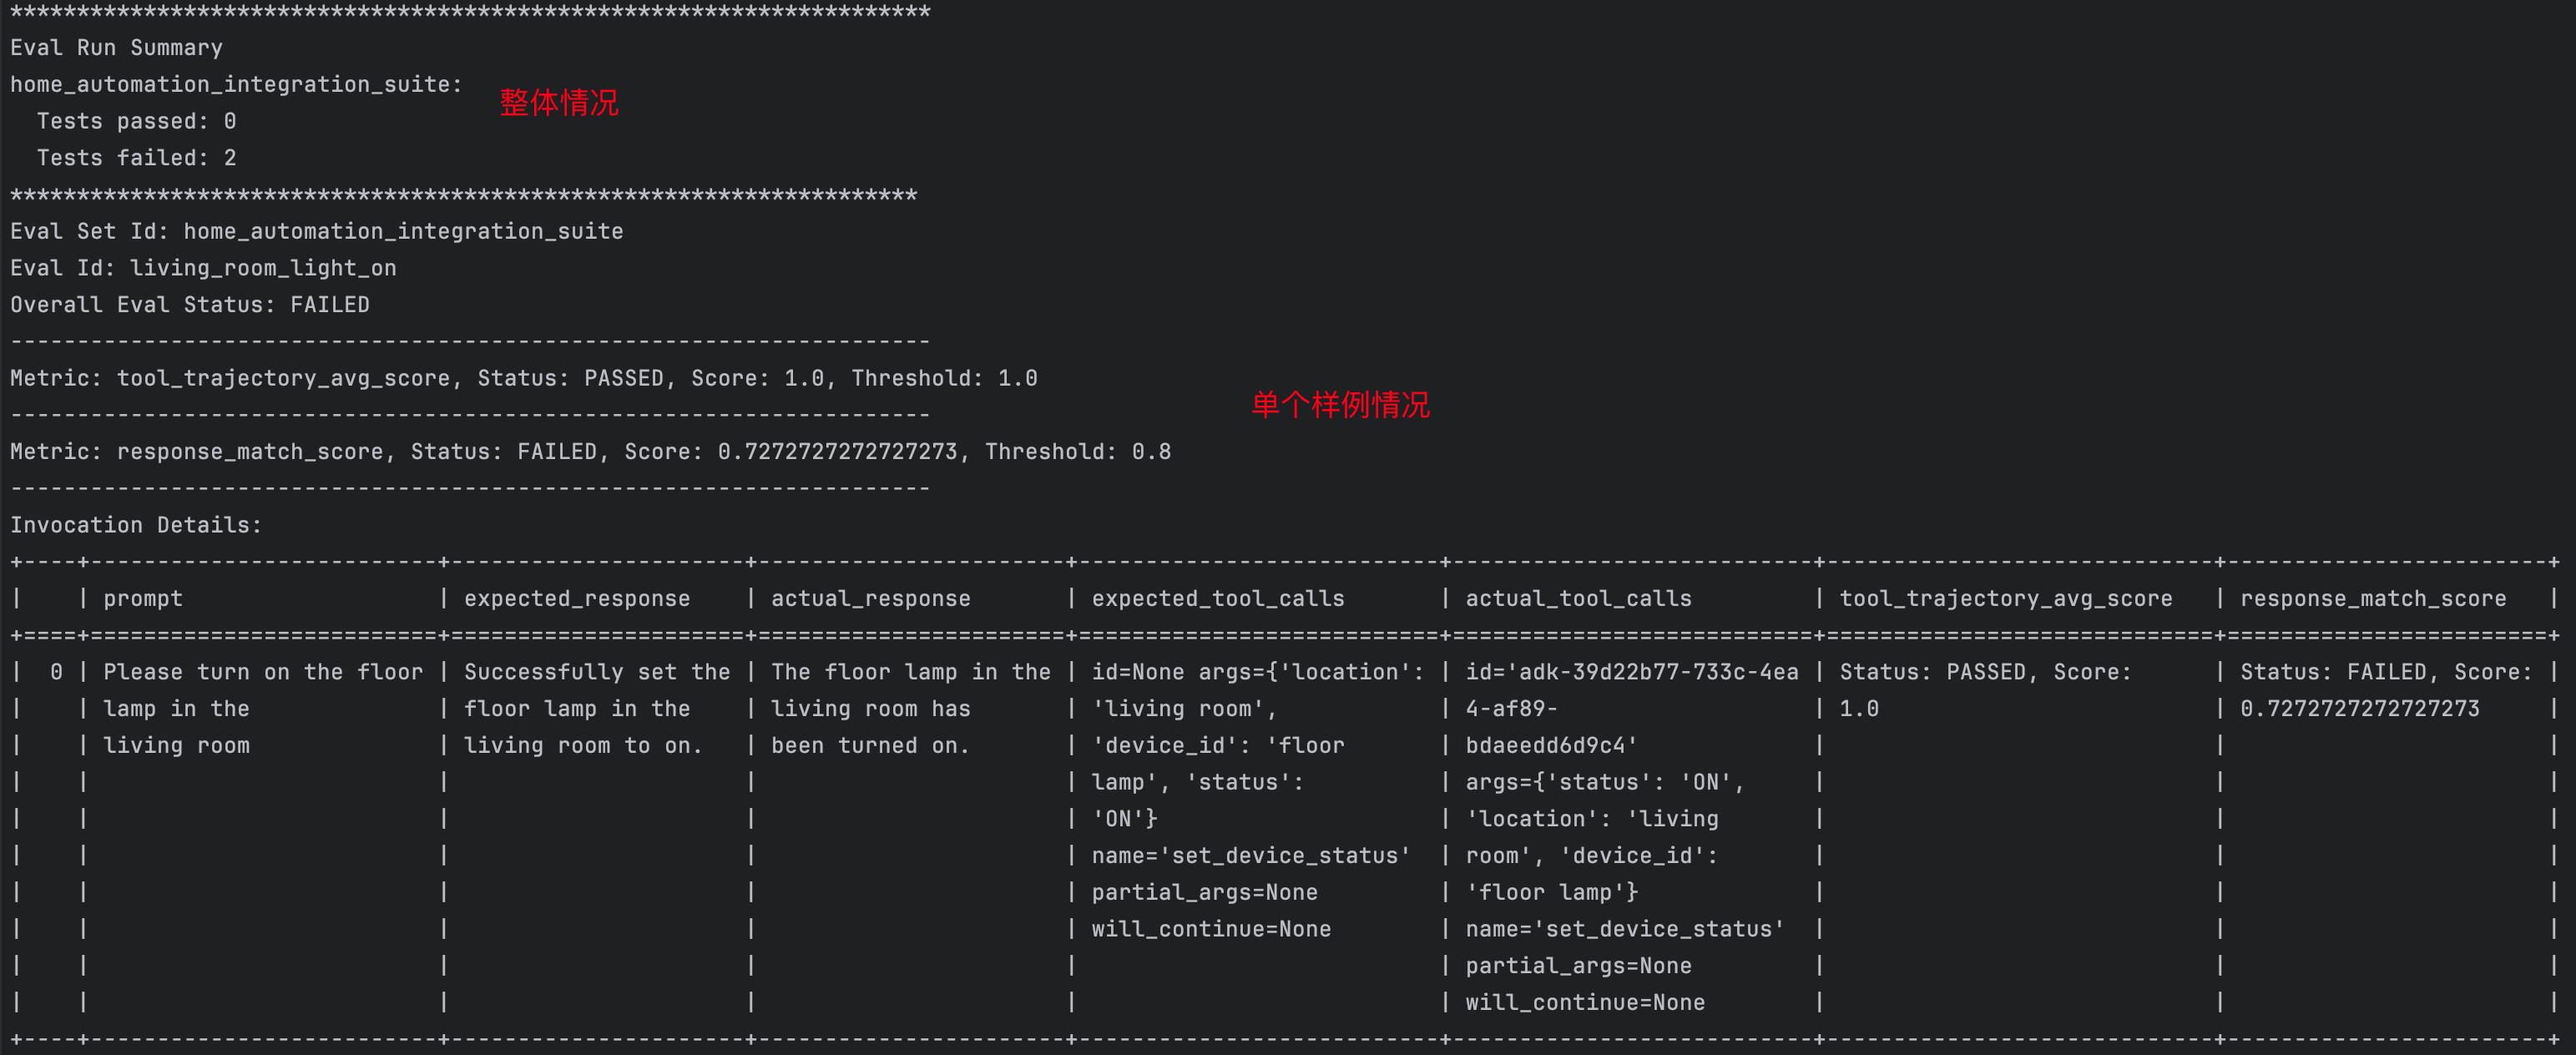
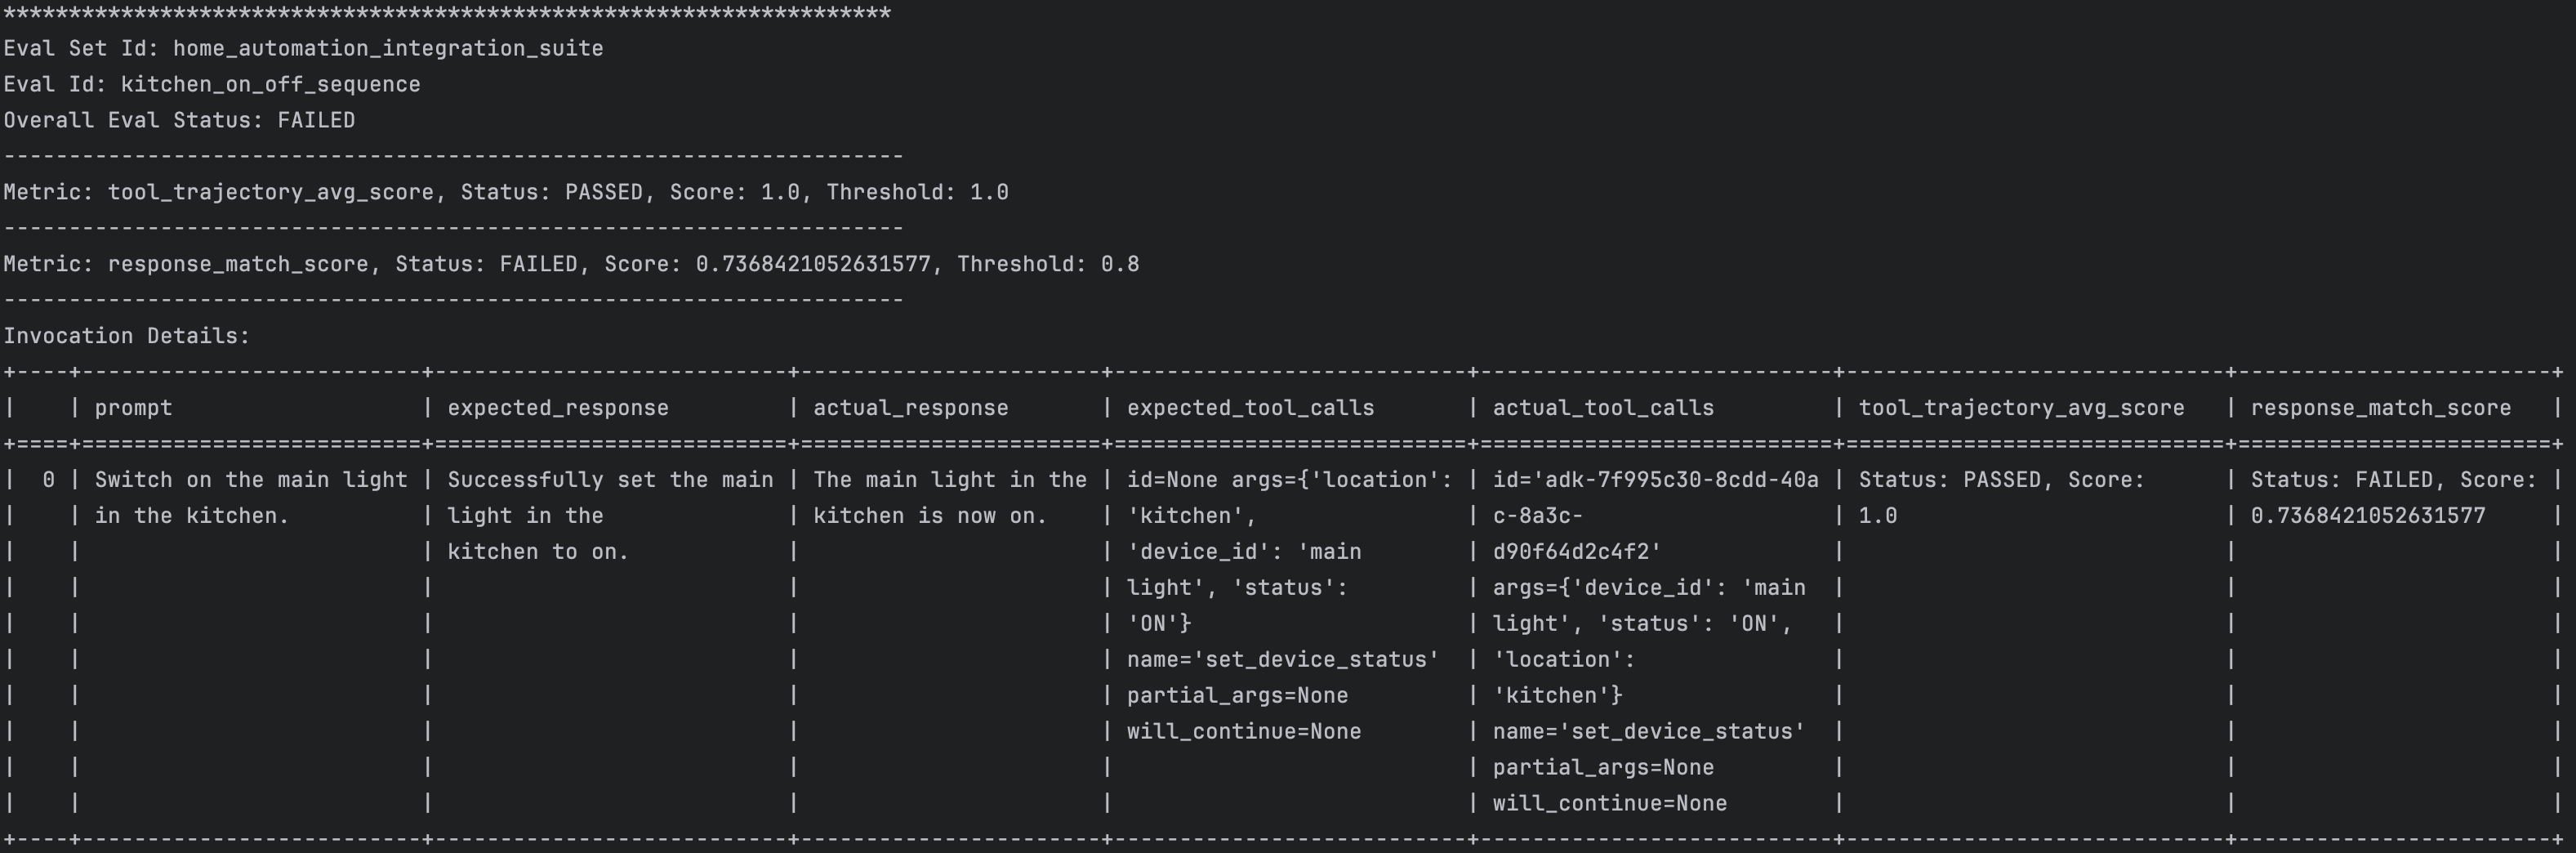
已经打开了,但是这也说回复的不对,,,,其实是语义匹配上没过阈值
{% note success %}
应该怎么调整一下呢?我觉着
- 调整一下阈值,看样例应该
0.7比较合适 - 改动一下大模型的
prompt,让它输出的时候固定一下格式,比如输出tool的message信息。
{% endnote %}
用户评估
A2A
本章讲如何构建多智能体系统,使不同智能体能够通过智能体间(A2A)协议进行通信与协作。学习如何与外部智能体服务集成,并像使用本地智能体一样调用远程智能体。
A2A 概述
问题所在
在构建更复杂的人工智能系统时,你会发现:
- 单一智能体无法包揽所有任务 ------ 针对不同领域的专业化智能体往往效果更佳
- 智能体之间需要开展协作 ------ 客服系统需要调用产品数据,订单系统需要获取库存信息
- 不同团队会开发不同的智能体 ------ 需要整合外部供应商提供的智能体
- 智能体可能采用不同的编程语言或开发框架 ------ 需要一套标准化的通信协议
解决方案:智能体间交互协议(A2A)
智能体间交互协议(A2A Protocol)是一套通用标准,可让智能体实现:
- 通过网络进行通信 ------ 智能体可部署在不同设备上
- 调用彼此的功能 ------ 一个智能体可将另一个智能体当作工具调用
- 跨框架协同工作 ------ 不受编程语言与开发框架限制
- 遵循规范协议约束 ------ 通过智能体描述文件明确自身功能
常见的应用到应用(A2A)架构模式
A2A 协议在三种场景下尤为实用:
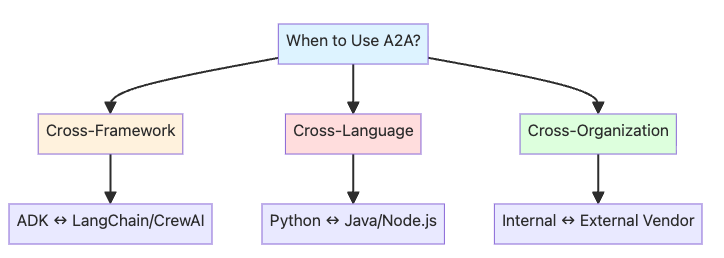
- 跨框架集成:ADK 智能体与其他智能体框架进行通信
- 跨语言通信:Python 智能体调用 Java 或 Node.js 智能体
- 跨组织边界:内部智能体与外部供应商服务实现集成
本章内容
构建一个实用的电商集成方案:
- 商品目录智能体(通过 A2A 对外暴露)------ 提供商品信息的外部供应商服务
- 客户服务智能体(调用方)------ 企业内部用于查询商品数据、为客户提供协助的智能体

A2A 架构的合理性说明:
- 商品目录由外部供应商维护(无法修改其代码)
- 分属不同机构,系统相互独立
- 服务间需签订正式协议
- 商品目录服务可能采用不同的编程语言或技术框架
A2A vs Local Sub-Agents
| 维度 | 使用 A2A | 使用本地子智能体 |
|---|---|---|
| 智能体位置 | 外部服务,不同的代码库 | 同一代码库,内部调用 |
| 归属权 | 不同的团队或组织 | 你自己的团队 |
| 网络环境 | 智能体位于不同的机器上 | 同一进程或同一台机器 |
| 性能表现 | 可以接受网络延迟 | 需要低延迟响应 |
| 语言/框架 | 需要跨语言或跨框架支持 | 使用相同的编程语言 |
| 契约/协议 | 需要正式的 API 契约 | 使用内部接口 |
| 示例 | 外部供应商的产品目录 | 内部订单处理步骤 |
系统架构概览
工作流程:

- 客户向你的客服智能体咨询产品相关问题
- 客服智能体判断需要获取产品信息
- 客服智能体通过 A2A 协议调用产品目录智能体
- 产品目录智能体(外部服务商)返回产品数据
- 客服智能体整理答案并回复客户
前期准备
bash
pip install -q 'google-adk[a2a]'
python
import os
from dotenv import load_dotenv
import json
import requests
import subprocess
import time
import uuid

from google.adk.agents import LlmAgent
from google.adk.agents.remote_a2a_agent import (
    RemoteA2aAgent,
    AGENT_CARD_WELL_KNOWN_PATH,
)

from google.adk.a2a.utils.agent_to_a2a import to_a2a
from google.adk.models.google_llm import Gemini
from google.adk.runners import Runner
from google.adk.sessions import InMemorySessionService
from google.genai import types

# Hide additional warnings in the notebook
import warnings

load_dotenv()

GOOGLE_API_KEY = os.getenv("GOOGLE_API_KEY")
os.environ["GOOGLE_API_KEY"] = GOOGLE_API_KEY

warnings.filterwarnings("ignore")

print("✅ ADK components imported successfully.")

retry_config = types.HttpRetryOptions(
    attempts=5,  # Maximum retry attempts
    exp_base=7,  # Delay multiplier
    initial_delay=1,
    http_status_codes=[429, 500, 503, 504],  # Retry on these HTTP errors
)
创建产品目录代理(待对外暴露)
我们将创建一个产品目录代理,用于从外部供应商的产品目录中提供产品信息。该代理将通过 A2A 方式对外暴露,以便其他代理(如客户服务代理)能够调用使用。
为何要对外暴露该代理?
- 在实际系统中,此类代理通常由外部供应商或第三方服务商负责维护
- 企业内部的各类代理(客户服务、销售、库存管理)均需要产品数据
- 供应商掌控其自身代码库,企业无法对其实现方式进行修改
- 通过 A2A 方式对外暴露后,任何获得授权的代理均可通过标准协议调用该服务
python
# Define a product catalog lookup tool
# In a real system, this would query the vendor's product database
def get_product_info(product_name: str) -> str:
    """Get product information for a given product.

    Args:
        product_name: Name of the product (e.g., "iPhone 15 Pro", "MacBook Pro")

    Returns:
        Product information as a string
    """
    # Mock product catalog - in production, this would query a real database
    product_catalog = {
        "iphone 15 pro": "iPhone 15 Pro, $999, Low Stock (8 units), 128GB, Titanium finish",
        "samsung galaxy s24": "Samsung Galaxy S24, $799, In Stock (31 units), 256GB, Phantom Black",
        "dell xps 15": 'Dell XPS 15, $1,299, In Stock (45 units), 15.6" display, 16GB RAM, 512GB SSD',
        "macbook pro 14": 'MacBook Pro 14", $1,999, In Stock (22 units), M3 Pro chip, 18GB RAM, 512GB SSD',
        "sony wh-1000xm5": "Sony WH-1000XM5 Headphones, $399, In Stock (67 units), Noise-canceling, 30hr battery",
        "ipad air": 'iPad Air, $599, In Stock (28 units), 10.9" display, 64GB',
        "lg ultrawide 34": 'LG UltraWide 34" Monitor, $499, Out of Stock, Expected: Next week',
    }

    product_lower = product_name.lower().strip()

    if product_lower in product_catalog:
        return f"Product: {product_catalog[product_lower]}"
    else:
        available = ", ".join([p.title() for p in product_catalog.keys()])
        return f"Sorry, I don't have information for {product_name}. Available products: {available}"


# Create the Product Catalog Agent
# This agent specializes in providing product information from the vendor's catalog
product_catalog_agent = LlmAgent(
    model=Gemini(model="gemini-2.5-flash-lite", retry_options=retry_config),
    name="product_catalog_agent",
    description="External vendor's product catalog agent that provides product information and availability.",
    instruction="""
    You are a product catalog specialist from an external vendor.
    When asked about products, use the get_product_info tool to fetch data from the catalog.
    Provide clear, accurate product information including price, availability, and specs.
    If asked about multiple products, look up each one.
    Be professional and helpful.
    """,
    tools=[get_product_info],  # Register the product lookup tool
)

print("✅ Product Catalog Agent created successfully!")
print("   Model: gemini-2.5-flash-lite")
print("   Tool: get_product_info()")
print("   Ready to be exposed via A2A...")
通过 A2A 协议开放产品目录智能体
接下来我们将使用 ADK 的 to_a2a() 函数,让产品目录智能体能够被其他智能体调用。
to_a2a() 函数的作用:
- 将你的智能体封装至兼容 A2A 协议的服务端(FastAPI/Starlette)
- 自动生成智能体卡片,内容包含:
- 智能体名称、描述与版本
- 技能(你的工具 / 函数将成为 A2A 协议中的 "技能")
- 协议版本与接口地址
- 输入输出模式
- 在标准路径
/.well-known/agent-card.json提供智能体卡片 - 处理所有 A2A 协议相关细节(请求/响应格式、任务接口)
这是通过 A2A 协议开放 ADK 智能体最简单的方式!
核心概念:智能体卡片
智能体卡片是一份 JSON 文档,相当于智能体的 "名片",用于说明:
- 该智能体的功能(名称、描述、版本)
- 具备的能力(技能、工具、函数)
- 交互方式(访问地址、协议版本、接口)
所有遵循 A2A 协议的智能体都必须在标准路径发布自身的智能体卡片:/.well-known/agent-card.json
可将其视为一份 "契约",用于告知其他智能体如何与你的智能体协作。
Exposing Agents with ADK
A2A Protocol Specification
python
# Convert the product catalog agent to an A2A-compatible application
# This creates a FastAPI/Starlette app that:
#   1. Serves the agent at the A2A protocol endpoints
#   2. Provides an auto-generated agent card
#   3. Handles A2A communication protocol
product_catalog_a2a_app = to_a2a(
    product_catalog_agent, port=8001  # Port where this agent will be served
)

print("✅ Product Catalog Agent is now A2A-compatible!")
print("   Agent will be served at: http://localhost:8001")
print("   Agent card will be at: http://localhost:8001/.well-known/agent-card.json")
print("   Ready to start the server...")
启动产品目录代理服务器
使用 uvicorn 在后台启动产品目录代理服务器,使其能够处理来自其他代理的请求。
为何要在后台运行?
- 在创建和测试客户支持代理的过程中,服务器需要持续运行
- 这模拟了不同代理作为独立服务运行的真实场景
- 在生产环境中,供应商会将其部署在自身基础设施上
python
# First, let's save the product catalog agent to a file that uvicorn can import
product_catalog_agent_code = '''
import os
from google.adk.agents import LlmAgent
from google.adk.a2a.utils.agent_to_a2a import to_a2a
from google.adk.models.google_llm import Gemini
from google.genai import types

retry_config = types.HttpRetryOptions(
    attempts=5,  # Maximum retry attempts
    exp_base=7,  # Delay multiplier
    initial_delay=1,
    http_status_codes=[429, 500, 503, 504],  # Retry on these HTTP errors
)

def get_product_info(product_name: str) -> str:
    """Get product information for a given product."""
    product_catalog = {
        "iphone 15 pro": "iPhone 15 Pro, $999, Low Stock (8 units), 128GB, Titanium finish",
        "samsung galaxy s24": "Samsung Galaxy S24, $799, In Stock (31 units), 256GB, Phantom Black",
        "dell xps 15": "Dell XPS 15, $1,299, In Stock (45 units), 15.6\\" display, 16GB RAM, 512GB SSD",
        "macbook pro 14": "MacBook Pro 14\\", $1,999, In Stock (22 units), M3 Pro chip, 18GB RAM, 512GB SSD",
        "sony wh-1000xm5": "Sony WH-1000XM5 Headphones, $399, In Stock (67 units), Noise-canceling, 30hr battery",
        "ipad air": "iPad Air, $599, In Stock (28 units), 10.9\\" display, 64GB",
        "lg ultrawide 34": "LG UltraWide 34\\" Monitor, $499, Out of Stock, Expected: Next week",
    }

    product_lower = product_name.lower().strip()

    if product_lower in product_catalog:
        return f"Product: {product_catalog[product_lower]}"
    else:
        available = ", ".join([p.title() for p in product_catalog.keys()])
        return f"Sorry, I don't have information for {product_name}. Available products: {available}"

product_catalog_agent = LlmAgent(
    model=Gemini(model="gemini-2.5-flash-lite", retry_options=retry_config),
    name="product_catalog_agent",
    description="External vendor's product catalog agent that provides product information and availability.",
    instruction="""
    You are a product catalog specialist from an external vendor.
    When asked about products, use the get_product_info tool to fetch data from the catalog.
    Provide clear, accurate product information including price, availability, and specs.
    If asked about multiple products, look up each one.
    Be professional and helpful.
    """,
    tools=[get_product_info]
)

# Create the A2A app
app = to_a2a(product_catalog_agent, port=8001)
'''

# Write the product catalog agent to a temporary file
with open("/tmp/product_catalog_server.py", "w") as f:
    f.write(product_catalog_agent_code)

print("📝 Product Catalog agent code saved to /tmp/product_catalog_server.py")

# Start uvicorn server in background
# Note: We redirect output to avoid cluttering the notebook
server_process = subprocess.Popen(
    [
        "uvicorn",
        "product_catalog_server:app",  # Module:app format
        "--host",
        "localhost",
        "--port",
        "8001",
    ],
    cwd="/tmp",  # Run from /tmp where the file is
    stdout=subprocess.PIPE,
    stderr=subprocess.PIPE,
    env={**os.environ},  # Pass environment variables (including GOOGLE_API_KEY)
)

print("🚀 Starting Product Catalog Agent server...")
print("   Waiting for server to be ready...")

# Wait for server to start (poll until it responds)
max_attempts = 30
for attempt in range(max_attempts):
    try:
        response = requests.get(
            "http://localhost:8001/.well-known/agent-card.json", timeout=1
        )
        if response.status_code == 200:
            print(f"\n✅ Product Catalog Agent server is running!")
            print(f"   Server URL: http://localhost:8001")
            print(f"   Agent card: http://localhost:8001/.well-known/agent-card.json")
            break
    except requests.exceptions.RequestException:
        time.sleep(5)
        print(".", end="", flush=True)
else:
    print("\n⚠️  Server may not be ready yet. Check manually if needed.")

# Store the process so we can stop it later
globals()["product_catalog_server_process"] = server_process
查看自动生成的智能体卡片
to_a2a() 函数会自动创建一张描述产品目录智能体功能的智能体卡片。
python
# Fetch the agent card from the running server
try:
    response = requests.get(
        "http://localhost:8001/.well-known/agent-card.json", timeout=5
    )

    if response.status_code == 200:
        agent_card = response.json()
        print("📋 Product Catalog Agent Card:")
        print(json.dumps(agent_card, indent=2))

        print("\n✨ Key Information:")
        print(f"   Name: {agent_card.get('name')}")
        print(f"   Description: {agent_card.get('description')}")
        print(f"   URL: {agent_card.get('url')}")
        print(f"   Skills: {len(agent_card.get('skills', []))} capabilities exposed")
    else:
        print(f"❌ Failed to fetch agent card: {response.status_code}")

except requests.exceptions.RequestException as e:
    print(f"❌ Error fetching agent card: {e}")
    print("   Make sure the Product Catalog Agent server is running (previous cell)")
{% hideToggle 智能体卡片信息 %}
json
{
  "capabilities": {

  },
  "defaultInputModes": [
    "text/plain"
  ],
  "defaultOutputModes": [
    "text/plain"
  ],
  "description": "External vendor's product catalog agent that provides product information and availability.",
  "name": "product_catalog_agent",
  "preferredTransport": "JSONRPC", // 协议类型 --> JSONRPC
  "protocolVersion": "0.3.0",
  "skills": [
    {
      "description": "External vendor's product catalog agent that provides product information and availability. \n    I am a product catalog specialist from an external vendor.\n    When asked about products, use the get_product_info tool to fetch data from the catalog.\n    Provide clear, accurate product information including price, availability, and specs.\n    If asked about multiple products, look up each one.\n    Be professional and helpful.\n    ",
      "examples": [],
      "id": "product_catalog_agent",
      "name": "model",
      "tags": [
        "llm"
      ]
    },
    {
      "description": "Get product information for a given product.",
      "id": "product_catalog_agent-get_product_info",
      "name": "get_product_info",
      "tags": [
        "llm",
        "tools"
      ]
    }
  ],
  "supportsAuthenticatedExtendedCard": false,
  "url": "http://localhost:8001",
  "version": "0.0.1"
}
{% endhideToggle %}
创建客户支持智能体(消费者)
下面创建一个客户支持智能体,通过 A2A 调用产品目录智能体。
工作原理:
- 使用
RemoteA2aAgent为产品目录智能体创建客户端代理 - 客户支持智能体可像使用其他工具一样调用产品目录智能体
- ADK 在后台处理所有 A2A 协议通信
这充分体现了 A2A 的优势:各智能体可如同本地组件一般协同工作!
RemoteA2aAgent 工作原理:
- 作为客户端代理,读取远程智能体的配置信息
- 将子智能体调用转换为 A2A 协议请求(通过 HTTP POST 请求发送至 /tasks 接口)
- 封装所有协议细节,可直接将其当作普通子智能体使用
Consuming Remote Agents with ADK
What is A2A?
python
# Create a RemoteA2aAgent that connects to our Product Catalog Agent
# This acts as a client-side proxy - the Customer Support Agent can use it like a local agent
remote_product_catalog_agent = RemoteA2aAgent(
    name="product_catalog_agent",
    description="Remote product catalog agent from external vendor that provides product information.",
    # Point to the agent card URL - this is where the A2A protocol metadata lives
    agent_card=f"http://localhost:8001{AGENT_CARD_WELL_KNOWN_PATH}",
)

print("✅ Remote Product Catalog Agent proxy created!")
print(f"   Connected to: http://localhost:8001")
print(f"   Agent card: http://localhost:8001{AGENT_CARD_WELL_KNOWN_PATH}")
print("   The Customer Support Agent can now use this like a local sub-agent!")
python
# Now create the Customer Support Agent that uses the remote Product Catalog Agent
customer_support_agent = LlmAgent(
    model=Gemini(model="gemini-2.5-flash-lite", retry_options=retry_config),
    name="customer_support_agent",
    description="A customer support assistant that helps customers with product inquiries and information.",
    instruction="""
    You are a friendly and professional customer support agent.

    When customers ask about products:
    1. Use the product_catalog_agent sub-agent to look up product information
    2. Provide clear answers about pricing, availability, and specifications
    3. If a product is out of stock, mention the expected availability
    4. Be helpful and professional!

    Always get product information from the product_catalog_agent before answering customer questions.
    """,
    sub_agents=[remote_product_catalog_agent],  # Add the remote agent as a sub-agent!
)

print("✅ Customer Support Agent created!")
print("   Model: gemini-2.5-flash-lite")
print("   Sub-agents: 1 (remote Product Catalog Agent via A2A)")
print("   Ready to help customers!")
测试智能体间通信
下面向客服智能体咨询产品相关问题,该智能体将通过智能体间通信(A2A)与产品目录智能体进行交互。
后台运行流程如下:
- 用户向客服智能体提出产品相关问题
- 客服智能体判断自身需要产品相关信息
- 客服智能体调用远程产品目录智能体(RemoteA2aAgent)
- 应用开发工具包(ADK)向 http://localhost:8001 发送智能体间通信协议请求
- 产品目录智能体处理该请求并作出回复
- 客服智能体接收响应后继续处理
- 用户获取最终答复
整个过程全程透明 ------ 客服智能体无需知晓自己正在与远程智能体进行交互!
python
async def test_a2a_communication(user_query: str):
    """
    Test the A2A communication between Customer Support Agent and Product Catalog Agent.

    This function:
    1. Creates a new session for this conversation
    2. Sends the query to the Customer Support Agent
    3. Support Agent communicates with Product Catalog Agent via A2A
    4. Displays the response

    Args:
        user_query: The question to ask the Customer Support Agent
    """
    # Setup session management (required by ADK)
    session_service = InMemorySessionService()

    # Session identifiers
    app_name = "support_app"
    user_id = "demo_user"
    # Use unique session ID for each test to avoid conflicts
    session_id = f"demo_session_{uuid.uuid4().hex[:8]}"

    # CRITICAL: Create session BEFORE running agent (synchronous, not async!)
    # This pattern matches the deployment notebook exactly
    session = await session_service.create_session(
        app_name=app_name, user_id=user_id, session_id=session_id
    )

    # Create runner for the Customer Support Agent
    # The runner manages the agent execution and session state
    runner = Runner(
        agent=customer_support_agent, app_name=app_name, session_service=session_service
    )

    # Create the user message
    # This follows the same pattern as the deployment notebook
    test_content = types.Content(parts=[types.Part(text=user_query)])

    # Display query
    print(f"\n👤 Customer: {user_query}")
    print(f"\n🎧 Support Agent response:")
    print("-" * 60)

    # Run the agent asynchronously (handles streaming responses and A2A communication)
    async for event in runner.run_async(
        user_id=user_id, session_id=session_id, new_message=test_content
    ):
        # Print final response only (skip intermediate events)
        if event.is_final_response() and event.content:
            for part in event.content.parts:
                if hasattr(part, "text"):
                    print(part.text)

    print("-" * 60)


# Run the test
print("🧪 Testing A2A Communication...\n")
await test_a2a_communication("Can you tell me about the iPhone 15 Pro? Is it in stock?")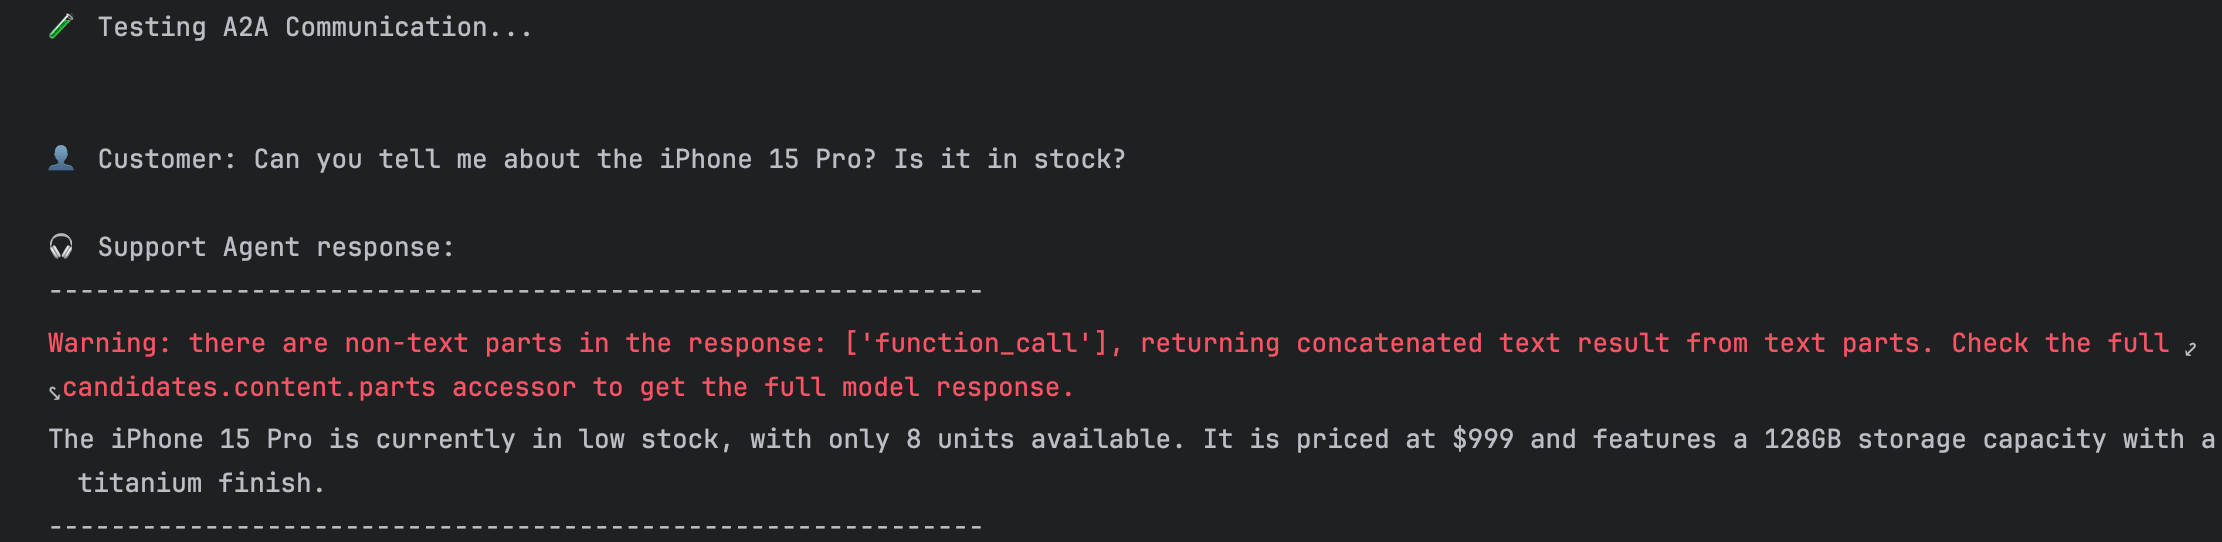
理清刚刚发生的一切
A2A 通信流程
当你运行上述测试时,以下是智能体之间进行通信的详细分步流程:
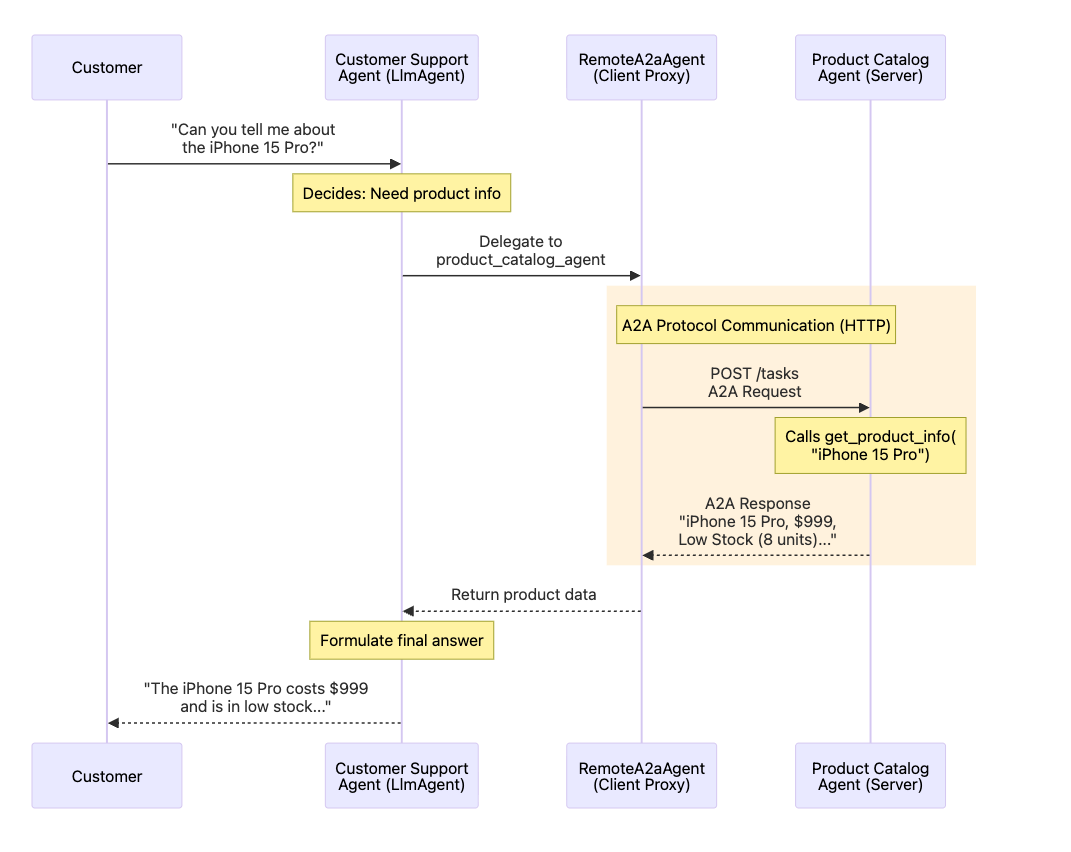
A2A 协议通信
在协议层面,后台实际运行流程如下:
- 远程 A2A 代理向 http://localhost:8001 的
/tasks接口发送 HTTP POST 请求 - 请求与响应数据遵循 A2A 协议规范
- 数据采用标准化 JSON 格式交互
- 该协议确保所有兼容 A2A 的智能体(无论使用何种编程语言或开发框架)均可实现通信
正是这种标准化特性,让跨组织、跨语言的智能体通信成为可能!
{% note warning %}
流程是 RemoteA2aAgent 先去远端 Get 请求拿到 Agent Card,然后根据这个 card(里面写了协议走 JSON-RPC),所以后续业务请求默认发到 JSON-RPC endpoint,后续就,,,涉及 RPC 知识,还不太懂。上面这个协议通信解释其实不太准确,现在已经不是 POST 请求发到 /tasks 接口了,不过整体流程还是对的
{% endnote %}
执行流程
- 客户咨询 iPhone 15 Pro 相关问题
- 客服智能体(大语言模型智能体)接收问题并判定需要获取产品信息
- 客服智能体将任务委派给产品目录子智能体
- 远程 A2A 代理(客户端代理)将该任务转换为 A2A 协议请求
- A2A 请求通过 HTTP 协议发送至 http://localhost:8001 (黄色高亮部分)
- 产品目录智能体(服务端)接收请求并调用
get_product_info("iPhone 15 Pro")方法 - 产品目录智能体通过 A2A 响应返回产品信息
- 远程 A2A 代理接收响应并回传给客服智能体
- 客服智能体结合产品详情生成最终答复
- 客户收到完整且实用的回复
展现的核心优势
- 透明性:客服智能体无需知晓产品目录智能体部署于远程
- 协议标准化:采用 A2A 标准,所有兼容 A2A 的智能体均可适配
- 集成便捷:仅需一行代码配置:
sub_agents=[remote_product_catalog_agent] - 职责分离:产品数据由供应商方的目录智能体管理,客服逻辑由企业自身的客服智能体处理
实际应用场景
该模式可实现:
- 微服务架构:每个智能体均为独立服务
- 第三方集成:调用外部供应商提供的智能体(如产品目录、支付处理系统)
- 跨语言开发:产品目录智能体可采用 Java 开发,客服智能体可采用 Python 开发
- 团队专业化分工:供应商负责维护目录系统,企业团队负责维护客服智能体
- 跨组织协作:供应商在自有基础设施上部署目录服务,企业通过 A2A 协议完成集成
{% note warning %}
A2A 和 RPC 什么关系?
RPC 只关注怎么调用远端方法,A2A 关注两个agent怎么协作完成任务,所以 A2A 实际上包含着 RPC 的。
A2A 支持三种传输绑定
- JSON-RPC
- gRPC
- HTTP + JSON/REST
{% endnote %}