我们之前总结过如何在Gym定义标准化环境、修改模型架构、输出MLP层。
这次我们新拿到一个项目,就是做星际争霸的强化学习智能体。同样使用基于Gym环境训练。
Gymnasium 环境简介
https://gymnasium.farama.org/api/env/
Gymnasium 环境(Env)的核心标准 API 非常简洁,主要由 4 个核心函数 和 2 个核心属性 组成。这是所有强化学习任务交互的基础。
🧠 1. 核心交互函数
这些是你在训练循环(Training Loop)中必须调用的函数。
| 函数名 | 参数/说明 | 返回值 (Tuple) |
|---|---|---|
.reset() (重置环境) |
作用 :在每个回合(Episode)开始前调用,将环境恢复到初始状态。 参数 :seed (可选,用于复现实验结果), options (特定环境的额外参数)。 |
1. observation :初始环境状态(符合 observation_space 定义)。 2. info:辅助诊断信息(字典)。 |
.step(action) (执行动作) |
作用 :这是强化学习的核心。将 Agent 的动作(Action)传入环境,环境反馈下一步的状态和奖励。 参数 :action (Agent 选择的动作)。 |
1. observation :执行动作后的新环境状态。 2. reward :该动作获得的奖励(浮点数)。 3. terminated :布尔值。True 表示回合正常结束(如到达目标/坠毁)。 4. truncated :布尔值。True 表示回合被强制截断(如超时/出界)。 5. info:辅助诊断信息。 |
.render() (渲染画面) |
作用 :将环境的当前状态可视化。 注意 :在 gymnasium.make() 时需指定 render_mode(如 "human", "rgb_array")。 |
根据 render_mode 不同而不同: * "human":通常返回 None (直接在窗口显示)。 * "rgb_array":返回图像帧 np.ndarray。 * "ansi":返回文本字符串。 |
.close() (关闭环境) |
作用 :释放环境占用的资源(如关闭 Pygame 窗口、数据库连接等)。 建议:在脚本结束或训练完成后调用。 | None |
📏 2. 核心属性 (Spaces)
在编写代码前,你需要通过这两个属性来了解环境的输入输出规格:
-
.action_space- 含义:定义了 Agent 可以采取的所有合法动作的范围。
- 用途 :用于构建 Agent 的输出层。例如,如果是
Discrete(4),说明有 4 个离散动作(如 Lunar Lander 的 0, 1, 2, 3)。 - 常用方法 :
sample()(随机采样一个动作)。
-
.observation_space- 含义:定义了环境状态(观测值)的数据结构和范围。
- 用途 :用于构建 Agent 的输入层。例如,
Box(4,)表示一个包含 4 个浮点数的数组。 - 常用方法 :
sample()(随机采样一个观测值,常用于测试)。
🛠️ 3. 辅助属性与函数
.metadata:包含环境的元信息,比如支持的渲染模式 (render_modes) 和帧率 (render_fps)。.spec:环境的配置规格,通常在通过gymnasium.make()创建时生成。.np_random:环境内部的随机数生成器,用于保证实验的可复现性 (Reproducibility)。
📝 总结代码模板
一个标准的 自定义环境类 模板长这样:
https://stable-baselines3.readthedocs.io/en/master/guide/custom_env.html
python
import gymnasium as gym
import numpy as np
from gymnasium import spaces


class CustomEnv(gym.Env):
    """Custom Environment that follows gym interface."""

    metadata = {"render_modes": ["human"], "render_fps": 30}

    def __init__(self, arg1, arg2, ...):
        super().__init__()
        # Define action and observation space
        # They must be gym.spaces objects
        # Example when using discrete actions:
        self.action_space = spaces.Discrete(N_DISCRETE_ACTIONS)
        # Example for using image as input (channel-first; channel-last also works):
        self.observation_space = spaces.Box(low=0, high=255,
                                            shape=(N_CHANNELS, HEIGHT, WIDTH), dtype=np.uint8)

    def step(self, action):
        ...
        return observation, reward, terminated, truncated, info

    def reset(self, seed=None, options=None):
        ...
        return observation, info

    def render(self):
        ...

    def close(self):
        ...
主脚本【上位机】
初始化函数编写
因此下面步骤
正常导入Gymnasium
python
import numpy as np
import gymnasium as gym
然后编写环境类,前面提到,环境类需要我们自定义四个函数,reset()、render()、step()、close()
python
def __init__(self, arg1, arg2, ...):
        super().__init__()
        # Define action and observation space
        # They must be gym.spaces objects
        # Example when using discrete actions:
        self.action_space = spaces.Discrete(N_DISCRETE_ACTIONS)
        # Example for using image as input (channel-first; channel-last also works):
        self.observation_space = spaces.Box(low=0, high=255,
                                            shape=(N_CHANNELS, HEIGHT, WIDTH), dtype=np.uint8)
模板给的第一个是__init__函数,需要定义动作空间和观测空间。
我们先预定观测空间的244X244的RGB彩图,动作空间为离散的6个。
python
    def __init__(self):
        super(StarCraft2Env,self).__init__()
        self.observation_space=gym.spaces.Box(low=0,high=255,shape=(244,244,3),dtype=np.uint8)
        self.action_space=gym.spaces.Discrete(6)
reset函数的编写
确定好动作和观测空间后就可以开始写reset函数了:
python
map=np.zeros((224,224,3),dtype=np.uint8)所以我们先编写reset,按照模板,需要返回observation、info
那Agent如何获取这个环境并与之交互呢?
我们可以将状态保存在一个transaction的文件中,Agent可以通过这个文件与环境交互。
要使用文件操作系统,就需要导入pickle库
python
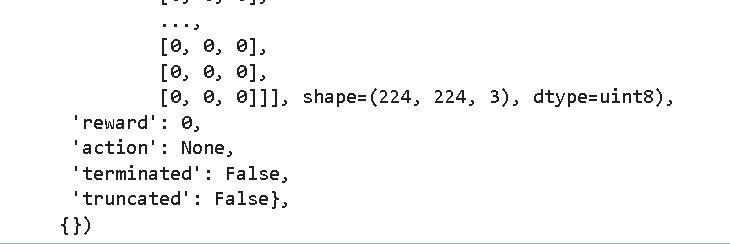
import pickletransaction={'observation':map,'reward':0,'action':None,'terminated':False,'truncated':False}包含当前的状态、奖励、动作、终止情况
python
    def reset(self):
        print('reset the Env')
        map=np.zeros((224,224,3),dtype=np.uint8)
        observation=map
        transaction={'observation':map,'reward':0,'action':None,'terminated':False,'truncated':False}

        with open('transaction.pkl','wb') as f:
            pickle.dump(transaction,f)
        info={}
        return observation,info
创建环境
python
sc2=StarCraft2Env()执行reset
python
sc2.reset()可以看到文件夹出现了pkl文件,同时输出了transaction的内容。

step函数的编写
输入是action,输出observation\reward\terminated\truncated\info
这个action需要上一节课用的sc2库实现,我们只需要将Action写入transaction.pkl中,然后由模型读取其中的action便可以执行当前传入的指令。
调用流程就是:创建智能体类后,创建智能体实例,由智能体决定当前的步骤,然后调用环境类的step函数,调用后会将智能体选择的动作存入transaction.pkl,然后API通过读取文件来执行动作
而这个过程是持续的,要用while True持续读取写入
python
    def step(self,action):
        while True:

            try:
                with open('transaction.pkl','rb') as f:#先读
                    transaction=pickle.load(f)
                if transaction['action'] is None:#如果没有记录
                    transaction['action']=action
                    with open('transaction','wb') as f:
                        pickle.dump(transaction,f)
                    break

            except Except as e:
                time.sleep(0.1)
                pass
测试:
测试是否能正常写入,运行step函数:
python
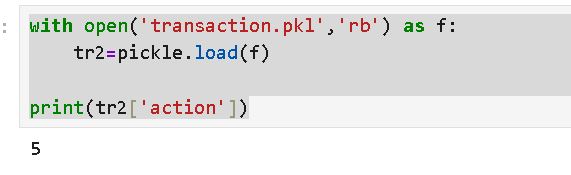
sc2.step(5)然后打开transaction.pkl文件,看看能否读取出来是5
python
with open('transaction.pkl','rb') as f:
    tr2=pickle.load(f)

print(tr2['action'])
没毛病
操作脚本【下位机】
创建一个jupyter新文件,虚拟环境要和上位机一致,一定要一致!!!!!!!!
下位机是具体来执行"上位机"大脑得出的action的,因为我们可以借用上一节课的部分内容,首先引入依赖库:
python
from sc2 import maps
from sc2.player import Bot, Computer
from sc2.main import run_game
from sc2.data import Race, Difficulty
from sc2.bot_ai import BotAI
import pickle
import time
import random
import numpy as np
python
import os
os.environ['KMP_DUPLICATE_LIB_OK']='True'
import nest_asyncio
nest_asyncio.apply()
我们需要一个"下位机",接收上位机的action后能执行对应动作,并将环境和结果返回给"上位机"。刚刚讲过,上下位机交互的枢纽就是transaction.pkl
在on_step函数中,我们如果读取到transaction.pkl的'action'栏有值,就执行函数,执行完毕后,写入None,这样上位机在读取到'action'是None后,就会知道下位机成功执行了,那么他就可以写下一次要执行的动作了。
python
class WorkerRushBot(BotAI):
async def on_step(self, iteration: int):
while True:
try:
with open('transaction.pkl','rb') as f:#先读
transaction=pickle.load(f)
if transaction['action'] is not None:#如果有记录
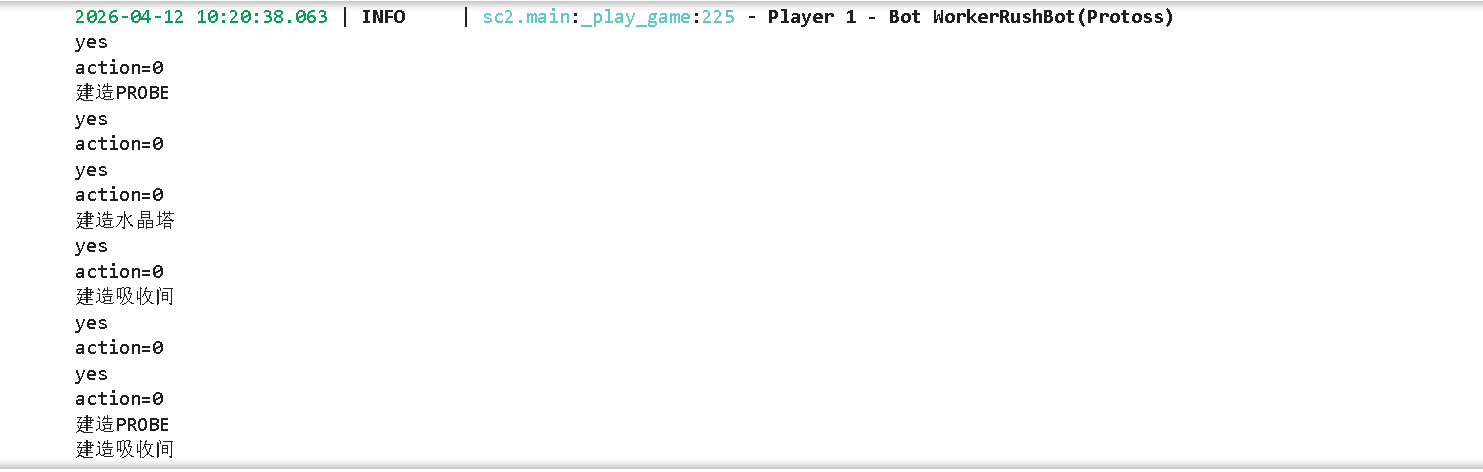
print('yes')
break
except Exception as e:
time.sleep(0.1)
pass
action=transaction['action']
print(f'iteration:{iteration}')
await self.distribute_workers()
if action==0:
print(f'action={action}')
pass
if action==1:
print(f'action={action}')
pass
if action==2:
print(f'action={action}')
pass
if action==3:
print(f'action={action}')
pass
if action==4:
print(f'action={action}')
pass
if action==5:
print(f'action={action}')
pass
transaction['action']=None
with open('transaction.pkl','wb') as f:
pickle.dump(transaction,f)
测试:
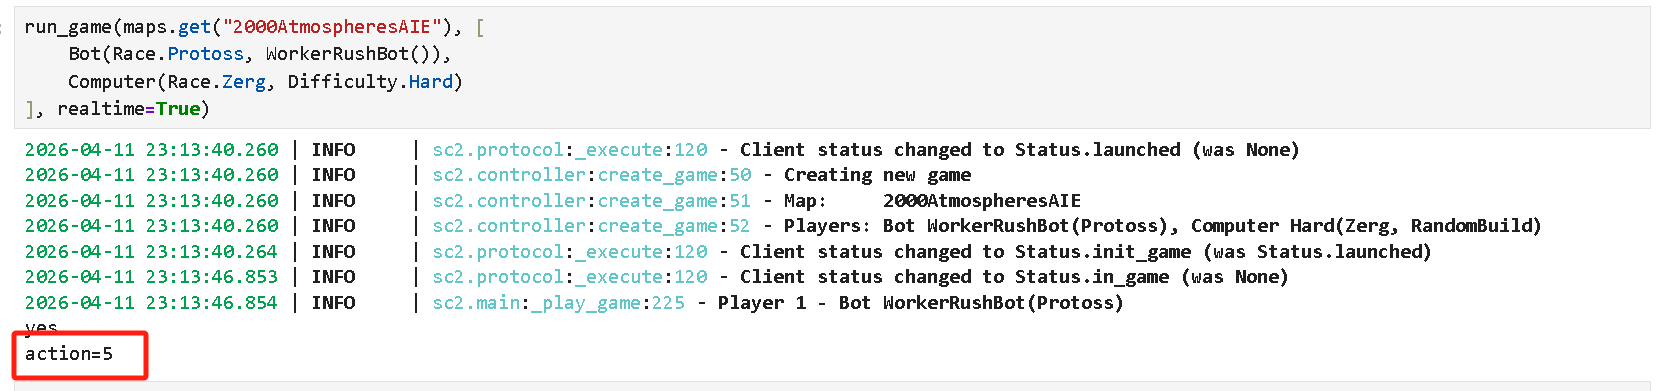
首先在上位机(一个jupyter页面)运行sc2.step(5),然后在下位机(另一个jupyter页面),
运行游戏,测试一下是否有动作输出:
python
run_game(maps.get("2000AtmospheresAIE"), [
    Bot(Race.Protoss, WorkerRushBot()),
    Computer(Race.Zerg, Difficulty.Hard)
], realtime=True)
有的兄弟有的。
然后现在已经执行了这个动作了,那么按理来说,应该下位机已经写入None了,我们读取再看看,没毛病:
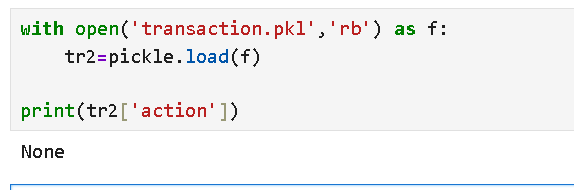
说明这种通过transaction.pkl来传输动作指令的方式是可行的。
编写动作
我们使用粗粒度控制,把「人类玩家的运营经验」写死成代码,AI 只需要学「什么时候该运营」,不用学「怎么运营」
这极大降低 RL 学习难度,适合学生项目 / 入门实验,避免 AI 学不会基础运营导致崩盘
第一个动作:【基础建筑建设】
扩展人口、训练探机、吸收间、水晶塔
我们希望
1. 互斥执行(have_builded 标记)
- 一帧只做一件事:补水晶塔 → 补农民 → 造气矿 → 开矿,按优先级依次执行
- 避免一帧同时造多个建筑,导致资源瞬间耗尽、卡人口、卡操作
2. 优先级逻辑完全符合星际 2 运营常识
- 防卡人口第一:永远先补水晶塔,避免人口满了造不了兵 / 农民
- worker满采第二:单矿 22 农民是经济基础,先保证采矿效率
- 气矿第三:有多余资源再建吸收间,为后续科技 / 兵种做准备
- 开矿最后:只有经济饱和了才扩张,避免乱开矿拖垮经济
建造逻辑和上一讲用决策树实现是基本一致的,都是先看是否负担得起,是否当前有在建造中的,然后建在哪里,然后一行build()调用就完事了。
我们通过have_build变量来控制确保每一帧只执行一个建设任务。
吸收间的建造要注意,不能使用上面的逻辑,必须参考官方的代码样例,这个上一节讲过了。
python
        if action==0:
            print(f'action={action}')
            have_builded = False  # 标记:本帧是否执行了建造/训练操作

            # 1. 优先补水晶塔(防卡人口)
            if self.supply_left < 4:
                if self.can_afford(UnitTypeId.PYLON) and self.already_pending(UnitTypeId.PYLON) == 0:
                    # 先判断:必须有基地才造
                    if self.townhalls.exists:
                        await self.build(UnitTypeId.PYLON, near=self.townhalls.first)
                        have_builded = True
                        #print('建造水晶塔')

            # 2. 如果没补水晶塔,就执行探机/吸收间/开矿
            if not have_builded:
                for nexus in self.townhalls:
                    # 2.1 补探机(保证基地满采)
                    workers_count = len(self.workers.closer_than(10, nexus))
                    if workers_count < 22:
                        if self.can_afford(UnitTypeId.PROBE) and nexus.is_idle:
                            nexus.train(UnitTypeId.PROBE)
                            have_builded = True
                            print('建造PROBE')

                    # 2.2 建吸收间(采气)
                    for vespene in self.vespene_geyser.closer_than(15, nexus):
                        if self.can_afford(UnitTypeId.ASSIMILATOR):
                            worker = self.select_build_worker(vespene.position)
                            if worker is not None:
                                # 神族造气矿 官方唯一正确方法
                                worker.build_gas(vespene)
                                worker.stop(queue=True)
                                have_builded=False
                                print('建造吸收间')

            # 3. 如果前面都没执行,就开分矿(扩张)
            if not have_builded:
                if self.can_afford(UnitTypeId.NEXUS) and self.already_pending(UnitTypeId.NEXUS) == 0:
                    await self.expand_now()
                    print('建造新基地')
我们测试一下,首先在下位机的jupyter页面中运行
python
run_game(maps.get("2000AtmospheresAIE"), [
    Bot(Race.Protoss, WorkerRushBot()),
    Computer(Race.Zerg, Difficulty.Hard)
], realtime=False)
然后回到上位机的jupyter页面中运行
python
sc2=StarCraft2Env()
sc2.reset()
多执行几次:
python
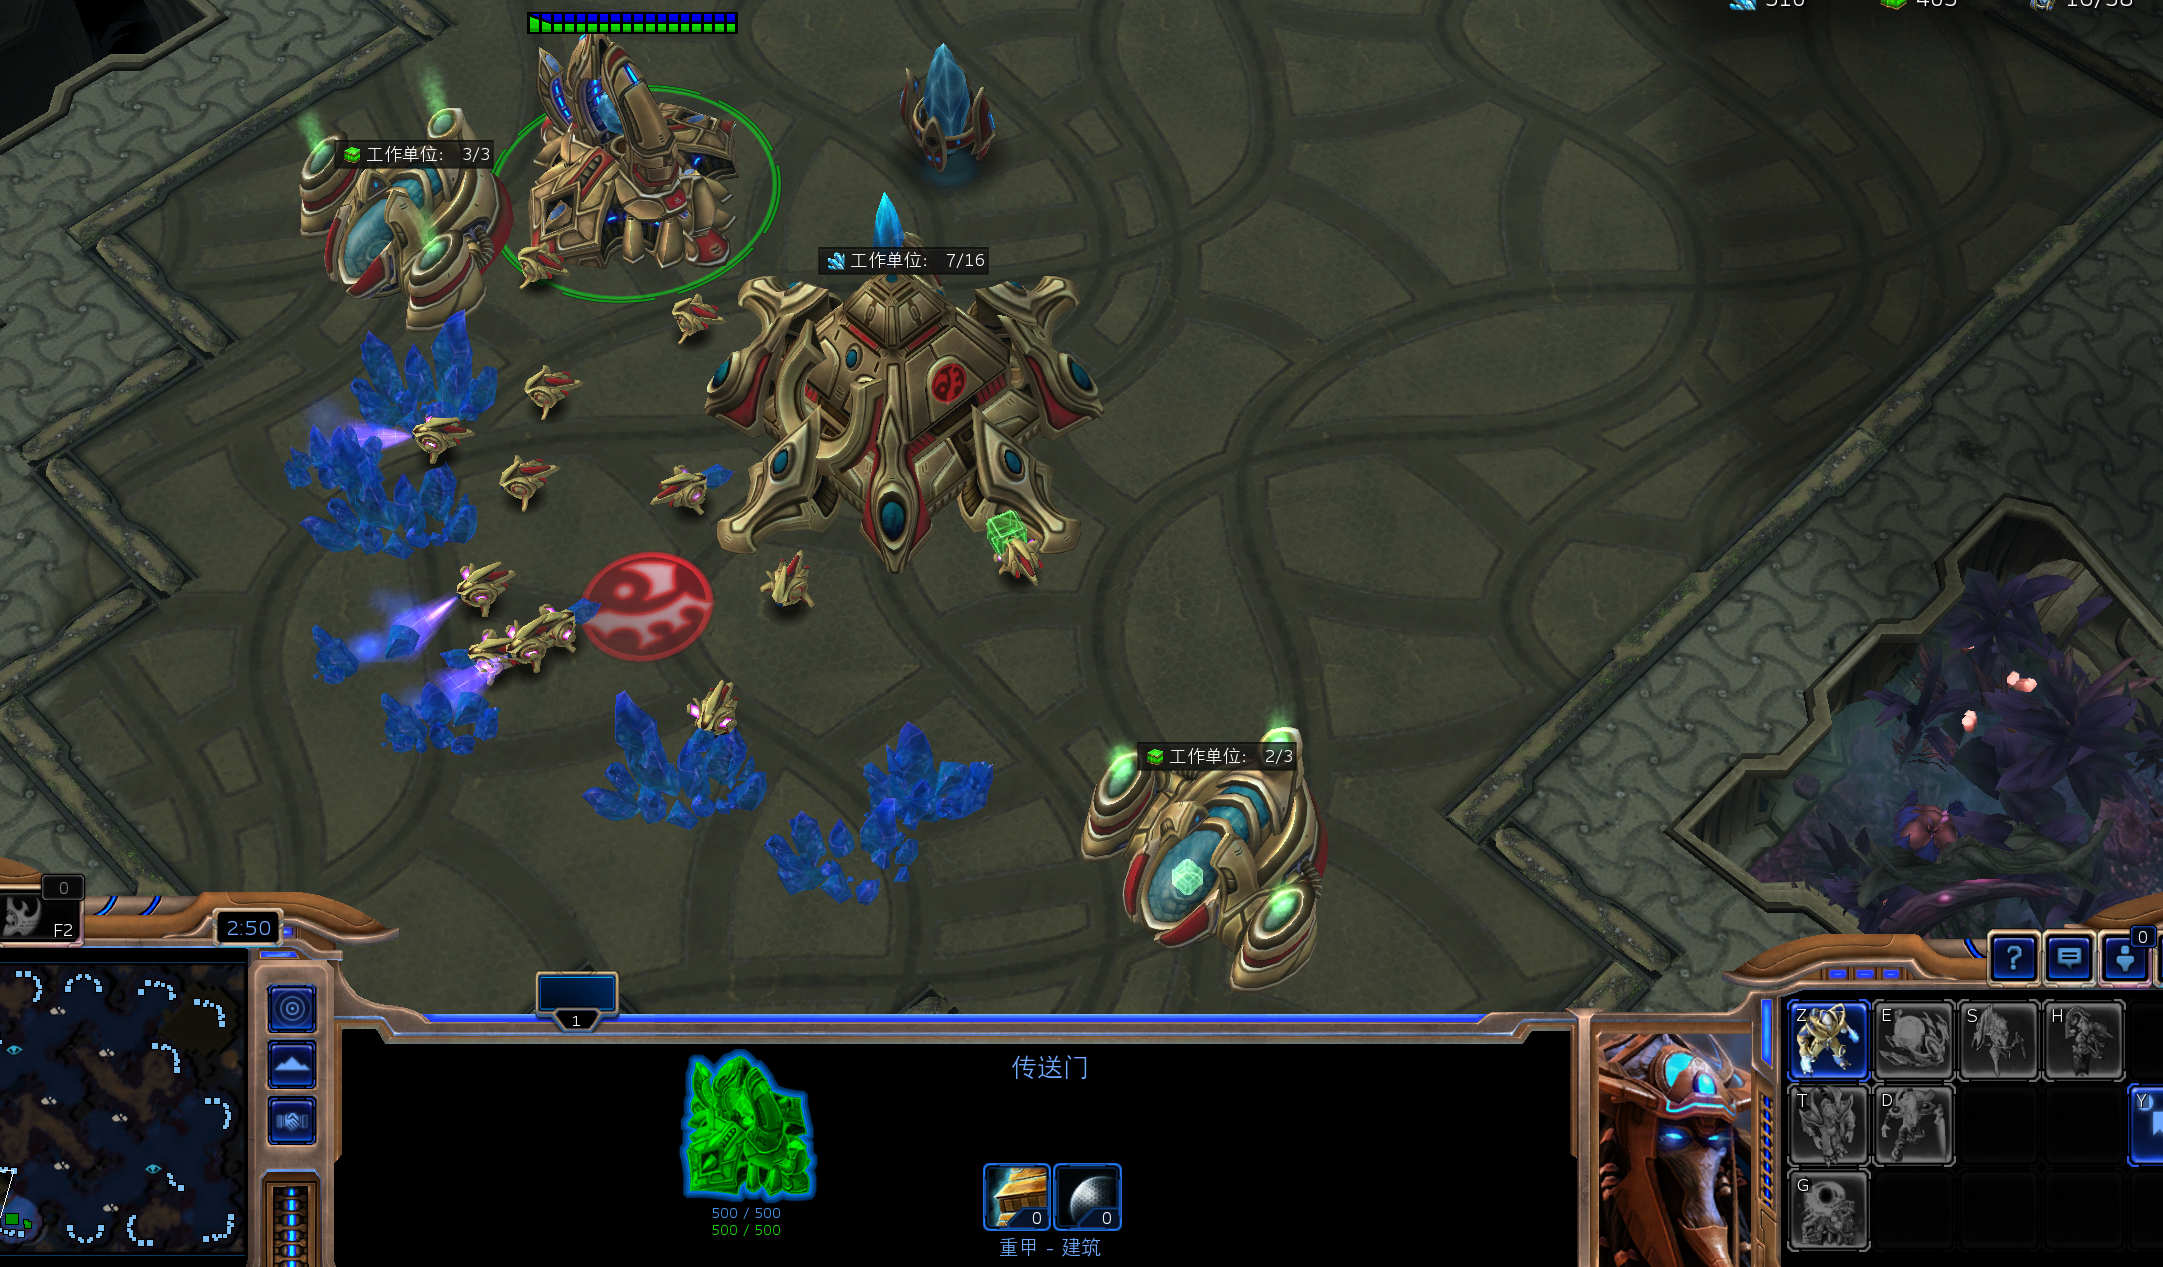
sc2.step(0)将上位机的动作传给下位机,然后就能在下位机的jupyter输出看到下面信息,说明建设在有序进行中。
第二个动作:【科技发展】
建设传送门、建设控制核心、建设星门
逻辑和第一个动作一模一样,互斥执行(通过hvae_build实现),优先级参考官方文档得知先建设传送门、再建设控制核心、最后建设星门。这么做的目的是为了一会用星门跃迁虚空战舰过来作为进攻单位。
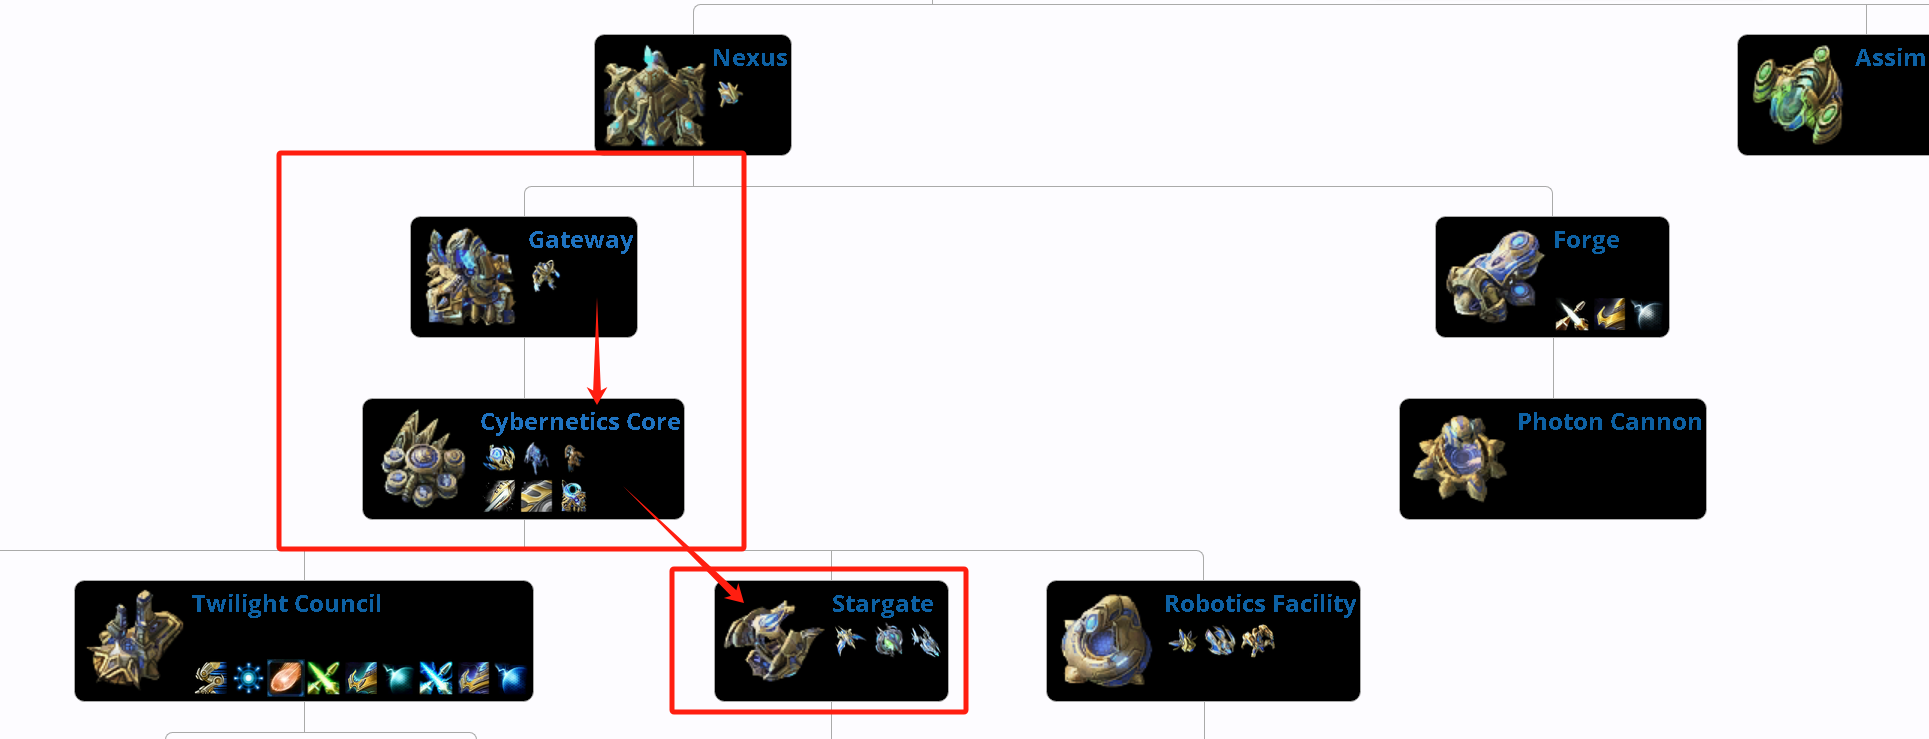
要给每个基地都建设,因此for一下。
python
        if action==1:
            #1:传送门、控制核心、星门
            print(f'action={action}')
            have_builded = False  # 标记:本帧是否执行了建造/训练操作

            for nexus in self.townhalls:  # 遍历所有基地(主矿+分矿)
                #传送门
                if not have_builded:
                    if not self.structures(UnitTypeId.GATEWAY).closer_than(10,nexus).exists:
                        if self.can_afford(UnitTypeId.GATEWAY) and self.already_pending(UnitTypeId.GATEWAY)==0:
                            await self.build(UnitTypeId.GATEWAY,near=nexus)
                            print('建设传送门')
                            have_builded = True

                #控制核心
                if not have_builded:
                    if not self.structures(UnitTypeId.CYBERNETICSCORE).closer_than(10,nexus).exists:
                        if self.can_afford(UnitTypeId.CYBERNETICSCORE) and self.already_pending(UnitTypeId.CYBERNETICSCORE)==0:
                            await self.build(UnitTypeId.CYBERNETICSCORE,near=nexus)
                            print('建设控制核心')
                            have_builded = True

                #星门
                if not have_builded:
                    if not self.structures(UnitTypeId.STARGATE).closer_than(10,nexus).exists:
                        if self.can_afford(UnitTypeId.STARGATE) and self.already_pending(UnitTypeId.STARGATE)==0:
                            await self.build(UnitTypeId.STARGATE,near=nexus)
                            print('建设星门')
                            have_builded = True
测试一下:
我们测试一下,首先在下位机的jupyter页面中运行
python
run_game(maps.get("2000AtmospheresAIE"), [
    Bot(Race.Protoss, WorkerRushBot()),
    Computer(Race.Zerg, Difficulty.Hard)
], realtime=False)
然后回到上位机的jupyter页面中运行
python
sc2=StarCraft2Env()
sc2.reset()
多执行几次:
python
sc2.step(0)有气有矿了再执行:
python
sc2.step(1)轮流执行多次比如这样:
将上位机的动作传给下位机,然后就能在下位机的jupyter输出看到下面信息,说明建设在有序进行中。
可以看到,三个建筑都被建造出来了.
老师讲到这里就没往后讲了,但是在之后的实践就会发现,这样存在一个问题,就是如果在主基地10格以内修建了星门,就不会再修建其他星门了,这导致训练虚空战舰的效率奇低,容易在虫族第一波暴兵就被平推了。
我们稍微修改一下逻辑
python
if action==1:
# 1:传送门、控制核心、星门
have_build = False # 正确拼写
# 全局最多造 4 个星门(暴兵效率最大化)
max_stargates = 4
current_stargates = self.structures(UnitTypeId.STARGATE).amount
for nexus in self.townhalls:
# 每个基地都造传送门
if not have_build:
if not self.structures(UnitTypeId.GATEWAY).closer_than(10, nexus).exists:
if self.can_afford(UnitTypeId.GATEWAY) and self.already_pending(UnitTypeId.GATEWAY) == 0:
await self.build(UnitTypeId.GATEWAY, near=nexus)
have_build = True # 正确拼写
# 每个基地都造控制核心
if not have_build:
if not self.structures(UnitTypeId.CYBERNETICSCORE).closer_than(10, nexus).exists:
if self.can_afford(UnitTypeId.CYBERNETICSCORE) and self.already_pending(UnitTypeId.CYBERNETICSCORE) == 0:
await self.build(UnitTypeId.CYBERNETICSCORE, near=nexus)
have_build = True
# ✅ 关键修复:允许造多个星门,直到 4 个
if not have_build:
if current_stargates < max_stargates: # 不限制"是否已有",只限制总数
if self.can_afford(UnitTypeId.STARGATE) and self.already_pending(UnitTypeId.STARGATE) == 0:
await self.build(UnitTypeId.STARGATE, near=nexus)
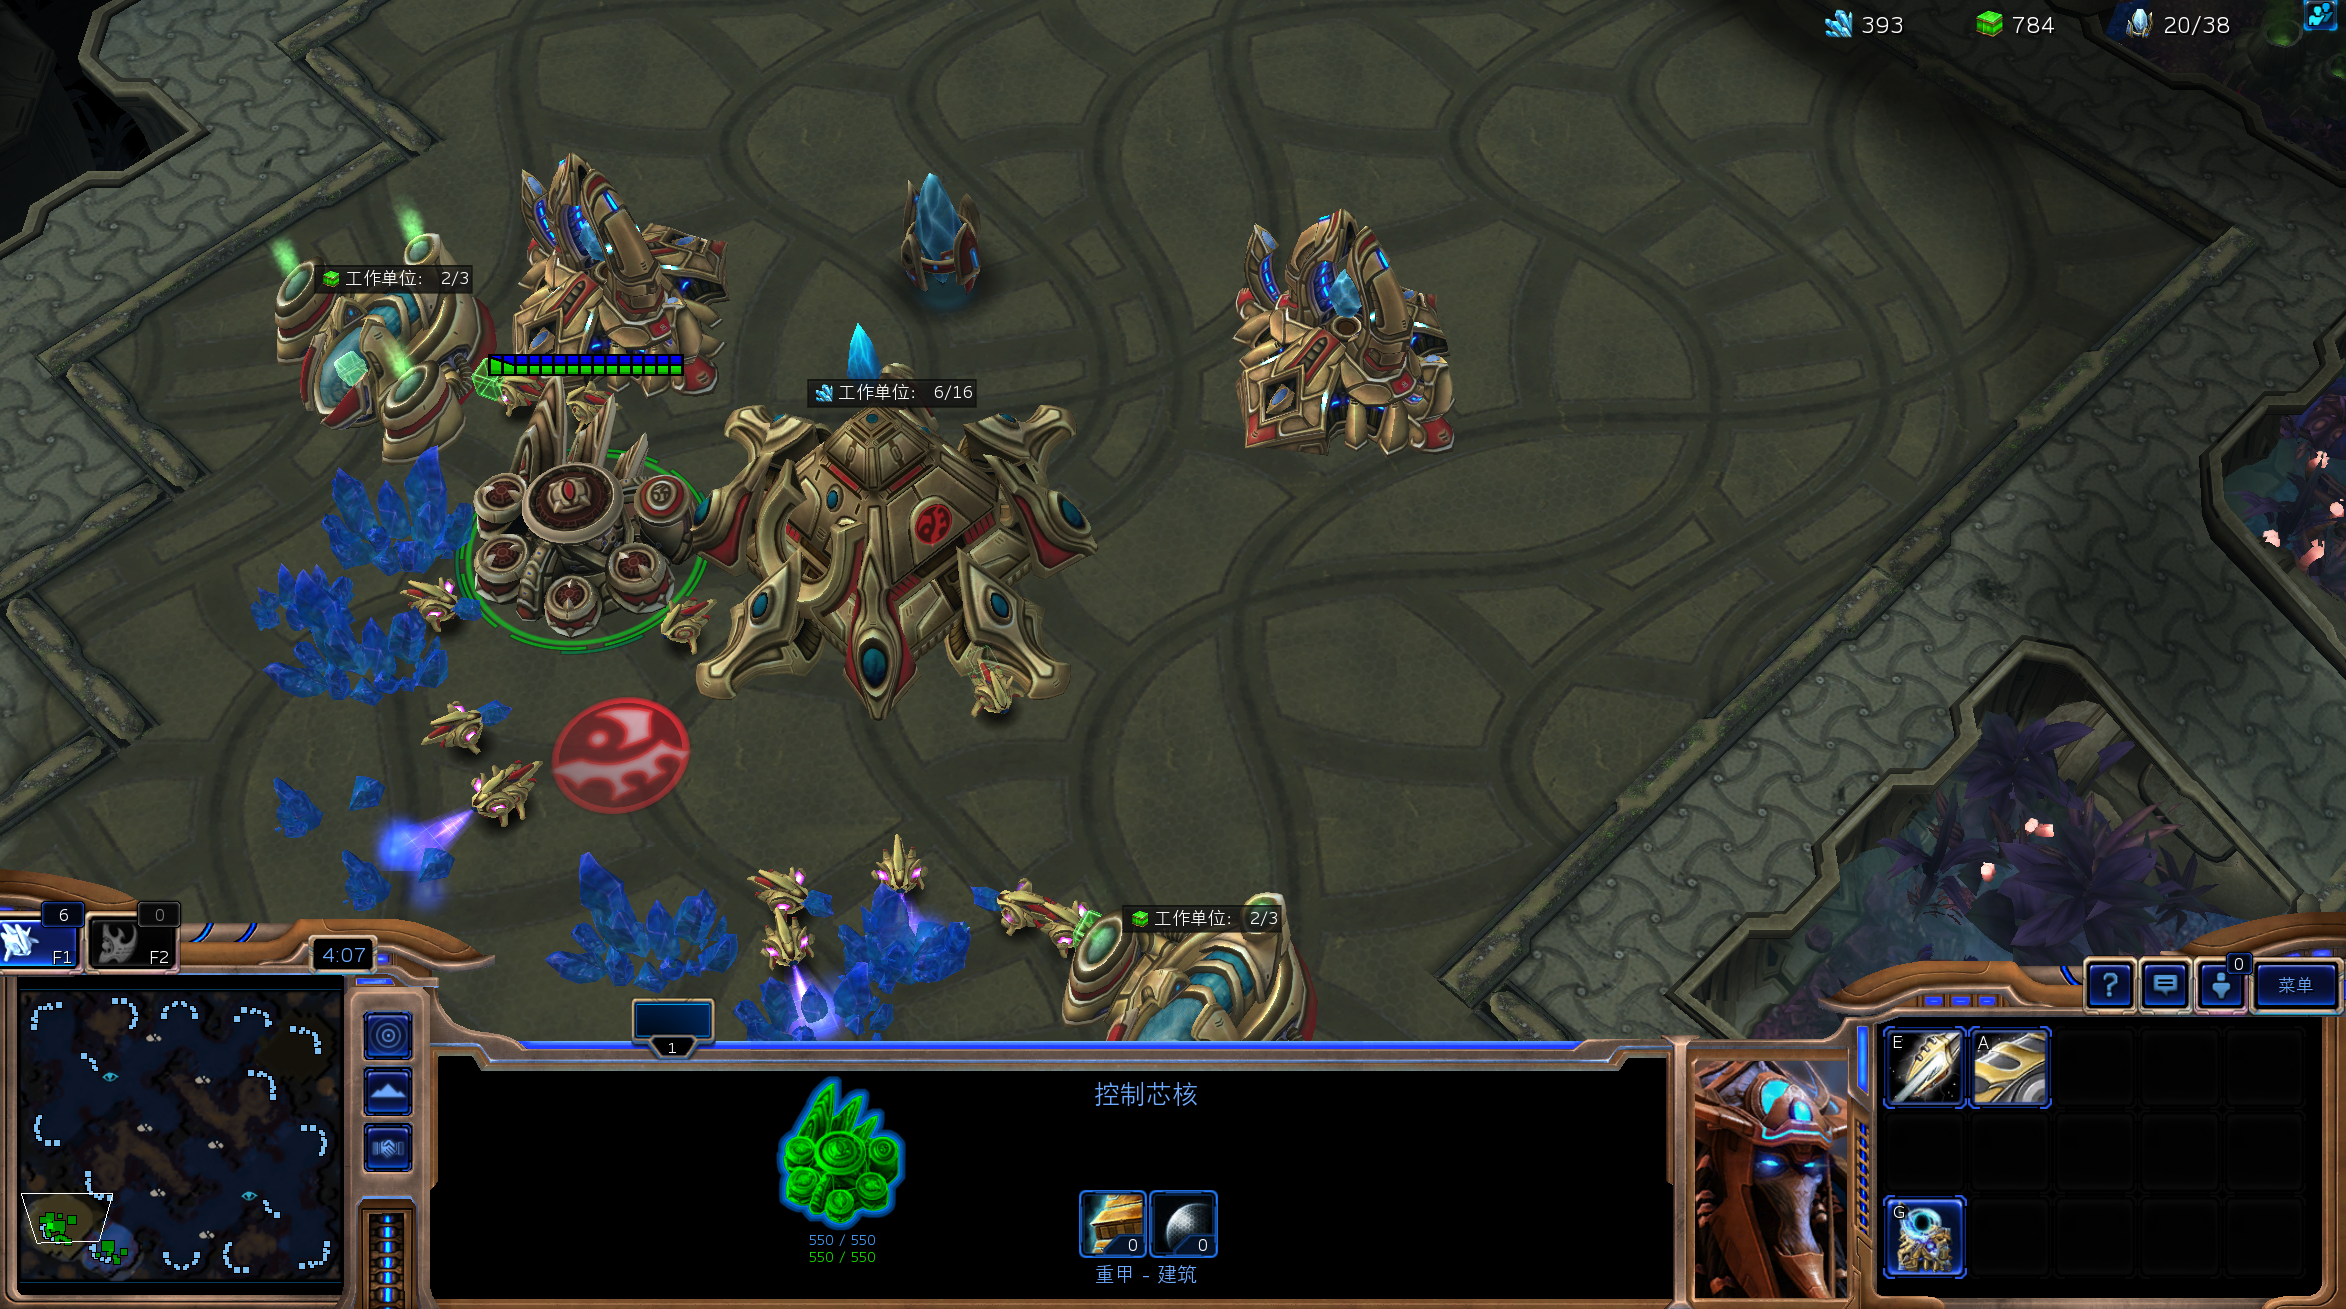
have_build = True第三个动作:进攻单位建造
训练虚空战舰
我们有了星门后就可以折跃虚空战舰了。
遍历所有的已经建成且空闲的星门,如果负担得起就建造星舰。
python
        if action==2:
            print(f'action={action}')
            #2:虚空辉光舰
            try:
                # 遍历所有【已建成、空闲】的星门
                for sg in self.structures(UnitTypeId.STARGATE).ready.idle:
                    # 如果钱够造虚空辉光舰
                    if self.can_afford(UnitTypeId.VOIDRAY):
                        # 让星门训练虚空辉光舰
                        sg.train(UnitTypeId.VOIDRAY)
                        print('训练虚空战舰')
            except Exception as e:
                print(e)
测试一下:
我们测试一下,首先在下位机的jupyter页面中运行
python
run_game(maps.get("2000AtmospheresAIE"), [
    Bot(Race.Protoss, WorkerRushBot()),
    Computer(Race.Zerg, Difficulty.Hard)
], realtime=False)
然后回到上位机的jupyter页面中运行
python
sc2=StarCraft2Env()
sc2.reset()
直接写for来自动调用动作吧:
python
for i in range(400):
    sc2.step(0)
    sc2.step(1)
    sc2.step(2)
一段时间后,三个科技建筑就造好了,而且成功训练出了虚空战舰。
第四个动作:【侦察】
- 每隔约 100 帧(约 4-5 秒,按 24FPS 计算),派出一个探机
- 优先派空闲探机,没有就随机派一个
- 让探机前往敌人出生点,获取敌人的运营、兵力信息
- 用
try-except兜底,避免探机不足、敌人位置不存在时崩溃
python
        if action==3:
            print(f'action={action}')
            #3:侦查
            # 1. 初始化 last_sent 时间戳(防止第一次运行报错)
            try:
                self.last_sent
            except:
                self.last_sent = 0

            # 2. 控制侦查频率:距离上次侦查超过100帧才执行
            if (iteration - self.last_sent) > 100:
                try:
                    # 3. 优先选择空闲的探机
                    if self.units(UnitTypeId.PROBE).idle.exists:
                        probe = random.choice(self.units(UnitTypeId.PROBE).idle)
                    # 4. 没有空闲探机,就随机选一个探机
                    else:
                        probe = random.choice(self.units(UnitTypeId.PROBE))

                    # 5. 命令探机攻击/移动到敌人出生点
                    probe.attack(self.enemy_start_locations[0])
                    # 6. 更新最后一次侦查的帧号
                    self.last_sent = iteration
                    print('侦查')
                except:
                    pass
测试一下:
这次使用加速,就需要修改读写逻辑,否则IO会大量占用时间(之前是直接whileTrue)。
对于上位机,关键是要等待下位机【清空action】后再写入,如果open没有action,就直接break出第一个while,然后在第二个while中一直等待下位机清空action。
python
    def step(self,action):
        while True:

            try:
                with open('transaction.pkl','rb') as f:#先读
                    transaction=pickle.load(f)
                if transaction['action'] is None:#如果没有记录
                    transaction['action']=action
                    with open('transaction.pkl','wb') as f:
                        pickle.dump(transaction,f)
                    break
            except Exception as e:
                time.sleep(0.05)


        while True:
            try:
                with open('transaction.pkl', 'rb') as f:
                    transaction = pickle.load(f)
                if transaction['action'] is None:
                    break
            except:
                time.sleep(0.05)


    def reset(self):
        #DEFAULT
对于下位机,需要再WorkerRushBot的on_step函数的读取位置做修改:
python
class WorkerRushBot(BotAI):
    async def on_step(self, iteration: int):
        try:
            with open('transaction.pkl', 'rb') as f:
                transaction = pickle.load(f)
        except:
            return

        action = transaction['action']
        if action is None:
            return  # 没有动作,直接跳过

        action=transaction['action']
        print(f'迭代次数:{iteration}')
        await self.distribute_workers()
        if action==0:
我们测试一下,首先在下位机的jupyter页面中运行(这次realtime改为False加速)
python
run_game(maps.get("2000AtmospheresAIE"), [
    Bot(Race.Protoss, WorkerRushBot()),
    Computer(Race.Zerg, Difficulty.Hard)
], realtime=False)
然后回到上位机的jupyter页面中运行
python
sc2=StarCraft2Env()
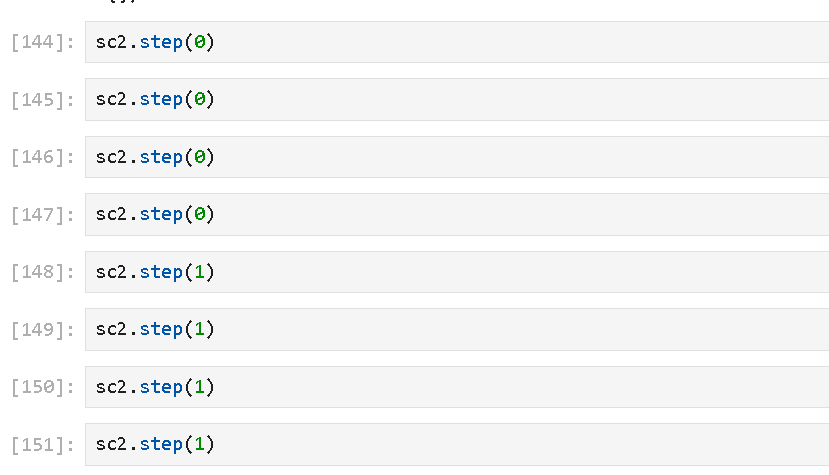
sc2.reset()我们不能每一帧发一个action了,我们设定0.2秒发一个指令:
python
for i in range(1500):
    sc2.step(0)
    time.sleep(0.2)
    sc2.step(1)
    time.sleep(0.2)
    sc2.step(2)
    time.sleep(0.2)
    sc2.step(3)
可以看到我们的PROBE正源源不断往地方基地探查。

第五个动作:进攻
使用虚空星舰进攻
参考之前决策树的代码,直接抄过来即可。
优先级是敌人单位-敌方建筑-敌方出生点
python
#4:进攻
elif action == 4:
    print(f'action={action}')
    try:
        for voidray in self.units(UnitTypeId.VOIDRAY).idle:
            # 优先级1:身边10格内有敌人单位 → 随机选一个攻击
            if self.enemy_units.closer_than(10, voidray):
                voidray.attack(random.choice(self.enemy_units.closer_than(10, voidray)))
            # 优先级2:身边10格内有敌人建筑 → 随机选一个攻击
            elif self.enemy_structures.closer_than(10, voidray):
                voidray.attack(random.choice(self.enemy_structures.closer_than(10, voidray)))
            # 优先级3:地图上有敌人单位 → 随机选一个攻击(A地板)
            elif self.enemy_units:
                voidray.attack(random.choice(self.enemy_units))
            # 优先级4:地图上有敌人建筑 → 随机选一个攻击(拆家)
            elif self.enemy_structures:
                voidray.attack(random.choice(self.enemy_structures))
            # 优先级5:找不到敌人 → 去敌人出生点
            elif self.enemy_start_locations:
                voidray.attack(self.enemy_start_locations[0])
        print('虚空辉光舰进攻')
    except Exception as e:
        print(e)
第六个动作:撤退
全体都有撤回出生点
这里用attack是在撤退途中仍然自动攻击敌人。
python
#5:撤退
elif action == 5:
    print(f'action={action}')
    try:
        if self.units(UnitTypeId.VOIDRAY).amount > 0:
            for voidray in self.units(UnitTypeId.VOIDRAY):
                voidray.attack(self.start_location)
        print('撤退')
    except Exception as e:
        print(e)
测试一下:
我们测试一下,在下位机运行:
python
run_game(maps.get("2000AtmospheresAIE"), [
    Bot(Race.Protoss, WorkerRushBot()),
    Computer(Race.Zerg, Difficulty.Hard)
], realtime=False)
然后回到上位机的jupyter页面中运行
python
sc2=StarCraft2Env()
sc2.reset()
我们不能每一帧发一个action了,我们设定0.2秒发一个指令:
python
for i in range(200):
    sc2.step(0)
    time.sleep(0.2)
    sc2.step(1)
    time.sleep(0.2)
    sc2.step(2)
    time.sleep(0.2)
    sc2.step(3)
    time.sleep(0.2)
    sc2.step(4)
然后等战舰出发后可以测试是否能正常撤退:
python
for i in range(200):
    sc2.step(5)
    time.sleep(0.2)
可以看到我们的战舰已经组织了一波冲锋。
当有敌人从侧翼绕后,我们也能撤退保家
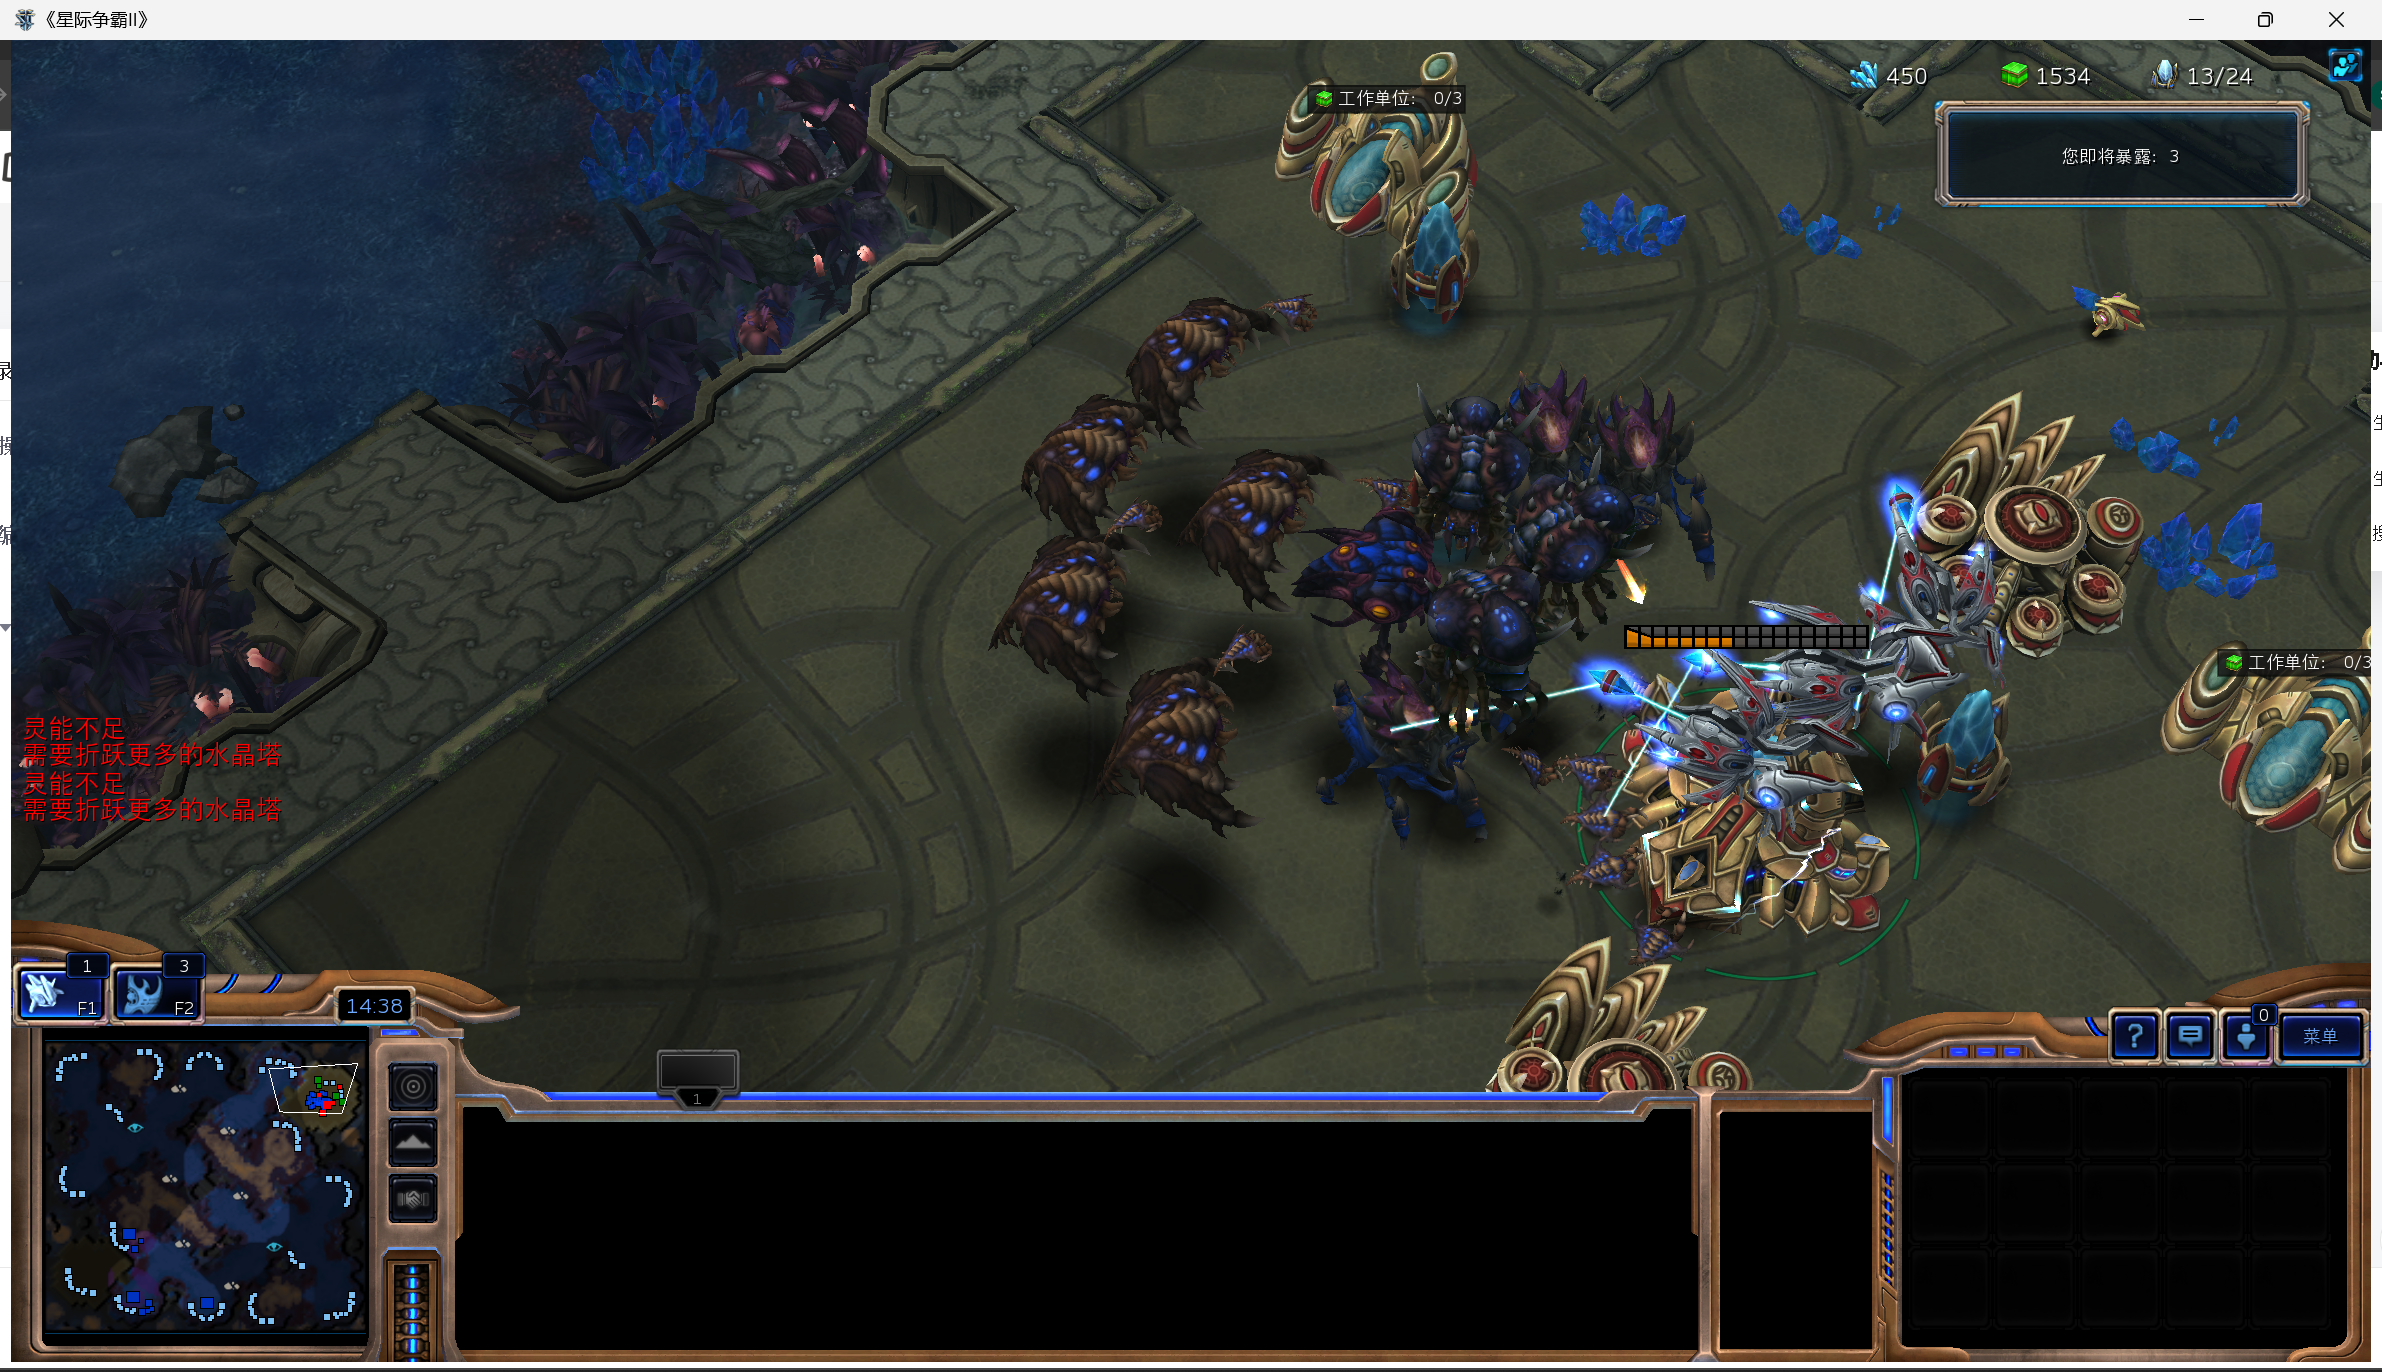
第七个动作:防御
建设熔炉和光子炮
老师讲到这里就不讲了,但是其实防御也是很重要的一部分,经过平均测试,有这个动作的Agent胜率较没有这个动作的高28%左右。
一般的核心逻辑是:极限爆Probe → 铺水晶塔推进 → 造熔炉 → 堆光子炮 → 冲脸,专门用来打前期快攻。
在这个网址可以看到建筑树
https://liquipedia.net/starcraft2/Protoss_Units_(Legacy_of_the_Void)
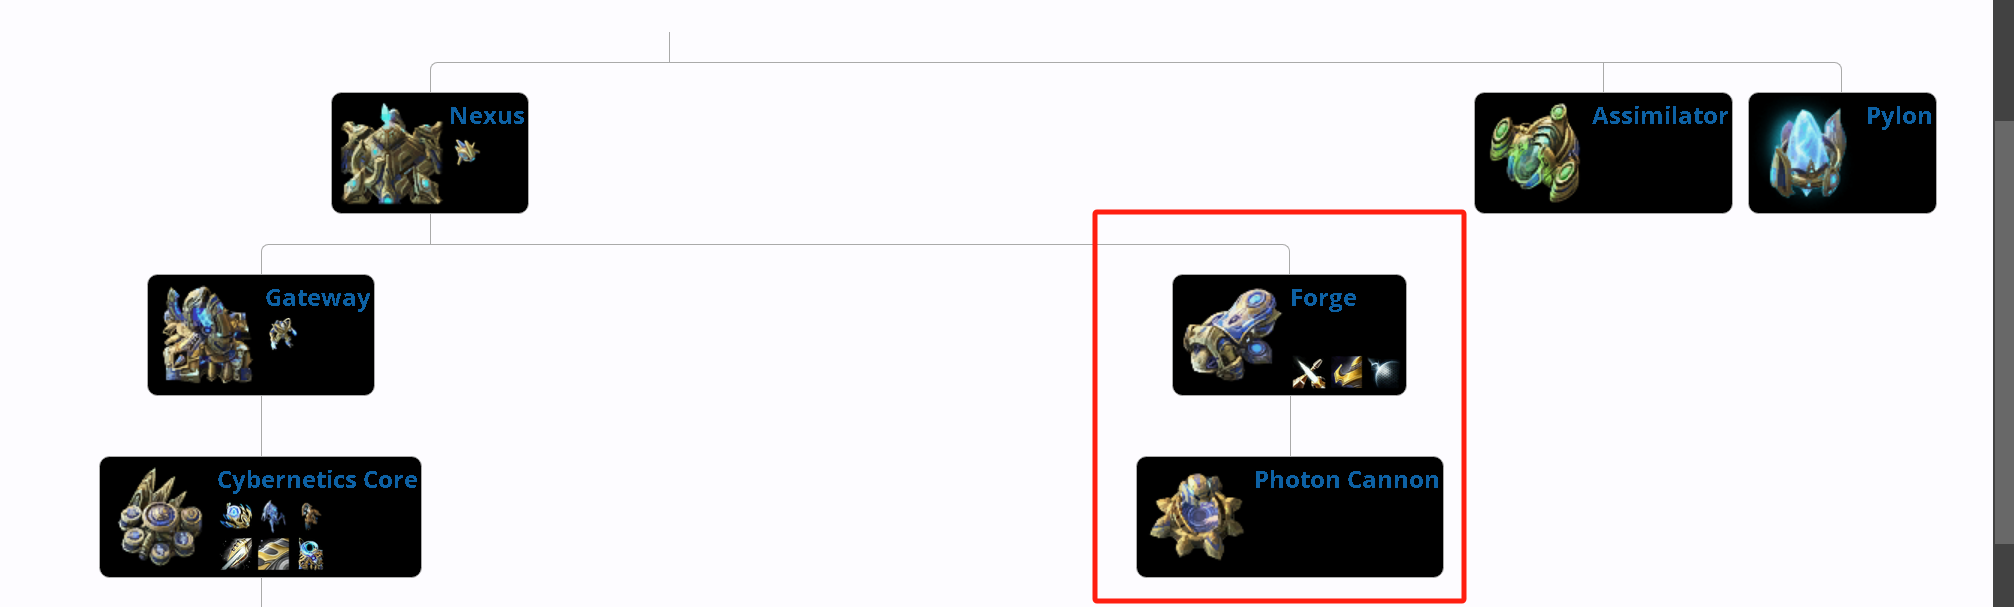
如果我们要构建光子炮,就需要修熔炉。
依然是判断是否有建造过/被摧毁,如果没有就看看能否造的起,然后选择合适的位置
熔炉我们选择靠大本营的第一座水晶塔建
near=self.structures(UnitTypeId.PYLON).closest_to(nexus))
python
            # 🔵 优先级4:造熔炉(Forge)
            elif not self.structures(UnitTypeId.FORGE):
                if self.can_afford(UnitTypeId.FORGE):
                    # 造在离主基地最近的水晶塔旁边(保证供电)
                    await self.build(UnitTypeId.FORGE, near=self.structures(UnitTypeId.PYLON).closest_to(nexus))
然后建造光子炮,要额外判断一下是否存在熔炉,然后也建在主基地附近
near=nexus
python
            # 🟠 优先级5:造光子炮(Photon Cannon,最多3个)
            elif self.structures(UnitTypeId.FORGE).ready and self.structures(UnitTypeId.PHOTONCANNON).amount < 3:
                if self.can_afford(UnitTypeId.PHOTONCANNON):
                    await self.build(UnitTypeId.PHOTONCANNON, near=nexus)  # 造在主基地附近防守/推进
画图
接下来,我们需要将战况通过图像返回给Agent,游戏的图像太乱了,特征是局部的,因此要根据已知的信息,绘制一张简化的新图发给上位机,作为observation。
先导入math、cv2绘图
python
import math
import cv2
基础资源点绘制
矿区绘制
我们规定已探明矿区的颜色是浅蓝色的,未探明矿区的颜色是灰色的。然后颜色会根据储量而线性变化。
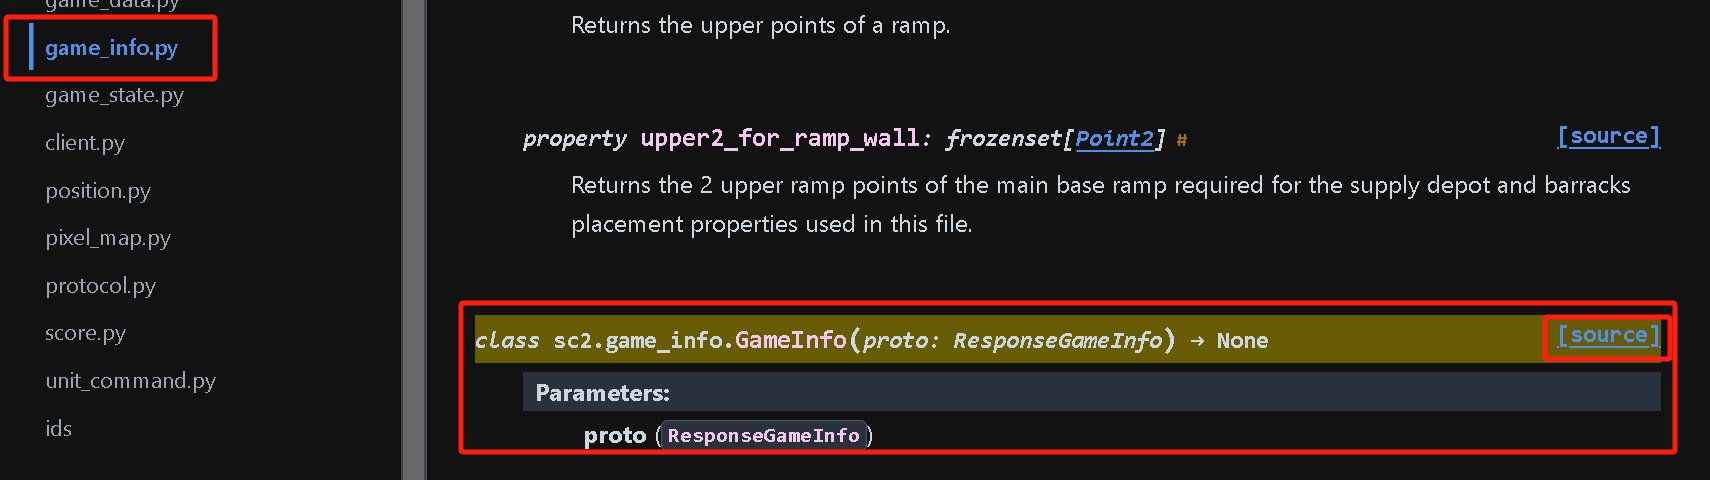
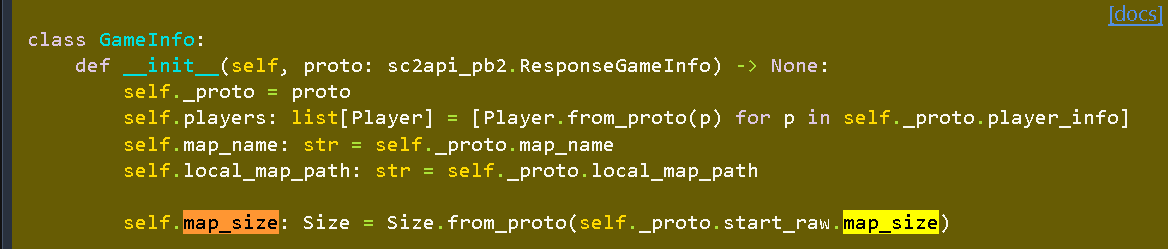
首先创建一张和原地图分辨率一致的空白图,尺寸可以从GameInfo类获取:
python
# 1. 初始化空白地图
map = np.zeros(
    (self.game_info.map_size[0], self.game_info.map_size[1], 3),
    dtype=np.uint8
)
然后获取地图所有的矿点,并设定基础颜色是黄色。
分两种情况,如果探明了,就按剩余比例调整颜色;
如果没探明就保持灰色。
python
# 2. 绘制矿产资源(水晶矿)
for mineral in self.mineral_field:
    pos = mineral.position  # 获取矿点的坐标(x,y)
    c = [175, 255, 255]     # 基础颜色:青蓝色(代表水晶矿)
    # 计算剩余矿量比例:当前矿量 / 初始满矿量(2250)
    fraction = mineral.mineral_contents / 2250

    if mineral.is_visible:
        # 可见矿:按剩余矿量比例,调整颜色亮度(矿越多越亮)
        map[math.ceil(pos.y)][math.ceil(pos.x)] = [int(fraction * i) for i in c]
    else:
        # 不可见/战争迷雾中的矿:显示灰色(代表未知)
        map[math.ceil(pos.y)][math.ceil(pos.x)] = [50, 50, 50]
最后显示地图,注意,
星际 2 的坐标系 和 OpenCV 的坐标系 是完全相反的! 不翻转,地图会上下颠倒。
星际 2 游戏坐标系
- X 轴:向右变大
- Y 轴:向上变大
- 原点 (0,0) 在左下角
OpenCV 图像坐标系
- X 轴:向右变大
- Y 轴:向下变大
- 原点 (0,0) 在左上角
因此只需要把图片上下颠倒就行,使用flip函数.
如果此时你运行,会发现图像很小(都是一个pix),看不清,因此需要放大,用resize。
地图是:
-
每个矿 = 1 个像素
-
每个基地 = 1 个像素
-
每个虚空舰 = 1 个像素
但是放大后会让信息点变成模糊的一坨(在predator项目我们已经体会过了),因此需要INTER_NEAREST最邻近插值,保持 "像素块" 风格。
python
# 3. 显示地图(缩放+翻转,适配OpenCV显示)
cv2.imshow(
    'map',
    cv2.flip(
        cv2.resize(
            map,
            None,
            fx=4, fy=4,  # 放大4倍,方便观察
            interpolation=cv2.INTER_NEAREST  # 最近邻插值,保留像素块
        ),
        0  # 0=上下翻转,修正坐标系
    )
)

气源绘制
类似矿区,抄一遍改个名字即可:
python
#2:绘制瓦斯资源
for vespene in self.vespene_geyser:
    pos = vespene.position  # 获取气矿的坐标(x,y)
    c = [255, 175, 255]     # 基础颜色:粉紫色(代表气矿)
    # 计算剩余气矿量比例:当前气矿量 / 初始满矿量(2250)
    fraction = vespene.vespene_contents / 2250

    if vespene.is_visible:
        # 可见气矿:按剩余气矿量比例,调整颜色亮度(气越多越亮)
        map[math.ceil(pos.y)][math.ceil(pos.x)] = [int(fraction * i) for i in c]
    else:
        # 不可见/战争迷雾中的气矿:显示灰色(代表未知)
        map[math.ceil(pos.y)][math.ceil(pos.x)] = [50, 50, 50]
完整代码:
python
# 画图:生成地图状态观测
# 1. 初始化空白地图
map = np.zeros(
(self.game_info.map_size[0], self.game_info.map_size[1], 3),
dtype=np.uint8
)
# 2. 绘制矿产资源(水晶矿)
for mineral in self.mineral_field:
pos = mineral.position # 获取矿点的坐标(x,y)
c = [175, 255, 255] # 基础颜色:青蓝色(代表水晶矿)
# 计算剩余矿量比例:当前矿量 / 初始满矿量(2250)
fraction = mineral.mineral_contents / 2250
if mineral.is_visible:
# 可见矿:按剩余矿量比例,调整颜色亮度(矿越多越亮)
map[math.ceil(pos.y)][math.ceil(pos.x)] = [int(fraction * i) for i in c]
else:
# 不可见/战争迷雾中的矿:显示灰色(代表未知)
map[math.ceil(pos.y)][math.ceil(pos.x)] = [50, 50, 50]
#3:绘制瓦斯资源
for vespene in self.vespene_geyser:
pos = vespene.position # 获取气矿的坐标(x,y)
c = [255, 175, 255] # 基础颜色:粉紫色(代表气矿)
# 计算剩余气矿量比例:当前气矿量 / 初始满矿量(2250)
fraction = vespene.vespene_contents / 2250
if vespene.is_visible:
# 可见气矿:按剩余气矿量比例,调整颜色亮度(气越多越亮)
map[math.ceil(pos.y)][math.ceil(pos.x)] = [int(fraction * i) for i in c]
else:
# 不可见/战争迷雾中的气矿:显示灰色(代表未知)
map[math.ceil(pos.y)][math.ceil(pos.x)] = [50, 50, 50]
# 4. 显示地图(缩放+翻转,适配OpenCV显示)
cv2.imshow(
'map',
cv2.flip(
cv2.resize(
map,
None,
fx=4, fy=4, # 放大3倍,方便观察
interpolation=cv2.INTER_NEAREST # 最近邻插值,保留像素块
),
0 # 0=上下翻转,修正坐标系
)
)
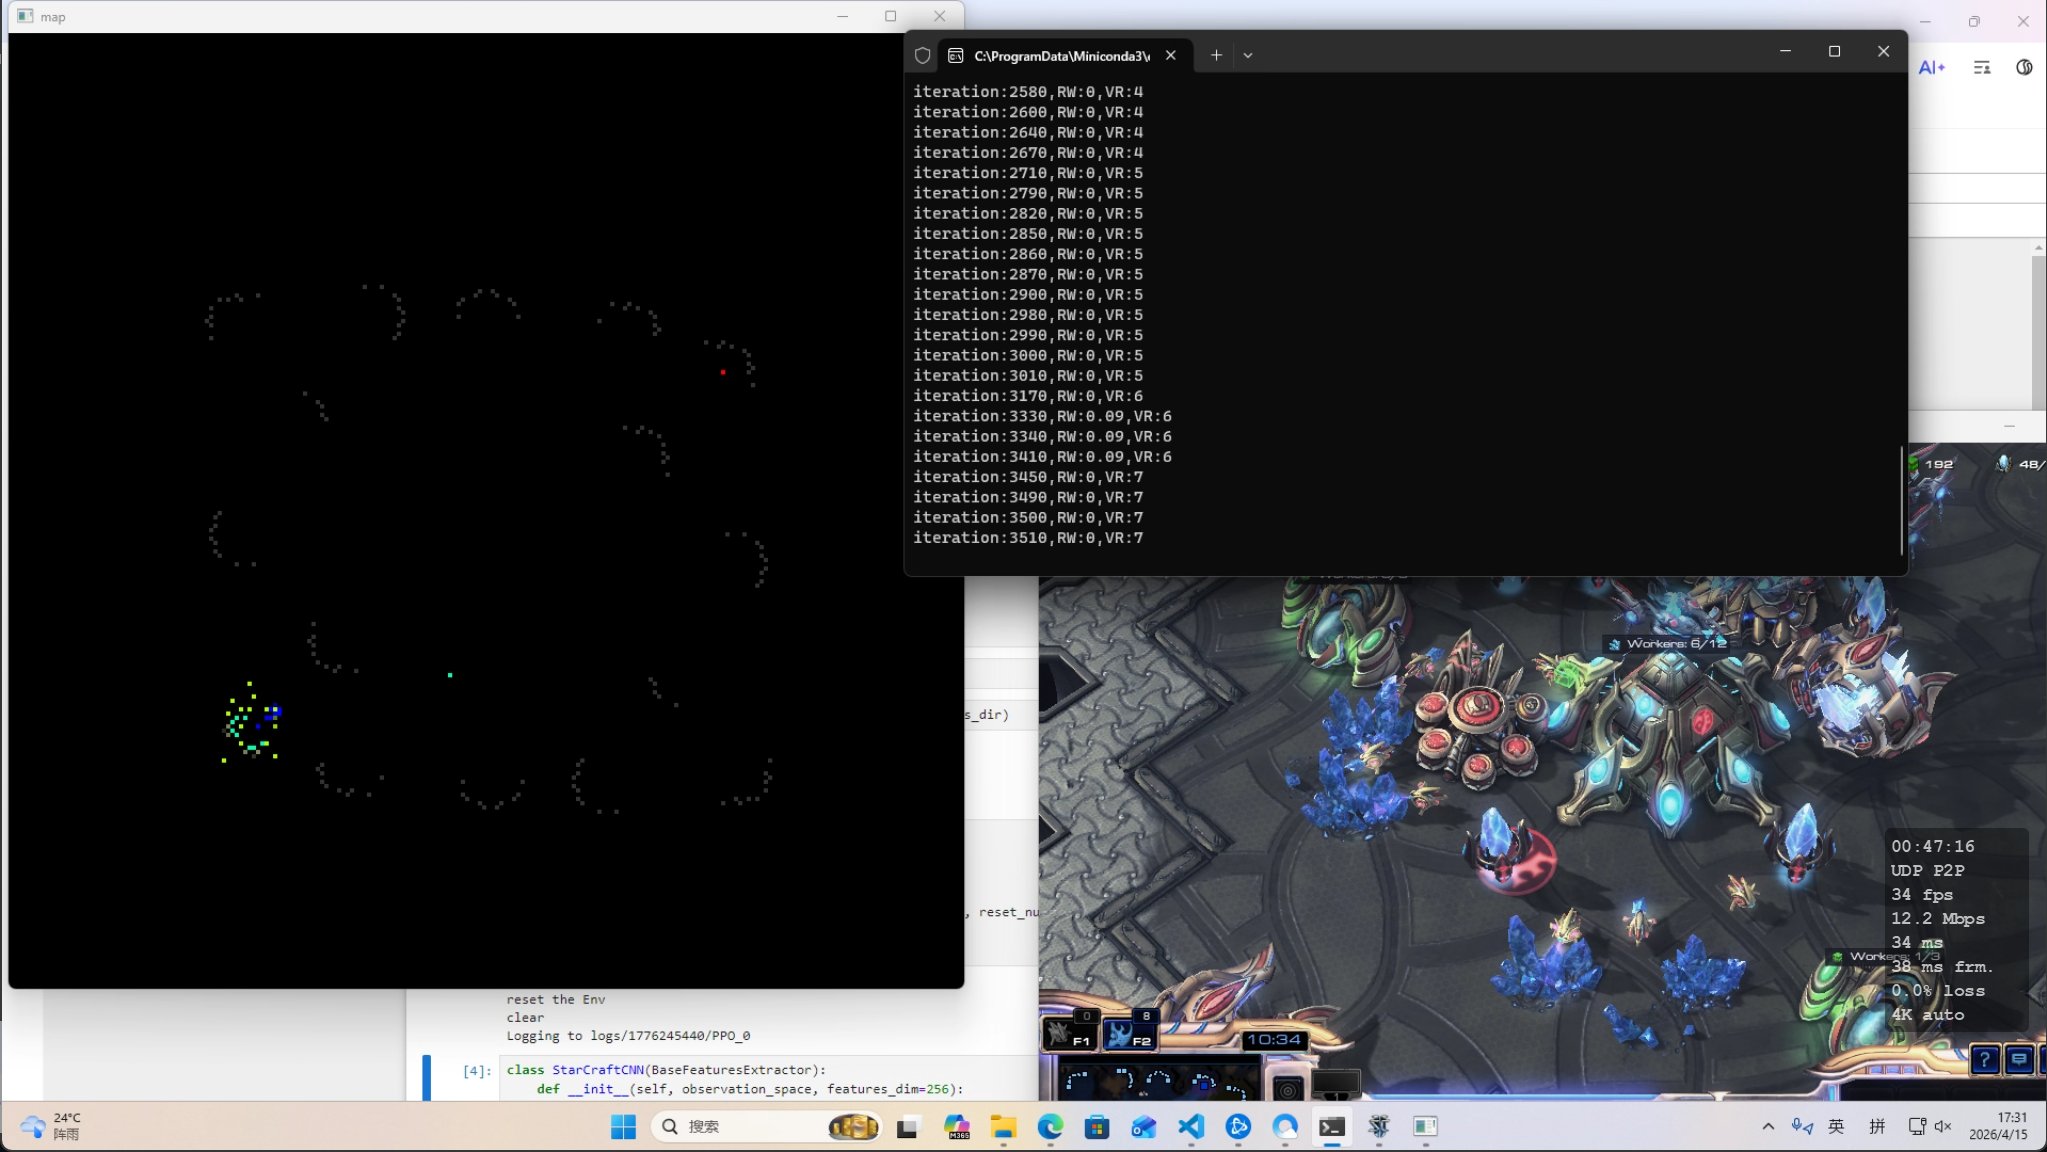
cv2.waitKey(1) # 等待1ms,刷新窗口(必须加,否则窗口卡死)跑一下测试:可以看到气矿是粉红色,晶矿是黄色


我方基础设施绘制
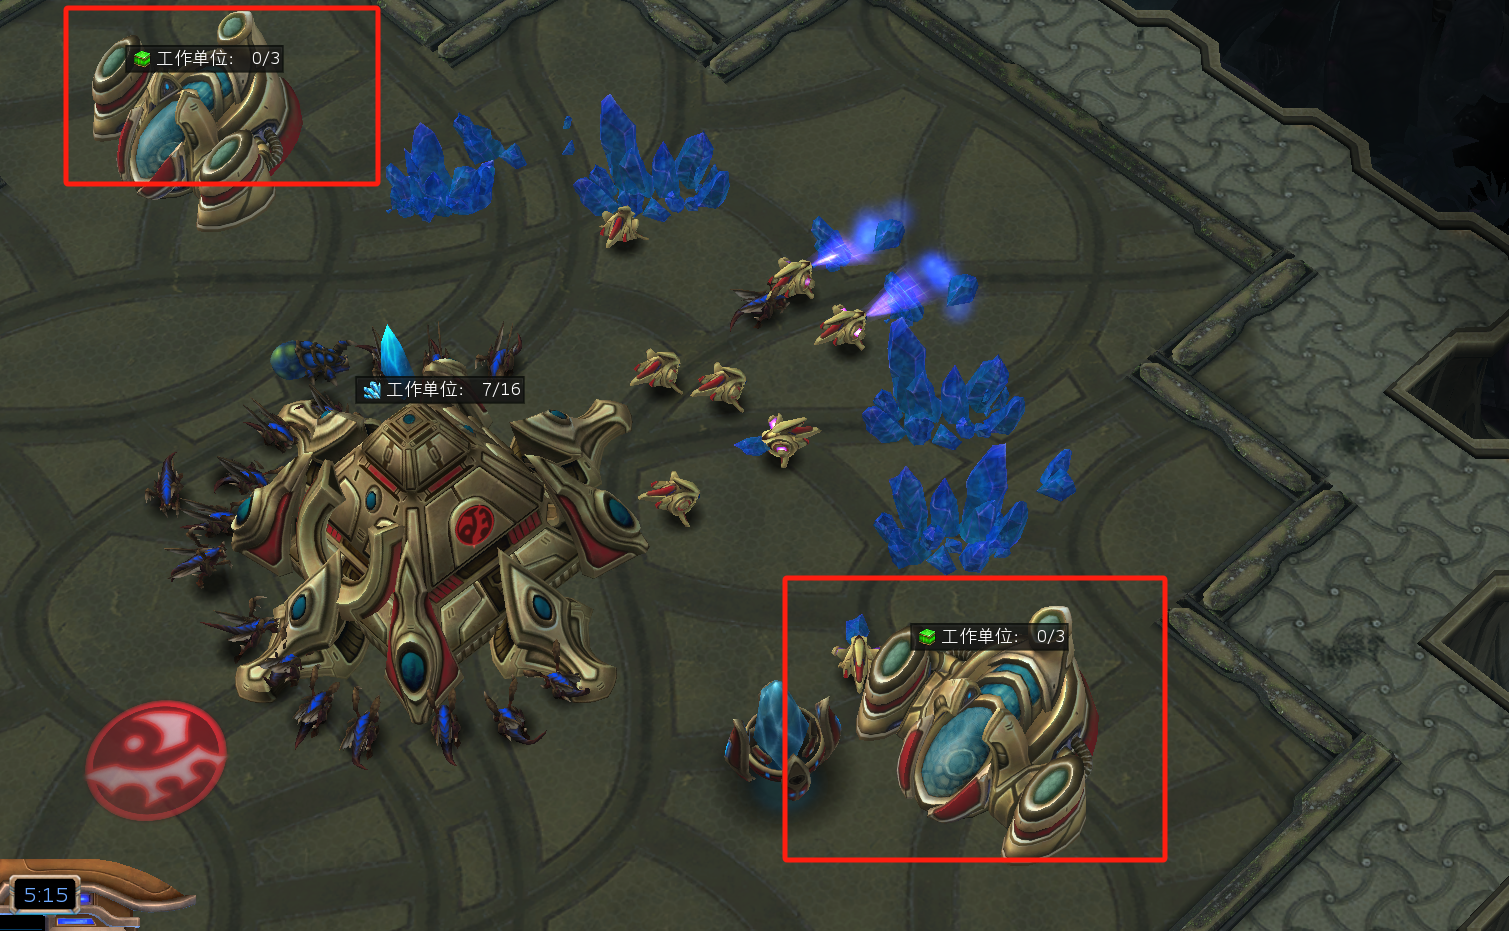
主基地使用浅蓝色色,其他设施使用绿色,同样根据其血量比例设定亮度。注意防止除零的情况加一个特判。
python
#3:绘制基础设施
for structure in self.structures:
    pos = structure.position  # 获取建筑的坐标(x,y)

    # 区分建筑类型:基地(nexus)用特殊颜色,其他建筑用另一种颜色
    if structure.type_id == UnitTypeId.NEXUS:
        c = [255, 255, 175]  # 亮黄色(代表基地/主基地)
    else:
        c = [0, 255, 175]     # 青绿色(代表其他己方建筑,如水晶塔、传送门、星门等)

    # 计算血量比例:当前血量 / 最大血量(避免除零)
    fraction = structure.health_percentage

    # 按血量比例缩放颜色,绘制到地图上
    map[math.ceil(pos.y)][math.ceil(pos.x)] = [int(fraction * i) for i in c]
运行一下:中枢是浅蓝色。


我方单位绘制
我们主要使用虚空星舰作战,因此赋予蓝色,其他辅助单位PROBE使用亮绿色即可。
python
        #5:绘制我方单位
        for unit in self.units:
            pos = unit.position  # 获取单位的坐标(x,y)

            # 区分单位类型:虚空辉光舰用特殊蓝色,其他单位用亮绿色
            if unit.type_id == UnitTypeId.VOIDRAY:
                c = [255, 0, 0]  # 蓝色(代表核心作战单位:虚空辉光舰)
            else:
                c = [175, 255, 0]  # 亮绿色(代表其他己方单位:探机等)

            # 直接获取血量百分比(0~1),无需手动计算
            fraction = unit.health_percentage

            # 按血量比例缩放颜色,绘制到地图上
            map[math.ceil(pos.y)][math.ceil(pos.x)] = [int(fraction * i) for i in c]
测试一下:
开局可以看到很多PROBE在主基地附近

一段时间后动作4派出了侦察兵

再过一段时间,训练出了虚空星舰

当虚空星舰超过阈值后执行进攻动作,开团:

绘制敌方单位、敌方初始建筑、敌方基础设施
逻辑和我方一样,只是改成enemy
python
        #6:绘制敌人的起始位置(出生点)
        for enemy_location in self.enemy_start_locations:
            pos = enemy_location  # 获取敌人出生点坐标
            # 纯红色(代表敌人老家,显眼)
            c = [0, 0, 255]
            # 直接赋值,不需要遍历i
            map[math.ceil(pos.y)][math.ceil(pos.x)] = c

        #7:绘制敌人的基础设施(建筑)
        for structure in self.enemy_structures:
            pos = structure.position
            # 亮红色(代表敌人建筑)
            c = [0, 100, 255]
            # 按血量比例缩放颜色(满血最亮,残血变暗)
            fraction = structure.health_percentage
            map[math.ceil(pos.y)][math.ceil(pos.x)] = [int(fraction * i) for i in c]

        #8:绘制敌人的单位(兵力)
        for unit in self.enemy_units:
            pos = unit.position
            # 橙红色(代表敌人活跃的单位/部队)
            c = [100, 0, 255]
            # 按血量比例缩放颜色
            fraction = unit.health_percentage
            map[math.ceil(pos.y)][math.ceil(pos.x)] = [int(fraction * i) for i in c]
运行一下:
开局我们的先遣队到敌方老巢就发现敌人了

敌方第一波快攻

激战

成功击退,我们的虚空星舰反攻敌方:

奖励设计
攻击奖励
我们规定,当星舰攻击敌人时,每一次给0.015的奖励。
索敌条件正在攻击且八格范围内有敌人。
python
# 计算奖励值
reward = 0 # 初始化奖励为0
try:
# 遍历所有己方的虚空辉光舰
for voidray in self.units(UnitTypeId.VOIDRAY):
# 条件1:虚空舰正在攻击,且目标在攻击范围内(有效攻击)
if voidray.is_attacking and voidray.target_in_range:
# 条件2:虚空舰8格范围内有敌人单位/建筑(在战场中,不是空跑)
if self.enemy_structures.closer_than(8, voidray) or self.enemy_units.closer_than(8, voidray):
# 满足所有条件,给奖励
reward += 0.015
except Exception as e:
# 捕获异常(比如没有虚空舰、敌人不存在),避免崩溃
print(f'reward error:{e}')
reward = 0 # 异常时奖励归零
# 每10帧打印一次日志,方便调试
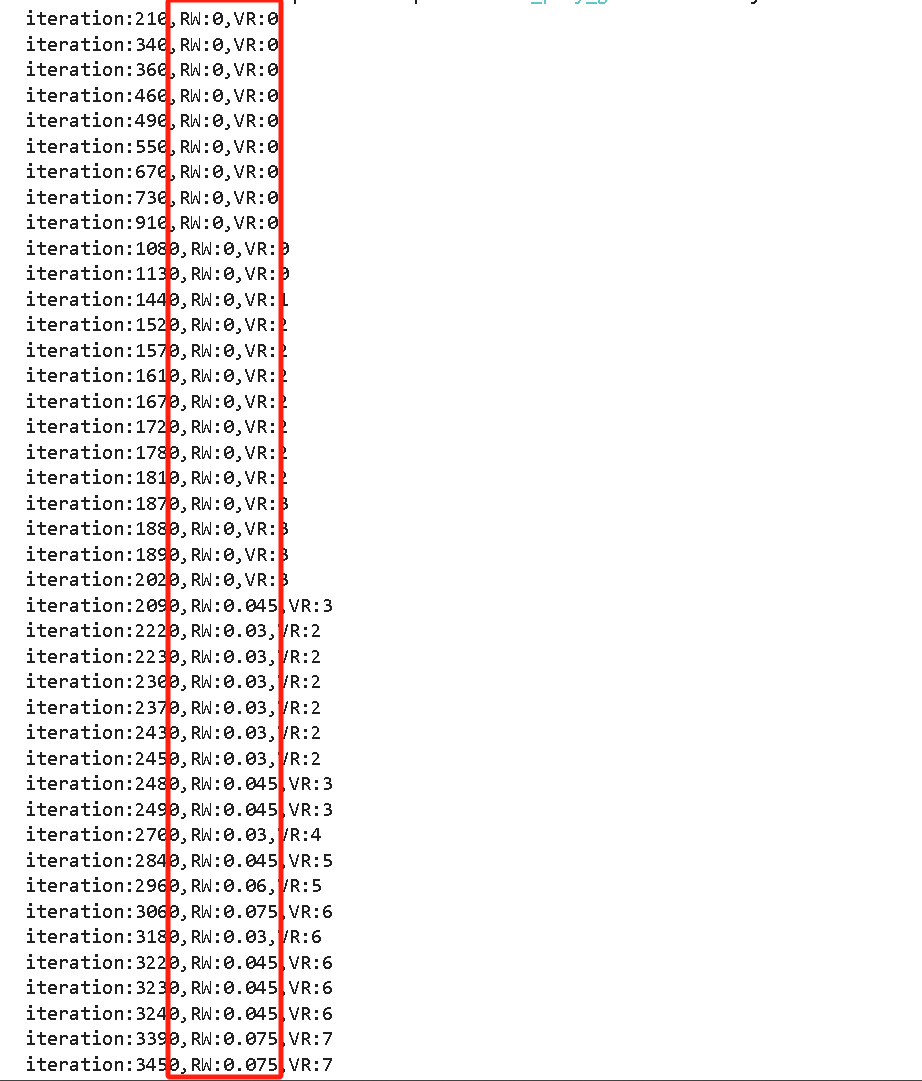
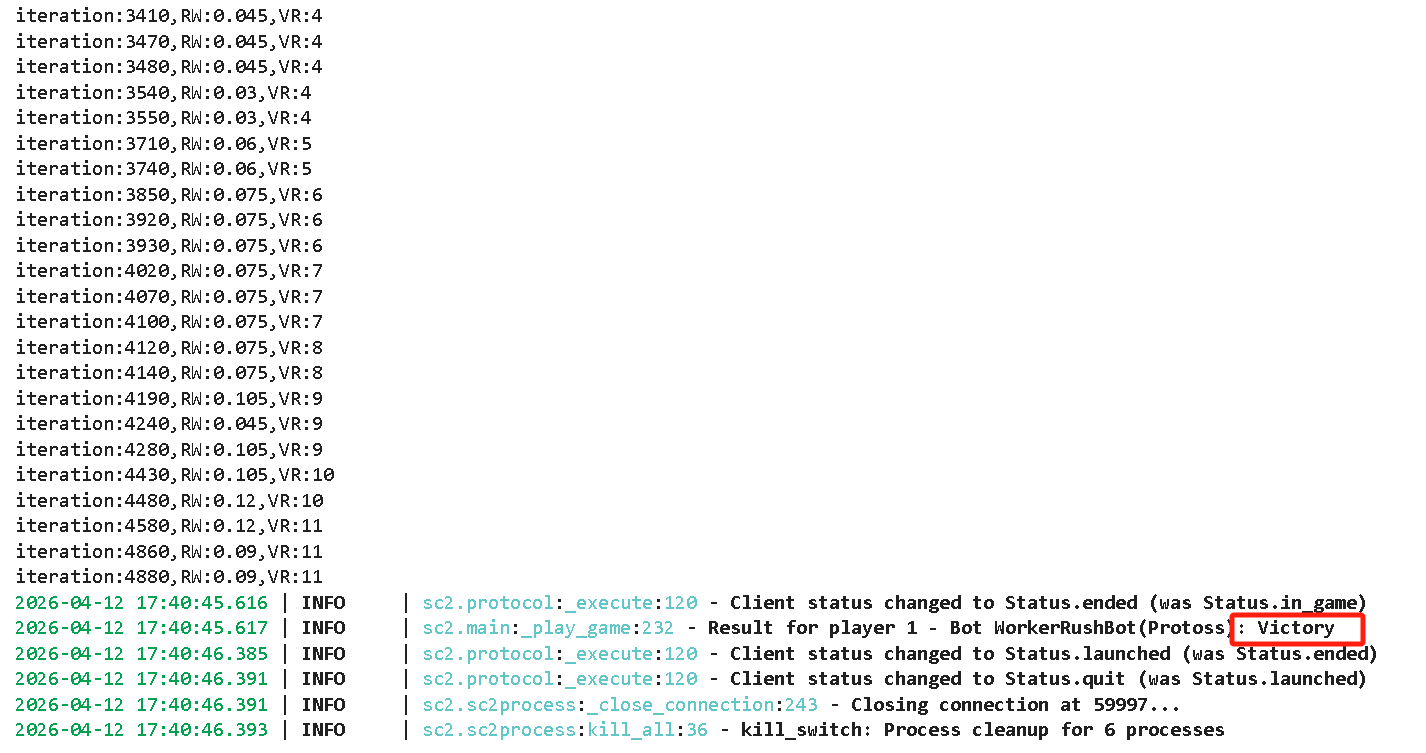
if iteration % 10 == 0:
print(f'iteration:{iteration},RW:{reward},VR:{self.units(UnitTypeId.VOIDRAY).amount}')测试一下:
我方虚空星舰抵达战场

激战

后续援兵跟上

敌方颓势明显

大赢特赢

我们查看输出日志,RW值明显是增加的。
全局胜负奖励
胜利给500,输了扣500。
首先先把对局结果存起来
python
result=run_game(maps.get("2000AtmospheresAIE"), [
    Bot(Race.Protoss, WorkerRushBot()),
    Computer(Race.Zerg, Difficulty.Hard)
], realtime=False)
然后存入到result.txt中。
python
# 1. 记录比赛结果到日志文件
with open('result.txt', 'a') as f:
    f.write(f'{result}\n')
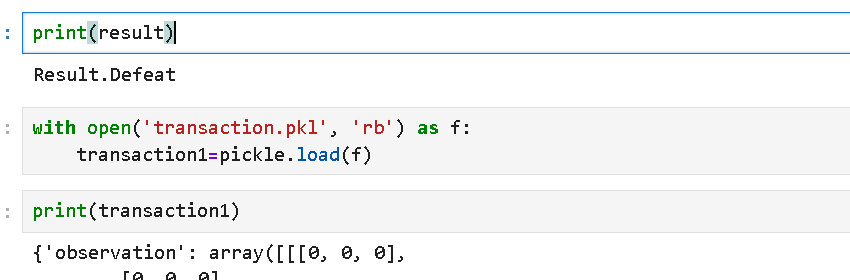
从之前的对局结果可以看到result对象的内容胜利时是Result.Victory
因此作为判定条件
python
# 2. 发放终局奖励/惩罚
if str(result) == 'Result.Victory':
    print('Victory!')
    rwd = 500  # 胜利,给+500大额奖励
else:
    rwd = -500  # 失败/平局,给-500大额惩罚
最后一步传递的内容依然要通过transaction.pkl传递,因此依然要填写
transaction={'observation':map,'reward':0,'action':None,'terminated':False,'truncated':False}
最后一步不用传图了,直接赋空图即可。
reward就是刚刚得到的rwd。
action省略。
终止达成。
结束后别忘了清理窗口。
完整修改:
python
# 1. 记录比赛结果到日志文件
with open('result.txt', 'a') as f:
    f.write(f'{result}\n')

# 2. 发放终局奖励/惩罚
if str(result) == 'Result.Victory':
    print('Victory!')
    rwd = 500  # 胜利,给+500大额奖励
else:
    rwd = -500  # 失败/平局,给-500大额惩罚

# 3. 生成最终观测与交易数据,保存为pkl文件
map = np.zeros((224,224,3), dtype = np.uint8)
transaction = {'observation':map, 'reward':rwd, 'action':None, 'terminated':True,'truncated':False}
with open('transaction.pkl', 'wb') as f:
    pickle.dump(transaction, f)

# 4. 清理OpenCV窗口,避免残留
cv2.destroyAllWindows()
cv2.waitKey(1)
time.sleep(1)
测试一下,
在后面先追加
python
print(result)
python
with open('transaction.pkl', 'rb') as f:
    transaction1=pickle.load(f)
python
print(transaction1)然后这次运行这个
python
result=run_game(maps.get("2000AtmospheresAIE"), [
    Bot(Race.Protoss, WorkerRushBot()),
    Computer(Race.Zerg, Difficulty.Hard)
], realtime=False)
然后启动上位机:
python
for i in range(200):
    sc2.step(0)
    time.sleep(0.05)
    sc2.step(1)
    time.sleep(0.05)
    sc2.step(2)
    time.sleep(0.05)
    sc2.step(3)
    time.sleep(0.05)
    sc2.step(4)
对线差一点,对方也差不多挂了,我们慢了一步:


打印一下result和最后一次transaction,数据都对的上

封装脚本
然后我们把下位机的代码保存为"WorkerRushBot.py",路径和当前jupyter文件一致。
有些许改动,可以在文末copy这个.py文件的代码。

编写自定义环境
我们已经写完下位机的脚本了,现在回过头来继续写上位机的内容。
还记得gym的环境要自实现四个函数step() render() close() reset()
step函数的编写
我们刚刚是从step()跳出来的,因此要回去写完step()
step()需要返回这些内容,因此我们需要在上位机把transaction的对应值return出来。
|------------------------------|------------------------------------------------------------------------------------------|------------------------------------------------------------------------------------------------------------------------------------------------------------------------------------------|
| .step(action) (执行动作) | 作用 :这是强化学习的核心。将 Agent 的动作(Action)传入环境,环境反馈下一步的状态和奖励。 参数 :action (Agent 选择的动作)。 | 1. observation :执行动作后的新环境状态。 2. reward :该动作获得的奖励(浮点数)。 3. terminated :布尔值。True 表示回合正常结束(如到达目标/坠毁)。 4. truncated :布尔值。True 表示回合被强制截断(如超时/出界)。 5. info:辅助诊断信息。 |
python
    def step(self,action):
        while True:

            try:
                with open('transaction.pkl','rb') as f:#先读
                    transaction=pickle.load(f)
                if transaction['action'] is None:#如果没有记录
                    transaction['action']=action
                    with open('transaction.pkl','wb') as f:
                        pickle.dump(transaction,f)
                    break
            except Exception as e:
                time.sleep(0.05)


        while True:
            try:
                with open('transaction.pkl', 'rb') as f:
                    transaction = pickle.load(f)
                if transaction['action'] is None:
                    break
            except:
                time.sleep(0.05)
回顾一下,step的逻辑,首先先看看transaction.pkl是否有记录,如果没有记录,就写入action,然后交给下位机读取,下位机读取后会修改action为None。因此上位机在提交action后立刻break,进入第二个while阻塞态,当发现transaction.pkl的action被下位机赋None后break,进入下一步,重新进入第一个while。
那么我们要获取observation\reward这类信息,就需要在第二个while中接收。
python
    def step(self,action):
        while True:

            try:
                with open('transaction.pkl','rb') as f:#先读
                    transaction=pickle.load(f)
                if transaction['action'] is None:#如果没有记录
                    transaction['action']=action
                    with open('transaction.pkl','wb') as f:
                        pickle.dump(transaction,f)
                    break
            except Exception as e:
                time.sleep(0.05)


        while True:
            try:
                with open('transaction.pkl', 'rb') as f:
                    transaction = pickle.load(f)
                if transaction['action'] is None:
                    observation=transaction['observation']
                    reward=transaction['reward']
                    terminated=transaction['terminated']
                    truncated=transaction['truncated']
                    break
            except:
                time.sleep(0.05)

        info={}
        return observation,reward,terminated,truncated,info
reset函数的编写
下位机的代码需要由上位机启动,相当于是一个子线程,因此需要导入子线程库,并在reset中启动下位机脚本。
python
import subprocess然后在reset函数中启动子线程:
切记要用shell=True否则无法打开星际争霸的窗口。
python
    def reset(self,seed=None, options=None):
        print('reset the Env')
        map=np.zeros((244,244,3),dtype=np.uint8)
        observation=map
        transaction={'observation':map,'reward':0,'action':None,'terminated':False,'truncated':False}

        with open('transaction.pkl','wb') as f:
            pickle.dump(transaction,f)


        #subprocess.Popen(['Python3','WorkerRushBot.py'],creationflags=subprocess.CREATE_NEW_CONSOLE)
        subprocess.Popen(
            [
                "cmd", "/c", "start",
                "python", "WorkerRushBot.py"
            ],
            shell=True
        )
        print('clear')
        info={}
        return observation,info
为了验证我们的环境是否符合Gym规范,在SB3官网,我们可以使用check_env验证。
https://stable-baselines3.readthedocs.io/en/master/guide/custom_env.html

python
from stable_baselines3.common.env_checker import check_env
check_env(sc2)
测试没报错就删掉这行,否则会开多个shell。之后用reset调用。
封装脚本
把自定义环境的代码封装成"StarCraft2Env.py"的代码,路径和当前jupyter文件一致。
代码有所改动,完整文件在文末获取。

强化学习PPO环境的编写
我们已经完成自定义环境【上位机】和操作脚本【下位机】的编写了,接下来到了最后一步,如何利用SB3套用自定义的环境来训练。
我们在jupyter再创建一个SC2_Training的文档。

我们计划用PPO来训练,这是一种基于优化策略的模型,具体原理可以在我之前的强化学习理论找到。
可以在SB3官网找到PPO的文档
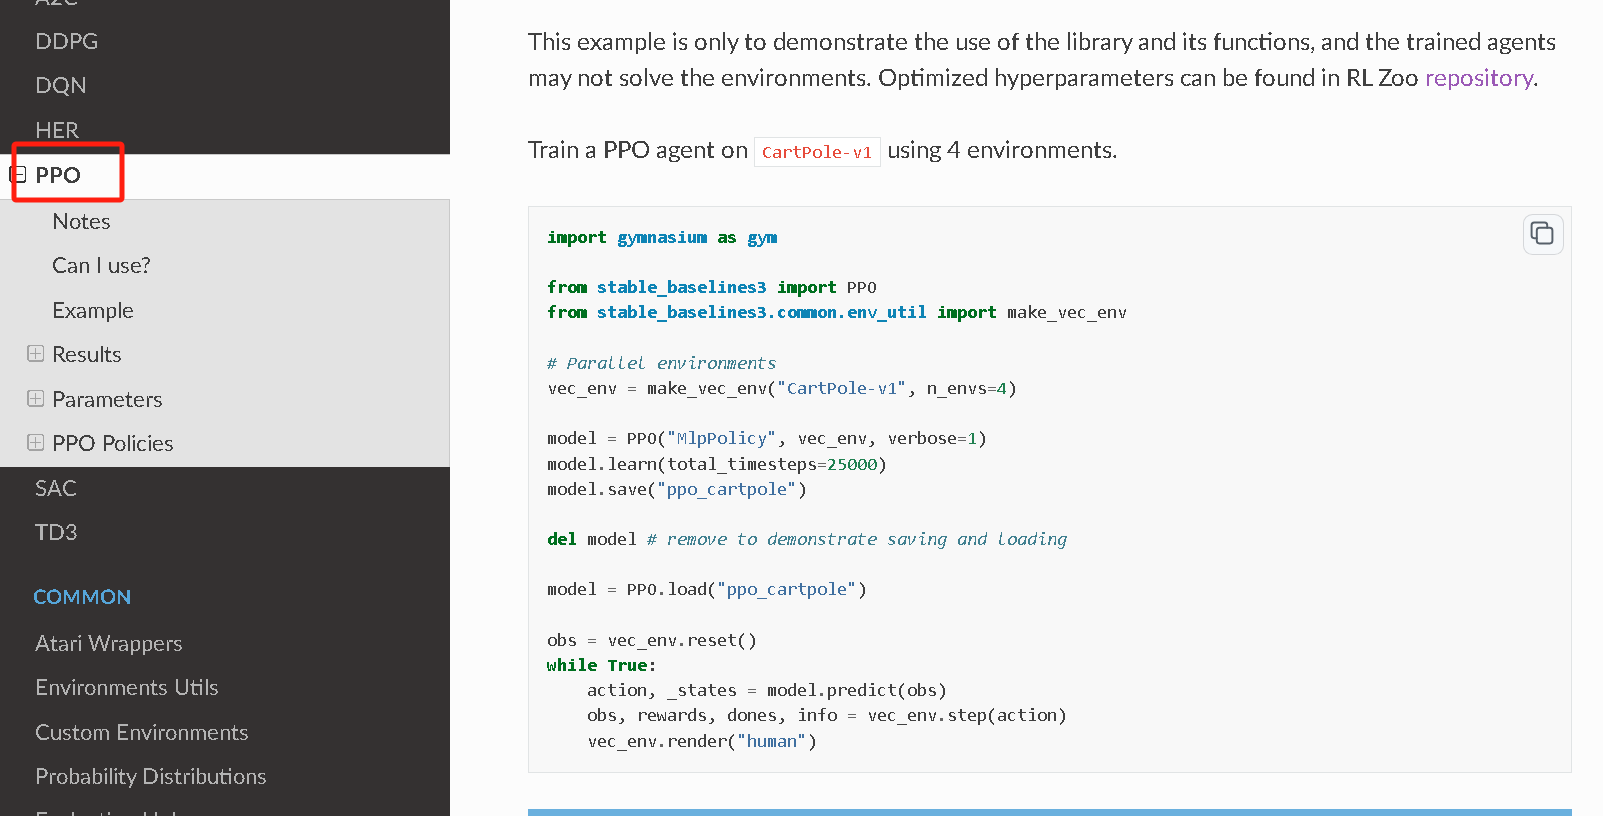
https://stable-baselines3.readthedocs.io/en/master/modules/ppo.html
我们的训练需要基于刚刚保存的Starcraft2Env,因此要把这个py文件作为库导入
python
# 1. 导入依赖库
from stable_baselines3 import PPO
import os
import time
from StarCraft2Env import StarCraft2Env
由于我们使用的是图像输入,训练量也非常大,中途可能出现断电等情况。因此我们需要每隔一定batch保存一个模型(也可以使用callbacks,往期讲过就不再提了)
python
model_name = f'{int(time.time())}'
model_dir = f'models/{model_name}/'
logs_dir = f'logs/{model_name}/'

if not os.path.exists(model_dir):
    os.makedirs(model_dir)
if not os.path.exists(logs_dir):
os.makedirs(logs_dir)- 核心设计 :用时间戳作为模型名,保证每次训练的模型 / 日志目录唯一,不会覆盖历史训练数据
model_dir:保存训练好的 PPO 模型权重,用于后续加载、测试、迭代logs_dir:保存 TensorBoard 训练日志,用于可视化训练曲线(奖励、胜率、损失等)- 自动创建目录,避免因目录不存在导致的报错
log是用于在tensorboard查看训练曲线的,不赘述。
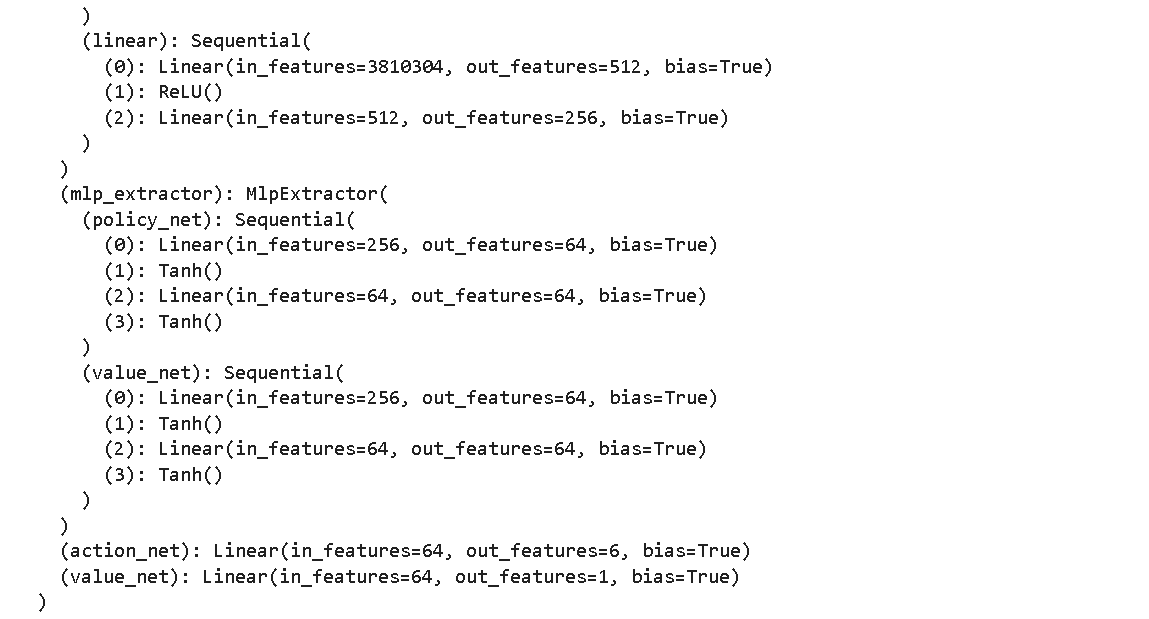
然后要选PPO的策略了,我们选CNN,老师选了MLP,我不理解。
我们就用CNN,图像输入不用CNN难到用全连接?244*244*3都多大了,训个der?
然后CNN不能直接用,因为默认的cnnpolicy特征提取器是做了池化的,池化就是区域取平均/最值,严重损失细节,就这么小一张图,单位本来就小,再池化啥特征都没有了。
https://blog.csdn.net/2301_80226956/article/details/159908855?spm=1001.2014.3001.5501
python
import torch as th
import torch.nn as nn
from gymnasium import spaces

from stable_baselines3 import PPO
from stable_baselines3.common.torch_layers import BaseFeaturesExtractor


class CustomCNN(BaseFeaturesExtractor):
    """
    :param observation_space: (gym.Space)
    :param features_dim: (int) Number of features extracted.
        This corresponds to the number of unit for the last layer.
    """

    def __init__(self, observation_space: spaces.Box, features_dim: int = 256):
        super().__init__(observation_space, features_dim)
        # We assume CxHxW images (channels first)
        # Re-ordering will be done by pre-preprocessing or wrapper
        n_input_channels = observation_space.shape[0]
        self.cnn = nn.Sequential(
            nn.Conv2d(n_input_channels, 32, kernel_size=(3,3), stride=(1,1), padding=0),
            nn.ReLU(),
            nn.Conv2d(32, 64, kernel_size=(3,3), stride=(1,1), padding=0),
            nn.ReLU(),
            nn.Conv2d(64, 64, kernel_size=(3,3), stride=(1,1), padding=0),
            nn.ReLU(),
            nn.Flatten(),
        )

        # Compute shape by doing one forward pass
        with th.no_grad():
            n_flatten = self.cnn(
                th.as_tensor(observation_space.sample()[None]).float()
            ).shape[1]

        self.linear = nn.Sequential(nn.Linear(n_flatten, features_dim), nn.ReLU())

    def forward(self, observations: th.Tensor) -> th.Tensor:
        return self.linear(self.cnn(observations))

policy_kwargs = dict(
    features_extractor_class=CustomCNN,
    features_extractor_kwargs=dict(features_dim=128),
    net_arch=dict(pi=[32, 32], vf=[64, 64]),
    activation_fn=th.nn.ReLU,
)
这是我们之前讲的,如何自定义特征提取器的一节,我们参考。
首先把依赖库补上
python
# 1. 导入依赖库
from stable_baselines3 import PPO
import os
import time
from StarCraft2Env import StarCraft2Env

import torch as th
import torch.nn as nn
from stable_baselines3.common.torch_layers import BaseFeaturesExtractor
然后参考自定义特征提取器的代码构建如下架构:
python
class StarCraftCNN(BaseFeaturesExtractor):
    def __init__(self, observation_space, features_dim=256):
        super().__init__(observation_space, features_dim)

        # 🔥 关键:无池化!小卷积!不丢失像素!
        self.cnn = nn.Sequential(
            nn.Conv2d(3, 32, kernel_size=3, stride=1, padding=1),
            nn.ReLU(),

            nn.Conv2d(32, 64, kernel_size=3, stride=1, padding=1),
            nn.ReLU(),

            nn.Conv2d(64, 64, kernel_size=3, stride=1, padding=1),
            nn.ReLU(),

            nn.Flatten()
        )
        # 计算最终特征维度
        with th.no_grad():
            n_flatten = self.cnn(th.rand(1, 3, 244, 244)).shape[1]

        self.linear = nn.Sequential(
            nn.Linear(n_flatten, 512),
            nn.ReLU(),
            nn.Linear(512, features_dim)
        )

    def forward(self, x):
        x = x.permute(0, 3, 1, 2)  # (H,W,C) → (C,H,W)
        x = self.cnn(x)
        return self.linear(x)
然后仔创建模型实例
python
model = PPO(
    policy="CnnPolicy",
    env=env,
    verbose=1,
    tensorboard_log=logs_dir,
    policy_kwargs=dict(
        features_extractor_class=StarCraftCNN,
        features_extractor_kwargs=dict(features_dim=256)
    )
)
可以输入这行指令,查看当前自定义的模型架构:
python
model.policy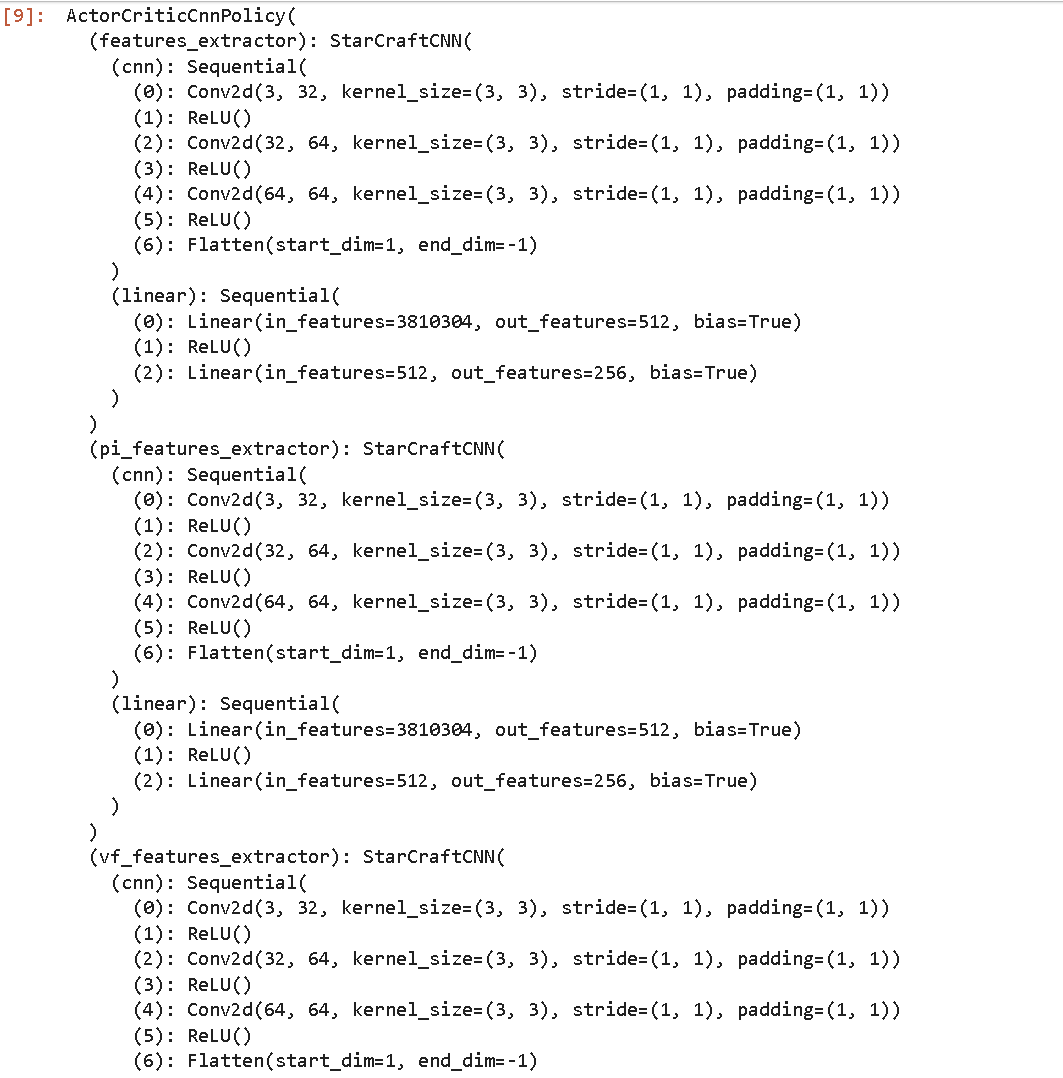
强化学习,启动!
如果训练不起来,请复制文末的代码。(我转到服务器后做了一些修改,尽量按照文末的代码复制粘贴)
python
TIMESTEPS = 10000
iters = 0
while True:
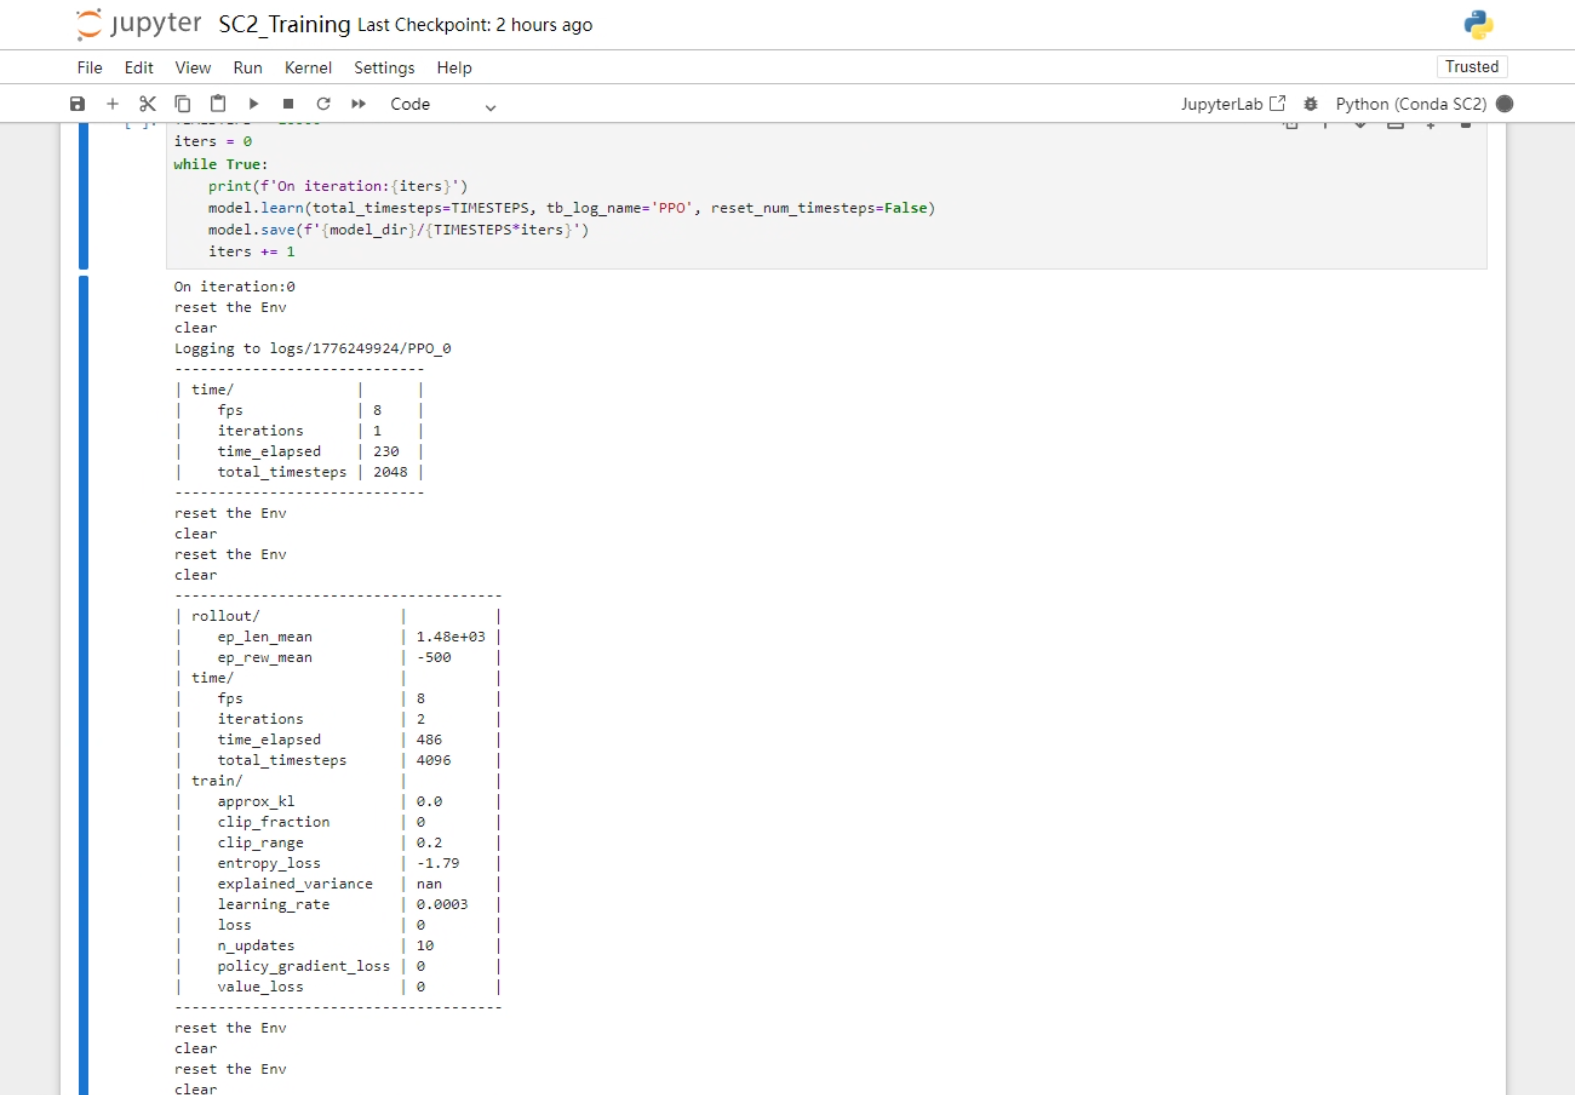
print(f'On iteration:{iters}')
model.learn(total_timesteps=TIMESTEPS, tb_log_name='PPO', reset_num_timesteps=False)
model.save(f'{model_dir}/{TIMESTEPS*iters}')- TIMESTEPS = 10000:每一轮训练的时间步长(每轮训练 1 万步,对应星际 2 多局游戏)
- while True:无限循环训练,持续迭代优化模型
- model.learn(...) :
total_timesteps=TIMESTEPS:本轮训练 1 万步tb_log_name='PPO':TensorBoard 日志标签reset_num_timesteps=False:关键! 不重置训练步数,保证多轮训练的日志连续、模型迭代不中断
- model.save(...) :每轮训练结束后,自动保存模型,命名为
{TIMESTEPS*iters}(如 10000、20000、30000...),方便后续加载不同训练阶段的模型
出现这个就是开始了

然后在vscode打开tensorboard,实时查看训练日志
python
tensorboard --logdir ./logs中断恢复
1.最新模型文件
首先在model对应的文件夹中找到最新的模型,我们用时间戳命名的,找最大的就行。
python
model_name = '<最新的模型>'
model_dir = f'models/{model_name}/'
logs_dir = f'logs/{model_name}/'
2. 加载指定步数的模型(断点续训)
然后确定继续训练步数,不会从零开始,不会浪费之前的计算
python
model = PPO.load(f'{model_dir}/<指定继训步数>.zip', env=env, tensorboard_log=logs_dir)3. 继续训练
model.learn(total_timesteps=TIMESTEPS, ...)
model.save(f'{model_dir}/{TIMESTEPS*iters}')- 每轮训 10000 步
- 保存为
260000,270000,280000... - 实现无缝续训,直到满意
训练效果

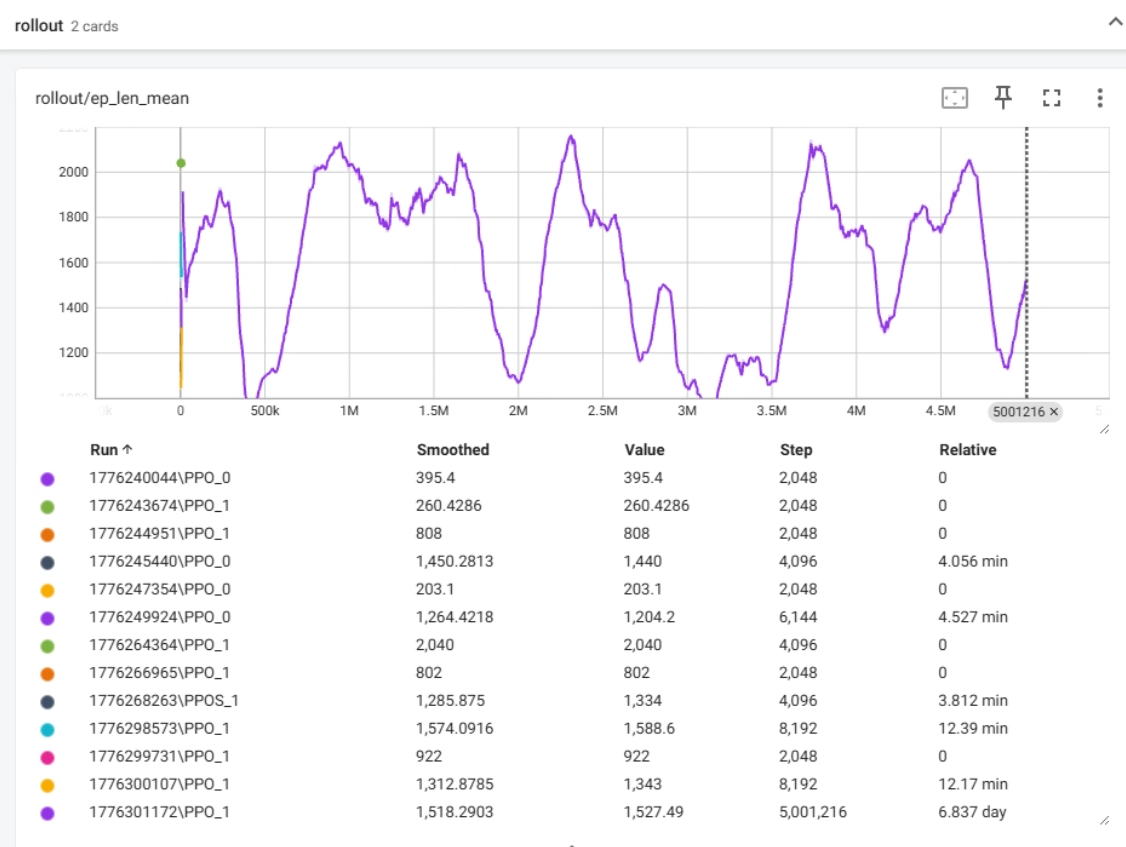
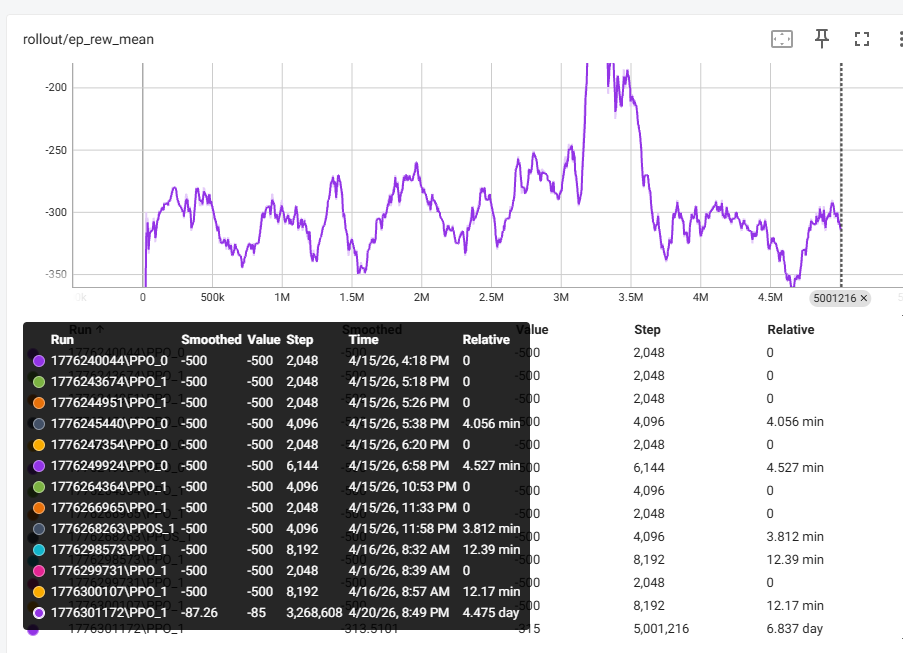
经过一周的训练,我们打开tensorflow面板:
在训练步数一栏,步数大概在1000-2000徘徊
在奖励一栏,可以看到在32万步的时候,奖励达到了-85,这是非常非常非常棒的结果!!!
我们用callbacks记录了最好批次的模型,可以后续调用。
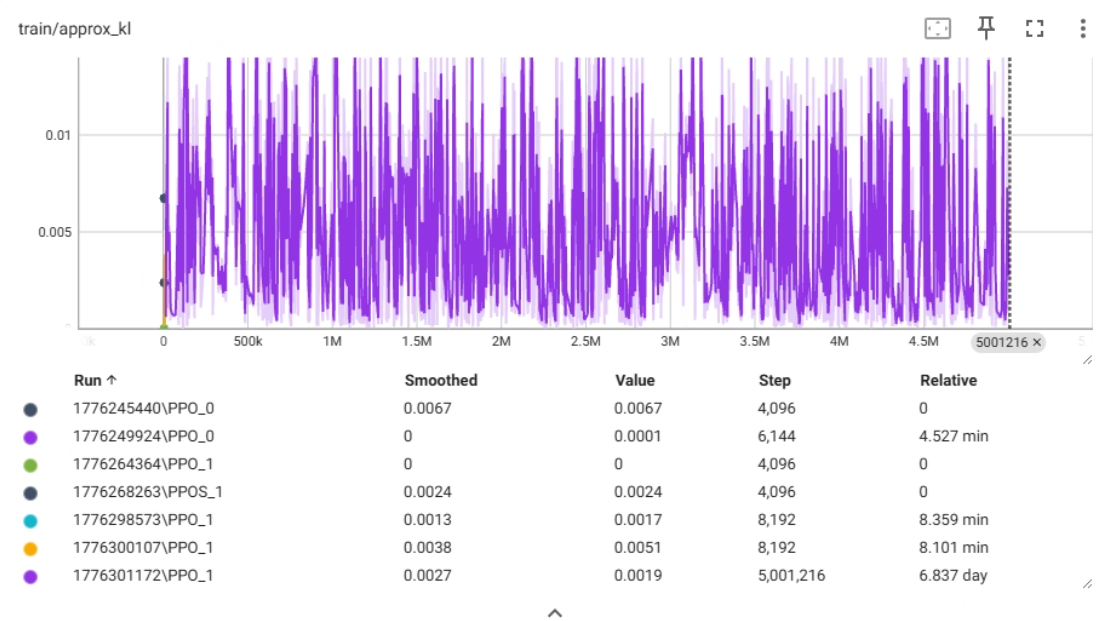
train/approx_kl 指标解释
train/approx_kl 代表 近似 KL 散度。
- 含义 :KL 散度(Kullback-Leibler Divergence)用于衡量两个概率分布之间的差异。在 PPO 训练中,它衡量的是当前策略(更新后) 与**旧策略(更新前)**之间的差异有多大。
- 通俗理解 :它表示模型每一次更新时,"步子"迈得有多大。
- 如果数值很高,说明新策略和旧策略差别很大,模型正在剧烈地改变它的行为。
- 如果数值很低,说明新策略和旧策略差不多,模型只是在做微调。
数值范围与稳定性
- 图表中的数值主要集中在 0 到 0.015 之间。
- 相比于上一张
clip_fraction图,虽然这里依然有剧烈的锯齿状波动,但整体维持在一个相对低位的水平。 - 早期(0 - 500k步):波动非常剧烈,甚至在某些点冲得很高,说明训练初期模型在学习时非常"激进",尝试大幅改变策略。
- 后期(2M - 5M步):波动依然存在,但整体趋势似乎略有下降或保持稳定,没有持续发散(即没有一直往上涨)。
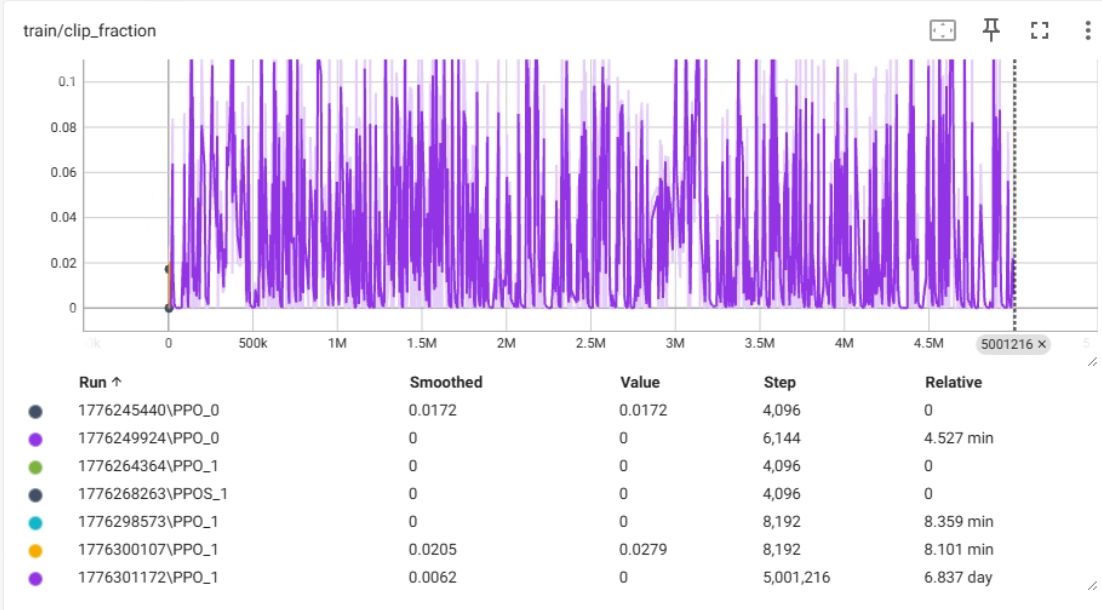
train/clip_fraction 指标解释
train/clip_fraction 是 PPO(Proximal Policy Optimization,近端策略优化)算法中的一个重要指标。
- 含义:它表示在当前的训练批次中,有多少比例的梯度更新被"裁剪"了。
- PPO 原理简述:PPO 为了防止策略更新步幅过大导致训练崩溃,引入了一个"裁剪"机制。它限制了新旧策略概率比率的变化范围(通常在 0.8 到 1.2 之间)。如果某个更新的比率超出了这个范围,就会被强行拉回到边界值,这就是"裁剪"。
- 这个指标的意义 :
- 数值过高(接近 1.0):说明绝大多数更新都被裁剪了。这通常意味着学习率太高,或者 PPO 的裁剪范围(epsilon)太小。模型想要迈大步子,但被强行拉住,可能导致学习效率低下。
- 数值过低(接近 0):说明几乎没有更新被裁剪。这可能意味着学习率太低,或者策略更新非常保守。虽然训练稳定,但可能收敛速度很慢。
- 理想状态:通常希望这个值在一个适中的范围(例如 0.1 - 0.3 左右,但这取决于具体任务),表明模型正在积极地学习,同时受到 PPO 机制的有效约束。
train/explained_variance 核心指标解释
train/explained_variance 衡量的是你的价值网络(Critic)预测的值与实际获得的回报之间的相关性。这是强化学习(尤其是 PPO 算法)中用于评估**价值函数(Value Function / Critic)**拟合好坏的重要指标。
- 数值为 1:完美预测。模型完全理解了环境,能准确预测未来的收益。
- 数值为 0:预测效果就像"瞎猜平均值"。模型没有学到任何有用的规律,预测值和随便猜一个平均数没区别。
- 数值为负数:预测比瞎猜还差。模型不仅没学会,甚至还在"误导"自己(预测值与实际值反向变动)。
train/loss 指标解释
train/loss,这是整个训练过程中最核心的指标之一。
简单来说,Loss(损失)代表了模型"犯错"的程度。Loss 越低,说明模型预测得越准,犯错越少;Loss 越高,说明模型越困惑,预测越离谱。
在 PPO 算法中,这个 Loss 通常是 策略损失(Policy Loss) 和 价值函数损失(Value Loss) 的总和。
train/policy_gradient_loss 指标解释
train/policy_gradient_loss ,这是 PPO 算法中专门衡量**策略网络(Actor)**更新力度的指标。
简单来说,它反映了模型为了获得更多奖励,想要改变自身行为的强烈程度。
核心指标解释
- 含义:这是 PPO 目标函数中的核心部分。它计算的是在考虑了"优势"(Advantage,即某个动作比平时好多少)之后,策略网络应该被更新多少。
- 数值通常为负:在 PPO 的实现中,为了使用梯度下降算法来最大化奖励,通常会对目标函数取反,所以你会看到这个 Loss 是负数。
- 解读 :
- 绝对值越大(越负):说明模型认为当前的策略很糟糕,或者发现了巨大的改进空间,因此想要进行大幅度的修改。
- 绝对值越小(接近 0):说明模型认为当前的策略已经不错了,或者在这个批次的数据中没有学到什么新的有用信息,不需要做大的改动。

train/value_loss 指标解释
train/value_loss ,它直接衡量的是 Critic(价值网络) 的预测误差。
这张图是整个训练问题的**"罪魁祸首"**,它揭示了为什么之前的总 Loss 会那么高。
- 含义 :Critic 的工作是预测未来能获得多少奖励(Value)。
value_loss衡量的是 Critic 的预测值与实际获得的回报(Return)之间的差距(通常使用均方误差 MSE)。 - 解读 :
- 数值越低越好:说明 Critic 预测得很准。
- 数值高:说明 Critic 完全是在"瞎猜",预测值和真实结果天差地别。
在vscode也可以看到每个指定步数存下的模型

在result.txt中也可以看到victory的频次明显增加了
完整训练代码
WorkerRushBot.py
python
from sc2 import maps
from sc2.player import Bot, Computer
from sc2.main import run_game
from sc2.data import Race, Difficulty
from sc2.bot_ai import BotAI
import pickle
import time
import random
import numpy as np
from sc2.ids.unit_typeid import UnitTypeId

import math
import cv2
import os
os.environ['KMP_DUPLICATE_LIB_OK']='True'
import nest_asyncio
import asyncio
nest_asyncio.apply()
class WorkerRushBot(BotAI):
    async def on_step(self, iteration: int):
        try:
            with open('transaction.pkl', 'rb') as f:
                transaction = pickle.load(f)
        except:
            return

        action = transaction['action']
        if action is None:
            return  # 没有动作,直接跳过

        action=transaction['action']
        #print(f'迭代次数:{iteration}')
        await self.distribute_workers()
        if action==0:
            have_builded = False

            # 1. 优先补水晶塔
            if self.supply_left < 4:
                if self.can_afford(UnitTypeId.PYLON) and self.already_pending(UnitTypeId.PYLON) == 0:
                    if self.townhalls.exists:
                        await self.build(UnitTypeId.PYLON, near=self.townhalls.first)
                        have_builded = True

            # --------------------------
            # ✅ 【扩张分矿】永远不阻塞!
            # --------------------------
            if self.townhalls.amount < 4 and self.can_afford(UnitTypeId.NEXUS):
                if self.already_pending(UnitTypeId.NEXUS) == 0:
                    await self.expand_now()

            # --------------------------
            # 【农民 / 气矿】独立运行
            # --------------------------
            for nexus in self.townhalls:
                # 农民
                if self.workers.closer_than(10, nexus).amount < 22:
                    if self.can_afford(UnitTypeId.PROBE) and nexus.is_idle:
                        nexus.train(UnitTypeId.PROBE)

                # 气矿
                for vespene in self.vespene_geyser.closer_than(15, nexus):
                        if self.can_afford(UnitTypeId.ASSIMILATOR):
                            worker = self.select_build_worker(vespene.position)
                            if worker is not None:
                                # 神族造气矿 官方唯一正确方法
                                worker.build_gas(vespene)
                                worker.stop(queue=True)
                                have_builded=False
                                #print('建造吸收间')

            # --------------------------
            # 【防御】不阻塞扩张
            # --------------------------
            pylon = self.structures(UnitTypeId.PYLON).ready
            if pylon.exists and not have_builded:
                near_pylon = pylon.first
                # 熔炉
                if not self.structures(UnitTypeId.FORGE).exists:
                    if self.can_afford(UnitTypeId.FORGE):
                        await self.build(UnitTypeId.FORGE, near=near_pylon)
                        have_builded = True
                # 光子炮
                elif self.structures(UnitTypeId.FORGE).ready:
                    if self.structures(UnitTypeId.PHOTONCANNON).amount < 3:
                        if self.can_afford(UnitTypeId.PHOTONCANNON):
                            await self.build(UnitTypeId.PHOTONCANNON, near=near_pylon)
                            have_builded = True


        if action==1:
            # 1:传送门、控制核心、星门
            have_build = False  # 正确拼写

            # 全局最多造 4 个星门(暴兵效率最大化)
            max_stargates = 4
            current_stargates = self.structures(UnitTypeId.STARGATE).amount

            for nexus in self.townhalls:
                # 每个基地都造传送门
                if not have_build:
                    if not self.structures(UnitTypeId.GATEWAY).closer_than(10, nexus).exists:
                        if self.can_afford(UnitTypeId.GATEWAY) and self.already_pending(UnitTypeId.GATEWAY) == 0:
                            await self.build(UnitTypeId.GATEWAY, near=nexus)
                            have_build = True  # 正确拼写

                # 每个基地都造控制核心
                if not have_build:
                    if not self.structures(UnitTypeId.CYBERNETICSCORE).closer_than(10, nexus).exists:
                        if self.can_afford(UnitTypeId.CYBERNETICSCORE) and self.already_pending(UnitTypeId.CYBERNETICSCORE) == 0:
                            await self.build(UnitTypeId.CYBERNETICSCORE, near=nexus)
                            have_build = True

                # ✅ 关键修复:允许造多个星门,直到 4 个
                if not have_build:
                    if current_stargates < max_stargates:  # 不限制"是否已有",只限制总数
                        if self.can_afford(UnitTypeId.STARGATE) and self.already_pending(UnitTypeId.STARGATE) == 0:
                            await self.build(UnitTypeId.STARGATE, near=nexus)
                            have_build = True

        if action==2:
            #print(f'action={action}')
            #2:虚空辉光舰
            try:
                # 遍历所有【已建成、空闲】的星门
                for sg in self.structures(UnitTypeId.STARGATE).ready.idle:
                    # 如果钱够造虚空辉光舰
                    if self.can_afford(UnitTypeId.VOIDRAY):
                        # 让星门训练虚空辉光舰
                        sg.train(UnitTypeId.VOIDRAY)
                        #print('训练虚空战舰')
            except Exception as e:
                print(e)

        if action==3:
            #print(f'action={action}')
            #3:侦查
            # 1. 初始化 last_sent 时间戳(防止第一次运行报错)
            try:
                self.last_sent
            except:
                self.last_sent = 0

            # 2. 控制侦查频率:距离上次侦查超过100帧才执行
            if (iteration - self.last_sent) > 100:
                try:
                    # 3. 优先选择空闲的探机
                    if self.units(UnitTypeId.PROBE).idle.exists:
                        probe = random.choice(self.units(UnitTypeId.PROBE).idle)
                    # 4. 没有空闲探机,就随机选一个探机
                    else:
                        probe = random.choice(self.units(UnitTypeId.PROBE))

                    # 5. 命令探机攻击/移动到敌人出生点
                    probe.attack(self.enemy_start_locations[0])
                    # 6. 更新最后一次侦查的帧号
                    self.last_sent = iteration
                    #print('侦查')
                except:
                    pass

        #4:进攻
        if action == 4:
            #print(f'action={action}')
            try:
                if(self.units(UnitTypeId.VOIDRAY).amount>1):
                    for voidray in self.units(UnitTypeId.VOIDRAY).idle:
                        # 优先级1:身边10格内有敌人单位 → 随机选一个攻击
                        if self.enemy_units.closer_than(10, voidray):
                            voidray.attack(random.choice(self.enemy_units.closer_than(10, voidray)))
                        # 优先级2:身边10格内有敌人建筑 → 随机选一个攻击
                        elif self.enemy_structures.closer_than(10, voidray):
                            voidray.attack(random.choice(self.enemy_structures.closer_than(10, voidray)))
                        # 优先级3:地图上有敌人单位 → 随机选一个攻击(A地板)
                        elif self.enemy_units:
                            voidray.attack(random.choice(self.enemy_units))
                        # 优先级4:地图上有敌人建筑 → 随机选一个攻击(拆家)
                        elif self.enemy_structures:
                            voidray.attack(random.choice(self.enemy_structures))
                        # 优先级5:找不到敌人 → 去敌人出生点
                        elif self.enemy_start_locations:
                            voidray.attack(self.enemy_start_locations[0])
                    #print('虚空辉光舰进攻')
            except Exception as e:
                print(e)

        #5:撤退
        if action == 5:
            #print(f'action={action}')
            try:
                if self.units(UnitTypeId.VOIDRAY).amount > 0:
                    for voidray in self.units(UnitTypeId.VOIDRAY):
                        voidray.attack(self.start_location)
                #print('撤退')
            except Exception as e:
                print(e)

        # 画图:生成地图状态观测
        # 1. 初始化空白地图
        map = np.zeros(
            (self.game_info.map_size[0], self.game_info.map_size[1], 3),
            dtype=np.uint8
        )

        # 2. 绘制矿产资源(水晶矿)
        for mineral in self.mineral_field:
            pos = mineral.position  # 获取矿点的坐标(x,y)
            c = [175, 255, 255]     # 基础颜色:青蓝色(代表水晶矿)
            # 计算剩余矿量比例:当前矿量 / 初始满矿量(2250)
            fraction = mineral.mineral_contents / 2250

            if mineral.is_visible:
                # 可见矿:按剩余矿量比例,调整颜色亮度(矿越多越亮)
                map[math.ceil(pos.y)][math.ceil(pos.x)] = [int(fraction * i) for i in c]
            else:
                # 不可见/战争迷雾中的矿:显示灰色(代表未知)
                map[math.ceil(pos.y)][math.ceil(pos.x)] = [50, 50, 50]

        #3:绘制瓦斯资源
        for vespene in self.vespene_geyser:
            pos = vespene.position  # 获取气矿的坐标(x,y)
            c = [255, 175, 255]     # 基础颜色:粉紫色(代表气矿)
            # 计算剩余气矿量比例:当前气矿量 / 初始满矿量(2250)
            fraction = vespene.vespene_contents / 2250

            if vespene.is_visible:
                # 可见气矿:按剩余气矿量比例,调整颜色亮度(气越多越亮)
                map[math.ceil(pos.y)][math.ceil(pos.x)] = [int(fraction * i) for i in c]
            else:
                # 不可见/战争迷雾中的气矿:显示灰色(代表未知)
                map[math.ceil(pos.y)][math.ceil(pos.x)] = [50, 50, 50]

        #4:绘制基础设施
        for structure in self.structures:
            pos = structure.position  # 获取建筑的坐标(x,y)

            # 区分建筑类型:基地(nexus)用特殊颜色,其他建筑用另一种颜色
            if structure.type_id == UnitTypeId.NEXUS:
                c = [255, 255, 175]  # 亮黄色(代表基地/主基地)
            else:
                c = [0, 255, 175]     # 青绿色(代表其他己方建筑,如水晶塔、传送门、星门等)

            # 计算血量比例:当前血量 / 最大血量(避免除零)
            fraction = structure.health_percentage

            # 按血量比例缩放颜色,绘制到地图上
            map[math.ceil(pos.y)][math.ceil(pos.x)] = [int(fraction * i) for i in c]

        #5:绘制我方单位
        for unit in self.units:
            pos = unit.position  # 获取单位的坐标(x,y)

            # 区分单位类型:虚空辉光舰用特殊蓝色,其他单位用亮绿色
            if unit.type_id == UnitTypeId.VOIDRAY:
                c = [255, 0, 0]  # 蓝色(代表核心作战单位:虚空辉光舰)
            else:
                c = [175, 255, 0]  # 亮绿色(代表其他己方单位:探机等)

            # 直接获取血量百分比(0~1),无需手动计算
            fraction = unit.health_percentage

            # 按血量比例缩放颜色,绘制到地图上
            map[math.ceil(pos.y)][math.ceil(pos.x)] = [int(fraction * i) for i in c]

        #6:绘制敌人的起始位置(出生点)
        for enemy_location in self.enemy_start_locations:
            pos = enemy_location  # 获取敌人出生点坐标
            # 纯红色(代表敌人老家,显眼)
            c = [0, 0, 255]
            # 直接赋值,不需要遍历i
            map[math.ceil(pos.y)][math.ceil(pos.x)] = c

        #7:绘制敌人的基础设施(建筑)
        for structure in self.enemy_structures:
            pos = structure.position
            # 亮红色(代表敌人建筑)
            c = [0, 100, 255]
            # 按血量比例缩放颜色(满血最亮,残血变暗)
            fraction = structure.health_percentage
            map[math.ceil(pos.y)][math.ceil(pos.x)] = [int(fraction * i) for i in c]

        #8:绘制敌人的单位(兵力)
        for unit in self.enemy_units:
            pos = unit.position
            # 橙红色(代表敌人活跃的单位/部队)
            c = [100, 0, 255]
            # 按血量比例缩放颜色
            fraction = unit.health_percentage
            map[math.ceil(pos.y)][math.ceil(pos.x)] = [int(fraction * i) for i in c]

        # 计算奖励值
        reward = 0  # 初始化奖励为0
        try:
            # 遍历所有己方的虚空辉光舰
            for voidray in self.units(UnitTypeId.VOIDRAY):
                # 条件1:虚空舰正在攻击,且目标在攻击范围内(有效攻击)
                if voidray.is_attacking and voidray.target_in_range:
                    # 条件2:虚空舰8格范围内有敌人单位/建筑(在战场中,不是空跑)
                    if self.enemy_structures.closer_than(8, voidray) or self.enemy_units.closer_than(8, voidray):
                        # 满足所有条件,给奖励
                        reward += 0.015
        except Exception as e:
            # 捕获异常(比如没有虚空舰、敌人不存在),避免崩溃
            print(f'reward error:{e}')
            reward = 0  # 异常时奖励归零

        # 每10帧打印一次日志,方便调试
        if iteration % 10 == 0:
            print(f'iteration:{iteration},RW:{reward},VR:{self.units(UnitTypeId.VOIDRAY).amount}')

        # 9. 显示地图(缩放+翻转,适配OpenCV显示)
        cv2.imshow(
            'map',
            cv2.flip(
                cv2.resize(
                    map,
                    None,
                    fx=4, fy=4,  # 放大3倍,方便观察
                    interpolation=cv2.INTER_NEAREST  # 最近邻插值,保留像素块
                ),
                0  # 0=上下翻转,修正坐标系
            )
        )
        cv2.waitKey(1)  # 等待1ms,刷新窗口(必须加,否则窗口卡死)

        transaction['action']=None
        with open('transaction.pkl','wb') as f:
            pickle.dump(transaction,f)


if __name__ == "__main__":
    print('WorkerRushBot.py start')

    result=run_game(maps.get("2000AtmospheresAIE"), [
        Bot(Race.Protoss, WorkerRushBot()),
        Computer(Race.Zerg, Difficulty.Hard)
    ], realtime=False)

    # 1. 记录比赛结果到日志文件
    with open('result.txt', 'a') as f:
        f.write(f'{result}\n')

    # 2. 发放终局奖励/惩罚
    if str(result) == 'Result.Victory':
        print('Victory!')
        rwd = 500  # 胜利,给+500大额奖励
    else:
        rwd = -500  # 失败/平局,给-500大额惩罚

    # 3. 生成最终观测与交易数据,保存为pkl文件
    map = np.zeros((244,244,3), dtype = np.uint8)
    transaction = {'observation':map, 'reward':rwd, 'action':None, 'terminated':True,'truncated':False}
    with open('transaction.pkl', 'wb') as f:
        pickle.dump(transaction, f)

    # 4. 清理OpenCV窗口,避免残留
    cv2.destroyAllWindows()
    cv2.waitKey(1)
    time.sleep(1)
StarCraft2Env.py
python
import numpy as np
import gymnasium as gym
import time
import pickle
import subprocess
import os # 用于检查文件

class StarCraft2Env(gym.Env):
    def __init__(self):
        super(StarCraft2Env, self).__init__()
        self.observation_space = gym.spaces.Box(low=0, high=255, shape=(244, 244, 3), dtype=np.uint8)
        self.action_space = gym.spaces.Discrete(6)

        # 1. 在类初始化时定义超时变量
        self.wait_time = 0
        self.process = None

    def step(self, action):
        # --- 阶段 1:发送动作 ---
        start_time = time.time()
        self.wait_time = 0

        while True:
            try:
                # 读取当前状态
                with open('transaction.pkl', 'rb') as f:
                    transaction = pickle.load(f)

                # 只有当 Bot 把 action 变回 None 时,我们才写入新动作
                if transaction.get('action') is None:
                    transaction['action'] = action
                    with open('transaction.pkl', 'wb') as f:
                        pickle.dump(transaction, f)
                    break # 动作发送成功,跳出循环
            except Exception as e:
                pass # 文件被占用或不存在,忽略

            time.sleep(0.05)
            self.wait_time = time.time() - start_time

            # 【修复】发送动作也要有超时,防止 Bot 死了不回 None
            if self.wait_time > 30:
                print("!!! 超时:Bot 未能在 30秒内接收动作,可能已卡死。")
                self.close()
                return self.reset()[0], 0, True, False, {}

        # --- 阶段 2:等待结果 ---
        start_time = time.time()
        self.wait_time = 0

        while True:
            try:
                with open('transaction.pkl', 'rb') as f:
                    transaction = pickle.load(f)

                # 当 Bot 处理完动作,会将 action 设回 None,并填入新数据
                if transaction.get('action') is None:
                    observation = transaction['observation']
                    reward = transaction['reward']
                    terminated = transaction['terminated']
                    truncated = transaction['truncated']
                    return observation, reward, terminated, truncated, {}

            except Exception as e:
                pass # 忽略读取错误

            time.sleep(0.05)
            self.wait_time = time.time() - start_time

            # 【修复】等待结果超时
            if self.wait_time > 60:
                print(f"!!! ERROR: 环境超时 (等待结果 > 60s),强制重置。")
                self.close()
                # 返回随机/零观测,并标记 done=True,让 RL 重新开始
                dummy_obs = np.zeros((244, 244, 3), dtype=np.uint8)
                return dummy_obs, 0, True, False, {}

    def reset(self, seed=None, options=None):
        print('--- Resetting Environment ---')
        self.wait_time = 0 # 【修复】重置计时器

        # 1. 杀掉旧进程
        self.close()

        # 2. 初始化文件
        # 创建一个初始的 transaction 文件,确保 Bot 启动时能读到
        map_data = np.zeros((244, 244, 3), dtype=np.uint8)
        transaction = {
            'observation': map_data,
            'reward': 0,
            'action': None,
            'terminated': False,
            'truncated': False
        }
        with open('transaction.pkl', 'wb') as f:
            pickle.dump(transaction, f)

        # 3. 启动新进程
        # 使用 shell=True 和 start 命令在 Windows 下启动新窗口
        try:
            subprocess.Popen(
                ['cmd', '/c', 'start', 'python', 'WorkerRushBot.py'],
                shell=True
            )
            print("Bot 进程已启动...")
        except Exception as e:
            print(f"启动 Bot 失败: {e}")

        # 4. 等待 Bot 初始化(给 Bot 一点时间加载游戏)
        time.sleep(5)

        return map_data, {}

    def close(self):
        # 【新增】确保能杀掉旧进程
        if self.process:
            try:
                self.process.kill()
                print("旧进程已杀掉")
            except:
                pass
        self.process = None
SC2_Training.ipynb
依赖库导入
python
# 1. 导入依赖库
from stable_baselines3 import PPO
import os
import time
from StarCraft2Env import StarCraft2Env

import torch as th
import torch.nn as nn
from stable_baselines3.common.torch_layers import BaseFeaturesExtractor
定义保存路径
python
model_name = f'{int(time.time())}'
model_dir = f'models/{model_name}/'
logs_dir = f'logs/{model_name}/'

if not os.path.exists(model_dir):
    os.makedirs(model_dir)
if not os.path.exists(logs_dir):
    os.makedirs(logs_dir)
创建环境实例
python
env = StarCraft2Env()创建模型实例
python
model = PPO("MlpPolicy", env, verbose=1, tensorboard_log=logs_dir)开始训练
python
TIMESTEPS = 5000000  # 500万步

print(f"开始训练,目标:{TIMESTEPS} 步...")
try:
    model.learn(total_timesteps=TIMESTEPS)
except KeyboardInterrupt:
    print("手动停止训练")
finally:
    env.close()  # 确保调用环境的关闭函数,杀掉 SC2 进程

print("训练结束!")
model.save("final_model")
保存模型
python
model.save(f'{model_dir}/{TIMESTEPS*iters}')