HSL颜色系统的基础知识见:https://blog.csdn.net/xulibo5828/article/details/160521898?spm=1011.2415.3001.5331
一、改造qdarkstyle库的颜色系统
qdarkstyle库的初步改造和自定义主题的使用方法见:https://blog.csdn.net/xulibo5828/article/details/156397862
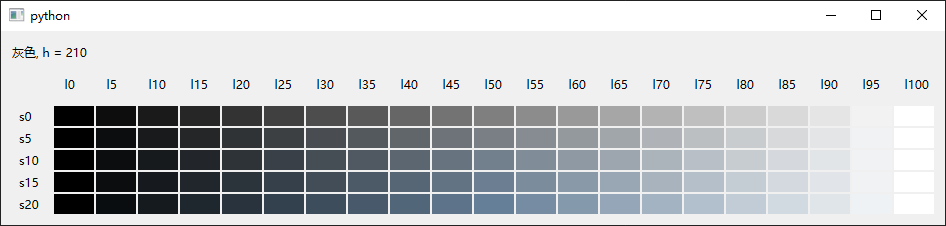
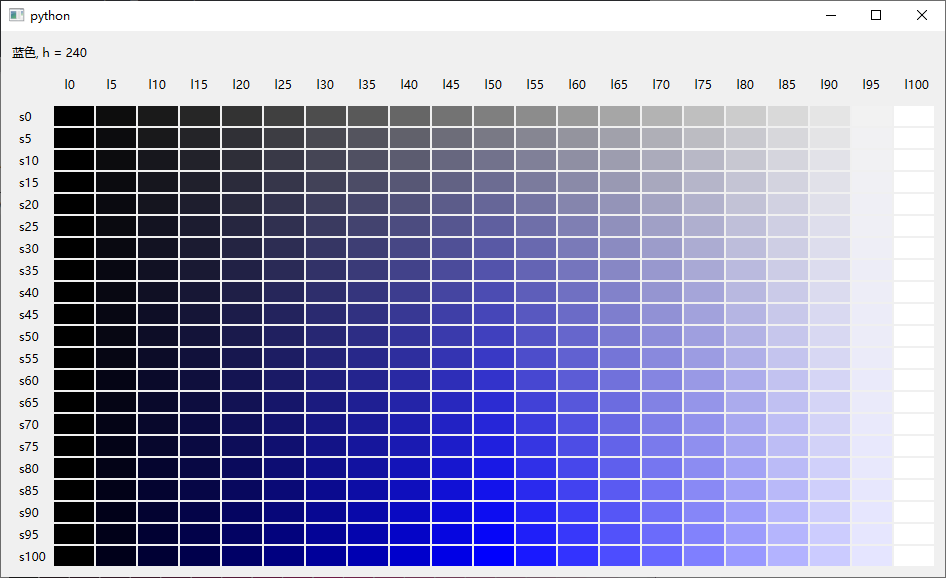
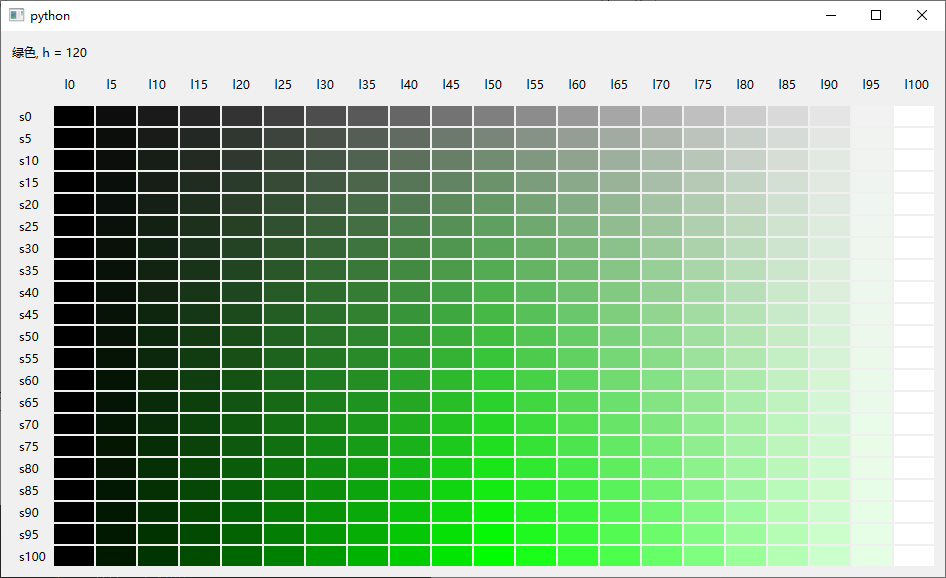
将颜色用hsl值表示,并且升级色彩库,升级以后的色彩库共有15个色系,每个色系的色相值固定,比如红色为0,绿色为120,蓝色240,每个色系的色彩浓度从0%到100%,每个浓度的又包含亮度的从0%到100%,浓度和亮度均以5%递进,这样每个色系有400多个颜色,就有了一个颜色丰富、足够使用的色彩库,而且从色彩名就大致能判断出它的颜色类型、鲜艳程度、明亮程度,无论是做动态或者渐变都很方便。比如:蓝色.B240_15_40,它的含义是hsl(240, 15%, 40%):色相240(标准蓝色的色相是240),色彩浓度15%(全色彩是100%),亮度40%(纯黑0%,纯白100%,纯色50%),这比原来的 "Blue.B100" 这种命名方式使用要直观多了。
为了兼容已有颜色定义,以前的旧名称仍然保留。
另外,保持qdarkstyle库的原始风格,灰色并没有定义为纯黑白,而是用了h=210(靛蓝),浓度从0到20。
先把未修改过的颜色系统文件备份为:qdarkstyle/colorsystem_bkp.py,然后在 qdarkstyle\ 目录下创建并运行以下脚本:
- to_hsl_color_system.py
python
import colorsys
import re

# 色相字典
h_dict = {
    "灰色": "210",
    "红色": "0",
    "棕色": "20",
    "橙色": "30",
    "橙黄": "45",
    "黄色": "60",
    "黄绿": "90",
    "绿色": "120",
    "青绿": "150",
    "青色": "180",
    "靛蓝": "210",
    "蓝色": "240",
    "紫色": "270",
    "品红": "300",
    "紫红": "330",
}


def hex_to_hslx(hex_color):
    """
    将 #RRGGBB 十六进制颜色 格式字符串转换为 hslx(h, s%, l%)
    :param hex_color: 十六进制颜色,例如 "#293544"
    :return: 例如 "hsl(214, 22%, 22%)"
    """
    # 去掉 # 号(如果有)
    hex_color = hex_color.lstrip('#')

    # 把 6(8) 位十六进制拆成 RGB 三个分量(或包含透明度a,4个)
    r = int(hex_color[0:2], 16)
    g = int(hex_color[2:4], 16)
    b = int(hex_color[4:6], 16)

    # colorsys 需要 0~1 范围的值
    r_norm = r / 255.0
    g_norm = g / 255.0
    b_norm = b / 255.0

    h, l, s = colorsys.rgb_to_hls(r_norm, g_norm, b_norm)

    # 转换成 CSS 标准格式:
    # 色相 0~360,饱和度和亮度 0~100%
    h_deg = round(h * 360)
    s_pct = round(s * 100)
    l_pct = round(l * 100)

    return f"hslx({h_deg}, {s_pct}%, {l_pct}%)"


def hslx_to_hex(hsl_str):
    """
    将 hslx(h, s%, l%) 格式字符串转换为 #RRGGBB 十六进制颜色
    :param hsl_str: 例如 "hsl(214, 22%, 22%)"
    :return: 例如 "#293544"
    """
    # 用正则提取 h, s, l 三个数值(自动忽略空格、%、括号)
    match = re.match(r'hslx\(\s*(\d+)\s*,\s*(\d+)%\s*,\s*(\d+)%\s*\)', hsl_str)
    if not match:
        err = f"\"{hsl_str}\" 输入格式错误,请使用 hslx(h, s%, l%) 格式"
        raise ValueError(err)

    # 提取并转为数字
    h = int(match.group(1))
    s = int(match.group(2))
    l = int(match.group(3))

    # 归一化到 0~1 范围(colorsys 要求)
    h_norm = h / 360.0
    s_norm = s / 100.0
    l_norm = l / 100.0

    # HSL -> RGB(注意:库函数是 hls 顺序)
    r_norm, g_norm, b_norm = colorsys.hls_to_rgb(h_norm, l_norm, s_norm)

    # 转回 0~255 并取整
    r = round(r_norm * 255)
    g = round(g_norm * 255)
    b = round(b_norm * 255)

    # 格式化为 #RRGGBB
    return f"#{r:02x}{g:02x}{b:02x}".upper()


if __name__ == "__main__":
    # 打开未修改过的原始颜色系统文件
    with open("colorsystem_bkp.py", "r") as s_min:
        lines = s_min.readlines()
    with open("colorsystem.py", "w") as s_min:
        for line in lines:
            color = line.strip()
            if color.startswith("B") and color.endswith("\'"):
                i = color.find("#")
                old_color = color[i : -1]
                new_color = f"\"{hex_to_hslx(old_color)}\"" + "\n"
                i = line.find("\'")
                line = line[:i] + new_color
            s_min.write(line)
    new_content = "# -*- coding: utf-8 -*-\n"

    with open("colorsystem.py", "r") as s_min:
        lines = s_min.readlines()
    for line in lines:
        if line.startswith("ALL"):
            all_list_str = line[: line.find("]")] + ", "
            line = ""
        new_content += line


    color_names = h_dict.keys()
    for color_name, h in h_dict.items():
        new_content += f"\nclass {color_name}:\n"
        if color_name == "灰色":
            s_min = 0  # from
            s_max = 25  # to
        else:
            s_max = 105
        for s in range(0, s_max, 5):
            for l in range(0, 105, 5):
                new_content = "".join([new_content, "    ", f"B{h_dict[color_name]}_{s}_{l}", f" = \"hslx({h}, {s}%, {l}%)\"", "\n"])
        new_content += "\n"
        all_list_str += f"{color_name}, "

    all_list_str = all_list_str[:-2] + "]\n"  # 去掉最后的逗号和空格
    new_content += all_list_str

    with open("colorsystem.py", "w", encoding="utf-8") as f:
        print(new_content)
        f.write(new_content)
结果,得到一个15个色系,6000个不同色彩浓度、不同亮度的颜色库系统。

这里的颜色值的表示方法使用了hslx(h, s%, l%)而不是hsl(h, s%, l%),原因是如果使用hsl(),使用sass.compile()将scss文件转换成qss文件后,会自动把hsl()颜色值转为16进制颜色值:#RRGGBB这种,而我期望.qss文件中仍然是hsl()格式的颜色。所以使用了sass不能识别的"hslx"前缀,最终生成.qss文件时再把"hslx()"替换为"hsl()"即可。
升级后的颜色举例:

**所有色系:**灰色, 红色, 棕色, 橙色, 橙黄, 黄色, 黄绿, 绿色, 青绿, 青色, 靛蓝, 蓝色, 紫色, 品红, 紫红
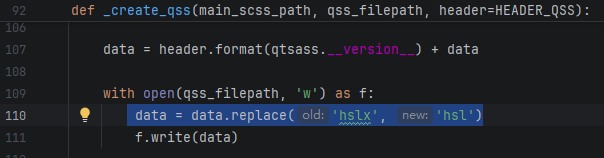
- 修改 qdarkstyle/utils/scss.py,增加:data = data.replace('hslx', 'hsl')
(替换hslx)
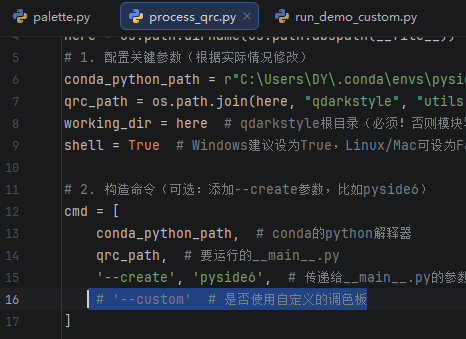
运行QDarkStyleSheet-master/process_qrc.py,生成新的样式表文件,样式表中的颜色格式为hsl(h, s%, l%)。在运行时,注释掉custom这一行,就会重新生成dark和light主题:
二、创建一个新项目并离线使用升级后的qdarkstyle主题
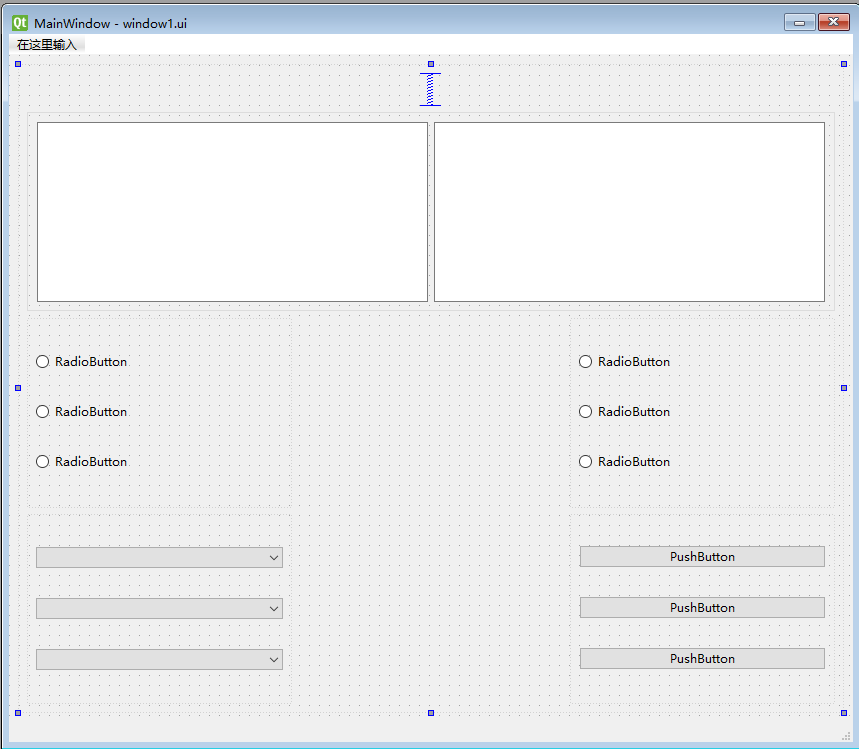
1、随便组态一个UI界面:
命名为window1.ui
2、创建项目、复制和新建目录、文件:
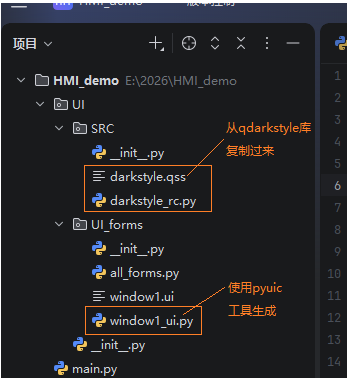
- UI/UI_froms/init.py:
python
# __all__的内容决定了from xxx import *时,哪些内容被导入

__all__ = ['window1_ui']- UI/UI_froms/all_forms.py:
python
from PySide6.QtWidgets import QMainWindow

from . import *
from .. SRC import darkstyle_rc


class Window1(QMainWindow, window1_ui.Ui_MainWindow):
    def __init__(self):
        super().__init__()
        self.setupUi(self)


window1 = Window1()
window1.show()
python
# -*- coding: utf-8 -*-
import sys

from PySide6.QtCore import qInstallMessageHandler
from PySide6.QtWidgets import QApplication


# Qt消息管理器
def msg_handler(a, b, c):
    print(c)

if __name__ == "__main__":
    app = QApplication(sys.argv)

    # 安装Qt消息管理器
    qInstallMessageHandler(msg_handler)

    # 为整个应用设置样式表
    with open("UI/SRC/darkstyle.qss", "r") as f:
        APP_STYLE_SHEET = f.read()
    app.setStyleSheet(APP_STYLE_SHEET)

    # 导入所有的画面
    from UI.UI_forms import all_forms

    sys.exit(app.exec())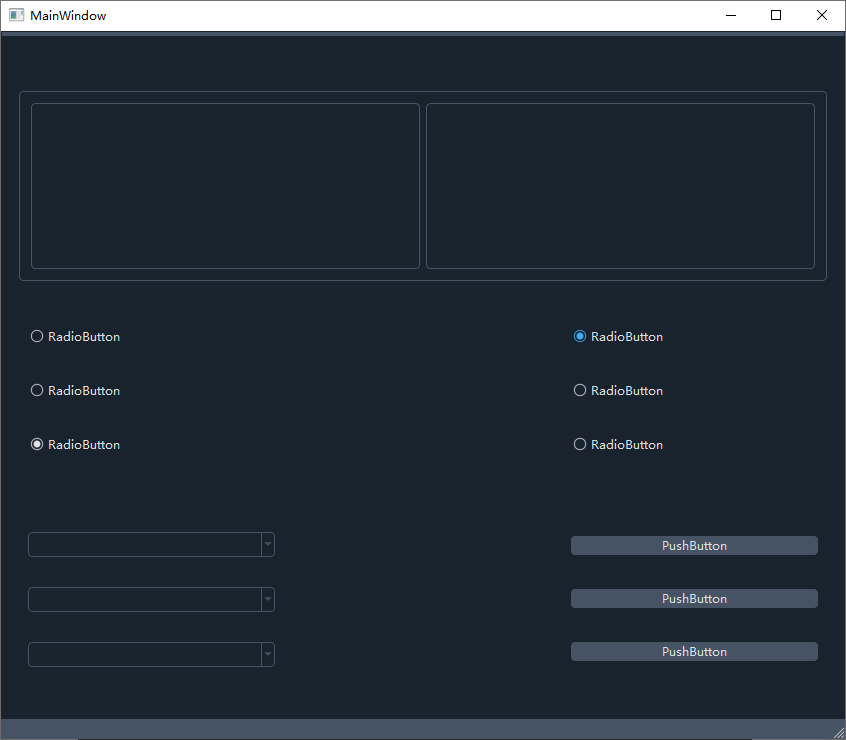
成功应用了改造后的dark主题,所有的颜色都用hsl值表示。
三、创建新主题并修改和扩充特性
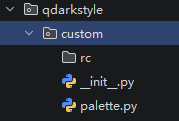
1、按照下面文章创建一个custom主题:
https://blog.csdn.net/xulibo5828/article/details/156397862
- 创建目录和文件:
调色板主要依据原有的dark主题,并改用颜色接近的hsl色值取代原有的颜色表示法。
- qdarkstyle/custom/palette.py:
python
# -*- coding: utf-8 -*-

"""QDarkStyle custom palette."""

# Local imports
from qdarkstyle.colorsystem import *
from qdarkstyle.palette import Palette


class CustomPalette(Palette):
    """Custom palette variables."""

    # Identifier
    ID = 'custom'

    # Color
    COLOR_BACKGROUND_1 = 靛蓝.B210_40_15
    COLOR_BACKGROUND_2 = 靛蓝.B210_25_20
    COLOR_BACKGROUND_3 = 灰色.B210_20_25
    COLOR_BACKGROUND_4 = 灰色.B210_20_35
    COLOR_BACKGROUND_5 = 灰色.B210_20_40
    COLOR_BACKGROUND_6 = 灰色.B210_20_45

    COLOR_TEXT_1 = 灰色.B210_5_90
    COLOR_TEXT_2 = 灰色.B210_5_75
    COLOR_TEXT_3 = 灰色.B210_5_70
    COLOR_TEXT_4 = 灰色.B210_15_65

    # 强调色
    COLOR_ACCENT_1 = 靛蓝.B210_50_30
    COLOR_ACCENT_2 = 靛蓝.B210_50_40
    COLOR_ACCENT_3 = 靛蓝.B210_75_40
    COLOR_ACCENT_4 = 靛蓝.B210_80_55
    COLOR_ACCENT_5 = 靛蓝.B210_100_60

    # Color for disabled elements
    COLOR_DISABLED = 灰色.B210_15_55

    OPACITY_TOOLTIP = 230
运行QDarkStyleSheet-master/process_qrc.py,不要注释掉custom这一行,生成custom的样式表文件。
2、引入UI管理器,管理更多的UI特性
qdarkstyle/utils下新建 UiManager.py:
python
from PySide6.QtCore import QObject, QTimer, QRegularExpression, Slot
from PySide6.QtGui import QRegularExpressionValidator


class UiManager(QObject):
    def __init__(self, parent=None):
        """
        UI管理器,各种关于UI的功能函数
        :param parent:
        """
        super().__init__(parent)
        self.blinked_widgets = []  # 需要闪烁的所有部件
        self.blink_timer = QTimer()
        self.blink_timer.setInterval(1000)
        self.blink_timer.timeout.connect(self.on_blink_timer_timeout)
        self.blink_timer.start()
        self.blink_value = True

    # 设置文字输入的正则公式
    def set_validator(self, obj, value):
        """
        数字输入的正则函数
        light_up^ 表示匹配字符串的开始位置。
        light_up-? 表示匹配一个可选的负号(-)。
        light_up\d+ 表示匹配一个或多个数字字符(0-9)。
        light_up\.? 表示匹配一个可选的小数点(.)。在正则表达式中,. 是一个特殊字符,需要用 \ 进行转义,因此写作 \.。
        light_up\d+ 表示匹配一个或多个数字字符。
        light_up$ 表示匹配字符串的结束位置。
        light_up如果希望可以输入负数,则正则表达式为:"^-?\d+\.?\d+$"
        light_up如果希望输入非负数,则正则表达式为: "^\d+\.?\d+$"
        """
        reg = QRegularExpression(value)
        validator = QRegularExpressionValidator()
        validator.setRegularExpression(reg)
        if not isinstance(obj, list):
            objs = [obj]
        else:
            objs = obj
        for o in objs:
            o.setValidator(validator)

    # 执行部件的操作函数(支持批量处理,函数执行、特性设定)
    def setup(self, obj, method_property, *args, **kwargs):
        if not isinstance(obj, list):  # 批量操作
            objs = [obj]
        else:
            objs = obj
        for o in objs:
            method = getattr(o, method_property, None)  # 如果是函数
            if method is not None:
                method(*args, **kwargs)
            else:  # 如果是属性
                # o.setProperty(method_property, *args)
                o.setProperty(method_property, *args)
                # print(method_property, args[0])
                # 如果是设置闪烁
                if method_property == "blinking" and args[0]:
                    if o not in self.blinked_widgets:
                        self.blinked_widgets.append(o)
                    # print(self.blinked_widgets)
                else:
                    # 刷新显示
                    o.style().unpolish(o)
                    o.style().polish(o)

    # 闪烁定时器的超时槽函数
    @Slot()
    def on_blink_timer_timeout(self):
        self.blink_value = not self.blink_value     # 反转显示
        if len(self.blinked_widgets) > 0:
            for widget in self.blinked_widgets:
                # 去掉不需要闪烁的
                if not widget.property("blinking"):
                    widget.setProperty("blink", False)
                    widget.style().unpolish(widget)
                    widget.style().polish(widget)
                    self.blinked_widgets.remove(widget)
        if len(self.blinked_widgets) > 0:
            for widget in self.blinked_widgets:
                # 设置闪烁颜色
                widget.setProperty("blink", self.blink_value)
                widget.style().unpolish(widget)
widget.style().polish(widget)3、新建目录qdarkstyle/UI_effects,目录下新建effects.py:
这个文件定义了各种特殊的显示效果,比如:亮灯、闪烁、渐变背景等。
python
# 基本的dark按钮
import sys

from PySide6.QtGui import QFont
from PySide6.QtWidgets import QApplication, QPushButton, QWidget, QVBoxLayout, QLabel, QRadioButton, QLineEdit

#############################################################################背景渐变的带指示灯、带闪烁按钮
widget = "QPushButton"
bc = (210, 20, 35)  # base_color,按钮的基础背景色
base_darkButton = f"""
     /*基本属性*/
{widget} {{background-color: qlineargradient(x1: 1, y1: 0, x2: 1, y2: 1,
    stop: 0 hsl({bc[0]},{bc[1]}%,{bc[2]}%),
    stop: 0.1 hsl({bc[0]},{bc[1]}%,{round(bc[2] * 0.85)}%),
    stop: 0.23 hsl({bc[0]},{bc[1]}%,{round(bc[2] * 0.6)}%),
    stop: 1.0 hsl({bc[0]},{bc[1]}%,{round(bc[2] * 0.5)}%));
}}
{widget}:hover {{background-color: qlineargradient(x1: 1, y1: 0, x2: 1, y2: 1,
    stop: 0 hsl({bc[0]},{bc[1]}%,{round(bc[2] * 1.15)}%),
    stop: 0.1 hsl({bc[0]},{bc[1]}%,{bc[2]}%),
    stop: 0.23 hsl({bc[0]},{bc[1]}%,{round(bc[2] * 0.85)}%),
    stop: 1.0 hsl({bc[0]},{bc[1]}%,{round(bc[2] * 0.5)}%));
}}
{widget}:pressed {{background-color:  qlineargradient(x1: 1, y1: 0, x2: 1, y2: 1,
    stop: 0 hsl({bc[0]},{bc[1]}%,{round(bc[2] * 1.28)}%),
    stop: 0.1 hsl({bc[0]},{bc[1]}%,{round(bc[2] * 1.15)}%),
    stop: 0.23 hsl({bc[0]},{bc[1]}%,{bc[2]}%),
    stop: 1.0 hsl({bc[0]},{bc[1]}%,{round(bc[2] * 0.5)}%));
    border: 2px solid hsl({bc[0]}, {round(bc[1] * 1.5)}%, {round(bc[2] * 1.35)}%);
}}
{widget}:checked {{
    border: 2px solid hsl({bc[0]}, {round(bc[1] * 1.5)}%, {round(bc[2] * 1.35)}%);
}}

      /*light,亮灯状态*/
{widget}[light="true"] {{
    color: /*$light_color*/;
    border: 1px solid /*$light_color*/;
}}

{widget}[light="true"]:pressed {{background-color:  qlineargradient(x1: 1, y1: 0, x2: 1, y2: 1,
    stop: 0 hsl({bc[0]},{bc[1]}%,{round(bc[2] * 1.28)}%),
    stop: 0.1 hsl({bc[0]},{bc[1]}%,{round(bc[2] * 1.15)}%),
    stop: 0.23 hsl({bc[0]},{bc[1]}%,{bc[2]}%),
    stop: 1.0 hsl({bc[0]},{bc[1]}%,{round(bc[2] * 0.5)}%));
    border: 1px solid hsl({bc[0]}, {round(bc[1] * 1.5)}%, {round(bc[2] * 1.35)}%);
}}
       /*blink,闪烁状态*/
{widget}[blink="true"] {{
    color: /*$blink_color*/;
    border: 1px solid /*$blink_color*/;
}}"""


class LEDBlinkButton:
    def __init__(self, light_color="", blink_color=""):
        self.style_sheet = base_darkButton  # 基础黑按钮
        if light_color != "":
            self.style_sheet = self.style_sheet.replace("/*$light_color*/",  light_color)
        if blink_color != "":
            self.style_sheet = self.style_sheet.replace("/*$blink_color*/", blink_color)

    def __str__(self):
        return self.style_sheet

#############################################################################################背景渐变的带闪烁的指示灯
widget = "QLabel"
bc = (0, 30, 20)  # base_color,指示灯的熄灭色
base_LED = f"""
     /*基本属性(灭灯状态)*/
{widget} {{border: 2px solid hsl(210, 20%, 35%);
    border-radius: /*$radius*/;
    background-color: qradialgradient(spread:pad, cx:0.55, cy:0.55, radius:0.7,
    fx:0.35, fy:0.35,
    stop:0 hsl(/*$led_on_h*/,{bc[1]}%,{round(bc[2] * 2.5)}%),
    stop:0.15 hsl(/*$led_on_h*/,{bc[1]}%,{round(bc[2] * 1.25)}%),
    stop:0.65 hsl(/*$led_on_h*/,{bc[1]}%,{bc[2]}%),
    stop:1 hsl(/*$led_on_h*/,{bc[1]}%,{round(bc[2] * 0.5)}%));
}}

      /*light,亮灯状态*/
{widget}[light="true"] {{
    background-color: qradialgradient(spread:pad, cx:0.55, cy:0.55, radius:0.7,
    fx:0.35, fy:0.35,
    stop:0 hsl(/*$led_on_h*/,{round(bc[1] * 3)}%,{round(bc[2] * 4.5)}%),
    stop:0.15 hsl(/*$led_on_h*/,{round(bc[1] * 2.7)}%,{round(bc[2] * 2.5)}%),
    stop:0.65 hsl(/*$led_on_h*/,{round(bc[1] * 2.7)}%,{bc[2] * 1.75}%),
    stop:1 hsl(/*$led_on_h*/,{round(bc[1] * 2.7)}%,{round(bc[2] * 0.75)}%));
}}

       /*blink,闪烁状态*/
{widget}[blink="true"] {{ background-color:
    qradialgradient(spread:pad, cx:0.55, cy:0.55, radius:0.7,
    fx:0.35, fy:0.35,
    stop:0 hsl(/*$blink_h*/,{round(bc[1] * 3)}%,{round(bc[2] * 4.5)}%),
    stop:0.15 hsl(/*$blink_h*/,{round(bc[1] * 2.7)}%,{round(bc[2] * 2.5)}%),
    stop:0.65 hsl(/*$blink_h*/,{round(bc[1] * 2.7)}%,{bc[2] * 1.75}%),
    stop:1 hsl(/*$blink_h*/,{round(bc[1] * 2.7)}%,{round(bc[2] * 0.75)}%));
}}"""

class LEDBlinkLamp:
    def __init__(self, radius:int,  light_color="", blink_color=""):
        self.style_sheet = base_LED  # 基础指示灯
        if light_color != "":
            led_on_h = light_color[light_color.find("(")+1:light_color.find(",")]
            self.style_sheet = self.style_sheet.replace("/*$led_on_h*/", led_on_h)
        if blink_color != "":
            blink_h = blink_color[blink_color.find("(")+1:blink_color.find(",")]
            self.style_sheet = self.style_sheet.replace("/*$blink_h*/", blink_h)
        self.style_sheet = self.style_sheet.replace("/*$radius*/", str(radius))

    def __str__(self):
        return self.style_sheet

#############################################################################################绿色方框指示器方单选按钮QRadioButton
widget = "QRadioButton"
bc = (210, 20, 60)  # base_color,未选中的指示器背景色
base_RadioButton = f"""
{widget} {{
        spacing: 10px;
    }}
    /*设置复选框的指示器尺寸*/
{widget}::indicator {{
        width: 18px;
        height: 18px;
        border: 1px solid hsl({bc[0]},{bc[1]}%,{round(bc[2] * 1.3)}%);
        border-radius: 1px;
        background-color: hsl({bc[0]},{bc[1]}%,{bc[2]}%);
    }}
    /*选中状态*/
{widget}::indicator:checked {{
        background-color: hsl(/*$checked_h*/, 70%, 50%);
    }}
    /* 鼠标悬停 */
{widget}::indicator:hover {{
        border: 1px solid hsl({bc[0]},{bc[1] * 4}%,{bc[2]}%);
    }}
"""

class RadioButton:
    def __init__(self, checked_color=""):
        self.style_sheet = base_RadioButton  # 基础指示灯
        if checked_color != "":
            checked_h = checked_color[checked_color.find("(")+1:checked_color.find(",")]
            self.style_sheet = self.style_sheet.replace("/*$checked_h*/", checked_h)

    def __str__(self):
        return self.style_sheet

#############################################################################################显示数据的QLabel
widget = "QLabel"
bc = (210, 20, 60)  # base_color,未选中的指示器背景色
base_showing_label = f"""
{widget} {{
    background-color: hsl(210, 30%, 25%);
    border: 1px solid hsl(210, 30%, 55%);
    border-radius: 4px;
    padding: 8px;
}}

/*blink,闪烁状态*/
{widget}[blink="true"] {{
    color: /*$blink_color*/;
    border: 1px solid /*$blink_color*/;
}}"""

class ShowLabel:
    def __init__(self, blink_color=""):
        self.style_sheet = base_showing_label  # 基础指示灯
        if blink_color != "":
            self.style_sheet = self.style_sheet.replace("/*$blink_color*/", blink_color)

    def __str__(self):
        return self.style_sheet


if __name__ == "__main__":
    app = QApplication(sys.argv)
    from qdarkstyle.utils.UiManager import UiManager

    with open("../custom/customstyle.qss", "r", encoding="utf-8") as f:
        s = f.read()

    app.setStyleSheet(s)
    um = UiManager()

    # 创建模板样式
    style_btn_normal = LEDBlinkButton()   # 渐变背景的普通按钮,不带灯,不闪烁
    style_btn_blinking = LEDBlinkButton(light_color="hsl(120, 80%, 50%)", blink_color="hsl(60, 80%, 50%)")  # 渐变背景的普通按钮,带绿色(h=120)灯,闪烁色为黄色(h=60)
    style_Led_blinking = LEDBlinkLamp(radius=20, light_color="hsl(0, 80%, 50%)", blink_color="hsl(60, 80%, 50%)")      # 渐变背景的红色(h=0)指示灯,闪烁色为黄色(h=60)
    style_radio_button = RadioButton(checked_color="hsl(120, 80%, 50%)")  # 方框指示器单选按钮,选中为绿色(h=120)
    style_showing_label = ShowLabel(blink_color="hsl(0, 80%, 50%)")

    widget = QWidget()
    layout = QVBoxLayout()

    font = QFont()
    font.setPixelSize(20)

    # 圆灯
    lamp_led = QLabel()
    # lamp_led.setFixedSize(40, 40)
    # lamp_led.setStyleSheet(f"{style_Led_blinking}")  # 应用模板

    btn_led = QPushButton("带灯的按钮")
    # btn_led.setStyleSheet(f"{btn_blinking}")
    # btn_led.setFixedSize(200, 60)
    # btn_led.setFont(font)

    btn2 = QPushButton("切换闪烁")
    # btn2.setStyleSheet(f"{LEDBlinkButton()}")
    # btn2.setFixedSize(200, 60)
    # btn2.setFont(font)
    # btn2.setCheckable(True)

    btn3 = QPushButton("切换亮灯")
    # btn3.setStyleSheet(f"{LEDBlinkButton()}")
    # btn3.setFixedSize(200, 60)
    # btn3.setFont(font)
    # btn3.setCheckable(True)

    rbtn1 = QRadioButton("RadioButton1")
    rbtn2 = QRadioButton("RadioButton2")

    sl = QLabel("显示标签")
    le = QLineEdit()


    um.setup(btn_led, "setStyleSheet", f"{style_btn_blinking}")  # 闪烁的按钮
    um.setup(lamp_led, "setStyleSheet", f"{style_Led_blinking}")   # 闪烁的灯
    um.setup([btn2, btn3], "setStyleSheet", f"{style_btn_normal}")  # 不闪烁的渐变背景按钮
    um.setup([rbtn1, rbtn2], "setStyleSheet", f"{style_radio_button}")  # 两个单选按钮
    um.setup(sl, "setStyleSheet", f"{style_showing_label}")  #一个显示标签
    # 批量设置属性
    um.setup([btn_led, btn2, btn3, le, sl], "setFixedSize", *(200,60))    # 设置尺寸
    um.setup(lamp_led, "setFixedSize", *(40, 40))  # 设置尺寸
    um.setup([btn_led, btn2, btn3, rbtn1, rbtn2, le, sl], "setFont", font)  # 设置字体
    um.setup([btn2, btn3], "setCheckable", True)


    btn2.clicked.connect(lambda x :um.setup([btn_led, lamp_led], "blinking", x))
    btn3.clicked.connect(lambda x :um.setup([btn_led, lamp_led], "light", x))
    btn3.clicked.connect(lambda: le.setText("123"))
    btn2.clicked.connect(lambda: le.setText("456"))

    rbtn1.toggled.connect(lambda x :um.setup(sl, "blinking", x))

    layout.addWidget(lamp_led)
    layout.addWidget(btn_led)
    layout.addWidget(btn2)
    layout.addWidget(btn3)
    layout.addWidget(rbtn1)
    layout.addWidget(rbtn2)
    layout.addWidget(le)
    layout.addWidget(sl)

    widget.setLayout(layout)
    widget.show()

    app.exec()