0. 一点个人的感悟和总结
-
当前一个愈发明显的现象是:代码几乎全由 AI 生成已经成为常态,管理层甚至明确要求日常开发必须借助 AI,手工编码的项目和完全靠手写的程序员似乎正被归入历史。这曾引发一种普遍的怀疑------那些花在啃代码、读厚书上的努力,是否终将白费。然而在深入使用各种 AI 工具之后,出现的并不是焦虑和恐慌,反而进一步印证了已有积累的价值。所有 AI 都逃不开"垃圾进,垃圾出"的准则,一个人如果不具备独立完成项目的能力和对底层实现的真正理解,那么经由 AI 生成的输出,也很难不成为一堆垃圾。
同样值得注意的,是对待 AI 态度的微小差别所带来的巨大分岔。一种方式是将 AI 用作执行助手,帮助落地已经思考清楚的逻辑;面对从未解决的问题,先充分讨论,再自行设计方案,随后逐步填充实现,主导权始终在人手里。另一种方式则是全盘听从指令执行,从不追问产出对真实问题是否合适、是否合理。真正工程师对细节的追求,并不表现为机械地执行指令,而应体现在专注解决问题,并对每一步、每一个细节实施精准的控制。这正是差别所在:一者是顺从执行、让渡判断;另一者是直面问题,主动背负起思考的代价。后一种选择,直到今天仍然值得明确地坚持。
回顾我的工作经历,不得不承认骄傲地夸赞一下自己竟然能在一年内掌握如此多的技能接触如此多的领域。万能的编程语言Python帮助我无论面对什么都有操作和学习的途径,性能语言Go让我在追求效率的场景也能有不错的发挥,在把自己的想法落成现实的过程又先后接触了Figma页面设计,再加上个人的模型和算法能力,距离全栈工程师近前端一步之遥。我相信"个人+AI"式的"全栈工程师"在肉眼可及的未来一定成为市场的主流。那么为了实现自己的想法,也为了将来的发展,让我们再次使用"古法"来学习React + Typescript + vite的前端技术框架,补齐自己的最后一块拼图!
-
就像学习任何一门其他语言一样,我们首先来查看数值、字符、字典、列表、结构体等基础变量类型如何定义和使用。用AI生成一个基础的项目代码出来:
...相信对完全没有接触过前端和Typescript的大家来说突然呈现的这个框架实在是...有点迷茫。没关系,这就转变策略,让我们来问问AI,这里面的各个文件都有什么作用,关注重点应该放在什么地方。
1. 定义基础变量 探索整体框架
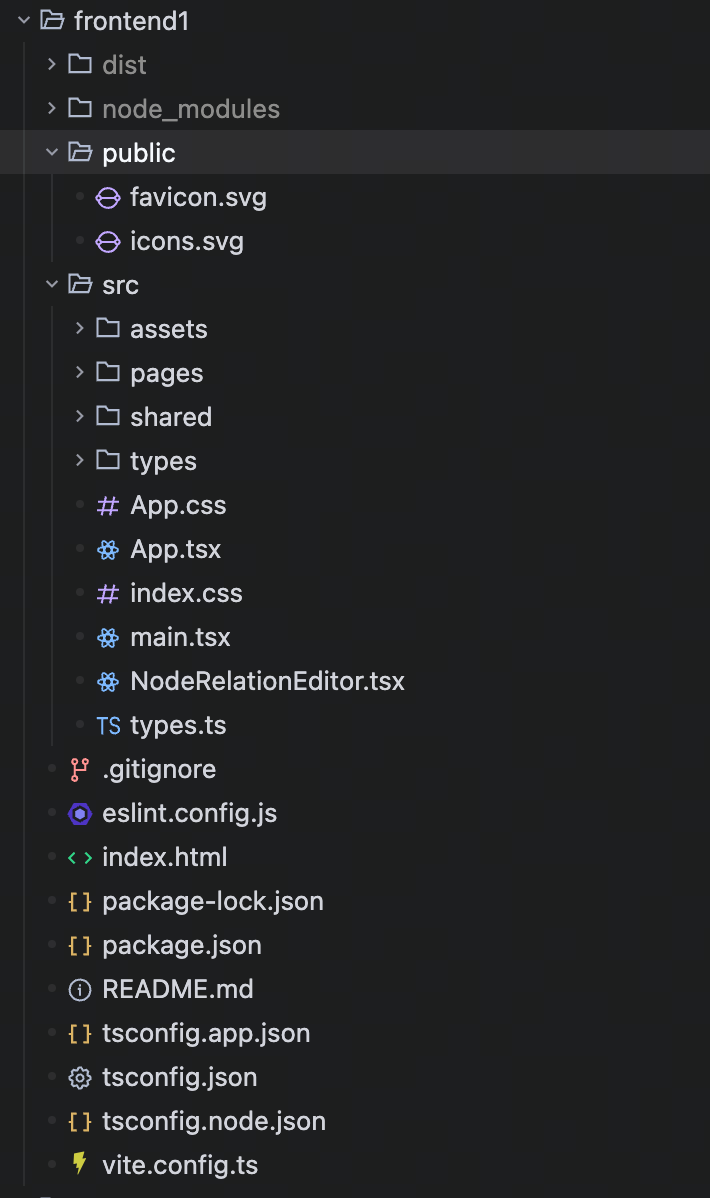
整体预览
相关的配置文件占据了大部分的项目空间,需要注重查看的文件只剩下了index.html和src目录下的内容。在看的过程中注意到,似乎每一个tsx文件都配有一个css文件。.ts文件可以理解为Typescript代码,那tsx,css和平时少见的.svg文件都有什么作用呢?下面对他们进行了详细的区分和介绍:
- 项目文件/目录介绍
(可能会多出一些文件没有介绍,因为我在最开始的基础上进行了改进,忘记保留之前的截图了)
| 文件/目录 | 作用 | 是否需要修改 |
|---|---|---|
| package.json | npm 包配置(依赖、脚本) | 一般不需要,除非要加新依赖 |
| package-lock.json | 依赖版本锁定文件 | ❌ 不要手动修改 |
| tsconfig.json | TypeScript 主配置 | ❌ 新手不用改 |
| tsconfig.app.json | TypeScript 应用配置 | ❌ 新手不用改 |
| tsconfig.node.json | TypeScript Node 配置 | ❌ 新手不用改 |
| vite.config.ts | Vite 构建工具配置 | ❌ 新手不用改 |
| eslint.config.js | ESLint 代码检查配置 | ❌ 新手不用改 |
| .gitignore | Git 忽略文件配置 | ❌ 一般不用改 |
| index.html | HTML 入口文件 | 可以改 title,其他不用 |
| src/index.css | 全局样式 | 可以改,但 App.css 更重要 |
| src/main.tsx | React 应用入口 | ❌ 一般不用改,是固定的 |
| README.md | 项目说明文档 | 可以改 |
| ... | ... | ... |
| public/favicon.svg | 网站图标(浏览器标签页显示) | 可以改 |
| public/icons.svg | 图标资源 | 可以改 |
| src/assets/hero.png | 首页大图 | 可以改 |
| src/assets/react.svg | React logo | 可以改 |
| src/assets/vite.svg | Vite logo | 可以改 |
| src/App.tsx | 主应用组件(包含所有页面逻辑:计数器、鼠标特效、API调用、拖拽排序等) | 可以改(这是最重要的文件) |
| src/NodeRelationEditor.tsx | 节点关系编辑器组件(核心功能组件,实现节点和关系的绘制、编辑、删除) | 可以改 |
| src/types.ts | TypeScript 类型定义(定义了 Node、Relation、ShapeType 等类型) | 可以改(你可以根据需要扩展) |
| src/App.css | App 组件样式(所有页面和组件的样式都在这里) | 可以改 |
- 文件类型介绍
| 后缀 | 全称 | 类型 | 主要用途 |
|---|---|---|---|
| .svg | Scalable Vector Graphics | 图片格式 | 矢量图形、图标 |
| .css | Cascading Style Sheets | 样式文件 | 网页美化、布局 |
| .tsx | TypeScript XML | 代码文件 | React 组件(TypeScript) |
发现和思考
纵览整个项目文件,会发现.css中的代码很像定义这个页面的组件一样。如果你也接触过figma设计产品图,那一定对这样的格式和写法非常亲切。对于之前"似乎每个tsx文件都配有一个css文件"的疑问可以得到进一步的理解。
CSS
.app {
  min-height: 200vh;
  padding-top: 80px;
}

.navbar {
  position: fixed;
  top: 0;
  left: 0;
  right: 0;
  background: linear-gradient(135deg, #667eea 0%, #764ba2 100%);
  padding: 15px 20px;
  display: flex;
  gap: 10px;
  justify-content: center;
  z-index: 1000;
  box-shadow: 0 4px 15px rgba(0, 0, 0, 0.2);
}

.navbar button {
  padding: 10px 20px;
  border: none;
  border-radius: 8px;
  background: rgba(255, 255, 255, 0.2);
  color: white;
  font-size: 16px;
  cursor: pointer;
  transition: all 0.3s ease;
}

.navbar button:hover {
  background: rgba(255, 255, 255, 0.3);
  transform: translateY(-2px);
}

.navbar button.active {
  background: white;
  color: #667eea;
  font-weight: bold;
}

.mouse-tracker {
  position: fixed;
  top: 80px;
  left: 20px;
  background: rgba(0, 0, 0, 0.8);
  color: white;
  padding: 10px 15px;
  border-radius: 8px;
  font-size: 14px;
  z-index: 999;
}

.scroll-tracker {
  position: fixed;
  top: 80px;
  right: 20px;
  background: rgba(0, 0, 0, 0.8);
  color: white;
  padding: 10px 15px;
  border-radius: 8px;
  font-size: 14px;
  z-index: 999;
}

.main-content {
  max-width: 800px;
  margin: 0 auto;
  padding: 20px;
}

.page {
  background: white;
  border-radius: 16px;
  padding: 40px;
  margin-bottom: 30px;
  box-shadow: 0 10px 40px rgba(0, 0, 0, 0.1);
}

.page h1 {
  color: #333;
  margin-bottom: 30px;
  font-size: 28px;
}

.page p {
  color: #666;
  line-height: 1.8;
  margin: 10px 0;
}

.counter-section {
  display: flex;
  flex-direction: column;
  align-items: center;
  gap: 20px;
}

.count-button {
  padding: 15px 40px;
  font-size: 18px;
  background: linear-gradient(135deg, #667eea 0%, #764ba2 100%);
  color: white;
  border: none;
  border-radius: 50px;
  cursor: pointer;
  transition: all 0.3s ease;
  box-shadow: 0 4px 15px rgba(102, 126, 234, 0.4);
}

.count-button:hover {
  transform: translateY(-3px);
  box-shadow: 0 8px 25px rgba(102, 126, 234, 0.5);
}

.count-display {
  font-size: 24px;
  font-weight: bold;
  color: #667eea;
}

.reset-button {
  padding: 10px 30px;
  font-size: 16px;
  background: #f0f0f0;
  color: #333;
  border: none;
  border-radius: 25px;
  cursor: pointer;
  transition: all 0.3s ease;
}

.reset-button:hover {
  background: #e0e0e0;
}

.effects-section {
  display: flex;
  flex-direction: column;
  gap: 20px;
  align-items: center;
}

.hover-box {
  width: 200px;
  height: 100px;
  background: linear-gradient(135deg, #f093fb 0%, #f5576c 100%);
  color: white;
  display: flex;
  align-items: center;
  justify-content: center;
  border-radius: 12px;
  font-size: 16px;
  font-weight: bold;
  cursor: pointer;
  transition: all 0.3s ease;
}

.hover-box:hover {
  transform: scale(1.1) rotate(5deg);
  box-shadow: 0 10px 30px rgba(245, 87, 108, 0.4);
}

.hover-count {
  font-size: 18px;
  color: #f5576c;
  font-weight: bold;
}

.color-box {
  width: 200px;
  height: 100px;
  background: #4facfe;
  color: white;
  display: flex;
  align-items: center;
  justify-content: center;
  border-radius: 12px;
  font-size: 16px;
  font-weight: bold;
  cursor: pointer;
  transition: all 0.3s ease;
}

.color-box:hover {
  background: #00f2fe;
  transform: scale(1.05);
}

.scale-box {
  width: 200px;
  height: 100px;
  background: #43e97b;
  color: white;
  display: flex;
  align-items: center;
  justify-content: center;
  border-radius: 12px;
  font-size: 16px;
  font-weight: bold;
  cursor: pointer;
  transition: all 0.3s ease;
}

.scale-box:hover {
  transform: scale(1.2);
}

.rotate-box {
  width: 200px;
  height: 100px;
  background: #fa709a;
  color: white;
  display: flex;
  align-items: center;
  justify-content: center;
  border-radius: 12px;
  font-size: 16px;
  font-weight: bold;
  cursor: pointer;
  transition: all 0.3s ease;
}

.rotate-box:hover {
  transform: rotate(360deg);
}

.api-section {
  display: flex;
  flex-direction: column;
  gap: 20px;
  align-items: center;
}

.api-button {
  padding: 15px 40px;
  font-size: 18px;
  background: linear-gradient(135deg, #11998e 0%, #38ef7d 100%);
  color: white;
  border: none;
  border-radius: 50px;
  cursor: pointer;
  transition: all 0.3s ease;
  box-shadow: 0 4px 15px rgba(17, 153, 142, 0.4);
}

.api-button:hover:not(:disabled) {
  transform: translateY(-3px);
  box-shadow: 0 8px 25px rgba(17, 153, 142, 0.5);
}

.api-button:disabled {
  opacity: 0.6;
  cursor: not-allowed;
}

.api-data {
  width: 100%;
  background: #f8f9fa;
  border-radius: 12px;
  padding: 20px;
  border: 2px solid #e9ecef;
}

.api-data h3 {
  color: #333;
  margin-bottom: 15px;
}

.api-data pre {
  white-space: pre-wrap;
  color: #555;
  line-height: 1.8;
  font-family: 'Courier New', monospace;
}

.drag-section {
  display: flex;
  flex-direction: column;
  gap: 20px;
}

.drag-section p {
  text-align: center;
  color: #666;
}

.drag-list {
  display: flex;
  flex-direction: column;
  gap: 10px;
}

.drag-item {
  padding: 20px;
  background: linear-gradient(135deg, #a18cd1 0%, #fbc2eb 100%);
  color: white;
  border-radius: 12px;
  font-size: 18px;
  font-weight: bold;
  cursor: grab;
  transition: all 0.3s ease;
  user-select: none;
}

.drag-item:hover {
  transform: translateX(10px);
  box-shadow: 0 5px 20px rgba(161, 140, 209, 0.4);
}

.drag-item:active {
  cursor: grabbing;
}

.scroll-demo {
  height: 100vh;
  display: flex;
  align-items: center;
  justify-content: center;
  background: linear-gradient(135deg, #667eea 0%, #764ba2 100%);
}

.scroll-demo p {
  color: white;
  font-size: 24px;
  font-weight: bold;
}
然后查看App.tsx文件,发现整个文件只定义了App()一个函数,返回值非常神似html结构。再看到它一开始import了对应的.css文件,我有理由相信这个框架中的代码规划是这么配合的:tsx文件定义了页面的交互逻辑和排版方式,css文件定义了所有需要被排版的东西和样式。最终通过神似html的语法将不同的组件页面组合在一起,就是整个前段逻辑!
Typescript
import { useState, useEffect } from 'react';
import './App.css';
import { Navbar, MouseTracker, ScrollTracker } from './shared';
import HomePage from './pages/HomePage';
import CounterPage from './pages/CounterPage';
import EffectsPage from './pages/EffectsPage';
import ApiPage from './pages/ApiPage';
import DragPage from './pages/DragPage';

function App() {
  const [currentPage, setCurrentPage] = useState('home');
  const [mousePosition, setMousePosition] = useState({ x: 0, y: 0 });
  const [scrollPosition, setScrollPosition] = useState(0);

  useEffect(() => {
    window.addEventListener('scroll', () => setScrollPosition(window.scrollY));
    return () => window.removeEventListener('scroll', () => setScrollPosition(window.scrollY));
  }, []);

  const handleMouseMove = (e: React.MouseEvent) => {
    setMousePosition({ x: e.clientX, y: e.clientY });
  };

  const renderPage = () => {
    switch (currentPage) {
      case 'home':
        return <HomePage />;
      case 'counter':
        return <CounterPage />;
      case 'effects':
        return <EffectsPage />;
      case 'api':
        return <ApiPage />;
      case 'drag':
        return <DragPage />;
      default:
        return <HomePage />;
    }
  };

  return (
    <div className="app" onMouseMove={handleMouseMove}>
      <Navbar currentPage={currentPage} onNavigate={setCurrentPage} />
      <MouseTracker x={mousePosition.x} y={mousePosition.y} />
      <ScrollTracker position={scrollPosition} />
      <main className="main-content">
        {renderPage()}
      </main>
      <div className="scroll-demo">
        <p>向下滚动页面查看滚动效果 👇</p>
      </div>
    </div>
  );
}

export default App;
在有了这样一个初步地模糊地认知后,让我们找找**最顺眼 **的文件:types.ts。这似乎是突破口,是定义了这个项目所需的所有类型和结构体的文件。另外,对于App.tsx和App.css这两个文件的理解也促使我去思考,是否可以对项目对整体布局进行一些调整,来适应灵活的真实开发过程。
2. 基础变量 ✅
数据类型
不多废话,直接进入正题:
- 注释方法
Typescript
// ==================== 单行注释示例 ====================
// 这是单行注释,使用两个斜杠开始

/* ==================== 多行注释示例 ====================
 注释内容第一行
 注释内容第二行
 注释内容第三行
*/- 基础类型定义
Typescript
// ==================== 基础类型定义 ====================

// 联合类型:多个可能的类型之一
export type ShapeType = 'circle' | 'square' | 'triangle';

// 编辑器模式类型
export type EditorMode = 'select' | 'node' | 'relation';

// ==================== 接口定义 ====================

// 节点接口:定义节点的数据结构
export interface Node {
  id: string;              // 字符串类型:节点唯一标识
  x: number;               // 数字类型:x坐标
  y: number;               // 数字类型:y坐标
  shape: ShapeType;        // 自定义类型:形状
  content: string;         // 字符串类型:节点内容
}

// 关系接口:定义节点之间的关系
export interface Relation {
  id: string;                      // 字符串:关系ID
  fromNodeId: string | null;       // 联合类型:起始节点ID或null
  toNodeId: string | null;         // 联合类型:目标节点ID或null
  x1: number;                      // 数字:起点x坐标
  y1: number;                      // 数字:起点y坐标
  x2: number;                      // 数字:终点x坐标
  y2: number;                      // 数字:终点y坐标
  content: string;                 // 字符串:关系内容
}

// ==================== 更多常用类型定义方法 ====================

// 1. 类型别名(type):用于给类型起别名
export type ID = string | number;
export type Status = 'pending' | 'success' | 'error';

// 2. 接口(interface):定义对象结构
export interface User {
  id: ID;                          // 使用自定义类型
  name: string;
  age?: number;                    // 可选属性:加 ? 表示可有可无
  readonly email: string;          // 只读属性:只能读取不能修改
  address?: {                      // 嵌套对象
    city: string;
    street: string;
  };
}

// 3. 数组类型
export type NumberArray = number[];                          // 数字数组
export type StringArray = Array<string>;                     // 另一种写法
export type NodeArray = Node[];                              // 节点数组
export type MixedArray = (string | number)[];                // 混合类型数组

// 4. 元组类型:固定长度和类型的数组
export type Coordinate = [number, number];                   // 坐标元组
export type RGB = [number, number, number];                  // RGB颜色元组
export type Tuple = [string, number, boolean]; // 混合类型元组- 泛型和结构体
Typescript
// 5. 泛型:让类型更灵活
export interface ApiResponse<T> {
  data: T;                     // 泛型数据
  status: number;
  message: string;
}

export type ListResponse<T> = {
  items: T[];
  total: number;
  page: number;
};

// 6. 类型继承(接口扩展)
export interface TreeNode extends Node {
  children?: TreeNode[];       // 继承Node并添加children属性
  parentId?: string;
}- 常见特殊语法
Typescript
// 7. 类型工具:Partial、Required、Pick、Omit等
export type PartialNode = Partial<Node>;                      // 所有属性都可选
export type RequiredUser = Required<User>;                    // 所有属性都必填
export type NodePosition = Pick<Node, 'x' | 'y'>;             // 只选取x和y属性
export type NodeWithoutContent = Omit<Node, 'content'>;       // 排除content属性

// 8. 字面量类型
export type Direction = 'up' | 'down' | 'left' | 'right';
export type HttpMethod = 'GET' | 'POST' | 'PUT' | 'DELETE';
export type StatusCode = 200 | 400 | 401 | 403 | 404 | 500;

// 9. 映射类型
export type ReadonlyNode = {
  readonly [K in keyof Node]: Node[K];
};

// 10. 条件类型
export type IsString<T> = T extends string ? true : false;

// 11. 枚举类型替代方案(由于项目启用 erasableSyntaxOnly,不能使用 enum)
// 使用 const 对象 + as const + 类型提取来替代 enum
export const Shape = {
  Circle: 'circle',
  Square: 'square',
  Triangle: 'triangle',
} as const;
export type ShapeType2 = typeof Shape[keyof typeof Shape];  // 提取值类型:'circle' | 'square' | 'triangle'

export const Priority = {
  Low: 0,
  Medium: 1,
  High: 2,
} as const;
export type PriorityType = typeof Priority[keyof typeof Priority];  // 提取值类型:0 | 1 | 2

// 12. Record类型:键值对映射
export type NodeMap = Record<string, Node>;                  // 以string为key,Node为value
export type Dictionary = Record<string, any>;                // 通用字典类型

// 13. 类型守卫相关
export type Maybe<T> = T | null | undefined;
export type NonNullable<T> = T extends null | undefined ? never : T;- 函数定义和继承
Typescript
// 14. 函数类型
export type Callback = (data: string) => void;               // 无返回值的回调函数
export type Transformer = (input: number) => string;         // 有返回值的函数
export type Handler = (event: MouseEvent, id: string) => boolean;  // 多参数函数

// 15. 函数重载接口
export interface Calculator {
  add(a: number, b: number): number;
  add(a: string, b: string): string;
}
基础运算操作
与此同时,再了解一下基础的运算操作如何进行。
- 算术运算
Typescript
// ==================== 算术运算 ====================

const a: number = 10;
const b: number = 3;

const add = a + b;           // 加法:13
const subtract = a - b;      // 减法:7
const multiply = a * b;      // 乘法:30
const divide = a / b;        // 除法:3.3333333333333335
const remainder = a % b;     // 取余:1
const power = a ** b;        // 幂运算:1000,等同于 Math.pow(a, b)

let count: number = 1;
count++;                     // 自增:先使用原值,再加 1
++count;                     // 前置自增:先加 1,再使用新值
count--;                     // 自减:先使用原值,再减 1
--count;                     // 前置自减:先减 1,再使用新值

// 注意事项:
// 1. TypeScript 的 number 底层是 JavaScript 的双精度浮点数
const floatResult = 0.1 + 0.2;     // 0.30000000000000004,不是精确的 0.3

// 2. 除以 0 不会报错,会得到 Infinity、-Infinity 或 NaN
const positiveInfinity = 10 / 0;   // Infinity
const negativeInfinity = -10 / 0;  // -Infinity
const notANumber = 0 / 0;          // NaN

// 3. NaN 不等于任何值,包括它自己
const checkNaN = Number.isNaN(notANumber); // true,推荐这样判断 NaN- 字符串拼接和模板字符串
Typescript
// ==================== 字符串运算 ====================

const firstName: string = 'Type';
const lastName: string = 'Script';

const fullName = firstName + lastName;      // 字符串拼接:'TypeScript'
const title = `${firstName}${lastName}`;    // 模板字符串:'TypeScript'

const age: number = 18;
const message = `我今年 ${age} 岁`;         // 模板字符串中可以直接写表达式

// 注意事项:
// 1. + 遇到字符串时会变成字符串拼接
const result1 = '1' + 2;        // '12'
const result2 = 1 + '2';        // '12'
const result3 = 1 + 2 + '3';    // '33',先算 1 + 2,再拼接 '3'
const result4 = '1' + 2 + 3;    // '123',从左到右执行

// 2. 其他算术符号会尝试把字符串转成数字
const result5 = '6' - 2;        // 4
const result6 = '6' * 2;        // 12
const result7 = '6' / 2;        // 3
const result8 = 'abc' - 1; // NaN- 赋值运算
Typescript
// ==================== 赋值运算 ====================

let score: number = 10;

score += 5;     // 等同于 score = score + 5,结果 15
score -= 3;     // 等同于 score = score - 3,结果 12
score *= 2;     // 等同于 score = score * 2,结果 24
score /= 4;     // 等同于 score = score / 4,结果 6
score %= 4;     // 等同于 score = score % 4,结果 2
score **= 3;    // 等同于 score = score ** 3,结果 8

let text: string = 'Hello';
text += ' TypeScript';  // 字符串也可以使用 += 拼接

// 注意事项:
// const 定义的是常量,不能重新赋值
const fixedValue = 100;
// fixedValue = 200;     // 报错:Cannot assign to 'fixedValue'

// 但是 const 对象的属性可以修改,因为对象引用没有变
const user = {
  name: 'Tom',
  age: 18,
};
user.age = 19; // 可以修改对象属性- 比较运算
Typescript
// ==================== 比较运算 ====================

const x: number = 10;
const y: number = 20;

const greater = x > y;           // 大于:false
const less = x < y;              // 小于:true
const greaterEqual = x >= 10;    // 大于等于:true
const lessEqual = y <= 20;       // 小于等于:true

const equal = x === 10;          // 严格相等:true
const notEqual = x !== y;        // 严格不相等:true

// 注意事项:
// 1. 推荐永远使用 === 和 !==,避免 == 和 != 的隐式类型转换
const looseEqual = '1' == 1;     // true,不推荐
const strictEqual = '1' === 1;   // false,推荐

// 2. 对象比较比较的是引用地址,不是内容
const obj1 = { id: 1 };
const obj2 = { id: 1 };
const obj3 = obj1;

const sameContent = obj1 === obj2;     // false,两个不同对象
const sameReference = obj1 === obj3;   // true,指向同一个对象

// 3. 字符串比较按 Unicode 编码顺序比较
const compareString = 'apple' < 'banana'; // true- 逻辑运算
Typescript
// ==================== 逻辑运算 ====================

const isLogin: boolean = true;
const isAdmin: boolean = false;

const canAccess = isLogin && isAdmin;   // 逻辑与:两个都为 true 才是 true
const canView = isLogin || isAdmin;     // 逻辑或:有一个为 true 就是 true
const isGuest = !isLogin;               // 逻辑非:取反

// 短路运算:
// && 左边为 false 时,右边不会执行
// || 左边为 true 时,右边不会执行
function printLog(): boolean {
  console.log('执行了函数');
  return true;
}

const shortAnd = false && printLog();   // printLog 不会执行
const shortOr = true || printLog();     // printLog 不会执行

// 常见用法:
const username = '';
const displayName = username || '匿名用户';  // username 是空字符串,结果为 '匿名用户'

// 注意事项:
// 以下值会被当成 false:false、0、''、null、undefined、NaN
// 其他大多数值都会被当成 true,包括 []、{}、'0'- 空值合并和可选链
Typescript
// ==================== 空值相关运算 ====================

interface Profile {
  name?: string;
  age?: number;
  address?: {
    city?: string;
  };
}

const profile: Profile = {
  name: '',
  age: 0,
};

// ?? 空值合并:只有左边是 null 或 undefined 时,才使用右边默认值
const name1 = profile.name ?? '匿名用户';    // '',不会使用默认值
const age1 = profile.age ?? 18;             // 0,不会使用默认值
const city1 = profile.address?.city ?? '未知城市';

// || 逻辑或:左边是假值时都会使用右边默认值
const name2 = profile.name || '匿名用户';    // '匿名用户'
const age2 = profile.age || 18;             // 18

// ?. 可选链:前面的值是 null 或 undefined 时,直接返回 undefined
const city2 = profile.address?.city;        // undefined,不会报错

// 注意事项:
// 1. ?? 更适合处理默认值,因为 0、''、false 都是有效值
// 2. ?. 只能避免 null 和 undefined 报错,不能保证最终值一定存在- 位运算
Typescript
// ==================== 位运算 ====================

const bitA: number = 5;   // 二进制:0101
const bitB: number = 3;   // 二进制:0011

const bitAnd = bitA & bitB;        // 按位与:1,二进制 0001
const bitOr = bitA | bitB;         // 按位或:7,二进制 0111
const bitXor = bitA ^ bitB;        // 按位异或:6,二进制 0110
const bitNot = ~bitA;              // 按位非:-6

const leftShift = bitA << 1;       // 左移:10,相当于乘以 2
const rightShift = bitA >> 1;      // 有符号右移:2
const zeroRightShift = bitA >>> 1; // 无符号右移:2

// 常见用法:权限标记
const Permission = {
  Read: 1 << 0,    // 1
  Write: 1 << 1,   // 2
  Delete: 1 << 2,  // 4
} as const;

let permission = Permission.Read | Permission.Write;       // 同时拥有读和写权限
const canRead = (permission & Permission.Read) !== 0;      // true
const canDelete = (permission & Permission.Delete) !== 0;  // false

// 注意事项:
// 位运算会把 number 转成 32 位整数,小数和超大数字会丢失精度- 三元运算
Typescript
// ==================== 三元运算 ====================

const point: number = 85;
const level = point >= 60 ? '及格' : '不及格';

const role: 'admin' | 'user' = 'admin';
const page = role === 'admin' ? '后台管理页' : '普通用户页';

// 嵌套三元运算可以写,但不要写太复杂
const grade = point >= 90 ? '优秀' : point >= 60 ? '合格' : '不合格';

// 更复杂的判断建议使用 if else,代码更清楚
let grade2: string;
if (point >= 90) {
  grade2 = '优秀';
} else if (point >= 60) {
  grade2 = '合格';
} else {
  grade2 = '不合格';
}- 类型相关运算
Typescript
// ==================== 类型相关运算 ====================

const value: unknown = 'hello';

// typeof:判断基础类型
if (typeof value === 'string') {
  const upper = value.toUpperCase();  // TypeScript 知道这里 value 是 string
}

// instanceof:判断对象是否来自某个类
class Person {
  constructor(public name: string) {}
}

const person = new Person('Tom');
const isPerson = person instanceof Person;  // true

// in:判断对象中是否存在某个属性
type Cat = { meow: () => void };
type Dog = { bark: () => void };

function speak(animal: Cat | Dog) {
  if ('meow' in animal) {
    animal.meow();   // TypeScript 知道这里是 Cat
  } else {
    animal.bark();   // TypeScript 知道这里是 Dog
  }
}

// as:类型断言,告诉 TypeScript 把某个值当成指定类型
const input = document.querySelector('input') as HTMLInputElement | null;
const inputValue = input?.value;

// 非空断言 !:告诉 TypeScript 这个值一定不是 null 或 undefined
const mustInput = document.querySelector('input')!;
const mustValue = mustInput.value;

// 注意事项:
// 1. as 和 ! 只是影响 TypeScript 类型检查,不会改变运行时结果
// 2. 非空断言用错了,运行时还是会报错
// 3. 能用类型守卫判断时,优先判断,再使用值- 数组和对象常用操作
Typescript
// ==================== 数组运算和对象操作 ====================

const nums: number[] = [1, 2, 3];

const newNums = [...nums, 4];       // 展开运算:创建新数组 [1, 2, 3, 4]
const [first, second, ...rest] = newNums;  // 解构和剩余运算

const userInfo = {
  id: 1,
  name: 'Tom',
};

const newUserInfo = {
  ...userInfo,
  age: 18,
};                                  // 展开对象并新增属性

const { id, ...otherInfo } = newUserInfo;  // 对象解构和剩余属性

// delete:删除对象属性
const tempUser: { name: string; age?: number } = {
  name: 'Tom',
  age: 18,
};
delete tempUser.age;

// 注意事项:
// 1. ... 对数组和对象都是浅拷贝,嵌套对象仍然共享引用
const oldState = {
  user: {
    name: 'Tom',
  },
};
const newState = { ...oldState };
newState.user.name = 'Jerry';
console.log(oldState.user.name);    // 'Jerry',嵌套对象被一起改了

// 2. delete 删除属性后,属性值会变成 undefined
// 3. 解构时可以设置默认值
const { name = '匿名用户' } = tempUser;- 运算优先级和常见建议
Typescript
// ==================== 运算优先级和建议 ====================

const priorityResult = 1 + 2 * 3;      // 7,乘法优先级高于加法
const clearResult = (1 + 2) * 3;       // 9,使用括号明确顺序

const mixResult = true || false && false;     // true,&& 优先级高于 ||
const clearMixResult = true || (false && false);

// 常见建议:
// 1. 复杂表达式多加括号,方便阅读
// 2. 比较时使用 === 和 !==
// 3. 默认值优先考虑 ??,不要盲目使用 ||
// 4. 金额、积分等需要精确计算的场景,不要直接依赖浮点数运算
// 5. as、!、any 都要少用,除非你明确知道运行时一定安全
// 6. 对象和数组展开是浅拷贝,不是深拷贝
3. 整体项目改造
types.ts
依旧拿老熟人类型定义文件开刀。在实际开发的时候一定会遇到这个问题------项目页面较多的时候将所有类型放在一起后就再也找不到单个类型在哪了。于是也和所有常见的操作一般,把文件替换为文件夹后,分门别类地将所需部分定义好即可。
src/
├── types/
│ ├── index.ts # 统一导出所有类型
│ ├── node.ts # 节点相关类型(ShapeType、Node、TreeNode)
│ ├── relation.ts # 关系相关类型(Relation)
│ ├── editor.ts # 编辑器相关类型(EditorMode、函数类型)
│ ├── common.ts # 通用类型(ID、Direction、HttpMethod等)
│ ├── user.ts # 用户相关类型(User)
│ └── api.ts # API相关类型(ApiResponse、ListResponse)
页面和样式的规划
同样,原本的项目框架中所有的页面都哟App.tsx定义,这是非常不好的。在查看了函数的返回结果后,自然而然地就能拓展出一个pages文件夹,其中存放了不同地方的页面,然后再通过App.tsx将他们组合在一起。(可以看到当前项目中并非每一个.tsx文件都对应有.css文件,这是由于不同页面都使用同一个背景。如果不同页面的展示不同的话,依然可以用同样的逻辑进行分门别类的创建)
只不过在划分的过程中可以想Figma中通过"元素"管理共同使用的插件一样,可以把多个文件都共同使用的插件或希望为一个整体的功能放入share文件夹中(.css文件可以放入styles中),这样就实现了不同页面的方便导入和管理。
src/
├── shared/ # 共享组件目录
│ ├── index.ts # 统一导出所有共享组件
│ ├── MouseTracker.tsx # 鼠标位置追踪组件(展示X/Y坐标)
│ ├── Navbar.tsx # 顶部导航栏组件(实现页面切换)
│ └── ScrollTracker.tsx # 页面滚动位置追踪组件
├── pages/ # 页面组件目录
│ ├── ApiPage.tsx # 后端接口调用页面(模拟异步数据请求)
│ ├── CounterPage.tsx # 计数器交互页面(基础状态管理展示)
│ ├── DragPage.tsx # 拖拽排序页面(HTML5 拖放 API 应用)
│ ├── EffectsPage.tsx # 鼠标特效页面(悬停事件与样式交互)
│ └── HomePage.tsx # 首页页面(渲染 NodeRelationEditor 主组件)
└── assets/ # 静态资源目录
├── hero.png # 主视觉/核心展示图片
├── react.svg # React 官方 Logo 图标
└── vite.svg # Vite 构建工具 Logo 图标
4. 下一步
了解Typescript的基础语法和项目结构以后,却依然不理解tsx文件中的代码和函数(不知道大家是否会和我一样,直到现在也对函数有种不清不楚的感觉...)。css文件如何设计一个灵活好看的交互...在下一节中,将深入分析tsx中的代码,并介绍简单的css样式。