千行代码,一步步搭出一个现代 LLM 推理引擎,吃透大模型推理的每一项关键技术。
本阶段目标 --- 最简推理实现
用最朴素的方式把端到端推理跑通:先搭起整体框架,再逐个模块替换为完整实现。整个阶段共 5 篇短文:
| 序号 | 主题 |
|---|---|
| 1 | 序章:LLM 推理引擎到底在做什么 |
| 2 | 核心数据结构:Req 与 SamplingParams(本篇) |
| 3 | 一个可运行的 Decoder Layer(一次性版本) |
| 4 | Naive KV Cache |
| 5 | 单 GPU Engine v0 与 greedy 生成 |
本篇你将学到
- 理解为什么一条请求需要一个独立的
Req对象,而不是直接传 prompt; - 看懂
Req的四个长度字段(cached_len/device_len/max_device_len/extend_len)如何同时表达 prefill 与 decode 两阶段; - 明白
complete_one/append_host为何拆成两个方法------host 与 device 的更新职责不同; - 掌握
SamplingParams.is_greedy这一个布尔表达式背后的工程取舍。
1. 为什么需要 Req
上一篇结尾的状态
第 1 篇结束时,单条请求内部的过程已经清楚:prompt 一次 prefill → 每步 decode 一个新 token。但一旦多请求并发涌入引擎,只有"prompt"是不够的。
一条请求当前的"全部状态"包含什么
试着列一下:
- 原始 prompt 的 token id 序列(在 CPU);
- KV cache 在 GPU 上已经写到第几个位置(在 device);
- 还允许再生成多少个 token(取决于用户设定的 max_tokens);
- 这条请求的采样参数(temperature / top_k / top_p / ...);
- 是否还没结束、是否被中途取消......
如果把这些散落在引擎各处,Scheduler 每一步都要从七八个不同的数据结构里凑齐"这条请求的当前状态",代码会迅速失控。
因此引入 Req 这个对象
Req 是引擎里"一条推理请求"的容器。它把这条请求当前的全部状态装进一个 dataclass,Scheduler / Engine / Sampler 之间传递的就是它。
具体怎么解决?Req 用四个长度字段(cached_len / device_len / max_device_len / extend_len)统一表达 prefill 与 decode 两阶段的进度,用两个方法(complete_one / append_host)分别推进 device 侧与 host 侧的状态------任何一处代码只要拿到一个 Req,就能算出"这条请求当前在哪一步、下一步要算什么、还能再走多少步"。
2. 四个长度字段及其演化
四个长度字段彼此通过简单算术绑定:
cached_len:KV cache 里已经"算好且固化"的前缀长度。它单调不减。device_len:device 侧已经"占了位"的 token 数。初值 = prompt 长度,每完成一次 forward(无论 prefill 还是 decode)+1。max_device_len:这条请求允许占到的最长 device 位置。一经创建不变,= prompt_len + output_len。extend_len(property):下一次 forward 要算 KV 的那一段长度,=device_len - cached_len。
外加一个派生量:remain_len = max_device_len - device_len,告诉调度器"这条请求还能再走多少步"。
一图看懂演化
下面以 prompt=6, output_len=4 为例,看 5 个时间点上这些字段的值:
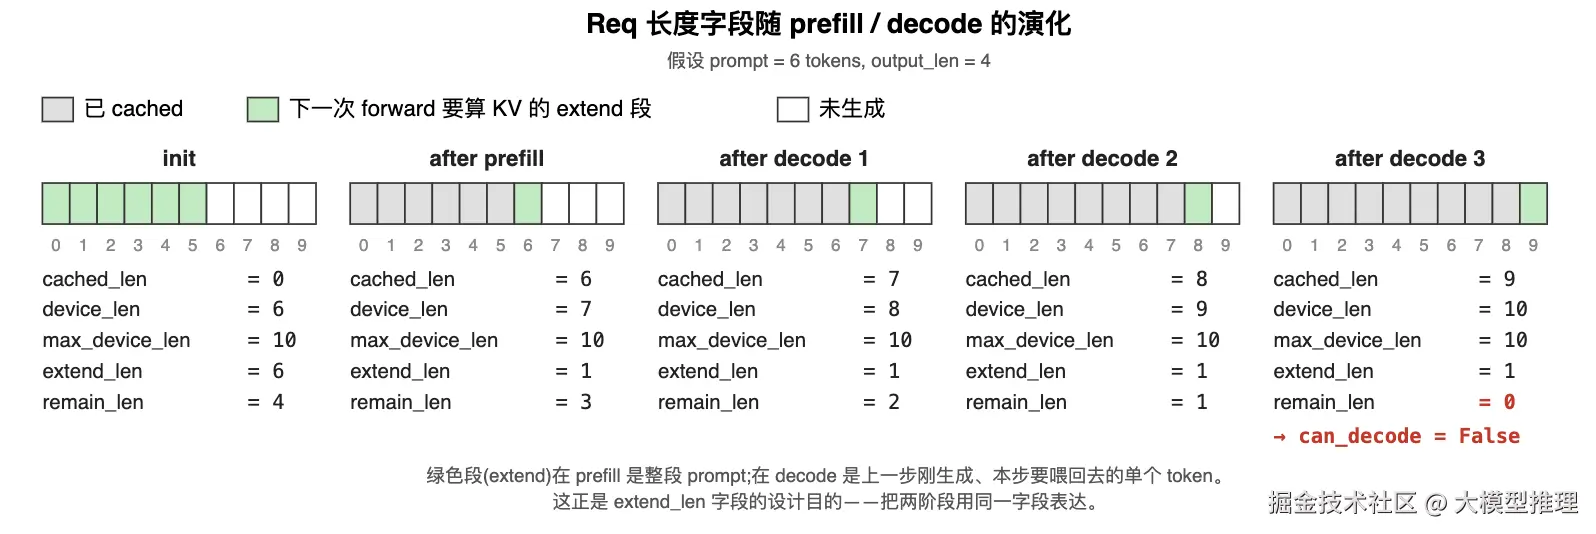
读这张图的关键:绿色段(extend)的物理含义在 prefill 和 decode 上不同。prefill 那一步,绿色是整段 prompt 的 6 个 token,模型一次算完所有 KV;而 decode 每一步,绿色都只有 1 个槽位,是"上一步刚生成的新 token,本步要喂回去算 KV"。
extend_len 字段同时表达了这两种情况------这正是用 4 个长度字段就能驱动 prefill / decode 两阶段的关键设计。
python
"""§2 Req:长度字段在 prefill / decode 过程中的演化"""
from dataclasses import dataclass

@dataclass
class Req:
    input_ids: list[int]                # CPU 侧的 token 序列
    output_len: int                     # 期望生成的 token 数
    cached_len: int = 0                 # KV cache 已固化的前缀长度

    def __post_init__(self) -> None:
        # device_len:device 侧当前占位数(prompt 起步,每完成 1 步 +1)
        # max_device_len:device 侧能占到的最远位置
        self.device_len = len(self.input_ids)
        self.max_device_len = len(self.input_ids) + self.output_len

    @property
    def extend_len(self) -> int:
        # 本次 forward 要算 KV 的段长:prefill 时 = 整段 prompt,decode 时 = 1
        return self.device_len - self.cached_len

    @property
    def remain_len(self) -> int:
        # 还允许再 decode 多少步
        return self.max_device_len - self.device_len

    @property
    def can_decode(self) -> bool:
        # decode 循环条件:remain_len 用完即停
        return self.remain_len > 0

    def complete_one(self) -> None:
        # 一次 forward 完成后推进 device 侧进度:
        # 把上次的"待算段"标为已 cached,并为下一个 token 预留 device 槽
        self.cached_len = self.device_len
        self.device_len += 1

    def append_host(self, next_token: int) -> None:
        # 在 CPU 侧的 input_ids 末尾追加新生成的 token
        self.input_ids.append(next_token)


def snapshot(req: Req, stage: str) -> None:
    print(
        f"{stage:<14} | cached={req.cached_len:>2}  device={req.device_len:>2}  "
        f"max_device={req.max_device_len:>2}  extend={req.extend_len:>2}  "
        f"remain={req.remain_len:>2}  can_decode={req.can_decode}"
    )


req = Req(
    input_ids=[101, 102, 103, 104, 105, 106],   # prompt 长 6
    output_len=4,                                # 与上方 SVG 的 5 列对齐
)
snapshot(req, "init")

# prefill:把 prompt 一次性算 KV。完成后第 1 个生成 token 已经在 device 上。
req.complete_one()
snapshot(req, "after prefill")

# decode 循环:每步 append_host(新 token) + complete_one()
for i in range(req.output_len):
    if not req.can_decode:
        break
    req.append_host(200 + i)
    req.complete_one()
    snapshot(req, f"after decode {i + 1}")
ini
init           | cached= 0  device= 6  max_device=10  extend= 6  remain= 4  can_decode=True
after prefill  | cached= 6  device= 7  max_device=10  extend= 1  remain= 3  can_decode=True
after decode 1 | cached= 7  device= 8  max_device=10  extend= 1  remain= 2  can_decode=True
after decode 2 | cached= 8  device= 9  max_device=10  extend= 1  remain= 1  can_decode=True
after decode 3 | cached= 9  device=10  max_device=10  extend= 1  remain= 0  can_decode=False
3. host 与 device:为什么要 append_host
同一个"长度"在两个地方
上一节的字段表里,device_len 这个名字提了一个细节:它的语义指的是 GPU 侧 的占位数。但 prompt 的 token id 是在 CPU 侧 的 input_ids 里。
这听起来重复,其实不是------两边的角色不同:
- CPU 侧的
input_ids:是 token id 序列本身,是"输入" - GPU 侧的 KV cache:是每个 token 投影出来的 K / V 张量,是"计算结果"
两者长度天然一致(一个 token 对应一个 KV 槽),但维护逻辑不同 ,所以 Req 用两个不同的方法分别推进它们。
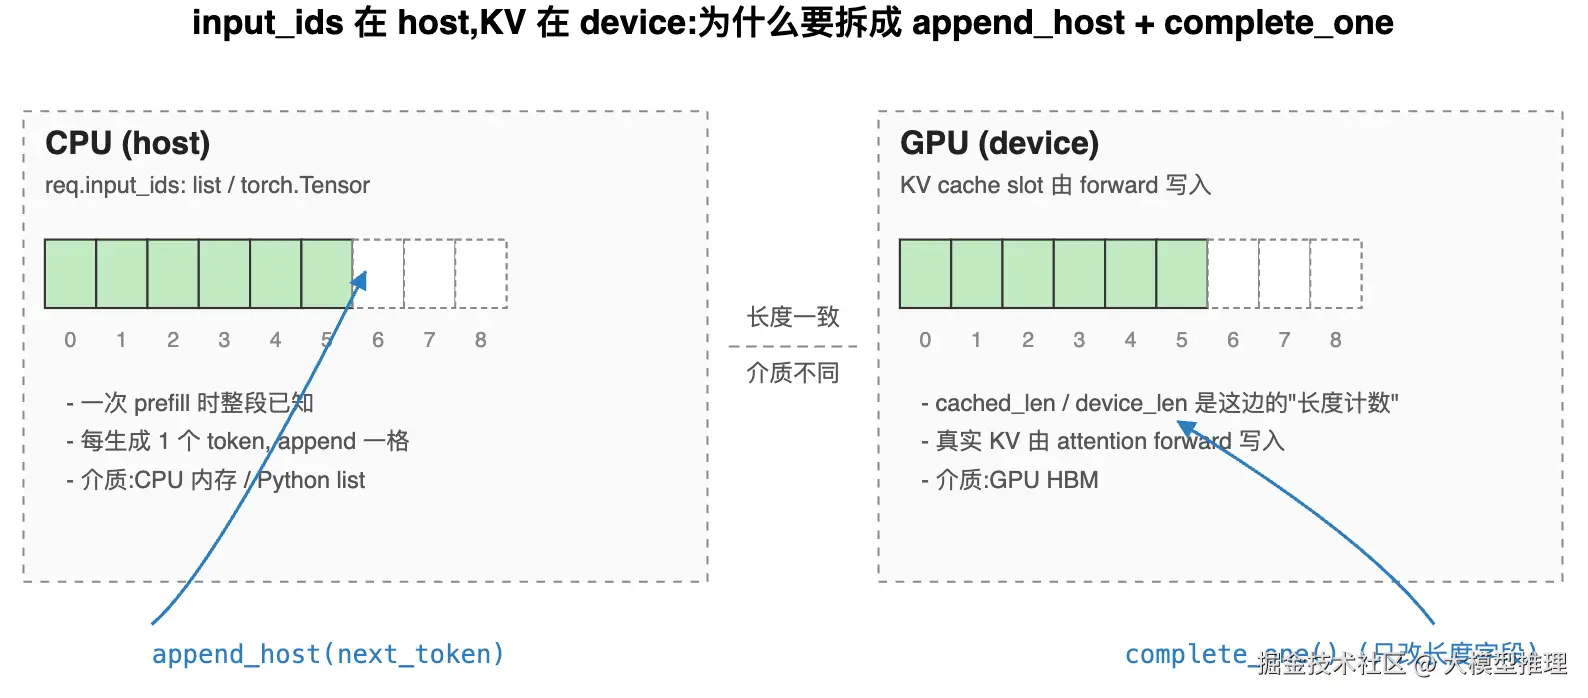
append_host 与 complete_one 各自做什么
complete_one() 只动两个整数:
cached_len = device_len:把上一次 forward 算过的那段标记为"已 cached"device_len += 1:为下一个待生成的 token 预留位置
它不写任何 KV ------KV 是由 attention 的 forward 自己写进 cache 张量的。complete_one 只是"事后告诉 Req:这一步已经走完了"。
append_host(next_token) 负责的是 CPU 侧:把刚刚 sampling 出来的 token id 放进 input_ids,这样下一步 forward 时模型能拿到它作为输入。
为什么拆成两个方法
如果合成一个 step(next_token),看起来确实简洁。但实际工程里,新 token 从 GPU 上的 sampler 出来后,先要从 GPU 传回 CPU(.cpu() 操作) 才能 append 到 input_ids------这一步在并发 batch 的批量回传里会被集中处理,与单个 Req 的 complete_one 时机错开。拆成两个方法,让两件事可以独立调用、独立测试,也方便 Scheduler 做 batch 级别的优化。
4. 一条 Req 的生命周期
把上面所有字段和方法串成一个状态机,就是这条请求从进入引擎到完成所经历的全部:

四个状态由两类事件驱动:
- 外部事件:Scheduler 决定是否把这条 Req 选入下一个 batch(从 Waiting 进入 Prefilling,或留在 Decoding 自环里)
- Req 内部事件 :每完成一步 forward,调用
complete_one()(decode 阶段还要append_host(next_token));每步结束查can_decode看是否要转移到 Done
can_decode 是这套状态机的循环条件 ------只要 remain_len > 0(还没用完用户给的 max_tokens 配额)且未被外部判停(EOS / abort),就继续在 Decoding 里转圈。
这套状态机谁来驱?
答:Scheduler。它每一步都会:
- 从 Waiting 队列里挑能进 prefill 的 Req
- 让正在 Decoding 的 Req 走一步
- 根据
can_decode决定要不要把某些 Req 移到 Done
但本篇不展开 Scheduler------它是阶段 4 的整篇主题。这里只需要建立一个直觉:Req 是被驱动的状态机,而不是自己跑的协程。
5. SamplingParams 与 greedy 快路径
SamplingParams 是另一个核心 dataclass。它把"用户怎么从 logits 里选 token"的所有控制参数打包,独立成一个对象------这样同一批请求共享同一份采样配置时,不需要在每条 Req 里重复存这些字段。下面是它的定义,并对几种典型参数组合验证 is_greedy 的输出。
5 个字段的完整语义将在阶段 2 的 sampler 模块展开,本节聚焦其中一个 property:is_greedy。
拆解 is_greedy 表达式
(temperature <= 0.0 or top_k == 1) and top_p == 1.0
三个子句各自的含义:
| 子句 | 含义 |
|---|---|
temperature <= 0.0 |
不做随机化,直接拿 logits 的 argmax |
top_k == 1 |
只保留最大的 1 个候选,等价于 argmax |
top_p == 1.0 |
不做 nucleus 截断,保留所有 token |
下图把这三个参数各自做了什么画在一张图里------is_greedy 关心的恰好是它们都"无操作"的情形。
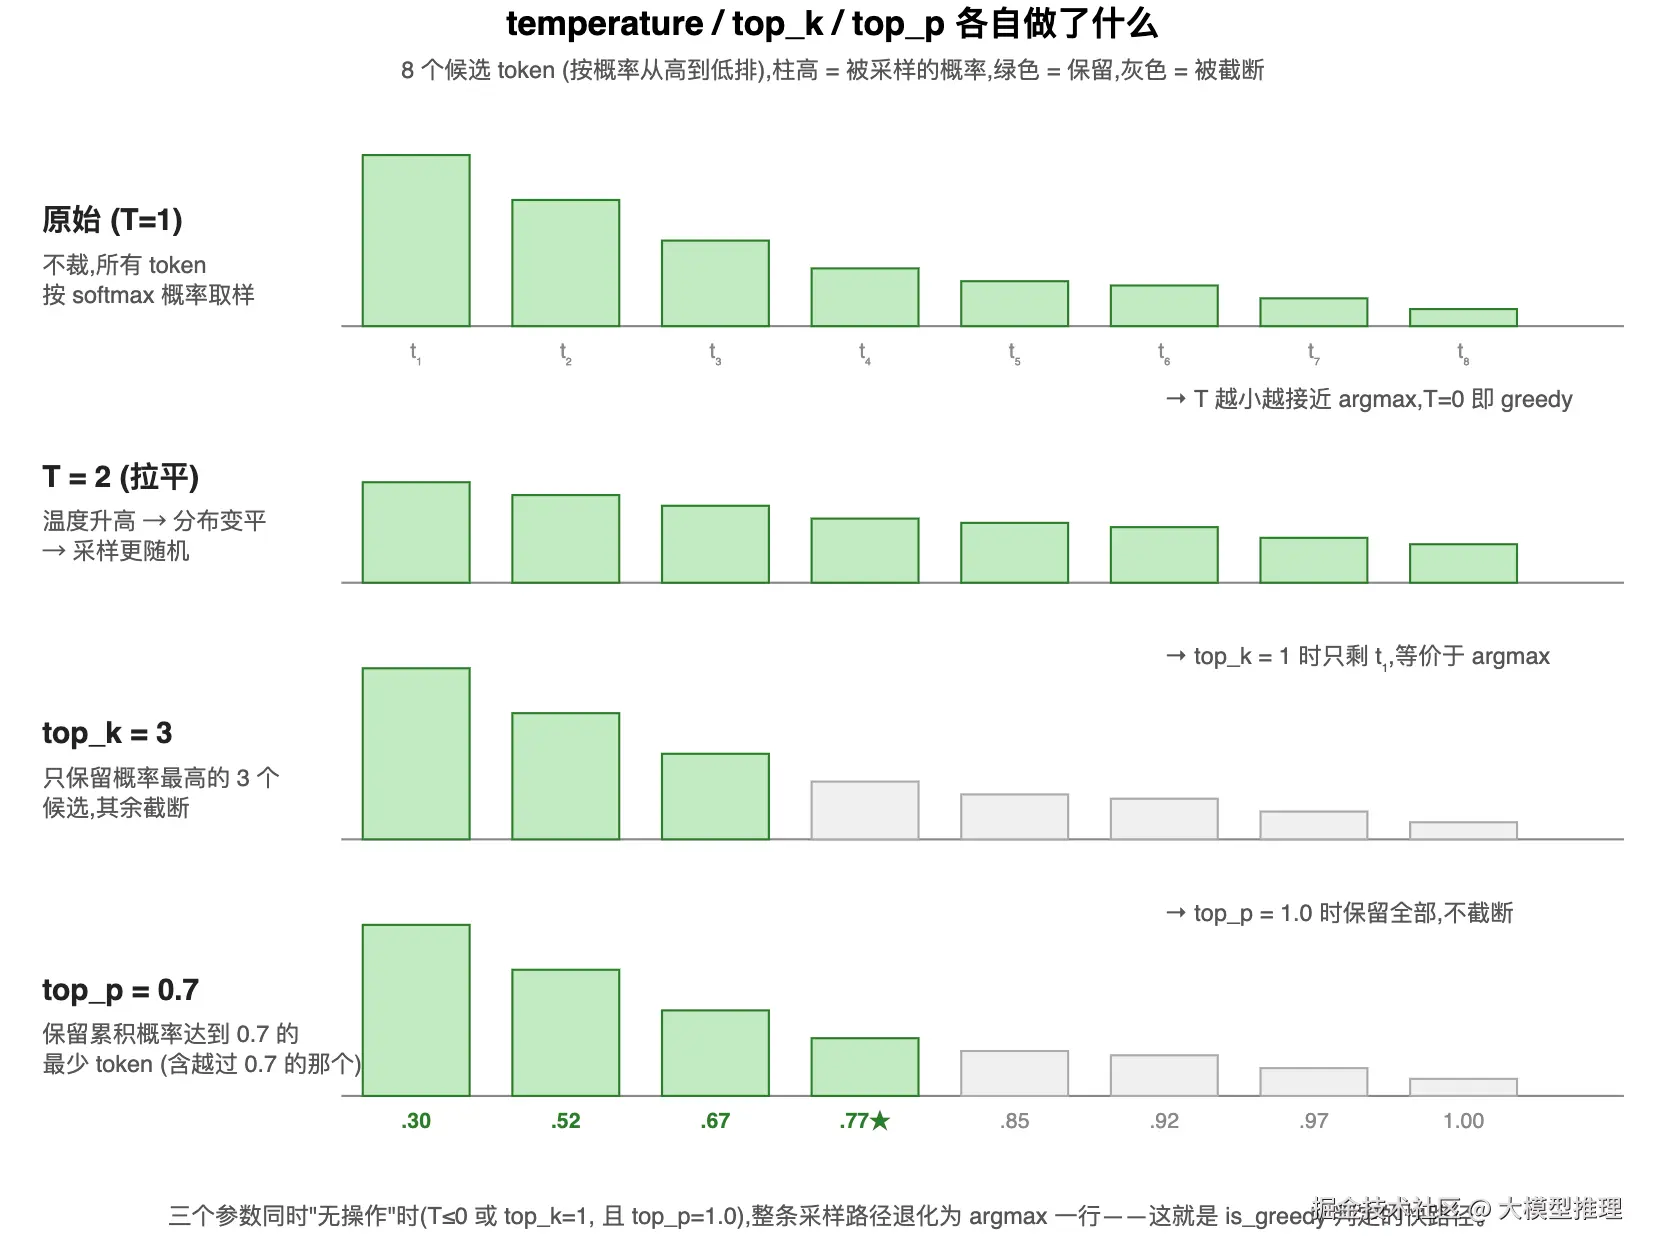
前两个子句是 OR 关系 ,因为各自单独都能让结果退化为 argmax;最后一个子句必须是 top_p == 1.0------如果 top_p < 1,即使是确定性采样,引擎仍然要算累积概率、做 sort 和 mask,根本走不了快路径。
temperature 的具体作用
temperature 把 logits 除以 T 后再做 softmax: softmax(xi/T)。它单一的作用是调节概率分布的尖锐程度:
- T < 1(如 0.7):分布变尖,高概率 token 更高 → 输出更确定、更收敛
- T = 1:模型原生分布
- T > 1(如 1.5):分布变平,各候选概率拉近 → 输出更随机、更多样
- T → 0 :分布退化到一个点(最大值为 1,其余为 0)→ 等价于
argmax,即 greedy
实际场景的常用取值:
| T | 适用场景 |
|---|---|
| 0(greedy) | 代码生成、工具调用、JSON 输出------要稳定可复现 |
| 0.3 ~ 0.7 | 知识问答、摘要------要正确,允许少量措辞变化 |
| 0.8 ~ 1.2 | 创意写作、对话------要多样性 |
数学直觉很简单:把所有 logits 除以一个大数(T 大),logits 之间的反差被压缩,softmax 后概率被拉平;除以小数则反之。所以 T 控制的是"按多大反差去比较 logits"。
回到 is_greedy:T = 0 时只关心 argmax,根本不需要算 softmax------这就是它被列为快路径条件的原因。
为什么要专门判 "greedy"
完整采样路径需要:softmax → 排序 → top-k 截断 → top-p 截断 → 重新归一化 → 按概率采样 。在 GPU 上这一整套即使融合(阶段 2 用 flashinfer.sampling),也比直接 argmax 慢得多。
判一个布尔条件就能跳过整套流程,对 batch 中那些用 temperature=0 的请求(代码生成、工具调用、结构化输出)是非常划算的。这个 is_greedy property 就是阶段 2 引入 fused sampler 时,用来分流走快路径还是慢路径的入口。
具体怎么走?is_greedy 为真时,采样器直接执行 next_token = logits.argmax(-1),跳过 softmax → top-k → top-p → 重采样这一整套流程;为假时才走完整路径。
python
"""§5 SamplingParams:定义 + 几种参数组合下的 is_greedy"""
from dataclasses import dataclass

@dataclass
class SamplingParams:
    temperature: float = 0.0    # 0 表示 deterministic
    top_k: int = -1             # -1 表示不裁
    top_p: float = 1.0          # 1.0 表示不裁
    ignore_eos: bool = False
    max_tokens: int = 1024

    @property
    def is_greedy(self) -> bool:
        # 三个子句联合判定 argmax 快路径:
        # T <= 0 或 top_k == 1 都退化为 argmax;但 top_p < 1 仍需走完整路径
        return (self.temperature <= 0.0 or self.top_k == 1) and self.top_p == 1.0


cases = [
    ("默认 (T=0)",          SamplingParams()),
    ("T=0.7",               SamplingParams(temperature=0.7)),
    ("T=0, top_p=0.9",      SamplingParams(top_p=0.9)),
    ("top_k=1",             SamplingParams(top_k=1)),
]
for name, sp in cases:
    print(f"{name:<22} → is_greedy = {sp.is_greedy}")
ini
默认 (T=0)               → is_greedy = True
T=0.7                  → is_greedy = False
T=0, top_p=0.9         → is_greedy = False
top_k=1                → is_greedy = True
6. Req 如何拼进 Batch
到这里 Req 单条已经够用。但生产场景里 Scheduler 一步要把几十、几百条 Req 同时塞给模型------这就需要一个把多条 Req 装在一起的容器:Batch。
一条 Req 进 Batch 时,需要补什么字段
模型 forward 只接受张量,不接受 Req 列表。所以组 Batch 这一步,本质上是把每条 Req 的状态翻译成跨请求共享的张量:
- input_ids:把所有 Req 的 token id 在第 0 维首尾拼接,得到一个 1D 张量 (packed 布局,见下图)
- cu_seqlens :累积偏移
[0, len₁, len₁+len₂, ...],告诉 attention 每条请求从哪开始、到哪结束 - page_table:每条 Req 在 KV cache 里占哪几个 page (KV 分页本身留到阶段 2 引入)
- out_loc:每条 Req 这一步算出来的新 token,要写回到 KV cache 的哪个位置
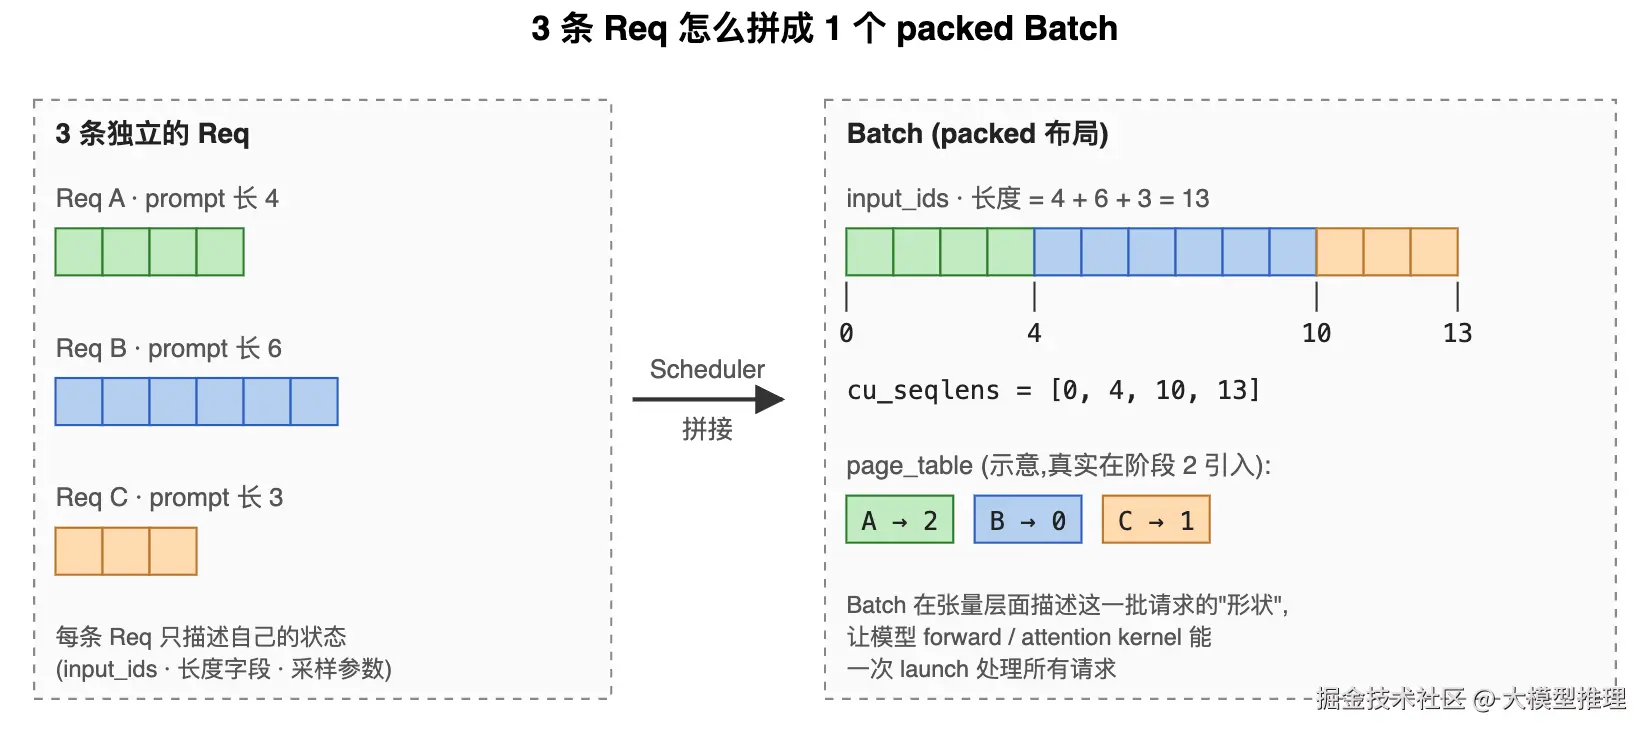
可以看到职责分工:每条 Req 自己 只描述"我有这些 token、生成进度到哪了";Batch 才描述"这一批请求在张量层面长什么样"。这种分工正是阶段 2 第 6 篇要完成的工作。
为什么不直接 padding 成二维矩阵
朴素方案是按最长请求把短请求补 <pad> 凑成 [batch_size, max_len] 的 2D 张量。三条 Req(长 4 / 6 / 3)按这种方案排出来就是 [3, 6] = 18 个格子,其中只有 13 个是真实 token,剩下 5 个(28%)是 padding:
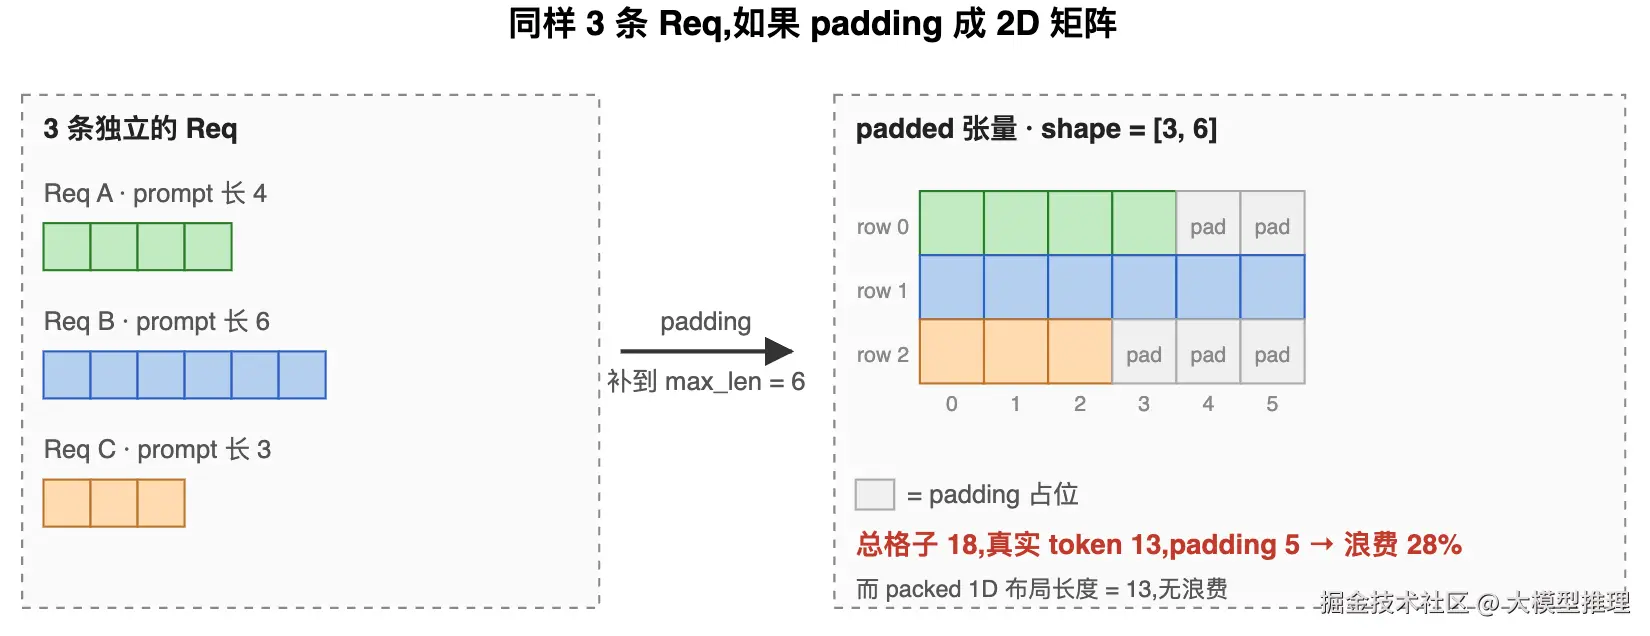
不用 padding 的原因有三:
- 算力浪费:模型要给每个 padding 位置算 Q/K/V 投影和 MLP------即便最后被 mask 掉,前面这些计算实打实跑过了
- attention 是平方代价 :padding 位置的 query 也要对整段
max_len算注意力分数,而不是它"应该"的较短长度,放大效应明显 - 真实方差更大 :生产环境里同一批的 prompt 长度可能从 50 到 50000,按最长那条 padding,90%+ 的位置都浪费了
而 packed 方案的 input_ids 长度严格等于真实 token 数之和(上图就是 4 + 6 + 3 = 13);cu_seqlens 替代"行号"告诉 attention 每条请求的边界。
FlashAttention 的 flash_attn_varlen_func 就是为这种 1D 变长输入设计的:kernel 用 cu_seqlens 把 Q × Kᵀ 隐式视作一个"块对角"结构,只算每个块内部的 causal 下三角,跨请求的位置完全跳过、不算、不读、不写。
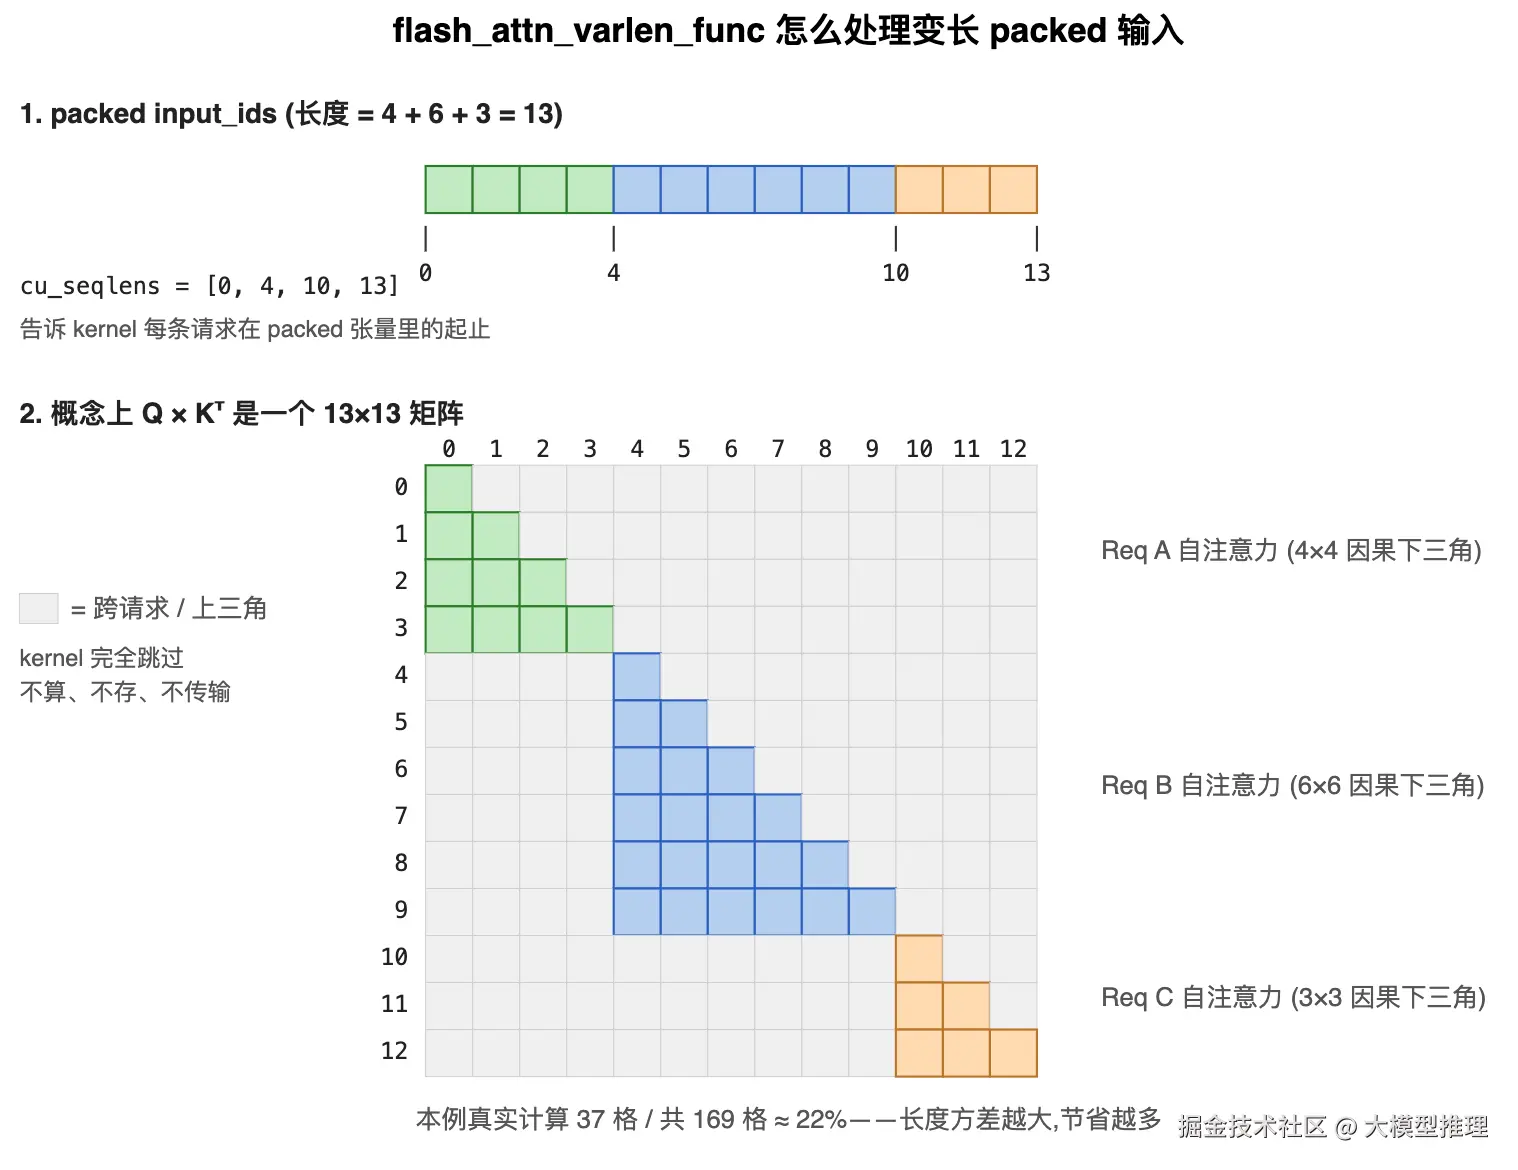
具体 kernel 实现 (Q/K 怎么切分到 SM、softmax 怎么 online 计算) 在阶段 2 第 9 篇接 FlashAttention 时展开,这里只需要建立直觉:变长 packed 输入 + cu_seqlens 边界 = 一个有效计算只在块对角的注意力,这是它和 padded 2D 方案在 kernel 层面的根本区别。
本阶段的退化形式:batch_size = 1
阶段 1 不展开 Batch------Engine 拿到一条 Req 直接包装成单元素 batch 送入模型:cu_seqlens 退化成 [0, prompt_len],page_table 退化成单行,packed 布局退化成单段。这种"先单条跑通,再扩 batch"的节奏,让我们能先把模型 forward 走通,再回头处理多请求的拼装。
小结
一条推理请求的状态,可以浓缩到一个 dataclass 里:
- 四个长度字段 同时支撑 prefill 与 decode 两阶段,关键是
extend_len在两阶段含义不同但形式统一 complete_one/append_host把 device 与 host 的更新职责拆开,为后续的批量优化留口子SamplingParams.is_greedy是一个布尔表达式,但决定了采样要走 argmax 一行,还是要走完整 softmax+top-k+top-p 一整套
下一篇预告
3 一个可运行的 Decoder Layer :用最朴素的 nn.Module 拼出一个 Qwen3 layer(QKV → RoPE → SDPA → O → MLP),attention 用 torch.nn.functional.scaled_dot_product_attention ------不做 TP、不做 fused kernel。这版代码会在阶段 3 整个推翻重写,但能让我们立刻看到模型跑起来的样子。