前言
在企业级 Linux 运维场景中,Web 服务、NFS 文件共享、DNS 域名解析是核心基础组件。本文通过双 Linux 服务器协同部署,完整实现基于 NFS 共享博客资源、DNS 域名解析、LNMP 环境运行 WordPress 博客的综合项目,覆盖静态 IP、主机名、防火墙、SELinux、时间同步、SSH 免密、服务配置与测试全流程,适合 Linux 运维实战练习与面试项目复盘。
一、项目架构与环境说明
1.1 服务器规划
| 主机 IP | 主机名 | 操作系统 | 核心服务 |
|---|---|---|---|
| 192.168.247.141 | Server-Web | Linux | Nginx、MariaDB、PHP、NFS 客户端 |
| 192.168.247.140 | Server-NFS-DNS | Linux | NFS 服务端、DNS 服务端 |
1.2 项目目标
- Server-NFS-DNS:部署 NFS 共享 WordPress 资源、部署 DNS 解析
www.zlybn.com - Server-Web:部署 LNMP 环境、挂载 NFS 共享目录、通过域名访问博客
- 基础环境:静态 IP、主机名映射、防火墙放行、时间同步、SSH 免密登录
二、项目准备工作
2.1 基础环境初始化
2.1.1 配置静态IP地址
Server-Web(192.168.247.141/24)
bash
[root@Server-Web ~]# nmcli c modify ens32 ipv4.method manual ipv4.addresses 192.168.247.141/24 ipv4.gateway 192.168.247.2 ipv4.dns 114.114.114.114
[root@Server-Web ~]# nmcli c reload
[root@Server-Web ~]# nmcli c up ens32
连接已成功激活(D-Bus 活动路径:/org/freedesktop/NetworkManager/ActiveConnection/3)
[root@Server-Web ~]# ip a
2: ens32: <BROADCAST,MULTICAST,UP,LOWER_UP> mtu 1500 qdisc fq_codel state UP group default qlen 1000
    link/ether 00:0c:29:d3:6f:41 brd ff:ff:ff:ff:ff:ff
    inet 192.168.247.141/24 brd 192.168.247.255 scope global noprefixroute ens32
       valid_lft forever preferred_lft forever
    inet6 fe80::20c:29ff:fed3:6f41/64 scope link noprefixroute
       valid_lft forever preferred_lft forever
[root@Server-Web ~]#
Server-NFS-DNS(192.168.247.140/24)
bash
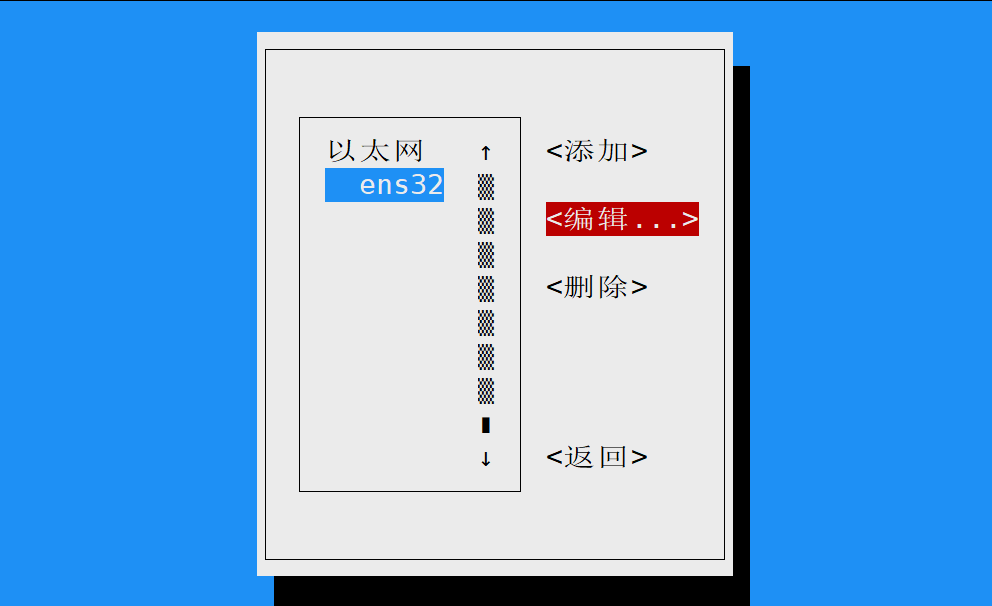
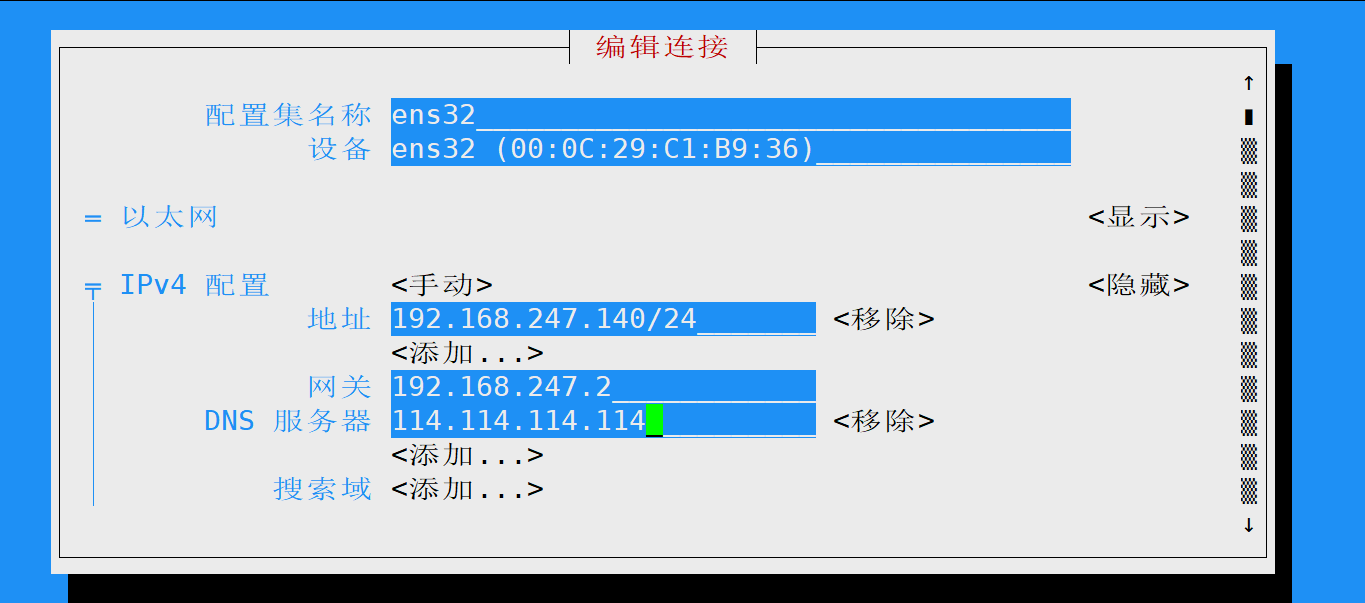
[root@Server-NFS-DNS ~]# nmtui
[root@Server-NFS-DNS ~]# nmcli c reload
[root@Server-NFS-DNS ~]# nmcli c up ens32
连接已成功激活(D-Bus 活动路径:/org/freedesktop/NetworkManager/ActiveConnection/3)
[root@Server-NFS-DNS ~]# ip a
2: ens32: <BROADCAST,MULTICAST,UP,LOWER_UP> mtu 1500 qdisc fq_codel state UP group default qlen 1000
    link/ether 00:0c:29:c1:b9:36 brd ff:ff:ff:ff:ff:ff
    inet 192.168.247.140/24 brd 192.168.247.255 scope global noprefixroute ens32
       valid_lft forever preferred_lft forever
    inet6 fe80::20c:29ff:fec1:b936/64 scope link noprefixroute
       valid_lft forever preferred_lft forever
[root@Server-NFS-DNS ~]# 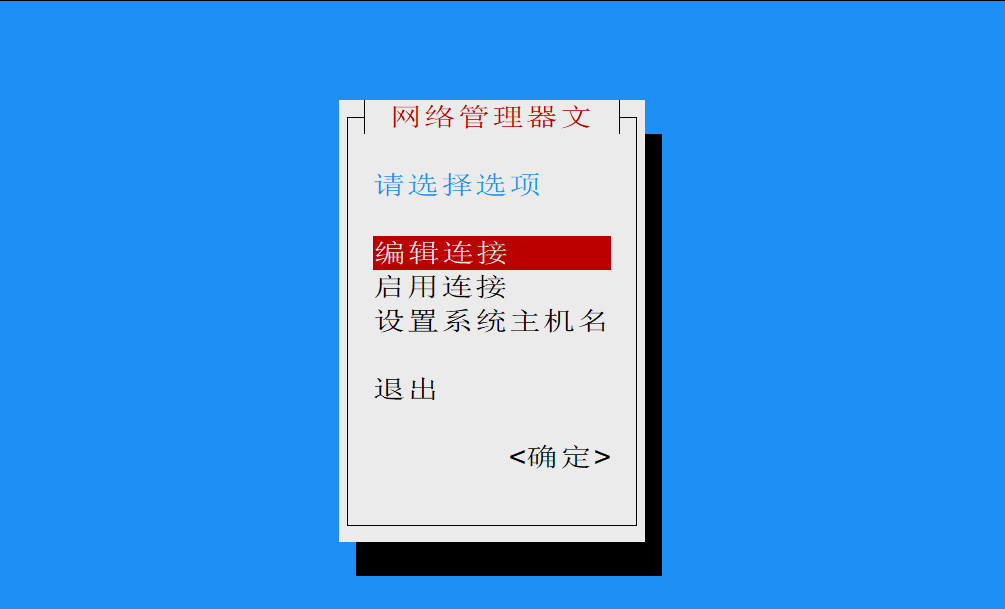
2.1.2 hosts映射
Server-Web
bash
[root@Server-Web ~]# vim /etc/hosts
127.0.0.1   localhost localhost.localdomain localhost4 localhost4.localdomain4
::1         localhost localhost.localdomain localhost6 localhost6.localdomain6
192.168.147.141 Server-Web
192.268.247.140 Server-NFS-DNS
Server-NFS-DNS
bash
[root@Server-NFS-DNS ~]# vim /etc/hosts
127.0.0.1   localhost localhost.localdomain localhost4 localhost4.localdomain4
::1         localhost localhost.localdomain localhost6 localhost6.localdomain6
192.168.147.141 Server-Web
192.268.247.140 Server-NFS-DNS
2.1.3 开启并自启防火墙
bash
#设置防火墙开启并且开机自启
[root@Server-Web ~]# systemctl enable --now firewalld
Created symlink /etc/systemd/system/dbus-org.fedoraproject.FirewallD1.service → /usr/lib/systemd/system/firewalld.service.
Created symlink /etc/systemd/system/multi-user.target.wants/firewalld.service → /usr/lib/systemd/system/firewalld.service.

#查看防火墙状态
[root@Server-Web ~]# systemctl status firewalld
● firewalld.service - firewalld - dynamic firewall daemon
     Loaded: loaded (/usr/lib/systemd/system/firewalld.service; enabled; vendor preset: enabled)
     Active: active (running) since Sun 2026-05-24 13:46:57 CST; 9s ago
       Docs: man:firewalld(1)
   Main PID: 2707 (firewalld)
      Tasks: 2 (limit: 21404)
     Memory: 27.3M
     CGroup: /system.slice/firewalld.service
             └─ 2707 /usr/bin/python3 -s /usr/sbin/firewalld --nofork --nopid

5月 24 13:46:57 Server-Web systemd[1]: Starting firewalld - dynamic firewall daemon...
5月 24 13:46:57 Server-Web systemd[1]: Started firewalld - dynamic firewall daemon.
bash
#设置防火墙开启并且开机自启
[root@Server-NFS-DNS ~]# systemctl  enable --now firewalld
Created symlink /etc/systemd/system/dbus-org.fedoraproject.FirewallD1.service → /usr/lib/systemd/system/firewalld.service.
Created symlink /etc/systemd/system/multi-user.target.wants/firewalld.service → /usr/lib/systemd/system/firewalld.service.

#查看防火墙状态
[root@Server-NFS-DNS ~]# systemctl  status firewalld
● firewalld.service - firewalld - dynamic firewall daemon
     Loaded: loaded (/usr/lib/systemd/system/firewalld.service; enabled; vendor preset: enabled)
     Active: active (running) since Sun 2026-05-24 13:47:24 CST; 8s ago
       Docs: man:firewalld(1)
   Main PID: 5711 (firewalld)
      Tasks: 2 (limit: 8933)
     Memory: 27.1M
     CGroup: /system.slice/firewalld.service
             └─ 5711 /usr/bin/python3 -s /usr/sbin/firewalld --nofork --nopid

5月 24 13:47:24 Server-NFS-DNS systemd[1]: Starting firewalld - dynamic firewall daemon...
5月 24 13:47:24 Server-NFS-DNS systemd[1]: Started firewalld - dynamic firewall daemon.
2.1.4 时间同步
方法一:
只更改配置文件中第三行
bash
[root@Server-Web ~]# vim /etc/chrony.conf
# Use public servers from the pool.ntp.org project.
# Please consider joining the pool (https://www.pool.ntp.org/join.html).
server ntp.aliyun.com iburst

# Use NTP servers from DHCP.
sourcedir /run/chrony-dhcp

# Record the rate at which the system clock gains/losses time.
driftfile /var/lib/chrony/drift

# Allow the system clock to be stepped in the first three updates
# if its offset is larger than 1 second.
makestep 1.0 3

# Enable kernel synchronization of the real-time clock (RTC).
rtcsync

# Enable hardware timestamping on all interfaces that support it.
#hwtimestamp *

# Increase the minimum number of selectable sources required to adjust
# the system clock.
#minsources 2

# Allow NTP client access from local network.
#allow 192.168.0.0/16

# Serve time even if not synchronized to a time source.
#local stratum 10

# Require authentication (nts or key option) for all NTP sources.
#authselectmode require

# Specify file containing keys for NTP authentication.
keyfile /etc/chrony.keys

# Save NTS keys and cookies.
ntsdumpdir /var/lib/chrony

# Insert/delete leap seconds by slewing instead of stepping.
#leapsecmode slew

# Get TAI-UTC offset and leap seconds from the system tz database.
leapsectz right/UTC

# Specify directory for log files.
logdir /var/log/chrony

# Select which information is logged.
#log measurements statistics tracking

[root@Server-Web ~]# systemctl restart chronyd
[root@Server-Web ~]# chronyc sources -v

  .-- Source mode  '^' = server, '=' = peer, '#' = local clock.
 / .- Source state '*' = current best, '+' = combined, '-' = not combined,
| /             'x' = may be in error, '~' = too variable, '?' = unusable.
||                                                 .- xxxx [ yyyy ] +/- zzzz
||      Reachability register (octal) -.           |  xxxx = adjusted offset,
||      Log2(Polling interval) --.      |          |  yyyy = measured offset,
||                                \     |          |  zzzz = estimated error.
||                                 |    |           \
MS Name/IP address         Stratum Poll Reach LastRx Last sample
===============================================================================
^* 203.107.6.88                  2   6    17    27  -2343us[-2710us] +/-   29ms
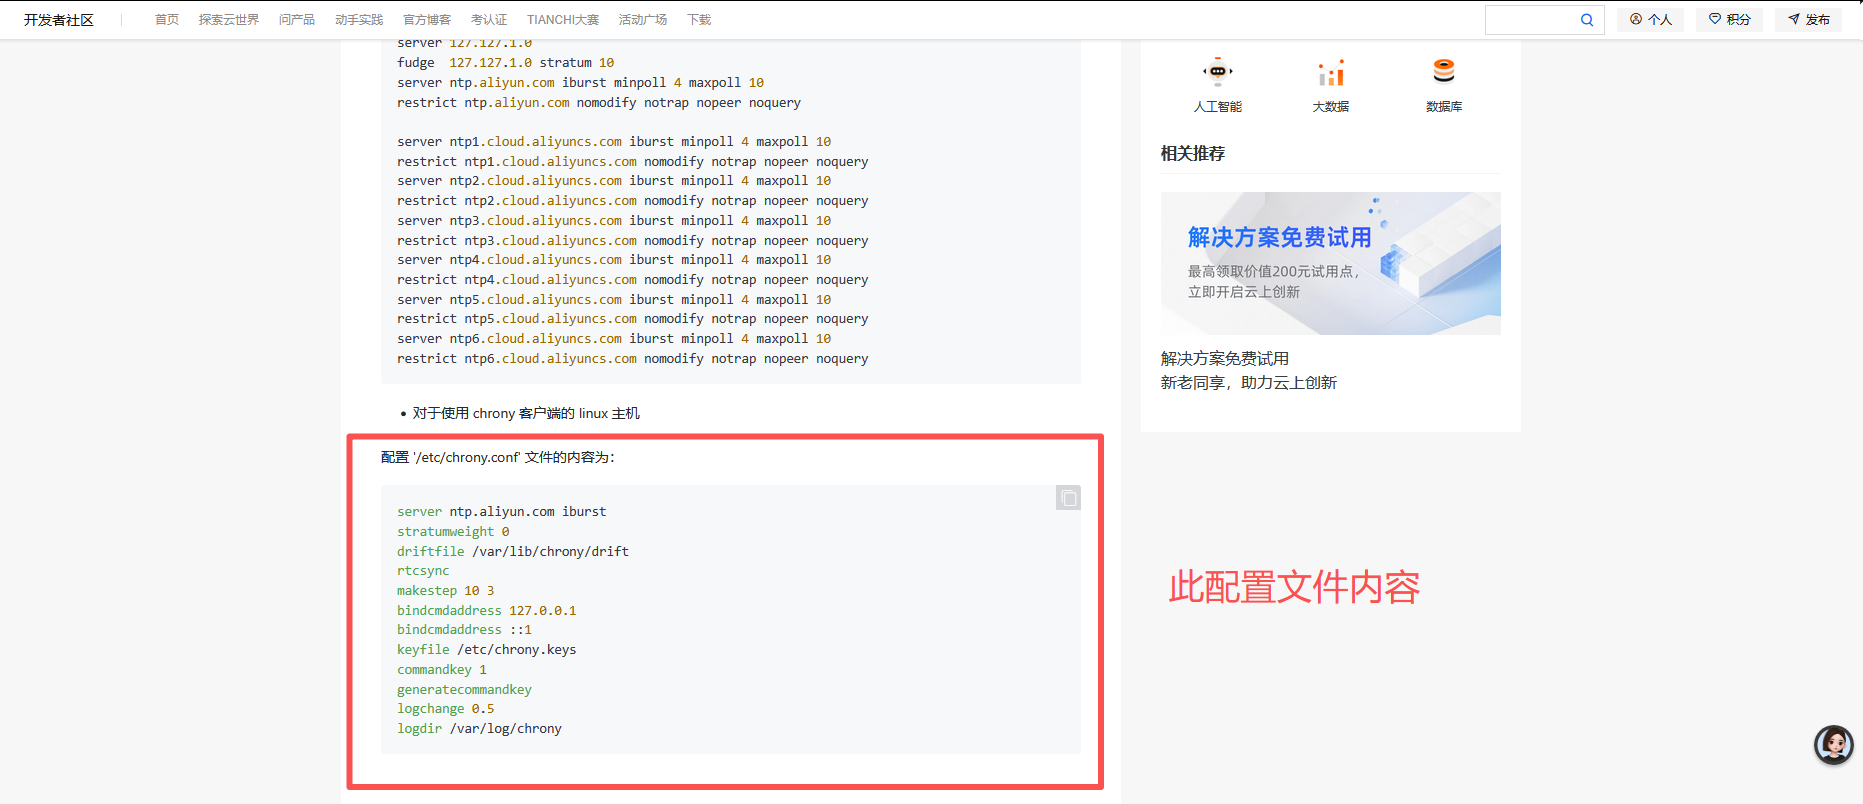
方法二:
使用阿里网络授时NTP
bash
[root@Server-NFS-DNS ~]# vim /etc/chrony.conf
server ntp.aliyun.com iburst
stratumweight 0
driftfile /var/lib/chrony/drift
rtcsync
makestep 10 3
bindcmdaddress 127.0.0.1
bindcmdaddress ::1
keyfile /etc/chrony.keys
commandkey 1
generatecommandkey
logchange 0.5
logdir /var/log/chrony

[root@Server-NFS-DNS ~]# systemctl restart chronyd
[root@Server-NFS-DNS ~]# chronyc sources -v

  .-- Source mode  '^' = server, '=' = peer, '#' = local clock.
 / .- Source state '*' = current best, '+' = combined, '-' = not combined,
| /             'x' = may be in error, '~' = too variable, '?' = unusable.
||                                                 .- xxxx [ yyyy ] +/- zzzz
||      Reachability register (octal) -.           |  xxxx = adjusted offset,
||      Log2(Polling interval) --.      |          |  yyyy = measured offset,
||                                \     |          |  zzzz = estimated error.
||                                 |    |           \
MS Name/IP address         Stratum Poll Reach LastRx Last sample
===============================================================================
^* 203.107.6.88                  2   6    33     2  -2559us[-2520us] +/-   31ms
[root@Server-NFS-DNS ~]# 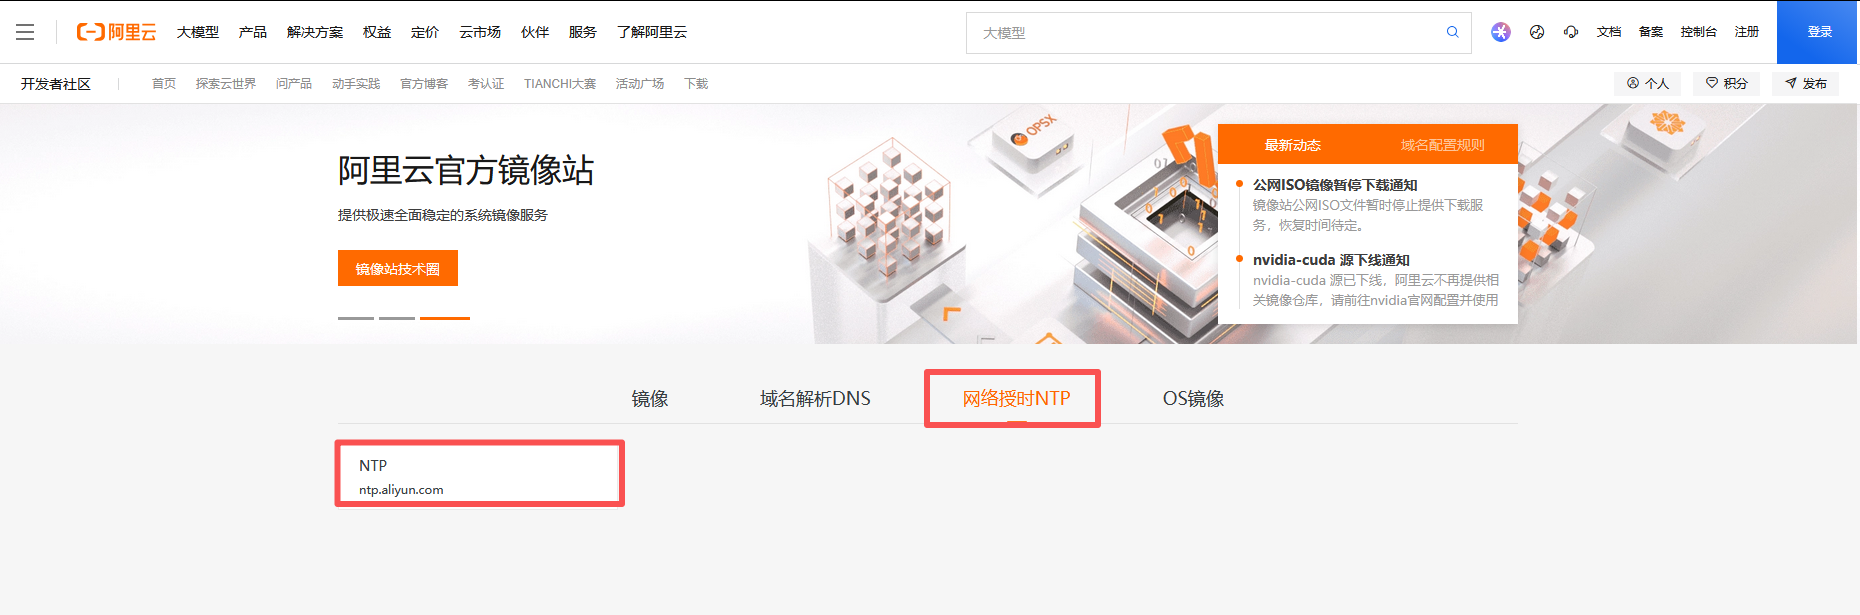
2.1.5 配置免密ssh登录
Server-Web 生成密钥并同步
bash
#生成公钥私钥
[root@Server-Web ~]# ssh-keygen -t rsa
Generating public/private rsa key pair.
Enter file in which to save the key (/root/.ssh/id_rsa):
Enter passphrase (empty for no passphrase):
Enter same passphrase again:
Your identification has been saved in /root/.ssh/id_rsa
Your public key has been saved in /root/.ssh/id_rsa.pub
The key fingerprint is:
SHA256:oLBCm6UkL4uWif4jUCqAfCI4JBj02Mbn0rcTGMr52TA root@Server-Web
The key's randomart image is:
+---[RSA 3072]----+
|+o               |
|o.=              |
|B+.* o.          |
|X+O+*.o.         |
|=B==.E oS        |
|*+o o * o        |
|*+   o +         |
|o. .    .        |
| .o..            |
+----[SHA256]-----+

[root@Server-Web ~]# ssh-copy-id 192.168.247.140
/usr/bin/ssh-copy-id: INFO: Source of key(s) to be installed: "/root/.ssh/id_rsa.pub"
The authenticity of host '192.168.247.140 (192.168.247.140)' can't be established.
ED25519 key fingerprint is SHA256:MwFeDvzO5zH2WJgmqNbHzYSG/ixE1/LATvKd4bluCyA.
This key is not known by any other names
Are you sure you want to continue connecting (yes/no/[fingerprint])? yes
/usr/bin/ssh-copy-id: INFO: attempting to log in with the new key(s), to filter out any that are already installed
/usr/bin/ssh-copy-id: INFO: 1 key(s) remain to be installed -- if you are prompted now it is to install the new keys

Authorized users only. All activities may be monitored and reported.
root@192.168.247.140's password:

Number of key(s) added: 1

Now try logging into the machine, with:   "ssh '192.168.247.140'"
and check to make sure that only the key(s) you wanted were added.

[root@Server-Web ~]# ssh 192.168.247.140

Authorized users only. All activities may be monitored and reported.

Authorized users only. All activities may be monitored and reported.
Last login: Sun May 24 13:17:14 2026 from 192.168.247.1


Welcome to 5.10.0-216.0.0.115.oe2203sp4.x86_64

System information as of time: 	2026年 05月 24日 星期日 14:25:27 CST

System load: 	0.02
Memory used: 	13.2%
Swap used: 	0%
Usage On: 	29%
IP address: 	192.168.247.140
Users online: 	3


[root@Server-NFS-DNS ~]# 注销
Connection to 192.168.247.140 closed.
[root@Server-Web ~]#
Server-NFS-DNS 生成密钥并同步
bash
[root@Server-NFS-DNS ~]# ssh-keygen -t rsa
Generating public/private rsa key pair.
Enter file in which to save the key (/root/.ssh/id_rsa):
Enter passphrase (empty for no passphrase):
Enter same passphrase again:
Your identification has been saved in /root/.ssh/id_rsa
Your public key has been saved in /root/.ssh/id_rsa.pub
The key fingerprint is:
SHA256:za8cYLbBCvjo4KLoE1eRDyoqCgfVgZAm8yFkItkxiDk root@Server-NFS-DNS
The key's randomart image is:
+---[RSA 3072]----+
|*Xo+...          |
|E.=..+           |
|o* .. +          |
|...o . o o       |
|..o o   S o      |
|+..+ . + + .     |
|=.+ . . . . .    |
|=+       . o     |
|*oo       o      |
+----[SHA256]-----+

[root@Server-NFS-DNS ~]# ssh-copy-id 192.168.247.141
/usr/bin/ssh-copy-id: INFO: Source of key(s) to be installed: "/root/.ssh/id_rsa.pub"
The authenticity of host '192.168.247.141 (192.168.247.141)' can't be established.
ED25519 key fingerprint is SHA256:MwFeDvzO5zH2WJgmqNbHzYSG/ixE1/LATvKd4bluCyA.
This key is not known by any other names
Are you sure you want to continue connecting (yes/no/[fingerprint])? yes
/usr/bin/ssh-copy-id: INFO: attempting to log in with the new key(s), to filter out any that are already installed
/usr/bin/ssh-copy-id: INFO: 1 key(s) remain to be installed -- if you are prompted now it is to install the new keys

Authorized users only. All activities may be monitored and reported.
root@192.168.247.141's password:

Number of key(s) added: 1

Now try logging into the machine, with:   "ssh '192.168.247.141'"
and check to make sure that only the key(s) you wanted were added.

[root@Server-NFS-DNS ~]# ssh 192.168.247.141

Authorized users only. All activities may be monitored and reported.

Authorized users only. All activities may be monitored and reported.
Last login: Sun May 24 13:17:10 2026 from 192.168.247.1


Welcome to 5.10.0-216.0.0.115.oe2203sp4.x86_64

System information as of time: 	2026年 05月 24日 星期日 14:30:46 CST

System load: 	0.06
Memory used: 	6.3%
Swap used: 	0%
Usage On: 	30%
IP address: 	192.168.247.141
Users online: 	5


[root@Server-Web ~]# exit
注销
Connection to 192.168.247.141 closed.
[root@Server-NFS-DNS ~]#
三、核心服务部署
3.1 Server-NFS-DNS:NFS+WordPress 部署
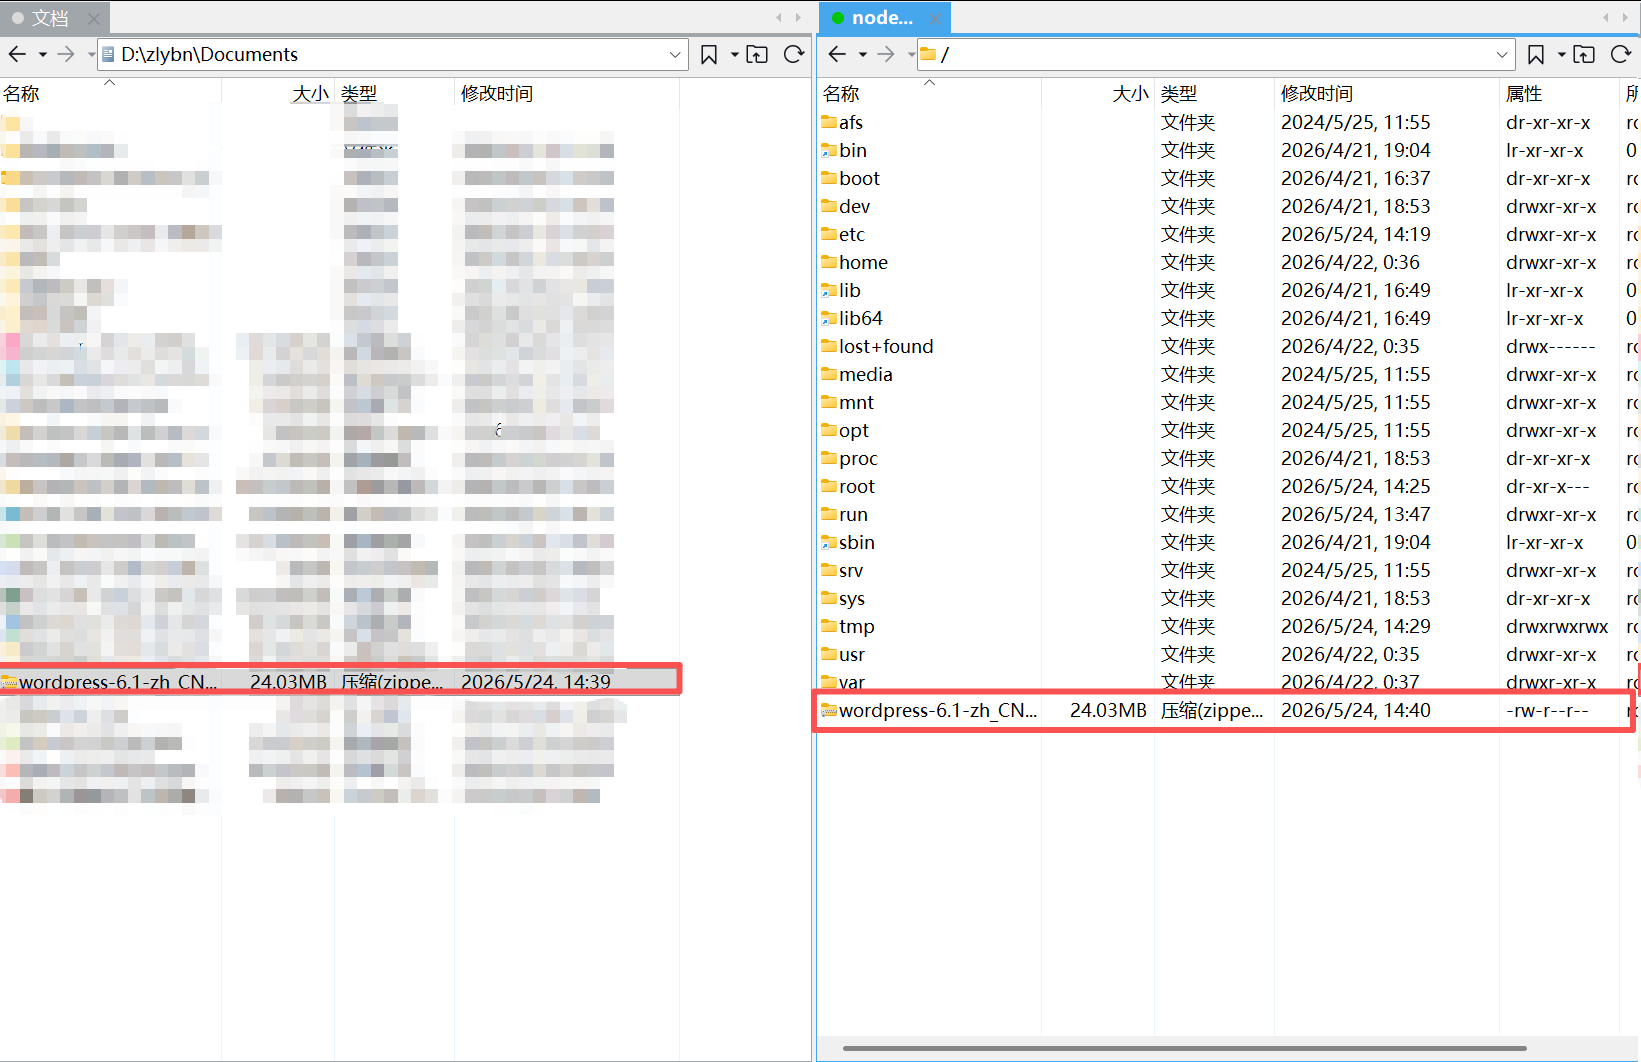
3.1.1 上传并解压 WordPress
WordPress下载地址 https://cn.wordpress.org/
bash
[root@Server-NFS-DNS ~]# ls /
afs  bin  boot  dev  etc  home  lib  lib64  lost+found  media  mnt  opt  proc  root  run  sbin  srv  sys  tmp  usr  var  wordpress-6.1-zh_CN.zip
[root@Server-NFS-DNS ~]# cd /
[root@Server-NFS-DNS /]# unzip wordpress-6.1-zh_CN.zip
[root@Server-NFS-DNS /]# cd wordpress
[root@Server-NFS-DNS wordpress]# ls
index.php    wp-activate.php     wp-comments-post.php  wp-cron.php        wp-load.php   wp-settings.php   xmlrpc.php
license.txt  wp-admin            wp-config-sample.php  wp-includes        wp-login.php  wp-signup.php
readme.html  wp-blog-header.php  wp-content            wp-links-opml.php  wp-mail.php   wp-trackback.php
[root@Server-NFS-DNS wordpress]#
3.1.2 部署NFS服务端
目的:将Server-NFS-DNS 端的 /wordpress 目录共享给 192.168.247.141 ( Server-Web)目的:将 Server-NFS-DNS 端的 /wordpress 目录共享给 192.168.247. 141( Server-Web )
bash
#安装所需要的软件
[root@Server-NFS-DNS ~]# yum install rpcbind nfs-utils -y

#编辑配置文件
[root@Server-NFS-DNS ~]# vim /etc/exports
/wordpress      192.168.247.141(rw,sync,all_squash)

#设置权限
[root@Server-NFS-DNS ~]# chmod -R 777 /wordpress

#防火墙添加服务放行
[root@Server-NFS-DNS ~]# firewall-cmd --permanent --zone public --add-service=mountd
success
[root@Server-NFS-DNS ~]# firewall-cmd --permanent --zone public --add-service=rpc-bind
success
[root@Server-NFS-DNS ~]# firewall-cmd --permanent --zone public --add-service=nfs
success
[root@Server-NFS-DNS ~]# firewall-cmd --reload
success

#启动服务
[root@Server-NFS-DNS ~]# systemctl start rpcbind
[root@Server-NFS-DNS ~]# systemctl start nfs-server
[root@Server-NFS-DNS ~]#
3.2 Server-Web:LNMP 环境部署
3.2.1 安装 LNMP
bash
[root@Server-Web ~]# yum install nginx mariadb-server php* -y3.2.2 挂载NFS共享目录
bash
#安装所需软件
[root@Server-Web ~]# yum install rpcbind nfs-utils -y

#查看共享目录
[root@Server-Web ~]# showmount -e 192.168.247.140
Export list for 192.168.247.140:
/wordpress 192.168.247.141

#创建挂载目录并挂载
[root@Server-Web ~]# mkdir /wp
[root@Server-Web ~]# mount -t nfs 192.168.247.140:/wordpress /wp
[root@Server-Web ~]# cd /wp
[root@Server-Web wp]# ls
index.php    wp-activate.php     wp-comments-post.php  wp-cron.php        wp-load.php   wp-settings.php   xmlrpc.php
license.txt  wp-admin            wp-config-sample.php  wp-includes        wp-login.php  wp-signup.php
readme.html  wp-blog-header.php  wp-content            wp-links-opml.php  wp-mail.php   wp-trackback.php
[root@Server-Web wp]#
3.2.3 Nginx配置
bash
[root@Server-Web ~]# firewall-cmd --permanent --zone public --add-service=http
success
[root@Server-Web ~]# firewall-cmd --reload
success
[root@Server-Web ~]# vim /etc/nginx/nginx.conf
        root     /wp;
[root@Server-Web ~]# systemctl restart nginx
3.2.4 Wordpress数据库配置
bash
[root@Server-Web ~]# cd /wp
[root@Server-Web wp]# ls
index.php    wp-activate.php     wp-comments-post.php  wp-cron.php        wp-load.php   wp-settings.php   xmlrpc.php
license.txt  wp-admin            wp-config-sample.php  wp-includes        wp-login.php  wp-signup.php
readme.html  wp-blog-header.php  wp-content            wp-links-opml.php  wp-mail.php   wp-trackback.php
[root@Server-Web wp]# cp wp-config-sample.php wp-config.php

#编辑wp-config.php配置文件
[root@Server-Web wp]# vim /wp/wp-config.php
[root@Server-Web wp]# 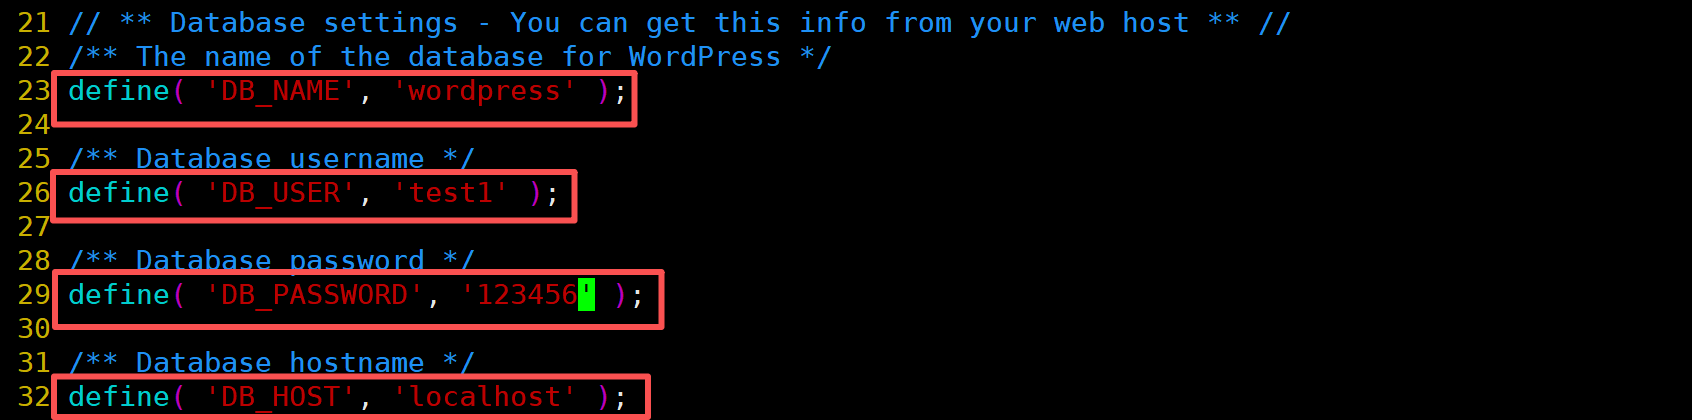
3.2.5 MariaDb初始化
bash
#启动数据库
[root@Server-Web ~]# systemctl start mariadb
[root@Server-Web ~]# systemctl enable mariadb
Created symlink /etc/systemd/system/mysql.service → /usr/lib/systemd/system/mariadb.service.
Created symlink /etc/systemd/system/mysqld.service → /usr/lib/systemd/system/mariadb.service.
Created symlink /etc/systemd/system/multi-user.target.wants/mariadb.service → /usr/lib/systemd/system/mariadb.service.

#在数据库中创建数据库和用户
[root@Server-Web ~]# mysql
Welcome to the MariaDB monitor.  Commands end with ; or \g.
Your MariaDB connection id is 3
Server version: 10.5.29-MariaDB MariaDB Server

Copyright (c) 2000, 2018, Oracle, MariaDB Corporation Ab and others.

Type 'help;' or '\h' for help. Type '\c' to clear the current input statement.

MariaDB [(none)]> create database wordpress;
Query OK, 1 row affected (0.000 sec)

MariaDB [(none)]> create user 'test1'@'localhost' identified by '123456';
Query OK, 0 rows affected (0.002 sec)

MariaDB [(none)]> grant all on wordpress.* to 'test1'@'localhost';
Query OK, 0 rows affected (0.001 sec)

MariaDB [(none)]> exit
Bye

#重启数据库和nginx
[root@Server-Web ~]# systemctl restart mariadb nginx
[root@Server-Web ~]#
3.3 Server-NFS-DNS:DNS 域名解析部署
3.3.1 安装所需软件
bash
[root@Server-NFS-DNS ~]# yum install bind -y
[root@Server-NFS-DNS ~]# firewall-cmd --permanent --zone public --add-service=dns
success
[root@Server-NFS-DNS ~]# firewall-cmd --reload
success
[root@Server-NFS-DNS ~]# systemctl start named
3.3.2 编辑主配置文件
bash
[root@Server-NFS-DNS ~]# vim /etc/named.conf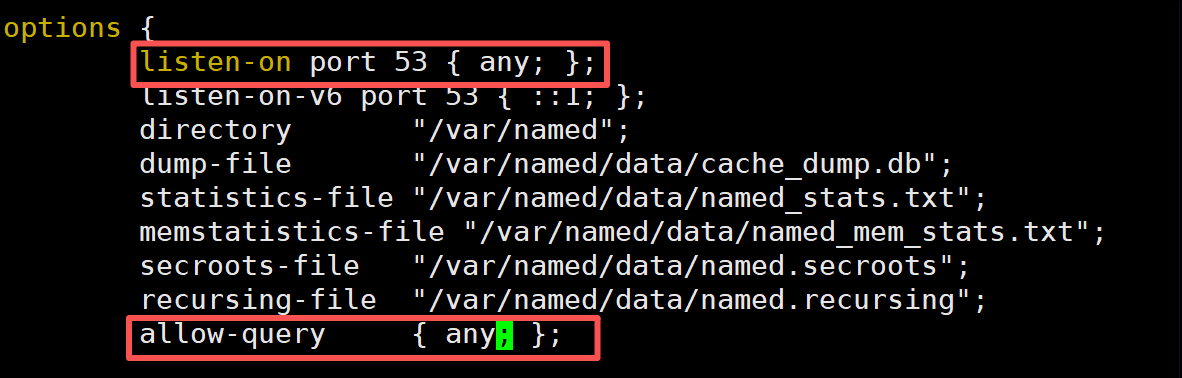
3.3.3 修改区域配置文件
bash
[root@Server-NFS-DNS ~]# vim /etc/named.rfc1912.zones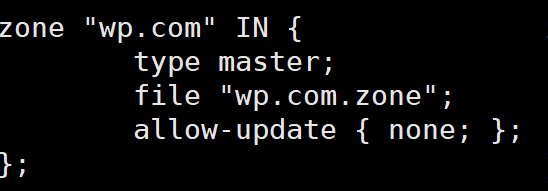
3.3.4 新建区域数据文件并配置解析
bash
[root@Server-NFS-DNS ~]# cd /var/named/
[root@Server-NFS-DNS named]# ls
data  dynamic  named.ca  named.empty  named.localhost  named.loopback  slaves
[root@Server-NFS-DNS named]# cp -a named.localhost wp.com.zone
[root@Server-NFS-DNS named]# ls
data  dynamic  named.ca  named.empty  named.localhost  named.loopback  slaves  wp.com.zone
[root@Server-NFS-DNS named]# vim wp.com.zone 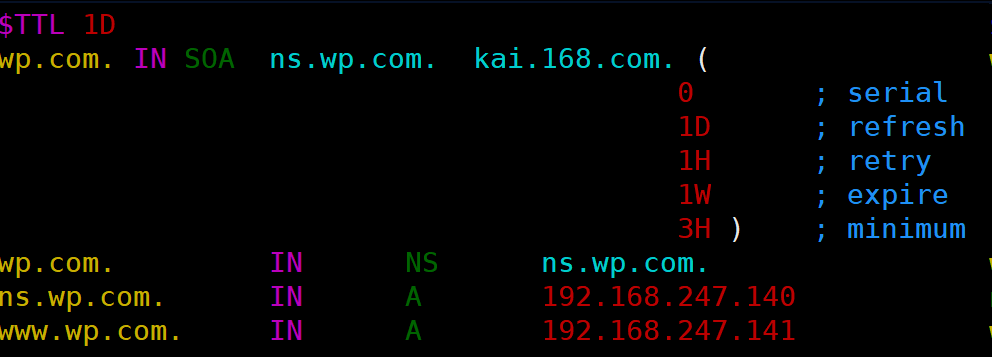
3.4.5 重启服务
bash
[root@Server-NFS-DNS named]# systemctl restart named四、项目测试验证
将Server-Web 端的 DNS 改为 192.168.247.140 后并输入 www.wp.com 域名访问
bash
[root@Server-Web ~]# nmtui
[root@Server-Web ~]# nmcli c reload
[root@Server-Web ~]# nmcli c up ens32
Connection successfully activated (D-Bus active path: /org/freedesktop/NetworkManager/ActiveConnection/4)
[root@Server-Web ~]# 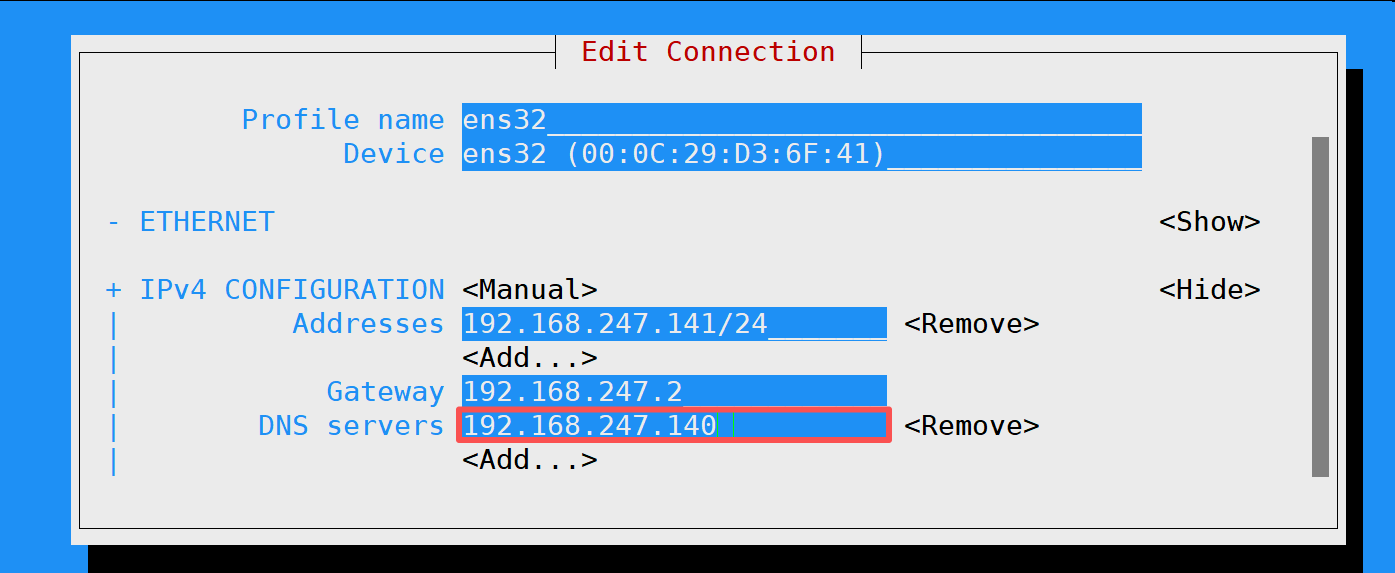
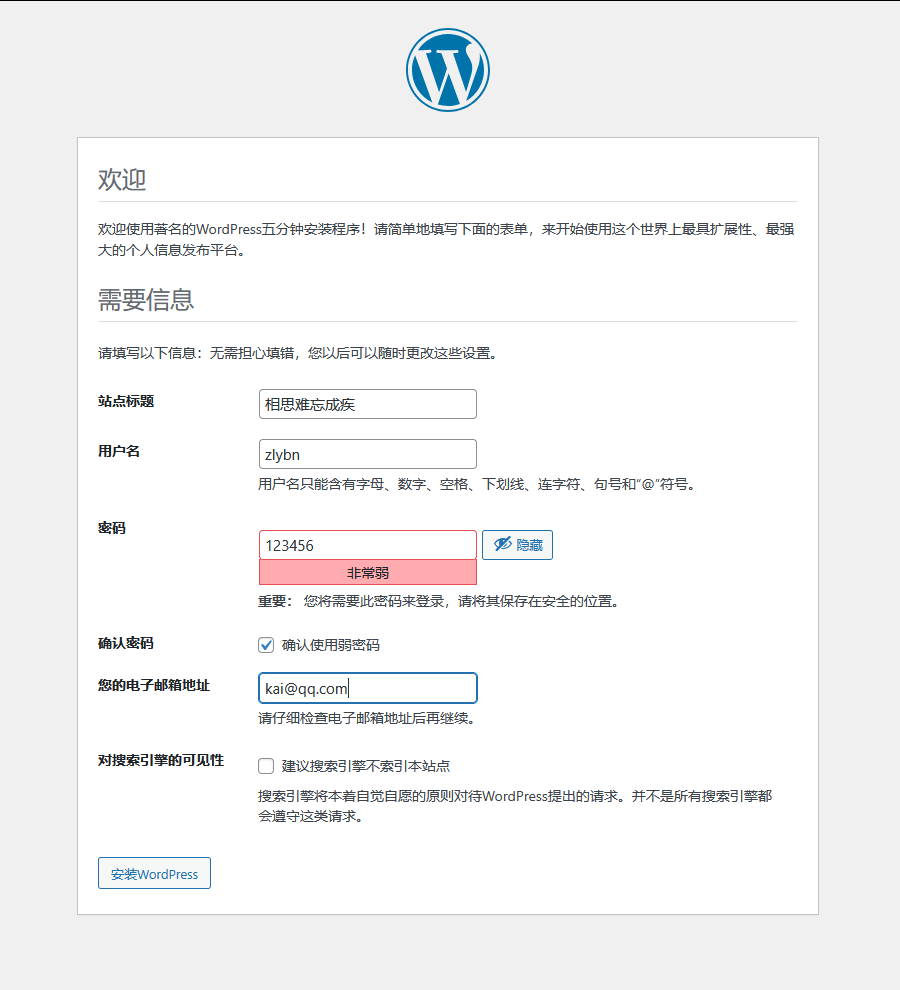
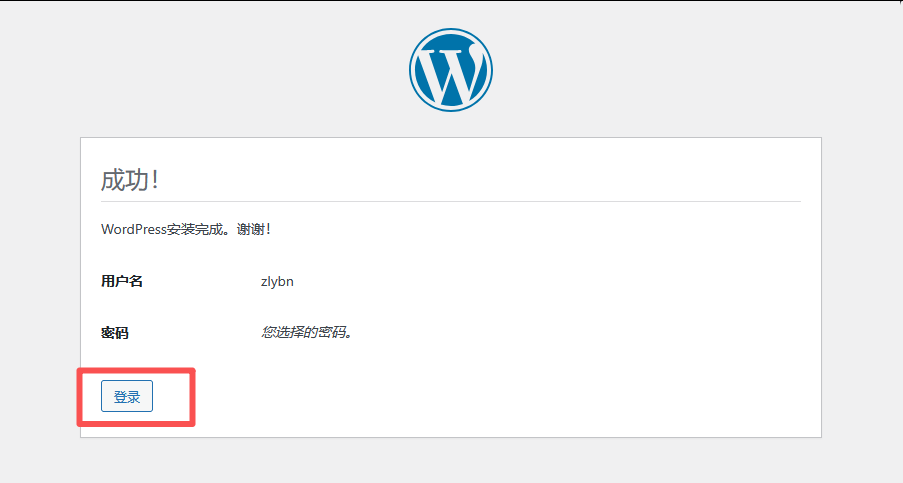
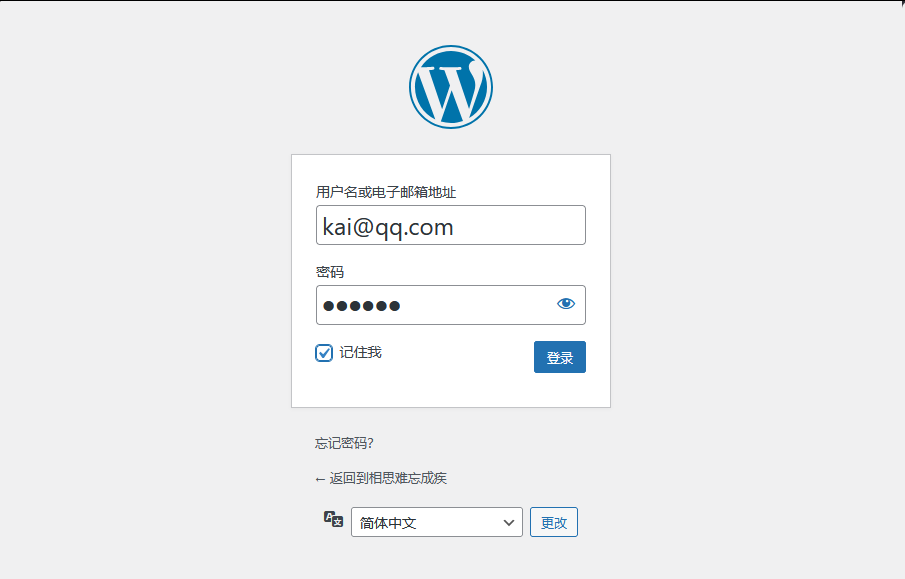
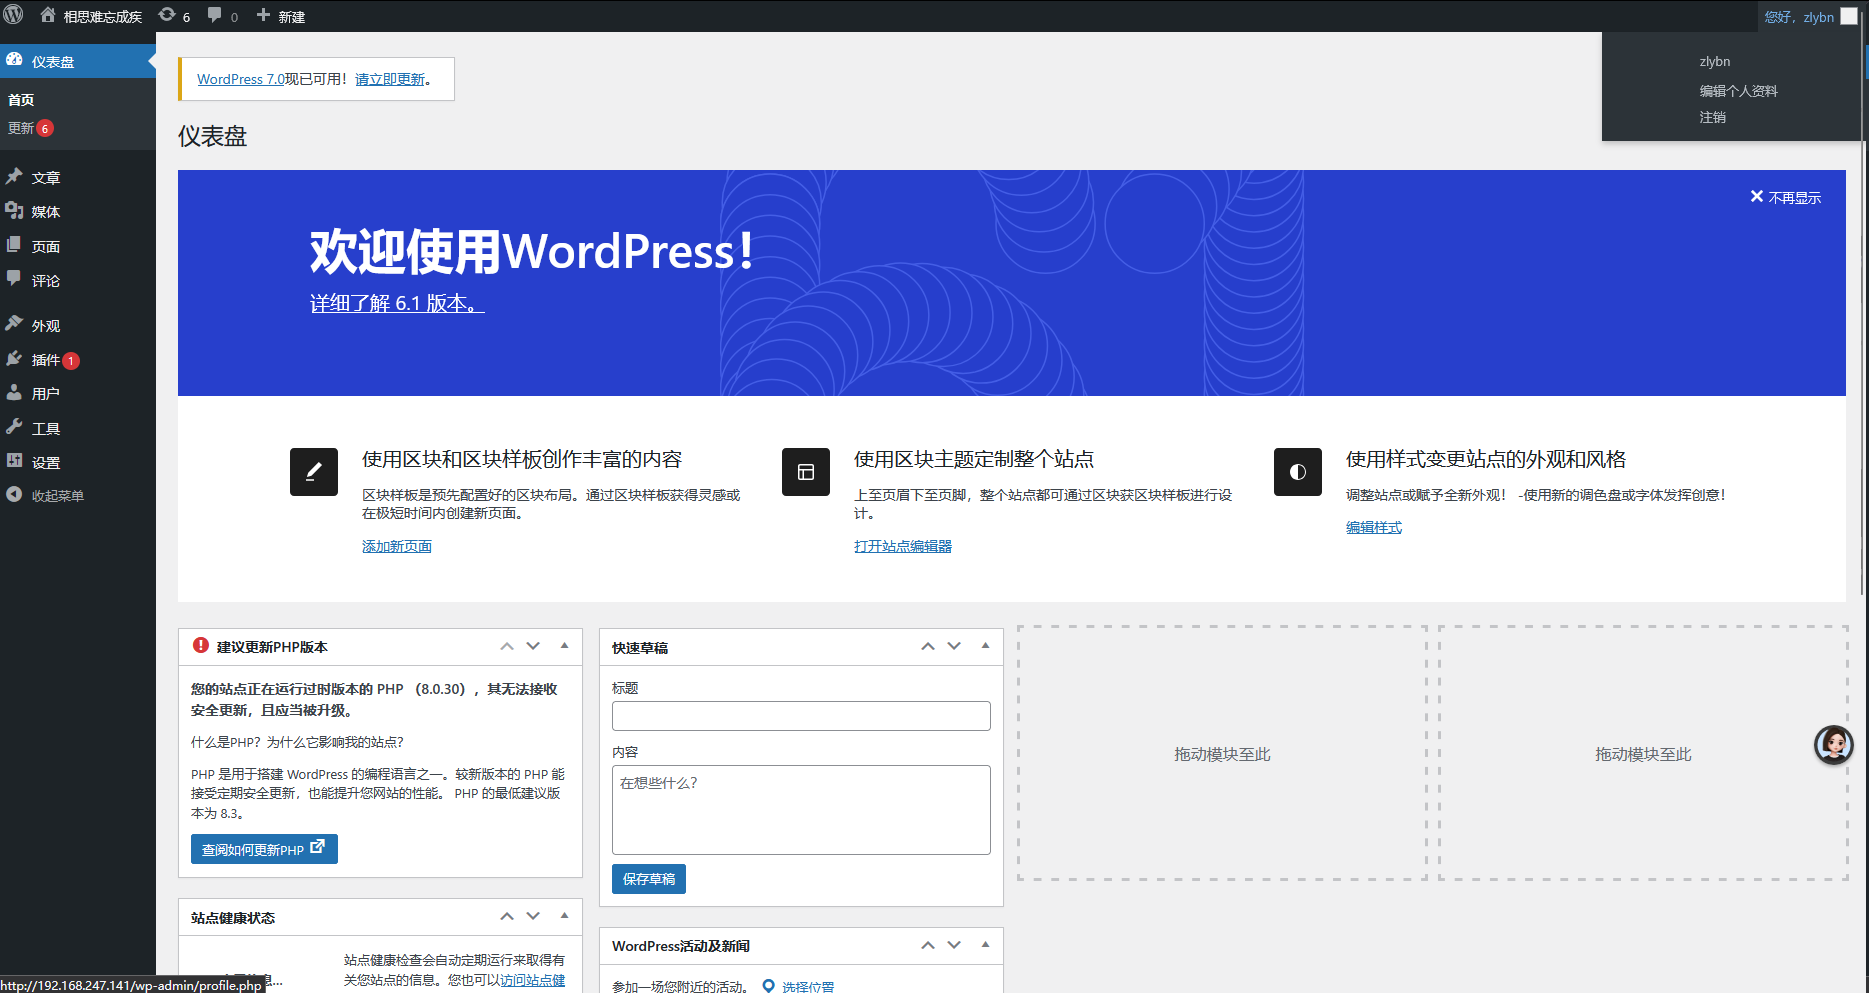
WordPress 安装初始化

五、常见问题排查
- NFS 挂载失败:检查防火墙放行、NFS 配置权限、目录权限 777
- 数据库连接失败:核对 wp-config.php 与 MariaDB 库名、用户名、密码一致
- DNS 解析失败:检查 named 配置、区域文件权限、防火墙 53 端口放行
- Nginx 无法访问 :检查 root 目录、Nginx 语法
nginx -t、服务状态
六、总结
本文通过双机协同,完整实现NFS 文件共享、DNS 域名解析、LNMP 运行 WordPress的企业级综合项目,覆盖 Linux 网络服务核心配置,可直接作为运维实战项目、课程设计、面试项目使用。