文章目录
-
- [0. 效果预览](#0. 效果预览)
- [1. 原理简述](#1. 原理简述)
- [2. 功能点](#2. 功能点)
- [3. 完整 Shader(可直接用)](#3. 完整 Shader(可直接用))
- [4. 使用方法](#4. 使用方法)
-
- [4.1 开启 URP 的 Opaque Texture 和 Depth Texture](#4.1 开启 URP 的 Opaque Texture 和 Depth Texture)
- [4.2 创建水面](#4.2 创建水面)
- [4.3 配置参数](#4.3 配置参数)
- [4.4 验证](#4.4 验证)
- [5. 参数说明](#5. 参数说明)
- [6. 变体与扩展](#6. 变体与扩展)
-
- [6.1 Flowmap 驱动的河流水面](#6.1 Flowmap 驱动的河流水面)
- [6.2 可交互水(物体激起的波纹)](#6.2 可交互水(物体激起的波纹))
- [6.3 轻量版(移动端)](#6.3 轻量版(移动端))
- [7. 常见问题](#7. 常见问题)
- [8. 性能建议](#8. 性能建议)
0. 效果预览
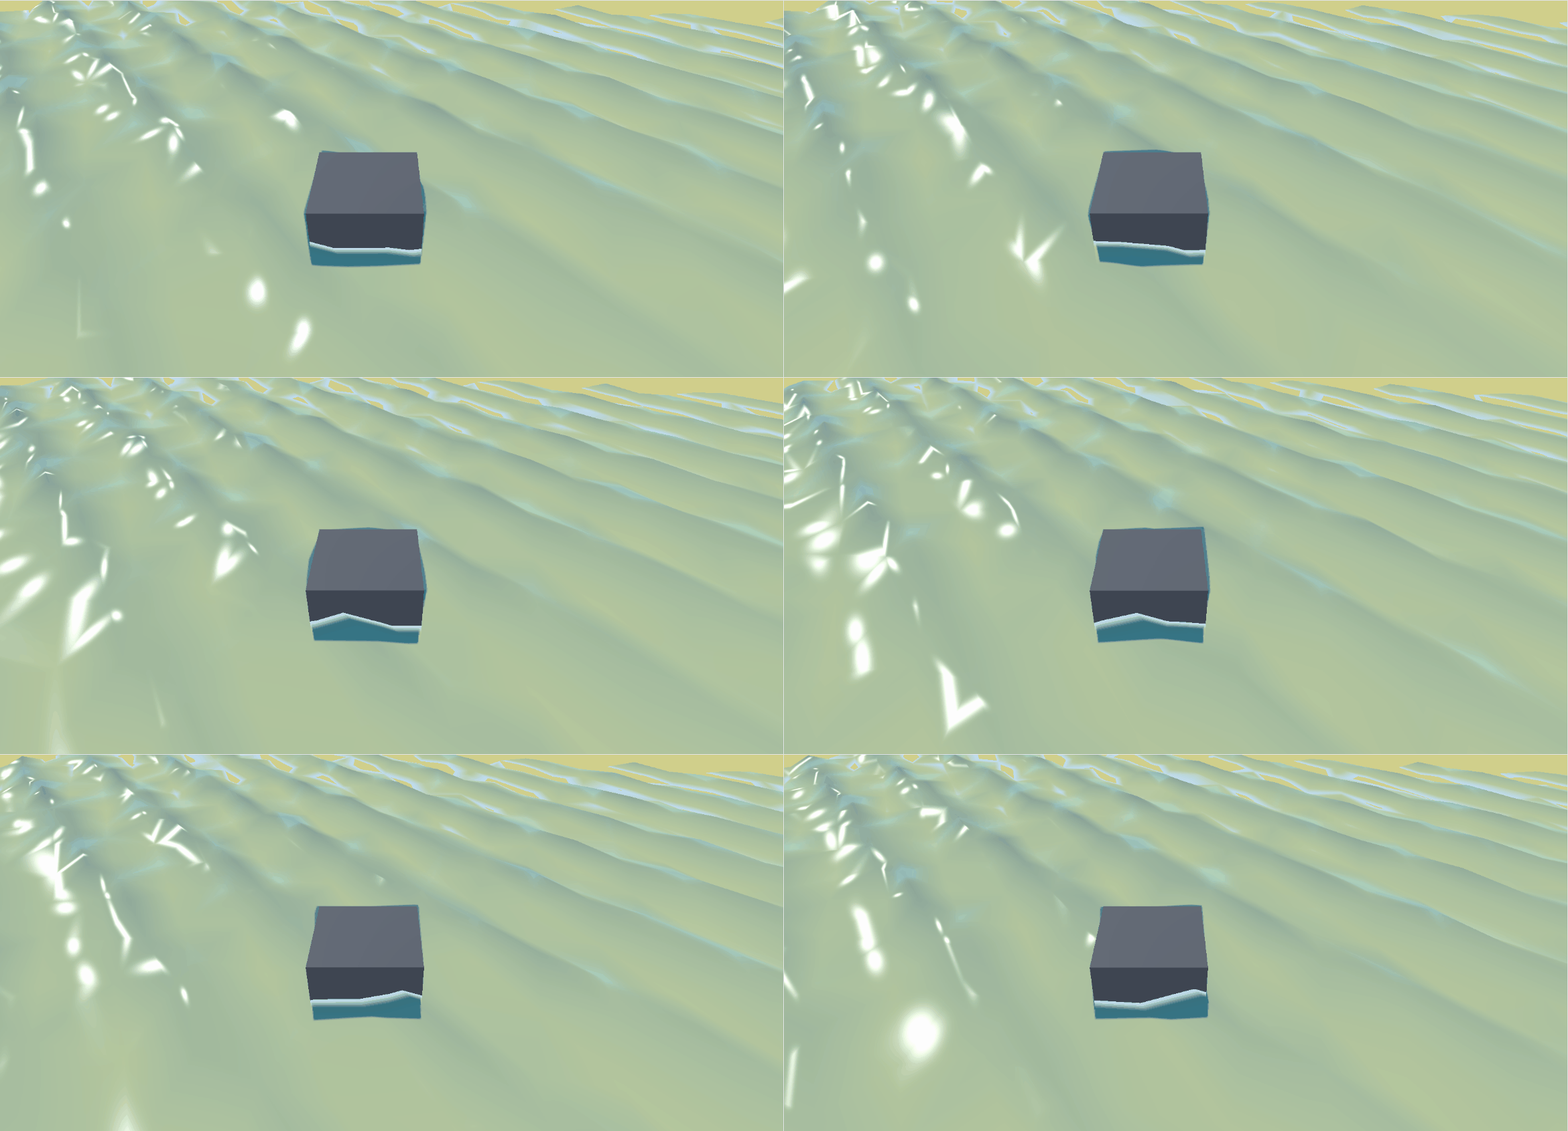
水面是游戏里少数"做一次,处处能用"的效果:顶点 Gerstner 波撑起起伏感,切线空间噪声法线撑起细碎波纹,_CameraOpaqueTexture 折射撑起"水下看得见底",再用深度差在岸边刷一圈泡沫,就是一整套可直接落地的水面方案。
1. 原理简述
水面的本质:顶点管几何起伏,片元管视觉细节。Gerstner 波给几何形,噪声法线给微观涟漪,屏幕折射给通透感,深度差给岸边泡沫。
传统 Sin 波只上下位移(y = sin(x)),水面看起来像抖动的毯子,没有波峰堆起的感觉。Gerstner 波在 Sin 波基础上同时让顶点沿波传播方向位移,波峰会被"挤尖"、波谷会被"拉平",这才是真实水面的形状:
hlsl
// D: 波方向 (xz 平面单位向量)  w: 波频  Q: 陡峭度  phi: 相位
float k  = dot(D, xz) * w + phi;
x += Q * A * D.x * cos(k);
z += Q * A * D.y * cos(k);
y += A * sin(k);
一波太平,叠 3~4 个不同方向、不同频率的波就有了天然的随机感。
法线不能直接用 (0,1,0):顶点被推尖了,法线也必须跟着变。两个做法,代价不同:
- 解析法线(本文用):把 Gerstner 公式对 x、z 求偏导,叉积算切线和副切线的法向量。代价小、结果准,但公式要推对
- 顶点差分:额外计算两个相邻顶点位置做差分。糙但省脑,适合简单 Sin 波
片元再叠一层法线贴图,两张同一张图按不同方向滚动,UnpackNormal 后混合,水面就有了"阳光下那种闪动的细碎涟漪"。
折射很直接:水面是透明物体,采样屏幕已渲染的不透明颜色(_CameraOpaqueTexture),用扰动法线的 xz 偏移 UV,水下的东西就会"扭"起来。URP 需要开启 Opaque Texture 才能拿到这张图。
岸边泡沫靠水面深度 - 场景深度:水面自身写入的线性深度和场景深度相减,差值越小(越靠近岸边),颜色越白。
2. 功能点
- Gerstner 波叠加,支持 4 层不同方向/频率/陡峭度的波
- 解析法线,波峰波谷高光正确
- 两层滚动法线贴图,微观涟漪
- 屏幕空间折射(采样
_CameraOpaqueTexture) - 基于深度差的水深渐变(浅蓝 → 深蓝)
- 基于深度差的岸边泡沫线
- Blinn-Phong 高光 + Fresnel 边缘亮
- URP 单 Pass 透明物体,移动端可用(关掉波数可进一步加速)
3. 完整 Shader(可直接用)
hlsl
Shader "Custom/WaterSurface_URP"
{
    Properties
    {
        [Header(Color)]
        _ShallowColor    ("Shallow Color", Color) = (0.3, 0.8, 0.85, 1)     // 浅水颜色(岸边)
        _DeepColor       ("Deep Color", Color)    = (0.05, 0.2, 0.4, 1)     // 深水颜色
        _DepthRange      ("Depth Range", Range(0.1, 20)) = 4.0              // 从浅到深的距离(米)
        _Transparency    ("Transparency", Range(0, 1)) = 0.85               // 最终透明度上限

        [Header(Gerstner Waves)]
        _WaveA ("Wave A (dir xy, steepness, wavelength)", Vector) = (1, 0, 0.5, 6)    // 方向 xz / 陡峭度 / 波长
        _WaveB ("Wave B (dir xy, steepness, wavelength)", Vector) = (0, 1, 0.3, 4)
        _WaveC ("Wave C (dir xy, steepness, wavelength)", Vector) = (1, 1, 0.25, 3)
        _WaveD ("Wave D (dir xy, steepness, wavelength)", Vector) = (1, -0.6, 0.2, 2)
        _WaveSpeed ("Wave Speed", Range(0, 3)) = 1.0                         // 整体时间缩放

        [Header(Normal Ripples)]
        _NormalMap    ("Normal Map", 2D) = "bump" {}                         // 法线贴图(可平铺噪声法线)
        _NormalScale1 ("Normal Tiling 1", Vector) = (0.3, 0.3, 0, 0)         // 第一层缩放
        _NormalScale2 ("Normal Tiling 2", Vector) = (0.7, 0.7, 0, 0)         // 第二层缩放
        _NormalSpeed1 ("Normal Flow 1 (xy)", Vector) = (0.05, 0.02, 0, 0)    // 第一层流动速度
        _NormalSpeed2 ("Normal Flow 2 (xy)", Vector) = (-0.03, 0.04, 0, 0)   // 第二层流动速度
        _NormalStrength ("Normal Strength", Range(0, 2)) = 1.0               // 法线强度

        [Header(Refraction)]
        _RefractStrength ("Refraction Strength", Range(0, 0.1)) = 0.02       // 屏幕 UV 扭曲幅度

        [Header(Lighting)]
        _SpecColor2  ("Specular Color", Color) = (1, 1, 1, 1)                // 高光颜色
        _Smoothness  ("Smoothness", Range(0, 1)) = 0.85                      // 高光光滑度
        _FresnelPow  ("Fresnel Power", Range(0.5, 8)) = 4.0                  // Fresnel 指数
        _FresnelTint ("Fresnel Tint", Color) = (0.8, 0.95, 1, 1)             // Fresnel 叠色(天光)

        [Header(Foam)]
        _FoamColor    ("Foam Color", Color) = (1, 1, 1, 1)                   // 泡沫颜色
        _FoamRange    ("Foam Range", Range(0.01, 3)) = 0.5                   // 泡沫出现的深度范围
        _FoamNoiseStrength ("Foam Noise Strength", Range(0, 1)) = 0.3        // 法线图扰动泡沫边缘
    }

    SubShader
    {
        Tags { "RenderType"="Transparent" "RenderPipeline"="UniversalPipeline" "Queue"="Transparent" }
        LOD 200

        Pass
        {
            Name "WaterForward"
            Tags { "LightMode"="UniversalForward" }

            Blend Off                                                        // 折射已在片元里手动合成,关闭硬件混合避免双重混合
            ZWrite On                                                        // 水面写深度,方便后面更靠近的透明物体正确排序
            Cull Off                                                         // 双面可见,避免摄像机钻进水里看不到背面

            HLSLPROGRAM
            #pragma vertex   vert
            #pragma fragment frag
            #pragma multi_compile_instancing
            #pragma multi_compile_fog

            #include "Packages/com.unity.render-pipelines.universal/ShaderLibrary/Core.hlsl"
            #include "Packages/com.unity.render-pipelines.universal/ShaderLibrary/Lighting.hlsl"
            #include "Packages/com.unity.render-pipelines.universal/ShaderLibrary/DeclareOpaqueTexture.hlsl"
            #include "Packages/com.unity.render-pipelines.universal/ShaderLibrary/DeclareDepthTexture.hlsl"

            struct Attributes
            {
                float4 positionOS : POSITION;
                float3 normalOS   : NORMAL;
                float2 uv         : TEXCOORD0;
                UNITY_VERTEX_INPUT_INSTANCE_ID
            };

            struct Varyings
            {
                float4 positionHCS  : SV_POSITION;
                float3 positionWS   : TEXCOORD0;
                float3 normalWS     : TEXCOORD1;
                float2 uv           : TEXCOORD2;
                float4 screenPos    : TEXCOORD3;
                float  fogCoord     : TEXCOORD4;
                UNITY_VERTEX_INPUT_INSTANCE_ID
            };

            TEXTURE2D(_NormalMap); SAMPLER(sampler_NormalMap);

            CBUFFER_START(UnityPerMaterial)
                float4 _ShallowColor;
                float4 _DeepColor;
                float  _DepthRange;
                float  _Transparency;

                float4 _WaveA;
                float4 _WaveB;
                float4 _WaveC;
                float4 _WaveD;
                float  _WaveSpeed;

                float4 _NormalMap_ST;
                float4 _NormalScale1;
                float4 _NormalScale2;
                float4 _NormalSpeed1;
                float4 _NormalSpeed2;
                float  _NormalStrength;

                float  _RefractStrength;

                float4 _SpecColor2;
                float  _Smoothness;
                float  _FresnelPow;
                float4 _FresnelTint;

                float4 _FoamColor;
                float  _FoamRange;
                float  _FoamNoiseStrength;
            CBUFFER_END

            // ===== Gerstner 波:返回位移,通过 ref 累加切线/副切线 =====
            // wave.xy = 方向 (xz 平面)  wave.z = 陡峭度 Q  wave.w = 波长
            // 切线 T = ∂P/∂x,副切线 B = ∂P/∂z,法线 = normalize(cross(B, T))
            float3 GerstnerWave(float4 wave, float3 p, inout float3 tangent, inout float3 binormal)
            {
                float  steepness  = wave.z;
                float  wavelength = wave.w;
                float  k          = 2.0 * PI / wavelength;                   // 角波数
                float  c          = sqrt(9.8 / k);                           // 深水重力波相速度 c = √(g/k)
                float2 d          = normalize(wave.xy);                     // 波方向归一化
                float  f          = k * (dot(d, p.xz) - c * _Time.y * _WaveSpeed); // 相位
                float  a          = steepness / k;                          // 振幅 A = Q/k 保证不自交

                // 切线、副切线累加(解析法线的基础)
                tangent  += float3(-d.x * d.x * (steepness * sin(f)),
                                    d.x      * (steepness * cos(f)),
                                   -d.x * d.y * (steepness * sin(f)));
                binormal += float3(-d.x * d.y * (steepness * sin(f)),
                                    d.y      * (steepness * cos(f)),
                                   -d.y * d.y * (steepness * sin(f)));

                // 位移:xz 沿传播方向挤压,y 竖直起伏
                return float3(d.x * (a * cos(f)),
                                    a * sin(f),
                              d.y * (a * cos(f)));
            }

            Varyings vert(Attributes IN)
            {
                Varyings OUT = (Varyings)0;
                UNITY_SETUP_INSTANCE_ID(IN);
                UNITY_TRANSFER_INSTANCE_ID(IN, OUT);

                // 物体空间 → 世界空间再叠波,保证波形跟世界坐标对齐(多块水面不会错位)
                float3 posWS = TransformObjectToWorld(IN.positionOS.xyz);

                float3 tangent  = float3(1, 0, 0);                           // 初始切线
                float3 binormal = float3(0, 0, 1);                           // 初始副切线
                posWS += GerstnerWave(_WaveA, posWS, tangent, binormal);
                posWS += GerstnerWave(_WaveB, posWS, tangent, binormal);
                posWS += GerstnerWave(_WaveC, posWS, tangent, binormal);
                posWS += GerstnerWave(_WaveD, posWS, tangent, binormal);

                // 解析法线:副切线 × 切线(注意顺序决定正负)
                float3 normalWS = normalize(cross(binormal, tangent));

                OUT.positionWS = posWS;
                OUT.normalWS   = normalWS;
                OUT.positionHCS = TransformWorldToHClip(posWS);
                OUT.uv          = TRANSFORM_TEX(IN.uv, _NormalMap);
                OUT.screenPos   = ComputeScreenPos(OUT.positionHCS);
                OUT.fogCoord    = ComputeFogFactor(OUT.positionHCS.z);
                return OUT;
            }

            half4 frag(Varyings IN) : SV_Target
            {
                UNITY_SETUP_INSTANCE_ID(IN);

                // ===== 1. 两层法线贴图混合,做微观涟漪 =====
                float2 uv1 = IN.positionWS.xz * _NormalScale1.xy + _Time.y * _NormalSpeed1.xy;
                float2 uv2 = IN.positionWS.xz * _NormalScale2.xy + _Time.y * _NormalSpeed2.xy;
                float3 n1  = UnpackNormal(SAMPLE_TEXTURE2D(_NormalMap, sampler_NormalMap, uv1));
                float3 n2  = UnpackNormal(SAMPLE_TEXTURE2D(_NormalMap, sampler_NormalMap, uv2));
                float3 nTS = normalize(float3(n1.xy + n2.xy, n1.z * n2.z));  // "whiteout"(白化)混合:xy 相加,z 相乘
                nTS.xy *= _NormalStrength;
                nTS = normalize(nTS);

                // 水面切线空间的简单构造:顶点法线已由 Gerstner 解析得到
                // 这里把切线空间法线的 x/z 扰动累加到世界法线上,避免重建完整 TBN 的开销
                float3 normalWS = normalize(IN.normalWS + float3(nTS.x, 0, nTS.y) * _NormalStrength);

                // ===== 2. 深度差:水面自身屏幕深度 vs 场景深度 =====
                float2 screenUV = IN.screenPos.xy / IN.screenPos.w;
                float  sceneRawDepth = SampleSceneDepth(screenUV);
                float  sceneEyeDepth = LinearEyeDepth(sceneRawDepth, _ZBufferParams);
                float  waterEyeDepth = LinearEyeDepth(IN.positionHCS.z, _ZBufferParams);
                float  waterDepth    = max(0, sceneEyeDepth - waterEyeDepth);   // 水深(米)

                // ===== 3. 颜色渐变:浅 → 深 =====
                float  depthT    = saturate(waterDepth / _DepthRange);
                half3  waterCol  = lerp(_ShallowColor.rgb, _DeepColor.rgb, depthT);

                // ===== 4. 屏幕空间折射:用法线扰动采样不透明贴图 =====
                float2 refractOffset = normalWS.xz * _RefractStrength;
                float2 refractUV     = saturate(screenUV + refractOffset);
                half3  sceneCol      = SampleSceneColor(refractUV);

                // ===== 5. 透明度:随水深变不透明 =====
                float  alpha   = lerp(0.2, _Transparency, depthT);
                half3  col     = lerp(sceneCol, waterCol, alpha);

                // ===== 6. Blinn-Phong 高光 + Fresnel =====
                Light  mainLight = GetMainLight();
                float3 L = normalize(mainLight.direction);
                float3 V = GetWorldSpaceNormalizeViewDir(IN.positionWS);
                float3 H = normalize(L + V);
                float  NdotH = saturate(dot(normalWS, H));
                float  NdotV = saturate(dot(normalWS, V));
                float  specPow = lerp(16.0, 512.0, _Smoothness);
                half3  spec    = _SpecColor2.rgb * mainLight.color * pow(NdotH, specPow);

                float  fresnel = pow(1.0 - NdotV, _FresnelPow);
                col += _FresnelTint.rgb * fresnel * 0.5;
                col += spec;

                // ===== 7. 岸边泡沫:水深越小越白,法线扰动边缘 =====
                float  foamCutoff = _FoamRange + nTS.x * _FoamNoiseStrength;
                float  foamMask   = 1.0 - saturate(waterDepth / max(foamCutoff, 0.001));
                foamMask = smoothstep(0.0, 1.0, foamMask);
                col = lerp(col, _FoamColor.rgb, foamMask);

                // ===== 8. 雾 =====
                col = MixFog(col, IN.fogCoord);

                // Blend Off 时 alpha 不参与硬件混合,写 1 即可
                return half4(col, 1);
            }
            ENDHLSL
        }
    }

    FallBack Off
}
4. 使用方法
4.1 开启 URP 的 Opaque Texture 和 Depth Texture
- 项目里找到当前使用的
UniversalRenderPipelineAsset(Project Settings → Graphics → Scriptable Render Pipeline Settings) - 勾选:
- Opaque Texture ✅(水面折射采样
_CameraOpaqueTexture) - Depth Texture ✅(深度渐变和泡沫需要
_CameraDepthTexture)
- Opaque Texture ✅(水面折射采样
没开这两项,水面会变成一块纯色。
4.2 创建水面
- 新建
Plane(Hierarchy → 3D Object → Plane),把它拉大或换成 10×10 细分的 Mesh。顶点密度决定波形精细度 ,Plane 默认 10×10 够用,更大的水体建议ProBuilder生成高密度面 - 新建
.shader文件,粘贴上面代码 - 新建材质,Shader 选
Custom/WaterSurface_URP - 把材质拖到 Plane 上
4.3 配置参数
- Normal Map :拖入任意无缝水面法线贴图(Unity Standard Assets 自带
WaterNormals,网上搜 "water normal seamless" 也能找到) - Wave A/B/C/D:保持默认或微调方向(xy 是 xz 平面的波向)和波长
- Depth Range:根据场景尺度调。小池塘给 2-4,海面给 10-30
- Shallow/Deep Color:浅水偏青、深水偏蓝是经典配色;热带风格把浅水调得更亮
4.4 验证
- 相机拉近看:顶点应该起伏
- 岸边应该出现一圈白色泡沫
- 水下放个 Cube,应该能看到 Cube 被扭曲
5. 参数说明
| 参数 | 类型 | 默认值 | 说明 |
|---|---|---|---|
| _ShallowColor | Color | (0.3, 0.8, 0.85, 1) | 浅水颜色 |
| _DeepColor | Color | (0.05, 0.2, 0.4, 1) | 深水颜色 |
| _DepthRange | Range(0.1, 20) | 4.0 | 颜色从浅到深过渡的距离(米) |
| _Transparency | Range(0, 1) | 0.85 | 深处的最大不透明度 |
| _WaveA...D | Vector | 见代码 | xy=方向, z=陡峭度, w=波长 |
| _WaveSpeed | Range(0, 3) | 1.0 | 整体时间缩放 |
| _NormalMap | 2D | bump | 法线贴图 |
| _NormalScale1/2 | Vector | (0.3,0.3)/(0.7,0.7) | 两层法线的平铺倍率 |
| _NormalSpeed1/2 | Vector | 见代码 | 两层法线的流动速度 |
| _NormalStrength | Range(0, 2) | 1.0 | 法线总强度 |
| _RefractStrength | Range(0, 0.1) | 0.02 | 屏幕折射扰动幅度 |
| _SpecColor2 | Color | (1,1,1,1) | 高光颜色 |
| _Smoothness | Range(0, 1) | 0.85 | 高光光滑度 |
| _FresnelPow | Range(0.5, 8) | 4.0 | Fresnel 指数(越大越贴边缘) |
| _FresnelTint | Color | (0.8, 0.95, 1, 1) | Fresnel 叠加的天光色 |
| _FoamColor | Color | (1,1,1,1) | 泡沫颜色 |
| _FoamRange | Range(0.01, 3) | 0.5 | 泡沫的深度范围(米) |
| _FoamNoiseStrength | Range(0, 1) | 0.3 | 法线扰动泡沫边缘的幅度 |
6. 变体与扩展
6.1 Flowmap 驱动的河流水面
让水沿指定方向"流"起来(适合瀑布、溪流)。核心是把 Flowmap(RG 通道表示流向)替换原本的固定 _NormalSpeed:
hlsl
// flow: Flowmap 采样,RG∈[-1,1]
float2 flow = SAMPLE_TEXTURE2D(_FlowMap, sampler_FlowMap, IN.positionWS.xz * 0.1).rg * 2 - 1;
float  t    = frac(_Time.y * 0.5);
float  wA   = 1 - abs(1 - 2 * t);                  // 两个相位交替混合,避免"跳帧"
float2 uvA  = IN.uv + flow * t;
float2 uvB  = IN.uv + flow * (t - 0.5) + 0.5;
float3 nA   = UnpackNormal(SAMPLE_TEXTURE2D(_NormalMap, sampler_NormalMap, uvA));
float3 nB   = UnpackNormal(SAMPLE_TEXTURE2D(_NormalMap, sampler_NormalMap, uvB));
float3 nTS  = lerp(nA, nB, wA);
效果:水会沿 Flowmap 绘制的方向流动,适合用 Polybrush 刷方向。
6.2 可交互水(物体激起的波纹)
本 Shader 基础上加一张 RenderTexture,用来记录物体接触水面的位置。每帧:
- 用 C# 脚本把接触点绘制到 RenderTexture(加法混合)
- Shader 把 RT 采样作为额外的法线扰动
这是"鸭子划过的波纹"等需要局部动态响应时的做法。
6.3 轻量版(移动端)
关掉 3 个 Gerstner 波、去掉 Fresnel、合并两层法线为一层,性能可再降 40%。原则:顶点波数 → 法线层数 → 折射 → 泡沫,按顺序砍。
7. 常见问题
Q: 水面整块变成纯色,看不到水下的东西?
A: URP Asset 的 "Opaque Texture" 没勾上。勾上后 SampleSceneColor 才有内容。
Q: 水面是平的,不会起伏?
A: 检查三点:(1) Plane 的顶点数够不够(默认 Plane 有 121 顶点,但 Cube 上面只有 4 个顶点,波会消失);(2) _WaveSpeed 是否为 0;(3) 材质上 Wave A/B/C/D 的陡峭度(z 分量)不能全是 0。
Q: 岸边泡沫没出现?
A: URP Asset 的 "Depth Texture" 没勾。或者水面下方没有不透明物体写深度,导致 sceneEyeDepth 拿到的是远裁剪面。
Q: 高光点太多太碎?
A: 把 _NormalStrength 降到 0.3~0.5,或 _Smoothness 调小。高光锐度由两者共同决定。
Q: 从水下往上看是一片黑?
A: 本 Shader 是单 Pass 双面(Cull Off),但背面没做折射。真实水下渲染需要单独背面 Pass + 水下雾,超出本文范围。实战里常用的妥协:背面贴一个更深的颜色即可。
8. 性能建议
- 顶点波数:Gerstner 波每增加一层,顶点计算量线性增加。移动端建议最多 2 层;PC 4 层;3A 级可以 6~8 层
- 水面 Mesh 密度:波形是顶点级的,面数过低会锯齿化。用 LOD 分级:远处低密度 Plane,近处高密度 Mesh
- 折射开关 :如果场景不需要看水下(浑浊河道、夜间水面),完全移除
SampleSceneColor,性能回升明显 - 法线贴图尺寸:256/512 够用,水面本来就在动,分辨率过高看不出来
- Opaque Texture 的代价:URP 为它额外 Blit 一次屏幕,有水面的场景建议只在有水的关卡开启,无水关卡关掉节省带宽
- Cull Off 的代价 :双面光栅化意味着 Overdraw 翻倍。如果摄像机永远在水面上方,改回
Cull Back能省一半片元