2026.05.28废话引言
其实自动化登录脚本是昨天调试成功的
登录自动化·脚本
python
# -*- coding: utf-8 -*-
"""
Appium + Python 登录自动化脚本
目标应用: *** (包名: com.***.***)
测试功能: 使用邮箱+密码登录
设备要求: Android 10
"""

import os
import re
import time
import subprocess
import xml.etree.ElementTree as ET
from datetime import datetime
from appium import webdriver
from appium.options.android import UiAutomator2Options
from selenium.webdriver.common.by import By
from appium.webdriver.common.appiumby import AppiumBy
from selenium.webdriver.support.ui import WebDriverWait
from selenium.webdriver.support import expected_conditions as EC


# ============================================================
# 1. Desired Capabilities 配置
# ============================================================
ANDROID_CAPABILITIES = {
    "platformName": os.getenv("ANDROID_PLATFORM_NAME", "Android"),
    "platformVersion": os.getenv("ANDROID_PLATFORM_VERSION", "10"),
    "deviceName": os.getenv("ANDROID_DEVICE_NAME", "************"),
    "automationName": os.getenv("ANDROID_AUTOMATION_NAME", "UiAutomator2"),
    "appPackage": os.getenv("ANDROID_APP_PACKAGE", "com.***.***"),
    "appActivity": os.getenv("ANDROID_APP_ACTIVITY", "com.***.***.MainActivity"),
    "noReset": True,
    "fullReset": False,
    "newCommandTimeout": 300,
    "unicodeKeyboard": True,
    "resetKeyboard": True,
}

APPIUM_SERVER = os.getenv("APPIUM_SERVER", "http://localhost:4723")
EMAIL = os.getenv("APP_EMAIL", "***@qq.com")
PASSWORD = os.getenv("APP_PASSWORD", "********")


def get_driver():
    """初始化 Appium Driver"""
    options = UiAutomator2Options().load_capabilities(ANDROID_CAPABILITIES)
    driver = webdriver.Remote(command_executor=APPIUM_SERVER, options=options)
    return driver


def wait_for_element(driver, by, value, timeout=15):
    """显式等待元素出现并返回"""
    return WebDriverWait(driver, timeout).until(
        EC.presence_of_element_located((by, value))
    )


def take_screenshot(driver, name):
    """截图并保存到当前目录,文件名带时间戳"""
    timestamp = datetime.now().strftime("%Y%m%d_%H%M%S")
    filename = f"{name}_{timestamp}.png"
    try:
        driver.save_screenshot(filename)
        print(f"[INFO] 已截图: {os.path.abspath(filename)}")
    except Exception as e:
        print(f"[WARN] 截图失败: {e}")


def adb_input_text(text):
    """使用 adb input text 输入文本,并用单引号包裹防止 shell 特殊字符被解析。"""
    safe_text = text.replace("'", "'\"'\"'")
    cmd = f"input text '{safe_text}'"
    subprocess.run(["adb", "shell", cmd], check=False)
    time.sleep(0.3)


def hide_keyboard_safe():
    """通过 adb 直接发送 keyevent 收起安全键盘,不经过 UiAutomator2。"""
    print("[INFO] 尝试收起键盘...")
    subprocess.run(["adb", "shell", "input", "keyevent", "66"], check=False)
    time.sleep(0.8)
    subprocess.run(["adb", "shell", "input", "tap", "980", "2120"], check=False)
    time.sleep(0.8)
    subprocess.run(["adb", "shell", "input", "keyevent", "111"], check=False)
    time.sleep(0.5)
    print("[INFO] 键盘收起流程执行完毕")


def parse_bounds(bounds_str):
    """解析 bounds 字符串 '[left,top][right,bottom]',返回 (left, top, right, bottom, center_x, center_y)"""
    match = re.match(r'\[(\d+),(\d+)\]\[(\d+),(\d+)\]', bounds_str)
    if match:
        left, top, right, bottom = map(int, match.groups())
        cx = (left + right) // 2
        cy = (top + bottom) // 2
        return left, top, right, bottom, cx, cy
    return None


def find_elements_all(page_source, text_keywords, preferred_classes=None, exclude_texts=None):
    """
    从 page_source XML 中查找所有匹配的元素,返回列表 [(left, top, right, bottom, cx, cy, text, class_name), ...]
    """
    results = []
    try:
        root = ET.fromstring(page_source)
        for elem in root.iter():
            text = elem.get('text', '') or elem.get('content-desc', '')
            class_name = elem.get('class', '')
            bounds = elem.get('bounds')
            if not bounds:
                continue
            if exclude_texts and any(ex in text for ex in exclude_texts):
                continue
            text_match = any(kw in text for kw in text_keywords)
            if not text_match:
                continue
            if preferred_classes:
                if not any(cls in class_name for cls in preferred_classes):
                    continue
            parsed = parse_bounds(bounds)
            if parsed:
                left, top, right, bottom, cx, cy = parsed
                results.append((left, top, right, bottom, cx, cy, text, class_name))
    except Exception as e:
        print(f"[WARN] 解析 page_source 失败: {e}")
    return results


def find_element_center(page_source, text_keywords, preferred_classes=None, exclude_texts=None):
    """
    从 page_source XML 中查找匹配的元素中心坐标(返回第一个匹配)。
    """
    results = find_elements_all(page_source, text_keywords, preferred_classes, exclude_texts)
    if results:
        left, top, right, bottom, cx, cy, text, class_name = results[0]
        return (cx, cy), text, class_name
    return None, None, None


def is_text_excluded(text, exclude_texts=None):
    if not text or not exclude_texts:
        return False
    return any(ex in text for ex in exclude_texts)


def find_login_candidate_elements(driver, keywords, exclude_texts=None):
    """优先使用 Appium XPATH 定位可点击的登录相关元素。"""
    xpath_parts = []
    for kw in keywords:
        xpath_parts.append(f"contains(@text, '{kw}')")
        xpath_parts.append(f"contains(@content-desc, '{kw}')")
    xpath_body = ' or '.join(xpath_parts)
    xpath = f"//*[@clickable='true' and ({xpath_body})]"
    try:
        elements = driver.find_elements(AppiumBy.XPATH, xpath)
    except Exception:
        return []

    valid_elements = []
    for elem in elements:
        text = elem.get_attribute('text') or elem.get_attribute('content-desc') or ''
        if is_text_excluded(text, exclude_texts):
            continue
        valid_elements.append(elem)
    return valid_elements


def find_login_button_element(driver):
    """尝试用 Appium 元素定位登录按钮。
    优先查找包含 '登录' 的可点击元素,若失败再查找包含 '登' 的元素。
    """
    exclude_texts = ["免密登录", "第三方登录", "验证码登录", "立即注册"]
    candidates = find_login_candidate_elements(driver, ["登录"], exclude_texts=exclude_texts)
    if not candidates:
        candidates = find_login_candidate_elements(driver, ["登"], exclude_texts=exclude_texts)
    if not candidates:
        return None

    # 选择屏幕位置最下方的候选元素
    candidates.sort(key=lambda el: int(el.get_attribute('bounds').split('][')[1].split(',')[1].rstrip(']')) if el.get_attribute('bounds') else 0, reverse=True)
    return candidates[0]


def find_checkbox_square(page_source, anchor_text="阅读并同意"):
    """
    在 page_source XML 中查找复选框小方框元素。
    策略:找到包含 anchor_text 的元素,然后查找其父节点下的兄弟元素中位于其左侧、
          宽度/高度接近(通常 40~120px)且最靠近 anchor 的元素。
    返回: (cx, cy, text, class_name, bounds_info) 或 None
    """
    try:
        root = ET.fromstring(page_source)
        # 第一步:找到 anchor 元素
        anchor_elem = None
        for elem in root.iter():
            text = elem.get('text', '') or elem.get('content-desc', '')
            if anchor_text in text:
                anchor_elem = elem
                break
        if anchor_elem is None:
            print(f"[WARN] 未找到 anchor 文本 '{anchor_text}'")
            return None

        anchor_bounds = anchor_elem.get('bounds')
        if not anchor_bounds:
            return None
        parsed = parse_bounds(anchor_bounds)
        if not parsed:
            return None
        a_left, a_top, a_right, a_bottom, a_cx, a_cy = parsed
        print(f"[DEBUG] anchor '{anchor_text}' bounds: [{a_left},{a_top}][{a_right},{a_bottom}]")

        # 第二步:获取父元素,遍历所有兄弟元素
        # xml.etree.ElementTree 的 iter() 会丢失父指针,需要重新遍历找父
        parent_map = {c: p for p in root.iter() for c in p}
        parent = parent_map.get(anchor_elem)
        if parent is None:
            print("[WARN] 无法获取 anchor 的父元素")
            return None

        candidates = []
        for child in parent:
            if child is anchor_elem:
                continue
            bounds = child.get('bounds')
            class_name = child.get('class', '')
            text = child.get('text', '') or child.get('content-desc', '')
            if not bounds:
                continue
            parsed_c = parse_bounds(bounds)
            if not parsed_c:
                continue
            c_left, c_top, c_right, c_bottom, c_cx, c_cy = parsed_c
            # 候选条件:位于 anchor 左侧,高度与 anchor 接近,宽度适中(小方框通常 40~120px)
            if c_right <= a_left + 20:  # 右侧不超过 anchor 左侧太多
                w = c_right - c_left
                h = c_bottom - c_top
                # 小方框通常是正方形或接近正方形,尺寸 35~150px
                if 20 <= w <= 150 and 20 <= h <= 150:
                    # 计算与 anchor 的垂直距离(应较小)
                    v_dist = abs(c_cy - a_cy)
                    if v_dist < 100:
                        candidates.append((c_left, c_top, c_right, c_bottom, c_cx, c_cy, text, class_name, w, h, v_dist))

        if candidates:
            # 优先选 right 最大(最靠近 anchor)且垂直距离最小的
            candidates.sort(key=lambda x: (-x[2], x[10]))  # 按 right 降序,再按 v_dist 升序
            best = candidates[0]
            c_left, c_top, c_right, c_bottom, c_cx, c_cy, text, class_name, w, h, v_dist = best
            print(f"[DEBUG] 找到复选框小方框候选: class={class_name}, text='{text}', bounds=[{c_left},{c_top}][{c_right},{c_bottom}], size={w}x{h}, center=({c_cx},{c_cy})")
            return (c_cx, c_cy, text, class_name, f"[{c_left},{c_top}][{c_right},{c_bottom}]")

        # 如果没有精确匹配的候选,放宽条件:只要位于 anchor 左侧且最近
        candidates_loose = []
        for child in parent:
            if child is anchor_elem:
                continue
            bounds = child.get('bounds')
            class_name = child.get('class', '')
            text = child.get('text', '') or child.get('content-desc', '')
            if not bounds:
                continue
            parsed_c = parse_bounds(bounds)
            if not parsed_c:
                continue
            c_left, c_top, c_right, c_bottom, c_cx, c_cy = parsed_c
            if c_right <= a_left + 30:
                v_dist = abs(c_cy - a_cy)
                if v_dist < 120:
                    candidates_loose.append((c_cx, c_cy, text, class_name, c_right, v_dist))
        if candidates_loose:
            candidates_loose.sort(key=lambda x: (-x[4], x[5]))
            best = candidates_loose[0]
            print(f"[DEBUG] 放宽条件找到左侧元素: class={best[3]}, text='{best[2]}', center=({best[0]},{best[1]})")
            return (best[0], best[1], best[2], best[3], "")

        print("[WARN] 未在 anchor 左侧找到复选框小方框")
        return None
    except Exception as e:
        print(f"[WARN] find_checkbox_square 异常: {e}")
        return None


def adb_tap(x, y):
    """使用 adb shell input tap 在指定坐标点击,比 driver.tap 更底层可靠。"""
    subprocess.run(["adb", "shell", "input", "tap", str(x), str(y)], check=False)
    time.sleep(0.5)


def login_by_uiautomator(driver):
    """使用 Android UiAutomator 定位输入框,其余用 adb 坐标点击。"""
    print("[INFO] 开始登录流程 (UiAutomator 定位方式)")

    # 1) 账号输入框
    email_input = wait_for_element(
        driver, AppiumBy.ANDROID_UIAUTOMATOR,
        'new UiSelector().className("android.widget.EditText").instance(0)'
    )
    email_input.click()
    time.sleep(0.5)
    adb_input_text(EMAIL)
    print(f"[INFO] 已输入账号: {EMAIL}")
    take_screenshot(driver, "01_after_email")

    # 2) 密码输入框
    pwd_input = wait_for_element(
        driver, AppiumBy.ANDROID_UIAUTOMATOR,
        'new UiSelector().className("android.widget.EditText").instance(1)'
    )
    pwd_input.click()
    time.sleep(0.5)
    adb_input_text(PASSWORD)
    print("[INFO] 已输入密码")
    take_screenshot(driver, "02_after_pwd")

    # 2.5) 收起键盘
    hide_keyboard_safe()
    take_screenshot(driver, "03_after_hide_keyboard")

    # 获取页面源码
    page_xml = driver.page_source
    try:
        with open("page_source_03b.xml", "w", encoding="utf-8") as f:
            f.write(page_xml)
        print("[INFO] 已保存页面源码: page_source_03b.xml")
    except Exception as e:
        print(f"[WARN] 保存页面源码失败: {e}")

    # 2.6) 勾选复选框
    print("[INFO] 尝试勾选用户协议复选框...")
    checkbox_info = find_checkbox_square(page_xml, anchor_text="阅读并同意")
    if checkbox_info:
        cx, cy, text, class_name, bounds = checkbox_info
        print(f"[INFO] 点击复选框小方框中心: ({cx}, {cy}), class={class_name}, text='{text}'")
        adb_tap(cx, cy)
    else:
        # 兜底:使用 XML 中确认过的精确坐标
        print("[WARN] 未自动定位到复选框,使用已知精确坐标 (252, 1448)")
        adb_tap(252, 1448)
    take_screenshot(driver, "03b_after_agreement")

    # 重新获取页面源码,查看复选框状态变化
    page_xml2 = driver.page_source
    try:
        with open("page_source_03c.xml", "w", encoding="utf-8") as f:
            f.write(page_xml2)
    except Exception as e:
        print(f"[WARN] 保存 page_source_03c.xml 失败: {e}")

    # 3) 点击登录按钮
    print("[INFO] 尝试点击登录按钮...")
    login_element = find_login_button_element(driver)
    if login_element:
        login_text = login_element.get_attribute('text') or login_element.get_attribute('content-desc') or ''
        print(f"[INFO] 通过 Appium 定位到登录按钮: text='{login_text}',尝试点击")
        try:
            login_element.click()
        except Exception as e:
            print(f"[WARN] 直接点击登录按钮失败: {e},改用 adb 坐标点击")
            bounds = login_element.get_attribute('bounds')
            if bounds:
                parsed = parse_bounds(bounds)
                if parsed:
                    _, _, _, _, cx, cy = parsed
                    adb_tap(cx, cy)
                else:
                    print("[WARN] 登录按钮 bounds 无法解析,使用默认坐标 (540, 1340)")
                    adb_tap(540, 1340)
            else:
                adb_tap(540, 1340)
    else:
        # 先不限定 class,找出所有包含"登录"的元素并打印调试
        login_all = find_elements_all(
            page_xml2,
            text_keywords=["登录"],
            exclude_texts=["免密登录", "第三方登录", "验证码登录"]
        )
        if login_all:
            print(f"[DEBUG] 共找到 {len(login_all)} 个匹配'登录'的元素:")
            for r in login_all:
                left, top, right, bottom, cx, cy, text, class_name = r
                print(f"       text='{text}', class={class_name}, bounds=[{left},{top}][{right},{bottom}], center=({cx},{cy})")
            # 优先选择 y 坐标最大(最靠下)且高度较大的元素,通常绿色大登录按钮在下方
            # 按 cy 降序排列,取最下面的
            login_all_sorted = sorted(login_all, key=lambda r: r[5], reverse=True)
            left, top, right, bottom, cx, cy, text, class_name = login_all_sorted[0]
            print(f"[INFO] 选择最下方的登录按钮: text='{text}', class={class_name}, center=({cx},{cy})")
            adb_tap(cx, cy)
        else:
            # 退而求其次,找包含"登"字的任何元素
            login_all = find_elements_all(
                page_xml2,
                text_keywords=["登"],
                exclude_texts=["免密登录", "第三方登录", "验证码登录", "立即注册"]
            )
            if login_all:
                print(f"[DEBUG] 共找到 {len(login_all)} 个匹配'登'的元素:")
                for r in login_all:
                    left, top, right, bottom, cx, cy, text, class_name = r
                    print(f"       text='{text}', class={class_name}, bounds=[{left},{top}][{right},{bottom}], center=({cx},{cy})")
                login_all_sorted = sorted(login_all, key=lambda r: r[5], reverse=True)
                left, top, right, bottom, cx, cy, text, class_name = login_all_sorted[0]
                print(f"[INFO] 选择最下方的'登'元素作为登录按钮: text='{text}', center=({cx},{cy})")
                adb_tap(cx, cy)
            else:
                print("[WARN] 未从页面源码解析到登录按钮,使用默认坐标 (540, 1340)")
                adb_tap(540, 1340)
    print("[INFO] 已点击登录按钮")
    take_screenshot(driver, "04_after_login_click")


def main():
    driver = None
    try:
        print("[INFO] 正在连接 Appium Server (http://localhost:4723) ...")
        driver = get_driver()
        print("[INFO] Driver 初始化成功")
        take_screenshot(driver, "00_initial")

        login_by_uiautomator(driver)

        time.sleep(3)
        print("[INFO] 登录流程执行完毕")
        take_screenshot(driver, "05_final")

    except Exception as e:
        print(f"[ERROR] 执行异常: {e}")
        if driver:
            take_screenshot(driver, "99_error")
    finally:
        if driver:
            print("[INFO] 退出 Appium Driver")
            driver.quit()


if __name__ == "__main__":
    main()
登录脚本涉及的技术和 Python 知识点清单
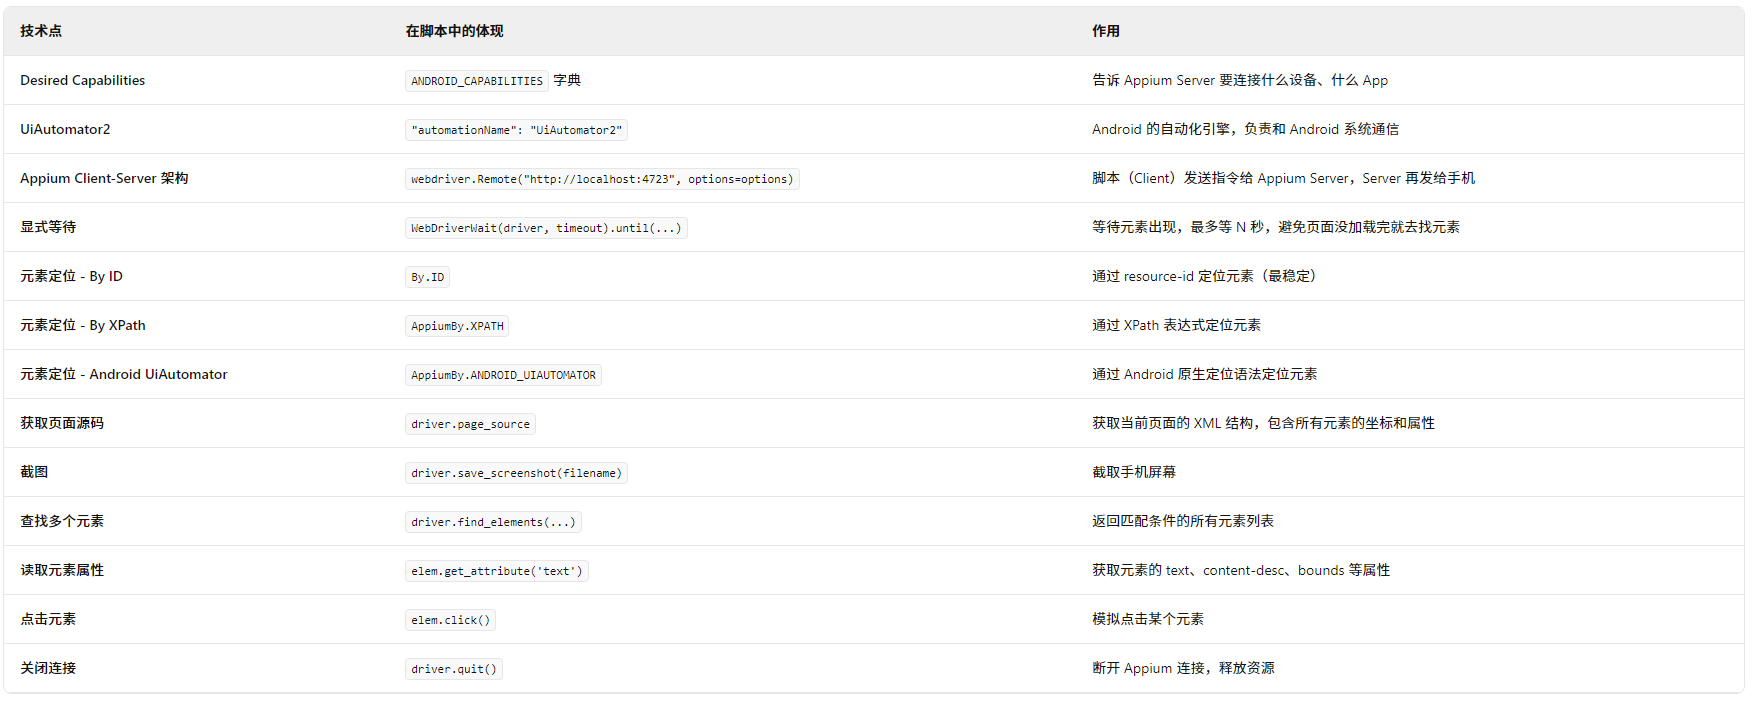
一、Appium / 移动端自动化技术
(11个技术点) Desired Capabilities、UiAutomator2、Client-Server 架构、显式等待、元素定位(ID/XPath/UiAutomator)、page_source、截图、find_elements、get_attribute、click、quit
二、ADB(Android Debug Bridge)技术
(4个技术点) adb shell input text、adb shell input keyevent、adb shell input tap、adb devices

三、XML 解析技术
(4个技术点) ElementTree、fromstring、iter 遍历、get 属性

四、Python 语言知识点(按出现顺序)
(23个) 文件编码、文档字符串、import 导入、字典、环境变量、函数定义、类实例化、f-string 格式化、try-except 异常处理、字符串替换、列表、正则表达式、map 类型转换、元组解包、if-elif-else、for 循环、生成器表达式 + any()、lambda 表达式、sorted 排序、append 追加、with open 文件操作、name == "main"
1. 文件编码声明
python
# -*- coding: utf-8 -*-知识点:告诉 Python 解释器,这个文件使用 UTF-8 编码,可以正确处理中文。
在脚本中:确保代码中的中文字符串(如 "阅读并同意")不会乱码。
2. 多行字符串(文档字符串)
python
"""
Appium + Python 登录自动化脚本
..."""
知识点:用三个引号包裹的多行字符串,通常放在文件开头或函数开头,作为说明文档。
在脚本中:描述脚本的功能和目标。
3. 模块导入
python
import os
import re
import subprocess
from datetime import datetime
from appium import webdriver
知识点:import 导入整个模块;from ... import ... 从模块中导入特定类或函数。
在脚本中:引入需要用到的所有工具和库。
4. 字典(dict)
python
ANDROID_CAPABILITIES = {
    "platformName": "Android",
    "platformVersion": "10",
    ...
}
知识点:字典是键值对的集合,用 {} 定义,通过键来存取值。
在脚本中:存储 Appium 连接手机需要的所有配置信息。
5. 环境变量读取
python
os.getenv("ANDROID_DEVICE_NAME", "D5F0218908000091")
知识点:os.getenv(key, default) 读取系统的环境变量,如果没有设置则返回默认值。
在脚本中:方便在不同电脑上运行,不需要修改代码,只需要设置环境变量。
6. 函数定义
python
def get_driver():
    """初始化 Appium Driver"""
    options = UiAutomator2Options().load_capabilities(ANDROID_CAPABILITIES)
    driver = webdriver.Remote(command_executor=APPIUM_SERVER, options=options)
    return driver
知识点:def 定义函数,函数可以有参数和返回值。函数体内的代码缩进 4 个空格。
在脚本中:把一段功能封装起来,方便重复使用。
7. 函数文档字符串
python
def adb_input_text(text):
    """使用 adb input text 输入文本..."""
知识点:函数开头的三个引号字符串,描述函数的功能和用法。
在脚本中:方便自己和他人理解这段代码是干什么的。
8. 类实例化
python
options = UiAutomator2Options().load_capabilities(ANDROID_CAPABILITIES)
知识点:类名() 创建类的实例对象,然后调用对象的方法(如 .load_capabilities())。
在脚本中:创建 Appium 的配置对象。
9. 字符串格式化(f-string)
python
filename = f"{name}_{timestamp}.png"
print(f"[INFO] 已截图: {os.path.abspath(filename)}")
知识点:f"...{变量}..." 在字符串中嵌入变量值,是最常用的字符串拼接方式。
在脚本中:动态生成文件名和日志信息。
10. 异常处理(try-except)
python
try:
    driver.save_screenshot(filename)
    print(f"[INFO] 已截图: ...")
except Exception as e:
    print(f"[WARN] 截图失败: {e}")
知识点:try 块里的代码如果出错,会跳到 except 块执行,不会导致整个程序崩溃。
在脚本中:截图失败时打印警告而不是报错退出。
11. 字符串替换
python
safe_text = text.replace("'", "'\"'\"'")
知识点:str.replace(old, new) 把字符串中的旧子串替换成新子串。
在脚本中:处理密码中的单引号,防止破坏 adb shell 命令。
12. 列表
python
subprocess.run(["adb", "shell", "input", "keyevent", "66"], check=False)
知识点:列表用 [] 定义,是有序的元素集合。subprocess.run 接收列表作为命令参数。
在脚本中:构建要执行的系统命令及其参数。
13. 正则表达式
python
match = re.match(r'\[(\d+),(\d+)\]\[(\d+),(\d+)\]', bounds_str)
知识点:re.match(pattern, string) 用正则表达式匹配字符串开头。\d+ 匹配一个或多个数字,括号 () 表示捕获组。
在脚本中:从 bounds 字符串 [226,1422][278,1474] 中提取四个数字。
14. 类型转换
python
left, top, right, bottom = map(int, match.groups())
知识点:map(function, iterable) 对可迭代对象的每个元素应用函数。int() 把字符串转成整数。
在脚本中:把正则匹配到的字符串数字转换成整数。
15. 元组解包
python
left, top, right, bottom, cx, cy = parsed
知识点:元组 (1, 2, 3) 可以用逗号赋值给多个变量,这叫"解包"。
在脚本中:parse_bounds 返回 6 个值,一次赋值给 6 个变量。
16. 条件判断(if-elif-else)
python
if checkbox_info:
    cx, cy = ...
    adb_tap(cx, cy)
else:
    adb_tap(252, 1448)
知识点:if 判断条件为真时执行,else 为假时执行。可以有多层嵌套。
在脚本中:如果自动定位成功就用定位坐标,否则用兜底坐标。
17. 循环(for)
python
for elem in root.iter():
    text = elem.get('text', '')
    ...
知识点:for 变量 in 可迭代对象: 遍历每一个元素。
在脚本中:遍历 XML 树中的每一个节点,查找符合条件的元素。
18. 生成器表达式 + any()
python
text_match = any(kw in text for kw in text_keywords)
知识点:(表达式 for 变量 in 可迭代对象) 是生成器表达式,配合 any() 判断是否至少有一个为真。
在脚本中:检查 text 是否包含 text_keywords 列表中的任意一个关键词。
19. Lambda 表达式
python
candidates.sort(key=lambda el: int(...), reverse=True)
login_all_sorted = sorted(login_all, key=lambda r: r[5], reverse=True)
知识点:lambda 参数: 表达式 是匿名函数,通常作为参数传给 sort 或 sorted。
在脚本中:指定排序规则------按元素的 y 坐标从大到小排。
20. 列表排序(sorted)
python
login_all_sorted = sorted(login_all, key=lambda r: r[5], reverse=True)知识点:sorted(列表, key=排序规则, reverse=True) 返回排序后的新列表。
在脚本中:把找到的元素按 y 坐标从大到小排列,选最下面的登录按钮。
21. 列表追加(append)
python
```python
results.append((left, top, right, bottom, cx, cy, text, class_name))
知识点:list.append(元素) 把元素添加到列表末尾。
在脚本中:把匹配到的元素信息收集到 results 列表中。
### 22. 文件操作(with open)

```python
with open("page_source_03b.xml", "w", encoding="utf-8") as f:
    f.write(page_xml)
知识点:with open(...) as f: 自动管理文件资源,写完后自动关闭文件。"w" 表示写入模式。
在脚本中:把页面 XML 源码保存到文件,方便调试时人工查看。
23. 模块入口判断
python
if __name__ == "__main__":
    main()
知识点:当直接运行这个 .py 文件时,name 的值是 "main ",所以会执行 main()。如果被别人 import,name 是模块名,不会自动执行。
在脚本中:确保只有直接运行脚本时才启动登录流程。
五、工程实践 / 编程思想
思想 在脚本中的体现
分层降级策略 先尝试元素定位,失败则解析 XML,再失败则用硬编码坐标
兜底思维 每个关键步骤都有 else 分支,提供默认坐标或默认行为
截图驱动调试 每一步操作后都截图,出问题能精确定位
日志记录 大量 print("INFO ...") 记录执行过程
异常安全 try-except-finally 确保出错时也能截图并正常退出
环境变量配置 用 os.getenv() 读取配置,代码不需要在不同机器上修改
函数封装 把重复逻辑(截图、点击、输入)封装成函数,主流程清晰
五、plus 5 个工程思想
** 分层降级、兜底思维、截图驱动调试、日志记录、异常安全
六、学习建议:按优先级逐个突破
零基础,建议按这个顺序学习这些知识点:
第一优先级(必须先会):
变量、数据类型(字符串、数字、列表、字典)条件判断(if-else)
循环(for)
函数定义(def)
模块导入(import)
字符串格式化(f-string)
异常处理(try-except)
第二优先级(脚本中大量使用的): 8. 文件操作(with open) 9. 正则表达式(re.match) 10. 列表排序(sorted + lambda) 11. 生成器表达式(any / all) 12. 元组解包
第三优先级(理解和会用即可): 13. 环境变量(os.getenv) 14. 子进程(subprocess.run) 15. XML 解析(ElementTree) 16. 正则表达式的捕获组
Appium 技术(边用边学): 17. Desired Capabilities 18. 元素定位(ID、XPath、UiAutomator) 19. 显式等待(WebDriverWait) 20. driver.page_source 和截图 21. ADB 命令(input text / tap / keyevent)
(必须先会): 变量、字符串、数字、列表、字典、if-else、for 循环、def 函数、import、f-string、try-except(脚本大量使用): with open 文件操作、正则表达式 re.match、sorted + lambda、any() 生成器表达式、元组解包
(边用边学): subprocess、os.getenv、ElementTree XML 解析、Appium 元素定位、WebDriverWait 显式等待、ADB 命令
跟着这个顺序走,每学会一个知识点,就到脚本里找到对应的地方,改一改、跑一跑,就真正掌握了。
七、从零写出一个 Appium 脚本的完整思考过程
1、核心心法:先想清楚"做什么",再思考"怎么做"
很多新手一上来就搜代码、复制粘贴,结果跑不通也不知道为什么。 正确顺序是:
先用手动操作在手机上完整跑一遍流程(理解业务)
把流程拆成一步一步的指令(翻译给计算机)
为每一步找对应的代码/API(技术实现)
把代码串起来,加错误处理和兜底(工程化)
第一步:理解需求("我要做什么?")
拿到需求时,先在脑子里还原场景:
"使用 Appium + Python,在 Android 10 华为手机上,自动完成 App 的邮箱密码登录。"
不要急着写代码,先用手动操作把手机上的流程完整走一遍:
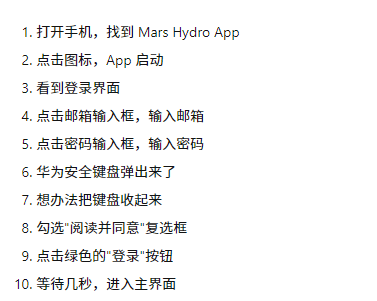
关键:手动操作时,脑子里要把自己当成一台机器。 机器不知道怎么"看见"按钮,它只能执行明确的指令。所以你要观察:这个按钮长什么样?它在屏幕什么位置?有没有文字?
第二步:拆解任务("把大目标切成小目标")
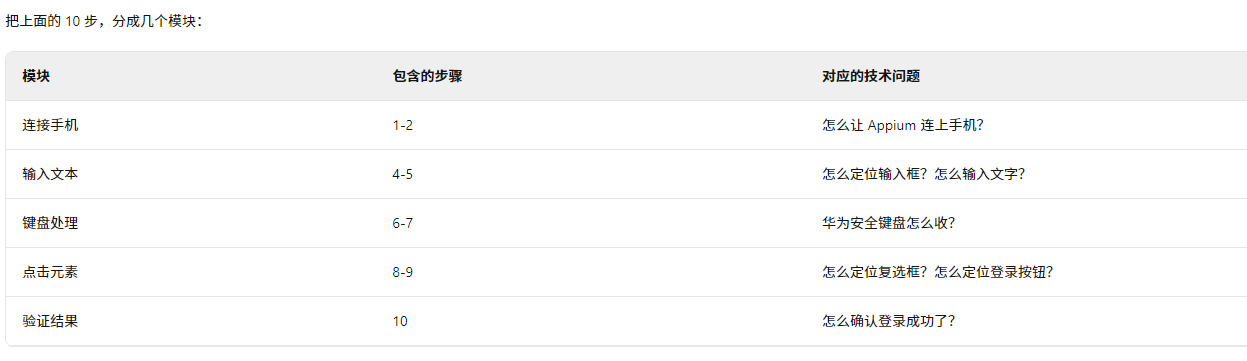
现在只需要逐个解决这 5 个小问题,而不是一次性解决一个大问题。
这就是分治思维:把大问题拆成小问题,逐个击破。
第三步:逐个击破("每个小问题怎么解决?")
问题 1:连接手机
思路:Appium 连接手机需要什么信息?
回忆一下 Appium 的工作原理:Appium Server 通过 ADB 和 Android 系统通信。所以需要告诉 Appium:
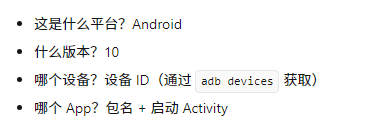
怎么找到这些信息?
设备 ID:adb devices
包名和 Activity:adb shell dumpsys window | findstr mCurrentFocus

对应代码:
python
ANDROID_CAPABILITIES = {
    "platformName": "Android",
    "platformVersion": "10",
    "deviceName": "xxxx",
    "automationName": "UiAutomator2",
    "appPackage": "com.",
    "appActivity": "com.",
}
问题 2:定位输入框并输入文字
思路:怎么让代码"看见"输入框?
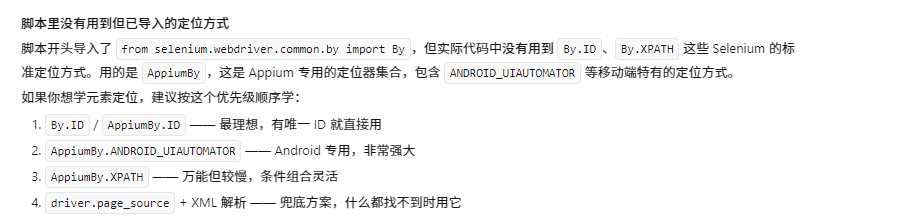
手机上有很多元素(输入框、按钮、文字),代码要找到特定的那个。有几种方法:
方法 A:看 resource-id(最理想) 用 Appium Inspector 查看元素属性,如果有 resource-id="email_input",直接:
python
driver.find_element(By.ID, "email_input")方法 B:看 class + instance(退而求其次) 如果没有 resource-id,但有 class="android.widget.EditText",页面上有两个输入框:
python
driver.find_element(AppiumBy.ANDROID_UIAUTOMATOR, 'new UiSelector().className("android.widget.EditText").instance(0)')instance(0) 表示第一个输入框,instance(1) 表示第二个。
方法 C:看 bounds 坐标(兜底) 如果连 class 都靠不住,直接解析 XML 里的坐标,用坐标点击。
输入文字的两种方式:
python
element.send_keys("text") ------ 标准方式,但华为安全键盘会拦截
subprocess.run(["adb", "shell", "input", "text", "text"]) ------ 绕过键盘,更可靠
问题 3:收起华为安全键盘
思路:华为键盘和普通键盘不一样,普通方法关不掉。
先尝试标准方法:driver.hide_keyboard() ------ 发现无效。
然后尝试用 Appium 发返回键:driver.press_keycode(4) ------ 发现会导致 instrumentation 崩溃。
结论:不能走 Appium,必须走 ADB。
试验几种 ADB 按键:
python
adb shell input keyevent 66(Enter)------ 有时候有效
adb shell input tap 980 2120(点击键盘完成按钮)------ 有时候有效
adb shell input keyevent 111(Escape)------ 有时候有效
最终方案:三招一起用,总有一招管用。
问题 4:定位复选框和登录按钮
思路:这两个元素是本次调试中最难的部分。
复选框的问题:
它不是标准的 CheckBox,而是一个 ImageView(图片)它没有 resource-id,text 属性为空
它藏在文字"阅读并同意"的左边
解决路径:
先用 driver.find_elements 尝试各种定位方式 ------ 失败保存 driver.page_source 到 XML 文件 ------ 人工查看
在 XML 里搜索"阅读并同意" ------ 找到文字元素
看文字元素附近的兄弟元素 ------ 发现 ImageView bounds=226,1422278,1474
用 ADB 点击坐标 (252, 1448) ------ 成功
登录按钮的问题:
它的 class 是 android.view.View,不是 Button页面上有多个包含"登录"文字的元素(免密登录、第三方登录)
解决路径:
限定只找 Button 类 ------ 找不到放宽条件,找所有包含"登录"的元素 ------ 找到多个
选 y 坐标最大的(最靠下的)------ 绿色大按钮通常在下方
问题 5:验证结果
思路:怎么确认登录成功了?
方法 A:看当前页面是不是登录页 ------ 如果不在登录页了,说明登录成功 方法 B:看页面上有没有"暂无设备,请添加设备"这样的文字 ------ 有就说明进了主界面 方法 C:截图 ------ 人工目视确认
最稳妥的是截图,因为断言写错了会导致误判。
第四步:搭建骨架("先把最简单的流程跑通")
不要一上来就写完整的代码。先写一个"骨架",让流程能跑起来:
python
from appium import webdriver
from appium.options.android import UiAutomator2Options


# 1. 配置
caps = {
    "platformName": "Android",
    "deviceName": "你的设备ID",
    "appPackage": "com.marspro.meizhi",
    "appActivity": "com.marspro.meizhi.MainActivity",
}

# 2. 连接手机
options = UiAutomator2Options().load_capabilities(caps)
driver = webdriver.Remote("http://localhost:4723", options=options)

# 3. 截图看看当前页面
driver.save_screenshot("test.png")

# 4. 退出
driver.quit()
这一步的目标是:让脚本能连上手机,截一张图。 只要这张图截出来了,说明你的环境没问题,可以继续往下写。
第五步:逐步填充("一块一块往上加")
骨架跑通后,像搭积木一样,一块一块往上加:
第 1 块:加输入账号
python
email = driver.find_element(AppiumBy.ANDROID_UIAUTOMATOR, 'new UiSelector().className("android.widget.EditText").instance(0)')
email.click()
email.send_keys("@qq.com")
跑一遍,看终端有没有报错,截图里有没有输入邮箱。
第 2 块:加输入密码
python
pwd = driver.find_element(AppiumBy.ANDROID_UIAUTOMATOR, 'new UiSelector().className("android.widget.EditText").instance(1)')
pwd.click()
pwd.send_keys("")
跑一遍,看截图里密码有没有输入成功。
第 3 块:加键盘处理
如果上一步发现键盘挡住了页面,加键盘收起逻辑。
第 4 块:加复选框
如果直接点击复选框点不中,尝试保存 XML 解析坐标。
第 5 块:加登录按钮
如果点击登录按钮去了注册页面,说明定位错了,换定位方式。
每加一块,就运行一遍,确认没问题再加下一块。 不要一次性加太多,否则出错了不知道是哪一块的问题。
第六步:加截图和日志("出了问题能定位")
每块都跑通后,给每一步加上截图和打印:
python
print("[INFO] 开始输入邮箱")

# ... 输入邮箱的代码 ...
driver.save_screenshot("01_after_email.png")

print("[INFO] 开始输入密码")
# ... 输入密码的代码 ...
driver.save_screenshot("02_after_pwd.png")
这样运行后,得到一串截图:01_after_email.png、02_after_pwd.png... 如果哪一步失败了,看对应步骤的截图就知道问题在哪。
第七步:加错误处理("让脚本更健壮")
现在的代码如果遇到异常会直接崩溃。加上 try-except:
python
try:
    # ... 登录流程 ...
except Exception as e:
    print(f"[ERROR] 出错了: {e}")
    driver.save_screenshot("99_error.png")
finally:
    driver.quit()
这样即使出错了,也会截图保存现场,然后正常退出,不会卡死。
第八步:封装成函数("让代码更整洁")
python
把重复的代码抽成函数:


def take_screenshot(driver, name):
    driver.save_screenshot(f"{name}.png")

def adb_tap(x, y):
    subprocess.run(["adb", "shell", "input", "tap", str(x), str(y)])

def login(driver):
    # ... 登录流程 ...
这样主流程就很清晰:
python
driver = get_driver()
login(driver)
driver.quit()
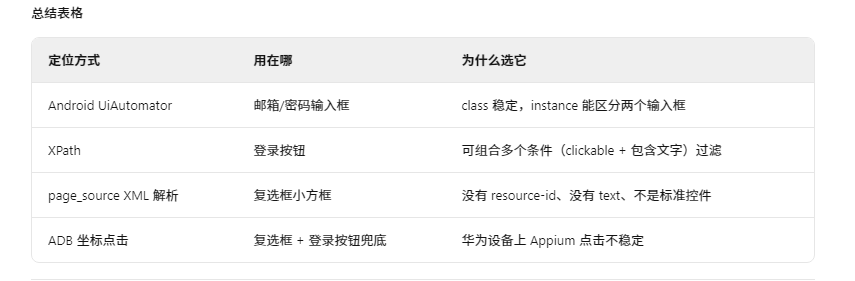
这个脚本用到了appium的元素定位
这个脚本里一共用到了 3 种 Appium 元素定位方式,外加一种底层兜底方案:
①Android UiAutomator 定位(用于输入框)
python
email_input = wait_for_element(
    driver, AppiumBy.ANDROID_UIAUTOMATOR,
    'new UiSelector().className("android.widget.EditText").instance(0)'
)
定位原理:直接调用 Android 系统底层的 UiAutomator 框架,通过 class 名称和索引找元素
className("android.widget.EditText") ------ 找输入框
instance(0) ------ 第一个输入框(邮箱),instance(1) 是第二个(密码)
为什么用它:输入框有稳定的 class 名,而且页面上只有俩,用索引就能区分
②XPath 定位(用于登录按钮)
python
xpath = f"//*[@clickable='true' and ({xpath_body})]"
elements = driver.find_elements(AppiumBy.XPATH, xpath)
定位原理:用 XPath 表达式在 XML 树中搜索元素
//*@clickable='true' ------ 找所有可点击的元素
contains(@text, '登录') 或 contains(@content-desc, '登录') ------ 文本包含"登录"
为什么用它:登录按钮不是标准 Button,没有 resource-id,用 XPath 可以组合多个条件(可点击 + 包含文字)来过滤
③page_source XML 解析(用于复选框和兜底定位)
python
page_xml = driver.page_source
# 然后用 ElementTree 解析 XML,提取 bounds 属性
定位原理:把整个页面的 XML 源码抓下来,人工解析每个元素的 bounds="left,topright,bottom" 坐标
为什么用它:复选框是个 ImageView(图片),没有 text、没有 resource-id、不是标准 CheckBox,所有标准定位方式都找不到它。只能从 XML 里读坐标,然后用 ADB 点击
④ 坐标点击兜底(ADB,不算 Appium 定位但属于脚本定位策略)
python
adb_tap(252, 1448)   # 复选框
adb_tap(cx, cy)      # 登录按钮
定位原理:绕过 Appium 的元素定位系统,直接用 ADB 在屏幕像素坐标上点击
为什么用它:华为手机上 driver.tap 经常点不准,adb shell input tap 更底层、更可靠
总结:思考框架
面对任何一个自动化需求,思考顺序永远是:
- 手动操作一遍(理解业务)
↓ - 拆解成小模块(分治)
↓ - 逐个解决每个模块(先查文档,再试代码)
↓ - 搭建骨架跑通最简单流程(验证环境)
↓ - 逐步填充每个模块(每步验证)
↓ - 加截图和日志(可观测性)
↓ - 加错误处理(健壮性)
↓ - 封装成函数(可维护性)
这个框架不限于 Appium,任何自动化脚本都是这个思路。
下次遇到一个新的自动化需求,按照这个顺序走,就能独立写出代码。如果某一步卡住了,把具体现象(报错信息、截图、日志)发给AI,分析卡在哪个环节。