
拉普拉斯算子(Laplacian)边缘检测
核心原理:二阶导数与过零点检测
1. 拉普拉斯算子的数学本质
拉普拉斯算子是基于二阶导数 的线性高通滤波器,用于度量图像亮度函数的"曲率"。其定义为:
laplace(I)=∂2I∂x2+∂2I∂y2 laplace(I) = \frac{\partial^2 I}{\partial x^2} + \frac{\partial^2 I}{\partial y^2} laplace(I)=∂x2∂2I+∂y2∂2I
它同时计算图像在水平和垂直方向的二阶导数之和,对亮度突变的边缘非常敏感。
2. 3×3 拉普拉斯卷积核
最简单的近似形式是:
K=0101−41010 K = \begin{bmatrix} 0 & 1 & 0 \\ 1 & -4 & 1 \\ 0 & 1 & 0 \end{bmatrix} K= 0101−41010
核中所有值的和为0,因此在平坦区域(无亮度变化),输出值为0。
3. 边缘检测的关键:过零点(Zero-crossing)
- 原理 :在图像边缘处,亮度从一侧快速过渡到另一侧,二阶导数会从正值变为负值(或反之),其过零点(即值为0的位置) 就是边缘的精确位置。
- 优点:可以实现亚像素级别的边缘定位。
- 缺点:对噪声极其敏感,因此常与高斯平滑结合使用(LoG,高斯-拉普拉斯算子)。
4. 高斯差分(DoG)近似 LoG
高斯差分(Difference of Gaussians)是 LoG 的高效近似:
- 用两个不同标准差(σ)的高斯核平滑图像;
- 将结果相减,即可得到带通滤波效果,其过零点也对应边缘。
OpenCV 核心 API 解析
1. cv::Laplacian 函数
cpp
void Laplacian(
    InputArray src,    // 输入图像(通常为灰度图)
    OutputArray dst,   // 输出图像
    int ddepth,        // 输出深度(推荐 CV_32F,防溢出)
    int ksize = 1,     // 核大小(1,3,5,7)
    double scale = 1,  // 缩放因子
    double delta = 0   // 偏移量
);ddepth:必须使用比输入更深的类型(如CV_32F),因为二阶导数可能为负,避免截断。ksize:越大,对噪声鲁棒性越强,对大尺度边缘越敏感。
2. 辅助函数
cv::convertTo:将浮点型结果映射到 0-255 显示范围。cv::minMaxLoc:找到拉普拉斯结果的极值,用于自动缩放显示。cv::threshold:对拉普拉斯结果取符号,用于过零点检测。cv::dilate+cv::subtract:形态学操作,提取过零点轮廓。
Android 完整工程实现
1. 布局文件 activity_main.xml
xml
<?xml version="1.0" encoding="utf-8"?>
<ScrollView xmlns:android="http://schemas.android.com/apk/res/android"
    android:layout_width="match_parent"
    android:layout_height="match_parent"
    android:background="#f5f5f5">

    <LinearLayout
        android:layout_width="match_parent"
        android:layout_height="wrap_content"
        android:orientation="vertical"
        android:padding="10dp">

        <LinearLayout
            android:layout_width="match_parent"
            android:layout_height="wrap_content"
            android:orientation="vertical">
            <TextView
                android:layout_width="wrap_content"
                android:layout_height="wrap_content"
                android:text="自动生成测试图"
                android:textSize="16sp"
                android:textStyle="bold"/>
            <ImageView
                android:id="@+id/iv_origin"
                android:layout_width="match_parent"
                android:layout_height="220dp"
                android:scaleType="fitCenter"
                android:background="#fff"/>
        </LinearLayout>

        <LinearLayout
            android:layout_width="match_parent"
            android:layout_height="wrap_content"
            android:orientation="vertical">
            <TextView
                android:layout_width="wrap_content"
                android:layout_height="wrap_content"
                android:text="加噪图"
                android:textSize="16sp"
                android:textStyle="bold"/>
            <ImageView
                android:id="@+id/iv_noisy"
                android:layout_width="match_parent"
                android:layout_height="220dp"
                android:scaleType="fitCenter"
                android:background="#fff"/>
        </LinearLayout>

        <LinearLayout
            android:layout_width="match_parent"
            android:layout_height="wrap_content"
            android:orientation="vertical">
            <TextView
                android:layout_width="wrap_content"
                android:layout_height="wrap_content"
                android:text="拉普拉斯边缘"
                android:textSize="16sp"
                android:textStyle="bold"/>
            <ImageView
                android:id="@+id/iv_laplacian"
                android:layout_width="match_parent"
                android:layout_height="220dp"
                android:scaleType="fitCenter"
                android:background="#fff"/>
        </LinearLayout>

        <LinearLayout
            android:layout_width="match_parent"
            android:layout_height="wrap_content"
            android:orientation="vertical">
            <TextView
                android:layout_width="wrap_content"
                android:layout_height="wrap_content"
                android:text="过零点边缘"
                android:textSize="16sp"
                android:textStyle="bold"/>
            <ImageView
                android:id="@+id/iv_zerocross"
                android:layout_width="match_parent"
                android:layout_height="220dp"
                android:scaleType="fitCenter"
                android:background="#fff"/>
        </LinearLayout>

    </LinearLayout>
</ScrollView>
2. Kotlin 上层代码 MainActivity.kt
kotlin
package com.nicoli.hellofilterlaplacian

import android.graphics.Bitmap
import android.graphics.BitmapFactory
import android.os.Bundle
import android.widget.ImageView
import androidx.appcompat.app.AppCompatActivity

class MainActivity : AppCompatActivity() {
    companion object {
        init {
            System.loadLibrary("native-lib")
        }
    }

    // JNI 方法声明
    private external fun generateTestImageAndProcess(
        srcBitmap: Bitmap,
        outNoisy: Bitmap,
        outLaplacian: Bitmap,
        outZeroCross: Bitmap
    )

    override fun onCreate(savedInstanceState: Bundle?) {
        super.onCreate(savedInstanceState)
        setContentView(R.layout.activity_main)

        val w = 2048
        val h = 2048

        val bmpOrigin = Bitmap.createBitmap(w, h, Bitmap.Config.ARGB_8888)
        val bmpNoisy = Bitmap.createBitmap(w, h, Bitmap.Config.ARGB_8888)
        val bmpLaplacian = Bitmap.createBitmap(w, h, Bitmap.Config.ARGB_8888)
        val bmpZeroCross = Bitmap.createBitmap(w, h, Bitmap.Config.ARGB_8888)

        generateTestImageAndProcess(bmpOrigin, bmpNoisy, bmpLaplacian, bmpZeroCross)

        findViewById<ImageView>(R.id.iv_origin).setImageBitmap(bmpOrigin)
        findViewById<ImageView>(R.id.iv_noisy).setImageBitmap(bmpNoisy)
        findViewById<ImageView>(R.id.iv_laplacian).setImageBitmap(bmpLaplacian)
        findViewById<ImageView>(R.id.iv_zerocross).setImageBitmap(bmpZeroCross)
    }
}
3. C++ 核心算法 native-lib.cpp
cpp
#include <jni.h>
#include <opencv2/opencv.hpp>
#include <android/bitmap.h>
#include <cstdlib>
#include <ctime>

using namespace cv;
using namespace std;

void matToBitmap(JNIEnv *env, const Mat& srcMat, jobject dstBitmap) {
    AndroidBitmapInfo info;
    void* pixels = nullptr;
    AndroidBitmap_getInfo(env, dstBitmap, &info);
    AndroidBitmap_lockPixels(env, dstBitmap, &pixels);
    Mat rgba;
    if (srcMat.channels() == 1) {
        cvtColor(srcMat, rgba, COLOR_GRAY2RGBA);
    } else {
        cvtColor(srcMat, rgba, COLOR_BGR2RGBA);
    }
    memcpy(pixels, rgba.data, info.width * info.height * 4);
    AndroidBitmap_unlockPixels(env, dstBitmap);
}

Mat createTestImage(int w, int h) {
    Mat img(h, w, CV_8UC3, Scalar(220, 220, 220));
    rectangle(img, Point(500, 500), Point(1500, 1500), Scalar(50, 50, 50), 20);
    circle(img, Point(1024, 1024), 400, Scalar(60, 60, 60), 15);
    line(img, Point(300, 1024), Point(1700, 1024), Scalar(70, 70, 70), 12);
    line(img, Point(1024, 300), Point(1024, 1700), Scalar(70, 70, 70), 12);
    return img;
}

void addNoise(Mat& img) {
    RNG rng(12345);
    for (int i = 0; i < 600; i++) {
        int x = rng.uniform(0, img.cols);
        int y = rng.uniform(0, img.rows);
        circle(img, Point(x, y), 2, Scalar(255, 255, 255), -1);
    }
}

void laplacianEdge(const Mat& src, Mat& lapla, Mat& zeroCross) {
    Mat gray;
    cvtColor(src, gray, COLOR_BGR2GRAY);
    GaussianBlur(gray, gray, Size(5, 5), 1.2);

    Mat lap;
    Laplacian(gray, lap, CV_32F, 5);
    convertScaleAbs(lap, lapla);

    Mat sign, bin1, bin2, dilateMat;
    cv::threshold(lap, sign, 0, 255, THRESH_BINARY);
    sign.convertTo(bin1, CV_8U);

    Mat kernel = getStructuringElement(MORPH_RECT, Size(3, 3));
    cv::dilate(bin1, dilateMat, kernel);
    zeroCross = dilateMat - bin1;

    double m = 0;
    minMaxIdx(cv::abs(lap), nullptr, &m);
    Mat strong;
    cv::threshold(cv::abs(lap), strong, m * 0.08, 255, THRESH_BINARY);
    strong.convertTo(strong, CV_8U);
    cv::bitwise_and(zeroCross, strong, zeroCross);
}

extern "C" JNIEXPORT void JNICALL
Java_com_nicoli_hellofilterlaplacian_MainActivity_generateTestImageAndProcess(
        JNIEnv* env, jobject thiz,
        jobject outOrigin, jobject outNoisy,
        jobject outLaplacian, jobject outZeroCross)
{
    Mat test = createTestImage(2048, 2048);
    Mat noisy = test.clone();
    addNoise(noisy);

    Mat lap, edge;
    laplacianEdge(noisy, lap, edge);

    matToBitmap(env, test, outOrigin);
    matToBitmap(env, noisy, outNoisy);
    matToBitmap(env, lap, outLaplacian);
    matToBitmap(env, edge, outZeroCross);
}
效果与参数详解
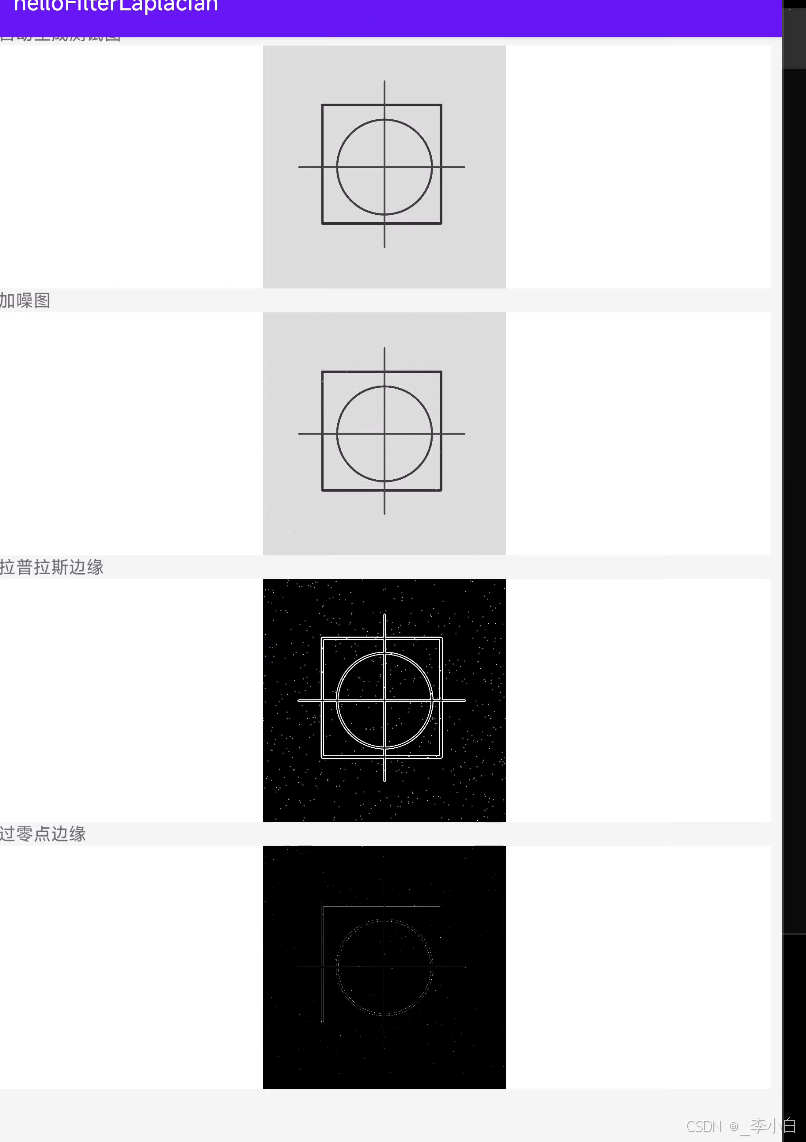
1. 运行效果
- 原图:你的 2048×2048 测试图。
- 拉普拉斯图像:以中灰色为背景,正值(边缘一侧)为亮,负值(另一侧)为暗,边缘处呈现明显变化。
- 过零点图像:二值图像,白色线条标记了所有边缘的位置。
2. 关键参数说明
aperture(7):对于 2048×2048 大图,使用 7×7 核可以检测更大尺度的边缘,并对噪声有更强的鲁棒性。CV_32F:必须使用浮点型存储拉普拉斯结果,否则负值会被截断为0,导致过零点检测失败。GaussianBlur:在拉普拉斯之前使用,是抑制噪声、防止误检的关键步骤。
总结
拉普拉斯算子通过二阶导数和过零点检测,能够定位图像边缘。其核心要点是:
- 原理:基于二阶导数,边缘位于过零点。
- 实现 :使用
cv::Laplacian,注意使用CV_32F深度,并配合cv::convertTo进行显示缩放。 - 应用:常与高斯平滑结合(LoG/DoG),用于边缘检测和尺度不变特征提取。