鸿蒙原生开发实战:从零打造一款涂鸦板应用
开发工具:DevEco Studio
一、前言:为什么选择涂鸦板作为练手项目
在鸿蒙原生应用开发的学习路径中,选择一个合适的练手项目至关重要。涂鸦板应用虽然功能看似简单,但它涵盖了鸿蒙开发的多个核心知识点:
- Canvas 画布绑定 :鸿蒙提供的
Canvas组件与CanvasRenderingContext2D的配合使用 - 触摸事件处理 :
TouchType.Down、Move、Up三种触摸状态的联动 - 状态管理 :
@State装饰器的实际应用,数组状态更新触发 UI 刷新 - 撤销/重做机制:栈数据结构在前端场景的经典应用
- UI 布局与样式 :
Column、Row、Flex等容器的嵌套使用
通过这个小项目,你能够快速建立对鸿蒙 ArkTS 开发的整体认知,为后续开发更复杂的应用打下基础。
二、项目初始化:创建第一个鸿蒙工程
2.1 新建项目
打开 DevEco Studio,选择 File → New → Create Project ,在模板选择界面选择 Empty Ability 模板。这个模板提供了最基础的项目结构,适合我们从零开始构建。
项目配置如下:
| 配置项 | 值 |
|---|---|
| Project name | MyApplication |
| Bundle name | com.example.myapplication |
| Compatible SDK | 6.1.0(23) |
| Target SDK | 6.1.1(24) |
| Device type | Phone |
2.2 项目结构解析
创建完成后,项目目录结构如下:
MyApplication/
├── AppScope/                    # 应用全局配置
│   ├── app.json5               # 应用配置(包名、版本、图标)
│   └── resources/              # 全局资源文件
├── entry/                       # 主模块
│   ├── src/main/
│   │   ├── ets/                # ArkTS 源码
│   │   │   ├── entryability/   # 应用入口
│   │   │   │   └── EntryAbility.ets
│   │   │   └── pages/          # 页面文件
│   │   │       └── Index.ets
│   │   ├── resources/          # 资源文件
│   │   │   └── base/
│   │   │       ├── element/    # 字符串、颜色等
│   │   │       ├── media/      # 图片资源
│   │   │       └── profile/    # 页面路由配置
│   │   └── module.json5        # 模块配置
│   └── build-profile.json5     # 构建配置
└── build-profile.json5         # 项目级构建配置
2.3 关键配置文件说明
app.json5 - 应用级配置:
json
{
  "app": {
    "bundleName": "com.example.myapplication",
    "vendor": "example",
    "versionCode": 1000000,
    "versionName": "1.0.0",
    "icon": "$media:layered_image",
    "label": "$string:app_name"
  }
}
module.json5 - 模块配置,定义了 Ability 和页面路由:
json
{
  "module": {
    "name": "entry",
    "type": "entry",
    "deviceTypes": ["phone"],
    "pages": "$profile:main_pages",
    "abilities": [
      {
        "name": "EntryAbility",
        "srcEntry": "./ets/entryability/EntryAbility.ets",
        "label": "$string:EntryAbility_label",
        "exported": true,
        "skills": [
          {
            "entities": ["entity.system.home"],
            "actions": ["ohos.want.action.home"]
          }
        ]
      }
    ]
  }
}
三、核心功能实现:涂鸦板开发详解
3.1 数据模型设计
在开始编码之前,我们需要定义清晰的数据结构。涂鸦板的核心是"线条",每条线包含:
- 点集合:构成线条的所有坐标点
- 颜色:线条的颜色值
- 粗细:线条的宽度
定义 TypeScript 接口:
typescript
interface Point {
  x: number
  y: number
}

interface DrawAction {
  points: Point[]
  color: string
  width: number
}
3.2 组件状态定义
鸿蒙的 @State 装饰器用于定义响应式状态,当状态变化时会自动触发 UI 刷新:
typescript
@Entry
@Component
struct Index {
  // Canvas 上下文,用于绘制操作
  private context: CanvasRenderingContext2D = new CanvasRenderingContext2D()

  // 已绘制的所有线条
  @State lines: DrawAction[] = []

  // 撤销栈,用于重做功能
  @State undoStack: DrawAction[] = []

  // 当前选中的颜色和粗细
  @State currentColor: string = '#333333'
  @State currentWidth: number = 4

  // 绘制状态标记
  @State isDrawing: boolean = false
  @State bgWhite: boolean = true

  // 当前正在画的线(临时存储)
  private currentLine: Point[] = []
}
3.3 画布初始化与背景绘制
在组件即将显示时,初始化画布背景:
typescript
aboutToAppear(): void {
  this.drawBg()
}

drawBg(): void {
  const ctx = this.context
  // 根据当前主题填充背景色
  ctx.fillStyle = this.bgWhite ? '#FFFFFF' : '#212121'
  ctx.fillRect(0, 0, 360, 600)
  // 重绘已有线条
  for (const line of this.lines) {
    this.drawLine(line)
  }
}
3.4 线条绘制核心方法
typescript
drawLine(action: DrawAction): void {
  const ctx = this.context
  if (action.points.length < 2) return

  ctx.beginPath()
  ctx.lineCap = 'round'      // 线帽圆角
  ctx.lineJoin = 'round'     // 拐角圆角
  ctx.strokeStyle = action.color
  ctx.lineWidth = action.width

  // 从第一个点开始
  ctx.moveTo(action.points[0].x, action.points[0].y)

  // 连接所有点
  for (let i = 1; i < action.points.length; i++) {
    ctx.lineTo(action.points[i].x, action.points[i].y)
  }
  ctx.stroke()
}技术要点:
lineCap = 'round':让线条端点呈现圆形,避免生硬的方角lineJoin = 'round':让线条拐角处圆滑过渡moveTo+lineTo组合:经典路径绑定方式
3.5 触摸事件处理
这是涂鸦板的核心交互逻辑,需要处理三种触摸状态:
typescript
handleTouchStart(event: TouchEvent): void {
  const touch = event.touches[0]
  this.isDrawing = true
  // 初始化当前线条,记录起点
  this.currentLine = [{ x: touch.x, y: touch.y }]
}

handleTouchMove(event: TouchEvent): void {
  if (!this.isDrawing) return
  const touch = event.touches[0]
  this.currentLine.push({ x: touch.x, y: touch.y })

  // 实时绘制:只绘制最新的一段(优化性能)
  const ctx = this.context
  const points = this.currentLine
  if (points.length < 2) return

  const last = points[points.length - 1]
  const prev = points[points.length - 2]

  ctx.beginPath()
  ctx.strokeStyle = this.currentColor
  ctx.lineWidth = this.currentWidth
  ctx.lineCap = 'round'
  ctx.lineJoin = 'round'
  ctx.moveTo(prev.x, prev.y)
  ctx.lineTo(last.x, last.y)
  ctx.stroke()
}

handleTouchEnd(): void {
  if (!this.isDrawing || this.currentLine.length < 2) {
    this.isDrawing = false
    this.currentLine = []
    return
  }

  // 保存完整线条到历史记录
  const action: DrawAction = {
    points: [...this.currentLine],
    color: this.currentColor,
    width: this.currentWidth
  }
  this.lines = [...this.lines, action]
  this.undoStack = []  // 新操作清空撤销栈
  this.isDrawing = false
  this.currentLine = []
}性能优化思路:
- 在
handleTouchMove中,不重绘所有线条,只绘制最新的一段 - 这样避免了频繁遍历所有历史数据,提升流畅度
3.6 撤销/重做机制
使用双栈实现经典的撤销/重做功能:
typescript
handleUndo(): void {
  if (this.lines.length === 0) return
  const last = this.lines[this.lines.length - 1]
  this.undoStack = [...this.undoStack, last]
  this.lines = this.lines.slice(0, -1)
  this.redrawAll()
}

handleRedo(): void {
  if (this.undoStack.length === 0) return
  const last = this.undoStack[this.undoStack.length - 1]
  this.lines = [...this.lines, last]
  this.undoStack = this.undoStack.slice(0, -1)
  this.redrawAll()
}

handleClear(): void {
  // 清空时将所有线条压入撤销栈,支持一键恢复
  this.undoStack = [...this.undoStack, ...this.lines]
  this.lines = []
  this.redrawAll()
}
3.7 深色模式切换
typescript
toggleBg(): void {
  this.bgWhite = !this.bgWhite
  this.redrawAll()
}

redrawAll(): void {
  const ctx = this.context
  ctx.fillStyle = this.bgWhite ? '#FFFFFF' : '#212121'
  ctx.fillRect(0, 0, 360, 700)
  for (const line of this.lines) {
    this.drawLine(line)
  }
}
四、UI 界面构建
4.1 整体布局结构
typescript
build() {
  Column() {
    // 顶部工具栏
    Column() { ... }

    // 画布区域
    Stack() { ... }

    // 颜色选择
    Column() { ... }

    // 粗细选择
    Column() { ... }

    // 底部提示
    Text(...)
  }
  .width('100%')
  .height('100%')
  .backgroundColor('#FFF8E1')  // 温暖的米黄色背景
}
4.2 顶部工具栏
包含应用标题和四个操作按钮:
typescript
Column() {
  Row() {
    Text('🎨 涂鸦板')
      .fontSize(20)
      .fontWeight(FontWeight.Bold)
      .fontColor('#5D4037')

    Flex({ justifyContent: FlexAlign.End }) {
      // 撤销按钮
      Button() {
        Text('↩').fontSize(18).fontColor('#666')
      }
      .width(36).height(36)
      .backgroundColor('#F5F5F5')
      .borderRadius(18)
      .onClick(() => this.handleUndo())

      // 重做按钮
      Button() { ... }
      .onClick(() => this.handleRedo())

      // 清空按钮
      Button() { ... }
      .backgroundColor('#FFEBEE')
      .onClick(() => this.handleClear())

      // 切换背景
      Button() { ... }
      .onClick(() => this.toggleBg())
    }
  }
  .width('100%')
  .padding({ left: 16, right: 16, top: 8 })
}
4.3 画布组件
typescript
Stack() {
  Canvas(this.context)
    .width('100%')
    .height(400)
    .backgroundColor(this.bgWhite ? '#FFFFFF' : '#212121')
    .borderRadius(12)
    .onTouch((event: TouchEvent) => {
      if (event.type === TouchType.Down) {
        this.handleTouchStart(event)
      } else if (event.type === TouchType.Move) {
        this.handleTouchMove(event)
      } else if (event.type === TouchType.Up) {
        this.handleTouchEnd()
      }
    })
}
.padding({ left: 16, right: 16 })
.margin({ top: 12 })
4.4 颜色选择器
使用 ForEach 循环渲染颜色按钮:
typescript
private readonly colors: string[] = [
  '#333333', '#E53935', '#FB8C00', '#FDD835',
  '#43A047', '#1E88E5', '#8E24AA', '#FFFFFF'
]

Column() {
  Text('颜色')
    .fontSize(13)
    .fontColor('#999')
    .margin({ bottom: 8 })

  Row() {
    ForEach(this.colors, (color: string) => {
      Stack() {
        Circle()
          .width(32).height(32)
          .fill(color)
          .stroke(color === '#FFFFFF' ? '#DDD' : color)

        // 选中状态的外圈
        if (color === this.currentColor) {
          Circle()
            .width(38).height(38)
            .fill('none')
            .stroke('#5D4037')
            .strokeWidth(2.5)
        }
      }
      .onClick(() => {
        this.currentColor = color
      })
    }, (color: string) => color)
  }
  .justifyContent(FlexAlign.SpaceEvenly)
  .width('100%')
}
4.5 笔触粗细选择
typescript
private readonly widths: number[] = [3, 6, 12]
private readonly widthLabels: string[] = ['细', '中', '粗']

Column() {
  Text('笔触')
    .fontSize(13)
    .fontColor('#999')

  Row() {
    ForEach(this.widths, (width: number, index: number) => {
      Column() {
        Circle()
          .width(width * 2)
          .height(width * 2)
          .fill(this.currentColor)

        Text(this.widthLabels[index])
          .fontSize(12)
          .fontColor(this.currentWidth === width ? '#5D4037' : '#BBB')
      }
      .backgroundColor(this.currentWidth === width ? '#EFEBE9' : 'transparent')
      .borderRadius(8)
      .onClick(() => {
        this.currentWidth = width
      })
    }, (width: number) => width.toString())
  }
}
五、开发中的踩坑与解决方案
5.1 踩坑一:状态更新后画布不刷新
问题描述 :修改 lines 数组后,期望画布自动重绘,但实际无变化。
原因分析 :ArkTS 的响应式更新机制要求状态变量是全新的引用,直接 push 或修改数组元素不会触发 UI 更新。
解决方案:
typescript
// ❌ 错误写法
this.lines.push(action)

// ✅ 正确写法
this.lines = [...this.lines, action]
5.2 踩坑二:触摸事件坐标获取
问题描述:初次使用触摸事件时,不清楚如何获取触摸点坐标。
解决方法:
typescript
handleTouchStart(event: TouchEvent): void {
  // event.touches 是一个数组,取第一个触摸点
  const touch = event.touches[0]
  console.log(`x: ${touch.x}, y: ${touch.y}`)
}
5.3 踩坑三:撤销后重做丢失
问题描述:撤销后再画新线条,之前撤销的内容无法重做。
原因分析:这是正确的交互逻辑。新操作应该清空撤销栈,否则重做会出现混乱。
解决方案:
typescript
handleTouchEnd(): void {
  // 保存新线条时清空撤销栈
  this.undoStack = []
}
5.4 踩坑四:白色颜色按钮不可见
问题描述:白色颜色按钮在浅色背景下难以辨认。
解决方案:给白色圆形添加边框:
typescript
Circle()
  .fill(color)
  .stroke(color === '#FFFFFF' ? '#DDD' : color)
  .strokeWidth(1)
六、项目完整代码
以下是 Index.ets 的完整代码,供参考:
typescript
interface Point {
x: number
y: number
}
interface DrawAction {
points: Point[]
color: string
width: number
}
@Entry
@Component
struct Index {
private context: CanvasRenderingContext2D = new CanvasRenderingContext2D()
@State lines: DrawAction[] = []
@State undoStack: DrawAction[] = []
@State currentColor: string = '#333333'
@State currentWidth: number = 4
@State isDrawing: boolean = false
@State bgWhite: boolean = true
private readonly colors: string[] = [
'#333333', '#E53935', '#FB8C00', '#FDD835',
'#43A047', '#1E88E5', '#8E24AA', '#FFFFFF'
]
private readonly widths: number[] = [3, 6, 12]
private readonly widthLabels: string[] = ['细', '中', '粗']
private currentLine: Point[] = []
aboutToAppear(): void {
this.drawBg()
}
drawBg(): void {
const ctx = this.context
ctx.fillStyle = this.bgWhite ? '#FFFFFF' : '#212121'
ctx.fillRect(0, 0, 360, 600)
for (const line of this.lines) {
this.drawLine(line)
}
}
drawLine(action: DrawAction): void {
const ctx = this.context
if (action.points.length < 2) return
ctx.beginPath()
ctx.lineCap = 'round'
ctx.lineJoin = 'round'
ctx.strokeStyle = action.color
ctx.lineWidth = action.width
ctx.moveTo(action.points[0].x, action.points[0].y)
for (let i = 1; i < action.points.length; i++) {
ctx.lineTo(action.points[i].x, action.points[i].y)
}
ctx.stroke()
}
redrawAll(): void {
const ctx = this.context
ctx.fillStyle = this.bgWhite ? '#FFFFFF' : '#212121'
ctx.fillRect(0, 0, 360, 700)
for (const line of this.lines) {
this.drawLine(line)
}
}
handleTouchStart(event: TouchEvent): void {
const touch = event.touches[0]
this.isDrawing = true
this.currentLine = [{ x: touch.x, y: touch.y }]
}
handleTouchMove(event: TouchEvent): void {
if (!this.isDrawing) return
const touch = event.touches[0]
this.currentLine.push({ x: touch.x, y: touch.y })
const ctx = this.context
const points = this.currentLine
if (points.length < 2) return
const last = points[points.length - 1]
const prev = points[points.length - 2]
ctx.beginPath()
ctx.strokeStyle = this.currentColor
ctx.lineWidth = this.currentWidth
ctx.lineCap = 'round'
ctx.lineJoin = 'round'
ctx.moveTo(prev.x, prev.y)
ctx.lineTo(last.x, last.y)
ctx.stroke()
}
handleTouchEnd(): void {
if (!this.isDrawing || this.currentLine.length < 2) {
this.isDrawing = false
this.currentLine = []
return
}
const action: DrawAction = {
points: [...this.currentLine],
color: this.currentColor,
width: this.currentWidth
}
this.lines = [...this.lines, action]
this.undoStack = []
this.isDrawing = false
this.currentLine = []
}
handleUndo(): void {
if (this.lines.length === 0) return
const last = this.lines[this.lines.length - 1]
this.undoStack = [...this.undoStack, last]
this.lines = this.lines.slice(0, -1)
this.redrawAll()
}
handleRedo(): void {
if (this.undoStack.length === 0) return
const last = this.undoStack[this.undoStack.length - 1]
this.lines = [...this.lines, last]
this.undoStack = this.undoStack.slice(0, -1)
this.redrawAll()
}
handleClear(): void {
this.undoStack = [...this.undoStack, ...this.lines]
this.lines = []
this.redrawAll()
}
toggleBg(): void {
this.bgWhite = !this.bgWhite
this.redrawAll()
}
build() {
Column() {
// 顶部工具栏
Column() {
Row() {
Text('🎨 涂鸦板')
.fontSize(20)
.fontWeight(FontWeight.Bold)
.fontColor('#5D4037')
Flex({ justifyContent: FlexAlign.End }) {
Button() { Text('↩').fontSize(18).fontColor('#666') }
.width(36).height(36).backgroundColor('#F5F5F5').borderRadius(18)
.margin({ left: 4 }).onClick(() => this.handleUndo())
Button() { Text('↪').fontSize(18).fontColor('#666') }
.width(36).height(36).backgroundColor('#F5F5F5').borderRadius(18)
.margin({ left: 6 }).onClick(() => this.handleRedo())
Button() { Text('🗑').fontSize(16).fontColor('#E53935') }
.width(36).height(36).backgroundColor('#FFEBEE').borderRadius(18)
.margin({ left: 6 }).onClick(() => this.handleClear())
Button() { Text(this.bgWhite ? '🌙' : '☀️').fontSize(16) }
.width(36).height(36).backgroundColor('#F5F5F5').borderRadius(18)
.margin({ left: 6 }).onClick(() => this.toggleBg())
}
}
.width('100%')
.padding({ left: 16, right: 16, top: 8 })
}
.padding({ top: 20 })
.width('100%')
// 画布
Stack() {
Canvas(this.context)
.width('100%')
.height(400)
.backgroundColor(this.bgWhite ? '#FFFFFF' : '#212121')
.borderRadius(12)
.onTouch((event: TouchEvent) => {
if (event.type === TouchType.Down) {
this.handleTouchStart(event)
} else if (event.type === TouchType.Move) {
this.handleTouchMove(event)
} else if (event.type === TouchType.Up) {
this.handleTouchEnd()
}
})
}
.padding({ left: 16, right: 16 })
.margin({ top: 12 })
// 颜色选择
Column() {
Text('颜色').fontSize(13).fontColor('#999').margin({ bottom: 8 })
Row() {
ForEach(this.colors, (color: string) => {
Stack() {
Circle().width(32).height(32).fill(color)
.stroke(color === '#FFFFFF' ? '#DDD' : color).strokeWidth(1)
if (color === this.currentColor) {
Circle().width(38).height(38).fill('none')
.stroke('#5D4037').strokeWidth(2.5)
}
}
.width(40).height(40)
.onClick(() => { this.currentColor = color })
}, (color: string) => color)
}
.justifyContent(FlexAlign.SpaceEvenly).width('100%')
}
.width('100%').padding({ left: 16, right: 16, top: 16 })
// 粗细选择
Column() {
Text('笔触').fontSize(13).fontColor('#999').margin({ bottom: 8 })
Row() {
ForEach(this.widths, (width: number, index: number) => {
Column() {
Circle().width(width * 2).height(width * 2).fill(this.currentColor)
Text(this.widthLabels[index]).fontSize(12)
.fontColor(this.currentWidth === width ? '#5D4037' : '#BBB')
.margin({ top: 4 })
}
.width(60).padding({ top: 6, bottom: 6 })
.backgroundColor(this.currentWidth === width ? '#EFEBE9' : 'transparent')
.borderRadius(8)
.onClick(() => { this.currentWidth = width })
}, (width: number) => width.toString())
}
.justifyContent(FlexAlign.SpaceEvenly).width('100%')
}
.width('100%').padding({ left: 16, right: 16, top: 16 })
// 底部提示
Text('👆 用手指在画布上涂鸦')
.fontSize(13).fontColor('#BCAAA4')
.margin({ top: 20, bottom: 20 })
}
.width('100%').height('100%')
.backgroundColor('#FFF8E1')
}
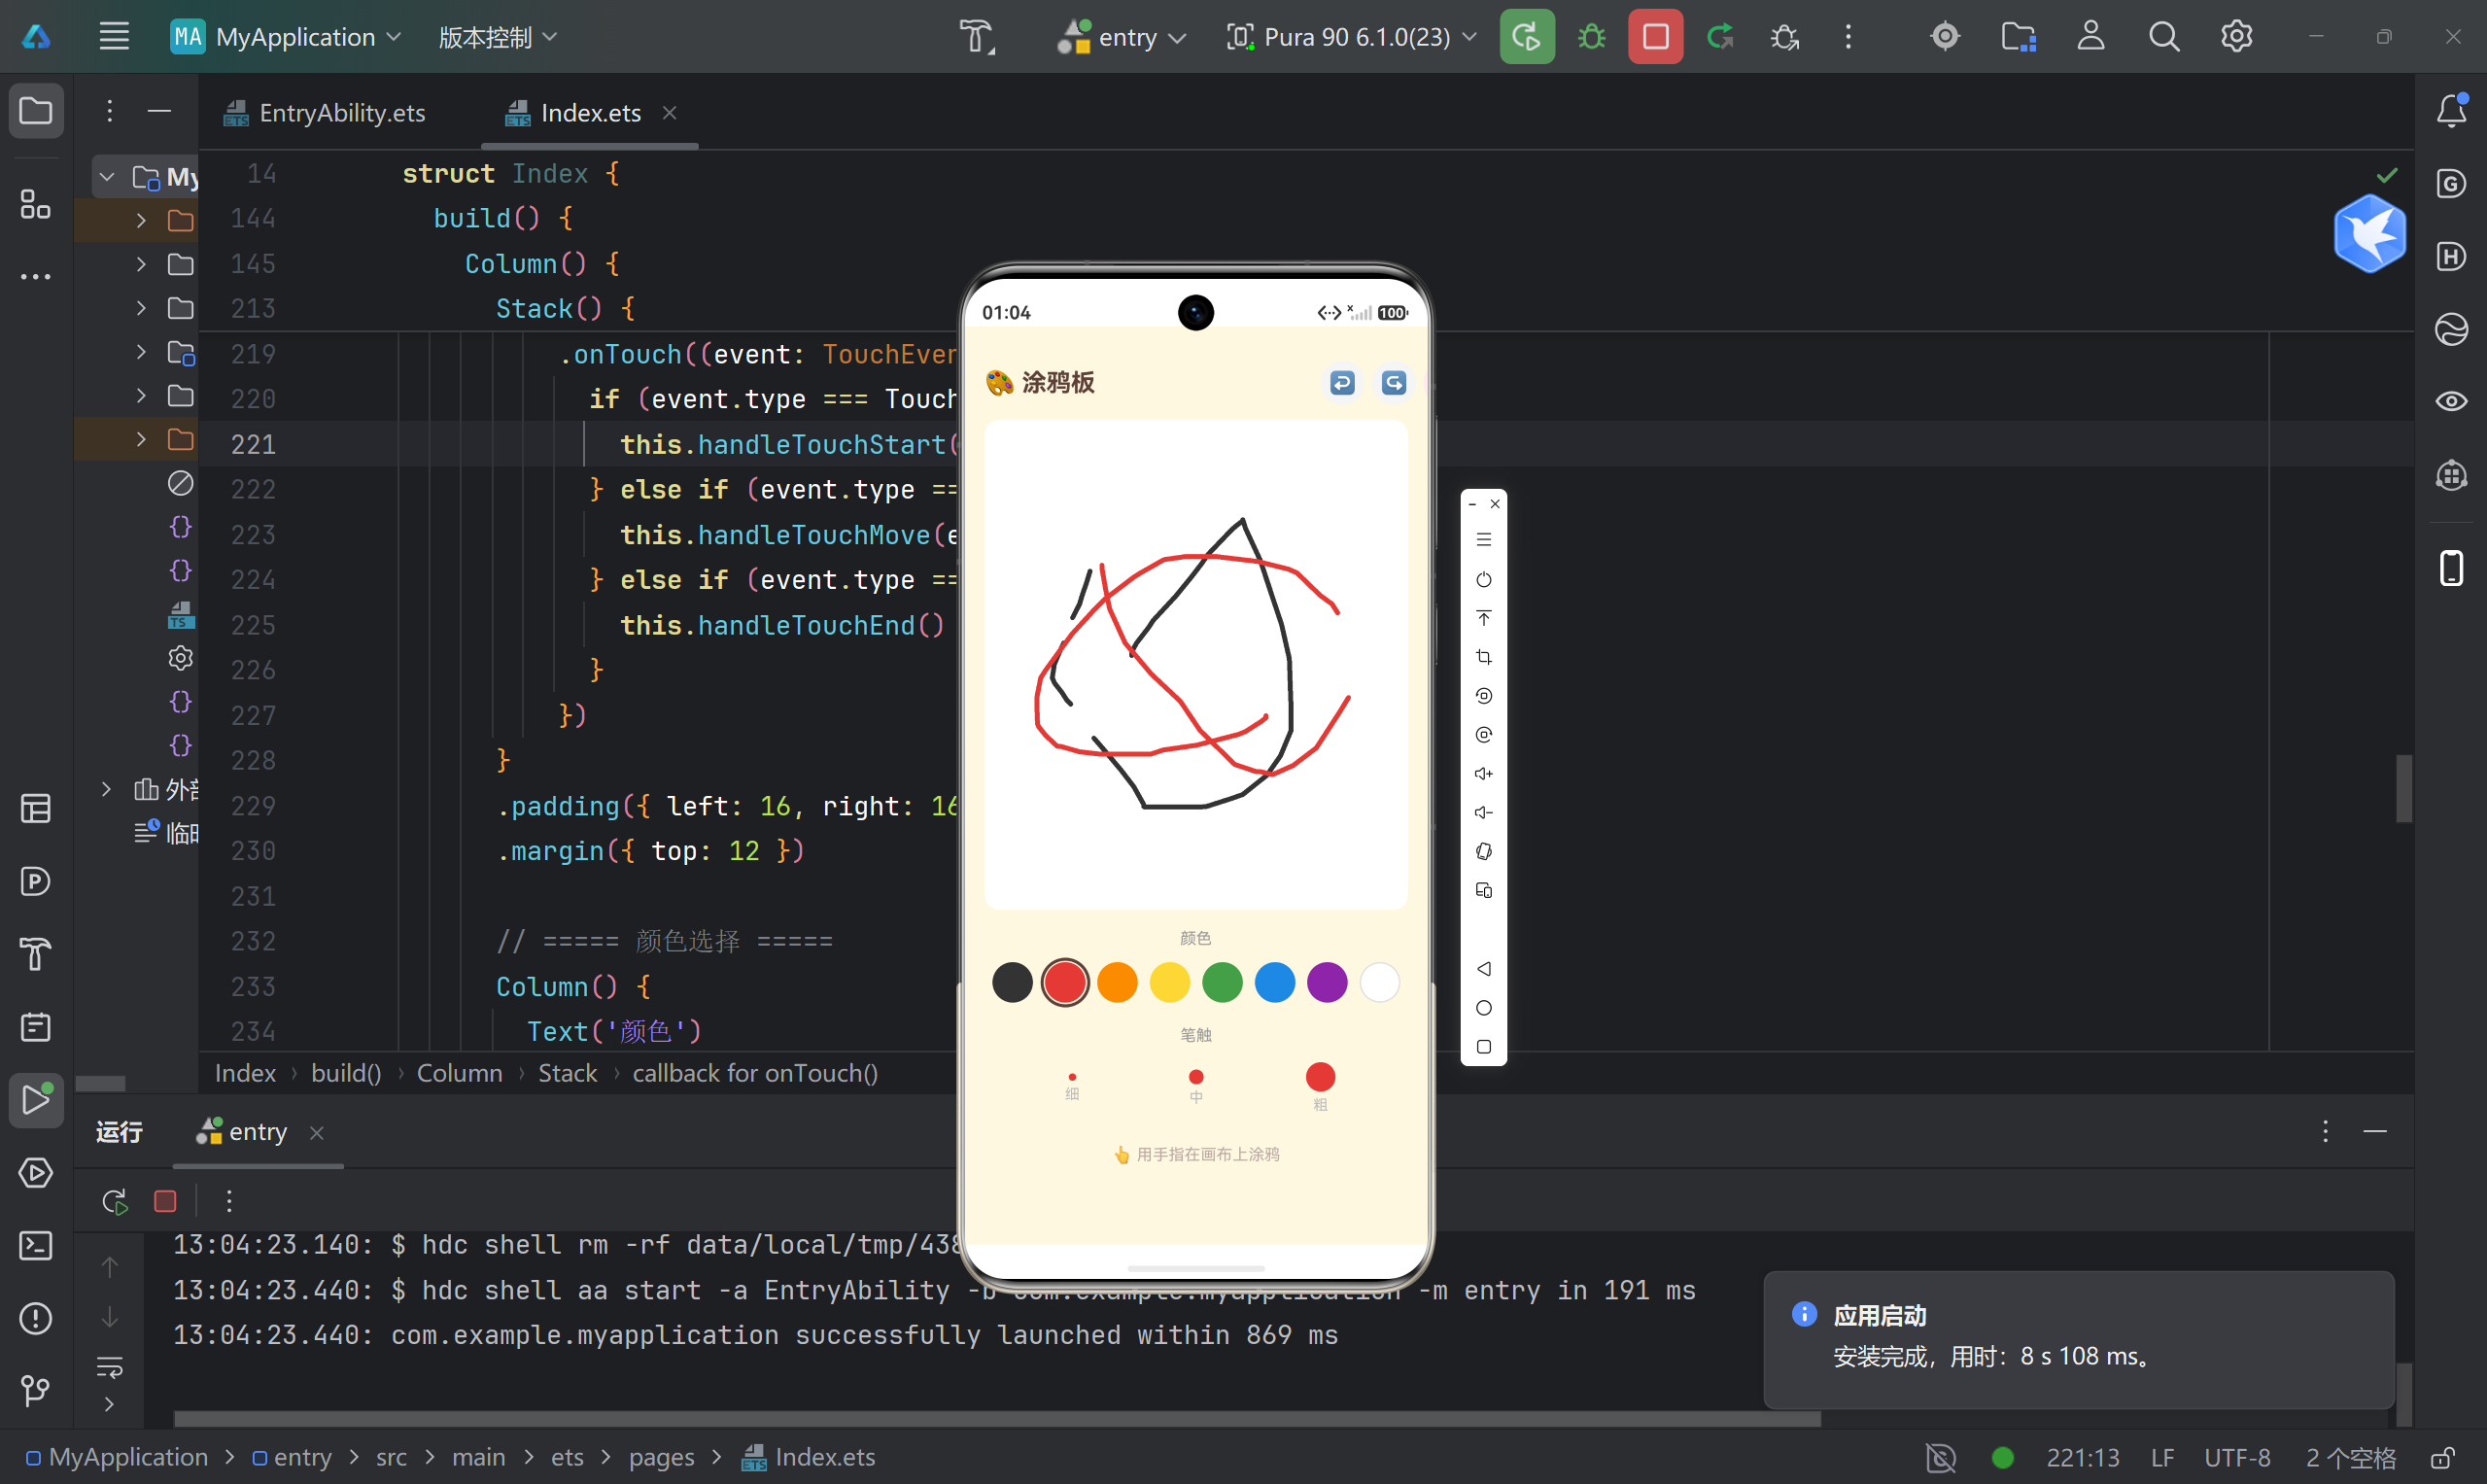
}七、功能截图位置提示
以下是各功能对应的截图位置,方便你插入实际运行截图:
八、总结与展望
通过这个涂鸦板项目,我们实践了鸿蒙原生开发的以下核心能力:
| 能力项 | 具体内容 |
|---|---|
| Canvas 绑定 | CanvasRenderingContext2D 上下文初始化与使用 |
| 触摸交互 | TouchType 三种状态的联动处理 |
| 状态管理 | @State 装饰器的响应式更新机制 |
| 数据结构 | 栈结构实现撤销/重做功能 |
| UI 布局 | Column、Row、Flex、ForEach 等组件组合 |
后续可扩展方向
- 保存功能 :将涂鸦内容导出为图片,使用
@kit.FileManagementKit - 更多画笔:支持虚线、喷枪、橡皮擦等模式
- 图层管理:引入图层概念,支持图层叠加与排序
- 云端同步:接入 HarmonyOS 云服务,实现跨设备同步
- 手势识别:支持双指缩放、旋转等手势操作
参考资料
本文为原创技术文章,转载请注明出处。如有问题欢迎在评论区交流讨论!