深入剖析 uiautomator dump:为何一个 shell 命令能导出任意 App 的布局 XML?
经常android studio一些布局抓取工具其实本质上都是使用sdk下的uiautomator命令进行的抓取View数据。
先看看uiautomator命令如何使用?看看使用帮助
adb shell uiautomator -help
展示如下
bash
adb shell uiautomator -help
Usage: uiautomator <subcommand> [options]

Available subcommands:

help: displays help message

runtest: executes UI automation tests
    runtest <class spec> [options]
    <class spec>: <JARS> < -c <CLASSES> | -e class <CLASSES> >
      <JARS>: a list of jar files containing test classes and dependencies. If
        the path is relative, it's assumed to be under /data/local/tmp. Use
        absolute path if the file is elsewhere. Multiple files can be
        specified, separated by space.
      <CLASSES>: a list of test class names to run, separated by comma. To
        a single method, use TestClass#testMethod format. The -e or -c option
        may be repeated. This option is not required and if not provided then
        all the tests in provided jars will be run automatically.
    options:
      --nohup: trap SIG_HUP, so test won't terminate even if parent process
               is terminated, e.g. USB is disconnected.
      -e debug [true|false]: wait for debugger to connect before starting.
      -e runner [CLASS]: use specified test runner class instead. If
        unspecified, framework default runner will be used.
      -e <NAME> <VALUE>: other name-value pairs to be passed to test classes.
        May be repeated.
      -e outputFormat simple | -s: enabled less verbose JUnit style output.

dump: creates an XML dump of current UI hierarchy
    dump [--verbose][file]
      [--compressed]: dumps compressed layout information.
      [file]: the location where the dumped XML should be stored, default is
      /sdcard/window_dump.xml

events: prints out accessibility events until terminated
平时主要使用的是dump命令来导出view的相关数据:
bash
adb shell uiautomator dump /sdcard/demo_dump-xiaomi-wx.xml然后再pull出这个xml导入到相关软件中,当然相关软件完全可以自己shell命令进行dump,然后展示。
本文基于 AOSP 15 frameworks/base/cmds/uiautomator 源码,逐层剖析 uiautomator dump 导出布局 XML 的完整原理。
uiautomator命令进行切入
Android 开发者几乎每天都会用到的命令:
bash
adb shell uiautomator dump xxx.xml执行后,当前屏幕的完整 UI 层次结构就被导出为一份 window_dump.xml 文件,包含每个控件的坐标、类名、resource-id、文本内容、可点击状态等信息。这个功能对自动化测试、UI 校验、竞品分析都至关重要。
那么问题来了:uiautomator 作为一个运行在 adbd shell 进程中的普通 Java 程序,它是如何跨越进程边界,读取到任意前台 App(比如微信、淘宝)内部 View 树的?
源码路径:
frameworks/base/cmds/uiautomator/cmds/uiautomator/
整体架构
先通过一张图俯瞰整体架构,它清晰地展示了从 shell 命令到最终 XML 文件的完整数据流:
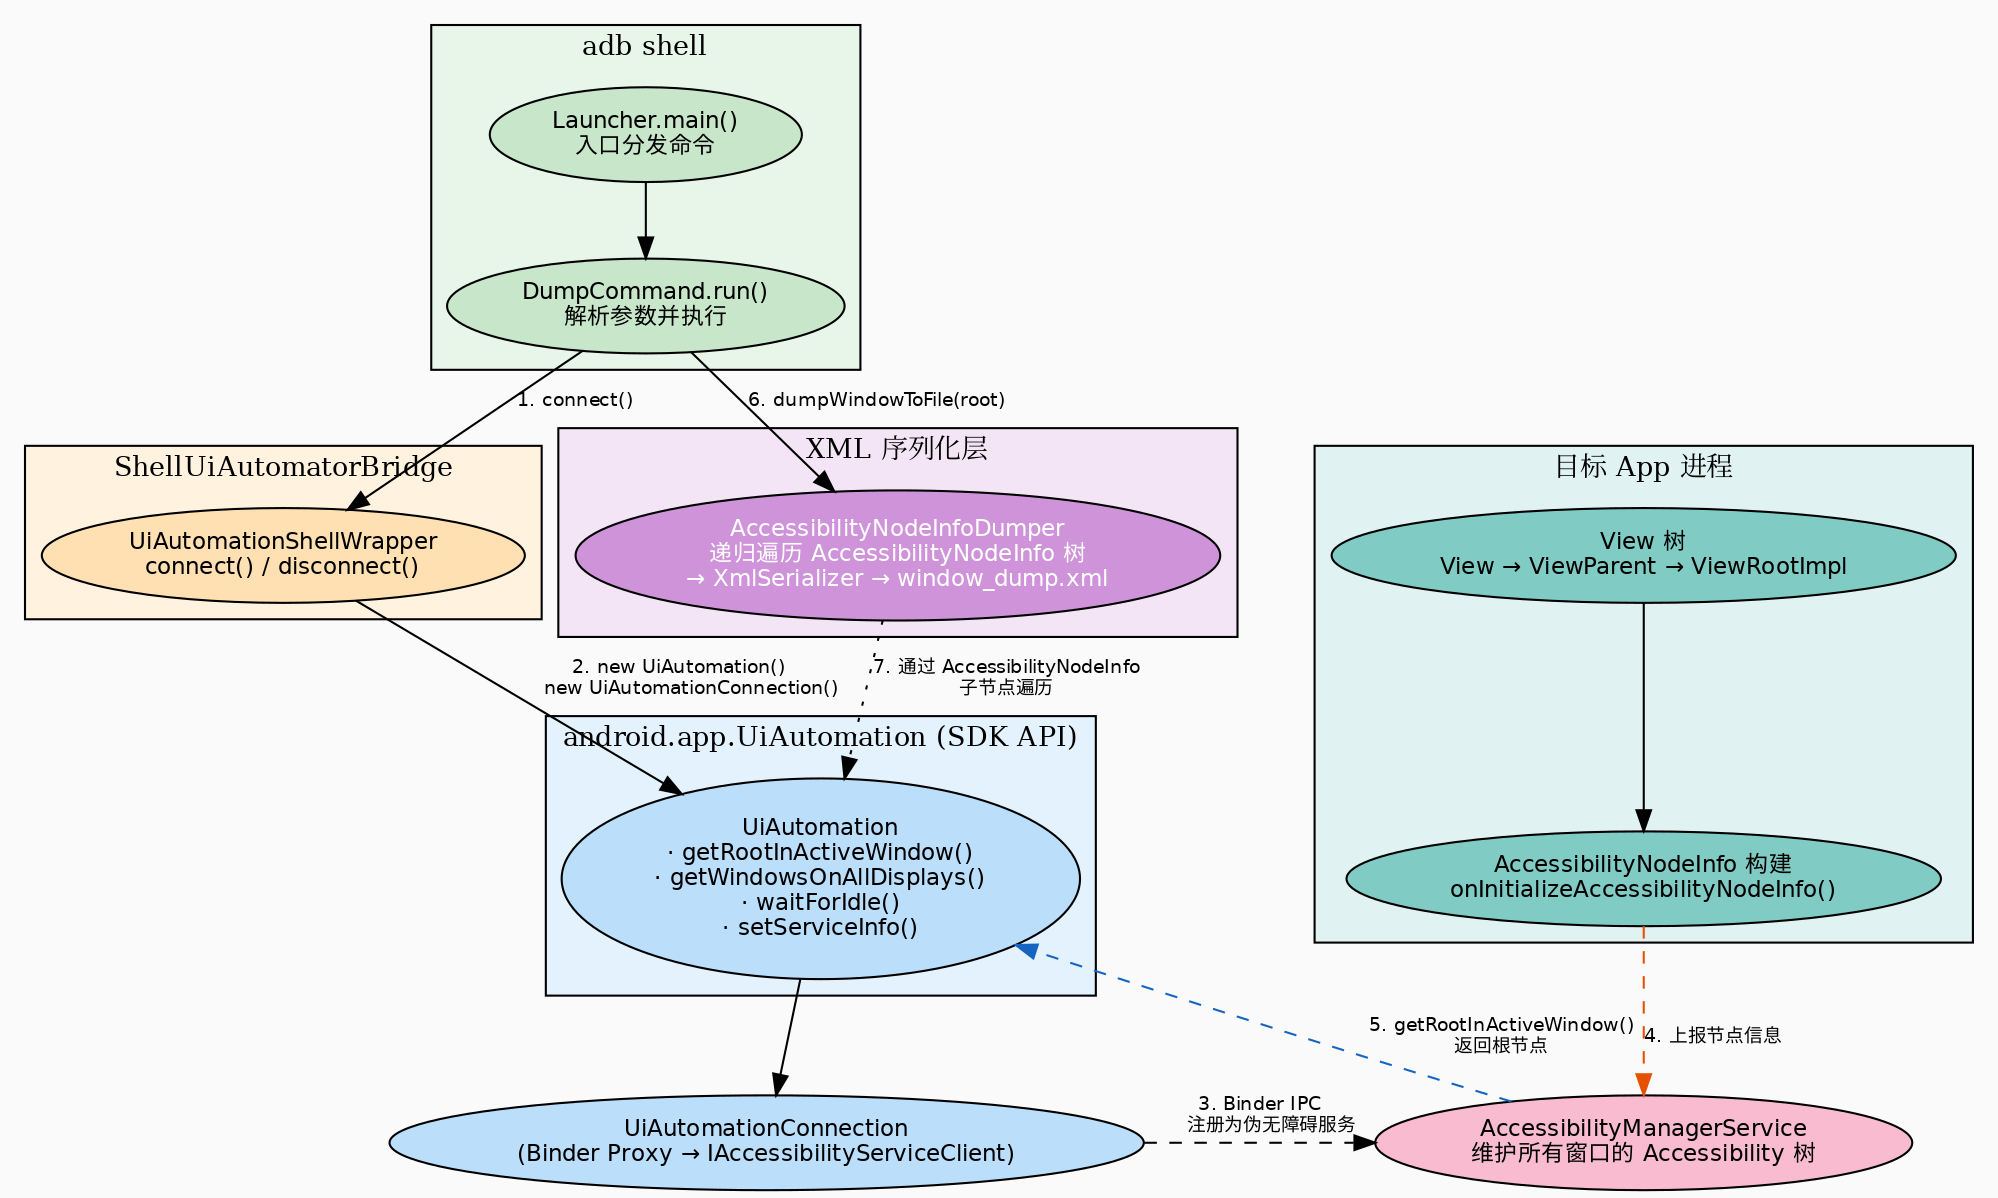
整个流程分为四个核心层次:
- 命令行入口层 (
Launcher→DumpCommand):解析用户输入的参数 - 连接层 (
UiAutomationShellWrapper):创建UiAutomation实例并向系统注册 - SDK API 层 (
android.app.UiAutomation):通过 Binder IPC 与AccessibilityManagerService通信 - 序列化层 (
AccessibilityNodeInfoDumper):递归遍历AccessibilityNodeInfo树,用XmlSerializer输出 XML
Android 无障碍框架(前置知识)
在深入代码之前,必须先理解 Android 无障碍框架的核心机制。这是整个 dump 功能的地基。

数据如何产生:View 的自我描述
Android 中的每个 View 都有一个方法:
java
// frameworks/base/core/java/android/view/View.java
public void onInitializeAccessibilityNodeInfo(AccessibilityNodeInfo info) {
    // 填充节点的基本信息
    info.setClassName(getClass().getName());
    info.setPackageName(getContext().getPackageName());
    info.setBoundsInScreen(...);
    info.setClickable(isClickable());
    info.setEnabled(isEnabled());
    info.setContentDescription(getContentDescription());
    // ...
}当无障碍服务被激活时,ViewRootImpl 会遍历 View 树,调用每个 View 的 onInitializeAccessibilityNodeInfo(),构建出对应的 AccessibilityNodeInfo 树。每个节点都是一个"View 的自我描述"------包含类名、坐标、文本、状态等。
数据如何传递:Binder IPC
ViewRootImpl 持有 AccessibilityManager 实例,通过 IAccessibilityInteractionConnection 这个 Binder 接口,将 View 树的 Accessibility 信息上报给系统进程中的 AccessibilityManagerService。
AccessibilityManagerService 是全局的"信息中转站"------它维护着所有窗口的 Accessibility 树,并响应无障碍服务的查询请求。
第一层:命令行入口 ------ Launcher
源码位置:cmds/uiautomator/src/com/android/commands/uiautomator/Launcher.java
java
public class Launcher {
    public static void main(String[] args) {
        Process.setArgV0("uiautomator");  // 让 ps 显示为 "uiautomator"
        if (args.length >= 1) {
            Command command = findCommand(args[0]);
            if (command != null) {
                String[] args2 = {};
                if (args.length > 1) {
                    args2 = Arrays.copyOfRange(args, 1, args.length);
                }
                command.run(args2);
                return;
            }
        }
        HELP_COMMAND.run(args);
    }

    private static Command[] COMMANDS = new Command[] {
        HELP_COMMAND,
        new RunTestCommand(),
        new DumpCommand(),
        new EventsCommand(),
    };
}
Launcher 是一个典型的命令分发器 。当你执行 uiautomator dump --windows /sdcard/ui.xml 时:
args[0]="dump"→ 匹配到DumpCommand- 剩余的
["--windows", "/sdcard/ui.xml"]作为参数传递给DumpCommand.run()
这个设计的巧妙之处在于,它让 uiautomator 这个二进制文件可以承载多种功能(dump、运行测试、注入事件),所有功能共享同一套连接机制。
第二层:连接无障碍服务 ------ UiAutomationShellWrapper
源码位置:library/testrunner-src/com/android/uiautomator/core/UiAutomationShellWrapper.java
这是让 uiautomator "变身"为无障碍服务的关键代码:
java
public class UiAutomationShellWrapper {
    private static final String HANDLER_THREAD_NAME = "UiAutomatorHandlerThread";
    private final HandlerThread mHandlerThread = new HandlerThread(HANDLER_THREAD_NAME);
    private UiAutomation mUiAutomation;

    public void connect() {
        if (mHandlerThread.isAlive()) {
            throw new IllegalStateException("Already connected!");
        }
        mHandlerThread.start();
        // 关键:UiAutomation 内部用到的 AccessibilityInteractionClient
        // 要求主线程 Looper 已准备好。在 App 进程中系统会自动帮你做,
        // 但这里是纯 shell 进程,所以必须显式调用。
        Looper.prepareMainLooper();
        mUiAutomation = new UiAutomation(
                mHandlerThread.getLooper(),
                new UiAutomationConnection());
        mUiAutomation.connect();  // ← 真正建立连接的地方
    }

    public void setCompressedLayoutHierarchy(boolean compressed) {
        AccessibilityServiceInfo info = mUiAutomation.getServiceInfo();
        if (compressed)
            info.flags &= ~AccessibilityServiceInfo.FLAG_INCLUDE_NOT_IMPORTANT_VIEWS;
        else
            info.flags |= AccessibilityServiceInfo.FLAG_INCLUDE_NOT_IMPORTANT_VIEWS;
        mUiAutomation.setServiceInfo(info);
    }
}
连接建立的底层:UiAutomation.connect()
UiAutomation 是 android.app 包中的 SDK 公开 API(非 hide)。它的 connect() 方法内部做了以下事情:
- 通过
UiAutomationConnection这个 Binder 代理向AccessibilityManagerService注册自己为伪无障碍服务 - 系统服务返回一个
IAccessibilityServiceClient的 Binder 通道 - 此后
UiAutomation就可以通过这个通道向系统服务查询任意窗口的AccessibilityNodeInfo树
"伪无障碍服务"的意思是:系统知道它是一个测试工具而非真正的无障碍服务(如 TalkBack),所以不会触发无障碍服务的标准生命周期(如 onServiceConnected),但会赋予它同等级甚至更高的查询权限。
第三层:获取根节点 ------ UiAutomation
源码位置:cmds/uiautomator/src/com/android/commands/uiautomator/DumpCommand.java
java
@Override
public void run(String[] args) {
    File dumpFile = DEFAULT_DUMP_FILE;
    boolean verboseMode = true;
    boolean allWindows = false;

    // 解析参数
    for (String arg : args) {
        if (arg.equals("--compressed"))
            verboseMode = false;
        else if (arg.equals("--windows"))
            allWindows = true;
        else if (!arg.startsWith("-"))
            dumpFile = new File(arg);
    }

    UiAutomationShellWrapper automationWrapper = new UiAutomationShellWrapper();
    automationWrapper.connect();
    // ...
    automationWrapper.setCompressedLayoutHierarchy(!verboseMode);

    try {
        UiAutomation uiAutomation = automationWrapper.getUiAutomation();
        uiAutomation.waitForIdle(1000, 1000 * 10);  // 等待界面稳定

        if (allWindows) {
            // --windows 模式:遍历所有显示器上所有窗口
            AccessibilityServiceInfo info = uiAutomation.getServiceInfo();
            info.flags |= AccessibilityServiceInfo.FLAG_RETRIEVE_INTERACTIVE_WINDOWS;
            uiAutomation.setServiceInfo(info);
            AccessibilityNodeInfoDumper.dumpWindowsToFile(
                    uiAutomation.getWindowsOnAllDisplays(), dumpFile,
                    DisplayManagerGlobal.getInstance());
        } else {
            // 默认模式:只导出当前前台窗口
            AccessibilityNodeInfo info = uiAutomation.getRootInActiveWindow();
            if (info == null) {
                System.err.println("ERROR: null root node...");
                return;
            }
            Display display = DisplayManagerGlobal.getInstance()
                .getRealDisplay(Display.DEFAULT_DISPLAY);
            int rotation = display.getRotation();
            Point size = new Point();
            display.getRealSize(size);
            AccessibilityNodeInfoDumper.dumpWindowToFile(
                info, dumpFile, rotation, size.x, size.y);
        }
    } catch (TimeoutException re) {
        System.err.println("ERROR: could not get idle state.");
    } finally {
        automationWrapper.disconnect();
    }
}
单窗口 vs 多窗口
- 默认模式 :
getRootInActiveWindow()返回当前聚焦窗口的根AccessibilityNodeInfo,对应 XML 中只有一个<hierarchy>根标签 - 多窗口模式 (
--windows):设置FLAG_RETRIEVE_INTERACTIVE_WINDOWS后,getWindowsOnAllDisplays()返回一个SparseArray(按 displayId 分组),每个窗口又包含自己的<hierarchy>树。最终 XML 结构为<displays>→<display>→<window>→<hierarchy>→<node>
分辨率信息的来源
导出 XML 时需要的屏幕宽度、高度和旋转角度,并非从 AccessibilityNodeInfo 获取,而是通过 DisplayManagerGlobal 直接查询硬件显示信息。这是因为 Accessibility 节点中的坐标可能被裁剪或变换,需要屏幕实际尺寸作为参考来校准。
第四层:递归遍历并序列化为 XML ------ AccessibilityNodeInfoDumper
源码位置:library/core-src/com/android/uiautomator/core/AccessibilityNodeInfoDumper.java
这是整个 dump 功能的核心引擎 。它接收一个 AccessibilityNodeInfo 根节点,递归遍历整棵树,用 Android 内置的 XmlSerializer 将每个节点写入 XML。
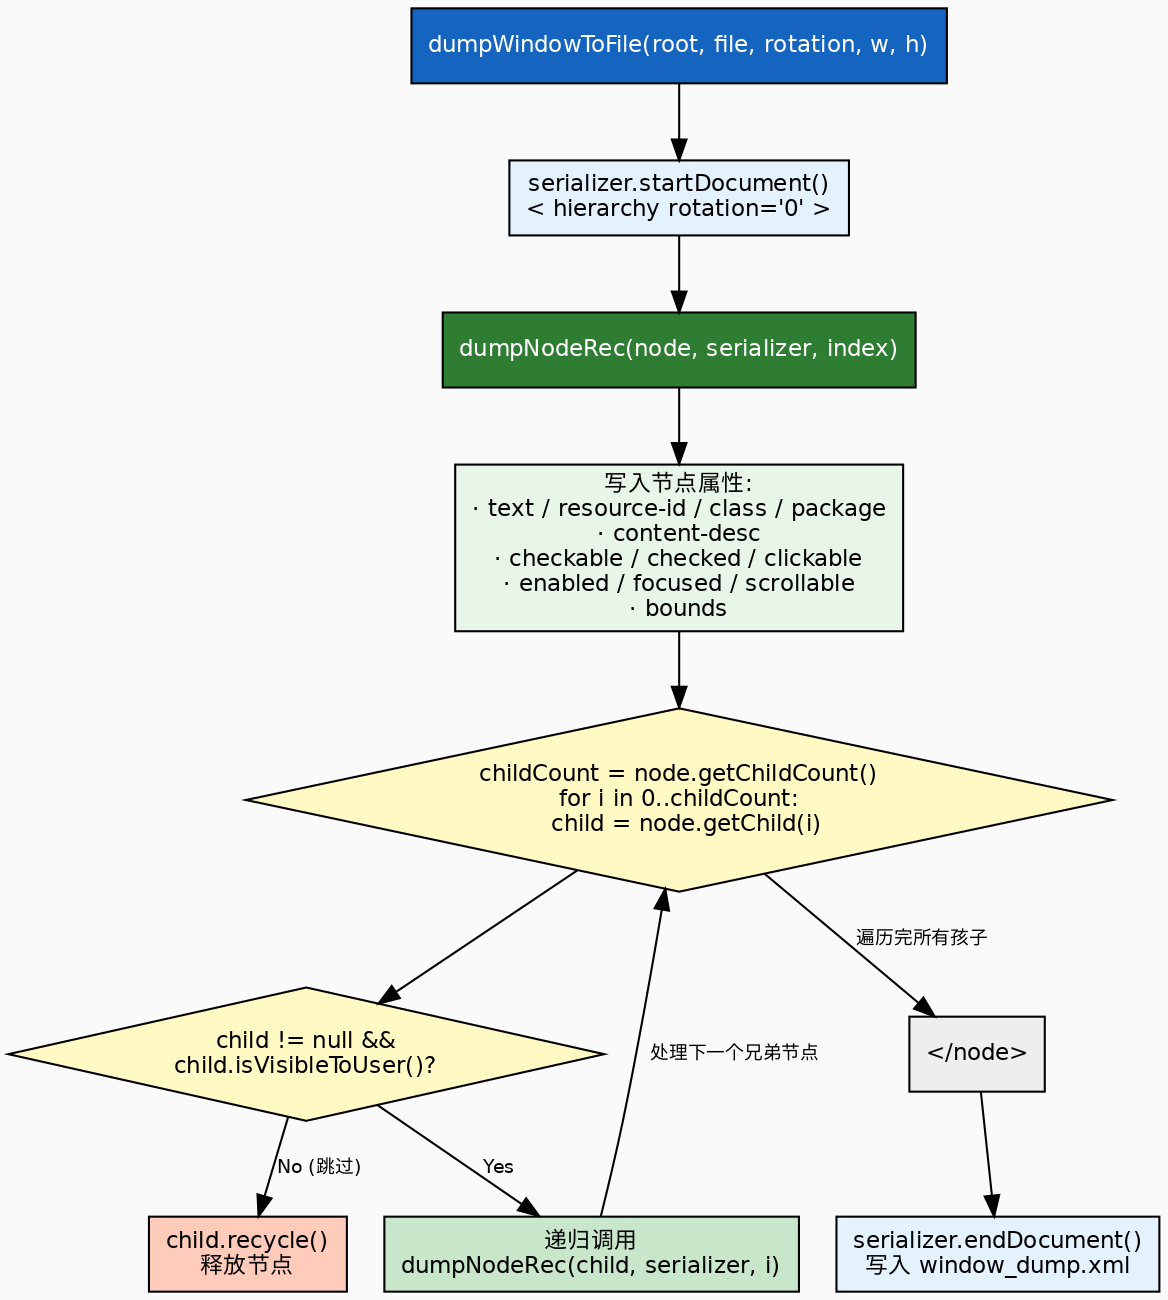
入口:dumpWindowToFile
java
public static void dumpWindowToFile(AccessibilityNodeInfo root, File dumpFile,
        int rotation, int width, int height) {
    if (root == null) return;
    final long startTime = SystemClock.uptimeMillis();
    try {
        FileWriter writer = new FileWriter(dumpFile);
        XmlSerializer serializer = Xml.newSerializer();
        StringWriter stringWriter = new StringWriter();
        serializer.setOutput(stringWriter);
        serializer.startDocument("UTF-8", true);
        serializer.startTag("", "hierarchy");
        serializer.attribute("", "rotation", Integer.toString(rotation));
        dumpNodeRec(root, serializer, 0, width, height);  // 递归入口
        serializer.endTag("", "hierarchy");
        serializer.endDocument();
        writer.write(stringWriter.toString());
        writer.close();
    } catch (IOException e) {
        Log.e(LOGTAG, "failed to dump window to file", e);
    }
    final long endTime = SystemClock.uptimeMillis();
    Log.w(LOGTAG, "Fetch time: " + (endTime - startTime) + "ms");
}这里有一个值得注意的性能细节:先写入 StringWriter 再一次性写入文件,而不是边遍历边写文件。这样做的好处是:
XmlSerializer操作的是内存中的 StringWriter,避免频繁的磁盘 I/O- 如果遍历过程中出错,不会产生不完整的 XML 文件
- 代价是需要足够内存来存放整个 XML 字符串------对于复杂的 UI(几百到几千个节点),这个字符串通常在几百 KB 到几 MB.
原文参考: