本文目录
-
- [1. 为什么在 Unity IAP 5.3 中需要自定义 Windows 商店?](#1. 为什么在 Unity IAP 5.3 中需要自定义 Windows 商店?)
- [2. 核心架构与设计模式](#2. 核心架构与设计模式)
- [3. 基于当前项目架构的实战开发步骤](#3. 基于当前项目架构的实战开发步骤)
-
- [步骤一:创建商品 ID 映射器](#步骤一:创建商品 ID 映射器)
- [步骤二:编写 Windows 专属的 Custom Store 核心类 (`IStore`)](#步骤二:编写 Windows 专属的 Custom Store 核心类 (
IStore)) - 步骤三:编写自定义采购模块 (`IPurchasingModule`)
- 步骤四:在游戏初始化代码中注入自定义商店
- 步骤五:编写编辑器高还原度模拟商店 (`EditorMockStoreBridge`)
-
- [1. 编写 Mock 商店实现类](#1. 编写 Mock 商店实现类)
- [2. 在编辑器测试的极大便利](#2. 在编辑器测试的极大便利)
- [4. 微软 Partner Center 后台配置与关联步骤](#4. 微软 Partner Center 后台配置与关联步骤)
-
- [1. 绑定应用包标识(Unity / VS 关联)](#1. 绑定应用包标识(Unity / VS 关联))
- [2. 在 Partner Center 中创建 Add-ons (外购品)](#2. 在 Partner Center 中创建 Add-ons (外购品))
- [5. 编译构建与真机联调](#5. 编译构建与真机联调)
-
- [1. 配置 AppxManifest 权限](#1. 配置 AppxManifest 权限)
- [2. 导出与部署](#2. 导出与部署)
- [3. 真实的真机联调测试方案(私有发布与 Package Flighting 流程)](#3. 真实的真机联调测试方案(私有发布与 Package Flighting 流程))
-
- [方案 A:以私有方式发布应用 (Private Visibility)](#方案 A:以私有方式发布应用 (Private Visibility))
- [方案 B:创建 Package Flighting (程序包外部测试)](#方案 B:创建 Package Flighting (程序包外部测试))
- [⚠️ 极其关键:为什么 VS 关联应用后"直接本地部署运行"无法完成内购?(开发机授权激活桥梁)](#⚠️ 极其关键:为什么 VS 关联应用后“直接本地部署运行”无法完成内购?(开发机授权激活桥梁))
- [6. UWP 架构下的黄金避坑指南](#6. UWP 架构下的黄金避坑指南)
-
- [🚨 坑一:购买了消费型商品(如金币)之后,第二次点击时报错"Already Purchased"](#🚨 坑一:购买了消费型商品(如金币)之后,第二次点击时报错“Already Purchased”)
- [🚨 坑二:网络断开或玩家购买成功后,游戏意外崩溃/闪退导致没能核销订单(卡单/丢单)](#🚨 坑二:网络断开或玩家购买成功后,游戏意外崩溃/闪退导致没能核销订单(卡单/丢单))
- [🚨 坑三:拉取不到任何商品信息,`RetrieveProducts` 返回空列表或者 ExtendedError](#🚨 坑三:拉取不到任何商品信息,
RetrieveProducts返回空列表或者 ExtendedError)
- [7. 结语](#7. 结语)
1. 为什么在 Unity IAP 5.3 中需要自定义 Windows 商店?
自 Unity IAP 5.0.0-pre.1 (2024-07-26) 版本开始,Unity 官方正式移除了对 Universal Windows Platform (UWP) / 微软商店的开箱即用支持。对于需要在 Windows / PC 平台(包括 Xbox)上发布游戏并集成微软内购的开发者而言,这带来了严重的断代。
为了解决该痛点,有两个常见的重构方向:
- 直接绕过 Unity IAP ,自己用 C# 直接调用 Windows UWP 原生的 WinRT API(例如本项目中的
WindowsStoreNativePurchaseService方案)。该方案极简、轻量、没有额外依赖包,且能完全控制底层的异步逻辑。 - 利用 Unity IAP 5.3 的 Custom Store(自定义商店)扩展机制 ,用 native WinRT API 对其进行封装。该方案的巨大优势在于保持上层业务一致性 ------无需更改游戏现有的
IStoreListener采购监听逻辑、UI 商品卡填充逻辑或第三方统计接口,仅仅在初始化时更换传入的PurchasingModule即可复活 UWP 平台的支付。
本篇教程将基于当前项目的原生封装经验,详细拆解如何为 Unity IAP 5.3 编写并注入一个高可靠的 Windows Custom Store。
2. 核心架构与设计模式
本方案的核心架构拓扑图如下。
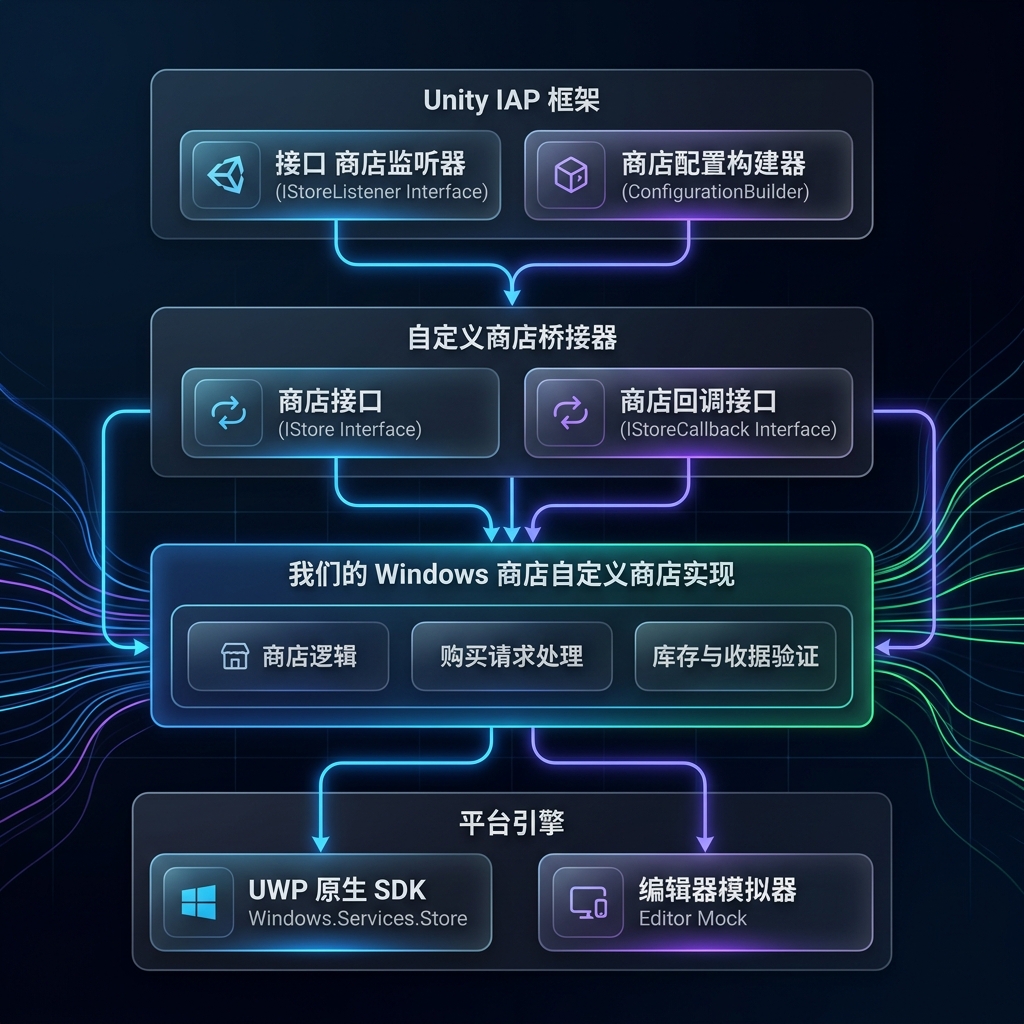
Unity IAP 允许通过注册自定义 Module 来接管所有的支付、查询与订单核销。其核心由三个接口驱动:
#mermaid-svg-hEn3Y6fFLd84gz09{font-family:"trebuchet ms",verdana,arial,sans-serif;font-size:16px;fill:#333;}@keyframes edge-animation-frame{from{stroke-dashoffset:0;}}@keyframes dash{to{stroke-dashoffset:0;}}#mermaid-svg-hEn3Y6fFLd84gz09 .edge-animation-slow{stroke-dasharray:9,5!important;stroke-dashoffset:900;animation:dash 50s linear infinite;stroke-linecap:round;}#mermaid-svg-hEn3Y6fFLd84gz09 .edge-animation-fast{stroke-dasharray:9,5!important;stroke-dashoffset:900;animation:dash 20s linear infinite;stroke-linecap:round;}#mermaid-svg-hEn3Y6fFLd84gz09 .error-icon{fill:#552222;}#mermaid-svg-hEn3Y6fFLd84gz09 .error-text{fill:#552222;stroke:#552222;}#mermaid-svg-hEn3Y6fFLd84gz09 .edge-thickness-normal{stroke-width:1px;}#mermaid-svg-hEn3Y6fFLd84gz09 .edge-thickness-thick{stroke-width:3.5px;}#mermaid-svg-hEn3Y6fFLd84gz09 .edge-pattern-solid{stroke-dasharray:0;}#mermaid-svg-hEn3Y6fFLd84gz09 .edge-thickness-invisible{stroke-width:0;fill:none;}#mermaid-svg-hEn3Y6fFLd84gz09 .edge-pattern-dashed{stroke-dasharray:3;}#mermaid-svg-hEn3Y6fFLd84gz09 .edge-pattern-dotted{stroke-dasharray:2;}#mermaid-svg-hEn3Y6fFLd84gz09 .marker{fill:#333333;stroke:#333333;}#mermaid-svg-hEn3Y6fFLd84gz09 .marker.cross{stroke:#333333;}#mermaid-svg-hEn3Y6fFLd84gz09 svg{font-family:"trebuchet ms",verdana,arial,sans-serif;font-size:16px;}#mermaid-svg-hEn3Y6fFLd84gz09 p{margin:0;}#mermaid-svg-hEn3Y6fFLd84gz09 .label{font-family:"trebuchet ms",verdana,arial,sans-serif;color:#333;}#mermaid-svg-hEn3Y6fFLd84gz09 .cluster-label text{fill:#333;}#mermaid-svg-hEn3Y6fFLd84gz09 .cluster-label span{color:#333;}#mermaid-svg-hEn3Y6fFLd84gz09 .cluster-label span p{background-color:transparent;}#mermaid-svg-hEn3Y6fFLd84gz09 .label text,#mermaid-svg-hEn3Y6fFLd84gz09 span{fill:#333;color:#333;}#mermaid-svg-hEn3Y6fFLd84gz09 .node rect,#mermaid-svg-hEn3Y6fFLd84gz09 .node circle,#mermaid-svg-hEn3Y6fFLd84gz09 .node ellipse,#mermaid-svg-hEn3Y6fFLd84gz09 .node polygon,#mermaid-svg-hEn3Y6fFLd84gz09 .node path{fill:#ECECFF;stroke:#9370DB;stroke-width:1px;}#mermaid-svg-hEn3Y6fFLd84gz09 .rough-node .label text,#mermaid-svg-hEn3Y6fFLd84gz09 .node .label text,#mermaid-svg-hEn3Y6fFLd84gz09 .image-shape .label,#mermaid-svg-hEn3Y6fFLd84gz09 .icon-shape .label{text-anchor:middle;}#mermaid-svg-hEn3Y6fFLd84gz09 .node .katex path{fill:#000;stroke:#000;stroke-width:1px;}#mermaid-svg-hEn3Y6fFLd84gz09 .rough-node .label,#mermaid-svg-hEn3Y6fFLd84gz09 .node .label,#mermaid-svg-hEn3Y6fFLd84gz09 .image-shape .label,#mermaid-svg-hEn3Y6fFLd84gz09 .icon-shape .label{text-align:center;}#mermaid-svg-hEn3Y6fFLd84gz09 .node.clickable{cursor:pointer;}#mermaid-svg-hEn3Y6fFLd84gz09 .root .anchor path{fill:#333333!important;stroke-width:0;stroke:#333333;}#mermaid-svg-hEn3Y6fFLd84gz09 .arrowheadPath{fill:#333333;}#mermaid-svg-hEn3Y6fFLd84gz09 .edgePath .path{stroke:#333333;stroke-width:2.0px;}#mermaid-svg-hEn3Y6fFLd84gz09 .flowchart-link{stroke:#333333;fill:none;}#mermaid-svg-hEn3Y6fFLd84gz09 .edgeLabel{background-color:rgba(232,232,232, 0.8);text-align:center;}#mermaid-svg-hEn3Y6fFLd84gz09 .edgeLabel p{background-color:rgba(232,232,232, 0.8);}#mermaid-svg-hEn3Y6fFLd84gz09 .edgeLabel rect{opacity:0.5;background-color:rgba(232,232,232, 0.8);fill:rgba(232,232,232, 0.8);}#mermaid-svg-hEn3Y6fFLd84gz09 .labelBkg{background-color:rgba(232, 232, 232, 0.5);}#mermaid-svg-hEn3Y6fFLd84gz09 .cluster rect{fill:#ffffde;stroke:#aaaa33;stroke-width:1px;}#mermaid-svg-hEn3Y6fFLd84gz09 .cluster text{fill:#333;}#mermaid-svg-hEn3Y6fFLd84gz09 .cluster span{color:#333;}#mermaid-svg-hEn3Y6fFLd84gz09 div.mermaidTooltip{position:absolute;text-align:center;max-width:200px;padding:2px;font-family:"trebuchet ms",verdana,arial,sans-serif;font-size:12px;background:hsl(80, 100%, 96.2745098039%);border:1px solid #aaaa33;border-radius:2px;pointer-events:none;z-index:100;}#mermaid-svg-hEn3Y6fFLd84gz09 .flowchartTitleText{text-anchor:middle;font-size:18px;fill:#333;}#mermaid-svg-hEn3Y6fFLd84gz09 rect.text{fill:none;stroke-width:0;}#mermaid-svg-hEn3Y6fFLd84gz09 .icon-shape,#mermaid-svg-hEn3Y6fFLd84gz09 .image-shape{background-color:rgba(232,232,232, 0.8);text-align:center;}#mermaid-svg-hEn3Y6fFLd84gz09 .icon-shape p,#mermaid-svg-hEn3Y6fFLd84gz09 .image-shape p{background-color:rgba(232,232,232, 0.8);padding:2px;}#mermaid-svg-hEn3Y6fFLd84gz09 .icon-shape .label rect,#mermaid-svg-hEn3Y6fFLd84gz09 .image-shape .label rect{opacity:0.5;background-color:rgba(232,232,232, 0.8);fill:rgba(232,232,232, 0.8);}#mermaid-svg-hEn3Y6fFLd84gz09 .label-icon{display:inline-block;height:1em;overflow:visible;vertical-align:-0.125em;}#mermaid-svg-hEn3Y6fFLd84gz09 .node .label-icon path{fill:currentColor;stroke:revert;stroke-width:revert;}#mermaid-svg-hEn3Y6fFLd84gz09 :root{--mermaid-font-family:"trebuchet ms",verdana,arial,sans-serif;} 1. 初始化/发起购买
2. 调用接口方法
3. 异步通信
4. 返回授权凭证/订单结果
5. 触发回调通知
6. 分发事件
7. 触发 ProcessPurchase 状态
游戏逻辑层 IStoreListener
Unity IAP 5.3 核心框架
WindowsCustomStore : IStore
Microsoft WinRT SDK StoreContext
IStoreCallback
IStore(来自UnityEngine.Purchasing.Extension命名空间) :自定义商店的核心实现类。接管初始化、商品详情查询 (RetrieveProducts)、购买唤起 (Purchase) 和确认核销 (FinishTransaction)。IStoreCallback(来自UnityEngine.Purchasing.Extension命名空间):由 Unity IAP 在初始化时注入,自定义商店通过调用它将结果(商品价格列表拉取成功、支付成功/失败)异步通知给 Unity 框架。IPurchasingModule(来自UnityEngine.Purchasing.Extension命名空间) :商店的模块注册器,用来将你的自定义商店类型绑定到特定的"商店标识字符串"(如WindowsCustomStore)。
3. 基于当前项目架构的实战开发步骤
步骤一:创建商品 ID 映射器
微软 Partner Center(合作伙伴中心)为内购商品分配的是 12 位的英数字唯一 Store ID (例如 9MXJ9SDXSX4H)。而在 Unity 项目中,为了可读性, we 一般使用人类可读的字符串(例如 remove_ads)。
我们需要一个双向映射器来解决两者之间的对齐。当前项目在 WindowsStoreProductIdMapper.cs(file:///f:/UnityProjects/UnityWinDemo/Assets/Scripts/Purchasing/WindowsStore/WindowsStoreProductIdMapper.cs) 中已实现该逻辑:
csharp
namespace Assets.Scripts.Purchasing
{
    public static class WindowsStoreProductIdMapper
    {
        public static string ToWindowsStoreId(string internalProductId)
        {
            return internalProductId switch
            {
                "remove_ads" => "9MXJ9SDXSX4H", // 示例:去广告 (Durable)
                "coins_100"  => "9N3J0R7WS6KM", // 示例:100金币 (Consumable)
                "coins_500"  => "9NZJ6BMNGVFS", // 示例:500金币 (Consumable)
                _ => internalProductId
            };
        }

        public static string ToInternalProductId(string windowsStoreProductId)
        {
            return windowsStoreProductId switch
            {
                "9MXJ9SDXSX4H" => "remove_ads",
                "9N3J0R7WS6KM" => "coins_100",
                "9NZJ6BMNGVFS" => "coins_500",
                _ => windowsStoreProductId
            };
        }
    }
}
步骤二:编写 Windows 专属的 Custom Store 核心类 (IStore)
现在我们创建一个全新的 C# 脚本,命名为 WindowsCustomStore.cs。它将引用微软原生的 Windows.Services.Store(此 API 在 UWP 编译模式下原生可用),并实现 Unity IAP 5.3 的 IStore 接口。
!IMPORTANT
注意:由于
Windows.Services.Store是 UWP 特有的 API,为了避免 Unity 编辑器在非 UWP 平台编译报错,整个类必须被包裹在#if UNITY_WSA && !UNITY_EDITOR编译宏中,或者单独放置在 UWP 专用的 Assembly Definition (AsmDef) 中。
csharp
#if UNITY_WSA && !UNITY_EDITOR
using System;
using System.Collections.Generic;
using System.Collections.ObjectModel;
using System.Threading.Tasks;
using UnityEngine;
using UnityEngine.Purchasing;
using UnityEngine.Purchasing.Extension;
using Windows.Services.Store;

namespace Assets.Scripts.Purchasing.WindowsStore
{
    public class WindowsCustomStore : IStore
    {
        private IStoreCallback storeCallback;
        private StoreContext storeContext;
        private StoreAppLicense appLicense;

        // 缓存当前已查询的微软关联商品元数据
        private readonly Dictionary<string, StoreProduct> microsoftProductsCache = new();

        /// <summary>
        /// 1. 初始化自定义商店,绑定回调
        /// </summary>
        public void Initialize(IStoreCallback callback)
        {
            storeCallback = callback;

            try
            {
                // 获取当前 UWP 架构下的默认商店通信上下文
                storeContext = StoreContext.GetDefault();
                if (storeContext == null)
                {
                    Debug.LogError("[WindowsCustomStore] 无法获取 StoreContext,环境可能不支持 UWP。");
                    storeCallback.OnSetupFailed(InitializationFailureReason.AppNotKnown);
                    return;
                }

                // 异步获取应用证书以读取当前用户拥有的商品(补漏与历史购买恢复)
                InitializeAsync();
            }
            catch (Exception ex)
            {
                Debug.LogError($"[WindowsCustomStore] 初始化发生异常: {ex}");
                storeCallback.OnSetupFailed(InitializationFailureReason.AppNotKnown);
            }
        }

        private async void InitializeAsync()
        {
            try
            {
                appLicense = await storeContext.GetAppLicenseAsync();

                // 检查并自动消耗已经被购买但由于闪退或断网未被"履行"的消费型商品(重要!)
                await AutoFulfillUnconsumedConsumables();
            }
            catch (Exception ex)
            {
                Debug.LogWarning($"[WindowsCustomStore] 异步初始化或补单失败: {ex.Message}");
            }
        }

        /// <summary>
        /// 2. 拉取微软商店后台配置的商品详情
        /// </summary>
        public async void RetrieveProducts(ReadOnlyCollection<ProductDefinition> products)
        {
            if (storeContext == null)
            {
                storeCallback.OnSetupFailed(InitializationFailureReason.AppNotKnown);
                return;
            }

            // 定义微软商店支持的所有 Add-on 类型
            string[] productKinds = { "Durable", "Consumable", "UnmanagedConsumable" };
            List<string> filterList = new List<string>(productKinds);

            try
            {
                Debug.Log("[WindowsCustomStore] 正在从微软商店拉取商品目录...");
                var queryResult = await storeContext.GetAssociatedStoreProductsAsync(filterList);

                if (queryResult == null || queryResult.ExtendedError != null)
                {
                    string errMsg = queryResult?.ExtendedError?.Message ?? "未知错误";
                    Debug.LogError($"[WindowsCustomStore] 微软商店目录查询失败: {errMsg}");
                    storeCallback.OnSetupFailed(InitializationFailureReason.NoProductsAvailable);
                    return;
                }

                var productDescriptions = new List<ProductDescription>();
                microsoftProductsCache.Clear();

                foreach (var pair in queryResult.Products)
                {
                    StoreProduct storeProduct = pair.Value;
                    string windowsStoreId = storeProduct.StoreId;

                    // 将微软 12 位 ID 映射为游戏内部配置的通用 ID
                    string internalProductId = WindowsStoreProductIdMapper.ToInternalProductId(windowsStoreId);

                    // 放入缓存以便在后续 Purchase / FinishTransaction 时使用
                    microsoftProductsCache[windowsStoreId] = storeProduct;

                    // 提取微软商品价格与详情
                    string priceString = storeProduct.Price?.FormattedPrice ?? "N/A";
                    string title = storeProduct.Title;
                    string description = storeProduct.Description;

                    // 检测当前用户是否拥有该授权(针对耐久性 Durable 买断商品)
                    bool isOwned = false;
                    if (appLicense != null && appLicense.AddOnLicenses.TryGetValue(windowsStoreId, out var license))
                    {
                        isOwned = license != null && license.IsActive;
                    }

                    // 构造符合 Unity IAP 5.3 标准的 ProductDescription 并塞入列表
                    var metadata = new ProductMetadata(priceString, title, description, "USD", 0);

                    // 模拟收据,Unity IAP 上层可能需要它来验证购买或恢复
                    string mockReceipt = isOwned ? $"{{\"Store\":\"WindowsCustomStore\",\"TransactionID\":\"{windowsStoreId}_license\"}}" : "";

                    productDescriptions.Add(new ProductDescription(internalProductId, metadata, mockReceipt, windowsStoreId));
                }

                // 核心步骤:将整理后的商品数组提交给 Unity IAP 回调
                Debug.Log($"[WindowsCustomStore] 成功加载 {productDescriptions.Count} 个商品。");
                storeCallback.OnProductsRetrieved(productDescriptions);
            }
            catch (Exception ex)
            {
                Debug.LogError($"[WindowsCustomStore] 获取商品详情异常: {ex}");
                storeCallback.OnSetupFailed(InitializationFailureReason.NoProductsAvailable);
            }
        }

        /// <summary>
        /// 3. 用户点击购买时触发
        /// </summary>
        public async void Purchase(ProductDefinition product, string developerPayload)
        {
            if (storeContext == null)
            {
                storeCallback.OnPurchaseFailed(new PurchaseFailureDescription(
                    product.storeSpecificId, PurchaseFailureReason.StoreUnavailable, "商店未初始化。"));
                return;
            }

            // 获取微软的 12 位 Store ID
            string windowsStoreId = WindowsStoreProductIdMapper.ToWindowsStoreId(product.id);
            Debug.Log($"[WindowsCustomStore] 唤起微软原生内购收银台。商品 ID: {windowsStoreId} (游戏内: {product.id})");

            try
            {
                // 唤起微软原生的结账 UI 界面(系统级弹窗)
                var result = await storeContext.RequestPurchaseAsync(windowsStoreId);

                if (result == null)
                {
                    storeCallback.OnPurchaseFailed(new PurchaseFailureDescription(
                        product.id, PurchaseFailureReason.Unknown, "结账无响应。"));
                    return;
                }

                switch (result.Status)
                {
                    case StorePurchaseStatus.Succeeded:
                    case StorePurchaseStatus.AlreadyPurchased:
                        Debug.Log($"[WindowsCustomStore] 结账成功。状态: {result.Status}。准备下发收据...");

                        string txId = Guid.NewGuid().ToString(); // 生成唯一的交易ID
                        string receipt = $"{{\"Store\":\"WindowsCustomStore\",\"TransactionID\":\"{txId}\",\"Payload\":\"{developerPayload}\"}}";

                        // 注意:此处先告知 Unity IAP 成功,不要在这里消耗 Consumable!
                        // 应该在 Unity 确认收到并调用 FinishTransaction 时进行核销,这是防丢单的核心!
                        storeCallback.OnPurchaseSucceeded(product.id, receipt, txId);
                        break;

                    case StorePurchaseStatus.NotPurchased:
                        storeCallback.OnPurchaseFailed(new PurchaseFailureDescription(
                            product.id, PurchaseFailureReason.UserCancelled, "用户取消了交易。"));
                        break;

                    case StorePurchaseStatus.NetworkError:
                        storeCallback.OnPurchaseFailed(new PurchaseFailureDescription(
                            product.id, PurchaseFailureReason.PaymentDeclined, "网络异常。"));
                        break;

                    default:
                        storeCallback.OnPurchaseFailed(new PurchaseFailureDescription(
                            product.id, PurchaseFailureReason.Unknown, $"交易未完成: {result.Status}"));
                        break;
                }
            }
            catch (Exception ex)
            {
                Debug.LogError($"[WindowsCustomStore] 结账流程发生致命异常: {ex}");
                storeCallback.OnPurchaseFailed(new PurchaseFailureDescription(
                    product.id, PurchaseFailureReason.Unknown, ex.Message));
            }
        }

        /// <summary>
        /// 4. 确认交易(Unity IAP 的防丢单回调)
        /// 如果是消费型商品,玩家必须在这里执行 ReportConsumableFulfillmentAsync 确认消耗,
        /// 只有消耗完成后,微软后台才会标记订单已结案,玩家下次才可以重新购买该项!
        /// </summary>
        public async void FinishTransaction(ProductDefinition product, string transactionId)
        {
            if (storeContext == null) return;

            string windowsStoreId = WindowsStoreProductIdMapper.ToWindowsStoreId(product.id);

            // 通过缓存或者 ID 查验该商品的分类是否为消费型
            bool isConsumable = IsMicrosoftProductConsumable(windowsStoreId);

            if (isConsumable)
            {
                Debug.Log($"[WindowsCustomStore] 检测到消费型商品核销信号: {product.id} ({windowsStoreId})。正在向微软上报履行...");

                Guid trackingId = Guid.NewGuid();
                try
                {
                    // 传入 1U (核销数量为 1) 和唯一追踪 ID
                    var fulfillResult = await storeContext.ReportConsumableFulfillmentAsync(windowsStoreId, 1U, trackingId);

                    if (fulfillResult != null)
                    {
                        Debug.Log($"[WindowsCustomStore] 微软消耗上报结果: {fulfillResult.Status} (跟踪号: {trackingId})");
                    }
                }
                catch (Exception ex)
                {
                    Debug.LogError($"[WindowsCustomStore] 核销消费品失败,可能导致下次无法购买: {ex}");
                }
            }
            else
            {
                Debug.Log($"[WindowsCustomStore] 耐久性/非消费型商品交易关闭: {product.id}");
            }
        }

        #region 辅助防丢单与元数据解析方法

        private bool IsMicrosoftProductConsumable(string windowsStoreId)
        {
            if (microsoftProductsCache.TryGetValue(windowsStoreId, out var prod))
            {
                return prod.ProductKind == "Consumable" || prod.ProductKind == "UnmanagedConsumable";
            }
            // 兜底策略:根据游戏内 ID 进行解析
            string internalId = WindowsStoreProductIdMapper.ToInternalProductId(windowsStoreId);
            return internalId.Contains("coin") || internalId.Contains("gold");
        }

        /// <summary>
        /// 扫描用户授权,检查并消耗之前卡单的消费型商品(启动时补单)
        /// </summary>
        private async Task AutoFulfillUnconsumedConsumables()
        {
            var unconsumedList = await storeContext.GetUnconsumedAddOnsAsync();
            if (unconsumedList == null) return;

            foreach (var unconsumed in unconsumedList)
            {
                string storeId = unconsumed.StoreId;
                Guid trackingId = unconsumed.TrackingId;

                Debug.LogWarning($"[WindowsCustomStore] 发现历史卡单(未消耗): {storeId}。开始自动补单核销...");

                try
                {
                    var result = await storeContext.ReportConsumableFulfillmentAsync(storeId, 1U, trackingId);
                    if (result != null && result.Status == StoreConsumableStatus.Succeeded)
                    {
                        Debug.Log($"[WindowsCustomStore] 历史卡单自动核销成功: {storeId}");
                    }
                }
                catch (Exception ex)
                {
                    Debug.LogError($"[WindowsCustomStore] 补单履行失败: {ex.Message}");
                }
            }
        }
        #endregion
    }
}
#endif
步骤三:编写自定义采购模块 (IPurchasingModule)
现在需要向 Unity IAP 注册这个商店。我们需要实现 IPurchasingModule:
csharp
using UnityEngine.Purchasing.Extension;
using Assets.Scripts.Purchasing.WindowsStore;

namespace Assets.Scripts.Purchasing
{
    public class WindowsStorePurchasingModule : IPurchasingModule
    {
        public void Configure(IPurchasingBinder binder)
        {
#if UNITY_WSA && !UNITY_EDITOR
            // 绑定到 UWP 原生自定义商店类
            binder.RegisterStore("WindowsCustomStore", new WindowsCustomStore());
#else
            // 非 UWP 或 编辑器下,绑定一个简单的空壳 Mock 商店
            binder.RegisterStore("WindowsCustomStore", new EditorMockStoreBridge());
#endif
        }
    }
}
步骤四:在游戏初始化代码中注入自定义商店
现在我们在现有的 Unity IAP 初始化逻辑中(通常是调用 ConfigurationBuilder 的地方)加载自定义的 Module 并运行:
csharp
using UnityEngine;
using UnityEngine.Purchasing;

namespace Assets.Scripts.Purchasing
{
    public class IAPInitializer : MonoBehaviour, IStoreListener
    {
        private IStoreController storeController;
        private IExtensionProvider extensionProvider;

        public void Start()
        {
            InitializeIAP();
        }

        private void InitializeIAP()
        {
            // 1. 初始化采购 Builder 并加载我们的自定义 Module
            var builder = ConfigurationBuilder.Instance(
                StandardPurchasingModule.Instance(),
                new WindowsStorePurchasingModule() // 注入自定义的 Windows 商店模块
            );

            // 2. 注册你的商品 ID 目录 (使用游戏内人类可读 ID)
            builder.AddProduct("remove_ads", ProductType.NonConsumable);
            builder.AddProduct("coins_100", ProductType.Consumable);
            builder.AddProduct("coins_500", ProductType.Consumable);

            // 3. 配置针对 Windows WSA 平台使用我们的 WindowsCustomStore 标识
#if UNITY_WSA && !UNITY_EDITOR
            builder.Configure<IMicrosoftConfiguration>().SetStoreName("WindowsCustomStore");
#endif

            // 4. 异步初始化 Unity IAP
            UnityPurchasing.Initialize(this, builder);
        }

        public void OnInitialized(IStoreController controller, IExtensionProvider extensions)
        {
            storeController = controller;
            extensionProvider = extensions;
            Debug.Log("Unity IAP 初始化成功!当前使用的是 Windows 自定义商店扩展。");
        }

        public void OnInitializeFailed(InitializationFailureReason error)
        {
            Debug.LogError($"Unity IAP 初始化失败: {error}");
        }

        public void OnInitializeFailed(InitializationFailureReason error, string message)
        {
            Debug.LogError($"Unity IAP 初始化失败: {error}, 信息: {message}");
        }

        public PurchaseProcessingResult ProcessPurchase(PurchaseEventArgs args)
        {
            string productId = args.purchasedProduct.definition.id;
            Debug.Log($"上层业务逻辑层收到支付成功回调: {productId}");

            // 执行发放金币、移除广告等游戏内业务逻辑
            if (productId == "coins_100")
            {
                // 发放 100 金币...
            }
            else if (productId == "remove_ads")
            {
                // 移除广告...
            }

            // 核心安全原则:告知 Unity IAP 我们已收到,框架会自动调用 CustomStore.FinishTransaction 执行底层的原生消耗上报
            return PurchaseProcessingResult.Complete;
        }

        public void OnPurchaseFailed(Product product, PurchaseFailureReason failureReason)
        {
            Debug.LogWarning($"购买失败: {product.definition.id}, 原因: {failureReason}");
        }
    }
}
步骤五:编写编辑器高还原度模拟商店 (EditorMockStoreBridge)
为了避免每次测试支付逻辑都必须打包导出 UWP 并在真机上联调,我们必须为 Unity 编辑器环境编写一个高还原度、支持本地持久化的 Mock 模拟商店。
通过实现 IStore 接口并在非 UWP 平台或编辑器下进行注册,我们可以在点击 Play 运行后立刻调起一套完整的虚拟内购闭环。
1. 编写 Mock 商店实现类
以下是为编辑器环境定制的 EditorMockStoreBridge.cs 脚本,它同样继承 IStore,在内部使用 PlayerPrefs 模拟微软后台的订单状态与历史授权凭证:
csharp
#if UNITY_EDITOR || !UNITY_WSA
using System;
using System.Collections.Generic;
using System.Collections.ObjectModel;
using System.Threading.Tasks;
using UnityEngine;
using UnityEngine.Purchasing;
using UnityEngine.Purchasing.Extension;

namespace Assets.Scripts.Purchasing.WindowsStore
{
    public class EditorMockStoreBridge : IStore
    {
        private IStoreCallback storeCallback;
        private readonly Dictionary<string, bool> ownedProductsCache = new();
        private const string PrefsPrefix = "MockIAP_Owned_";

        // 模拟网络延迟(毫秒)
        private const int NetworkDelayMs = 500;

        /// <summary>
        /// 1. 初始化 Mock 商店
        /// </summary>
        public async void Initialize(IStoreCallback callback)
        {
            storeCallback = callback;
            Debug.Log("[EditorMockStoreBridge] 编辑器模拟商店正在初始化...");

            // 模拟真实网络延迟
            await Task.Delay(NetworkDelayMs);
            Debug.Log("[EditorMockStoreBridge] 模拟商店成功连接虚拟服务器。");
        }

        /// <summary>
        /// 2. 模拟拉取商品目录
        /// </summary>
        public async void RetrieveProducts(ReadOnlyCollection<ProductDefinition> products)
        {
            await Task.Delay(NetworkDelayMs);

            var productDescriptions = new List<ProductDescription>();
            ownedProductsCache.Clear();

            foreach (var product in products)
            {
                // 从 PlayerPrefs 读取本地持久化已拥有的状态
                bool isOwned = PlayerPrefs.GetInt(PrefsPrefix + product.id, 0) == 1;
                ownedProductsCache[product.id] = isOwned;

                // 模拟元数据
                string simulatedPrice = product.type == ProductType.Consumable ? "$0.99" : "$1.99";
                string simulatedTitle = $"模拟商品 - {product.id}";
                string simulatedDesc = $"这是一项用于编辑器测试的模拟内购项。";

                var metadata = new ProductMetadata(simulatedPrice, simulatedTitle, simulatedDesc, "USD", 0);
                string mockReceipt = isOwned ? $"{{\"Store\":\"EditorMockStore\",\"TransactionID\":\"{product.id}_mock_tx\"}}" : "";

                productDescriptions.Add(new ProductDescription(product.id, metadata, mockReceipt, product.id));
            }

            Debug.Log($"[EditorMockStoreBridge] 成功拉取并初始化了 {productDescriptions.Count} 个虚拟商品。");
            storeCallback.OnProductsRetrieved(productDescriptions);
        }

        /// <summary>
        /// 3. 模拟唤起虚拟结算面板
        /// </summary>
        public async void Purchase(ProductDefinition product, string developerPayload)
        {
            Debug.Log($"[EditorMockStoreBridge] 正在发起模拟购买: {product.id}...");
            await Task.Delay(NetworkDelayMs + 300);

            // 成功几率极高,模拟付款成功
            Debug.Log($"[EditorMockStoreBridge] 模拟付款成功。商品: {product.id}。正在持久化订单...");

            // 持久化购买状态
            ownedProductsCache[product.id] = true;
            PlayerPrefs.SetInt(PrefsPrefix + product.id, 1);
            PlayerPrefs.Save();

            string txId = Guid.NewGuid().ToString();
            string mockReceipt = $"{{\"Store\":\"EditorMockStore\",\"TransactionID\":\"{txId}\",\"Payload\":\"{developerPayload}\"}}";

            // 回调通知 Unity IAP 成功
            storeCallback.OnPurchaseSucceeded(product.id, mockReceipt, txId);
        }

        /// <summary>
        /// 4. 模拟消费核销(防丢单核销)
        /// </summary>
        public void FinishTransaction(ProductDefinition product, string transactionId)
        {
            if (product.type == ProductType.Consumable)
            {
                Debug.Log($"[EditorMockStoreBridge] 收到消费型商品核销: {product.id}。正在清除编辑器本地许可证,允许玩家重新购买该项!");
                ownedProductsCache[product.id] = false;
                PlayerPrefs.DeleteKey(PrefsPrefix + product.id);
                PlayerPrefs.Save();
            }
            else
            {
                Debug.Log($"[EditorMockStoreBridge] 永久性商品订单确认完成: {product.id}");
            }
        }

        /// <summary>
        /// 测试辅助工具:重置所有模拟购买状态
        /// </summary>
        public void ClearAllMockPurchases(ReadOnlyCollection<ProductDefinition> products)
        {
            foreach (var product in products)
            {
                PlayerPrefs.DeleteKey(PrefsPrefix + product.id);
            }
            PlayerPrefs.Save();
            Debug.Log("[EditorMockStoreBridge] 成功清除编辑器内所有虚拟内购拥有许可证!");
        }
    }
}
#endif
2. 在编辑器测试的极大便利
通过绑定 EditorMockStoreBridge,开发者无需离开 Unity 编辑器即可完成以下逻辑测试:
- 持久化保存测试:购买了"去广告"等非消费型商品后,重新点击 Play,商品应该依然显示为"已拥有"。
- 重复购买测试 :消费型商品(金币)在购买完并在
ProcessPurchase返回Complete后,由于FinishTransaction会自动调用清除 PlayerPrefs 逻辑,开发者可以立刻进行第二次购买。 - UI 逻辑调试:可以极速测试金币余额增加、按钮不可点击状态切换等所有游戏内 UI 的动态响应。
4. 微软 Partner Center 后台配置与关联步骤
自定义商店的核心是与微软后台建立信任。请严格执行以下三步操作:
1. 绑定应用包标识(Unity / VS 关联)
- 在 Unity 中选择 File > Build Settings ,切换平台为 Universal Windows Platform。
- 导出 UWP 工程,在生成的
/Build目录中找到并用 Visual Studio 打开生成的.sln解决方案。 - 在 Visual Studio 中,右键点击主项目目录 -> Publish (发布) -> Associate App with the Store (将应用与商店关联)。
- 登录你的 Windows 开发者账号,选择预先在 Partner Center 中创建的应用名称。
- 完成关联后,Visual Studio 会自动修改
Package.appxmanifest中的包名称(Package Name)、发布者(Publisher)及本地开发者证书,使其与微软服务器安全匹配。
2. 在 Partner Center 中创建 Add-ons (外购品)
登录 Microsoft Partner Center 仪表板,在你的应用页面配置你的内购项目:
| 游戏内 ID (Internal ID) | 商店 ID (Store ID) | 商店商品类型 (Product Kind) | 含义说明 |
|---|---|---|---|
remove_ads |
9MXJ9SDXSX4H |
Durable | 去广告(永久性买断) |
coins_100 |
9N3J0R7WS6KM |
Consumable (Developer-managed) | 100金币(开发人员管理型消费品) |
!WARNING
- 特别注意 :创建 Add-on 时,必须使用 Durable / Consumable 对应正确的类型。
- 不可重复购买的问题:如果把金币选成了 Durable,微软会判定用户已永久拥有,导致用户第二次点击时报错"已拥有该商品"且无法弹出付款。
5. 编译构建与真机联调
1. 配置 AppxManifest 权限
在 Unity 的 Player Settings > Publishing Settings 或者 Visual Studio 的 Package.appxmanifest 中,确保勾选了 Internet (Client) / 互联网(客户端) 权限。否则游戏被沙盒隔离后,无法发起任何网络请求去微软服务器拉取价格。
2. 导出与部署
- 在 VS 中,将上方工具栏的编译平台配置为 x64 (不要选 ARM 或 ARM64,除非在特定移动端/Xbox),配置类型选择 Debug 或 Release。
- 点击 Local Machine (本地计算机) 开始部署。
3. 真实的真机联调测试方案(私有发布与 Package Flighting 流程)
在微软 Partner Center 中,普通的 Windows 应用开发者无法像其他平台那样直接创建简单的沙盒测试账号 。因为在微软体系中,"创建沙盒测试账号"是专属于 Xbox Live Services (Xbox 开发者计划 / ID@Xbox) 的高级权限,一般应用账号申请会直接提示"没有权限创建"。
针对常规 UWP 应用,目前业界验证最成功的零成本真机联调与支付测试方案主要有以下两种:
方案 A:以私有方式发布应用 (Private Visibility)
- 在 Partner Center 应用后台中,进入 Pricing and availability (定价和可用性) -> Visibility (可见性)。
- 将其设置为 Private audience (私有受众)。
- 创建一个 Customer group (测试用户组),并将你的开发测试用微软账号 (Email) 添加到该组中。
- 提交发布。普通公众用户在微软商店中无法通过搜索或直接链接发现该应用,但只要是处于 Customer group 组内的微软账号,登录本机的微软商店 (Microsoft Store) 后即可下载该应用并安全地调起测试交易。
方案 B:创建 Package Flighting (程序包外部测试)
- 在 Partner Center 对应的应用导航栏中选择 Package flights (程序包外部测试)。
- 创建一个新的外部测试组,例如命名为
AlphaTest。 - 创建或关联一个包含测试人员微软账号的 Customer group (客户群)。
- 上传你的 UWP 应用包并提交外部测试。测试人员接受邀请后,他们的系统账号即获得了专属的内购测试权。
!NOTE
测试交易弹出标志 :当测试账号通过上述方式安装应用并点击购买时,弹出的微软原生内购支付框会明确标注**"这是一笔测试交易,不会扣除真实费用"**(或者以
0元直接确认结算)。这代表你的联调测试大功告成!
⚠️ 极其关键:为什么 VS 关联应用后"直接本地部署运行"无法完成内购?(开发机授权激活桥梁)
仅仅在 Visual Studio 中关联商店应用并直接本地部署运行(F5 部署),是压根无法完成内购的。
- 原因 :微软 WinRT
StoreContext的内购 API 必须依靠本地 Windows OS 内注册的合法应用许可证书(Entitlement/Licensing Context) 。当你在 VS 中直接本地部署时,虽然 Package 身份匹配,但你的微软账号在本地系统上从未在该应用下成功建立合法的商店下载/交易注册关系 。此时 OS 无法定位该 Package Family Name 的购买凭证,会导致StoreContext拉取不到目录详情,或者结算直接抛出 HRESULT 异常。 - 终极解决方法(授权激活桥) :
- 必须首先通过商店下载安装一次 :在你的测试开发机上,使用测试用的微软账号通过你的 Package Flight (外部测试链接) 或者 Private 私有发布链接 (在 Microsoft Store 客户端中)正式下载并安装一次该应用。这一步的目的是为了让 Windows 系统注册"该微软账号已拥有该 Package 许可证"的注册表记录。
- VS 本地覆盖调试 :完成商店版的初次下载安装后,直接在 Visual Studio 中运行你的本地编译部署/覆盖调试(或 F5 调试) 。Visual Studio 会自动用你的本地开发代码覆盖掉刚刚下载的商店版本,但会完全保留并共享该 Package 相同的合法授权环境!
- 顺利测试 :此时,在你的 VS 调试运行版中,再次触发
StoreContext内购代码,微软的"这是一笔测试交易"结算框就会如期完美弹出! - 🚫 极其关键的网络限制:关闭本机的网络代理 / VPN :在本地 VS 部署运行调试时,必须完全关闭本机的 VPN、游戏加速器或各类全局/系统网络代理 。这是因为 UWP 应用处于 AppContainer 沙盒安全网络限制中,大部分 VPN 的系统级路由无法正确穿透此沙盒,或者会将连接区域强行切换(例如定位到海外 IP,导致与你微软账号实际绑定的市场区域发生冲突),这将直接导致
StoreContext初始化完全卡死、无法获取商店目录,或根本无法调起微软的内购结账弹窗。
6. UWP 架构下的黄金避坑指南
🚨 坑一:购买了消费型商品(如金币)之后,第二次点击时报错"Already Purchased"
- 原因 :没有在交易成功后,在
FinishTransaction中向微软服务器发送"核销"请求(即storeContext.ReportConsumableFulfillmentAsync)。微软商店认为玩家一直抱着这个商品没有用掉,所以拒绝再次售卖。 - 解决 :务必确认在自定义商店的
FinishTransaction中有针对消费品的ReportConsumableFulfillmentAsync逻辑,且返回的 Status 为Succeeded。
🚨 坑二:网络断开或玩家购买成功后,游戏意外崩溃/闪退导致没能核销订单(卡单/丢单)
- 原因:付款扣费已经由微软处理成功,但客户端在给玩家加金币前崩溃了,未执行核销。
- 解决 :在自定义商店初始化
Initialize的异步链路中,像本项目一样加入storeContext.GetUnconsumedAddOnsAsync()查询。检索未消耗的历史遗留订单,在游戏启动时自动重新履行核销,并通知上层发放道具。
🚨 坑三:拉取不到任何商品信息,RetrieveProducts 返回空列表或者 ExtendedError
- 原因 :
- 导出的 UWP程序没有执行 VS 的 Associate App with the Store 关联,包名对不上,微软服务器无法识别该程序。
- 商品刚在 Partner Center 创建完毕,微软 CDN 服务器尚未在全球同步生效(通常需要几小时)。
- 系统自带的"微软商店"App 锁区或网络代理异常。建议关闭 VPN,确保本机"微软商店"客户端能够正常打开和加载商品。
7. 结语
通过 Unity IAP 5.3 的 Custom Store 接口扩展,我们成功地为 UWP 平台构建了稳固的支付桥梁。本方案在逻辑上做到了"底层极客,上层纯净",完全保留了原汁原味的 Unity IAP 工作流,彻底免去了更换平台就要大改代码的痛苦,非常适合多平台发布的商业化项目!