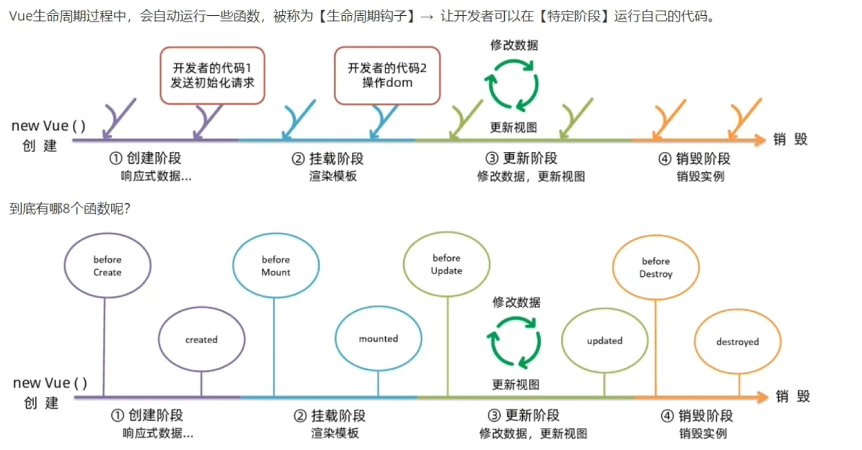
Vue的生命周期

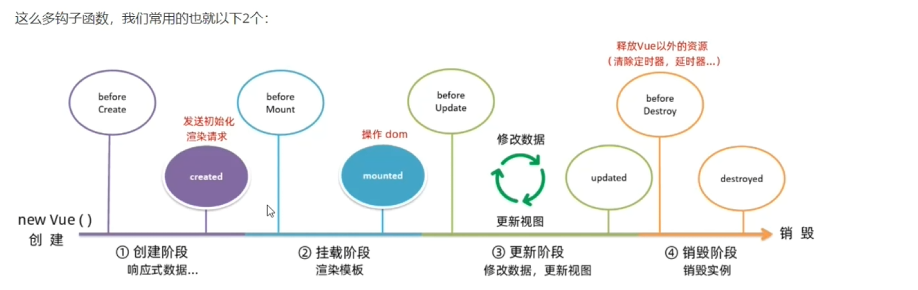
生命周期的钩子函数
<!DOCTYPE html>
<html lang="en">
<head>
    <meta charset="UTF-8">
    <meta name="viewport" content="width=device-width, initial-scale=1.0">
    <title>Document</title>
</head>
<body>
    <div id="app">
        <h3>jjjj</h3>
        <button @click="dec()">-</button>
        <span>{{count}}</span>
        <button @click="add()">+</button>
    </div>
</body>
<script src="https://cdn.jsdelivr.net/npm/vue@2"></script>
<script>
    const v = new Vue({
        el:'#app',
        data:{
            count:0,
        },
        methods:{
            dec(){
                this.count--;
            },
            add(){
                this.count++;
            }
        },
        //创建阶段之前触发的钩子函数
        beforeCreate(){
            console.log("beforeCreate函数执行了",this.count)
            //获取不了,因为还没有创建
        },
        //创建阶段完成之后的钩子函数
        created(){
            console.log("created函数执行了",this.count)
            //可以获取,因为此时数据在创建阶段已经准备好了
        },
        //挂载阶段前触发的钩子函数
        beforeMount(){
            console.log("beforeMount函数执行了",document.querySelector('h3').innerHTML)
            //不能获取,此时模板还没有渲染
        },
        mounted(){
            console.log("mount函数执行了",document.querySelector('h3').innerHTML)
            //可以获取,此时模板渲染好了
        },
        //更新阶段前触发的钩子函数
        beforeUpdate(){
            console.log("beforeUpdata函数执行了",document.querySelector('span').innerHTML)
            //获取修改前的值
        },
        //更新阶段之后触发的钩子函数
        updated(){
            console.log("updated函数执行了",document.querySelector('span').innerHTML)
            //获取修改后的值
        },
        //销毁前执行的钩子函数
        beforeDestroy(){
            console.log("beforeDestory函数执行了",document.querySelector('span').innerHTML)

        },
        //销毁后执行的钩子函数
        destroyed(){
            console.log("destoryed函数执行了",document.querySelector('span').innerHTML)

        }
    })
</script>
</html>
<!DOCTYPE html>
<html lang="en">
<head>
<meta charset="UTF-8">
<meta http-equiv="X-UA-Compatible" content="IE=edge">
<meta name="viewport" content="width=device-width, initial-scale=1.0">
<title>Document</title>
<style>
* {
margin: 0;
padding: 0;
list-style: none;
}
.news {
display: flex;
height: 120px;
width: 600px;
margin: 0 auto;
padding: 20px 0;
cursor: pointer;
}
.news .left {
flex: 1;
display: flex;
flex-direction: column;
justify-content: space-between;
padding-right: 10px;
}
.news .left .title {
font-size: 20px;
}
.news .left .info {
color: #999999;
}
.news .left .info span {
margin-right: 20px;
}
.news .right {
width: 160px;
height: 120px;
}
.news .right img {
width: 100%;
height: 100%;
object-fit: cover;
}
</style>
</head>
<body>
<div id="app">
<ul>
<li v-for="(item,index) in list" :key="item.id" class="news">
<div class="left">
<div class="title">{{item.title}}</div>
<div class="info">
<span>{{item.source}}</span>
<span>{{item.time}}</span>
</div>
</div>
<div class="right">
<img :src="item.img" alt="">
</div>
</li>
</ul>
</div>
<script src="https://cdn.jsdelivr.net/npm/vue@2/dist/vue.js"></script>
<script src="https://cdn.jsdelivr.net/npm/axios/dist/axios.min.js"></script>
<script>
const app = new Vue({
el: '#app',
// 请求方式:get
data:{
list:[],
},
async created(){
//发送后端请求,获取数据
const res = await axios.get("http://localhost:3000/news");
//解析后端数据,将数据赋予给list
this.list = res.data;
}
})
</script>
</body>
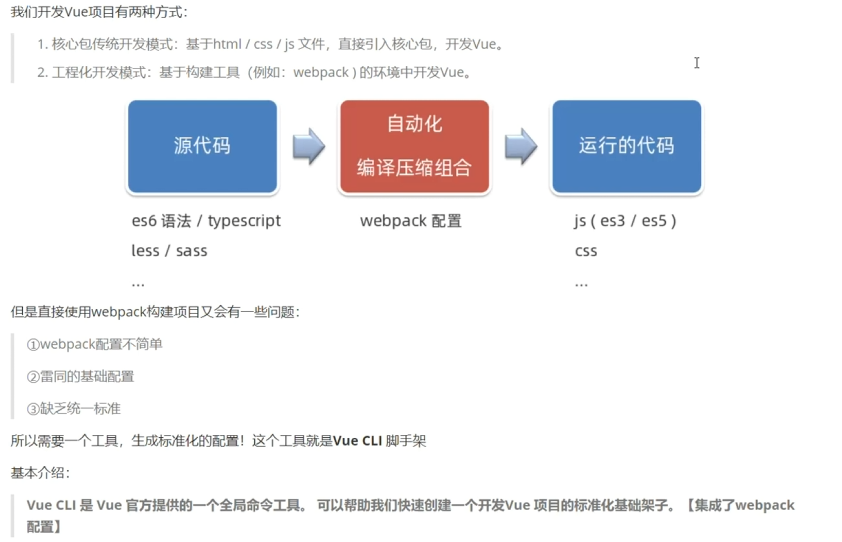
</html>Vue工程化开发
<template>
<div class="my-footer">尾部盒子<MyButton></MyButton></div>
</template>
<script>
export default {
}
</script>
<style>
.my-footer{
width:400px;
height: 100px;
background-color: purple;
}
</style>
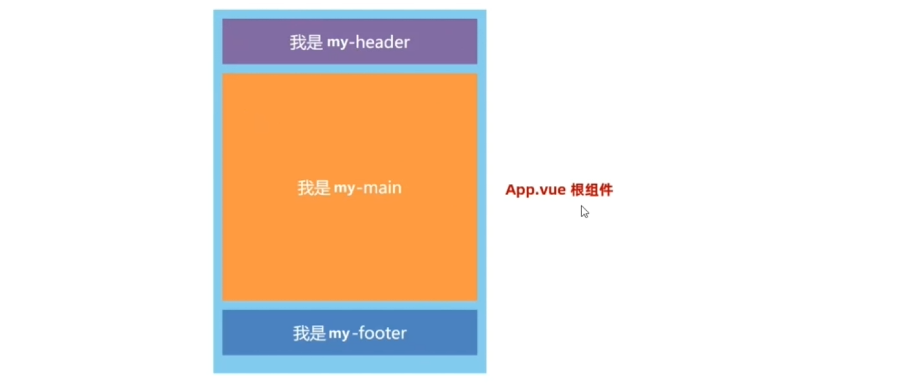
<template>
<div class="app">
<MyHeader></MyHeader>
<MyBody></MyBody>
<MyFooter></MyFooter>
</div>
</template>
<script>
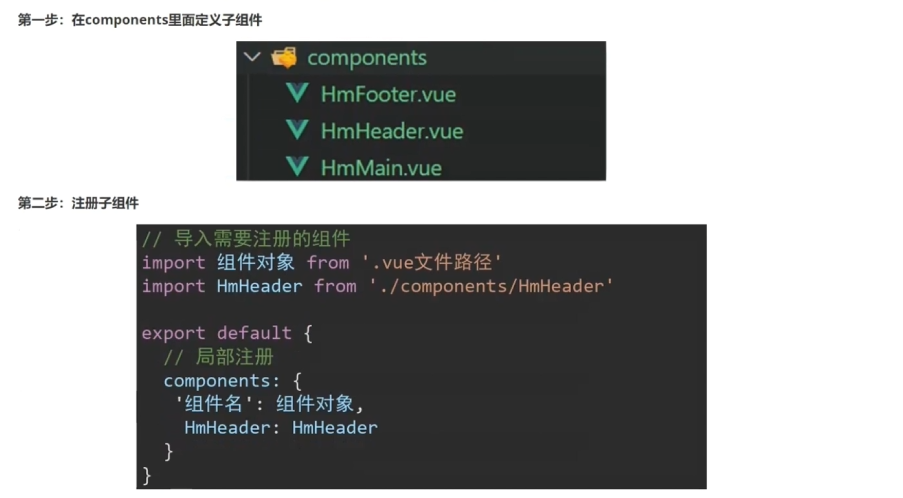
//导入子组件:import 组件对象 from 子组件的路径
import MyHeader from './components/MyHeader.vue'
import MyBody from './components/MyBody.vue'
import MyFooter from './components/MyFooter.vue'
export default {
//组件的局部注册
components:{
//组件名称:组件对象
MyHeader:MyHeader,
MyBody:MyBody,
//如果组件名称和组件对象的名字一样,就可以简写
MyFooter:MyFooter
}
}
</script>
<style>
.app{
widows: 400px;
height: 700px;
background-color: brown;
}
</style>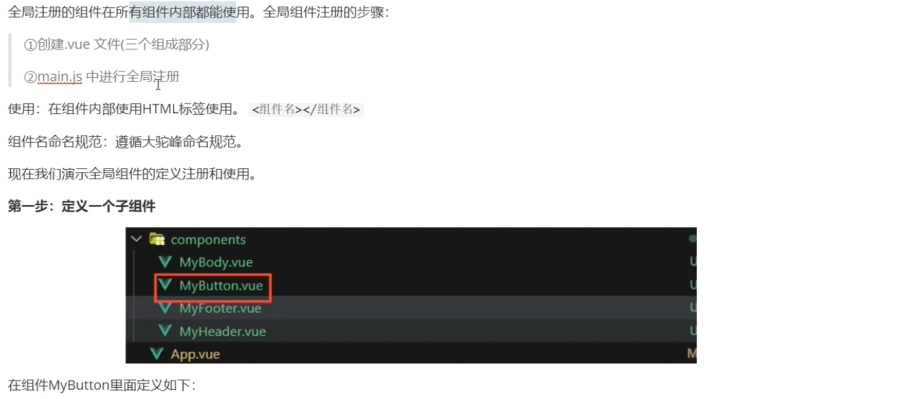
【
<template>
<button class="my-button">按钮</button>
</template>
<script>
export default {
}
</script>
<style>
.my-button{
height: 50px;
line-height: 50px;
padding:0 20px;
color:white;
border: none;
vertical-align: middle;
cursor:pointer;
background-color: aqua;
}
</style>
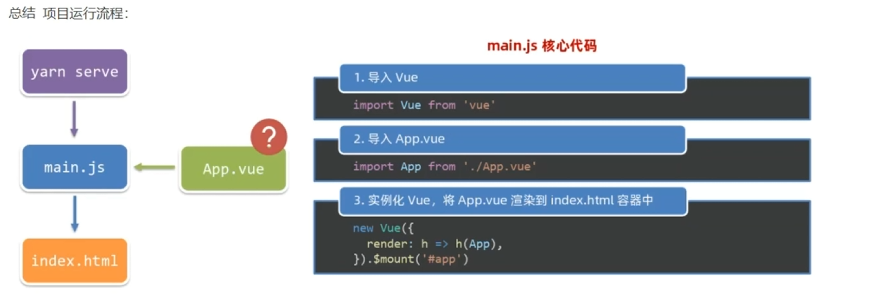
import Vue from 'vue'// 导入vue的核心包
import App from './App.vue'// 导入根组件App.vue
//定义导入组件的代码
import MyButton from "./components/MyButton.vue";
//描述当前项目所处的环境是否是生产环境
Vue.config.productionTip = false
//进行组件注册,Vue.component(组件名,组件对象)
Vue.component("MyButton",MyButton)
//创建Vue实例对象
new Vue({
render: h => h(App),// render方法 基于App.vue组件,将其渲染到index.html中
}).$mount('#app')// 将要渲染的结构,挂载到index.html的<div id="app"></div>中,类似于我们自己写的el:'#app'