一、前言:为什么要做接口自动化?
在做博客系统的功能测试时,我发现每次回归都要重复执行几十次登录、发布、编辑、删除的操作,效率极低还容易漏测。而且接口的底层逻辑问题,单靠 UI 测试很难发现。
于是我决定用 Python + Pytest 搭建一套接口自动化框架,目标很明确:
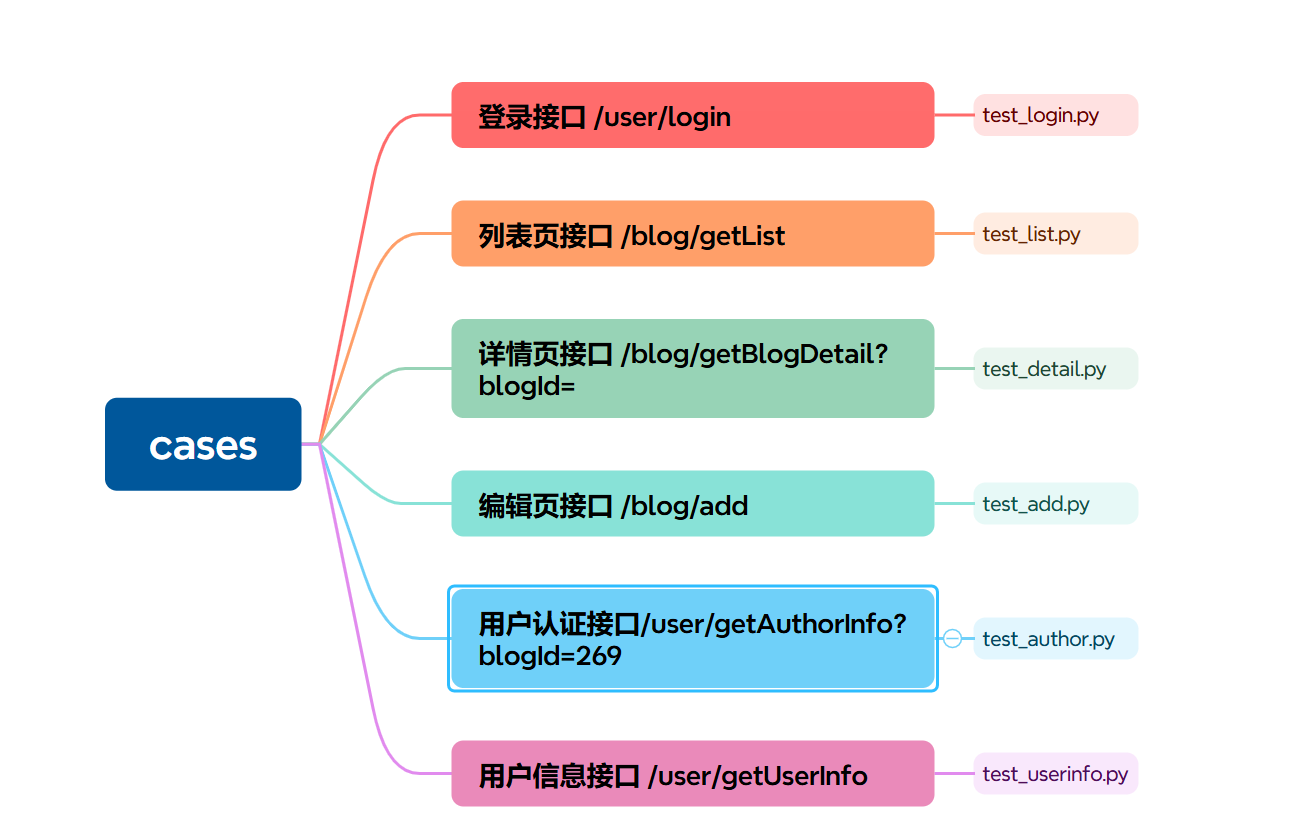
- 覆盖核心业务接口(登录、博客增删改查)
- 支持数据驱动,减少重复代码
- 生成可视化测试报告
- 日志完整,方便定位问题
- 结构清晰,方便后续维护和扩展
二、框架整体架构设计
1. 技术选型
- 语言 / 框架:Python + Pytest(测试框架)
- 核心模块 :
- requests: 发送 HTTP 请求
- PyYAML: 读取 / 写入测试数据和配置
- jsonschema: 响应数据格式校验
- allure-pytest:生成可视化测试报告
- logging: 日志记录
- 开发工具:PyCharm
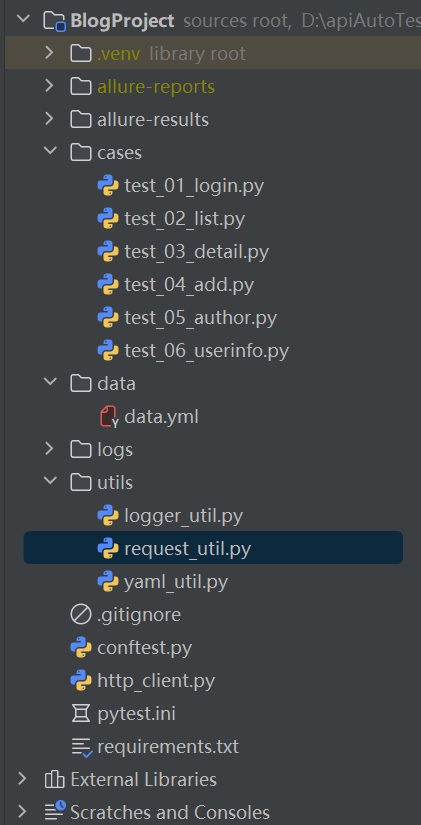
2. 项目目录结构
三、核心模块封装(工具类实现)
1. 请求封装:统一处理 GET/POST 请求
最底层的封装get/post请求 utils/request_util.py
python
import requests
from utils.logger_util import Logger

class Request:
    log = Logger.getlog()

    def get(self, url, **kwargs):
        self.log.info(f"【GET请求】{url}")
        self.log.info(f"请求参数:{kwargs}")
        resp = requests.get(url=url,** kwargs)
        self.log.info(f"响应状态码:{resp.status_code}")
        try:
            res_data = resp.json()
        except:
            res_data = resp.text
        self.log.info(f"响应内容:{res_data}")
        return resp

    def post(self, url,** kwargs):
        self.log.info(f"【POST请求】{url}")
        self.log.info(f"请求参数:{kwargs}")
        resp = requests.post(url=url,** kwargs)
        self.log.info(f"响应状态码:{resp.status_code}")
        try:
            res_data = resp.json()
        except:
            res_data = resp.text
        self.log.info(f"响应内容:{res_data}")
return resphttp_client.py对get/post请求的二次封装:
python
from utils.request_util import Request

class ApiClient:
    def __init__(self, base_url, global_headers=None):
        self.base_url = base_url
        self.global_headers = global_headers or {}
        self.token = None  # 👈 专门存 token
        self.req = Request()

    # 核心:不管什么头,都自动加上 token
    def _get_req_headers(self, kwargs):
        # 1. 拿到用户传的 headers 或者全局 headers
        if "headers" in kwargs:
            headers = kwargs.pop("headers")
            # 在这里直接返回headers,测试未登录时不加token
            return headers
        else:
            headers = dict(self.global_headers)

        # 2.只要有 token,就强制加进去(永远不丢)
        if self.token:
            headers["user_token_header"] = self.token

        # print(f"头文件中的内容为{headers}")
        return headers

    # 设置 token(登录后调用)
    def set_token(self, token):
        self.token = token

    # ------------------------------
    # 所有请求方法(不变)
    # ------------------------------
    def get(self, uri, **kwargs):
        url = f"{self.base_url}/{uri.lstrip('/')}"
        headers = self._get_req_headers(kwargs)
        return self.req.get(url, headers=headers, **kwargs)

    def post(self, uri, **kwargs):
        url = f"{self.base_url}/{uri.lstrip('/')}"
        headers = self._get_req_headers(kwargs)
        return self.req.post(url, headers=headers,**kwargs)

    def close(self):
        pass
2. YAML 工具类:读写测试数据
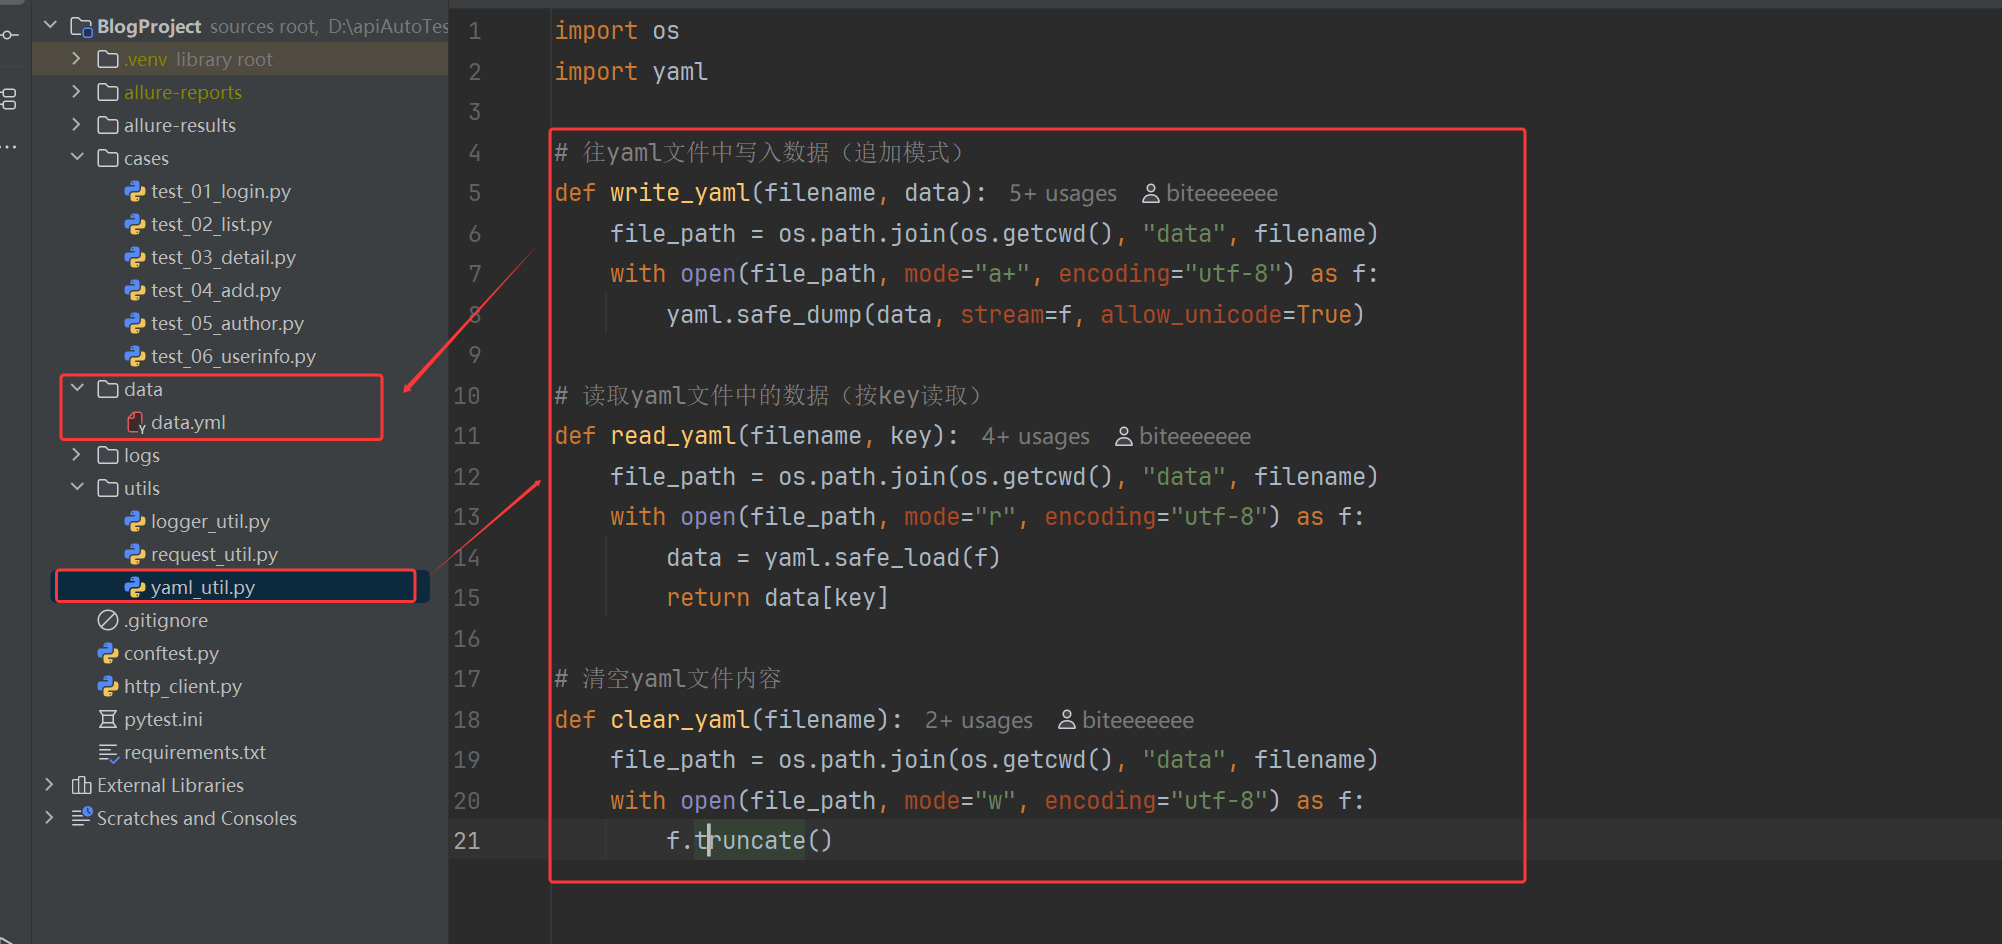
utils/yaml_util.py
python
import os
import yaml

# 往yaml文件中写入数据(追加模式)
def write_yaml(filename, data):
    file_path = os.path.join(os.getcwd(), "data", filename)
    with open(file_path, mode="a+", encoding="utf-8") as f:
        yaml.safe_dump(data, stream=f, allow_unicode=True)

# 读取yaml文件中的数据(按key读取)
def read_yaml(filename, key):
    file_path = os.path.join(os.getcwd(), "data", filename)
    with open(file_path, mode="r", encoding="utf-8") as f:
        data = yaml.safe_load(f)
        return data[key]

# 清空yaml文件内容
def clear_yaml(filename):
    file_path = os.path.join(os.getcwd(), "data", filename)
    with open(file_path, mode="w", encoding="utf-8") as f:
        f.truncate()
存储的yanl数据文件位置
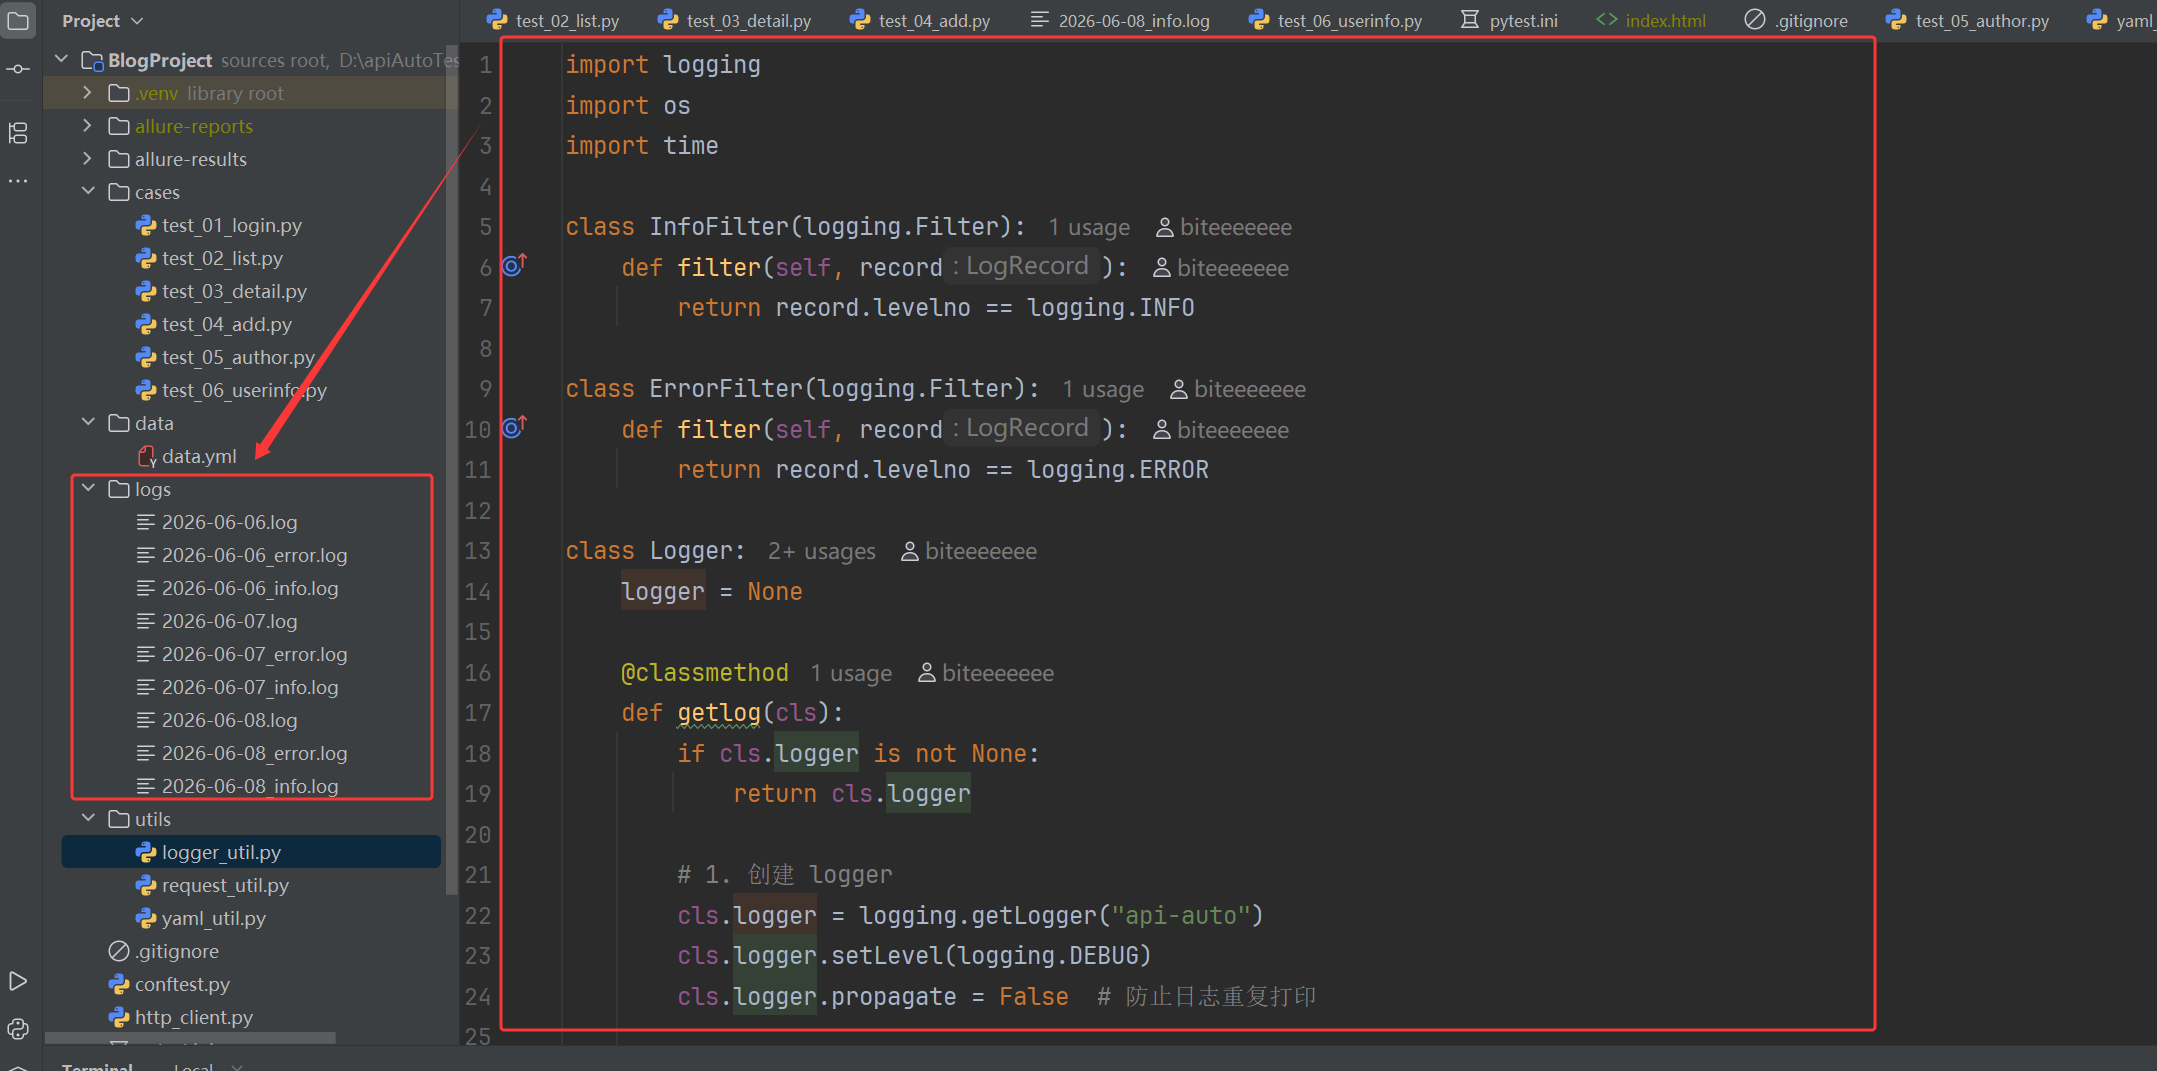
3. 日志工具类:按天分割日志,区分 INFO/ERROR
utils/logger_util.py
python
import logging
import os
import time

class InfoFilter(logging.Filter):
    def filter(self, record):
        return record.levelno == logging.INFO

class ErrorFilter(logging.Filter):
    def filter(self, record):
        return record.levelno == logging.ERROR

class Logger:
    logger = None

    @classmethod
    def getlog(cls):
        if cls.logger is not None:
            return cls.logger

        # 1. 创建 logger
        cls.logger = logging.getLogger("api-auto")
        cls.logger.setLevel(logging.DEBUG)
        cls.logger.propagate = False  # 防止日志重复打印

        # 2. 日志目录
        log_path = "./logs/"
        os.makedirs(log_path, exist_ok=True)

        # 3. 按天生成文件名
        today = time.strftime("%Y-%m-%d")
        all_file = os.path.join(log_path, f"{today}.log")
        info_file = os.path.join(log_path, f"{today}_info.log")
        err_file = os.path.join(log_path, f"{today}_error.log")

        # 4. 定义格式(你写的非常棒)
        formatter = logging.Formatter(
            "%(asctime)s %(levelname)s [%(filename)s:%(lineno)d] %(message)s"
        )

        # 5. 处理器1:全部日志
        all_handler = logging.FileHandler(all_file, encoding="utf-8")
        all_handler.setFormatter(formatter)

        # 6. 处理器2:仅 info
        info_handler = logging.FileHandler(info_file, encoding="utf-8")
        info_handler.addFilter(InfoFilter())
        info_handler.setFormatter(formatter)

        # 7. 处理器3:仅 error
        err_handler = logging.FileHandler(err_file, encoding="utf-8")
        err_handler.addFilter(ErrorFilter())
        err_handler.setFormatter(formatter)

        # 8. 添加到 logger
        cls.logger.addHandler(all_handler)
        cls.logger.addHandler(info_handler)
        cls.logger.addHandler(err_handler)

        return cls.logger
日志文件存储在logs文件下
四、测试用例编写(登录接口实战)

以登录接口为例
1:整体归到登录模块并设置执行顺序优先运行
2:定义接口地址和通用响应格式的 JSON 校验规则
3:利用参数化批量编写各类登录失败场景,包含账号密码错误、账号或密码为空等多种异常情况:
4:以表单形式发送请求后,通过 JSON Schema 校验返回结构,并断言响应状态码和错误提示与预期一致;
5:编写登录成功用例,使用两组正确账号密码发起请求,通过专属的 JSON Schema 严格校验成功响应的字段内容与 JWT 令牌格式,确认登录成功后,将获取到的令牌设置到请求客户端并写入 YAML 文件保存,供后续接口调用使用。
cases/test_login.py
python
import allure
import pytest
from jsonschema.validators import validate

from utils.yaml_util import write_yaml, clear_yaml


@allure.feature("登录模块")
@pytest.mark.order(order=1)
class TestLogin:
    url = "/user/login"
    login_schema = {
        "type": "object",
        "required": ["code", "errMsg", "data"],
        "additionalProperties": False,  # 不允许多出字段
        "properties": {
            "code": {
                "type": "string",
            },
            "errMsg": {
                "type": "string"
            },
            "data": {
                "type": ["string", "null"],
            }
        }
    }

    # 异常登录
    @allure.story("登录失败 - 错误用户名密码")
    @pytest.mark.parametrize("login", [
        # 错误的账号,错误的密码
        {
            "username": "zhangsa",
            "password": "12345",
            "errMsg": "用户不存在"
        },
        # 错误的账号,正确的密码
        {
            "username": "lis",
            "password": "123456",
            "errMsg": "用户不存在"
        },
        # 正确的账号,错误的密码
        {
            "username": "lisi",
            "password": "12345",
            "errMsg": "密码错误"
        },
        # 不存在的账号
        {
            "username": "",
            "password": "123456",
            "errMsg": "账号或密码不能为空",
        },
        # 密码为空
        {
            "username": "lis",
            "password": "",
            "errMsg": "账号或密码不能为空",
        },
        # 账号为空
        {
            "username": "",
            "password": "",
            "errMsg": "账号或密码不能为空",
        },
    ])
    def test_login_fail(self, api_client,login):
        temp_header = {"Content-Type": "application/x-www-form-urlencoded; charset=UTF-8"}
        resp = (api_client.post(
            self.url,
            data={"username": login["username"], "password": login["password"]},
            headers=temp_header
        ))
        resp_json = resp.json()
        # 断言
        validate(instance=resp_json, schema=self.login_schema)
        assert resp_json["code"] == "FAIL"
        assert resp_json["errMsg"] == login["errMsg"]


    # 正常登录
    @allure.story("登录成功 - 正确用户名密码")
    @pytest.mark.parametrize("login", [
        {
            "username": "zhangsan",
            "password": "123456",
        },
        {
            "username": "lisi",
            "password": "123456",
        }
    ])
    def test_login_success(self, api_client,login):
        temp_header = {"Content-Type": "application/x-www-form-urlencoded; charset=UTF-8"}
        resp = (api_client.post(
            self.url,
            data={"username": login["username"], "password": login["password"]},
            headers=temp_header
        ))
        login_success_schema = {
            "type": "object",
            "required": ["code", "errMsg", "data"],
            "additionalProperties": False,  # 不允许多余字段
            "properties": {
                "code": {
                    "type": "string",
                    "const": "SUCCESS"
                },
                "errMsg": {
                    "type": "string",
                    "const": ""
                },
                "data": {
                    "type": "string",
                    # JWT正则:三段base64url字符,点分割
                    "pattern": r"^[A-Za-z0-9_\-]+\.[A-Za-z0-9_\-]+\.[A-Za-z0-9_\-]+$"
                }
            }
        }
        resp_json = resp.json()
        # 断言
        validate(instance=resp_json, schema=login_success_schema)
        assert resp_json["code"] == "SUCCESS"
        api_client.set_token(resp_json["data"])
        token = {
            "user_token_header": resp_json["data"]
        }
        clear_yaml("data.yml")
        write_yaml("data.yml", token)
列表页接口
整体归到列表模块并设置执行顺序第二运行
先定义接口地址和通用响应格式的 JSON 校验规则
接着利用参数化批量编写各类获取列表失败的异常场景,包含未登录、无效 token、空 token 等多种异常情况,以 GET 形式发送请求后,通过 JSON Schema 校验返回结构,并断言响应状态码和错误提示与预期一致;
同时编写正常获取列表的成功用例,分别使用 GET、POST 两种请求方式发起请求,通过专属的 JSON Schema 严格校验成功响应的字段内容与数组数据格式
确认获取成功后,将返回列表中的第一条博客 ID 提取并写入 YAML 文件保存,供后续详情接口调用使用。
python
import allure
import pytest
from jsonschema.validators import validate

from utils.yaml_util import write_yaml


@allure.feature("列表模块")
@pytest.mark.order(order=2)
class TestList:
    url = "/blog/getList"
    json_schema = {
      "type": "object",
      "required": ["code", "errMsg", "data"],
        "additionalProperties": False,
      "properties": {
        "code": { "type": "string" },
        "errMsg": { "type": "string" },
        "data": {
          "type": "array",
            "minItems": 1,
          "items": {
            "type": "object",
            "required": [
              "id", "title", "content", "userId",
              "deleteFlag", "createTime", "updateTime", "loginUser"
            ],
              "additionalProperties": False,
            "properties": {
              "id": { "type": "integer" },
              "title": { "type": "string" },
              "content": { "type": "string" },
              "userId": { "type": "integer" },
              "deleteFlag": { "type": "integer" },
              "createTime": { "type": "string" },
              "updateTime": { "type": "string" },
              "loginUser": { "type": "boolean" }
            }
          }
        }
      }
    }
    # 正常登录状态下get访问
    @allure.story("get获取列表成功")
    def test_list_get(self, api_client):
        resp = api_client.get(self.url)
        resp_json = resp.json()
        # 断言
        validate(instance=resp_json, schema=self.json_schema)
        assert resp_json["code"] == "SUCCESS"

        # 提取有效的blogID信息存储在yaml文件中,在下一个test_03_detail.py文件中使用
        blogId={
            "blogId": resp_json["data"][0]["id"],
        }
        write_yaml("data.yml", blogId)


    # 正常登录状态下post访问
    @allure.story("post获取列表")
    def test_list_post(self, api_client):
        resp = api_client.post(self.url)
        resp_json = resp.json()
        # 断言
        validate(instance=resp_json, schema=self.json_schema)
        assert resp_json["code"] == "SUCCESS"


    # 未登录状态下get访问
    @allure.story("登录状态下get访问获取列表")
    def test_list_unauthorized_post(self, api_client):
        temp_header = {"user_token_header": ""}
        resp = api_client.get(self.url,headers=temp_header)
        # 断言
        assert resp.status_code == 401
五、执行用例与测试报告
1. 安装依赖
先把项目需要的依赖写入requirements.txt:
python
allure-pytest==2.13.5
allure-python-commons==2.13.5
attrs==26.1.0
certifi==2026.5.20
charset-normalizer==3.4.7
colorama==0.4.6
coverage==7.14.1
exceptiongroup==1.3.1
idna==3.18
iniconfig==2.3.0
Jinja2==3.1.6
jsonschema==4.23.0
jsonschema-specifications==2025.9.1
MarkupSafe==3.0.3
packaging==26.2
pluggy==1.6.0
pytest==8.3.2
pytest-cov==5.0.0
pytest-html==4.1.1
pytest-metadata==3.1.1
pytest-order==1.3.0
pytest-rerunfailures==16.3
python-dotenv==1.1.1
PyYAML==6.0.1
referencing==0.37.0
requests==2.31.0
rpds-py==0.30.0
tomli==2.4.1
typing_extensions==4.15.0
urllib3==2.7.0pip install -r requirements.txt2. 配置pytest.ini并执行测试用例
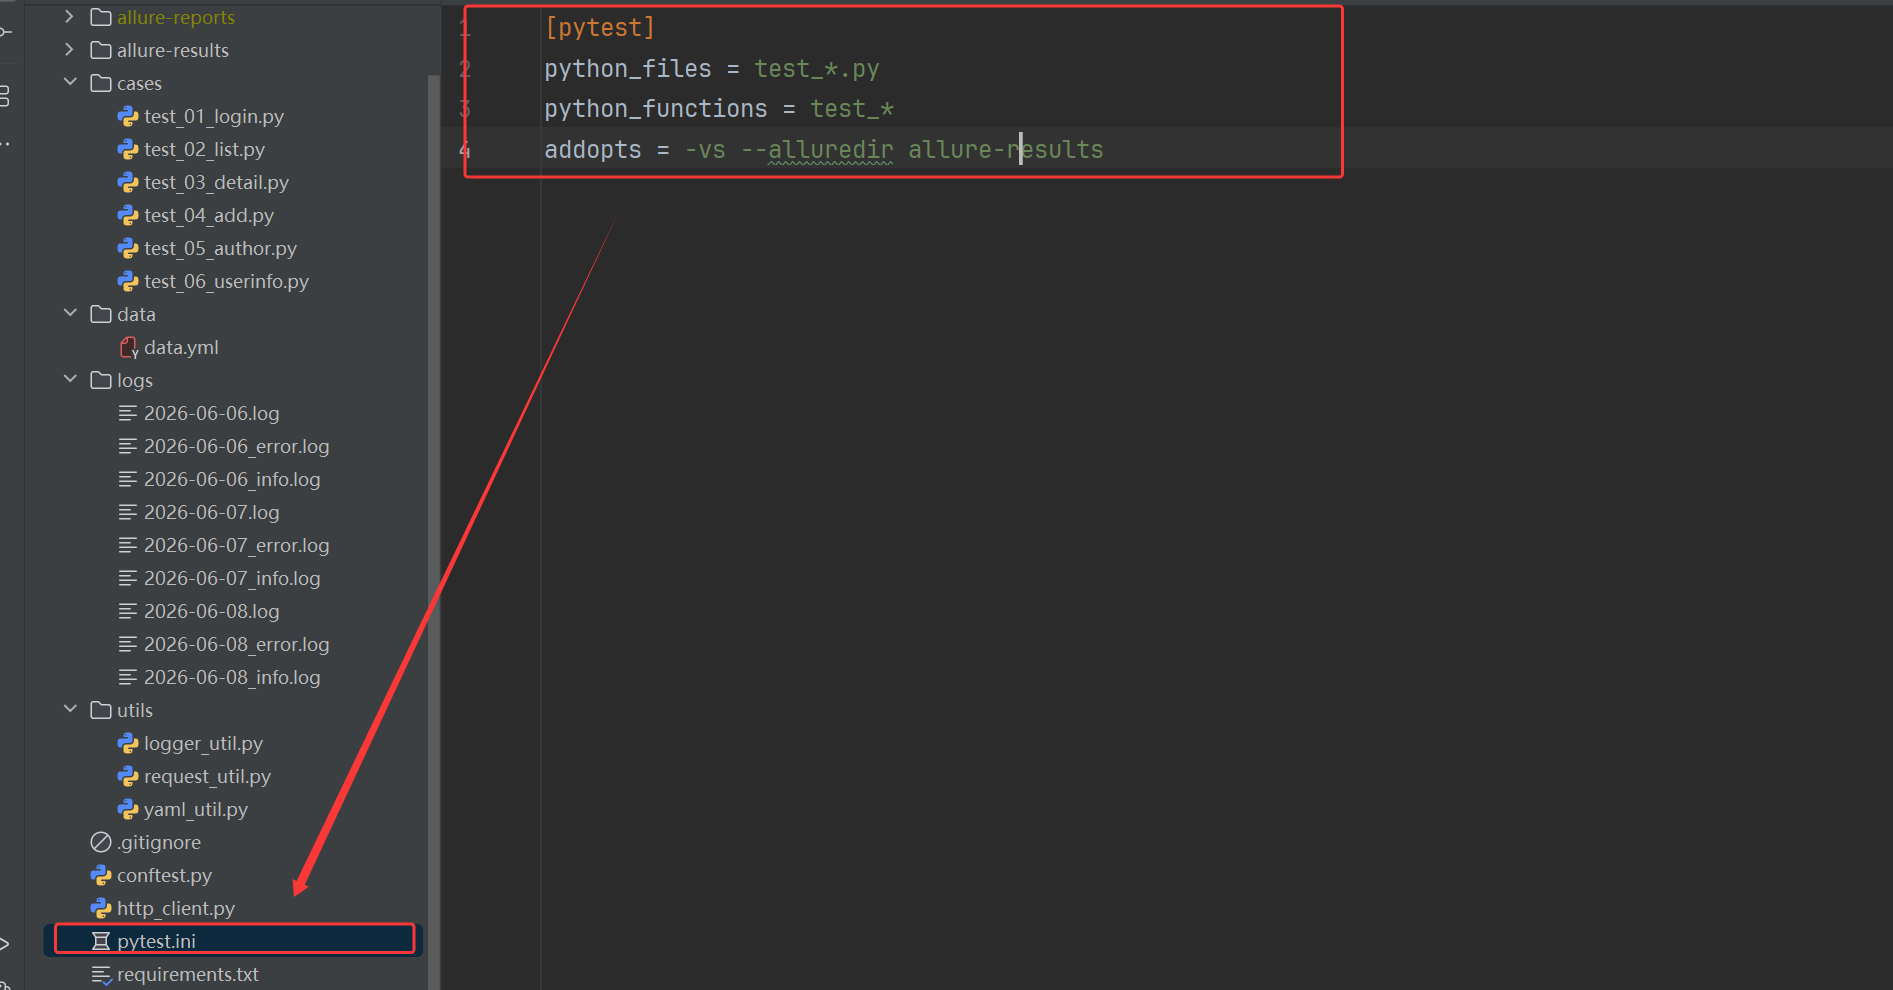
python
[pytest]
python_files = test_*.py
python_functions = test_*
addopts = -vs --alluredir allure-results
python
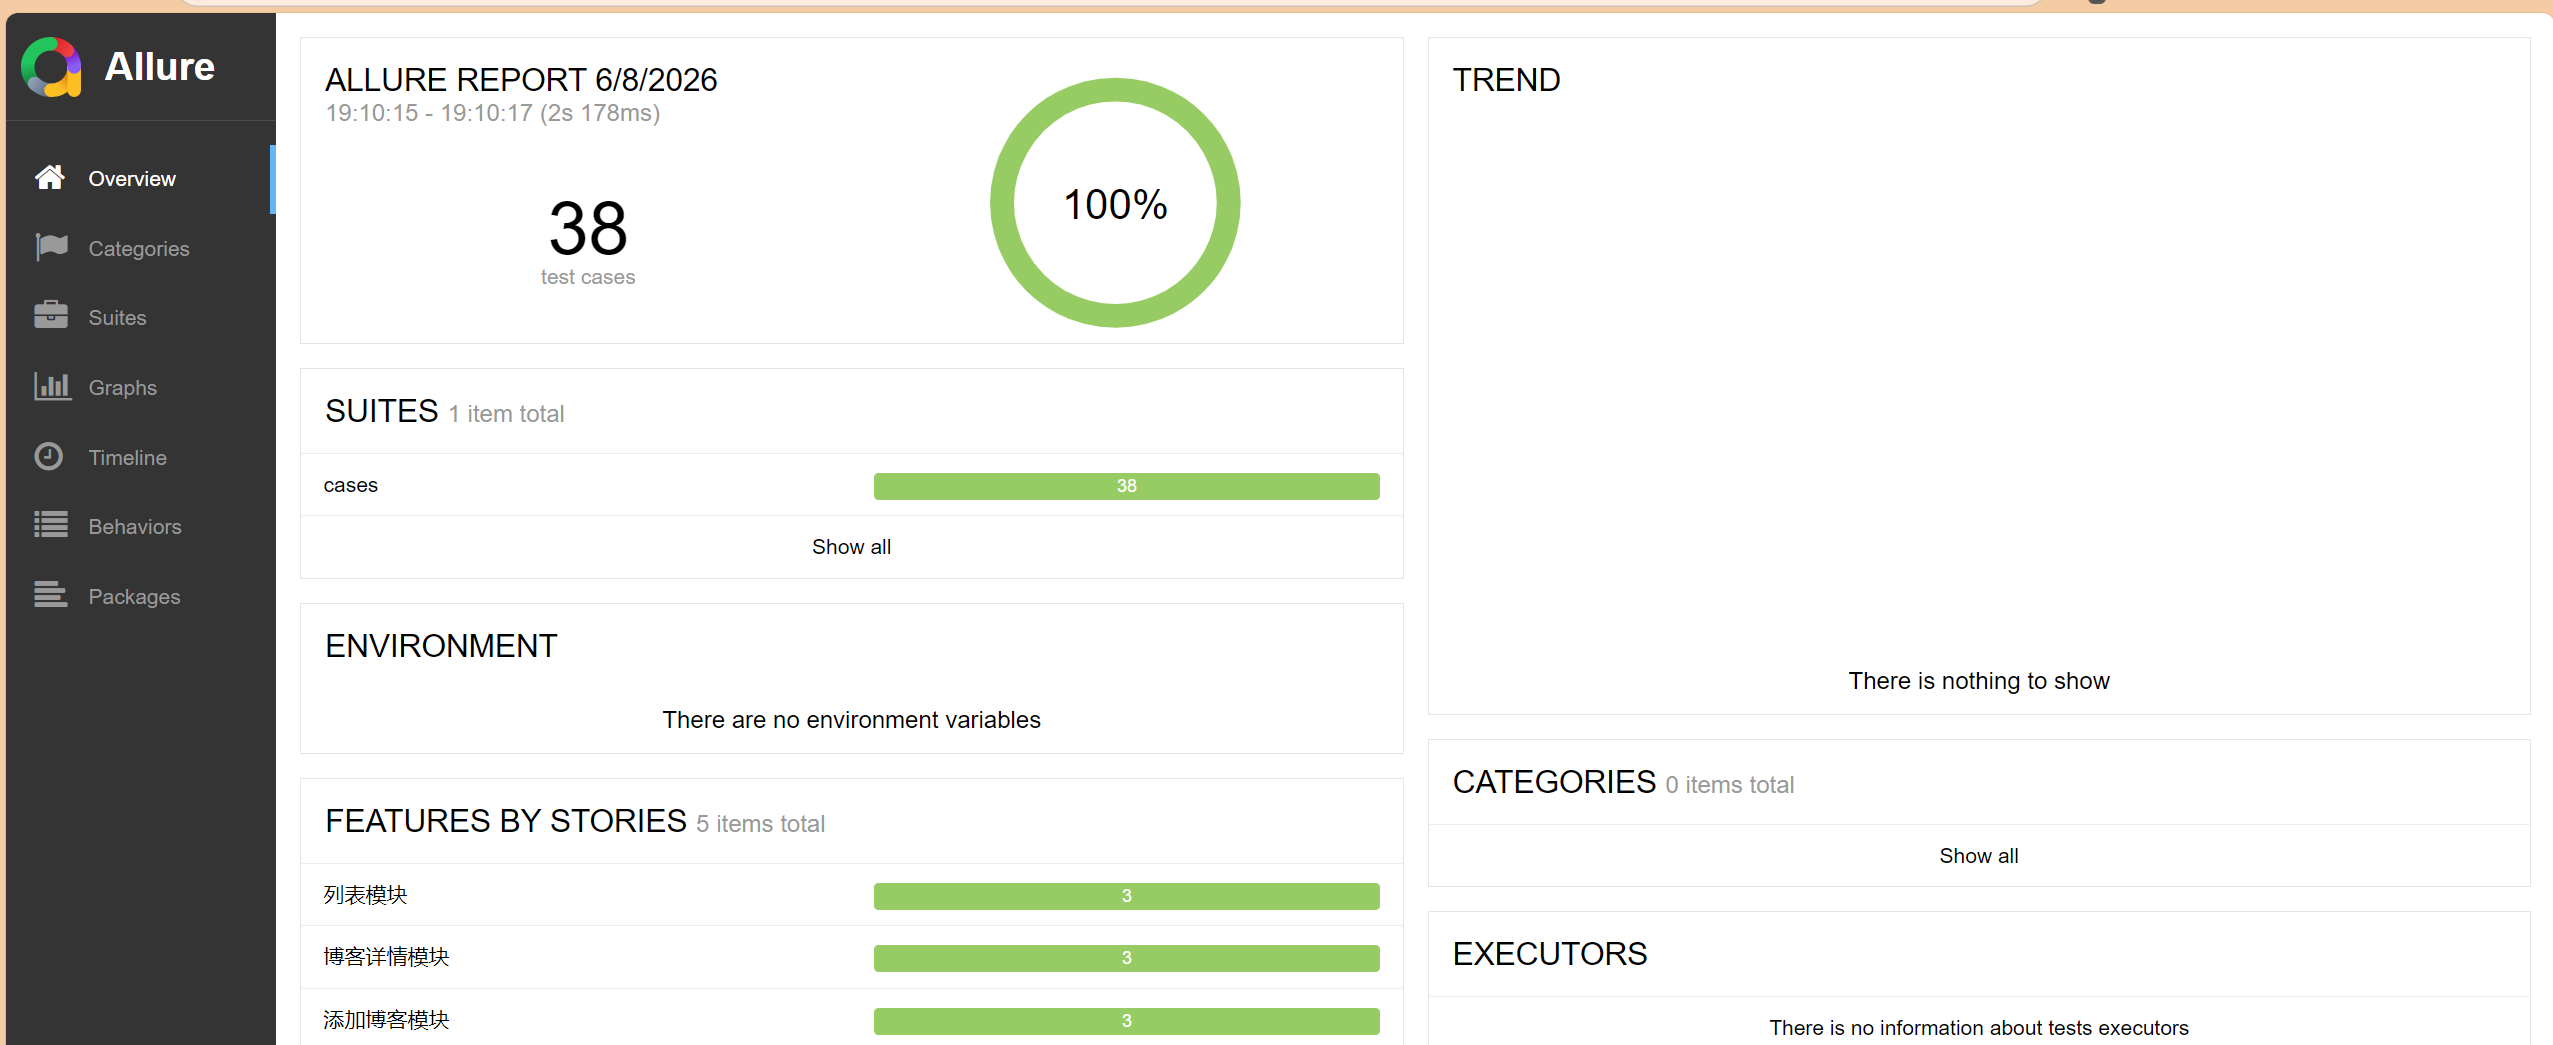
pytest3. 生成 Allure 报告 与 静态报告
python
allure serve allure-results
allure generate .\allure-results\ -o .\allure-reports\ --clean
生成的报告可以清晰看到用例执行结果、通过率、失败用例详情,还能按功能模块分组查看,非常适合测试结果分析。
六、踩坑记录与优化方向
1. 踩过的坑
一是 YAML 文件写入乱序与重复数据问题,最初使用 mode="a" 追加写入时,会出现字段乱序和数据重复的情况,影响后续接口读取,后来改为先清空文件再写入,并使用 safe_dump 严格控制格式,保证了 YAML 数据结构稳定、不重复、不乱序;
二是 用例执行顺序问题,由于新增、列表、详情等接口都依赖登录返回的 token,必须保证登录用例优先执行,我通过 pytest-order 插件指定用例执行顺序,确保了业务流程的依赖关系;
三是 明确了 requests 中 json、data、params 三种传参方式的用法与区别,其中 json 用于传递 JSON 格式请求体,对应 Content-Type 为 application/json,data 用于传递表单格式数据,对应 form 表单提交,params 用于在 URL 后拼接查询参数,我根据接口实际要求选择正确传参方式,确保请求能被后端正常解析。
2. 后续优化方向
- 增加配置文件管理不同环境(测试 / 预发 / 生产)的 host 和端口
- 封装公共的断言方法,减少重复代码
- 增加接口依赖处理,比如登录 token 自动传递给后续接口
- 接入 CI/CD,每次代码提交自动执行接口测试
- 增加更多业务接口用例,覆盖博客发布、编辑、删除、点赞等场景