
图像轮廓检测与分析
在图像分析与机器视觉中,轮廓检测是物体识别、目标分割、形状分析的基础步骤。
它能从二值图像中提取出连通区域的边界,帮助我们定位物体、计算面积、判断形状,广泛应用于工业检测、文档处理、智能监控等场景。。
轮廓检测核心原理
1. 什么是轮廓?
在图像中,轮廓是指由一系列连续的边缘点构成的闭合曲线,它定义了物体的边界。轮廓检测的目标,就是从二值图像(黑白图)中找出这些闭合曲线。
2. 轮廓检测的前提:二值图像
轮廓检测算法需要黑白分明的二值图像作为输入:
- 前景物体:白色(像素值 255)
- 背景:黑色(像素值 0)
在本文的 Android 项目中,我们会自动将输入的彩色图片转为灰度图,再通过阈值化处理得到二值图像,为轮廓检测做准备。
3. 轮廓检测的核心算法:边界跟踪
OpenCV 的 findContours 函数采用了经典的边界跟踪算法,步骤如下:
- 扫描图像:从左到右、从上到下遍历图像,寻找第一个非零像素点(即物体边界起点);
- 跟踪边界:从起点开始,沿着边界顺时针或逆时针行走,记录下所有边界像素点,形成一条轮廓;
- 标记已处理像素:在跟踪过程中,标记已访问的边界像素,避免重复处理;
- 重复步骤:继续扫描图像,寻找下一个未被标记的边界起点,直到所有物体轮廓都被提取完成。
4. 轮廓的层次结构
图像中的轮廓可能存在嵌套关系,例如一个物体内部有孔洞,孔洞内部还有其他物体。OpenCV 提供了多种轮廓检索模式来处理这种层次结构:
RETR_EXTERNAL:只检测最外层轮廓,忽略内部的孔洞和嵌套轮廓;RETR_LIST:检测所有轮廓,不建立层次关系,仅按列表存储;RETR_CCOMP:检测所有轮廓,并建立两层层次结构(外层轮廓与孔洞轮廓);RETR_TREE:检测所有轮廓,并建立完整的树状层次结构,包含父子关系。
5. 轮廓近似方法
轮廓跟踪得到的边界点可能非常密集,OpenCV 提供了多种近似方法来简化轮廓:
CHAIN_APPROX_NONE:存储轮廓上的所有点,不做任何简化;CHAIN_APPROX_SIMPLE:仅存储轮廓的拐点,例如矩形轮廓只存储 4 个顶点,大幅减少点的数量;CHAIN_APPROX_TC89_L1/CHAIN_APPROX_TC89_KCOS:使用 Teh-Chin 链码近似算法,进一步优化轮廓点集。
OpenCV 核心 API 解析
1. cv::findContours:轮廓检测
这是 OpenCV 中实现轮廓检测的核心函数,从二值图像中提取连通区域的轮廓。
函数原型
cpp
void findContours(
    InputArray image,                          // 输入二值图像(CV_8UC1)
    OutputArrayOfArrays contours,             // 输出轮廓集合,每个轮廓为 std::vector<Point>
    OutputArray hierarchy,                    // 输出轮廓层次结构(可选,Vec4i 类型)
    int mode,                                  // 轮廓检索模式
    int method,                                // 轮廓近似方法
    Point offset = Point()                     // 轮廓点偏移量,默认 (0,0)
);
参数解读
image:必须为 8 位单通道二值图像,非零像素视为前景;contours:输出的轮廓集合,每个轮廓是一个std::vector<cv::Point>,存储轮廓上的所有点;hierarchy:可选参数,存储轮廓的层次关系,每个元素为Vec4i,包含下一个同级轮廓、上一个同级轮廓、第一个子轮廓、父轮廓的索引;mode:轮廓检索模式,前文已详细介绍;method:轮廓近似方法,前文已详细介绍。
2. cv::drawContours:绘制轮廓
该函数可以在图像上绘制检测到的轮廓,支持绘制全部轮廓或指定单个轮廓。
函数原型
cpp
void drawContours(
    InputOutputArray image,                   // 目标图像
    InputArrayOfArrays contours,             // 轮廓集合
    int contourIdx,                           // 要绘制的轮廓索引,-1 表示绘制所有轮廓
    const Scalar& color,                      // 轮廓颜色
    int thickness = 1,                        // 轮廓线宽,-1 表示填充轮廓内部
    int lineType = LINE_8,                    // 线条类型
    InputArray hierarchy = noArray(),        // 轮廓层次结构(可选)
    int maxLevel = INT_MAX,                   // 绘制轮廓的最大层次深度(可选)
    Point offset = Point()                    // 轮廓点偏移量(可选)
);
Android 完整工程实现
布局文件 activity_main.xml
页面分为原图展示区、二值化图像区、轮廓筛选图、轮廓绘制结果区,使用滚动布局适配大图预览:
xml
<?xml version="1.0" encoding="utf-8"?>
<ScrollView xmlns:android="http://schemas.android.com/apk/res/android"
android:layout_width="match_parent"
android:layout_height="match_parent"
android:background="#f5f5f5">
<LinearLayout
android:layout_width="match_parent"
android:layout_height="wrap_content"
android:orientation="vertical"
android:padding="10dp"
android:gap="10dp">
<!-- 原始图片展示 -->
<LinearLayout
android:layout_width="match_parent"
android:layout_height="wrap_content"
android:orientation="vertical">
<TextView
android:layout_width="wrap_content"
android:layout_height="wrap_content"
android:text="原始图片"
android:textSize="16sp"
android:textStyle="bold"/>
<ImageView
android:id="@+id/iv_origin"
android:layout_width="match_parent"
android:layout_height="220dp"
android:scaleType="fitCenter"
android:background="#ffffff"/>
</LinearLayout>
<!-- 二值化图像 -->
<LinearLayout
android:layout_width="match_parent"
android:layout_height="wrap_content"
android:orientation="vertical">
<TextView
android:layout_width="wrap_content"
android:layout_height="wrap_content"
android:text="二值化图像"
android:textSize="16sp"
android:textStyle="bold"/>
<ImageView
android:id="@+id/iv_binary"
android:layout_width="match_parent"
android:layout_height="220dp"
android:scaleType="fitCenter"
android:background="#ffffff"/>
</LinearLayout>
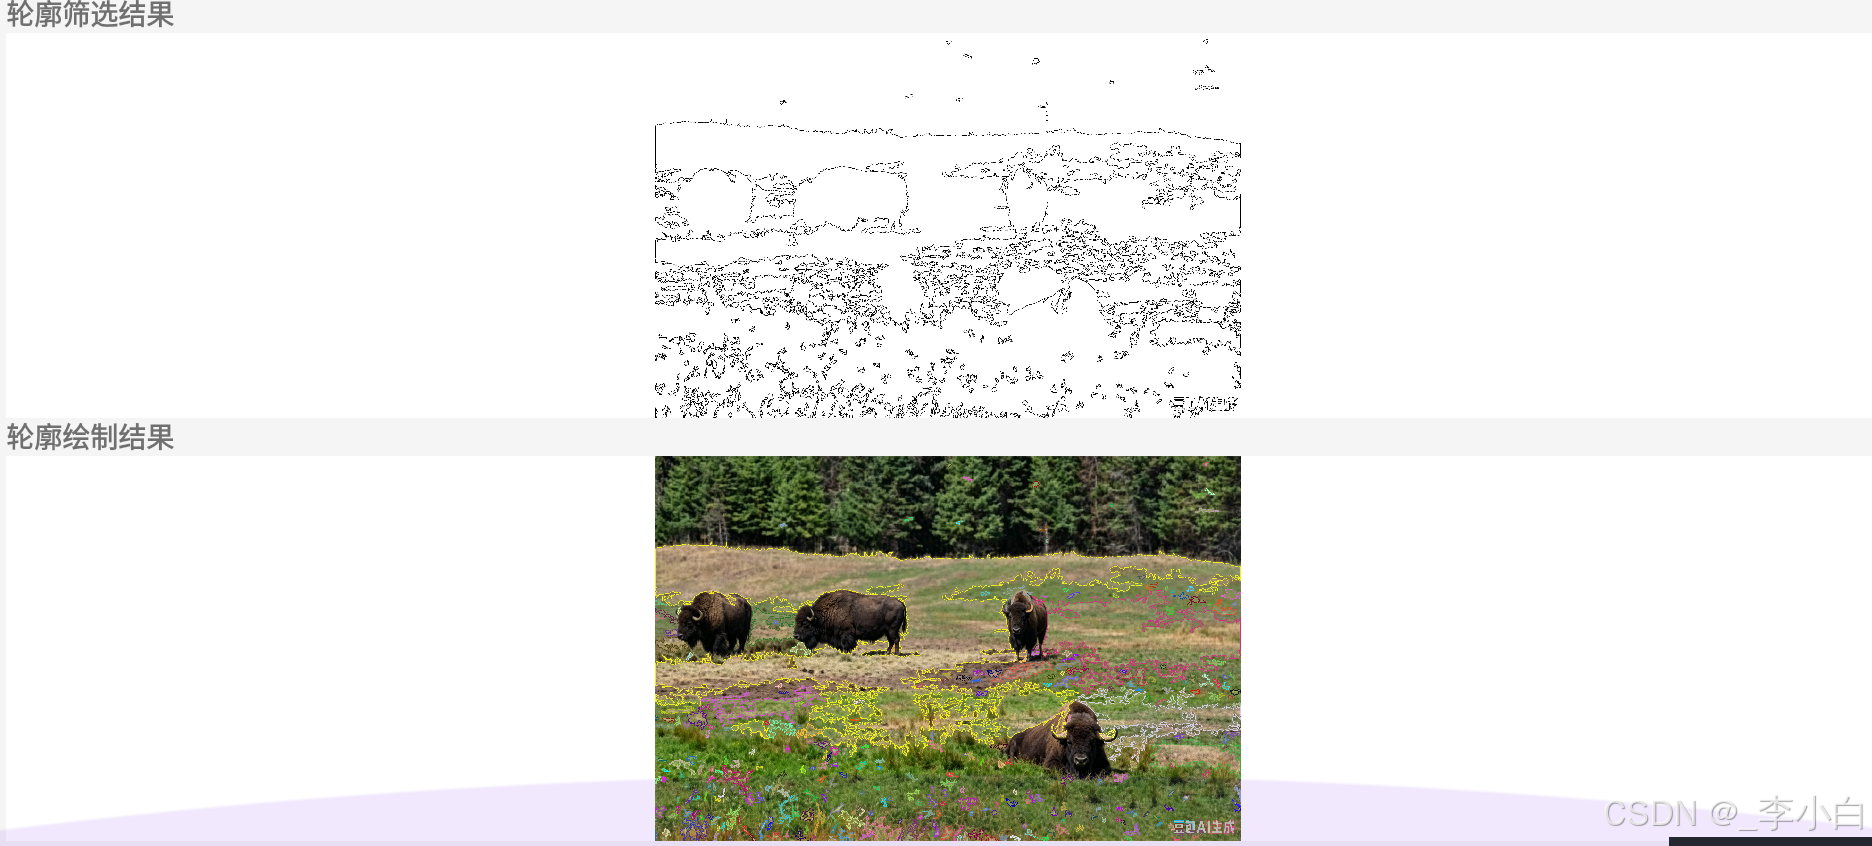
<!-- 轮廓筛选结果 -->
<LinearLayout
android:layout_width="match_parent"
android:layout_height="wrap_content"
android:orientation="vertical">
<TextView
android:layout_width="wrap_content"
android:layout_height="wrap_content"
android:text="轮廓筛选结果"
android:textSize="16sp"
android:textStyle="bold"/>
<ImageView
android:id="@+id/iv_contours_filtered"
android:layout_width="match_parent"
android:layout_height="220dp"
android:scaleType="fitCenter"
android:background="#ffffff"/>
</LinearLayout>
<!-- 轮廓绘制结果 -->
<LinearLayout
android:layout_width="match_parent"
android:layout_height="wrap_content"
android:orientation="vertical">
<TextView
android:layout_width="wrap_content"
android:layout_height="wrap_content"
android:text="轮廓绘制结果"
android:textSize="16sp"
android:textStyle="bold"/>
<ImageView
android:id="@+id/iv_contours"
android:layout_width="match_parent"
android:layout_height="220dp"
android:scaleType="fitCenter"
android:background="#ffffff"/>
</LinearLayout>
</LinearLayout>
</ScrollView>上层 Kotlin 代码 MainActivity.kt
负责加载本地图片、创建位图、调用 JNI 原生方法、展示结果。开发者只需将自己的 2048×2048 图片放入 res/drawable 目录,修改资源名即可使用:
kotlin
package com.example.contourdetect

import android.graphics.Bitmap
import android.graphics.BitmapFactory
import android.os.Bundle
import android.widget.ImageView
import androidx.appcompat.app.AppCompatActivity

class MainActivity : AppCompatActivity() {

    companion object {
        init {
            System.loadLibrary("native-lib")
        }
    }

    /**
     * JNI 原生方法:执行二值化 + 轮廓检测 + 筛选与绘制
     * @param srcBitmap 输入原图 Bitmap
     * @param outBinary 输出二值化图像 Bitmap
     * @param outContoursFiltered 输出轮廓筛选结果 Bitmap
     * @param outContours 输出轮廓绘制结果 Bitmap
     */
    private external fun processContourDetect(
        srcBitmap: Bitmap,
        outBinary: Bitmap,
        outContoursFiltered: Bitmap,
        outContours: Bitmap
    )

    override fun onCreate(savedInstanceState: Bundle?) {
        super.onCreate(savedInstanceState)
        setContentView(R.layout.activity_main)

        // ========== 1. 加载你自己的 2048*2048 图片 ==========
        val srcBitmap = BitmapFactory.decodeResource(resources, R.drawable.test_image)

        // 创建输出位图,尺寸与原图保持一致
        val binaryBitmap = Bitmap.createBitmap(srcBitmap.width, srcBitmap.height, Bitmap.Config.ARGB_8888)
        val contoursFilteredBitmap = Bitmap.createBitmap(srcBitmap.width, srcBitmap.height, Bitmap.Config.ARGB_8888)
        val contoursBitmap = Bitmap.createBitmap(srcBitmap.width, srcBitmap.height, Bitmap.Config.ARGB_8888)

        // ========== 2. 调用原生算法 ==========
        processContourDetect(srcBitmap, binaryBitmap, contoursFilteredBitmap, contoursBitmap)

        // ========== 3. 展示图片 ==========
        findViewById<ImageView>(R.id.iv_origin).setImageBitmap(srcBitmap)
        findViewById<ImageView>(R.id.iv_binary).setImageBitmap(binaryBitmap)
        findViewById<ImageView>(R.id.iv_contours_filtered).setImageBitmap(contoursFilteredBitmap)
        findViewById<ImageView>(R.id.iv_contours).setImageBitmap(contoursBitmap)
    }
}
底层 C++ JNI 代码 native-lib.cpp
核心逻辑:Bitmap 与 OpenCV Mat 互转、灰度化与二值化、轮廓检测、轮廓筛选与绘制,附带完整注释:
cpp
#include <jni.h>
#include <opencv2/opencv.hpp>
#include <android/bitmap.h>

using namespace cv;
using namespace std;

/**
 * Bitmap 转 OpenCV Mat
 * @param bitmap Android 上层传入的 Bitmap
 * @return 转换后的 BGR 格式 Mat
 */
Mat bitmapToMat(JNIEnv *env, jobject bitmap) {
    AndroidBitmapInfo info;
    void* pixels = nullptr;
    AndroidBitmap_getInfo(env, bitmap, &info);
    AndroidBitmap_lockPixels(env, bitmap, &pixels);

    Mat rgba(info.height, info.width, CV_8UC4, pixels);
    Mat bgr;
    cvtColor(rgba, bgr, COLOR_RGBA2BGR);
    AndroidBitmap_unlockPixels(env, bitmap);
    return bgr;
}

/**
 * OpenCV Mat 转 Bitmap,用于回传给 Android 上层展示
 * @param srcMat OpenCV 图像矩阵
 * @param dstBitmap 目标 Bitmap
 */
void matToBitmap(JNIEnv *env, const Mat& srcMat, jobject dstBitmap) {
    AndroidBitmapInfo info;
    void* pixels = nullptr;
    AndroidBitmap_getInfo(env, dstBitmap, &info);
    AndroidBitmap_lockPixels(env, dstBitmap, &pixels);

    Mat rgba;
    if (srcMat.channels() == 1) {
        cvtColor(srcMat, rgba, COLOR_GRAY2RGBA);
    } else {
        cvtColor(srcMat, rgba, COLOR_BGR2RGBA);
    }
    memcpy(pixels, rgba.data, info.width * info.height * 4);
    AndroidBitmap_unlockPixels(env, dstBitmap);
}

/**
 * 轮廓检测核心逻辑
 * @param srcBgr 输入彩色图像
 * @param outBinary 输出二值化图像
 * @param outContoursFiltered 输出轮廓筛选结果
 * @param outContours 输出轮廓绘制结果
 */
void contourDetectProcess(const Mat& srcBgr, Mat& outBinary, Mat& outContoursFiltered, Mat& outContours) {
    // 1. 转灰度图 + 二值化
    Mat srcGray;
    cvtColor(srcBgr, srcGray, COLOR_BGR2GRAY);
    threshold(srcGray, outBinary, 127, 255, THRESH_BINARY);

    // 2. 轮廓检测(仅检测外层轮廓,简化处理)
    vector<vector<Point>> contours;
    findContours(outBinary, contours, RETR_EXTERNAL, CHAIN_APPROX_SIMPLE);

    // 3. 轮廓筛选(过滤掉面积过小的噪声轮廓)
    vector<vector<Point>> filteredContours;
    const double minArea = 500.0; // 最小轮廓面积,可根据需求调整
    for (const auto& contour : contours) {
        if (contourArea(contour) >= minArea) {
            filteredContours.push_back(contour);
        }
    }

    // 4. 绘制筛选后的轮廓(在白色背景上绘制黑色轮廓)
    outContoursFiltered = Mat::ones(outBinary.size(), CV_8UC1) * 255;
    drawContours(outContoursFiltered, filteredContours, -1, Scalar(0), 2);

    // 5. 在原图上绘制彩色轮廓(不同轮廓使用不同颜色)
    outContours = srcBgr.clone();
    for (size_t i = 0; i < filteredContours.size(); i++) {
        Scalar color(rand() % 256, rand() % 256, rand() % 256);
        drawContours(outContours, filteredContours, i, color, 3);
    }
}

/**
 * JNI 入口函数:供 Kotlin 调用
 */
extern "C" JNIEXPORT void JNICALL
Java_com_example_contourdetect_MainActivity_processContourDetect(
        JNIEnv *env, jobject thiz,
        jobject srcBitmap,
        jobject outBinary,
        jobject outContoursFiltered,
        jobject outContours)
{
    // 1. Bitmap 转 Mat
    Mat srcBgr = bitmapToMat(env, srcBitmap);
    Mat matBinary, matContoursFiltered, matContours;

    // 2. 执行轮廓检测算法
    contourDetectProcess(srcBgr, matBinary, matContoursFiltered, matContours);

    // 3. 结果回转为 Bitmap,返回上层
    matToBitmap(env, matBinary, outBinary);
    matToBitmap(env, matContoursFiltered, outContoursFiltered);
    matToBitmap(env, matContours, outContours);
}
总结
- 算法核心 :轮廓检测通过边界跟踪算法从二值图像中提取物体边界,OpenCV 的
findContours函数支持多种检索模式和近似方法; - 工程流程:原图 → 灰度化 → 二值化 → 轮廓检测 → 轮廓筛选与绘制,解决噪声干扰和无效轮廓问题;
- 工程优势:本项目完全基于 Android NDK + OpenCV 实现,支持自定义大图输入,源码注释完整,可直接用于物体识别、形状分析、目标分割等项目集成;
- 拓展方向:可在此基础上实现轮廓面积与周长计算、轮廓外接矩形/最小外接圆拟合、轮廓匹配等功能,进一步拓展轮廓检测的应用场景。