一、整体布局
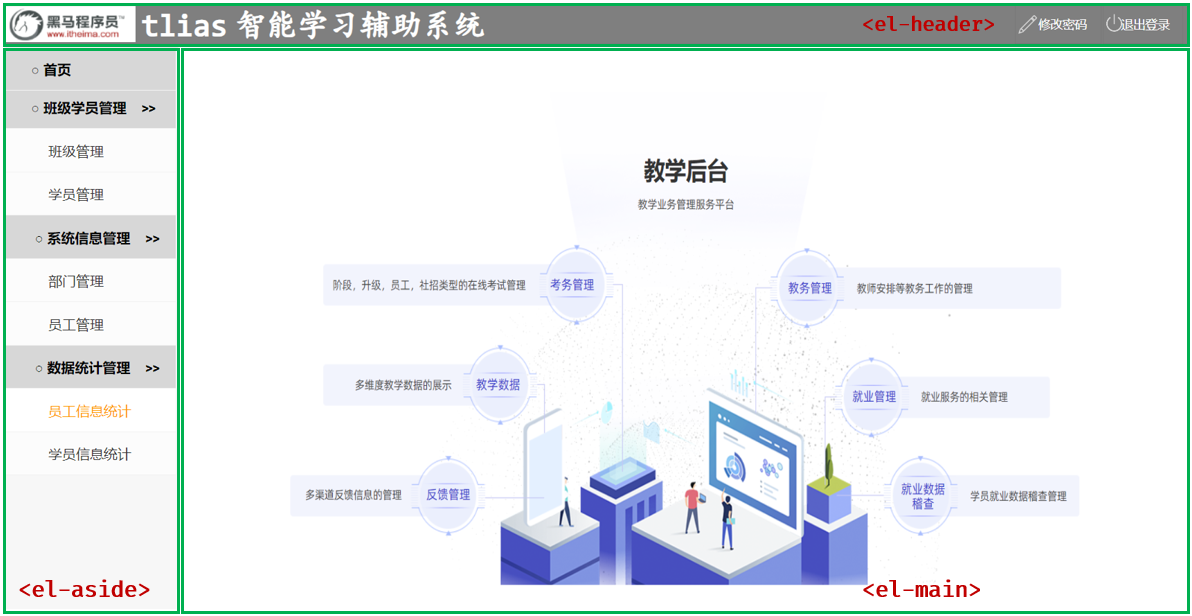
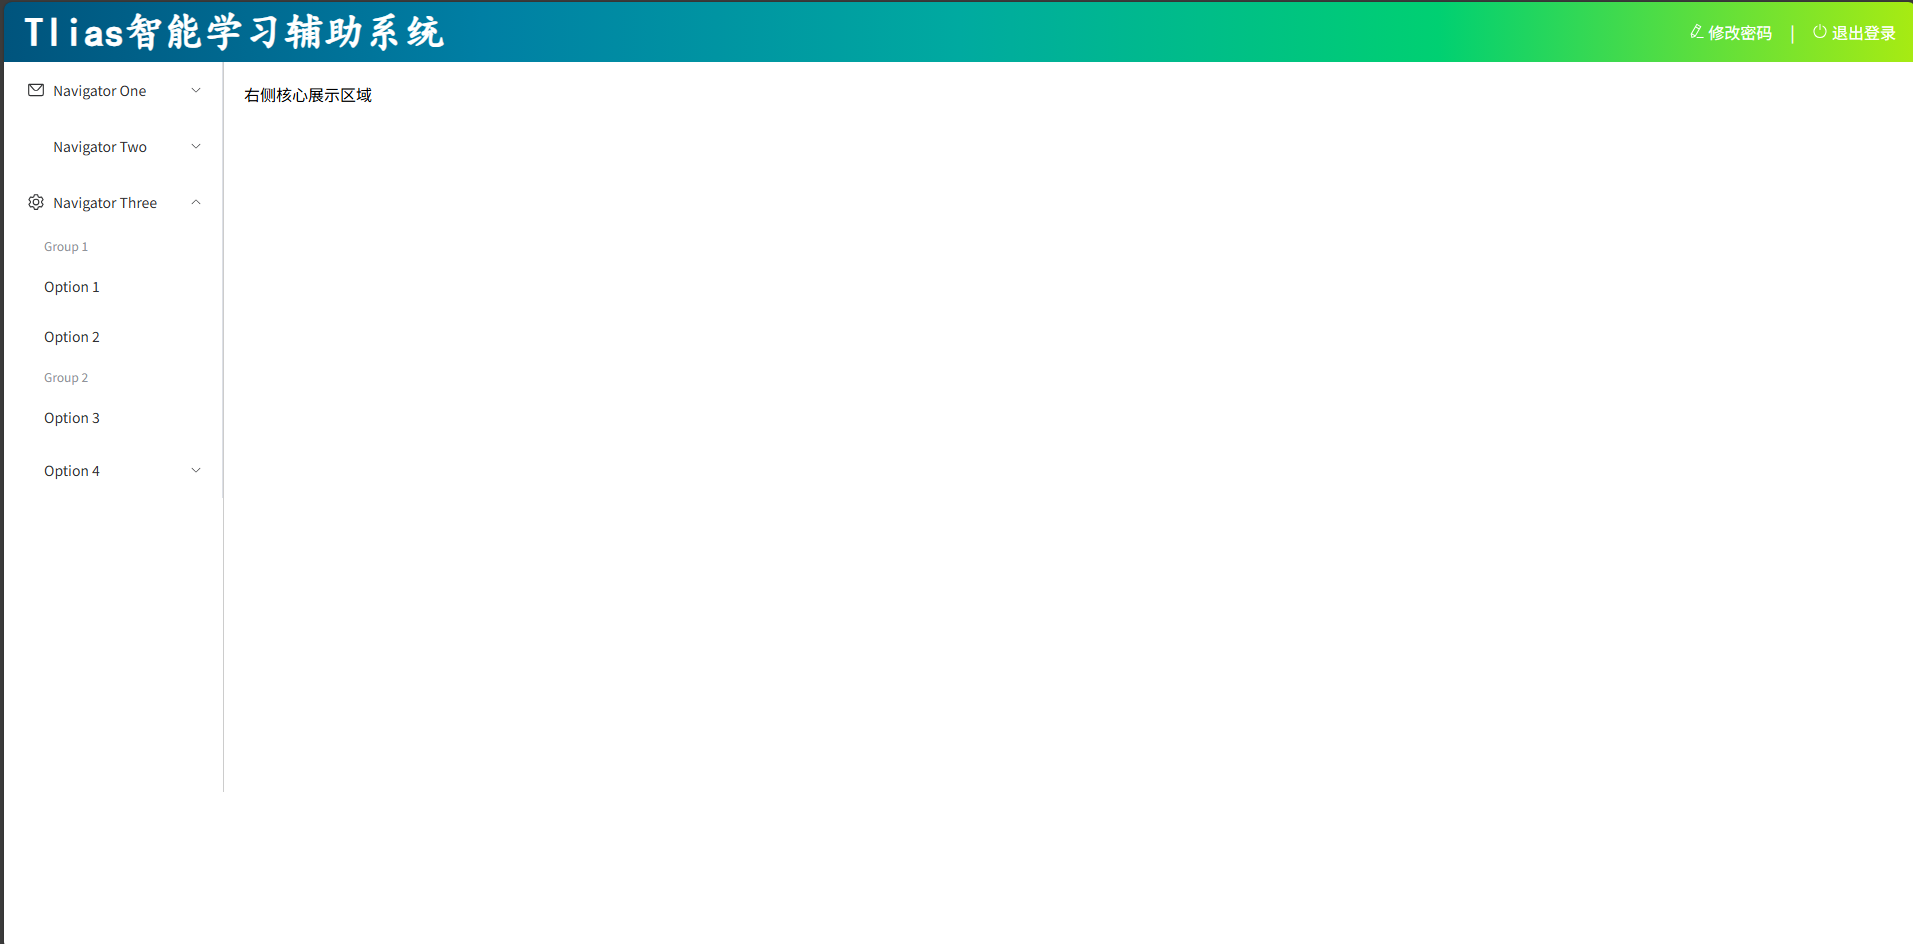
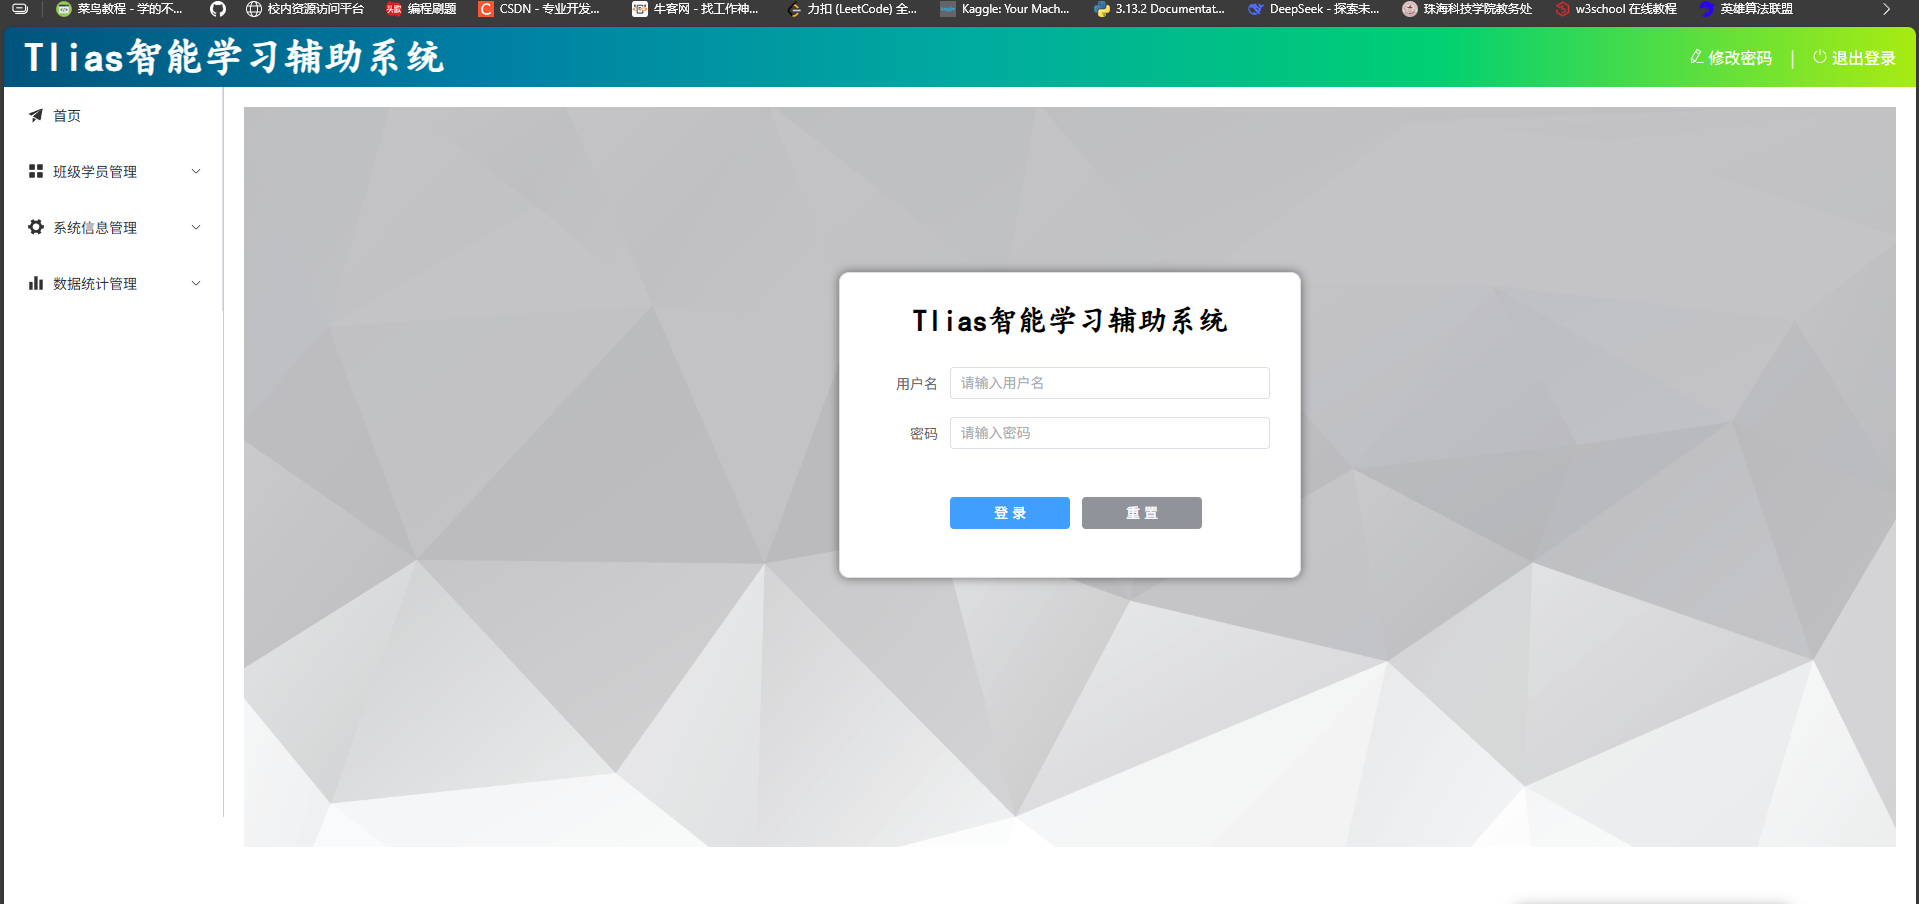
我们首先先确定目标,确认目标效果如下图所示。
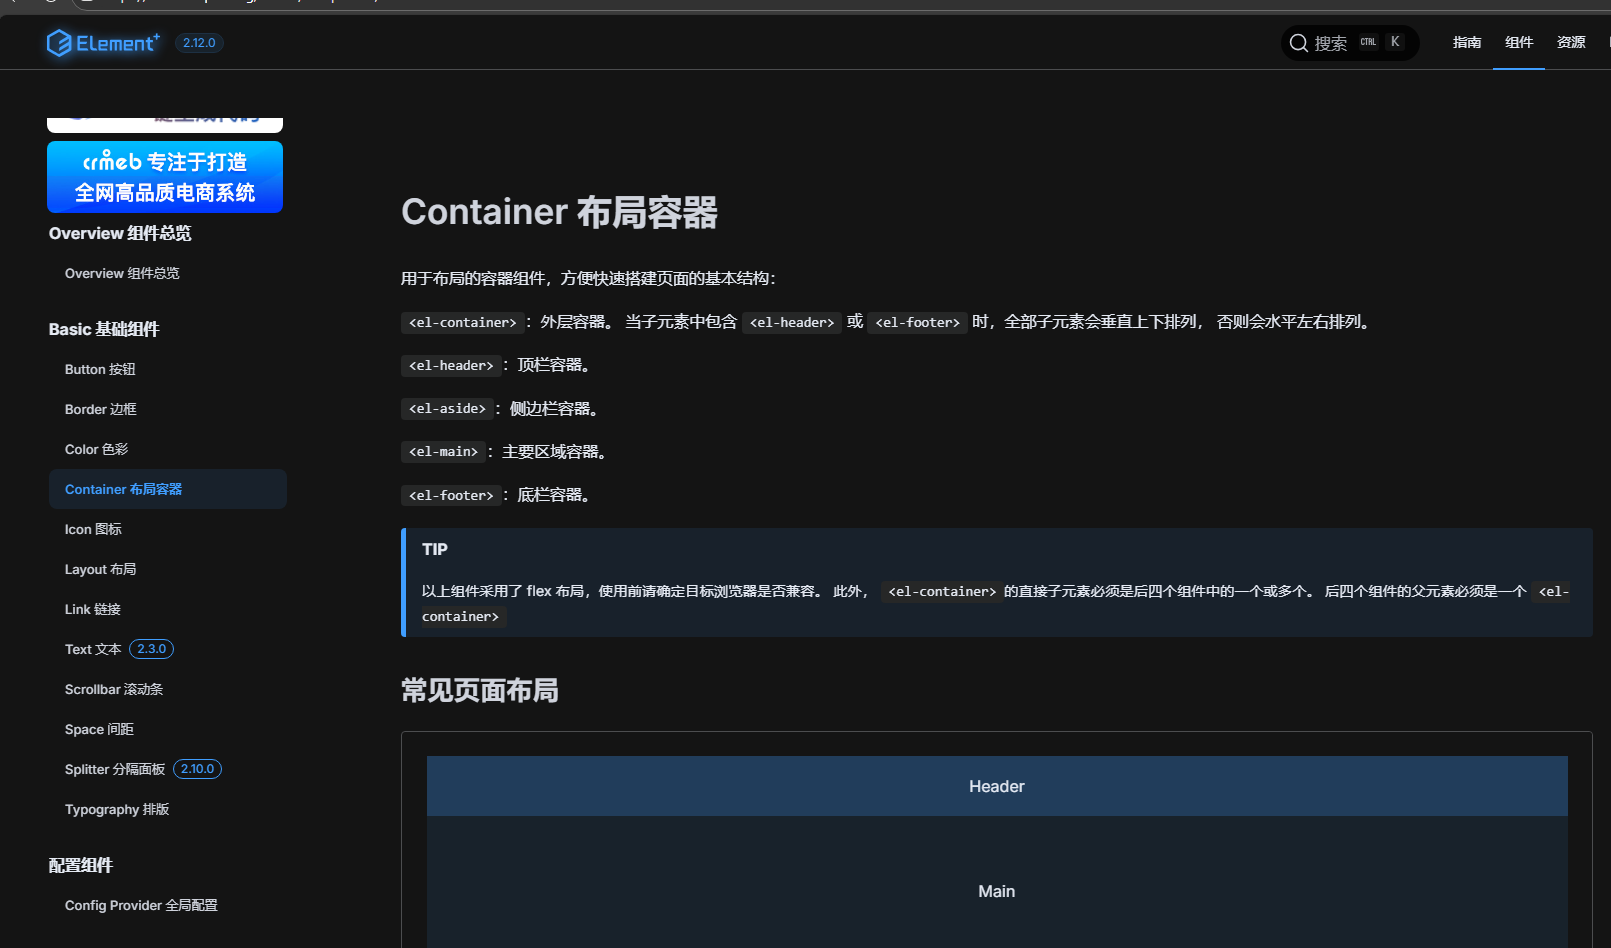
随后我们到Element官网寻找合适的布局,找到布局容器,阅读一下官方api大概了解一下每个标签的作用。
用于布局的容器组件,方便快速搭建页面的基本结构:
<el-container>:外层容器。 当子元素中包含 <el-header> 或 <el-footer> 时,全部子元素会垂直上下排列, 否则会水平左右排列。
<el-header>:顶栏容器。
<el-aside>:侧边栏容器。
<el-main>:主要区域容器。
<el-footer>:底栏容器。
随后往下划寻找心仪的布局,我们发现这个布局和我们的目标布局相符,于是我们可以将它复制到工程文件。
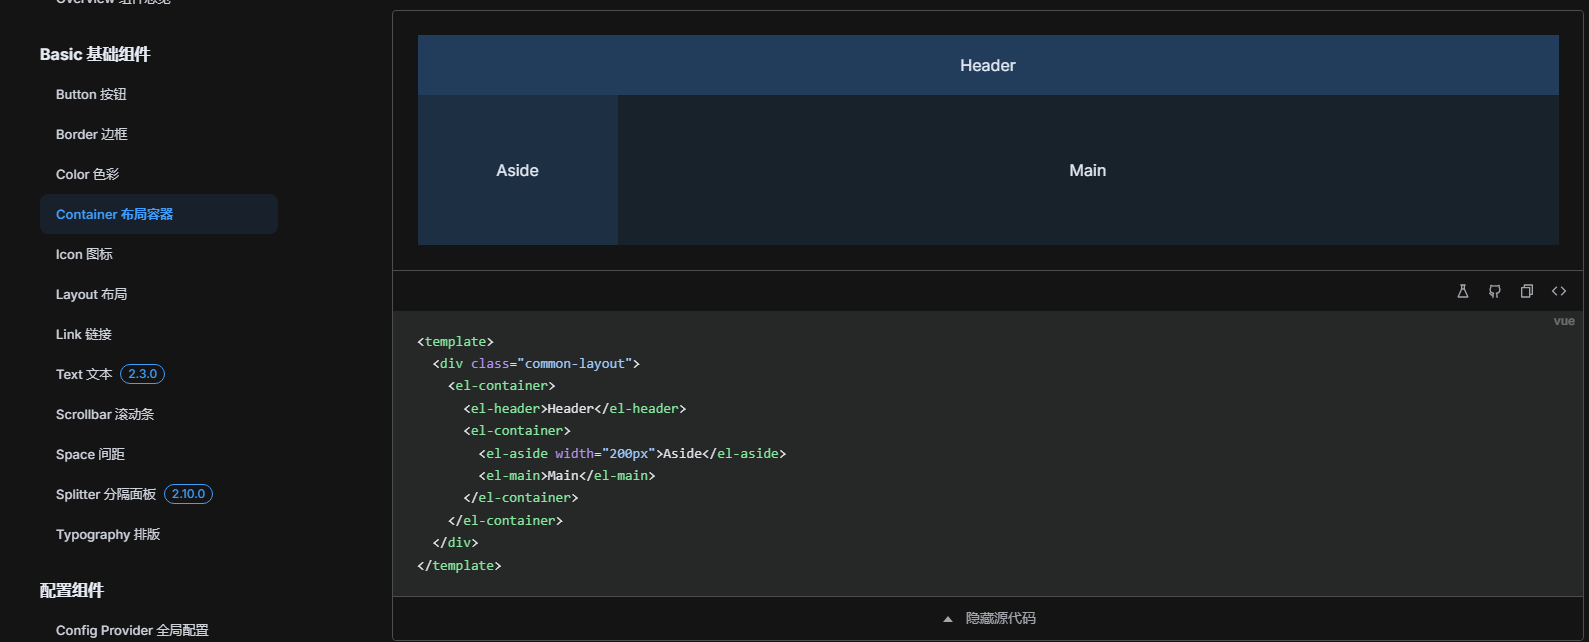
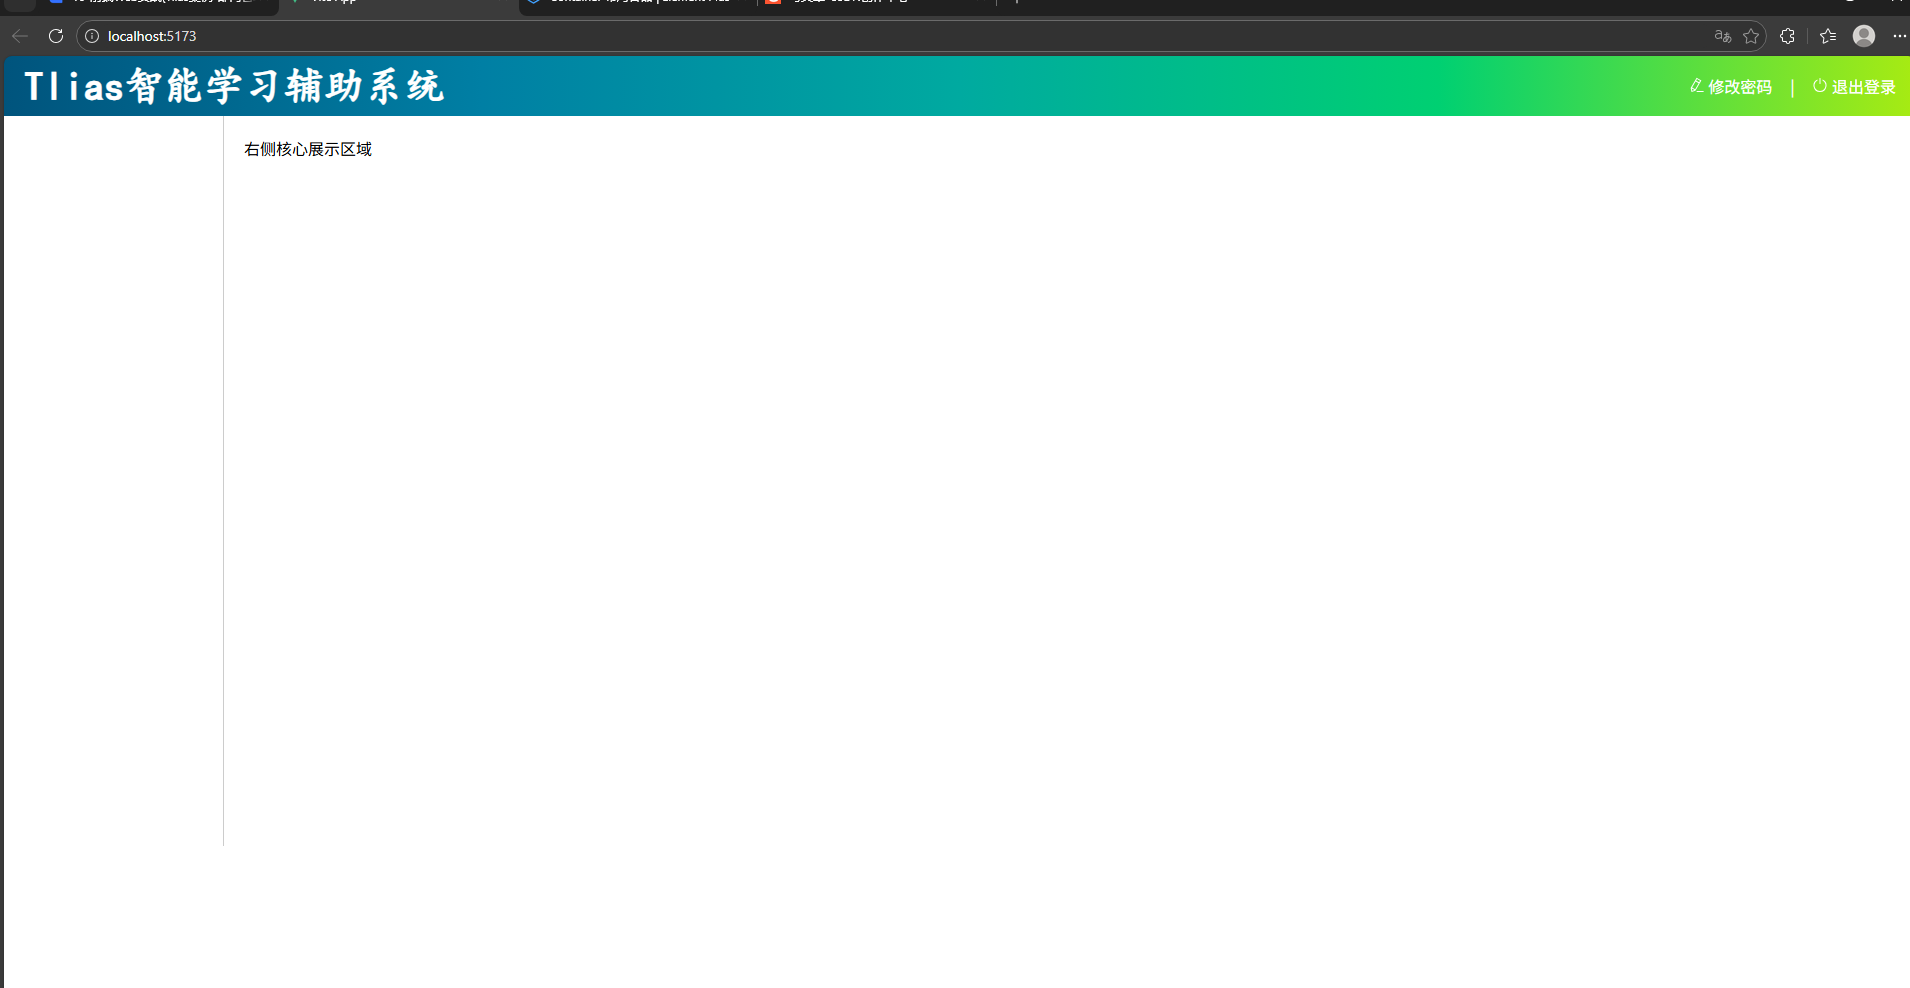
复制到template标签下,style标签的内容看个人自行决定。
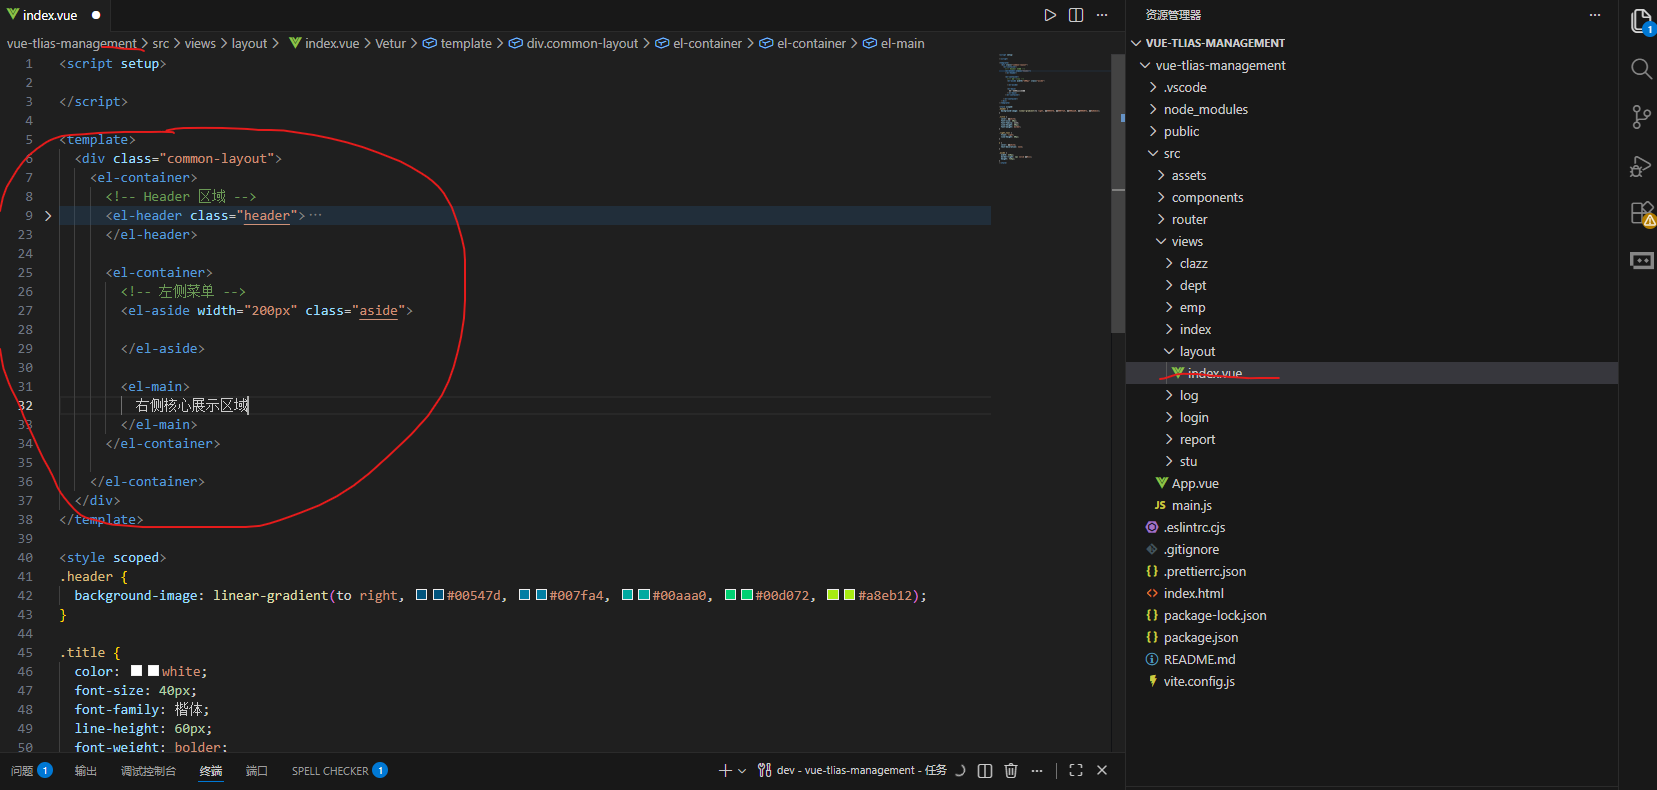
最后出来效果如下图
二、侧边栏
这时候我们发现我们侧边栏还缺少一些选项按钮,那么我们在官网的Container布局容器处往下滑,发现这里有选项栏,那我们挑选合适的进行cv
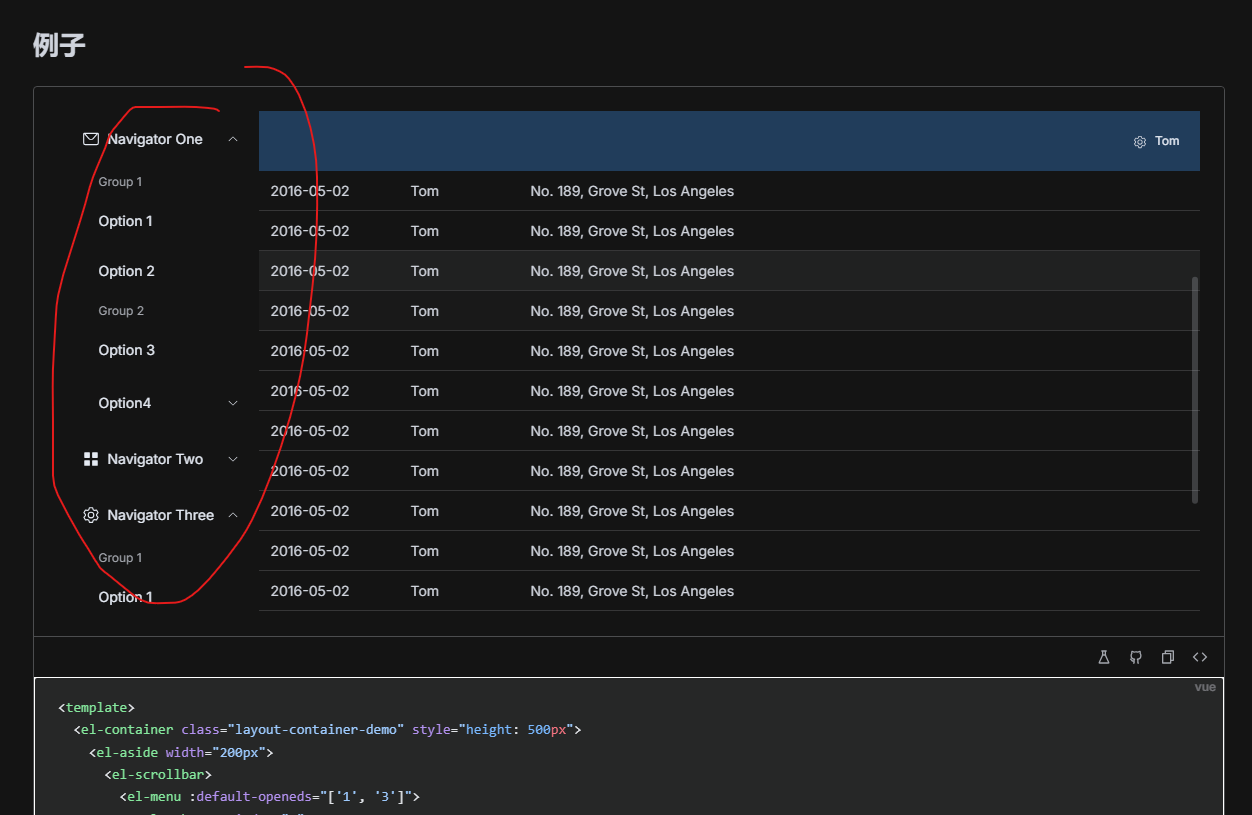
我们观察这个选项,大概位置实在el-menu标签位置,那我们就把这块复制到我们的文件中的el-aside里,然后我们再看看效果对不对。
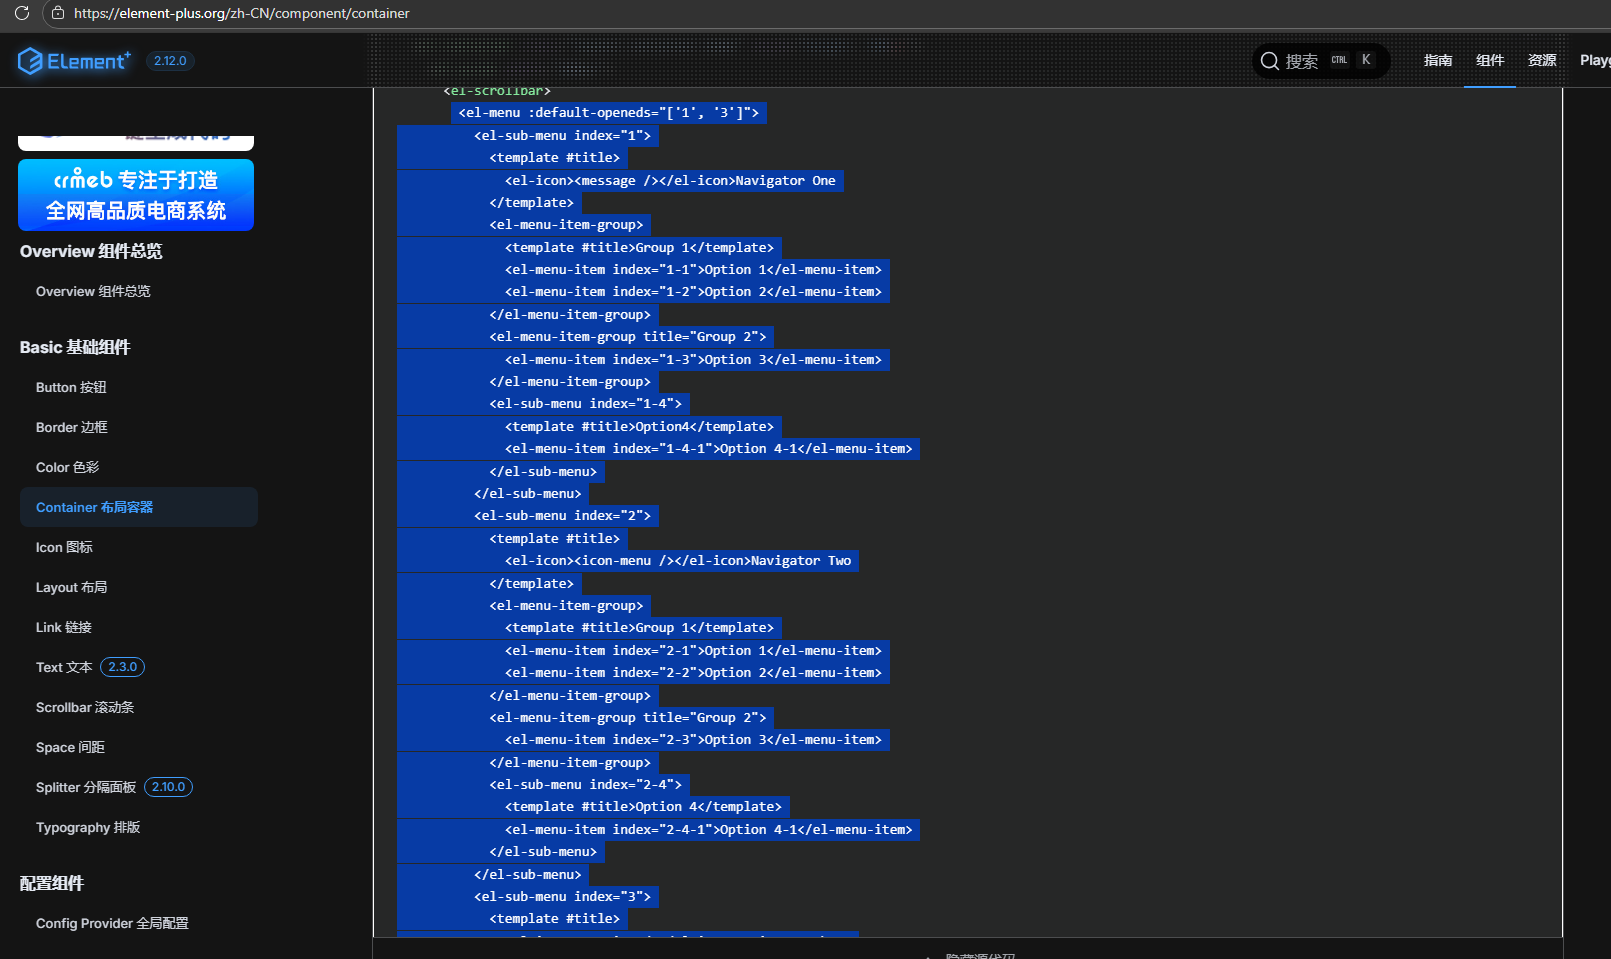
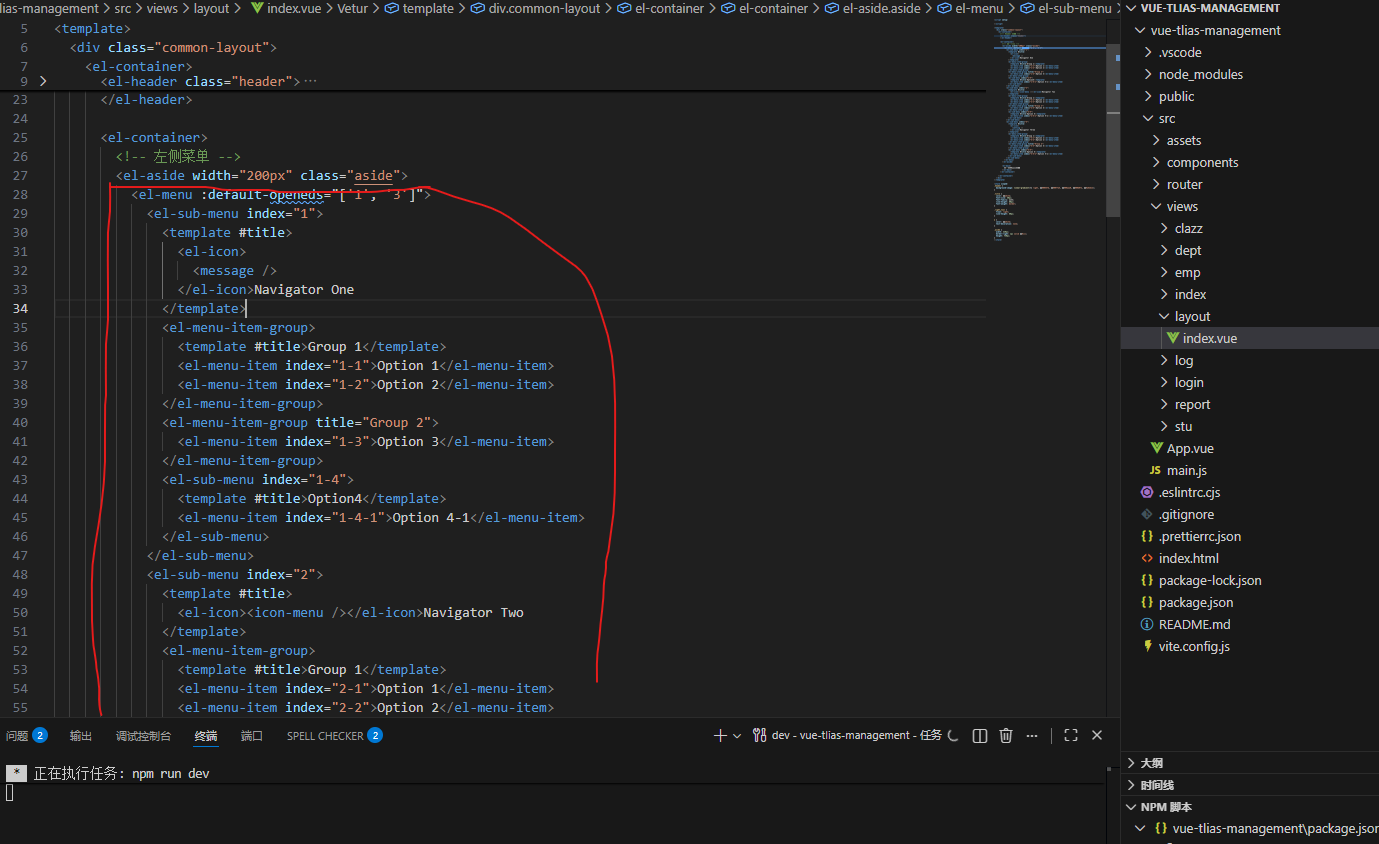
官方代码
javascript
<el-menu :default-openeds="['1', '3']">
<el-sub-menu index="1">
<template #title>
<el-icon><message /></el-icon>Navigator One
</template>
<el-menu-item-group>
<template #title>Group 1</template>
<el-menu-item index="1-1">Option 1</el-menu-item>
<el-menu-item index="1-2">Option 2</el-menu-item>
</el-menu-item-group>
<el-menu-item-group title="Group 2">
<el-menu-item index="1-3">Option 3</el-menu-item>
</el-menu-item-group>
<el-sub-menu index="1-4">
<template #title>Option4</template>
<el-menu-item index="1-4-1">Option 4-1</el-menu-item>
</el-sub-menu>
</el-sub-menu>
<el-sub-menu index="2">
<template #title>
<el-icon><icon-menu /></el-icon>Navigator Two
</template>
<el-menu-item-group>
<template #title>Group 1</template>
<el-menu-item index="2-1">Option 1</el-menu-item>
<el-menu-item index="2-2">Option 2</el-menu-item>
</el-menu-item-group>
<el-menu-item-group title="Group 2">
<el-menu-item index="2-3">Option 3</el-menu-item>
</el-menu-item-group>
<el-sub-menu index="2-4">
<template #title>Option 4</template>
<el-menu-item index="2-4-1">Option 4-1</el-menu-item>
</el-sub-menu>
</el-sub-menu>
<el-sub-menu index="3">
<template #title>
<el-icon><setting /></el-icon>Navigator Three
</template>
<el-menu-item-group>
<template #title>Group 1</template>
<el-menu-item index="3-1">Option 1</el-menu-item>
<el-menu-item index="3-2">Option 2</el-menu-item>
</el-menu-item-group>
<el-menu-item-group title="Group 2">
<el-menu-item index="3-3">Option 3</el-menu-item>
</el-menu-item-group>
<el-sub-menu index="3-4">
<template #title>Option 4</template>
<el-menu-item index="3-4-1">Option 4-1</el-menu-item>
</el-sub-menu>
</el-sub-menu>
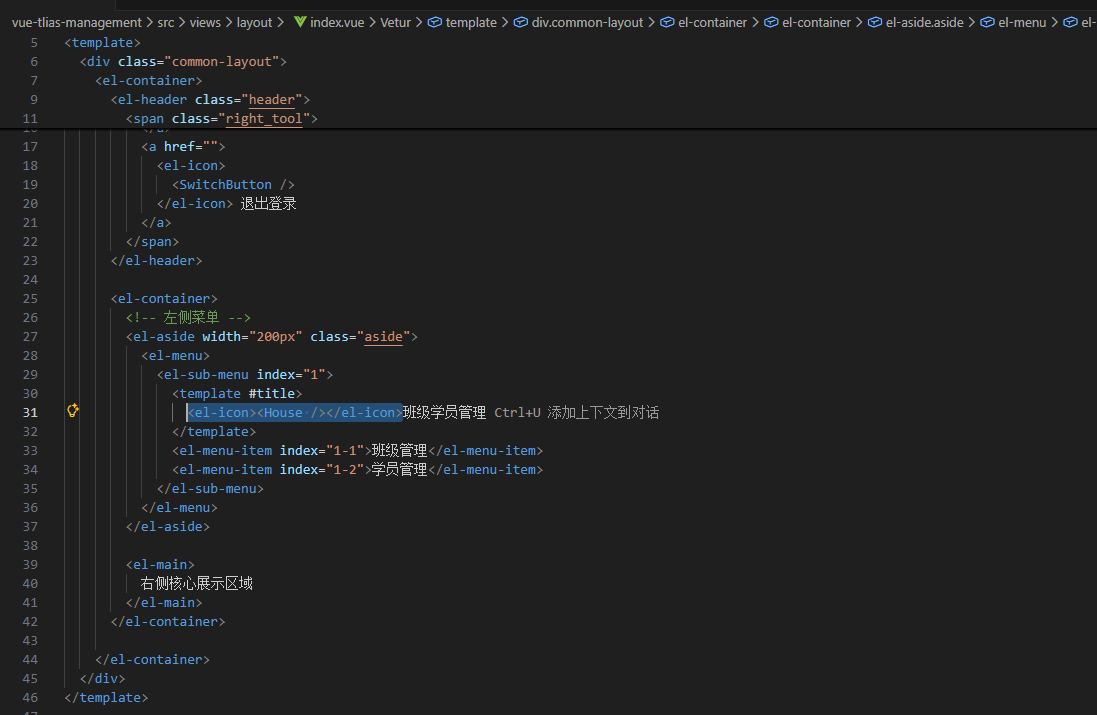
</el-menu>由于官方的菜单过于复杂,我们可以进行适当的改造,把每个标签都改为一个,后面需要在复制。
裁剪后
javascript
<el-menu>
            <el-sub-menu index="1">
              <template #title>
                <el-icon>
                  <message />
                </el-icon>班级学员管理
              </template>
              <el-menu-item index="1-1">班级管理</el-menu-item>
              <el-menu-item index="1-2">学员管理</el-menu-item>
            </el-sub-menu>
          </el-menu>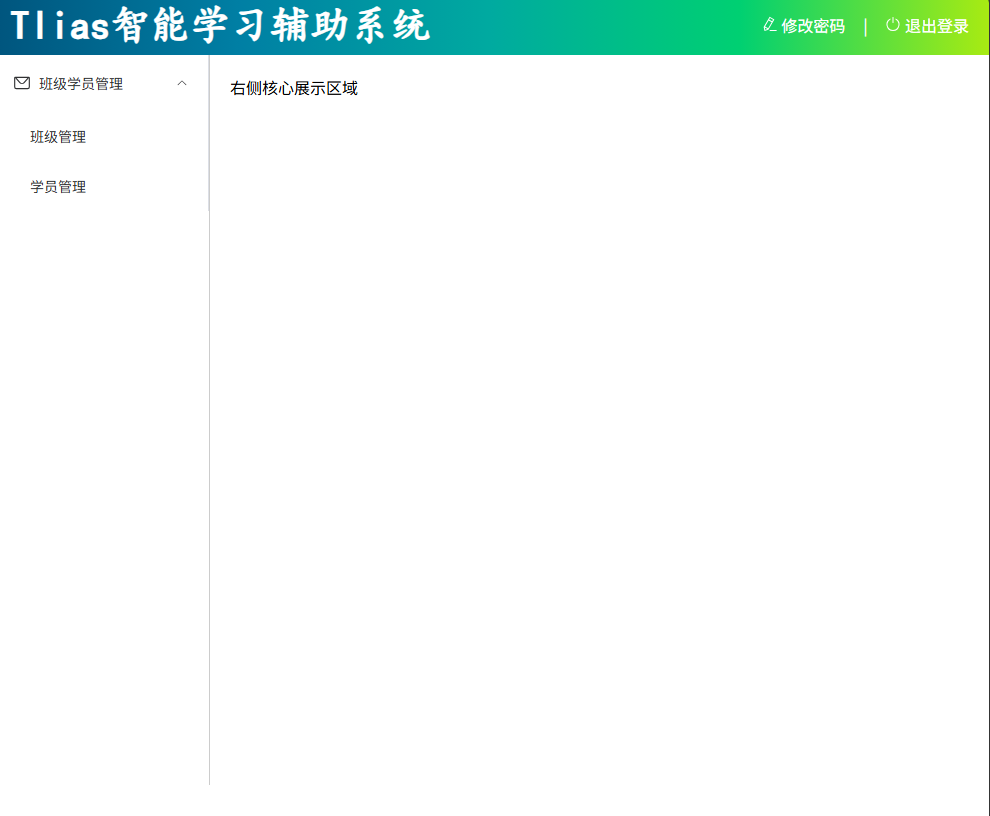
我们先在还想要每个选项前有添加图标。那么我还是去Element官方查找。
先按要求安装包管理器,随后按模板要求到main.js文件注册所有图标
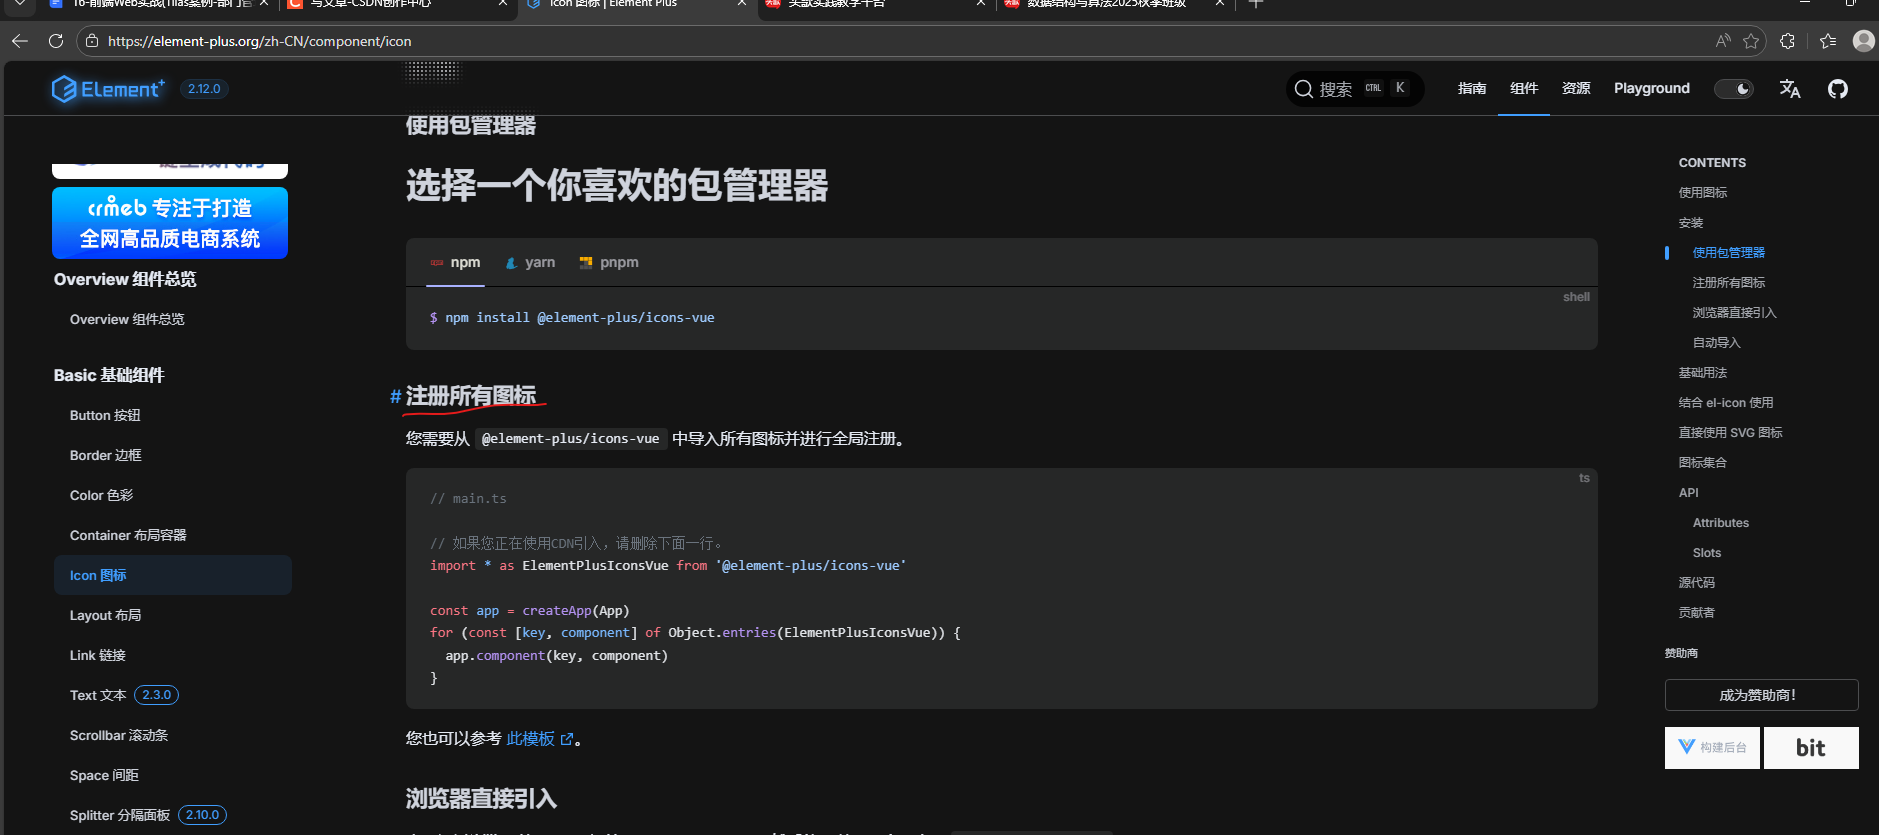
main.js
javascript
import { createApp } from 'vue'

import App from './App.vue'
import router from './router'
import ElementPlus from 'element-plus'
import 'element-plus/dist/index.css'
import zhCn from 'element-plus/es/locale/lang/zh-cn'
import * as ElementPlusIconsVue from '@element-plus/icons-vue'

import './assets/main.css'

const app = createApp(App)

app.use(router)
app.use(ElementPlus, {locale: zhCn})
for (const [key, component] of Object.entries(ElementPlusIconsVue)) {
  app.component(key, component)
}

app.mount('#app')
配置完成后,我们继续下滑,找到需要的图标,点击就可复制。
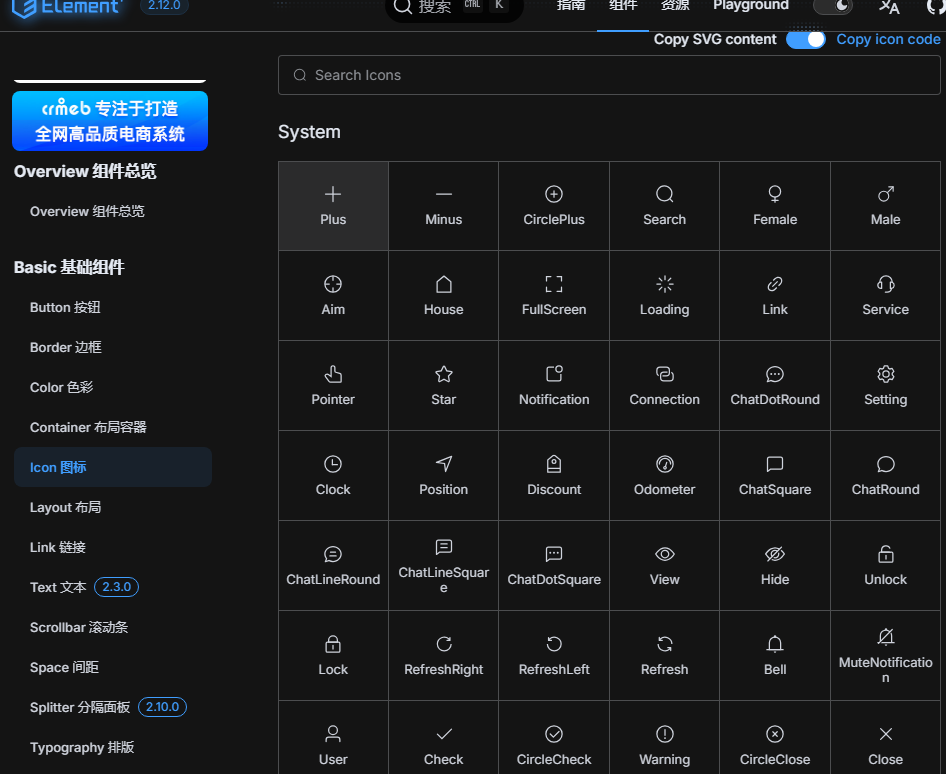
复制到想要的位置
学会了菜单栏基本应用。给个现成的代码直接复制到左侧菜单栏区域即可。
javascript
<!-- 左侧菜单栏 -->
<el-menu>
  <!-- 首页菜单 -->
  <el-menu-item index="/index">
    <el-icon><Promotion /></el-icon> 首页
  </el-menu-item>

  <!-- 班级管理菜单 -->
  <el-sub-menu index="/manage">
    <template #title>
      <el-icon><Menu /></el-icon> 班级学员管理
    </template>
    <el-menu-item index="/clazz">
      <el-icon><HomeFilled /></el-icon>班级管理
    </el-menu-item>
    <el-menu-item index="/stu">
      <el-icon><UserFilled /></el-icon>学员管理
    </el-menu-item>
  </el-sub-menu>

  <!-- 系统信息管理 -->
  <el-sub-menu index="/system">
    <template #title>
      <el-icon><Tools /></el-icon>系统信息管理
    </template>
    <el-menu-item index="/dept">
      <el-icon><HelpFilled /></el-icon>部门管理
    </el-menu-item>
    <el-menu-item index="/emp">
      <el-icon><Avatar /></el-icon>员工管理
    </el-menu-item>
  </el-sub-menu>

  <!-- 数据统计管理 -->
  <el-sub-menu index="/report">
    <template #title>
      <el-icon><Histogram /></el-icon>数据统计管理
    </template>
    <el-menu-item index="/empReport">
      <el-icon><InfoFilled /></el-icon>员工信息统计
    </el-menu-item>
    <el-menu-item index="/stuReport">
      <el-icon><Share /></el-icon>学员信息统计
    </el-menu-item>
    <el-menu-item index="/log">
      <el-icon><Document /></el-icon>日志信息统计
    </el-menu-item>
  </el-sub-menu>
</el-menu>
效果如下
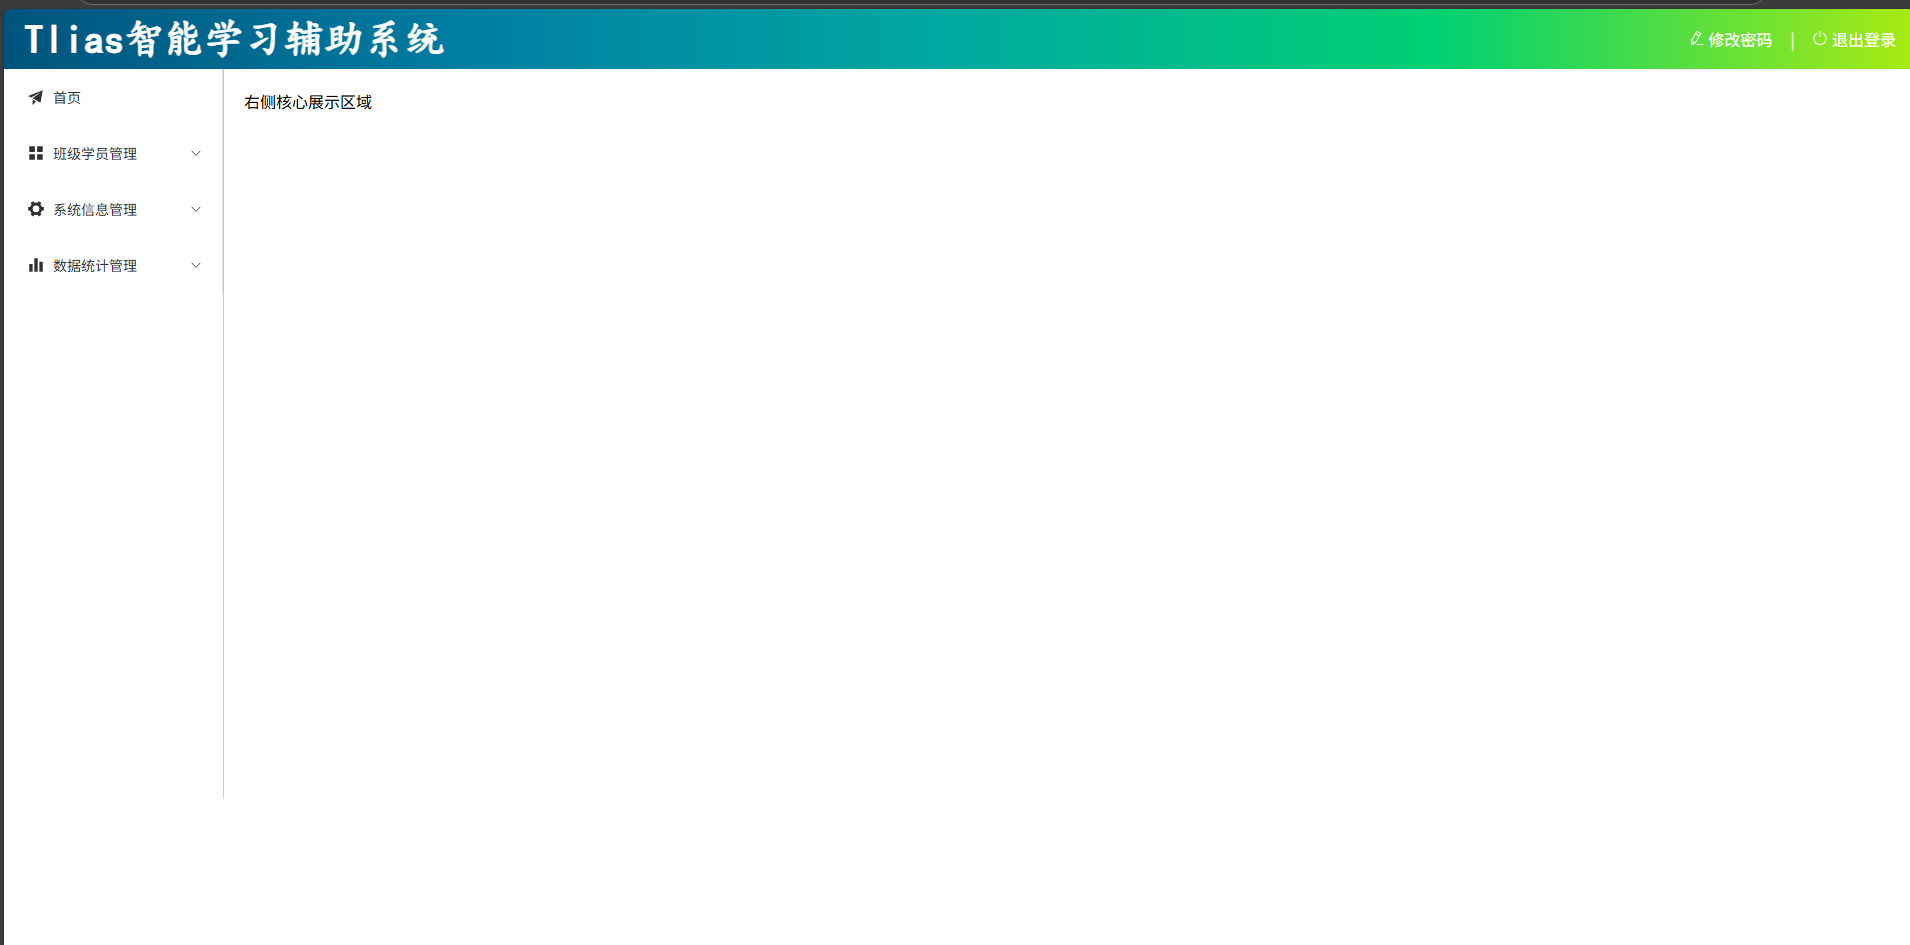
三、动态菜单栏
(一)知识准备
1.Vue Router
(1)Vue Router: Vue的官方路由 。为Vue提供富有表现力、可配置的、方便的路由。
(2)Vue中的路由: 用于表示路径 与 组件 的对应关系。
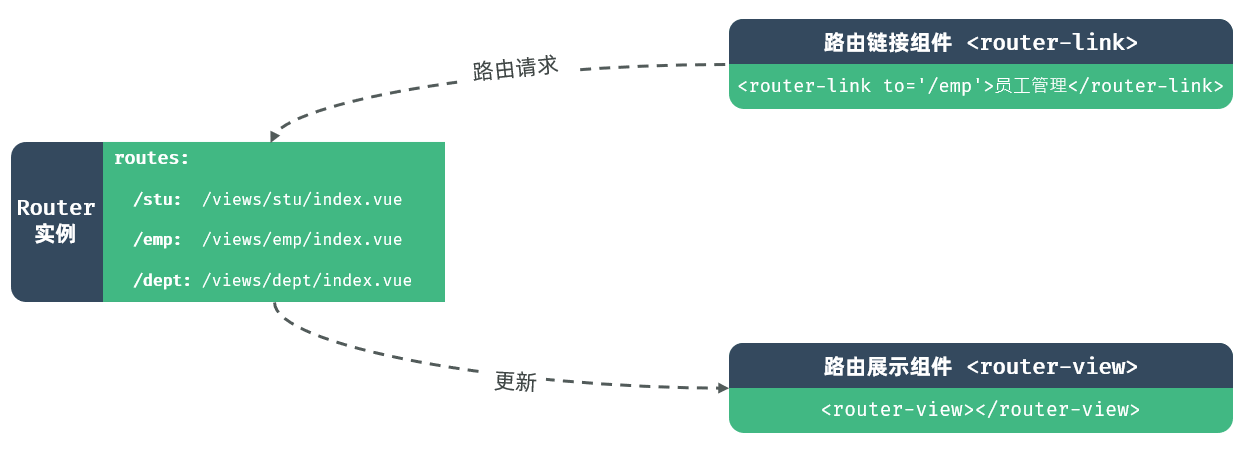
(3)组成:
- Router实例(管理请求路径和组件关系) :路由实例,基于createRouter函数创建,维护了应用的路由信息。(在所创建的实例中 ,就会去维护一个路由表,在路由表中 就回去维护路径与组件的对应关系)
eg:如果你访问的是/stu,就会展示/views/stu/index.vue。 - <router-link>(发起请求) :路由链接组件,浏览器会解析成<a>
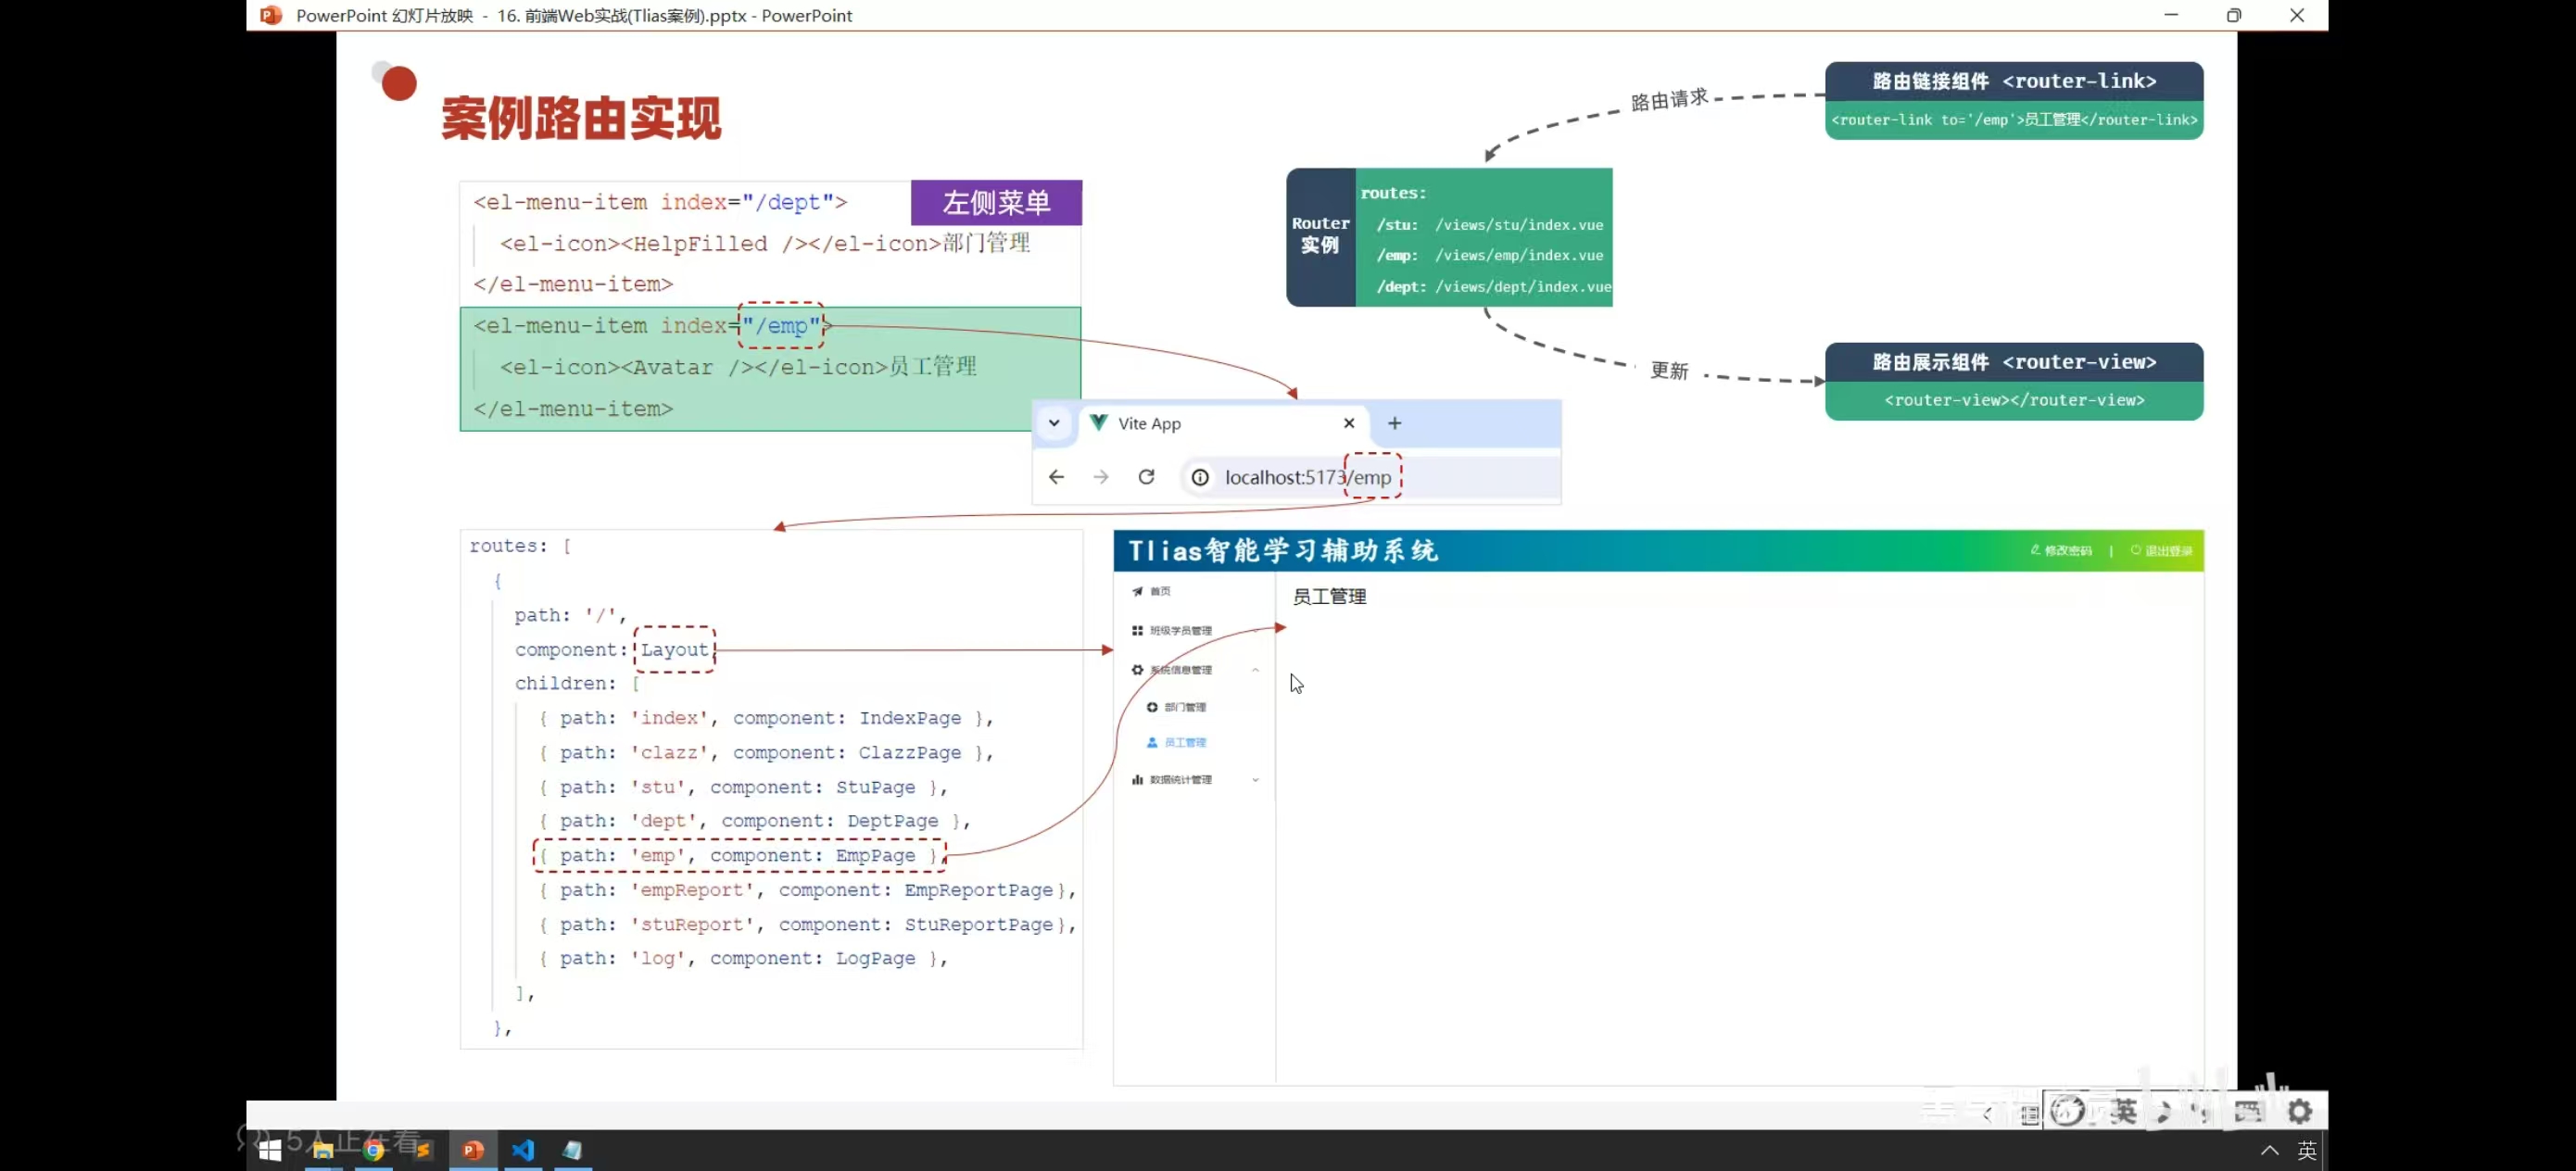
eg:如下图,当你点击这个<a>标签时就会访问/emp路径,此时/emp就回去请求路由实例中对应的组件 - <router-view>(渲染组件) :动态试图组件,用来渲染展示与路由路径对应的组件。(Router实例中被匹配到的组件,会在<router-view></router-view>中展示出来)
2.Vue Router环境配置
想要配置Router环境只需要在创建Vue工程时勾选上即可。
等创建好工程文件后,在项目中的src/router文件夹 中有一个index.js
在文件中会创建一个router实例
在router实例中的routers,配置path与组件的关系。
javascript
const router = createRouter({
  history: createWebHistory(import.meta.env.BASE_URL),
  // 路由配置
  // path: 路由路径
  // name: 路由名称
  // component: 路由组件
  routes: [
    {path: '/index',name: 'index',component: IndexView},
    {path: '/clazz',name: 'clazz',component: ClazzView},
    {path: '/stu',name: 'stu',component: StuView},
    {path: '/dept',name: 'dept',component: DeptView},
    {path: '/emp',name: 'emp',component: EmpView},
    {path: '/empReport',name: 'empReport',component: EmpReportView},
    {path: '/stuReport',name: 'stuReport',component: StuReportView},
    {path: '/log',name: 'log',component: LogView},
    {path: '/login',name: 'login',component: LoginView},
  ]
})
3.应用
我们要想点击某个按钮时访问对应路径,需要去给按钮添加<router-link to="路径">,在layout文件夹的el-menu外包裹一个router-link标签,这样当点击这个menu时就会访问to中的路径。
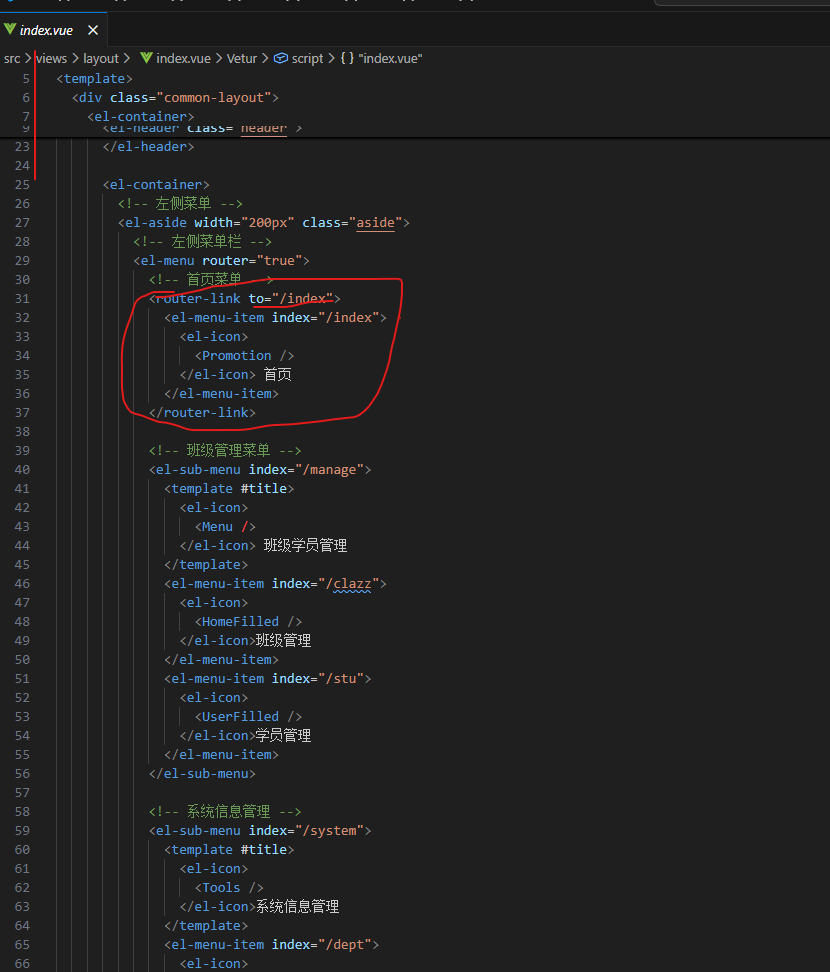
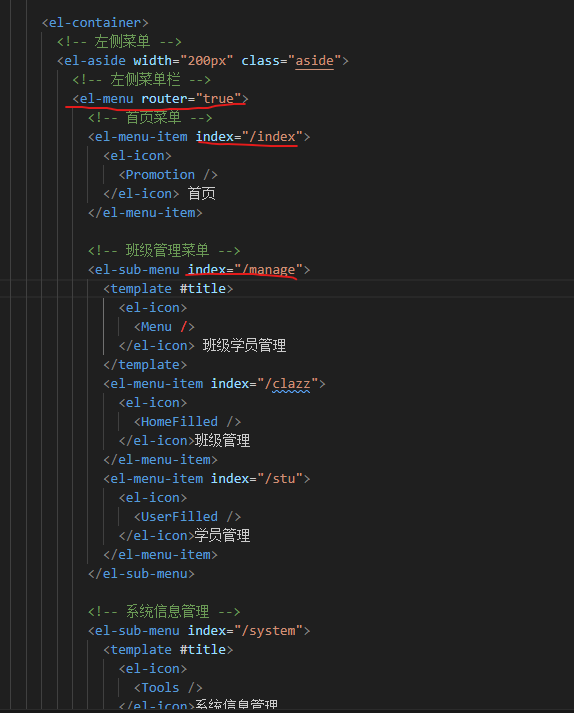
但这样使用十分麻烦,elementplus为我们提供新的方法,我们查看官方文档得知,我们可以在el-menu标签中开启router模式,只需要为el-menu添加router属性,如果为true则视为开启vueRouter模式,启用后会以<el-menu-item>的index属性的内容作为path进行路径跳转。

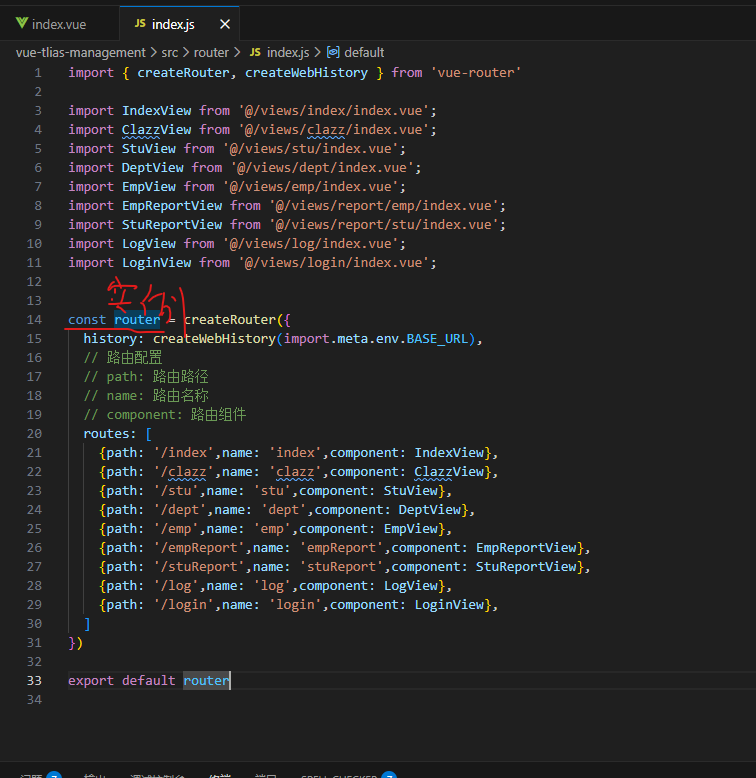
现在我们配置好了路由链接组件,我们该去配置路由实例了,我们将视角转到src/router/index.js中。我们先将各个组件导入进来,再放到routes中。再routes中,路由表每行由三部分组成,path(绑定的路由路径),name(路由名称),component(路径要绑定的组件)。
javascript
import { createRouter, createWebHistory } from 'vue-router'

import IndexView from '@/views/index/index.vue';
import ClazzView from '@/views/clazz/index.vue';
import StuView from '@/views/stu/index.vue';
import DeptView from '@/views/dept/index.vue';
import EmpView from '@/views/emp/index.vue';
import EmpReportView from '@/views/report/emp/index.vue';
import StuReportView from '@/views/report/stu/index.vue';
import LogView from '@/views/log/index.vue';
import LoginView from '@/views/login/index.vue';


const router = createRouter({
  history: createWebHistory(import.meta.env.BASE_URL),
  // 路由配置
  // path: 路由路径
  // name: 路由名称
  // component: 路由组件
  routes: [
    {path: '/index',name: 'index',component: IndexView},
    {path: '/clazz',name: 'clazz',component: ClazzView},
    {path: '/stu',name: 'stu',component: StuView},
    {path: '/dept',name: 'dept',component: DeptView},
    {path: '/emp',name: 'emp',component: EmpView},
    {path: '/empReport',name: 'empReport',component: EmpReportView},
    {path: '/stuReport',name: 'stuReport',component: StuReportView},
    {path: '/log',name: 'log',component: LogView},
    {path: '/login',name: 'login',component: LoginView},
  ]
})
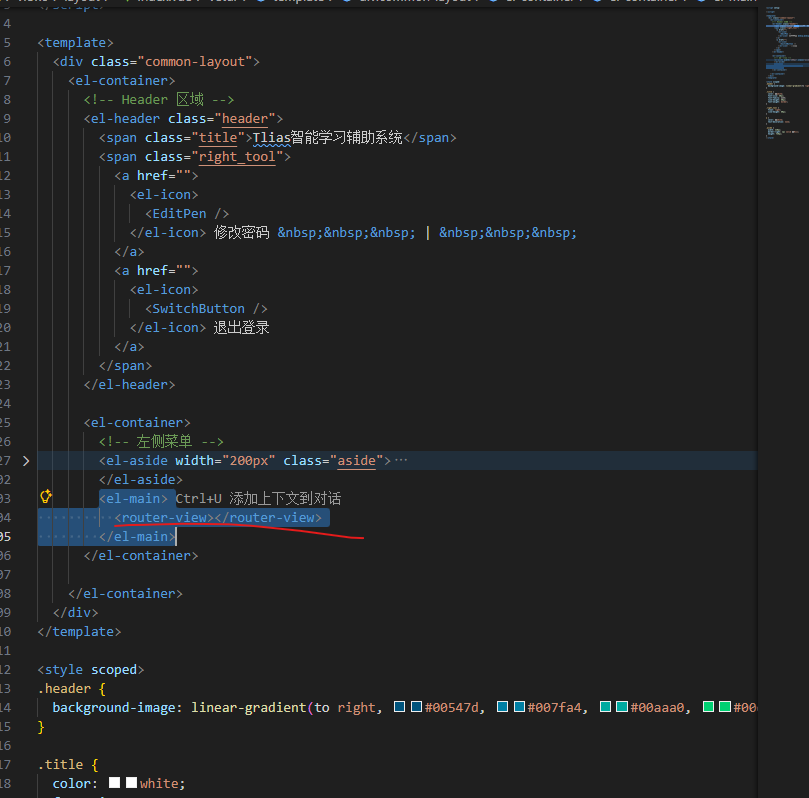
export default router配置好后,我们现在要想在主要展示区展示出对应内容还需要配置router-view进行渲染展示。所以我们现在找到核心展示区的地方,在标签内放上<router-view>
(二)登录界面
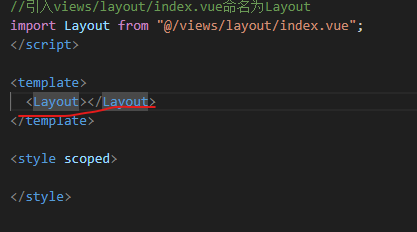
在我们路由配置好后,又出现一个问题,当我们访问/login时 ,登录界面仍然在主展示区展示,这是因为,根组件中,我们的<layout>是写死的就会出现这个问题,我们应该将根组件也改为动态视图组件router-view。
这时候我们就需要用到嵌套路由,根据请求路径会先渲染父路径的组件,再到父路径的组件中找到router-view渲染对应的子路径组件。如果没有
javascript
import { createRouter, createWebHistory } from 'vue-router'
import IndexView from '@/views/index/index.vue'
import ClazzView from '@/views/clazz/index.vue'
import DeptView from '@/views/dept/index.vue'
import EmpView from '@/views/emp/index.vue'
import LogView from '@/views/log/index.vue'
import StuView from '@/views/stu/index.vue'
import EmpReportView from '@/views/report/emp/index.vue'
import StuReportView from '@/views/report/stu/index.vue'
import LayoutView from '@/views/layout/index.vue'
import LoginView from '@/views/login/index.vue'


const router = createRouter({
  history: createWebHistory(import.meta.env.BASE_URL),
  routes: [
    {
      path: '/', //父路径
      name: '',
      component: LayoutView,
      redirect: '/index',
      children: [//子路径
        {path: 'index',name: 'index',component: IndexView},
        {path: 'clazz',name: 'clazz',component: ClazzView},
        {path: 'stu',name: 'stu',component: StuView},
        {path: 'dept',name: 'dept',component: DeptView},
        {path: 'emp',name: 'emp',component: EmpView},
        {path: 'empReport',name: 'empReport',component: EmpReportView},
        {path: 'stuReport',name: 'stuReport',component: StuReportView},
        {path: 'log',name: 'log',component: LogView},
      ]
    },
    {path: '/login',name: 'login',component: LoginView}


    // {
    //   path: '/',
    //   name: 'home',
    //   component: HomeView
    // },
    // {
    //   path: '/about',
    //   name: 'about',
    //   component: () => import('../views/AboutView.vue')
    // }
  ]
})

export default router
(三)路由实现思路
当我们点击员工管理菜单,请求路径改变,这时候我们到router实例中进行匹配,先匹配到'/'渲染展示Layout主页面,继续匹配子路由,匹配到emp,在上层组件Layout找到router-view,渲染展示EmpPage组件。
 四、部门管理
(一)列表查询
1.页面布局
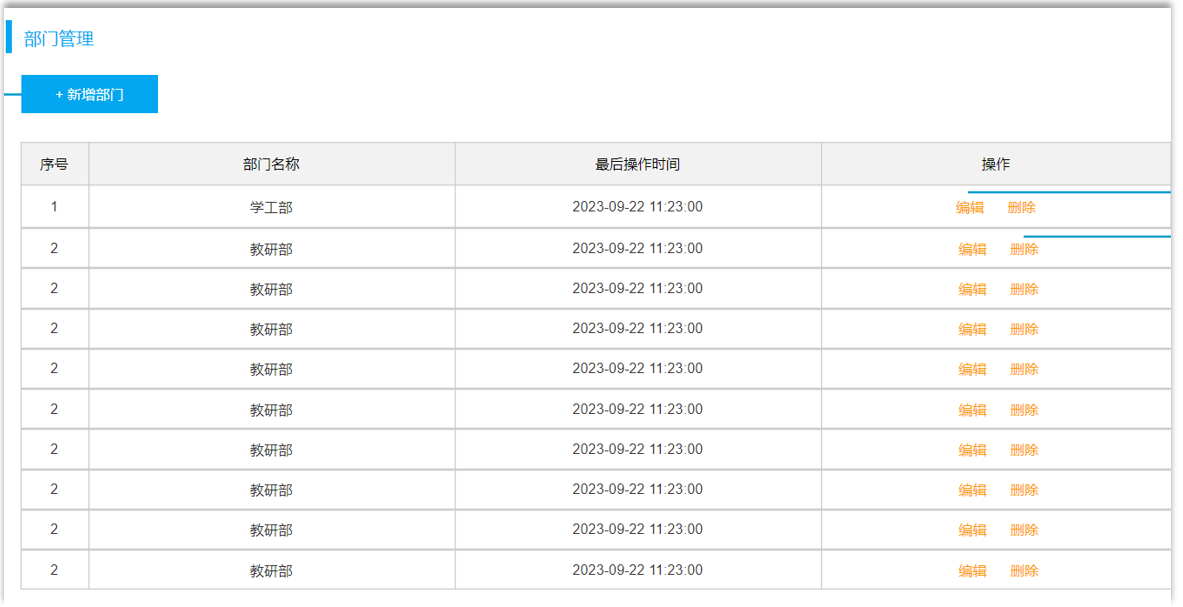
我们根据下图的页面原型,可以看出我们需要Button按钮组件和Table表格组件,随后去Element寻找组件。
当页面加载完毕调用钩子函数,钩子函数调用search方法,search方法中进行异步请求,如果响应数据不为空或者为200时,将响应数据赋值给deptList。
javascript
<script setup>
import { ref,onMounted } from 'vue'
import axios from 'axios'
//钩子函数
onMounted(() => {
search();
})
const search = async() => {
const result = await axios.get('http://127.0.0.1:4523/m1/7648010-7388815-default/depts')
if(result.data.code){
deptList.value = result.data.data;
}
}
const deptList = ref([]);
</script>
<template>
<h1>部门管理</h1>
<div class="container">
<el-button type="primary">新增员工</el-button>
</div>
<div class="container">
<el-table :data="deptList" border style="width: 100%">
<el-table-column type="index" width="100" />
<el-table-column prop="name" label="部门名称" width="260" />
<el-table-column prop="updateTime" label="最后操作时间" width="300" />
<el-table-column label="操作">
<template #default="scope">
<el-button type="primary" size="small">编辑</el-button>
<el-button type="danger" size="small">删除</el-button>
</template>
</el-table-column>
</el-table>
</div>
</template>
<style scoped>
.container {
margin: 10px 0px;
}
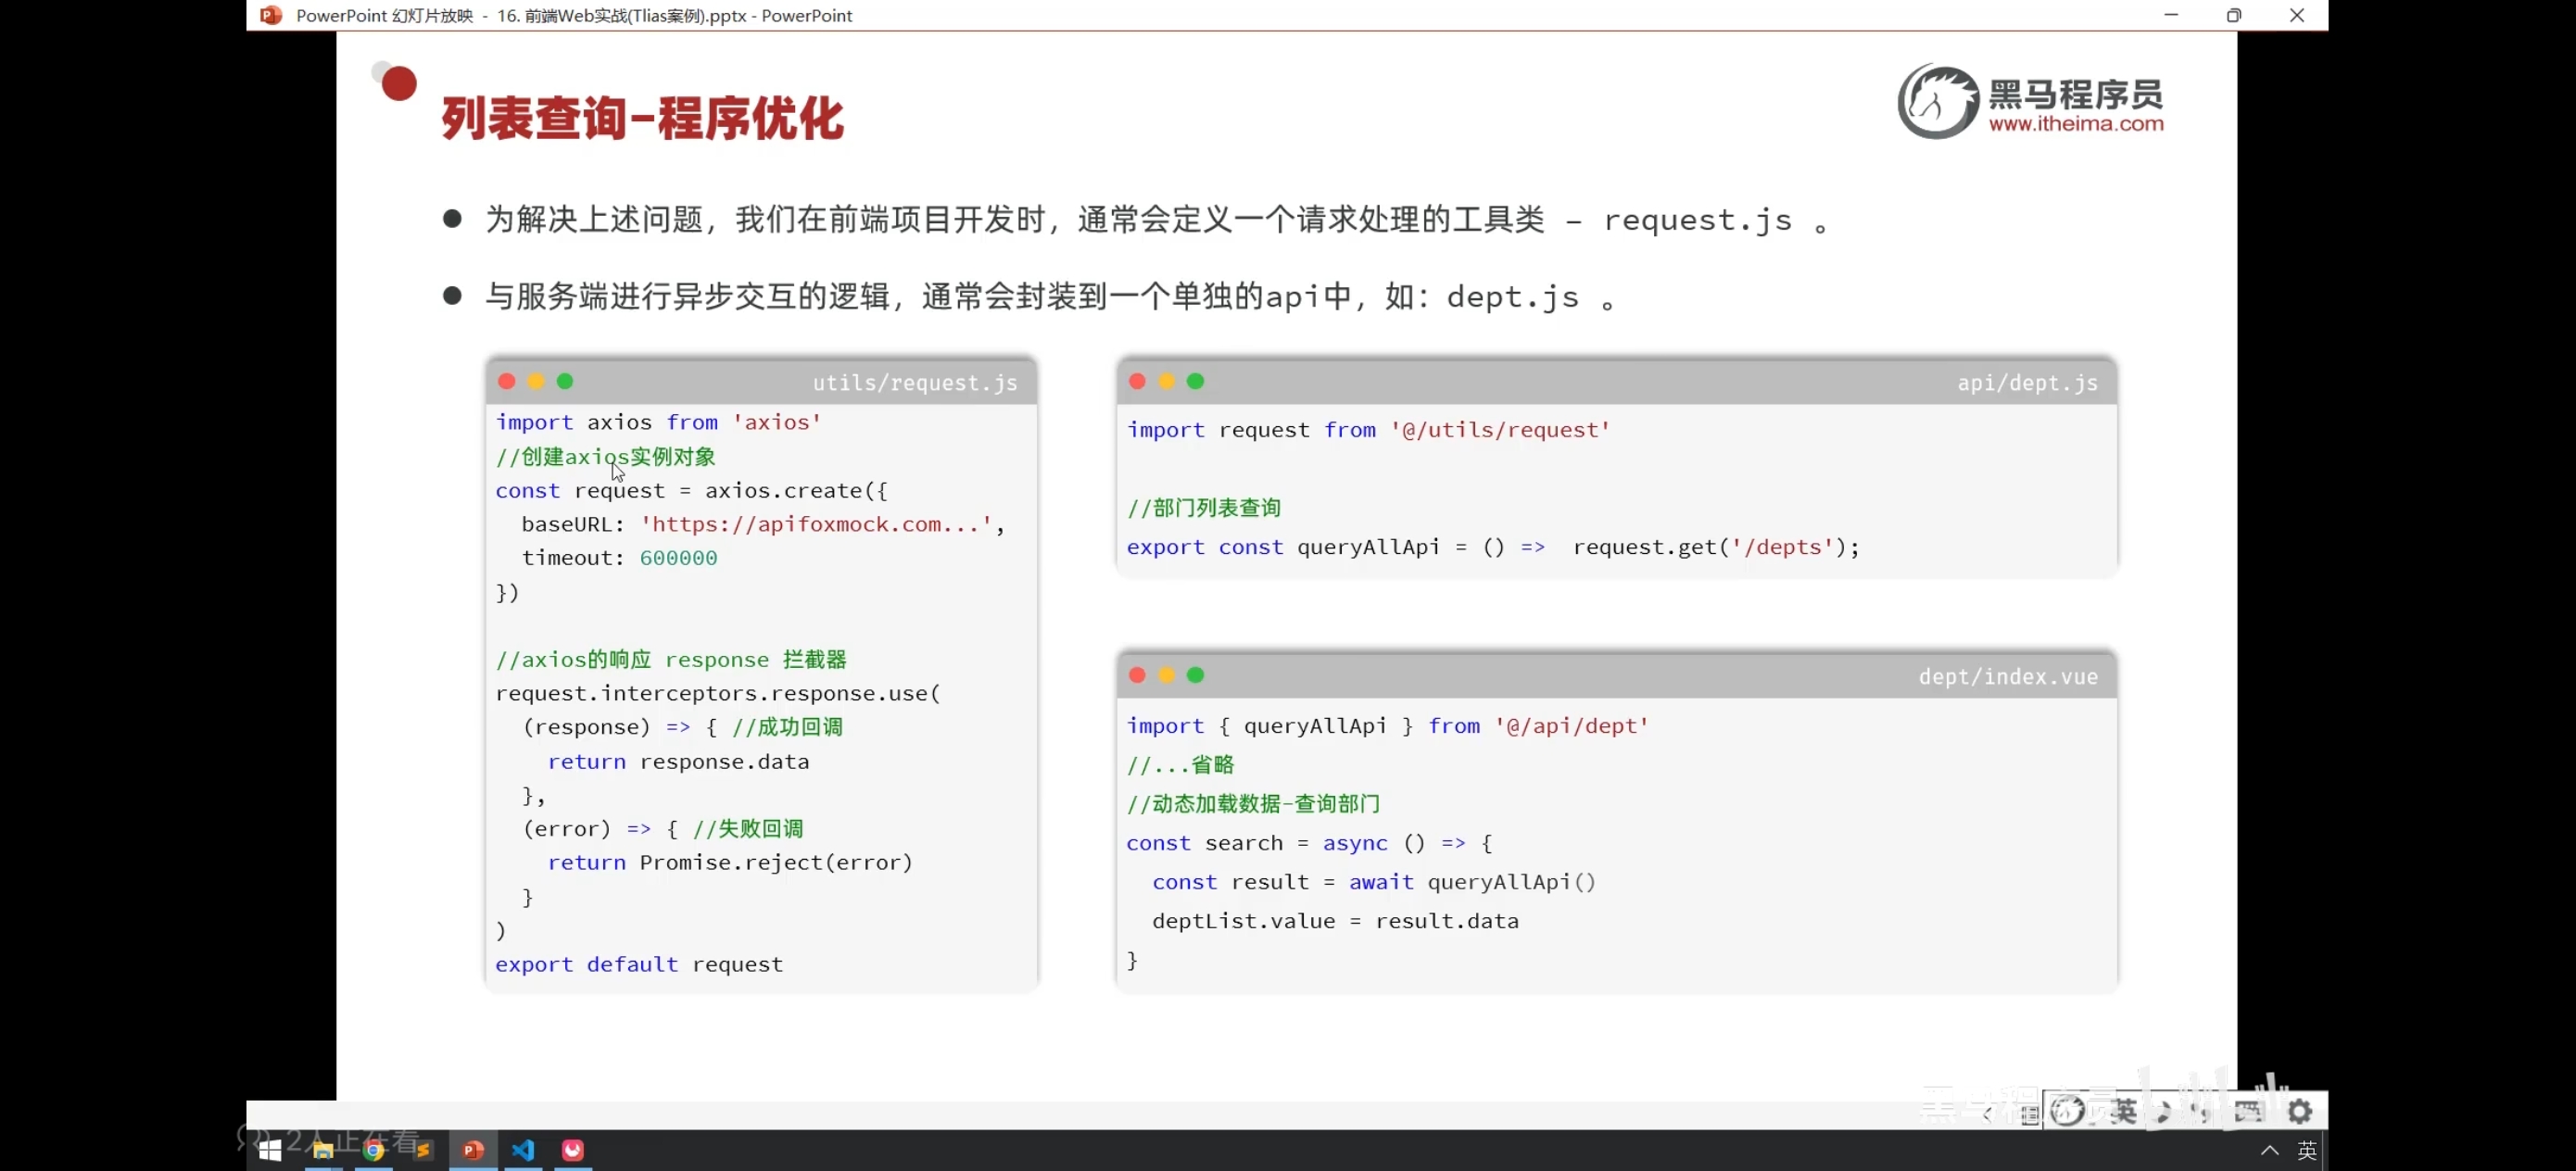
</style>2.程序优化
我们现在请求路径是写死的,每次调用都要单独写请求路径,