SpringBoot(06):多数据源配置------一个项目连多个库怎么做
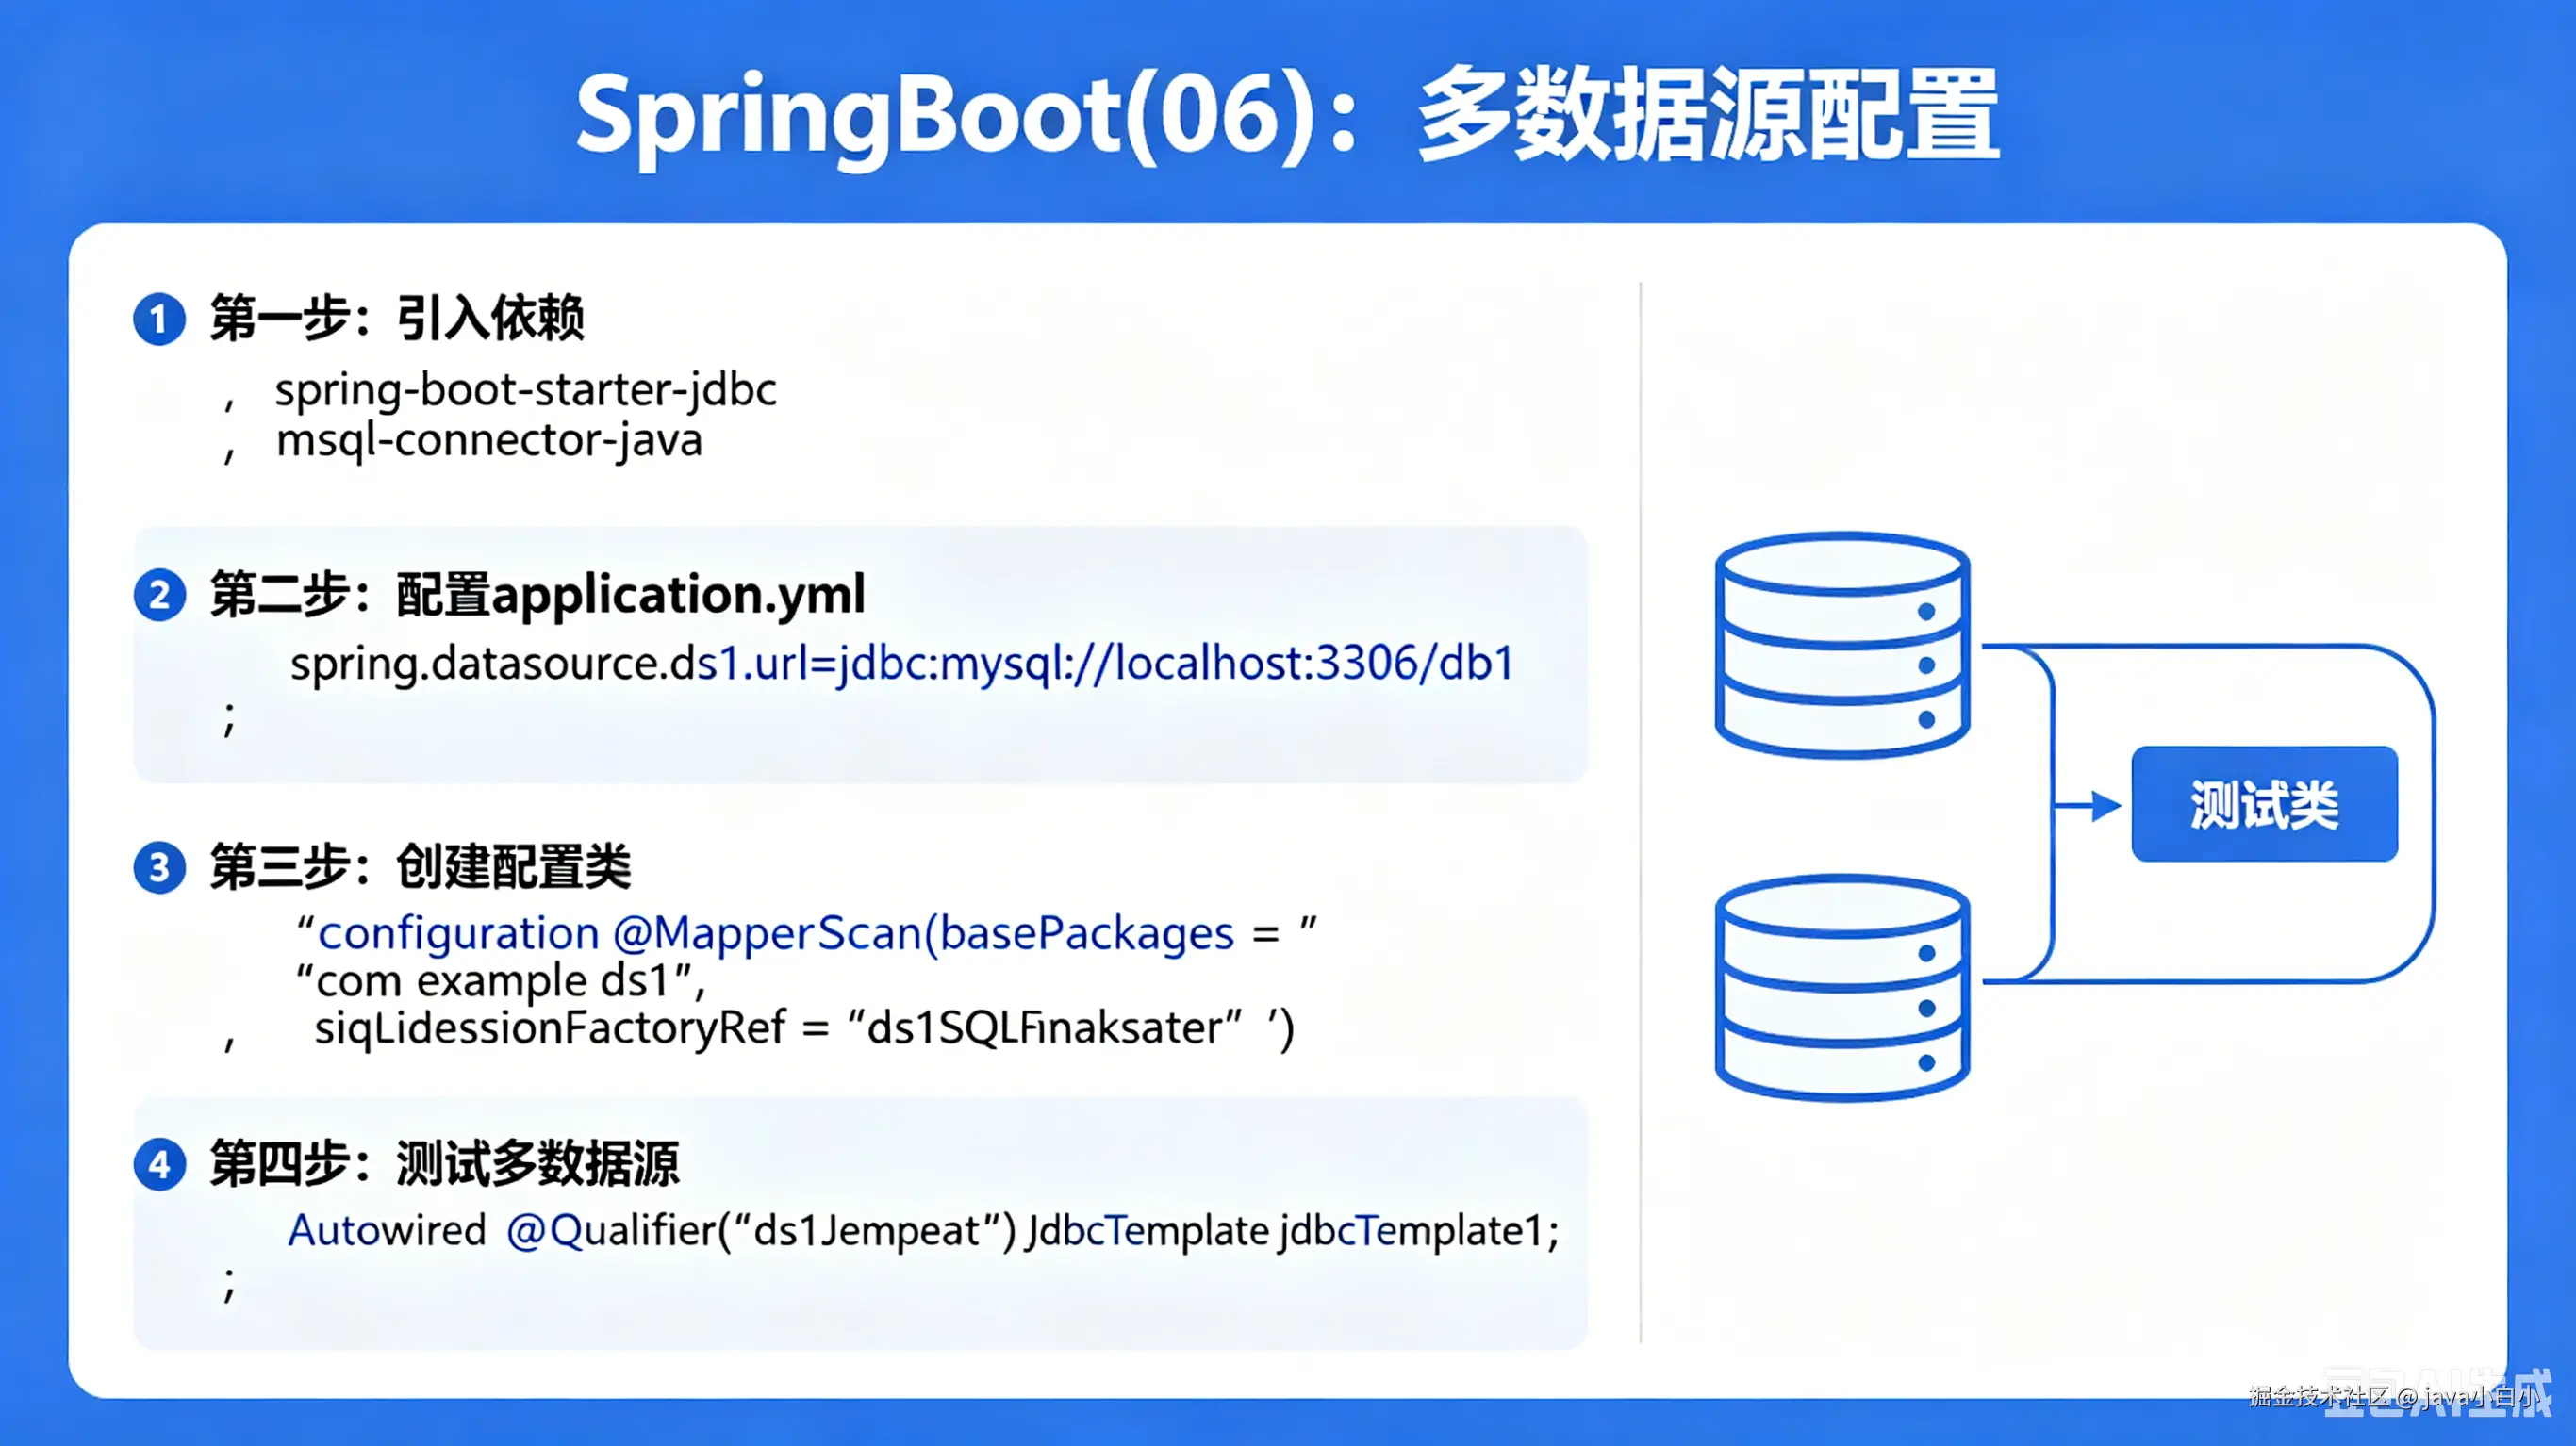
一个电商项目,订单库在 MySQL,用户库在另一个 MySQL 实例,报表又得从 PostgreSQL 读。Spring Boot 默认只配一个数据源,多出来的库怎么连?有人用多项目硬拆,有人写原生 JDBC 手动管理连接,都是笨办法。Spring 本身就支持多数据源,关键在于搞清楚 DataSource、SqlSessionFactory、事务管理器这几样东西谁跟谁绑定。
问题:单数据源的局限
Spring Boot 的自动配置挺省事,spring.datasource.url 一写,DataSource、SqlSessionFactory、TransactionManager 全部给你配好。但要连第二个库的时候,问题就来了:
scss
@Service
public class OrderService {

    @Autowired
    private OrderMapper orderMapper; // 指向订单库

    @Autowired
    private UserMapper userMapper;   // 指向用户库

    public OrderDTO getOrder(Long orderId) {
        Order order = orderMapper.selectById(orderId);   // OK
        User user = userMapper.selectById(order.getUserId()); // 报错!查的不是同一个库
        return new OrderDTO(order, user);
    }
}
两个 Mapper 用的是同一个 DataSource,查的自然是同一个库。想让它们各查各的库,得给每个数据源单独配一套组件。
多数据源的整体架构
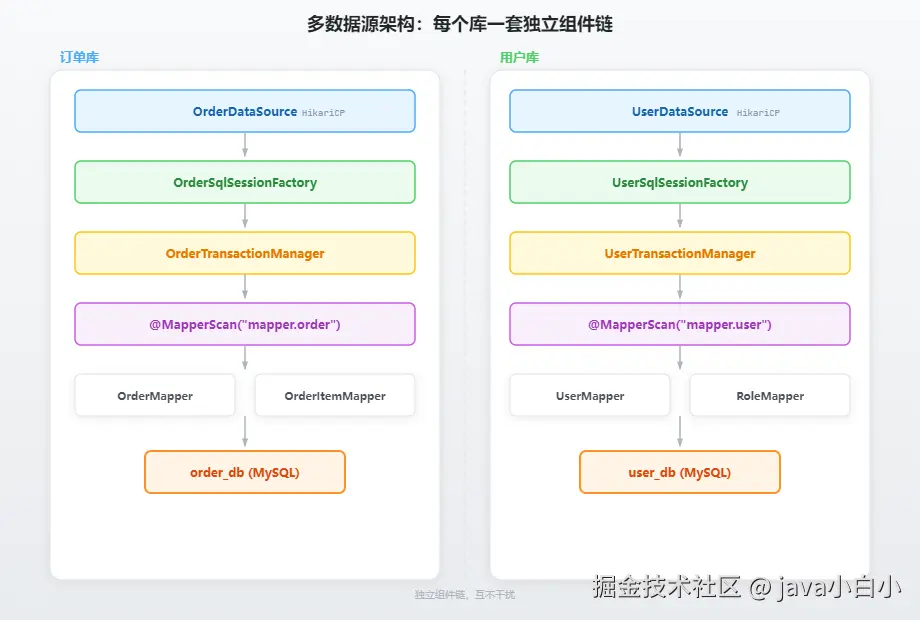
核心思路:每个数据源各配一套独立的组件链------DataSource → SqlSessionFactory → TransactionManager → Mapper 扫描路径,互不干扰。
几个关键点:
- DataSource:每个库一个 DataSource 实例
- SqlSessionFactory:MyBatis 用它创建 SqlSession,每个数据源各一个
- TransactionManager:每个数据源有独立的事务管理器,@Transactional 必须指定用哪个
- Mapper 扫描路径:不同数据源的 Mapper 放在不同的包下,扫描时指定路径
实战一:MyBatis 多数据源
最常见的需求:两个 MySQL 库,一个存订单,一个存用户。
项目结构
scss
com.example.multids
├── config
│   ├── OrderDataSourceConfig.java    // 订单库配置
│   └── UserDataSourceConfig.java     // 用户库配置
├── mapper
│   ├── order                         // 订单库 Mapper
│   │   └── OrderMapper.java
│   └── user                          // 用户库 Mapper
│       └── UserMapper.java
├── entity
│   ├── Order.java
│   └── User.java
└── service
    └── OrderService.java
第一条规则:不同数据源的 Mapper 分开放,不同包。 这是最重要的约定,后面扫描就靠包路径区分。
配置文件
less
spring:
  datasource:
    order:
      url: jdbc:mysql://192.168.1.10:3306/order_db?useUnicode=true&characterEncoding=utf-8&serverTimezone=Asia/Shanghai
      username: root
      password: 123456
      driver-class-name: com.mysql.cj.jdbc.Driver
    user:
      url: jdbc:mysql://192.168.1.20:3306/user_db?useUnicode=true&characterEncoding=utf-8&serverTimezone=Asia/Shanghai
      username: root
      password: 654321
      driver-class-name: com.mysql.cj.jdbc.Driver
注意:自定义的多数据源配置不能用 spring.datasource.url,因为 Spring Boot 的自动配置会抢着用这个键。换成 spring.datasource.order 和 spring.datasource.user 这种自定义前缀。
订单库配置
less
@Configuration
@MapperScan(
    basePackages = "com.example.multids.mapper.order",
    sqlSessionFactoryRef = "orderSqlSessionFactory"
)
public class OrderDataSourceConfig {

    @Bean(name = "orderDataSource")
    @ConfigurationProperties(prefix = "spring.datasource.order")
    public DataSource orderDataSource() {
        return DataSourceBuilder.create().build();
    }

    @Bean(name = "orderSqlSessionFactory")
    public SqlSessionFactory orderSqlSessionFactory(
            @Qualifier("orderDataSource") DataSource dataSource) throws Exception {
        SqlSessionFactoryBean bean = new SqlSessionFactoryBean();
        bean.setDataSource(dataSource);
        bean.setMapperLocations(
            new PathMatchingResourcePatternResolver()
                .getResources("classpath:mapper/order/*.xml"));
        return bean.getObject();
    }

    @Bean(name = "orderTransactionManager")
    public PlatformTransactionManager orderTransactionManager(
            @Qualifier("orderDataSource") DataSource dataSource) {
        return new DataSourceTransactionManager(dataSource);
    }
}
用户库配置
less
@Configuration
@MapperScan(
    basePackages = "com.example.multids.mapper.user",
    sqlSessionFactoryRef = "userSqlSessionFactory"
)
public class UserDataSourceConfig {

    @Bean(name = "userDataSource")
    @ConfigurationProperties(prefix = "spring.datasource.user")
    public DataSource userDataSource() {
        return DataSourceBuilder.create().build();
    }

    @Bean(name = "userSqlSessionFactory")
    public SqlSessionFactory userSqlSessionFactory(
            @Qualifier("userDataSource") DataSource dataSource) throws Exception {
        SqlSessionFactoryBean bean = new SqlSessionFactoryBean();
        bean.setDataSource(dataSource);
        bean.setMapperLocations(
            new PathMatchingResourcePatternResolver()
                .getResources("classpath:mapper/user/*.xml"));
        return bean.getObject();
    }

    @Bean(name = "userTransactionManager")
    public PlatformTransactionManager userTransactionManager(
            @Qualifier("userDataSource") DataSource dataSource) {
        return new DataSourceTransactionManager(dataSource);
    }
}
Mapper 和实体
less
// com.example.multids.mapper.order.OrderMapper
public interface OrderMapper {
    @Select("SELECT * FROM orders WHERE id = #{id}")
    Order selectById(Long id);

    @Insert("INSERT INTO orders(user_id, amount, status) VALUES(#{userId}, #{amount}, #{status})")
    @Options(useGeneratedKeys = true, keyProperty = "id")
    int insert(Order order);
}

// com.example.multids.mapper.user.UserMapper
public interface UserMapper {
    @Select("SELECT * FROM users WHERE id = #{id}")
    User selectById(Long id);

    @Select("SELECT * FROM users WHERE name LIKE CONCAT('%', #{keyword}, '%')")
    List<User> findByName(String keyword);
}
使用
java
@Service
public class OrderService {

    @Autowired
    private OrderMapper orderMapper;

    @Autowired
    private UserMapper userMapper;

    public OrderDTO getOrder(Long orderId) {
        Order order = orderMapper.selectById(orderId);
        User user = userMapper.selectById(order.getUserId());
        return new OrderDTO(order, user);
    }

    // 事务要指定 transactionManager,否则不知道用哪个数据源的事务
    @Transactional(transactionManager = "orderTransactionManager")
    public void createOrder(Order order) {
        orderMapper.insert(order);
    }
}
注意 @Transactional(transactionManager = "orderTransactionManager"):多数据源环境下,必须显式指定事务管理器。不指定的话,Spring 默认用 @Primary 标记的那个。
排除自动配置
多数据源环境下,Spring Boot 的单数据源自动配置会冲突。启动类要排除它:
arduino
@SpringBootApplication(exclude = {
    DataSourceAutoConfiguration.class,
    DataSourceTransactionManagerAutoConfiguration.class,
    MybatisAutoConfiguration.class
})
public class Application {
    public static void main(String[] args) {
        SpringApplication.run(Application.class, args);
    }
}
不排除的话,Spring Boot 会自动创建一个 HikariDataSource,跟你自己定义的 DataSource 冲突。
实战二:JPA 多数据源
JPA 多数据源比 MyBatis 稍微复杂一点,因为 EntityManagerFactory 和 Repository 扫描也要分。
项目结构
sql
com.example.multids
├── config
│   ├── OrderJpaConfig.java
│   └── UserJpaConfig.java
├── entity
│   ├── order
│   │   └── Order.java
│   └── user
│       └── User.java
├── repository
│   ├── order
│   │   └── OrderRepository.java
│   └── user
│       └── UserRepository.java
└── service
订单库 JPA 配置
less
@Configuration
@EnableJpaRepositories(
    basePackages = "com.example.multids.repository.order",
    entityManagerFactoryRef = "orderEntityManagerFactory",
    transactionManagerRef = "orderTransactionManager"
)
public class OrderJpaConfig {

    @Bean(name = "orderDataSource")
    @ConfigurationProperties(prefix = "spring.datasource.order")
    public DataSource orderDataSource() {
        return DataSourceBuilder.create().build();
    }

    @Bean(name = "orderEntityManagerFactory")
    public LocalContainerEntityManagerFactoryBean orderEntityManagerFactory(
            @Qualifier("orderDataSource") DataSource dataSource) {
        LocalContainerEntityManagerFactoryBean em = new LocalContainerEntityManagerFactoryBean();
        em.setDataSource(dataSource);
        em.setPackagesToScan("com.example.multids.entity.order");
        em.setPersistenceUnitName("orderUnit");
        HibernateJpaVendorAdapter vendorAdapter = new HibernateJpaVendorAdapter();
        em.setJpaVendorAdapter(vendorAdapter);
        Map<String, Object> properties = new HashMap<>();
        properties.put("hibernate.hbm2ddl.auto", "update");
        properties.put("hibernate.show_sql", true);
        properties.put("hibernate.format_sql", true);
        em.setJpaPropertyMap(properties);
        return em;
    }

    @Bean(name = "orderTransactionManager")
    public PlatformTransactionManager orderTransactionManager(
            @Qualifier("orderEntityManagerFactory") EntityManagerFactory emf) {
        return new JpaTransactionManager(emf);
    }
}
用户库 JPA 配置
less
@Configuration
@EnableJpaRepositories(
    basePackages = "com.example.multids.repository.user",
    entityManagerFactoryRef = "userEntityManagerFactory",
    transactionManagerRef = "userTransactionManager"
)
public class UserJpaConfig {

    @Bean(name = "userDataSource")
    @ConfigurationProperties(prefix = "spring.datasource.user")
    public DataSource userDataSource() {
        return DataSourceBuilder.create().build();
    }

    @Bean(name = "userEntityManagerFactory")
    public LocalContainerEntityManagerFactoryBean userEntityManagerFactory(
            @Qualifier("userDataSource") DataSource dataSource) {
        LocalContainerEntityManagerFactoryBean em = new LocalContainerEntityManagerFactoryBean();
        em.setDataSource(dataSource);
        em.setPackagesToScan("com.example.multids.entity.user");
        em.setPersistenceUnitName("userUnit");
        HibernateJpaVendorAdapter vendorAdapter = new HibernateJpaVendorAdapter();
        em.setJpaVendorAdapter(vendorAdapter);
        Map<String, Object> properties = new HashMap<>();
        properties.put("hibernate.hbm2ddl.auto", "update");
        properties.put("hibernate.show_sql", true);
        em.setJpaPropertyMap(properties);
        return em;
    }

    @Bean(name = "userTransactionManager")
    public PlatformTransactionManager userTransactionManager(
            @Qualifier("userEntityManagerFactory") EntityManagerFactory emf) {
        return new JpaTransactionManager(emf);
    }
}
MyBatis 和 JPA 的多数据源套路一模一样:DataSource → 核心工厂(SqlSessionFactory / EntityManagerFactory)→ TransactionManager → 扫描路径,四样东西各配各的。
实战三:动态数据源------运行时切换
静态多数据源能解决"固定连两个库"的问题,但有些场景数据源是动态的:比如 SaaS 系统里每个租户一个库,或者读写分离(写走主库、读走从库)。这时候需要运行时切换数据源。
原理:AbstractRoutingDataSource
Spring 提供了 AbstractRoutingDataSource,它是一个 DataSource 的路由器。调用 getConnection() 时,它不自己创建连接,而是根据一个 key 找到对应的真实 DataSource,再从那个 DataSource 拿连接。
scala
// org.springframework.jdbc.datasource.lookup.AbstractRoutingDataSource
public abstract class AbstractRoutingDataSource extends AbstractDataSource {

    private Map<Object, Object> targetDataSources;    // key → DataSource 映射
    private Object defaultTargetDataSource;             // 默认数据源

    @Override
    public Connection getConnection() throws SQLException {
        return determineTargetDataSource().getConnection();
    }

    protected DataSource determineTargetDataSource() {
        // 调用子类实现的 determineCurrentLookupKey() 获取当前数据源的 key
        Object lookupKey = determineCurrentLookupKey();
        DataSource dataSource = this.resolvedDataSources.get(lookupKey);
        if (dataSource == null) {
            dataSource = this.resolvedDefaultDataSource;
        }
        return dataSource;
    }

    // 子类实现这个方法,返回当前应该用哪个数据源的 key
    protected abstract Object determineCurrentLookupKey();
}核心就一个方法:determineCurrentLookupKey()。你告诉它用哪个 key,它就帮你找到对应的 DataSource。
实现:动态数据源
1. 定义数据源 key 的上下文
用 ThreadLocal 存当前线程应该用哪个数据源:
typescript
public class DynamicDataSourceContext {

    private static final ThreadLocal<String> CONTEXT_HOLDER = new ThreadLocal<>();

    public static void setDataSourceKey(String key) {
        CONTEXT_HOLDER.set(key);
    }

    public static String getDataSourceKey() {
        return CONTEXT_HOLDER.get();
    }

    public static void clearDataSourceKey() {
        CONTEXT_HOLDER.remove();
    }
}
2. 实现 AbstractRoutingDataSource
scala
public class DynamicDataSource extends AbstractRoutingDataSource {

    @Override
    protected Object determineCurrentLookupKey() {
        return DynamicDataSourceContext.getDataSourceKey();
    }
}三行代码。determineCurrentLookupKey() 从 ThreadLocal 里取 key,返回给 Spring。
3. 配置动态数据源
less
@Configuration
@MapperScan(basePackages = "com.example.mapper", sqlSessionFactoryRef = "dynamicSqlSessionFactory")
public class DynamicDataSourceConfig {

    @Bean
    @ConfigurationProperties(prefix = "spring.datasource.master")
    public DataSource masterDataSource() {
        return DataSourceBuilder.create().build();
    }

    @Bean
    @ConfigurationProperties(prefix = "spring.datasource.slave")
    public DataSource slaveDataSource() {
        return DataSourceBuilder.create().build();
    }

    @Bean
    @Primary
    public DynamicDataSource dynamicDataSource(
            @Qualifier("masterDataSource") DataSource master,
            @Qualifier("slaveDataSource") DataSource slave) {
        DynamicDataSource dynamicDataSource = new DynamicDataSource();
        Map<Object, Object> targetDataSources = new HashMap<>();
        targetDataSources.put("master", master);
        targetDataSources.put("slave", slave);
        dynamicDataSource.setTargetDataSources(targetDataSources);
        dynamicDataSource.setDefaultTargetDataSource(master);
        return dynamicDataSource;
    }

    @Bean
    public SqlSessionFactory dynamicSqlSessionFactory(
            @Qualifier("dynamicDataSource") DataSource dataSource) throws Exception {
        SqlSessionFactoryBean bean = new SqlSessionFactoryBean();
        bean.setDataSource(dataSource);
        bean.setMapperLocations(
            new PathMatchingResourcePatternResolver()
                .getResources("classpath:mapper/**/*.xml"));
        return bean.getObject();
    }

    @Bean
    public PlatformTransactionManager transactionManager(
            @Qualifier("dynamicDataSource") DataSource dataSource) {
        return new DataSourceTransactionManager(dataSource);
    }
}
4. 定义注解
less
@Target({ElementType.METHOD, ElementType.TYPE})
@Retention(RetentionPolicy.RUNTIME)
@Documented
public @interface DS {
    String value() default "master";
}
5. AOP 切面
less
@Aspect
@Component
@Slf4j
public class DynamicDataSourceAspect {

    @Before("@annotation(ds)")
    public void before(JoinPoint point, DS ds) {
        DynamicDataSourceContext.setDataSourceKey(ds.value());
        log.debug("切换数据源: {}", ds.value());
    }

    @After("@annotation(ds)")
    public void after(JoinPoint point, DS ds) {
        DynamicDataSourceContext.clearDataSourceKey();
    }
}
6. 使用
kotlin
@Service
public class OrderService {

    @Autowired
    private OrderMapper orderMapper;

    @DS("master")
    public int insertOrder(Order order) {
        return orderMapper.insert(order);
    }

    @DS("slave")
    public Order getOrder(Long id) {
        return orderMapper.selectById(id);
    }
}
方法上打个 @DS("slave"),AOP 在方法执行前把 ThreadLocal 设成 slave,执行完清掉。这就是读写分离的基本实现。
动态数据源注意事项
事务内切换数据源无效 :Spring 的事务在方法开始时就绑定了 DataSource。方法内中途切换 ThreadLocal key,已经拿到的 Connection 不会变。所以 @DS 必须在 @Transactional 外层,或者干脆不在同一事务里用。
less
// 错误:@Transactional 先绑定了 master 的连接,@DS 切不进去
@Transactional
@DS("slave")
public void wrongExample() {
    // 实际走的还是 master
}

// 正确:@DS 在外层,先切换数据源,再开事务
@DS("slave")
@Transactional(transactionManager = "transactionManager")
public void rightExample() {
    // 走 slave
}
ThreadLocal 一定要清 :AOP 的 @After 里清 ThreadLocal。如果是异步线程(线程池),子线程拿不到父线程的 ThreadLocal,需要用 InheritableThreadLocal 或者手动传递。
实战四:MyBatis-Plus 多数据源
MyBatis-Plus 从 3.4.0 开始提供了 mybatis-plus-spring-boot-starter 内置的动态数据源支持,原理和上面一样,但帮你封装好了配置。
引入依赖
xml
<dependency>
    <groupId>com.baomidou</groupId>
    <artifactId>mybatis-plus-spring-boot3-starter</artifactId>
    <version>3.5.5</version>
</dependency>
<dependency>
    <groupId>com.baomidou</groupId>
    <artifactId>dynamic-datasource-spring-boot3-starter</artifactId>
    <version>4.2.0</version>
</dependency>
配置
yaml
spring:
  datasource:
    dynamic:
      primary: master          // 默认数据源
      strict: true             // 严格匹配,找不到数据源时报错
      datasource:
        master:
          url: jdbc:mysql://192.168.1.10:3306/order_db?useUnicode=true&characterEncoding=utf-8&serverTimezone=Asia/Shanghai
          username: root
          password: 123456
          driver-class-name: com.mysql.cj.jdbc.Driver
        slave:
          url: jdbc:mysql://192.168.1.20:3306/order_db_readonly?useUnicode=true&characterEncoding=utf-8&serverTimezone=Asia/Shanghai
          username: root
          password: 654321
          driver-class-name: com.mysql.cj.jdbc.Driver
        report:
          url: jdbc:postgresql://192.168.1.30:5432/report_db
          username: postgres
          password: postgres
          driver-class-name: org.postgresql.Driver
使用
kotlin
@Service
@DS("master")   // 类级别:默认用 master
public class OrderService {

    @Autowired
    private OrderMapper orderMapper;

    public int createOrder(Order order) {
        return orderMapper.insert(order);       // 走 master
    }

    @DS("slave")                                // 方法级别:覆盖类级别
    public Order getOrder(Long id) {
        return orderMapper.selectById(id);      // 走 slave
    }

    @DS("report")
    public List<Order> getReportData() {
        return orderMapper.selectList(null);    // 走 report(PostgreSQL)
    }
}
@DS 可以加在类上(对所有方法生效),也可以加在方法上(覆盖类级别)。MyBatis-Plus 的 dynamic-datasource 内部也是用 AOP + ThreadLocal + AbstractRoutingDataSource 实现的,只不过帮你省掉了那堆配置代码。
原理:Spring 数据源初始化流程
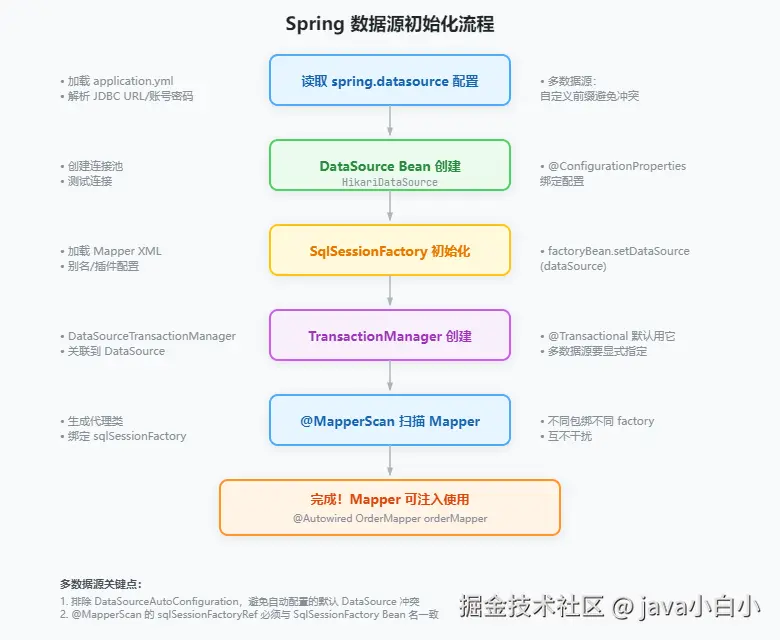 Spring Boot 启动时,数据源相关组件的创建顺序:
- DataSource 创建 :读取
spring.datasource.*配置,创建 HikariDataSource(或其他连接池) - SqlSessionFactory 创建:用 DataSource 初始化 MyBatis 的 SqlSessionFactory,加载 Mapper XML
- TransactionManager 创建:用 DataSource 创建事务管理器
- Mapper 扫描:@MapperScan 扫描指定包路径下的接口,为每个接口生成代理类,绑定到对应的 SqlSessionFactory
多数据源的情况下,这套流程跑多遍,每个数据源一套。关键在于用 @Qualifier 把它们关联起来。
源码:DataSourceAutoConfiguration
less
// org.springframework.boot.autoconfigure.jdbc.DataSourceAutoConfiguration
@AutoConfiguration
@ConditionalOnClass({ DataSource.class, EmbeddedDatabaseType.class })
@ConditionalOnMissingBean(type = "io.r2dbc.spi.ConnectionFactory")
@EnableConfigurationProperties(DataSourceProperties.class)
public class DataSourceAutoConfiguration {

    @Configuration(proxyBeanMethods = false)
    @Conditional(EmbeddedDatabaseCondition.class)
    @ConditionalOnMissingBean({ DataSource.class })
    protected static class EmbeddedDataSourceConfiguration {

        @Bean
        @ConfigurationProperties("spring.datasource.hikari")
        public DataSource dataSource(DataSourceProperties properties) {
            return properties.initializeDataSourceBuilder()
                .type(HikariDataSource.class).build();
        }
    }
}
这个自动配置类会在没有自定义 DataSource Bean 时创建默认数据源。多数据源场景下我们要排除它,手动创建每个 DataSource。
源码:AbstractRoutingDataSource
typescript
// org.springframework.jdbc.datasource.lookup.AbstractRoutingDataSource
public abstract class AbstractRoutingDataSource extends AbstractDataSource {

    private Map<Object, Object> targetDataSources;
    private Object defaultTargetDataSource;
    private Map<Object, DataSource> resolvedDataSources;
    private DataSource resolvedDefaultDataSource;

    // 初始化时把 targetDataSources 里的配置解析成真正的 DataSource 对象
    @Override
    public void afterPropertiesSet() {
        if (this.targetDataSources == null) {
            throw new IllegalArgumentException("targetDataSources 不能为空");
        }
        this.resolvedDataSources = new HashMap<>(this.targetDataSources.size());
        for (Map.Entry<Object, Object> entry : this.targetDataSources.entrySet()) {
            Object key = entry.getKey();
            Object value = entry.getValue();
            DataSource dataSource = resolveDataSource(value);
            this.resolvedDataSources.put(key, dataSource);
        }
        if (this.defaultTargetDataSource != null) {
            this.resolvedDefaultDataSource = resolveDataSource(this.defaultTargetDataSource);
        }
    }

    // 获取连接时,根据 key 找到对应数据源
    @Override
    public Connection getConnection() throws SQLException {
        return determineTargetDataSource().getConnection();
    }

    protected DataSource determineTargetDataSource() {
        Object lookupKey = determineCurrentLookupKey();
        DataSource dataSource = this.resolvedDataSources.get(lookupKey);
        if (dataSource == null) {
            dataSource = this.resolvedDefaultDataSource;
        }
        if (dataSource == null) {
            throw new IllegalStateException("找不到 key 为 [" + lookupKey + "] 的数据源");
        }
        return dataSource;
    }

    protected abstract Object determineCurrentLookupKey();
}
afterPropertiesSet() 在 Bean 初始化时调用,把配置里的 Map 转成真正的 DataSource 对象缓存起来。之后每次 getConnection() 只是查 Map 取对应的 DataSource,开销可以忽略。
源码:@MapperScan 的绑定逻辑
less
// org.mybatis.spring.annotation.MapperScan
@Retention(RetentionPolicy.RUNTIME)
@Target(ElementType.TYPE)
@Import(MapperScannerRegistrar.class)
public @interface MapperScan {
    String[] basePackages() default {};
    String sqlSessionFactoryRef() default "";
    String sqlSessionTemplateRef() default "";
    Class<? extends MapperFactoryBean> factoryBean() default MapperFactoryBean.class;
}
@MapperScan 里的 sqlSessionFactoryRef 指定了扫描到的 Mapper 接口要绑定到哪个 SqlSessionFactory。这就是为什么不同数据源的 Mapper 要分开放------扫描时只扫自己包下的 Mapper,绑到自己的 SqlSessionFactory 上。
三种方案对比
| 对比项 | 静态多数据源 | 动态数据源(自建) | MyBatis-Plus 动态数据源 |
|---|---|---|---|
| 配置复杂度 | 每个数据源一套配置类 | 一个配置类 + ThreadLocal + AOP | YAML 配置即可 |
| 切换方式 | 不同包的 Mapper 自动路由 | @DS 注解 + AOP | @DS 注解 + AOP |
| 数据源数量 | 固定,编译期确定 | 可运行时动态增减 | 可运行时动态增减 |
| 适用场景 | 固定两三个库 | 读写分离、租户隔离 | 读写分离、多库快速切换 |
| 事务管理 | 每个数据源独立事务 | 只支持单库事务 | 只支持单库事务 |
| 跨库事务 | 不支持 | 不支持 | 不支持 |
跨库事务怎么办
多数据源最大的痛点:跨库事务。两个库的更新要么同时成功,要么同时失败,单靠本地事务做不到。
方案一:分布式事务 Seata
Seata 是阿里开源的分布式事务框架,支持 AT、TCC、Saga、XA 四种模式。AT 模式对代码侵入最小:
xml
<dependency>
    <groupId>io.seata</groupId>
    <artifactId>seata-spring-boot-starter</artifactId>
    <version>1.7.1</version>
</dependency>
less
@Service
public class OrderService {

    @DS("master")
    @Transactional
    @GlobalTransactional  // Seata 全局事务
    public void createOrderWithUser(Order order, User user) {
        orderMapper.insert(order);       // 订单库
        userMapper.update(user);          // 用户库
        // 任一失败,两个库都回滚
    }
}
Seata 的 AT 模式通过拦截 SQL 生成回滚日志(undo_log),在全局事务回滚时自动补偿。代价是每个库要加一张 undo_log 表,性能比本地事务低不少。
方案二:消息最终一致性
不强求实时一致,用消息队列保证最终一致:
less
@Service
public class OrderService {

    @DS("master")
    @Transactional(transactionManager = "orderTransactionManager")
    public void createOrder(Order order) {
        orderMapper.insert(order);
        // 发消息,用户服务消费后更新用户积分
        rabbitTemplate.convertAndSend("order.exchange", "order.created", order.getId());
    }
}
用户服务消费消息,在自己的事务里更新用户数据。如果消费失败,消息队列会重试。最终两边一致。
方案三:本地事务表
less
@Service
public class OrderService {

    @DS("master")
    @Transactional(transactionManager = "orderTransactionManager")
    public void createOrder(Order order) {
        orderMapper.insert(order);
        // 在订单库写一条待处理的消息记录
        OutMessage msg = new OutMessage();
        msg.setTopic("user.update");
        msg.setBody(order.toJson());
        msg.setStatus("PENDING");
        outMessageMapper.insert(msg);
    }
}
用定时任务扫描待处理的消息,调用用户库的接口。消息处理成功后标记为 DONE。这个方案不需要消息队列,适合中小项目。
连接池配置
多数据源环境下,每个数据源都要单独配连接池参数。不配的话,每个库默认 10 个连接,三个库就是 30 个,数据库连接数很快就用光。
less
spring:
  datasource:
    order:
      url: jdbc:mysql://192.168.1.10:3306/order_db
      username: root
      password: 123456
      driver-class-name: com.mysql.cj.jdbc.Driver
      hikari:
        maximum-pool-size: 15
        minimum-idle: 5
        idle-timeout: 30000
        connection-timeout: 3000
        max-lifetime: 1800000
    user:
      url: jdbc:mysql://192.168.1.20:3306/user_db
      username: root
      password: 654321
      driver-class-name: com.mysql.cj.jdbc.Driver
      hikari:
        maximum-pool-size: 10
        minimum-idle: 3
        idle-timeout: 30000
        connection-timeout: 3000
max-lifetime: 1800000| 参数 | 含义 | 建议值 |
|---|---|---|
maximum-pool-size |
最大连接数 | 主库 15-20,从库 10-15 |
minimum-idle |
最小空闲连接 | 主库 5,从库 3 |
idle-timeout |
空闲连接超时 | 30 秒 |
connection-timeout |
获取连接超时 | 3 秒 |
max-lifetime |
连接最大存活时间 | 30 分钟 |
总连接数 = 各数据源连接数之和 ,不能超过数据库的 max_connections。MySQL 默认 151 个连接,三个数据源各配 50 个,加上其他应用的连接,很容易超。
注意事项和常见坑
1. @Primary 只能标一个
多个 DataSource 时,必须有一个标 @Primary,否则 Spring 注入时不知道用哪个。动态数据源场景下,@Primary 标在 DynamicDataSource 上。
2. Mapper 扫描路径不能重叠
less
// 错误:两个数据源扫了同一个包
@MapperScan(basePackages = "com.example.mapper")     // 数据源A
@MapperScan(basePackages = "com.example.mapper")     // 数据源B
// 结果:每个 Mapper 被注册两次,后注册的覆盖前面的,行为不确定
3. 事务传播与数据源切换
@Transactional 的默认传播行为是 REQUIRED:如果当前有事务,加入当前事务。多数据源环境下,一个方法调另一个数据源的方法,事务不会自动切换。
less
@Service
public class OrderService {

    @DS("master")
    @Transactional(transactionManager = "orderTransactionManager")
    public void createOrder(Order order) {
        orderMapper.insert(order);
        // 调用用户服务的方法,但它的事务管理器是 userTransactionManager
        // 当前事务是 orderTransactionManager,不会切换
        userService.updateUser(user);   // 走的还是 order 库的事务
    }
}
想跨库事务,用上面提到的分布式事务方案。
4. 动态数据源的嵌套切换
A 方法切到 slave,B 方法切到 master,A 调 B------B 切完了回 A,数据源还是 master 还是 slave?
typescript
@DS("slave")
public void methodA() {
    // 走 slave
    methodB();
    // 这里走什么?取决于 AOP 的恢复逻辑
}

@DS("master")
public void methodB() {
    // 走 master
}
MyBatis-Plus 的 dynamic-datasource 用栈结构保存了嵌套切换前的 key,方法返回后自动恢复。自建的方案如果只用了 set 和 clear,嵌套调用时可能丢掉外层的数据源 key。解决办法:用栈代替简单的 ThreadLocal。
arduino
public class DynamicDataSourceContext {

    private static final ThreadLocal<Deque<String>> STACK = ThreadLocal.withInitial(ArrayDeque::new);

    public static void push(String key) {
        STACK.get().push(key);
    }

    public static void pop() {
        Deque<String> stack = STACK.get();
        stack.pop();
        if (stack.isEmpty()) {
            STACK.remove();
        }
    }

    public static String peek() {
        Deque<String> stack = STACK.get();
        return stack.isEmpty() ? null : stack.peek();
    }
}
5. 连接泄漏排查
多数据源环境下连接池更容易出问题。某个方法拿着连接不放,其他请求就拿不到连接了。HikariCP 自带连接泄漏检测:
yaml
spring:
  datasource:
    order:
      hikari:
        leak-detection-threshold: 60000   # 连接持有超过60秒就报警
总结
| 知识点 | 要点 |
|---|---|
| 核心思路 | 每个数据源一套独立组件链:DataSource → Factory → TransactionManager |
| MyBatis 多数据源 | @MapperScan 指定包路径和 sqlSessionFactoryRef |
| JPA 多数据源 | @EnableJpaRepositories 指定包路径、entityManagerFactoryRef、transactionManagerRef |
| 动态数据源 | AbstractRoutingDataSource + ThreadLocal + AOP |
| MyBatis-Plus 动态数据源 | dynamic-datasource-spring-boot-starter,@DS 注解切换 |
| 跨库事务 | Seata 分布式事务 / 消息最终一致性 / 本地事务表 |
| 连接池 | 每个数据源单独配,总连接数不超过数据库上限 |
| Mapper 分包 | 不同数据源的 Mapper 分开放,扫描路径不能重叠 |
| @Primary | 多个 DataSource 时必须标一个为默认 |
| 嵌套切换 | 用栈结构保存切换前的 key,避免丢失 |
多数据源配置的本质就一句话:每个库配一套组件,用包路径或注解把 Mapper 跟数据源绑定起来。