操作指南
本节中的每个指南都针对您作为有经验的用户在使用 Ragas 时可能遇到的实际问题提供了专注的解决方案。这些指南设计得简洁直接,为您的问题提供快速解决方案。我们假设您对 Ragas 的概念有基本了解且能够熟练使用。如果不是,请先浏览 快速入门 (Get Started)部分。
如何评估和改进 RAG 应用
在本指南中,您将学习如何使用 Ragas 评估和迭代改进一个 RAG(检索增强生成)应用。
您将完成的工作
- 设置评估数据集
- 建立衡量 RAG 性能的指标
- 构建可重用的评估管道
- 分析错误并系统地改进您的 RAG 应用
- 学习如何利用 Ragas 进行 RAG 评估
设置并运行 RAG 系统
我们构建了一个简单的 RAG 系统,从 Hugging Face 文档数据集中检索相关文档,并使用 LLM 生成答案。该数据集包含许多 Hugging Face 包的文档页面,以 markdown 格式存储,为测试 RAG 能力提供了丰富的知识库。
完整实现位于: ragas_examples/improve_rag

要运行此应用,请安装依赖项:
bash
uv pip install "ragas-examples[improverag]"然后运行 RAG 应用:
python
import os
import asyncio
from openai import AsyncOpenAI
from ragas_examples.improve_rag.rag import RAG, BM25Retriever
# Set up OpenAI client
os.environ["OPENAI_API_KEY"] = "<your_key>"
openai_client = AsyncOpenAI()
# Create retriever and RAG system
retriever = BM25Retriever()
rag = RAG(openai_client, retriever)
# Query the system
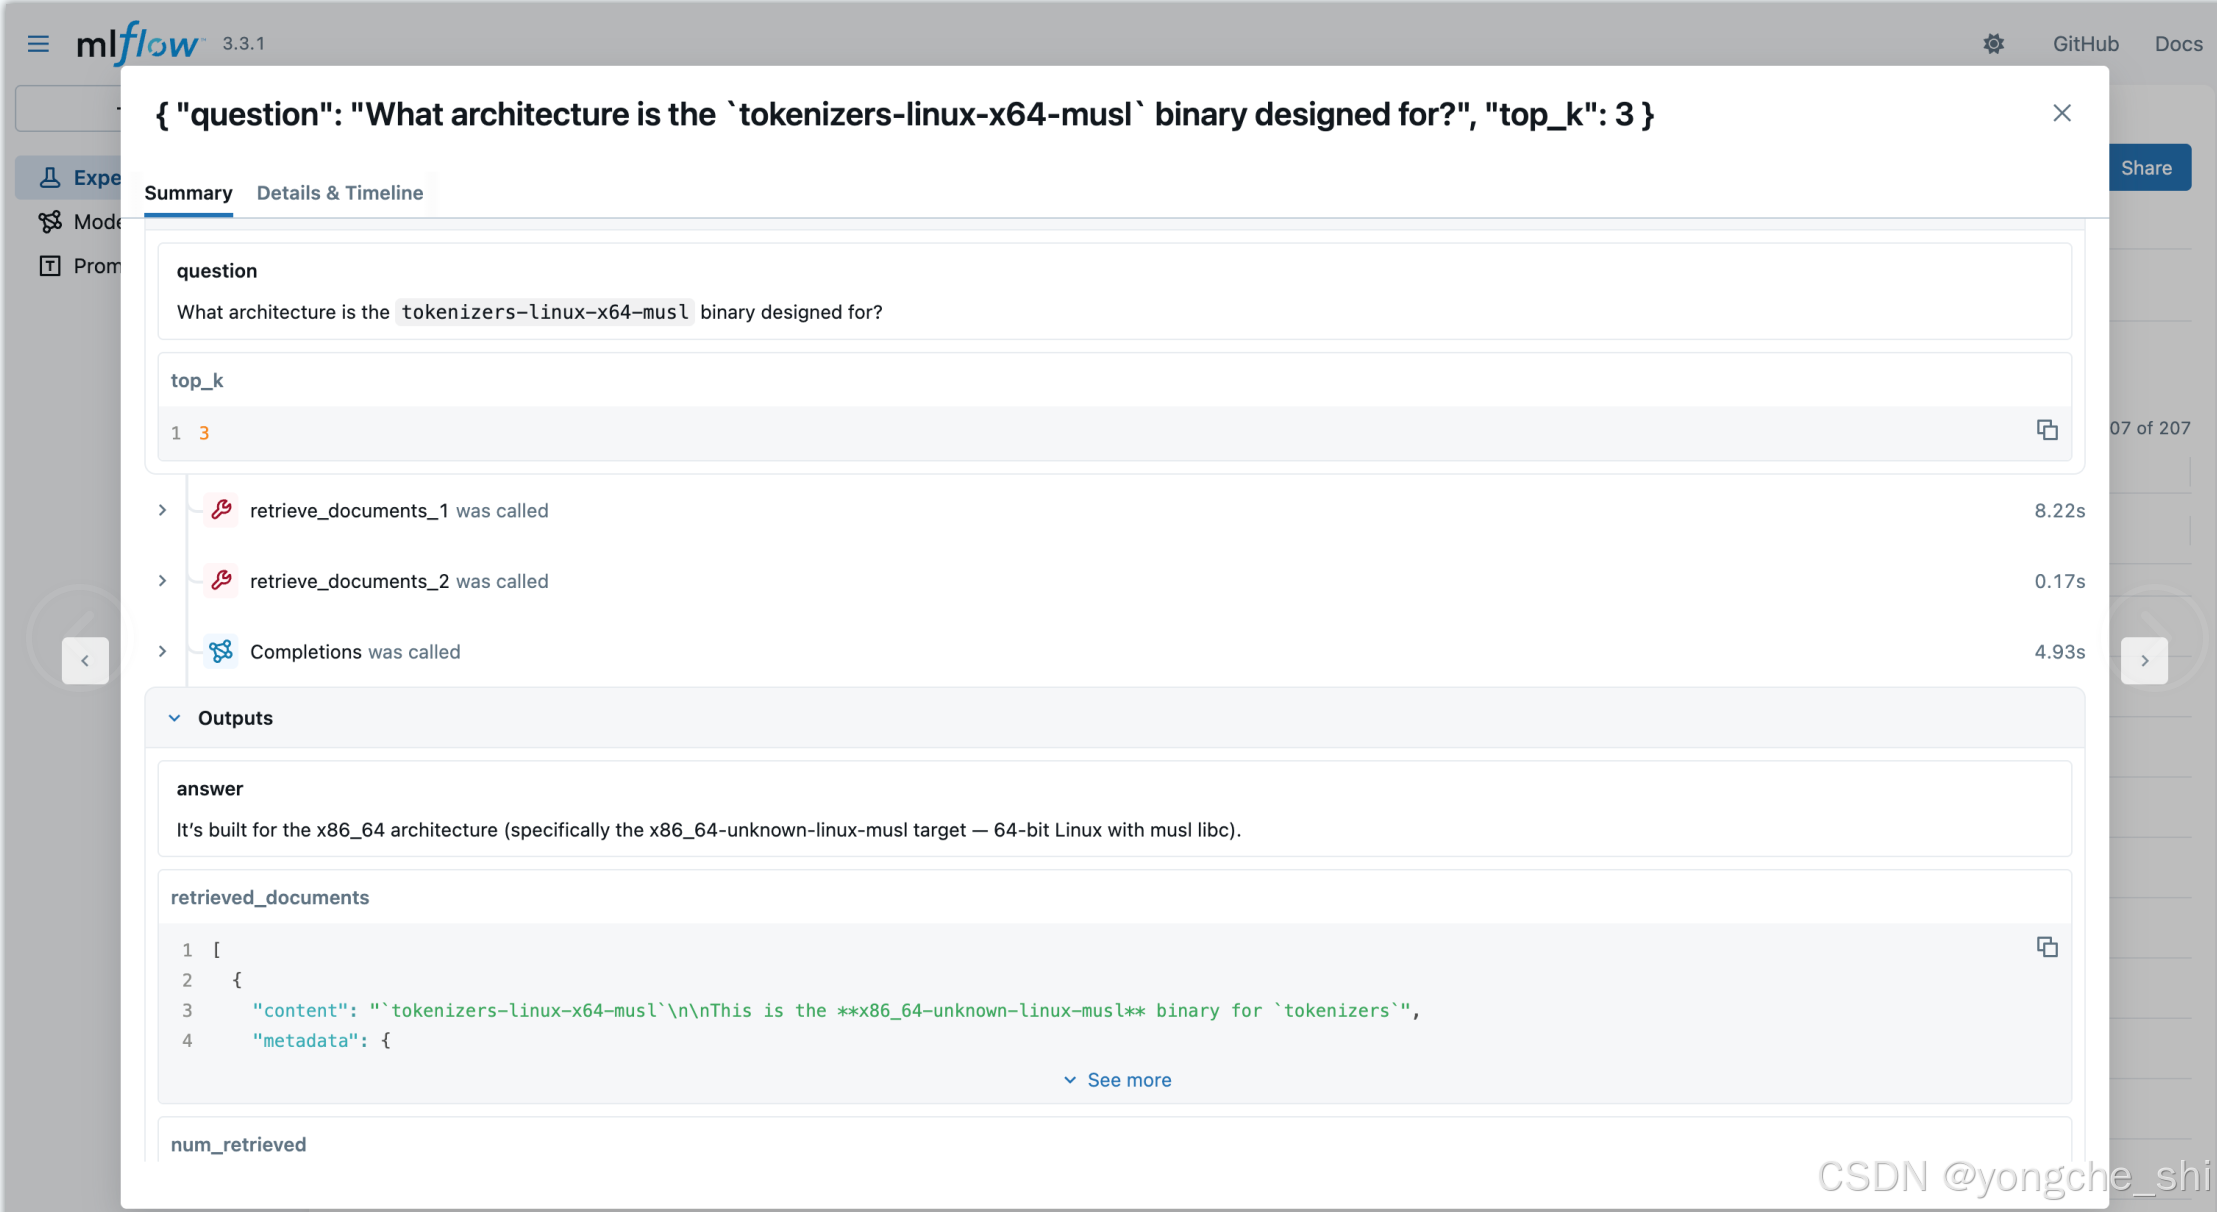
question = "What architecture is the `tokenizers-linux-x64-musl` binary designed for?"
result = asyncio.run(rag.query(question))
print(f"Answer: {result['answer']}")输出
python
Answer: It's built for the x86_64 architecture (specifically the x86_64-unknown-linux-musl target --- 64-bit Linux with musl libc).理解 RAG 实现
上面的代码使用了一个简单的 RAG 类,演示了核心的 RAG 模式。其工作原理如下:
python
# examples/ragas_examples/improve_rag/rag.py
from typing import Any, Dict, Optional
from openai import AsyncOpenAI

class RAG:
    """Simple RAG system for document retrieval and answer generation."""

    def __init__(self, llm_client: AsyncOpenAI, retriever: BM25Retriever, system_prompt=None, model="gpt-4o-mini", default_k=3):
        self.llm_client = llm_client
        self.retriever = retriever
        self.model = model
        self.default_k = default_k
        self.system_prompt = system_prompt or "Answer only based on documents. Be concise.\n\nQuestion: {query}\nDocuments:\n{context}\nAnswer:"

    async def query(self, question: str, top_k: Optional[int] = None) -> Dict[str, Any]:
        """Query the RAG system."""
        if top_k is None:
            top_k = self.default_k

        return await self._naive_query(question, top_k)

    async def _naive_query(self, question: str, top_k: int) -> Dict[str, Any]:
        """Handle naive RAG: retrieve once, then generate."""
        # 1. Retrieve documents using BM25
        docs = self.retriever.retrieve(question, top_k)

        if not docs:
            return {"answer": "No relevant documents found.", "retrieved_documents": [], "num_retrieved": 0}

        # 2. Build context from retrieved documents
        context = "\n\n".join([f"Document {i}:\n{doc.page_content}" for i, doc in enumerate(docs, 1)])
        prompt = self.system_prompt.format(query=question, context=context)

        # 3. Generate response using OpenAI with retrieved context
        response = await self.llm_client.chat.completions.create(
            model=self.model,
            messages=[{"role": "user", "content": prompt}]
        )

        return {
            "answer": response.choices[0].message.content.strip(),
            "retrieved_documents": [{"content": doc.page_content, "metadata": doc.metadata, "document_id": i} for i, doc in enumerate(docs)],
            "num_retrieved": len(docs)
        }
这展示了基本的 RAG 模式:检索相关文档 → 注入提示词 → 生成答案。
创建评估数据集
我们将使用 huggingface_doc_qa_eval ,这是一个关于 Hugging Face 文档的问答数据集。
以下是数据集中的几个示例行:
| Question | Expected Answer |
|---|---|
| tokenizers-linux-x64-musl 二进制文件是为哪种架构设计的? | x86_64-unknown-linux-musl |
| BLIP-Diffusion 模型的用途是什么? | The BLIP-Diffusion model is designed for controllable text-to-image generation and editing. |
| Datasets server API 中 /healthcheck 端点的用途是什么? | Ensure the app is running |
评估脚本从此处下载数据集,并将其转换为 Ragas Dataset 格式:
python
# examples/ragas_examples/improve_rag/evals.py
import urllib.request
from pathlib import Path
from ragas import Dataset
import pandas as pd

def download_and_save_dataset() -> Path:
    dataset_path = Path("datasets/hf_doc_qa_eval.csv")
    dataset_path.parent.mkdir(exist_ok=True)

    if not dataset_path.exists():
        github_url = "https://raw.githubusercontent.com/vibrantlabsai/ragas/main/examples/ragas_examples/improve_rag/datasets/hf_doc_qa_eval.csv"
        urllib.request.urlretrieve(github_url, dataset_path)

    return dataset_path

def create_ragas_dataset(dataset_path: Path) -> Dataset:
    dataset = Dataset(name="hf_doc_qa_eval", backend="local/csv", root_dir=".")
    df = pd.read_csv(dataset_path)

    for _, row in df.iterrows():
        dataset.append({"question": row["question"], "expected_answer": row["expected_answer"]})

    dataset.save()
    return dataset
了解更多关于使用数据集的信息,请参阅核心概念 - 数据集(Core Concepts - Datasets)。
设置 RAG 评估指标
既然我们的评估数据集已准备就绪,我们需要指标来衡量 RAG 性能。从简单、专注的指标开始,这些指标直接衡量您的核心用例。有关指标的更多信息,请参阅核心概念 - 指标(Core Concepts - Metrics)。
在这里,我们使用一个正确性离散指标(correctness discrete metric),用于评估 RAG 响应是否包含预期答案中的关键信息,并且基于提供的上下文在事实层面是准确的。
python
# examples/ragas_examples/improve_rag/evals.py
from ragas.metrics import DiscreteMetric

# Define correctness metric
correctness_metric = DiscreteMetric(
    name="correctness",
    prompt="""Compare the model response to the expected answer and determine if it's correct.

Consider the response correct if it:
1. Contains the key information from the expected answer
2. Is factually accurate based on the provided context
3. Adequately addresses the question asked

Return 'pass' if the response is correct, 'fail' if it's incorrect.

Question: {question}
Expected Answer: {expected_answer}
Model Response: {response}

Evaluation:""",
    allowed_values=["pass", "fail"],
)
既然我们有了评估指标,我们需要在整个数据集上系统地运行它。这就是 Ragas 实验(Ragas experiments)的用途。
创建评估实验
实验函数在每个数据样本上运行您的 RAG 系统,并使用我们的正确性指标评估响应。有关实验的更多信息,请参阅核心概念 - 实验(Core Concepts - Experimentation)。
实验函数接收包含问题、预期上下文和预期答案的数据集行,然后:
- 使用问题查询 RAG 系统
- 使用正确性指标评估响应
- 返回详细结果,包括分数和原因
python
# examples/ragas_examples/improve_rag/evals.py
import asyncio
from typing import Dict, Any
from ragas import experiment

@experiment()
async def evaluate_rag(row: Dict[str, Any], rag: RAG, llm) -> Dict[str, Any]:
    """
    Run RAG evaluation on a single row.

    Args:
        row: Dictionary containing question and expected_answer
        rag: Pre-initialized RAG instance
        llm: Pre-initialized LLM client for evaluation

    Returns:
        Dictionary with evaluation results
    """
    question = row["question"]

    # Query the RAG system
    rag_response = await rag.query(question, top_k=4)
    model_response = rag_response.get("answer", "")

    # Evaluate correctness asynchronously
    score = await correctness_metric.ascore(
        question=question,
        expected_answer=row["expected_answer"],
        response=model_response,
        llm=llm
    )

    # Return evaluation results
    result = {
        **row,
        "model_response": model_response,
        "correctness_score": score.value,
        "correctness_reason": score.reason,
        "mlflow_trace_id": rag_response.get("mlflow_trace_id", "N/A"),  # MLflow trace ID for debugging (explained later)
        "retrieved_documents": [
            doc.get("content", "")[:200] + "..." if len(doc.get("content", "")) > 200 else doc.get("content", "")
            for doc in rag_response.get("retrieved_documents", [])
        ]
    }

    return result
既然我们的数据集、指标和实验函数都已准备就绪,我们现在可以评估我们的 RAG 系统性能了。
运行初始 RAG 实验
启动 MLflow 服务器
在运行评估之前,您必须启动 MLflow 服务器。RAG 系统会自动将跟踪信息记录到 MLflow 中,以便进行调试和分析:
python
# Start MLflow server (required - in a separate terminal)
uv run mlflow ui --backend-store-uri sqlite:///mlflow.db --port 5000
MLflow UI 将在 http://127.0.0.1:5000 可用。
运行初始 RAG 实验
现在让我们运行完整的评估管道,以获取我们 RAG 系统的基线性能指标:
python
# Import required components
import asyncio
from datetime import datetime
from ragas_examples.improve_rag.evals import (
    evaluate_rag,
    download_and_save_dataset,
    create_ragas_dataset,
    get_openai_client,
    get_llm_client
)
from ragas_examples.improve_rag.rag import RAG, BM25Retriever

async def run_evaluation():
    # Download and prepare dataset
    dataset_path = download_and_save_dataset()
    dataset = create_ragas_dataset(dataset_path)

    # Initialize RAG components
    openai_client = get_openai_client()
    retriever = BM25Retriever()
    rag = RAG(llm_client=openai_client, retriever=retriever, model="gpt-5-mini", mode="naive")
    llm = get_llm_client()

    # Run evaluation experiment
    exp_name = f"{datetime.now().strftime('%Y%m%d-%H%M%S')}_naiverag"
    results = await evaluate_rag.arun(
        dataset,
        name=exp_name,
        rag=rag,
        llm=llm
    )

    # Print results
    if results:
        pass_count = sum(1 for result in results if result.get("correctness_score") == "pass")
        total_count = len(results)
        pass_rate = (pass_count / total_count) * 100 if total_count > 0 else 0
        print(f"Results: {pass_count}/{total_count} passed ({pass_rate:.1f}%)")

    return results

# Run the evaluation
results = await run_evaluation()
print(results)
此步骤会下载数据集、初始化 BM25 检索器、对每个样本运行评估实验,并将详细结果保存为 CSV 文件到 experiments/ 目录中,以便后续分析。
输出
python
Results: 43/66 passed (65.2%)
Evaluation completed successfully!

Detailed results:
Experiment(name=20250924-212541_naiverag,  len=66)
在 65.2% 的通过率下,我们现在拥有了一个基线。 experiments/ 目录中的详细结果 CSV 文件包含了我们进行错误分析和系统性改进所需的所有数据。
在 MLflow 中查看追踪
实验结果 CSV 包含每个评估的 mlflow_trace_id 和 mlflow_trace_url ,您可以通过它们分析详细的执行追踪。追踪信息帮助您精确定位失败发生的位置------无论是在检索、生成还是评估步骤中。
RAG 系统会自动将追踪记录到之前启动的 MLflow 服务器中,您可以在 http://127.0.0.1:5000 查看。
这让您能够:
- 在 CSV 中分析结果:查看响应、指标分数和原因
- 通过追踪深入分析:点击结果中的 mlflow_trace_url ,直接跳转到 MLflow UI 中该评估的详细执行追踪
小贴士:点击追踪 URL 进行调试
每个评估结果都包含 mlflow_trace_url ------一个指向 MLflow UI 中追踪记录的直接可点击链接。无需手动导航或复制追踪 ID,只需点击即可直接跳转到详细执行追踪!
分析错误和失败模式
运行评估后,检查 experiments/ 目录中的结果 CSV 文件,以识别失败案例中的模式。每行包含 mlflow_trace_id / mlflow_trace_url ------可用于在 MLflow UI 中查看详细执行追踪。对每个失败案例进行标注,以便理解模式并改进应用程序。
评估中的实际失败模式分析:
在我们的示例中,核心问题是检索失败------BM25 检索器未能找到包含答案的文档。模型正确地遵循指令,在文档不包含信息时如实说明,但检索到了错误的文档。
文档检索失败示例 BM25 检索器未能检索到包含答案的相关文档:
| 问题 | 预期答案 | 模型响应 | 根本原因 |
|---|---|---|---|
| "create_repo 的默认仓库类型是什么?" | model | "提供的文档未说明默认仓库类型..." | BM25 遗漏了包含 create_repo 详情的文档 |
| "BLIP-Diffusion 模型的用途是什么?" | "可控文本到图像的生成与编辑" | "提供的文档未提及 BLIP‑Diffusion..." | BM25 未检索到 BLIP-Diffusion |
| 相关文档 "Hugging Face 用于托管 scikit-learn 模型的新库名称是什么?" | Skops | "提供的文档未提及或命名任何新的 Hugging Face 库..." | BM25 遗漏了 Skops 文档 |
基于此分析,我们可以看到检索是主要瓶颈。让我们实施针对性改进。
改进 RAG 应用
既然检索已被确定为主要瓶颈,我们可以通过两种方式改进系统:
传统方法侧重于更好的分块、混合搜索或向量嵌入。然而,由于我们的 BM25 检索在单次查询中始终遗漏相关文档,我们将改为探索智能体(agentic)方法。
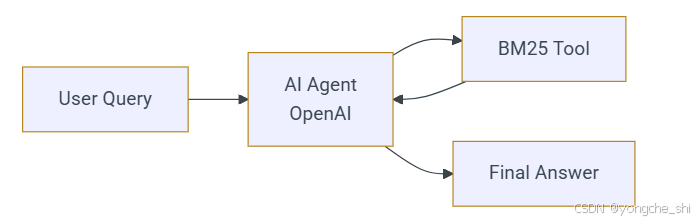
智能体 RAG(Agentic RAG)让 AI 能够迭代优化其搜索策略------尝试多个搜索词并自行判断何时已找到足够的上下文,而不是依赖单一的静态查询。
智能体 RAG 实现
运行 Agentic RAG 应用以执行示例查询:
python
# Switch to agentic mode
rag_agentic = RAG(openai_client, retriever, mode="agentic")

question = "What architecture is the `tokenizers-linux-x64-musl` binary designed for?"
result = await rag_agentic.query(question)
print(f"Answer: {result['answer']}")
输出
python
Answer: It targets x86_64 --- i.e. the x86_64-unknown-linux-musl target triple.理解 Agentic RAG 的实现
Agentic RAG 模式使用 OpenAI Agents SDK 创建一个配备 BM25 检索工具的 AI 智能体:
python
# Key components from the RAG class when mode="agentic"
from agents import Agent, Runner, function_tool

def _setup_agent(self):
    """Setup agent for agentic mode."""
    @function_tool
    def retrieve(query: str) -> str:
        """Search documents using BM25 retriever for a given query."""
        docs = self.retriever.retrieve(query, self.default_k)
        if not docs:
            return "No documents found."
        return "\n\n".join([f"Doc {i}: {doc.page_content}" for i, doc in enumerate(docs, 1)])

    self._agent = Agent(
        name="RAG Assistant",
        model=self.model,
        instructions="Use short keywords to search. Try 2-3 different searches. Only answer based on documents. Be concise.",
        tools=[retrieve]
    )

async def _agentic_query(self, question: str, top_k: int) -> Dict[str, Any]:
    """Handle agentic mode: agent controls retrieval strategy."""
    result = await Runner.run(self._agent, input=question)
    print(result.answer)
与朴素模式(naive mode)的单次检索调用不同,智能体自主决定何时以及如何搜索------尝试多种关键词组合,直到找到足够的上下文。
重新运行实验并比较结果
现在让我们评估 agentic RAG 方法:
python
# Import required components
import asyncio
from datetime import datetime
from dotenv import load_dotenv

# Load environment variables
load_dotenv()

from ragas_examples.improve_rag.evals import (
    evaluate_rag,
    download_and_save_dataset,
    create_ragas_dataset,
    get_openai_client,
    get_llm_client
)
from ragas_examples.improve_rag.rag import RAG, BM25Retriever

async def run_agentic_evaluation():
    # Download and prepare dataset
    dataset_path = download_and_save_dataset()
    dataset = create_ragas_dataset(dataset_path)

    # Initialize RAG components with agentic mode
    openai_client = get_openai_client()
    retriever = BM25Retriever()
    rag = RAG(llm_client=openai_client, retriever=retriever, model="gpt-5-mini", mode="agentic")
    llm = get_llm_client()

    # Run evaluation experiment
    exp_name = f"{datetime.now().strftime('%Y%m%d-%H%M%S')}_agenticrag"
    results = await evaluate_rag.arun(
        dataset,
        name=exp_name,
        rag=rag,
        llm=llm
    )

    # Print results
    if results:
        pass_count = sum(1 for result in results if result.get("correctness_score") == "pass")
        total_count = len(results)
        pass_rate = (pass_count / total_count) * 100 if total_count > 0 else 0
        print(f"Results: {pass_count}/{total_count} passed ({pass_rate:.1f}%)")

    return results

# Run the agentic evaluation
results = await run_agentic_evaluation()
print("\nDetailed results:")
print(results)
Agentic RAG 评估输出
python
Results: 58/66 passed (87.9%)太棒了!我们取得了显著改进,正确率从 65.2%(朴素模式)提升至 87.9%(智能体模式)------agentic RAG 方法带来了 22.7 个百分点的提升!
性能对比
Agentic RAG 方法相较于朴素 RAG 基线有显著改进:
| 方法 | 正确率 | 改进幅度 |
|---|---|---|
| 朴素 RAG | 65.2% | - |
| Agentic RAG | 87.9% | +22.7% |
将此循环应用于您的 RAG 系统
遵循这一系统化方法来改进任何 RAG 系统:
- 创建评估数据集 :使用系统中的真实查询,或利用 LLM 生成合成数据。
- 定义指标 :选择与您的用例对齐的简单指标,保持聚焦。
- 运行基线评估 :测量当前性能,分析错误模式以识别系统性故障。
- 实施针对性改进 :基于错误分析,改进检索(分块、混合搜索)、生成(提示词、模型),或尝试智能体方法。
- 比较并迭代 :测试改进方案相对于基线的效果。每次只改变一件事,直到准确率达到业务要求。
Ragas 框架自动处理编排和结果聚合,让您可以专注于分析和改进,而不是构建评估基础设施。