Three.js 实战 ------ 从零构建 3D 原子模型
本文基于元素周期表项目中的 3D 原子模型实现,带你从零掌握 Three.js 核心概念。 最终效果:一个可交互的 3D 原子可视化,包含原子核(质子/中子)、电子轨道、动态动画。
最终效果概览
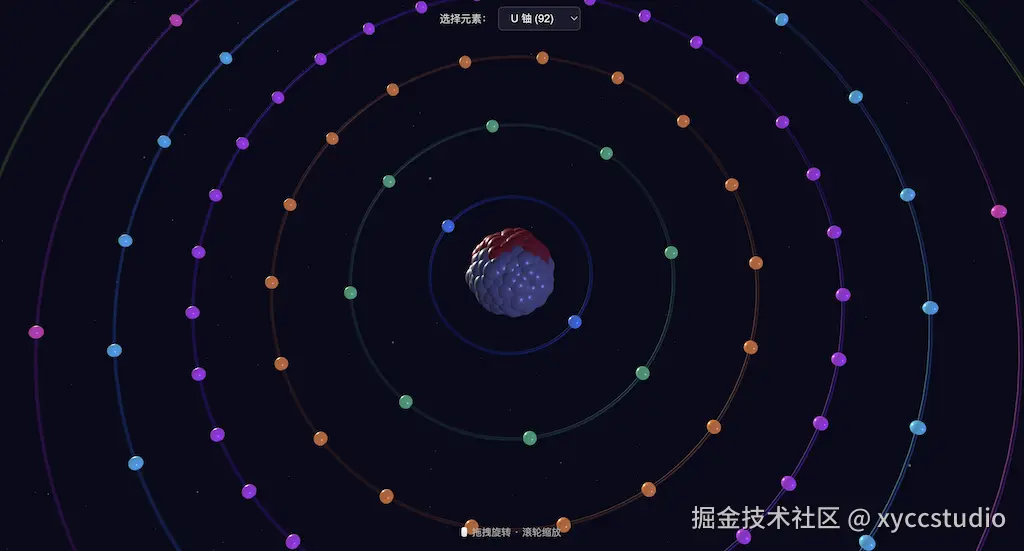
我们要实现的东西:
- 原子核:由红色质子、灰色中子组成的球状聚集体,带发光呼吸效果
- 电子轨道:多层同心圆环(Torus),每层分布对应数量的电子球体
- 交互控制:鼠标拖拽旋转、滚轮缩放
- 背景粒子:漂浮的星尘粒子增加氛围感
- 动态动画:电子沿轨道运动、原子核发光脉动
第一步:环境准备与 CDN 动态加载
在 Vue 项目中,我们不想把 Three.js 打包进 vendor,而是通过 CDN 按需加载:
js
// Three.js 核心 + OrbitControls 控制器
const CDN_THREE = 'https://unpkg.com/three@0.170.0/build/three.module.min.js'
const CDN_ORBIT  = 'https://unpkg.com/three@0.170.0/examples/jsm/controls/OrbitControls.js'

let _THREE = null
let _OrbitControls = null

async function ensureThree() {
  if (_THREE) return { THREE: _THREE, OrbitControls: _OrbitControls }
  // 动态 import CDN 地址,Vite 需要 @vite-ignore 跳过静态分析
  _THREE = await import(/* @vite-ignore */ CDN_THREE)
  _OrbitControls = (await import(/* @vite-ignore */ CDN_ORBIT)).OrbitControls
  return { THREE: _THREE, OrbitControls: _OrbitControls }
}要点:
- 使用
import()动态加载 ES Module,浏览器原生支持 /* @vite-ignore */注释让 Vite 不尝试解析 CDN URL- 加载结果缓存到模块变量,避免重复请求
如果你使用 npm 安装,直接 import * as THREE from 'three' 即可。
第二步:搭建场景三件套 ------ Scene、Camera、Renderer
Three.js 的一切都离不开这三个核心对象:
js
const { THREE, OrbitControls } = await ensureThree()

// 1. 场景 ------ 所有物体的容器
const scene = new THREE.Scene()

// 2. 相机 ------ 观察世界的眼睛(透视相机,近大远小)
const w = container.clientWidth   // 容器宽度
const h = container.clientHeight  // 容器高度
const camera = new THREE.PerspectiveCamera(45, w / h, 0.1, 100)
//                   fov  宽高比  近裁剪面  远裁剪面
camera.position.set(0, 0, 7)  // 相机初始位置:正前方距离 7

// 3. 渲染器 ------ 把场景画到 canvas 上
const renderer = new THREE.WebGLRenderer({
  canvas: canvasEl,    // 指定已有的 <canvas> 元素
  antialias: true,     // 抗锯齿
  alpha: true          // 透明背景
})
renderer.setSize(w, h)
renderer.setPixelRatio(Math.min(window.devicePixelRatio, 2)) // 限制像素比,性能优化概念速记:
| 概念 | 类比 | 作用 |
|---|---|---|
| Scene | 舞台 | 放所有物体 |
| Camera | 摄影机 | 决定从哪看 |
| Renderer | 胶片 | 把画面渲染出来 |
| Mesh | 演员 | 可见的 3D 物体 = 几何体 + 材质 |
第三步:打光 ------ 让物体可见
没有光源的场景一片漆黑。我们使用三种光:
js
// 1. 环境光 ------ 均匀照亮所有物体,无方向感(防止暗面全黑)
scene.add(new THREE.AmbientLight(0x404060, 2.5))

// 2. 主方向光 ------ 模拟太阳光,从右上方照射
const mainLight = new THREE.DirectionalLight(0xffffff, 3)
mainLight.position.set(5, 5, 5)
scene.add(mainLight)

// 3. 补光 ------ 从左下方补蓝调,增加层次感
const fillLight = new THREE.DirectionalLight(0x8888ff, 1.5)
fillLight.position.set(-3, -2, -3)
scene.add(fillLight)光照类型选择指南:
AmbientLight:基础保底,让暗面不至于死黑DirectionalLight:模拟平行光(太阳),有明确方向PointLight:点光源(灯泡),向四周发散HemisphereLight:天地光,上半球一个颜色、下半球一个颜色
第四步:构建原子核 ------ Fibonacci 球面分布 + 物理沉降
这是整个项目最有趣的部分。原子核由质子和中子紧密堆积而成,我们需要让它们在球体内自然分布。
4.1 基础几何体与材质
js
const nucR = 0.14  // 单个核子半径

// 质子 ------ 红色
const protonMat = new THREE.MeshStandardMaterial({
  color: 0xe63946,
  roughness: 0.25,   // 粗糙度(0=镜面,1=完全粗糙)
  metalness: 0.2     // 金属感
})

// 中子 ------ 灰色
const neutronMat = new THREE.MeshStandardMaterial({
  color: 0x9ca3af,
  roughness: 0.3,
  metalness: 0.15
})

// 球体几何体(所有核子共用同一个几何体,节省内存)
const nucGeo = new THREE.SphereGeometry(nucR, 20, 20)
//                            半径    宽度分段  高度分段
Mesh = Geometry + Material:几何体定义形状,材质定义外观。同一个 Geometry 可以被多个 Mesh 复用。
4.2 Fibonacci 球面均匀分布
直接在球体内随机分布会导致中心密集、边缘稀疏。Fibonacci 球面算法可以生成均匀分布的点:
js
const n = protons + neutrons  // 总核子数
const fibPhi = Math.PI * (3 - Math.sqrt(5))  // 黄金角
const clusterScale = Math.pow(n, 1/3) * nucR * 0.75

for (let i = 0; i < n; i++) {
  const k = i + 0.5
  const y = 1 - (k / n) * 2              // y 从 1 到 -1
  const theta = fibPhi * k                // 绕 y 轴旋转的角度
  const rr = Math.sqrt(1 - y * y)         // 当前纬度的半径

  particles[i].pos = new THREE.Vector3(
    Math.cos(theta) * rr * clusterScale + (Math.random() - 0.5) * 0.12,
    y * clusterScale + (Math.random() - 0.5) * 0.12,
    Math.sin(theta) * rr * clusterScale + (Math.random() - 0.5) * 0.12
  )
}
原理 :利用黄金角 π(3-√5) 的无理数特性,每次旋转一个黄金角再下降一点,就能在球面上均匀铺满点。加上少量随机偏移 (Math.random()-0.5)*0.12 让分布更自然。
4.3 物理沉降 ------ 让核子紧密堆积
Fibonacci 分布的点还在球壳表面,我们需要通过简单的物理模拟让它们"沉降"到内部,形成紧密堆积:
js
const repDist = nucR * 1.2  // 排斥距离
const settleIters = n <= 20 ? 6 : n <= 60 ? 4 : 3  // 迭代次数(核子越多迭代越少,控制性能)

for (let iter = 0; iter < settleIters; iter++) {
  for (let a = 0; a < n; a++) {
    const p1 = particles[a]
    const force = new THREE.Vector3(0, 0, 0)

    // 1. 中心引力 ------ 把所有粒子往中心拉
    force.add(p1.pos.clone().multiplyScalar(-0.18))

    // 2. 粒子间斥力 ------ 太近了互相推开
    for (let b = 0; b < n; b++) {
      if (a === b) continue
      const diff = new THREE.Vector3().subVectors(p1.pos, particles[b].pos)
      const dist = diff.length()
      if (dist < repDist && dist > 0.01) {
        force.add(diff.normalize().multiplyScalar((repDist - dist) * 0.25))
      }
    }

    p1.pos.add(force)
  }
}效果:经过几轮迭代后,核子会形成一个自然的紧密球体------既不会全部塌缩到中心(因为有斥力),也不会散开(因为有引力)。
4.4 表面剔除 ------ 大原子核只画外壳
对于重元素(如铀,146 个中子 + 92 个质子 = 238 个核子),全部渲染太耗性能。我们只渲染表面的核子:
js
if (n > 30) {
  let maxDist = 0
  for (let i = 0; i < n; i++) {
    const d = particles[i].pos.length()
    if (d > maxDist) maxDist = d
  }
  // 只保留距中心较远的粒子(表面层)
  const cutoff = maxDist - nucR * 2.5
  if (cutoff > 0) surface = particles.filter(p => p.pos.length() >= cutoff)
}
4.5 组装原子核
js
const nucGroup = new THREE.Group()

// 添加核子 Mesh
for (let i = 0; i < surface.length; i++) {
  const p = surface[i]
  const mesh = new THREE.Mesh(nucGeo, p.type === 'proton' ? protonMat : neutronMat)
  mesh.position.copy(p.pos)
  nucGroup.add(mesh)
}

// 居中(Fibonacci 分布可能不完全对称)
const box = new THREE.Box3().setFromObject(nucGroup)
const center = box.getCenter(new THREE.Vector3())
nucGroup.children.forEach(c => c.position.sub(center))

// 发光晕 ------ 半透明大球体包裹原子核
const glowR = Math.cbrt(total) * nucR * 1.5
const glowGeo = new THREE.SphereGeometry(glowR, 32, 32)
const glowMat = new THREE.MeshBasicMaterial({
  color: new THREE.Color(categoryColor),
  transparent: true,
  opacity: 0.06,
  depthWrite: false   // 不写入深度缓冲,避免遮挡其他物体
})
nucGroup.add(new THREE.Mesh(glowGeo, glowMat))
Group 是 Three.js 的容器概念,类似 HTML 的
<div>。对 Group 做变换(位移/旋转/缩放),内部所有子对象跟着变。
第五步:构建电子轨道 ------ Torus 环 + 电子球
5.1 电子排布规则(Aufbau 原理)
电子按能量从低到高依次填充亚层:
js
function getSubshellConfig(z) {
  // Aufbau 填充顺序: [主量子数n, 亚层类型, 最大容量]
  const order = [
    [1,'s',2], [2,'s',2], [2,'p',6], [3,'s',2], [3,'p',6],
    [4,'s',2], [3,'d',10], [4,'p',6], [5,'s',2], [4,'d',10],
    [5,'p',6], [6,'s',2], [4,'f',14], [5,'d',10], [6,'p',6],
    [7,'s',2], [5,'f',14], [6,'d',10], [7,'p',6]
  ]
  const shells = {}
  let remaining = z
  for (const [n, sub, cap] of order) {
    if (remaining <= 0) break
    if (!shells[n]) shells[n] = {}
    const fill = Math.min(remaining, cap)
    shells[n][sub] = fill
    remaining -= fill
  }
  return shells
}以碳(z=6)为例:{ 1: { s: 2 }, 2: { s: 2, p: 2 } } ------ 第一层 2 个,第二层 4 个。
5.2 绘制轨道环与电子
js
const ringColors = [0x4488ff, 0x44cc88, 0xff8844, 0xcc44ff, 0x44ccff, 0xff44cc, 0x88ff44]
const electrons = []

shellNums.forEach((n, idx) => {
  const shellR = 1.0 + idx * 1.0   // 轨道半径逐层递增
  const total = (subs.s || 0) + (subs.p || 0) + (subs.d || 0) + (subs.f || 0)

  // ---- 轨道环(Torus 几何体)----
  const ringGeo = new THREE.TorusGeometry(shellR, 0.02, 16, 100)
  //                               主半径   管半径  管分段  环分段
  const ringMat = new THREE.MeshStandardMaterial({
    color: ringColors[idx] || 0x888888,
    roughness: 0.3,
    metalness: 0.5,
    transparent: true,
    opacity: 0.45        // 半透明轨道线
  })
  const ring = new THREE.Mesh(ringGeo, ringMat)
  // Torus 默认在 XY 平面,正好符合我们的设计
  atomGroup.add(ring)

  // ---- 电子(小球体,沿环均匀分布)----
  for (let i = 0; i < total; i++) {
    const angle = (i / total) * Math.PI * 2
    const eGeo = new THREE.SphereGeometry(0.08, 12, 12)
    const eMat = new THREE.MeshStandardMaterial({
      color: ringColors[idx] || 0x4488ff,
      emissive: ringColors[idx] || 0x4488ff,  // 自发光
      emissiveIntensity: 0.4,
      roughness: 0.2,
      metalness: 0.3
    })
    const electron = new THREE.Mesh(eGeo, eMat)
    electron.position.set(
      Math.cos(angle) * shellR,
      Math.sin(angle) * shellR,
      0   // 所有轨道在同一 XY 平面
    )
    // 存储动画参数
    electron.userData = { shellR, angle, speed: 0.8 }
    atomGroup.add(electron)
    electrons.push(electron)
  }
})关键几何体总结:
| 几何体 | 用途 | 关键参数 |
|---|---|---|
SphereGeometry |
核子、电子 | 半径、宽高细分段数 |
TorusGeometry |
电子轨道环 | 主半径(环大小)、管半径(环粗细) |
BufferGeometry |
背景粒子 | 手动设置顶点坐标 |
第六步:交互控制 ------ OrbitControls
OrbitControls 让用户可以用鼠标拖拽旋转、滚轮缩放:
js
const controls = new OrbitControls(camera, renderer.domElement)
controls.enableDamping = true       // 惯性阻尼(松手后缓慢停止)
controls.dampingFactor = 0.08       // 阻尼系数
controls.autoRotate = false         // 是否自动旋转
controls.autoRotateSpeed = 0.8
controls.minDistance = 2.5          // 最近缩放距离
controls.maxDistance = 10           // 最远缩放距离
controls.target.set(0, 0, 0) // 观察目标点动态适配原子大小:不同元素的电子层数不同,需要自动调整相机距离:
js
const maxN = shellNums.length        // 最大壳层数
const maxR = 1.0 + (maxN - 1) * 1.0 // 最外层轨道半径
const dist = Math.max(3, maxR * 3.5) // 相机距离

camera.position.set(0, 0, dist)
controls.minDistance = maxR * 1.2
controls.maxDistance = maxR * 4
controls.update()
第七步:动画循环 ------ 让一切动起来
Three.js 的动画基于 requestAnimationFrame:
js
function animate() {
  requestAnimationFrame(animate)
  const t = performance.now() * 0.001  // 当前时间(秒)

  // 1. 背景粒子缓慢旋转
  particles.rotation.y += 0.0003
  particles.rotation.x += 0.0002

  // 2. 电子沿轨道运动
  const electrons = atomGroup.userData.electrons
  if (electrons) {
    electrons.forEach(e => {
      const d = e.userData
      d.angle += d.speed * 0.015     // 角度递增
      // 在 XY 平面上沿圆环运动
      e.position.set(
        Math.cos(d.angle) * d.shellR,
        Math.sin(d.angle) * d.shellR,
        0
      )
    })
  }

  // 3. 原子核发光呼吸效果
  const nucleus = atomGroup.children[0]
  if (nucleus) {
    nucleus.children.forEach(c => {
      if (c.material && c.material.depthWrite === false) {
        // 发光晕的 opacity 随时间正弦波动
        c.material.opacity = 0.12 + Math.sin(t * 2) * 0.05
      }
    })
  }

  // 4. 更新控制器(阻尼需要每帧更新)
  controls.update()

  // 5. 渲染
  renderer.render(scene, camera)
}
性能提示 :
controls.update()必须在每帧调用(开启 damping 时),否则惯性效果不生效。
第八步:背景粒子 ------ 氛围感拉满
用 BufferGeometry + Points 创建大量粒子:
js
const pGeo = new THREE.BufferGeometry()
const pArr = new Float32Array(600)  // 200 个粒子 × 3 坐标(x,y,z)

for (let i = 0; i < 600; i++) {
  pArr[i] = (Math.random() - 0.5) * 15  // -7.5 ~ 7.5 的范围
}

pGeo.setAttribute('position', new THREE.BufferAttribute(pArr, 3))
//                                                   数组  每个顶点分量数

const particleMat = new THREE.PointsMaterial({
  size: 0.02,
  color: 0xaaccff,
  transparent: true,
  opacity: 0.5
})

const particles = new THREE.Points(pGeo, particleMat)
scene.add(particles)
BufferGeometry vs Geometry:
BufferGeometry直接操作 TypedArray,性能更好,是 Three.js 推荐方式Float32Array(600)表示 200 个粒子的 xyz 坐标(每 3 个值一个顶点)
第九步:资源清理 ------ 别忘了!
组件销毁时必须清理 Three.js 资源,否则内存泄漏:
js
let threeCtx = null  // 保存场景引用

function destroyThreeScene() {
  if (threeCtx) {
    cancelAnimationFrame(threeCtx.animId)   // 停止动画循环
    threeCtx.renderer.dispose()             // 释放 GPU 资源
    threeCtx = null
  }
}

// Vue 组件卸载时调用
onUnmounted(() => destroyThreeScene())
如果场景中有大量 Geometry 和 Material,还需要逐个 dispose:
js
scene.traverse(obj => {
  if (obj.geometry) obj.geometry.dispose()
  if (obj.material) {
    if (Array.isArray(obj.material)) {
      obj.material.forEach(m => m.dispose())
    } else {
      obj.material.dispose()
    }
  }
})
完整流程总结
scss
1. ensureThree()        → CDN 加载 Three.js + OrbitControls
2. new Scene()          → 创建场景
3. new Camera()         → 设置相机位置与参数
4. new Renderer()       → 绑定 canvas,设置尺寸与像素比
5. add Lights           → 环境光 + 方向光 × 2
6. add Particles        → 背景星尘粒子
7. new OrbitControls()  → 交互控制
8. buildAtomModel()     → 构建原子核(Fibonacci + 物理沉降)+ 电子轨道
9. animate()            → 动画循环(电子运动 + 核发光呼吸)
10. destroy()           → 组件卸载时清理资源
完整可运行代码
下面是一个可以直接在浏览器打开的完整 HTML 文件,把上面所有步骤串起来。保存为 atom.html 双击即可运行:
html
<!DOCTYPE html>
<html lang="zh-CN">
<head>
  <meta charset="UTF-8">
  <title>Three.js 3D 原子模型</title>
  <!-- importmap:让 OrbitControls 内部的 import 'three' 能正确解析 -->
  <script type="importmap">
    {
      "imports": {
        "three": "https://unpkg.com/three@0.170.0/build/three.module.min.js",
        "three/addons/": "https://unpkg.com/three@0.170.0/examples/jsm/"
      }
    }
  </script>
  <style>
    * { margin: 0; padding: 0; box-sizing: border-box; }
    body { background: #0a0a1a; overflow: hidden; font-family: sans-serif; }
    canvas { display: block; }
    #info {
      position: absolute; bottom: 20px; left: 50%;
      transform: translateX(-50%);
      color: #aaa; font-size: 13px;
      pointer-events: none; text-align: center;
    }
    #element-select {
      position: absolute; top: 20px; left: 50%;
      transform: translateX(-50%);
      display: flex; gap: 8px; align-items: center;
    }
    #element-select label { color: #ccc; font-size: 14px; }
    #element-select select {
      padding: 6px 12px; border-radius: 6px;
      border: 1px solid #444; background: #1a1a2e;
      color: #eee; font-size: 14px; cursor: pointer;
    }
  </style>
</head>
<body>
  <div id="element-select">
    <label>选择元素:</label>
    <select id="elSelect">
      <option value="1">H 氢 (1)</option>
      <option value="6" selected>C 碳 (6)</option>
      <option value="8">O 氧 (8)</option>
      <option value="26">Fe 铁 (26)</option>
      <option value="79">Au 金 (79)</option>
      <option value="92">U 铀 (92)</option>
    </select>
  </div>
  <canvas id="canvas"></canvas>
  <div id="info">🖱 拖拽旋转 · 滚轮缩放</div>

  <script type="module">
    // ---- CDN 加载 Three.js(通过 importmap 解析)----
    import * as THREE from 'three'
    import { OrbitControls } from 'three/addons/controls/OrbitControls.js'

    // ---- 电子排布(Aufbau 原理)----
    function getSubshellConfig(z) {
      const order = [
        [1,'s',2],[2,'s',2],[2,'p',6],[3,'s',2],[3,'p',6],
        [4,'s',2],[3,'d',10],[4,'p',6],[5,'s',2],[4,'d',10],
        [5,'p',6],[6,'s',2],[4,'f',14],[5,'d',10],[6,'p',6],
        [7,'s',2],[5,'f',14],[6,'d',10],[7,'p',6]
      ]
      const shells = {}
      let remaining = z
      for (const [n, sub, cap] of order) {
        if (remaining <= 0) break
        if (!shells[n]) shells[n] = {}
        const fill = Math.min(remaining, cap)
        shells[n][sub] = fill
        remaining -= fill
      }
      return shells
    }

    // ---- 构建原子核(Fibonacci + 物理沉降)----
    function buildNucleus(group, z, mass) {
      const protons = z
      const neutrons = Math.round(mass) - z
      const total = protons + neutrons
      const nucR = 0.14

      const protonMat = new THREE.MeshStandardMaterial({ color: 0xe63946, roughness: 0.25, metalness: 0.2 })
      const neutronMat = new THREE.MeshStandardMaterial({ color: 0x9ca3af, roughness: 0.3, metalness: 0.15 })
      const nucGeo = new THREE.SphereGeometry(nucR, 20, 20)

      if (total === 0) return

      // 构建粒子列表
      const particles = []
      for (let i = 0; i < protons; i++) particles.push({ type: 'proton' })
      for (let i = 0; i < neutrons; i++) particles.push({ type: 'neutron' })

      // Fibonacci 球面均匀分布
      const fibPhi = Math.PI * (3 - Math.sqrt(5))
      const clusterScale = Math.pow(total, 1/3) * nucR * 0.75
      for (let i = 0; i < total; i++) {
        const k = i + 0.5
        const y = 1 - (k / total) * 2
        const theta = fibPhi * k
        const rr = Math.sqrt(1 - y * y)
        particles[i].pos = new THREE.Vector3(
          Math.cos(theta) * rr * clusterScale + (Math.random()-0.5) * 0.12,
          y * clusterScale + (Math.random()-0.5) * 0.12,
          Math.sin(theta) * rr * clusterScale + (Math.random()-0.5) * 0.12
        )
      }

      // 物理沉降(引力 + 斥力迭代)
      const repDist = nucR * 1.2
      const iters = total <= 20 ? 6 : total <= 60 ? 4 : 3
      const _v = new THREE.Vector3()
      for (let iter = 0; iter < iters; iter++) {
        for (let a = 0; a < total; a++) {
          _v.set(0, 0, 0)
          _v.add(particles[a].pos.clone().multiplyScalar(-0.18))  // 中心引力
          for (let b = 0; b < total; b++) {
            if (a === b) continue
            const diff = new THREE.Vector3().subVectors(particles[a].pos, particles[b].pos)
            const d = diff.length()
            if (d < repDist && d > 0.01) {
              _v.add(diff.normalize().multiplyScalar((repDist - d) * 0.25))
            }
          }
          particles[a].pos.add(_v)
        }
      }

      // 大原子核只渲染表面
      let surface = particles
      if (total > 30) {
        let maxDist = 0
        for (const p of particles) { const d = p.pos.length(); if (d > maxDist) maxDist = d }
        const cutoff = maxDist - nucR * 2.5
        if (cutoff > 0) surface = particles.filter(p => p.pos.length() >= cutoff)
      }

      // 添加到场景
      for (const p of surface) {
        const mesh = new THREE.Mesh(nucGeo, p.type === 'proton' ? protonMat : neutronMat)
        mesh.position.copy(p.pos)
        group.add(mesh)
      }

      // 居中
      const box = new THREE.Box3().setFromObject(group)
      const center = box.getCenter(new THREE.Vector3())
      group.children.forEach(c => c.position.sub(center))
    }

    // ---- 构建电子轨道 ----
    function buildElectrons(group, z) {
      const shells = getSubshellConfig(z)
      const shellNums = Object.keys(shells).map(Number).sort((a,b) => a-b)
      const ringColors = [0x4488ff, 0x44cc88, 0xff8840, 0xcc44ff, 0x44ccff, 0xff44cc, 0x88ff44]
      const electrons = []

      shellNums.forEach((n, idx) => {
        const shellR = 1.0 + idx * 1.0
        const subs = shells[n]
        const total = (subs.s||0) + (subs.p||0) + (subs.d||0) + (subs.f||0)

        // 轨道环
        const ringGeo = new THREE.TorusGeometry(shellR, 0.02, 16, 100)
        const ringMat = new THREE.MeshStandardMaterial({
          color: ringColors[idx], roughness: 0.3, metalness: 0.5,
          transparent: true, opacity: 0.45
        })
        group.add(new THREE.Mesh(ringGeo, ringMat))

        // 电子
        for (let i = 0; i < total; i++) {
          const angle = (i / total) * Math.PI * 2
          const eGeo = new THREE.SphereGeometry(0.08, 12, 12)
          const eMat = new THREE.MeshStandardMaterial({
            color: ringColors[idx], roughness: 0.2, metalness: 0.3,
            emissive: ringColors[idx], emissiveIntensity: 0.4
          })
          const e = new THREE.Mesh(eGeo, eMat)
          e.position.set(Math.cos(angle)*shellR, Math.sin(angle)*shellR, 0)
          e.userData = { shellR, angle, speed: 0.8 }
          group.add(e)
          electrons.push(e)
        }
      })
      return electrons
    }

    // ---- 主程序 ----
    const canvas = document.getElementById('canvas')
    const w = window.innerWidth, h = window.innerHeight

    // 场景
    const scene = new THREE.Scene()

    // 相机
    const camera = new THREE.PerspectiveCamera(45, w/h, 0.1, 100)
    camera.position.set(0, 0, 7)

    // 渲染器
    const renderer = new THREE.WebGLRenderer({ canvas, antialias: true, alpha: true })
    renderer.setSize(w, h)
    renderer.setPixelRatio(Math.min(window.devicePixelRatio, 2))

    // 光照
    scene.add(new THREE.AmbientLight(0x404060, 2.5))
    const dl = new THREE.DirectionalLight(0xffffff, 3)
    dl.position.set(5, 5, 5)
    scene.add(dl)
    const dl2 = new THREE.DirectionalLight(0x8888ff, 1.5)
    dl2.position.set(-3, -2, -3)
    scene.add(dl2)

    // 背景粒子
    const pGeo = new THREE.BufferGeometry()
    const pArr = new Float32Array(600)
    for (let i = 0; i < 600; i++) pArr[i] = (Math.random()-0.5) * 15
    pGeo.setAttribute('position', new THREE.BufferAttribute(pArr, 3))
    scene.add(new THREE.Points(pGeo, new THREE.PointsMaterial({
      size: 0.02, color: 0xaaccff, transparent: true, opacity: 0.5
    })))

    // 控制器
    const controls = new OrbitControls(camera, renderer.domElement)
    controls.enableDamping = true
    controls.dampingFactor = 0.08
    controls.minDistance = 2.5
    controls.maxDistance = 15

    // 原子模型容器
    const atomGroup = new THREE.Group()
    scene.add(atomGroup)

    // 构建指定元素的原子模型
    const elementData = {
      1:  { sym: 'H',  mass: 1.008 },
      6:  { sym: 'C',  mass: 12.011 },
      8:  { sym: 'O',  mass: 15.999 },
      26: { sym: 'Fe', mass: 55.845 },
      79: { sym: 'Au', mass: 196.97 },
      92: { sym: 'U',  mass: 238.03 },
    }

    let electrons = []

    function buildAtom(z) {
      // 清空旧模型
      while (atomGroup.children.length) atomGroup.remove(atomGroup.children[0])
      electrons = []

      // 原子核
      const data = elementData[z] || { sym: '?', mass: z * 2 }
      buildNucleus(atomGroup, z, data.mass)

      // 电子轨道
      electrons = buildElectrons(atomGroup, z)

      // 自动适配相机距离
      const shells = getSubshellConfig(z)
      const maxN = Math.max(...Object.keys(shells).map(Number))
      const maxR = 1.0 + (maxN - 1) * 1.0
      const dist = Math.max(3, maxR * 3.5)
      camera.position.set(0, 0, dist)
      controls.minDistance = maxR * 1.2
      controls.maxDistance = maxR * 4
      controls.target.set(0, 0, 0)
      controls.update()
    }

    // 初始构建(碳)
    buildAtom(6)

    // 切换元素
    document.getElementById('elSelect').addEventListener('change', e => {
      buildAtom(parseInt(e.target.value))
    })

    // 动画循环
    function animate() {
      requestAnimationFrame(animate)
      const t = performance.now() * 0.001

      // 背景粒子缓动
      scene.children.forEach(c => {
        if (c.isPoints) { c.rotation.y += 0.0003; c.rotation.x += 0.0002 }
      })

      // 电子沿轨道运动
      electrons.forEach(e => {
        const d = e.userData
        d.angle += d.speed * 0.015
        e.position.set(Math.cos(d.angle)*d.shellR, Math.sin(d.angle)*d.shellR, 0)
      })

      controls.update()
      renderer.render(scene, camera)
    }
    animate()

    // 窗口大小变化
    window.addEventListener('resize', () => {
      const w = window.innerWidth, h = window.innerHeight
      camera.aspect = w / h
      camera.updateProjectionMatrix()
      renderer.setSize(w, h)
    })
  </script>
</body>
</html>
将上面的代码保存为
.html文件,用浏览器直接打开即可运行。可以切换不同元素观察原子核和电子层的变化。
核心概念速查表
| Three.js 概念 | 一句话解释 |
|---|---|
Scene |
所有 3D 物体的容器 |
PerspectiveCamera |
透视相机,近大远小 |
WebGLRenderer |
用 WebGL 把场景画出来 |
Mesh |
可见物体 = Geometry(形状)+ Material(外观) |
Group |
物体容器,用于整体变换 |
Geometry |
顶点数据定义形状 |
Material |
颜色、粗糙度、金属感等外观属性 |
Light |
光源,影响材质明暗 |
OrbitControls |
鼠标拖拽旋转/缩放控制器 |
Points |
粒子系统,高效渲染大量小点 |
BufferGeometry |
直接操作 TypedArray 的几何体 |
userData |
给 Mesh 挂载自定义数据的万能口袋 |
进阶方向
- 真实电子云模型:用概率密度代替固定轨道,更接近量子力学
- 后处理效果:添加 Bloom(泛光)、FXAA(抗锯齿)等 PostProcessing
- Shader 自定义:用 GLSL 写自定义材质,实现更炫酷的视觉效果
- 物理引擎:引入 Cannon.js / Ammo.js 做真实的物理碰撞
- GLTF 模型加载 :用
GLTFLoader加载外部 3D 模型