1、什么是帧对象
在 Python 中,帧对象(Frame Object) 是每次函数调用时在堆上分配的一个数据结构,它完整保存了该次函数调用的执行上下文。
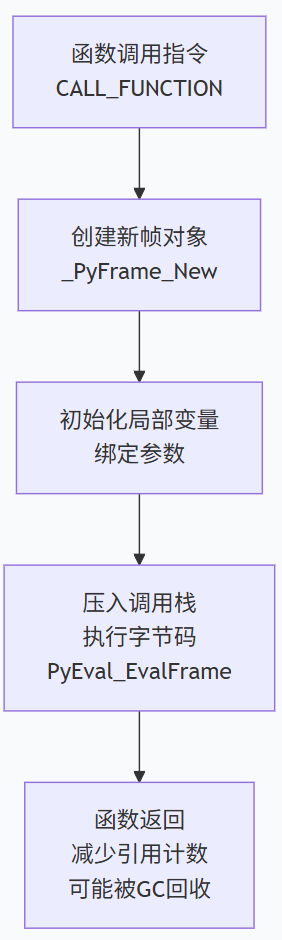
当你调用一个函数时,CPython 会:
- 创建一个 PyFrameObject(帧对象)
- 将参数绑定到局部变量
- 将当前字节码执行位置、全局/局部命名空间等存入帧
- 将该帧压入调用栈
帧对象的生命周期:
- 创建:函数被调用时
- 销毁:函数执行完毕且没有引用保留它时(由垃圾回收处理)
2、帧对象的核心结构
帧对象的核心属性如下:
| 属性 | 说明 |
|---|---|
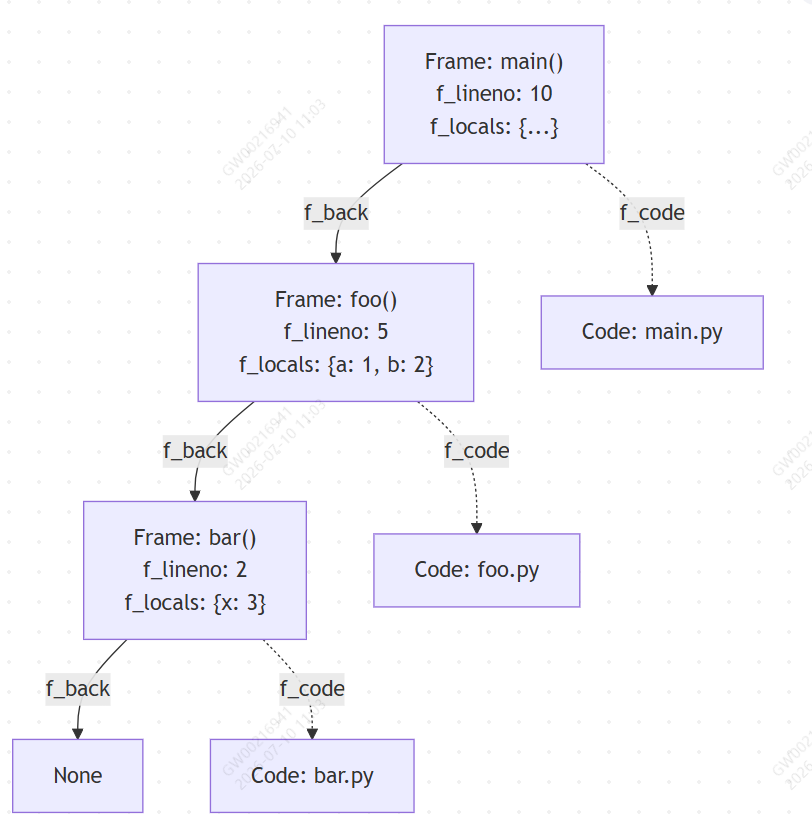
| f_back | 指向上一个帧(调用者),形成调用链 |
| f_code | 代码对象(code object),包含编译后的字节码、常量、变量名等 |
| f_locals | 当前帧的局部变量字典 |
| f_globals | 当前帧的全局变量字典 |
| f_builtins | 内置命名空间 |
| f_lineno | 当前正在执行代码的行号 |
| f_lasti | 最后执行的字节码指令偏移量 |
| f_trace | 跟踪函数(调试器/profiler 使用) |
3、原理图解
3.1 帧对象调用链
3.2 调用栈与帧对象的关系
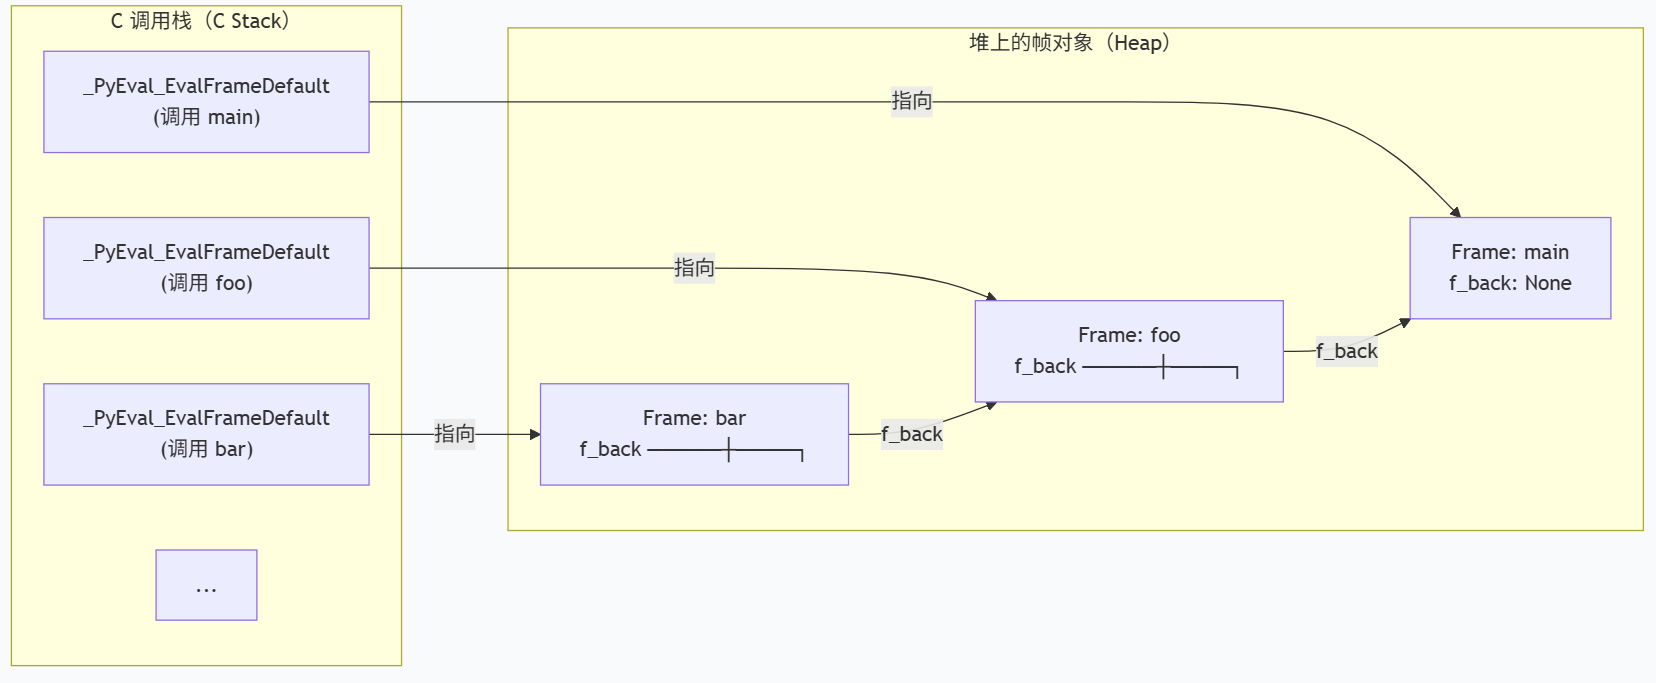
Python 的帧对象分配在堆上,而不是 C 栈上。这意味着你可以持有对帧对象的引用(例如 traceback 对象),即使函数已经返回,帧对象仍可能存活。
4、如何访问帧对象
4.1 使用 sys._getframe()
python
import sys

def bar():
    # 获取当前帧
    current_frame = sys._getframe()
    print(f"当前函数: {current_frame.f_code.co_name}")
    print(f"当前行号: {current_frame.f_lineno}")

    # 获取调用者帧
    caller_frame = current_frame.f_back
    print(f"调用者函数: {caller_frame.f_code.co_name}")

def foo():
    bar()

foo()
输出:
python
当前函数: bar
当前行号: 4
调用者函数: foo
4.2 使用 inspect 模块(推荐)
python
import inspect

def demo():
    frame = inspect.currentframe()          # 当前帧
    caller = inspect.getouterframes(frame)  # 所有外层帧

    for i, f in enumerate(caller):
        print(f"[{i}] 函数: {f.function}, 文件: {f.filename}, 行: {f.lineno}")

def outer():
    demo()

outer()
5、深入原理:CPython 层面
5.1 帧对象的 C 结构
cpp
// Include/cpython/frameobject.h (简化版)
typedef struct _frame {
    PyObject_HEAD
    struct _frame *f_back;       // 上一个帧
    PyCodeObject *f_code;        // 代码对象
    PyObject *f_builtins;        // 内置命名空间
    PyObject *f_globals;         // 全局命名空间
    PyObject *f_locals;          // 局部命名空间
    PyObject **f_valuestack;     // 值栈指针
    int f_lineno;                // 当前行号
    int f_lasti;                 // 最后执行指令偏移
    PyObject *f_trace;           // 跟踪函数
    // ...
} PyFrameObject;
5.2 帧创建与销毁流程
6、实际应用场景
6.1 自动获取调用上下文(日志增强)
python
import sys
import os
import logging

class ContextualFormatter(logging.Formatter):
    """自动记录调用者文件、函数、行号的格式化器"""

    def format(self, record):
        # 获取调用日志的帧(跳过当前帧和logging内部帧)
        frame = sys._getframe(6)  # 根据调用栈深度调整

        record.real_pathname = frame.f_code.co_filename
        record.real_funcname = frame.f_code.co_name
        record.real_lineno = frame.f_lineno

        return super().format(record)

# 使用
logger = logging.getLogger("mylogger")
handler = logging.StreamHandler()
formatter = ContextualFormatter(
    "[%(real_pathname)s:%(real_lineno)d - %(real_funcname)s] %(message)s"
)
handler.setFormatter(formatter)
logger.addHandler(handler)
logger.setLevel(logging.DEBUG)

def business_logic():
    logger.info("处理订单...")

business_logic()
6.2 动态变量注入(类似 pytest fixture 原理)
python
import sys

def inject_locals(**kwargs):
    """向调用者的局部命名空间注入变量"""
    caller_frame = sys._getframe(1)
    caller_frame.f_locals.update(kwargs)
    # 重要:PyFrame_LocalsToFast 需要触发才能生效
    # 在实际 CPython 中直接修改 f_locals 对局部变量的影响有限
    # 因为局部变量是通过数组+索引访问的(FAST locals)

def test():
    inject_locals(user_name="Alice", user_age=30)
    # 注意:在函数内部直接访问可能不生效,因为编译器优化
    print(test.__code__.co_varnames)  # 查看局部变量名

test()
注意:CPython 3.11+ 对局部变量访问做了大量优化(使用栈和数组),直接修改 f_locals 可能不会立即反映到局部变量。
6.3 手动回溯调用栈(调试器原理)
python
import sys

def print_stack_trace():
    """打印完整的调用栈,模拟 traceback"""
    frame = sys._getframe(1)  # 从调用者开始

    stack = []
    while frame is not None:
        code = frame.f_code
        stack.append({
            'filename': code.co_filename,
            'function': code.co_name,
            'lineno': frame.f_lineno,
            'locals': dict(frame.f_locals)
        })
        frame = frame.f_back

    # 反转,从最早到最近
    stack.reverse()

    for i, info in enumerate(stack):
        print(f'  File "{info["filename"]}", line {info["lineno"]}, in {info["function"]}')
        if info['locals']:
            for name, value in list(info['locals'].items())[:3]:
                print(f'    {name} = {value!r}')
            print('    ...')

def c():
    x = 42
    print_stack_trace()

def b():
    y = "hello"
    c()

def a():
    z = [1, 2, 3]
    b()

a()
6.4 帧跟踪与性能分析
python
import sys

def tracer(frame, event, arg):
    """
    帧跟踪函数 - 调试器/性能分析器核心

    event: 'call', 'line', 'return', 'exception', 'opcode'
    """
    if event == 'call':
        print(f"▶ 调用 {frame.f_code.co_name} at line {frame.f_lineno}")
    elif event == 'line':
        print(f"  执行 {frame.f_code.co_name}:{frame.f_lineno}")
    elif event == 'return':
        print(f"◀ 返回 {frame.f_code.co_name},返回值: {arg}")

    return tracer  # 返回自身以继续跟踪

def example(x):
    y = x + 1
    z = y * 2
    return z

# 设置跟踪器
sys.settrace(tracer)
example(5)
sys.settrace(None)  # 关闭跟踪
7、与相关对象的关系
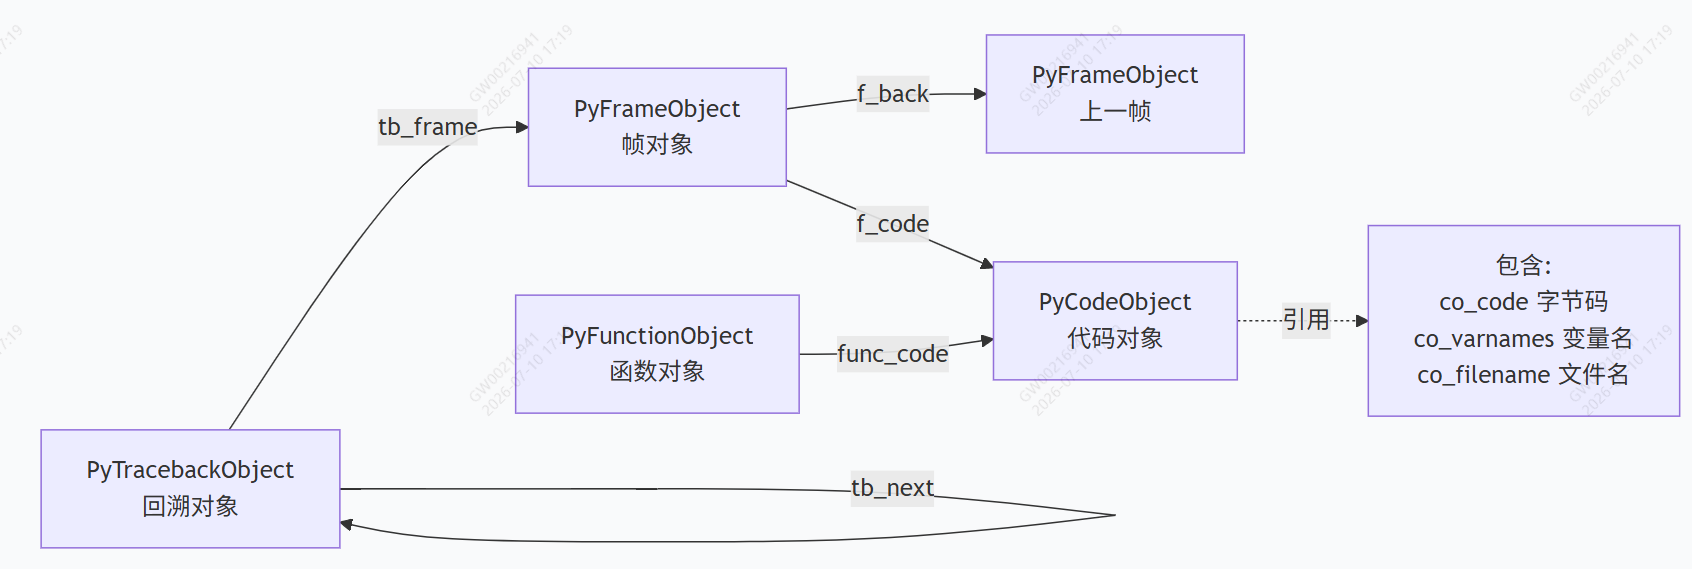
- 函数对象 (function):包含代码对象和默认参数,是静态的"模板"
- 帧对象 (frame):函数调用的动态实例,有运行时状态
- 代码对象 (code):编译后的静态信息,可被多个帧共享
- 回溯对象 (traceback):持有帧对象的引用,用于异常追溯
8、版本差异与注意事项
8.1 Python 3.11+ 的帧栈优化
Python 3.11 引入了 "简化帧栈"(Shameless Plug / Frame Stack Optimization):
内部使用 C 栈上的 InterpreterFrame 结构加速
PyFrameObject 变为惰性分配
f_locals 的修改行为可能有变化
8.2 内存泄漏风险
python
import sys, traceback

def leaky_function():
    big_data = "x" * 10_000_000  # 10MB 字符串
    try:
        raise ValueError("error")
    except:
        # 这里持有 traceback,间接持有帧,帧又持有 f_locals
        return sys.exc_info()[2]  # 返回 traceback 对象

tb = leaky_function()
# 此时 big_data 无法被释放,因为 traceback -> frame -> f_locals -> big_data
解决方案:及时释放 traceback 引用,或使用 traceback.clear_frames(tb)。
8.3 局部变量修改限制
由于 CPython 优化,函数内的局部变量通过 LOAD_FAST / STORE_FAST 访问数组索引,而非字典查找。因此:
python
def demo():
    x = 1
    frame = sys._getframe()
    frame.f_locals['x'] = 999
    print(x)  # 可能仍然输出 1,而非 999!
若需强制同步,在 CPython 中需要触发内部同步机制(通常不推荐在生产代码中使用)。
9、总结
| 维度 | 要点 |
|---|---|
| 本质 | 函数调用的运行时上下文,保存在堆上的对象 |
| 核心链 | f_back 形成调用链,可追溯完整调用栈 |
| 命名空间 | f_locals / f_globals / f_builtins 三级 |
| 代码 | f_code 指向编译后的代码对象(可共享) |
| 应用 | 调试器、性能分析、日志上下文、异常追溯 |
| 风险 | 持有帧会导致局部变量无法释放;3.11+ 实现变化 |
10 实现自己的调试器
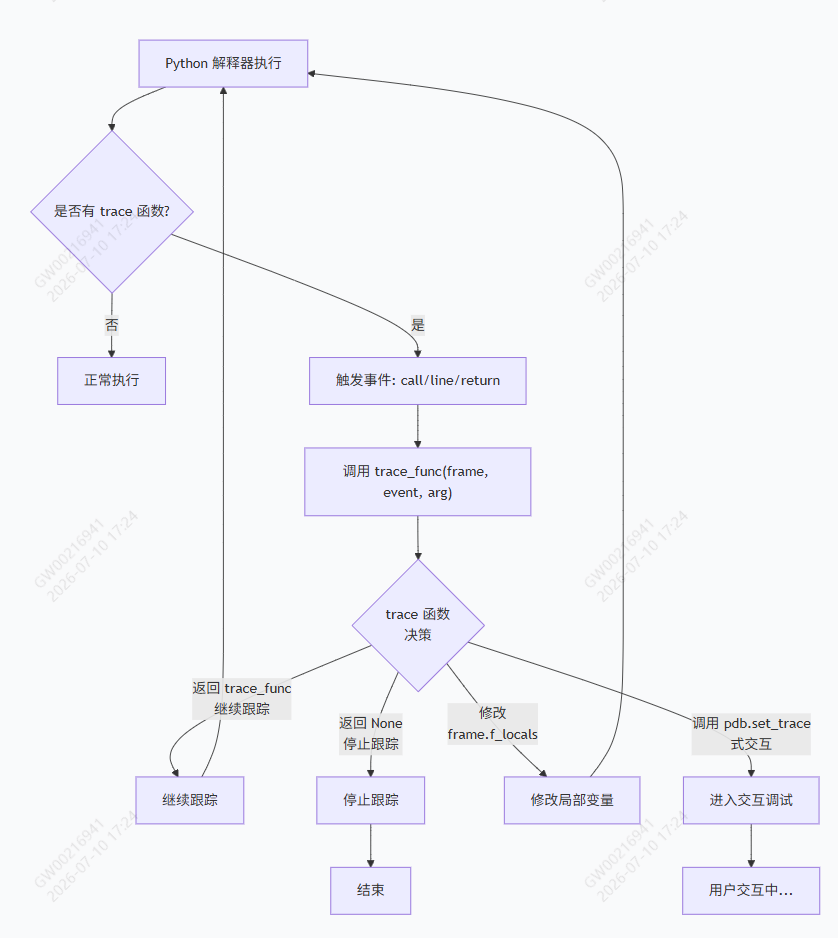
实现一个 Python 调试器的核心在于拦截代码执行事件并检查/修改运行时状态。Python 提供了完善的钩子机制,让你无需修改解释器源码即可实现。
下面从原理到实战,分层次讲解。
10.1 核心原理:sys.settrace
Python 虚拟机在执行代码时,会检查当前线程的跟踪函数(trace function)。如果设置了,每发生以下事件就会调用它:
| 事件 | 触发时机 |
|---|---|
| 'call' | 函数被调用,进入新帧 |
| 'line' | 即将执行新的一行 |
| 'return' | 函数返回 |
| 'exception' | 发生异常 |
| 'opcode' | 即将执行单个字节码(Python 3.7+) |
函数签名:
python
def trace_func(frame, event, arg):
    # frame: 当前帧对象
    # event: 事件字符串
    # arg: 附加信息(如返回值、异常元组)
    return trace_func  # 返回自身以继续跟踪,返回None则停止
10.2 、最小调试器:50行代码
python
import sys
import inspect

class MiniDebugger:
    def __init__(self):
        self.breakpoints = set()      # 断点集合: {(filename, lineno), ...}
        self.stepping = False         # 是否处于单步模式
        self.current_frame = None
        self.interactive = True

    def set_break(self, filename, lineno):
        self.breakpoints.add((filename, lineno))
        print(f"断点设置: {filename}:{lineno}")

    def trace(self, frame, event, arg):
        filename = frame.f_code.co_filename
        lineno = frame.f_lineno

        # 跳过调试器自身代码
        if __file__ in filename:
            return self.trace

        # 检查是否需要暂停
        should_stop = (
            self.stepping or
            (event == 'line' and (filename, lineno) in self.breakpoints)
        )

        if should_stop:
            self.current_frame = frame
            self.stepping = False
            self.interact(frame, event, arg)

        return self.trace

    def interact(self, frame, event, arg):
        code = frame.f_code
        print(f"\n{'='*40}")
        print(f"命中 [{event}] {code.co_filename}:{frame.f_lineno}")
        print(f"函数: {code.co_name}")

        # 打印当前行源码
        try:
            lines = inspect.getsourcelines(code)[0]
            line_idx = frame.f_lineno - code.co_firstlineno
            if 0 <= line_idx < len(lines):
                print(f"  --> {lines[line_idx].strip()}")
        except:
            pass

        # 交互循环
        while True:
            try:
                cmd = input("(dbg) ").strip()
            except EOFError:
                break

            if cmd == 'c' or cmd == 'continue':
                break
            elif cmd == 's' or cmd == 'step':
                self.stepping = True
                break
            elif cmd == 'q' or cmd == 'quit':
                sys.settrace(None)
                raise SystemExit("调试器退出")
            elif cmd == 'l' or cmd == 'locals':
                print("局部变量:")
                for k, v in frame.f_locals.items():
                    print(f"  {k} = {v!r}")
            elif cmd == 'p':
                expr = input("表达式: ")
                try:
                    result = eval(expr, frame.f_globals, frame.f_locals)
                    print(f"  => {result!r}")
                except Exception as e:
                    print(f"  错误: {e}")
            elif cmd == 'stack':
                self.print_stack(frame)
            else:
                print("命令: c(继续), s(单步), l(局部变量), p(求值), stack(栈), q(退出)")

    def print_stack(self, frame):
        print("\n调用栈:")
        depth = 0
        f = frame
        while f:
            code = f.f_code
            print(f"  [{depth}] {code.co_filename}:{f.f_lineno} {code.co_name}")
            f = f.f_back
            depth += 1

    def run(self, func, *args, **kwargs):
        sys.settrace(self.trace)
        try:
            return func(*args, **kwargs)
        finally:
            sys.settrace(None)


# ========== 测试代码 ==========
def factorial(n):
    if n <= 1:
        return 1
    return n * factorial(n - 1)

def main():
    x = 5
    result = factorial(x)
    print(f"结果: {result}")

if __name__ == "__main__":
    dbg = MiniDebugger()
    # 在 test.py 第 X 行设置断点,请根据实际文件调整
    dbg.set_break(__file__, 95)  # 假设 result = factorial(x) 所在行
    dbg.run(main)
10.3 关键机制图解
10.4 进阶架构:基于 bdb 模块
Python 标准库提供了 bdb(Basic Debugger),它是一个调试器框架。pdb 就是基于它构建的。
python
import bdb
import sys

class MyDebugger(bdb.Bdb):
    def __init__(self):
        super().__init__()
        self.breaks = {}

    def user_call(self, frame, argument_list):
        """进入函数调用时触发"""
        name = frame.f_code.co_name
        if name == '???':
            return
        print(f"--> call {name}()")

    def user_line(self, frame):
        """每执行一行触发(核心)"""
        # 检查是否命中断点
        if self.break_here(frame):
            self.interaction(frame, None)
        # 检查是否单步
        elif self.stop_here(frame):
            self.interaction(frame, None)

    def user_return(self, frame, return_value):
        """函数返回时触发"""
        print(f"<-- return {return_value!r}")

    def user_exception(self, frame, exc_info):
        """异常发生时触发"""
        print(f"!!! exception: {exc_info[1]}")

    def interaction(self, frame, traceback):
        """进入交互模式"""
        print(f"\n[{frame.f_code.co_filename}:{frame.f_lineno}]")
        self.cmdloop()  # 可继承 cmd.Cmd 实现命令行

    def run_script(self, filename):
        import __main__
        __main__.__dict__.clear()
        __main__.__dict__.update({
            "__name__": "__main__",
            "__file__": filename,
            "__builtins__": __builtins__,
        })
        self.run(open(filename, 'rb').read(), globals=__main__.__dict__)

# 使用
dbg = MyDebugger()
dbg.set_break("target.py", 10)
dbg.run_script("target.py")
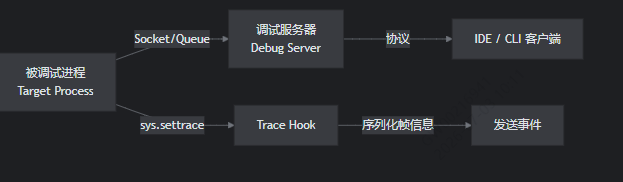
10.5、远程调试架构(进程分离)
生产环境调试通常需要被调试进程与调试器前端分离:
被调试端(精简):
python
import sys
import json
import socket

class RemoteTracer:
    def __init__(self, host='127.0.0.1', port=9999):
        self.sock = socket.socket(socket.AF_INET, socket.SOCK_STREAM)
        self.sock.connect((host, port))

    def trace(self, frame, event, arg):
        # 只发送必要信息,避免序列化复杂对象
        data = {
            'event': event,
            'filename': frame.f_code.co_filename,
            'funcname': frame.f_code.co_name,
            'lineno': frame.f_lineno,
        }
        self.sock.sendall(json.dumps(data).encode() + b'\n')

        # 接收调试器指令
        cmd = self.sock.recv(1024).decode().strip()
        if cmd == 'step':
            return self.trace
        elif cmd == 'stop':
            return None
        return self.trace

    def start(self):
        sys.settrace(self.trace)