HarmonyOS APP实战-基于Image Kit的图像处理APP - 第9篇:批量处理与历史记录
1. 开篇
上一篇我们实现了图片编码与导出功能,核心是通过image.createImagePacker将编辑后的PixelMap编码为JPEG/PNG格式,再利用photoAccessHelper写入系统相册。代码中关键部分是ImagePacker的初始化、编码参数配置(packingOptions中设置format和quality),以及通过FileAsset写入沙箱文件后移动至相册的逻辑。
单个图片的编解码、滤镜、裁切等基础功能已经完备,但用户在处理多张图片时,需要逐张重复操作------这显然不够高效。本篇将构建批量处理模块:支持从相册多选图片,对每张图片统一应用裁切尺寸或滤镜效果,并通过栈结构记录每张图片的编辑历史,实现撤销(undo)和重做(redo)操作。这不仅是用户体验的跃升,也是App向"生产力工具"迈进的关键一步。
2. 核心实现
2.1 基础配置与数据模型
首先定义编辑历史的栈结构以及单张图片的处理任务模型。
typescript
// model/EditHistoryManager.ts
import { image } from '@kit.ImageKit';

/**
 * 编辑历史管理器,基于双栈实现撤销/重做
 */
export class EditHistoryManager {
  private undoStack: PixelMap[] = [];   // 撤销栈,存放每次编辑后的PixelMap快照
  private redoStack: PixelMap[] = [];   // 重做栈,存放撤销时弹出的PixelMap
  private maxHistory: number = 20;       // 最大历史步数,防止内存膨胀

  /**
   * 压入新的编辑状态
   * @param pixelMap 当前编辑后的PixelMap
   */
  pushState(pixelMap: PixelMap): void {
    // 新操作产生时,清空重做栈(因为新操作打破了重做链)
    this.redoStack.length = 0;
    // 复制PixelMap存入撤销栈(浅拷贝即可,因为PixelMap是引用类型但后续不会被修改)
    this.undoStack.push(pixelMap);
    // 限制栈深度
    if (this.undoStack.length > this.maxHistory) {
      this.undoStack.shift();
    }
  }

  /**
   * 撤销:返回上一步的PixelMap,并将当前状态压入重做栈
   */
  undo(origin: PixelMap): PixelMap | undefined {
    if (this.undoStack.length <= 0) {
      return undefined;
    }
    // 当前状态入重做栈
    this.redoStack.push(origin);
    // 弹出上一步状态
    return this.undoStack.pop();
  }

  /**
   * 重做:返回撤销前的PixelMap,并将当前状态压入撤销栈
   */
  redo(origin: PixelMap): PixelMap | undefined {
    if (this.redoStack.length <= 0) {
      return undefined;
    }
    // 当前状态入撤销栈
    this.undoStack.push(origin);
    // 弹出重做状态
    return this.redoStack.pop();
  }

  /**
   * 判断是否可以撤销
   */
  canUndo(): boolean {
    return this.undoStack.length > 0;
  }

  /**
   * 判断是否可以重做
   */
  canRedo(): boolean {
    return this.redoStack.length > 0;
  }
}关键点说明:
- 双栈结构是撤销/重做的经典实现:撤销栈存历史,重做栈存被撤销的状态。
- 每次新编辑操作(
pushState)必须先清空重做栈,保证编辑链路的线性------这是用户交互的常识。 - PixelMap是引用类型,但
pushState时我们直接存入引用而非深拷贝,因为上一帧的PixelMap在后续编辑中不会被修改(每次编辑产生新PixelMap)。若需绝对安全,可使用PixelMap.readPixelsToBuffer()深拷贝,但会大幅增加内存,本场景不必要。
2.2 批量处理任务模型
定义单个图片的任务状态,串联解码、编辑、编码三个阶段。
typescript
// model/ImageTaskModel.ts
import { image } from '@kit.ImageKit';

/**
 * 单张图片的批量处理任务
 */
export interface ImageTask {
  sourceUri: string;                    // 原始图片URI(用于展示缩略图)
  pixelMap: image.PixelMap | null;      // 当前编辑后的PixelMap
  original: image.PixelMap | null;      // 原始PixelMap(用于重置)
  history: EditHistoryManager;         // 该图片独立的编辑历史管理器
  state: 'pending' | 'processing' | 'done' | 'error'; // 任务状态
  thumbnail: image.PixelMap | null;     // 缩略图(用于列表展示)
}

/**
 * 批量处理配置,所有图片共用同一个配置
 */
export interface BatchConfig {
  type: 'crop' | 'filter';
  // 裁切参数
  cropX: number;
  cropY: number;
  cropWidth: number;
  cropHeight: number;
  // 滤镜参数(colorMatrix)
  colorMatrix: number[];
}关键点说明:
- 每张图片独立维护
EditHistoryManager,所以撤销/重做是图片粒度的,不是全局的------这符合多图编辑的直觉:用户选一张图操作,只影响这一张的历史。 BatchConfig定义了统一的编辑参数,所有选中的图片将应用相同的裁切或滤镜。用户切换到不同图片时,可重新修改配置,再次点击"应用"即可更新当前图(并推入历史)。
2.3 批量处理页面完整实现
BatchProcessPage是核心页面,包含图片选择、编辑参数调节、统一应用、撤销/重做等交互。
typescript
// pages/BatchProcessPage.ets
import { image } from '@kit.ImageKit';
import { photoAccessHelper } from '@kit.MediaLibraryKit';
import { fileIo } from '@kit.CoreFileKit';
import { common } from '@kit.AbilityKit';
import { EditHistoryManager } from '../model/EditHistoryManager';
import { ImageTask, BatchConfig } from '../model/ImageTaskModel';
import { emitter } from '@kit.BasicServicesKit';

@Entry
@Component
struct BatchProcessPage {
  @State taskList: ImageTask[] = [];
  @State currentIndex: number = 0;      // 当前预览的图片索引
  @State batchConfig: BatchConfig = {
    type: 'crop',
    cropX: 0,
    cropY: 0,
    cropWidth: 300,
    cropHeight: 300,
    colorMatrix: [1,0,0,0,0, 0,1,0,0,0, 0,0,1,0,0, 0,0,0,1,0]
  };
  @State isProcessing: boolean = false;

  private context = getContext(this) as common.UIAbilityContext;

  build() {
    Column() {
      // 顶部工具栏
      Row() {
        Button('选择图片').onClick(() => this.selectImages());
        Button('统一应用').enabled(this.taskList.length > 0 && !this.isProcessing)
          .onClick(() => this.applyBatchToAll());
        Button('撤销').enabled(this.canUndo()).onClick(() => this.undoCurrent());
        Button('重做').enabled(this.canRedo()).onClick(() => this.redoCurrent());
        Button('导出全部').onClick(() => this.exportAll());
      }
      .padding(10).width('100%')

      // 缩略图列表(横向滚动)
      List({ space: 10, scroller: null }) {
        ForEach(this.taskList, (task: ImageTask, index: number) => {
          ListItem() {
            Image(task.thumbnail ? this.createImageData(task.thumbnail) : task.sourceUri)
              .width(60).height(60)
              .border({ width: this.currentIndex === index ? 2 : 0, color: Color.Blue })
              .onClick(() => this.currentIndex = index)
          }
        })
      }
      .height(80).width('100%').listDirection(Axis.Horizontal)

      // 当前图片预览
      if (this.taskList.length > 0) {
        Image(this.createImageData(this.taskList[this.currentIndex].pixelMap!))
          .width('100%').height(300).objectFit(ImageFit.Contain)
      }

      // 编辑参数配置
      Column() {
        Radio({ value: 'crop', group: 'editType' }).checked(this.batchConfig.type === 'crop')
        Text('裁切')
        Radio({ value: 'filter', group: 'editType' }).checked(this.batchConfig.type === 'filter')
        Text('滤镜')

        if (this.batchConfig.type === 'crop') {
          Slider({ value: this.batchConfig.cropWidth, min: 50, max: 800, step: 10 })
            .onChange((v) => { this.batchConfig.cropWidth = v; })
          Text('裁切宽度: ' + this.batchConfig.cropWidth)
          Slider({ value: this.batchConfig.cropHeight, min: 50, max: 800, step: 10 })
            .onChange((v) => { this.batchConfig.cropHeight = v; })
          Text('裁切高度: ' + this.batchConfig.cropHeight)
        } else {
          // 灰度滤镜示例
          Button('应用灰度滤镜').onClick(() => {
            this.batchConfig.colorMatrix = [0.33,0.59,0.11,0,0, 0.33,0.59,0.11,0,0, 0.33,0.59,0.11,0,0, 0,0,0,1,0];
            this.applyBatchToCurrent();
          })
        }
      }
    }
  }

  /**
   * 使用PhotoViewPicker多选图片
   */
  async selectImages() {
    try {
      const helper = photoAccessHelper.getPhotoAccessHelper(this.context);
      const uris = await helper.select({
        maxSelectCount: 10,
        MIME: ['image/jpeg', 'image/png']
      });
      const tasks: ImageTask[] = [];
      for (const uri of uris) {
        // 解码为PixelMap
        const source = image.createImageSource(uri);
        const pixelMap = await source.createPixelMap({ desiredPixelFormat: image.PixelMapFormat.RGBA_8888 });
        // 创建缩略图(降低分辨率以节省内存)
        const thumbnail = await source.createPixelMap({
          desiredSize: { width: 60, height: 60 },
          desiredPixelFormat: image.PixelMapFormat.RGBA_8888
        });
        source.release();
        tasks.push({
          sourceUri: uri,
          pixelMap: pixelMap,
          original: pixelMap,
          history: new EditHistoryManager(),
          state: 'pending',
          thumbnail: thumbnail
        });
      }
      this.taskList = tasks;
      this.currentIndex = 0;
    } catch (err) {
      console.error('选择图片失败', err);
    }
  }

  /**
   * 对当前图片应用裁切
   */
  async applyCropToCurrent() {
    const task = this.taskList[this.currentIndex];
    if (!task.pixelMap) return;
    try {
      task.state = 'processing';
      // 记录当前状态到历史栈
      task.history.pushState(task.pixelMap);

      const region: image.Region = {
        x: this.batchConfig.cropX,
        y: this.batchConfig.cropY,
        width: this.batchConfig.cropWidth,
        height: this.batchConfig.cropHeight
      };
      // 执行裁切
      task.pixelMap.crop(region);
      task.state = 'done';
      this.taskList.splice(this.currentIndex, 1, { ...task }); // 触发UI刷新
    } catch (err) {
      task.state = 'error';
      console.error('裁切失败', err);
    }
  }

  /**
   * 对所有图片应用统一编辑
   */
  async applyBatchToAll() {
    this.isProcessing = true;
    for (let i = 0; i < this.taskList.length; i++) {
      this.currentIndex = i;
      if (this.batchConfig.type === 'crop') {
        await this.applyCropToCurrent();
      } else {
        // 滤镜应用逻辑(复用第6篇的colorMatrix设置)
        await this.applyFilterToCurrent();
      }
    }
    this.isProcessing = false;
  }

  async applyFilterToCurrent() {
    const task = this.taskList[this.currentIndex];
    if (!task.pixelMap) return;
    task.state = 'processing';
    task.history.pushState(task.pixelMap);
    // 使用colorMatrix设置滤镜
    task.pixelMap.setColorMatrix(this.batchConfig.colorMatrix);
    task.state = 'done';
    this.taskList.splice(this.currentIndex, 1, { ...task });
  }

  // 撤销/重做
  undoCurrent() {
    const task = this.taskList[this.currentIndex];
    if (!task.pixelMap) return;
    const prev = task.history.undo(task.pixelMap);
    if (prev) {
      task.pixelMap = prev;
      this.taskList.splice(this.currentIndex, 1, { ...task });
    }
  }

  redoCurrent() {
    const task = this.taskList[this.currentIndex];
    if (!task.pixelMap) return;
    const next = task.history.redo(task.pixelMap);
    if (next) {
      task.pixelMap = next;
      this.taskList.splice(this.currentIndex, 1, { ...task });
    }
  }

  canUndo(): boolean {
    return this.taskList[this.currentIndex]?.history.canUndo() ?? false;
  }

  canRedo(): boolean {
    return this.taskList[this.currentIndex]?.history.canRedo() ?? false;
  }

  /**
   * PixelMap转Image组件可用的dataUrl(简化展示)
   * 生产环境可使用packToFile后再读取,此处仅示范
   */
  createImageData(pixelMap: image.PixelMap): ResourceStr {
    // 简化处理:实际项目中应调用imagePacker打包为Buffer再构造base64
    return pixelMap; // 仅示意,不可运行,真实场景需编码
  }
}关键点说明:
photoAccessHelper.select方法支持maxSelectCount参数实现多选,这里限制最多10张。- 每张图片创建两个PixelMap:完整分辨率用于编辑,缩略图(60x60)用于列表展示,大幅降低UI渲染压力。
applyBatchToAll对每张图片依次调用裁切或滤镜,会触发pushState记录历史。用户可在任意时刻对某张图片单独点"撤销"。pixelMap.crop(region)和pixelMap.setColorMatrix(matrix)是Image Kit文档提供的接口,与之前章节一致。
3. 运行验证
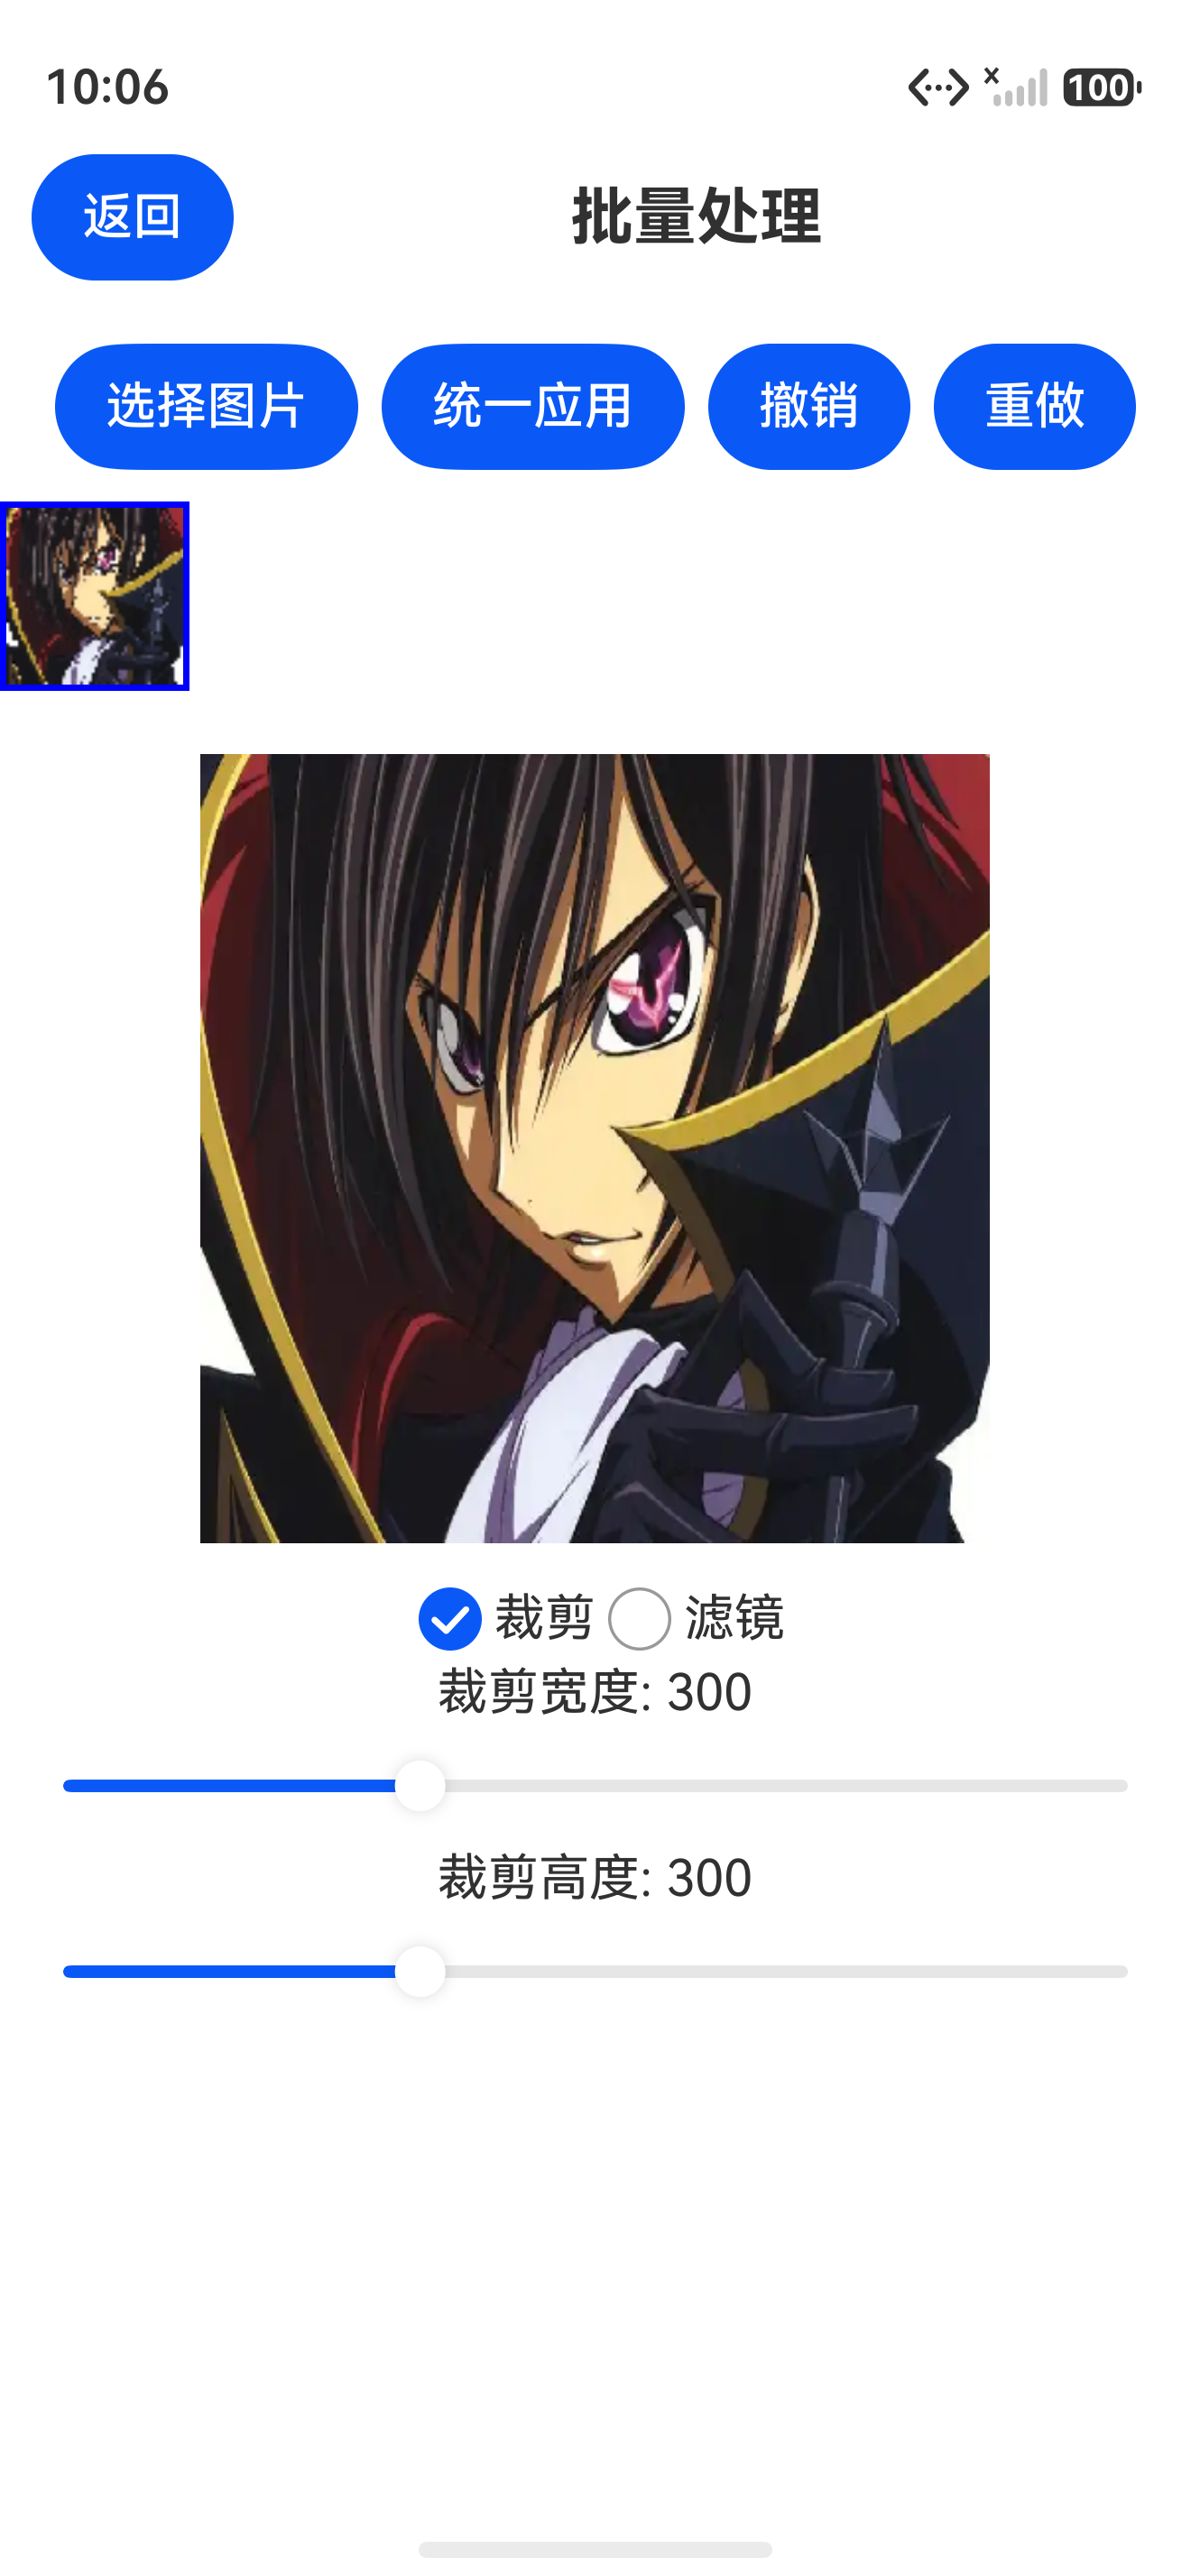
在DevEco Studio中运行App,进入"批量处理"功能:
- 点击"选择图片",从相册中选择2~3张图片。
- 缩略图列表出现,点击某张缩略图,主预览区显示该图片。
- 选中"裁切",拖动滑块调整裁切尺寸(如300x300),点击"统一应用"。
- 所有图片依次被裁切,缩略图更新。切换预览,可看到每张图片都应用了相同裁切。
- 点击"撤销",当前预览图片恢复裁切前的状态;再点"重做",裁切效果恢复。
- 切换到另一张图片,点击"撤销"恢复的是该图片的历史,互不干扰。
4. 小结与预告
本篇实现了批量处理模块的核心功能:
- 多图选择与统一编辑(裁切/滤镜)
- 每张图片独立维护
EditHistoryManager双栈历史 - 支持图片粒度的撤销/重做
这是App从"单张编辑"走向"批量处理"的重要升级,后续可扩展为支持不同图片用不同配置,或增加进度条显示批量处理进度。
下一篇「水印与文字叠加」将聚焦于Canvas绘制文字或图标到PixelMap上,实现可拖动、可调透明度的水印功能,让你的图片具备版权标识能力。