LabelStudio工具介绍
Label Studio 是一款开源的数据标注工具,由 Heartex 公司开发。它支持多种数据类型的标注任务,包括文本、图像、音频、视频和时间序列等。
主要特点
- 多模态支持:支持文本分类、命名实体识别(NER)、图像分割、目标检测、音频转录等多种标注类型
- 可配置界面:通过简单的 XML 或 JSON 配置即可自定义标注界面,无需编写代码
- 机器学习集成:支持预标注和主动学习,可与机器学习模型集成以提高标注效率
- 协作功能:支持多用户协作标注,包含审核和质量控制工作流
- API 接口:提供 REST API,便于与现有数据管道集成
适用场景
- 计算机视觉:图像分类、目标检测、语义分割、关键点标注
- 自然语言处理:文本分类、情感分析、序列标注、问答对构建
- 语音识别:音频转录、说话人识别
- 时间序列分析:异常检测、模式标注
部署方式
Label Studio 支持多种部署方式:
- Docker 一键部署
- pip 安装:
pip install label-studio - 本地开发环境运行
- 云服务版本(Label Studio Enterprise)
该工具广泛应用于学术研究和企业级数据标注项目中,是构建高质量训练数据集的重要工具。
Label Studio部署
LabelStudio工具部署方法如下:
Docker安装
https://hub.docker.com/u/heartexlabs

# 在联网机器上下载镜像
docker pull heartexlabs/label-studio:latest
# 导出镜像为压缩包
docker save -o label-studio.tar heartexlabs/label-studio:latest
# 在目标机器导入镜像
docker load -i label-studio.tar
配置docker-compose.yml 文件
services:
  label-studio:
    image: heartexlabs/label-studio:latest
    pull_policy: never  # <--- 增加这一行,强制只使用本地镜像
    ports:
      - "8090:8080"
    volumes:
      - /workspace/label-studio/data:/label-studio/data
    environment:
      - CHECK_FOR_UPDATE=false      # <--- 关闭版本检查,解决网络报错
      - TELEMETRY_ENABLED=false     # <--- 关闭遥测,解决网络报错
      - LABEL_STUDIO_HOST=http://172.16.10.80:8090
      #- LABEL_STUDIO_USERNAME=xxx@example.com
      #- LABEL_STUDIO_PASSWORD=xxx
启动容器
docker compose up -d其他相关命令
# 容器停止
docker compose down
# 容器重启
docker compose restart
启动后,即可通过浏览器访问 http://172.16.10.80:8090/ ,即可登录LabelStudio工具。
LabelStudio ML Backend使用方法
Label Studio 支持众多AI模型接入,实现自动或半自动标注。目前接入SAM2实现自动分割标注。
- 硬件配置:
- GPU: NVIDIA GeForce RTX 5080
SAM2 Docker 方式部署运行
官方自动标注镜像容器地址:
https://hub.docker.com/r/heartexlabs/label-studio-ml-backend

# 在联网机器上下载SAM官方镜像
docker pull heartexlabs/label-studio-ml-backend:sam-master
docker pull heartexlabs/label-studio-ml-backend:sa2-master
但官方SA2或者SAM镜像在NVIDIA GeForce RTX 5080 sm_120机器上运行报如下错误
/opt/conda/lib/python3.11/site-packages/torch/cuda/__init__.py:235: UserWarning:
NVIDIA GeForce RTX 5080 with CUDA capability sm_120 is not compatible with the current PyTorch installation.
The current PyTorch install supports CUDA capabilities sm_50 sm_60 sm_70 sm_75 sm_80 sm_86 sm_90.
If you want to use the NVIDIA GeForce RTX 5080 GPU with PyTorch, please check the instructions at https://pytorch.org/get-started/locally/官方镜像内置 CUDA 运行时(CUDA Runtime)版本过低 (PyTorch 编译时搭载的是基于CUDA Toolkit 12.4),缺少支持 sm_120(RTX 5080)的运行库和算子指令。RTX 5080 是最新的 Blackwell 架构 (sm_120),必须使用 CUDA 12.8 或更高版本。即使强行运行,SAM2 也会在 CPU 上计算,对于 SAM 这种巨型模型,CPU 计算一张图可能需要 20-30 秒。需要自定义 Dockerfile 来支持 RTX 5080 GPU。
自定义Dockerfile参考:
主要改动:将 pytorch/pytorch:2.5.1-cuda12.4-cudnn9-runtime 升级为 pytorch/pytorch:2.8.0-cuda12.8-cudnn9-runtime
FROM pytorch/pytorch:2.8.0-cuda12.8-cudnn9-runtime
ARG DEBIAN_FRONTEND=noninteractive
ARG TEST_ENV

WORKDIR /app


# ==================== 加速源配置 ====================
# 1. apt 使用华为云(速度快)
RUN sed -i 's|http://archive.ubuntu.com|http://repo.huaweicloud.com|g' /etc/apt/sources.list && \
    sed -i 's|http://security.ubuntu.com|http://repo.huaweicloud.com|g' /etc/apt/sources.list && \
    apt-get update && apt-get install -y ca-certificates

# 2. conda 只保留官方 + 清华主源(避免 pytorch 子通道 404)
RUN conda config --add channels https://mirrors.tuna.tsinghua.edu.cn/anaconda/pkgs/main/ && \
    conda config --add channels https://mirrors.tuna.tsinghua.edu.cn/anaconda/pkgs/free/ && \
    conda config --set show_channel_urls yes && \
    mamba update conda -y --all

# 3. pip 使用华为云
ENV PIP_INDEX_URL=https://repo.huaweicloud.com/repository/pypi/simple/
ENV PIP_TRUSTED_HOST=repo.huaweicloud.com
# ====================================================


RUN --mount=type=cache,target="/var/cache/apt",sharing=locked \
    --mount=type=cache,target="/var/lib/apt/lists",sharing=locked \
    apt-get -y update \
    && apt-get install -y git \
    && apt-get install -y wget \
    && apt-get install -y g++ freeglut3-dev build-essential libx11-dev \
    libxmu-dev libxi-dev libglu1-mesa libglu1-mesa-dev libfreeimage-dev \
    && apt-get -y install ffmpeg libsm6 libxext6 libffi-dev python3-dev python3-pip gcc

ENV PYTHONUNBUFFERED=1 \
    PYTHONDONTWRITEBYTECODE=1 \
    PIP_CACHE_DIR=/.cache \
    PORT=9090 \
    WORKERS=2 \
    THREADS=4 \
    CUDA_HOME=/usr/local/cuda

ENV CUDA_HOME=/usr/local/cuda \
    TORCH_CUDA_ARCH_LIST="8.9;9.0;12.0"

# install base requirements
COPY requirements-base.txt .
RUN --mount=type=cache,target=${PIP_CACHE_DIR},sharing=locked \
    pip install -r requirements-base.txt

COPY requirements.txt .
RUN --mount=type=cache,target=${PIP_CACHE_DIR},sharing=locked \
    pip3 install -r requirements.txt

# install segment-anything-2
RUN cd / && git clone --depth 1 --branch main --single-branch https://github.com/facebookresearch/sam2.git
WORKDIR /sam2
RUN --mount=type=cache,target=${PIP_CACHE_DIR},sharing=locked \
    pip3 install -e .
RUN cd checkpoints && ./download_ckpts.sh

WORKDIR /app

# install test requirements if needed
COPY requirements-test.txt .
# build only when TEST_ENV="true"
RUN --mount=type=cache,target=${PIP_CACHE_DIR},sharing=locked \
    if [ "$TEST_ENV" = "true" ]; then \
      pip3 install -r requirements-test.txt; \
    fi

COPY . ./

WORKDIR ../sam2

RUN python - <<EOF
import torch
print("Torch:", torch.__version__)
print("CUDA:", torch.version.cuda)
print("Arch:", torch.cuda.get_arch_list())
EOF

CMD ["../app/start.sh"]
构建镜像
docker build --build-arg TEST_ENV=false -t sa2-rtx5080:pytorch2.8.0-cuda12.8-cudnn9 --no-cache --progress=plain .配置docker-compose.yml 文件
参考:
-
LABEL_STUDIO_URL:是Label Studio 运行的IP地址和相应端口号
-
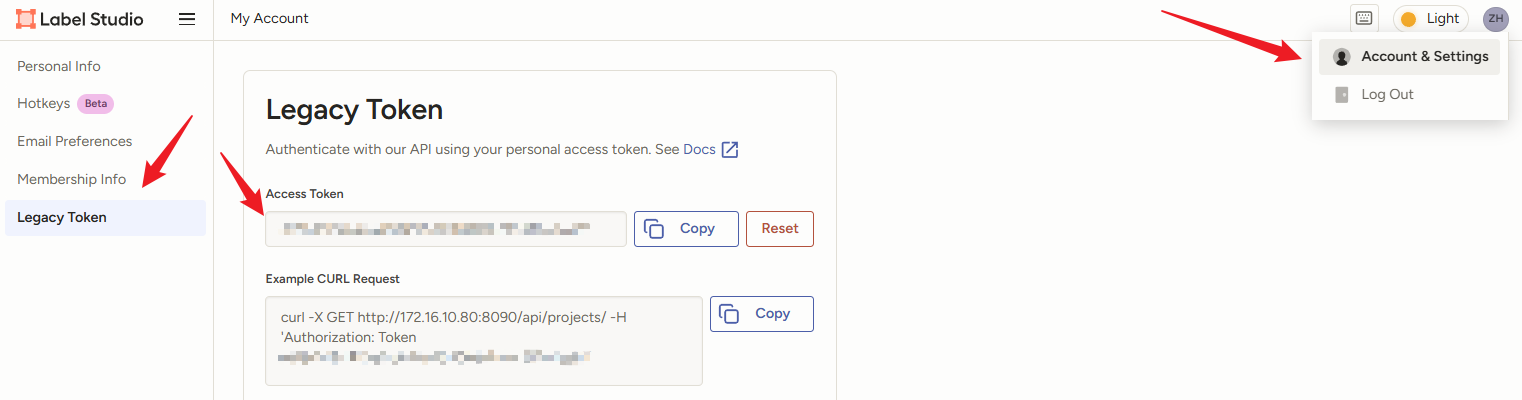
LABEL_STUDIO_API_KEY:
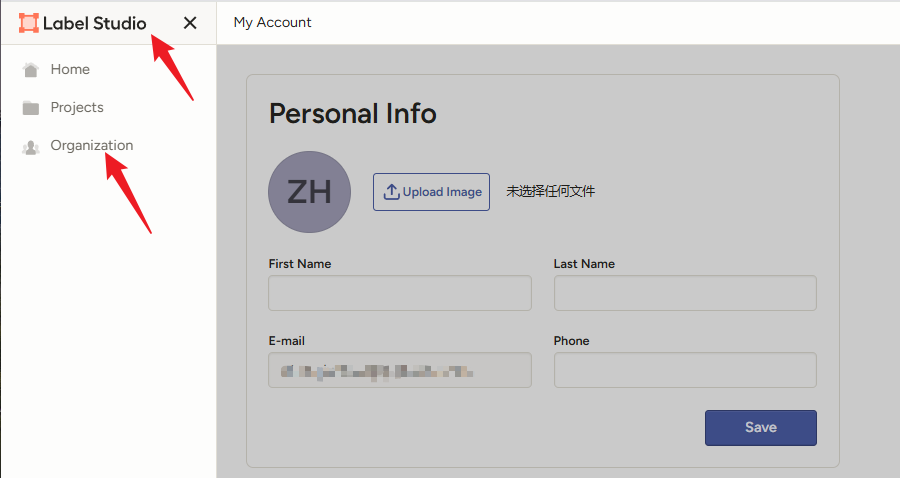
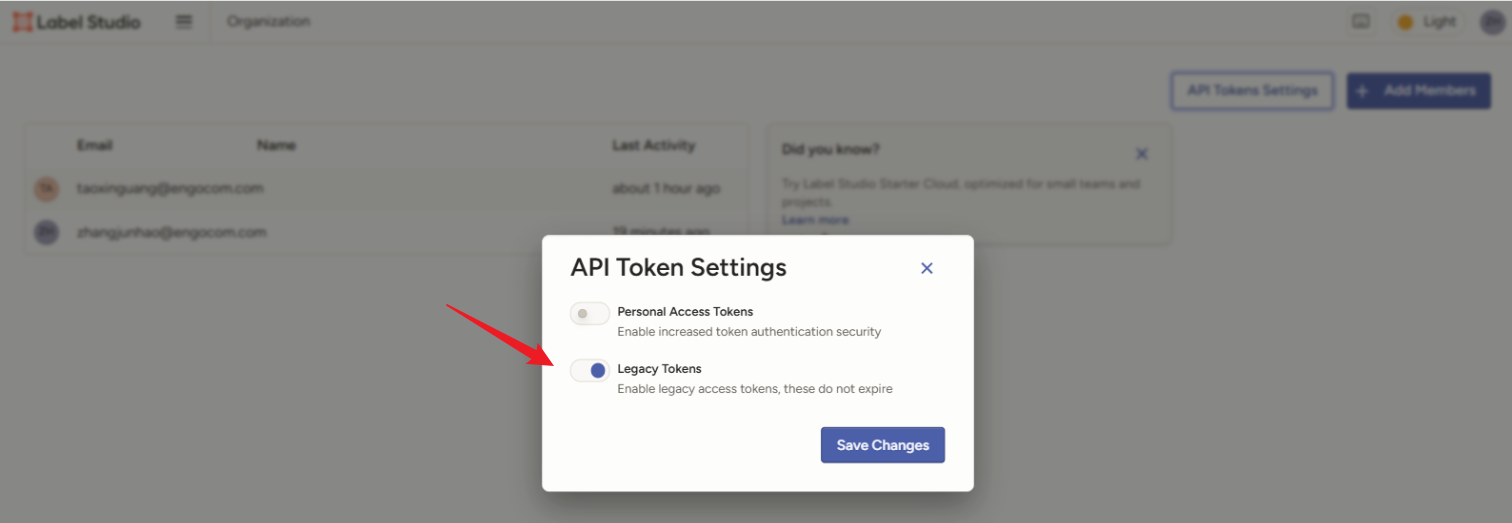
因为需要配置LABEL_STUDIO_API_KEY,Label Studio 需要修改配置:
Label Studio -> Organization -> API Tokens Settings -> Legacy Tokens

- volumes挂载的地址要和MODEL_DIR中预训练模型地址对应
将下载的模型放在相应的映射路径下比如:/workspace/label-studio/sam2-docker/models
这里下载的是:sam2.1_hiera_large.pt :https://dl.fbaipublicfiles.com/segment_anything_2/092824/sam2.1_hiera_large.pt
docker-compose.yml具体如下:
version: "3.8"

services:
  ml-backend:
    container_name: sa2-backend
    image: sa2-rtx5080:pytorch2.8.0-cuda12.8-cudnn9
    build:
      context: .
      args:
        TEST_ENV: ${TEST_ENV}

    deploy:
      resources:
        reservations:
          devices:
            - driver: nvidia
              count: 1
              capabilities: [ gpu ]


    environment:
      # specify these parameters if you want to use basic auth for the model server
      - BASIC_AUTH_USER=
      - BASIC_AUTH_PASS=
      # set the log level for the model server
      - LOG_LEVEL=DEBUG
      # any other parameters that you want to pass to the model server
      - ANY=PARAMETER
      # specify the number of workers and threads for the model server
      - WORKERS=1
      - THREADS=8
      # specify the model directory (likely you don't need to change this)
      - MODEL_DIR=/data/models
      # specify device
      - DEVICE=cuda  # or 'cpu' (coming soon)
      # SAM2 model config
      - MODEL_CONFIG=configs/sam2.1/sam2.1_hiera_l.yaml
      # SAM2 checkpoint
      - MODEL_CHECKPOINT=sam2.1_hiera_large.pt

      # Specify the Label Studio URL and API key to access
      # uploaded, local storage and cloud storage files.
      # Do not use 'localhost' as it does not work within Docker containers.
      # Use prefix 'http://' or 'https://' for the URL always.
      # Determine the actual IP using 'ifconfig' (Linux/Mac) or 'ipconfig' (Windows).
      - LABEL_STUDIO_URL=http://172.16.10.80:8090
      - LABEL_STUDIO_API_KEY=xxx
    ports:
      - "9090:9090"
    volumes:
      - "/workspace/label-studio/sam2-docker:/data"
注意:将docker-compose.yml中的LABEL_STUDIO_URL,LABEL_STUDIO_API_KEY替换为实际值
容器启动
docker compose up -d 查看日志确认加载成功
docker logs -f sa2-backend
或者
docker compose logs -f
SAM2源码方式运行
- 不依赖 Docker 来启动机器学习后端,需要克隆(clone)代码仓库,并使用 pip 安装所有的依赖项
备注:创建并激活虚拟环境,在虚拟环境中安装相关依赖
git clone https://github.com/HumanSignal/label-studio-ml-backend.git
cd label-studio-ml-backend
pip install -e .
cd label_studio_ml/examples/segment_anything_2_image
pip install -r requirements.txt- 下载SAM2源码库和权重文件
SAM2源码库:https://github.com/facebookresearch/sam2
Checkpoints: https://github.com/facebookresearch/sam2?tab=readme-ov-file#download-checkpoints
这里下载的是:sam2.1_hiera_large.pt :https://dl.fbaipublicfiles.com/segment_anything_2/092824/sam2.1_hiera_large.pt
源码目录结构:
| root directory
|-- label-studio-ml-backend
|     |-- label-studio-ml
|           |-- examples
|                 |-- segment_anything_2_image
|-- sam2
      |-- sam2
      |-- checkpoints
|-- sam2.1_hiera_large.pt-
设置环境变量
export LABEL_STUDIO_URL=http://172.16.10.80:8090
export LABEL_STUDIO_API_KEY=xxx
注意:环境变量替换为实际值
-
启动ML后端(在默认的 9090 端口)
cd ~/sam2
label-studio-ml start ../label-studio-ml-backend/label_studio_ml/examples/segment_anything_2_image
LabelStudio 前端配置
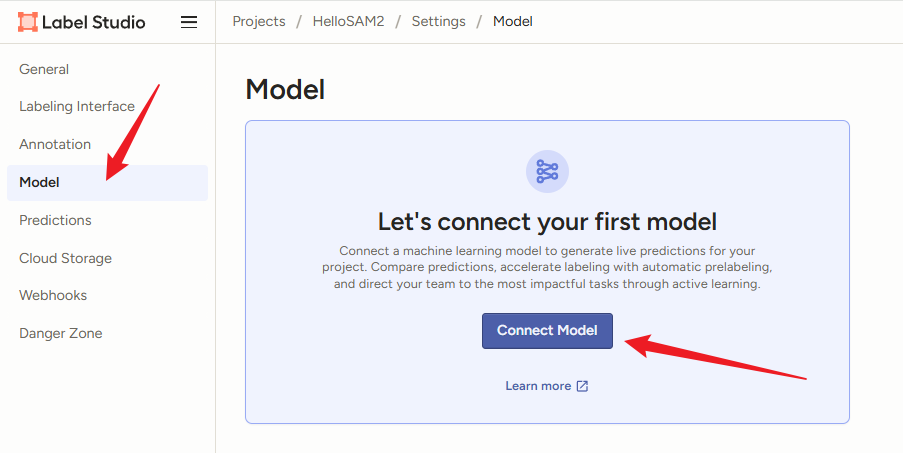
按照如下配置进行填写:
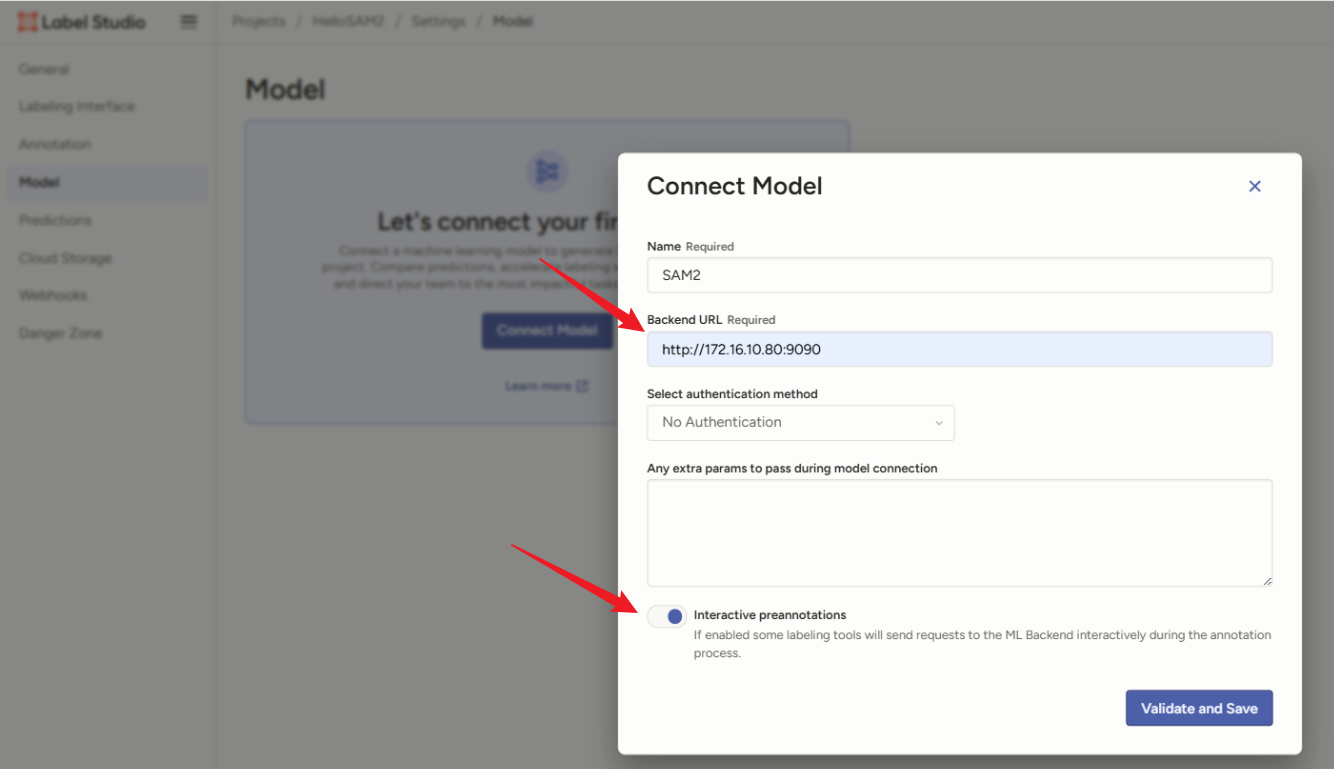
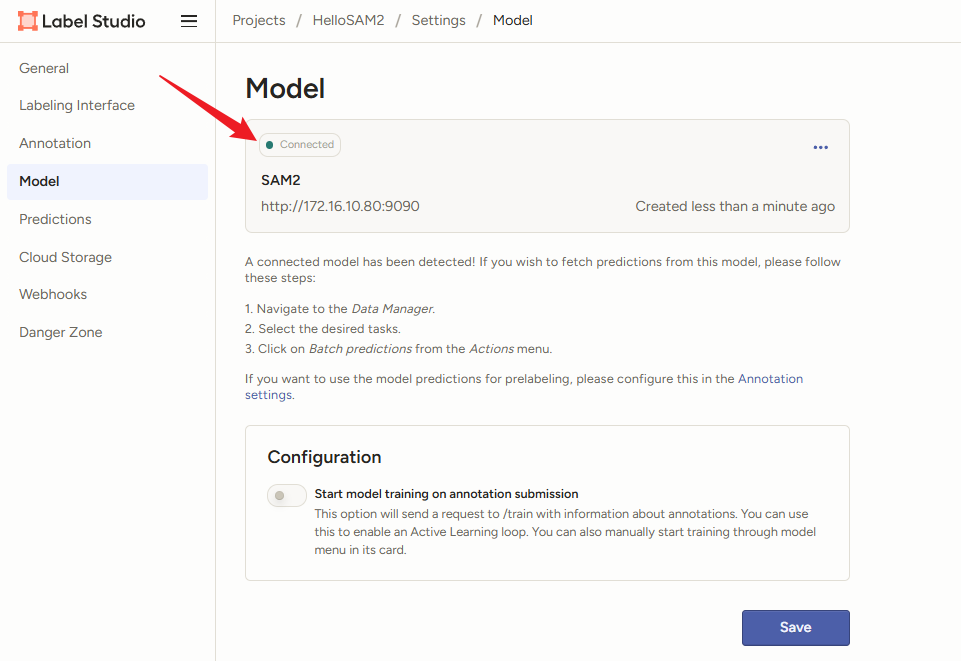
绿色点表示Connected连接
Label Interface配置
按照如下模板添加标注配置:
参考:https://github.com/HumanSignal/label-studio-ml-backend/tree/master/label_studio_ml/examples/segment_anything_2_image Labeling configuration
<View>
<Style>
  .main {
    font-family: Arial, sans-serif;
    background-color: #f5f5f5;
    margin: 0;
    padding: 20px;
  }
  .container {
    display: flex;
    justify-content: space-between;
    margin-bottom: 20px;
  }
  .column {
    flex: 1;
    padding: 10px;
    background-color: #fff;
    border-radius: 5px;
    box-shadow: 0 2px 5px rgba(0, 0, 0, 0.1);
    text-align: center;
  }
  .column .title {
    margin: 0;
    color: #333;
  }
  .column .label {
    margin-top: 10px;
    padding: 10px;
    background-color: #f9f9f9;
    border-radius: 3px;
  }
  .image-container {
    width: 100%;
    height: 300px;
    background-color: #ddd;
    border-radius: 5px;
  }
</Style>
<View className="main">
  <View className="container">
    <View className="column">
      <View className="title">Choose Label</View>
      <View className="label">
        <BrushLabels name="BrushLabels" toName="image">
          <Label value="pointer" background="#181dbf"/>
          <Label value="main_scale_mark" background="#44bf18"/>
        </BrushLabels>
      </View>
    </View>
    <View className="column">
      <View className="title">Use Keypoint</View>
      <View className="label">
        <KeyPointLabels name="KeyPointLabels" toName="image" smart="true">
          <Label value="pointer" background="#d30d0d"/>
          <Label value="main_scale_mark" background="#d30d17"/>
        </KeyPointLabels>
      </View>
    </View>
    <View className="column">
      <View className="title">Use Rectangle</View>
      <View className="label">
        <RectangleLabels name="RectangleLabels" toName="image" smart="true">
          <Label value="pointer" background="#FFC069"/>
          <Label value="main_scale_mark" background="#FFC069"/>
        </RectangleLabels>
      </View>
    </View>

  </View>
  <View className="image-container">
    <Image name="image" value="$image" zoom="true" zoomControl="true"/>
  </View>
</View>
</View>
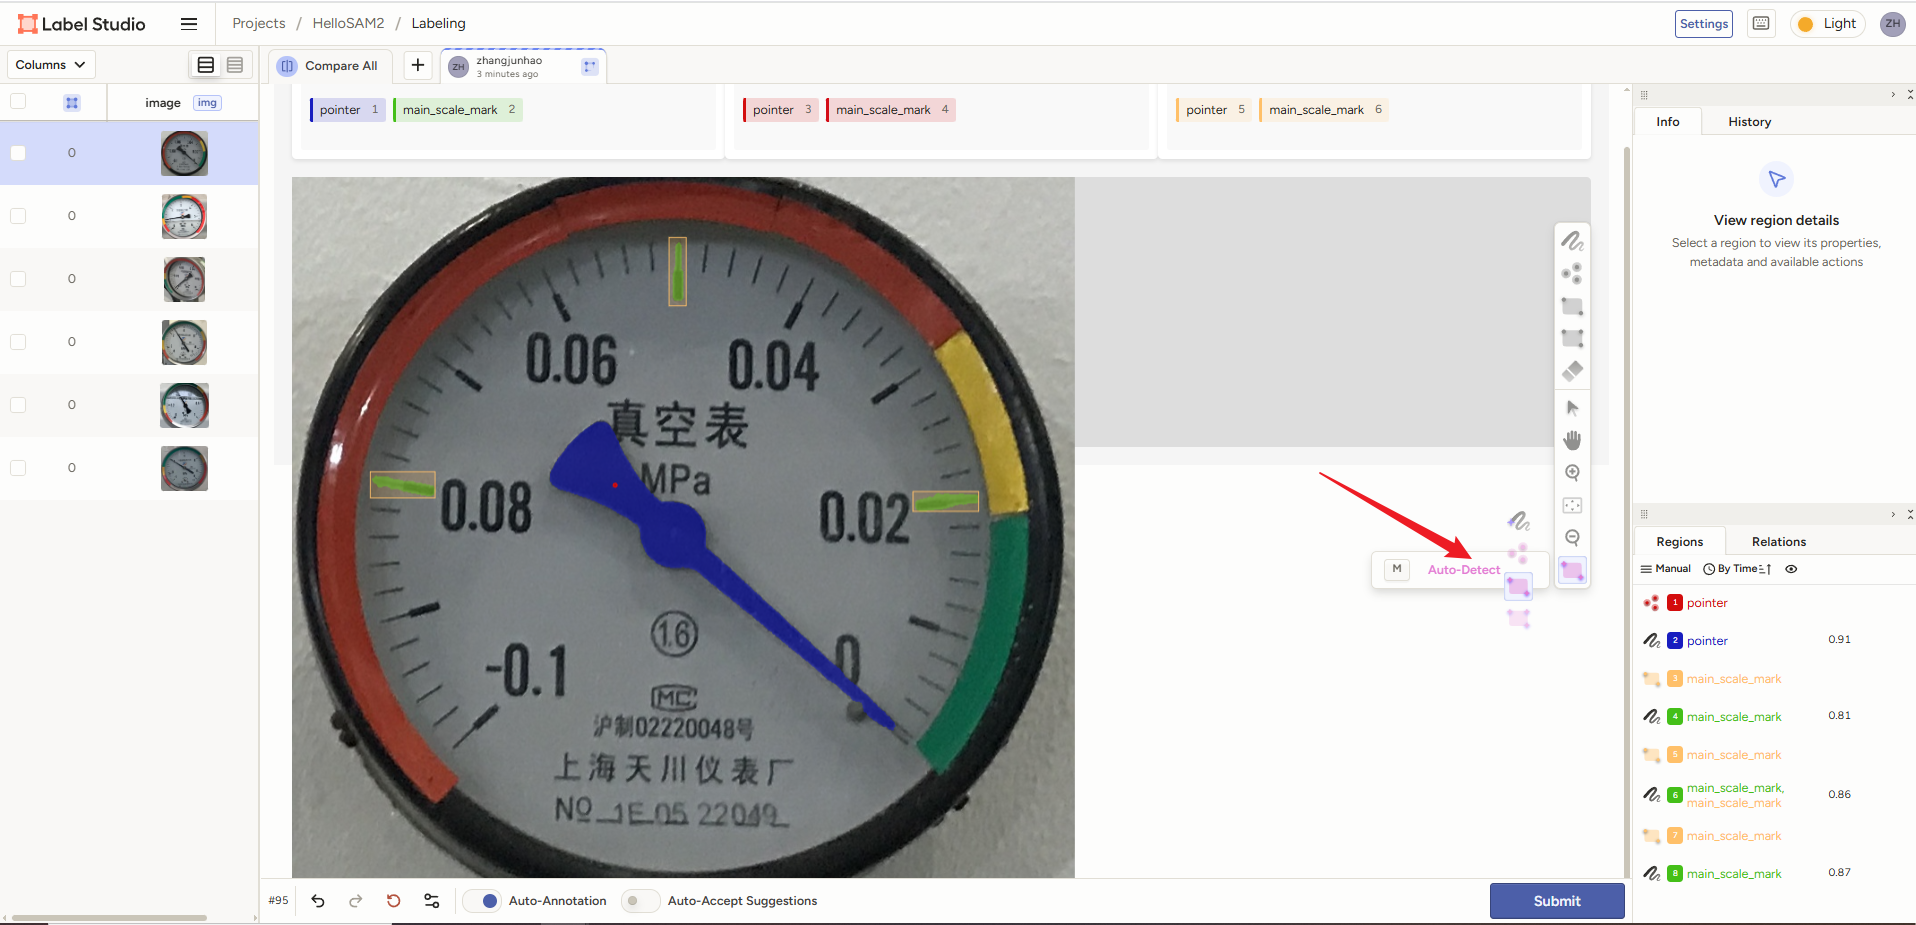
目前 Label Studio 的 SAM2 机器学习后端采用的是交互模式(Interactive mode)运行。
用户提供的引导输入包括:
- 关键点标签(KeypointLabels)
- 矩形标签(RectangleLabels)
SAM2 会输出BrushLabels掩码作为结果。
在标注页面将Auto-Annotation设置为True,即可开启自动标注功能。
具体流程:选中右侧工具栏Auto-Detect的关键点(三个点)后,或者矩形框,然后选中标签进行选点或者标注矩形区域,即可触发自动分割标注,会提示红色按钮表示拒绝、接受自动标注结果。
参考资料
Label Studio Documentation:https://labelstud.io/guide
Integrate Label Studio into your machine learning pipeline:
https://labelstud.io/guide/ml#Example-models
label-studio-ml-backend: https://github.com/HumanSignal/label-studio-ml-backend/tree/master
label-studio-ml-backend SAM2: https://github.com/HumanSignal/label-studio-ml-backend/tree/master/label_studio_ml/examples/segment_anything_2_image