文章目录
- Qt_常用控件
-
- 按钮控件
-
- [Push Button:命令按钮](#Push Button:命令按钮)
- [Tool Button:工具按钮](#Tool Button:工具按钮)
- [Radio Button:单选按钮](#Radio Button:单选按钮)
- [Check Box:复选框按钮](#Check Box:复选框按钮)
- [Command Link Button:命令链接按钮](#Command Link Button:命令链接按钮)
- QDialogButtonBox按钮盒
- 容器组控件
-
- [Group Box:](#Group Box:)
- ScrollArea:滚动区域
- [Tool Box:工具箱](#Tool Box:工具箱)
- [Tab Widget:标签小部件](#Tab Widget:标签小部件)
- [Frama 框架](#Frama 框架)
- [Dock Widget:停靠窗体部件](#Dock Widget:停靠窗体部件)
- [item View 列表控件](#item View 列表控件)
-
- QListView
- [table View](#table View)
- [list Widget 清单控件](#list Widget 清单控件)
- [tree Widget 树形控件](#tree Widget 树形控件)
- [table Widget 表控件](#table Widget 表控件)
- [input Widgets 输入组控件](#input Widgets 输入组控件)
-
- QComboBox
- QFontComboBox
- [Line Edit 单行输入框](#Line Edit 单行输入框)
- [text Edit 多行文本编辑](#text Edit 多行文本编辑)
- [Spin Box](#Spin Box)
- [TimeEdit 时间编辑器](#TimeEdit 时间编辑器)
- [Scroll Bar控件](#Scroll Bar控件)
- [Key Sequence Edit 快捷键捕获](#Key Sequence Edit 快捷键捕获)
- [Display Widgets](#Display Widgets)
-
- [label :标签](#label :标签)
- [Text Brower : 文本浏览器](#Text Brower : 文本浏览器)
- [textBrowser 进度条](#textBrowser 进度条)
- [LCD Number 液晶数字](#LCD Number 液晶数字)
Qt_常用控件
按钮控件
Push Button:命令按钮
最常用的按钮控件,支持文本、图标、快捷键。
| 特性 | 说明 |
|---|---|
| 文本显示 | 支持 & 设置快捷键(如 &OK → Alt+O) |
| 图标支持 | setIcon() 设置图标 |
| 默认按钮 | setDefault(true) 设为回车默认按钮 |
| 自动默认 | setAutoDefault(true) 焦点所在时自动成为默认按钮 |
| 扁平化 | setFlat(true) 去除边框,悬停才显示 |
| 可选中 | setCheckable(true) 切换选中/未选中状态 |
| 菜单 | setMenu() 绑定下拉菜单 |
cpp
QPushButton *btn = new QPushButton("&OK", parent);
btn->setIcon(QIcon(":/icons/ok.png"));
btn->setDefault(true);
connect(btn, &QPushButton::clicked, [](){ /* 处理点击 */ });
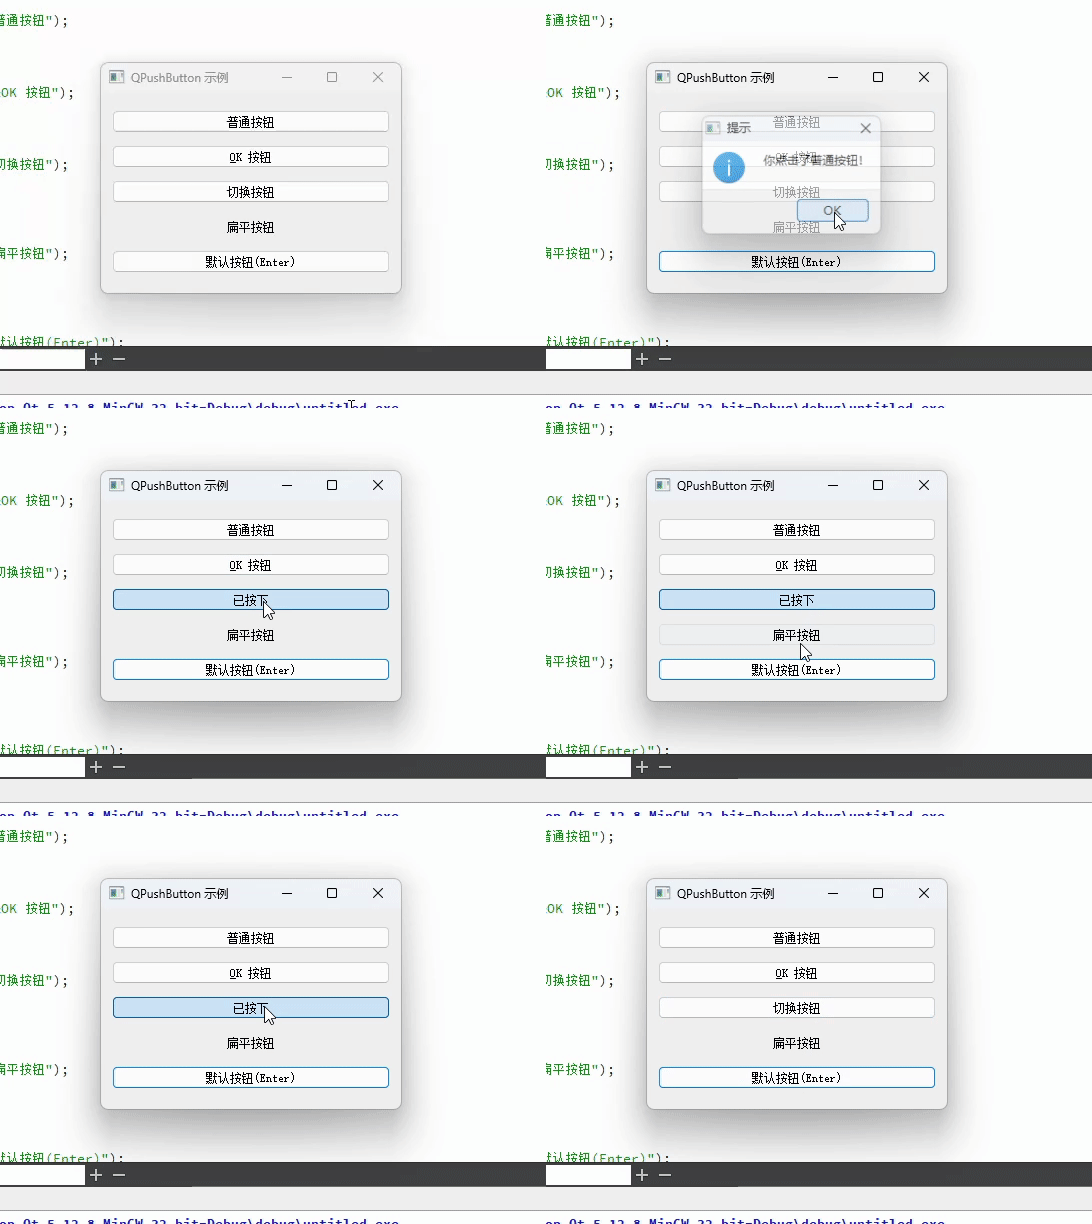
使用示例:
cpp
#include <QApplication>
#include <QPushButton>
#include <QVBoxLayout>
#include <QWidget>
#include <QMessageBox>

int main(int argc, char *argv[]) {
    QApplication app(argc, argv);
    QWidget window;
    window.setWindowTitle("QPushButton 示例");
    window.resize(300, 200);

    QVBoxLayout *layout = new QVBoxLayout(&window);

    // 普通按钮
    QPushButton *btn1 = new QPushButton("普通按钮");
    layout->addWidget(btn1);

    // 带快捷键的按钮(Alt+O)
    QPushButton *btn2 = new QPushButton("&OK 按钮");
    layout->addWidget(btn2);

    // 可切换状态的按钮
    QPushButton *btn3 = new QPushButton("切换按钮");
    btn3->setCheckable(true);
    layout->addWidget(btn3);

    // 扁平化按钮
    QPushButton *btn4 = new QPushButton("扁平按钮");
    btn4->setFlat(true);
    layout->addWidget(btn4);

    // 默认按钮(按回车触发)
    QPushButton *btn5 = new QPushButton("默认按钮(Enter)");
    btn5->setDefault(true);
    layout->addWidget(btn5);

    QObject::connect(btn1, &QPushButton::clicked, [&]() {
        QMessageBox::information(&window, "提示", "你点击了普通按钮!");
    });

    QObject::connect(btn3, &QPushButton::toggled, [&](bool checked) {
        btn3->setText(checked ? "已按下" : "切换按钮");
    });

    window.show();
    return app.exec();
}
使用效果:
Tool Button:工具按钮
为工具栏设计,支持多种显示模式和弹出菜单。
| 特性 | 说明 |
|---|---|
| 显示模式 | setToolButtonStyle() 控制图标/文字显示方式 |
| 弹出菜单 | setPopupMode() 控制菜单弹出行为 |
| 自动提升 | setAutoRaise(true) 鼠标悬停时才显示凸起效果 |
| 可切换 | setCheckable(true) 作为开关按钮使用 |
ToolButtonStyle 枚举值:
| 值 | 说明 |
|---|---|
Qt::ToolButtonIconOnly |
只显示图标(默认) |
Qt::ToolButtonTextOnly |
只显示文字 |
Qt::ToolButtonTextBesideIcon |
文字在图标旁边 |
Qt::ToolButtonTextUnderIcon |
文字在图标下方 |
Qt::ToolButtonFollowStyle |
跟随系统风格 |
cpp
QToolButton *toolBtn = new QToolButton;
toolBtn->setText("Save");
toolBtn->setIcon(QIcon(":/icons/save.png"));
toolBtn->setToolButtonStyle(Qt::ToolButtonTextUnderIcon);
toolBtn->setPopupMode(QToolButton::MenuButtonPopup);
toolBtn->setMenu(new QMenu);
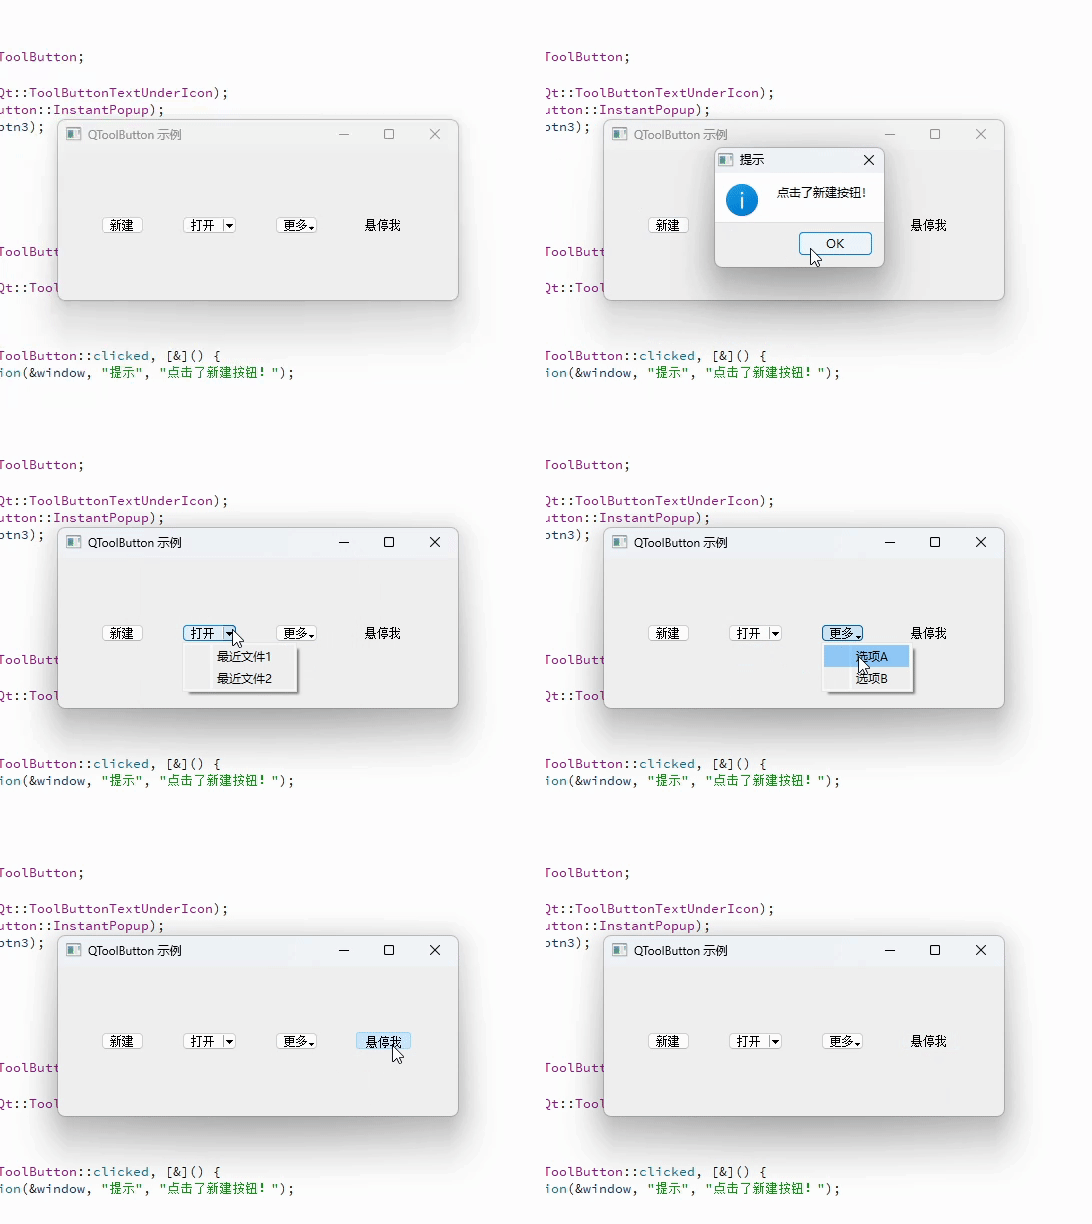
使用示例:
cpp
#include <QApplication>
#include <QToolButton>
#include <QHBoxLayout>
#include <QMenu>
#include <QWidget>
#include <QMessageBox>

int main(int argc, char *argv[]) {
    QApplication app(argc, argv);
    QWidget window;
    window.setWindowTitle("QToolButton 示例");
    window.resize(400, 150);

    QHBoxLayout *layout = new QHBoxLayout(&window);

    // 仅图标按钮
    QToolButton *btn1 = new QToolButton;
    btn1->setText("新建");
    btn1->setToolButtonStyle(Qt::ToolButtonTextUnderIcon);
    layout->addWidget(btn1);

    // 带下拉菜单的按钮
    QToolButton *btn2 = new QToolButton;
    btn2->setText("打开");
    btn2->setToolButtonStyle(Qt::ToolButtonTextUnderIcon);
    btn2->setPopupMode(QToolButton::MenuButtonPopup);
    QMenu *menu = new QMenu(btn2);
    menu->addAction("最近文件1");
    menu->addAction("最近文件2");
    btn2->setMenu(menu);
    layout->addWidget(btn2);

    // 即时弹出菜单
    QToolButton *btn3 = new QToolButton;
    btn3->setText("更多");
    btn3->setToolButtonStyle(Qt::ToolButtonTextUnderIcon);
    btn3->setPopupMode(QToolButton::InstantPopup);
    QMenu *menu2 = new QMenu(btn3);
    menu2->addAction("选项A");
    menu2->addAction("选项B");
    btn3->setMenu(menu2);
    layout->addWidget(btn3);

    // 自动提升(悬停才显示边框)
    QToolButton *btn4 = new QToolButton;
    btn4->setText("悬停我");
    btn4->setToolButtonStyle(Qt::ToolButtonTextUnderIcon);
    btn4->setAutoRaise(true);
    layout->addWidget(btn4);

    QObject::connect(btn1, &QToolButton::clicked, [&]() {
        QMessageBox::information(&window, "提示", "点击了新建按钮!");
    });

    window.show();
    return app.exec();
}
使用效果:
Radio Button:单选按钮
同组内只能选中一个,常用于互斥选项。
| 特性 | 说明 |
|---|---|
| 分组机制 | 同一父容器内的 Radio Button 自动互斥 |
| 手动分组 | 使用 QButtonGroup 实现跨容器分组 |
| 默认选中 | setChecked(true) 设置初始选中项 |
| 信号 | toggled(bool) 选中状态变化时触发 |
cpp
QRadioButton *radio1 = new QRadioButton("Option A");
QRadioButton *radio2 = new QRadioButton("Option B");
radio1->setChecked(true);

// 使用 QButtonGroup 获取选中 ID
QButtonGroup *group = new QButtonGroup;
group->addButton(radio1, 0);
group->addButton(radio2, 1);
connect(group, &QButtonGroup::idClicked, [](int id){ /* 处理选择 */ });
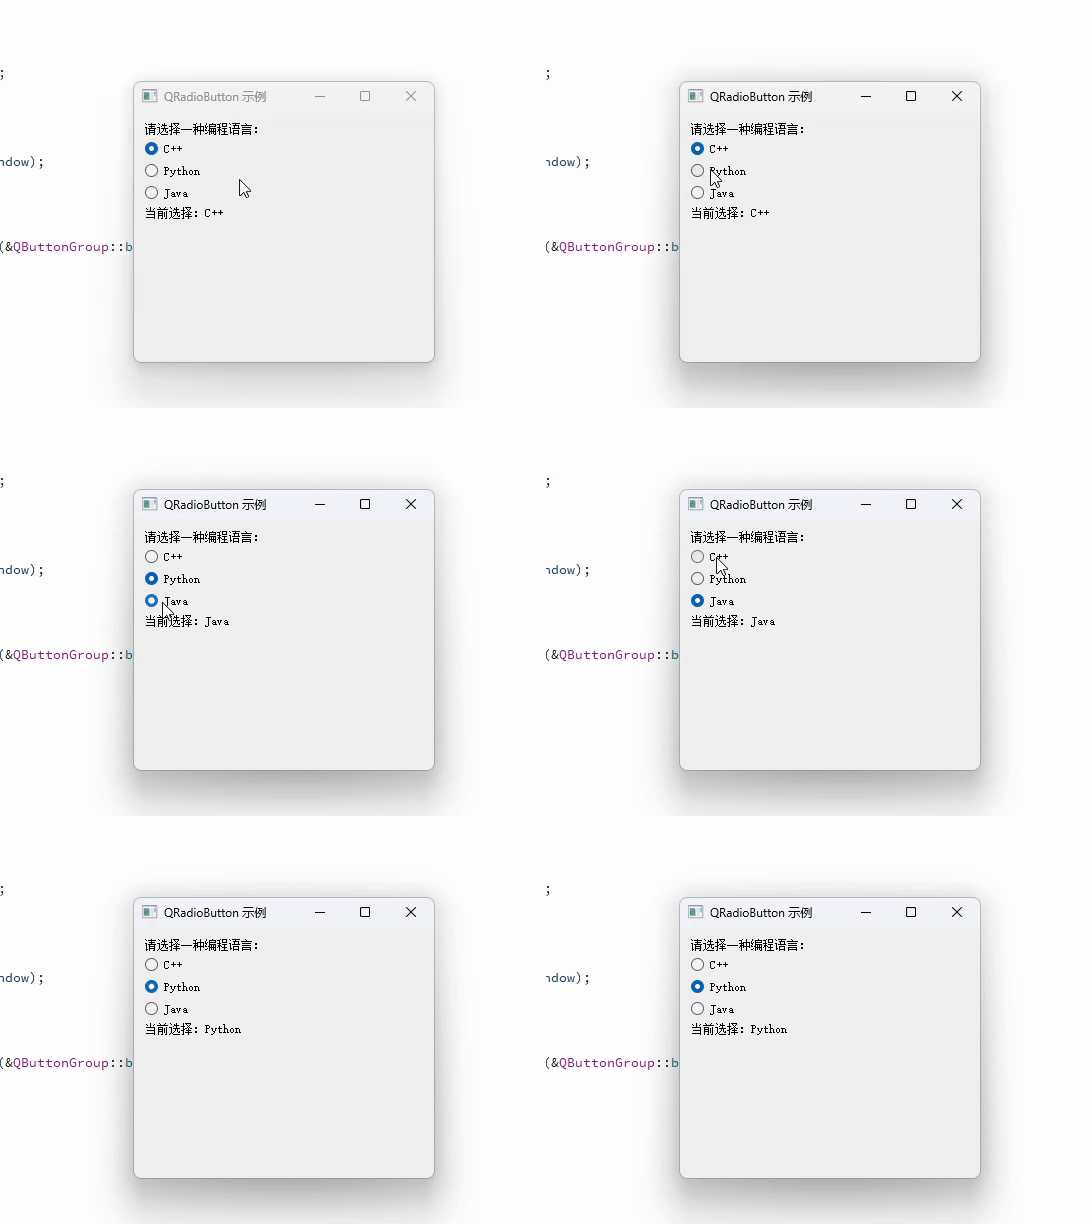
使用示例
cpp
#include <QApplication>
#include <QRadioButton>
#include <QButtonGroup>
#include <QVBoxLayout>
#include <QLabel>
#include <QWidget>

int main(int argc, char *argv[]) {
    QApplication app(argc, argv);
    QWidget window;
    window.setWindowTitle("QRadioButton 示例");
    window.resize(300, 250);

    QVBoxLayout *layout = new QVBoxLayout(&window);

    QLabel *label = new QLabel("请选择一种编程语言:");
    layout->addWidget(label);

    // 创建单选按钮
    QRadioButton *radio1 = new QRadioButton("C++");
    QRadioButton *radio2 = new QRadioButton("Python");
    QRadioButton *radio3 = new QRadioButton("Java");
    radio1->setChecked(true);  // 默认选中

    layout->addWidget(radio1);
    layout->addWidget(radio2);
    layout->addWidget(radio3);

    QLabel *result = new QLabel("当前选择:C++");
    layout->addWidget(result);
    layout->addStretch();

    // 使用 QButtonGroup 管理互斥和获取选中项
    QButtonGroup *group = new QButtonGroup(&window);
    group->addButton(radio1, 0);
    group->addButton(radio2, 1);
    group->addButton(radio3, 2);

    QObject::connect(group, QOverload<int>::of(&QButtonGroup::buttonClicked), [&](int id) {
        QString lang;
        switch (id) {
        case 0: lang = "C++";    break;
        case 1: lang = "Python"; break;
        case 2: lang = "Java";   break;
        }
        result->setText("当前选择:" + lang);
    });

    window.show();
    return app.exec();
}
使用效果
Check Box:复选框按钮
支持独立选中/取消,可表示三态。
| 特性 | 说明 |
|---|---|
| 二态 | 选中 / 未选中(默认) |
| 三态 | setTristate(true) 启用,增加"不确定"状态 |
| 信号 | stateChanged(int) 状态变化时触发 |
| 状态值 | Qt::Unchecked(0) / Qt::PartiallyChecked(1) / Qt::Checked(2) |
cpp
QCheckBox *cb = new QCheckBox("Agree to terms");
cb->setTristate(true);
connect(cb, &QCheckBox::stateChanged, [](int state){
    switch (state) {
    case Qt::Unchecked:        /* 未选中 */ break;
    case Qt::PartiallyChecked: /* 半选 */   break;
    case Qt::Checked:          /* 选中 */   break;
    }
});
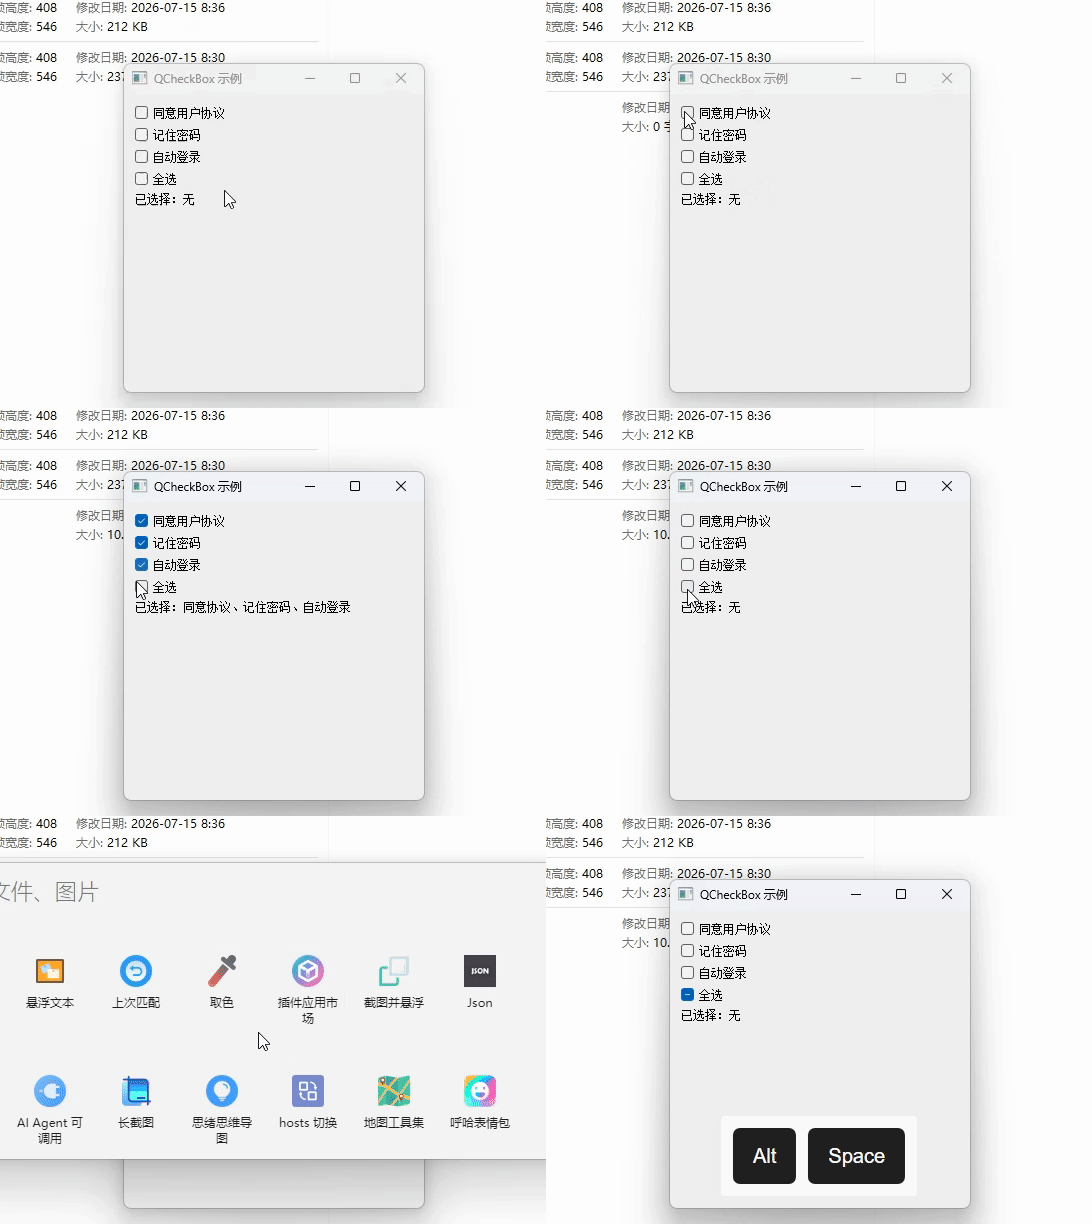
使用示例
cpp
// ==================== 头文件引入 ====================
#include <QApplication>   // 每个 Qt GUI 程序都必须包含,负责管理应用程序的控制流和设置
#include <QCheckBox>      // 复选框控件,支持二态(勾选/未勾选)和三态(勾选/未勾选/半选)
#include <QVBoxLayout>    // 垂直布局管理器,让控件从上到下依次排列
#include <QLabel>         // 标签控件,用于显示文本或图片(不可编辑)
#include <QWidget>        // 所有可视化控件的基类,这里用作主窗口容器

// ==================== 主函数 ====================
// argc 和 argv 是命令行参数,Qt 程序需要它们来初始化
int main(int argc, char *argv[]) {

    // 创建应用程序对象,整个程序只能有一个 QApplication 实例
    // 它负责处理事件循环、字体、调色板等全局设置
    QApplication app(argc, argv);

    // ==================== 创建主窗口 ====================
    // QWidget 是最基础的窗口类,这里作为顶层窗口使用
    QWidget window;
    window.setWindowTitle("QCheckBox 示例");  // 设置窗口标题栏显示的文字
    window.resize(300, 300);                  // 设置窗口初始大小:宽300像素,高300像素

    // ==================== 布局管理 ====================
    // QVBoxLayout 是垂直盒布局,控件会从上往下依次排列
    // 传入 &window 表示这个布局属于 window 窗口
    // 一旦设置了布局,window 会自动管理布局内所有控件的大小和位置
    QVBoxLayout *layout = new QVBoxLayout(&window);

    // ==================== 创建普通二态复选框 ====================
    // QCheckBox 默认是二态的:只有"勾选"和"未勾选"两种状态
    // 参数是显示在复选框旁边的文字
    QCheckBox *cb1 = new QCheckBox("同意用户协议");
    layout->addWidget(cb1);  // 将控件添加到布局中(自动从上往下排列)

    QCheckBox *cb2 = new QCheckBox("记住密码");
    layout->addWidget(cb2);

    QCheckBox *cb3 = new QCheckBox("自动登录");
    layout->addWidget(cb3);

    // ==================== 创建三态复选框 ====================
    QCheckBox *cbAll = new QCheckBox("全选");
    // setTristate(true) 开启三态模式,三种状态分别是:
    //   Qt::Unchecked   (0) - 未勾选(表示"全不选")
    //   Qt::PartiallyChecked (1) - 半选/中间态(表示"部分选中")
    //   Qt::Checked     (2) - 已勾选(表示"全选")
    cbAll->setTristate(true);
    layout->addWidget(cbAll);

    // ==================== 创建结果标签 ====================
    // 用于实时显示当前勾选了哪些选项
    QLabel *result = new QLabel("已选择:无");
    layout->addWidget(result);

    // addStretch() 在布局末尾添加一个可伸缩的空白区域
    // 它会把上面的所有控件"顶"到窗口顶部,下方留白
    // 如果不加这行,控件会均匀分布在窗口中
    layout->addStretch();

    // ==================== 定义更新函数(Lambda 表达式)====================
    // auto 让编译器自动推导类型,[&] 表示以引用方式捕获外部所有变量
    // 这个 lambda 的作用是:遍历所有复选框,把被勾选的文字拼起来显示到 result 标签上
    auto updateResult = [&]() {
        QStringList selected;  // QStringList 是 Qt 提供的字符串列表,类似 QVector<QString>

        // isChecked() 返回复选框是否被勾选(true/false)
        if (cb1->isChecked()) selected << "同意协议";   // << 是 QStringList 的重载运算符,用于追加元素
        if (cb2->isChecked()) selected << "记住密码";
        if (cb3->isChecked()) selected << "自动登录";

        // isEmpty() 判断列表是否为空
        // join("、") 将列表中所有字符串用 "、" 连接成一个字符串
        result->setText("已选择:" + (selected.isEmpty() ? "无" : selected.join("、")));
    };

    // ==================== 信号与槽连接(核心机制)====================
    // Qt 的核心机制是"信号与槽"(Signals & Slots):
    //   - 信号(signal):控件发出的事件通知,比如按钮被点击、复选框状态改变
    //   - 槽(slot):响应信号的函数,可以是普通函数、成员函数或 lambda 表达式
    //
    // connect 语法:connect(发送者, &类::信号, 接收的函数)
    //
    // toggled 信号:当复选框的勾选状态发生变化时触发,参数是新的勾选状态(bool)
    // 这里三个复选框的状态变化都连接到同一个 updateResult 函数
    QObject::connect(cb1, &QCheckBox::toggled, updateResult);
    QObject::connect(cb2, &QCheckBox::toggled, updateResult);
    QObject::connect(cb3, &QCheckBox::toggled, updateResult);

    // ==================== 全选联动逻辑 ====================
    // stateChanged 信号:当复选框状态发生变化时触发,参数是新的状态值(int)
    // 注意:这里用 stateChanged 而不是 toggled,因为三态复选框有三种状态
    //   toggled 只传 bool(true/false),无法区分"半选"状态
    //   stateChanged 传 int(0=未勾选, 1=半选, 2=已勾选),信息更完整
    QObject::connect(cbAll, &QCheckBox::stateChanged, [&](int state) {
        // Qt::Checked 是枚举值,等于 2,表示"已勾选"状态
        bool checked = (state == Qt::Checked);

        // setChecked() 以编程方式设置复选框的勾选状态
        // 当"全选"被勾选时,三个子项全部勾选;取消勾选时,全部取消
        // 注意:这里只处理了"全选"和"全不选",没有处理"半选"状态
        cb1->setChecked(checked);
        cb2->setChecked(checked);
        cb3->setChecked(checked);
    });

    // ==================== 显示窗口并进入事件循环 ====================
    window.show();       // 默认情况下窗口是隐藏的,必须调用 show() 才会显示
    return app.exec();   // 进入事件循环,程序会一直运行在这里
                         // 直到用户关闭窗口或调用 app.quit() 才会退出
                         // exec() 的返回值就是程序的退出码
}
使用效果
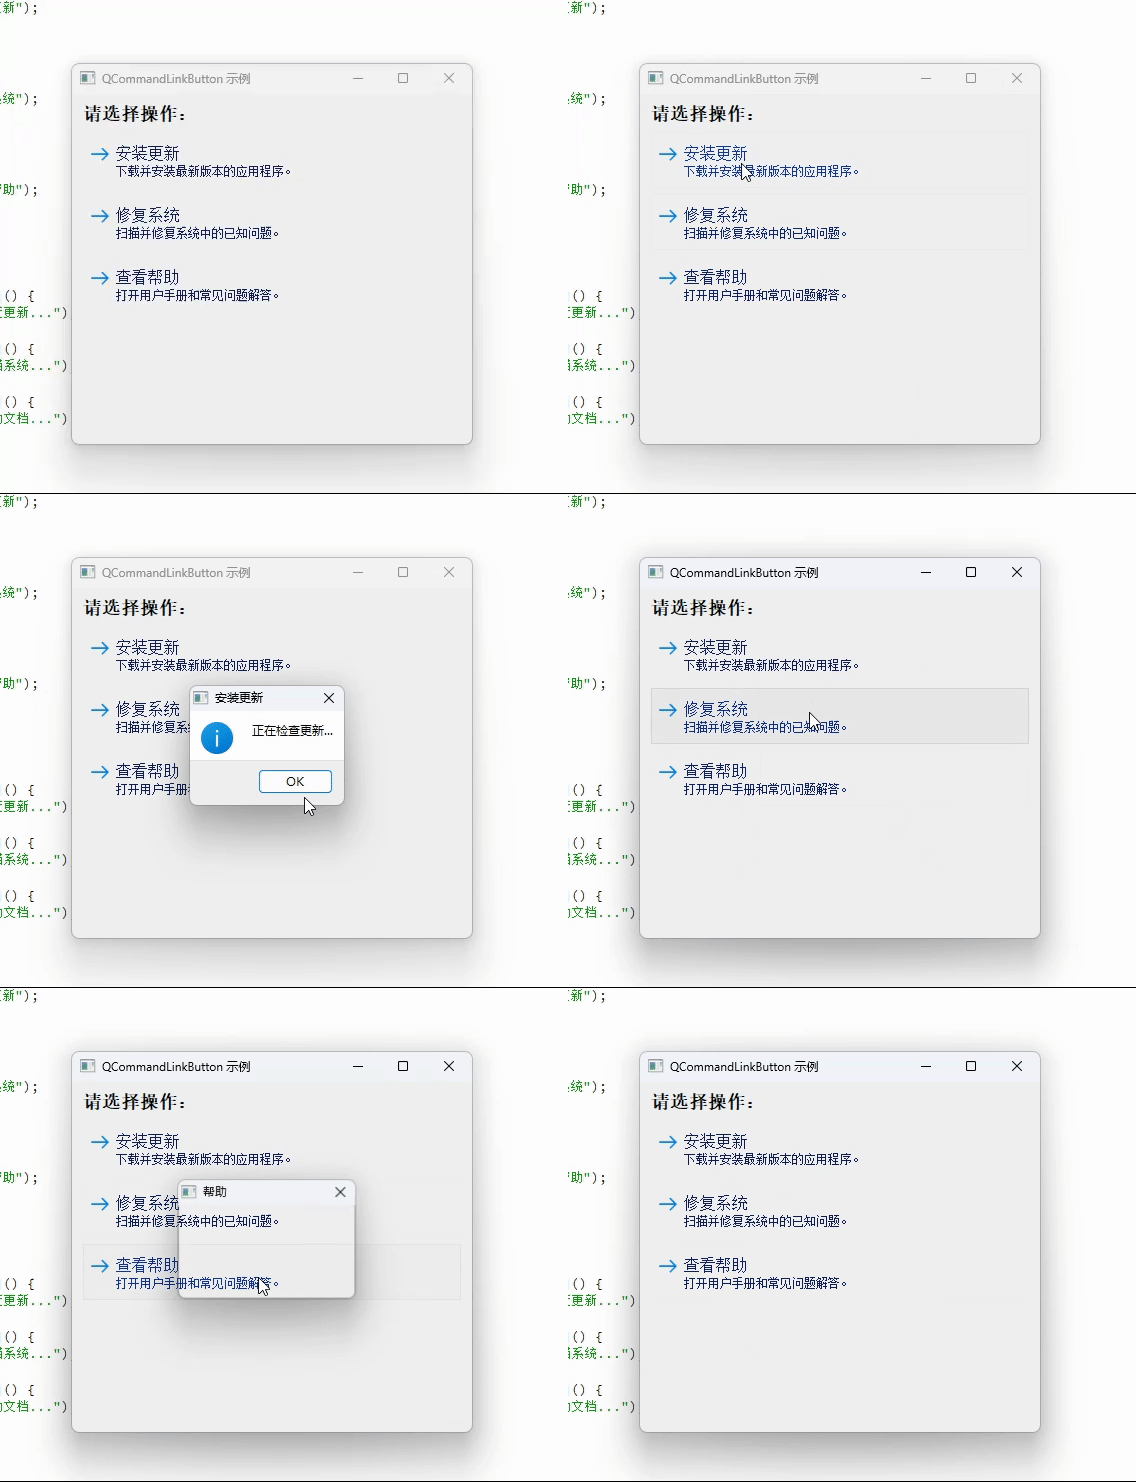
Command Link Button:命令链接按钮
Windows Vista 风格,带有描述文字的链接式按钮。
| 特性 | 说明 |
|---|---|
| 外观 | 蓝色文字 + 箭头图标,无传统按钮边框 |
| 描述文字 | setDescription() 设置副标题说明 |
| 图标 | setIcon() 可自定义图标 |
| 平台 | 主要在 Windows 上有明显效果,其他平台退化为普通按钮 |
cpp
QCommandLinkButton *cmdBtn = new QCommandLinkButton("Install Update");
cmdBtn->setDescription("Download and install the latest version.");
cmdBtn->setIcon(QIcon(":/icons/update.png"));
connect(cmdBtn, &QCommandLinkButton::clicked, [](){ /* 处理点击 */ });
使用示例
cpp
#include <QApplication>
#include <QCommandLinkButton>
#include <QVBoxLayout>
#include <QLabel>
#include <QWidget>
#include <QMessageBox>

int main(int argc, char *argv[]) {
    QApplication app(argc, argv);
    QWidget window;
    window.setWindowTitle("QCommandLinkButton 示例");
    window.resize(400, 350);

    QVBoxLayout *layout = new QVBoxLayout(&window);

    QLabel *title = new QLabel("<h2>请选择操作:</h2>");
    layout->addWidget(title);

    // 命令链接按钮1
    QCommandLinkButton *cmd1 = new QCommandLinkButton("安装更新");
    cmd1->setDescription("下载并安装最新版本的应用程序。");
    layout->addWidget(cmd1);

    // 命令链接按钮2
    QCommandLinkButton *cmd2 = new QCommandLinkButton("修复系统");
    cmd2->setDescription("扫描并修复系统中的已知问题。");
    layout->addWidget(cmd2);

    // 命令链接按钮3
    QCommandLinkButton *cmd3 = new QCommandLinkButton("查看帮助");
    cmd3->setDescription("打开用户手册和常见问题解答。");
    layout->addWidget(cmd3);

    layout->addStretch();

    QObject::connect(cmd1, &QCommandLinkButton::clicked, [&]() {
        QMessageBox::information(&window, "安装更新", "正在检查更新...");
    });
    QObject::connect(cmd2, &QCommandLinkButton::clicked, [&]() {
        QMessageBox::information(&window, "修复系统", "正在扫描系统...");
    });
    QObject::connect(cmd3, &QCommandLinkButton::clicked, [&]() {
        QMessageBox::information(&window, "帮助", "正在打开帮助文档...");
    });

    window.show();
    return app.exec();
}
示例效果
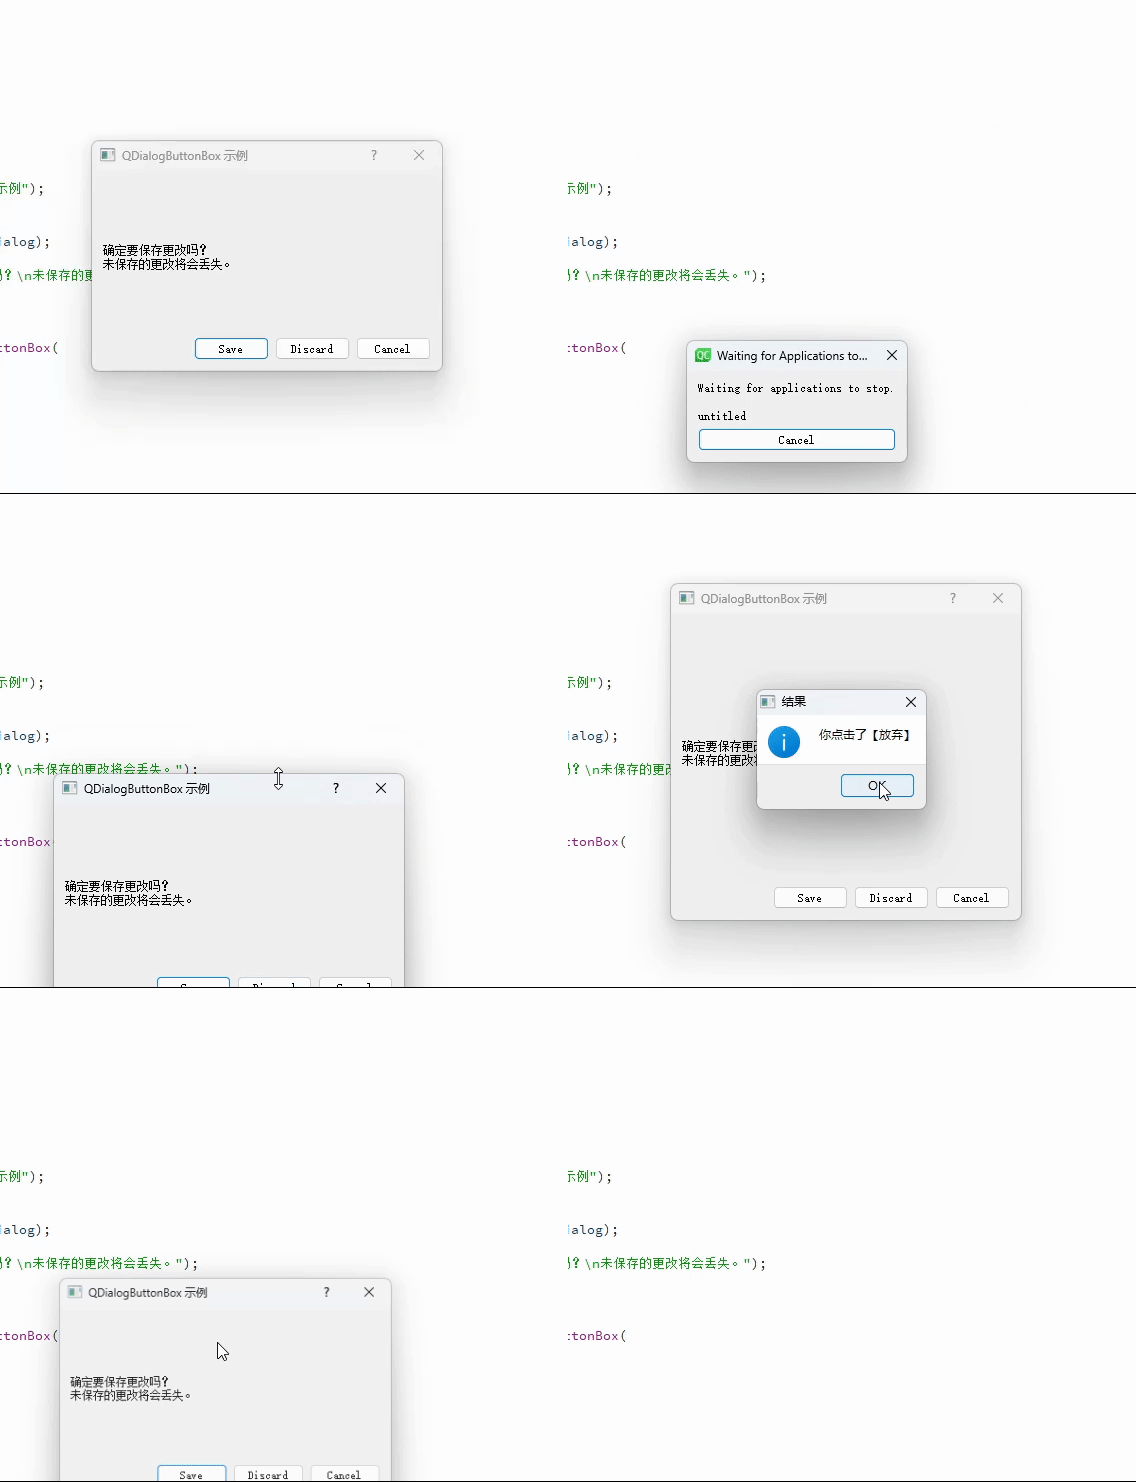
QDialogButtonBox按钮盒
对话框专用容器,自动排列标准按钮并处理角色。
| 特性 | 说明 |
|---|---|
| 标准按钮 | 一键添加 OK、Cancel、Yes、No 等预定义按钮 |
| 角色管理 | 每个按钮自动分配角色(Accept / Reject / Action 等) |
| 信号转发 | accepted() / rejected() 信号自动关联 |
| 布局方向 | setOrientation() 水平或垂直排列 |
ButtonRole 枚举值:
| 值 | 说明 |
|---|---|
QDialogButtonBox::AcceptRole |
接受(如 OK) |
QDialogButtonBox::RejectRole |
拒绝(如 Cancel) |
QDialogButtonBox::DestructiveRole |
破坏性操作(如 Discard) |
QDialogButtonBox::HelpRole |
帮助 |
QDialogButtonBox::ActionRole |
自定义动作 |
QDialogButtonBox::ResetRole |
重置 |
QDialogButtonBox::ApplyRole |
应用 |
StandardButton 常用值:
| 值 | 角色 |
|---|---|
QDialogButtonBox::Ok |
AcceptRole |
QDialogButtonBox::Cancel |
RejectRole |
QDialogButtonBox::Yes |
AcceptRole |
QDialogButtonBox::No |
RejectRole |
QDialogButtonBox::Apply |
ApplyRole |
QDialogButtonBox::Close |
RejectRole |
QDialogButtonBox::Save |
AcceptRole |
QDialogButtonBox::Discard |
DestructiveRole |
cpp
QDialogButtonBox *btnBox = new QDialogButtonBox(
    QDialogButtonBox::Ok | QDialogButtonBox::Cancel, parent);

connect(btnBox, &QDialogButtonBox::accepted, dialog, &QDialog::accept);
connect(btnBox, &QDialogButtonBox::rejected, dialog, &QDialog::reject);

// 动态添加自定义按钮
QPushButton *customBtn = btnBox->addButton("Custom", QDialogButtonBox::ActionRole);
示例代码
cpp
#include <QApplication>
#include <QDialog>
#include <QDialogButtonBox>
#include <QVBoxLayout>
#include <QLabel>
#include <QMessageBox>
#include <QPushButton>

int main(int argc, char *argv[]) {
    QApplication app(argc, argv);

    QDialog dialog;
    dialog.setWindowTitle("QDialogButtonBox 示例");
    dialog.resize(350, 200);

    QVBoxLayout *layout = new QVBoxLayout(&dialog);

    QLabel *label = new QLabel("确定要保存更改吗?\n未保存的更改将会丢失。");
    layout->addWidget(label);

    // 创建标准按钮盒:Save / Discard / Cancel
    QDialogButtonBox *btnBox = new QDialogButtonBox(
        QDialogButtonBox::Save |
        QDialogButtonBox::Discard |
        QDialogButtonBox::Cancel,
        &dialog
    );
    layout->addWidget(btnBox);

    // 连接标准信号
    QObject::connect(btnBox, &QDialogButtonBox::accepted, [&]() {
        QMessageBox::information(&dialog, "结果", "你点击了【保存】");
        dialog.accept();
    });

    QObject::connect(btnBox, &QDialogButtonBox::rejected, [&]() {
        QMessageBox::information(&dialog, "结果", "你点击了【取消】");
        dialog.reject();
    });

    // 单独处理 Discard 按钮
    QPushButton *discardBtn = btnBox->button(QDialogButtonBox::Discard);
    QObject::connect(discardBtn, &QPushButton::clicked, [&]() {
        QMessageBox::information(&dialog, "结果", "你点击了【放弃】");
        dialog.reject();
    });

    dialog.exec();
    return app.exec();
}
示例效果
容器组控件
Group Box:
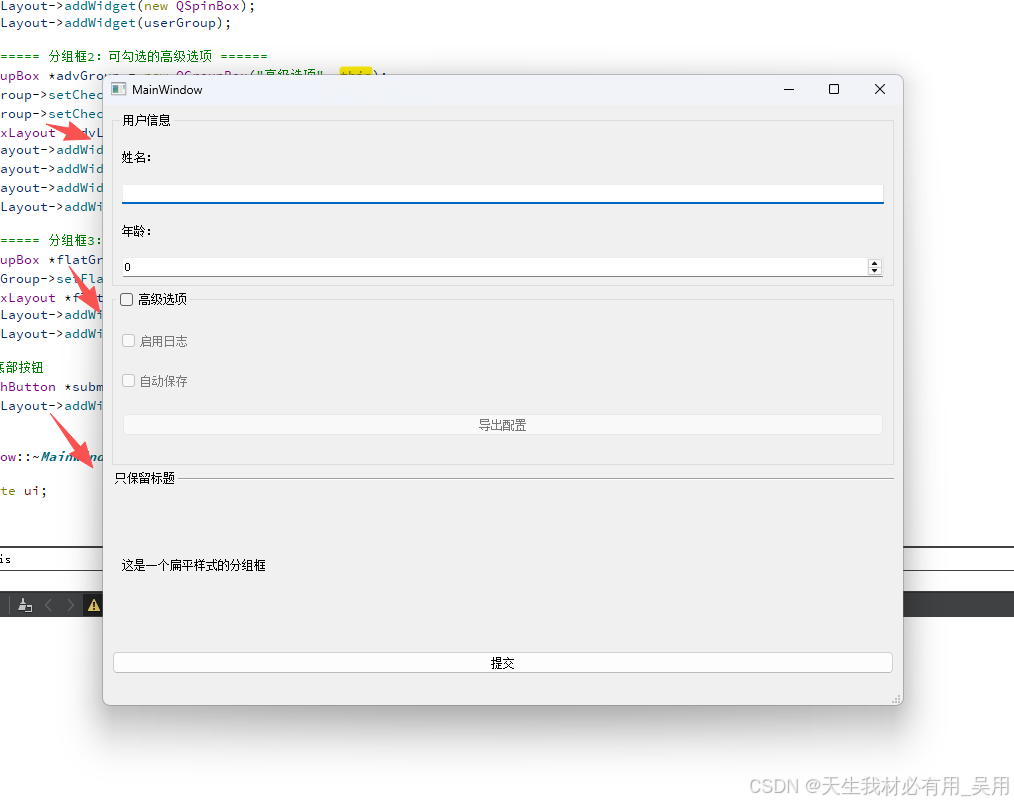
QGroupBox 是一个带标题的分组容器,用于在视觉上将一组相关的控件归为一类,让界面更清晰、更有层次感。
常用 API
| 函数 | 说明 |
|---|---|
setTitle(const QString &) |
设置分组框标题 |
title() |
获取标题文本 |
setCheckable(bool) |
设置是否可勾选(勾选后内部控件才启用) |
isChecked() |
获取勾选状态 |
setChecked(bool) |
设置勾选状态 |
isFlat() |
是否以扁平样式显示(无边框) |
setFlat(bool) |
设置扁平样式 |
使用示例
cpp
#include "mainwindow.h"
#include "ui_mainwindow.h"
#include <QGroupBox>
#include <QVBoxLayout>
#include <QHBoxLayout>
#include <QLabel>
#include <QLineEdit>
#include <QSpinBox>
#include <QCheckBox>
#include <QPushButton>

MainWindow::MainWindow(QWidget *parent)
    : QMainWindow(parent)
    , ui(new Ui::MainWindow)
{
    ui->setupUi(this);

    // ====== 创建一个中心控件 ======
    QWidget *centralWidget = new QWidget(this);
    setCentralWidget(centralWidget);

    QVBoxLayout *mainLayout = new QVBoxLayout(centralWidget);

    // ====== 分组框1:用户信息 ======
    QGroupBox *userGroup = new QGroupBox("用户信息", this);
    QVBoxLayout *userLayout = new QVBoxLayout(userGroup);
    userLayout->addWidget(new QLabel("姓名:"));
    userLayout->addWidget(new QLineEdit);
    userLayout->addWidget(new QLabel("年龄:"));
    userLayout->addWidget(new QSpinBox);
    mainLayout->addWidget(userGroup);

    // ====== 分组框2:可勾选的高级选项 ======
    QGroupBox *advGroup = new QGroupBox("高级选项", this);
    advGroup->setCheckable(true);   // 标题前出现勾选框
    advGroup->setChecked(false);    // 默认不勾选,内部控件禁用
    QVBoxLayout *advLayout = new QVBoxLayout(advGroup);
    advLayout->addWidget(new QCheckBox("启用日志"));
    advLayout->addWidget(new QCheckBox("自动保存"));
    advLayout->addWidget(new QPushButton("导出配置"));
    mainLayout->addWidget(advGroup);

    // ====== 分组框3:扁平样式 ======
    QGroupBox *flatGroup = new QGroupBox("只保留标题", this);
    flatGroup->setFlat(true);       // 无边框,只显示标题
    QVBoxLayout *flatLayout = new QVBoxLayout(flatGroup);
    flatLayout->addWidget(new QLabel("这是一个扁平样式的分组框"));
    mainLayout->addWidget(flatGroup);

    // 底部按钮
    QPushButton *submitBtn = new QPushButton("提交");
    mainLayout->addWidget(submitBtn);
}

MainWindow::~MainWindow()
{
    delete ui;
}
使用效果
ScrollArea:滚动区域
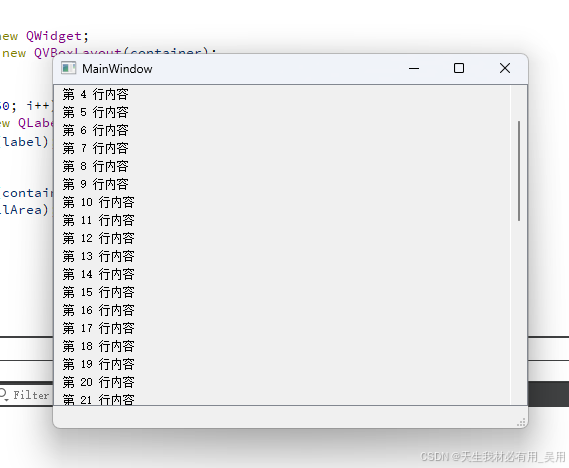
QScrollArea 是一个带滚动条的容器控件,当内部内容超出可视区域时,自动出现滚动条,让用户可以滚动查看所有内容。QScrollArea 本身不能直接添加多个控件,它只能容纳一个子控件(Widget)。如果要在里面放多个控件,需要:
创建一个容器 QWidget
给容器设置布局,往布局里添加各种控件
把这个容器通过 setWidget() 放进 QScrollArea
cpp
QScrollArea(滚动区域)
└── QWidget(容器,唯一子控件)
    └── QVBoxLayout(布局)
        ├── QLabel
        ├── QPushButton
        ├── QLabel
        └── ...(任意多个控件)
滚动条策略有三种
| 策略 | 说明 |
|---|---|
Qt::ScrollBarAsNeeded |
需要时才显示(默认) |
Qt::ScrollBarAlwaysOn |
始终显示 |
Qt::ScrollBarAlwaysOff |
始终隐藏 |
使用实例
cpp
#include "mainwindow.h"
#include "ui_mainwindow.h"
#include <QScrollArea>
#include <QVBoxLayout>
#include <QLabel>
#include <QPushButton>

MainWindow::MainWindow(QWidget *parent)
    : QMainWindow(parent)
    , ui(new Ui::MainWindow)
{
    ui->setupUi(this);

    // 创建滚动区域
    QScrollArea *scrollArea = new QScrollArea(this);
    scrollArea->setWidgetResizable(true);

    // 创建容器
    QWidget *container = new QWidget;
    QVBoxLayout *layout = new QVBoxLayout(container);

    // 添加大量内容
    for (int i = 1; i <= 50; i++) {
        QLabel *label = new QLabel(QString("第 %1 行内容").arg(i));
        layout->addWidget(label);
    }

    scrollArea->setWidget(container);
    setCentralWidget(scrollArea);
}

MainWindow::~MainWindow()
{
    delete ui;
}
效果
Tool Box:工具箱
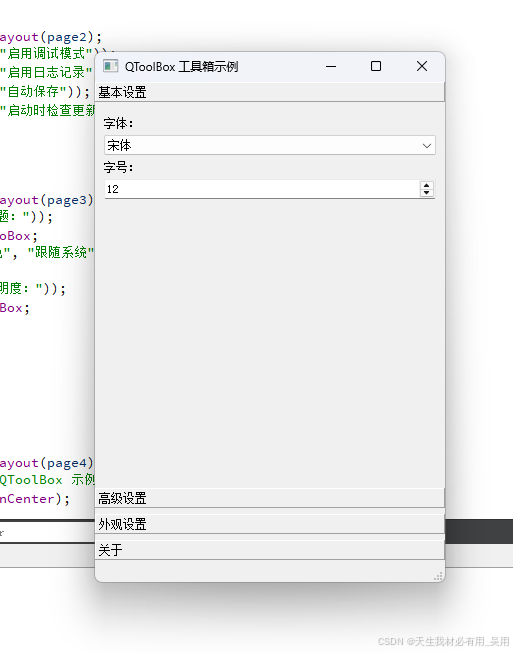
QToolBox 是一个垂直堆叠的可折叠面板控件,每个面板有一个标题栏,点击标题可以展开/折叠对应内容,同一时刻只有一个面板处于展开状态。常用于实现类似"设置面板"、"属性编辑器"等界面。
使用示例
cpp
#include "mainwindow.h"
#include "ui_mainwindow.h"
#include <QToolBox>
#include <QVBoxLayout>
#include <QLabel>
#include <QLineEdit>
#include <QComboBox>
#include <QSpinBox>
#include <QCheckBox>
#include <QPushButton>
#include <QGroupBox>
#include <QDebug>

MainWindow::MainWindow(QWidget *parent)
    : QMainWindow(parent)
    , ui(new Ui::MainWindow)
{
    ui->setupUi(this);
    setWindowTitle("QToolBox 工具箱示例");
    resize(350, 500);

    // 创建 QToolBox
    QToolBox *toolBox = new QToolBox(this);

    // ====== 页面1:基本设置 ======
    QWidget *page1 = new QWidget;
    QVBoxLayout *layout1 = new QVBoxLayout(page1);
    layout1->addWidget(new QLabel("字体:"));
    QComboBox *fontCombo = new QComboBox;
    fontCombo->addItems({"宋体", "微软雅黑", "楷体", "黑体"});
    layout1->addWidget(fontCombo);
    layout1->addWidget(new QLabel("字号:"));
    QSpinBox *sizeSpin = new QSpinBox;
    sizeSpin->setRange(8, 72);
    sizeSpin->setValue(12);
    layout1->addWidget(sizeSpin);
    layout1->addStretch();  // 底部弹簧,控件靠上对齐

    // ====== 页面2:高级设置 ======
    QWidget *page2 = new QWidget;
    QVBoxLayout *layout2 = new QVBoxLayout(page2);
    layout2->addWidget(new QCheckBox("启用调试模式"));
    layout2->addWidget(new QCheckBox("启用日志记录"));
    layout2->addWidget(new QCheckBox("自动保存"));
    layout2->addWidget(new QCheckBox("启动时检查更新"));
    layout2->addStretch();

    // ====== 页面3:外观设置 ======
    QWidget *page3 = new QWidget;
    QVBoxLayout *layout3 = new QVBoxLayout(page3);
    layout3->addWidget(new QLabel("主题:"));
    QComboBox *themeCombo = new QComboBox;
    themeCombo->addItems({"浅色", "深色", "跟随系统"});
    layout3->addWidget(themeCombo);
    layout3->addWidget(new QLabel("透明度:"));
    QSpinBox *opacitySpin = new QSpinBox;
    opacitySpin->setRange(50, 100);
    opacitySpin->setValue(100);
    opacitySpin->setSuffix("%");
    layout3->addWidget(opacitySpin);
    layout3->addStretch();

    // ====== 页面4:关于 ======
    QWidget *page4 = new QWidget;
    QVBoxLayout *layout4 = new QVBoxLayout(page4);
    QLabel *aboutLabel = new QLabel("QToolBox 示例程序\n版本:1.0.0\n作者:Qt 学习者");
    aboutLabel->setAlignment(Qt::AlignCenter);
    layout4->addWidget(aboutLabel);
    QPushButton *btn = new QPushButton("确定");
    layout4->addWidget(btn, 0, Qt::AlignCenter);
    layout4->addStretch();

    // 将页面添加到 QToolBox
    toolBox->addItem(page1, "基本设置");
    toolBox->addItem(page2, "高级设置");
    toolBox->addItem(page3, "外观设置");
    toolBox->addItem(page4, "关于");

    // 默认展开第一个页面
    toolBox->setCurrentIndex(0);

    setCentralWidget(toolBox);

    // 连接信号:切换页面时输出当前页面标题
    connect(toolBox, &QToolBox::currentChanged, [toolBox](int index) {
        qDebug() << "切换到页面:" << toolBox->itemText(index);
    });
}

MainWindow::~MainWindow()
{
    delete ui;
}
示例效果
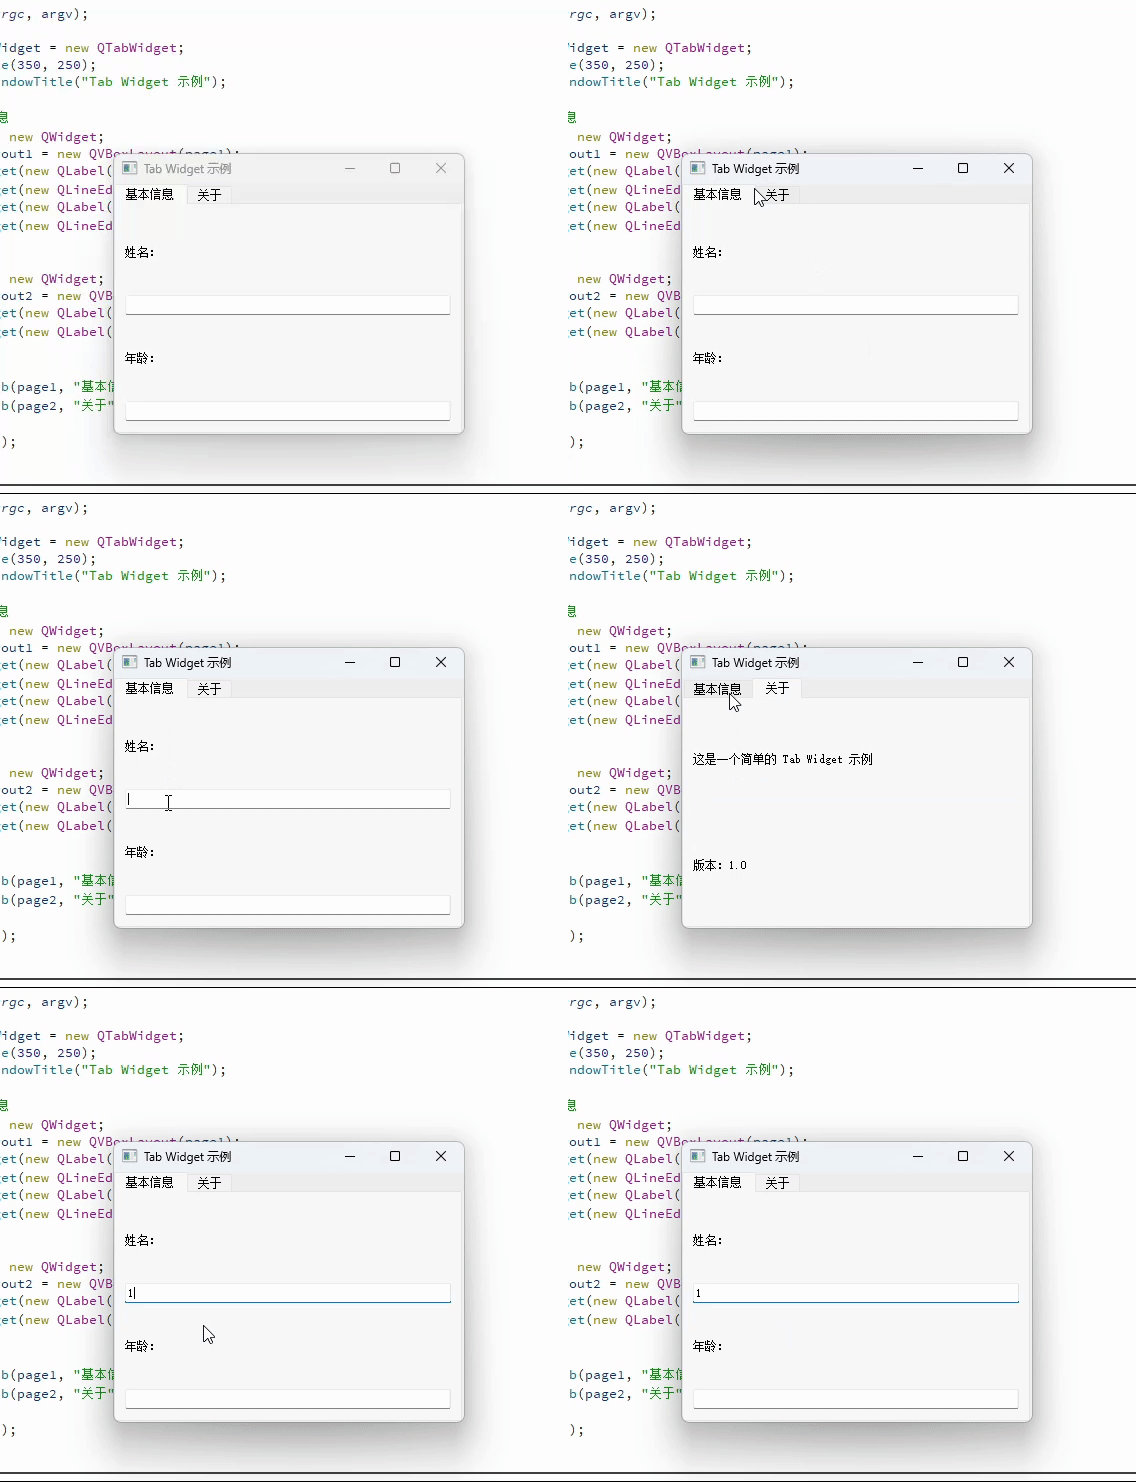
Tab Widget:标签小部件
cpp
#include <QApplication>
#include <QTabWidget>
#include <QLabel>
#include <QLineEdit>
#include <QVBoxLayout>

int main(int argc, char *argv[])
{
    QApplication a(argc, argv);

    QTabWidget *tabWidget = new QTabWidget;
    tabWidget->resize(350, 250);
    tabWidget->setWindowTitle("Tab Widget 示例");

    // 标签页1:基本信息
    QWidget *page1 = new QWidget;
    QVBoxLayout *layout1 = new QVBoxLayout(page1);
    layout1->addWidget(new QLabel("姓名:"));
    layout1->addWidget(new QLineEdit);
    layout1->addWidget(new QLabel("年龄:"));
    layout1->addWidget(new QLineEdit);

    // 标签页2:关于
    QWidget *page2 = new QWidget;
    QVBoxLayout *layout2 = new QVBoxLayout(page2);
    layout2->addWidget(new QLabel("这是一个简单的 Tab Widget 示例"));
    layout2->addWidget(new QLabel("版本:1.0"));

    // 添加标签页
    tabWidget->addTab(page1, "基本信息");
    tabWidget->addTab(page2, "关于");

    tabWidget->show();
    return a.exec();
}
Frama 框架
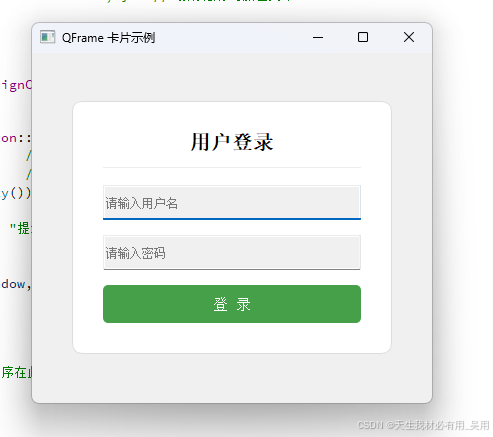
QFrame 是一个基础的框架控件,用于在界面上绘制各种边框、分隔线、面板等装饰性元素,也可以作为容器承载其他控件。
典型示例
cpp
#include <QApplication>      // Qt应用程序类,管理程序的控制流和设置
#include <QFrame>            // 框架控件,可做分隔线或带边框的容器
#include <QLabel>            // 标签控件,用于显示文本或图片
#include <QLineEdit>         // 单行输入框
#include <QPushButton>       // 按钮控件
#include <QVBoxLayout>       // 垂直布局,控件从上到下排列
#include <QMessageBox>       // 消息弹窗(提示框、警告框等)

int main(int argc, char *argv[])
{
    // 创建Qt应用程序对象,每个Qt程序有且只有一个
    QApplication a(argc, argv);

    // 创建主窗口
    QWidget window;
    window.resize(400, 350);                              // 设置窗口大小:宽400,高350
    window.setWindowTitle("QFrame 卡片示例");             // 设置窗口标题
    window.setStyleSheet("background-color: #f0f0f0;");   // 设置窗口背景为浅灰色

    // 创建主布局(垂直排列),绑定到window上
    QVBoxLayout *mainLayout = new QVBoxLayout(&window);
    mainLayout->setAlignment(Qt::AlignCenter);            // 布局内容居中对齐

    // ========== 核心:用 QFrame 做卡片容器 ==========
    QFrame *card = new QFrame;
    // 用样式表设置卡片外观:白色背景、浅灰边框、圆角10px
    card->setStyleSheet(
        "QFrame {"
        "  background-color: white;"
        "  border: 1px solid #ddd;"
        "  border-radius: 10px;"
        "}"
    );
    card->setFixedWidth(320);  // 卡片固定宽度320,高度随内容自适应

    // 给卡片内部创建垂直布局,间距15px,四边内边距30px
    QVBoxLayout *cardLayout = new QVBoxLayout(card);
    cardLayout->setSpacing(15);
    cardLayout->setContentsMargins(30, 30, 30, 30);  // 上、左、下、右各留30px

    // ---- 标题 ----
    QLabel *title = new QLabel("用户登录");
    title->setAlignment(Qt::AlignCenter);                          // 文字居中
    title->setStyleSheet("font-size: 20px; font-weight: bold; border: none;");  // 大号加粗,去掉继承的边框
    cardLayout->addWidget(title);

    // ---- 分隔线(QFrame 第二常用场景) ----
    QFrame *line = new QFrame;
    line->setFrameShape(QFrame::HLine);      // 设置为水平线
    line->setFrameShadow(QFrame::Sunken);    // 凹陷效果(看起来有立体感)
    line->setStyleSheet("border: none; border-top: 1px solid #eee;");  // 自定义为1px浅灰线
    cardLayout->addWidget(line);

    // ---- 用户名输入框 ----
    QLineEdit *userEdit = new QLineEdit;
    userEdit->setPlaceholderText("请输入用户名");   // 占位提示文字(输入后消失)
    userEdit->setMinimumHeight(35);                 // 最小高度35px,让输入框大一点
    cardLayout->addWidget(userEdit);

    // ---- 密码输入框 ----
    QLineEdit *passEdit = new QLineEdit;
    passEdit->setPlaceholderText("请输入密码");
    passEdit->setEchoMode(QLineEdit::Password);     // 密码模式,输入内容显示为圆点
    passEdit->setMinimumHeight(35);
    cardLayout->addWidget(passEdit);

    // ---- 登录按钮 ----
    QPushButton *loginBtn = new QPushButton("登 录");
    loginBtn->setMinimumHeight(38);                 // 按钮最小高度
    loginBtn->setStyleSheet(
        "QPushButton {"
        "  background-color: #4CAF50;"              // 绿色背景
        "  color: white;"                           // 白色文字
        "  border: none;"                           // 无边框
        "  border-radius: 5px;"                     // 圆角5px
        "  font-size: 15px;"                        // 字号15px
        "}"
        "QPushButton:hover { background-color: #45a049; }"  // 鼠标悬停时颜色变深
    );
    cardLayout->addWidget(loginBtn);

    // 将卡片添加到主布局中,居中对齐
    mainLayout->addWidget(card, 0, Qt::AlignCenter);

    // ---- 点击登录按钮的事件处理 ----
    QObject::connect(loginBtn, &QPushButton::clicked, [&]() {
        QString user = userEdit->text();    // 获取用户名输入内容
        QString pass = passEdit->text();    // 获取密码输入内容
        if (user.isEmpty() || pass.isEmpty()) {
            // 任一为空,弹出警告框
            QMessageBox::warning(&window, "提示", "用户名和密码不能为空!");
        } else {
            // 都不为空,弹出欢迎信息
            QMessageBox::information(&window, "成功", "欢迎," + user + "!");
        }
    });

    window.show();       // 显示主窗口
    return a.exec();     // 进入事件循环,程序在此阻塞等待用户操作
}
示例效果
Dock Widget:停靠窗体部件
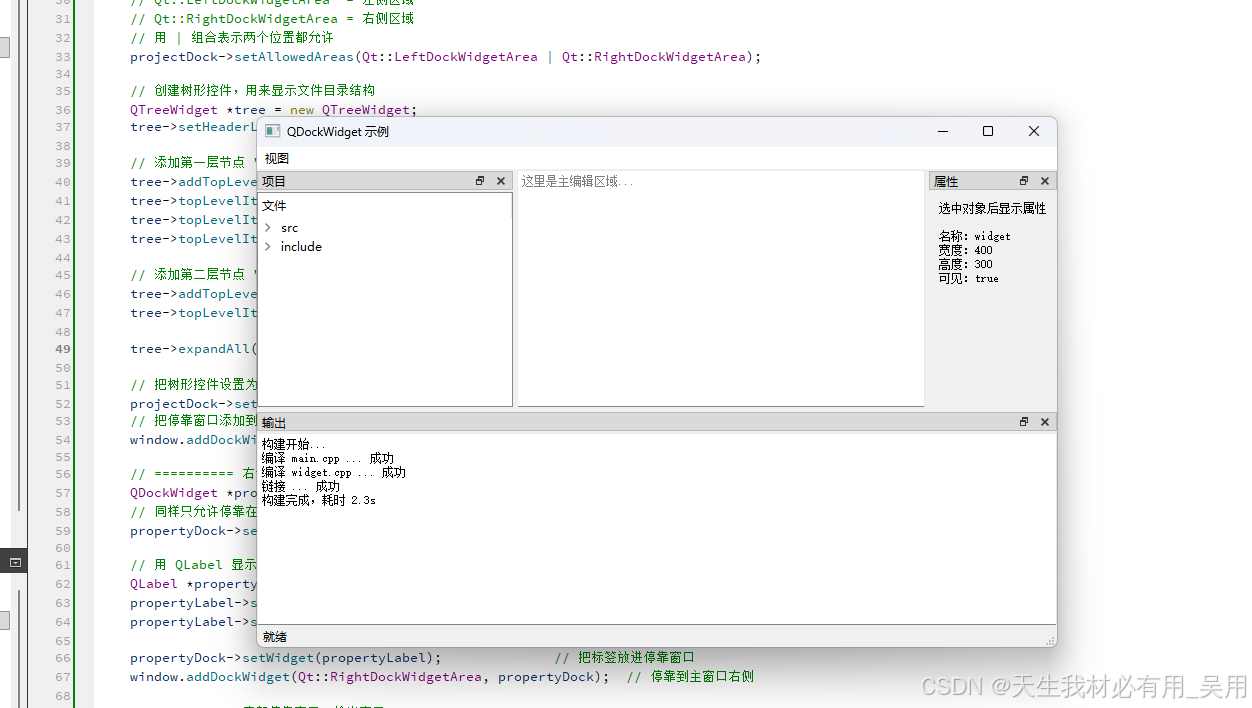
QDockWidget 是一个可停靠的浮动面板,可以停靠在主窗口的上、下、左、右四个方向,也可以脱离主窗口变成独立浮动窗口,甚至可以在多个停靠区域之间自由拖拽。常见于 IDE、图像处理软件等专业工具界面。
| 特性 | 说明 |
|---|---|
| 停靠方向 | 可停靠在主窗口的上、下、左、右 |
| 浮动 | 可脱离主窗口变成独立窗口 |
| 可关闭 | 标题栏有关闭按钮(可禁用) |
| 可移动 | 可在停靠区域之间拖拽 |
| 嵌套停靠 | 多个 DockWidget 可以堆叠在一起,通过 Tab 切换 |
使用示例
cpp
#include <QApplication>      // Qt应用程序类,管理程序的控制流和设置,每个Qt程序有且只有一个
#include <QMainWindow>       // 主窗口类,自带菜单栏、工具栏、状态栏、停靠窗口的支持
#include <QDockWidget>       // 停靠窗口控件,可以拖拽、浮动、停靠在主窗口的四周
#include <QTextEdit>         // 多行文本编辑控件
#include <QTreeWidget>       // 树形控件,用于显示层级结构数据(如文件目录)
#include <QLabel>            // 标签控件,用于显示文本或图片
#include <QMenuBar>          // 菜单栏
#include <QStatusBar>        // 状态栏,显示在主窗口底部

int main(int argc, char *argv[])
{
    // 创建Qt应用程序对象,管理程序的控制流和设置
    QApplication a(argc, argv);

    // ========== 创建主窗口 ==========
    QMainWindow window;
    window.resize(800, 500);                    // 设置窗口大小:宽800,高500
    window.setWindowTitle("QDockWidget 示例");  // 设置窗口标题栏文字

    // ========== 主区域:文本编辑器 ==========
    // QMainWindow 的中心区域只能放一个控件,这里放一个多行文本编辑器
    QTextEdit *editor = new QTextEdit;
    editor->setPlaceholderText("这里是主编辑区域...");  // 占位提示文字(内容为空时显示)
    window.setCentralWidget(editor);                    // 设置为中心控件,占据主窗口中间区域

    // ========== 左侧停靠窗口:项目树 ==========
    // 创建一个停靠窗口,标题为"项目",父窗口为window
    QDockWidget *projectDock = new QDockWidget("项目", &window);
    // 限制停靠位置:只允许停靠在主窗口的左侧或右侧
    // Qt::LeftDockWidgetArea  = 左侧区域
    // Qt::RightDockWidgetArea = 右侧区域
    // 用 | 组合表示两个位置都允许
    projectDock->setAllowedAreas(Qt::LeftDockWidgetArea | Qt::RightDockWidgetArea);

    // 创建树形控件,用来显示文件目录结构
    QTreeWidget *tree = new QTreeWidget;
    tree->setHeaderLabel("文件");  // 设置树形控件的列标题为"文件"

    // 添加第一层节点 "src",然后给它添加3个子节点
    tree->addTopLevelItem(new QTreeWidgetItem({"src"}));           // 顶层节点:src
    tree->topLevelItem(0)->addChild(new QTreeWidgetItem({"main.cpp"}));    // src 的子节点
    tree->topLevelItem(0)->addChild(new QTreeWidgetItem({"widget.cpp"}));  // src 的子节点
    tree->topLevelItem(0)->addChild(new QTreeWidgetItem({"widget.h"}));    // src 的子节点

    // 添加第二层节点 "include",然后给它添加1个子节点
    tree->addTopLevelItem(new QTreeWidgetItem({"include"}));       // 顶层节点:include
    tree->topLevelItem(1)->addChild(new QTreeWidgetItem({"global.h"}));    // include 的子节点

    tree->expandAll();  // 展开所有节点(默认是折叠的)

    // 把树形控件设置为停靠窗口的内容
    projectDock->setWidget(tree);
    // 把停靠窗口添加到主窗口的左侧区域
    window.addDockWidget(Qt::LeftDockWidgetArea, projectDock);

    // ========== 右侧停靠窗口:属性面板 ==========
    QDockWidget *propertyDock = new QDockWidget("属性", &window);
    // 同样只允许停靠在左右两侧
    propertyDock->setAllowedAreas(Qt::LeftDockWidgetArea | Qt::RightDockWidgetArea);

    // 用 QLabel 显示属性信息(实际项目中会用 QPropertyEditor 等更复杂的控件)
    QLabel *propertyLabel = new QLabel("选中对象后显示属性\n\n名称:widget\n宽度:400\n高度:300\n可见:true");
    propertyLabel->setAlignment(Qt::AlignTop);           // 文字靠顶部对齐(默认是居中)
    propertyLabel->setContentsMargins(10, 10, 10, 10);   // 四边内边距各10px,避免文字贴边

    propertyDock->setWidget(propertyLabel);              // 把标签放进停靠窗口
    window.addDockWidget(Qt::RightDockWidgetArea, propertyDock);  // 停靠到主窗口右侧

    // ========== 底部停靠窗口:输出窗口 ==========
    QDockWidget *outputDock = new QDockWidget("输出", &window);
    // 只允许停靠在顶部或底部(上下方向)
    outputDock->setAllowedAreas(Qt::TopDockWidgetArea | Qt::BottomDockWidgetArea);

    // 创建一个只读的文本编辑控件,用来显示编译输出信息
    QTextEdit *output = new QTextEdit;
    output->setReadOnly(true);  // 设为只读,用户不能编辑
    // 逐行添加输出信息
    output->append("构建开始...");
    output->append("编译 main.cpp ... 成功");
    output->append("编译 widget.cpp ... 成功");
    output->append("链接 ... 成功");
    output->append("构建完成,耗时 2.3s");

    outputDock->setWidget(output);                               // 把输出控件放进停靠窗口
    window.addDockWidget(Qt::BottomDockWidgetArea, outputDock);   // 停靠到主窗口底部

    // ========== 菜单栏:控制停靠窗口的显示/隐藏 ==========
    // 在菜单栏添加一个"视图"菜单
    QMenu *viewMenu = window.menuBar()->addMenu("视图");
    // toggleViewAction() 是 QDockWidget 自带的 Action:
    //   - 自动生成一个带勾选框的菜单项
    //   - 勾选 = 显示停靠窗口,取消勾选 = 隐藏停靠窗口
    //   - 不需要自己写信号槽,Qt自动处理
    viewMenu->addAction(projectDock->toggleViewAction());    // 添加"项目"的显示/隐藏菜单项
    viewMenu->addAction(propertyDock->toggleViewAction());   // 添加"属性"的显示/隐藏菜单项
    viewMenu->addAction(outputDock->toggleViewAction());     // 添加"输出"的显示/隐藏菜单项

    // ========== 状态栏 ==========
    // 在主窗口底部状态栏显示"就绪"文字
    window.statusBar()->showMessage("就绪");

    window.show();       // 显示主窗口
    return a.exec();     // 进入事件循环,程序在此阻塞等待用户操作(关闭窗口后退出)
}
使用效果
item View 列表控件
QListView
cpp
#include <QApplication>
#include <QListView>
#include <QStringListModel>
#include <QLineEdit>
#include <QPushButton>
#include <QVBoxLayout>
#include <QHBoxLayout>
#include <QLabel>
#include <QComboBox>
#include <QCheckBox>
#include <QMessageBox>
#include <QItemSelectionModel>

int main(int argc, char *argv[])
{
    QApplication a(argc, argv);

    QWidget window;
    window.resize(500, 550);
    window.setWindowTitle("QListView 经典示例(Model/View 架构)");

    QVBoxLayout *mainLayout = new QVBoxLayout(&window);

    // ============================================================
    // 1. 创建数据模型(Model)
    //    QStringListModel 是 Qt 提供的最简单的字符串列表模型
    //    QListView 本身不存储数据,所有数据由 Model 管理
    // ============================================================
    QStringListModel *model = new QStringListModel;

    // 准备初始数据
    QStringList dataList;
    dataList << "C++" << "Python" << "Java" << "JavaScript"
             << "Go" << "Rust" << "TypeScript" << "Kotlin"
             << "Swift" << "Ruby";
    model->setStringList(dataList);  // 将数据设置到模型中

    // ============================================================
    // 2. 创建 QListView 控件,并绑定模型
    // ============================================================
    QListView *listView = new QListView;
    listView->setModel(model);  // 核心:把模型绑定到视图上
    // 此后视图会自动从模型中读取数据并显示

    // --- 视图外观设置 ---
    listView->setAlternatingRowColors(true);  // 交替行颜色,方便阅读
    listView->setSpacing(2);                  // 每项之间的间距(像素)
    listView->setEditTriggers(QAbstractItemView::DoubleClicked |
                              QAbstractItemView::SelectedClicked);  // 双击或单击已选中项可编辑
    listView->setSelectionMode(QAbstractItemView::ExtendedSelection);  // Ctrl/Shift 多选

    mainLayout->addWidget(new QLabel("编程语言列表(双击可编辑):"));
    mainLayout->addWidget(listView);

    // ============================================================
    // 3. 操作区域:增删改查
    // ============================================================
    QHBoxLayout *opLayout = new QHBoxLayout;

    QLineEdit *input = new QLineEdit;
    input->setPlaceholderText("输入新语言名称...");

    QPushButton *addBtn    = new QPushButton("添加");
    QPushButton *insertBtn = new QPushButton("插入到当前位置");
    QPushButton *deleteBtn = new QPushButton("删除选中");
    QPushButton *clearBtn  = new QPushButton("清空全部");

    opLayout->addWidget(input);
    opLayout->addWidget(addBtn);
    opLayout->addWidget(insertBtn);
    opLayout->addWidget(deleteBtn);
    opLayout->addWidget(clearBtn);
    mainLayout->addLayout(opLayout);

    // ============================================================
    // 4. 排序与显示方向控制
    // ============================================================
    QHBoxLayout *settingLayout = new QHBoxLayout;

    QPushButton *sortAscBtn  = new QPushButton("升序排序");
    QPushButton *sortDescBtn = new QPushButton("降序排序");
    QCheckBox *flowCheck     = new QCheckBox("横向排列");
    QComboBox *layoutCombo   = new QComboBox;
    layoutCombo->addItems({"列表模式(ListMode)", "图标模式(IconMode)"});

    settingLayout->addWidget(sortAscBtn);
    settingLayout->addWidget(sortDescBtn);
    settingLayout->addWidget(flowCheck);
    settingLayout->addWidget(layoutCombo);
    mainLayout->addLayout(settingLayout);

    // ============================================================
    // 5. 底部信息栏
    // ============================================================
    QLabel *infoLabel = new QLabel("共 0 项 | 未选中");
    infoLabel->setStyleSheet("color: #555; padding: 5px; background: #f0f0f0; border-radius: 3px;");
    mainLayout->addWidget(infoLabel);

    // ============================================================
    // 6. 更新信息栏的 Lambda
    // ============================================================
    auto updateInfo = [&]() {
        int total = model->rowCount();  // 从模型获取总行数
        QModelIndexList selected = listView->selectionModel()->selectedIndexes();  // 获取选中项的索引列表
        int selectedCount = selected.size();

        QString text = QString("共 %1 项").arg(total);
        if (selectedCount > 0) {
            // 取第一个选中项的文本
            QString firstText = selected.first().data(Qt::DisplayRole).toString();
            text += QString(" | 已选中 %1 项(当前:%2)").arg(selectedCount).arg(firstText);
        } else {
            text += " | 未选中";
        }
        infoLabel->setText(text);
    };

    // ============================================================
    // 7. 信号槽连接
    // ============================================================

    // --- 添加:追加到末尾 ---
    QObject::connect(addBtn, &QPushButton::clicked, [&]() {
        QString text = input->text().trimmed();
        if (text.isEmpty()) {
            QMessageBox::warning(&window, "提示", "请输入内容!");
            return;
        }
        // 通过模型操作数据(不是直接操作视图)
        int row = model->rowCount();  // 当前行数 = 新项的插入位置
        model->insertRow(row);        // 在末尾插入一行
        model->setData(model->index(row), text);  // 设置该行显示的数据
        input->clear();
        input->setFocus();
        updateInfo();
    });

    // --- 插入到当前选中位置的上方 ---
    QObject::connect(insertBtn, &QPushButton::clicked, [&]() {
        QString text = input->text().trimmed();
        if (text.isEmpty()) {
            QMessageBox::warning(&window, "提示", "请输入内容!");
            return;
        }
        // 获取当前选中行的行号,如果没有选中则插入到末尾
        int row = model->rowCount();
        QModelIndex currentIndex = listView->currentIndex();
        if (currentIndex.isValid()) {
            row = currentIndex.row();  // 在选中项的位置插入
        }
        model->insertRow(row);
        model->setData(model->index(row), text);
        // 选中新插入的项
        listView->setCurrentIndex(model->index(row));
        input->clear();
        input->setFocus();
        updateInfo();
    });

    // --- 删除选中项 ---
    QObject::connect(deleteBtn, &QPushButton::clicked, [&]() {
        QModelIndexList selected = listView->selectionModel()->selectedIndexes();
        if (selected.isEmpty()) {
            QMessageBox::warning(&window, "提示", "请先选中要删除的项!");
            return;
        }
        // 从后往前删除,避免行号偏移导致删错
        // 先按行号降序排序
        std::sort(selected.begin(), selected.end(),
                  [](const QModelIndex &a, const QModelIndex &b) {
                      return a.row() > b.row();
                  });
        for (const QModelIndex &idx : selected) {
            model->removeRow(idx.row());  // 通过模型删除行
        }
        updateInfo();
    });

    // --- 清空全部 ---
    QObject::connect(clearBtn, &QPushButton::clicked, [&]() {
        model->removeRows(0, model->rowCount());  // 从第0行开始,删除所有行
        updateInfo();
    });

    // --- 升序排序 ---
    QObject::connect(sortAscBtn, &QPushButton::clicked, [&]() {
        model->sort(0, Qt::AscendingOrder);   // 第0列,升序
    });

    // --- 降序排序 ---
    QObject::connect(sortDescBtn, &QPushButton::clicked, [&]() {
        model->sort(0, Qt::DescendingOrder);  // 第0列,降序
    });

    // --- 横向/纵向排列切换 ---
    QObject::connect(flowCheck, &QCheckBox::toggled, [&](bool checked) {
        if (checked) {
            listView->setFlow(QListView::LeftToRight);   // 横向排列
            listView->setWrapping(true);                  // 允许换行
            listView->setResizeMode(QListView::Adjust);   // 自动调整大小
            listView->setSpacing(10);
        } else {
            listView->setFlow(QListView::TopToBottom);   // 纵向排列(默认)
            listView->setWrapping(false);
            listView->setResizeMode(QListView::Fixed);
            listView->setSpacing(2);
        }
    });

    // --- 列表模式 / 图标模式 切换 ---
    QObject::connect(layoutCombo, QOverload<int>::of(&QComboBox::currentIndexChanged), [&](int index) {
        if (index == 0) {
            listView->setViewMode(QListView::ListMode);   // 列表模式:紧凑排列
        } else {
            listView->setViewMode(QListView::IconMode);   // 图标模式:网格排列,可拖拽
            listView->setMovement(QListView::Snap);       // 对齐到网格
        }
    });

    // --- 数据变化时自动更新信息栏 ---
    QObject::connect(model, &QStringListModel::dataChanged, updateInfo);
    QObject::connect(listView->selectionModel(),
                     &QItemSelectionModel::selectionChanged,
                     updateInfo);

    // 初始化信息
    updateInfo();

    window.show();
    return a.exec();
}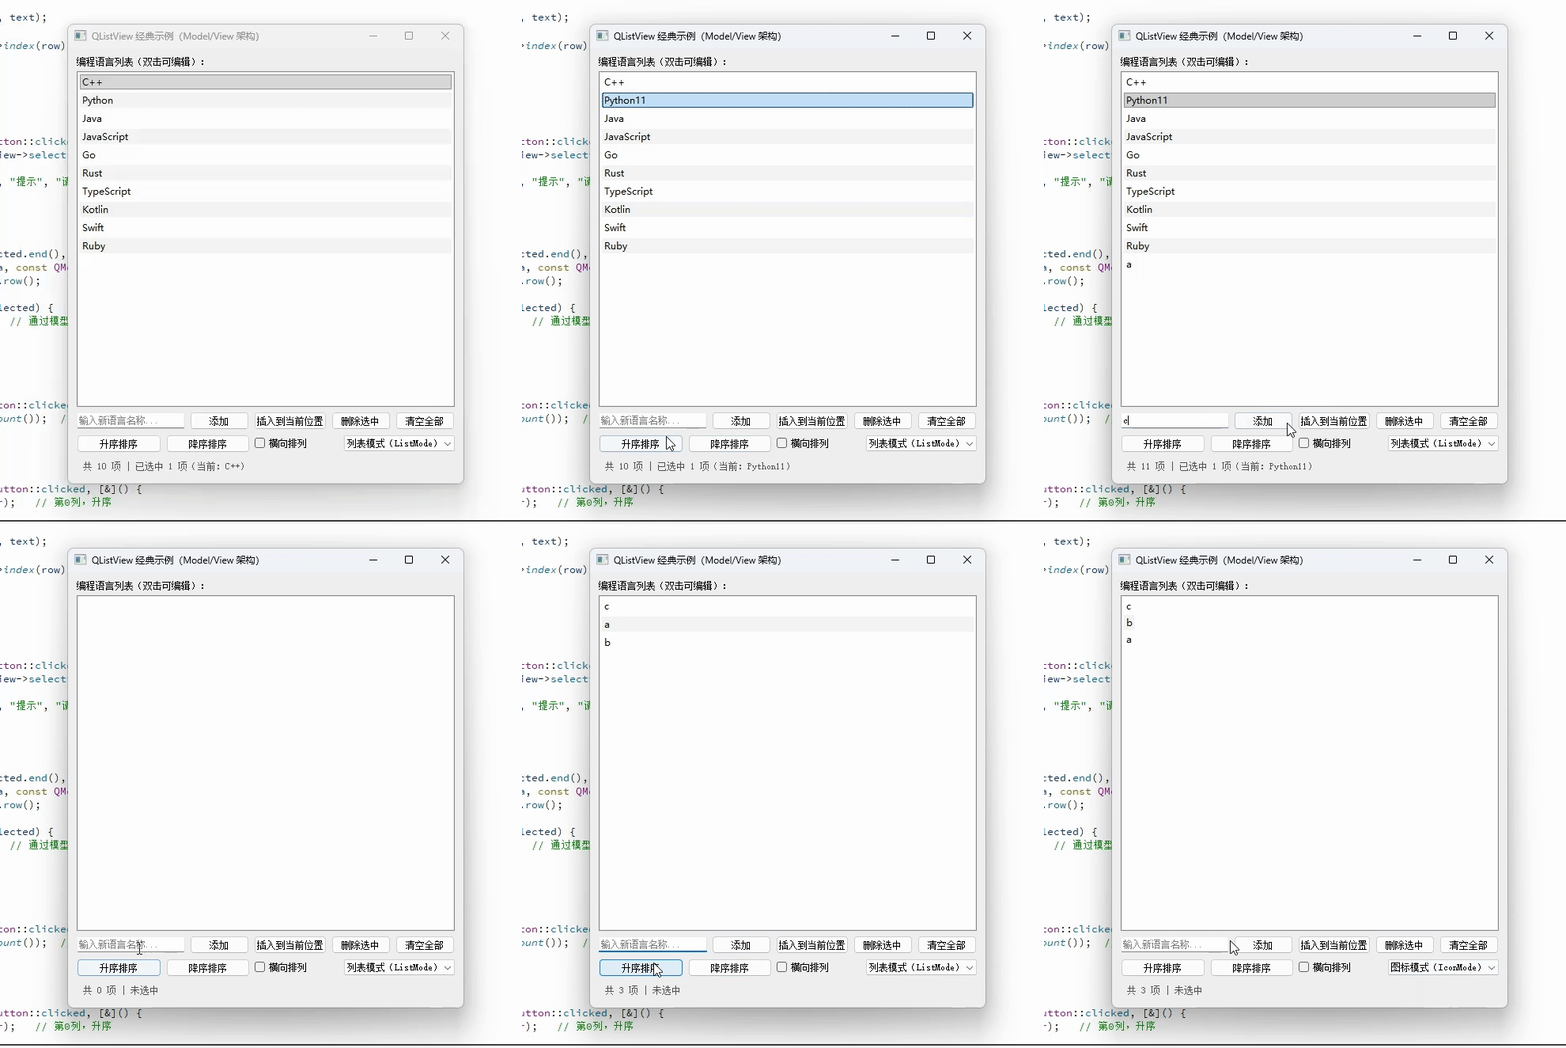
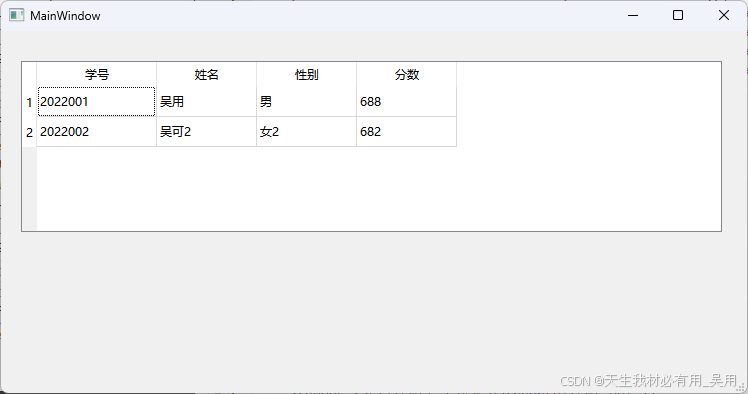
table View
cpp
#include "mainwindow.h"
#include "ui_mainwindow.h"
#include <QStandardItemModel>

MainWindow::MainWindow(QWidget *parent)
    : QMainWindow(parent)
    , ui(new Ui::MainWindow)
{
    ui->setupUi(this);
    // 调用自定义函数
    InitTableViewFunc();
}

MainWindow::~MainWindow()
{
    delete ui;
}

void MainWindow::InitTableViewFunc(){
    // 添加表头,准备数据模型
    QStandardItemModel *stuMode = new QStandardItemModel();
    stuMode->setHorizontalHeaderItem(0,new QStandardItem(QObject::tr("学号")));
    stuMode->setHorizontalHeaderItem(1,new QStandardItem(QObject::tr("姓名")));
    stuMode->setHorizontalHeaderItem(2,new QStandardItem(QObject::tr("性别")));
    stuMode->setHorizontalHeaderItem(3,new QStandardItem(QObject::tr("分数")));

    // 通过API函数将数据模型绑定到QTableCiew
    ui->tableView->setModel(stuMode);

    // 设置表格列的宽度
    ui->tableView->setColumnWidth(0,120);

    // 添加数据信息
    stuMode->setItem(0,0,new QStandardItem("2022001"));
    stuMode->setItem(0,1,new QStandardItem("吴用"));
    stuMode->setItem(0,2,new QStandardItem("男"));
    stuMode->setItem(0,3,new QStandardItem("688"));


    stuMode->setItem(1,0,new QStandardItem("2022002"));
    stuMode->setItem(1,1,new QStandardItem("吴可2"));
    stuMode->setItem(1,2,new QStandardItem("女2"));
    stuMode->setItem(1,3,new QStandardItem("682"));
    stuMode->sort(3,Qt::DescendingOrder);
}
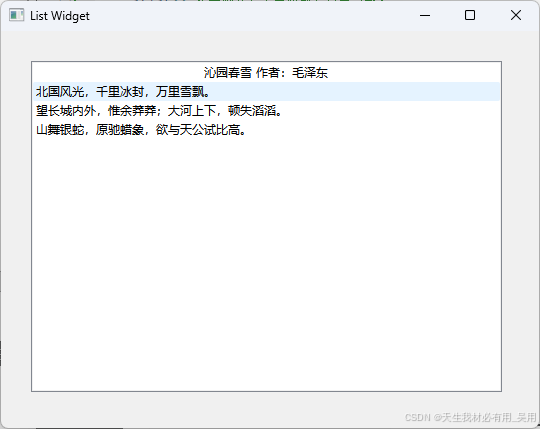
list Widget 清单控件
cpp
#include "widget.h"
#include "ui_widget.h"
#include <QListWidget>
#include <QListWidgetItem>

Widget::Widget(QWidget *parent)
    : QWidget(parent)
    , ui(new Ui::Widget)
{
    ui->setupUi(this);
    QListWidgetItem *qitem = new QListWidgetItem("沁园春雪 作者:毛泽东");
    ui->listWidget->addItem(qitem);
    qitem->setTextAlignment(Qt::AlignCenter);
    QStringList slist;
    slist<<"北国风光,千里冰封,万里雪飘。";
    slist<<"望长城内外,惟余莽莽;大河上下,顿失滔滔。";
    slist<<"山舞银蛇,原驰蜡象,欲与天公试比高。";
    ui->listWidget->addItems(slist);
}

Widget::~Widget()
{
    delete ui;
}
tree Widget 树形控件
cpp
#include "widget.h"
#include "ui_widget.h"

Widget::Widget(QWidget *parent)
    : QWidget(parent)
    , ui(new Ui::Widget)
{
    ui->setupUi(this);

    // 添加第一级节点
    QTreeWidgetItem *topItem1 = new QTreeWidgetItem(ui->treeWidget);
    topItem1->setText(0,"清华大学");
    topItem1->setCheckState(0,Qt::Checked);
    ui->treeWidget->addTopLevelItem(topItem1);

    // 隐藏表头
    ui->treeWidget->setHeaderHidden(true);
    ui->treeWidget->expandAll();

    // 将二级节点添加到一级节点的topitem1
    QTreeWidgetItem *topItem11 = new QTreeWidgetItem(topItem1);
    topItem11->setText(0,"建筑学院");
    topItem11->setCheckState(0,Qt::Checked);


    QTreeWidgetItem *topItem12 = new QTreeWidgetItem(topItem1);
    topItem12->setText(0,"计算机");
    topItem12->setCheckState(0,Qt::Checked);


    QTreeWidgetItem *topItem13 = new QTreeWidgetItem(topItem1);
    topItem13->setText(0,"美术");
    topItem13->setCheckState(0,Qt::Checked);


    QTreeWidgetItem *topItem14 = new QTreeWidgetItem(topItem1);
    topItem14->setText(0,"信息科学与技术");
    topItem14->setCheckState(0,Qt::Checked);


    QTreeWidgetItem *topItem2 = new QTreeWidgetItem(ui->treeWidget);
    topItem2->setText(0,"背景大学");
    topItem2->setCheckState(0,Qt::Checked);
    ui->treeWidget->addTopLevelItem(topItem2);


    QTreeWidgetItem *topItem21 = new QTreeWidgetItem(topItem2);
    topItem21->setText(0,"美术学院");
    topItem21->setCheckState(0,Qt::Checked);


    QTreeWidgetItem *topItem22 = new QTreeWidgetItem(topItem2);
    topItem22->setText(0,"信息科学与技术");
    topItem22->setCheckState(0,Qt::Checked);
}

Widget::~Widget()
{
    delete ui;
}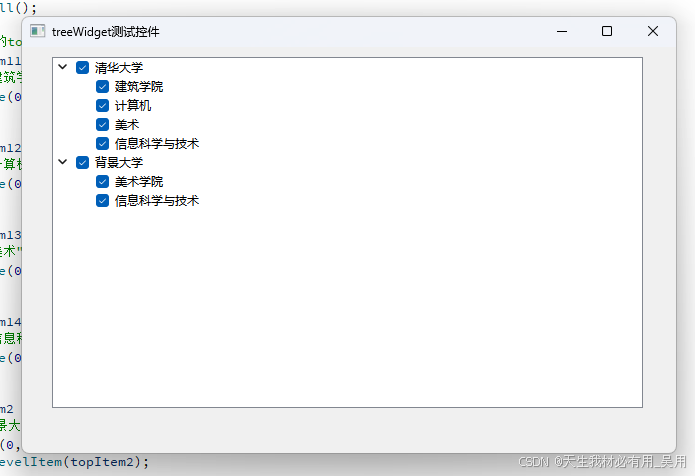
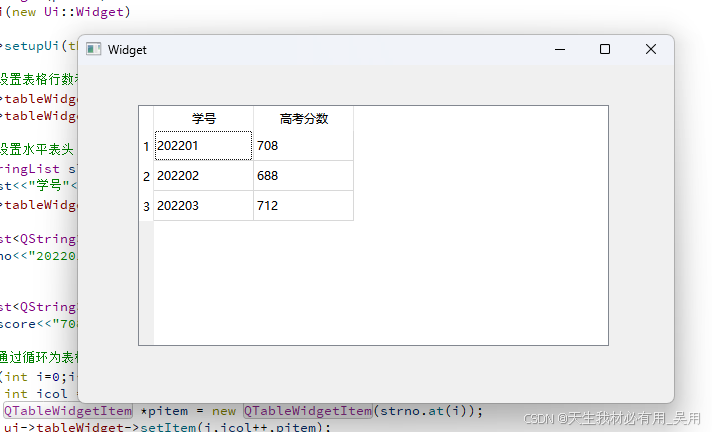
table Widget 表控件
cpp
#include "widget.h"
#include "ui_widget.h"

Widget::Widget(QWidget *parent)
    : QWidget(parent)
    , ui(new Ui::Widget)
{
    ui->setupUi(this);

    // 设置表格行数和列数
    ui->tableWidget->setRowCount(3);
    ui->tableWidget->setColumnCount(2);

    // 设置水平表头
    QStringList slist;
    slist<<"学号"<<"高考分数";
    ui->tableWidget->setHorizontalHeaderLabels(slist);

    QList<QString> strno;
    strno<<"202201"<<"202202"<<"202203";


    QList<QString> strscore;
    strscore<<"708"<<"688"<<"712";

    // 通过循环为表格赋值
    for(int i=0;i<3;i++){
        int icol =0;
        QTableWidgetItem *pitem = new QTableWidgetItem(strno.at(i));
        ui->tableWidget->setItem(i,icol++,pitem);
        ui->tableWidget->setItem(i,icol++,new QTableWidgetItem(strscore.at(i)));
    }
}

Widget::~Widget()
{
    delete ui;
}
input Widgets 输入组控件
QComboBox
cpp
#include "mainwindow.h"
#include "ui_mainwindow.h"

#include <QMessageBox>
#include <QDebug>

MainWindow::MainWindow(QWidget *parent)
    : QMainWindow(parent)
    , ui(new Ui::MainWindow)
{
    ui->setupUi(this);
    this->setGeometry(300,200,1000,600);

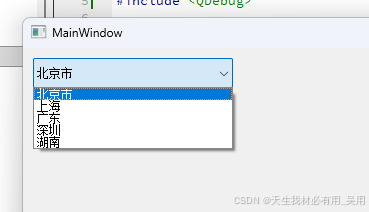
    combobox = new QComboBox(this); // 实例化对象
    combobox->setGeometry(10,10,200,30);
    combobox->addItem("北京市");
    combobox->addItem("上海");
    combobox->addItem("广东");
    combobox->addItem("深圳");
    combobox->addItem("湖南");
    // 信号槽函数
    connect(combobox,SIGNAL(currentIndexChanged(int)),this,SLOT(comboboxIndex(int)));
}

MainWindow::~MainWindow()
{
    delete ui;
}
void MainWindow::comboboxIndex(int index){
    QMessageBox mybox(QMessageBox::Question,"信息",combobox->itemText(index),QMessageBox::Yes|QMessageBox::No);
    mybox.exec();
}
QFontComboBox
cpp
#include "mainwindow.h"
#include "ui_mainwindow.h"

#include <QMessageBox>
#include <QDebug>

MainWindow::MainWindow(QWidget *parent)
    : QMainWindow(parent)
    , ui(new Ui::MainWindow)
{
    ui->setupUi(this);
    this->setGeometry(300,200,1000,600);

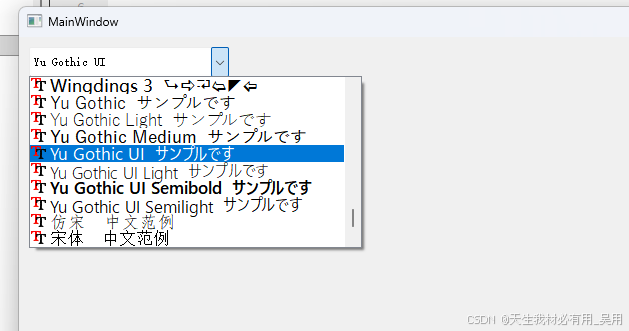
    fontcombobox = new QFontComboBox(this);
    qlabel = new QLabel(this);
    fontcombobox->setGeometry(10,10,200,30);
    qlabel->setGeometry(10,30,300,50);
    connect(fontcombobox,SIGNAL(currentFontChanged(QFont)),this,SLOT(fontcomboboxFunc(QFont)));
}

MainWindow::~MainWindow()
{
    delete ui;
}

void MainWindow::fontcomboboxFunc(QFont font){
    qlabel->setFont(font);
    QString qStr = "凹凸曼";
    qlabel->setText(qStr);
}
Line Edit 单行输入框
cpp
#include "mainwindow.h"
#include "ui_mainwindow.h"

#include <QMessageBox>
#include <QDebug>

MainWindow::MainWindow(QWidget *parent)
    : QMainWindow(parent)
    , ui(new Ui::MainWindow)
{
    ui->setupUi(this);
    this->setGeometry(300,200,1000,600);
    this->setGeometry(300,200,1000,600);
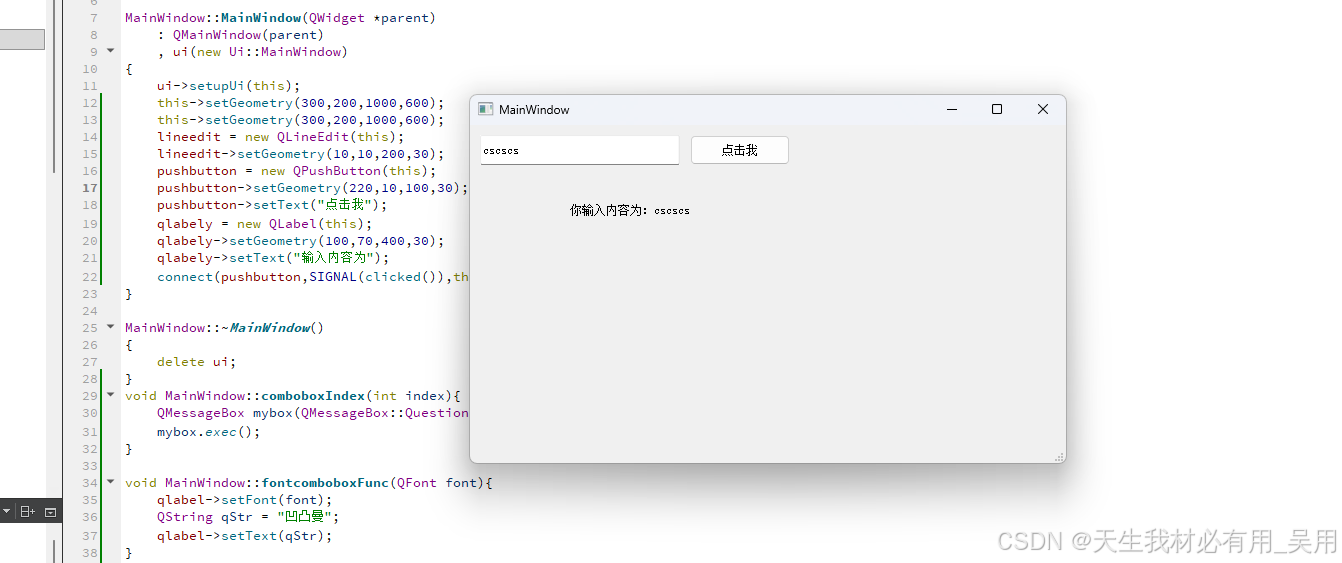
    lineedit = new QLineEdit(this);
    lineedit->setGeometry(10,10,200,30);
    pushbutton = new QPushButton(this);
    pushbutton->setGeometry(220,10,100,30);
    pushbutton->setText("点击我");
    qlabely = new QLabel(this);
    qlabely->setGeometry(100,70,400,30);
    qlabely->setText("输入内容为");
    connect(pushbutton,SIGNAL(clicked()),this,SLOT(pushbuttonClicked()));
}

MainWindow::~MainWindow()
{
    delete ui;
}
void MainWindow::comboboxIndex(int index){
    QMessageBox mybox(QMessageBox::Question,"信息",combobox->itemText(index),QMessageBox::Yes|QMessageBox::No);
    mybox.exec();
}

void MainWindow::pushbuttonClicked(){
    QString qStr;
    qStr = "你输入内容为:";
    qStr = qStr+lineedit->text();
    qlabely->setText(qStr);
}
text Edit 多行文本编辑
cpp
#include "mainwindow.h"
#include "ui_mainwindow.h"

#include <QMessageBox>
#include <QDebug>

MainWindow::MainWindow(QWidget *parent)
    : QMainWindow(parent)
    , ui(new Ui::MainWindow)
{
    ui->setupUi(this);
    this->setGeometry(300,200,1000,600);

    plaintedit = new QPlainTextEdit(this);
    plaintedit->setGeometry(10,40,400,200);

    radiobutton = new QRadioButton(this);
    radiobutton->setGeometry(10,10,200,30);
    radiobutton->setText("只读模式");


    // 设置当前程序为工作目录
    QDir::setCurrent(QCoreApplication::applicationDirPath());
    QFile fe("moc_mainwindow.cpp");
    fe.open((QFile::ReadOnly | QFile::Text));
    QTextStream strin(&fe);
    plaintedit->insertPlainText(strin.readAll());
    connect(radiobutton,SIGNAL(clicked()),this,SLOT(radioButtonClicked()));
}

MainWindow::~MainWindow()
{
    delete ui;
}
void MainWindow::radioButtonClicked(){
    if(radiobutton->isChecked()){
        plaintedit->setReadOnly(true);
    }else{
        plaintedit->setReadOnly(false);
    }
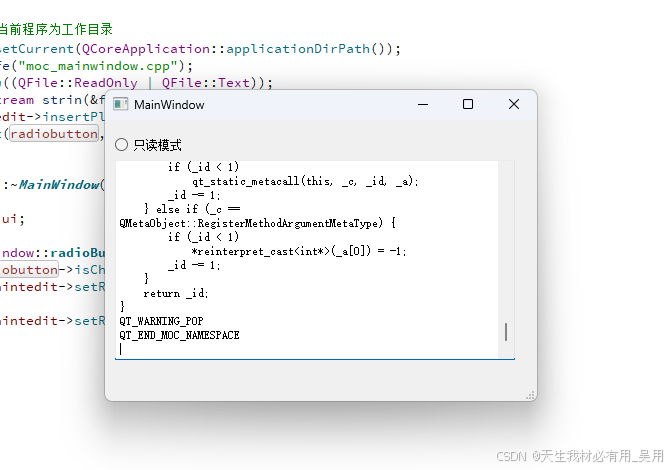
}
Spin Box
cpp
#include "mainwindow.h"
#include "ui_mainwindow.h"

#include <QMessageBox>
#include <QDebug>

MainWindow::MainWindow(QWidget *parent)
    : QMainWindow(parent)
    , ui(new Ui::MainWindow)
{
    ui->setupUi(this);
    this->setGeometry(300,200,1000,600);

    plaintedit = new QPlainTextEdit(this);
    plaintedit->setGeometry(10,40,400,200);

    radiobutton = new QRadioButton(this);
    radiobutton->setGeometry(10,10,200,30);
    radiobutton->setText("只读模式");


    // 设置当前程序为工作目录
    QDir::setCurrent(QCoreApplication::applicationDirPath());
    QFile fe("moc_mainwindow.cpp");
    fe.open((QFile::ReadOnly | QFile::Text));
    QTextStream strin(&fe);
    plaintedit->insertPlainText(strin.readAll());
    connect(radiobutton,SIGNAL(clicked()),this,SLOT(radioButtonClicked()));


    // 改变窗口背景颜色
    this->setStyleSheet("QMainWindow{background-color:""rgba(255,250,100,100%)}");

    spinbox = new QSpinBox(this);
    spinbox->setGeometry(440,200,150,30);
    spinbox->setRange(0,100);
    spinbox->setSingleStep(10);

    spinbox->setSuffix("%不透明度");

    connect(spinbox,SIGNAL(valueChanged(int)),this,SLOT(spinboxValueChanged(int)));
}

MainWindow::~MainWindow()
{
    delete ui;
}
void MainWindow::radioButtonClicked(){
    if(radiobutton->isChecked()){
        plaintedit->setReadOnly(true);
    }else{
        plaintedit->setReadOnly(false);
    }
}

void MainWindow::spinboxValueChanged(int x){
    double dx = (double)x/100;
    this->setWindowOpacity(dx);
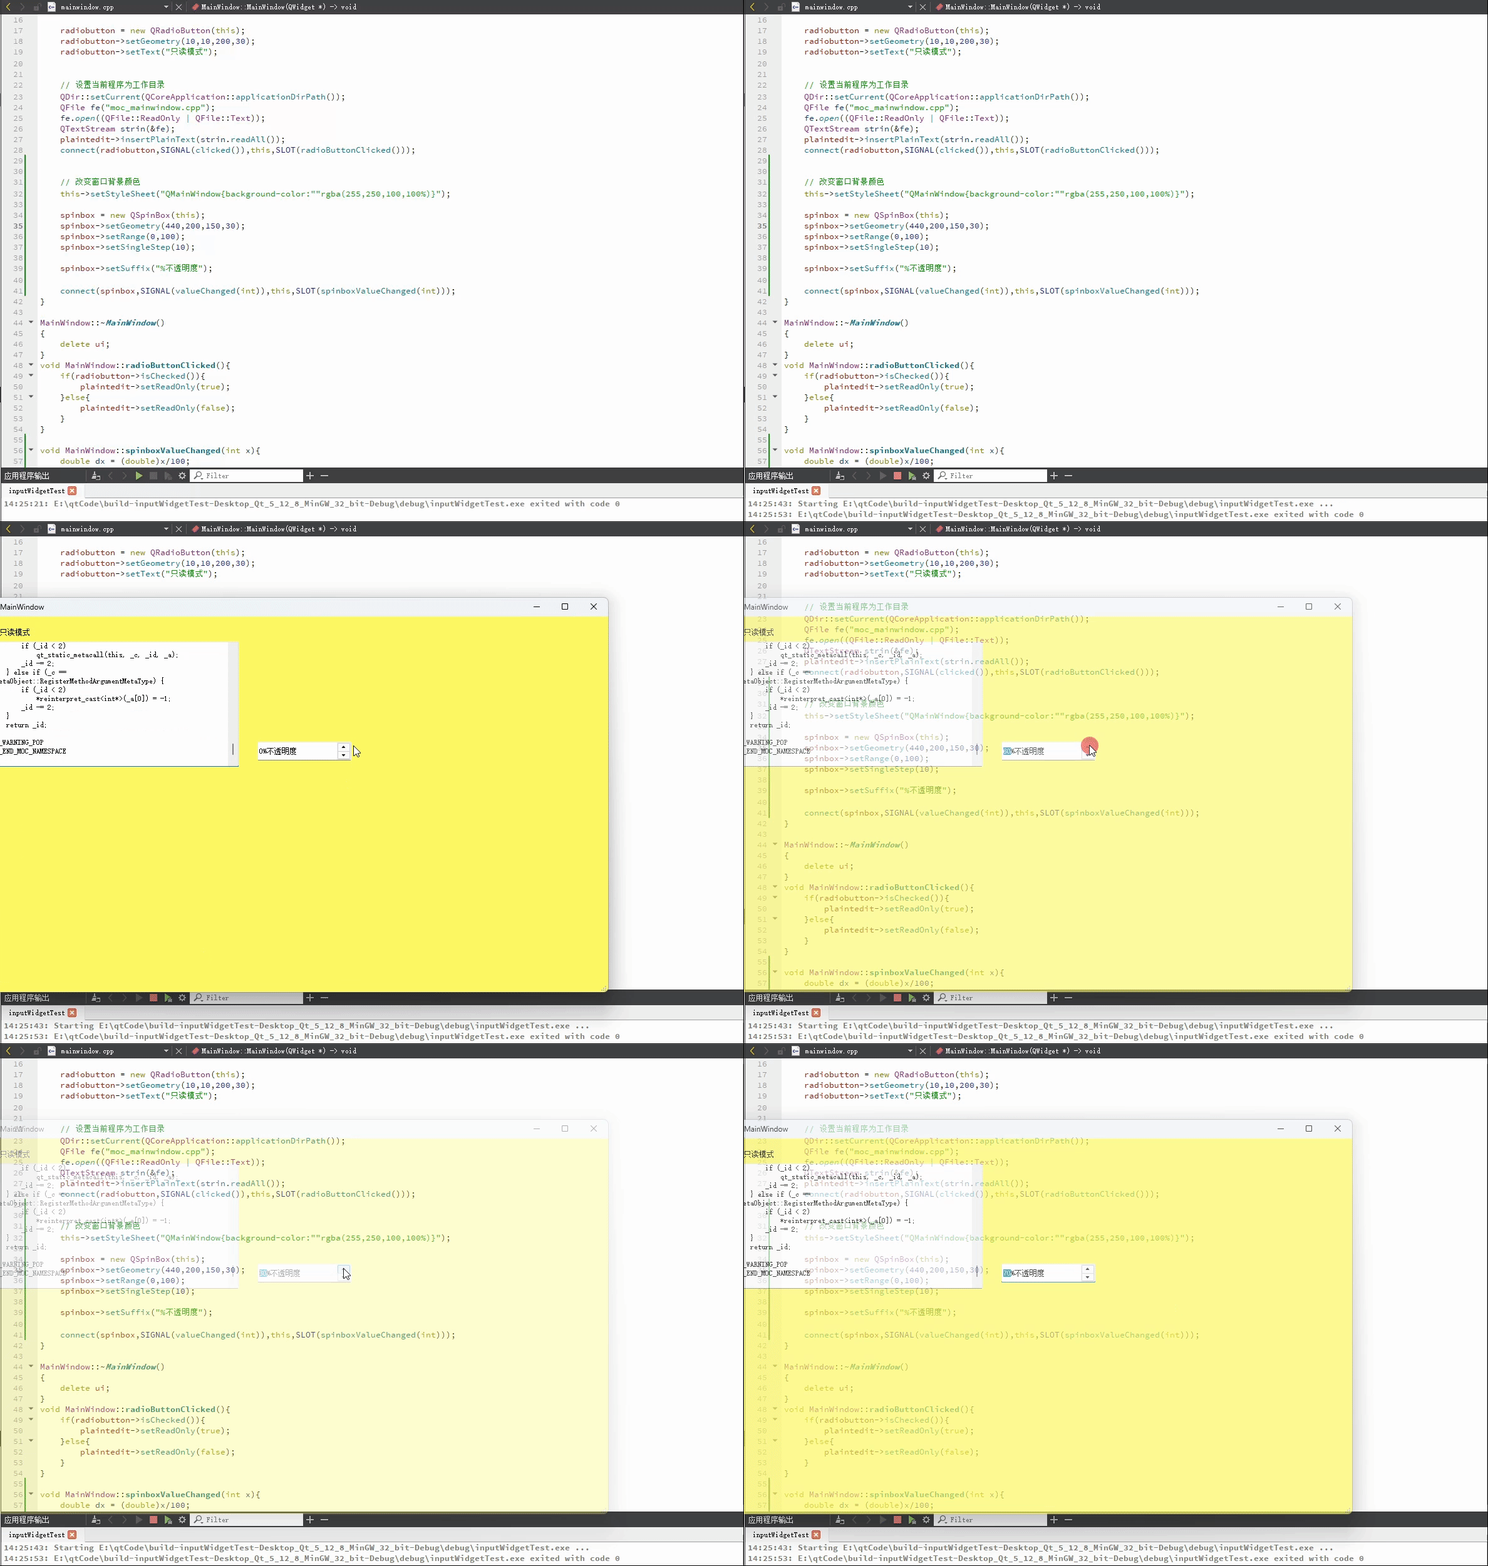
}
TimeEdit 时间编辑器
cpp
    dte = new QDateTimeEdit(QDateTime::currentDateTime(),this);
    dte->setGeometry(440,290,220,30);

    te = new QTimeEdit(QTime::currentTime(),this);
    te->setGeometry(440,330,200,30);


    de = new QDateEdit(QDate::currentDate(),this);
    de->setGeometry(440,370,200,30);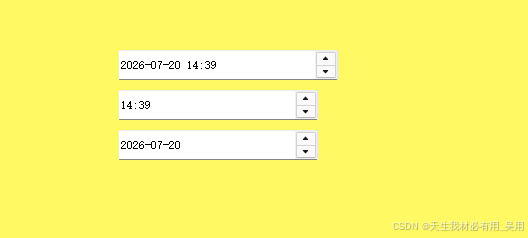
Scroll Bar控件
cpp
#include "mainwindow.h"
#include "ui_mainwindow.h"

#include <QMessageBox>
#include <QDebug>


MainWindow::MainWindow(QWidget *parent)
    : QMainWindow(parent)
    , ui(new Ui::MainWindow)
{
    ui->setupUi(this);
    this->setGeometry(300,200,1000,600);

    hscrollbar = new QScrollBar(Qt::Horizontal,this);
    hscrollbar->setGeometry(0,500,1000,30);
    vscrollbar = new QScrollBar(Qt::Vertical,this);
    vscrollbar->setGeometry(970,0,30,500);
}

MainWindow::~MainWindow()
{
    delete ui;
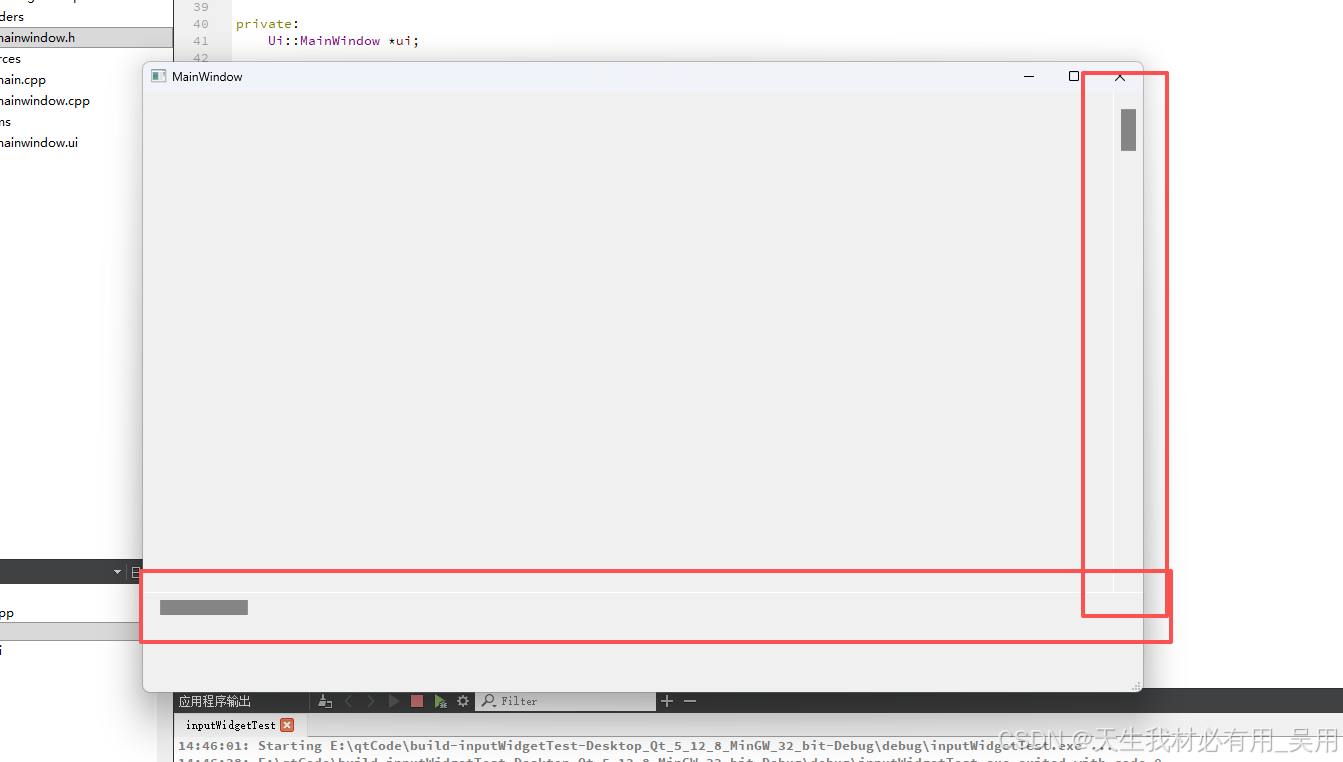
}
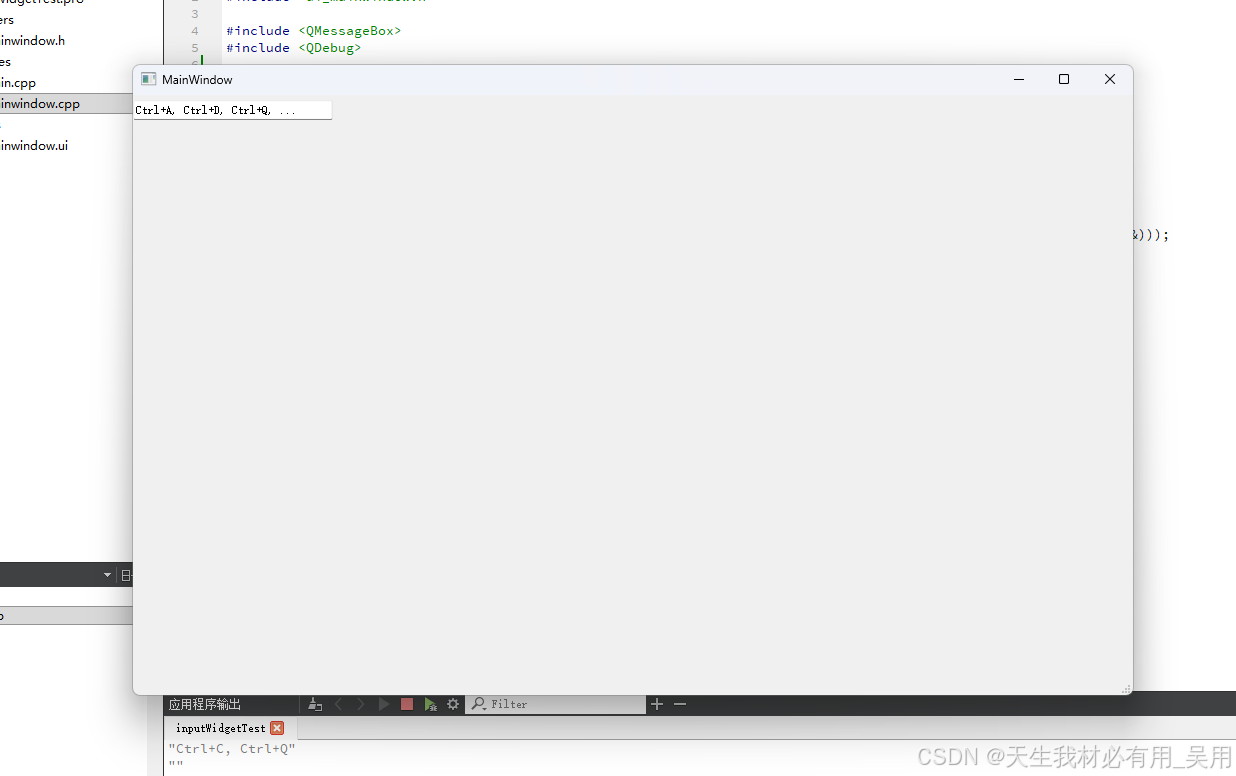
Key Sequence Edit 快捷键捕获
cpp
#include "mainwindow.h"
#include "ui_mainwindow.h"

#include <QMessageBox>
#include <QDebug>


MainWindow::MainWindow(QWidget *parent)
    : QMainWindow(parent)
    , ui(new Ui::MainWindow)
{
    ui->setupUi(this);
    this->setGeometry(300,200,1000,600);
    kse = new QKeySequenceEdit(this);
    kse->setGeometry(0,0,200,30);
    connect(kse,SIGNAL(keySequenceChanged(const QKeySequence &)),this,SLOT(keysequeditChanged(const QKeySequence &)));
}

MainWindow::~MainWindow()
{
    delete ui;
}

void MainWindow::keysequeditChanged(const QKeySequence  &key){
    if(key==QKeySequence(tr("Ctrl+Q"))){
        this->close();
    }else{
        qDebug()<<key.toString();
    }
}
Display Widgets
label :标签
cpp
#include "widget.h"
#include "ui_widget.h"
#include <QImageReader>

Widget::Widget(QWidget *parent) : QWidget(parent), ui(new Ui::Widget) {
  ui->setupUi(this);
  textlabelFunc();
}

Widget::~Widget() { delete ui; }

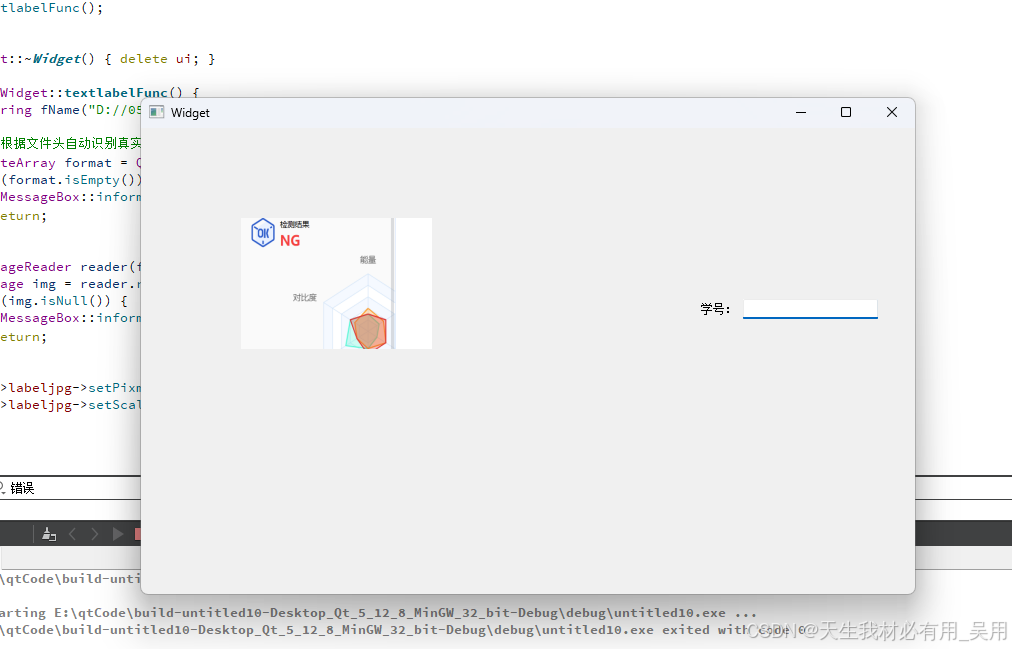
void Widget::textlabelFunc() {
  QString fName("D://0527.png");

  // 根据文件头自动识别真实格式(不依赖扩展名,即使 .jpg 实际是 PNG 也能识别)
  QByteArray format = QImageReader::imageFormat(fName);
  if (format.isEmpty()) {
    QMessageBox::information(this, "失败", "无法识别图片格式");
    return;
  }

  QImageReader reader(fName, format);
  QImage img = reader.read();
  if (img.isNull()) {
    QMessageBox::information(this, "失败", reader.errorString());
    return;
  }

  ui->labeljpg->setPixmap(QPixmap::fromImage(img));
}
Text Brower : 文本浏览器
cpp
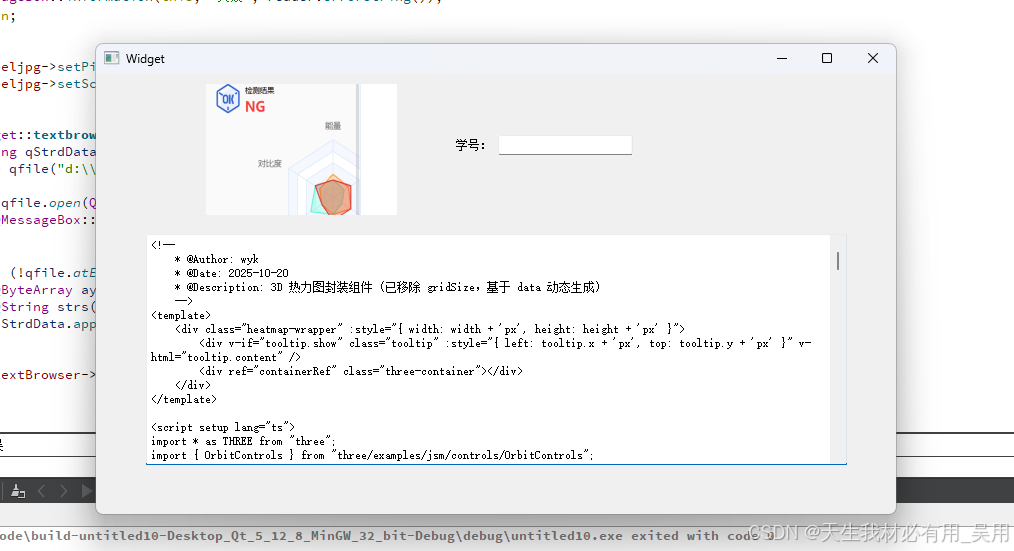
void Widget::textbrowserFuncReadTxt(){
    QString qStrdData;
    QFile qfile("d:\\01.txt");

    if(!(qfile.open(QIODevice::ReadOnly|QIODevice::Text))){
        QMessageBox::warning(this,"失败","打开文件失败,请重新检查");
    }

    while (!qfile.atEnd()) {
        QByteArray ay = qfile.readLine();
        QString strs(ay);
        qStrdData.append(strs);
    }

    ui->textBrowser->setText(qStrdData);
}
textBrowser 进度条
cpp
#include "widget.h"
#include "ui_widget.h"
#include <QImageReader>

Widget::Widget(QWidget *parent) : QWidget(parent), ui(new Ui::Widget) {
  ui->setupUi(this);
  textlabelFunc();
  textbrowserFuncReadTxt();
}

Widget::~Widget() { delete ui; }

void Widget::textlabelFunc() {
  QString fName("D://0527.png");

  // 根据文件头自动识别真实格式(不依赖扩展名,即使 .jpg 实际是 PNG 也能识别)
  QByteArray format = QImageReader::imageFormat(fName);
  if (format.isEmpty()) {
    QMessageBox::information(this, "失败", "无法识别图片格式");
    return;
  }

  QImageReader reader(fName, format);
  QImage img = reader.read();
  if (img.isNull()) {
    QMessageBox::information(this, "失败", reader.errorString());
    return;
  }

  ui->labeljpg->setPixmap(QPixmap::fromImage(img));
  ui->labeljpg->setScaledContents(true);


  // 初始化进度条
  ui->progressBar->setRange(0,1000000);
  ui->progressBar->setValue(0);
}

void Widget::textbrowserFuncReadTxt(){
    QString qStrdData;
    QFile qfile("d:\\01.txt");

    if(!(qfile.open(QIODevice::ReadOnly|QIODevice::Text))){
        QMessageBox::warning(this,"失败","打开文件失败,请重新检查");
    }

    while (!qfile.atEnd()) {
        QByteArray ay = qfile.readLine();
        QString strs(ay);
        qStrdData.append(strs);
    }

    ui->textBrowser->setText(qStrdData);
}

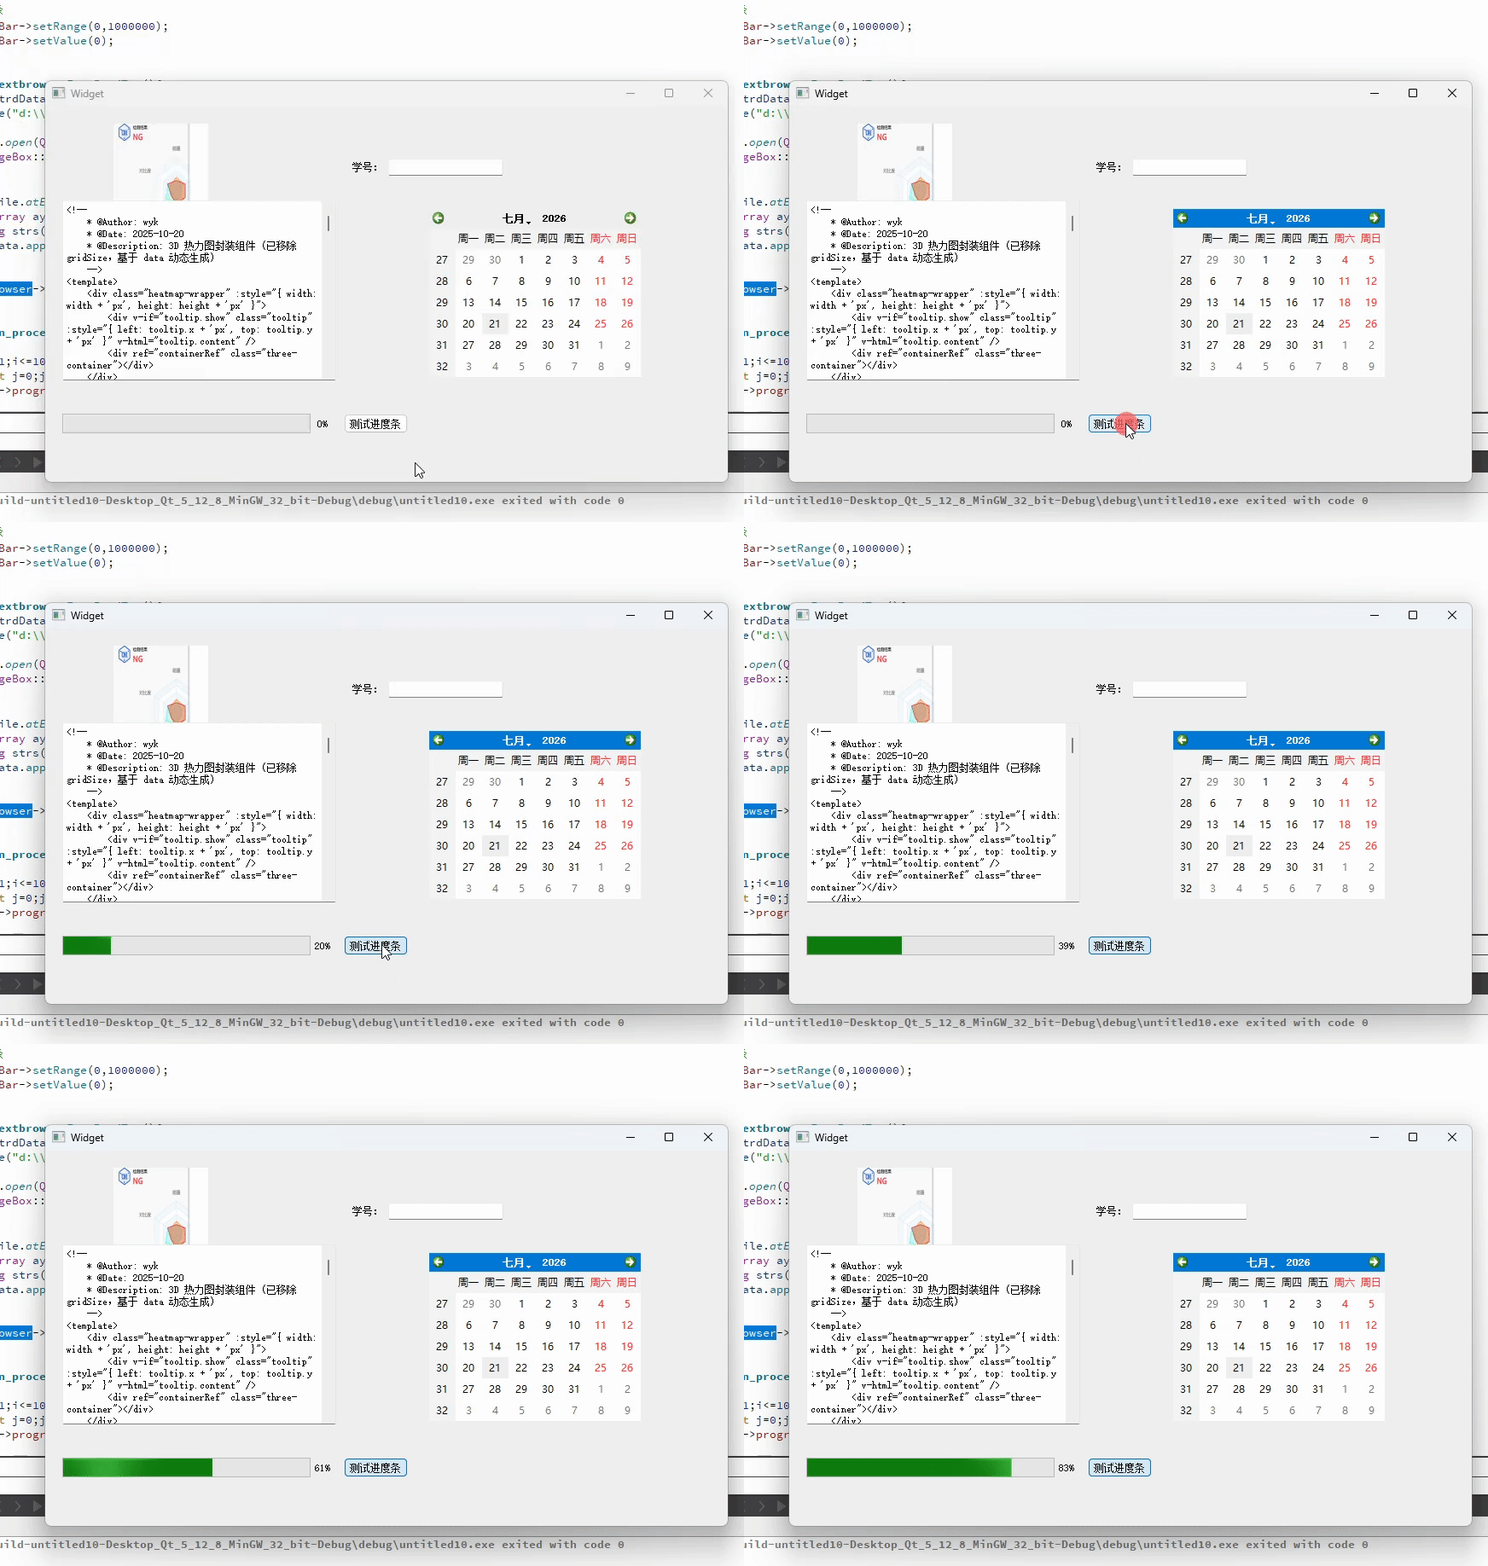
void Widget::on_processButton_clicked()
{
    for(int i=1;i<=1000000;i++){
        for(int j=0;j<1;j++){
            ui->progressBar->setValue(i);
        }
    }
}
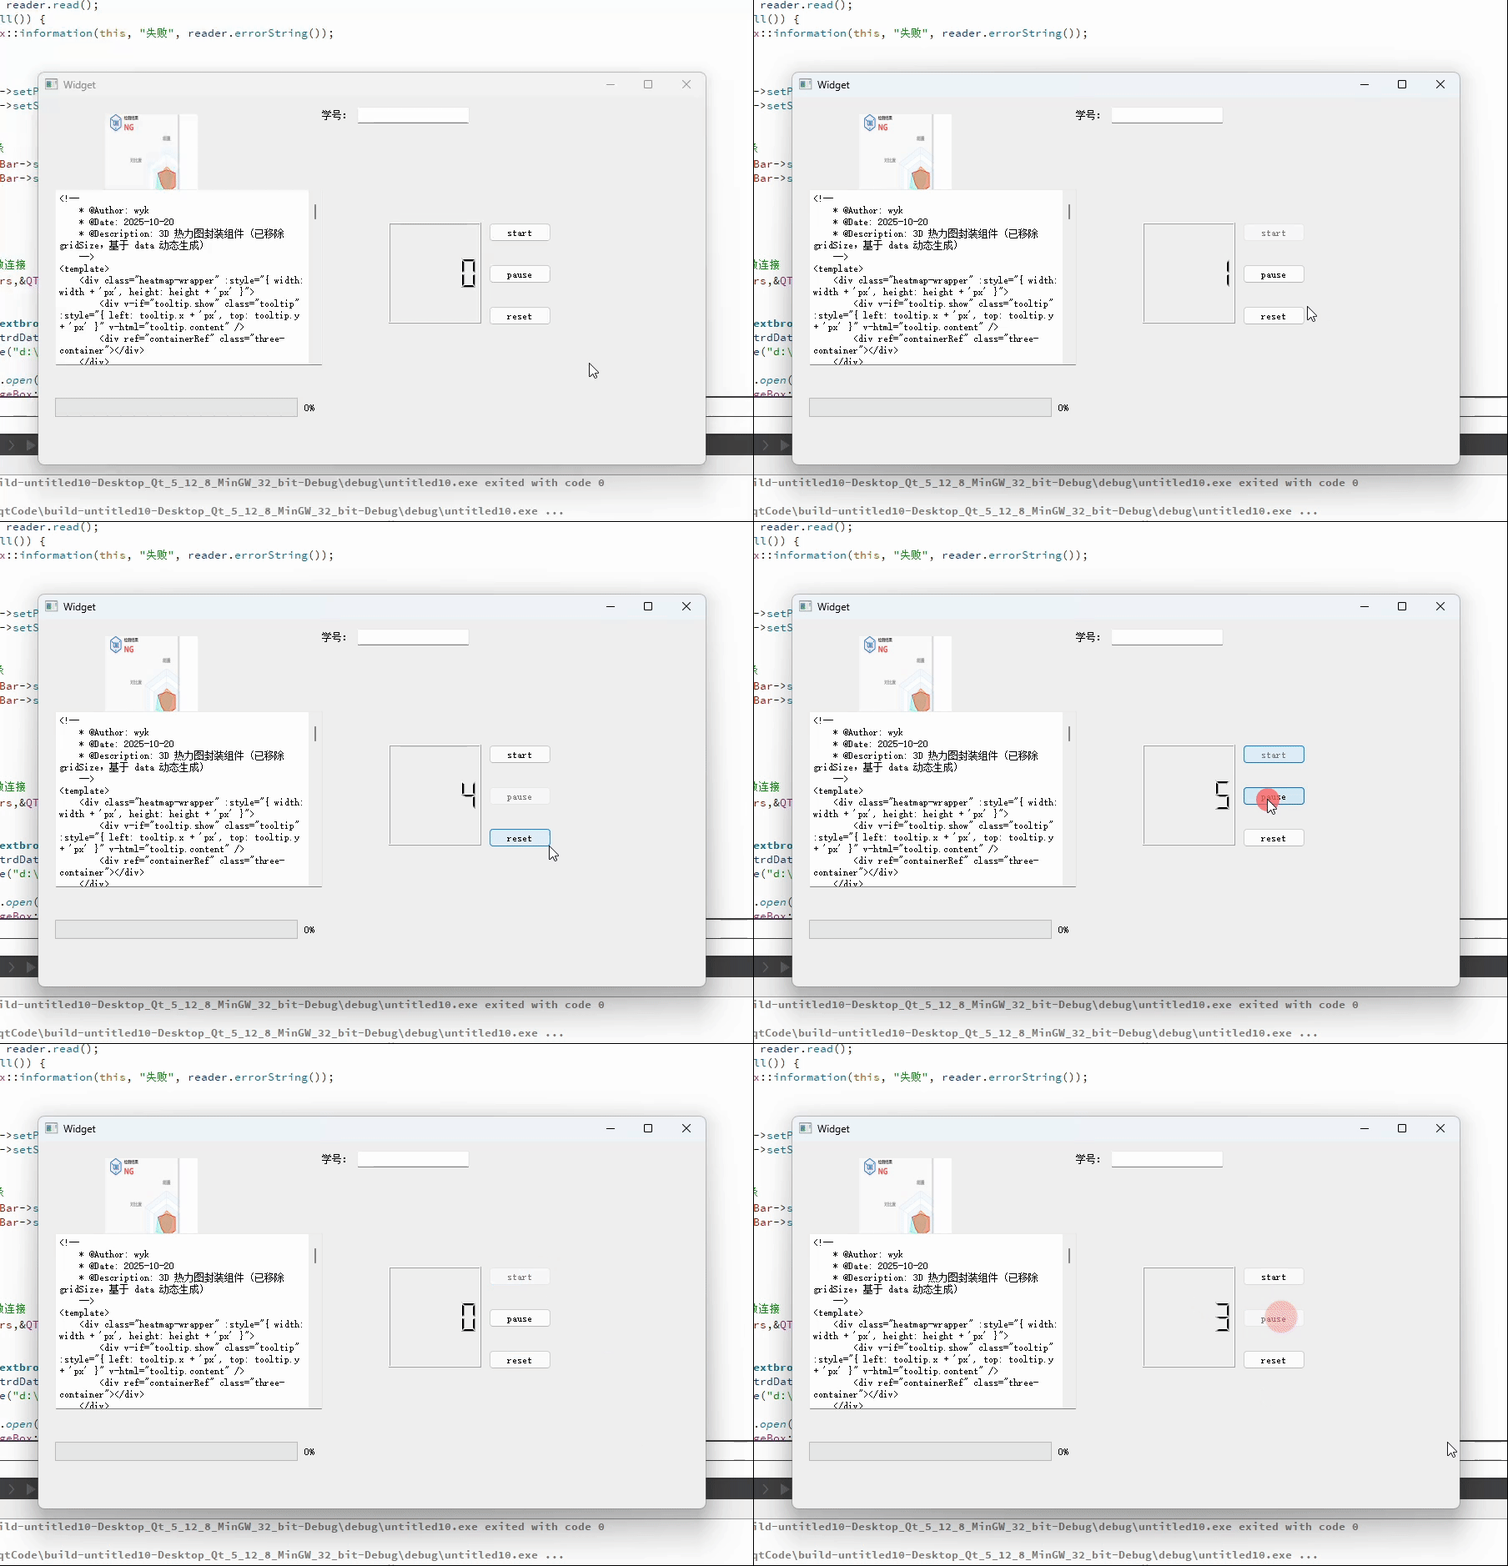
LCD Number 液晶数字
cpp
#include "widget.h"
#include "ui_widget.h"
#include <QImageReader>

Widget::Widget(QWidget *parent) : QWidget(parent), ui(new Ui::Widget) {
  ui->setupUi(this);
  textlabelFunc();
  textbrowserFuncReadTxt();
}

Widget::~Widget() { delete ui; }

void Widget::textlabelFunc() {
  QString fName("D://0527.png");

  // 根据文件头自动识别真实格式(不依赖扩展名,即使 .jpg 实际是 PNG 也能识别)
  QByteArray format = QImageReader::imageFormat(fName);
  if (format.isEmpty()) {
    QMessageBox::information(this, "失败", "无法识别图片格式");
    return;
  }

  QImageReader reader(fName, format);
  QImage img = reader.read();
  if (img.isNull()) {
    QMessageBox::information(this, "失败", reader.errorString());
    return;
  }

  ui->labeljpg->setPixmap(QPixmap::fromImage(img));
  ui->labeljpg->setScaledContents(true);


  // 初始化进度条
  ui->progressBar->setRange(0,1000000);
  ui->progressBar->setValue(0);


  // 初始化
  initFunc();

  // 信号与槽函数连接
  connect(timers,&QTimer::timeout,this,&Widget::on_timerout);
}

void Widget::textbrowserFuncReadTxt(){
    QString qStrdData;
    QFile qfile("d:\\01.txt");

    if(!(qfile.open(QIODevice::ReadOnly|QIODevice::Text))){
        QMessageBox::warning(this,"失败","打开文件失败,请重新检查");
    }

    while (!qfile.atEnd()) {
        QByteArray ay = qfile.readLine();
        QString strs(ay);
        qStrdData.append(strs);
    }

    ui->textBrowser->setText(qStrdData);
}

void Widget::on_processButton_clicked()
{
    for(int i=1;i<=1000000;i++){
        for(int j=0;j<1;j++){
            ui->progressBar->setValue(i);
        }
    }
}
void Widget::on_timerout(){
    iValues++;
    ui->lcdNumber->display(iValues);
}
void Widget::on_startBtn_clicked()
{
    timers->start();
    ui->startBtn->setEnabled(false);
    ui->pauseBtn->setEnabled(true);
    ui->resetBtn->setEnabled(true);
}

void Widget::on_pauseBtn_clicked()
{
    timers->stop();
    ui->startBtn->setEnabled(true);
    ui->pauseBtn->setEnabled(false);
    ui->resetBtn->setEnabled(true);
}

void Widget::on_resetBtn_clicked()
{
    timers->stop();
    iValues = 0;
    ui->lcdNumber->display(iValues);
    ui->startBtn->setEnabled(true);
    ui->pauseBtn->setEnabled(true);
    ui->resetBtn->setEnabled(false);


}
void Widget::initFunc(){
    timers = new QTimer(this);
    timers->setInterval(1000);
    timers->stop();
}
doing后续补充~